navori ql software installation - c11309199.r99.cf2...
TRANSCRIPT

1 / 83
Navori QL Software Installation

2 / 83
Table of contents
Introduction ............................................................................................................................. 3 Navori QL Server .................................................................................................................... 4
Server system requirements ............................................................................................... 5 Preparing the QL Server Host PC ...................................................................................... 6
Initial PC login ................................................................................................................ 7 Step 1. Installing Microsoft SQL Server ......................................................................... 8
Special considerations for SLQ Server in a DMZ .................................................... 14 Step 2. IIS Server and .NET components .................................................................... 15
Configuring Microsoft IIS Server .............................................................................. 16 Install Microsoft .NET v4 .......................................................................................... 17 Confirm Microsoft IIS is running .............................................................................. 18 Internet Explorer Enhanced Security Configuration ................................................. 19
Step 3. Installing the Microsoft Desktop Experience (Windows 2008 R2 users) .......... 22 Step 4. Adobe Flash ActiveX plug-in installation .......................................................... 24 Step 5. Identifying server PC's IP or DNS address for QL Manager Users .................. 25 Step 6. Configuring Internet Explorer to communicate via Proxy (if installed) .............. 26 Step 7. Collecting installation data (documentation) .................................................... 27
Installing the Navori QL Server application ...................................................................... 28 Validating your QL Server installation .............................................................................. 44
Log in using the default administrator account ............................................................. 45 Change the default Administrator password ................................................................ 46 Log in using the extranet account ................................................................................ 48 Testing your installation ............................................................................................... 49
1. Login test ............................................................................................................. 50 2. Image upload test ................................................................................................ 51 3. Playlist test .......................................................................................................... 52 4. Scheduling test .................................................................................................... 53 5. Player update test................................................................................................ 54
QL Server installation troubleshooting .............................................................................. 55 1. Accessing the login page ......................................................................................... 56 2. Verifying the server's IP and DNS configuration ...................................................... 57 3. Testing user login ..................................................................................................... 59 4. If you cannot connect to QL Manager and there are no errors ................................ 60
Backing up your installation .............................................................................................. 61 Navori QL Player .................................................................................................................. 65
Preparation ....................................................................................................................... 66 If installing QL Player behind a proxy server ................................................................ 67
Navori QL Player Installation ............................................................................................ 69 Validating your QL Player installation ............................................................................... 78
1. Player status ............................................................................................................ 79 2. Content download test ............................................................................................. 80 3. Reboot test .............................................................................................................. 81 4. Player status post-reboot ......................................................................................... 82
Legal disclaimer .................................................................................................................... 83

3 / 83
Introduction
Navori QL
Digital Signage Software Platform
QL Software Setup Instructions
Navori QL - Copyright © 2012, Navori SA - World Trade Center, Avenue Gratta Paille 2, CH-1000 Lausanne, Switzerland Phone: +41 21 641 19 60 www.navori.com

4 / 83
Navori QL Server
This section covers the Navori QL Server application. You will find here instructions on how to install, configure and maintain QL Server. Navori QL - Copyright © 2012, Navori SA - World Trade Center, Avenue Gratta Paille 2, CH-1000 Lausanne, Switzerland Phone: +41 21 641 19 60 www.navori.com

5 / 83
Server system requirements Navori QL Server is a service that runs under any version of Windows 7 (including Embedded) or Windows Server 2008. This application requires Microsoft SQL Server (Express or full SQL) and Microsoft IIS Server. Recommended hardware configuration:
o Windows Server 2008 or any Windows PC equipped with Microsoft IIS v7.5. o Microsoft SQL Server Express edition or commercial version of SQL Server (workgroup edition,
etc...). o 4 GB RAM.
Navori QL - Copyright © 2012, Navori SA - World Trade Center, Avenue Gratta Paille 2, CH-1000 Lausanne, Switzerland Phone: +41 21 641 19 60 www.navori.com

6 / 83
Preparing the QL Server Host PC The following section features the instructions you should follow to ensure your server host PC is properly configured prior to installing the Navori QL Server application. Navori QL - Copyright © 2012, Navori SA - World Trade Center, Avenue Gratta Paille 2, CH-1000 Lausanne, Switzerland Phone: +41 21 641 19 60 www.navori.com

7 / 83
Initial PC login
In order to complete this software installation you must be logged in on the PC where you will install Navori QL Server with a user account that has full administrative rights. Navori QL - Copyright © 2012, Navori SA - World Trade Center, Avenue Gratta Paille 2, CH-1000 Lausanne, Switzerland Phone: +41 21 641 19 60 www.navori.com

8 / 83
Step 1. Installing Microsoft SQL Server
• Navori QL requires Microsoft SQL Server 2005 or 2008 in either Express and commercial versions. Please note the following differences between SQL Server Express and Commercial Editions:
o SQL Server Express can support databases up to 4 Gb. Commercial versions of SQL do not have this constraint. With commercial versions of SQL Server, the limit is the storage available on the PC.
o To automate database backups on SQL Server Express you will need to install third party software. Commercial versions of SQL Server can perform automated backups via "Maintenance Tasks".
• Microsoft SQL Server can be installed on the same PC on which you will install Navori QL Server or it can be installed on a remote PC.
• SQL Server needs to be configured with very specific settings in order for it to work with Navori QL Server.
• You must configure your SQL account login so that it uses Mixed Mode (Windows and SQL Server authentication). See below for details.
If you do not have SQL Server currently set up and installed, you can use the link below to download SQL Express 2008 which is the version we recommend: http://www.microsoft.com/downloads/en/details.aspx?familyid=E08766CE-FC9D-448F-9E98-FE84AD61F135&displaylang=en Once SLQ Server is installed you must follow the steps below to configure it for Navori QL: 1. Running the required services:
Make sure SQL Server and SQL Server Browser are both running and set to "Automatic".
9 / 83
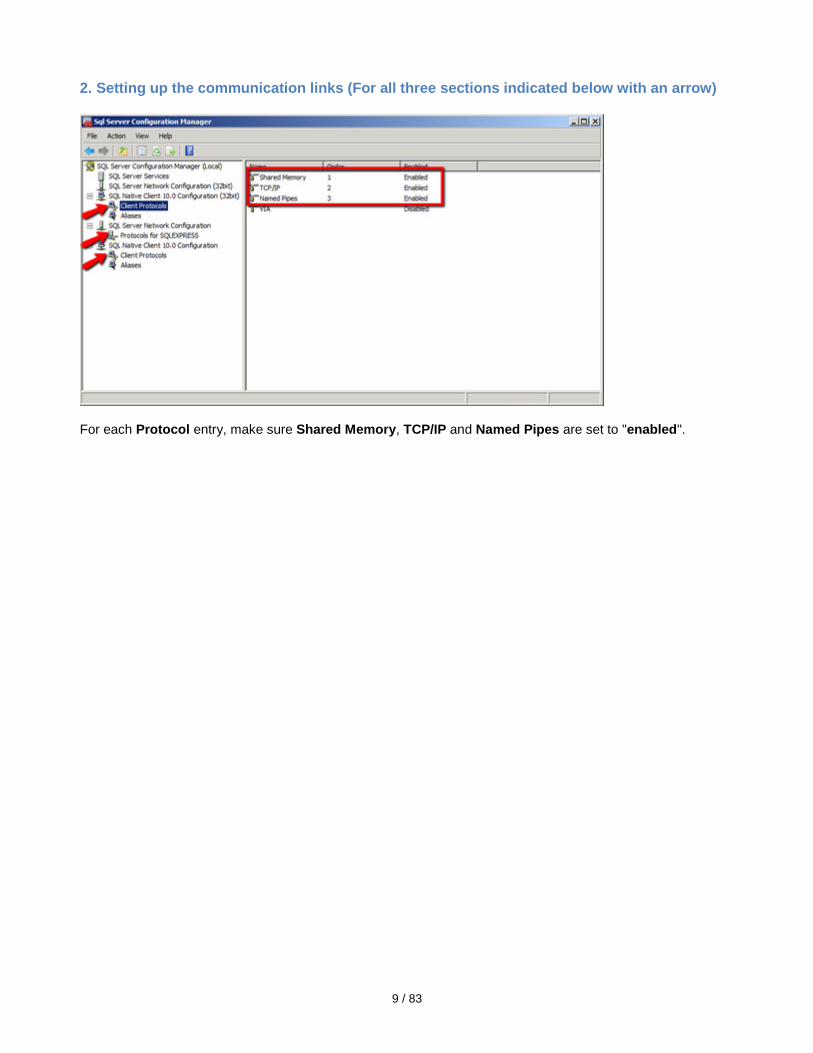
2. Setting up the communication links (For all three sections indicated below with an arrow)
For each Protocol entry, make sure Shared Memory, TCP/IP and Named Pipes are set to "enabled".
10 / 83
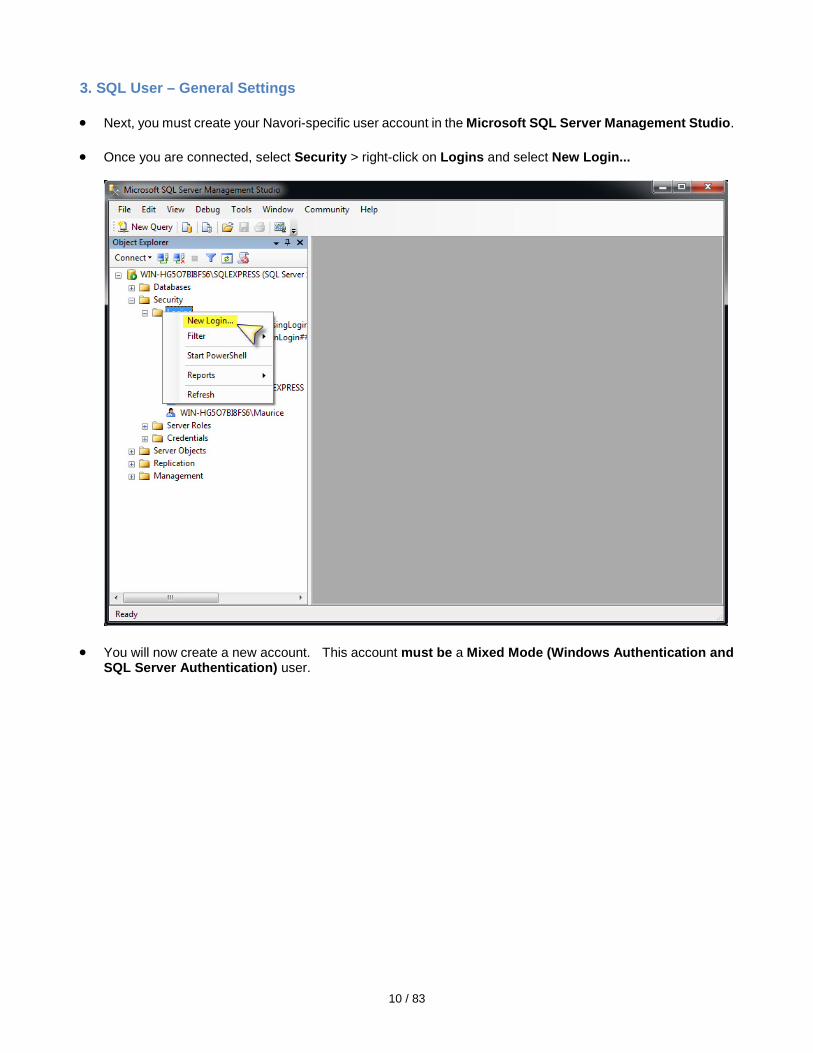
3. SQL User – General Settings • Next, you must create your Navori-specific user account in the Microsoft SQL Server Management Studio.
• Once you are connected, select Security > right-click on Logins and select New Login...
• You will now create a new account. This account must be a Mixed Mode (Windows Authentication and SQL Server Authentication) user.

11 / 83
• Make sure the password will not expire, and that the language is set to English. Also, the default database should be master.
• Be sure to re-start the SQL Server service to ensure your settings have been registered by the application.
• Next, you must assign the following settings:
12 / 83
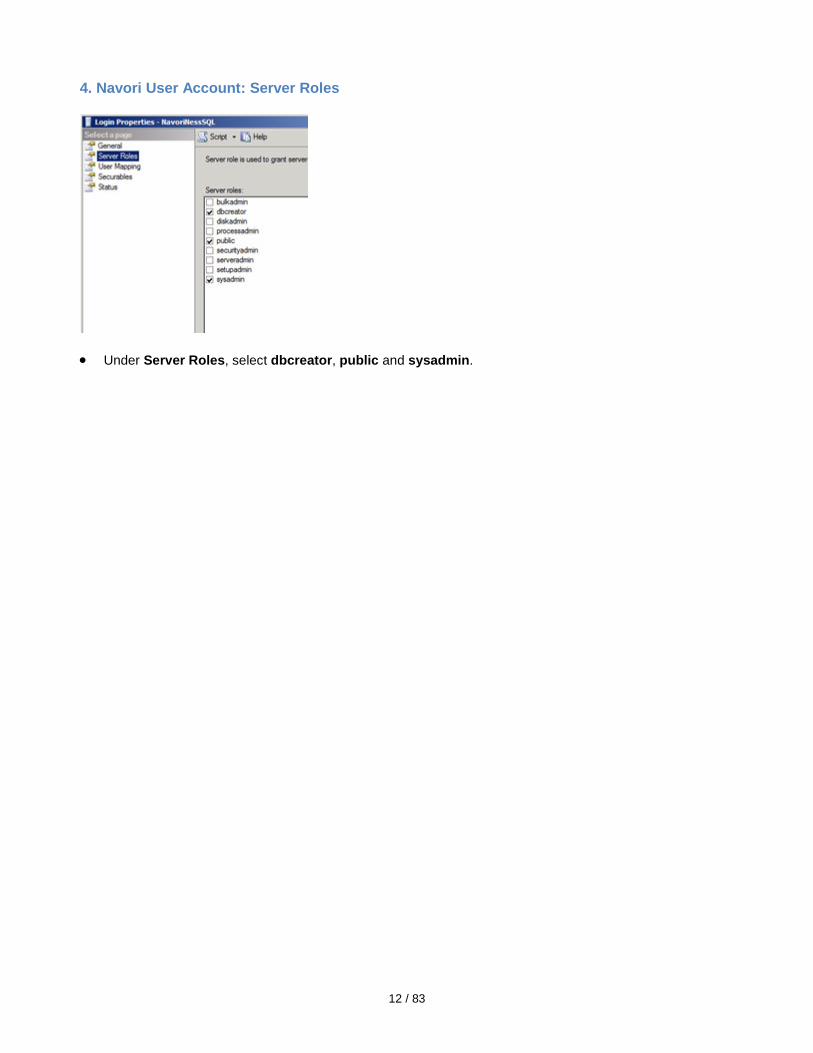
4. Navori User Account: Server Roles
• Under Server Roles, select dbcreator, public and sysadmin.

13 / 83
5. Navori User Account: User Mapping
• Under User Mapping select Master in the top pane and db_accessadmin, db_owner and public in the
pane below. • Once you have completed these settings, your SQL Server will be configured and ready to use.
• The next section describes how you configure Microsoft IIS server so it can be used with Navori QL. Navori QL - Copyright © 2012, Navori SA - World Trade Center, Avenue Gratta Paille 2, CH-1000 Lausanne, Switzerland Phone: +41 21 641 19 60 www.navori.com

14 / 83
Special considerations for SLQ Server in a DMZ
By default, Navori QL looks to access the SQL Server via a name and not an IP address. If your SQL Server installation is set up so the SQLserver Name corresponds to an "IP:Port Number" (such as is the case in a DMZ for example) you must enter the address as follows: 10.2.230.4,5000 (example only, substitute the IP address and port number according to your installation). So you must separate the IP address from the port number using a comma (,) and not a semicolon (:). Navori QL - Copyright © 2012, Navori SA - World Trade Center, Avenue Gratta Paille 2, CH-1000 Lausanne, Switzerland Phone: +41 21 641 19 60 www.navori.com

15 / 83
Step 2. IIS Server and .NET components
The next steps will describe how you install and configure Microsoft IIS Server and Microsoft .NET components for use with Navori QL. Navori QL - Copyright © 2012, Navori SA - World Trade Center, Avenue Gratta Paille 2, CH-1000 Lausanne, Switzerland Phone: +41 21 641 19 60 www.navori.com

16 / 83
Configuring Microsoft IIS Server
Microsoft IIS needs to be installed and configured on your Navori QL Server PC using the following components:
These settings ensure that your IIS server has everything it needs to run the Navori QL Server software. If IIS is not currently installed, select Start > Control Panel > Programs > Programs and Features > Turn Windows Features On or Off > Internet Information Services Enable the features listed above. You will find these listed under Web Management Tools and World Wide Web Services. Once the settings have been activated, you can install Microsoft .NET Navori QL - Copyright © 2012, Navori SA - World Trade Center, Avenue Gratta Paille 2, CH-1000 Lausanne, Switzerland Phone: +41 21 641 19 60 www.navori.com

17 / 83
Install Microsoft .NET v4
To function properly, Navori QL Server needs .NET Framework 4.0 to be installed on the Server PC. Use the link below to download and install the latest version of Microsoft .Net Framework: http://www.microsoft.com/downloads/en/details.aspx?FamilyID=9cfb2d51-5ff4-4491-b0e5-b386f32c0992 NOTE: What to do when you cannot reach your SQL Server using a server name (DMZ installation): In certain cases, SQL Server cannot be reached by entering a server name. If you are asked to enter the SQL Server name as follows: "IP address:Port Number" (such as is the case when the server is in a DMZ), you must enter the address as in this example: 10.2.230.4,5000 You must use a comma (,) instead of the colon (:) between the IP address and the port number otherwise it will not work. Navori QL - Copyright © 2012, Navori SA - World Trade Center, Avenue Gratta Paille 2, CH-1000 Lausanne, Switzerland Phone: +41 21 641 19 60 www.navori.com

18 / 83
Confirm Microsoft IIS is running
• On the QL Server PC, launch Internet Explorer. • Type in the following URL: http://localhost/ • You should see the IIS welcome screen. This confirms IIS is installed and operational.
PLEASE NOTE: If you do not see the IIS welcome screen, verify that IIS is installed and configured according to our instructions. Navori QL - Copyright © 2012, Navori SA - World Trade Center, Avenue Gratta Paille 2, CH-1000 Lausanne, Switzerland Phone: +41 21 641 19 60 www.navori.com

19 / 83
Internet Explorer Enhanced Security Configuration
PLEASE NOTE: The following steps are only required for Microsoft Server 2008 users only. • Log in to your Server PC. • Select Start > Administrative Tools> Server Manager.

20 / 83
• In the Server Manager window, click on the root (Server Manager) and then click Configure IE ESC.

21 / 83
• This will open the Enhanced Security Configuration window. Make sure Administrators and Users are set to OFF.
• Next, launch Microsoft Internet Explorer (IMPORTANT: use IE 32 bit version, not IE 64 bit).
• Navigate to the Navori web site (www.navori.com). If necessary, install the Flash Active-X plug-in so you can view the Navori web site correctly.
Navori QL - Copyright © 2012, Navori SA - World Trade Center, Avenue Gratta Paille 2, CH-1000 Lausanne, Switzerland Phone: +41 21 641 19 60 www.navori.com

22 / 83
Step 3. Installing the Microsoft Desktop Experience (Windows 2008 R2 users)
If you plan on installing Navori QL Server on Windows Server 2008 R2, you will need to install the Microsoft Desktop Experience (PLEASE NOTE: this step is not required if you are planning to run Navori QL Server on a Windows 7 PC). The Desktop Experience feature enables you to install a variety of Windows 7 features on your server running Windows Server 2008. What does the Desktop Experience feature include? Desktop Experience includes the following Windows 7 components and features: • Windows Media Player • Desktop themes • Video for Windows (AVI support) • Windows SideShow • Windows Defender • Disk Cleanup • Sync Center • Sound Recorder • Character Map • Snipping Tool

23 / 83
Installing the Desktop Experience feature You can install Desktop Experience using the Initial Configuration Tasks Wizard or Server Manager. To install Desktop Experience using the Initial Configuration Tasks Wizard: • In the Customize This Server section, click Add features. • Select the Desktop Experience check box, and then click Next. • Complete the wizard by clicking Install. To install Desktop Experience using Server Manager: Open Server Manager: click Start, point to Administrative Tools, and click Server Manager. Note: You can also open Server Manager by typing the following at a command prompt: servermanager.msc In the Features Summary section, click Add features. Select the Desktop Experience check box, and then click Next. Complete the wizard by clicking Install. Navori QL - Copyright © 2012, Navori SA - World Trade Center, Avenue Gratta Paille 2, CH-1000 Lausanne, Switzerland Phone: +41 21 641 19 60 www.navori.com

24 / 83
Step 4. Adobe Flash ActiveX plug-in installation
The ActiveX version of the Adobe Flash Player must be installed on your server PC. To do so, proceed as follows: • Launch Internet Explorer and visit http://get.adobe.com/flashplayer/. Follow the instructions to download the
Flash Player. • This will ensure proper Flash playback inside Internet Explorer (IE). • To confirm Flash has been installed correctly, open an IE browser window and go to http://www.navori.com If you can see the Navori home page's Flash banner, your Flash installation is completed and you can go to the next step. Navori QL - Copyright © 2012, Navori SA - World Trade Center, Avenue Gratta Paille 2, CH-1000 Lausanne, Switzerland Phone: +41 21 641 19 60 www.navori.com

25 / 83
Step 5. Identifying server PC's IP or DNS address for QL Manager Users
Your Navori QL Server PC must use a static IP address. To determine the IP or DNS address of your Navori QL Server PC, proceed as follows: • Click on Start > Run > and Type command cmd > Press [enter] key • At the DOS prompt type the command: C:\>ipconfig /all • You should see the IP and DNS address including other information related to Windows networking: You may also use this technique. • Click on Start > Control Panel > Network and Sharing Center > Connection > View Status • Click on Properties • Select Internet Protocol (TCP/IP) • Click on Properties and look for IP Address and Preferred DNS server
Navori QL - Copyright © 2012, Navori SA - World Trade Center, Avenue Gratta Paille 2, CH-1000 Lausanne, Switzerland Phone: +41 21 641 19 60 www.navori.com

26 / 83
Step 6. Configuring Internet Explorer to communicate via Proxy (if installed)
This procedure is only required for users who need to access the Internet through a Proxy Server • On the QL Server PC, look in the application installation folder. By default, this will be: C:\Program Files
(x86)\Navori\Navori QL Server Installation Package.
• Locate and launch NavoriQLConfigHelper (note, there is a XML configuration file and the executable so make sure you double click on the executable file).
• Under the tag Proxy settings, click Enable proxy and then fill in the fields.
• Once you have entered your proxy settings, click the Test Proxy button. If you get an error after clicking the test button, take a screen shot and save the file. Open a new support ticket and report your findings. Take the screen shot file that you saved previously, compress it into a single Zip file and then attach it to your support ticket. Navori QL - Copyright © 2012, Navori SA - World Trade Center, Avenue Gratta Paille 2, CH-1000 Lausanne, Switzerland Phone: +41 21 641 19 60 www.navori.com

27 / 83
Step 7. Collecting installation data (documentation)
Once you have completed your QL Server installation, we recommend you collect the following information which you will save in a text file (for safekeeping). This is so you can easily restore your installation to its default parameters should you ever need to do so. Create a new Word or text file and list this information: 1. The IP or DNS address of the PC on which you installed Navori QL Server.
2. The Host Name of your Microsoft SQL Server.
3. Your SQL Server PC Name.
4. Name of the SLQ Server instance (*if it applies).
5. Your Navori extranet user account name, password and your Navori QL Server license serial number. Navori QL - Copyright © 2012, Navori SA - World Trade Center, Avenue Gratta Paille 2, CH-1000 Lausanne, Switzerland Phone: +41 21 641 19 60 www.navori.com
28 / 83
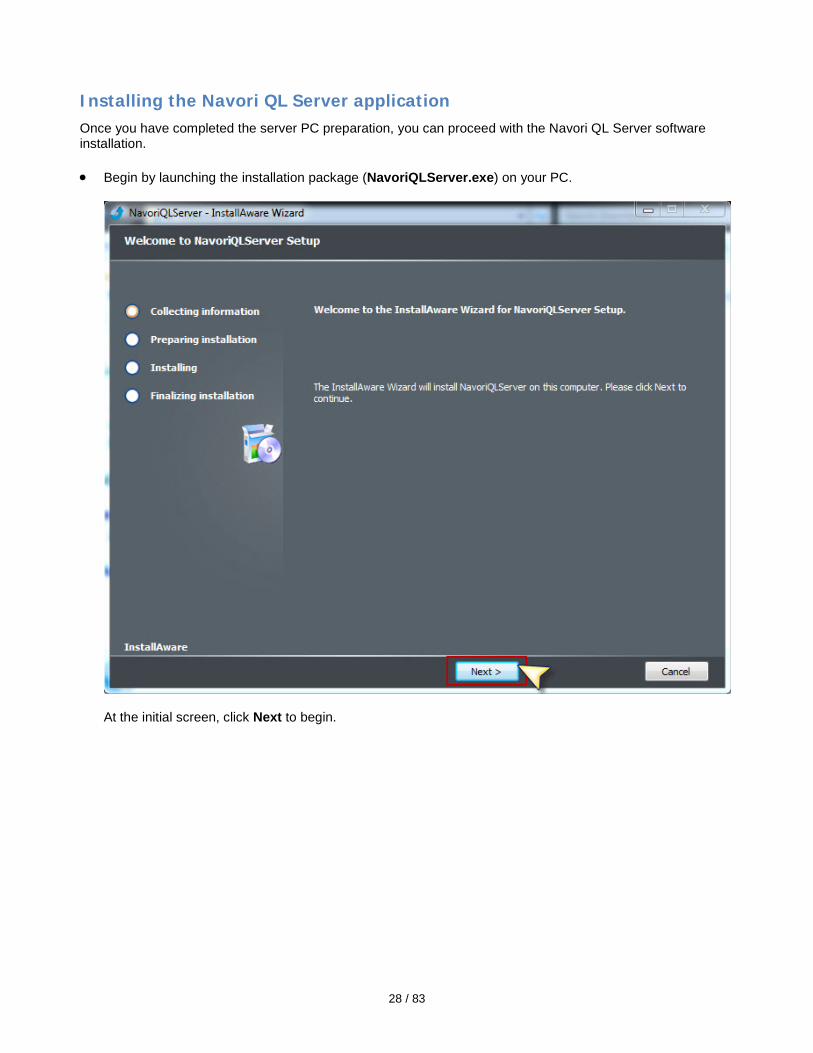
Installing the Navori QL Server application Once you have completed the server PC preparation, you can proceed with the Navori QL Server software installation. • Begin by launching the installation package (NavoriQLServer.exe) on your PC.
At the initial screen, click Next to begin.

29 / 83
• You will be presented with the license agreement. Please review it and click the box to accept the license agreement and click Next to continue.

30 / 83
• You will be asked to test your connection with the Navori extranet. Users with direct access to the Internet can click the Verify Connection to Navori button. Users accessing the Internet via a Proxy Server must fill out the Proxy Settings fields and validate their connection before they can proceed.

31 / 83
• You will see the following confirmation upon successful connection. Click OK to continue.

32 / 83
• Click Next.

33 / 83
• In the following window you will be asked to input your Navori Extranet login information, your Navori QL Server License Key, your SQL Server information, the IP or DNS address of your QL Server PC. You must also specify a folder where Navori QL Server will store its data. Once the information has been entered, you may click the "Verify Credentials" buttons to confirm your entries before proceeding with the installation.

34 / 83
35 / 83
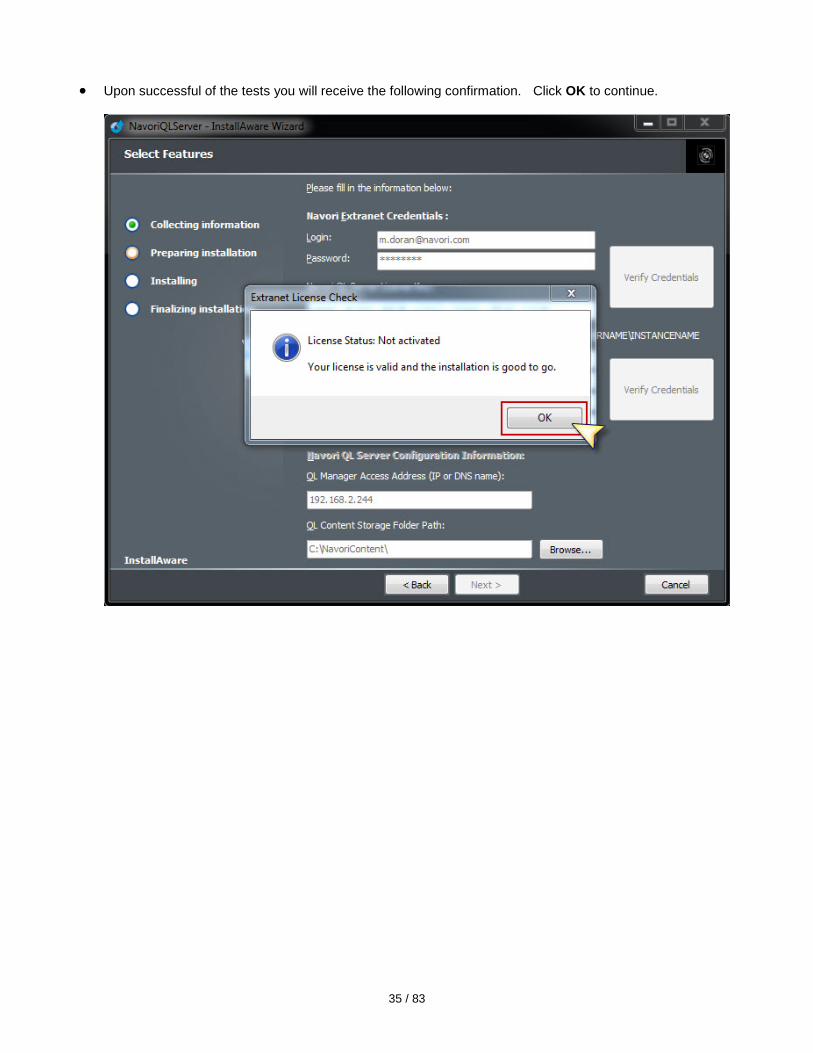
• Upon successful of the tests you will receive the following confirmation. Click OK to continue.

36 / 83

37 / 83
• Click Next.

38 / 83
• If you need to revise your settings, click the Back button, otherwise, click Next to begin the installation on your Server PC.

39 / 83
• The next window will show the progress bar.

40 / 83

41 / 83
• When the installation has been completed you will be asked to activate your license. Click the Activate your product now button to proceed.
Leave the Run NavoriQLServer now box checked to automatically launch the application at the end of this process.

42 / 83
• Upon successful license activation you will see the following message:
• After you have completed the installation and activation of your software click the Finish button to close the installer. Internet Explorer will launch and you will be presented with the QL Manager login page.
• Navori QL Server is automatically configured with two user accounts. You may log in with either account to test your installation.

43 / 83
Default User Accounts • One account is the Root Level Administrator account. This account has full administrative rights for this
Server. You must login with this account to perform any administrative duties. Here are the account's default credentials (note: they are case-sensitive): User Name: Administrator Password: VD293330
• The installer also will create a second user account. This user account will only have regular end-user
rights. It cannot be used to perform management duties. This user account will automatically be configured according to your Navori Extranet account user's login name and password.
Example: Let's say your Navori Extranet login name is [email protected] and your Navori Extranet password is: "lucky123". Once you have completed your Navori QL Server installation, you can log in to your server using this account and you would have access as an end-user. You would not be able to create other user accounts nor assign domain access. You would simply be permitted to interact with the server as a regular user. To perform any administrative duties, you would need to log in using the Administrator account. Once you have typed in your login name and password, you will see a screen indicating the application is loading followed by the QL Manager application interface. • Your Navori QL Server software is now installed and configured. You may now proceed to the QL Player
installation. Navori QL - Copyright © 2012, Navori SA - World Trade Center, Avenue Gratta Paille 2, CH-1000 Lausanne, Switzerland Phone: +41 21 641 19 60 www.navori.com

44 / 83
Validating your QL Server installation Follow these steps to validate your Navori QL Server installation. Navori QL - Copyright © 2012, Navori SA - World Trade Center, Avenue Gratta Paille 2, CH-1000 Lausanne, Switzerland Phone: +41 21 641 19 60 www.navori.com

45 / 83
Log in using the default administrator account
1. Launch Internet Explorer and type in your QL Server's IP or DNS Address followed by /navorimanager.
2. Log in to your Navori QL Server using the Root Level Administrator account using the account's default credentials (note: they are case-sensitive): User Name: Administrator Password: VD293330
Navori QL - Copyright © 2012, Navori SA - World Trade Center, Avenue Gratta Paille 2, CH-1000 Lausanne, Switzerland Phone: +41 21 641 19 60 www.navori.com
46 / 83
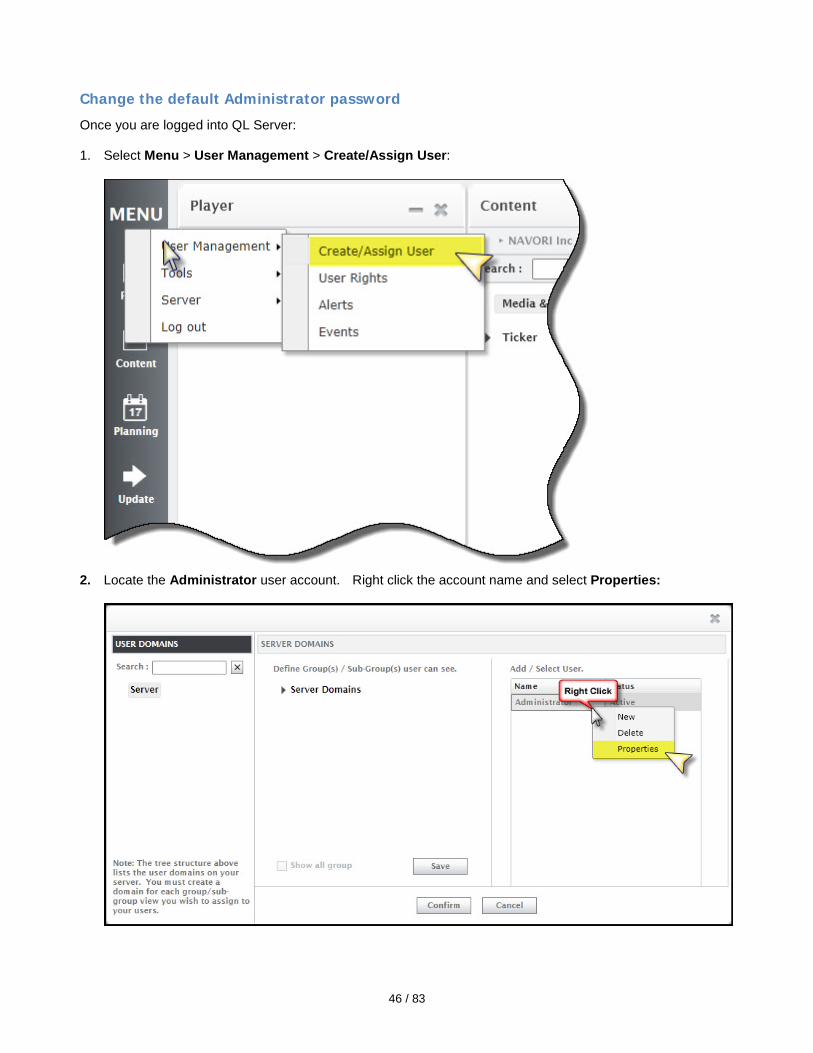
Change the default Administrator password
Once you are logged into QL Server: 1. Select Menu > User Management > Create/Assign User:
2. Locate the Administrator user account. Right click the account name and select Properties:
47 / 83
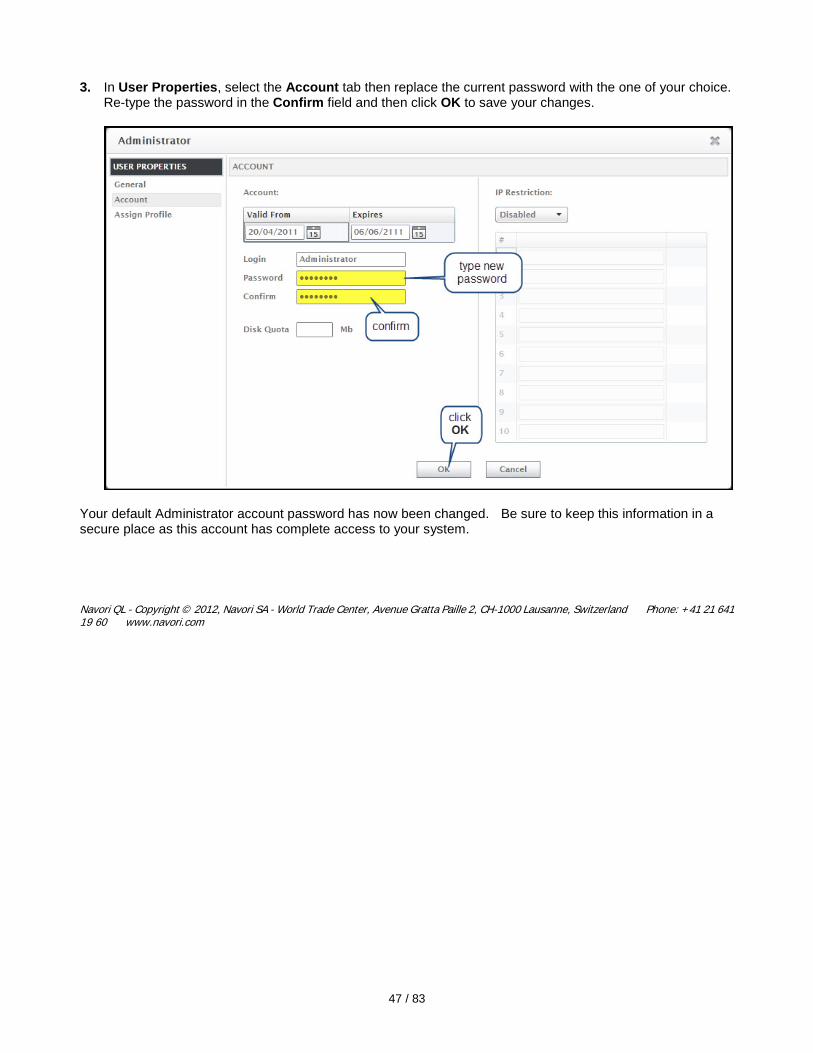
3. In User Properties, select the Account tab then replace the current password with the one of your choice. Re-type the password in the Confirm field and then click OK to save your changes.
Your default Administrator account password has now been changed. Be sure to keep this information in a secure place as this account has complete access to your system. Navori QL - Copyright © 2012, Navori SA - World Trade Center, Avenue Gratta Paille 2, CH-1000 Lausanne, Switzerland Phone: +41 21 641 19 60 www.navori.com

48 / 83
Log in using the extranet account
The installer automatically creates a second user account which is based on your Navori Extranet account. This account has regular user rights. It cannot be used to perform management duties. To complete the installation validation process, you must log in to your QL Server using this account. Example: Let's say your Navori Extranet login name is [email protected] and your Navori Extranet password is: "lucky123". Once you have completed your Navori QL Server installation, you can log in to your server using this account and you would have access as an end-user. With this account you are not authorized to create other user accounts nor assign domain access, however you can interact with the server as a regular user. 1. Launch Internet Explorer and type in your QL Server's IP or DNS Address followed by /navorimanager.
2. Log in to your Navori QL Server using the Default User account using the account's default credentials (your
Navori Extranet login name and password). You may now proceed to the QL Manager testing steps. Navori QL - Copyright © 2012, Navori SA - World Trade Center, Avenue Gratta Paille 2, CH-1000 Lausanne, Switzerland Phone: +41 21 641 19 60 www.navori.com

49 / 83
Testing your installation
In this section we will go over a series of tests meant to ensure your Navori QL Server is fully functional. Begin by logging in with your Administrator or Default User account. Next, proceed with the steps described on the next pages. Navori QL - Copyright © 2012, Navori SA - World Trade Center, Avenue Gratta Paille 2, CH-1000 Lausanne, Switzerland Phone: +41 21 641 19 60 www.navori.com

50 / 83
1. Login test
Does the Navori QL Manager login page show up when you attempt to access it on your Navori QL Server PC (using "localhost")? If YES, see step #2. If NO, make sure IIS is properly configured and running. Navori QL - Copyright © 2012, Navori SA - World Trade Center, Avenue Gratta Paille 2, CH-1000 Lausanne, Switzerland Phone: +41 21 641 19 60 www.navori.com

51 / 83
2. Image upload test
When you are logged in via QL Manager and you upload an image file, can you see the thumbnail after adding the new media? If YES, see step #3. If NO, make sure SQL Server is properly configured and running. Navori QL - Copyright © 2012, Navori SA - World Trade Center, Avenue Gratta Paille 2, CH-1000 Lausanne, Switzerland Phone: +41 21 641 19 60 www.navori.com

52 / 83
3. Playlist test
Can you create a Playlist? If YES, see step #4. If NO, make sure SQL Server is properly configured and running. Navori QL - Copyright © 2012, Navori SA - World Trade Center, Avenue Gratta Paille 2, CH-1000 Lausanne, Switzerland Phone: +41 21 641 19 60 www.navori.com

53 / 83
4. Scheduling test
Can you drag and drop your Playlist to the Planning grid and assign it a time slot? If YES, see step #5. If NO, make sure SQL Server is properly configured and running. Navori QL - Copyright © 2012, Navori SA - World Trade Center, Avenue Gratta Paille 2, CH-1000 Lausanne, Switzerland Phone: +41 21 641 19 60 www.navori.com

54 / 83
5. Player update test
Can you download a copy of the QL Player installer via QL Manager? If YES, congratulations! Your installation is validated. If NO, check your Internet/Proxy settings. Navori QL - Copyright © 2012, Navori SA - World Trade Center, Avenue Gratta Paille 2, CH-1000 Lausanne, Switzerland Phone: +41 21 641 19 60 www.navori.com

55 / 83
QL Server installation troubleshooting If there were any issues with your installation, you should follow the steps in this section. Navori QL - Copyright © 2012, Navori SA - World Trade Center, Avenue Gratta Paille 2, CH-1000 Lausanne, Switzerland Phone: +41 21 641 19 60 www.navori.com

56 / 83
1. Accessing the login page
Does the Navori QL Manager login page display when you attempt to access it on the PC on which you installed the application? (via your server's IP or DNS address followed by \navorimanager) If so, proceed to the next step. Navori QL - Copyright © 2012, Navori SA - World Trade Center, Avenue Gratta Paille 2, CH-1000 Lausanne, Switzerland Phone: +41 21 641 19 60 www.navori.com
57 / 83
2. Verifying the server's IP and DNS configuration
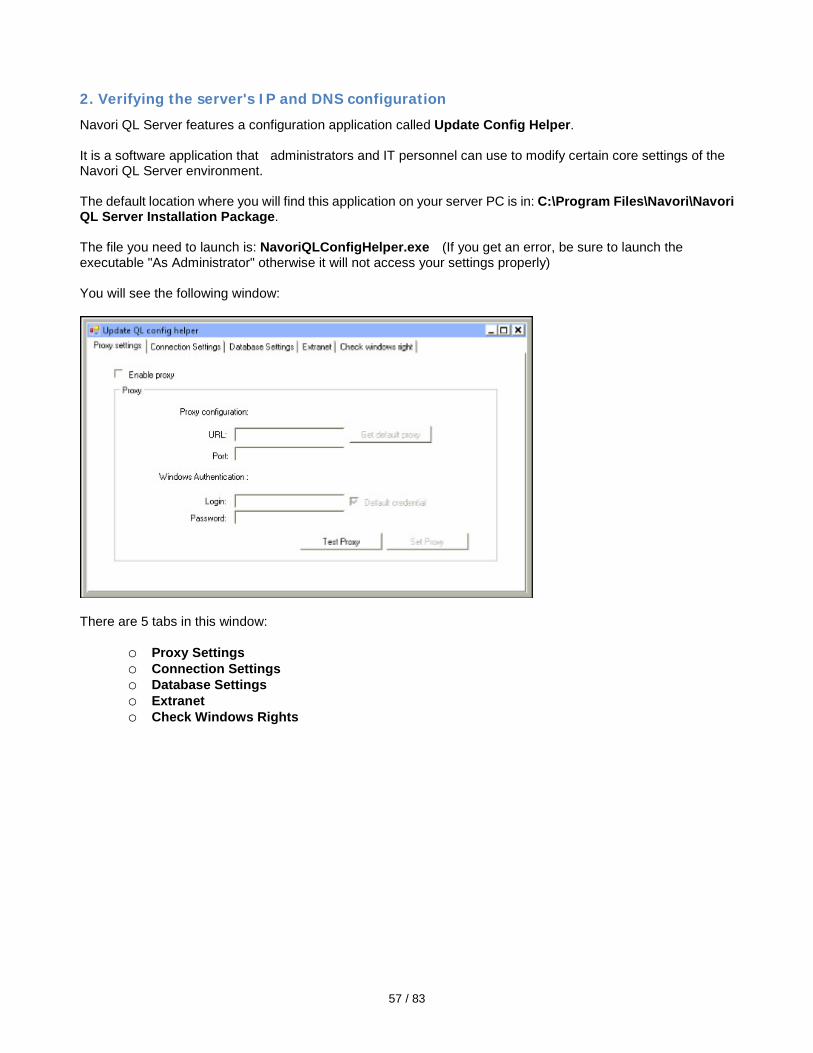
Navori QL Server features a configuration application called Update Config Helper. It is a software application that administrators and IT personnel can use to modify certain core settings of the Navori QL Server environment. The default location where you will find this application on your server PC is in: C:\Program Files\Navori\Navori QL Server Installation Package. The file you need to launch is: NavoriQLConfigHelper.exe (If you get an error, be sure to launch the executable "As Administrator" otherwise it will not access your settings properly) You will see the following window:
There are 5 tabs in this window:
o Proxy Settings o Connection Settings o Database Settings o Extranet o Check Windows Rights

58 / 83
The Connection Settings tab is where you can review and configure your server's communication parameters.
• Select the IP or DNS of the Navori Web Service. Copy it to the clipboard (Ctrl+C) • Launch Internet Explorer and paste the URL (Ctrl+V). Hit Enter. You should see the Navori QL Manager
page come up. The QL Manager login page is accessed by the Navori Web Service IP Address. If this is not properly configured, you will not be able to access your system via QL Manager. Navori QL - Copyright © 2012, Navori SA - World Trade Center, Avenue Gratta Paille 2, CH-1000 Lausanne, Switzerland Phone: +41 21 641 19 60 www.navori.com

59 / 83
3. Testing user login
When you enter the default Administrator or default User login in QL Manager's login page, do you see a "wrong login" or "wrong password" error? If so, you have a software activation issue. Proceed as follows: 1. Launch SQL Server Management Studio.
2. Connect to your SLQ database instance.
3. In the Object Explorer pane, select Databases > NavoriSQL > Tables (REQUIRES CONFIRMATION
FROM NAVORI FOR OTHER STEPS)
Navori QL - Copyright © 2012, Navori SA - World Trade Center, Avenue Gratta Paille 2, CH-1000 Lausanne, Switzerland Phone: +41 21 641 19 60 www.navori.com

60 / 83
4. If you cannot connect to QL Manager and there are no errors
If you attempt to login using QL Manager and do not see a "wrong login" or "wrong password" error, proceed as follows: The URL you entered to access QL Manager does not match the Navori Web Service , IP or DNS. Visit this page for instructions on how to correct these settings : Verifying the server's IP and DNS configuration. Navori QL - Copyright © 2012, Navori SA - World Trade Center, Avenue Gratta Paille 2, CH-1000 Lausanne, Switzerland Phone: +41 21 641 19 60 www.navori.com

61 / 83
Backing up your installation It is recommended your backup your Navori QL Server on a regular basis or at the very least: • Following a successful installation. • Prior to installing a Navori QL software update or patch. QL Server Backup Procedure • Next, backup the following directories on your QL Server PC:
Make sure you back up the contents of these folders:
o The NavoriManager folder (typically located under C:\inetpub\wwwroot\)
o The NavoriService folder (typically located under C:\inetpub\wwwroot\)
o The Content Storage Folder. This will preserve all of your media files in case you need to restore your setup. The content storage folder location is determined during the QL Server software installation.

62 / 83
Backup your NavoriSQL database. PLEASE NOTE!: The Navori Content folder and the database must be synchronized; that is, the content must match what is in the SQL database. To backup your database, proceed as follows:
1. Launch the Microsoft SQL Server Management Studio.
2. Open the Databases tree and locate NavoriSQL. Right click it and select Tasks > Back Up...

63 / 83
3. Make sure the correct database is selected. Select Full backup. Give this database backup a name. Select Disk as the destination. The first time you back up your database, you will need to click Add..., select in which folder to store the backup and name the backup file. The next time you create a backup you can simply click OK and this will overwrite the previous file, saving you a step. You can also create a new backup under another name if you wish.

64 / 83
4. When the backup is completed you can click OK to finish the process.
Once you have performed these backups, the system can be restored at any time from any broken state. Navori QL - Copyright © 2012, Navori SA - World Trade Center, Avenue Gratta Paille 2, CH-1000 Lausanne, Switzerland Phone: +41 21 641 19 60 www.navori.com

65 / 83
Navori QL Player
This section covers the Navori QL Player application. You will find here instructions on how to install, configure and maintain QL Players. Navori QL - Copyright © 2012, Navori SA - World Trade Center, Avenue Gratta Paille 2, CH-1000 Lausanne, Switzerland Phone: +41 21 641 19 60 www.navori.com

66 / 83
Preparation Navori QL Player features a new proprietary graphics engine that takes advantage of the latest PC technologies. It was designed run fully autonomously on dedicated PC equipment. For the best possible performance, we recommend installing Navori QL Player on a Windows 7, 64 bit PC with the Aero user interface enabled and functional. We suggest you take the following steps to prepare your PC prior to installing Navori QL Player: 1. Update your video card and audio card drivers to the most current version available.
2. Uninstall any previously installed video codecs, including the Apple QuickTime Player.
Please note that Navori QL Player is made up of 3 components:
o The QL Engine which is the playback application, fully dedicated to content playback.
o QL Conductor which is a watchdog service that monitors the health of the PC and manages the communications between Navori QL Server and the QL Engine.
o QL Guard which is a service who’s sole purpose is monitoring the QL Conductor service making sure it is always operational.
All 3 components will be installed. Navori QL - Copyright © 2012, Navori SA - World Trade Center, Avenue Gratta Paille 2, CH-1000 Lausanne, Switzerland Phone: +41 21 641 19 60 www.navori.com

67 / 83
If installing QL Player behind a proxy server
Before installing Navori QL Player behind a Proxy Server you will must follow these steps: PLEASE NOTE: The procedures that are described on this page may require information about your proxy server that can only be provided by your system administrator. Because of this, you may need to contact your system administrator before you can proceed. Configuring Internet Explorer 9 to connect via a proxy server 1. Open Internet Explorer by clicking the Start button . In the search box, type Internet Explorer, and then, in
the list of results, click Internet Explorer.
2. Click the Tools button , and then click Internet options.
3. Click the Connections tab, and then click LAN settings.
4. Select the Use a proxy server for your LAN check box.
5. In the Address box, type the address of the proxy server.
6. In the Port box, type the port number. If your network requires separate proxy addresses and port numbers for different services, such as HTTP, HTTPS, or FTP, click the Advanced button, and then type the individual proxy server addresses and port numbers to use.
7. When you're finished making changes, click OK, and then click OK again. If you follow the steps to change proxy server settings and still find that the address you type for a new proxy server isn't remembered, here are some things to check: • If you're entering a Uniform Resource Locator (URL) or Internet address for the proxy server, be sure you're
using slashes (/) rather than backslashes (\) when typing the address. For example, type http://servername rather than http:\\servername.
• If you're entering a universal naming convention (UNC) or local network address for the proxy server, make sure you're using backslashes (\) rather than slashes (/). For example, type \\servername rather than //servername.

68 / 83
Testing access to the Navori QL Web Service 1. Enter the following URL:
http://[IP or DNS address of your QL Server]/NavoriService/NavoriService.svc
2. If a web page appears with a request to create a service, Player is communicating properly with QL Server. If you do not see this message, Player is not communicating with QL Server and you must check your settings.
Navori QL - Copyright © 2012, Navori SA - World Trade Center, Avenue Gratta Paille 2, CH-1000 Lausanne, Switzerland Phone: +41 21 641 19 60 www.navori.com

69 / 83
Navori QL Player Installation
• To download the Navori QL Player you must first have created a Navori Extranet user account and your QL Server must be properly configured so it can log in to the extranet.
• Launch your web browser (from the Player PC) and type in the IP address or DNS of your Navori QL Server. You should see the Navori QL Manager login page come up.
• Type in your login name and password then click Connection.

70 / 83
• Once you are logged in, retrieve the Player license serial number by right clicking on the Player's name and selecting Properties > License Information. Highlight the entire serial number and copy it to the Windows Clipboard using Ctrl+C. You will be able to paste it when prompted by the Player installer. Click OK to close this window and continue.

71 / 83
• Select Menu > Tools > Download QL Player
• You will be prompted to download and run the installer on your PC. Save the file to your hard drive.

72 / 83
• Locate the installer file on your hard drive. It is recommended you use the Run as administrator option to launch the Player installer.
73 / 83
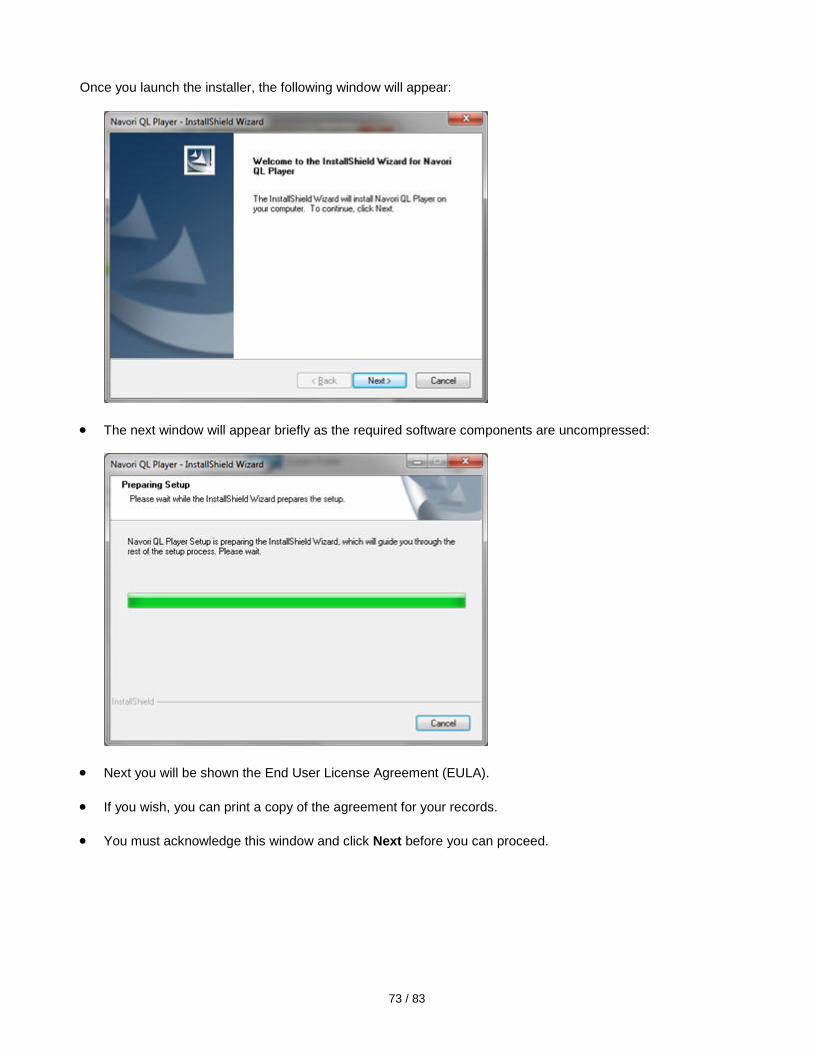
Once you launch the installer, the following window will appear:
• The next window will appear briefly as the required software components are uncompressed:
• Next you will be shown the End User License Agreement (EULA).
• If you wish, you can print a copy of the agreement for your records.
• You must acknowledge this window and click Next before you can proceed.

74 / 83
• Once the installation has completed, you will be prompted to enter your license information to activate your software.
• Enter your Navori QL Server’s URL in the top field.
• Then enter the Player’s serial number in the second field. This is your activation key.
• Upon successful completion of the software activation, you will be presented with the following window:

75 / 83
• After a brief moment, the Navori QL Player will launch and you will see the default screen.

76 / 83
• When you log back into Navori QL Manager you will see your Player appear under your assigned group:
• The status box left of the Player’s name will change from gray to blue to indicate it is communicating with the Server.
77 / 83
IMPORTANT! If the QL Player software is to run under a specific user account, proceed as follows: In certain cases (due to security policies for example), you may need to have the Player PC boot up with a user account that has minimal rights on your network. When this happens, some Navori QL Player services will not have sufficient credentials to operate properly. To resolve this situation, you must configure the Navori Guard and Navori Controller services so they always use proper administrative credentials even if the Player is logged in under a restricted account. Here is the procedure: 1. Perform the Navori QL Player installation as above using a full administrator account. 2. Once the software has been installed, go to the Windows toolbar and select Start > My Computer (right-click
and select Manage). This will open the Computer Management window.
3. Select Services and Applications > Services. Scroll down until you see Navori Conductor Service and Navori Guard Service.
4. Right click Navori Conductor Service. This will open the Service Properties window. Select the 2nd tab (Log On).
5. Under Log on as: select This account and then either select an existing Administrator account using the
Browse button or type the Administrator account name, password and re-enter the password to confirm. Click OK to confirm your settings.
6. Repeat these steps for the Navori Guard Service. You may now configure the PC to boot up under a restricted user account and both Navori services will use the administrator credentials ensuring the load and operate as required. Navori QL - Copyright © 2012, Navori SA - World Trade Center, Avenue Gratta Paille 2, CH-1000 Lausanne, Switzerland Phone: +41 21 641 19 60 www.navori.com

78 / 83
Validating your QL Player installation The following section features the instructions you should follow to validate your Navori QL Player installation. Navori QL - Copyright © 2012, Navori SA - World Trade Center, Avenue Gratta Paille 2, CH-1000 Lausanne, Switzerland Phone: +41 21 641 19 60 www.navori.com

79 / 83
1. Player status
Locate the player in Navori QL Manager (in the player window). Is the status color blue? If so, your player is communicating properly with your server. If the status color is red, your player is not communicating with your server. • Ensure the PC is powered up and the QL Player software is running. • Ensure all networking cables are connected and the Player can communicate with the QL Server PC. • If communicating via proxy server, ensure the proper settings have been entered. Navori QL - Copyright © 2012, Navori SA - World Trade Center, Avenue Gratta Paille 2, CH-1000 Lausanne, Switzerland Phone: +41 21 641 19 60 www.navori.com

80 / 83
2. Content download test
Perform the following test to confirm the player can receive new content. 1. In QL Manager, select the group (or sub-group) in which the player is located.
2. Add a new media item to the content library (pick something simple like a jpeg image for example).
3. Add the item to a new playlist.
4. Drag and drop the playlist onto the program grid. Pick today and select a period that covers the current
date/time. This will assign the playlist to a time slot in the planning grid.
5. Click Update to send your new program and content to the player. You should now see a progress bar showing the file being transmitted to the player. Depending on the speed of your connection and the size of the file being sent, it is possible the file transfer progress may jump from 0% to Done instantly. If this is the case, the player is communicating properly. Done means the player has received its update. If the file transfer status only shows 0% and never increases then you should look at the player status indicator in QL Manager. If the status color is red, your player is not communicating with your server. • Ensure the PC is powered up and the QL Player software is running. • Ensure all networking cables are connected and the Player can communicate with the QL Server PC. • If communicating via proxy server, ensure the proper settings have been entered. Navori QL - Copyright © 2012, Navori SA - World Trade Center, Avenue Gratta Paille 2, CH-1000 Lausanne, Switzerland Phone: +41 21 641 19 60 www.navori.com

81 / 83
3. Reboot test
It is important to ensure the QL Player engine and its associated services load automatically whenever the PC is restarted or rebooted. To ensure the software is configured correctly, perform the following test: 1. If QL Player is running on the PC, click Alt-Tab to bring up the Exit Player window. Click Exit Player to
shut down the application.
2. Once QL Player has terminated, select Start > Shut Down >Restart in the Windows task bar.
3. Your PC will reboot. QL Player should launch automatically and any scheduled content will be displayed on the screen. If no content was scheduled for this period, the default media will be shown.
Navori QL - Copyright © 2012, Navori SA - World Trade Center, Avenue Gratta Paille 2, CH-1000 Lausanne, Switzerland Phone: +41 21 641 19 60 www.navori.com
82 / 83
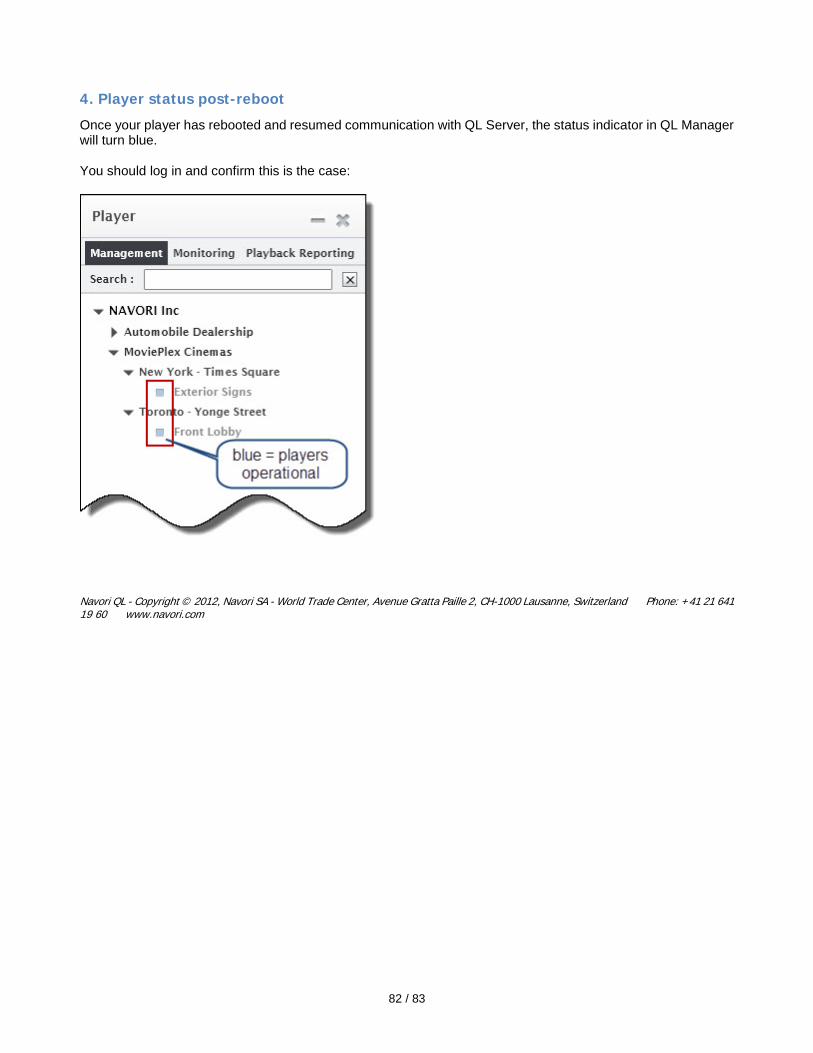
4. Player status post-reboot
Once your player has rebooted and resumed communication with QL Server, the status indicator in QL Manager will turn blue. You should log in and confirm this is the case:
Navori QL - Copyright © 2012, Navori SA - World Trade Center, Avenue Gratta Paille 2, CH-1000 Lausanne, Switzerland Phone: +41 21 641 19 60 www.navori.com
83 / 83
Legal disclaimer
Trademarks All copyrights, trademarks, and registered trademarks are the property of their respective owners. Disclaimer All information on this site is of a general nature and is furnished for your knowledge and understanding and as a technical resource only. The documents and any related graphics published on this server could include technical inaccuracies or typographical errors. Changes are periodically added to the information contained in this Web site. Navori SA may make improvements and/or changes to any of the products depicted or described herein at any time. Navori SA expressly disclaims any responsibility or liability for any adverse consequences or damages resulting from your reliance on the information on this site. Limitation of Liability YOUR USE OF THE SERVICE IS ENTIRELY AT YOUR OWN RISK. NAVORI SA WILL NOT BE RESPONSIBLE TO YOU OR TO ANY THIRD PARTIES FOR ANY DIRECT OR INDIRECT, CONSEQUENTIAL, SPECIAL, OR PUNITIVE DAMAGES OR LOSSES YOU MAY INCUR IN CONNECTION WITH THE SERVICE, YOUR USE THEREOF, OR ANY OF THE DATA OR OTHER MATERIALS TRANSMITTED THROUGH OR RESIDING ON OUR SERVICE, REGARDLESS OF THE TYPE OF CLAIM OR THE NATURE OF THE CAUSE OF ACTION, EVEN IF WE HAVE ADVISED OF THE POSSIBILITY OF SUCH DAMAGE OR LOSS. Links to Third Party Sites The links furnished in this site will allow you to leave Navori's web site. These linked sites are not under the control of Navori SA and Navori SA disclaims any responsibility for the contents of such linked sites or any link(s) contained in any such linked site(s) or any changes or updates to any of these sites. Navori SA further disclaims any responsibility for any form of transmission received from any linked site. Navori SA provides these links to you as a convenience to you and inclusion of any link herein shall in no way be construed as an endorsement by Navori SA of the site(s). Navori QL - Copyright © 2012, Navori SA - World Trade Center, Avenue Gratta Paille 2, CH-1000 Lausanne, Switzerland Phone: +41 21 641 19 60 www.navori.com