nautical mini quilt tutorial - quilting jetgirl · resulting mini quilt looks less scrappy due to...
TRANSCRIPT

Page 1
Nautical Mini Quilt
Designed by Yvonne Fuchs http://quiltingjetgirl.com
Nautical Mini Quilt Pattern (31 ½" x 31 ½")

Page 2
Nautical Mini Quilt
Planning
For me, nothing says summer like thoughts of spending time around water, whether on a beach, in a boat, at a pool, or
in a summer rain shower. I selected a grouping of 9 Fabri-Quilt cotton solids to create the Marine Hues palette, and
playing off a nautical theme I created a fun, skill building mini quilt.
This mini quilt will help develop consistent ¼″ seam allowance skills, agility in handling smaller piecing (1 ½" wide strips),
and familiarity with methods to make some standard quilt blocks that are building blocks for many other patterns. The
resulting mini quilt looks less scrappy due to intentional use of blending backgrounds and the nautical flag theme.
The Nautical mini quilt pattern refers to the Marine Hues bundle of 9 Fabri-Quilt cotton solids throughout the pattern.
Below is a blank quilt pattern that you can use to color and plan your own unique layout. I also like to use blank patterns
to doodle and design my quilting.

Page 3
Nautical Mini Quilt
General Pattern Notes
1. Sew all seams with a ¼″ seam allowance unless otherwise indicated.
2. Press seams open to reduce bulk.
3. The pattern refers to fabric units by fabric number, block letter name, and size. You may choose to group like
blocks together and label them with their corresponding size or letter if that helps your organization.
Alternately, there are associated images for each step and you may print the pattern and mark with your own
fabric selection to help keep the assembly going together correctly. I suggest cutting small swatches of your
fabric choices to place beside the fabrics shown on this page to use in coordination with the pattern images.
Fabric Requirements
This pattern is designed around the use of 9 solids, as seen in the cover image and illustrated below. If you would like to
reduce the fabric selections, simply add the yardage requirements together to make sure you have enough yardage for
the project.
The fabric listed below is enough to create a scrappy backing and binding for the mini quilt, but if you would like
continuous backing / binding, 1 yard of backing fabric and ½ yard of binding fabric is suggested.
• Fabric 1 (navy) = ½ yard
• Fabric 2 (royal) = fat quarter
• Fabric 3 (lapis blue) = fat quarter
• Fabric 4 (teal) = fat quarter
• Fabric 5 (turquoise) = fat quarter
• Fabric 6 (waterfall) = fat quarter
• Fabric 7 (purple) = fat quarter
• Fabric 8 (lavender) = fat quarter
• Fabric 9 (white) = ½ yard
Page 4
Nautical Mini Quilt
Cutting Instructions
WOF = Width of Fabric
Fabric 1 (navy)
Note 44" WOF assumed
• Cut (8) 1 ½" by WOF strips
o Set (4) 1 ½" by WOF strips aside [A]
o Subcut (16) 1 ½" x 5 ½" rectangles [B]
o Subcut (4) 1 ½" x 17 ½" rectangles [C]
• Cut (1) 5 ½" by WOF strips
o Subcut (8) 5 ½" x 5 ½" squares [D]
Fabric 2 (royal)
• Cut (1) 2 ½" x 20" strip (set aside for binding)
• Cut (1) 5 ½" x 5 ½" square [E]
Fabric 3 (lapis blue)
• Cut (1) 2 ½" x 20" strip (set aside for binding)
• Cut (1) 7" x 7" square [F]
• Cut (1) 5 ½" x 5 ½" square [G]
• Cut (2) 2 ½" x 2 ½" squares [H]
Fabric 4 (teal)
• Cut (1) 2 ½" x 20" strip (set aside for binding)
• Cut (2) 2 1/8" x 5 ½" rectangles [I]
• Cut (2) 1 ½" x 5 ½" rectangles [J]
• Cut (2) 3" x 3" squares [K]
Fabric 5 (turquoise)
• Cut (1) 2 ½" x 20" strip (set aside for binding)
• Cut (1) 7" x 7" square [L]
• Cut (1) 5 ½" x 5 ½" square [M]
• Cut (4) 3" x 3" squares [N]
• Cut (4) 2 ½" x 2 ½" squares [O]
• Cut (1) 1 ½" x 5 ½" rectangle [P]
Fabric 6 (waterfall)
• Cut (1) 2 ½" x 20" strip (set aside for binding)
• Cut (1) 5 ½" x 5 ½" square [Q]
• Cut (4) 3” x 3” squares [R]
• Cut (1) 2 ½” x 2 ½” square [S]
Fabric 7 (purple)
• Cut (1) 2 ½" x 20" strip (set aside for binding)
• Cut (1) 5 ½” x 5 ½” square [T]
• Cut (2) 3” x 3” squares [U]
• Cut (6) 2 ½” x 2 ½” squares [V]
• Cut (2) 2” x 2 ½” rectangles [W]
• Cut (2) 2” x 5 ½” rectangles [X]
Fabric 8 (lavender)
• Cut (1) 2 ½" x 20" strip (set aside for binding)
• Cut (1) 7” x 7” square [Y]
• Cut (1) 5 ½” x 5 ½” square [Z]
• Cut (2) 3” x 3” squares [AA]
Fabric 9 (white)
Note 43" WOF assumed
• Cut (1) 2 ½" x WOF strip (set aside for binding)
• Cut (1) 1 ½” by WOF strips
o Subcut (6) 1 ½” x 2 ½” rectangles [BB]
o Subcut (5) 1 ½” x 5 ½” rectangles [CC]
• Cut (1) 6 ½” by WOF strips
o Subcut (2) 17 ½” x 6 ½” rectangles [DD]
• Cut (1) 7” by WOF strip
o Subcut (1) 7” x 7” square [EE]
o Subcut (2) 6 ½” x 5 ½” rectangles [FF]
o Subcut (1) 5 ½” x 5 ½” square [GG]
o Subcut (1) 2 1/8” x 5 ½” rectangle [HH]
o Subcut (2) 3” x 3” squares [II]

Page 5
Nautical Mini Quilt
Piecing Instructions
Step 1 – Center Block Pieces required:
• (1) Fabric 2 (royal) 5 ½” x 5 ½” square [E]
• (2) Fabric 9 (white) 17 ½” x 6 ½” rectangles [DD]
• (2) Fabric 9 (white) 6 ½” x 5 ½” rectangles [FF]
1. Sew (1) Fabric 9 (white) 6 ½” x 5 ½” rectangle [FF] to the right side of Fabric 2
(royal) 5 ½” x 5 ½” square [E] and (1) Fabric 9 (white) 6 ½” x 5 ½” rectangle [FF]
to the left side of [E]. Press seams open.
2. Sew (1) Fabric 9 (white) 17 ½” x 6 ½” rectangle [DD] to the top of the unit from
Step 1 and (1) Fabric 9 (white) 17 ½” x 6 ½” rectangle [DD] to the bottom of the
unit from Step 1. Press seams open.
3. The center block should measure 17 ½” x 17 ½”.
Step 2 – Plus Blocks Pieces required:
• (2) Fabric 3 (lapis blue) 2 ½” x 2 ½” squares [H]
• (4) Fabric 5 (turquoise) 2 ½” x 2 ½” squares [O]
• (6) Fabric 7 (purple) 2 ½” x 2 ½” squares [V]
• (6) Fabric 9 (white) 1 ½” x 2 ½” rectangles [BB]
• (3) Fabric 9 (white) 1 ½” x 5 ½” rectangles [CC]
1. Sew (1) Fabric 7 (purple) 2 ½” x 2 ½” square [V] to the left side of (1) Fabric 9 (white) 1 ½” x 2 ½”
rectangle [BB]. Press seam open. Sew (1) Fabric 7 (purple) 2 ½” x 2 ½” square [V] to the right side
of rectangle [BB]. Press seam open. Repeat to make (2) units that measure 5 ½” x 2 ½”as shown in
the figure.
2. Sew (1) unit from Step 1 to the top of (1) Fabric 9 (white) 1 ½” x 5 ½” rectangle [CC]. Press seam
open. Sew the second unit from Step 1 to the bottom of rectangle [CC]. Press seam open.
3. Repeat process to create (3) plus blocks that measure 5 ½” x 5 ½”.
Page 6
Nautical Mini Quilt
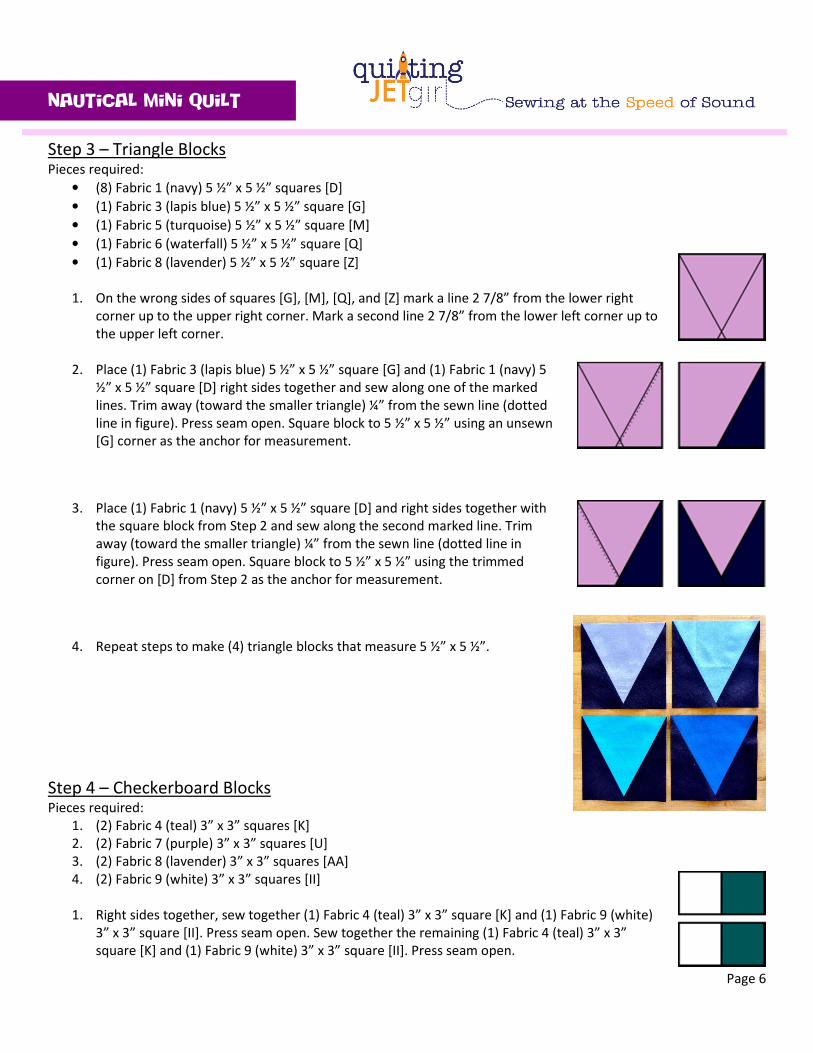
Step 3 – Triangle Blocks Pieces required:
• (8) Fabric 1 (navy) 5 ½” x 5 ½” squares [D]
• (1) Fabric 3 (lapis blue) 5 ½” x 5 ½” square [G]
• (1) Fabric 5 (turquoise) 5 ½” x 5 ½” square [M]
• (1) Fabric 6 (waterfall) 5 ½” x 5 ½” square [Q]
• (1) Fabric 8 (lavender) 5 ½” x 5 ½” square [Z]
1. On the wrong sides of squares [G], [M], [Q], and [Z] mark a line 2 7/8” from the lower right
corner up to the upper right corner. Mark a second line 2 7/8” from the lower left corner up to
the upper left corner.
2. Place (1) Fabric 3 (lapis blue) 5 ½” x 5 ½” square [G] and (1) Fabric 1 (navy) 5
½” x 5 ½” square [D] right sides together and sew along one of the marked
lines. Trim away (toward the smaller triangle) ¼” from the sewn line (dotted
line in figure). Press seam open. Square block to 5 ½” x 5 ½” using an unsewn
[G] corner as the anchor for measurement.
3. Place (1) Fabric 1 (navy) 5 ½” x 5 ½” square [D] and right sides together with
the square block from Step 2 and sew along the second marked line. Trim
away (toward the smaller triangle) ¼” from the sewn line (dotted line in
figure). Press seam open. Square block to 5 ½” x 5 ½” using the trimmed
corner on [D] from Step 2 as the anchor for measurement.
4. Repeat steps to make (4) triangle blocks that measure 5 ½” x 5 ½”.
Step 4 – Checkerboard Blocks Pieces required:
1. (2) Fabric 4 (teal) 3” x 3” squares [K]
2. (2) Fabric 7 (purple) 3” x 3” squares [U]
3. (2) Fabric 8 (lavender) 3” x 3” squares [AA]
4. (2) Fabric 9 (white) 3” x 3” squares [II]
1. Right sides together, sew together (1) Fabric 4 (teal) 3” x 3” square [K] and (1) Fabric 9 (white)
3” x 3” square [II]. Press seam open. Sew together the remaining (1) Fabric 4 (teal) 3” x 3”
square [K] and (1) Fabric 9 (white) 3” x 3” square [II]. Press seam open.

Page 7
Nautical Mini Quilt
2. Rotating the units from Step 1 to make sure that opposing colors are aligned, sew rectangles
from Step 1 together. Press seam open.
3. Repeat steps using (2) Fabric 7 (purple) 3” x 3” squares [U] and (2) Fabric 8
(lavender) 3” x 3” squares [AA] to make (2) checkerboard blocks that measure
5 ½” x 5 ½”.
Step 5 – Horizontal Stripe Block Pieces required:
• (2) Fabric 4 (teal) 1 ½” x 5 ½” rectangles [J]
• (1) Fabric 5 (turquoise) 1 ½” x 5 ½” rectangle [P]
• (2) Fabric 9 (white) 1 ½” x 5 ½” rectangles [CC]
1. Right sides together, sew together (1) Fabric 4 (teal) 1 ½” x 5 ½” rectangle [J] and (1) Fabric 9
(white) 1 ½” x 5 ½” rectangle [CC]. Press seam open. Sew together the remaining (1) Fabric 4
(teal) 1 ½” x 5 ½” rectangle [J] and (1) Fabric 9 (white) 1 ½” x 5 ½” rectangle [CC]. Press seam
open.
2. Right sides together, sew the Fabric 9 (white) edge of one unit from Step 1 to the Fabric 5
(turquoise) 1 ½” x 5 ½” rectangle [P]. Press seam open. Sew the Fabric 9 (white) edge of the
second unit from Step 2 to the other side of the Fabric 5 (turquoise) 1 ½” x 5 ½” rectangle [P].
Press seam open. Block should measure 5 ½” x 5 ½”.
Step 6 – Quarter Square Triangle Blocks Pieces required:
• (1) Fabric 3 (lapis blue) 7” x 7” square [F]
• (1) Fabric 5 (turquoise) 7” x 7” square [L]
• (1) Fabric 8 (lavender) 7” x 7” square [Y]
• (1) Fabric 9 (white) 7” x 7” square [EE]
1. On the wrong side of the Fabric 9 (white) 7” x 7” square [EE], draw a diagonal line from
corner to corner.
2. Place the Fabric 9 (white) 7” x 7” square [EE] right sides together with the Fabric 8 (lavender)
7” x 7” square [Y]. Sew a quarter inch seam allowance on either side of the marked diagonal
line.

Page 8
Nautical Mini Quilt
3. Cut into (2) triangles along the marked diagonal line. Press seams open.
4. On the wrong side of (1) HST from Step 3, mark one diagonal line from the opposite
corners from the sewn seam.
5. Right sides together, stack the (2) HSTs from Step 3 with the
sewn seams aligned but with opposite colors on top of each
other, as shown in the figure.
6. Sew a quarter inch seam allowance on either side of the marked diagonal
line. Cut into (2) triangles along the marked diagonal line. Press seams
open. Trim to 5 ½” square.
7. Repeat steps with remaining blocks to create (2) quarter square triangle blocks
that measure 5 ½” x 5 ½”.
Step 7 – Square in a Square Blocks Pieces required:
• (4) Fabric 5 (turquoise) 3” x 3” squares [N]
• (4) Fabric 6 (waterfall) 3” x 3” squares [R]
• (1) Fabric 7 (purple) 5 ½” x 5 ½” square [T]
• (1) Fabric 9 (white) 5 ½” x 5 ½” square [GG]
1. On the wrong side of the (4) Fabric 5 (turquoise) 3” x 3” squares [N], mark a diagonal line
from corner to corner.

Page 9
Nautical Mini Quilt
2. Right sides together, align (1) Fabric 5 (turquoise) 3” x 3” square [N] with the
upper right corner of the Fabric 9 (white) 5 ½” x 5 ½” square [GG]. Sew along
marked line and trim ¼” away from the sewn line (toward the corner) as
shown in the figure (dotted line). Press seam open.
3. Right sides together, align (1) Fabric 5 (turquoise) 3” x 3” square [N] with the
lower left corner of the Fabric 9 (white) 5 ½” x 5 ½” square [GG]. Sew along
marked line and trim ¼” away from the sewn line (toward the corner) as
shown in the figure (dotted line). Press seam open.
4. Right sides together, align (1) Fabric 5 (turquoise) 3” x 3” square [N] with the
upper left corner of the Fabric 9 (white) 5 ½” x 5 ½” square [GG]. Sew along
marked line and trim ¼” away from the sewn line (toward the corner) as
shown in the figure (dotted line). Press seam open.
5. Right sides together, align (1) Fabric 5 (turquoise) 3” x 3” square [N] with the
lower right corner of the Fabric 9 (white) 5 ½” x 5 ½” square [GG]. Sew along
marked line and trim ¼” away from the sewn line (toward the corner) as
shown in the figure (dotted line). Press seam open.
6. Repeat steps with remaining blocks to create (2) square in a square blocks
that measure 5 ½” x 5 ½”.
Step 8 – Mini Log Cabin Block (Courthouse Steps Variation) Pieces required:
• (1) Fabric 6 (waterfall) 2 ½" x 2 ½" square [S]
• (2) Fabric 7 (purple) 2" x 2 ½" rectangles [W]
• (2) Fabric 7 (purple) 2" x 5 ½" rectangles [X]
1. Sew (1) Fabric 7 (purple) 2" x 2 ½" rectangle [W] to the right side of Fabric 6 (waterfall) 2 ½" x
2 ½" square [S] and (1) Fabric 7 (purple) 2" x 2 ½" rectangle [W] to the left side of [S]. Press
seams open.
2. Sew (1) Fabric 7 (purple) 2" x 5 ½" rectangle [X] to the top of the unit from Step 1 and (1)
Fabric 7 (purple) 2" x 5 ½" rectangle [X] to the bottom of the unit from Step 1. Press seams
open.
3. The mini log cabin block should measure 5 ½” x 5 ½”.

Page 10
Nautical Mini Quilt
Step 9 – Vertical Strip Block Pieces required:
• (2) Fabric 4 (teal) 2 1/8" x 5 ½" rectangles [I]
• (1) Fabric 9 (white) 2 1/8" x 5 ½" rectangle [HH]
*Use a scant ¼" seam allowance when piecing this block
1. Sew (1) Fabric 4 (teal) 2 1/8" x 5 ½" rectangle [I] to the right side of the Fabric 9 (white) 2 1/8"
x 5 ½" rectangle [HH] and Fabric 4 (teal) 2 1/8" x 5 ½" rectangle [I] to the left side of [HH] using a scant ¼" seam
allowance. Press seams open. The vertical strip block should measure 5 ½” x 5 ½”; trim as necessary.
Assembly Instructions
Step 1 – Assemble the Top Row Pieces required:
• (1) Plus Block
• (1) Triangle Block
• (1) Checkerboard Block
• (1) Horizontal Stripe Block
• (1) Quarter Square Triangle Block
• (2) Fabric 1 (navy) 1 ½" by WOF strips [A]
• (6) Fabric 1 (navy) 1 ½" x 5 ½" rectangles [B]
1. Sew (1) Fabric 1 (navy) 1 ½" x 5 ½" rectangle [B] to the left of each block. Press seams open. Sew (1) Fabric 1
(navy) 1 ½" x 5 ½" rectangle [B] to the right side of the Quarter Square Triangle Block. Press seam open.
2. Sew blocks together into a row. Press seams open.
3. Sew (1) Fabric 1 (navy) 1 ½" by WOF strip [A] to the top of the row from Step 2. Press seam open and trim
square with the row. Sew (1) Fabric 1 (navy) 1 ½" by WOF strip [A] to the bottom of the row from Step 2. Press
seam open and trim square with the row.

Page 11
Nautical Mini Quilt
Step 2 – Assemble the Middle Row Pieces required:
• (1) Center Block
• (1) Plus Block
• (2) Triangle Blocks
• (2) Square in a Square Blocks
• (1) Vertical Stripe Block
• (4) Fabric 1 (navy) 1 ½" x 5 ½" rectangles [B]
• (4) Fabric 1 (navy) 1 ½" x 17 ½" rectangles [C]
1. Sew (1) Fabric 1 (navy) 1 ½" x 5 ½" rectangle [B] to the bottom of the plus block, (1) triangle block, (1) square in a
square block, and the vertical stripe block. Press seams open.
2. Sew blocks together into (2) columns as shown in the figure. Press seams open.
Page 12
Nautical Mini Quilt
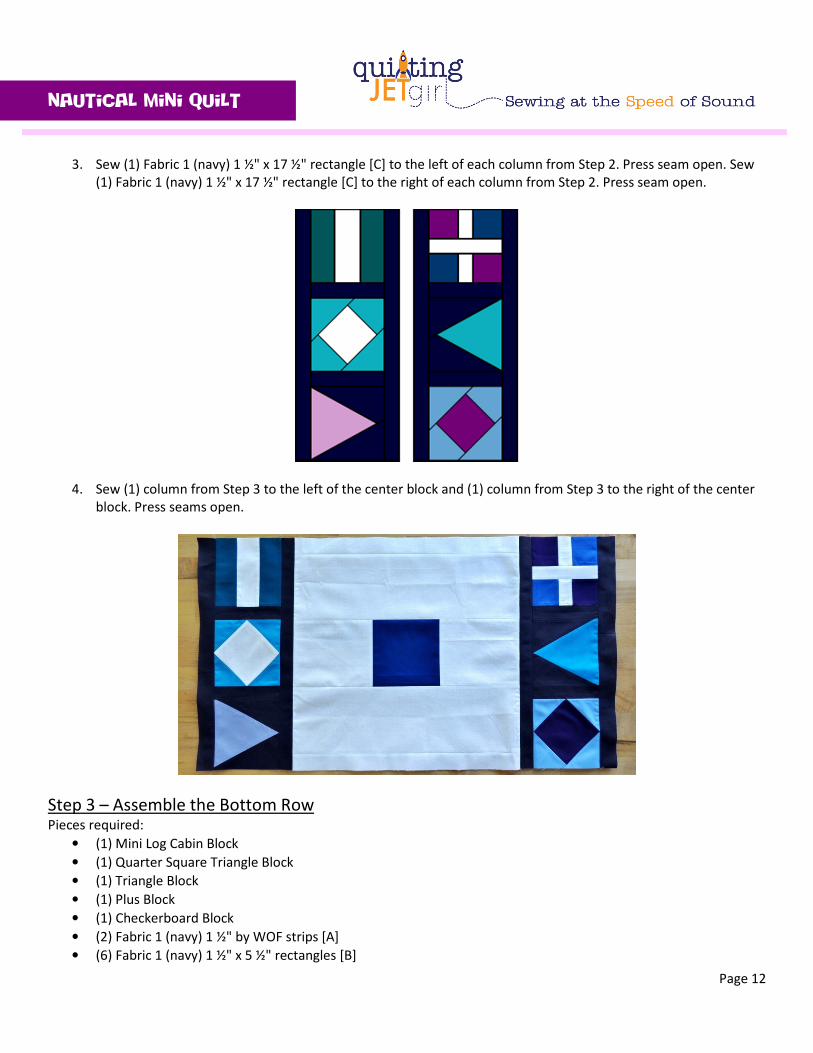
3. Sew (1) Fabric 1 (navy) 1 ½" x 17 ½" rectangle [C] to the left of each column from Step 2. Press seam open. Sew
(1) Fabric 1 (navy) 1 ½" x 17 ½" rectangle [C] to the right of each column from Step 2. Press seam open.
4. Sew (1) column from Step 3 to the left of the center block and (1) column from Step 3 to the right of the center
block. Press seams open.
Step 3 – Assemble the Bottom Row Pieces required:
• (1) Mini Log Cabin Block
• (1) Quarter Square Triangle Block
• (1) Triangle Block
• (1) Plus Block
• (1) Checkerboard Block
• (2) Fabric 1 (navy) 1 ½" by WOF strips [A]
• (6) Fabric 1 (navy) 1 ½" x 5 ½" rectangles [B]

Page 13
Nautical Mini Quilt
1. Sew (1) Fabric 1 (navy) 1 ½" x 5 ½" rectangle [B] to the left of each block. Press seams open. Sew (1) Fabric 1
(navy) 1 ½" x 5 ½" rectangle [B] to the right side of the Quarter Square Triangle Block. Press seam open.
2. Sew blocks together into a row. Press seams open.
3. Sew (1) Fabric 1 (navy) 1 ½" by WOF strip [A] to the top of the row from Step 2. Press seam open and trim
square with the row. Sew (1) Fabric 1 (navy) 1 ½" by WOF strip [A] to the bottom of the row from Step 2. Press
seam open and trim square with the row.
Step 4 – Assemble the Quilt Top Pieces required:
• Top Row from Assembly Step 1
• Middle Row from Assembly Step 2
• Bottom Row from Assembly Step 3
1. Sew the top row to the top of the middle row. Press seams open.

Page 14
Nautical Mini Quilt
2. Sew the bottom row to the bottom of the middle row. Press seams open.
3. The Nautical Mini Quilt should measure 31 ½" x 31 ½".
Quilt Construction
1. Layer the quilt top, batting, and backing. Baste and quilt as desired.
2. Form the binding by chain sewing together the pre-cut binding strips from Fabrics 2-9 to create a scrappy
binding. Bind and enjoy your quilt!
Congratulations! You have completed a Nautical Mini Quilt! I would love to see what you create.
If you are on Instagram, tag me (@QuiltingJetgirl) and any images of your quilt using
#NauticalMiniQuilt. Or send an email to jetgirl8(at)gmail(dot)com with a photograph or link to
a blog post about your quilt!