my memories suite operation manual
TRANSCRIPT
My Memories Suite
User Guide
1 – My Memories Suite 2 User Guide 20091221

There are software applications made for creating slides shows, and others designed for photo editing professionals. Many have features that are useless to a digital scrapbook designer, and most have an expensive price tag. The My Memories Suite is specific to digital scrapbooks, their designers, and the audience those memories are shared with. This feature rich software is one-stop solution for digital scrapbook design and sharing. Using This Guide This guide is separated into two major sections: IntroductionThis section contains information about computer system requirements, downloading and installing the software. Using My Memories SuiteThis section will guide you through the steps of creating a My Memories Suite album, including adding and editing photos, layouts, and adding multimedia elements.
My Memories Suite 2 User Guide – 2

Copyright Information My Memories Suite Copyright © 2007-2009 StoryRock, Inc. and its licensors. All Rights Reserved. Unauthorized reproduction of the software is a violation of applicable copyright laws. Memories Viewer Copyright © 2007-2009 StoryRock, Inc. and its licensors. All Rights Reserved. Unauthorized reproduction of the software and/or the album created for it is a violation of applicable copyright laws. Design Elements and Page Layouts Copyright © 2007-2009 StoryRock, Inc. and its licensors. All Rights Reserved. Unauthorized reproduction is a violation of applicable copyright laws. Content cannot be used in any form for commercial use without express written consent from StoryRock. The Sentry Spelling-Checker Engine Copyright © 2000 Wintertree Software Inc. QuickTime® QuickTime and the QuickTime logo are trademarks used under license. The QuickTime logo is registered in the U.S. and other countries. Trademarks The My Memories Suite and StoryRock logos are trademarks of StoryRock, Inc. QuickTime and QuickTime logos are trademarks used under license. The QuickTime logo is registered in the U.S. and other countries. All other company and/or product names are trademarks and/or registered trademarks of their respective manufacturers. Copyright © 2007-2009 StoryRock, Inc. All rights reserved. This document and the software that it describes are furnished under license and may only be used in accordance with the terms of such license.
3 – My Memories Suite 2 User Guide

Introduction .................................................................................. 6 Computer System Requirements................................................................................. 6 Downloading and Installing My Memories Suite 2.................................................... 7
Setting Up My Memories Suite 2 on Windows Vista or Windows 7 ....................................................7 Downloading and Installing My Memories Suite 2 on Windows XP..................................................8 Downloading and Installing My Memories Suite 2 on a Macintosh...................................................8
Updating My Memories Suite 2 ................................................................................. 10 Customer Support....................................................................................................... 10 Important Album Information .................................................................................. 11
Using My Memories Suite .......................................................... 12 The Interface ............................................................................................................... 12 Starting an Album....................................................................................................... 13
New Album Options ............................................................................................................................13 Recent Albums ....................................................................................................................................14 Using the Designer Template Wizard.................................................................................................14 Designing Your Own Album...............................................................................................................18 Opening an Album..............................................................................................................................19
Album Pages ................................................................................................................ 22 Adding a Page .....................................................................................................................................22 Adding or Changing a Background Image........................................................................................23 Photo Layout .......................................................................................................................................24 Page Order ..........................................................................................................................................24 Importing Pages ..................................................................................................................................25
Working with Page Objects ....................................................................................... 27 Selecting Objects .................................................................................................................................27 Cut, Copy, and Paste ...........................................................................................................................28 Moving Objects....................................................................................................................................28 Aligning Objects..................................................................................................................................29 Grouping Objects ................................................................................................................................29 Deleting Objects ..................................................................................................................................30 Layers ..................................................................................................................................................30 Choose Color.......................................................................................................................................32
Photos ........................................................................................................................... 36 Adding Photos .....................................................................................................................................36 Editing Photos.....................................................................................................................................39
Text............................................................................................................................... 47 Adding and Editing Text.....................................................................................................................47 Other Control Panel Options ..............................................................................................................47
Word Art...................................................................................................................... 50 Adding Word Art .................................................................................................................................50 Editing Word Art.................................................................................................................................50
Embellishments ........................................................................................................... 54 Adding Embellishments ......................................................................................................................54 Editing Embellishments ......................................................................................................................55
Shapes........................................................................................................................... 57 Adding Shapes.....................................................................................................................................57 Editing Shapes ....................................................................................................................................57
Video and Multimedia ................................................................................................ 61 Video Files (Quick Introduction) .......................................................................................................61 Add Hot Spot Link...............................................................................................................................61 Edit Hot Spot Link ..............................................................................................................................67
My Memories Suite 2 User Guide – 4

Music and Narration................................................................................................... 68 Add/Change Music..............................................................................................................................69 Add/Change Narration .......................................................................................................................70
Checking an Album .................................................................................................... 72 Check Album.......................................................................................................................................72 Preliminary Suggestion: Back Up the Album....................................................................................72 Preview ................................................................................................................................................73 Spelling................................................................................................................................................74 Errors ..................................................................................................................................................75 Album Output Preparation .................................................................................................................76
Sharing Your Album .................................................................................................. 78 Print.....................................................................................................................................................80 Export to JPEG...................................................................................................................................84 Photo Album........................................................................................................................................88 Greeting Card......................................................................................................................................93 Trading Cards .....................................................................................................................................96 Calendar ..............................................................................................................................................99 Interactive Album..............................................................................................................................102 Make Movie.......................................................................................................................................105 iPod-ready Movie ..............................................................................................................................108 Burn DVD-Video ..............................................................................................................................110
Preferences................................................................................................................. 113 Font Tab............................................................................................................................................113 Captions Tab .....................................................................................................................................113 Shadow Tab.......................................................................................................................................114 Grid/Ruler Tab ..................................................................................................................................115 Thumbnail Cache..............................................................................................................................116 Message Reset ...................................................................................................................................116
Album Properties ...................................................................................................... 117 Album Info ........................................................................................................................................117 Transition ..........................................................................................................................................117 Disc Type ...........................................................................................................................................117 Navigation Bar ..................................................................................................................................118
Resource Gallery....................................................................................................... 119 Page Canvas............................................................................................................... 121
Right-Click Menu..............................................................................................................................121 Double-Click .....................................................................................................................................121
Page Thumbnails....................................................................................................... 122 Right-Click Options...........................................................................................................................122 Reordering Pages ..............................................................................................................................122
Menus and Toolbars ................................................................................................. 123 Menus ................................................................................................................................................123 Toolbar Icons ....................................................................................................................................127
5 – My Memories Suite 2 User Guide
INTRODUCTION This section will describe how to get My Memories Suite 2 set up on your computer. Please ensure that your computer meets the minimum system requirements.
Computer System Requirements Prior to installing My Memories Suite 2, ensure that your computer meets the following technical specifications: Windows: • Windows XP, Vista, or Window 7 • Pentium 4, 1 GHz or better (1.6 GHz recommended) or comparable AMD processor • 512 MB RAM available (1 GB or more recommended, 1 GB required for Windows
Vista and Windows 7 users) • 16 MB Video RAM (64 MB recommended) • Available Hard Disk Space: 750 MB Macintosh: • OS X 10.4.11 or greater (with latest Java update) • G4 500 MHz or Faster (G5 1 GHz or better recommended) • 512 MB RAM (1 GB or more recommended) • 8 MB Video RAM (64 MB recommended) • Available Hard Disk Space: 750 MB Other Requirements • QuickTime™ Player version 7.5 or higher is required. System Settings • Monitor Resolution: 1024 x 768 or higher (1152 x 864 or higher recommended) Recommended Additional Equipment • CD or DVD Burner (Required for interactive album and DVD-Video output options) • Printer • Speakers • Digital Camera • Microphone • Digital Camcorder • Scanner
My Memories Suite 2 User Guide – 6
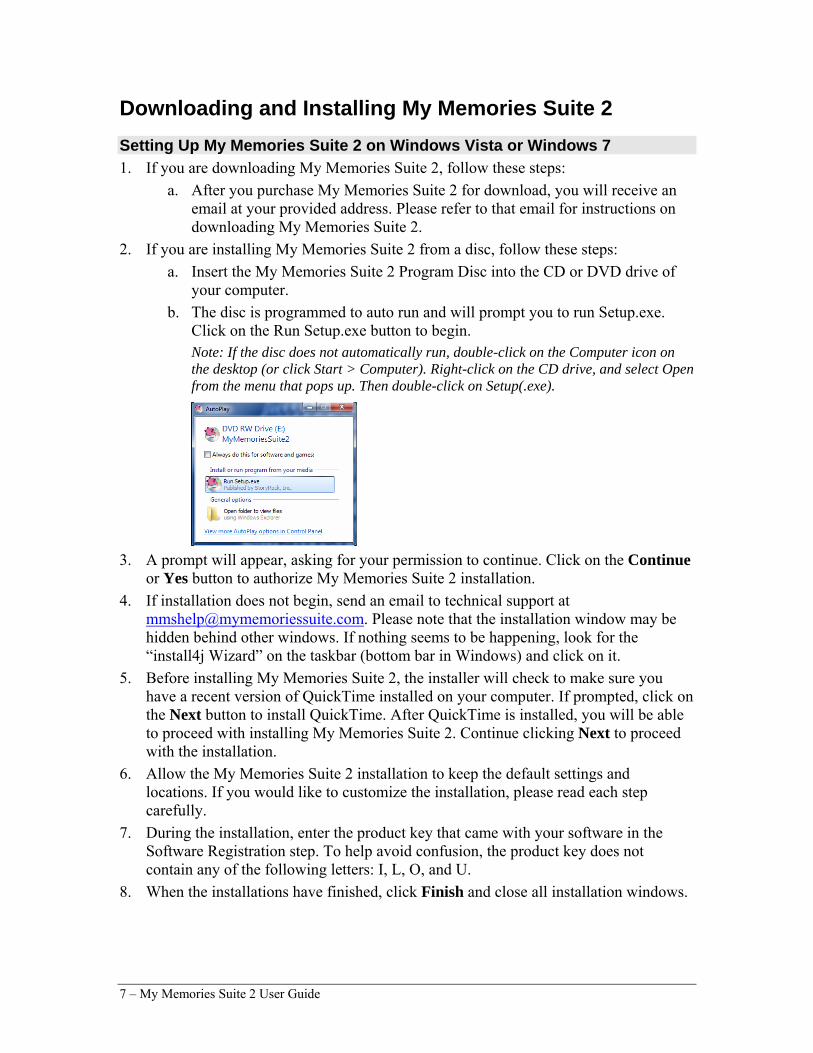
Downloading and Installing My Memories Suite 2 Setting Up My Memories Suite 2 on Windows Vista or Windows 7 1. If you are downloading My Memories Suite 2, follow these steps:
a. After you purchase My Memories Suite 2 for download, you will receive an email at your provided address. Please refer to that email for instructions on downloading My Memories Suite 2.
2. If you are installing My Memories Suite 2 from a disc, follow these steps: a. Insert the My Memories Suite 2 Program Disc into the CD or DVD drive of
your computer. b. The disc is programmed to auto run and will prompt you to run Setup.exe.
Click on the Run Setup.exe button to begin. Note: If the disc does not automatically run, double-click on the Computer icon on the desktop (or click Start > Computer). Right-click on the CD drive, and select Open from the menu that pops up. Then double-click on Setup(.exe).
3. A prompt will appear, asking for your permission to continue. Click on the Continue
or Yes button to authorize My Memories Suite 2 installation. 4. If installation does not begin, send an email to technical support at
[email protected]. Please note that the installation window may be hidden behind other windows. If nothing seems to be happening, look for the “install4j Wizard” on the taskbar (bottom bar in Windows) and click on it.
5. Before installing My Memories Suite 2, the installer will check to make sure you have a recent version of QuickTime installed on your computer. If prompted, click on the Next button to install QuickTime. After QuickTime is installed, you will be able to proceed with installing My Memories Suite 2. Continue clicking Next to proceed with the installation.
6. Allow the My Memories Suite 2 installation to keep the default settings and locations. If you would like to customize the installation, please read each step carefully.
7. During the installation, enter the product key that came with your software in the Software Registration step. To help avoid confusion, the product key does not contain any of the following letters: I, L, O, and U.
8. When the installations have finished, click Finish and close all installation windows.
7 – My Memories Suite 2 User Guide

Downloading and Installing My Memories Suite 2 on Windows XP 1. If you are downloading My Memories Suite 2, follow these steps:
a. After you purchase My Memories Suite 2 for download, you will receive an email at your provided address. Please refer to that email for instructions on downloading My Memories Suite 2.
2. If you are installing My Memories Suite 2 from a disc, follow these steps: a. Insert the My Memories Suite 2 Program Disc into the CD or DVD drive of
your computer. b. The disc is programmed to automatically begin the installation.
Note: If the disc does not automatically run, locate the CD from My Computer. Right-click on the CD drive, and select Open from the menu that pops up. Then double-click on Setup(.exe).
3. Please note that the installation window may be hidden behind other windows. If nothing seems to be happening, look for the “install4j Wizard” on the taskbar (bottom bar in Windows) and click on it. If installation does not begin, send an email to technical support at [email protected].
4. Before installing My Memories Suite 2, the installer will check to make sure you have a recent version of QuickTime installed on your computer. If prompted, click on the Next button to, install QuickTime. After QuickTime is installed, you will be able to proceed with installing My Memories Suite 2. Continue clicking Next to proceed with the installation.
5. Allow the My Memories Suite 2 installation to keep default settings and locations. If you would like to customize the installation, please read each step carefully.
6. During the installation, enter the product key that came with your software in the Software Registration step. To help avoid confusion, the product key does not contain any of the following letters: I, L, O, and U.
7. When the installations have finished, click Finish and close all installation windows.
Downloading and Installing My Memories Suite 2 on a Macintosh 1. If you are downloading My Memories Suite 2, follow these steps:
a. After you purchase My Memories Suite 2 for download, you will receive an email at your provided address. Please refer to that email for instructions on downloading My Memories Suite 2.
2. If you are installing My Memories Suite 2 from a disc, follow these steps: a. Insert the My Memories 2 Suite Program Disc into the CD or DVD drive of
your computer. b. The disc is programmed to open automatically. If it does not, double-click on
the disc icon on your desktop. 3. Double-click on the My Memories Suite Installer.app icon. If installation does not
begin, please send an email to technical support at [email protected].
My Memories Suite 2 User Guide – 8

4. Click Next to proceed with the installation. Allow the installation to keep the default settings and locations. If you would like to customize the installation, please read each step carefully.
5. During the installation, enter the product key that came with your software in the Software Registration step. To help avoid confusion, the product key does not contain any of the following letters: I, L, O, and U.
6. When installation has finished, click Finish and close all installation windows.
9 – My Memories Suite 2 User Guide

Updating My Memories Suite 2 My Memories Suite 2 includes regular updates to the program with enhanced features and fixes. It is important that you register the software at www.MyMemoriesSuite.com/registration_v2 to keep informed of any updates. We strongly recommend that you install updates as they become available. To update My Memories Suite 2, choose Help > Check for Updates… from the menu (Internet connection required).
Customer Support If questions arise while using or installing the software, don’t hesitate to check the My Memories Suite website or email our technical support specialists. Website: www.MyMemoriesSuite.com E-mail: [email protected]
My Memories Suite 2 User Guide – 10

Important Album Information These items are important and will help you avoid serious problems with your albums. • Read the Album Output Preparation topic. This information about trim areas and
DVD-Video creation will make the difference between excellent results when printing, creating a photo album, and creating a DVD-Video and problematic album output.
• Do not delete your album files prematurely. Keep your album and all related files (videos, images, audio) on your computer’s hard drive until you have created the final output (print, interactive album, DVD-Video). If you are sending or uploading the album for printing or other production, keep all files on your computer until you receive and check your shipment.
• Follow all Check Album steps. We highly recommend that you follow the steps in the Check Album menu before using the Share Album menu to create your album output. This will ensure the best results in the final output.
• Always exit the software. Always exit the software before logging off or turning off your computer to avoid corrupting your album.
• Ensure adequate hard drive space. My Memories Suite albums require large amounts of hard drive space. Check your computer for free hard drive space on a regular basis. If you run out of space while you are building your album, you may lose some of your work.
• Backup your albums. To avoid losing your work, we recommend backing up your albums to an external drive, USB flash drive, or to CD or DVD. Copy the entire album folder, typically located in My Documents/My Memories Suite Albums (Windows XP/Windows 7) or Documents/My Memories Suite Albums (Windows Vista, Mac OS X).
11 – My Memories Suite 2 User Guide

USING MY MEMORIES SUITE This section will help you get started quickly by giving you instructions for using the most important features of My Memories Suite first.
The Interface We’ll start by looking at the layout of the program. The My Memories Suite interface can be divided into five areas, as shown below.
1. Menus and Toolbars—Most application functions can be accessed through this area. 2. Resource Gallery—Drag page elements from this panel onto the page canvas to add
them to the page. Dragging a photo onto a photo box will place the photo in the box. Other elements will be added directly to the page.
3. Page Canvas—Page elements are displayed in this area. The Page Canvas is where you will create the album by adding backgrounds, photos, embellishments, images, text, audio, and Hot Spots (links to video files or other items).
4. Control Panel—This area gives you access to My Memories Suite’s editing tools. 5. Page Thumbnails—The bottom area of My Memories Suite displays thumbnails of
your album pages and allows you to rearrange, add, and delete pages. The names of background music files are shown beneath the album pages. Page changes will not be reflected in the thumbnail until you open another page or save the album.
My Memories Suite 2 User Guide – 12
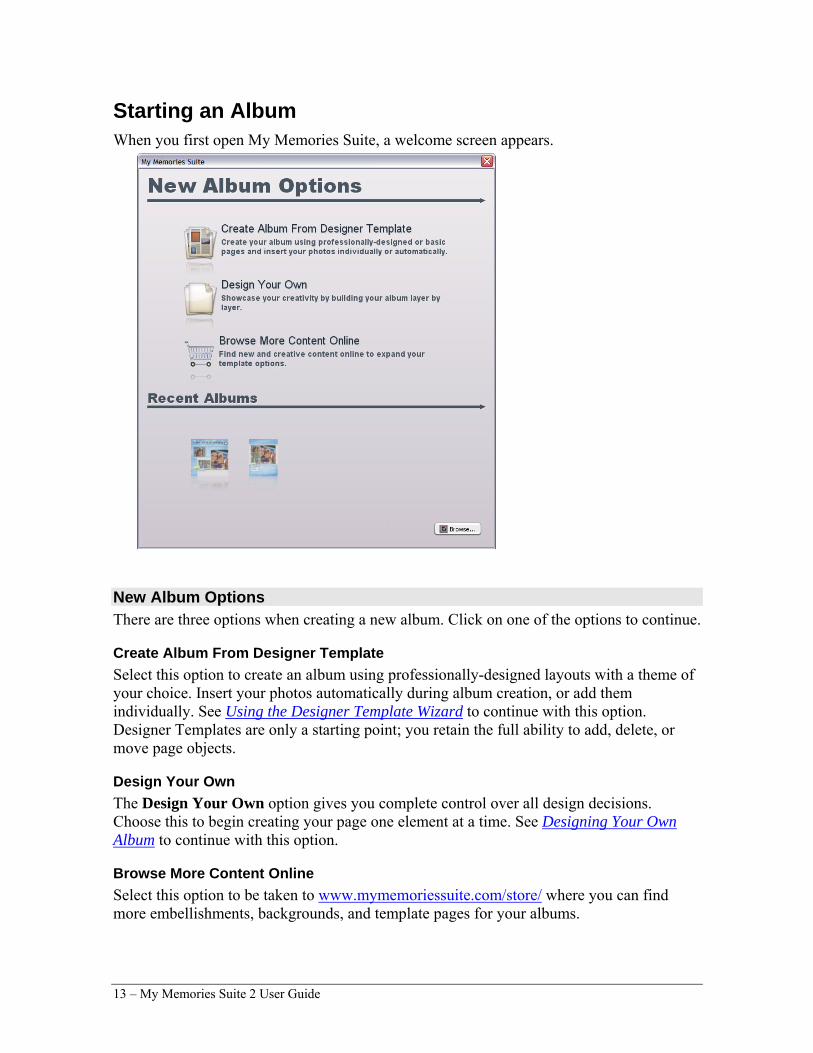
Starting an Album When you first open My Memories Suite, a welcome screen appears.
New Album Options There are three options when creating a new album. Click on one of the options to continue.
Create Album From Designer Template Select this option to create an album using professionally-designed layouts with a theme of your choice. Insert your photos automatically during album creation, or add them individually. See Using the Designer Template Wizard to continue with this option. Designer Templates are only a starting point; you retain the full ability to add, delete, or move page objects.
Design Your Own The Design Your Own option gives you complete control over all design decisions. Choose this to begin creating your page one element at a time. See Designing Your Own Album to continue with this option.
Browse More Content Online Select this option to be taken to www.mymemoriessuite.com/store/ where you can find more embellishments, backgrounds, and template pages for your albums.
13 – My Memories Suite 2 User Guide
Recent Albums To continue working on an existing album, click on one of the album thumbnails.
Note: Hovering the mouse cursor over an album thumbnail will display its name.
See Opening an Album for more information.
Using the Designer Template Wizard The Designer Template process creates an album from professionally-designed page layouts. In addition to choosing the Designer Template to use as a basis for your album, you can customize the page order and choose whether to place photos automatically during the Designer Template creation, or individually afterwards. The Album Wizard will guide you through the steps of creating a new album. If the Album Wizard is not already open, you can get to it by choosing File > New Album from the menu and clicking on Create Album From Designer Template.
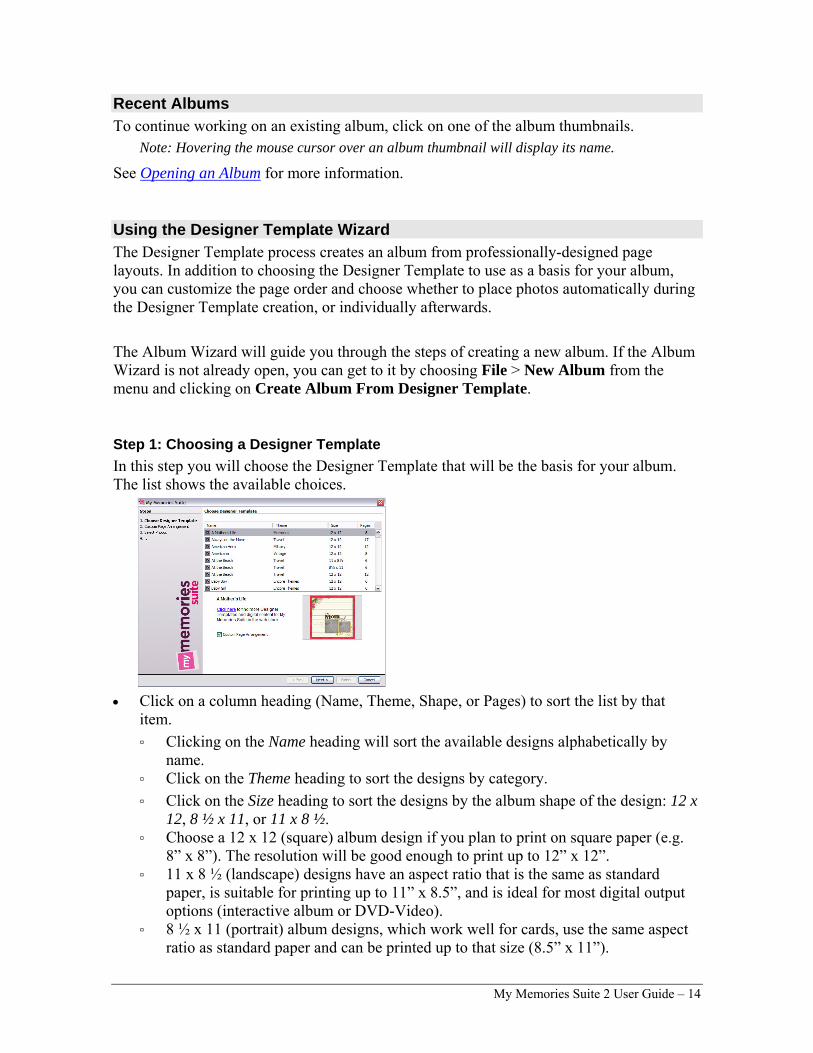
Step 1: Choosing a Designer Template In this step you will choose the Designer Template that will be the basis for your album. The list shows the available choices.
• Click on a column heading (Name, Theme, Shape, or Pages) to sort the list by that
item. ▫ Clicking on the Name heading will sort the available designs alphabetically by
name. ▫ Click on the Theme heading to sort the designs by category. ▫ Click on the Size heading to sort the designs by the album shape of the design: 12 x
12, 8 ½ x 11, or 11 x 8 ½. ▫ Choose a 12 x 12 (square) album design if you plan to print on square paper (e.g.
8” x 8”). The resolution will be good enough to print up to 12” x 12”. ▫ 11 x 8 ½ (landscape) designs have an aspect ratio that is the same as standard
paper, is suitable for printing up to 11” x 8.5”, and is ideal for most digital output options (interactive album or DVD-Video).
▫ 8 ½ x 11 (portrait) album designs, which work well for cards, use the same aspect ratio as standard paper and can be printed up to that size (8.5” x 11”).
My Memories Suite 2 User Guide – 14
▫ Click on the Pages heading to sort the designs according to the number of page layout options the design provides.
• Click on a template name. A preview will appear in the lower part of the screen. • Click on the link under the album name to be taken to the My Memories Suite store,
where you can find more embellishments, backgrounds, and template pages for your albums.
• The Custom Page Arrangement option will be automatically checked. This will allow you to customize the order of the pages (see instructions below). If you would like to use the template as it is provided, uncheck this option before clicking Next.
• When you have made your selection, click Next.
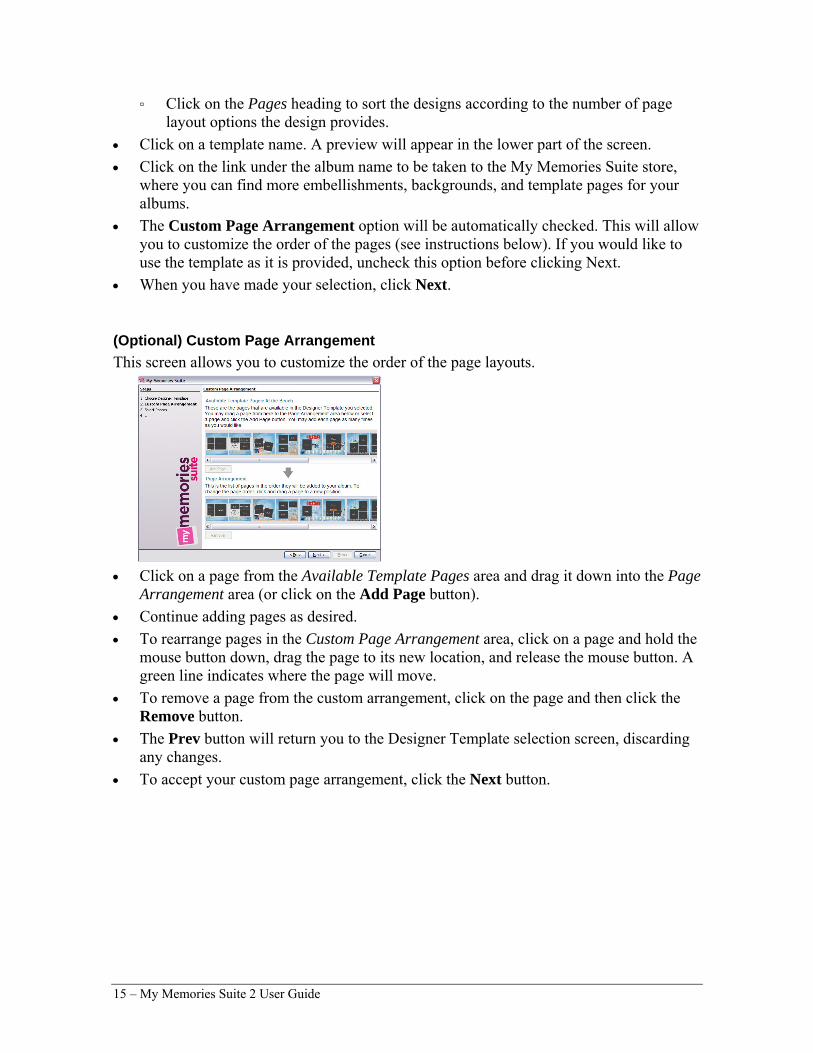
(Optional) Custom Page Arrangement This screen allows you to customize the order of the page layouts.
• Click on a page from the Available Template Pages area and drag it down into the Page
Arrangement area (or click on the Add Page button). • Continue adding pages as desired. • To rearrange pages in the Custom Page Arrangement area, click on a page and hold the
mouse button down, drag the page to its new location, and release the mouse button. A green line indicates where the page will move.
• To remove a page from the custom arrangement, click on the page and then click the Remove button.
• The Prev button will return you to the Designer Template selection screen, discarding any changes.
• To accept your custom page arrangement, click the Next button.
15 – My Memories Suite 2 User Guide

Step 2: Inserting Photos Choose a method for adding photos to your album: individually or automatically.
• Click on the Pick and Click: Insert Photos Individually option to immediately create
the album without photos. The album pages will have photo boxes that you can double-click to add your photos. See Adding Photos for more information. After choosing Pick and Click, click the Next button and skip to Step 3: Naming the Album.
• Click on the FastFill: Insert Photos Automatically option to add photos automatically during the creation of the album. Click on the Next button and see the Choosing Photos instructions below.
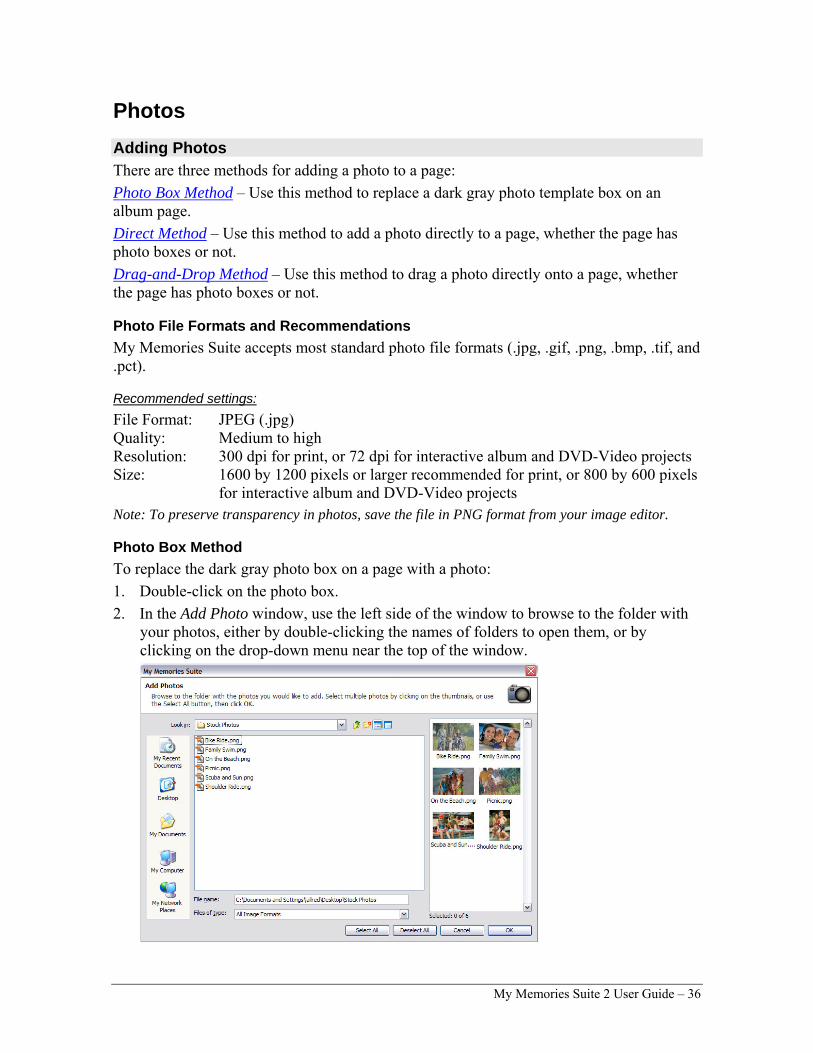
Choosing Photos (optional) If you chose the FastFill option, you will now be prompted to choose the photos to add during album creation in the Add Photos window.
• Choose the folder with your photos using the left side of the Add Photos window or
from the drop-down menu at the top. • Click on the thumbnails of your photos on the right side of the window to select them
(you may select more than one) or click on the Select All button at the bottom of the window to select all the photos in the folder. Click on OK to add the photos to your album.
My Memories Suite 2 User Guide – 16

Organizing Photos The Organize Photos window allows you to add more photos, remove, rearrange, or rotate photos.
• Click on the Add Photos button to add more photos. • To remove a photo from the album, click on the photo thumbnail in the preview pane
and then click on the Remove button. • Photos will be placed on pages in the order that they appear in the preview pane. To
rearrange photos, click on a photo thumbnail, hold the mouse button down, and drag the photo to a new position. A green line will show where the photo will be placed.
• If a photo is sideways, click on its thumbnail in the preview pane and then click the Rotate 90° button. To select and rotate multiple pictures, hold down the Ctrl key (Command key on the Mac) as you click on the thumbnails.
Click the Next button when you have finished adding and organizing photos.
Step 3: Naming the Album
• Type a name in the box under Album Name:. When My Memories Suite creates your
album, this will be the name of the album folder. You will not be able to create two albums with the same name in the same folder.
• Click on the Change Location… button in the Album Name area to choose a location for your album (or make a note of the default location). Browse to a folder in the Open dialog, select it, and click the Select Folder button.
When you have made your choices, click on the Finish button.
17 – My Memories Suite 2 User Guide

Album Creation My Memories Suite will now create the album. This process may take a few moments. When the album is complete, My Memories Suite will display the album. The Page Canvas will display the first page of the album, while a preview image of all the other album pages will appear in the Page Thumbnails bar near the bottom of the screen.
To begin editing pages and photos, see the topics starting with Album Pages.
Designing Your Own Album The Design Your Own option allows you to begin working with your album immediately. If the New Album Name window is not open, choose File > New Album from the menu and click on the Design Your Own button. 1. In the New Album Name dialog:
• Type a name in the Album Name box. When My Memories Suite creates your
album, this will be the name of the album folder. You will not be able to create two albums with the same name in the same folder.
• Click on the yellow open folder icon to choose a location for your album or make a note of the default location. Browse to a folder in the Open dialog, select it, and click the Select Folder button.
• Click on one of the Square, Portrait, or Landscape buttons to choose the album shape. ▫ Choose the square album if you plan to print on square paper (e.g. 8” x 8”).
Square albums can be printed up to 12” x 12”. ▫ Portrait albums, which work well for cards, use the same aspect ratio as
standard paper and can be printed up to that size (8.5” x 11”).
My Memories Suite 2 User Guide – 18
▫ The landscape option creates an album with an aspect ratio that is the same as standard paper (11” x 8.5”), is suitable for printing up to 11” x 8.5”, and is ideal for most digital output options (interactive album or DVD-Video).
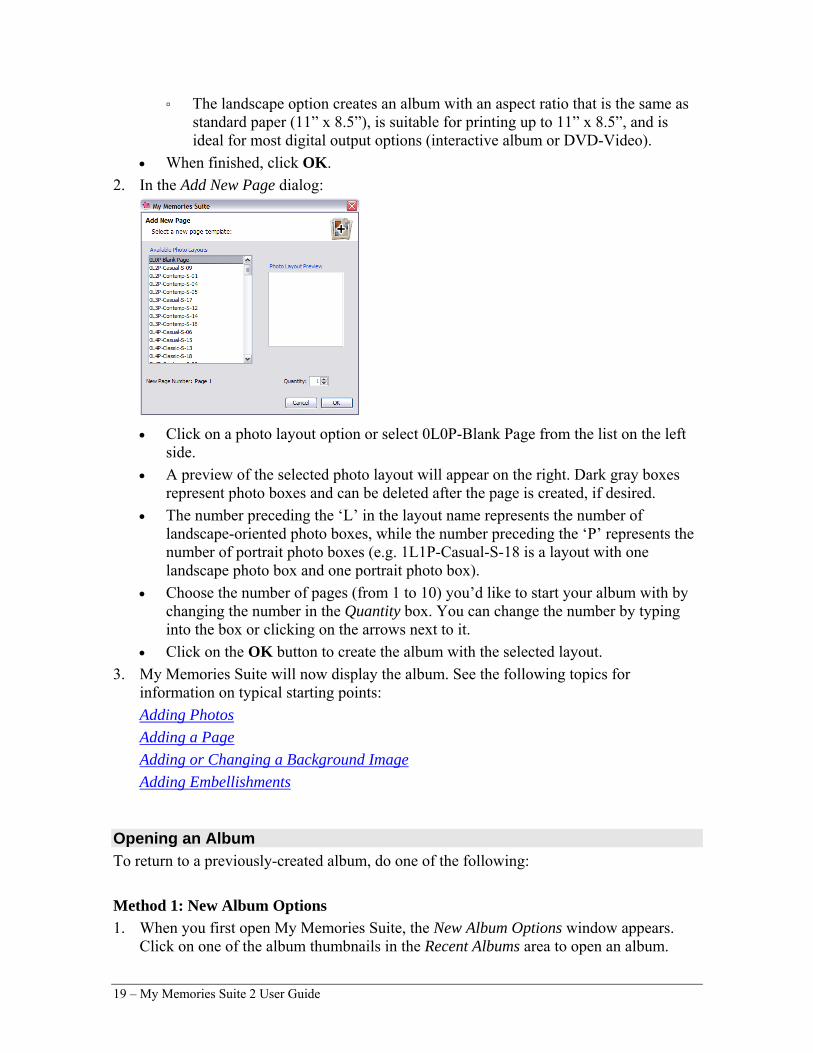
• When finished, click OK. 2. In the Add New Page dialog:
• Click on a photo layout option or select 0L0P-Blank Page from the list on the left
side. • A preview of the selected photo layout will appear on the right. Dark gray boxes
represent photo boxes and can be deleted after the page is created, if desired. • The number preceding the ‘L’ in the layout name represents the number of
landscape-oriented photo boxes, while the number preceding the ‘P’ represents the number of portrait photo boxes (e.g. 1L1P-Casual-S-18 is a layout with one landscape photo box and one portrait photo box).
• Choose the number of pages (from 1 to 10) you’d like to start your album with by changing the number in the Quantity box. You can change the number by typing into the box or clicking on the arrows next to it.
• Click on the OK button to create the album with the selected layout. 3. My Memories Suite will now display the album. See the following topics for
information on typical starting points: Adding PhotosAdding a PageAdding or Changing a Background Image Adding Embellishments
Opening an Album To return to a previously-created album, do one of the following: Method 1: New Album Options 1. When you first open My Memories Suite, the New Album Options window appears.
Click on one of the album thumbnails in the Recent Albums area to open an album.
19 – My Memories Suite 2 User Guide

2. If the album does not appear in the Recent Albums area, click on the Browse… button. 3. In the Open Album window, browse to the album folder and either double-click it or
click on it once and then click the Open Album button.
4. My Memories Suite will open the album. Method 2: File Menu 1. Choose File > Open Album from the menu. 2. In the Open window, browse to the album folder (not file) and double-click it, or click
on it once and then click the Select Album button in the lower right corner.
3. My Memories Suite will open the album. Method 3: Recent Albums 1. Click on the File menu.
My Memories Suite 2 User Guide – 20

2. Hover the mouse over Recent Albums to display the last few albums that were open in My Memories Suite.
3. Click on an album name to open it.
21 – My Memories Suite 2 User Guide
Album Pages See the topics below for information about adding pages, changing an album page photo layout, changing the page background, and more.
Adding a Page There are three ways to add a page: • Choose Insert > Add Page from the menu.
• Click on the Add Page icon on the toolbar. • Click on a page thumbnail in the Page Thumbnails (bottom bar of My Memories Suite)
using the right mouse button (Ctrl-click on the Mac). From the menu that appears, choose Insert Page After or Insert Page Before. After the page is created, it will appear either after (Insert After) or before (Insert Before) the page that you clicked on. This approach gives you the flexibility of choosing where the new page will be created.
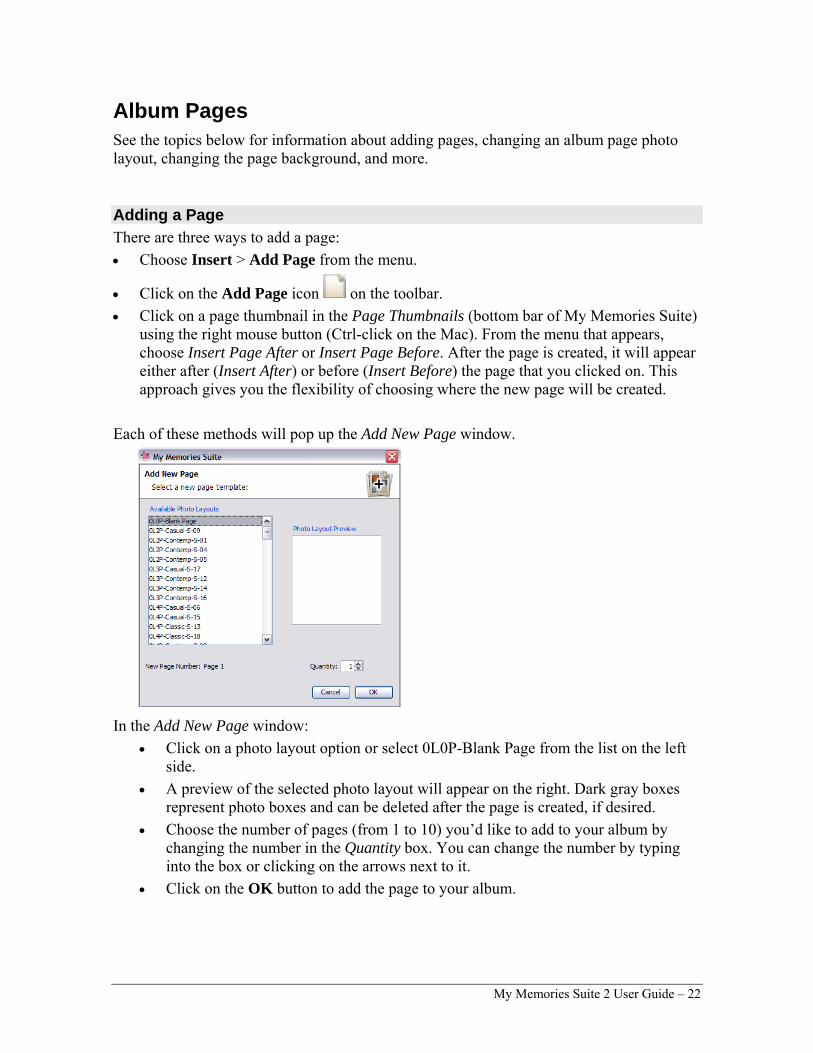
Each of these methods will pop up the Add New Page window.
In the Add New Page window:
• Click on a photo layout option or select 0L0P-Blank Page from the list on the left side.
• A preview of the selected photo layout will appear on the right. Dark gray boxes represent photo boxes and can be deleted after the page is created, if desired.
• Choose the number of pages (from 1 to 10) you’d like to add to your album by changing the number in the Quantity box. You can change the number by typing into the box or clicking on the arrows next to it.
• Click on the OK button to add the page to your album.
My Memories Suite 2 User Guide – 22
Adding or Changing a Background Image There are two ways to access background choices: Method 1: Control Panel 1. Click on a page in the Page Thumbnails (bottom bar of My Memories Suite). 2. Click on Background Papers in the Control Panel (the right side of My Memories
Suite) to reveal available category choices. Method 2: Arrange Menu 1. Click on a page in the Page Thumbnails (bottom bar of My Memories Suite). 2. Click on the Arrange menu and hover the mouse over the Change Background Paper
menu item. A submenu will appear with the available category choices. After accessing the background categories: 1. Click on one of the background category icons (Color, Paper, etc.). The background
category determines how you select the background: Color Backgrounds:
Click on a color square from the Palette tab. For more information about the other color selection tabs, see the Choose Color topic.
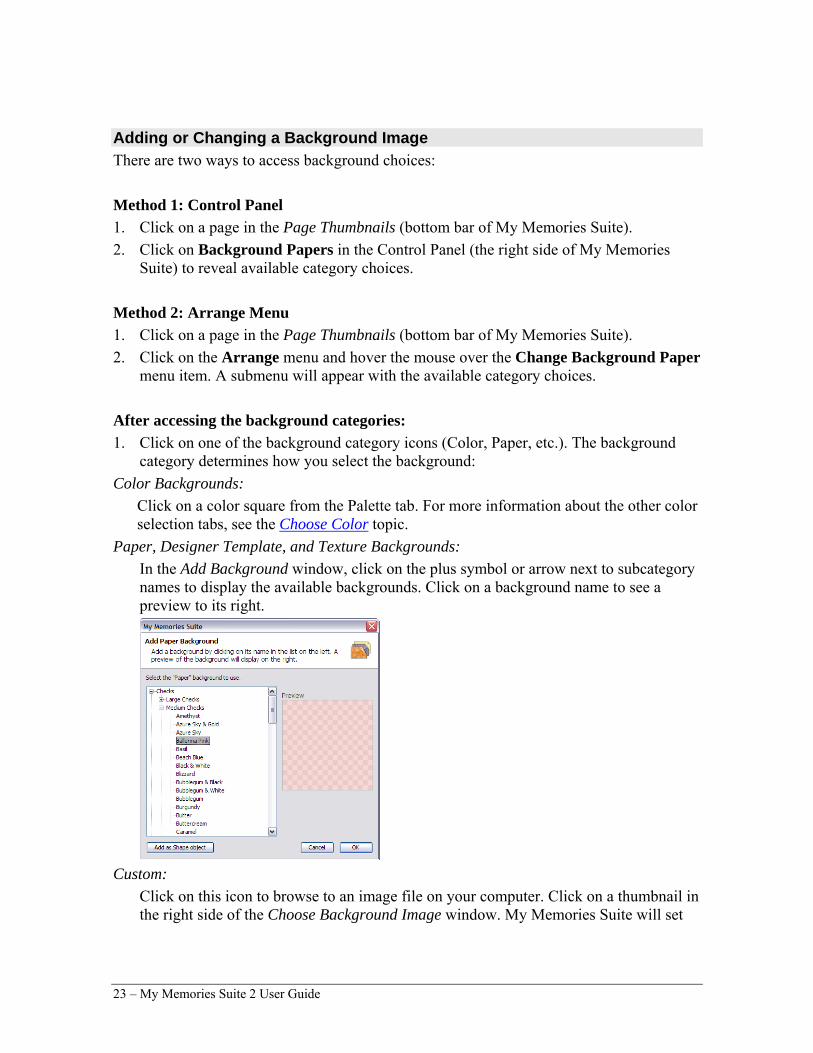
Paper, Designer Template, and Texture Backgrounds: In the Add Background window, click on the plus symbol or arrow next to subcategory names to display the available backgrounds. Click on a background name to see a preview to its right.
Custom:
Click on this icon to browse to an image file on your computer. Click on a thumbnail in the right side of the Choose Background Image window. My Memories Suite will set
23 – My Memories Suite 2 User Guide

the file that you chose as the page background. Please be aware that the image file will be cropped to fit the shape of the album.
2. Click OK to assign the selected background to the current page. 3. You can change the background on all pages in the album to match the current page’s
background by clicking on the Apply Background to All Pages button in the Control Panel under Background Papers (on the right side of My Memories Suite).
Photo Layout To change the photo layout on a page: 1. Click on the page to change.
2. Click on Photo Layout icon in the Resource Gallery (left side of the program). 3. Double-click on one of the available layout options. My Memories Suite will rearrange
the photos on the page to fit the new photo layout. Notes: Please be aware that if you choose a layout with fewer photos than the current page, My Memories Suite will remove some of the photos from the page.
My Memories Suite will crop photos (as needed) to make them fit the layout that you choose. For example, if the current page contains one photo in portrait orientation and one in landscape and the new layout contains two landscape photos, My Memories Suite will crop the portrait photo on the current page to make it a landscape photo.
It is best, but not necessary, to choose layouts that contain the same type of photos as the current page. You may also reposition the photo within the crop area or create a new crop area.
Page Order To reorder pages in an album: 1. Click with the mouse on a page in the Album Thumbnails (the bottom portion of My
Memories Suite) and hold the mouse button down as you drag the page to a new position, as shown below:
2. As you move the current page in the Album Thumbnails, the other pages will be
automatically rearranged to show where the page will be placed.
My Memories Suite 2 User Guide – 24
3. Release the mouse button to place the page. My Memories Suite will move the page to its new position.
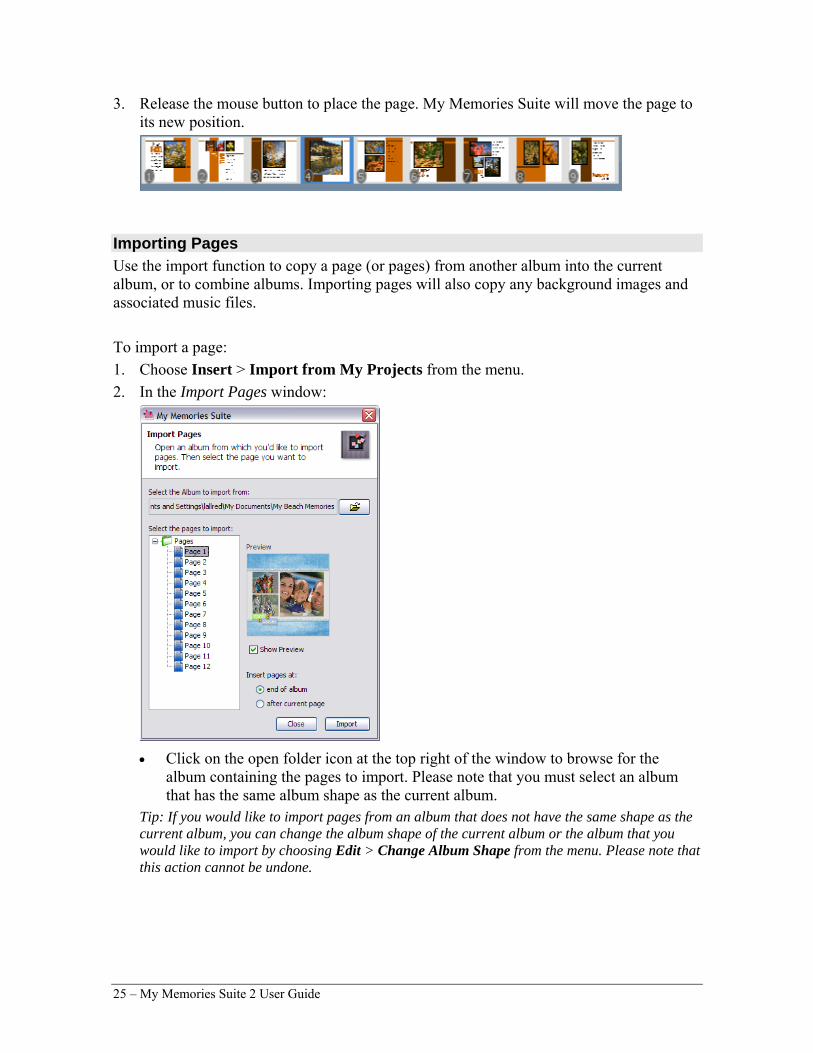
Importing Pages Use the import function to copy a page (or pages) from another album into the current album, or to combine albums. Importing pages will also copy any background images and associated music files. To import a page: 1. Choose Insert > Import from My Projects from the menu. 2. In the Import Pages window:
• Click on the open folder icon at the top right of the window to browse for the
album containing the pages to import. Please note that you must select an album that has the same album shape as the current album.
Tip: If you would like to import pages from an album that does not have the same shape as the current album, you can change the album shape of the current album or the album that you would like to import by choosing Edit > Change Album Shape from the menu. Please note that this action cannot be undone.
25 – My Memories Suite 2 User Guide
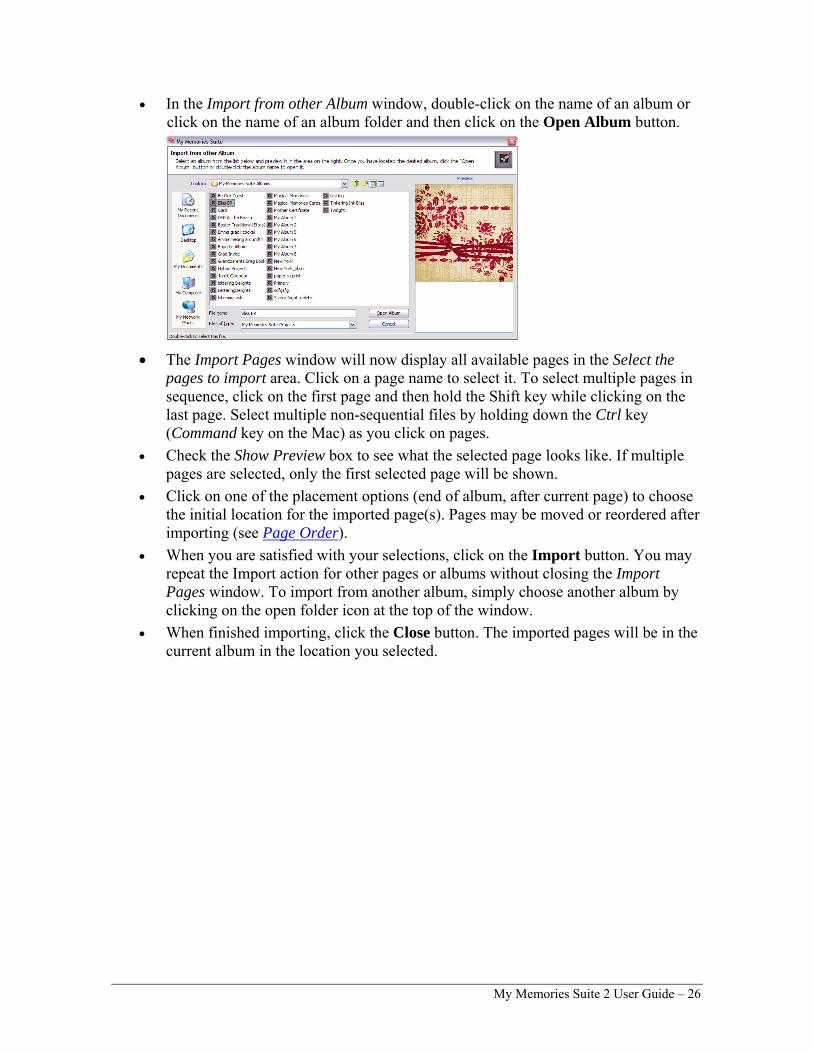
• In the Import from other Album window, double-click on the name of an album or click on the name of an album folder and then click on the Open Album button.
• The Import Pages window will now display all available pages in the Select the
pages to import area. Click on a page name to select it. To select multiple pages in sequence, click on the first page and then hold the Shift key while clicking on the last page. Select multiple non-sequential files by holding down the Ctrl key (Command key on the Mac) as you click on pages.
• Check the Show Preview box to see what the selected page looks like. If multiple pages are selected, only the first selected page will be shown.
• Click on one of the placement options (end of album, after current page) to choose the initial location for the imported page(s). Pages may be moved or reordered after importing (see Page Order).
• When you are satisfied with your selections, click on the Import button. You may repeat the Import action for other pages or albums without closing the Import Pages window. To import from another album, simply choose another album by clicking on the open folder icon at the top of the window.
• When finished importing, click the Close button. The imported pages will be in the current album in the location you selected.
My Memories Suite 2 User Guide – 26

Working with Page Objects A Page Object is anything that you place on a page, such as photos, text, Hot Spots (links to videos, other album pages, etc). All of these objects can be modified on the page using cut, copy, paste, and move operations. Also, click on the Arrange menu or right-click (Ctrl-click on the Mac) for more editing options.
Selecting Objects In order to move or modify objects that you placed on the page (photos, text, etc.), you will need to select the object first. To select an object, click on it once. You can select multiple objects by holding down the left mouse button and dragging a selection rectangle over the objects you would like to select. Example of selecting multiple objects using the drag method:
The gray box is the selection rectangle. Any objects that are fully or partially inside the selection rectangle will be selected when you release the mouse button.
You may use this click-and-drag method when selecting a single object as well. You can also select multiple objects one at a time by holding down the Shift key while clicking on the objects. If multiple objects are already selected, deselect a single object by clicking on the object with the left mouse button while holding down the Shift key.
27 – My Memories Suite 2 User Guide

To select all the embellishments on an album page, choose Arrange > Select All Embellishments from the menu. To select all of the objects on an album page, choose Arrange > Select All from the menu.
Cut, Copy, and Paste To remove, duplicate, or move (between pages) a page object, use the Cut, Copy, and Paste functions.
Cut 1. Select the object(s) to be cut (see Selecting Objects).
2. Select the Cut icon or choose Edit > Cut from the menu. 3. The cut object(s) is now available for pasting anywhere in the album.
Copy 1. Select the object(s) to be copied by clicking on it.
2. Select the Copy icon or choose Edit > Copy from the menu. 3. The copied object(s) is now available for pasting anywhere in your album.
Paste 1. After cutting or copying an object, select the page where the object(s) should be pasted.
2. Either click on the Paste icon or choose Edit > Paste from the menu. The object(s) will be slightly offset from the original position.
3. To paste objects without an offset, click on the icon or choose Edit > Paste In Place from the menu at the top of My Memories Suite.
Moving Objects To move an object (on a single page): 1. Select the object to move and hold the mouse button down. 2. While holding the mouse button and dragging, the object may be placed anywhere on
the page. A light gray outline of the object will assist in placing the object properly. 3. The process for moving multiple objects simultaneously is the same. Simply select the
objects to move by clicking on them while holding down the Shift key (Command key on the Mac). You may also select all of the objects on a page by choosing Edit > Select All from the menu. Then move the objects as you would a single object (also, see Grouping Objects).
My Memories Suite 2 User Guide – 28

Aligning Objects
Page Grid To ensure accuracy when aligning objects, an overlay grid can be placed on the Page
Canvas. Click on the Grid icon or choose View > Show Grid to display the grid. Choose View > Snap to Grid to have the top left corner of objects line up with the nearest grid line when you move them. The grid will not appear in the final album output (print, JPEG output, DVD-Video, etc.).
Align Menu Another way to align objects on the Page Canvas is with the Align menu item. The first six and last two options align selected objects in reference to each another. The other two options align objects with respect to the page. 1. After selecting one or more objects, choose Arrange > Align from the menu (also
available from the right click menu). 2. Using the submenu that appears, choose from the list of available alignment options:
• Top – Aligns all selected objects to the topmost object on the page. • Middle – Lines up the vertical middle of each selected object. • Bottom – Aligns all selected objects to the bottommost object on the page. • Left – Aligns all selected objects to the leftmost object on the page. • Center – Lines up the horizontal center of each selected object. • Right – Aligns all selected objects to the rightmost object on the page. • Center Vertical on Page – Places all selected objects in the vertical center of the
page. • Center Horizontal on Page – Places all selected objects in the horizontal center of
the page. • Space Evenly – Horizontal – Places all selected objects so that the horizontal
spaces between each object are equal. • Space Evenly – Vertical – Places all selected objects so that the vertical spaces
between each object are equal.
Grouping Objects Grouping objects will fix the position of objects in relation to one another so that you can move them without changing their position relative to each other (e.g. a photo and a mat). Please note that grouped objects may only be moved (objects must be ungrouped to be able to apply effects or edit in any way). To group objects: 1. Select all of the objects to be grouped (see Selecting Objects).
29 – My Memories Suite 2 User Guide

2. Choose Arrange > Group from the menu. To ungroup objects, click on the object group and choose Arrange > Ungroup from the menu. To move grouped objects, click on the object group and hold down the mouse button. Drag the group to a new position on the page, and then release the mouse button to place it.
Deleting Objects My Memories Suite provides a number of ways to remove objects from the album. 1. Select the object by clicking on it. 2. Do one of the following:
• Choose Edit > Delete Object from the menu.
• Click on the Cut icon. • Choose Edit > Cut from the menu. • Hit the Delete key on your keyboard. • Click on the object with the right mouse button (Ctrl-click on the Mac) and choose
Delete from the menu that appears.
Layers My Memories Suite puts each page object on its own layer. Layer order determines which objects display on top of other objects if they overlap. You can change an object’s layer by
clicking on the Change object layer icon on the tool bar or by right-clicking on the object itself (Ctrl-click on the Mac). General Guidelines • Hot Spots are always the topmost layer on the page canvas.
Note: The Hot Spot outline is for editing assistance only; it will not appear in the album’s final output (print, DVD-Video, etc.).
• The most recently placed page objects will have a higher layer order and therefore display on top of older page objects by default.
• All objects will display on top of the background image.
My Memories Suite 2 User Guide – 30
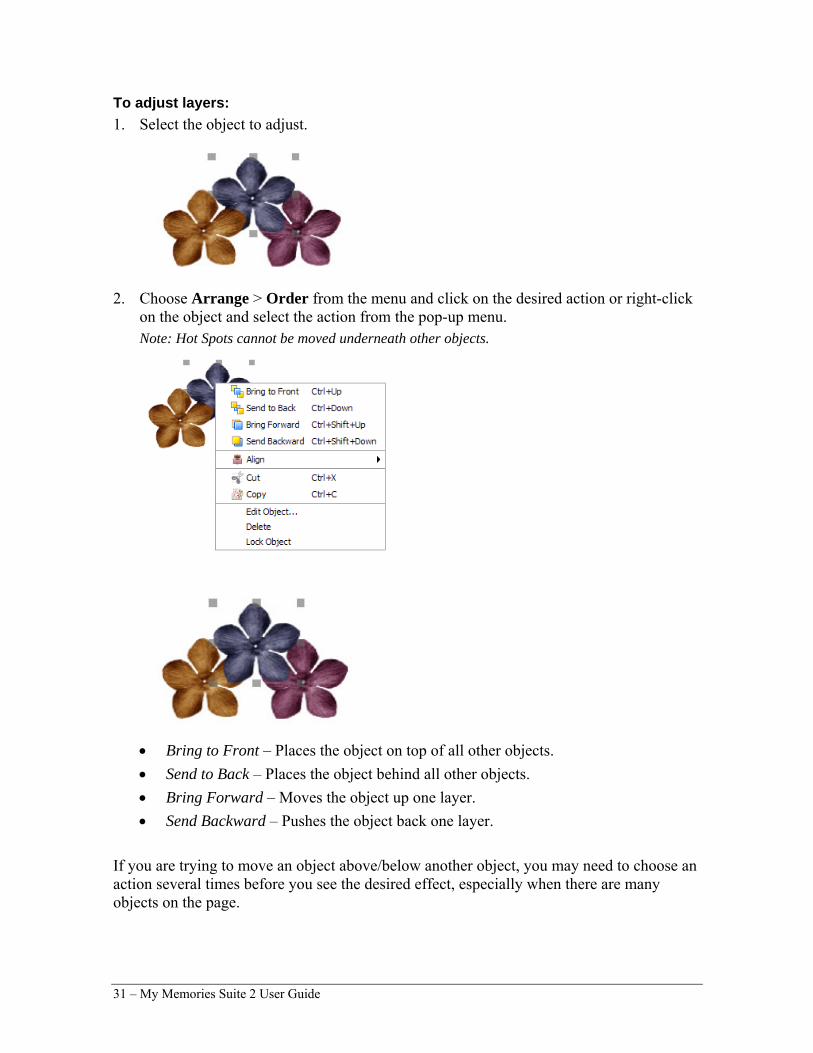
To adjust layers: 1. Select the object to adjust.
2. Choose Arrange > Order from the menu and click on the desired action or right-click
on the object and select the action from the pop-up menu. Note: Hot Spots cannot be moved underneath other objects.
• Bring to Front – Places the object on top of all other objects. • Send to Back – Places the object behind all other objects. • Bring Forward – Moves the object up one layer. • Send Backward – Pushes the object back one layer.
If you are trying to move an object above/below another object, you may need to choose an action several times before you see the desired effect, especially when there are many objects on the page.
31 – My Memories Suite 2 User Guide

Choose Color A number of functions provide advanced color choices through My Memories Suite’s Choose Color dialog. The Choose Color window will open when you: • Click on the Change button in the Text or Shapes sections of the Control Panel. • Choose the Color category in the Background Papers section of the Control Panel. • Click on the Color box or Change… button when adding a shadow to a photo, a shape,
or text. • Click on the Color box or Change… button in the Mat Properties dialog for shapes or
photos. • Click on the Change button in any of the Word Art Designer sub-sections.
Palette and Swatches Tab The easiest way to select colors is to click on one of the color squares on the Palette or Swatches tabs. For this or any other method of choosing colors, the Preview area will show the chosen color; the color on the left (or top for Word Art) is the original color and the color on the left (bottom for Word Art) is the newly selected color.
My Memories Suite 2 User Guide – 32

HSB Tab HSB (short for Hue, Saturation, and Brightness) is useful for adding or removing white, black, and gray in the color, as well as lightening and darkening a color.
• Move the slider next to the color bar up and down to choose the desired hue or type it
into the H field. • Click on the circle in the large color box and drag it around to add or remove white,
black, and gray. • You may type values directly into the HSB boxes, or click on the up and down arrows
next to the box.
RGB Tab RGB (short for Red, Green, and Blue) is a standard method of choosing colors.
• Move each slider bar (Red, Green, and Blue) back and forth to add or reduce the
amount of each color in the composite color. • An absence of the color is 0, while 255 represents the maximum amount of that color.
33 – My Memories Suite 2 User Guide
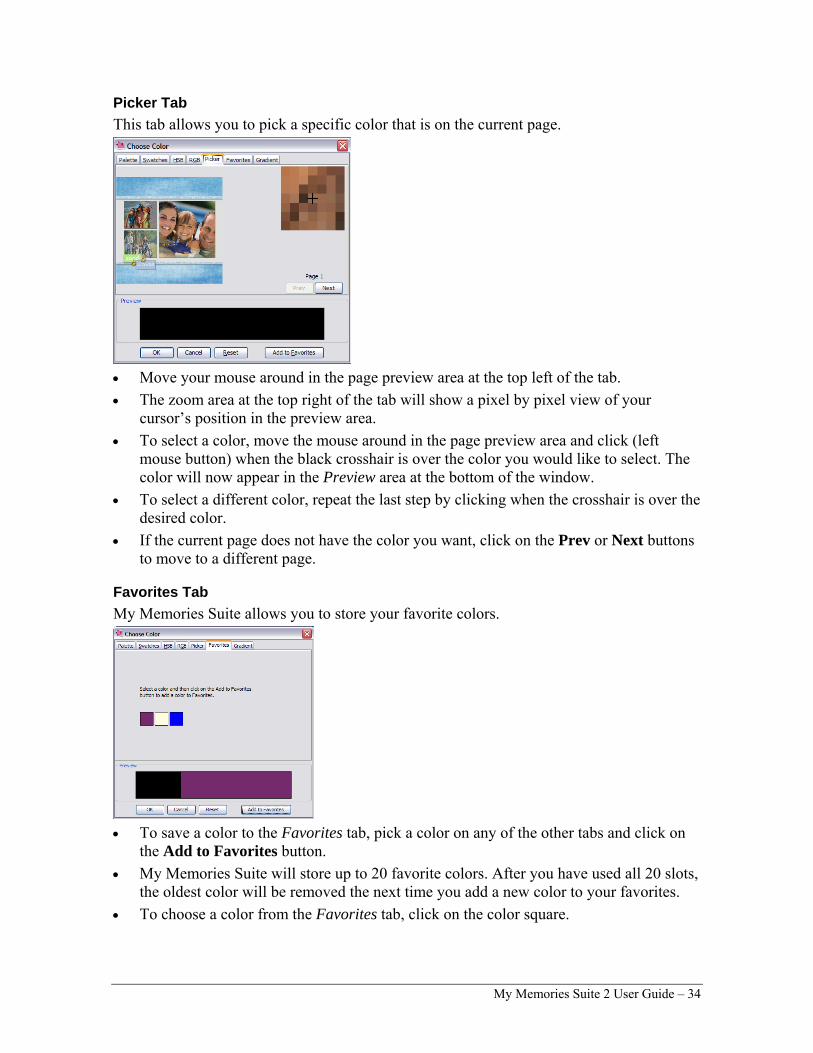
Picker Tab This tab allows you to pick a specific color that is on the current page.
• Move your mouse around in the page preview area at the top left of the tab. • The zoom area at the top right of the tab will show a pixel by pixel view of your
cursor’s position in the preview area. • To select a color, move the mouse around in the page preview area and click (left
mouse button) when the black crosshair is over the color you would like to select. The color will now appear in the Preview area at the bottom of the window.
• To select a different color, repeat the last step by clicking when the crosshair is over the desired color.
• If the current page does not have the color you want, click on the Prev or Next buttons to move to a different page.
Favorites Tab My Memories Suite allows you to store your favorite colors.
• To save a color to the Favorites tab, pick a color on any of the other tabs and click on
the Add to Favorites button. • My Memories Suite will store up to 20 favorite colors. After you have used all 20 slots,
the oldest color will be removed the next time you add a new color to your favorites. • To choose a color from the Favorites tab, click on the color square.
My Memories Suite 2 User Guide – 34
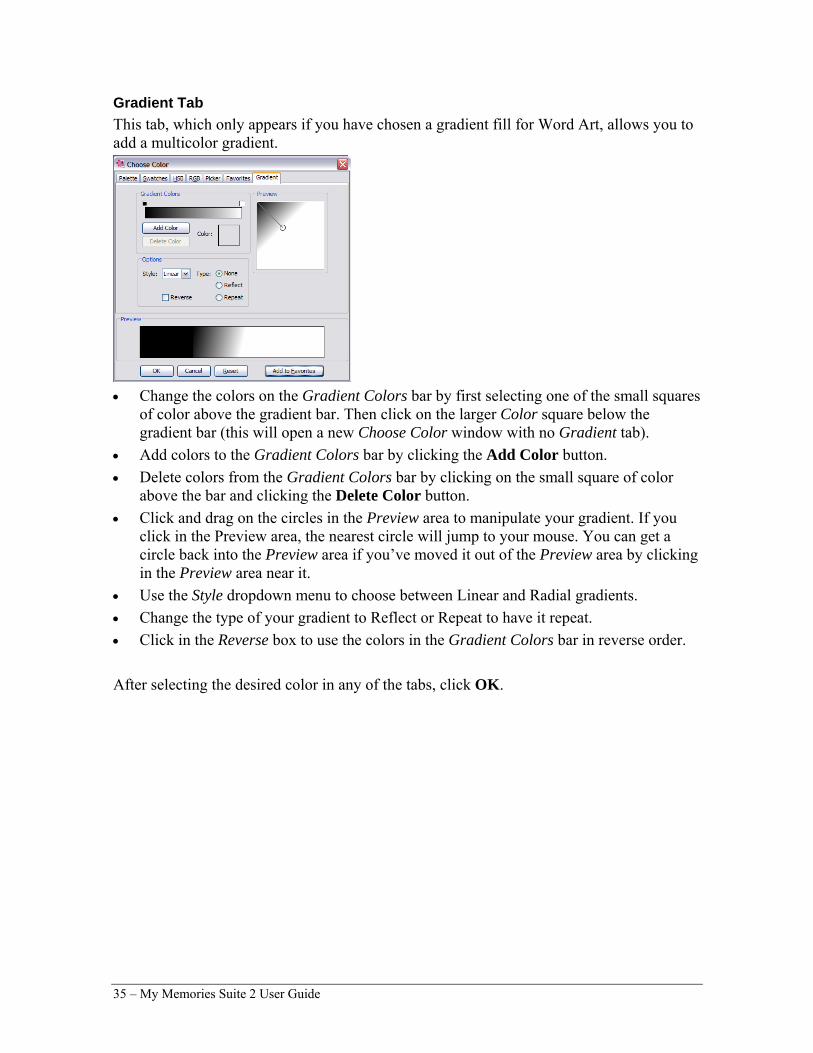
Gradient Tab This tab, which only appears if you have chosen a gradient fill for Word Art, allows you to add a multicolor gradient.
• Change the colors on the Gradient Colors bar by first selecting one of the small squares
of color above the gradient bar. Then click on the larger Color square below the gradient bar (this will open a new Choose Color window with no Gradient tab).
• Add colors to the Gradient Colors bar by clicking the Add Color button. • Delete colors from the Gradient Colors bar by clicking on the small square of color
above the bar and clicking the Delete Color button. • Click and drag on the circles in the Preview area to manipulate your gradient. If you
click in the Preview area, the nearest circle will jump to your mouse. You can get a circle back into the Preview area if you’ve moved it out of the Preview area by clicking in the Preview area near it.
• Use the Style dropdown menu to choose between Linear and Radial gradients. • Change the type of your gradient to Reflect or Repeat to have it repeat. • Click in the Reverse box to use the colors in the Gradient Colors bar in reverse order.
After selecting the desired color in any of the tabs, click OK.
35 – My Memories Suite 2 User Guide
Photos Adding Photos There are three methods for adding a photo to a page: Photo Box Method – Use this method to replace a dark gray photo template box on an album page. Direct Method – Use this method to add a photo directly to a page, whether the page has photo boxes or not. Drag-and-Drop Method – Use this method to drag a photo directly onto a page, whether the page has photo boxes or not.
Photo File Formats and Recommendations My Memories Suite accepts most standard photo file formats (.jpg, .gif, .png, .bmp, .tif, and .pct).
Recommended settings: File Format: JPEG (.jpg) Quality: Medium to high Resolution: 300 dpi for print, or 72 dpi for interactive album and DVD-Video projects Size: 1600 by 1200 pixels or larger recommended for print, or 800 by 600 pixels
for interactive album and DVD-Video projects Note: To preserve transparency in photos, save the file in PNG format from your image editor.
Photo Box Method To replace the dark gray photo box on a page with a photo: 1. Double-click on the photo box. 2. In the Add Photo window, use the left side of the window to browse to the folder with
your photos, either by double-clicking the names of folders to open them, or by clicking on the drop-down menu near the top of the window.
My Memories Suite 2 User Guide – 36

3. To select a photo, double-click the thumbnail of the photo on the right side of the window, or click on it once and then click the OK button.
4. The photo will appear in the Photo Editor.
Any parts of the photo that are grayed-out will not appear on the page.
• The Reset button will undo any changes you make in the editor. • The next set of buttons will rotate the photo 90º counter-clockwise (left button) or
clockwise (right button). • The magnifying glass icons will adjust the cropping of the photo to include more
(left button) or less (right button) of the photo. • To change which parts of the photo will be displayed, click on the photo and hold
the mouse button down while dragging the mouse around. • Click OK to place the photo.
5. The photo replaces the photo box on the page. 6. To move the photo, click on it and hold the mouse button down while dragging the
photo to its new location. To resize the photo, drag one of the light gray handles (small boxes) that appears at the edge of the photo. Corner handles resize the photo proportionally, while side handles stretch out a single edge.
Direct Method To add a photo or graphic to a blank page or to add extra photos to a template page:
1. Click on the Add Photo icon or choose Insert > Add Photo from the menu.
37 – My Memories Suite 2 User Guide
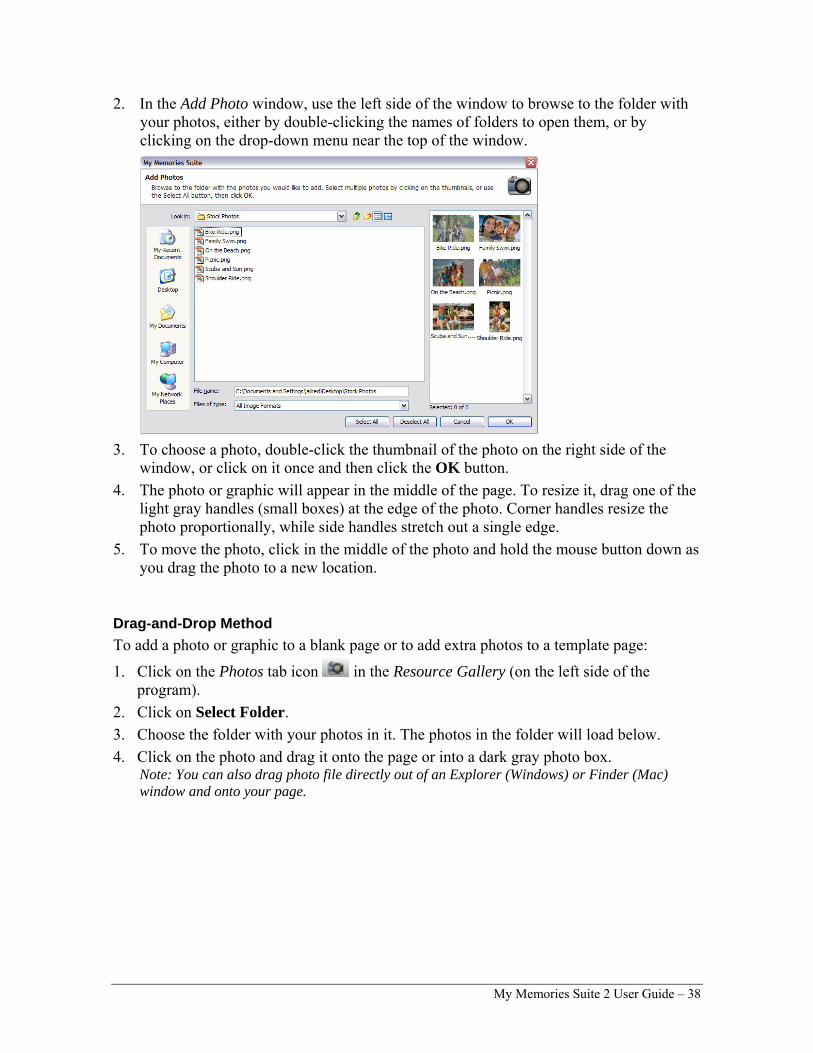
2. In the Add Photo window, use the left side of the window to browse to the folder with your photos, either by double-clicking the names of folders to open them, or by clicking on the drop-down menu near the top of the window.
3. To choose a photo, double-click the thumbnail of the photo on the right side of the
window, or click on it once and then click the OK button. 4. The photo or graphic will appear in the middle of the page. To resize it, drag one of the
light gray handles (small boxes) at the edge of the photo. Corner handles resize the photo proportionally, while side handles stretch out a single edge.
5. To move the photo, click in the middle of the photo and hold the mouse button down as you drag the photo to a new location.
Drag-and-Drop Method To add a photo or graphic to a blank page or to add extra photos to a template page:
1. Click on the Photos tab icon in the Resource Gallery (on the left side of the program).
2. Click on Select Folder. 3. Choose the folder with your photos in it. The photos in the folder will load below. 4. Click on the photo and drag it onto the page or into a dark gray photo box.
Note: You can also drag photo file directly out of an Explorer (Windows) or Finder (Mac) window and onto your page.
My Memories Suite 2 User Guide – 38

Editing Photos Click on a photo to open the Photos section of the Control Panel:
See the function descriptions below for more details.
Add Photo Click on this icon or choose Insert > Add Photo from the menu to add a new photo to the current album page. See Adding Photos for more information.
39 – My Memories Suite 2 User Guide
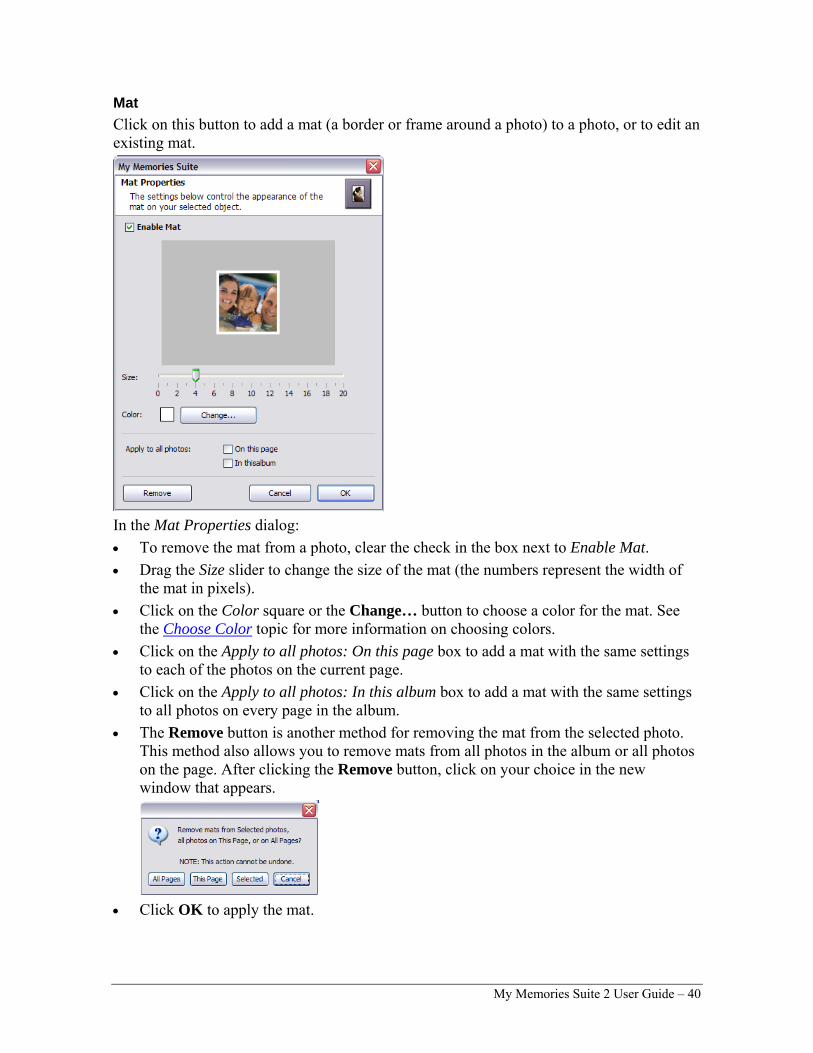
Mat Click on this button to add a mat (a border or frame around a photo) to a photo, or to edit an existing mat.
In the Mat Properties dialog: • To remove the mat from a photo, clear the check in the box next to Enable Mat. • Drag the Size slider to change the size of the mat (the numbers represent the width of
the mat in pixels). • Click on the Color square or the Change… button to choose a color for the mat. See
the Choose Color topic for more information on choosing colors. • Click on the Apply to all photos: On this page box to add a mat with the same settings
to each of the photos on the current page. • Click on the Apply to all photos: In this album box to add a mat with the same settings
to all photos on every page in the album. • The Remove button is another method for removing the mat from the selected photo.
This method also allows you to remove mats from all photos in the album or all photos on the page. After clicking the Remove button, click on your choice in the new window that appears.
• Click OK to apply the mat.
My Memories Suite 2 User Guide – 40
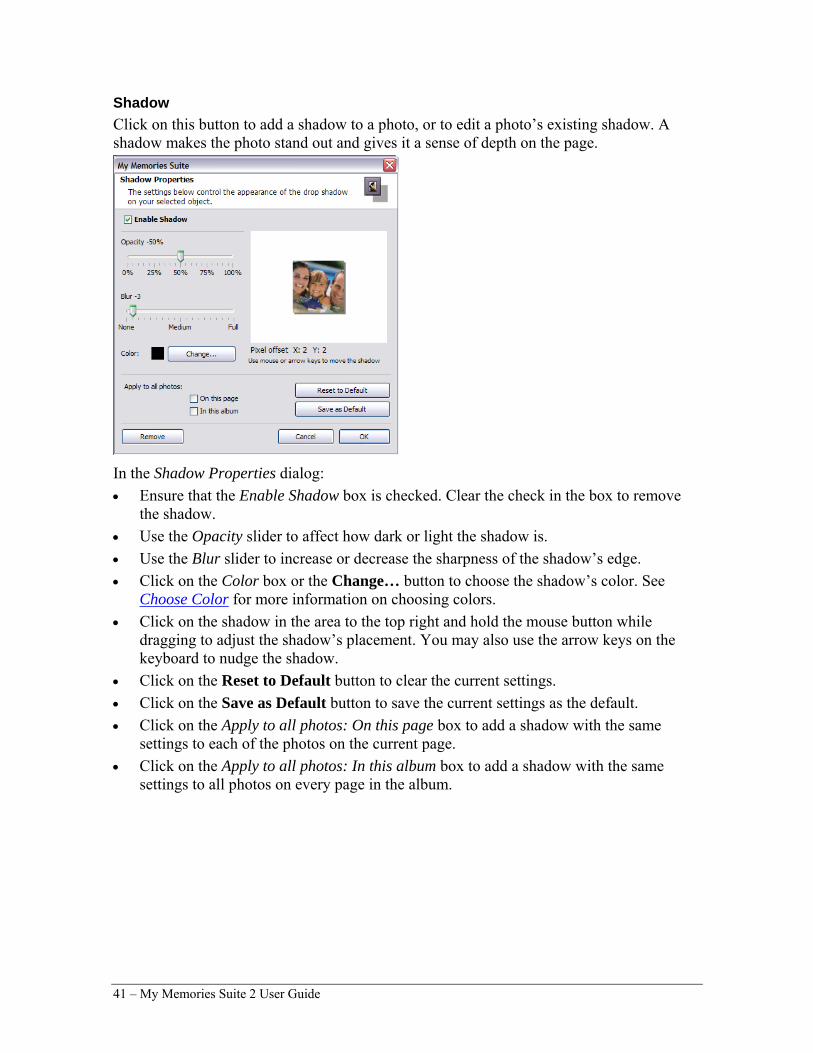
Shadow Click on this button to add a shadow to a photo, or to edit a photo’s existing shadow. A shadow makes the photo stand out and gives it a sense of depth on the page.
In the Shadow Properties dialog: • Ensure that the Enable Shadow box is checked. Clear the check in the box to remove
the shadow. • Use the Opacity slider to affect how dark or light the shadow is. • Use the Blur slider to increase or decrease the sharpness of the shadow’s edge. • Click on the Color box or the Change… button to choose the shadow’s color. See
Choose Color for more information on choosing colors. • Click on the shadow in the area to the top right and hold the mouse button while
dragging to adjust the shadow’s placement. You may also use the arrow keys on the keyboard to nudge the shadow.
• Click on the Reset to Default button to clear the current settings. • Click on the Save as Default button to save the current settings as the default. • Click on the Apply to all photos: On this page box to add a shadow with the same
settings to each of the photos on the current page. • Click on the Apply to all photos: In this album box to add a shadow with the same
settings to all photos on every page in the album.
41 – My Memories Suite 2 User Guide
• The Remove button is another method for removing the shadow. This method allows you to remove shadows from all photos in the album, all photos on the page, or the selected photo. After clicking the Remove button, select your choice in the new window that appears.
• Click OK to place the shadow.
Add Photo Box Click on the Box icon to add a new photo box to the page. The photo box will appear in the center of the page. You can then drag it to a new location, resize it, or fill it.
Note: The difference between this and the Add Photo function is that if you delete a photo from the page that you added by filling a photo box, the photo box will remain (allowing you to maintain the layout and fill the box with another photo). On the other hand, if you delete a photo that was added using the Add Photo function, no photo box will remain.
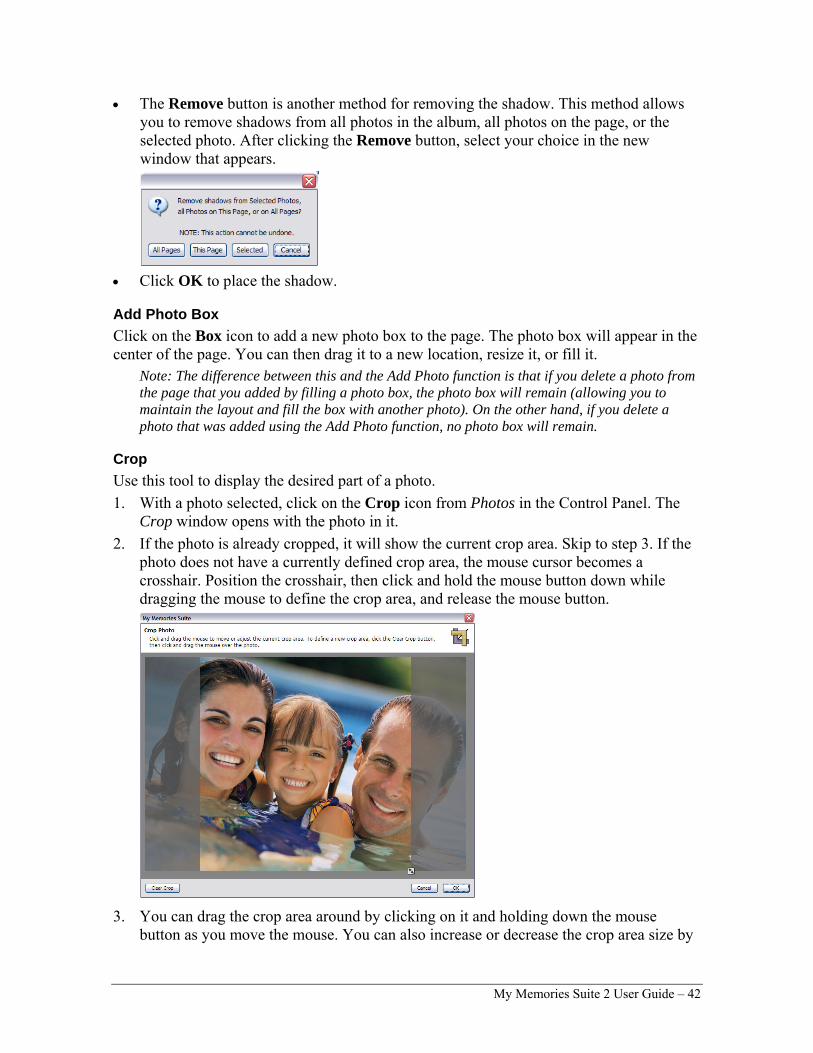
Crop Use this tool to display the desired part of a photo. 1. With a photo selected, click on the Crop icon from Photos in the Control Panel. The
Crop window opens with the photo in it. 2. If the photo is already cropped, it will show the current crop area. Skip to step 3. If the
photo does not have a currently defined crop area, the mouse cursor becomes a crosshair. Position the crosshair, then click and hold the mouse button down while dragging the mouse to define the crop area, and release the mouse button.
3. You can drag the crop area around by clicking on it and holding down the mouse
button as you move the mouse. You can also increase or decrease the crop area size by
My Memories Suite 2 User Guide – 42

clicking on the box with the arrows at the bottom right corner of the crop region and holding the mouse button down as you drag the mouse.
4. To start over, or to display the entire photo, click on the Clear Crop button in the bottom left corner of the window.
5. When you are satisfied with your crop area selection, click on the OK button. The grayed out parts of the photo will not be shown on the page. Your photo will be the same size as the crop area and will not resize to fit a photo box (if originally added from a template).
Nudge This tool allows you to adjust the position of the photo within the crop area without reopening the Crop Photo window. Click on an arrow to nudge the photo in the direction of the arrow. Clicking on the corners of the icon will nudge the photo diagonally. Note: This tool will have no effect if the photo is not cropped.
Red Eye Red eye is the undesired effect that causes the irises of a person’s eye to appear red in a photograph. To reduce this effect: 1. With a photo selected, click on the Red Eye icon under the Photos heading in the
Control Panel.
2. The red eye reduction tool will open in a new window.
43 – My Memories Suite 2 User Guide
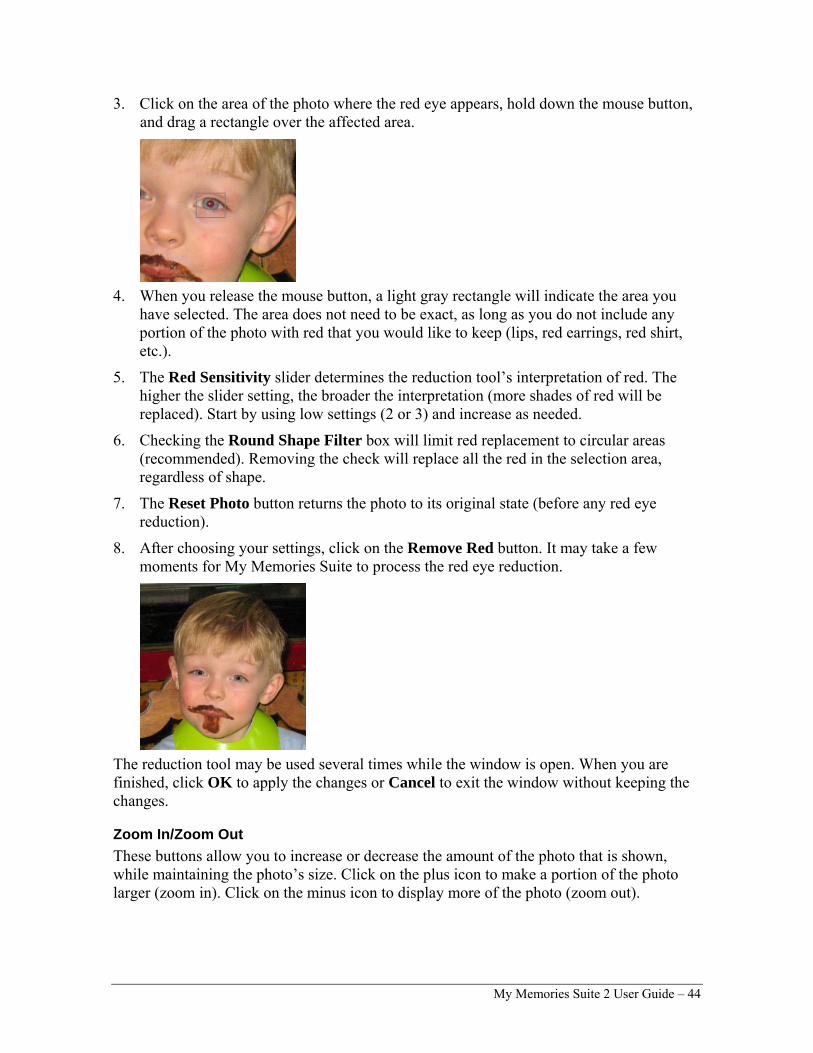
3. Click on the area of the photo where the red eye appears, hold down the mouse button, and drag a rectangle over the affected area.
4. When you release the mouse button, a light gray rectangle will indicate the area you
have selected. The area does not need to be exact, as long as you do not include any portion of the photo with red that you would like to keep (lips, red earrings, red shirt, etc.).
5. The Red Sensitivity slider determines the reduction tool’s interpretation of red. The higher the slider setting, the broader the interpretation (more shades of red will be replaced). Start by using low settings (2 or 3) and increase as needed.
6. Checking the Round Shape Filter box will limit red replacement to circular areas (recommended). Removing the check will replace all the red in the selection area, regardless of shape.
7. The Reset Photo button returns the photo to its original state (before any red eye reduction).
8. After choosing your settings, click on the Remove Red button. It may take a few moments for My Memories Suite to process the red eye reduction.
The reduction tool may be used several times while the window is open. When you are finished, click OK to apply the changes or Cancel to exit the window without keeping the changes.
Zoom In/Zoom Out These buttons allow you to increase or decrease the amount of the photo that is shown, while maintaining the photo’s size. Click on the plus icon to make a portion of the photo larger (zoom in). Click on the minus icon to display more of the photo (zoom out).
My Memories Suite 2 User Guide – 44
Rotate 90° Left/Rotate 90° Right This feature makes it easy to correct photos that were taken in different orientations (portrait and landscape) so that everything is right side up. The left button rotates the photo 90° counter-clockwise, and the right button rotates it 90° clockwise.
Effect Click on this button to open the Add Photo Effect dialog. Click on an effect to preview it. • Black & White – Transforms a color photo into a black and white photo. • Sepia – Applies a brown and white coloration to the photo like early 20th century
photographs. • Blue – Applies blue coloration to the photo.
• Red – Applies red coloration to the photo.
• Brighten – Moves the balance of light and dark shades in the photo more toward the light shades.
• Darken – Moves the balance of light and dark shades in the photo more toward the dark shades.
• Mirror – Turns the photo around horizontally, as if you were seeing it in a mirror. • Flip – Turns the photo upside down. • Blur – Softens the focus, reducing the definition of the photo. • Sharpen – Increases the focus, or definition, of the photo. • Negative – Reverses the colors in a photo, as if viewing a film/photo negative. • Gamma Correction – Changes the brightness values of the gray tones without
dramatically altering the shadows and highlights. • Emboss – Makes the photo look like foil has been placed over the photo, sculpted to
the photo’s contours, and then colorized. • Sketch – Simulates a pencil drawing of the photo. • Impressionist Painting – Gives the photo an artistic, brushed look. • Fish Eye – Simulates the photo through a fisheye lens, a lens that distorts photos to
make the middle portion of the photo appear larger and the outer edges smaller. • Choosing some effects will activate the Effect Amount slider. Drag this to increase or
decrease the amount of the selected effect. • Click the Apply button to add the effect to the photo. You can add more effects after
clicking Apply. • Click OK once you have finished applying effects.
Shape By default, the Photo Shape is a square/rectangle. To change the Photo Shape, click on this button and choose a new shape.
45 – My Memories Suite 2 User Guide

After selecting a photo shape, if you would like to modify the shape without affecting the photo, click on the Crop button (instead of using the gray boxes on the sides and corners of the photo).
Rotate (by Degrees) To rotate a photo, drag the slider to set the angle of rotation. The number in the box at the top right will show the angle in degrees. Negative numbers represent counter-clockwise rotation. You may also type the angle of rotation in the box by clicking in the box, entering the number, and hitting Enter (Return on the Mac) on the keyboard.
Opacity This allows you to make photos semi-transparent (the original state of the photo is 100% opaque – not transparent at all). Drag the slider to the left to make a photo more transparent or drag the slider to the right to make a photo more opaque (less transparent).
Edit Clicking on this button will bring up the Object Settings dialog, which allows you to make exact adjustments to the size and location of the photo.
Click on the up or down arrows next to each field, or select a number and type in a new value to change the settings. • X – Changes the horizontal position of the selected object. • Y – Changes the vertical position of the selected object. • Width – Changes the width of the selected object. • Height – Changes the height of the selected object. • Keep Proportions – When checked, this option automatically adjusts the photo
properties (as you change the width or height) to keep it from becoming distorted, such as looking stretched or squished. If you change the width, the height will also be adjusted to maintain the proportions of the photo, and vice versa. Clear the check to allow stretching.
Replace Click on this button to put a different photo in the place of a current photo. See Adding Photos for instructions. The new photo will inherit the size, position, and photo shape of the current photo.
Remove Clicking on this button will delete the selected photo. If the photo was originally a photo box, the photo box will remain in place of the deleted photo. You can select the photo box and delete it also.
My Memories Suite 2 User Guide – 46

Text Adding and Editing Text 1. To add a photo caption, title, or other text to a page, click on the Text section of the
Control Panel and click on the Add Text button, choose Insert > Add Text from the
menu, or click on the Add Text icon on the toolbar. 2. A text box will appear centered on the page.
• Clicking on this text box will allow you edit its properties with the tools below. • Double-clicking will load the cursor and allow you to type in the text box. • If you would like to edit a specific portion of the text, click and drag the cursor to
highlight it after double-clicking on the text box. Note: If a text box has a red border, your text might be too large for it. Expand the text box or decrease the size of the text inside.
Other Control Panel Options After selecting a text box, the following options are available in the Control Panel under the Text heading:
47 – My Memories Suite 2 User Guide

Shape Clicking on this button will open a menu that will allow you to wrap your text around a square or a circle.
Shadow This button will allow you to add a drop shadow to your text, or to edit an existing drop shadow. Since the options are the same as the options for a photo’s shadow, see the Shadow topic for more information.
Select Font Clicking here will load a drop-down menu of fonts. After single-clicking on the text box, click on the font you would like to apply to the entire text box. If you would like to apply a font to a certain portion of the text, double-click on the text box and then click and drag the cursor over that text to highlight it. Then select the font.
Size Change how large the text characters are by choosing a number from the Size drop-down list. You may also type a size directly into the box (hit the Enter or Return key to apply).
Line Spacing Click the up or down arrows to change the space between the lines of text in the text box. You may also type a size directly into the box (hit the Enter or Return key to apply).
Bold, Underline, and Italic Click on the B (bold), U (underline), or I (italic) to apply the selected formatting style to the text. Click again to remove them. You can also select a specific portion of text to apply them to.
Alignment Click on an alignment icon to set the text alignment. Left alignment (the left icon) justifies the text to the left side of the text box. Center alignment (the middle icon) centers the text in the middle of the text box. Right alignment (the right icon) justifies the text to the right side of the text box.
Black Text Click on this icon to change the color of the text in the selected text box to black.
White Text Click on this icon to change the color of the text in the selected text box to white.
Change Color Click on the Change icon to change the text color. This opens the Choose Color window.
Match Color Clicking on this icon opens the Picker tab of the Choose Color window. See the Choose Color topic for more information.
My Memories Suite 2 User Guide – 48

Rotate (by Degrees) To rotate the text, drag the slider to set the angle of rotation. The number in the box at the top right will show the angle in degrees. You may also type the angle of rotation directly into the box and hit Enter (Return on the Mac) on the keyboard.
Opacity This allows you to make text semi-transparent (the original state of the text is 100% opaque – not transparent at all). Drag the slider to the left to make the text more transparent. Drag the slider to the right to make the text more opaque (less transparent).
Edit Clicking this button will have the same effect as double-clicking on the text box.
49 – My Memories Suite 2 User Guide

Word Art Word Art objects allow you to edit text as graphic elements on your page.
Adding Word Art To add Word Art to a page: 1. Select a page in the Page Thumbnails. 2. Click on Word Art Designer in the Control Panel and click on the Add Word Art
button, choose Insert > Add Word Art from the menu, or click on the Add Word Art icon Edit this graphic: on the toolbar.
3. Your Word Art will load in the center of the page.
Editing Word Art To begin editing Word Art, click on it to select it. The Word Art Designer section of the Control Panel will open, displaying the available functions. Refer to the description of each function below:
My Memories Suite 2 User Guide – 50

Enter Word Art text below Edit the text in this area to change the Word Art text. This may take a moment to update on the page.
Select Font Clicking here will load a drop-down menu of fonts. Click the font you would like.
Size Change how large the text characters are by choosing a number from the Size drop-down list. You may also type a size directly into the box (hit the Enter or Return key to apply).
Line Spacing Click the up or down arrows to change the space between the lines of text in the text box. You may also type a value directly into the box (hit the Enter or Return key to apply).
Bold and Italic Click on the B (bold) or I (italic) to apply the selected formatting style to the text. Click again to remove them.
Rotate (by Degrees) To rotate the Word Art, drag the slider to set the angle of rotation. The number in the box at the top right will show the angle in degrees. You may also type the angle of rotation directly into the box and hit Enter (Return on the Mac) on the keyboard.
Opacity This allows you to make Word Art semi-transparent (the original state of the Word Art is 100% opaque – not transparent at all). Drag the slider to the left to make the Word Art more transparent. Drag the slider to the right to make the Word Art more opaque (less transparent).
Fill Tab The Fill tab allows you to change the color inside the Word Art. Check the Enable Fill checkbox to turn the fill on and off. Click on the Type drop-down menu to choose what type of fill to use.
• Solid Color – This will fill your Word Art with one solid color. Click on the Change button to change this color. This opens the Choose Color window.
• Gradient Color – This will fill your Word Art with a gradient. Click on the Change button to change this color. This opens the Choose Color window.
• Image – This will let you choose an image of your own to fill the Word Art with. Click on the Change button to change the image. This opens the Add Photo window. Select the photo you would like to use and click OK. Click on the Position button to open the Position Editor. This will allow you to zoom in and out on the selected image and to click and drag the image to position it within your Word Art.
51 – My Memories Suite 2 User Guide

• Texture – This will load a drop-down menu of textures to use with your Word Art. Click on the desired texture to apply it to your Word Art.
Click and drag the Opacity slider to make the fill semi-transparent (the original state of the fill is 100% opaque – not transparent at all). Drag the slider to the left to make the fill more transparent. Drag the slider to the right to make the fill more opaque (less transparent).
Stroke Tab The Stroke tab allows you to add and edit a border around the outside of the Word Art. Check the Enable Stroke checkbox to turn the stroke on and off. Click on the Type drop-down menu to choose what type of stroke to use.
• Solid Color – This will border your Word Art with one solid color. Click on the Change button to change this color. This opens the Choose Color window.
• Gradient Color – This will border your Word Art with a gradient. Click on the Change button to change this color. This opens the Choose Color window.
• Neon – This will add a neon effect to the stroke. Click on the Edge and Center buttons to change their colors. This opens the Choose Color window.
• Glow – This will add a glow effect to the stroke. Click on the Change button to change this color. This opens the Choose Color window.
Click and drag the Width slider to make the stroke thicker or thinner. Click and drag the Opacity slider to make the stroke semi-transparent (the original state of the stroke is 100% opaque – not transparent at all). Drag the slider to the left to make the stroke more transparent. Drag the slider to the right to make the stroke more opaque (less transparent).
Shadow Tab The Shadow tab allows you to add and edit a shadow behind the Word Art. Check the Enable Shadow checkbox to turn the shadow on and off. Click on the Change button to change the shadow color. This opens the Choose Color window. Move the shadow by changing the X and Y box values. Click on the up or down arrows or type a value directly into the box (hit the Enter or Return key to apply). Click and drag the Blur slider to make the shadow larger and more diffuse or smaller and darker. Click and drag the Opacity slider to make the shadow more or less transparent.
Bevel Tab The Bevel tab allows you to add and edit a bevel effect on the Word Art. Check the Enable Bevel checkbox to turn the bevel on and off. Click on the Shape drop-down menu to change the type of bevel used. Click and drag the Height slider to make the bevel more or less pronounced. Click and drag the Bevel Softness slider to make the shadow more or less transparent.
My Memories Suite 2 User Guide – 52

Shape Tab The Shape tab allows you to force the Word Art into a shape. Check the Enable Shape checkbox to turn the shape on and off. Click on the Type drop-down menu to change the shape to fit the Word Art to.
• Click on the Arc option to bend your Word Art into an arc. Click and drag the Angle slider to make the arc bend more sharply or reverse the arc.
• Click on the Shear option to place your Word Art at a slant. Click and drag the X Magnitude slider to change the horizontal slant. Click and drag the Y Magnitude slider to change the vertical slant.
• Click on the Wave option to bend your Word Art into a wave. Click and drag the Wave Height slider to make the bend more pronounced or to reverse the wave.
53 – My Memories Suite 2 User Guide

Embellishments Embellishments are graphic objects that act as decoration on a page.
Adding Embellishments To add an embellishment to a page: 1. Select a page in the Page Thumbnails. 2. Click on Embellishments in the Control Panel and click on the Add icon, choose Insert
> Add Embellishment from the menu, or click on the Add Embellishment icon on the toolbar.
3. The Choose Embellishment window opens.
4. In the Choose Embellishment window:
• Click on a category name in the left column (double-click on the category name or click on the plus sign or arrow symbol to expand categories). Available embellishments will appear in the right column.
• Click on an embellishment in the right column. • Click on the up or down arrows next to Quantity to add more or fewer of that type
of embellishment (up to ten of one type at a time). Alternately, type a number between 1 and 10 in the box to change the quantity.
• Click the Add to Favorites button to add the selected embellishment to the Favorites category.
• Type a word in the Search box to find all the embellishments with that word in their names. If you would like to search a specific category, select the category, check the Search selected category only checkbox and then use the Search box.
My Memories Suite 2 User Guide – 54

• If you have graphics you would like to add as embellishments that are not listed, click the Browse other… and browse for the graphic. Select it and click OK to add it directly to the page.
• Click on the Apply button to add the embellishment(s) to the page, leaving the Choose Embellishment window open, allowing you to add more embellishments.
• The Close button exits the Add Embellishment window without adding any further embellishments.
Editing Embellishments To begin editing an embellishment, click on it to select it. The Embellishments section of the Control Panel will open, displaying the available functions. Refer to the description of each function below:
Shadow Click on this button to add a shadow to an embellishment or to edit an embellishment’s existing shadow. A shadow makes the embellishment stand out and gives it a sense of depth on the page. Since the options are the same as the options for a photo’s shadow, see the Shadow topic for more information.
Mirror/Flip Use these buttons to turn an embellishment into its mirror image. Click on the left button (Mirror) to flip the embellishment horizontally. Click on the right button (Flip) to flip the embellishment vertically.
55 – My Memories Suite 2 User Guide

90° Left/ 90° Right Click on the 90° Left button to rotate the embellishment 90° counter-clockwise or click the 90° Right button to rotate it 90° clockwise.
Rotate (by Degrees) To rotate an embellishment, drag the slider to set the angle of rotation. The number in the box at the top right will show the angle in degrees (negative numbers represent counter-clockwise rotation). Alternately, you can type a number directly into the box at the right and hit Enter (Return on the Mac) on the keyboard.
Opacity This allows you to make embellishments semi-transparent (the original state of the embellishment is 100% opaque – not transparent at all). Drag the slider to the left to make an embellishment more transparent. Drag the slider to the right to make an embellishment more opaque (less transparent).
Edit Clicking on this button will bring up the Object Settings dialog, which allows you to make exact adjustments to the size and location of the embellishment.
Click on the up or down arrows next to each field or select a number and type in a new value to change the settings. • X – Changes the horizontal position of the selected object. • Y – Changes the vertical position of the selected object. • Width – Changes the width of the selected object. • Height – Changes the height of the selected object. • Keep Proportions – When checked, this option automatically adjusts the embellishment
properties (as you change the width or height) to keep it from becoming distorted, such as looking stretched or squished. If you change the width, the height will also be adjusted to maintain the proportions of the embellishment, and vice versa. Clear the check to allow stretching.
Reset Click on the Reset button to return the embellishment to a default state.
Remove Clicking this button will delete the currently selected embellishment.
My Memories Suite 2 User Guide – 56

Shapes Shapes can be used as design elements in a number of ways. Shapes behind text can make the text stand out, or various odd shapes can make the page more fun.
Adding Shapes 1. To add a shape to the page canvas, click on the Shapes section of the Control Panel and
click the Add icon, choose Insert > Add Shape from the menu, or click on the Add
Shape icon on the toolbar. 2. Choose a basic shape from the drop-down menu. 3. My Memories Suite will place the shape in the center of the page. 4. Click and hold any of the gray squares at the edges of the shape, while dragging the
mouse around, to resize a shape. 5. See Editing Shapes for more information on modifying shapes.
Editing Shapes To begin editing a shape, click on it. The Shapes section of the Control Panel will open, showing the available functions. Refer to the description of the functions below the image:
57 – My Memories Suite 2 User Guide

Add This is the same as choosing Insert > Add Shape from the menu. See Adding Shapes for more information.
Mat Click on this button to add a mat (a border or frame) to a shape, or to edit an existing mat.
In the Mat Properties dialog: • Drag the Size slider to change the size of the mat (the numbers represent the width of
the mat in pixels). • Click on the Color square or the Change button to choose a color for the mat. See
Choose Color. • Click OK to apply the mat.
Shadow Click on this button to add a shadow to a shape, or to edit a shape’s existing shadow. A shadow makes the shape stand out and gives it a sense of depth on the page. Since the options are the same as the options for a photo’s shadow, see the Shadow topic for more information.
Mirror/Flip Use these buttons to turn a shape into its mirror image. Click on the left button (Mirror) to flip the shape horizontally. Click on the right button (Flip) to flip the shape vertically.
90° Left/ 90° Right Click on the 90° Left button to rotate the shape 90° counter-clockwise or click the 90° Right button to rotate it 90° clockwise.
Paper Click on this icon to fill a shape with a My Memories Suite background. Select the paper you would like to use and click OK.
My Memories Suite 2 User Guide – 58
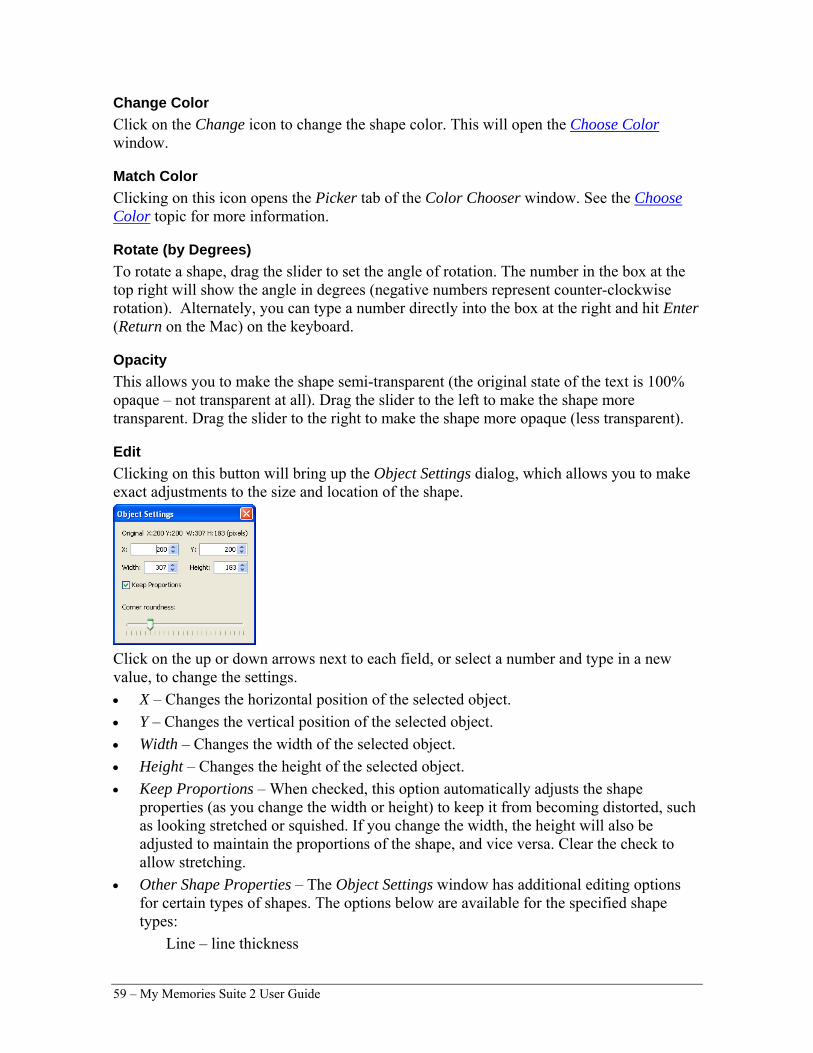
Change Color Click on the Change icon to change the shape color. This will open the Choose Color window.
Match Color Clicking on this icon opens the Picker tab of the Color Chooser window. See the Choose Color topic for more information.
Rotate (by Degrees) To rotate a shape, drag the slider to set the angle of rotation. The number in the box at the top right will show the angle in degrees (negative numbers represent counter-clockwise rotation). Alternately, you can type a number directly into the box at the right and hit Enter (Return on the Mac) on the keyboard.
Opacity This allows you to make the shape semi-transparent (the original state of the text is 100% opaque – not transparent at all). Drag the slider to the left to make the shape more transparent. Drag the slider to the right to make the shape more opaque (less transparent).
Edit Clicking on this button will bring up the Object Settings dialog, which allows you to make exact adjustments to the size and location of the shape.
Click on the up or down arrows next to each field, or select a number and type in a new value, to change the settings. • X – Changes the horizontal position of the selected object. • Y – Changes the vertical position of the selected object. • Width – Changes the width of the selected object. • Height – Changes the height of the selected object. • Keep Proportions – When checked, this option automatically adjusts the shape
properties (as you change the width or height) to keep it from becoming distorted, such as looking stretched or squished. If you change the width, the height will also be adjusted to maintain the proportions of the shape, and vice versa. Clear the check to allow stretching.
• Other Shape Properties – The Object Settings window has additional editing options for certain types of shapes. The options below are available for the specified shape types:
Line – line thickness
59 – My Memories Suite 2 User Guide

Picture Frame – frame thickness Polygon – number of sides Rounded Corners – corner roundness (depth) Star – number of points, star depth
Reset Click on the Reset icon to return the shape to its original state (the way it looked immediately upon adding it).
Remove Clicking on this button will delete the current shape.
My Memories Suite 2 User Guide – 60

Video and Multimedia Interactive albums can include a variety of interactive features using Hot Spots. A Hot Spot is an area on a page that viewers can click to open a file (video, audio, text), jump to another page in the album, or link to a Web page. Important: Hot Spots can only apply Interactive Album output, with one exception. If you are creating an album for DVD-Video output, any video files you link to will be included on the DVD and played automatically. Hot Spots have no effect on print outputs (photo album, printing pages, etc.).
Video Files (Quick Introduction) Videos taken directly from your digital camera are easy to add to a page. See Add Hot Spot Link below. My Memories Suite can accept video files in the QuickTime movie (.mov), AVI (using Cinepak, DV, or Motion JPEG codecs), MPEG (.mpg), and Flash (.swf) formats. Recommended settings (for an interactive album): Format: QuickTime Movie (.mov) Frame Size: 320x240 Compressor: MPEG-4 Quality Setting: High or Best Frame Rate: 15fps (30fps for action or sports video) Data Rate: between 900 and 1500 kbits/sec For DVD-Video output, use the highest quality source files available (e.g. DV or DV-AVI). Working with video on computers can be a complex task. For more information, we suggest that you consult your video product’s documentation and read the following articles on www.howstuffworks.com to introduce you to important terms and concepts: CamcordersVideo Editing
Add Hot Spot Link Pop-up Navigation Area—Interactive albums will include a bar that has navigation buttons similar to a Web browser. This bar will appear at the bottom of the presentation area as a viewer moves the mouse to the bottom of the screen. Warning: Hot Spots placed in this area may interfere with the ability to access pages. Preview the album to check
for problems by clicking on the icon located on the toolbar.
61 – My Memories Suite 2 User Guide

Note: Although a Hot Spot will be represented by an outline on an album page, the outline is for editing assistance only; it will not appear in the album’s final output (print, DVD-Video, etc.). Add a text box to assist viewers in finding Hot Spots (e.g. Click here to see a movie of the family summer vacation).
Video Hot Spot 1. To add a video Hot Spot, click on the Video & Multimedia section of the Control Panel
and then click on the Video icon, choose Insert > Add Video Hot Spot from the
menu, or click on the Add Video icon on the toolbar. 2. The Link Hot Spot To dialog box will appear.
• Browse to a video file by clicking on the open folder icon next to the File field. • Interactive Albums Only: Check the Play background music (faded) during video
or audio box to continue to play the background music (if applicable) at a reduced volume level while the video is playing. If this box is not checked, the background music will be paused while the video is playing.
• Check the box next to Mute the video’s sound track to disable the movie’s sound (if present, background audio will continue to play).
• Interactive Albums Only: The Tool Tip box will display a description of the link when the viewer holds the mouse over the link (see example below). Type a description in the Tool Tip field, if desired.
• When you have finished setting up the Hot Spot, click OK.
3. The Hot Spot area will appear in the center of the page. To move it, click on it and hold the mouse button down while moving the mouse. It may also be resized by dragging one of the gray handles (small boxes) on the edge of the Hot Spot outline.
4. Hot Spots always appear on top of other page objects so that they won’t become hidden under other page objects. If you need to select an object on a layer underneath a Hot Spot, move the Hot Spot, modify the other object, and then replace the Hot Spot.
My Memories Suite 2 User Guide – 62

Audio Hot Spot 1. To add an audio Hot Spot, click on the Video & Multimedia section of the Control
Panel and then click on the Audio icon, choose Insert > Add Hot Spot from the menu. 2. The Link Hot Spot To dialog box will appear. If the Audio option is not already
selected, click on it.
• Browse to an audio file (WAV, MP3, AIFF, MIDI) by clicking on the open folder
icon next to the Audio field. • Interactive Albums Only: Check the Play background music (faded) during video
or audio box to continue to play the background music (if applicable) at a reduced volume level while the video is playing. If this box is not checked, the background music will be paused while the video is playing.
• Interactive Albums Only: The Tool Tip box displays a description of the link when the viewer holds the mouse over the link (see example below). Type a description in the Tool Tip field, if desired.
• When you have finished setting up the Hot Spot, click OK.
3. The Hot Spot area will appear in the center of the page. To move it, click on it and hold the mouse button down while moving the mouse. It may also be resized by dragging one of the gray handles (small boxes) on the edge of the Hot Spot outline.
4. Hot Spots always appear on top of other page objects so that they won’t become hidden under other page objects. If you need to select an object on a layer underneath a Hot Spot, temporarily move the Hot Spot out of the way, modify the other object, and then replace the Hot Spot.
63 – My Memories Suite 2 User Guide

File Hot Spot 1. To add a file Hot Spot, click on the Video & Multimedia section of the Control Panel
and then click on the File icon, choose Insert > Add Hot Spot from the menu, or click
on the Add Hot Spot icon on the toolbar. 2. The Link Hot Spot To dialog box will appear. If the File option is not already selected,
click on it.
• Browse to a file by clicking on the open folder icon next to the File field. Tip: Be
careful when linking to files created in a program that may not be on every computer, such as WordPerfect or Windows Media Player. Save files in generic formats to accommodate everyone (i.e. .rtf or .wav).
• The Tool Tip box displays a description of the link when the viewer holds the mouse over the link (see example below). Type a description in the Tool Tip field, if desired.
• When you have finished setting up the Hot Spot, click OK.
3. The Hot Spot area will appear in the center of the page. To move it, click on it and hold the mouse button down while moving the mouse. It may also be resized by dragging one of the gray handles (small boxes) on the edge of the Hot Spot outline.
4. Hot Spots always appear on top of other page objects so that they won’t become hidden under other page objects. If you need to select an object on a layer underneath a Hot Spot, temporarily move the Hot Spot out of the way, modify the other object, and then replace the Hot Spot.
My Memories Suite 2 User Guide – 64

Website Hot Spot 1. To add a Hot Spot that opens a website, click on the Video & Multimedia section of the
Control Panel and then click on the Website icon, choose Insert > Add Hot Spot from
the menu, or click on the Add Hot Spot icon on the toolbar. 2. The Link Hot Spot To dialog box will appear. If the Website option is not already
selected, click on it.
• To link to a Web page, type the Web address in the Web Link field. • The Tool Tip box displays a description of the link when the viewer holds the
mouse over the link (see example below). Type a description in the Tool Tip field, if desired.
• When you have finished setting up the Hot Spot, click OK.
3. The Hot Spot area will appear in the center of the page. To move it, click on it and hold the mouse button down while moving the mouse. It may also be resized by dragging one of the gray handles (small boxes) on the edge of the Hot Spot outline.
4. Hot Spots always appear on top of other page objects so that they won’t become hidden under other page objects. If you need to select an object on a layer underneath a Hot Spot, temporarily move the Hot Spot out of the way, modify the other object, and then replace the Hot Spot.
65 – My Memories Suite 2 User Guide
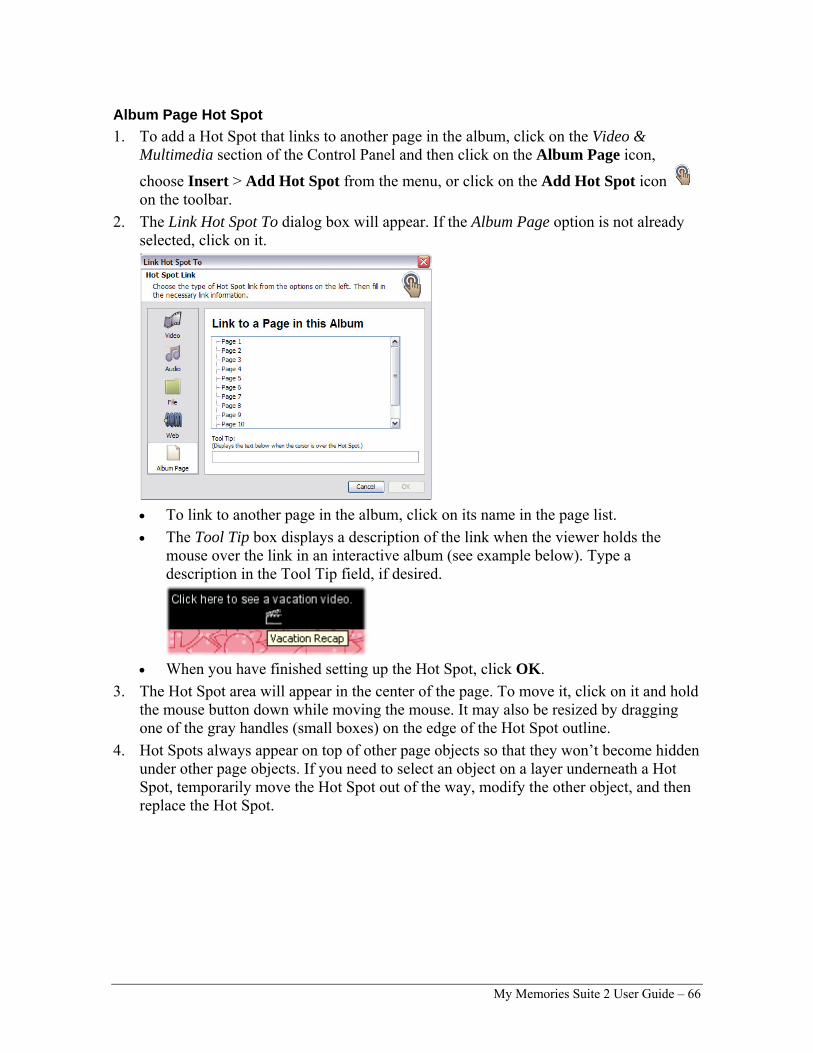
Album Page Hot Spot 1. To add a Hot Spot that links to another page in the album, click on the Video &
Multimedia section of the Control Panel and then click on the Album Page icon,
choose Insert > Add Hot Spot from the menu, or click on the Add Hot Spot icon on the toolbar.
2. The Link Hot Spot To dialog box will appear. If the Album Page option is not already selected, click on it.
• To link to another page in the album, click on its name in the page list. • The Tool Tip box displays a description of the link when the viewer holds the
mouse over the link in an interactive album (see example below). Type a description in the Tool Tip field, if desired.
• When you have finished setting up the Hot Spot, click OK.
3. The Hot Spot area will appear in the center of the page. To move it, click on it and hold the mouse button down while moving the mouse. It may also be resized by dragging one of the gray handles (small boxes) on the edge of the Hot Spot outline.
4. Hot Spots always appear on top of other page objects so that they won’t become hidden under other page objects. If you need to select an object on a layer underneath a Hot Spot, temporarily move the Hot Spot out of the way, modify the other object, and then replace the Hot Spot.
My Memories Suite 2 User Guide – 66

Edit Hot Spot Link 1. Click on a Hot Spot. The Video & Multimedia area of the Control Panel will open. 2. Click on the Edit icon to open the Link Hot Spot To window (this can also be accessed
by choosing Edit > Edit Object from the menu or double-clicking on the Hot Spot). 3. In the Link Hot Spot To window, make the changes to the Hot Spot:
• To change the Hot Spot’s type (Video, Audio, File, Web, Album Page), click on a
button on the left side of the window. • To link to a different file (Video, Audio, and File Hot Spots), click on the yellow
open folder icon to browse for a different file. • To change a Web link, type the new Web address in the Web Link field. • To change an Album Page Hot Spot, click on the name of a new page to link to it. • The Tool Tip box displays a description of the link when the viewer holds the
mouse over the link in an interactive album (see example below). Type a description in the Tool Tip field, if desired.
• When you have finished editing the link, click OK.
67 – My Memories Suite 2 User Guide
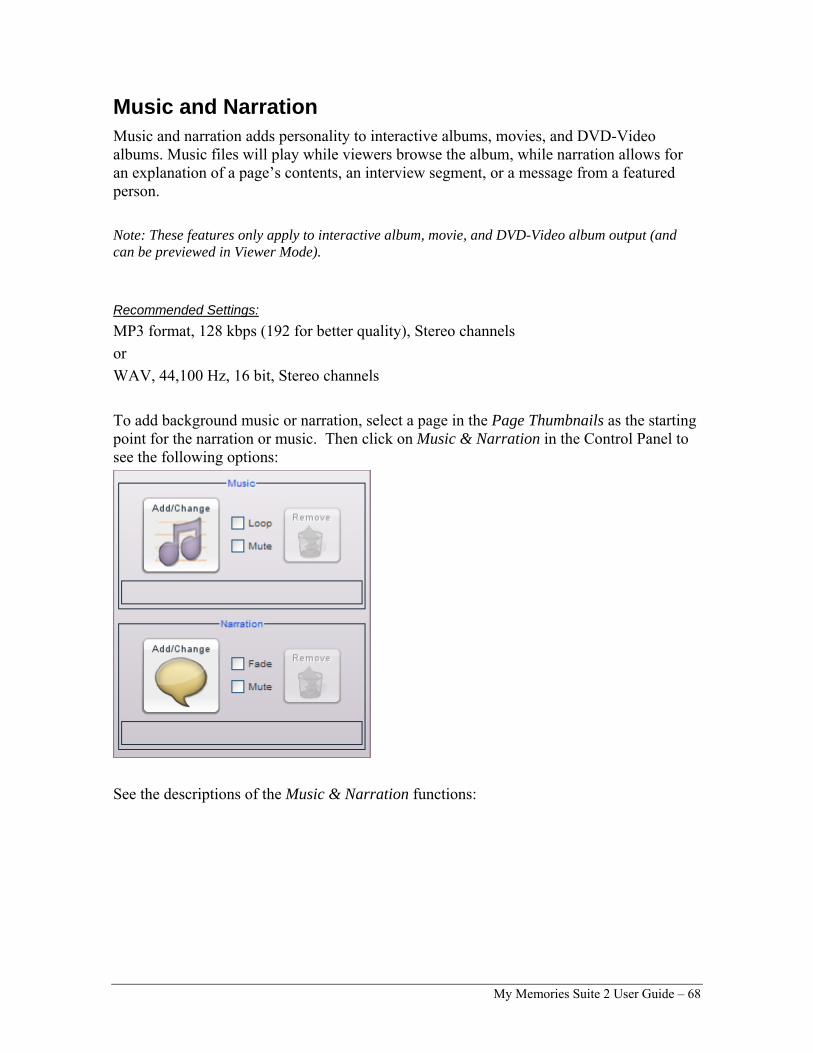
Music and Narration Music and narration adds personality to interactive albums, movies, and DVD-Video albums. Music files will play while viewers browse the album, while narration allows for an explanation of a page’s contents, an interview segment, or a message from a featured person. Note: These features only apply to interactive album, movie, and DVD-Video album output (and can be previewed in Viewer Mode).
Recommended Settings: MP3 format, 128 kbps (192 for better quality), Stereo channels or WAV, 44,100 Hz, 16 bit, Stereo channels To add background music or narration, select a page in the Page Thumbnails as the starting point for the narration or music. Then click on Music & Narration in the Control Panel to see the following options:
See the descriptions of the Music & Narration functions:
My Memories Suite 2 User Guide – 68

Add/Change Music Click on this icon to add a music file to the album (you can also access this function by
choosing Insert > Add Music from the menu, or by clicking on the Add Music icon on the toolbar). The music file will begin playing when viewers reach the currently selected page.
In the File Preview window: • Select an audio file by clicking on its name. • The Preview box on the right side allows you to listen to the audio file by clicking on
the Play button (small triangle icon on the preview bar). • When you are satisfied with your selection, click Open. The audio file will be assigned
to begin playing on the currently selected page. • To add additional music files, click on another page in the Page Thumbnails. Then
click on the Add/Change Music icon. As you add music files to the album, they will appear in the Page Thumbnails, below their respective start page.
Other Options Loop – Check this box to cause the music file to continue playing until viewers reach the next music selection. Clear the check in the box to prevent the music file from looping. Mute – To stop the background music from playing on a particular page, click on the page in the Page Thumbnails and check this box. Remove – Click on this icon to clear the music selection.
69 – My Memories Suite 2 User Guide

Add/Change Narration Click on this icon in the Music & Narration section of the Control Panel to open the Page Narration dialog, which will allow you to browse for, or record, a narration file. You may also access this function by choosing Insert > Add Page Narration from the menu. The settings in the Page Narration dialog box will allow you to modify certain aspects of interactive albums and DVD-Video albums. They apply to the current page only.
The top portion of the Page Narration dialog displays the current page number. The lower area is used for adding Page Narration. Although narration is typically spoken word, it can be any type of sound file. Follow these steps to add page narration: 1. In the Page Narration dialog, click on the open folder icon in the Narration area to
select a pre-recorded file. To record your own, see step 4 below. 2. In the File Preview dialog, browse to the file you wish to use. My Memories Suite
supports the following audio file formats: WAV, MP3, AIFF, and MIDI. The Preview box in the right side of the File Preview dialog allows a preview of the audio file by clicking on the Play button (small triangle).
3. Once the file selection is made, click the Open button.
My Memories Suite 2 User Guide – 70

4. The Page Narration dialog provides several additional options: • The Play button provides a preview of the current audio narration. • The Record button allows you to create your own narration (microphone required).
Instructions for Windows XP computers: To prepare for recording page narration, plug a microphone into the computer. Access Windows Volume Control by clicking on the Start button and choosing All Programs > Accessories > Entertainment. Select the microphone input in the Recording Control panel (choose Options > Properties from the menu, and then click on the Recording radio button). Instructions for Windows Vista computers: To prepare for recording page narration, plug a microphone into the computer. Click on the Start button (at the bottom left of the screen) and type ‘sound’ in the search field. Click on the Sound application, click on the Recording tab, click on the current microphone, and click the Set Default button. Instructions for Mac computers: Click on the Apple icon in the top menu bar, and choose System Preferences. Choose the Speech item in System Preferences. In the Speech window, make sure that the Microphone field is set to Microphone or Internal Microphone (rather than Line In). After setting up your microphone, click the Record button. A new window will pop up that instructs you to begin recording. When you have finished recording, click the Stop button. The Narration field will now show that your Recorded Narration is set to play on the page.
• Clear removes the current narration for this page. • Don’t play narration disables the page narration to allow pages to be played and
tested with or without narration in Preview mode. • Interactive Albums Only: Play background music (faded), when checked, will
continue to play the background music (if applicable) at a reduced volume level during the narration. If this box is not checked, the background music will be paused while the narration is playing.
5. When finished, click OK.
Other Options Fade – Check this box to have My Memories Suite continue to play the background music at a lower volume level while the narration is playing. If this box is not checked, the background music will be paused while the narration is playing. Mute – Check this box to disable narration on the current page. Remove – Check this box to clear the page narration.
71 – My Memories Suite 2 User Guide

Checking an Album Use the functions in the Check Album section of the Control Panel to prepare your album for sharing with others.
Check Album Click on the Check Album section of the Control Panel to ensure that the album is ready for output (print, photo album, interactive album, etc.). Refer to the description of each function below:
Preview Click on this icon to view your album in Viewer Mode, which simulates the way an album will appear for various types of output. See Preview.
Spelling Click on this icon to start a spell check which processes the entire album, checking all text boxes on unlocked album pages for spelling. See Spelling.
Errors Click on this icon to search the album for potential problems and display a list of any errors. This function primarily searches for corrupt objects, missing files, and photos and text that extend beyond the edge of the page canvas. See Errors.
Album Details The Check Album section of the Control Panel provides important album size information. Interactive, DVD-Video, and photo album output options have size limitations. Check the current status of an album by clicking on Check Album in the Control Panel and consulting the information in the Album Details area. If you are planning to print the album, please see the extra information in the Album Output Preparation topic.
Preliminary Suggestion: Back Up the Album Copy the entire album folder to another hard drive location, a backup drive, or burn it to a CD or DVD prior to making changes.
My Memories Suite 2 User Guide – 72

Preview Viewer Mode is useful for proofing pages before choosing all output options. Check your entire album in this mode before creating output from the Share Album section of the Control Panel. 1. To enter Viewer Mode, click on the Preview Album icon in the Check Album section
of the Control Panel, choose View > View Album… from the menu, or click on the
View Album icon on the toolbar.
2. My Memories Suite will enter Viewer Mode. Before beginning, you will choose how
you would like to view your album. You may also be prompted to choose whether to advance pages automatically and the default time interval for auto-advancing pages. This selection will be saved with the album and will become the default setting for interactive album, movie, and DVD-Video output. • Interactive Slideshow – The Viewer will play as an Interactive Slideshow. Hot Spots
will be active but will not play automatically in this mode. • Movie/DVD – The Viewer will play as a movie or DVD. Hot Spots will be
activated automatically. • Photo Album – The Viewer will show page spreads as they would appear in a photo
album. A window will appear asking whether you are using a photo cover. This will affect the order of the pages in the Viewer. Hot Spots will be inactive in this mode.
• Calendar – The Viewer will display your album in calendar layout. Use the arrows to move through the pages.
• Greeting Card – The Viewer will display your album in greeting card layout. Select up to 3 pages to use and click OK. Use the arrows to move through the pages.
• Page-by-page – The Viewer will display each page individually at a high resolution. This is the recommended mode to see how individual pages will print.
73 – My Memories Suite 2 User Guide

3. In the Interactive and Movie/DVD modes album pages will advance automatically if you chose that option. Otherwise, a row of navigation and function buttons will appear at the bottom of the presentation if you move the mouse to the bottom of the screen. Browse through the album using the arrow icons or go to a specific page with the Contents icon on the far left.
4. When you have finished previewing your album, click on the Exit or OK button on the
far right.
Spelling The My Memories Suite spell checker processes the entire album, checking all text boxes on unlocked album pages for spelling. To run the spell check:
1. Click on the Check Spelling icon on the toolbar, click on the Spelling icon in the Check Album section of the Control Panel, or choose Check Album > Check Spelling from the menu.
2. Select Check the entire album or Check this page only and click OK. 3. If the spell checker finds any misspelled words, it will launch the Check Spelling
dialog. The image and list below describe the function of each button in the dialog:
a. Ignore – Leaves the current word as it is and moves on to the next misspelling. b. Ignore All – Leaves the current word and any identical words in the entire album as
they are. c. Change – Replaces the current word with the one currently in the Change to field. d. Change All – Replaces this and all subsequent instances of the word in the Not in
dictionary field with the one in the Change to field. e. Suggest – If the spell checker doesn’t automatically provide alternate words in the
Suggestions area, click on this button. f. Add – Places the current word into the dictionary and continues with the spell
check process. Double-check your spelling with an official source (a dictionary or some other reference) to avoid adding misspelled words to the spell check dictionary.
My Memories Suite 2 User Guide – 74

g. Undo – Returns the most recently changed word to its former spelling. Please note that this only works if the Spell Checker has not advanced to a new text box.
h. Cancel – Exits the spell checker. 4. The spell check will pop up a dialog box when it has finished checking the text in the
album or on the page.
Errors The album error check searches the album for potential problems and displays a list of any errors it finds. This function primarily searches for corrupt objects, missing files, and photos and text that extend beyond the edge of the page canvas. 1. Click on the Errors icon in the Check Album section of the Control Panel or choose
Check Album > Check Album for Errors from the menu. If you would like to check only the current page, click Check Album > Check Page for Errors from the menu.
2. My Memories Suite checks the album.
3. When it has finished, My Memories Suite displays a printable list of errors.
Common Errors: • File is missing from the project folder. If you receive this error, it is because an object
file (video, photo, or text) is missing. If the album is missing a large number of objects, contact Technical Support for assistance ([email protected]). If there are only a few missing objects, make a note of the missing objects’ locations or print the error log, locate the missing objects on their respective pages (video files will be replaced by a blank, white background, photos by a dark gray box, and text by a yellow box), and replace them with the original file or text.
• Photo - <Name of file>: This object is partly or completely off the page. This error indicates that a photo (or other object, if indicated) has been pushed off the edge of a
75 – My Memories Suite 2 User Guide

page. Check to see if an important part of the photo is not visible on the page. If so, select the photo and move it back onto the page.
• Text Box - "<Excerpt of text>": This object is partly or completely off the page. This indicates that part of text box may be off the page, possibly making the text unreadable. Move the box fully on the page to show all of the text.
If you have questions, send an email to technical support at [email protected].
Album Output Preparation My Memories Suite provides extensive flexibility when outputting your album: printing the same album to different sizes of paper, creating an interactive album or DVD-Video, and more. Careful planning is necessary to take full advantage of this flexibility. Please take note of the following considerations when designing an album: • Print - My Memories Suite portrait and landscape albums use an 8.5”x11” aspect. An
album can be printed to any paper size, but differences between the aspect ratio of the paper and album will result in some trimming.
• Photo album - The photo album creation process will trim up to ¼” per page side. • DVD-Video - Not all television sets display the full DVD picture (usually 5-10 % of the
picture extends beyond the visible area of a TV screen). For this reason, text, menu buttons, and other essential objects must be within the area that is visible on all TV sets. This area is called the “TV safe area.”
My Memories Suite provides two primary tools to assist with album output preparation and checking.
Guides The My Memories Suite guides are the best method for checking which portions of your album may be trimmed when outputting to different paper sizes, photo album, or DVD-Video. 1. Click on the View menu and hover the mouse over the Guides item. 2. From the submenu that appears, choose the option that corresponds to your output type
– a photo album, a paper size, or DVD-Video.
My Memories Suite 2 User Guide – 76

3. The gray areas around the outside of album pages indicate where the album will likely be trimmed (or possibly cut off in a DVD-Video). Any critical objects (photos, embellishments, shapes, titles, journaling, etc.) should be kept out of these gray shaded areas. The guides are not exact, and should only be considered estimates – it is always wise to allow a little extra space as a margin of error.
Rulers Rulers can also be helpful in determining which parts of an album page may be trimmed (or not shown), especially when printing to a paper size that is not available from the list of Guides. To display rulers, choose View > Rulers from the menu.
To change the ruler units and size, choose Edit > Preferences from the menu. Click on the Grid/Ruler tab. Choose the default ruler units from the Display Ruler and Grid in drop-down menu. To prepare for printing, choose the units that best correspond to the size of the paper (usually inches). Finally, adjust the Horizontal and Vertical numbers next to Ruler Size until both dimensions are equal to or greater than the intended print size (e.g. to print to 5”x7” paper, adjusting the ruler size so that both dimensions are equal to or greater than 5”x7” results in 5.4” for the Horizontal dimension and 7” for the Vertical dimension). The excess (in the example given, 5.4”-5” = .4” or .2” per side) is the area that will be trimmed.
77 – My Memories Suite 2 User Guide
Sharing Your Album My Memories Suite provides a number of ways to share your album with family and friends. The descriptions of each output option are provided below, followed by detailed instructions for each option. Click on the Share Album section of the Control Panel to display the output options. Important Note: It is critical you read and understand the information in the Album Output Preparation topic before proceeding with the Share Album options. Note: The Interactive Album option requires a CD or DVD burner and the Burn DVD-Video option requires a DVD burner.
Print Print the entire album, or individual pages, on your home computer’s printer. To print your album, click on the Print option to continue. Export to JPEG This option will save each album page as a JPEG image file, which can be stored on your computer, sent to family and friends, or taken to a photo processing center for printing. To create JPEG images, click on the Export to JPEG option to continue. Photo Album This service allows you to order a hardbound or softbound book made from the pages in your album, which can be mailed to family and friends. To create files for a photo album, click on the Photo Album option to continue. Greeting Card Send pages of your album to a service that prints them as a greeting card. This service allows you to order printed greeting cards, which can be mailed to family and friends. To create a greeting card, click on the Greeting Card option to continue. Of course, you may also print your pages at home. See Print. Trading Cards Send pages of your album to a service that prints them as trading cards. This service allows you to order printed trading cards, which can be mailed to family and friends. To create a trading card, click on the Trading Cards option to continue. Of course, you may also print your pages at home. See Print.
My Memories Suite 2 User Guide – 78

Calendar Output a page of your album as a calendar. This service allows you to order printed calendars, which can be mailed to family and friends. To create a calendar, click on the Calendar option to continue. Of course, you may also print your pages at home. See Print. Interactive Album This will write the album to a recordable CD or DVD (DVD-ROM), which can be played on a Windows or Macintosh computer. The interactive album will look and function similar to Viewer Mode (see the Preview topic). To create an interactive album, your computer must have a CD or DVD burner drive and you must have a blank disc. To create an interactive disc, click on the Interactive Album option to continue. Make Movie This option will create a movie file (in QuickTime movie format) from your album pages and any linked video files. To create a movie file, click on the Make Movie option to continue. iPod-ready Movie This option will create an iPod-compatible movie file from your album pages and any linked video files. To create a movie file, click on the iPod-ready Movie to continue. Burn DVD-Video This option will turn your album into a DVD-Video that can be played on home DVD players or computers that have a DVD drive. This process requires a DVD burner and blank DVDs. To begin the process of burning a DVD, click on the Burn DVD-Video option to continue.
79 – My Memories Suite 2 User Guide

Print After choosing the Print option, the Print Options window will appear. You can also access the Print option by clicking File > Print… in the menu.
Choosing a Printer The method for choosing your printer depends on your operating system: • Windows XP - Click on the Print Setup button, click on the Printer button in the new
window, and choose a printer from the drop-down list.
• Windows Vista and Windows 7 - Click on the Printer button and choose a printer from the drop-down list.
• Mac - Click on the Print Setup button and then choose the printer on the next screen from the Format for drop-down menu.
Selecting Pages Select which pages in your album to print using the left side of the Print Options dialog: • The Select All button will mark all pages for printing. • The Clear All button will clear all pages from printing. • Alternately, type a range of pages in the Page range field. To indicate a range of pages
(e.g. from page 2 through page 5), put a dash in between the page numbers (2-5). You may also enter specific page numbers, separated by commas (1,4,6) or a combination of ranges and individual pages (1-3,5).
• You may also directly check the box in the upper left corner of each album page preview to mark the page for printing.
My Memories Suite 2 User Guide – 80

• The print resolution setting determines how large you can print your album without a noticeable grainy effect. Choose the Best setting for large printing sizes (like 12” x 12” or 8 ½” x 11”). Reducing the resolution may speed up print jobs for smaller sizes.
• Drag the Quality slider to choose a different option for the quality of the print job. Higher values will slow down the printing, but result in a better end product. 80% is the minimum recommended setting for printing. Values less than that are only recommended for drafts.
Print Setup Button Click on the Print Setup button (Page Setup in Vista and Windows 7) to choose your paper options, margins (Windows), and printer (Windows XP).
• Click on the Size (Paper Size on a Mac) drop-down menu to choose the size of the
printing paper.
• Choose an option from the Orientation area.
Windows-specific Options • Click on the Source drop-down menu to choose a printer tray.
• Click on the Printer button to select your printer (Windows XP only). Click on Properties if you would like to select settings specific to your printer, such as borderless printing, or to specify the type of paper you will be printing to (glossy, etc.).
• Set the print margins by typing in numbers. If you enter a number that is smaller than the minimum margin size, it will be adjusted to the minimum size.
81 – My Memories Suite 2 User Guide

Mac Options • If you have not done so already, choose a printer from the Format for drop-down
menu.
• Choose the appropriate setting from Paper Size. This will determine your default margin settings.
• 100% is the recommended setting for the Scale field.
• Click on OK when you have made your selections to return to the Print Options screen. Advanced Options (optional) Click on the Advanced… button to select layout options for the print job, such as the number of album pages to print per page (see below).
Changes to your print settings can be previewed in the area to the right as you select them.
Size of Image Area These options allow you to quickly choose a specific print size. • Click on an option in the Standard Sizes drop-down menu to select a print size. • Click on the Custom Size option to specify a size that is not available from the Standard
Sizes. Select the number in the Width or Height field and type in a new value (the ″ character is required). Alternately, click on the up/down arrows next to the numbers to change them by small increments.
My Memories Suite 2 User Guide – 82

• The Crop image to fit area option will ensure that the entire area you specify (e.g. 5”x7”) is filled, even if this means trimming two sides of the page. Refer to the print preview area on the right side of the screen to see the effect this option will have on your album pages.
Paper Orientation These options determine the direction that the album pages will print on the paper.
Number of Images per Page This option allows you to print more than one album page on each piece of paper. In order to print more than one album page per page, you must first choose a print size small enough to accommodate multiple album pages from the Size of Image Area options (e.g. two album pages will fit on a standard piece of paper at 3”x5”). • Click on the Contact Sheet… button to set the size of multiple album pages on a page. • Click on the drop-down menu to choose the number of album pages to print per page. • Click on the up/down arrows (or type in a number) next to Vertical space between
images and Horizontal space between images to create a buffer between the album pages that are printing on a single piece of paper.
Image Layout Adjustment • Click on an option from the drop-down list to choose how the printing will be justified
on the page. • Select Custom Layout and click on the up/down arrows (or type in a number) next to
the Top/Bottom/Left/Right numbers to manually set the print area. When finished, click the OK button. You will be returned to the Print Options screen. Click on the OK button when you have completed selecting pages, print setup, and advanced options. A standard Windows or Mac print window will appear. Click OK or Print to print the album.
83 – My Memories Suite 2 User Guide

Export to JPEG After choosing Export to JPEG, the Export JPEG Wizard window will appear. You can also access this option by clicking Share Album > Export to JPEG… in the menu.
Click Next to begin.
The Page Selection window will appear.
Select which album pages to export using the options in this step: • The Select All button will mark all pages.
My Memories Suite 2 User Guide – 84
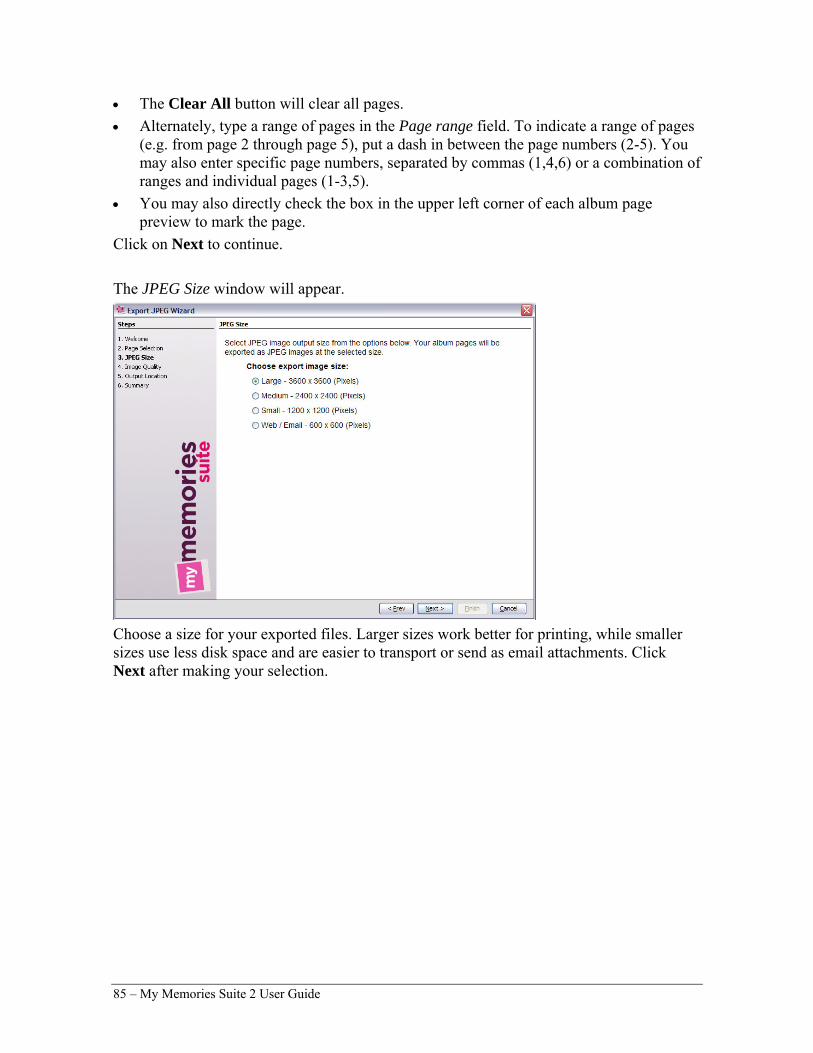
• The Clear All button will clear all pages. • Alternately, type a range of pages in the Page range field. To indicate a range of pages
(e.g. from page 2 through page 5), put a dash in between the page numbers (2-5). You may also enter specific page numbers, separated by commas (1,4,6) or a combination of ranges and individual pages (1-3,5).
• You may also directly check the box in the upper left corner of each album page preview to mark the page.
Click on Next to continue. The JPEG Size window will appear.
Choose a size for your exported files. Larger sizes work better for printing, while smaller sizes use less disk space and are easier to transport or send as email attachments. Click Next after making your selection.
85 – My Memories Suite 2 User Guide

The Image Quality window will appear.
Move the Quality Level slider to set the quality of the exported JPEGs. Higher quality images will be sharper but will have larger file sizes. Click Next after making your selection. My Memories Suite will prompt you to choose a save location for the image files it creates.
My Memories Suite 2 User Guide – 86

Double-click on folders to open them. With the desired folder open, click the Next button. My Memories Suite will place all of the created images in a new folder (with the album’s name) inside the selected folder. The Summary step will show your selected settings. Click Finish to confirm your choices. My Memories Suite will begin saving each page as an image to the folder you specified. When the process has completed, browse to the folder containing the newly created images. The filenames will have the following format: <Album Name>-<Page Number>.jpg (i.e. Family Reunion 2005-003.jpg)
87 – My Memories Suite 2 User Guide

Photo Album After choosing Photo Album, the Photo Album Wizard window will appear. You can also access the option by clicking Share Album > Photo Album… in the menu. Click on the Large Photo Album or Small Photo Album button if you have not checked the trim areas for your album yet. Click Next to proceed.
The Page Selection window will appear.
Select which album pages to print using the options in this step: • The Select All button will mark all pages for printing. • The Clear All button will clear all pages from printing.
My Memories Suite 2 User Guide – 88
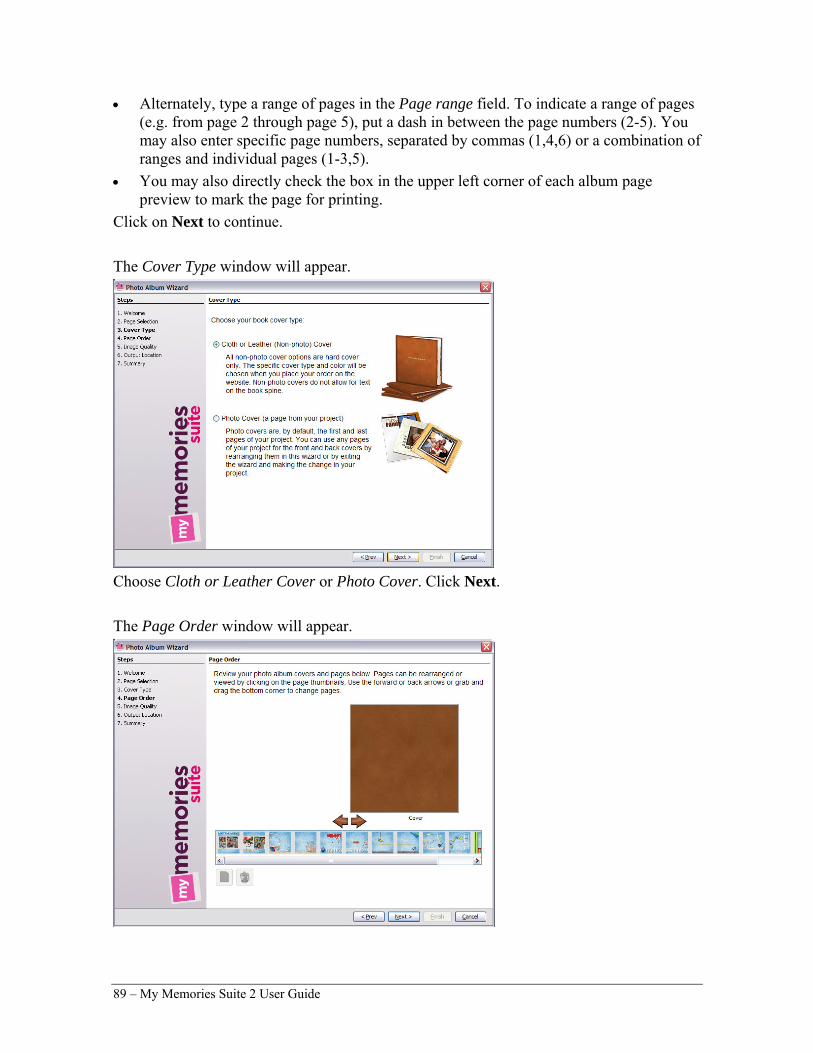
• Alternately, type a range of pages in the Page range field. To indicate a range of pages (e.g. from page 2 through page 5), put a dash in between the page numbers (2-5). You may also enter specific page numbers, separated by commas (1,4,6) or a combination of ranges and individual pages (1-3,5).
• You may also directly check the box in the upper left corner of each album page preview to mark the page for printing.
Click on Next to continue. The Cover Type window will appear.
Choose Cloth or Leather Cover or Photo Cover. Click Next. The Page Order window will appear.
89 – My Memories Suite 2 User Guide

To change the order of the pages: 1. Click with the mouse on a page in the row of page thumbnails and hold the mouse
button down as you drag the page to a new position.
2. As you move the current page, the other pages will be automatically rearranged to show where the page will be placed.
3. Release the mouse button to place the page. My Memories Suite will move the page to its new position.
• The upper right side of the window will show a preview of the current page in the
context of how it will be printed in the book.
• Click on the Blank Page icon to add a new page to the book. This can help maintain page spreads.
• Click on the Delete icon to remove the current page from the photo album. It will not be uploaded and printed.
• Click Next to continue. If you chose a photo cover, the Book Spine Options window will appear.
• Spine Color: Click on a color square to choose the color of the spine. For more options,
click on the More Colors button. • Spine Text: The spine text is what you will see when the photo album is sitting on a
shelf. Type in the text you would like in the Spine Text field. Click the No spine text checkbox if you do not want to print anything on the spine.
• Spine Text Color: Choose the color for the spine text by clicking on one of the options. • Spine Font: Choose a font and size for the spine text from the drop-down menus. • Click the Next button.
My Memories Suite 2 User Guide – 90

The Image Quality step is next.
Move the Quality Level slider to set the quality of the exported JPEGs. Higher quality images will be sharper but will take longer to upload. The highest quality setting possible is recommended for photo albums. Click Next after making your selection. My Memories Suite will prompt you to choose a save location for the image files it creates.
Double-click on folders to open them. With the desired folder open, click the Next button. My Memories Suite will place all of the created images in a new folder (with the album’s name) inside the selected folder. The Summary page will show your selected settings. In order to continue, you will need to check I have reviewed and approved my project and am ready to purchase. Click Finish to
91 – My Memories Suite 2 User Guide

confirm your choices. My Memories Suite will begin saving each page as an image to the folder you specified. My Memories Suite will launch the photo album ordering website (Internet connection required), where you will complete the order. It is recommended that you wait until My Memories Suite indicates that it has uploaded all files before continuing with the website portion of the ordering process.
My Memories Suite 2 User Guide – 92

Greeting Card After choosing Greeting Card, the Greeting Card Wizard window will appear. You can also access this option by clicking Share Album > Greeting Card… in the menu. Click Next to proceed.
The Page Selection window will appear. Up to 3 pages may be selected for greeting cards.
Select which album pages to print using the options in this step: • The Select All button will mark all pages for printing. • The Clear All button will clear all pages from printing. • Alternately, type a range of pages in the Page range field. To indicate a range of pages
(e.g. from page 3 through page 5), put a dash in between the page numbers (2-4). You may also enter specific page numbers, separated by commas (1,4,6) or a combination of ranges and individual pages (1-2,5).
93 – My Memories Suite 2 User Guide
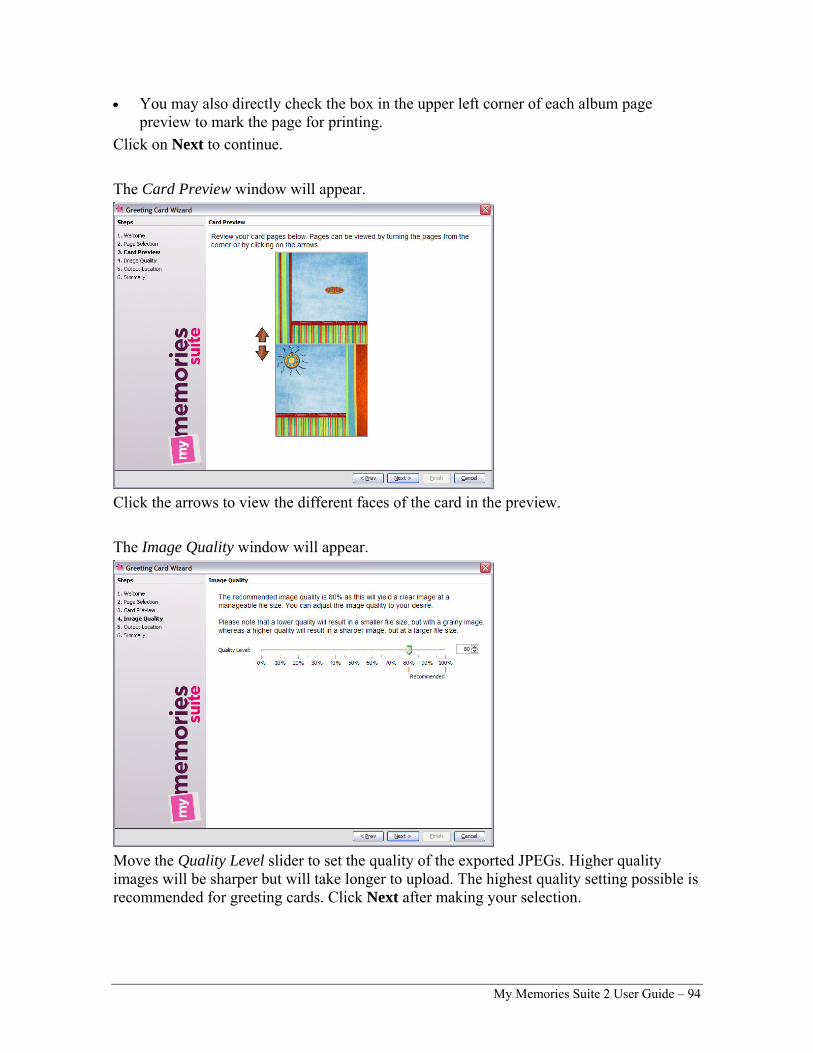
• You may also directly check the box in the upper left corner of each album page preview to mark the page for printing.
Click on Next to continue. The Card Preview window will appear.
Click the arrows to view the different faces of the card in the preview. The Image Quality window will appear.
Move the Quality Level slider to set the quality of the exported JPEGs. Higher quality images will be sharper but will take longer to upload. The highest quality setting possible is recommended for greeting cards. Click Next after making your selection.
My Memories Suite 2 User Guide – 94
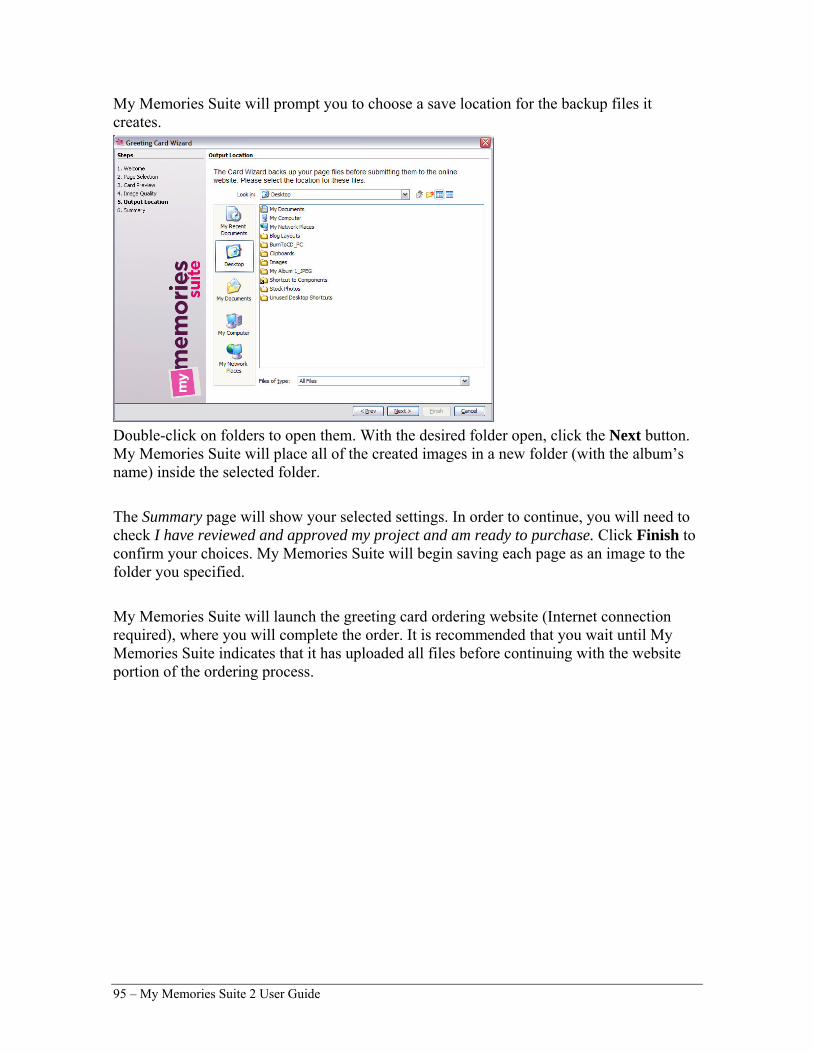
My Memories Suite will prompt you to choose a save location for the backup files it creates.
Double-click on folders to open them. With the desired folder open, click the Next button. My Memories Suite will place all of the created images in a new folder (with the album’s name) inside the selected folder. The Summary page will show your selected settings. In order to continue, you will need to check I have reviewed and approved my project and am ready to purchase. Click Finish to confirm your choices. My Memories Suite will begin saving each page as an image to the folder you specified. My Memories Suite will launch the greeting card ordering website (Internet connection required), where you will complete the order. It is recommended that you wait until My Memories Suite indicates that it has uploaded all files before continuing with the website portion of the ordering process.
95 – My Memories Suite 2 User Guide

Trading Cards After choosing Trading Cards, you may be prompted to convert the album to a portrait layout. If you need to do this, click Yes, and follow the steps. Note: This step is permanent! You will also need to begin the Trading Cards export steps again. The Trading Card Wizard window will appear. You can also access this option by clicking Share Album > Trading Cards… in the menu. Click Next to proceed.
The Page Selection window will appear.
Select which album pages to print using the options in this step: • The Select All button will mark all pages for printing. • The Clear All button will clear all pages from printing.
My Memories Suite 2 User Guide – 96
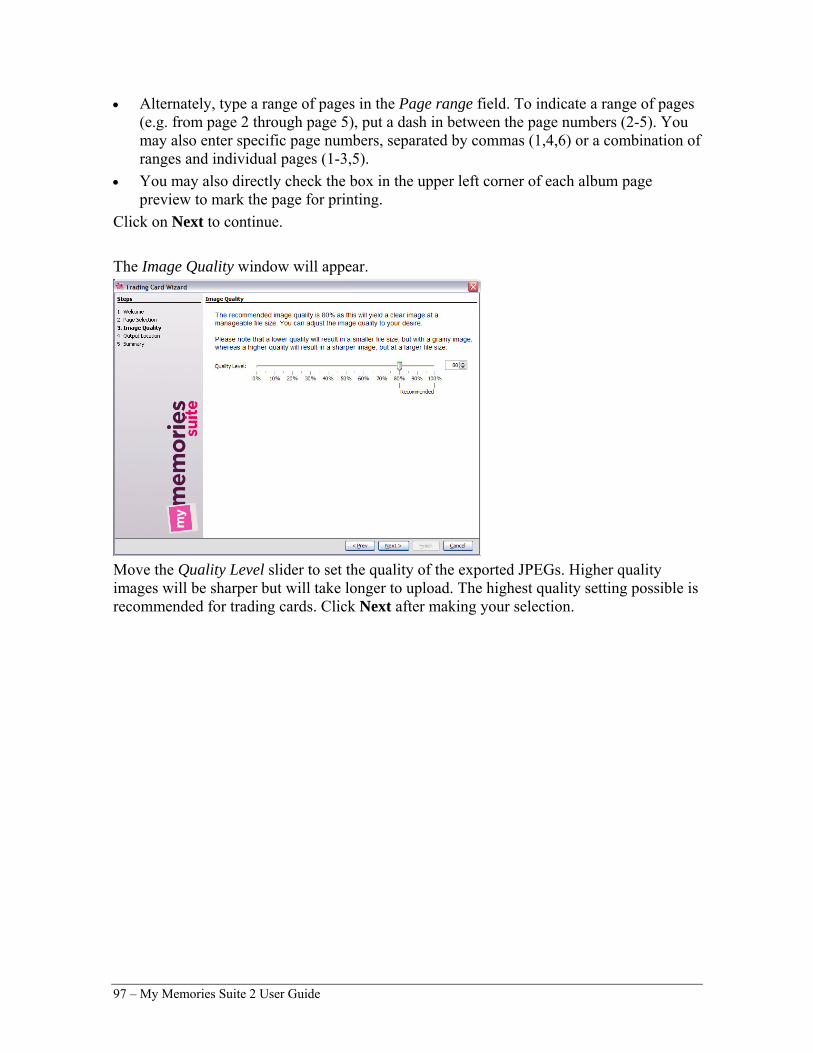
• Alternately, type a range of pages in the Page range field. To indicate a range of pages (e.g. from page 2 through page 5), put a dash in between the page numbers (2-5). You may also enter specific page numbers, separated by commas (1,4,6) or a combination of ranges and individual pages (1-3,5).
• You may also directly check the box in the upper left corner of each album page preview to mark the page for printing.
Click on Next to continue. The Image Quality window will appear.
Move the Quality Level slider to set the quality of the exported JPEGs. Higher quality images will be sharper but will take longer to upload. The highest quality setting possible is recommended for trading cards. Click Next after making your selection.
97 – My Memories Suite 2 User Guide

My Memories Suite will prompt you to choose a save location for the backup files it creates.
Double-click on folders to open them. With the desired folder open, click the Next button. My Memories Suite will place all of the created images in a new folder (with the album’s name) inside the selected folder. The Summary page will show your selected settings. In order to continue, you will need to check I have reviewed and approved my project and am ready to purchase. Click Finish to confirm your choices. My Memories Suite will begin saving each page as an image to the folder you specified. My Memories Suite will launch the trading cards ordering website (Internet connection required), where you will complete the order. It is recommended that you wait until My Memories Suite indicates that it has uploaded all files before continuing with the website portion of the ordering process.
My Memories Suite 2 User Guide – 98

Calendar After choosing Calendar, the Welcome screen of the Calendar Wizard will appear. Click Next to begin. The Page Selection step is next.
Select album pages using the options in this step: • The Select All button will mark all pages.
• The Clear All button will clear all pages.
• Alternately, type a range of pages in the Page range field. To indicate a range of pages (e.g. from page 2 through page 5), put a dash in between the page numbers (2-5). You may also enter specific page numbers, separated by commas (1,4,6) or a combination of ranges and individual pages (1-3,5).
• You may also directly check the box in the upper left corner of each album page preview to mark the page.
Click on Next to continue.
99 – My Memories Suite 2 User Guide
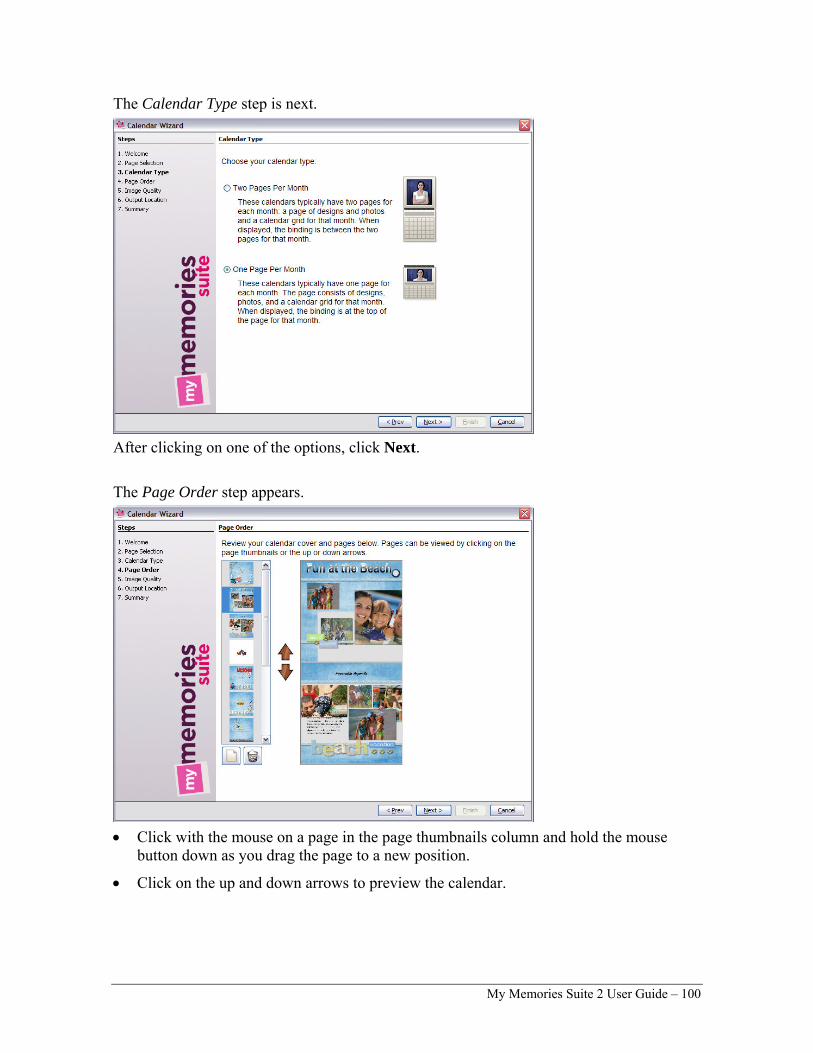
The Calendar Type step is next.
After clicking on one of the options, click Next. The Page Order step appears.
• Click with the mouse on a page in the page thumbnails column and hold the mouse
button down as you drag the page to a new position.
• Click on the up and down arrows to preview the calendar.
My Memories Suite 2 User Guide – 100

• Click on the Blank Page icon to add a new page to the calendar. This can help maintain page spreads.
• Click on the Delete Page icon to remove the current page from the calendar. It will not be uploaded and printed.
• Click Next to continue.
The Image Quality step is next.
Drag the slider to choose a quality setting. The higher percentages create sharper, more accurate files, but the files will take up more disk space and will take longer to upload to the printing website. Lower percentages will create smaller files, but the files may have a noticeable grainy or blurry character. For good printing results choose 80% or higher. Click the Next button to continue. In the Output Location step My Memories Suite will prompt you to choose an output location for a backup of the album page image files it creates. Double-click on a folder to open and select it. Click the Next button to continue. In the Summary screen, confirm that you have approved your album pages by checking the box and then click the Finish button. My Memories Suite will begin preparing each page. When the process has completed, My Memories Suite will open the website for calendar orders and begin the upload process. Follow the instructions on the website to complete the order.
101 – My Memories Suite 2 User Guide

Interactive Album After choosing the Interactive Album option, the Interactive Album Wizard window will appear. You can also access this option by clicking Share Album > Interactive Album… in the menu. Click Next to proceed.
Choose a method for creating your interactive album and then click OK.
• To burn the interactive album immediately, click on Burn Directly to Disc (a CD/DVD burner and a recordable CD or DVD are required). See the instructions below.
• Click on the Write ISO Disc Image option to create an ISO disc image. You can use this option if the current computer is not able to burn a disc and you have a way of moving the ISO file to a computer with burning capabilities (using a USB flash drive, for example). You may also want to select this option if you would like to create multiple copies of your interactive album, or you have a software program that can burn discs from ISO disc images (e.g. Sonic RecordNow). See the instructions below.
Burn Directly to Disc 1. Ensure that you have a CD/DVD burner, a blank disc, and sufficient free space on your
hard drive. 2. Choose the burning options:
• If there is not already a blank disc in the computer, you will need to insert the blank disc and click Refresh to proceed.
• If your computer has multiple burner drives, click on the Drive drop-down menu and choose the drive you would like to use.
• Optional: Choose a burning speed from the Write Speed drop-down menu. Slower speeds are sometimes useful for preventing errors during the burning process, but take longer.
My Memories Suite 2 User Guide – 102

• Check the Verify Disc checkbox to run a utility that checks the integrity of the burned disc after the burning process.
• Click on the Next button to continue. 3. The Summary page will load. Review your selections and click Finish to continue. 4. My Memories Suite will prepare the album for writing to the disc. This may be a
lengthy process. Please be patient.
5. My Memories Suite will now burn your album to the disc.
6. When finished, My Memories Suite indicates that your album was successfully burned.
7. You are now ready to play the CD or DVD-ROM on a Windows or Mac computer, or
make copies of it to give to friends and family.
Write ISO Disc Image 1. Ensure that you have sufficient free space on your hard drive and then click on the
Next button to continue.
103 – My Memories Suite 2 User Guide
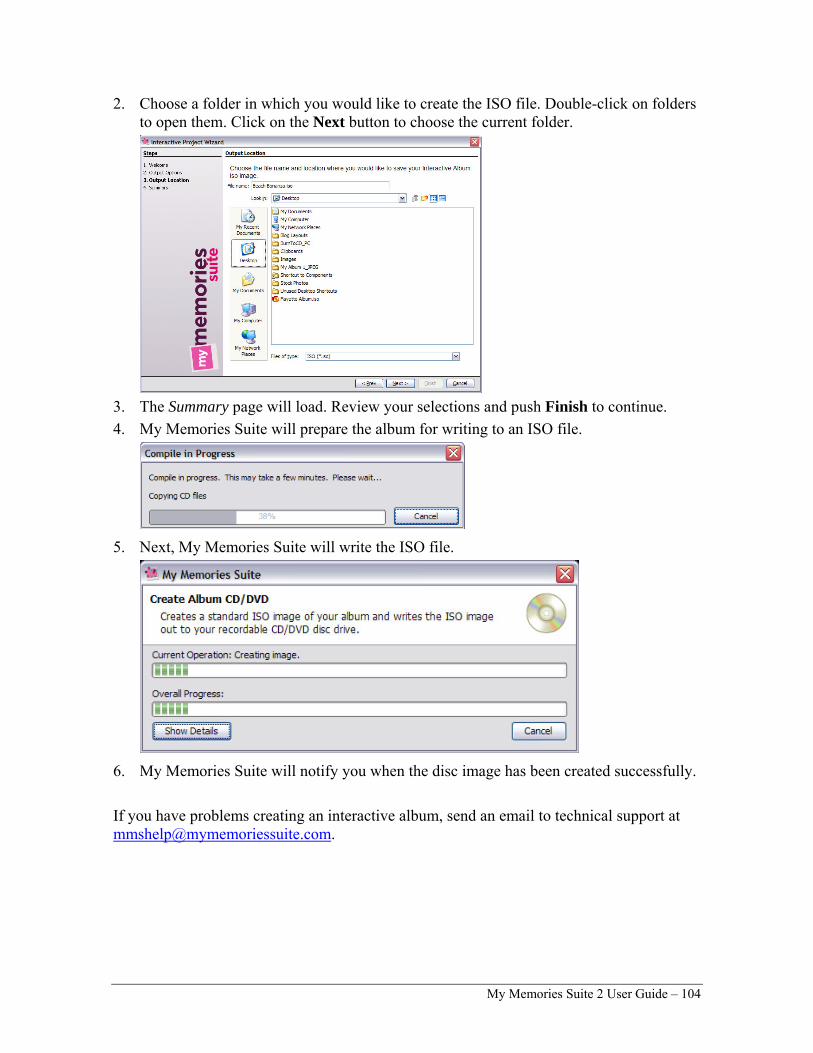
2. Choose a folder in which you would like to create the ISO file. Double-click on folders to open them. Click on the Next button to choose the current folder.
3. The Summary page will load. Review your selections and push Finish to continue. 4. My Memories Suite will prepare the album for writing to an ISO file.
5. Next, My Memories Suite will write the ISO file.
6. My Memories Suite will notify you when the disc image has been created successfully. If you have problems creating an interactive album, send an email to technical support at [email protected].
My Memories Suite 2 User Guide – 104

Make Movie After choosing Movie, the Movie Export Wizard window will appear. Click Next to continue.
My Memories Suite will prompt you to choose the Movie Options output.
Choose an option for the quality for your exported movie. Higher quality movie files require more disk space. See the guidelines below for help with this selection: DVD Quality – Choose this option if you plan to use the movie file as part of a DVD-Video presentation, such as a DVD-Video with multiple My Memories Suite albums. Please note that DVD-Video authoring software is required to create a DVD-Video from individual movie files.
105 – My Memories Suite 2 User Guide
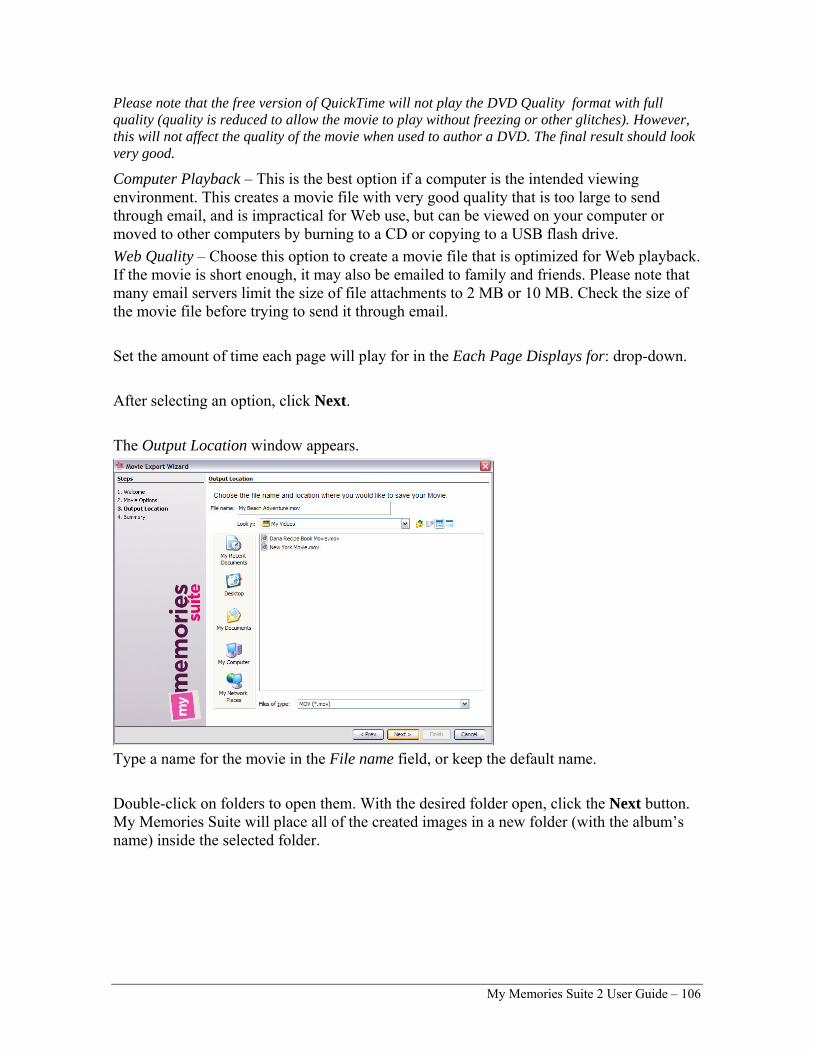
Please note that the free version of QuickTime will not play the DVD Quality format with full quality (quality is reduced to allow the movie to play without freezing or other glitches). However, this will not affect the quality of the movie when used to author a DVD. The final result should look very good.
Computer Playback – This is the best option if a computer is the intended viewing environment. This creates a movie file with very good quality that is too large to send through email, and is impractical for Web use, but can be viewed on your computer or moved to other computers by burning to a CD or copying to a USB flash drive. Web Quality – Choose this option to create a movie file that is optimized for Web playback. If the movie is short enough, it may also be emailed to family and friends. Please note that many email servers limit the size of file attachments to 2 MB or 10 MB. Check the size of the movie file before trying to send it through email. Set the amount of time each page will play for in the Each Page Displays for: drop-down. After selecting an option, click Next. The Output Location window appears.
Type a name for the movie in the File name field, or keep the default name. Double-click on folders to open them. With the desired folder open, click the Next button. My Memories Suite will place all of the created images in a new folder (with the album’s name) inside the selected folder.
My Memories Suite 2 User Guide – 106
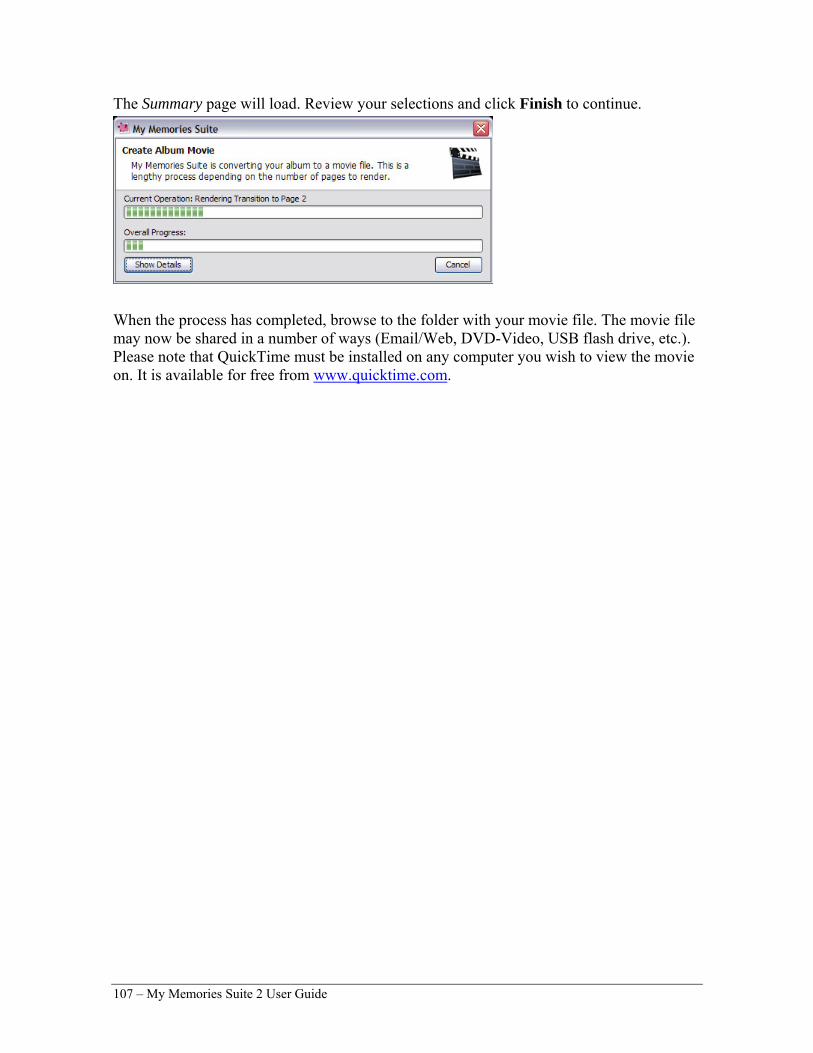
The Summary page will load. Review your selections and click Finish to continue.
When the process has completed, browse to the folder with your movie file. The movie file may now be shared in a number of ways (Email/Web, DVD-Video, USB flash drive, etc.). Please note that QuickTime must be installed on any computer you wish to view the movie on. It is available for free from www.quicktime.com.
107 – My Memories Suite 2 User Guide
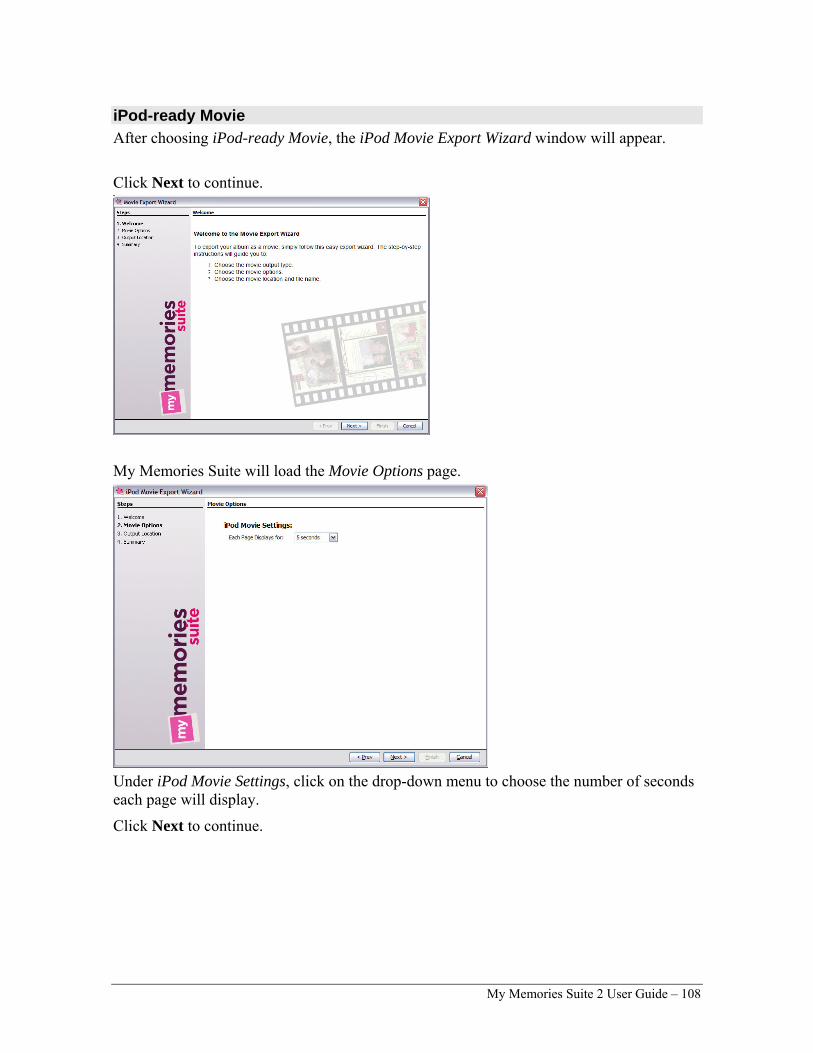
iPod-ready Movie After choosing iPod-ready Movie, the iPod Movie Export Wizard window will appear. Click Next to continue.
My Memories Suite will load the Movie Options page.
Under iPod Movie Settings, click on the drop-down menu to choose the number of seconds each page will display.
Click Next to continue.
My Memories Suite 2 User Guide – 108

The Output Location window appears.
Type a name for the movie in the File name field, or keep the default name. To choose the save location for the movie, double-click on folders to open them. With the desired folder open, click the Next button. My Memories Suite will create the movie file in the selected folder. The Summary page will load. Review your selections and click Finish to continue.
When the process has completed, browse to the folder with your movie file. Please note that QuickTime or iTunes must be installed on any computer you wish to view the movie on. QuickTime is available for free from www.quicktime.com.
109 – My Memories Suite 2 User Guide

Burn DVD-Video Critical Note: Before burning a DVD, read the information in the Album Output Preparation topic and choose Guides > TV Safe Area from the menu to see which parts of your album may not be visible when viewing the DVD on a TV. Also check to ensure that your album will fit on a DVD. See the Check Album topic. Additionally, if you experience problems burning the DVD, try a different brand of blank media (i.e. Verbatim). If you continue to experience problems with creating a DVD-Video, email Technical Support at [email protected]. After choosing the Burn DVD-Video option, the DVD Video Wizard window will appear. Click Next to continue.
My Memories Suite will load the DVD Options page.
Choose a method for creating your DVD-Video and then click Next.
My Memories Suite 2 User Guide – 110

• To burn the DVD-Video immediately, click on Burn Directly to DVD (a DVD burner and a recordable DVD are required). Ensure that you have a DVD burner, blank DVDs, and sufficient free space on your hard drive before choosing this option. See the instructions below.
• Click on the Write ISO Disc Image option to create an ISO disc image. You can use this option if the current computer is not able to burn a disc and you have a way of moving the ISO file to a computer with burning capabilities (using a USB flash drive, for example). You may also want to select this option if you would like to create multiple copies of your DVD-Video, or you have a software program that can burn discs from ISO disc images (e.g. Sonic RecordNow). Ensure that you have sufficient free space on your hard drive. See the instructions below.
• Under DVD-Video Settings, click on the drop-down menu to choose the number of seconds each page will display. Also, choose a DVD looping option. If Loop DVD is selected, the DVD will start playing from the start after it finishes. Choosing Play DVD Once will end the presentation after the DVD has played once through.
Burn Directly to DVD 1. Ensure that you have a CD/DVD burner, a blank disc, and sufficient free space on your
hard drive. 2. Choose the burning options:
• If there is not already a blank disc in the computer, you will need to insert the blank disc and click Refresh to proceed.
• If your computer has multiple burner drives, click on the Drive drop-down menu and choose the drive you would like to use.
• Optional: Choose a burning speed from the Write Speed drop-down menu. Slower speeds are sometimes useful for preventing errors during the burning process, but take longer.
• Check the Verify Disc checkbox to run a utility that checks the integrity of the burned disc after the burning process.
• Click on the Next button to continue. 3. My Memories Suite will prepare the album for writing to DVD. The preparation and
burning process can be quite lengthy, depending on the number of pages and video clips in the album. Please be patient.
111 – My Memories Suite 2 User Guide
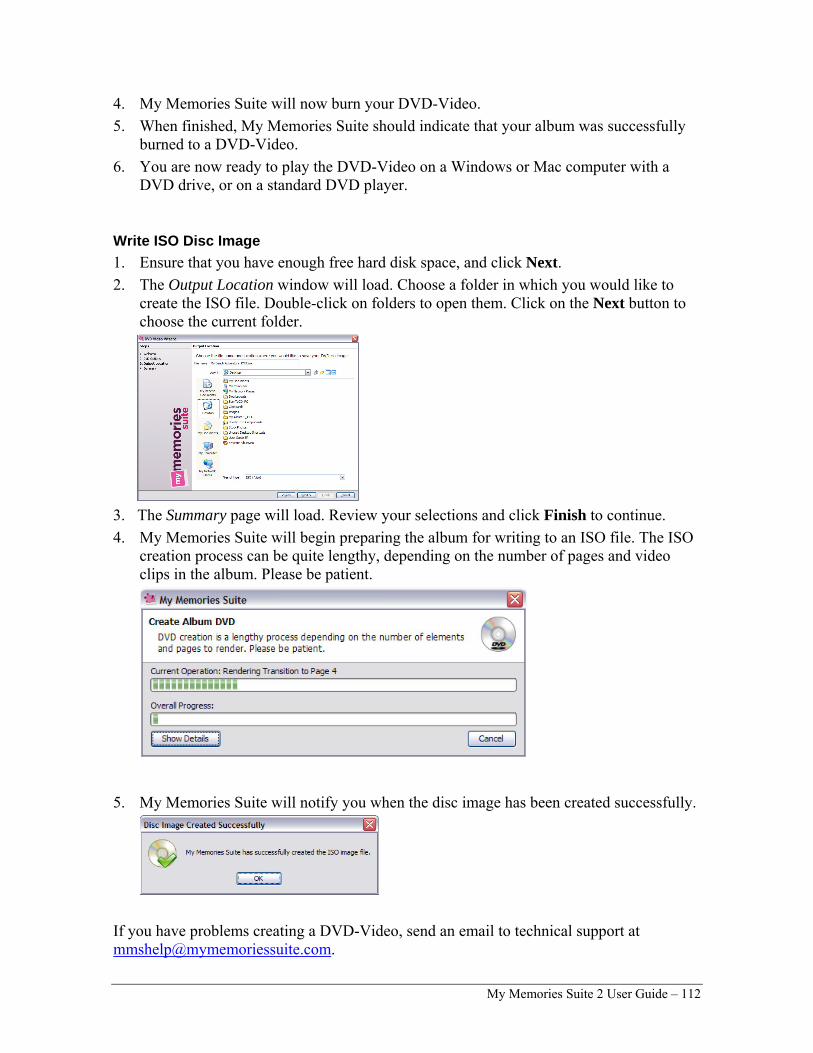
4. My Memories Suite will now burn your DVD-Video. 5. When finished, My Memories Suite should indicate that your album was successfully
burned to a DVD-Video. 6. You are now ready to play the DVD-Video on a Windows or Mac computer with a
DVD drive, or on a standard DVD player.
Write ISO Disc Image 1. Ensure that you have enough free hard disk space, and click Next. 2. The Output Location window will load. Choose a folder in which you would like to
create the ISO file. Double-click on folders to open them. Click on the Next button to choose the current folder.
3. The Summary page will load. Review your selections and click Finish to continue. 4. My Memories Suite will begin preparing the album for writing to an ISO file. The ISO
creation process can be quite lengthy, depending on the number of pages and video clips in the album. Please be patient.
5. My Memories Suite will notify you when the disc image has been created successfully.
If you have problems creating a DVD-Video, send an email to technical support at [email protected].
My Memories Suite 2 User Guide – 112

Preferences Use the settings in the Preferences dialog box to customize My Memories Suite and set defaults for the program. To open the Preferences dialog, choose Edit > Preferences from the menu. See the description for each tab below.
Font Tab This sets the default font for text and journaling in the album. Each new text box will start with these settings and can be customized at any time.
Choose the default font style options for new text boxes. These are the same as the options for a text box. See Adding Text for more information.
Captions Tab Check the box in this tab to enable auto captions. With auto captions enabled, every time you add a photo to a page, My Memories Suite will place a text box below the photo with the filename. For example, if you add a photo named “Wedding Breakfast.jpg” to a page, My Memories Suite will place a text box below the photo with the words “Wedding Breakfast” in it.
113 – My Memories Suite 2 User Guide

Shadow Tab Choose the default shadow settings for photos and embellishments.
• Drag the Opacity slider to adjust the transparency of the shadow. Higher values for the
slider make the shadow more opaque (darker); lower values make it more transparent. • Drag the Blur slider to adjust the depth of the shadow around the edges. Lower values
for the slider make the shadow darker around the edges, while higher values lighten the shadow edge.
• Click on the Shadow Color square to adjust the hue of the shadow. • To move the shadow, click and hold the mouse down in the white box area as you
move the mouse. You may also use the arrow keys on your keyboard to move the shadow.
• Checking the Add shadows to photos by default box will apply a shadow with the default settings to all photos you add to pages.
• To indicate which page object types the shadow settings will affect, check the boxes under Apply above settings to and then click the Apply button.
• Click on the Reset to System Default button to clear any custom default shadow settings.
• Click OK to apply the default shadow settings.
My Memories Suite 2 User Guide – 114

Grid/Ruler Tab Choose the settings for rulers and the page grid.
• Choose an option from the Display Ruler and Grid in option (pixels, inches, or millimeters). This will be the default display unit for rulers in all albums.
• Adjust the settings for the current album’s rulers by clicking on the up/down arrows next to the Horizontal/Vertical numbers in the Ruler Size item. Alternately, type a number directly Note: The Ruler Size setting is only a visual aid. It does not actually change the size of the album. Portrait and landscape albums may be printed up to 8.5”x11” and square albums may be printed up to 12”x12”, regardless of the ruler setting.
• Choose Show Grid to display grid lines on the page canvas to help align objects. • Choose Snap to Grid to have objects line up with the nearest grid line when you move
them. The top, left corner of the object being moved will align with the grid. • Use the Grid Size slider to determine how far apart the grid lines are.
115 – My Memories Suite 2 User Guide

Thumbnail Cache Choose the settings for thumbnail caching.
My Memories Suite uses caching technology, which stores small versions of your photos in a local folder, to speed up the displaying of thumbnails.
• To change where the cache is located, click the Browse button, click a folder name in the Select Cache Folder window, and click the Select button.
• To clear the contents of the cache folder, click the Clear button. This will free up space on the hard drive, but thumbnails will take longer to load.
• To disable the cache, clear the check next to Use Cache. Note: disabling caching will slow down the display of thumbnails.
Message Reset To enable any messages that have been disabled (such as the pixilation warning), click on this tab, clear the checkbox next to the appropriate warning, and click OK.
My Memories Suite 2 User Guide – 116

Album Properties These setting affect the presentation of interactive album, movie, and DVD-Video output. They will not affect print, photo album, and JPEG output. To open the Album Properties window, choose Edit > Album Properties from the menu.
Album Info Store important information about the album by filling in the fields in this tab. Also, this tab displays information about any templates the album was based on.
Transition Interactive album, movie, and DVD-VIDEO album output includes a transition between album pages. A transition smoothes the change between pages and adds a nice visual effect. 1. To select the transition between pages, choose Edit > Album Properties from the
menu and click on the Transition tab. 2. Choose a transition from the drop-down list.
3. To see the effects of the transition, click on the View Album icon or choose View > View Album from the menu. The transition will be applied as you move from page to page.
Disc Type Select the Intended Disc Type for the project. My Memories Suite will warm you if you exceed the size limit for the selected disc type.
117 – My Memories Suite 2 User Guide

Navigation Bar Interactive albums will include a bar that has navigation buttons similar to a Web browser. Warning: Hot Spots placed in this area may interfere with the ability to access pages. Preview the album (choose View > View Album from the menu) to check for problems.
My Memories Suite 2 User Guide – 118

Resource Gallery The Resource Gallery on the left side of My Memories Suite allows you to add elements to album pages quickly. The panel shows the thumbnails of all the elements in the current folder or category. The name of the folder or category appears near the top of the pane.
Click the icons at the top of the pane to select which gallery to view:
• Photos – Allows you to browse your computer for photos. • Embellishments – Allows you to browse the My Memories Suite embellishments. • Shapes – Allows you to browse the My Memories Suite shapes. • Photo Layout – Allows you to browse the My Memories Suite photo layouts. • Background Papers – Allows you to browse the My Memories Suite backgrounds. • Word Art – Allows you to browse Word Art templates.
119 – My Memories Suite 2 User Guide

To add an element to a page, click on its thumbnail, hold down the mouse button, and drag the mouse to the page canvas. You may also double-click on the thumbnail. The element will appear in the middle of the page. Some gallery options will allow you to change the current folder or category. Click on the Select Folder or Select Category button above current folder or category name and browse to a new folder or category (click on plus or arrow symbols to expand folders in the folder selection window). Click on the folder or category to load thumbnails of the elements it contains. Photos: If the current page has an unfilled photo box, you can fill the box by dragging a photo thumbnail over the box. The box will highlight in yellow to indicate that it will be filled. When you release the mouse, the photo will be placed in the box.
My Memories Suite 2 User Guide – 120

Page Canvas The Page Canvas provides a few object editing functions in addition to the functions described in the Working with Page Objects topic.
Right-Click Menu Click with the right mouse button on an object to bring up the following menu: • Bring to Front – Places the object on top of all other objects. • Send to Back – Places the object behind all other objects. • Bring Forward – Moves the object up one layer. • Send Backward – Pushes the object back one layer. • Align – Provides the following options for aligning objects with each other or the page:
• Top – Aligns all selected objects to the topmost object on the page. • Middle – Lines up the vertical middle of each selected object. • Bottom – Aligns all selected objects to the bottommost object on the page. • Left – Aligns all selected objects to the leftmost object on the page. • Center – Lines up the horizontal center of each selected object. • Right – Aligns all selected objects to the rightmost object on the page. • Center Vertically – Places all selected objects in the vertical center of the page. • Center Horizontally – Places all selected objects in the horizontal center of the
page. • Space Evenly – Horizontal – Places all selected objects so that the horizontal
spaces between each object are equal. • Space Evenly – Vertical – Places all selected objects so that the vertical spaces
between each object are equal. • Cut – Removes a page object from the page, but saves it in memory so that it may be
pasted to another location. • Copy – Saves a page object in memory so that it may be pasted to another location. • Edit Object… – Opens the edit dialog for the selected object. • Delete – Removes a page object from the album. • Lock Object – Locks the selected object. Locked objects cannot be selected or edited.
Double-Click Double-click a photo to open the crop function (see Crop). Double-click an embellishment or shape to open the Object Settings window. See the description of the Object Settings functions in the Edit topic for more information. Double-click a text box to edit the text (see Editing Text). Double-click a Hot Spot to open the Hot Spot editor (see Add Hot Spot Link).
121 – My Memories Suite 2 User Guide
Page Thumbnails The bottom portion of My Memories Suite displays a thumbnail of the pages in the album. Below the page thumbnails, My Memories Suite displays the names of the album’s music tracks.
Right-Click Options The following functions are available by clicking with the right mouse button on a page thumbnail: • Insert Page After – Opens the Select Photo Layout dialog for choosing a page template.
After you select a page template, My Memories Suite creates a new page with the selected template after the page that you right-clicked.
• Insert Page Before – Opens the Select Photo Layout dialog for choosing a page template. After you select a page template, My Memories Suite creates a new page with the selected template before the page that you right-clicked.
• Insert Duplicate Page – Makes an exact copy of the right-clicked page. • Insert Duplicate Page Mirrored – Makes a horizontally mirrored copy of the right-
clicked page. • Delete Page – Removes the page that you right-clicked from the album.
Reordering Pages To move a page to a different position in the album, click on the page thumbnail in the Page Thumbnails, hold down the mouse button, and drag the page to its new position.
My Memories Suite 2 User Guide – 122

Menus and Toolbars Menus
File New Album – Closes the current album and opens the new album selector. See the Starting
an Album topic for more information. Open Album – Closes the current album and opens a window for selecting and opening an
existing album. Recent Albums – Displays a list of recently accessed albums. Click on an album name to
open it. Close Album – Closes the current album. Save – Writes the album in its current state to disk using the current album name and save
location. Save As – Writes the album in its current state to disk in a custom location with a new
name. (The previously named album will exist separately under the original name. This will increase the amount of disk space used.)
Save Photo Layout – Uses the objects on the current page (photos and text boxes) to create a new page layout that will appear in the list of layouts when adding a new page to the album or when choosing from the Photo Layout section of the Control Panel.
Delete Album – Allows you to select an album to delete permanently from your hard disk. Rename Album – Allows you to select an album and choose a new name for it. Find Albums – Allows you to choose a folder to search for My Memories Suite albums in. Print Setup – Opens the standard print setup window. Print – Opens a print window for printing the album or individual pages. Exit – Closes the current album and quits My Memories Suite.
Edit Undo – Cancels the last operation. Redo – Reverses the effect of the undo operation. Cut – Removes a page object from the page, but saves it in memory so that it may be pasted
to another location. Copy – Saves a page object in memory so that it may be pasted to another location. Paste – Places the page object stored in memory on the current page (the object will be
slightly offset from its copied position). Paste in Place – Places the page object stored in memory on the current page without an
offset. Clear – Permanently deletes a page object from the page. Edit Object – Opens the Object Settings window for adjustments to object size and
placement. See the Edit topic in the Shapes section for an example of what the Object Settings window does.
Delete Object – Permanently removes the selected page object from the page.
123 – My Memories Suite 2 User Guide
Lock Object – Ensures that no changes, additions, or deletions can be made to an object by disabling editing functions.
Unlock All Page Objects – Enables changes, additions, and deletions made to all objects on a page.
Delete Shadow – Removes the shadow from the selected page object. Delete Page – Removes the currently selected page from the album. Find/Replace – Opens a window for searching for and replacing specific words. Album Properties – Displays the Album Properties dialog to view or change:
Transition. See the Album Properties topic for more information. Disc Type. See the Album Properties topic for more information. Navigation Bar. See the Album Properties topic for more information.
Change Album Shape – Opens the Change Album Shape dialog, which can be used to change an album from its current album shape (Landscape, Portrait, or Square) to a different shape.
Preferences – Opens the Preferences dialog, which allows default program settings to be customized. See the Preferences topic for more information.
Arrange Order – Adjusts the layer order of objects on the current album page. Align – Brings objects into alignment with each other or the page. Group – Fixes the position of objects in relation to one another so that they can be moved
without changing their position relative to each other. Ungroup – Returns a group of objects to individual objects. Select All – Selects all objects on the current page. Select All Embellishments – Same as Select All, except that it only selects the
embellishments on the page. Change Background Paper – Allows you to choose the background for the current page.
See the Adding or Changing a Background Image topic for more information.
Insert Add Page – Creates a new page in the album. Insert Duplicate Page – Makes an exact copy of the current page. Insert Duplicate Page Mirrored – Makes a horizontally mirrored copy of the current page. Add Other Template Pages – Opens a utility for adding more photos or pages from a
Designer Template to the current album. The steps are the same as those for creating a new album from a Designer Template (minus the Name Album step). See the Designer Template option for more information.
Import from My Projects – Opens a utility for copying pages from other albums into the current album. See Importing Pages for more information.
FastFill Photos – Opens a utility for adding more photos to the current album. Add Photo – Opens a window for choosing a photo (jpg, bmp, png, gif, tif, pic) to add to
the current page. See the Adding Photos topic for more information.
My Memories Suite 2 User Guide – 124
Add Embellishment – Opens a window for selecting an embellishment to add to the current page. See Adding Embellishments for more information.
Add Text – Creates a new text box in the center of the current page. Add Word Art – Creates a new Word Art in the center of the current page. Add Video Hot Spot – Opens a window for creating a link to a video file on the current
page. See Add Hot Spot Link for more information. Add Hot Spot – Opens a window for creating a link on the current page to a file (video,
audio, document, etc.), website, or album page. See Add Hot Spot Link for more information.
Add Shape or Line – Displays a list of shapes that can be added to the current page. See Adding Shapes for more information.
Add Music – Opens a window for choosing a music file (mp3, wav, aiff, midi) to add to the current page. See Add/Change Music for more information.
Add Page Narration – Opens a window for choosing or recording a speech file (wav) to add to the current page. See Add Narration for more information.
Add Online Content – Opens www.mymemoriessuite.com/store to browse for additional content.
View View Album – Displays the album as it will appear in different types of output. Guides – Displays a list of guides, which show trim areas for different kinds of album
output. See the Album Output Preparation topic. Snap To Grid – Aligns objects to the grid when they are moved. Show Grid – Displays a grid on the current page for assistance in placement of page
objects. Rulers – Displays rulers along the top and left side of the page. Page Windows – Displays each page in a separate window. Canvas Zoom – Opens a drop-down menu allowing you to zoom the canvas.
Check Album Check Page for Errors – Opens a utility that checks for problems on the current page and
displays a printable list of results. Check Album for Errors – Opens a utility that checks for problems in the album and
displays a printable list of results. Check Spelling – Opens a utility that checks the album for spelling errors and suggests
changes. Lock Page – Ensures that no changes, additions, or deletions can be made to a page by
disabling editing functions on the page.
125 – My Memories Suite 2 User Guide

Share Album Print – Opens the Album Print Wizard for printing the album on a local or network printer.
See Sharing Your Album. Export to JPEG – Prepares the album to be output to JPEG files. Photo Album – Prepares the album to be made into a photo album. Greeting Card – Connects to a service for printing and mailing pages from the album as a
greeting card. Trading Cards – Connects to a service for printing and mailing pages from the album as
trading cards. Calendar – Connects to a service for printing and mailing pages from the album as
calendars. Interactive Album – Prepares the album to be made into an interactive album on CD or
DVD-ROM. Make Movie – Prepares the album to be made into a movie file. iPod-ready Movie – Prepares the album to be made into an iPod movie file. Burn DVD-Video – Prepares the album to be made into a DVD-Video.
Window The options in this menu arrange the page windows, if the Page Windows menu item has been selected.
Help My Memories Suite Help – Opens the help system, which contains topics, an index, and a
search function for finding help with My Memories Suite. Check for Updates – If your computer is connected to the Internet, this will check to see if
you have the most current version of My Memories Suite. User Guide – Opens the User Guide in another window, a print-ready document that
contains complete information about using My Memories Suite. Register – Launches the My Memories Suite website to the software registration page. Visit My Memories Suite Web Site – Launches the My Memories Suite website, which
contains information and updates for My Memories Suite. About My Memories Suite – Displays a screen that contains copyright and version
information for My Memories Suite.
My Memories Suite 2 User Guide – 126

Toolbar Icons The main toolbar contains the most common program functions. The Main Toolbar
Icon Descriptions 1. Create a New Album – Closes the current album and opens the new album selector.
See Starting an Album for more information. 2. Open an Album – Closes the current album and opens a window for selecting and
opening an existing album. 3. Save the Album – Writes the album in its current state to disk using the current album
name and save location. 4. View the Album – Presents the album the way it will appear in various type of output.
See Preview for more information. 5. Print the Album – Opens a print window for printing the album or individual pages. 6. Cut Selected Object – Removes a page object to the clipboard to be pasted in another
location. 7. Copy Selected Object – Copies a page object to the clipboard to be pasted in another
location. 8. Paste Copied or Cut Page Object – Applies the page object stored in the clipboard to
the current page, slightly offset from the original position. 9. Paste Page Object Without an Offset – Same as Paste (8), except that the pasted
object does not paste offset from the original position. 10. Check Album Spelling – Opens a utility that checks the spelling on all unlocked
pages, points out errors, and suggests changes. 11. Undo – Cancels the last operation. 12. Redo – Restores the “undone” operation. 13. Add a New Page – Opens the Select Photo Layout dialog. After choosing a template,
My Memories Suite will place a new page at the end of the album. 14. Add Photo or Graphic – Opens a window for importing a photo or graphic file (jpg,
bmp, png, gif, tif, pic) to the current page. 15. Add Text – Creates a new text box in the center of the current page 16. Add Word Art – Creates a new Word Art in the center of the current page. 17. Add Embellishment – Opens a window for choosing and adding an embellishment to
the current page. See Adding Embellishments for more information. 18. Add a Shape Object – Opens a window for choosing a shape to add to the current
page. See Adding Shapes for more information. 19. Add Video – Opens a window for importing a video file (QuickTime movie file, AVI,
DV or MPEG) to the current page.
127 – My Memories Suite 2 User Guide

20. Add a Hot Spot (Link) – Opens a window for choosing the type of Hot Spot and its settings, and then adding it to the current page.
21. Add Music to the Album – Opens a window for importing a music file, starting on the current page. See Add/Change Music for more information.
22. Change Object Layer – Displays the options for adjusting object layer position. See Layers.
23. Align Objects – Displays the options for changing the alignment of objects. See Aligning Objects.
24. Turn Page Grid On/Off – Click on this icon to display an overlay grid to assist with accuracy in placing and moving objects.
25. Turn Ruler Guides On/Off – Displays/hides the rulers. 26. Help – Opens the My Memories Suite help topics.
My Memories Suite 2 User Guide – 128