my aged care provider portal user guide · home care package attributes.....38 adding pricing...
TRANSCRIPT

My Aged Care
Provider Portal
User Guide
Part One:
Administrator Functions
June 2019

Contents
Background and overview of the provider portal .................................................. 3
Purpose of the Guide ................................................................................... 3
1.1.1 What this Guide does not cover .............................................................. 3
Document key .............................................................................................. 3
Key Terms .................................................................................................... 3
Introduction to using the provider portal ....................................................... 4
Preparing to access the provider portal ....................................................... 4
1.5.1 AUSkey and technology requirements.................................................... 4
1.5.2 What is AUSkey? .................................................................................... 4
1.5.3 What will you need to use an AUSkey? .................................................. 5
1.5.4 Where can you go for more information?................................................ 6
1.5.5 Nominating an Organisation Administrator ............................................. 6
Further information, enquiries and technical support ................................... 6
How to login to the provider portal ............................................................... 7
Staff roles in the provider portal ................................................................... 9
1.8.1 Homepage views by role type ............................................................... 11
Administrator homepage ................................................................ 11
Team Leader homepage ................................................................ 12
Staff Member homepage ................................................................ 13
Homepage for person assigned multiple roles ............................... 13
Administrator role ............................................................................................... 14
Creating service delivery outlets ................................................................ 14
2.1.1 How do I create or add a new outlet? ................................................... 15
2.1.2 How to view outlets ............................................................................... 18
2.1.3 Organisation philosophy ..................................................... 19
Adding service items .................................................................................. 23
2.2.1 Adding a service item ........................................................................... 23
2.2.2 Editing a service item............................................................................ 27
Editing availability of services and waitlists for a service ................ 29
Editing service delivery area .......................................................... 30
Attaching promotional material ....................................................... 35
Home Care Package attributes ...................................................... 38
Adding pricing information to a Home Care Package service item or outlet ....................................................................................................... 40

My Aged Care Provider Portal User Guide – Part One June 2019
2
Additional home care pricing features ............................................ 44
Editing service sub-types ............................................................... 45
2.2.2.7.1 Adding a service sub-type ......................................................... 46
2.2.2.7.2 Removing a service sub-type .................................................... 48
2.2.2.7.3 Maintaining availability of service sub-types and waitlists for a service sub-type ......................................................................................... 50
2.2.3 Adding a room type .............................................................................. 53
2.2.4 Transferring service items .................................................................... 58
2.2.5.1 Reviewing the Service Transfer Log .................................................. 62
2.2.6 Transferring clients between service items ............................................... 64
2.2.6.1 Reviewing the Client Transfer Log ..................................................... 67
2.2.5 Activating/deactivating a service item ................................................... 70
Maintaining service delivery outlets ........................................................... 71
2.3.1 Activating an outlet ............................................................................... 71
2.3.2 Deactivating an outlet ........................................................................... 74
2.3.3 Removing an outlet ............................................................................... 76
2.3.4 Editing outlet details ............................................................................. 78
Tasks and notifications .............................................................................. 82
2.4.1 Viewing tasks and notifications ............................................................. 82
2.4.2 Managing task and notification preferences ......................................... 85
Creating and maintaining staff accounts .................................................... 89
2.5.1 Viewing staff accounts .......................................................................... 89
2.5.2 Adding new staff accounts, allocating roles and outlets ....................... 90
2.5.3 Editing a staff account .......................................................................... 94
2.5.4 Deactivating staff accounts ................................................................... 97
2.5.5 Removing staff accounts ...................................................................... 99
Attachment A: First time login to the provider portal ............................................... 102
Attachment B: Generating reports and accessing forms ........................................ 106
Generating reports ....................................................................................... 106
Viewing reports ............................................................................................ 108
Accessing forms .......................................................................................... 110
My Aged Care Provider Portal User Guide – Part One June 2019
3
Background and overview of the provider portal
Purpose of the Guide
The My Aged Care Provider Portal User Guide – Part One (Provider Portal User Guide) outlines how Commonwealth-funded service providers (providers) set up and maintain the My Aged Care provider portal (the provider portal) for your organisation.
The Provider Portal User Guide is split into two parts as follows:
Part One (this document) provides an overview of the portal and describes the functions that an individual with the Administrator role in the provider portal can perform.
Part Two provides an overview of the portal and describes the functions that an individual with the Team Leader or Staff Member role in the provider portal can perform.
1.1.1 What this Guide does not cover
This guide does not cover:
Detailed instructions on how to obtain an AUSkey (which can be found on the AUSkey website at https://abr.gov.au/AUSkey/).
Document key
This symbol is used to highlight a point that all providers need to pay particular attention to.
Key Terms
The updated list of key terms in My Aged Care relevant to assessors and service providers is available on the Department’s website at https://agedcare.health.gov.au/my-aged-care-key-terms

My Aged Care Provider Portal User Guide – Part One June 2019
4
Introduction to using the provider portal
The provider portal is used to:
Manage information about the services you provide
Manage referrals for service(s) issued by My Aged Care contact centre staff or assessors by accepting, rejecting, or placing on a waitlist
Update client records with information about services being delivered
Request that an assessor undertakes a support plan review for a client
Generate reports.
AUSkey is the primary authentication mechanism for service providers to securely access and use the My Aged Care system. For those providers experiencing AUSkey access issues, the Department is promoting VANguard Federated Authentication Service (FAS), as an alternative secure authentication mechanism. Further information on accessing My Aged Care using VANguard FAS is available on the Department’s website at https://agedcare.health.gov.au/programs/my-aged-care/vanguard-federated-authentication-service-fact-sheet
Staff must have an individual AUSkey linked to their organisation to access the provider portal. If you require access to the provider portal for multiple organisations, you will need a different AUSkey for each user account.
Preparing to access the provider portal
The steps to prepare to access the provider portal and AUSkey requirements are outlined below.
1.5.1 AUSkey and technology requirements
Prior to accessing the provider portal, each staff member intending to use the provider portal needs their own AUSkey that is linked to a unique email address. An AUSkey is needed prior to logging on for the first time.
1.5.2 What is AUSkey?
AUSkey is a secure login that identifies you when you use participating Government online services on behalf of your business. Obtaining an AUSkey is a simple process and is free. Many organisations already use an AUSkey to interact with other Government services. Each AUSkey is linked to an Australian Business Number (ABN) and can be stored on a computer or a USB stick for staff that use multiple Windows-based computers.

My Aged Care Provider Portal User Guide – Part One June 2019
5
If your organisation does not currently use AUSkey, your organisation must register for an Administrator AUSkey. To register for the first AUSkey you need to be an eligible associate recorded on the Australian Business Register (ABR) for that ABN. You can register yourself or someone else for the first AUSkey. The first person to be registered will have an Administrator AUSkey and can set up other AUSkey Administrators within the organisation.
After the first AUSkey is issued, there can be unlimited AUSkeys linked to that ABN. In most cases, each person wanting to use participating government online services on behalf of a business must have a separate AUSkey. The registration process for subsequent AUSkey users depends on the type of AUSkey you need.
The information you will need to register for an AUSkey is outlined below:
Administrator AUSkey
the ABN of the business you want the AUSkey to be linked to
your full legal name
your date of birth
an email address that only you have access to
Standard AUSkey for other Staff
an Administrator AUSkey user’s email address
your full legal name
an email address that only you have access to
The Administrator AUSkey holder is also able to set up Standard AUSkeys for all staff members who will use the provider portal. Administrator AUSkey holders can upload all staff AUSkeys in a batch by uploading a CSV file to ABR. For more information go to the ABR website (https://abr.gov.au/AUSkey/Help-and-support/Registering-for-AUSkey-troubleshooting/Register-more-than-one-person/). Alternatively, staff members are able to self-register online.
1.5.3 What will you need to use an AUSkey?
To use an AUSkey you will need a computer with an internet connection and a standard internet browser that supports AUSkey, such as Internet Explorer, Safari or Firefox.
To use AUSkey you will need to use a browser that is compatible. Please note that the following are not compatible with AUSkey:
Google Chrome browsers
Microsoft Edge browsers
Mobile devices such as smartphones and tablets
To use an AUSkey to log in to the provider portal, the computer will need certain software installed. If you and your staff do not have administration rights to the

My Aged Care Provider Portal User Guide – Part One June 2019
6
computer, you will need to consult your organisation’s IT support area to ensure the appropriate software is installed.
1.5.4 Where can you go for more information?
Further details of software and compatibility can be found at https://abr.gov.au/AUSkey/Help-and-support/Setting-up-AUSkey-troubleshooting/AUSkey-compatibility/
For more information: visit the ABR website at https://abr.gov.au/AUSkey/ or call the ABR national service desk (1300 287 539).
Email the Australian Taxation Office (ATO) technical helpdesk [email protected].
1.5.5 Nominating an Organisation Administrator
In order to gain access to the provider portal, your organisation will first need to nominate an Organisation Administrator. The Organisation Administrator is the initial user to gain access to the portal for your organisation. The Department is responsible for creating the initial user account for each organisation. The Organisation Administrator will be responsible for setting up the structure of your organisation in the Portal and creating staff user accounts, including additional administrator accounts as required. The administrator details provided for your organisation should be the person who is most suitable to set-up these details.
To nominate the Organisation Administrator for your organisation, you will need to complete and submit an Organisation Administrator Registration Form. This form is emailed to the key personnel (listed on your contract) when your organisation is added to the My Aged Care system.
If you need a copy of the registration form, please contact [email protected] with your organisation name, ABN, NAPS ID (if known) and your contact details.
Further information, enquiries and technical support
The My Aged Care service provider and assessor helpline is available on 1800 836 799. The helpline answers enquiries relating to the My Aged Care system and provides technical support. The helpline is available between 8am to 8pm Monday to Friday and 10am to 2pm Saturday, local time across Australia.
You can view a record of enquires you have made to the helpline via the provider portal, by selecting the ‘My Aged Care Interactions’ icon on the homepage.

My Aged Care Provider Portal User Guide – Part One June 2019
7
Further information to support the use of the provider portal (including fact sheets, videos, FAQs) is available at https://agedcare.health.gov.au/our-responsibilities/ageing-and-aged-care/programs-services/my-aged-care/information-for-service-providers.
How to login to the provider portal
The steps you need to follow to log in to the provider portal are outlined below.
The first time log in process is different. The steps you need to take to log in for the first time are outlined in Attachment A.
Step One: The provider portal can be accessed at https://myagedcare-serviceproviderportal.dss.gov.au. Alternatively, you can go to the ‘Information for service providers’ section of the Department’s website (https://agedcare.health.gov.au/our-responsibilities/ageing-and-aged-care/programs-services/my-aged-care/information-for-service-providers) and select the ‘My Aged Care Provider Portal’ link.

My Aged Care Provider Portal User Guide – Part One June 2019
8
Step Two: An Australian Government ‘Authentication Service’ page will be displayed. Select your AUSkey credentials from the drop down list. Enter your AUSkey password and select ‘Continue’.
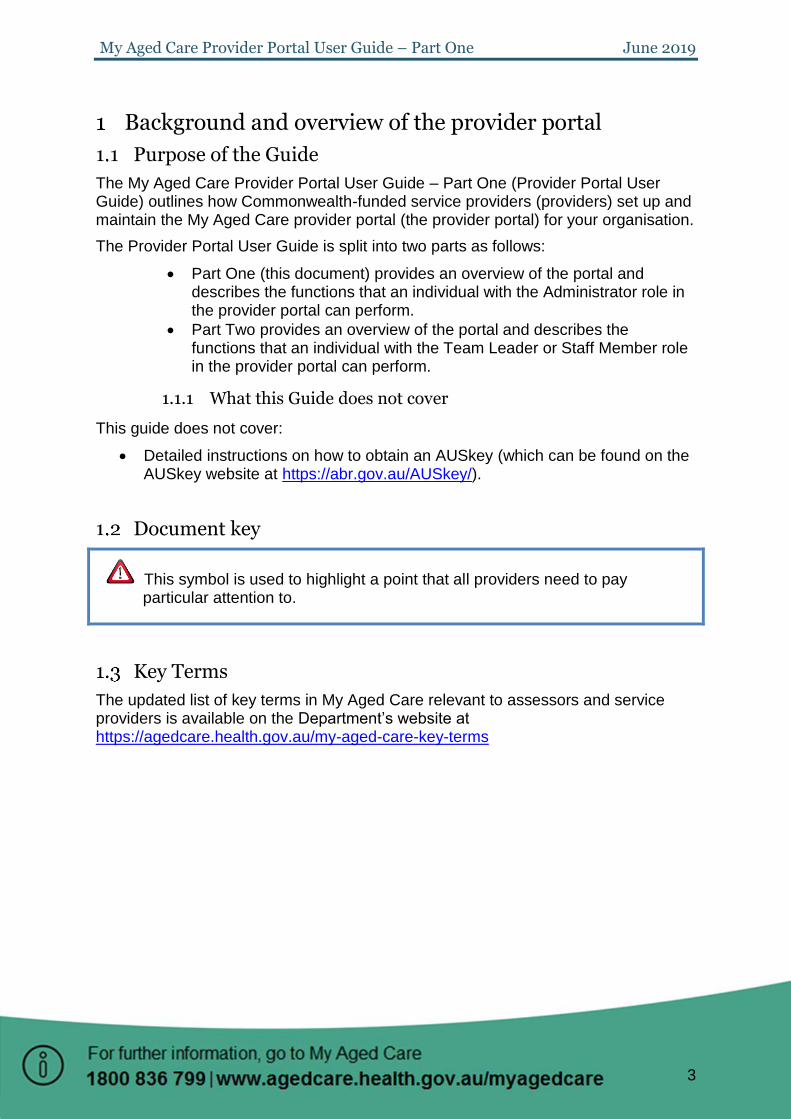
Step Three: After you select ‘Continue’ the provider portal homepage will be displayed.
My Aged Care Provider Portal User Guide – Part One June 2019
9
Staff roles in the provider portal
The person nominated on the My Aged Care Organisation Administrator Registration Form, needs to be the first person from your organisation to log in to the provider portal. How to nominate your first Organisation Administrator is detailed in Section 1.5.5 of this guide.
The Organisation Administrator will be responsible for assigning roles to other staff; this can include assigning other staff the administrator role to help set up and maintain information about your organisation in the provider portal. Roles should be assigned in accordance with the duties the person performs within your organisation.
If you are assigned more than one role, this access will apply across all outlets you have been granted access to in the provider portal.
The table below outlines the functions for each role within the provider portal. It
includes both client focused and organisation focused tasks.

My Aged Care Provider Portal User Guide – Part One June 2019
10
Key Functions
Roles
Organisation
Administrator
Outlet Administrator
Team Leader
Staff Member
Cli
en
t
Fo
cu
sse
d
Search for a client record (for referred clients)
View client records (for referred clients)
View referrals
Accept, reject and revoke referrals
View tasks and notifications
Manage organisation preferences for tasks and notifications
Manage outlet preferences for tasks and notifications
View My Aged Care interactions
Add client service information
Transfer clients between services
Org
an
isa
tio
n F
oc
us
se
d
Request change to contractual information
Enter quality indicator data for Residential Care Facilities
Submit quality indicator data for Residential Care Facilities
Add outlets
Manage outlets: edit, activate, deactivate, remove
Manage services: add, edit, activate, transfer (organisation administrators only) or deactivate
Manage staff (organisation level): add, edit, deactivate, remove
Manage staff (outlet level): add, edit, deactivate, remove
My Aged Care Provider Portal User Guide – Part One June 2019
11
1.8.1 Homepage views by role type
Administrator homepage
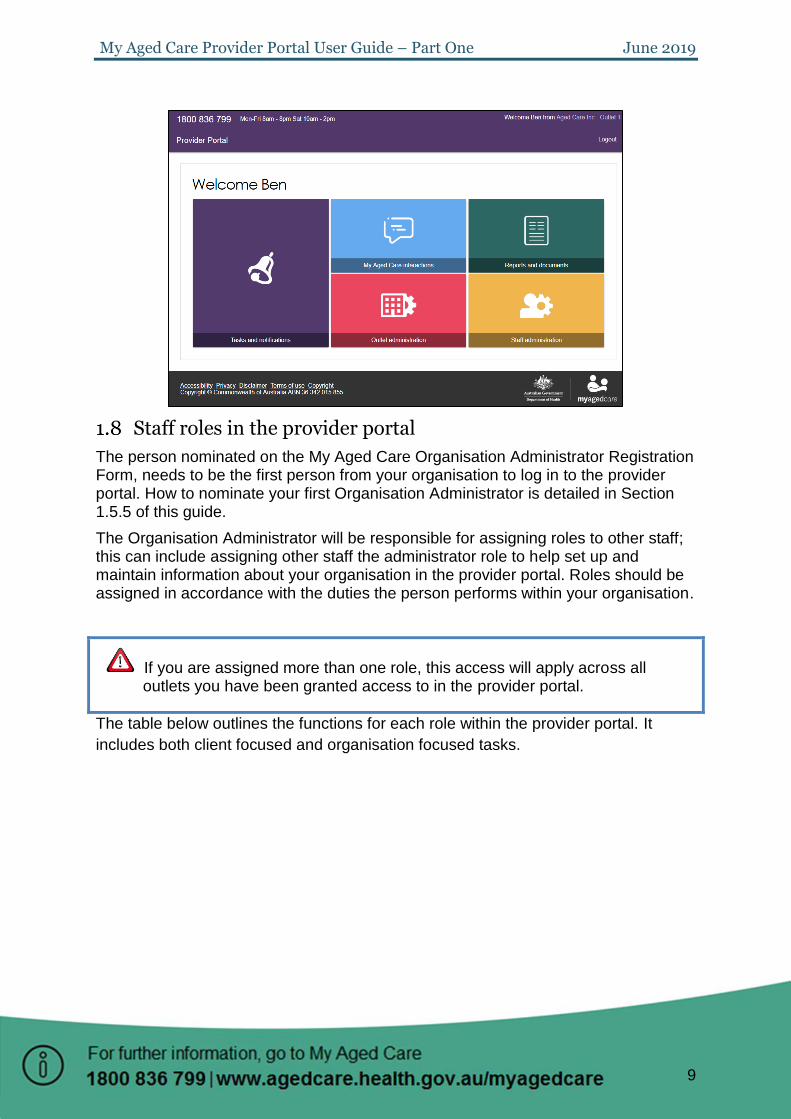
People assigned an Administrator role at an organisation level can view and manage information for the entire organisation in the portal. People assigned an Administrator role for one or more outlet(s) in the organisation will only be able to view and manage information for the outlet(s) they have been assigned.
If you log in to the provider portal as an Administrator, you will see ‘Tasks and notifications’, ‘My Aged Care interactions’, ‘Reports’, ‘Outlet administration’, and ‘Staff administration’ tiles on your homepage.
From 1 July 2019 it is mandatory for all Commonwealth subsidised residential aged care services to collect and submit clinical quality indicator data to the Department of Health. If you are a Commonwealth subsidised residential aged care service and you are assigned as an administrator at the outlet level, and the ‘Quality indicator’ role has been added to your staff profile, the ‘Quality Indicators’ tile will display on your home page. Administrators at the organisation level will NOT see the ‘Quality Indicators’ tile on their home page.
For information on how to add the quality indicator application for staff members please refer to the National Aged Care Mandatory Quality Indicator Program Manual 1.0.

My Aged Care Provider Portal User Guide – Part One June 2019
12
Team Leader homepage
People assigned the Team Leader role in the provider portal have the same functions as the Staff Member role and are also responsible for managing referrals for service(s).
If you log into the provider portal as a Team Leader, you will see ‘Service referrals’, ‘Find a client’, ‘Tasks and notifications’, ‘My Aged Care interactions’, ‘Reports’, ‘Retrieve a referral code’ and ‘Quality Indicators’ tiles on your homepage.
The Quality Indicators tile will only display on your home page once your Administrator for the Provider Portal has added the the ‘Quality indicator’ role for your staff profile.
For information on how to add the quality indicator application for staff members please refer to the National Aged Care Mandatory Quality Indicator Program Manual 1.0.

My Aged Care Provider Portal User Guide – Part One June 2019
13
Staff Member homepage
People assigned the Staff Member role in the provider portal are responsible for adding and updating client service information in the client record.
If you log in to the provider portal as a Staff Member, you will see ‘Service referrals’, ‘Find a client’, ‘Tasks and notifications’, ‘My Aged Care interactions’, ‘Reports’ and ‘Quality Indicators’ tiles on your homepage.
The Quality Indicators tile will display on the home page for residential facilities.
Homepage for person assigned multiple roles
If you log in to the provider portal as a user with Administrator, Team Leader and Staff Member roles, you will see the functions for all of these roles on the homepage.

My Aged Care Provider Portal User Guide – Part One June 2019
14
Administrator role
Service information is displayed publically in the service finder on the My Aged Care website. My Aged Care contact centre staff, assessors use this service information to send referrals and consumers use this service information to research and access services.
It is the Administrator’s responsibility to set up and maintain this information.
It is critically important that service information (such as availability and services provided) is maintained by providers to ensure accurate referrals.
Creating service delivery outlets
Administrators will need to set up ‘outlets’ in the provider portal before they can add their organisation’s service information (service items and service sub-types). Administrators can choose how to set up service(s) in the provider portal (i.e. all under one outlet or under multiple outlets).
Each outlet that you set up can have different staff, service information, locations and contact details recorded.
See Quick Reference Guide – Create service delivery outlets and add service information using the My Aged Care provider portal for further information about outlets, available on the Department of Health’s website (https://agedcare.health.gov.au/programs-services/quality-indicators-for-aged-care/information-for-service-providers/quick-reference-guide-create-service-delivery-outlets-and-add-service-information-using-the-my-aged-care-provider-portal).
My Aged Care Provider Portal User Guide – Part One June 2019
15
You will need to set up at least one outlet in the provider portal to add and maintain information about the services your organisation delivers in order to receive referrals.
2.1.1 How do I create or add a new outlet?
Administrators need to set up outlets in the provider portal before service information can be added.
When you create an outlet, the status is set to ‘Inactive’ by default. You must activate the outlet and create service items in an outlet before it can be made operational.
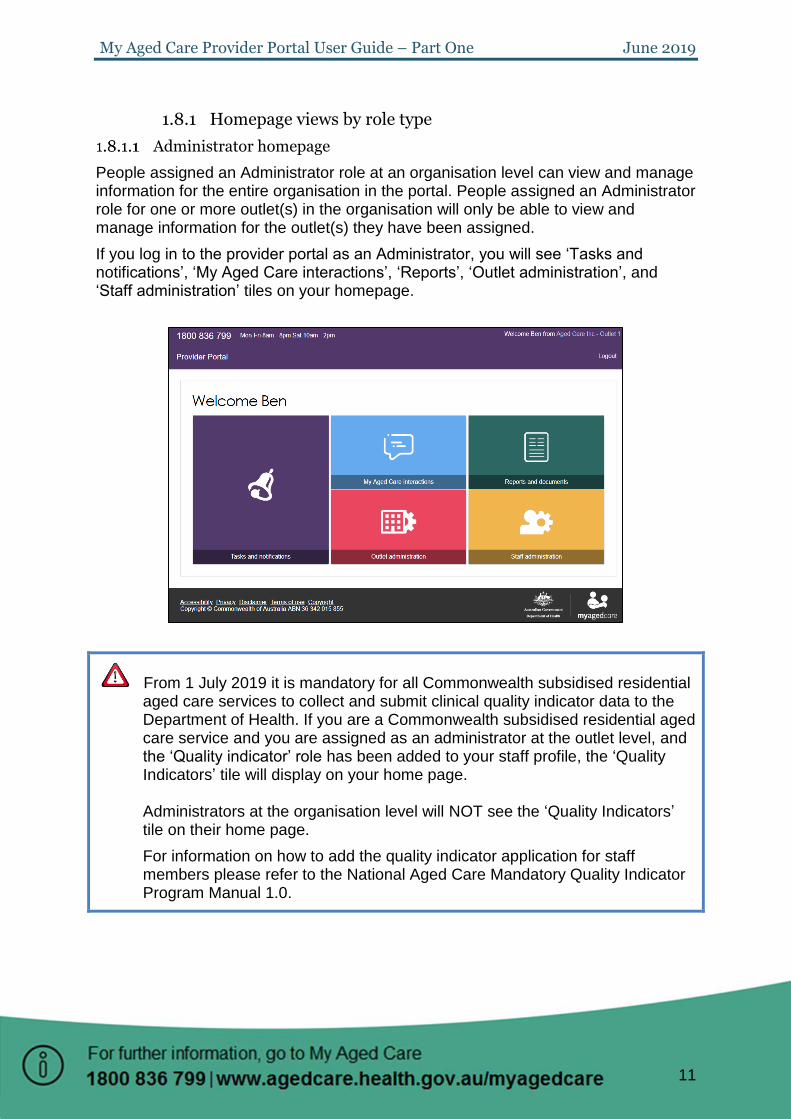
1. From the Outlet administration page, select 'Add new outlet'.
2. Enter outlet details. To add an outlet address, select 'Add outlet address'.

My Aged Care Provider Portal User Guide – Part One June 2019
16
3. Fill out your address details, Select 'Validate this address'.
4. Confirm that the address is displayed correctly, then select 'Save address'.

My Aged Care Provider Portal User Guide – Part One June 2019
17
If the address has been entered correctly but is not returned as a result, select 'Not found use entered address anyway'.
Complete the remaining fields. Select 'Create outlet' in order to save the record and
create the outlet.
The outlet has now been created and the details for the outlet have been saved.
Repeat this process for remaining outlets, if required.

My Aged Care Provider Portal User Guide – Part One June 2019
18
When you create an outlet, the status is set to ‘Inactive’ by default. You must have service items added to an outlet before it can be activated. The process for activating an outlet is described later in this guide.
2.1.2 How to view outlets
To view outlets, follow the procedure below.
1. Select 'Outlet administration' from the home page.
You can view all of the outlets for your organisation.
If you are assigned the role of Staff Member or Team Leader only, your home page will not display the ‘Outlet administration’ tile.

My Aged Care Provider Portal User Guide – Part One June 2019
19
2.1.3 Organisation philosophy
Organisation philosophy attributes will be shown in the service finder results and displayed as part of the detailed information for each of your services.
1. Add/edit cultural specialisations.
Click the ‘‘Edit’ icon next to ‘Cultural specialisations’ to select those groups that you have a focus on providing culturally specific care to.
You can choose to apply this to all services in your organisation by using the ‘Save and apply to all Outlets’ option, or save as a default for all new services added by using the ‘Save and don’t apply to all Outlets’ option.

My Aged Care Provider Portal User Guide – Part One June 2019
20
If you see an error message stating that ‘Maximum Exit Amount’ is a mandatory value, then you will need to set this up before proceeding. Please see section below for details on how to do this.
2. Add/edit religious specialisations.
Click the ‘edit’ icon next to ‘Religious specialisations’ to indicate if you have a focus on delivering care that aligns with particular religious needs or values.
You can choose to apply this to all current services in your organisation by using the ‘Save and apply to all Outlets’ option, or save as a default for all new services added by using the ‘Save and don’t apply to all Outlets’ option.

My Aged Care Provider Portal User Guide – Part One June 2019
21
3. Setting the Maximum exit amount
Maximum exit amount is for Home Care Package providers to complete. Further information on Home Care Packages can be found on the Department’s website. If you are not funded for Home Care Packages you will not need to set this up.
The maximum exit amount refers to the sum that a provider may include in a home care agreement and deduct from any unspent funds upon a client ceasing care with them. This is set at the organisation level and inherited by all outlets that provide Home Care Package services. A Home Care Package provider must enter an amount even if it is not charged (enter $0 if not charged).
1. If you are required to set a maximum exit amount for your Home Care Package services and have not yet done so, you will have an option to enter an amount by
selecting the ‘edit’ icon next to the maximum exit amount.
The ‘View changes’ link displays the history of changes made to the maximum exit amount including the date the change occurred. The link will not display until a change has been made.

My Aged Care Provider Portal User Guide – Part One June 2019
22
2. Save new amount. Enter the new amount and select ‘Save and apply to all Outlets’ to save the new amount.

My Aged Care Provider Portal User Guide – Part One June 2019
23
Adding service items
You will need to create and maintain information about the aged care services that your organisation provides (known as service items) in the provider portal in order to receive referrals through My Aged Care.
It is important that information about the services you provide is kept up to date as the information is publicly displayed for consumers on the service finder on the My Aged Care website (www.myagedcare.gov.au), and used by My Aged Care contact centre staff and assessors to refer clients to service(s).
If you are adding or updating multi-purpose services or Short-Term Restorative Care (STRC) as a service type, please refer to the quick reference guides available here: Information for Service Providers.
Services need to be linked to one or more of your outlets.
You can also add service sub-types under your service items. The steps to edit service sub-types are outlined in Section 2.2.3 on page 39 of this guide.
2.2.1 Adding a service item
The steps to add a service item to an outlet are outlined below.
Step One: Select ‘Outlet administration’ from the homepage.

My Aged Care Provider Portal User Guide – Part One June 2019
24
1. From the Outlet administration page, select the name of the outlet on the outlet card that you want to add a service item to.
The 'View outlet' page will be displayed.
2. From the 'View outlet' page, select View Service Items'.

My Aged Care Provider Portal User Guide – Part One June 2019
25
3. From the View Service Items page, select ‘Add a service item’.
4. Select the program for the service that you wish to add.
5. Select ‘Funded’ for the service item you are adding
'Funded' refers to government subsidised services that are funded and approved by the Australian Government under a Commonwealth aged care programme. Although the functionality currently exists in the service provider portal to add non-funded services, these will cease to be visible on the new My Aged Care website as previously communicated by the Department.
For Home Care Package services this option will not be available as all services must be Commonwealth government subsidised

My Aged Care Provider Portal User Guide – Part One June 2019
26
6. For funded services, select the service you want to add to your outlet by selecting the relevant service item and then select 'Save'. You can refine the list of service items by entering details and using the 'Filter' function.
The service item will now display in the Outlet details page under ‘Services’.
If you are adding a new Home Care Package service, you will be required to enter a unique name for the service in the ‘Service Item Name’ field that is displayed.
The service item will be defaulted to ‘Offline’ and the status will need to be changed to ‘Operational’ before it is displayed on the public service finder. The process for activating a service item is described later in this guide.

My Aged Care Provider Portal User Guide – Part One June 2019
27
Once services have been added to an outlet, you can filter the list of services that are listed under a specific program by status, service availability and waitlist availability.
2.2.2 Editing a service item
You are able to edit service item details, including:
Service item name
Service delivery area
If a service caters for diverse needs
Upload promotional attachments (for residential facilities)
Edit Home Care Package specific attributes
Enter a detailed description for the service item.
The steps for editing service item information are outlined below.
Only non-contractual information can be edited in the provider portal. The steps you need to take to request changes to contractual information are outlined in Section 2.3.5 on page 60 of this guide.
Step One: Select ‘Outlet administration’ from the homepage.

My Aged Care Provider Portal User Guide – Part One June 2019
28
Step Two: Select the outlet card you want to edit by selecting the outlet name.
Step Three: On the ‘View outlet’ page, Select View Service items then select ‘Edit’ next to the relevant service item.

My Aged Care Provider Portal User Guide – Part One June 2019
29
The ‘Service details’ page will display.
Step Four: Make the required changes and select ‘Save’. Read only information is contractual information, and cannot be edited via the provider portal. Any additional service information can be added in the ‘Service description’ free text field. This information will be displayed in the public service finder on the My Aged Care website to assist clients in selecting a provider.
The steps for attaching promotional material are outlined in Section 2.2.2.2 in this guide.
Editing availability of services and waitlists for a service
You can maintain information about the availability of service items via the provider portal.
To maintain a waitlist via the provider portal you must ensure that the waitlist availability status on the service item is set to ‘Yes’ to turn on the waitlist, or ‘No’ to turn off the waitlist.
1. Navigate to the ‘View Outlet’ details from the ‘Outlet administration’ page for the outlet that you want to edit service and waitlist information and click on ‘View service items’.
My Aged Care Provider Portal User Guide – Part One June 2019
30
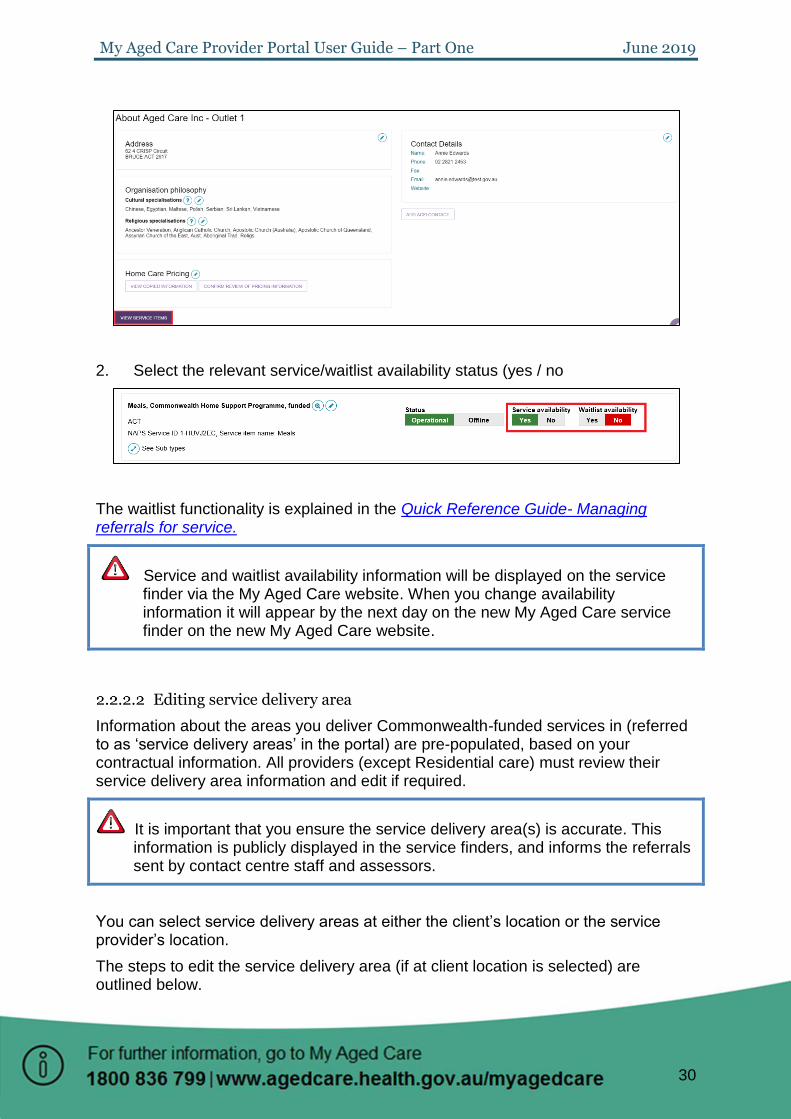
2. Select the relevant service/waitlist availability status (yes / no
The waitlist functionality is explained in the Quick Reference Guide- Managing referrals for service.
Service and waitlist availability information will be displayed on the service finder via the My Aged Care website. When you change availability information it will appear by the next day on the new My Aged Care service finder on the new My Aged Care website.
Editing service delivery area
Information about the areas you deliver Commonwealth-funded services in (referred to as ‘service delivery areas’ in the portal) are pre-populated, based on your contractual information. All providers (except Residential care) must review their service delivery area information and edit if required.
It is important that you ensure the service delivery area(s) is accurate. This information is publicly displayed in the service finders, and informs the referrals sent by contact centre staff and assessors.
You can select service delivery areas at either the client’s location or the service provider’s location.
The steps to edit the service delivery area (if at client location is selected) are outlined below.

My Aged Care Provider Portal User Guide – Part One June 2019
31
Step One: Select ‘Outlet administration’ from the homepage.
My Aged Care Provider Portal User Guide – Part One June 2019
32
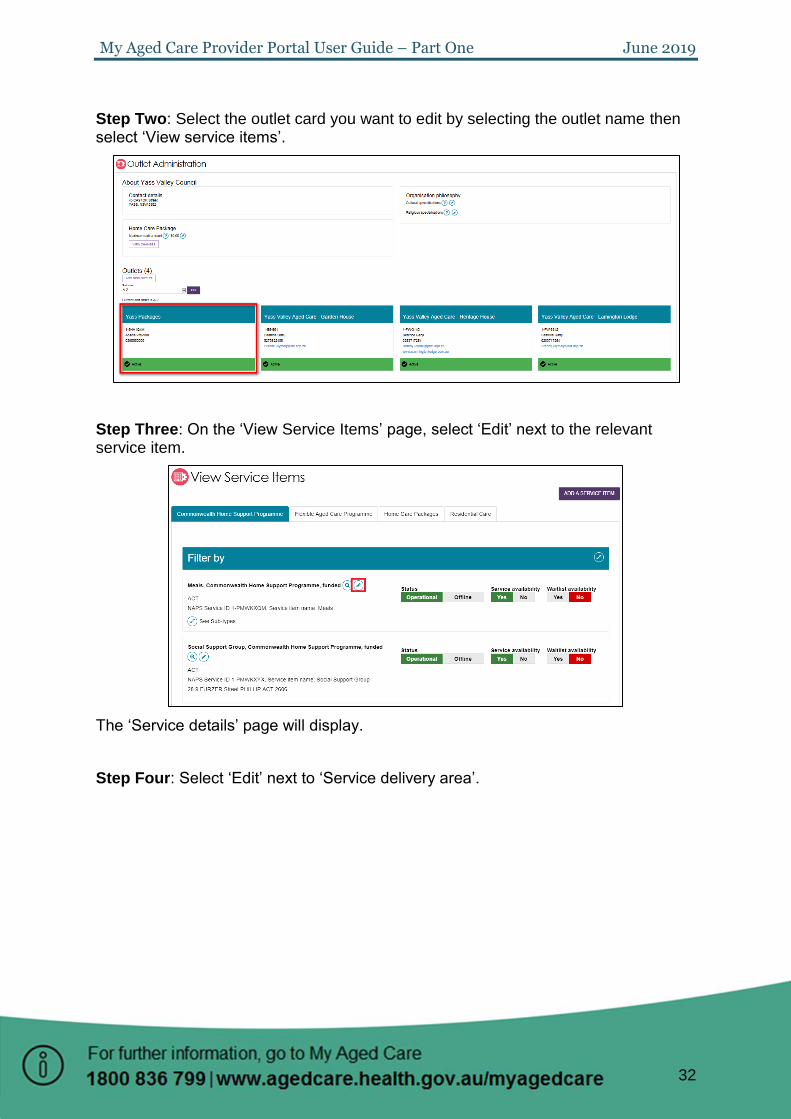
Step Two: Select the outlet card you want to edit by selecting the outlet name then select ‘View service items’.
Step Three: On the ‘View Service Items’ page, select ‘Edit’ next to the relevant service item.
The ‘Service details’ page will display.
Step Four: Select ‘Edit’ next to ‘Service delivery area’.

My Aged Care Provider Portal User Guide – Part One June 2019
33
Step Five: Select the service delivery type (At provider location/at client location).
If you have selected at client location, you can choose the suburb(s) the service is delivered in. By default the entire region, in which you are funded to provide service, is selected. You can choose to search for a specific suburb to add, add all the suburbs in the selected state, or add all the suburbs in the selected region.
The ‘List of serviced suburbs’ is automatically saved upon adding new suburbs. Select ‘Close’ to go back to editing the service.

My Aged Care Provider Portal User Guide – Part One June 2019
34
To remove suburbs from the list, select the suburbs you wish to remove using the checkbox and select ‘Remove selected’, or use ‘Remove all’ to start configuring your list of suburbs from the beginning. These changes are automatically saved. Click ‘Close’ to go back to editing the service.

My Aged Care Provider Portal User Guide – Part One June 2019
35
Attaching promotional material
Residential Care providers can add promotional material to be displayed in the service finder.
The steps to attach promotional material (for example, photos, brochures, menus) are outlined below.
Transition Care and CHSP providers have the option to attach promotional material in the portal; however this material will not be displayed on the service finder. Further information on attachments for Home Care Package providers is shown in the next section of this guide.
Step One: Select ‘Outlet administration’ from the homepage.
Step Two: Select the ‘Outlet Card’ you want to edit by selecting the outlet name.

My Aged Care Provider Portal User Guide – Part One June 2019
36
Step Three: On the ‘View outlet’ page, select ‘View Service Items’
Step Four: On the ‘View Service Items’ page, select ‘Residential Care’ and ‘Edit’ the relevant service item.
The ‘Service details’ page will display.
My Aged Care Provider Portal User Guide – Part One June 2019
37
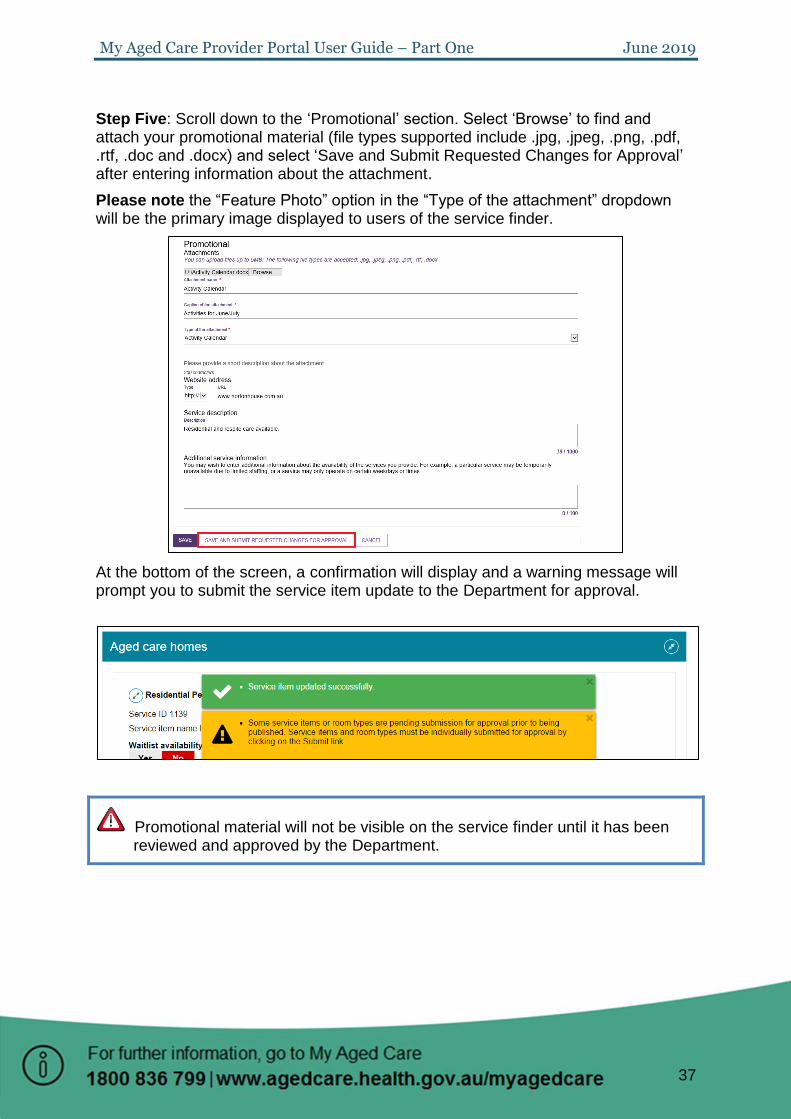
Step Five: Scroll down to the ‘Promotional’ section. Select ‘Browse’ to find and attach your promotional material (file types supported include .jpg, .jpeg, .png, .pdf, .rtf, .doc and .docx) and select ‘Save and Submit Requested Changes for Approval’ after entering information about the attachment.
Please note the “Feature Photo” option in the “Type of the attachment” dropdown will be the primary image displayed to users of the service finder.
At the bottom of the screen, a confirmation will display and a warning message will prompt you to submit the service item update to the Department for approval.
Promotional material will not be visible on the service finder until it has been reviewed and approved by the Department.

My Aged Care Provider Portal User Guide – Part One June 2019
38
The submitted material must be reviewed and approved by the Department. It is expected that it will take three business days. When approved, the promotional material will be displayed on the service finder via the My Aged Care website.
Home Care Package attributes
If you are configuring a Home Care Package service, a number of attributes specific to the delivery of this service type will become available to select and display on the service finder. These are shown as follows.
Specialisations Service providers of all care types are able to consistently identify their ability to provide services that cater to Diverse needs and language specialisations under the ‘Specialisations’ section. ‘Specialised services’ will be displayed only for HCP service items.
Diverse needs To select specific special needs groups that customised services may be offered for, select the relevant check boxes in the ‘Diverse needs’ section.
Check boxes should only be selected where there are specific measures in place to cater for that group. Guidelines will be available on the Department’s website.
Specialised services To indicate if this service has a focus on providing access to specific specialised services, you can mark them in the ‘Specialised services’ section.

My Aged Care Provider Portal User Guide – Part One June 2019
39
Languages To indicate if this service caters for specific language requirements, select the languages in the ‘Languages’ section. Select ‘Edit’ to bring up the selection and select ‘Save’ to save the configuration.
Hours of operation You can outline standard hours of operation for this service. By default you can enter specific Monday to Friday, Saturday and Sunday hours. You can also specify individual working days by using the ‘Customise’ option.
You can also indicate the average number of hours of service provision you provide each week per level of home care package.

My Aged Care Provider Portal User Guide – Part One June 2019
40
Adding pricing information to a Home Care Package service item or outlet
From 1 July 2019, publishing pricing information will be mandatory for all Home Care Package services and outlets. You are encouraged to complete this information now, but from 1 July 2019, you will not be able to save a new service and make it ‘Operational’, save changes to partially complete existing pricing information, edit waitlist information or confirm if you have reviewed pricing information if the service does not have the mandatory pricing information.
Up until this time, the current requirement to publish your current pricing schedule either via a pricing schedule website link (URL) or a pricing schedule document (e.g. PDF) remains. You will not be able to save updates to the Service Details or set home care package service items to ‘operational’ without your pricing schedule.
1. From the ‘Home Care Packages’ tab in the ‘View Service Items’ page, select the ‘Edit’ icon next to the Home Care Package services you wish to add pricing information to.
Alternatively, from the ‘View Outlet’ page, select the ‘Edit’ icon next to Home Care Pricing to edit the pricing information at the outlet level.
Please note: when you edit pricing information at the outlet level, this is a pricing template that you can save and apply to the services within a single outlet or all

My Aged Care Provider Portal User Guide – Part One June 2019
41
outlets in your organisation. This is best used when the pricing information for a number of your services is the same.
Only information saved at the service item level will display on the My Aged Care service finder. If you select ‘Save’ at the outlet level this will save the information locally and will not display in the My Aged Care service finder. Select ‘Save and apply to all service items of this outlet’ to display your changes in the My Aged Care service finder.
2. The ‘Home care pricing service details’ page will be displayed. Select ‘Home Care Pricing’ to add or edit pricing information for that service.
3. From the ‘Home Care Pricing’ tab, providers are able to enter detailed information for home care services about:
a. Information about service offering and value statements

My Aged Care Provider Portal User Guide – Part One June 2019
42
b. Approximate Home Care Package Amounts
If you do not charge the maximum basic daily fee you will be required to indicate a price for each package level. If you do not charge any basic daily fee you will still be required to note a price, for example $0.
c. Care Management Approach and relevant prices and number of hours of service
Only select ‘N/A’ where you do not provide or charge for care management in this way.
d. Details and prices for common services that are offered under each level of Home Care Package

My Aged Care Provider Portal User Guide – Part One June 2019
43
Only select ‘N/A’ where you do not provide this particular service, for example on Public Holidays. If you provide the service but do not charge an extra amount, enter in the price.
e. Other pricing information that may be charged by the provider
Only select ‘N/A’ where you do not charge for package management. If you do not charge for other costs listed in this selection, enter $0.
The help text against each pricing attribute provides further guidance on what specific information providers should be entering.
4. Under the ‘Full Price List’ section, a pricing schedule website link (URL) and/or a pricing schedule attachment can be added.
To add a pricing schedule website link type in the URL in the “Provide a website link” section.

My Aged Care Provider Portal User Guide – Part One June 2019
44
Ensure that the website URL you enter is a valid website address, and includes ‘www.’ at the beginning of the URL.
To upload the pricing schedule attachment you must select “Browse” and choose the document (e.g. PDF file) you wish to upload. Name the attachment and provide a caption or short description of the attachment.
If you are editing an individual service item select ‘Save’ to apply all pricing information you have added to the home care service.
Alternatively, if you are an Administrator and editing pricing information at the outlet level, you can choose to save and apply the pricing information to all Home care service items in that outlet, save locally (before applying to any services), apply these details to all of your outlets (if you are an Organisation Administrator) or ‘Cancel’ to discard any changes made.
All pricing information saved, including pricing schedule attachments, will appear by the next day on the new My Aged Care service finder on the new My Aged Care website, and do not require approval from the Department.
Additional home care pricing features
1. Home care service providers are required to review and if required, update their pricing information annually. In the scenario where no changes need to be made to any of the pricing information, providers can confirm that they have reviewed their pricing.

My Aged Care Provider Portal User Guide – Part One June 2019
45
To do this select 'Confirm Review of Pricing Information’
Select the service(s) that you wish to confirm, and select ‘Confirm Review’.
2. Home care service providers can also view a history of copied pricing information that has been applied to services within an outlet. Select ‘View Copied Information’ to view this history.
3. Home care service providers can also view and print a copy of the pricing information they have added to individual services, which can then be attached to clients’ Home Care Agreements.
Editing service sub-types
Service sub-types are individual services listed under a service item within an outlet in the provider portal.

My Aged Care Provider Portal User Guide – Part One June 2019
46
2.2.2.7.1 Adding a service sub-type
The steps to add a service sub-type for a service item are outlined below.
Service sub-types are automatically populated when service items are added to your outlet; however Administrators can edit service sub-types as needed.
Step One: Select ‘Outlet administration’ from the homepage.
Step Two: Select the name of the outlet on the ‘Outlet card’ you want to add a service sub-type to. The ‘View outlet’ page will be displayed. Select ‘View Service items’
Step Three: To add a service sub-type, select the blue arrow next to ‘See Sub-types’ under the service to see expanded service details.

My Aged Care Provider Portal User Guide – Part One June 2019
47
Then select ‘Add/Remove Subtypes’.
The ‘Service Sub type’ page will be displayed.
Step Four: Select the sub-type you want to add to the service and then select ‘Save’.
The service sub-type will be added to the service item. It will also be displayed in the service finder.

My Aged Care Provider Portal User Guide – Part One June 2019
48
2.2.2.7.2 Removing a service sub-type
The steps to remove a service sub-type for a service item are outlined below.
Step One: Select ‘Outlet administration’ from the homepage.
Step Two: Select the name of the outlet on the ‘Outlet card’ you want to remove a service sub-type from. The ‘View outlet’ page will be displayed. Select ‘View Service items’

My Aged Care Provider Portal User Guide – Part One June 2019
49
Step Three: Select the blue arrow next to ‘See Sub-types’ under the service to see expanded service details.
Then select ‘Add/Remove Subtypes’.
Step Four: In the ‘Add/Remove Subtypes box, deselect the subtypes you want to remove the from the service item and save.
The service sub-type will be removed, and information about the service sub-type will not display in the service finder.

My Aged Care Provider Portal User Guide – Part One June 2019
50
2.2.2.7.3 Maintaining availability of service sub-types and waitlists for a service sub-type
You can maintain detailed information about service sub-types for a service that you offer via the provider portal. You are able to edit details about:
Service sub-type availability (and waitlist)
Hours of operation for the service sub-type
Notes of staffing for the service sub-type
Whether transport is provided as part of that service
1. Navigate to the ‘View Outlet’ details from the ‘Outlet administration’ page for the outlet that you want to edit service and waitlist information and click on ‘View service items’.
2. To edit availability and waitlist information for service sub-types, select the arrows next to ‘See Sub-types’ to display the sub-types that have been added to the service.
3. Here you can edit the sub-type availability and sub-type waitlist availability by clicking the toggles, and edit additional information about the service sub-type by selecting the ‘Edit’ icon.

My Aged Care Provider Portal User Guide – Part One June 2019
51
4. Add any additional information about operating hours, staffing or transport for that service sub-type and select ‘Save’.
Your updated information will saved.

My Aged Care Provider Portal User Guide – Part One June 2019
52
Service sub-type information will be displayed on the service finder via the My Aged Care website. When you change this information it will appear by the next day on the new My Aged Care service finder on the new My Aged Care website.

My Aged Care Provider Portal User Guide – Part One June 2019
53
2.2.3 Adding a room type
Residential Care providers can add information about the types of rooms their organisation offers.
The steps to add room information are outlined below.
Step One: Select ‘Outlet administration’ from the homepage.
Step Two: Select the name of the outlet on the ‘Outlet Card’ you want to add room information to. The ‘View outlet’ page will be displayed.

My Aged Care Provider Portal User Guide – Part One June 2019
54
Step Three: Select the blue arrow next to the service and select ‘See room types’.
Then click ‘Add Room Type’
‘Room Type’ page will be displayed.
Step Four: Enter required information in the ‘General room information’ and ‘Pricing information’ sections

My Aged Care Provider Portal User Guide – Part One June 2019
55
Accommodation prices above a refundable deposit amount of $550,000 (or equivalent daily payment) must be approved by the Aged Care Pricing Commissioner.
If the Aged Care Pricing Commissioner has not approved this price, or you have not submitted an application for approval of this price, you cannot publish this price. You cannot charge this price until it is approved by the Aged Care Pricing Commissioner.
Please note that when an approval is granted by the Aged Care Pricing Commissioner, the approved amount is not automatically updated on the My Aged Care website. Providers must update their own pricing information using the Aged Care Provider Portal.

My Aged Care Provider Portal User Guide – Part One June 2019
56
Step Five: Enter the required information under ‘Key feature statement’. Select ‘Save and Submit Requested Changes For Approval’ after all the required information has been entered.
Fields marked with an asterisk (*) are mandatory.

My Aged Care Provider Portal User Guide – Part One June 2019
57
This room information will be displayed on the service finder once approved by the Department (allow 3 business days).
If you save the room type but do not select ‘Submit’, you will be notified that there are room types requiring approval by the Department and be prompted to submit the room type to the Department prior to displaying on the public service finder.

My Aged Care Provider Portal User Guide – Part One June 2019
58
2.2.4 Transferring service items
Organisation administrators may choose one or multiple service items to transfer between outlets of an organisation in the provider portal. Using this function, administrators can:
Select and list the service item(s) you wish to transfer
Select an outlet to which you may transfer service item(s)
Generate and export a report listing service referrals linked to the service item(s)
If you are required to transfer clients between organisations, for example, as part of a merger or acquisition, contact the My Aged Care Service Provider and Assessor Helpline on 1800 836 799, who will be able to intiate the transfer of clients for you.
This functionality does not apply to residential care (permanent and respite).
To transfer a service item between outlets, follow the steps below.
1. From ‘Outlet administration’ select the outlet that contains the service items you wish to transfer to a different outlet.
2. Under ‘View Service Items’, click on the ‘Transfer Service Item’ button.

My Aged Care Provider Portal User Guide – Part One June 2019
59
3. Select the outlet you wish to transfer the service items to using the list provided. You can search for a specific outlet using the search function. Click ‘Next’ to continue.
4. Select the service item(s) that you want to transfer to another outlet. You can search for specific service items using the search functionality (by Programme or Service type). Click ‘Next’ to proceed to the next screen. If you click on ‘Cancel’, you will exit the Transfer process and be re-directed to the ‘View Outlet’ screen.
The following information is displayed to help identify each service item: the service type, NAPS service ID, service item name, funding state and funding region.

My Aged Care Provider Portal User Guide – Part One June 2019
60
You can transfer up to a maximum of 25 service items.
5. Review the information to ensure that it is correct. To remove a service item, click the red bin icon. To cancel the transfer, click ‘Cancel’.
6. To see the impact the service transfer will have on your organisation before you complete the transfer, select the ‘Save Transfer and Generate Impact Report’ button.
This report will appear in the ‘Reports and documents’ tab. You can review the report and resume the transfer at a later stage.
The following banner will display.
The ‘Transfer Impact Report’ may, on occasion, take some time to generate. If this happens, an alert message will prompt on screen. You can navigate away from the ‘Transfer Service Inventory Items’ screen, and be notified when the ‘Transfer Impact Report’ completes. Alternatively, you may choose to transfer service inventory items without reviewing the report at any time.

My Aged Care Provider Portal User Guide – Part One June 2019
61
7. If you have reviewed the impact of the transfer and want to proceed, select ‘Transfer Services’.
8. To make any changes, click ‘Cancel’. To finalise the transfer, click ‘Confirm Transfer’.
The transfer may take some time to complete. Review the status of the transfer by reviewing the service transfer log.
When the transfer action has started, the impacted records in the transfer process will be locked – the transfer process will run in the background.
Users will be able to view the records, but cannot change the details until the transfer process has successfully completed.

My Aged Care Provider Portal User Guide – Part One June 2019
62
2.2.5.1 Reviewing the Service Transfer Log
To review the status or details of previous and current service transfers, review the Transfer Log.
1. Select ‘Outlet administration’ from the homepage.
2. Select an outlet to access the transfer log.
3. Select the ‘View Transfer Logs’ button.

My Aged Care Provider Portal User Guide – Part One June 2019
63
The transfer log will display information about past and current service and client transfers, including:
Transfer type (service or person)
Transfer date
Status (In progress, completed, completed with errors)
For more detailed information about the transfer, click the magnifying glass icon.
If a transfer has not been completed successfully, you can retry by clicking the magnifying glass icon, selecting the items you want to retry and clicking the ‘Retry Selected’ button.

My Aged Care Provider Portal User Guide – Part One June 2019
64
2.2.6 Transferring clients between service items
Organisation administrators may choose one or multiple clients to transfer between services (of the same service type) within an outlet or to another outlet within their organisation.
This functionality does not apply to residential care (permanent and respite).
To transfer a client(s) to another service, follow the steps below.
1. From ‘Outlet administration’ select the outlet that contains the clients you wish to transfer to another service (the outlet you want to transfer clients ‘from’).
2. Click on the ‘Transfer Clients’ button to start the process of transferring client(s) to another service.

My Aged Care Provider Portal User Guide – Part One June 2019
65
3. Select the service that the client(s) is currently linked to. You can use the search functionality to find specific service types. Click ‘Next’ to continue.
4. You can choose to transfer clients to another service within the same outlet or transfer clients to another service under another outlet. Choose from one of these options and select ‘Next’.
If you select ‘Transfer to another outlet’ you will not be able to proceed unless you select an outlet.
To transfer clients to another outlet, you must be an organisation administrator.
My Aged Care Provider Portal User Guide – Part One June 2019
66
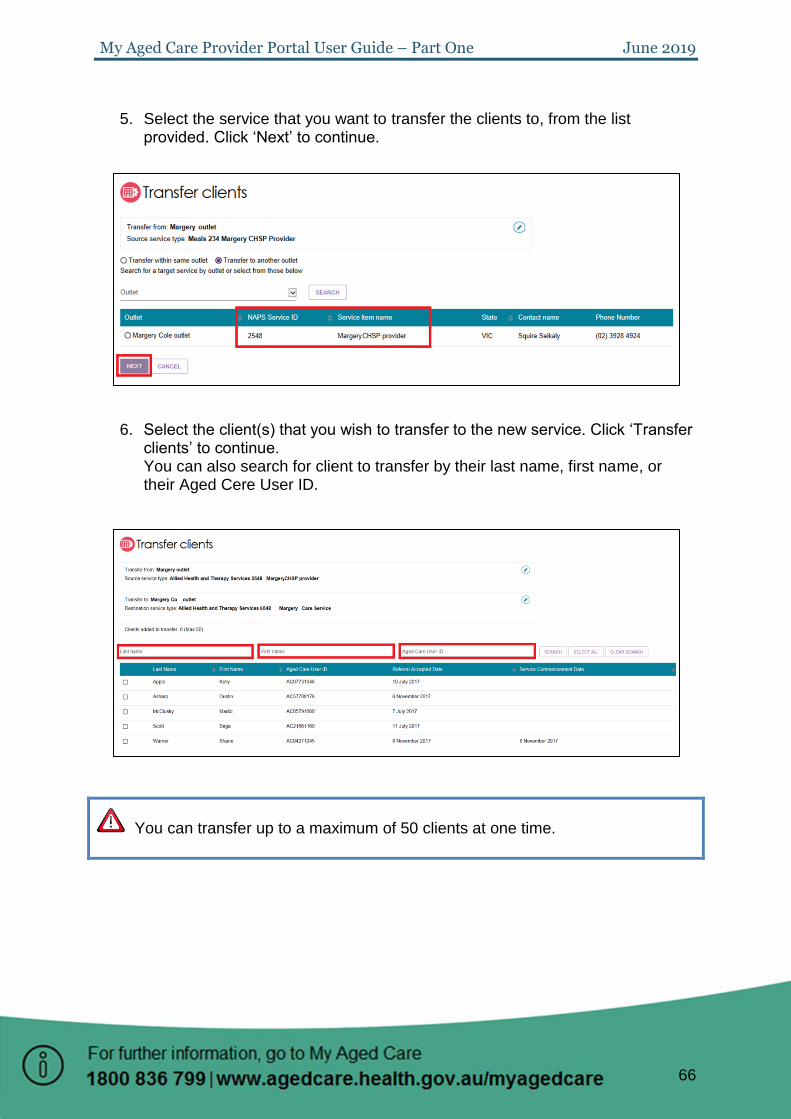
5. Select the service that you want to transfer the clients to, from the list provided. Click ‘Next’ to continue.
6. Select the client(s) that you wish to transfer to the new service. Click ‘Transfer clients’ to continue. You can also search for client to transfer by their last name, first name, or their Aged Cere User ID.
You can transfer up to a maximum of 50 clients at one time.

My Aged Care Provider Portal User Guide – Part One June 2019
67
7. Review the information about the transfer. To make any changes, click ‘Cancel’. If correct, select ‘Confirm transfer’ to complete the process.
2.2.6.1 Reviewing the Client Transfer Log
To review the status or details of previous and current client transfers, review the Transfer Log.
1. Select ‘Outlet administration’ from the homepage.
2. Select an outlet to access the transfer log.

My Aged Care Provider Portal User Guide – Part One June 2019
68
3. Select the ‘View Transfer Logs’ button.
The transfer log will display information about past and current service and client transfers, including:
Transfer type (service or person)
Transfer date
Status (In progress, completed, completed with errors)
For more detailed information about the transfer, click the magnifying glass icon.
If a transfer has not been completed successfully, you can retry by clicking the magnifying glass icon, selecting the items you want to retry and clicking the ‘Retry Selected’ button.

My Aged Care Provider Portal User Guide – Part One June 2019
69
If you continue to experience issues with transferring clients, please call My Aged Care on 1800 836 799 for assistance.

My Aged Care Provider Portal User Guide – Part One June 2019
70
2.2.5 Activating/deactivating a service item
The steps to activate/deactivate a service item are outlined below.
Step One: Select ‘Outlet administration’ from the homepage.
1. Step Two: Navigate to the ‘View Outlet’ details from the ‘Outlet administration’ page for the outlet with the service item that you want to activate/deactivate and click on ‘View service items’.
2. For the services that have been added to the outlet, select 'Operational' to activate the service item or 'Offline' to deactivate the service item under the 'Status' heading.

My Aged Care Provider Portal User Guide – Part One June 2019
71
Only ‘Operational’ services will display in the service finders.
The ‘Offline’ status has replaced the ‘Inactive’ status, and should be used to indicate where a funded service is not currently offered by the provider. For example, the service is at capacity.
Services that are ‘Inactive’ are services that are no longer funded by the Department. ‘Inactive’ services will not be visible in the My Aged Care provider portal. Please contact the Service Provider and Assessor Helpline if you have questions about your ‘Inactive’ services.
Maintaining service delivery outlets
2.3.1 Activating an outlet
After service items are added, outlet(s) need to be made active so that the following occurs:
The service items display in the service finder.
Contact centre staff and assessors can send electronic referrals to the appropriate outlet.
The steps to activate an outlet are outlined on the following page.

My Aged Care Provider Portal User Guide – Part One June 2019
72
1. Step One: Navigate to the ‘View Outlet’ details from the ‘Outlet administration’ page for the outlet that you want to activate, and select ‘Activate outlet’.
2. Select 'Activate outlet' to confirm that you wish for this information to be displayed
in the service finder. A warning message will display
Your outlet is now active and operational service item information will display in the service finder, and will display as ‘Active’ in the provider portal.

My Aged Care Provider Portal User Guide – Part One June 2019
73
Assessors can only match and refer to active services.

My Aged Care Provider Portal User Guide – Part One June 2019
74
2.3.2 Deactivating an outlet
To remove an outlet from the service finder on the My Aged Care website, and stop referrals being sent to the outlet, it must be deactivated.
The steps to deactivate an outlet are outlined below.
Step One: Select ‘Outlet administration’ from the homepage.
1. Step Two: Navigate to the ‘View Outlet’ details from the ‘Outlet administration’ page for the outlet that you want to deactivate.
2. Select 'Deactivate outlet' to confirm that you wish to deactivate the outlet.

My Aged Care Provider Portal User Guide – Part One June 2019
75
The outlet is now inactive, does not display on the relevant service finder or receive referrals, and displays as ‘Inactive’ in the provider portal.
An outlet cannot be made inactive if there are accepted and commenced services.
My Aged Care Provider Portal User Guide – Part One June 2019
76
2.3.3 Removing an outlet
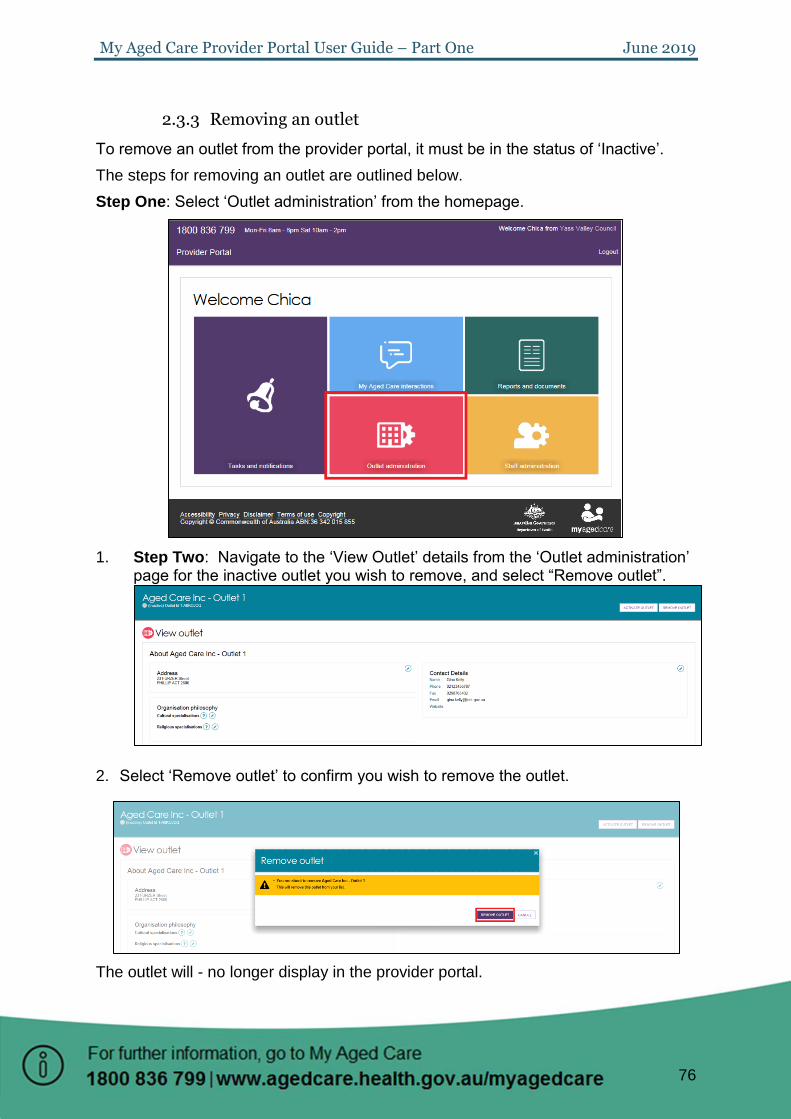
To remove an outlet from the provider portal, it must be in the status of ‘Inactive’.
The steps for removing an outlet are outlined below.
Step One: Select ‘Outlet administration’ from the homepage.
1. Step Two: Navigate to the ‘View Outlet’ details from the ‘Outlet administration’ page for the inactive outlet you wish to remove, and select “Remove outlet”.
2. Select ‘Remove outlet’ to confirm you wish to remove the outlet.
The outlet will - no longer display in the provider portal.

My Aged Care Provider Portal User Guide – Part One June 2019
77
If you want to create an outlet with the same name as the one you removed, you will need to call the My Aged Care service provider and assessor helpline on 1800 836 799.

My Aged Care Provider Portal User Guide – Part One June 2019
78
2.3.4 Editing outlet details
The steps to edit an outlet are outlined below.
Only non-contractual information can be edited in the provider portal. The steps you need to take to request changes to contractual information are outlined in section 2.3.5, on page 60 of this guide.
Step One: Select ‘Outlet administration’ from the homepage.
Step Two: Select the name of the outlet on the ‘Outlet card’ you want to edit.

My Aged Care Provider Portal User Guide – Part One June 2019
79
Step Three: On the ‘View outlet’ page, select the area that you would like to edit, ‘Address’, ‘Contact details’ or ‘Organisation philosophy’.
Step Four: Edit information, and select ‘Save changes’. To edit address details select ‘Edit’ next to the outlet address.
You can also change the ‘Organisation philosophy’ when viewing your outlet information.

My Aged Care Provider Portal User Guide – Part One June 2019
80
Step Five: Organisation philosophy.
Click ‘Edit’ next to ‘Cultural specialisations’ to select those groups that you have a focus on providing culturally specific care to.

My Aged Care Provider Portal User Guide – Part One June 2019
81
Click ‘Edit’ next to ‘Religious specialisations’ to indicate if you have a focus on delivering care that aligns with particular religious needs or values.

My Aged Care Provider Portal User Guide – Part One June 2019
82
Tasks and notifications
2.4.1 Viewing tasks and notifications
You can view tasks and notifications in the provider portal. The steps to view tasks and notifications are outlined below.
To view tasks for a particular outlet, you must be logged into the relevant outlet. You can do this by selecting the outlet you wish to log in to next to the ‘Logout’ link at the top right of the portal.
Step One: From the provider portal homepage select ‘Tasks and notifications’.
Step Two: To view tasks for your organisation select ‘Tasks’. Select an outlet to view tasks related to that outlet.
In the Tasks tab, you will be able to view all tasks that are relevant to your role. You can sort tasks by:
- Due date

My Aged Care Provider Portal User Guide – Part One June 2019
83
- Category
- Title/Description
- Aged Care User ID
- Client name
- Activity ID
Tasks that have been marked as important for your outlet by your outlet administrator will be displayed with a visual indicator. The managing preferences section in this guide explains how to set tasks as important.
Step Three: To view notifications for your organisation, select ‘Notifications’. Select an outlet to view tasks related to that outlet.
You will only be able to see tasks and notifications that are associated to your outlet and for clients you are providing services to. Assessors will be able to see all tasks and notifications for clients.
1. You can search for specific tasks using the filter options, or using custom
filters in Advanced Search. Select the arrows to the right to expand or
collapse the filter options.
My Aged Care Provider Portal User Guide – Part One June 2019
84
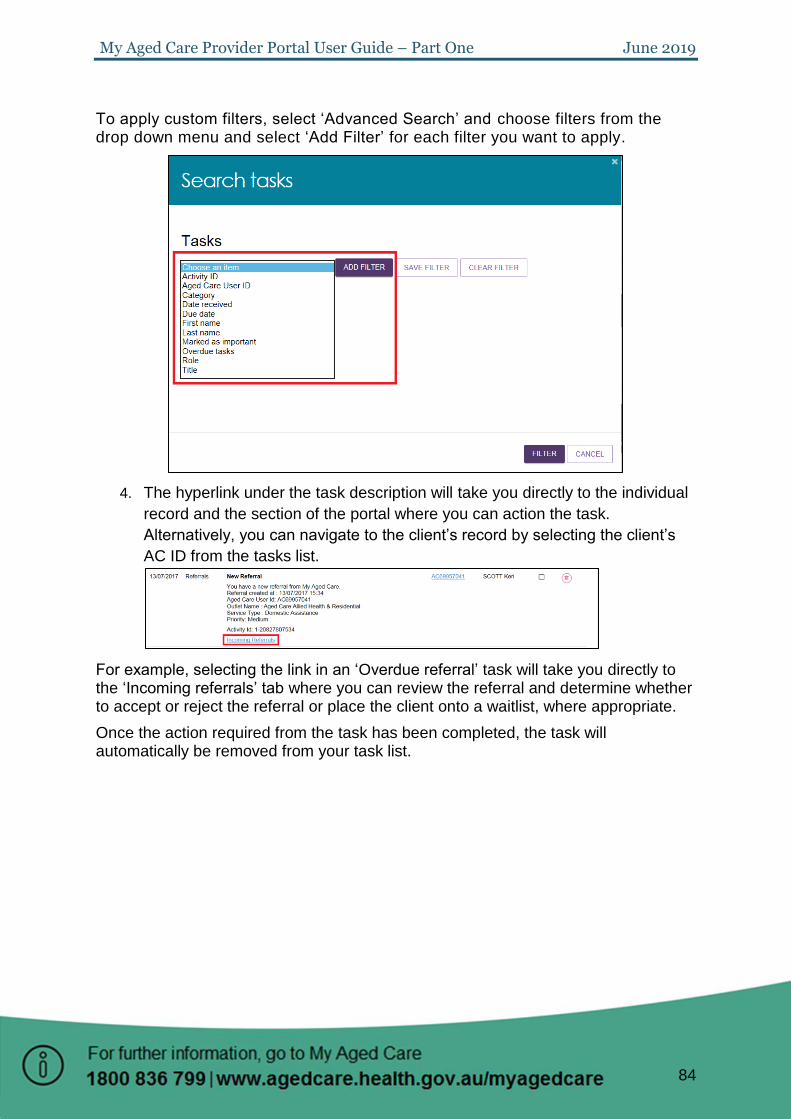
To apply custom filters, select ‘Advanced Search’ and choose filters from the drop down menu and select ‘Add Filter’ for each filter you want to apply.
4. The hyperlink under the task description will take you directly to the individual
record and the section of the portal where you can action the task.
Alternatively, you can navigate to the client’s record by selecting the client’s
AC ID from the tasks list.
For example, selecting the link in an ‘Overdue referral’ task will take you directly to the ‘Incoming referrals’ tab where you can review the referral and determine whether to accept or reject the referral or place the client onto a waitlist, where appropriate.
Once the action required from the task has been completed, the task will automatically be removed from your task list.

My Aged Care Provider Portal User Guide – Part One June 2019
85
2.4.2 Managing task and notification preferences
You must be assigned an administrator role to manage task and notification preferences for your organisation or outlet. If you need to add this role to your user account, please see your organisation administrator.
As an administrator, you will be able to:
1. Edit email address and email frequency for new task and notifications
2. Turn off visibility of notifications in the assessor portal
3. View description of each task and notification, including which user types will
be able to see them
4. Edit individual task and notification preferences
5. Mark a task or notification as important to your outlet
These settings will affect all staff assigned to your outlet, so please ensure all staff are made aware of any changes you make.
1. From the provider portal homepage select ‘Tasks and notifications’.
2. Select the ‘Manage Preferences’ tab
3. If you are the administrator for your organisation, you will be able to select
which outlet you want to configure task and notification preferences for.

My Aged Care Provider Portal User Guide – Part One June 2019
86
If you are the administrator for your outlet, you will only be able to see your outlet’s preferences.
4. The preferences page for the outlet will open. At the top of the page, you can
configure the overall preferences for email preference, email address, email
frequency and notification visibility in the portal.
You can choose to hide all notifications, or hide individual notification types for the outlet. Selecting ‘No’ to hide all means that no notifications for the outlet will be visible to staff associated with the outlet. Selecting ‘No’ for an individual notification type means that only notifications of that type will be hidden for staff associated with the outlet.

My Aged Care Provider Portal User Guide – Part One June 2019
87
5. Tasks and notifications are sorted by category. Select the arrow icon to
expand/collapse each category.
For each task or notification you will be able to view:
Type (e.g. task or notification)
Title and brief description of the why the task or notification has triggered
User type who can view or action the task or notification
For each task or notification you will be able to individually configure:
Whether to send an email when a task or notification generates
Frequency of email notification, if enabled
Whether to display a task or notification as important in the portal
If you choose to mark a task or notification as important, staff within your outlet who can view that particular task/notification will see a visual indicator in their portal. For example, a notification of home care correspondence.

My Aged Care Provider Portal User Guide – Part One June 2019
88
6. Select ‘Save’ when all changes have been made. You can reset the
preferences by selecting ‘Reset preferences’ at the top of the page.
Hint: Selecting the arrow in the bottom right of the screen will automatically take you to the top of the page.

My Aged Care Provider Portal User Guide – Part One June 2019
89
Creating and maintaining staff accounts
After you have created outlets for your organisation (outlined at Section 2.3), you can create and maintain staff accounts. Information about the different staff roles is outlined at Section 1.8 on page 8 of this guide.
All staff must have an individual AUSkey linked to their organisation to access the provider portal. If you require access to the provider and/or assessor portal for multiple organisations, please note you will need a unique AUSkey and email address for each user account. For more information, visit https://abr.gov.au/AUSkey/.
2.5.1 Viewing staff accounts
By selecting ‘Staff administration’ on the homepage you can view all current staff that have access to the provider portal. You can sort staff alphabetically, or by the outlet(s) they are assigned to.

My Aged Care Provider Portal User Guide – Part One June 2019
90
2.5.2 Adding new staff accounts, allocating roles and outlets
After you have created outlets for your organisation you can create staff accounts. You will need to assign roles to your staff, and assign your staff to one or more outlets.
Staff can be assigned a number of roles (Administrator, Team Leader, Staff Member) within the provider portal. Staff members can be assigned more than one role at the same time. The role(s) assigned to staff will apply across all outlets they are assigned to.
The steps to add a new staff account are outlined below.
Staff assigned the ‘Administrator’ role for the organisation can manage all outlets for their organisation. Staff assigned the ‘Administrator’ role for one or more outlets will only be able to manage services and staff for the outlet(s) they have been assigned.
Step One: Select ‘Staff administration’ from the homepage.

My Aged Care Provider Portal User Guide – Part One June 2019
91
Step Two: Select ‘Add new staff’ from the staff administration page.
Step Three: You must enter staff details (First name, last name, unique email and a
contact number), assign role(s) to staff, and assign staff to one or more outlets. Next,
select ‘Create staff member’.

My Aged Care Provider Portal User Guide – Part One June 2019
92
You can assign staff to either the Organisation Level or Outlet Level. Organisation Level allows staff to access to the Organisation details, including all outlets for that organisation. Alternatively, you can choose to assign staff to access one, multiple, or all outlets under the Organisation.
The first time each staff member logs into the provider portal, they will need to follow the steps outlined in Attachment A.

My Aged Care Provider Portal User Guide – Part One June 2019
93
From 1 July 2019 it is mandatory for all Commonwealth subsidised residential aged care services to collect and submit clinical quality indicator data to the Department of Health. The National Aged Care Quality Indicator Program is an opportunity for residential providers to drive continuous quality improvement. Further information is provided on the department’s website.
Service Provider Administrators can add the ability for staff to enter Quality Indicator information on behalf of the outlet (as below).

My Aged Care Provider Portal User Guide – Part One June 2019
94
2.5.3 Editing a staff account
The steps to edit a staff account are outlined below.
Step One: Select ‘Staff administration’ from the homepage.

My Aged Care Provider Portal User Guide – Part One June 2019
95
Step Two: Select the name on the ‘Staff card’ that you want to edit.

My Aged Care Provider Portal User Guide – Part One June 2019
96
Step Three: Select ‘Edit staff details’.
Step Four: Edit staff details and select ‘Save changes’.

My Aged Care Provider Portal User Guide – Part One June 2019
97
2.5.4 Deactivating staff accounts
The steps to deactivate a staff account are outlined below.
Deactivating an account will permanently lock the account for the staff member and remove their access to the provider portal.
Step One: Select ‘Staff administration’ from the homepage.
Step Two: From the 'Staff administration page, select the name of the staff member on the 'Staff card' that you want to deactivate.

My Aged Care Provider Portal User Guide – Part One June 2019
98
Step Three: From the ‘View staff member’ page, select ‘Deactivate’.
Step Four: Select ‘Deactivate account’ to confirm.
The staff member account will now appear as ‘Inactive’ in the provider portal.

My Aged Care Provider Portal User Guide – Part One June 2019
99
2.5.5 Removing staff accounts
Inactive staff members (that have previously been deactivated) can be removed from organisations and outlets, and will no longer display in the provider portal.
The steps to remove a staff account are outlined below.
Step One: Select ‘Staff administration’ from the homepage.
Step Two: From the 'Staff administration’ page, select ‘Inactive’ from the ‘View Status’ drop down menu to view inactive staff.

My Aged Care Provider Portal User Guide – Part One June 2019
100
Step Three: Select the name of the staff member on the ‘Staff card’ that you want to
deactivate. The ‘View staff member’ page will be displayed.
Step Four: From the ‘View staff member’ page, select ‘Remove’.
My Aged Care Provider Portal User Guide – Part One June 2019
101
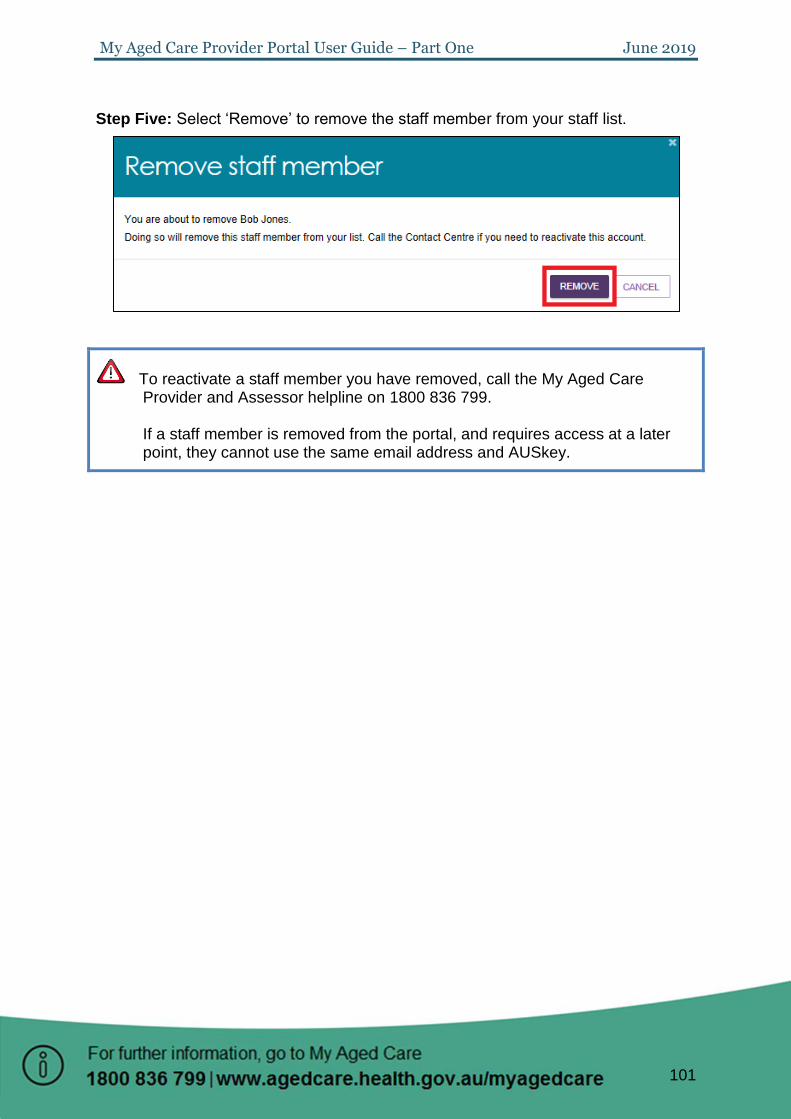
Step Five: Select ‘Remove’ to remove the staff member from your staff list.
To reactivate a staff member you have removed, call the My Aged Care Provider and Assessor helpline on 1800 836 799. If a staff member is removed from the portal, and requires access at a later point, they cannot use the same email address and AUSkey.

My Aged Care Provider Portal User Guide – Part One June 2019
102
Attachment A: First time login to the provider portal
Before you log in to the provider portal for the first time, you need to activate your account by completing the following steps.
If you are using VANguard FAS for secure authentication step two below does not apply. For more information on VANguard FAS, visit https://agedcare.health.gov.au/programs/my-aged-care/vanguard-federated-authentication-service-fact-sheet
You must have an individual AUSkey linked to your organisation to access the provider portal. For more information, visit https://abr.gov.au/AUSkey/.
Step One: Go to the ‘Information for service providers’ section of the Department’s
website (https://agedcare.health.gov.au/our-responsibilities/ageing-and-aged-
care/programs-services/my-aged-care/information-for-service-providers) and select
the ‘My Aged Care Provider Portal’ link. The provider portal can also be accessed at:
https://myagedcare-serviceproviderportal.dss.gov.au
Step Two: An Australian Government ‘Authentication Service’ screen will be displayed. Select your AUSkey credentials from the drop down list, then enter your AUSkey password and select ‘Continue’.

My Aged Care Provider Portal User Guide – Part One June 2019
103
Step Three: A DSS ‘Request activation code’ screen will be displayed. Enter the email address that is linked to your portal user account, and select ‘Continue’.
Step Four: You will receive an email with an activation code. You will only need to use this activation code when logging in for the first time.
If you do not receive an email with your activation code, contact your Organisation Administrator or the My Aged Care service provider and assessor helpline on 1800 836 799.
Step Five: Enter the activation code you received, and select ‘Confirm’. Your account has now been successfully activated.

My Aged Care Provider Portal User Guide – Part One June 2019
104
Your activation code is only valid for five days. If you require a new activation code, select ‘Resend activation Code’.
Step Six: Select ‘Go to My Aged Care provider portal’ to be directed to the provider portal.
Step Seven: The provider portal home screen will be displayed.

My Aged Care Provider Portal User Guide – Part One June 2019
105
You have now set up access to the provider portal. The next time you log in, follow the steps in Section 1.6, on page 7 of this guide.

My Aged Care Provider Portal User Guide – Part One June 2019
106
Attachment B: Generating reports and accessing forms
Providers can generate and view reports and access forms via the provider portal.
You will also be able to use the ‘Reports’ feature to print documents, including completed National Screening and Assessment Form (NSAF) PDF reports and client record PDFs.
Generating reports
Team Leaders and Staff Members can generate reports.
The steps to generate a report are outlined below.
Step One: Select ‘Reports and documents’ from the homepage. The ‘Reports and forms’ page will be displayed.

My Aged Care Provider Portal User Guide – Part One June 2019
107
Step Two: The ‘Reports and forms’ page features a ‘Reports’ tab and a ‘Forms’ tab. The reports tab displays a list of ‘Recently Requested Reports’ and ‘Reports’.
The ‘Recently Requested Reports’ will display client record PDFs or NSAF reports that have been generated by the user. Reports available under the ‘Reports and forms’ tab are the Workload Management report and Quality Indicators reports.
For information on how to generate quality indicator reports please refer to the National Aged Care Quality Indicator Program Manual 1.0.
Step Three: To generate a report, select the name of the report in the ‘Reports’ list.
n
Step Four: Select the Outlet ID, enter a start and end date, and an output type (CVS or PDF), then select ‘Request report’. If you do not want to generate the report, select ‘Cancel’.

My Aged Care Provider Portal User Guide – Part One June 2019
108
Viewing reports
The steps to view reports are outlined below.
Step One: Select ‘Reports and documents’ from the homepage. The ‘Reports and forms’ page will be displayed.
Step Two: In the ‘Recently Requested Reports’ list, select ‘View’ beside the report you would like to view.

My Aged Care Provider Portal User Guide – Part One June 2019
109
Step Three: Select the action you want to complete: ‘Open’, ‘Save’ or ‘Cancel’ the report.

My Aged Care Provider Portal User Guide – Part One June 2019
110
Accessing forms
The steps to access forms are outlined below.
Step One: Select ‘Reports’ from the homepage.
Step Two: Select the ‘Forms’ tab. A list of all forms available will be displayed.