module guide
TRANSCRIPT

Page | 1
Version: December 2013

Page | 2
Contents
Welcome to the Module Guide ........................................................................................................................................ 4
Website Banners ............................................................................................................................................................... 5
Banner Slider Main Column .......................................................................................................................................... 5
Banner Slider Site Width ............................................................................................................................................... 5
Banner Slider Small Column .......................................................................................................................................... 5
Banner Slider Half Column ............................................................................................................................................ 6
Collections ....................................................................................................................................................................... 11
Link Boxes ........................................................................................................................................................................ 15
Weather Module ............................................................................................................................................................. 18
Forecast Weather Module .......................................................................................................................................... 18
Advanced Weather Module ........................................................................................................................................ 20
Results - Last Searched/ last viewed ............................................................................................................................... 24
Latest News Lister ........................................................................................................................................................... 26
Newsletter ....................................................................................................................................................................... 28
Offer Boxes ...................................................................................................................................................................... 31
General Offer Boxes ................................................................................................................................................ 31
Travel Offer Lister - General offers ......................................................................................................................... 31
Geo Accommodation Lister ..................................................................................................................................... 38
RSS Display ...................................................................................................................................................................... 42
Search Boxes ................................................................................................................................................................... 46
Horizontal Search Box ................................................................................................................................................. 46
Vertical Search Box ..................................................................................................................................................... 46
Travel Search Box Vertical (Layout 2) ..................................................................................................................... 48
Travel Search Box Vertical ( Layout 3)..................................................................................................................... 50
Search Box/ Flight Results -Multi Leg .............................................................................................................................. 57
Social Sharing Widget ..................................................................................................................................................... 60
Editable Lists - Why book info ......................................................................................................................................... 62
You Tube ......................................................................................................................................................................... 64
Dropdown menus ........................................................................................................................................................... 68
Location Lists ................................................................................................................................................................... 70
Theme Manager .............................................................................................................................................................. 72
Trip Advisor Review Widgets .......................................................................................................................................... 73
E Travel Document Manager .......................................................................................................................................... 76
Multi-Currency ................................................................................................................................................................ 79

Page | 3
Currency Convertor ......................................................................................................................................................... 81
Full Multi-Lingual CMS Upgrade ..................................................................................................................................... 82
Rewards / Points System................................................................................................................................................. 83
SMS Integration .............................................................................................................................................................. 85
Order Handoff API ........................................................................................................................................................... 86
Sales Agent Quotation System ........................................................................................................................................ 88
Hot List ............................................................................................................................................................................ 91
Google Translate ............................................................................................................................................................. 93
Cruise .............................................................................................................................................................................. 95
Personalised web e-brochure ....................................................................................................................................... 100
CRM Reporting .............................................................................................................................................................. 101
Integrated Destination Content .................................................................................................................................... 104
Maps ............................................................................................................................................................................. 105
Mobile Website ............................................................................................................................................................. 106
Manage Bookings .......................................................................................................................................................... 107
Third Party Integrations ................................................................................................................................................ 108
Wufoo Forms ................................................................................................................................................................ 110
Page | 4
Welcome to the Module Guide
Digital Trip will have provided you with two links during your website handover. One link is for the front end of your website and the second is for your administration (CMS) area. You will also have been provided with login details to this area, these will appear as follows in your email: Front end for development site - http://test.digital-trip.co.uk Back end (CMS) of development site - http://test.digital-trip.co.uk/admin Back end (CMS) log in username –test 123 Back end (CMS) log in password – test 123
Our CMS guide will help you through the CMS, using this guide will assist you with all the modules.

Page | 5
Website Banners
This section will show you how to create a Banner, as shown in the examples below: There are four different types of Banner Sliders, which you can choose from the ‘Add Module’ box.
Banner Slider Main Column
Banner Slider Site Width
Banner Slider Small Column

Page | 6
Banner Slider Half Column
To add a banner slider onto your website, select the page you want to add it to, under ‘Page Layout & Content’
select a Column and add module ‘Banner Slider Half Column’. As this banner is a half column, it is suggested to be placed on either the left or right hand side.
The module will now appear in your page layout and you can add the images you wish to display. To add settings,
press on the green pencil to the left of the module

Page | 7
The default setting is to be enabled, if you wish to disabled this module un-tick the hide/show box. You can also select if you want to have rounded corners:
Rounded Corners Non rounded corners
Page | 8
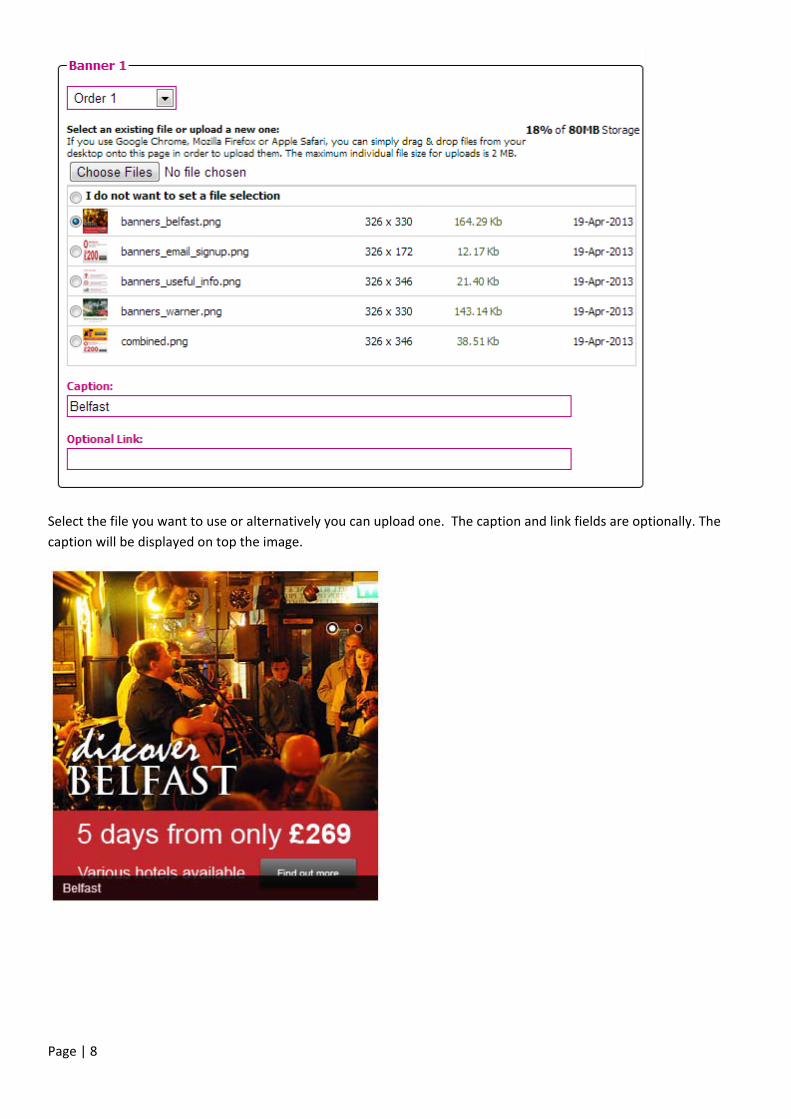
Select the file you want to use or alternatively you can upload one. The caption and link fields are optionally. The caption will be displayed on top the image.

Page | 9

Page | 10
Select the effect you want to be displayed between the images. The animation settings are already pre-set but you can amend this if you wish.
The Navigation Settings, allow you to choose the direction settings, manual/automatic transition and the text you want displayed.

Page | 11
Collections This is a really nice style to show a collection of offers. For example you could have a general 'Our Collections' or one specifically for 'weddings and honeymoons'.
To add this search box onto your website, select the page you want to add it to, under ‘Page Layout & Content’ add
module ‘Our Collections’.
You have the option to name the module so you can easily view it on the page layout section of the CMS page.
Edit Collections
In the CMS you can select a title for the 'collections', choose images and add descriptions and URL links. To add an image you select from the images stored in your site. To add a new image you can simply drag and drop an image into the list here or you can use the 'choose files' button.

Page | 12
You can select how many you wish to display on your site. As they display three across, to keep things even its best to select wither 3 or 6 or 9 etc.
Page | 13
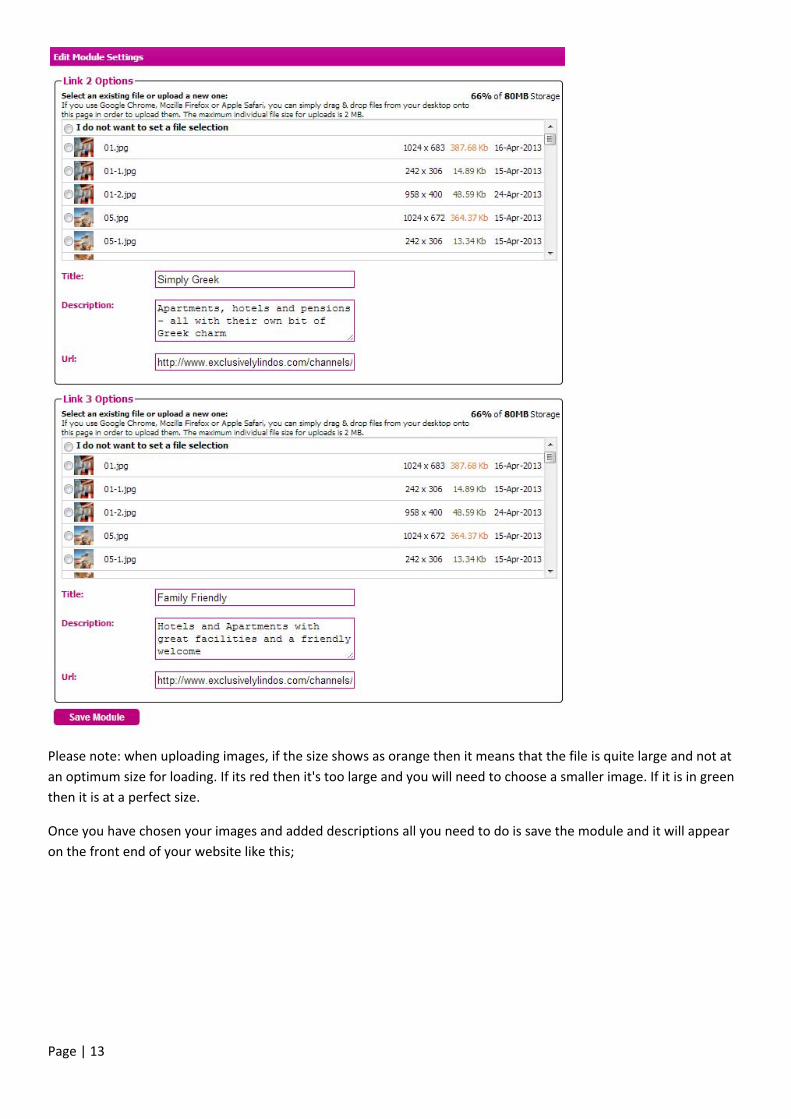
Please note: when uploading images, if the size shows as orange then it means that the file is quite large and not at an optimum size for loading. If its red then it's too large and you will need to choose a smaller image. If it is in green then it is at a perfect size.
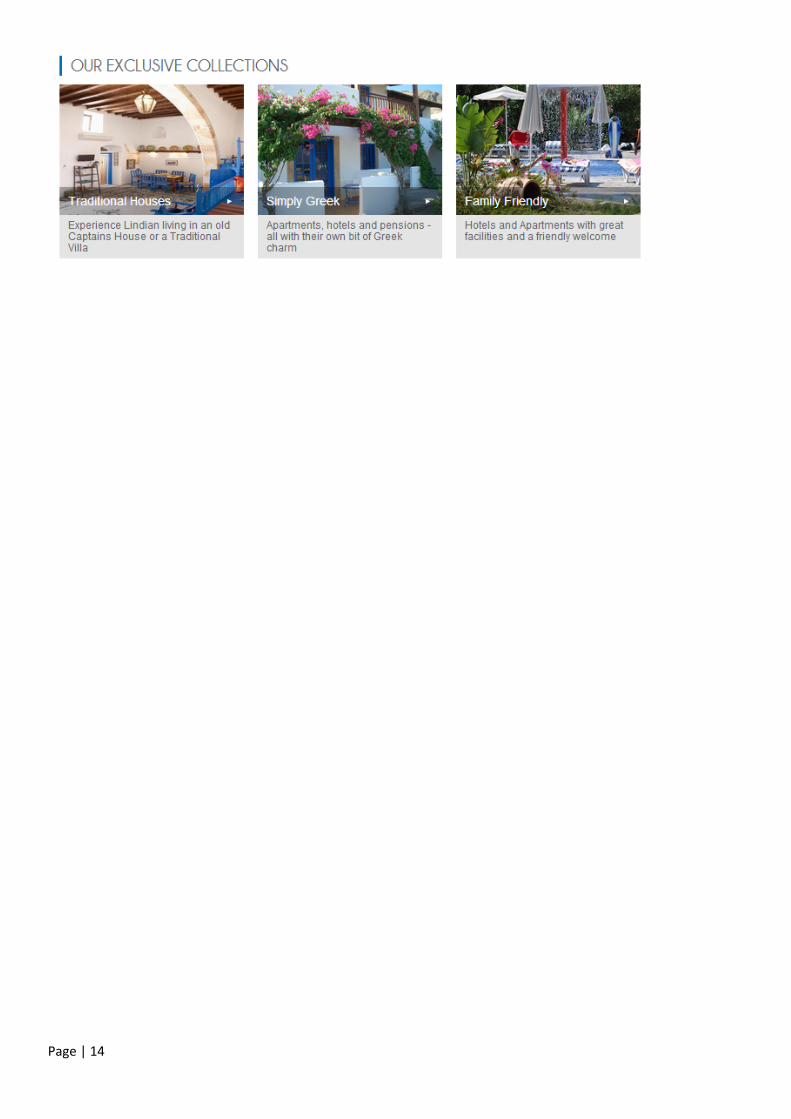
Once you have chosen your images and added descriptions all you need to do is save the module and it will appear on the front end of your website like this;
Page | 14

Page | 15
Link Boxes Similar to ‘Collections’ but with scrollable images and links to you Geo/CMS page.
To add this onto your website, select the page you want to add it to, under ‘Page Layout & Content’ add module
‘Link Boxes’.
Once the module has been added you can edit the module by selecting the green pencil icon on the left hand side.

Page | 16
The header will be the main heading for the module, the header link URL will take the user to another page, for this example the page will be /destinations.aspx.
The header settings will appear on the front end of the site as shown in the example below:

Page | 17
Page | 18
Weather Module
We currently have two weather modules, the Forecast Weather Module or the Advanced Weather Module. Should you wish to have either module there is a £10 +VAT monthly charge on top of the module’s setup price.
Forecast Weather Module The weather module can be displayed either in the left column or in any of the right columns.
Adding the Forecast Weather Module
To add the weather module into your site, select the page you wish to add it to, under ‘Page layout & Content’, and
then select which column you’d like it to appear in, and add module ‘Weather Forecast’.
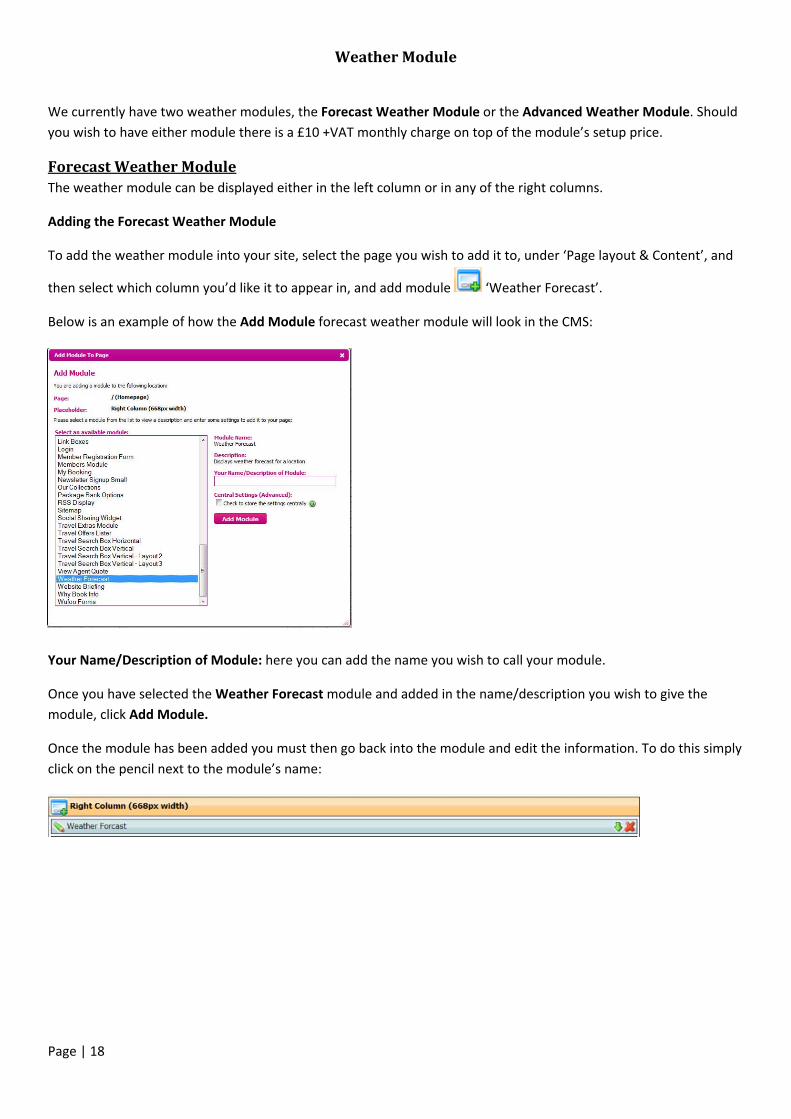
Below is an example of how the Add Module forecast weather module will look in the CMS:
Your Name/Description of Module: here you can add the name you wish to call your module.
Once you have selected the Weather Forecast module and added in the name/description you wish to give the module, click Add Module.
Once the module has been added you must then go back into the module and edit the information. To do this simply click on the pencil next to the module’s name:

Page | 19
You will then be directed to the following module settings:
Your Name / Description of Module - Here you are able to once again edit the module name/description should you wish to.
Location – Here you must put in the location that you wish the weather to display for. If you start typing the auto search will pick up the location, which you are then able to choose your location from.
Metric – if you wish for the weather to display in metric measurements, click the box here.
Layout – here you can choose if you’d like your weather module to appear vertical or horizontal. If you choose vertical your weather module will look like this:
If you choose horizontal your weather module will look like this:

Page | 20
Max Days – Here you can choose how many days you’d like your weather to display for. You can choose 3, 5, 7 and 10 days forecast. Once you have entered your location, which orientation you’d like, and how many days forecast you’d like, simply click ‘save’.
Advanced Weather Module
To add the advanced weather module into your site, select the page you wish to add it to under ‘Page layout &
Content’, select which column you’d like it to appear in, and add module ‘Advanced Weather’.
Below is an example of how the Add Module advanced weather module will look in the CMS:
Your Name/Description of Module: here you can add the name you wish to call your module.
Once you have selected the Advanced Weather module and added in the name/description you wish to give the module, click Add Module.

Page | 21
Once the module has been added you must then go back into the module and edit the information by clicking on the pencil next to the module’s name:

Page | 22
You will then be directed to the following module settings:
Your Name/Description of Module – here you are able to once again choose what you’d like to call this module.
Weather Settings – here you are able to display the weather for up to five locations. Simply start typing into each Location 1/2/3/4/5:* where you’d like to display the weather for, and then choose the location from the auto search. Once you have chosen all five locations click Save Module.
Once you have chosen your locations and saved the module, it will appear like so in the front end of your site:
As you can see, whichever location you choose to put in Location 1:* this location will display as the main location.
To view the other locations weather forecast, simply click on the drop down next to the first location, and they will display:

Page | 23
To view one of the other four locations selected, simply click on whichever you wish to view the weather for and the weather module will display this location.

Page | 24
Results - Last Searched/ last viewed This module stores the searches performed on your website and displays them in a table for the customer.
Select the relevant section of the page and select add module.
As with all the modules, here you can customise the name of the module to suit you.
Once the module has been added you can edit the settings:

Page | 25
The name of the module should be relevant to last searches so it is easy for the customer to view. You can restrict the maximum number of results shown and also the previous days.
Page | 26
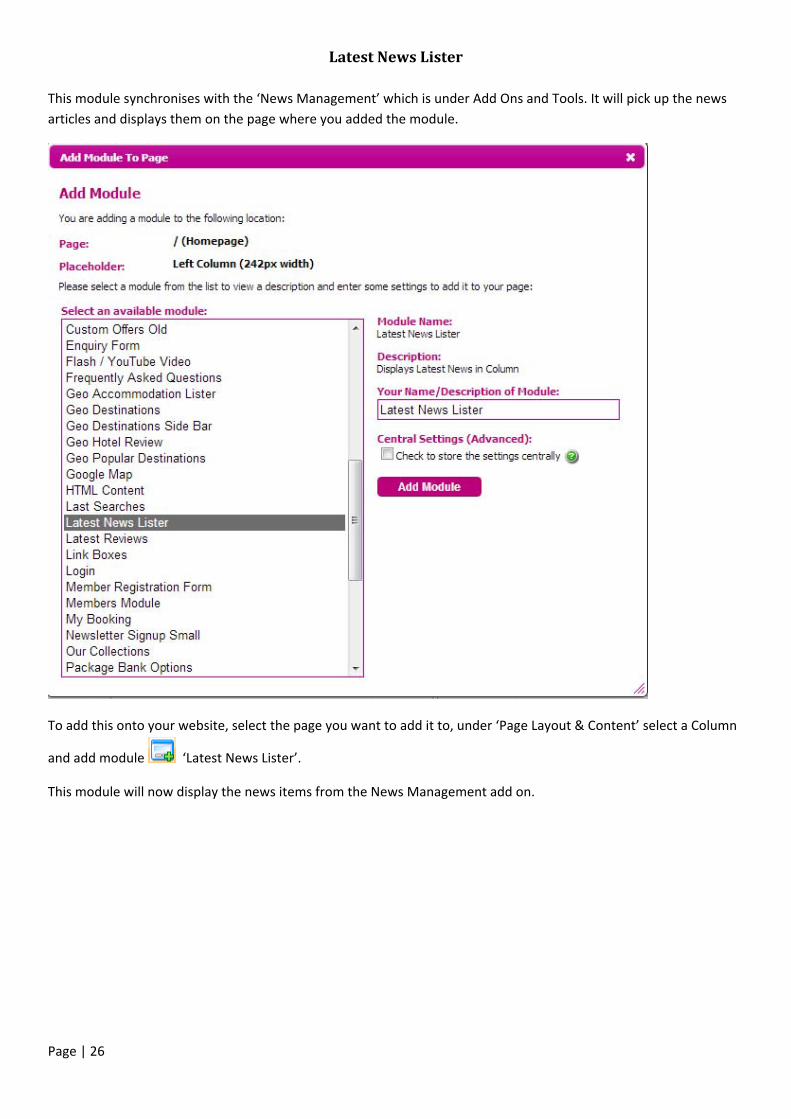
Latest News Lister This module synchronises with the ‘News Management’ which is under Add Ons and Tools. It will pick up the news articles and displays them on the page where you added the module.
To add this onto your website, select the page you want to add it to, under ‘Page Layout & Content’ select a Column
and add module ‘Latest News Lister’.
This module will now display the news items from the News Management add on.

Page | 27
When a user selects ‘Read More’ or the article title, they will be taken to another page where the user can view the whole article, an example of one of these is shown below:

Page | 28
Newsletter
To add this signup box onto your website, select the page you want to add it to, under ‘Page Layout & Content’
select Left Column (242px width) add module ‘Newsletter Signup Small’.

Page | 29
You have the option to name the module so you can easily view it on the page layout section of the CMS page:
You can edit this module at any time by selecting the green pencil (as shown in the previously screen shot).
Using the module settings, you can add the text you want to appear in the required fields as well as compose the email which will be sent to your customer once they have signed up to your newsletter.
This box will appear once your customer has submitted their name and email address.

Page | 30
Your customer will be sent a confirmation email.

Page | 31
Offer Boxes There are many different types of offer boxes to choose from.
General Offer Boxes These offer boxes pull through general searches a customer makes on your website. You can either keep the options as very general, allowing any searches made on your site to come through to show as offers of you can specify certain countries, suppliers or resorts if you wish to only show results from a certain country, supplier or resort.
These offer boxes can show accommodation, flight or package holiday offers. Please see below for an example of an accommodation offer set up.
Travel Offer Lister - General offers To add this search box onto your website, select the page you want to add it to, under ‘Page Layout & Content’
select Right Column (668px width) add module ‘Travel Offer Lister’.
You have the option to name the module so you can easily view it on the page layout section of the CMS page.
Edit Offer box

Page | 32
Default Offer settings. To set up an accommodation only offer lister, select accommodation in the 'offer type' dropdown.
In the main offer settings part you can edit the type of offer and how many you wish to display on your site. As well as this you can choose duration, price and date range.

Page | 33
Default Accommodation Settings
In this section you will firstly need to select which display option you would like.
Display option one
Display option two

Page | 34
Display option 3
After you have chosen your display layout you can set up your other options. For general results you do not need to select any options here, this will mean all any accommodation searches will pull through at random. For specific results you can choose from the range of options below such as countries, resorts, operators, star rating, accommodation types etc.
Lastly you will see an Accommodation Only Custom offer select box;
This option here lets you choose whether you want custom offers that you have created under 'custom offer management' in the 'add on's and tools section' of your CMS pull through. If you have chosen to leave all the default settings for general searched to come through on your site then the search results will appear as random. For example below we have done a search for Athens and two for Bangkok so this is what shows;
*Please note that the offer box looks exaclty the same for Flights and Package holidays except the information on the offfers will change accordingly. Travel Offer Lister - Luxury Accommodation offers in Greece There are many options available to you here such as specific supplier results or sepcific country results. You could

Page | 35
also catogrise the results by luxury such as luxury accommodation in Greece and select 5 star accommodation to show only and the country selection as Greece. Please see example below;
Main Offer settings

Page | 36
For these settings you would choose the country code of Greece (GR). There is a list of country codes available to you here, you will need the 2 letter code. To show only luxury accommodation I have selected 5* only as the rating.
You do not need to select the custom offer option at the bottom of the module settings;
Once you have selected these settings, only five star accommodation results from Greece should return. Please see the example on the next page. these were the results that pulled through after doing a search for 5* accommodation in Athens.
Accommodation Settings

Page | 37

Page | 38
Geo Accommodation Lister
*please not that this is only available if you have the Geo Database included in your website package.
This is a simple module that allows you to list certain hotels in your Geo database for the customer to see on your website. To add this search box onto your website, select the page you want to add it to, under ‘Page Layout &
Content’ select Right Column (668px width) add module ‘Geo Accommodation Lister’.
Once you have this added to your page you select the pencil icon besides the module to edit the settings.

Page | 39
For this module you simply give the module a header and then list the hotels you would like to show. They will then appear on the home page like this;

Page | 40
Geo Destination Lister
*please not that this is only available if you have the Geo Database included in your website package.
This module is similair to the Geo Accommodation lister but lists destinations rather than accommodation. To add this module onto your website, select the page you want to add it to, under ‘Page Layout & Content’ select Right
Column (668px width) add module ‘Geo Destination Lister’.
Once this is on your page, you edit the module by clicking on the pencil icon by the module.

Page | 41
You simply choose your header title and then list the destinations you would like to show. The list will then appear on your site like this;

Page | 42
RSS Display
The RSS allows you to retrieve the RSS feeds from various sites and display them for you to read and use.
To add this search box onto your website, select the page you want to add it to, under ‘Page Layout & Content’
select the position of the modules either the Left or Right Column, add module ‘RSS Display’.
You have the option to name the module so you can easily view it on the page layout section of the CMS page ‘RSS Display’. You can edit this module at any time by selecting the green pencil.

Page | 43
Feed Reader, Feed Burner or News Aggregator software allows you to grab the RSS feeds from various sites and display them for you to read and use.
Using the RSS Feed Settings you can add the title of the feeds you are choosing to display along with the URL for example ‘Travel News’ or ‘Latest Updates’. The URL will be provided by the RSS feeds software that you choose to use. The unique URL can be copied and pasted into the settings and this will automatically update the news when it is published on the site you have chosen, for example ‘Breakingtravelnews.com.’ You can add up to 30 RSS Feeds to the module. This is the number of feeds that will be shown at any one time. There is also an option to add descriptions along with the title. This allows a preview of what the feed is about so the customer can choose whether it is of relevance to them.
It will appear on your site like this with or without descriptions.

Page | 44
As you can see above the difference in display whether you choose to select yes or no to descriptions.
When you customer clicks on the title it takes them to the correct website link. This is a good way to have up to date news and information available on your site that is relevant to you either that of travel, weather etc.

Page | 45
Page | 46
Search Boxes
Note you can only have one search box on a page at a time so you will have to remove it if it's already on a page.
The search boxes can be displayed vertically or horizontally. Within these styles you then have further options to choose how you would like the search box displayed.
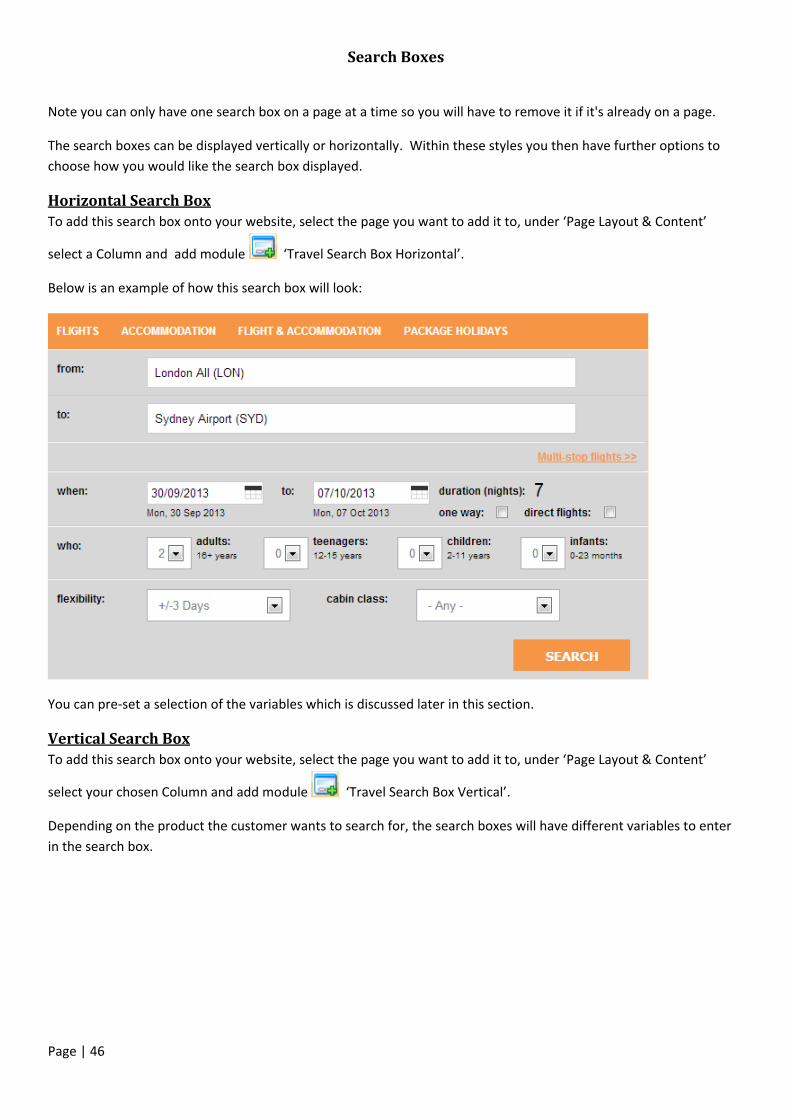
Horizontal Search Box To add this search box onto your website, select the page you want to add it to, under ‘Page Layout & Content’
select a Column and add module ‘Travel Search Box Horizontal’.
Below is an example of how this search box will look:
You can pre-set a selection of the variables which is discussed later in this section.
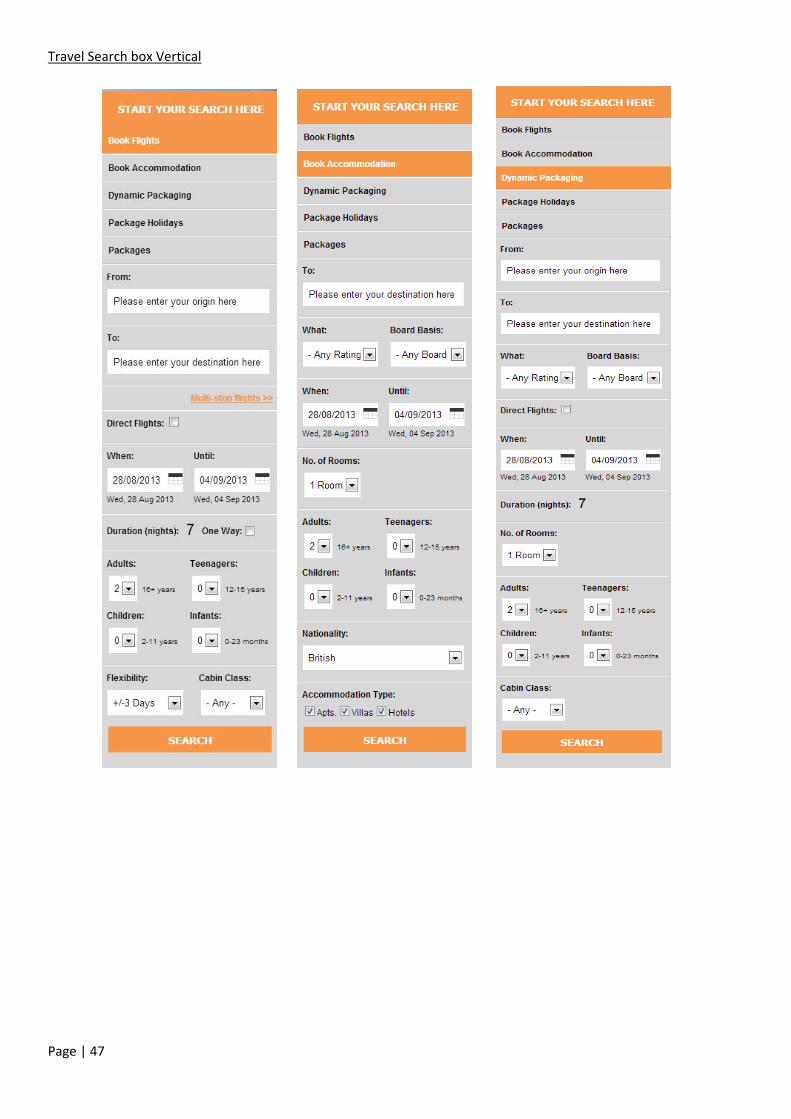
Vertical Search Box To add this search box onto your website, select the page you want to add it to, under ‘Page Layout & Content’
select your chosen Column and add module ‘Travel Search Box Vertical’.
Depending on the product the customer wants to search for, the search boxes will have different variables to enter in the search box.
Page | 47
Travel Search box Vertical
Search Boxes

Page | 48
Travel Search Box Vertical (Layout 2) This search box can only be used with the Homepage Template V2 page layout. When you add this page, this search box is already set up on the page.
Page | 49
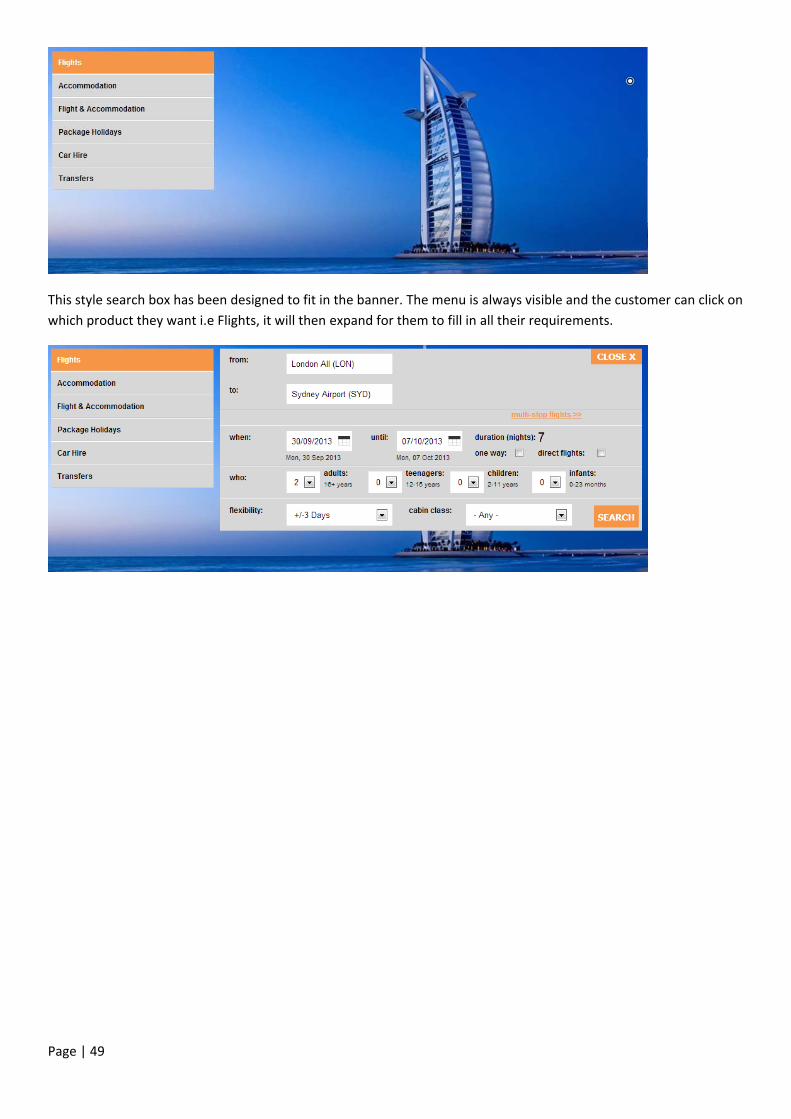
This style search box has been designed to fit in the banner. The menu is always visible and the customer can click on which product they want i.e Flights, it will then expand for them to fill in all their requirements.
Page | 50
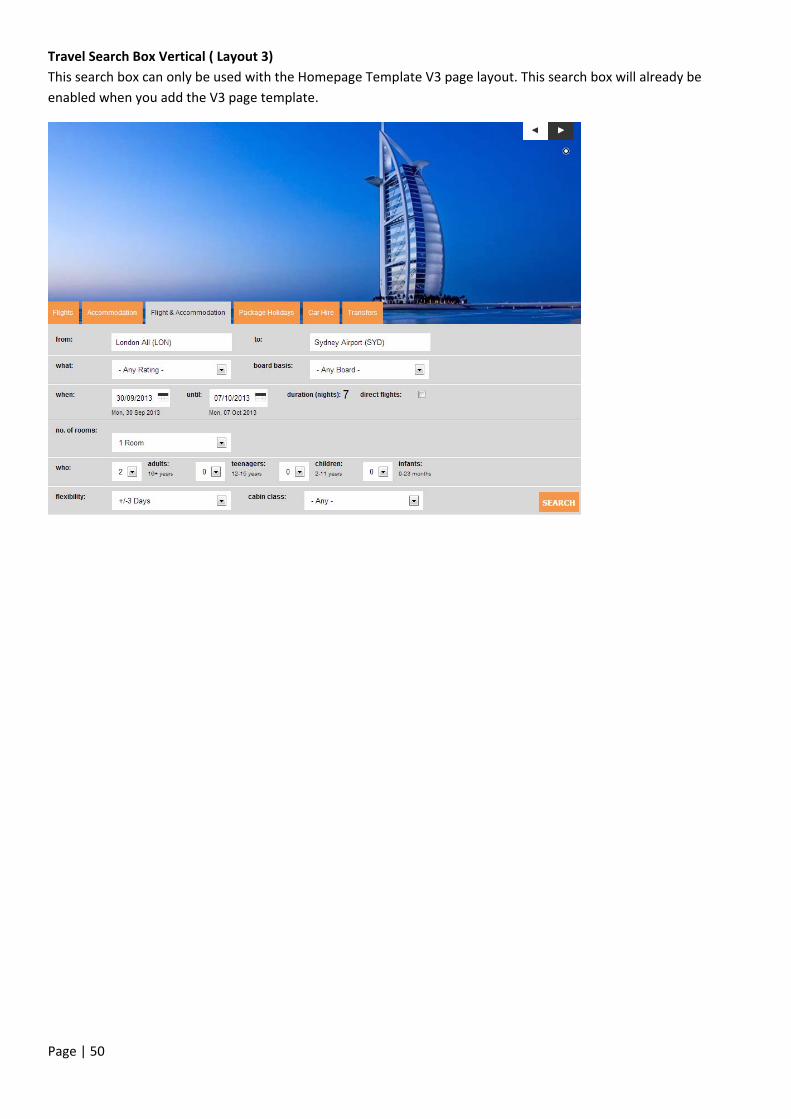
Travel Search Box Vertical ( Layout 3) This search box can only be used with the Homepage Template V3 page layout. This search box will already be enabled when you add the V3 page template.

Page | 51
Adding a Search Box onto a page
For this working example, we will be using the Vertical Search box to explain the module.
Travel Search box Vertical
You have the option to name the module so you can easily view it on the page layout section of the CMS page:
You can edit this module at any time by selecting the green pencil (as shown in the previously screen shot).

Page | 52
Edit Search box Default Search settings
You can predetermine the search box details; this is a useful tool if you want to set the search box on a specific page i.e Sydney. You can also choose the start date, please note that the customer can override these settings as they are just a default option.
Default Passenger Settings

Page | 53
Default Accommodation Settings
If the hotels you want returning are of a specific star rating or board rating, you can select it within the Default Accommodation Settings. If you wish to hide the accommodation type e.g. hotel and villa tick the box to hide the type. You can also restrict the board basis, to remove room only, untick the box and this option will not be available on the search box.

Page | 54
Default DP Settings and Display Settings
The View Mode allows you to choose how the results are displayed; Split DP or Combined DP. Split DP will separate the flights and accommodation whereas the combined DP will package together the flights and accommodation.
The Car Hire and Transfers search tabs will need to be standalone modules if you would like them to appear in the search box, otherwise these products will return in the extra pages.

Page | 55
Tab Text Settings
If you wish to personalise your tab text, you can override the default tab name and enter your own text. For example if you do not want it to say ‘Book Accommodation’ you can rename it ‘Accommodation’.
The final option within the settings is Multi-Leg, here you can disable this selection.
Once you have made any changes, press save module. The search box will appear with the following options:

Page | 56

Page | 57
Search Box/ Flight Results -Multi Leg
One Way, return and now open-jaw and Multi-leg flight searches are all available.
Fly from anywhere to anywhere, leave from one airport and return to another, round the world trips are all possible. (Subject to carriers supporting required routes).
When the user selects ‘Book Flights’ they are presented with the option for ‘Multi-stop flights’. By clicking here, it will open up the following window for them to enter their information.
The user is able to plan their flight journey from one airport to the next. By clicking ‘Add Leg’ will create a new field. They can create as many journeys as they wish. A leg can be deleted by clicking on the red circles. Click ‘Confirm Selection’ once complete.

Page | 58
The user must now select the number of passengers from the dropdown menus as well as flexibility and cabin class for the flights. Once complete click ‘Search’.

Page | 59
The system will return a variety of searches dependant on their search flight criteria.

Page | 60
Social Sharing Widget Adding social networking to your website opens up new marketing channels, giving you more ways to connect with your customers. As one of the most powerful forces driving travel planning today, building your social media strategy is essential, supporting your web marketing, and enhancing your SEO and web exposure in a dramatic way. Each social network and channel has its own following and focus and Digital Trip can advise on the best solution for you. To add this Widget onto your website, select the page you want to add it to, under ‘Page Layout & Content’, select a
column and add module .
Select the module you’d like to add, in this case, ‘Social Sharing Widget’, then name it yourself in the box labelled, ‘Your Name/Description of Module’ and click ‘Add Module’.
After you have click ‘Add Module’, you will be taken back to the page settings and your new module should appear as above, in the column that you selected.
Now that you have created your Widget, you can now choose which social medias you would like it to include on
your page. You can do this by clicking edit.
Once you have clicked on this, the ‘Edit Module Settings’ box should appear as below. Here you can also decide on the alignment, size and layout of your social media icons.

Page | 61
Once you have chosen all of your desired settings, click ‘Save Module’. Your end result should turn out something
like this:

Page | 62
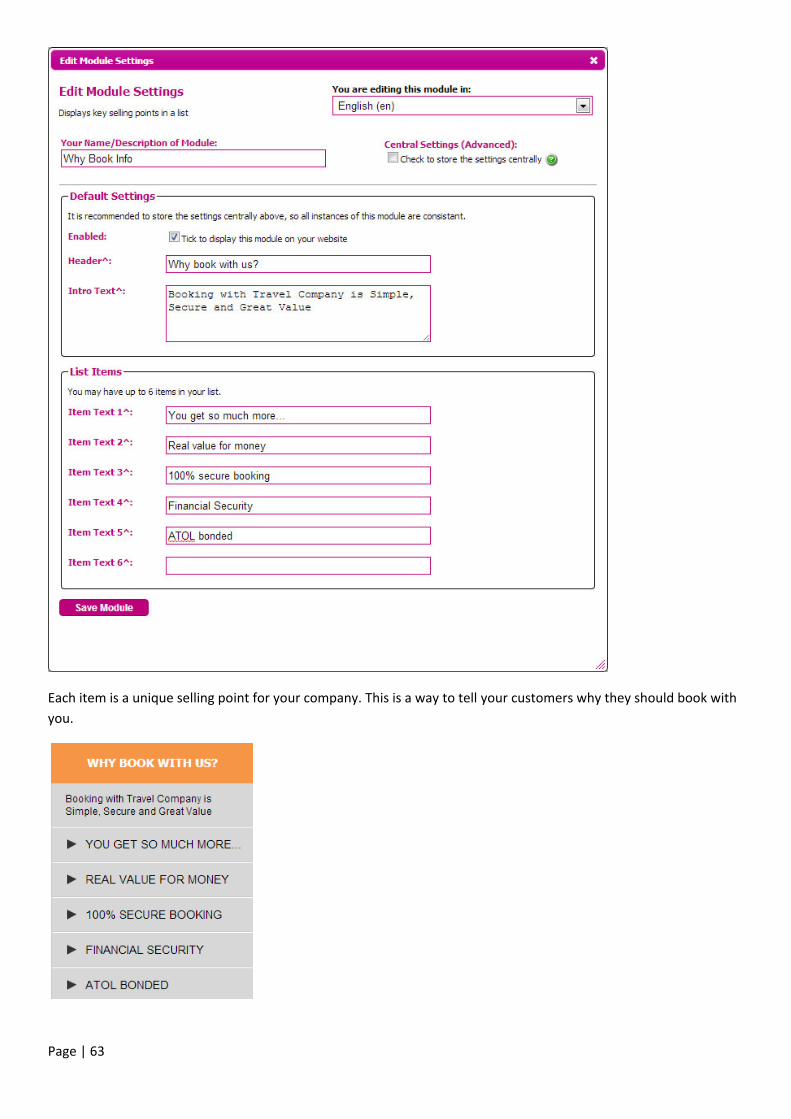
Editable Lists - Why book info
To add editable lists such as ‘Why book with us?’ onto your website, select the page you want to add it to, under
‘Page Layout & Content’ select Left Column (242px width) add module ‘Why book info’.
You have the option to name the module so you can easily view it on the page layout section of the CMS page:
You can edit this module at any time by selecting the green pencil (as shown in the previously screen shot).
Page | 63
Each item is a unique selling point for your company. This is a way to tell your customers why they should book with you.

Page | 64
You Tube
To add a You Tube video onto your website, To add this onto your website, select the page you want to add it to,
under ‘Page Layout & Content’ select a Column and add module
‘Flash / You Tube Video’.
Here you can name the module so you can easily view it on the page layout. Once the module has been added you assign a video to it.
You can edit this module by selecting the edit green pencil on the left hand side of the module.
Page | 65
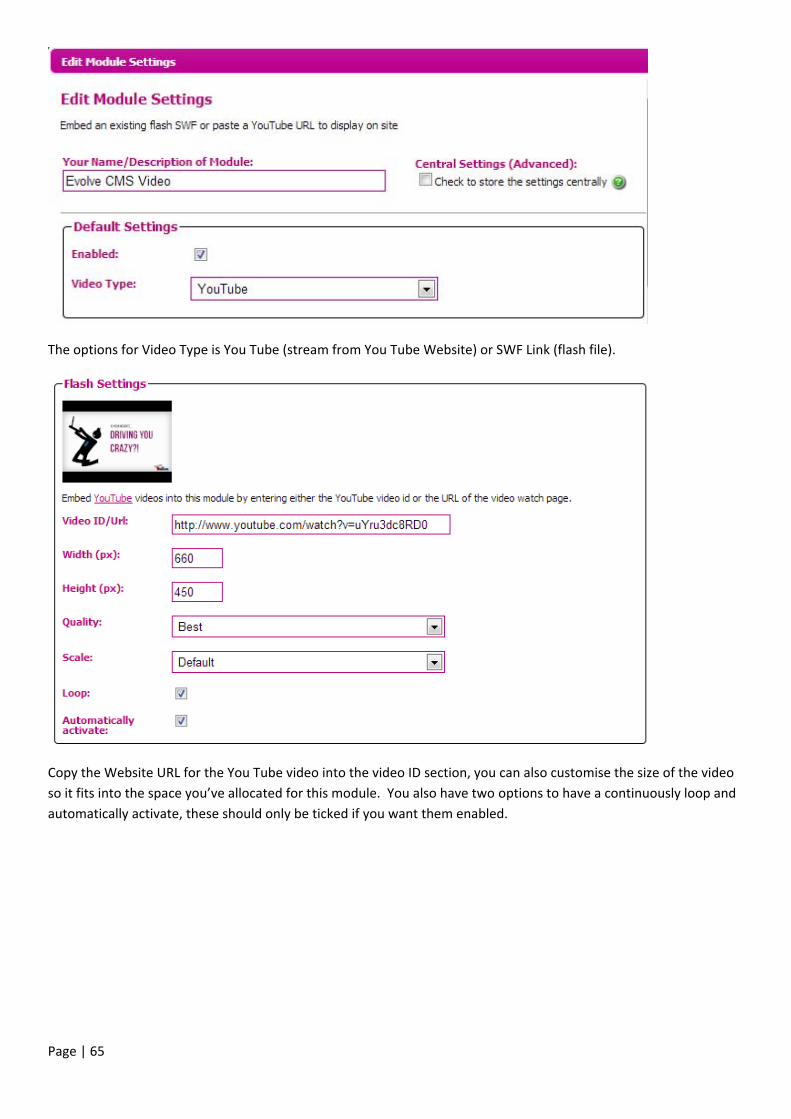
The options for Video Type is You Tube (stream from You Tube Website) or SWF Link (flash file).
Copy the Website URL for the You Tube video into the video ID section, you can also customise the size of the video so it fits into the space you’ve allocated for this module. You also have two options to have a continuously loop and automatically activate, these should only be ticked if you want them enabled.

Page | 66
The default settings are applied but you can customise them if you wish in this section.
Here you can give the video a name and a description.
Once all the settings have been set, press save module and the video will appear on the website.

Page | 67

Page | 68
Dropdown menus When you have created a dropdown, it will not appear on your Main Navigation Bar unless you have assigned pages to it. To do this, first go to the first page you would like to appear on the dropdown, and click on 'Site Menu Options' - here will see a number of options:
Firstly you need to give you page a name, this is what will appear when you hover over your drop down. So for this example let's call our page UK 5* Hotels, should you wish you can also add this in different languages into each of their associated box's. Further down you can see 'Show in Menus' - this is where you choose where you would like your page to appear. So if I wanted to put this page straight onto the Main Navigation bar I would just select 'Header Main Nav' - but for our example lets use the dropdown we have just set up. As you scroll down the Menus you will notice all of your added dropdowns appear below the pre-set ones.

Page | 69
When you click on the drop down you will see a list of 'Show as item' with numbers, this is how you order where your pages appear on the dropdown. So if you want this page to appear first select 1, if you want it to appear second select 2 etc. When you have selected your number click on 'Save Page' and you will know your action has been completed by the green bar across the top. Go to the front end of your site and refresh the page, you should then see your dropdown appear:

Page | 70
Location Lists Once you have created your location list you need to assign it to the search box that it’s associated with. To use a location list, firstly go to the page in your CMS that you want to use, scroll down the page to your modules, and click on the pencil icon by your search box module to bring up the options.
Here there is a huge range of options, but for now we're just looking at your location list, so approximately two thirds of the way down the options, under 'Display Settings' you will see two drop downs - 'Use Customer Destination List' and 'Use Custom Package Destination List': There are two different options because a package holiday is built up different to your other search types, however there is nothing different you need to do when actually creating your location list.

Page | 71
To activate your location list for this search box simply select it from the drop down list and click Save Module at the bottom of all the options. If you would like this location list to be used for all searches including package holidays, then make sure you select it from the Package Destination List also. As before, you will know that your options have been saved by the green 'Module Settings Successfully Updated' box appearing. Finally go to the front end of your site onto the amended page and check that your Location list is now working, you should only see the locations you have pre-set:

Page | 72
Theme Manager You can only add a theme to a folder not an individual page - for example, if you have a folder called 'Attractions' you can add a theme to the folder which will appear on all pages under Attractions. Select your folder and you will see a number of options; in the first section called 'Folder Settings' you will see the option 'Folder Theme'.
Click on the drop down from the folder theme and you will see several themes.
Select the desired theme from the list, and then click 'Update Folder' - you will know your theme has worked by seeing a green bar at the top telling you your update has been successful. The theme will now be applied to the pages associated within the folder.

Page | 73
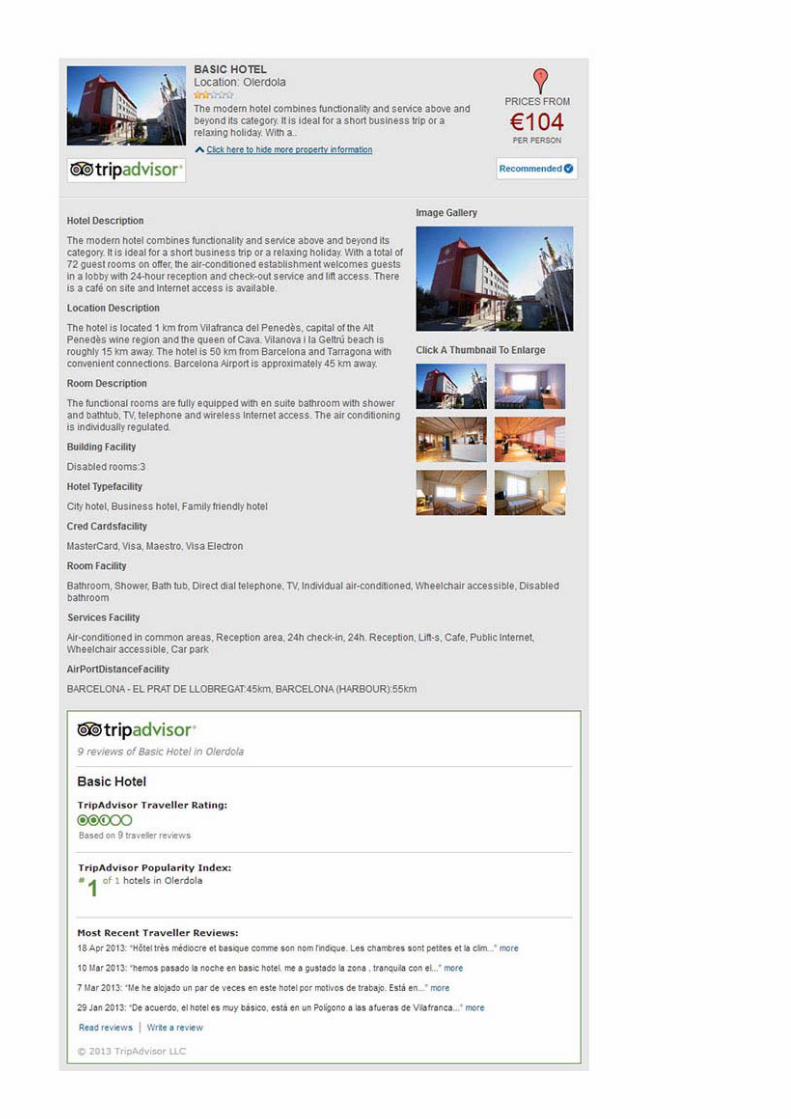
Trip Advisor Review Widgets Customers are more likely to book if a hotel or apartment is recommended by fellow travellers and there is no bigger review centre than Trip Advisor, using the Geo-database you can now ‘tag’ all your properties with the Trip Advisor widget and show your users the last 3 reviews and the average review for each property.
To link the review widget, firstly select the property from your Geo Database (for more details on your Geo Database, please refer to the CMS Userguide).
You will then need to locate the property on the Trip Advisor website, copy and paste the URL into the ‘TripAdvisor URL’ field within the main settings.

Page | 74
When a customer searches for the particular property, they will see the Trip Advisor logo:
The customer will then be able to click on the logo to see the reviews:
Page | 75

Page | 76
E Travel Document Manager
The E Travel Document Manager allows you to cut down on your administration times by controlling your customers’ travel documents inside our content management system. Once the order is fully confirmed, you can simply click a button and the system will automatically create a PDF of all vouchers and important booking documents and email it straight to your customer. To use the E Travel Document Manager, firstly open Order Management in the Add Ons and Tools section of your CMS.
Once you have accessed your orders simply choose the order you wish to create the document for, and open it.
Then to create the E Travel Document, enter the customer’s email address in the box and click Send.
This will then send out to the customer a document similar to the one below:

Page | 77

Page | 78

Page | 79
Multi-Currency
If you are targeting customers throughout Europe or even worldwide, it is always important to offer a more personal experience. This tool allows you to include additional currencies to your site. To begin, select ‘Currency Management’ under Add Ons & Tools.
Select the currency you wish to add from the dropdown menu. Click ‘Add’ once selected. To activate the currency click ‘Edit’ beside the one you wish to show on your site. Click on the red x to activate the chosen currency. The green ticks represent the active currencies on your site.
A user can change the currency using the dropdown tab at the top of the site.

Page | 80
The site will automatically reload prices to their chosen currency.

Page | 81
Currency Convertor
The currency convertor is a live feed for currencies that updates automatically every 12 hours to ensure you are selling products and services at the right price. It will display the current exchange rate alongside the currencies you have active on your site.
NB. You can add additional currencies to your site but you cannot remove them. You can deactivate the currency so that it is not shown on your site. Removing it will lose all data about purchases made in that currency.
Hedge Value – When using the dynamic conversion, you may find that you want to set a hedge value to alter the rates received from the 3rd party service. Please note that this is a multiplier and so to add 10% to the exchange rate, you would enter 1.1 in the box and click ‘Update Hedge’.
You can lock specific currencies so that they do not update dynamically using the ‘Lock Rate’ feature. You can refresh the currency at any stage by turning the Lock Rate off and on again by clicking at the red X or green tick.
To active currencies will be highlighted with a green tick. To activate a currency, click on the red X in the ‘Is Active’ column.

Page | 82
Full Multi-Lingual CMS Upgrade
Build your websites in an unlimited amount of languages with the Full Multi Lingual CMS upgrade.
To begin select ‘Language Management’ below ‘Add Ons & Tools’.
Select from our wide range of language options from the dropdown menu. Click ‘Add’ once the language has been selected.
To activate the language on your site click ‘Edit’. Click on the red x to activate the language. The green ticks indicate the languages that are active.
The language can be selected from the dropdown tab at the top of the site. The site will automatically load to the chosen language making your site accessible for all to use.

Page | 83
Rewards / Points System
You are able to allocate points to your members. These points can be achieved by a variety of reasons of your choice such as member loyalty or repeat bookings. Select the member you wish to allocate points to from the CRM/Members section.
Here is where you manage your member accounts. By clicking View/Edit will open up the following window:
Select the ‘Points’ tab. Here it will display the previous points the member has been allocated along with the total number of points that they have. Enter the number of points along with the description and order reference into the fields. Make sure the ‘Approved’ box is selected before clicking ‘Add Points’.
When the member is signed into your website, they can find out the number of points they have obtained on their homepage in ‘My Points’.
Select ‘My points’ to open up the following window:

Page | 84
The member is able to redeem their points on their booking purchases. To do so, search for the holiday until you reach the checkout area.
At the checkout, the member can enter the number of points they would like to redeem. Each point is valued at £1 and is automatically discounted from their total. Click ‘Submit’ once the number of points has been entered. Continue with the payment process as normal.
The Rewards/ Points System enables you to harness the power of customer retention programs and loyalty marketing strategies. A successful loyalty program will keep customers coming back again and again to spend their points and their money.

Page | 85
SMS Integration
Linked with the System emails and Trigger email modules the SMS module is a simple way of communicating quickly with your customers. Send booking confirmations, travel reminders and more. Why not send a text on the day of departure wishing them a great trip, or one on their return welcoming your customer back home?
Enter the text using the Special Content Tags just like with Trigger emails. Click ‘Save Trigger’ when complete. This will send an SMS to your customer with their individual holiday information.

Page | 86
Order Handoff API
Most clients are already using a back office system and don’t want to change to a new one just because they have a new website. Any booking taken on line is added to either an XML file or to a specially created SQL database that can then be used to automatically upload in to your chosen back office solution, thus saving you time and money and of course stopping the need for manually re-keying bookings which can lead to errors.

Page | 87

Page | 88
Sales Agent Quotation System The Sales Agent Quotation System allows a logged in Agent to search the website in the normal way, add up to five items to a quote, collect some details from the customer (e.g. phone call/in store) and email them the quote. It also allows them to flag the quote for a customer call back. Additionally another member of staff can pick up that quote reference if the customer calls back, update notes and status of the order. The information is stored within the CRM and customer data can be downloaded and added to your email system for follow up. Using the quotation system is simple; first select your chosen property and click ‘add to quote’
Your property will then be added to the agent toolbar. Click ‘prepare to send’ to allow you to enter the contact information
Here you can enter all the information relating to the order. You can enter the customer’s information, whether they are a good prospect, who the Assignee is, when the call back should be, what the status of the order is, and if the customer has any comments.

Page | 89
You will be sent an email with a link. Click on the link
The link from your email will send you to your quote

Page | 90

Page | 91
Hot List
Similar to the Sales Agent Quotation System but for the customer. A module that allows a customer to search the website and add up to five items to a ‘hot-list’, email it to themselves. The information is then stored within the Advanced Membership System and the CRM.
The information when paired with the CRM system and Advanced Membership module is a powerful tool to collect and store customer data, which can then be downloaded and added to your marketing system for, follow up.
In addition you get a copy of every email that is sent using the ‘hot-list’ enabling you to chase up potential customers.
When a customer see’s a hotel they are interested in, they will select ‘Add to List’ the items will appear in the tool bar at the bottom of the page. Once they have selected the properties they are interested in, they will select ‘prepare to send’.
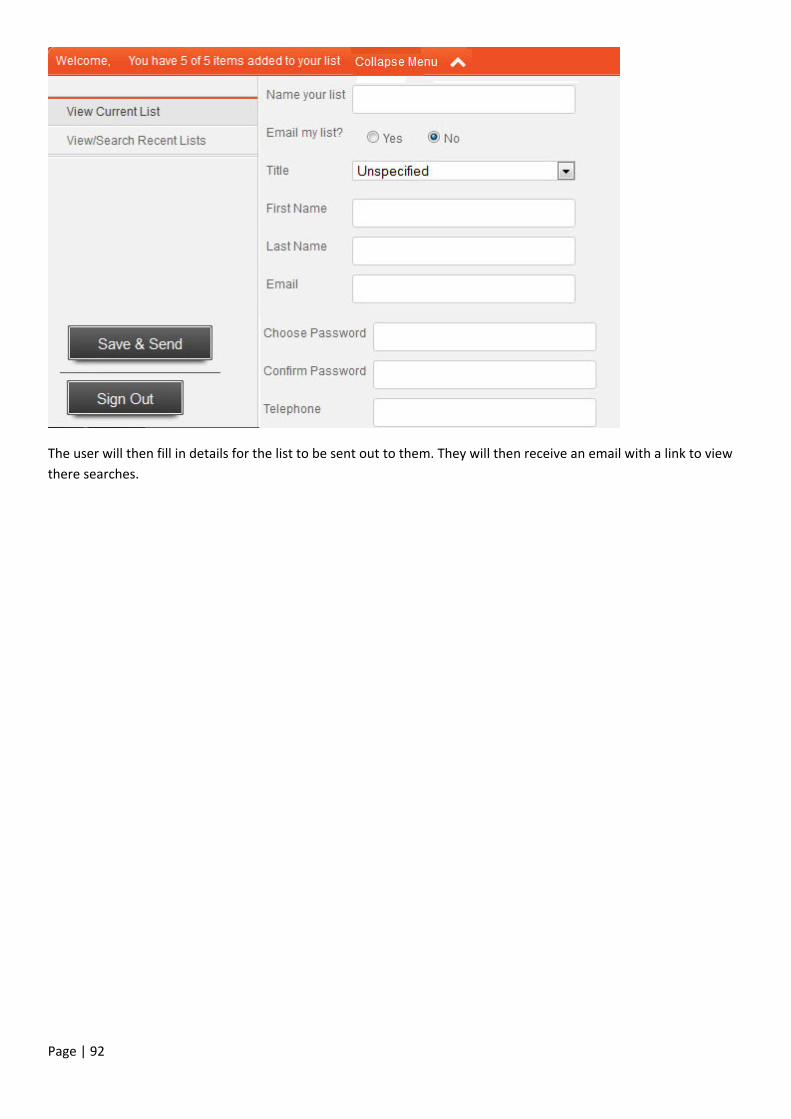
Page | 92
The user will then fill in details for the list to be sent out to them. They will then receive an email with a link to view there searches.

Page | 93
Google Translate
Add Google Translate to your website and sell to other nationalities in their own language.
Top tip: If you are looking for something more sophisticated then upgrade your website to include custom translations using the eVolve Multi-lingual tool.
The dropdown menu can be found at the top of the web page and offers the user a wide range of language options to choose from.
The default language is set to English. When the user selects their chosen language, the page will reload automatically.

Page | 94
This tool allows you to reach a wide audience by making it accessible for all to use.
Page | 95
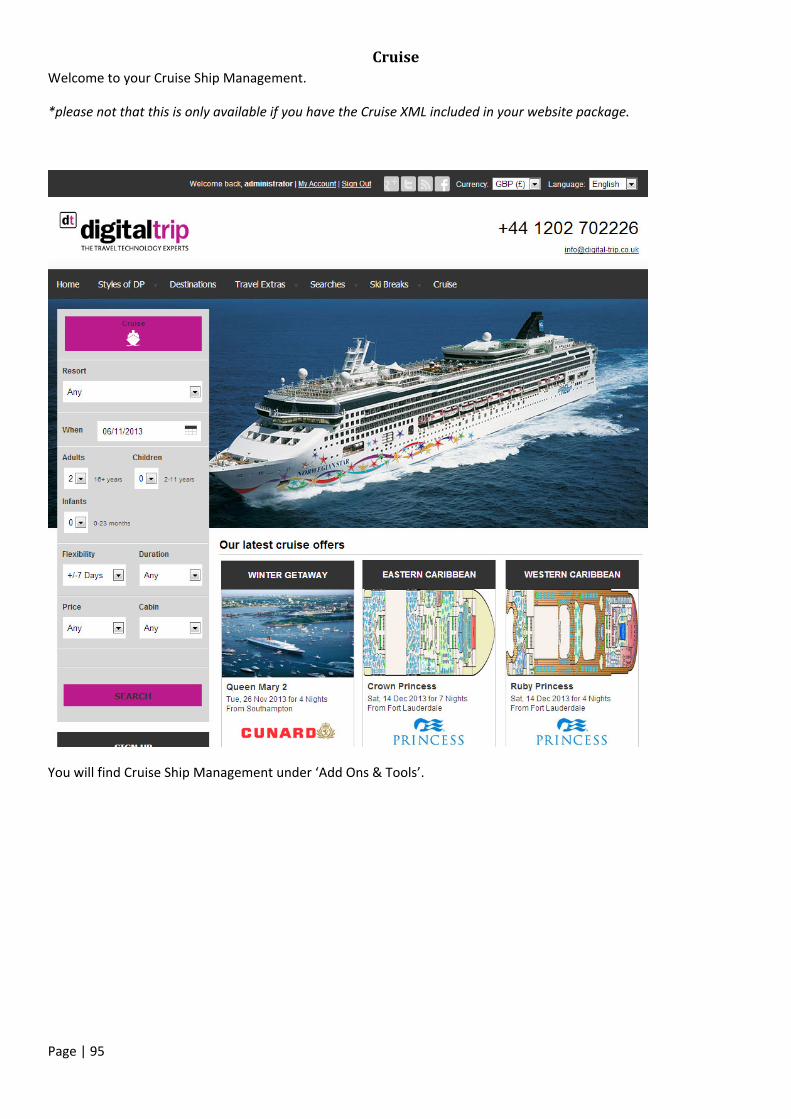
Cruise Welcome to your Cruise Ship Management.
*please not that this is only available if you have the Cruise XML included in your website package.
You will find Cruise Ship Management under ‘Add Ons & Tools’.
Page | 96
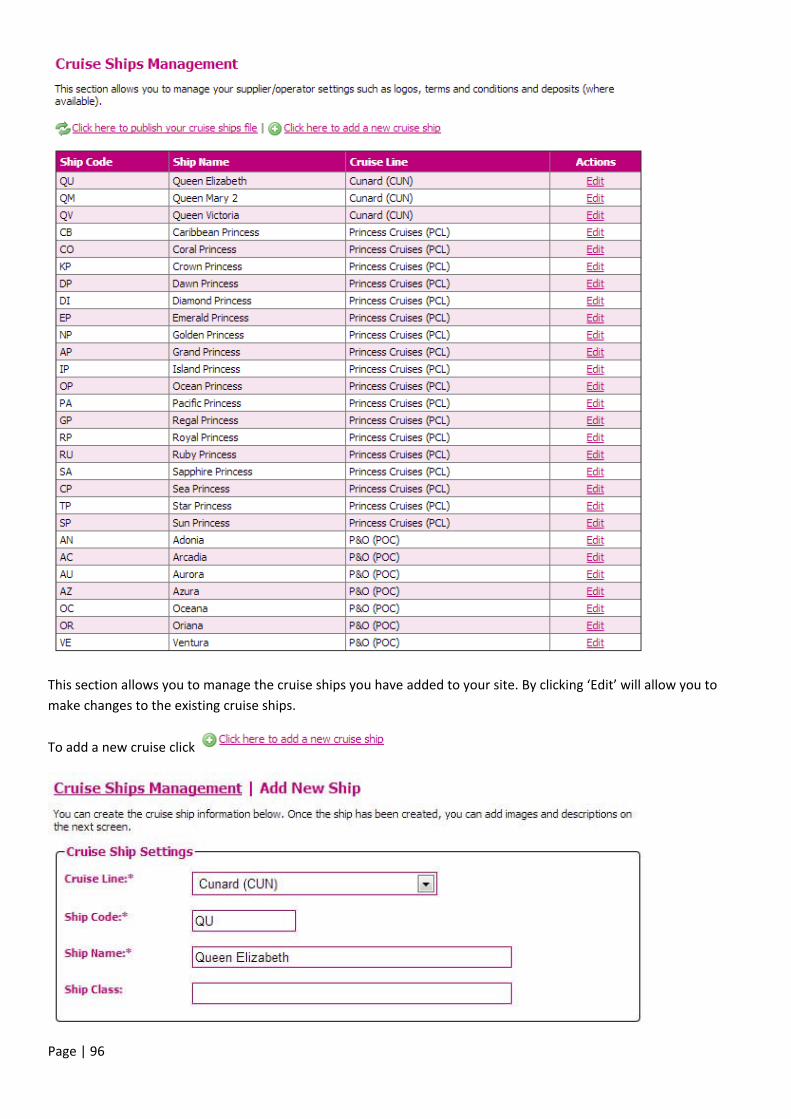
This section allows you to manage the cruise ships you have added to your site. By clicking ‘Edit’ will allow you to make changes to the existing cruise ships.
To add a new cruise click

Page | 97
Enter the mandatory information into the fields.
Cruise Line
Select from the dropdown menu.
Ship Code
Enter the code for the cruise ship you are entering i.e QU.
Ship Name
Enter the full name of the cruise ship i.e P&O.
Enter all of the ship information – Description, more information, specifications and facilities.

Page | 98
Click ‘Create Ship’ once complete. This will take you to the next section where you can add media.
Video Gallery
Embed YouTube videos into this ship by entering either the YouTube video id or the URl of the video watch page.

Page | 99
Images
Upload images for the cruise ship you are adding. You can drag and drop new images below from your computer, or upload new files using the file upload box. This primary image is denoted by a star icon – to set another image as the primary, just click the grey plus icon.
Deck Plans
You can upload deck plan images for the cruise ship. You can drag and drop new images below from your computer, or upload new files using the file upload box. This primary image is denoted by a star icon – to set another image as the primary, just click the grey plus icon.
Click ‘Save Ship’ when complete.
To publish the new information you have entered click
Your cruise ship entry will appear like above on your website.

Page | 100
Personalised web e-brochure
Do you have a brochure that you would like to add to your website? Simply provide us with a 12 page PDF and we’ll do the rest.
We will place a banner on your website with a link for the user to click on. This will take them to an online document where they can read through the pages online.

Page | 101
CRM Reporting
This handy tool allows you to create reports based on your customers and their activity with your website. The reports can be used for internal use such as customer development and retention strategies. Build your report using a diverse range of filters, then preview and export for use.
Filter
Choose a filter from the dropdown menu.
Modifier
Depending on the filter you select, the modifier dropdown options will be ‘like’, ‘is’, ‘before’, ‘after’ etc. For example if you select First Name, the modifier dropdown options are ‘is’ or ‘like’.
Value
If you have selected the filter of first name the value for example could be David.
You can provide extra criteria for the search by clicking ‘Add New Filter’.

Page | 102
Once you have entered all your filters then click ‘Generate Preview’.
The system will return the relevant searches based on your filter requirements.
You have a range of tools on what you would like to do with the search results returned.
Download As CSV – A report on the customers is produced in an Excel document.
Send Email To Group – Send an email to the customers found in the search criteria.
Tag Collection – You can create a ‘Tag’ for the search results. You can organise your customers using Tags such as ‘Loyal Customers’, ‘UK clients’ etc. Click ‘Set Tag’ when complete.

Page | 103
Use this tool to manage your customer relations.
Page | 104
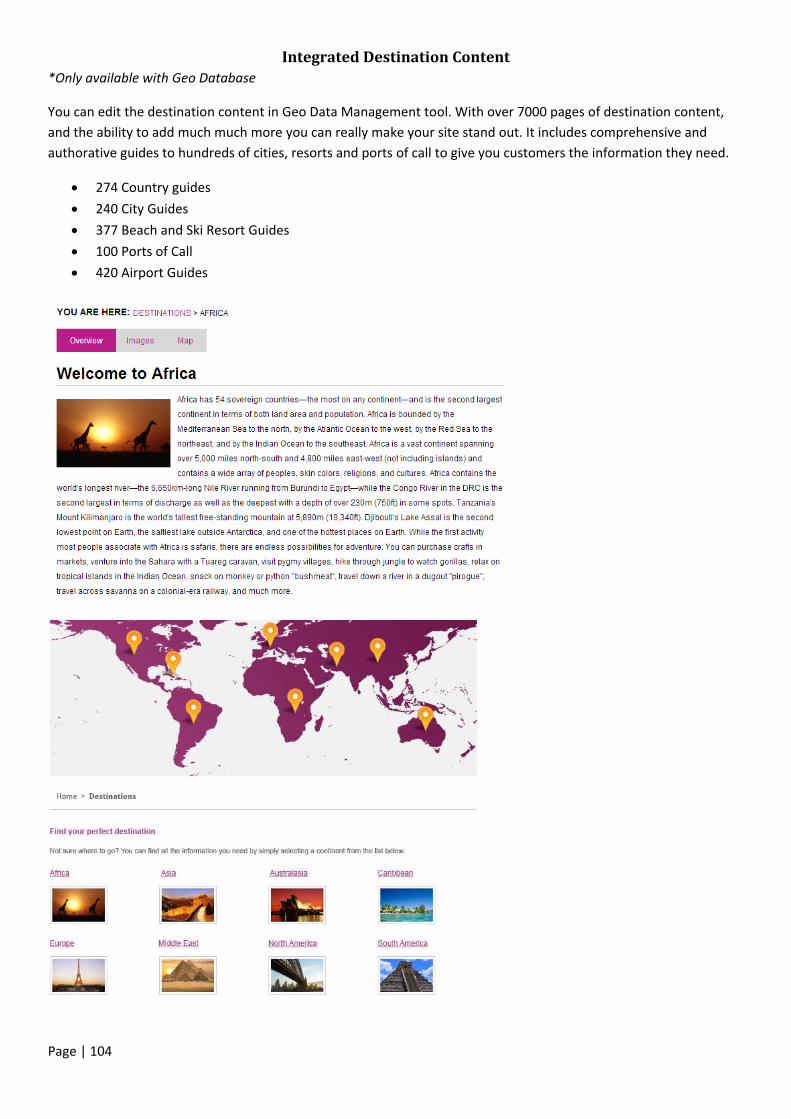
Integrated Destination Content *Only available with Geo Database
You can edit the destination content in Geo Data Management tool. With over 7000 pages of destination content, and the ability to add much much more you can really make your site stand out. It includes comprehensive and authorative guides to hundreds of cities, resorts and ports of call to give you customers the information they need.
274 Country guides
240 City Guides
377 Beach and Ski Resort Guides
100 Ports of Call
420 Airport Guides

Page | 105
Maps *Only available with Geo Database
By adding Google Maps functionality to your website you can greatly enhance your customers’ travel planning experience. You will have the ability to pinpoint resorts, accommodation and points of interest directly on your website, allowing customers to quickly and easily find their ideal accommodation with the familiar, easy-to-use Google Maps interface.
Page | 106
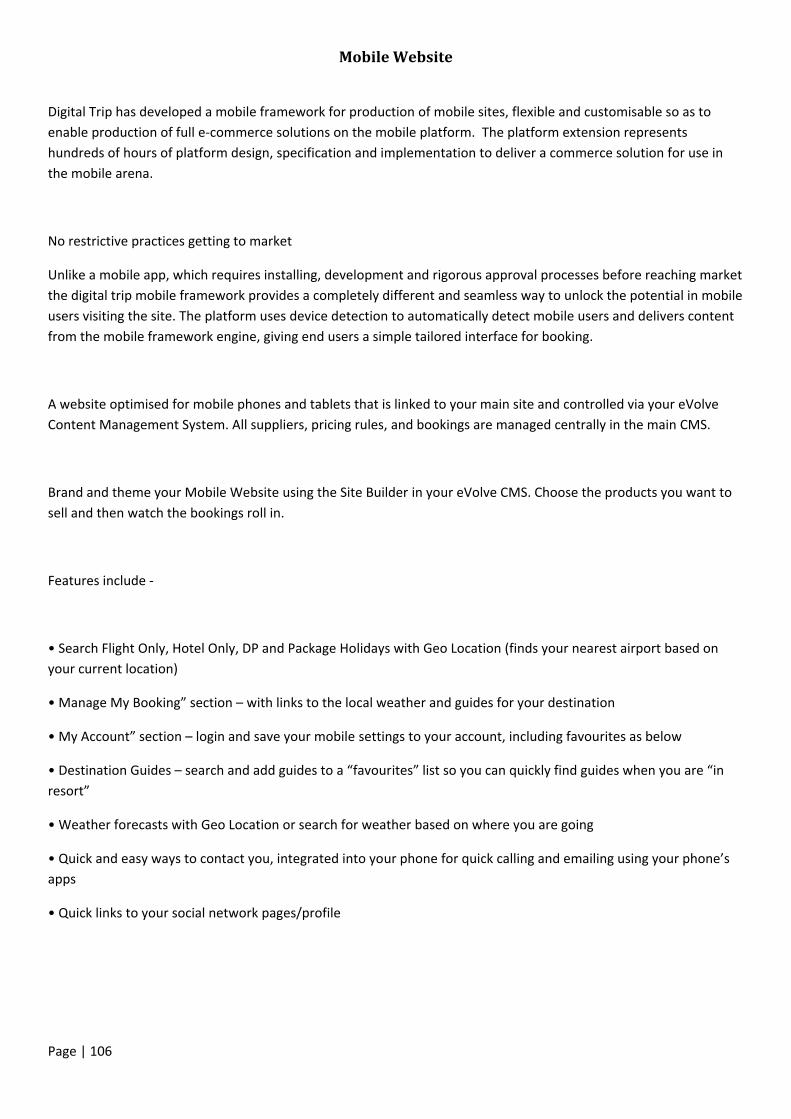
Mobile Website
Digital Trip has developed a mobile framework for production of mobile sites, flexible and customisable so as to enable production of full e-commerce solutions on the mobile platform. The platform extension represents hundreds of hours of platform design, specification and implementation to deliver a commerce solution for use in the mobile arena.
No restrictive practices getting to market
Unlike a mobile app, which requires installing, development and rigorous approval processes before reaching market the digital trip mobile framework provides a completely different and seamless way to unlock the potential in mobile users visiting the site. The platform uses device detection to automatically detect mobile users and delivers content from the mobile framework engine, giving end users a simple tailored interface for booking.
A website optimised for mobile phones and tablets that is linked to your main site and controlled via your eVolve Content Management System. All suppliers, pricing rules, and bookings are managed centrally in the main CMS.
Brand and theme your Mobile Website using the Site Builder in your eVolve CMS. Choose the products you want to sell and then watch the bookings roll in.
Features include -
• Search Flight Only, Hotel Only, DP and Package Holidays with Geo Location (finds your nearest airport based on your current location)
• Manage My Booking” section – with links to the local weather and guides for your destination
• My Account” section – login and save your mobile settings to your account, including favourites as below
• Destination Guides – search and add guides to a “favourites” list so you can quickly find guides when you are “in resort”
• Weather forecasts with Geo Location or search for weather based on where you are going
• Quick and easy ways to contact you, integrated into your phone for quick calling and emailing using your phone’s apps
• Quick links to your social network pages/profile
Page | 107
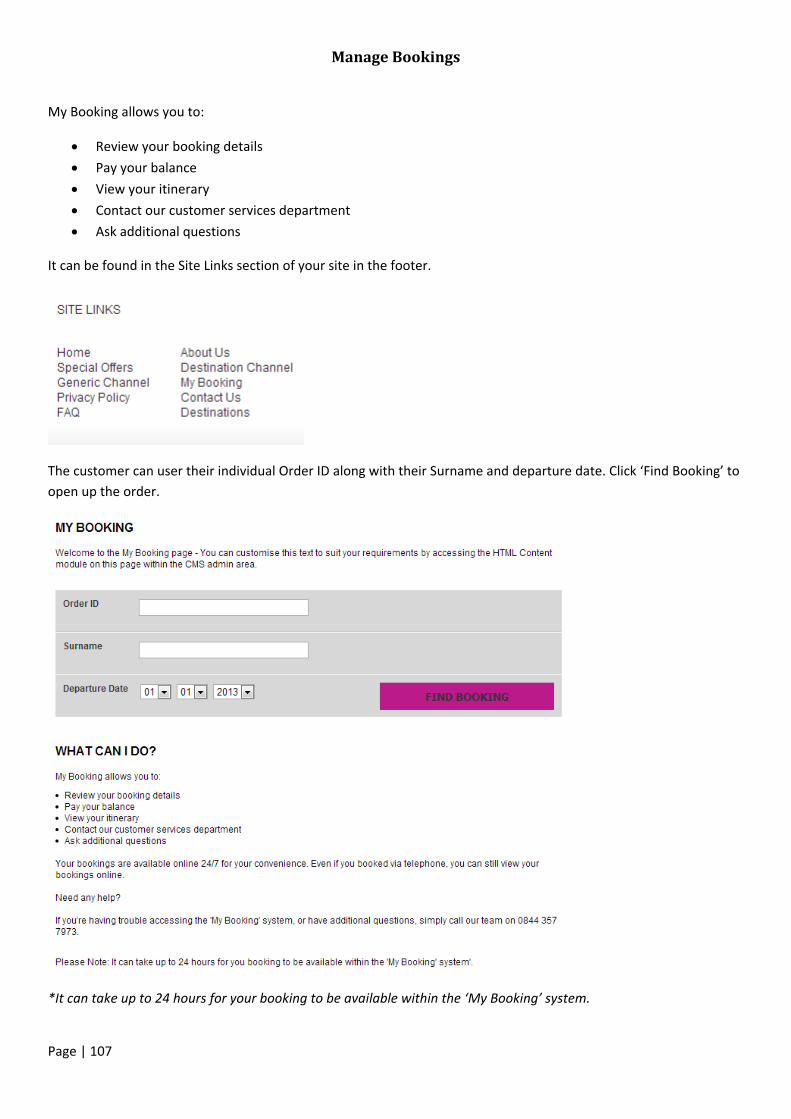
Manage Bookings
My Booking allows you to:
Review your booking details
Pay your balance
View your itinerary
Contact our customer services department
Ask additional questions
It can be found in the Site Links section of your site in the footer.
The customer can user their individual Order ID along with their Surname and departure date. Click ‘Find Booking’ to open up the order.
*It can take up to 24 hours for your booking to be available within the ‘My Booking’ system.

Page | 108
Third Party Integrations
We have chosen a number of 3rd party tools to enhance the eVolve CMS. Where possible all of the companies we have integrated offer a ‘free’ version of their product and you can of course upgrade any of the accounts to offer a potentially richer tool set.
Choose from a variety of email providers, SMS suppliers, RSS feeds and affiliate companies and get the most from your new website.
AffiliateFuture Tracking
Affiliate Future are performance-based marketing specialists, providing sales solutions and marketing services to advertisers, publishers and agencies. Please Note: This feature does not currently support Pay out Codes in the tracking.
Custom News Feeds
There are loads of great news websites available and this module will display any or all of them as long as they have an RSS feed. If your website is set up to be Multi-lingual then this app will support any of the languages that your chosen source provides.
Form Builder
Wufoo is a web application that helps anybody build amazing online forms. When you design a form with Wufoo, it automatically builds the database, backend and scripts needed to make collecting and understanding your data easy, fast and fun. Basic accounts are available free of charge from Wufoo.
Mailchimp
Allow website users to subscribe to your Mailchimp mailing lists using any of the eVolve CMS newsletter subscription modules, booking flows or other CRM activity. Either choose a single list for all subscriptions, or configure each CRM activity to a different list. Choose between Single or Double opt-in subscriptions.
OR
Newsweaver
Allow website users to subscribe to your MailChimp mailing lists using any of the eVolve CMS newsletter subscription modules, booking flows or other CRM activity. Either choose a single list for all subscriptions, or configure each CRM activity to a different list. Choose between Single or Double opt-in subscriptions.
OR
Dotmailer
Allow website users to subscribe to your Dotmailer mailing lists using any of the eVolve CMS newsletter subscription modules, booking flows or other CRM activity. Either choose a single list for all subscriptions, or configure each CRM activity to a different list. Choose between Single or Double opt-in subscriptions.
Page | 109
Mandrill
Mandrill is a scalable and affordable email infrastructure service, with marketing-friendly analytics tools Route inbound email through Mandrill and forward to your customers. Enter the sender email addresses, which you want to forward to your customers (e.g. [email protected]). All other emails will be ignored by the forwarding system.
Social Bookmarking
Integrating social marketing capabilities to your website opens up powerful new marketing channels, giving you more ways to connect with your customers. As one of the most powerful forces driving travel planning today, building your social media strategy is essential, supporting your web marketing, and enhancing your SEO and web exposure in a dramatic way. Each social platform and channel has its own following and focus and Digital Trip’s social marketing experts can advise on the best solution for you.

Page | 110
Wufoo Forms
Wufoo is a web application that helps anybody build amazing online forms. When you design a form with Wufoo, it automatically builds the database, backend and scripts needed to make collecting and understanding your data easy, fast and fun. Basic accounts are available free of charge from Wufoo.
You need to sign up to Wufoo and create an account. www.wufoo.com
You will be given a domain name which you need to enter into the integration section of the CMS.
Login to your Wufoo account. (www.wufoo.com)
Create the form on the site. Once you have saved the form, you will be provided with a short link URL.
In the CMS put the Wufoo module on the page you want the form to appear.

Page | 111
Select + where you want to position the form then select the Wufoo Forms module. Enter a name/description for the module.

Page | 112
The Wufoo Form module will be added to the page. Click the green pencil to open up the settings. In the module settings, it will ask you to put the short link URL into the module.
Click ‘Save Module’ when you entered the shortlink URL.