model hfm-60 streamline flowmeter - …sinom.com.tw/produt_pdf/has-hfm60manual.pdf · 1-2 general...
TRANSCRIPT

MODEL HFM-60STREAMLINEFLOWMETER
Contains Operating and Programming Information


MODEL HFM-60STREAMLINEFLOWMETER
1996, Teledyne Brown Engineering,
Hastings Instruments Division
All rights reserved.
Hampton, Virginia, U.S.A.
First Printing January, 1997
Document Number: 143-1196 Rev. A

Manual Print HistoryThe print history shown below lists the printing dates of all revisions and addenda created forthis manual. The revision level letter increases alphabetically as the manual undergoes subse-quent updates. Addenda, which are released between revisions, contain important changeinformation that the user should incorporate immediately into the manual. Addenda arenumbered sequentially. When a new revision is created, all addenda associated with theprevious revision of the manual are incorporated into the new revision of the manual. Eachnew revision includes a revised copy of this print history page.
Revision A (Document Number 143-0197) ........................................................ January 1997
WarrantyHastings Instruments warrants this product, for a period of one year from the date of ship-ment, to be free from defects in material and workmanship. This warranty does not apply todefects or failures resulting from unauthorized modification, misuse or mishandling of theproduct. This warranty does not apply to batteries or other expendable parts, nor to damagecaused by leaking batteries or any similar occurrence.
This warranty is in lieu of all other warranties, expressed or implied, including any impliedwarranty as to fitness for a particular use. Hastings Instruments shall not be liable for anyindirect or consequential damages.
Hastings Instruments will, at its option, repair, replace, or refund the selling price of theproduct if Hastings Instruments determines in good faith, that it is defective in materials orworkmanship during the warranty period. Defective instruments should be returned toHastings Instruments together with a written statement of the problem and a repair authoriza-tion number.

Table of Contents
1.0 GENERAL INFORMATION ................................................................1-1
1.1 Features .............................................................................................................................. 1-2
1.2 Specifications ..................................................................................................................... 1-3
1.3 Optional 4-20mA Output .................................................................................................. 1-4
1.4 Optional 0-90° Tiltable Digital Display ............................................................................. 1-4
1.4.1 Local Display .............................................................................................. 1-4
1.4.2 Remote Display .......................................................................................... 1-4
1.5 Optional Power Supply ...................................................................................................... 1-4
1.6 Other Accessories ............................................................................................................... 1-4
1.6.1 Hastings Wall Transformer .......................................................................... 1-4
1.6.2 Hastings Model 400/200 ............................................................................. 1-4
1.7 Warranty ............................................................................................................................ 1-4
2.0 INSTALLATION AND OPERATION..................................................2-1
2.1 Receiving Inspection .......................................................................................................... 2-2
2.2 Power Requirements .......................................................................................................... 2-2
2.3 Output Voltage ................................................................................................................... 2-2
2.4 Mechanical Connections .................................................................................................... 2-2
2.5 Electrical Connections ....................................................................................................... 2-3
2.6 Operation ........................................................................................................................... 2-3
2.6.1 Operating Temperature ............................................................................... 2-3
2.6.2 Zero Check ................................................................................................. 2-3
2.6.3 Blending ..................................................................................................... 2-3
2.6.4 Range Changes ........................................................................................... 2-4
2.6.5 Spanning of digital display ........................................................................ 2-4
3.0 THEORY OF OPERATION ..................................................................3-1
3.1 Overall Functional Description .......................................................................................... 3-2
3.2 Sensor .............................................................................................................................. 3-2
3.3 Base .............................................................................................................................. 3-3
3.4 Shunt .............................................................................................................................. 3-4
3.5 Electronic Circuitry ........................................................................................................ ... 3-4

4.0 MAINTENANCE ...................................................................................4-1
4.1 Authorized Maintenance.................................................................................................... 4-2
4.2 Troubleshooting ................................................................................................................. 4-2
4.3 Adjustments ....................................................................................................................... 4-3
4.4 End Cap Removal .............................................................................................................. 4-4
4.8 PCB Replacement .............................................................................................................. 4-5
4.9 Sensor Replacement ........................................................................................................... 4-5
5.0 WARRANTY and REPAIR ....................................................................5-1
5.1 Warranty Repair ................................................................................................................. 5-2
5.2 Non-Warranty Repair ........................................................................................................ 5 -2
6.0 SCHEMATICS AND DRAWINGS .......................................................6-1
Main Circuit Card Parts List (PC-844) .................................................................................... 6-3
Main Circuit Card Assembly (PC-844) .................................................................................... 6-4
Main Circuit Card Schematic (PC-844) .................................................................................. 6-5
Option Card Assembly (PC-845) ............................................................................................. 6-6
Option Card Schematic (PC-845) ............................................................................................ 6-7
Display Card Assembly (PC-846) ............................................................................................ 6-8
Display Card Schematic (PC-845) ........................................................................................... 6-9
Hastings Instruments reserves the right to change or modify the design of its equipment withoutany obligation to provide notification of change or intent to change.

General Information
SECTION 1

1-2 General Information
The Hastings Mass Flowmeter, HFM-60 Streamline is designed to accurately measure mass flowwithout corrections or compensations for gas pressure and temperature up to 60 slpm with anaccuracy of better than 3%. Hastings mass flow instruments do not require any periodic mainte-nance under normal operating conditions with clean gases. No damage will occur from the useof moderate overpressures (~150 psi) or overflows. Special calibrations for other gases, such asoxygen, helium and argon, are available upon special order. Instruments are normally calibratedwith the appropriate standard calibration gas (nitrogen) then a correction factor is used to adjustthe output for the intended gas.
1.1 Features
• The HFM-60 is inherently linear. Should recalibration (a calibration standard is
required) in the field be desired, the customer needs to simply set the zero and
span points.
• The HFM-60 incorporates a removable/replaceable main PC board/sensor module
which virtually eliminates long down time due to clogging. Clogging is the mostcommon cause of failure in the industry. The HFM-60 sensor is less likely to be
clogged due to the large internal diameter (0.020).
• Each flowmeter has a shunt which can be quickly and easily exchanged in the field
to different ranges. Calibration, however, is required.
• The filters located upstream of the shunt and sensor eliminate most of the larger
particulates and impurities which tend to clog the sensor tube.
• The HFM-60 is available in ranges from 0-10 sccm to 0-60 slpm (air equivalent
flow). Special ranges are available upon request.
• The HFM-60 is constructed of 6061-T6 aluminum alloy. Buna-N is standard for theO-rings and seals. Other elastomers are available upon request, e.g., Kalrez, Viton.
• The temperature coefficient of the HFM-60 is less than 0.1%/°C from 0-50°C.
• The 4-20 mA option gives the user the advantages of a current loop output tominimize environmental noise pickup.
• The optional 0-90° tiltable digital display allows convenient real time indication of theflow rate.
• The low pressure drop across this instrument is ideal for leak detection applications.
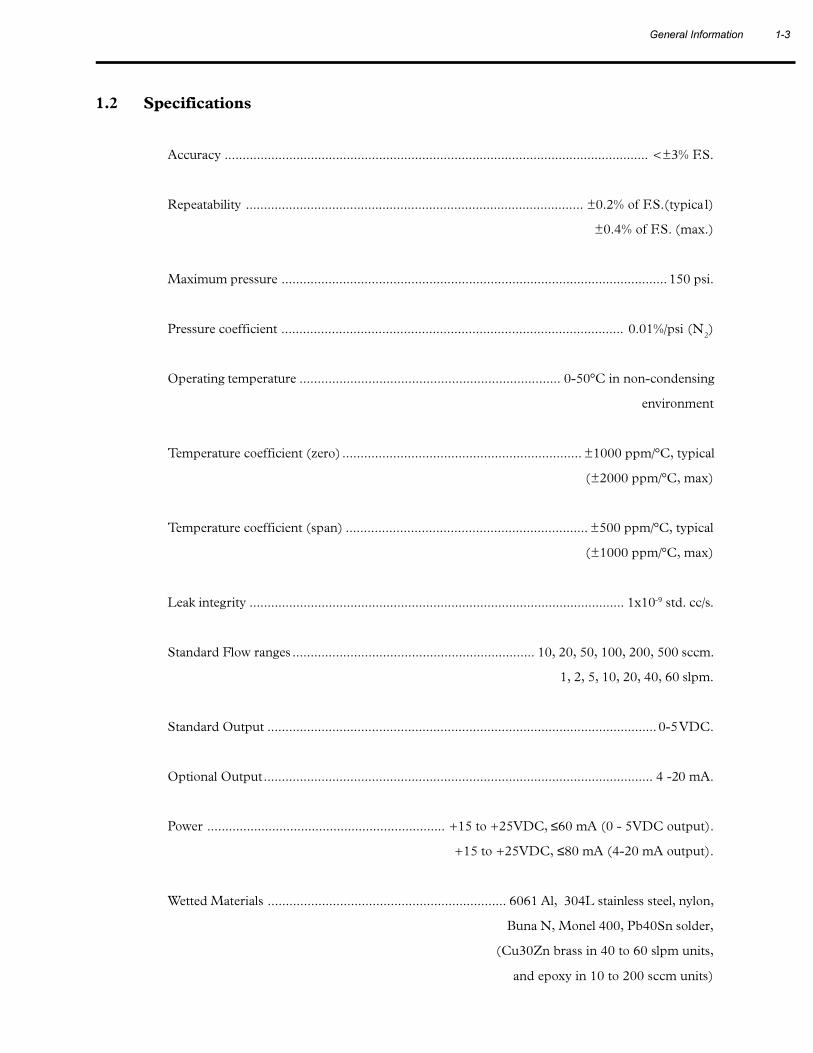
1.2 Specifications
Accuracy ...................................................................................................................... <±3% F.S.
Repeatability .............................................................................................. ±0.2% of F.S.(typica l)
±0.4% of F.S. (max.)
Maximum pressure ........................................................................................................... 150 psi.
Pressure coefficient ............................................................................................... 0.01%/psi (N2)
Operating temperature ........................................................................ 0-50°C in non-condensing
environment
Temperature coefficient (zero) .................................................................. ±1000 ppm/°C, typical
(±2000 ppm/°C, max)
Temperature coefficient (span) ................................................................... ±500 ppm/°C, typical
(±1000 ppm/°C, max)
Leak integrity ........................................................................................................ 1x10⁻⁹ std. cc/s.
Standard Flow ranges ................................................................... 10, 20, 50, 100, 200, 500 sccm.
1, 2, 5, 10, 20, 40, 60 slpm.
Standard Output ............................................................................................................ 0-5 VDC.
Optional Output............................................................................................................ 4 -20 mA.
Power .................................................................. +15 to +25VDC, ≤60 mA (0 - 5VDC output).
+15 to +25VDC, ≤80 mA (4-20 mA output).
Wetted Materials .................................................................. 6061 Al, 304L stainless steel, nylon,
Buna N, Monel 400, Pb40Sn solder,
(Cu30Zn brass in 40 to 60 slpm units,
and epoxy in 10 to 200 sccm units)
General Information 1-3

1.3 Optional 4-20 mA Current Output
An option to the standard 0-5 VDC output is the 4-20 mA current output that is proportional toflow. The 4 - 20 mA signal is produced from the 0 - 5 VDC output of the flowmeter. Thecurrent loop output is useful for remote applications where pickup noise could substantiallyaffect the stability of the voltage output. The load impedance should be between 0 and 400Ω.
1.4 Digital Display (0-90° Tiltable)
1.4.1 Local Display
For real time indication of the flow rate, a very useful option available is a 3.5 digit LCD digitaldisplay module mounted directly on top of the flowmeter case. The display can be rotated 90°from the horizontal position to the fully vertical for better visibility. The LCD digits are largeand clear and can be easily discerned at distances of 20 feet.
1.4.2 Remote Display
The tiltable display module may be removed from the flowmeter case and mounted at any distanceaway from the flowmeter body to permit convenient observation. Standard lengths of 7', 15' and25' cable (also special orders of any desired length) are available.
1.5 Wall Transformer Power Supply
The input voltage required for operation of the flowmeter is +15 to +25 VDC, at a maximum of60 mA (80 mA for the 4-20 mA output option). A 115 VAC wall power supply rectified to+18.5 VDC is available as a power supply option. The wall power supply comes with a 6' lengthof 2 conductor cable which can be connected directly to the HFM-60 connector.
1.6 Other Accessories
1.6.1 Totalizer (ATR-1J)
The Hastings Flow Totalizer integrates the 0-5 VDC signal generated by the flowmeter to give atotal flow reading. Count rates from 0 to 999 counts per minute are selectable by internal setting.
1.6.2 Hastings Model 400/200/40 Power Supply
Hastings power supplies (other than the aforementioned wall transformer) are available in eithertwo or four channel versions. They convert 115 or 230VAC to the +15 VDC required to operatethe flowmeter. Interface terminals to for the +15 VDC input and the 0-5 VDC linear outputsignal are located on the rear of the panel. Also, a cable can be supplied with the power supplythat provides the +15 VDC on pin 11 of a D connector and the 0 - 5VDC output measure-ment on pin 6. Pins 5 and 12 are common and pin 7 is chassis ground. Throughout thismanual, when reference is made to a power supply, it is assumed the customer is using aHastings wall power supply or a Model 200/400/40 supply.
1.7 Warranty
Hastings Instruments warrants the product for a period of one year from the date of shipment tobe free from defects in materials and workmanship. This does not apply to defects or failuresresulting from unauthorized modification, misuse or mishandling of the product. This warranty alsodoes not apply to fuses, filters, batteries or other expendable parts nor to damage caused by leakingbatteries, clogged filters or similar occurrences. This warranty is in lieu of all other warranties,expressed of implied, including any implied warranty as to fitness for a particular use. HastingsInstruments shall not be liable for any indirect or consequential damages.
Refer to Section 5 for information on obtaining warranty repair or replacement or other servicefor this product.
1-4 General Information

SECTION 2Installation

2-2 Installation
This section contains the necessary steps to assist in getting a new flowmeter in operation asquickly and easily as possible. Please read the following thoroughly before attempting to installthe instrument.
WARNING
The customer should determine if their process gas is compatible with thewetted materials of the flowmeter as specified in section 1.2. Some corrosivegases may damage the flowmeter materials and elastomer O-ring. This couldresult in incorrect flow measurement , or leakage over time.
2.1 Receiving and Inspection
Carefully unpack the Hastings HFM-60 and any accessories that have also been ordered. Inspectfor any obvious signs of damage to the shipment. Immediately advise the carrier who delivered theshipment if any damage is suspected. Check each component shipped with the packing list. Insurethat all parts are present (i.e., flowmeter, wall transformer power supply, cables, etc.). Optionalequipment or accessories will be listed separately on the packing list. There may also be one ormore OPT-options on the packing list. These normally refer to special ranges or special gascalibrations. They may also refer to special helium leak tests, high pressure tests or special modifi-cations such as high temperature O-ring materials. In most cases, these are not separate parts, butspecial options or modifications built into the flowmeter.
2.2 Power Requirements
The HFM-60 requires +15 to+25VDC, 60mA (0 - 5VDC output); 80mA (4 -20mA output).The supply voltage should be regulated such that there is no more than 50 mV ripple. Surgesuppressers are recommended to prevent power spikes reaching the instrument. These powerrequirements are satisfied by the Hastings wall transformer or by the Hastings wall power supplydescribed in Section 1.6.1 or 1.6.2.
2.3 Output Signal
The standard output of the flowmeter is a 0-5 VDC signal proportional to the flow rate. Theinput power is applied at pins 1 (+15 to+25 VDC) and 2 (ground). The output is obtained onpins 3 (0 to +5 VDC) and 4 (common) of the 4 pin connector. It is recommended that the loadresistance be no less that 2KΩ. When the 4-20 mA option (see Section 1.3) is selected the outputis also on pins 3 and 4. The load impedance must be no greater than 400Ω.
2.4 Mechanical Connections
The flowmeter may be mounted in any position as long as the direction of gas flow through theinstrument follows the arrow marked on the bottom of the flowmeter case label. The preferredorientation is with the inlet and outlet fittings in a horizontal plane. Changing the mountingorientation requires the re-zeroing of the instrument at zero flow.
The smallest of the internal passageways in the HFM-60 is the diameter of the sensor tube, whichis 0.020, and the annular clearance for the 500 sccm shunt which is 0.009", so the instrumentrequires adequate filtering of the gas supply to prevent blockage or clogging of the tube. Thescreen diffusers assist in filtering to some extent where the filter mesh is as small as 0.010".
There is a threaded hole in the bottom of the transducer that can be used to secure it to a mount-ing bracket, if desired. Other holes for special mounting can be added to the end cap as desired.
The standard inlet and outlet fittings for the HFM-60 are 1/4" NPT to 1/4" Swagelok (optionalVCR and VCO fittings are available from the factory). The O-rings for the end cap and the

Installation 2-3
sensor are Buna N (optional Kalrez, Neoprene or Viton O-rings are available from the factory).It is suggested that all connections be checked for leaks after installation. This can be done bypressurizing the instrument (do not exceed 150 psig unless the flowmeter is specifically rated forhigher pressures) and applying a diluted soap solution to the flow connections.
2.5 Electrical Connections
If a wall transformer power supply from Hastings Instruments is used, installation consists ofconnecting the 4 conductor cable to the 4 pin connector located on the side of the flowmeter. Thepower is supplied to the instrument on pin 1, +15 to +25VDC, and pin 2, ground. The output ismeasured on pin 3, 0 - 5 VDC or 4-20 mA and pin 4, ground. If a Hastings Model 400/200/40power supply is used, installation consists of connecting a 4 conductor cable to the terminal stripon the rear of the supply to the 4 pin connector located on the side of the flowmeter (similar tothat described above). Also, a cable with a male D connector can be supplied that mates withthe power supply. The D connector cable provides +15 VDC on pin 11 and the 0-5 VDCoutput on pin 6. Pins 5 and 12 are common and pin 7 is chassis ground.
2.6 Operation
The standard instrument output is a 0 - 5 VDC out and the signal is proportional to the flow i.e.,0 volts = zero flow and 5 volts = 100% of rated flow. The 4 - 20 mA option is also proportionalto flow.
2.6.1 Operating Temperature
For proper operation, the combination of ambient temperature and gas temperature must be suchthat the flowmeter temperature remains between 0 and 50°C. Most accurate measurement of flowwill be obtained if the flowmeter is zeroed at operating temperature as temperature shifts result insome zero offset.
2.6.2 Zero Check
Connect the wall transformer power supply to the instrument or if using a Hastings power supply,turn the power supply on. Allow approximately 10% flow for 1/2 hour warm-up. Stop all flowthrough the instrument and wait 2 minutes. Caution: Do not assume that all metering valvescompletely shut off the flow. Even a slight leakage will cause an indication on the meter and anapparent zero shift. For the standard 0-5 VDC output, adjust the zero potentiometer located onthe lower outlet side of the flowmeter until the meter indicates zero. For the optional 4-20 mAoutput, adjust the zero potentiometer so that the meter indicates slightly more than 4 mA, i.e.4.03 to 4.05 mA. This slight positive adjustment ensures that the 4-20 mA current loop transmit-ter is not in its cut-off region. The error induced by this adjustment is approximatly 0.3% of fullscale. This zero should be checked periodically during normal operation. Zero adjustment isrequired if there is a change in ambient temperature, vertical orientation of the flowmeter, or achange in input voltage.
2.6.3 Blending of Gases
If more than one flowmeter is used to mix gases and each is calibrated for a given gas, a desiredmixture of the gases can be achieved. As an example, suppose a total flow rate of 50 slpm of gasesA+B+C is required; 15% of the total flow should be gas B, 20% of the total flow should be gas Cand the balance is gas A. Then gas A should have a total flow of 0.65 (50) = 32.5 splm, gas Bshould have a total flow of 0.15(50) = 7.5 splm and gas C should have a total flow of 0.20(50) =10 splm. Further, let us say that flowmeter A has a 0-60 slpm range, flowmeter B has a 10 slpmrange and flowmeter C has a 40 slpm range. Since all 3 flowmeters have 0-5 VDC out thenflowmeter A should be set to read 5/60 = A/32.5 or A = 2.71volts, flowmeter B should be set toread5/10 = B/7.5 or B = 3.75 volts and flowmeter C should be set to read 5/40 = C/10 or C =1.25 volt. Ideally, however, flow controllers are a far better way to accomplish the blending,simply because there are no problems with pressure fluctuations.

2-4 Installation
2.6.4 Range Changes:
The range of the flowmeter can be changed in the field if recalibration facilities are available.The flowmeter may require a different shunt which can be purchased from the factory. A listingof available shunts (order codes) and the corresponding air equivalent flow ranges are as follows:
Order Code Shunt Range Order Code Shunt Range
01 0-10 sccm 07 0-1 slpm
02 0-20 sccm 08 0-2 slpm
03 0-50 sccm 09 0-5 slpm
04 0-100 sccm 10 0-10 slpm
05 0-200 sccm 11 0-20 slpm
06 0-500 sccm 12 0-40 slpm
13 0-60 slpm
Gases other than air or nitrogen have different properties, and the range of each shunt will bedifferent than those listed in the order codes above.
The flow rate of interest determines the size of the shunt required. As previously indicated, 13separate shunts are required for the range of flow spanning 10 sccm to 60 slpm full scale. Forthe 200 sccm flow range, four Monel 400 tubes of 0.027" i.d. are located within the aluminumshunt plug to accommodate the full 200 sccm. Lower flow rates require proportionally fewertubes and the unused holes are sealed with epoxy (or selected eutectic solder if epoxy is undes-ired). A single 304L stainless steel plug with an annular spacing of 0.009" with the base accom-modates the 500 sccm flow range. Increasing the flow requires more annular passageways whichis accomplished by adding concentric cylinder shells with increasing gap dimensions. Eventually,a maximum annular gap dimension for laminar flow is obtained (~0.030"). For a maximum flowrate of 60 slpm, three annular regions using two brass concentric cylinders is required. Tochange ranges, a new shunt must be installed and a calibration conducted to do further measure-ments.
2.6.5 Spanning the Digital Display
An exchange of shunt requires resetting of the digital display. Ideally, the flow should beestablished to the full scale level consistent with the selected shunt and the display pot adjustedfor that full scale flow rate. It is also possible to disconnect the phone jack connector to the mainbody and input 5.00VDC and set the display consistent with the particular full scale flow for theselected shunt. Verify the full scale voltage/current output and adjust the display pot for that fullscale flow rate. It is also possible to disconnect the phone jack between the display and flowme-ter, and supply external power (+5 VDC) and a full scale voltage (0-5 VDC) to the display.Refer to the schematics of PCB-846 in section 6 of this manual. The display may then beadjusted consistent with the particular full scale flow for the selected shunt. Note that there maybe need to change the display board solder jumpers in order to exhibit the new full scale flowrate.
Largest Display Value Jumper Setting
1999. All jumpers open
199.9 JP 1 closed
19.99 JP 2 closed
1.999 JP 3 closed

Operating Information
SECTION 3

3-2 Operating Information
This section contains an overall functional description of the HFM-60. Detailed schematics andparts lists can be found at the end of the manual in Section 5.0. In this section and other sectionsthroughout this manual, it is assumed that the customer is using the wall transformer powersupply supplied by Hastings or a Hastings Power Supply.
3.1 Overall Functional Description
The HFM-60 consists of a sensor, a base, shunt and electronic circuitry. The sensor measuresthe gas flow rate from 0 to 10 sccm. The shunt divides the flow such that the flow through thesensor is a precise percentage of the flow through the shunt. The flow through both the sensorand shunt is laminar. The circuit board amplifies the sensor output from the two Chromel Pthermocouples and and provides an analog output of either 0-5 VDC or 4-20 mA. The outputcan also be indicated on the digital display.
3.2 Sensor
The Hastings HFM-60 operates on a unique thermal electric principle whereby a metalliccapillary tube is heated uniformly by a resistance winding attached at the center of the capillary(see figure 3.1). Thermocouples TC-1 and TC-2 are positioned on each side of the heater coil andare welded at equal distances from the mid-point of the capillary. At zero flow, the TC outputs areequal. When flow occurs through the tubing, heat is transferred from the heated region to the gasand from the gas back to the cool wall downstream. Thermocouple TC-1 measures the tempera-ture upstream before the gas is heated and thermocouple TC-2 measures the gas temperaturedownstream after it is heated. During flow, the temperature distribution along the sensor tubebecomes skewed (see figure 3.2). Conventionally, the difference in temperature of the twothermocouples provides a voltage difference that is proportional to flow.
For a constant power input, the differential voltage is a function of the mass flow rate and theheat capacity of the gas. Since the heat capacity of many gases is relatively constant over wideranges of temperature and pressure, the flowmeter may be calibrated directly in mass units forthose gases. Changes in gas composition usually require application of a multiplication factorto the air calibration to account for the difference in heat capacity. The flowmeter is capableof measuring a wide range of gases. The Monel 400 sensor tube has an internal diameter of0.0205" and is heated by 600 W of MWS-800 wire. This diameter measures approximately10 sccm full scale flow with ∆p of 0.5 inches of H
2O. The sensor is encapsulated by a plastic
cover and filled with fiberglass insulation to minimize convective heat losses.
Heater (VDC Source)
TC-1 TC-2
NylonSpacer
O-ring
PC Board
flowfigure 3.1

Operating Information 3-3
3.3 Base
The 6061 aluminum alloy base has a 1" square cross-section and is 3.375" long (with end cap).The internal flow channel is 0.812" diameter with in and out 304L stainless steel fittings 1/4"NPT to 1/4" Swagelok fittings.
3.4 Shunt
The flow rate of interest determines the size of the shunt required. As previously indicated, 13separate shunts are required for the range of flow spanning 10 sccm to 60 slpm full scale. Thegeometry of the shunt for 0- 200 sccm is shown in figure 3.3(a). Four Monel 400 tubes of 0.027"i.d. are located within the aluminum plug to accommodate the full 200 sccm. Lower flow ratesrequire proportionally fewer tubes and the unused holes are sealed with epoxy (or selected eutecticsolder if epoxy is undesired). At the lowest flow rate (10 sccm), the shunt is completely blockedand all of the flow is routed through the sensor. Figure 3.3(b) shows the geometry for higher flowrates. A single 304L stainless steel plug with an annular spacing of 0.009" accommodates the 500sccm flow range. Increasing the flow requires more annular passageways which is accomplished byadding concentric cylinder shells with increasing gap dimensions. Eventually, a maximum annulargap dimension for laminar flow is obtained (~0.030"). For a maximum flow rate of 60 slpm, threeannular regions using two brass concentric cylinders is required. This patent pending shunttechnology also includes inboard sensor ports which ensure laminar flow without the turbulenceassociated with end effects. This unique flow geometry provides an exceedingly linear shunt.
A schematic diagram of the integral flowmeter (without the digital display module) employing a 60slpm shunt is shown in figure 3.4. Note the inboard location of the sensors inlet and outlet withrespect to the inlet and outlet of the shunt. Also note the screen disk and washer which are used tominimize the radial velocity gradient entering the shunt. This results in a more uniform flowvelocity profile and therefore, more uniform flow in the annular passages of the shunt.
figure 3.2
Length of tube
L/2 L/20
Tem
per
atu
re o
ftu
be
TC-1 TC-2
ZERO
FLOW SMALL
FLOW

3-4 Operating Information
Aluminum
epoxy
figure 3.3 (a)
figure 3.3 (b)
annular flow
passages
500 sccm - 60 slm(typical configuration)
10 sccm - 200 sccm(typical configuration)

3.5 Electronic Circuitry
The HFM-60 employs a thermal flow sensor (capillary tube described in section 3.2) to measurethe flow which is proportional to the total flow through the instrument. The sensor develops adifferential voltage output signal proportional to flow which is approximately 1 mV full scalemagnitude. A differential amplifier and an inverting amplifier boost the signal strength by afactor of ~5000 at full scale flow. The amplified output can be measured on pins 3 and 4 of theexternal connector. If a Hastings power supply is employed, the 5 volt output is also sent to theterminals on the back and to the decoding circuitry in the display which converts it to a 3 and 1/2digit output. An optional 4-20 mA analog output on pins 3 and 4 is also available in lieu of anoutput voltage. The addition of a 4-20 mA current loop transmitter on the secondary pc board(mounted parallel to the main pc board) is required to provide this current loop. A jumperchange is made on the main PC board to establish the selected output mode. The digital displayoption includes the tiltable LCD display module which is removable for remote display. Thisseparate module contains its own pc board and mounts directly on the top of the main cover.This local or remote digital unit provides a continual digital display in addition to the 0-5 VDCor 4-20 mA output. A standard 4 conductor phone jack and cable is used to connect the displaymodule to the main pc board. The circuit diagrams for the aforementioned functions arepresented in Section 6.
flow
end cap
O-ringcoarsescreen
finescreen
base
shunt plug
(60 slm shown)
shunttubes
PCboard
cover
spacer
figure 3.4
Operating Information 3-5


Maintenance
SECTION 4

4-2 Maintainance
This section contains service and calibration information. Some portions of the instrument aredelicate. Use extreme care when servicing the instrument. The potentiometer positions and theelectrical components referred to in the troubleshooting section can be found in Section 4.3 onthe electrical component layout drawing.
4.1 Authorized Maintenance
With proper care in installation and use, the flowmeter will require little or no maintenance. Ifmaintenance does become necessary, most of the instrument can be cleaned or repaired in the field.Some procedures may require recalibration. Do not attempt these procedures unless facilities areavailable. Entry into the sensor or tampering with the printed circuit board will void warranty. Donot perform repairs on these assemblies while the unit is still under warranty.
4.2 Troubleshooting
Symptom: Output reads strong indication of flow with no flow present. Zero pot has no effect.
Cause: Power shorted out.
Action: Unplug power supply for a few seconds, then plug it back in. If this is ineffective,disconnect the power supply from the unit and check the power supply voltage(+15 to +25 VDC on pin 1).
Symptom: Output of flowmeter is proportional to flow, but extremely small and not correctableby span pot.
Cause: Sensor is not being heated.
Action: Shut off gas supply and disconnect the power to the flowmeter. Remove cover and pcboard from unit. Check the resistance between w1 and w2 on PCB-844 (refer tofigures in section 6) of the flowmeter. The resistance should be approximately 560Ω.The resistance between w3 and w4 should be approximately 2-3Ω. If not, thesensor unit needs to be replaced.
Symptom: Sensor has proper resistance readings, but little or no output with flow.
Cause: Plugged sensor.
Action: Shut off gas supply and disconnect the power to the flowmeter. Remove cover and pcboard from unit. If sensor has evidence of clogging, clean or replace as applicable.
Symptom: Flowmeter reads other than 0.00 VDC with no flow or there is a small flow when theflowmeter reads 0.00 VDC.
Cause: Zero pot is out of adjustment.
Action: Shut off all flow. For the standard 0-5VDC output, adjust the zero potentiometerlocated on the lower outlet side of the flowmeter until the meter indicates zero. Forthe optional 4-20 mA output, adjust the zero potentiometer so that the meterindicates slightly more than 4 mA, i.e. 4.03 to 4.05 mA. This slight positiveadjustment ensures that the 4-20 mA transmitter is not in its cut-off region. Theerror induced by this adjustment is approximately 0.3% of full scale.

Maintainance and Repair 4-3
Symptom: Flowmeter is out of calibration and non-linear.
Cause: Leaks in the gas inlet or outlet fittings.
Action: Check all fittings for leaks by placing soap solution on all fittings between gas supply andfinal destination of gas. Check flowmeter for leaks. Replace O-rings if required orrecalibrate as necessary.
4.3 Adjustments
Calibration Procedure (See figure 4.1)
1. Connect power to pins 1 and 2 as specified in Section 2.5. Allow the instrument to warm upfor 30 minutes with 10% flow.
2. Completely shut off the flow and wait for 5 minutes. For the standard 0-5VDC output,adjust the zero potentiometer located on the lower outlet side of the flowmeter until themeter indicates zero. For the optional 4-20 mA output, adjust the zero potentiometer so thatthe meter indicates slightly more than 4 mA, i.e. 4.03 to 4.05 mA. This slight positiveadjustment ensures that the 4-20 mA transmitter is not in its cut-off region. The errorinduced by this adjustment is approximately 0.3% of full scale.
3. Turn on gas supply to inlet of instrument and insure the flow rate is an accurate maximumflow for the shunt employed. Ensure that the full range can still be obtained at minimuminlet pressure.
4. Adjust Span pot until the flow reference reads full scale (5.00VDC or 20 mA). Perform thisstep only if a calibrated reference flowmeter is available.
5. Adjust the span pot of the display so that it reads correct full scale flow.
6. Record flowmeter and flow reference outputs for flow rates of 20%, 40%, 60%, 80% and100% and make sure data are within ± 3% of full scale.
figure 4.1
span
zero
flow
Maintenance 4-3

4.4 End Cap Removal
The end cap on the inlet side must be removed to gain access to the filter and shunt assembly.First remove power and shut off the supply of gas to the instrument. Disconnect the Swagelokfittings on the inlet and outlet sides of the transducer and remove it from the system plumbing.Remove the two Allen head screws holding the end cap to the instrument (see figure 4.2).Carefully remove the end cap, retaining ring, filter, spacer, filter washer and ball bearing (ifpresent) and shunt, noting their order and proper orientation. The shunt can be severely dam-aged if dropped. Examine the filter and shunt. If either is damaged, dirty or blocked, clean andreplace as applicable. Reassemble in the reverse order of disassembly. Secure the endcap with4 in lb of torque on each 18-8 stainless steel socket head cap screw. Use of a fastener other thanthe one mentioned here may result in leakage at the seal. Recalibration of the HFM-60 isnecessary.
figure 4.2
10 sccm to 200 sccm
500 sccmto
20 slm
40 slm
60 slm
4-4 Maintenance

4.5 Printed Circuit Board Replacement
In the event that any of the PC boards fail, they are easily removed from the instrument andreplaced with a spare. This ease in disassembly and replacement substantially reduces instrumentdowntime.
1. Replacement of the 4-20 mA option PC board: Unplug the power cable from the transducer.If a digital display exists, unplug the phone jack connection and remove the flowmeter cover.Remove the 4 brass spacers and lift off the 4-20 mA board. Be careful not to damage themain board and 4-20 mA board connector.
2. Replacement of the main PC board: Continue from 1. Remove the 4 brass spacers from themain board and gently lift the board from the flowmeter base. When installing the replacementboard, insure that the brass spacers are uniformly and securely tightened (finger tight) since thecompression seals the O-rings on the base, PC board and the sensor tube which, in turn,maintains the integrity of the flow in the sensor.
4.6 Sensor Replacement
The sensor is an intimate part of the main PC board and can not be separately removed from themain board without great difficulty. Therefore, sensor replacement requires the replacement of theentire main board. Follow instructions for removing the main board as shown in Section 4.5 andconsult Section 5 to acquire a new main board/sensor unit.
Maintenance 4-5


Warranty and Repair
SECTION 5
To place and order or to obtain information concerning replacement parts, contact the factoryrepresentative in your area. See below or the last page in this manual for the address or phonenumber. When ordering, include the following information: Instrument model number, partdescription and Hastings part number.
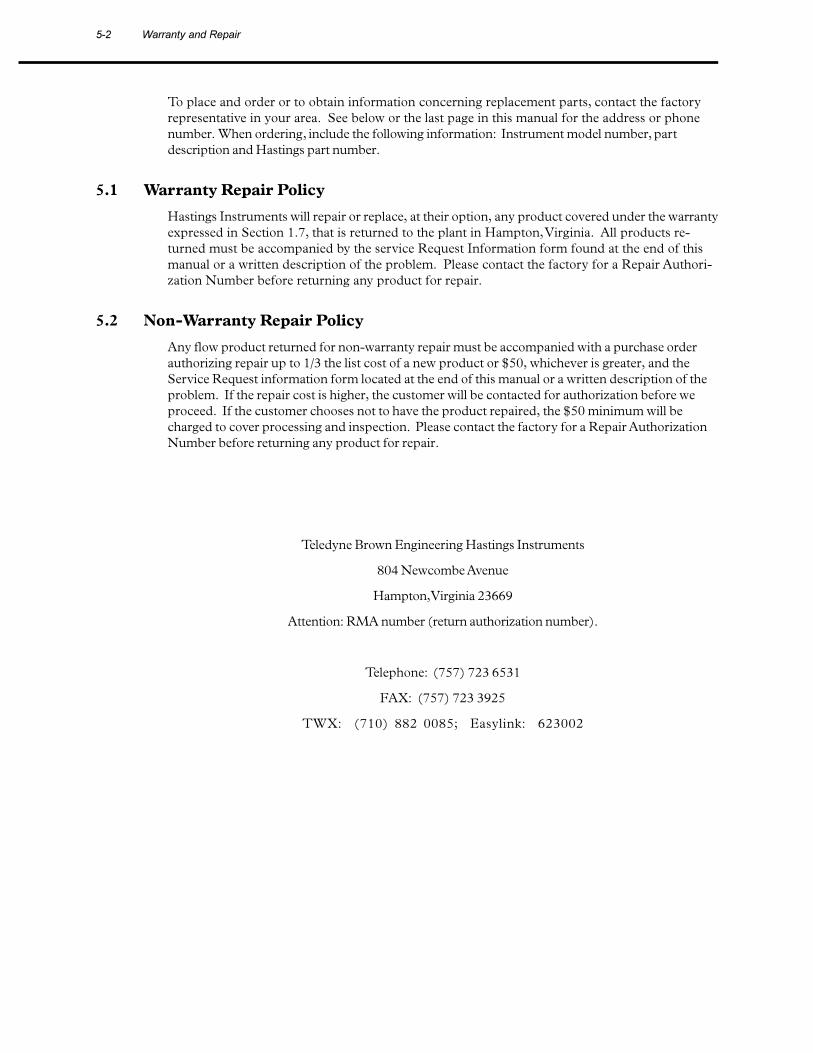
5.1 Warranty Repair Policy
Hastings Instruments will repair or replace, at their option, any product covered under the warrantyexpressed in Section 1.7, that is returned to the plant in Hampton, Virginia. All products re-turned must be accompanied by the service Request Information form found at the end of thismanual or a written description of the problem. Please contact the factory for a Repair Authori-zation Number before returning any product for repair.
5.2 Non-Warranty Repair Policy
Any flow product returned for non-warranty repair must be accompanied with a purchase orderauthorizing repair up to 1/3 the list cost of a new product or $50, whichever is greater, and theService Request information form located at the end of this manual or a written description of theproblem. If the repair cost is higher, the customer will be contacted for authorization before weproceed. If the customer chooses not to have the product repaired, the $50 minimum will becharged to cover processing and inspection. Please contact the factory for a Repair AuthorizationNumber before returning any product for repair.
Teledyne Brown Engineering Hastings Instruments
804 Newcombe Avenue
Hampton, Virginia 23669
Attention: RMA number (return authorization number).
Telephone: (757) 723 6531
FAX: (757) 723 3925
TWX: (710) 882 0085; Easylink: 623002
5-2 Warranty and Repair


Drawings
SECTION 6


Drawings 6-3

6-4 Drawings

Drawings 6-5

6-6 Drawings

Drawings 6-7

6-8 Drawings

Drawings 6-9
