mmc instruction manua1 - vertex-tw.comvertex-tw.com/data/07b890.pdf · 1 1 introduction 1.1...
TRANSCRIPT

MMC instruction manual
1 Introduction ................................................................................................................................................... 1
1.1 Overview ................................................................................................................................................ 1
1.2 Introduction ........................................................................................................................................... 1
1.2.1 Mother board............................................................................................................................. 1
1.2.2 4‐channels PID module .............................................................................................................. 2
1.2.3 Output module........................................................................................................................... 3
1.2.4 Extension board ......................................................................................................................... 3
1.2.5 AI board ...................................................................................................................................... 4
1.2.6 GIO board ................................................................................................................................... 4
1.3 Specification ........................................................................................................................................... 4
2 Wiring and Switch Setting ............................................................................................................................. 5
2.1 Mother Board......................................................................................................................................... 5
2.2 Output Board ......................................................................................................................................... 6
2.3 Extension Board ..................................................................................................................................... 6
2.4 PID Module ............................................................................................................................................ 7
3 Communication.............................................................................................................................................. 7
3.1 Specification ........................................................................................................................................... 7
3.2 Communication Setting ......................................................................................................................... 8
3.3 Communication wiring .......................................................................................................................... 8
3.4 MODBUS Communication Protocol....................................................................................................... 9
3.4.1 General ....................................................................................................................................... 9
3.4.2 Composition of Command Message ......................................................................................... 9
3.4.3 Response Message of MMC..................................................................................................... 11
3.4.4 MODBUS Message RTU Framing ............................................................................................. 12
3.5 Function Code Description .................................................................................................................. 13
3.5.1 Read Data Registers [Function Code: 03] ................................................................................ 13
3.5.2 Read Input Registers [Function Code: 04]............................................................................... 14
3.5.3 Write Single Coil [Function Code: 05] ..................................................................................... 15
3.5.4 Write Single Register [Function Code: 06] .............................................................................. 15
3.5.5 Write Multiple Registers [Function Code: 10]......................................................................... 16

4 Parameters Description and Data Register Map......................................................................................... 17
4.1 Parameters Description ....................................................................................................................... 17
4.1.1 User .......................................................................................................................................... 17
4.1.2 Level PID ................................................................................................................................... 19
4.1.3 Option....................................................................................................................................... 21
4.1.4 Control Output ......................................................................................................................... 25
4.1.5 Program .................................................................................................................................... 26
4.1.6 Calibration ................................................................................................................................ 28
4.2 Alarm Section ....................................................................................................................................... 29
4.3 Data Register Map ............................................................................................................................... 32
v.1.0 20130304

1
1 Introduction 1.1 Overview
The MMC (Multi‐channels Modular Controller) system consists of a mother board, 4‐channels PID
modules, output modules and extension boards; the AI (analog input) module board and GPIO
(General Purpose Input/Output) board are options and customized depending on the application.
One MMC system can control up to 32 (max.) channels PID control loops with various output
devices such as Relay contact, Pulsed Voltage, 4 ~ 20mA or 0 ~10Vdc etc. An overview of the MMC
system is shown in Fig. 1.
Figure 1 MMC system overview
Feature
Compact size – Saving your assembly cost by reducing the space
Modular design –Flexible combination to fulfill your control & measurement requirement
DIN rail mount – Easy to installation
Plug connector – Easy to wiring & maintenance
USB port – Easy to configuration
1.2 Introduction 1.2.1 Mother board

2
Figure 2 Mother Board
The mother board as shown in Figure 2 is the central part of a MMC system. It provides the
major functions of MMC system which include two RS485 communication ports, up to 16
alarm output signal, 8 channels PID control loop with heating and cooling control output signal,
one USB configuration port, 10 channels 12‐bits A/D converter and 16 general‐ purpose I/Os.
The powerful facilities have the features as below
Two RS485 communication port – One RS485 port can be set to interface with HMI
(Human Machine Interface) or customize Display & keys board for local operation, the
other can be set to interface with Supervisory or data acquisition system. Because of all
the controlled parameters of linked 4‐channels PID modules have been buffered into the
memories of main CPU. It is possible to access all the controlled data with high
communication speed up to 115.2K bps.
Up to 16 alarm outputs – Each alarm can be freely assigned to any PID loops with various
alarm modes.
8 channels PID control loop – 8 channels PID controller working independently provide
high control performance without taking resource from main CPU.
USB configuration port – This user‐friendly USB port make it easy to configure the MMC
setting.
12‐bits A/D converter – The built‐in 10 channels 12‐bits A/D of the mother board are
useful to convert any analog process variable to a digital measuring value. For example, a
customize AI module with CT (Current Transformer) and rectifier circuit can be connected
to the mother board to measure the load current of heating element.
GPIO – The auxiliary general purpose I/O are useful to expend the digital input and/or
output to perform logic control of controlled system.
1.2.2 4‐channels PID module

3
Figure 3 4‐channels PID module
The 4‐channels PID module is a daughterboard to be mounted on the motherboard or
extension board. It provides 4 channels independent PID control loop with various facilities.
Universal input signal including various thermocouples, RTD, mV, mA and V.
Heating and cooling control output signals
Ramp to set‐point
Soft start
8 segments (ramp & soak) programmable profile
4 independent level PID
1.2.3 Output module
Figure 4 Output module ‐ Relay
The output module takes control signals from the PID module or alarm signals from the mother
board to drive heating/cooling elements or alarm devices with various output devices. The
output devices can be relay contact, Pulsed Voltage, 4 ~ 20mA or 0 ~10Vdc etc.
1.2.4 Extension board

4
Figure 5 Extension board
Maximum 3 extension boards can be connected to a MMC system. One extension board can
have 4 or 8 PID control loops by equipped with one or two 4‐channels PID module. That is the
PID control loop of MMC system can be extended to 32 channels maximum.
1.2.5 AI board
The AI module is customizing board which is designed according the customer’s requirement.
Further details please contact your MMC supplier.
1.2.6 GIO board
The GPIO board is customizing board which is designed according the customer’s requirement.
Further details please contact your MMC supplier.
1.3 Specification Power supply: 24 Vdc ±20%
Power consumption:
Mother Board – 2VA with 2 PID modules
Output Module –3.6VA (max.) each
Extension Board – 1VA with 2 PID modules
Sensor input:
Thermocouple Type Measuring/Setting Range Accuracy
J ‐50 ~ 1000 °C ±2°C
K ‐50 ~ 1370 °C ±2°C
T ‐270 ~ 400 °C ±2°C
E ‐50 ~ 950 °C ±2°C
B 0 ~ 1800 °C ±2°C
R ‐50 ~ 1750 °C ±2°C
S ‐50 ~ 1750 °C ±2°C
N ‐50 ~ 1300 °C ±2°C
C ‐50 ~ 1800 °C ±2°C
RTD Type Measuring/Setting Range Accuracy
PT100 (DIN) ‐200 ~ 850 °C ±0.2°C
PT100 (JIS) ‐200 ~ 600 °C ±0.2°C

5
Linear Type Scale/Setting Range Accuracy
‐10 ~ 10 V ‐30000 ~ 30000 counts ±4mV
‐50 ~ 50 mV ‐30000 ~ 30000 counts ±20uV
4 ~ 20 mA ‐30000 ~ 30000 counts ±10uA
Control mode: On/Off or P, PI, PD, PID
Sampling Rate of PID loop: 100ms each channel
Resolution of PID loop: 24‐Bits A/D converter
Resolution of AI module: 12‐bits A/D converter
Control output:
Relay – SPST NO, 250Vac 3A resistive load
Pulsed Voltage – 24Vdc 24mA
4~20mA – 600Ω Max.
0~10Vdc – 500Ω Min.
Alarm output:
Relay – SPST NO, 250Vac 3A resistive load
No. of auxiliary GPIO: 16
Communication: RS485 interface with MODBUS RTU mode protocol, up to 115.2K bps
Memory: EEPROM (Non‐volatile memory)
Ambient temperature: ‐10 ~ 55˚C
Ambient humidity: RH 25 ~ 85%
2 Wiring and Switch Setting
2.1 Mother Board
SW1: Set the ID of mother board in the range of 1 ~ 9. “0” is reserved for configuration purpose
only. When set to “0”, the MMC will be with Baud Rate=9600 and ID=1 temporarily. So no matter

6
what the Baud Rate and ID of a MMC had been set , it can be communicated with 2 Stop bits,9600
Bps and ID=1.
COM1: The COM1 connector has 4 pins. The pin 1 and 2 are connected to the master ( such as
SCADA, supervisory control and data acquisition) ,the pin 3 and 4 are connected to the next
mother board.
COM2: The COM2 connector can be connected to a HMI or Display & keys board for local
operation.
2.2 Output Board
The output board can be equipped with various output device such as Relay, Voltage pulse to drive
SSR or linear 4 ~ 20mA
2.3 Extension Board

7
SW2: Set the SW2 in the range of 1 ~ 9. The SW2 of those extension boards connected to the same
MMC system must be set to a value different to each other.
2.4 PID Module
SW1, SW2, SW3, SW4: These DIP switchs are used to configure the hardware for various input signal
for each channel. The setting is shown as the table on PID module.
3 Communication
3.1 Specification
Item Specification
Electrical specification Based on EIA RS‐485
Transmit system 2‐wire, half‐duplex
Synchronizing system Asynchronous mode
Transmission distance 500m max
Transmission speed Up to 115.2K BPS
Start bit 1 bit
Data length bit 8 bits
Parity bit None
Data format
Stop bit 1 or 2 bits selectable
Transmission code HEX value (MODBUS RTU mode)
Error detection CRC‐16 bits
8
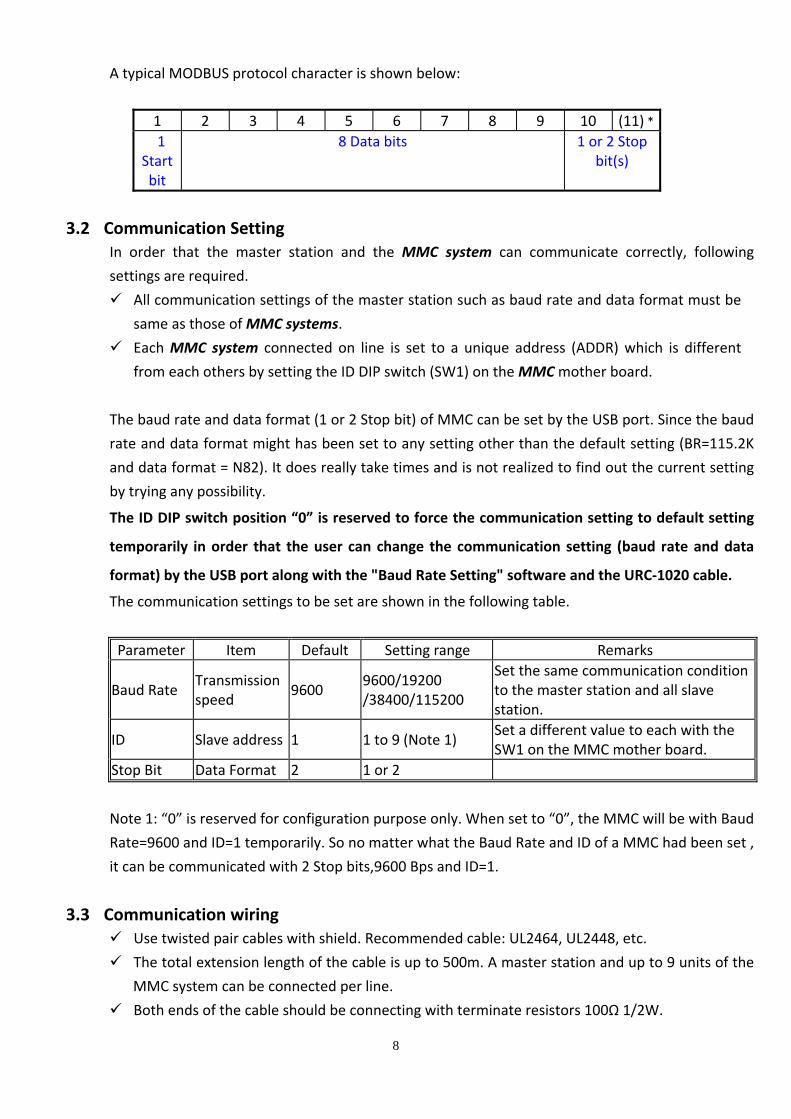
A typical MODBUS protocol character is shown below:
1 2 3 4 5 6 7 8 9 10 (11) *
1 Start bit
8 Data bits 1 or 2 Stop bit(s)
3.2 Communication Setting In order that the master station and the MMC system can communicate correctly, following
settings are required.
All communication settings of the master station such as baud rate and data format must be
same as those of MMC systems.
Each MMC system connected on line is set to a unique address (ADDR) which is different
from each others by setting the ID DIP switch (SW1) on the MMC mother board.
The baud rate and data format (1 or 2 Stop bit) of MMC can be set by the USB port. Since the baud
rate and data format might has been set to any setting other than the default setting (BR=115.2K
and data format = N82). It does really take times and is not realized to find out the current setting
by trying any possibility.
The ID DIP switch position “0” is reserved to force the communication setting to default setting
temporarily in order that the user can change the communication setting (baud rate and data
format) by the USB port along with the "Baud Rate Setting" software and the URC‐1020 cable.
The communication settings to be set are shown in the following table.
Parameter Item Default Setting range Remarks
Baud Rate Transmission speed
9600 9600/19200 /38400/115200
Set the same communication condition to the master station and all slave station.
ID Slave address 1 1 to 9 (Note 1) Set a different value to each with the SW1 on the MMC mother board.
Stop Bit Data Format 2 1 or 2
Note 1: “0” is reserved for configuration purpose only. When set to “0”, the MMC will be with Baud
Rate=9600 and ID=1 temporarily. So no matter what the Baud Rate and ID of a MMC had been set ,
it can be communicated with 2 Stop bits,9600 Bps and ID=1.
3.3 Communication wiring Use twisted pair cables with shield. Recommended cable: UL2464, UL2448, etc.
The total extension length of the cable is up to 500m. A master station and up to 9 units of the
MMC system can be connected per line.
Both ends of the cable should be connecting with terminate resistors 100Ω 1/2W.
9
The shield wire of the cable should be grounded at one place on the master station unit side.
3.4 MODBUS Communication Protocol 3.4.1 General
The MODBUS serial line is a Master‐Slaves protocol. Only one master (at the same time) is
connected to the bus, and one or several MMCs (9 maximum) are also connected to the same
serial bus. A MODBUS communication is always initiated by the master. The MMC will never
transmit data without receiving a request from the master. The MMCs will never
communicate with each other. The master initiates only one MODBUS transaction at the
same time.
The master issues a MODBUS command message to the MMCs in two modes:
1. Unicast Mode: the master addresses an individual MMC. After receiving and processing
the command message, the MMC returns a response message to the master. Each MMC
must have an unique address (1~9) set by the SW1 switch on the mother board.
2. Broadcast mode: the master can send a command message to all MMCs. No response is
returned to a broadcast command sent by the master. The broadcast commands are
necessarily writing commands. ALL MMCs must accept the broadcast for writing function.
The address 0 is reserved to identify a broadcast exchange.
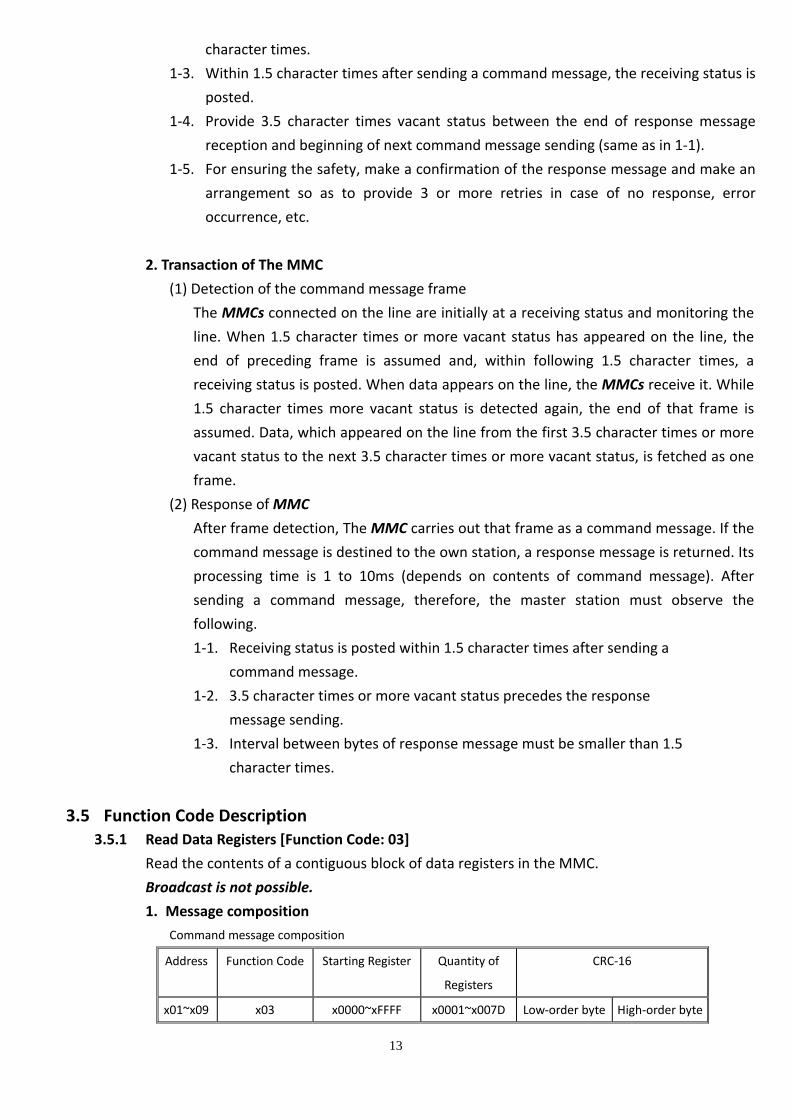
3.4.2 Composition of Command Message
Command message and response message consist of 4 fields: Slave Address (ID), Function
code, Data and CRC check code. And these are sends in this order. The allowable character
transmitted for all fields are hexadecimal 0‐9, A‐F.
RTU message framing
In the following, each field is explained.
1. Slave Address (ID)
Address is the number specifying a MMC. The individual addresses are set by the SW1
switch in the range of 1‐9 decimal. A master addresses a MMC by placing the MMC
address in the address field of the message. When the MMC returns its response, it
places its own address in this address field of the response to let the master know which
MMC is responding.
Address 0 is used for the broadcast address, which all MMCs recognize.
When the broadcast address (address 0) is applied on the command message, no any
response message will be sent from the MMC
2. Function Code

10
This is a code to designate the function executed by MMC. When a message is sent from a
master to a MMC, the function code field tells the MMC what kind of action to perform.
When the MMC responds to the master, it uses the function code field to indicate either
a normal response or that some kind of error occurred. For normal response, the MMC
simply echoes the original function code. For an exception response, the MMC returns a
code that is equivalent to the original function code with its most‐signification bit set to
logic 1.
The listing below shows the function codes supported by the MMC.
Function code
Code Function Object Type
03 Read‐out 16‐bit word Read/Write Register
04 Read‐out 16‐bit word Read Only Register
05 Write‐in Single bit
06 Write‐in 16‐bit word Read/Write Register
10 Write‐in 16‐bit word Read/Write Register
3. Data
Data are the data required for executing function codes. The composition of data varies
with function codes.
A data register is assigned to each parameter in the MMC. For reading/writing parameter
by communication, designate the data register. Refer to section 4.2 for details.
4. CRC check
This is the code to detect message errors (change in bit) in the signal transmission.
On the MODBUS protocol (RTU mode), CRC‐16 (Cyclical Redundancy Check) is applied.
CRC‐16 is the 2‐bytes (16‐bits) error check code. From the first byte (address) of the
message to the end of the data field are calculated.
The slave station calculates the CRC of the received message, and does not respond if the
calculated CRC is different from the contents of the received CRC code.
The Cyclical Redundancy Checking (CRC) field is two bytes, containing a 16–bit binary
value. The CRC value is calculated by the transmitting device, which appends the CRC to
the message. The device that receives recalculates a CRC during receipt of the message,
and compares the calculated value to the actual value it received in the CRC field. If the
two values are not equal, an error results.
The CRC is started by first preloading a 16–bit register to all 1’s. Then a process begins of
applying successive 8–bit bytes of the message to the current contents of the register.
Only the eight bits of data in each character are used for generating the CRC. Start and
stop bits and the parity bit, do not apply to the CRC.
During generation of the CRC, each 8–bit character is exclusive ORed with the register
contents. Then the result is shifted in the direction of the least significant bit (LSB), with a

11
zero filled into the most significant bit (MSB) position. The LSB is extracted and examined.
If the LSB was a 1, the register is then exclusive ORed with a preset, fixed value. If the LSB
was a 0, no exclusive OR takes place.
This process is repeated until eight shifts have been performed. After the last (eighth)
shift, the next 8–bit character is exclusive ORed with the register’s current value, and the
process repeats for eight more shifts as described above. The final content of the register,
after all the characters of the message have been applied, is the CRC value.
A procedure for generating a CRC is:
1. Load a 16‐bits register with FFFF hex (all 1’s). Call this the CRC register.
2. Exclusive OR the first 8‐bit byte of the message with the low‐order byte of
the 16‐bit CRC registers, putting the result in the CRC register.
3. Shift the CRC register one bit to the right ( toward the LSB ), Zero‐filling the
MSB. Extract and examine the LSB.
4. If the LSB was 0: Repeat Step 3.
If the LSB was 1: Exclusive OR the CRC registers with the polynomial value 0xA001
(1010 0000 0000 0001).
5. Repeat step 3 and 4 until 8 shifts have been performed. When this is done,
a complete 8‐bit byte will have been processed.
6. Repeat step 2 through 5 for the next 8‐bit byte of the message. Continue
doing this until all bytes have been processed.
7. The final content of the CRC register is the CRC value.
8. When the CRC is placed into the message, its upper and lower bytes must
be swapped as described below.
For example, if the CRC value is x1241H ( 0001 0010 0100 0001):
Addr Func Data Count
Data Data Data DataCRCLo
CRC Hi
0×41 0×12
3.4.3 Response Message of MMC
Once the command message has been processed by the MMC, a response message is built
depending on the result of processing.
1. Normal Response
To a relevant command message, the MMC creates and sends back a response message,
which corresponds to the command message. The composition of response message in
this case is the same as command message. Content of the data field depend on the
function code. For details, refer to Chapter 6.
2. Exception Response
If contents of a command message have an abnormality (for example, non‐actual function
code is designated) other than transmission error, the slave station does not execute that

12
command but creates and sends back a response message at error detection.
The composition of response message at error detection is shown on below;
the value used for function code field is the function code of command
message plus x80H.
Slave Address Function code (Function code + x80H) Error code CRC check
8 BITS 8 BITS 8 BITS 16 BITS
Error Code Contents Description
01 Illegal function The function code received is not an allowable action for the slave.
02 Illegal data address The data address received is not an allowable address for the slave.
03 Illegal data value A value contained in the data field is not an allowable value for the slave.
3.4.4 MODBUS Message RTU Framing
In RTU mode, message frame are separated by a silent interval of at least 3.5 character times.
The entire message frame must be transmitted as a continuous stream of characters. If a
silent interval of more than 1.5 character times occurs between two characters, the message
frame is declared incomplete and will be discarded by the MMC.
RTU Message Frame
1. Transmission procedure of master station
Since the communication system uses the 2‐write RS‐485 interface, there may be 2
statuses on a line below.
(a) Vacant status (no data on line)
(b) Communication status (data is existing)
The master station must proceed to a communication upon conforming to the following
items.
1‐1. Before sending a command message, at least 3.5 character times silent interval must
be provided.
1‐2. For sending, the interval between bytes of a command message must be below 1.5
13
character times.
1‐3. Within 1.5 character times after sending a command message, the receiving status is
posted.
1‐4. Provide 3.5 character times vacant status between the end of response message
reception and beginning of next command message sending (same as in 1‐1).
1‐5. For ensuring the safety, make a confirmation of the response message and make an
arrangement so as to provide 3 or more retries in case of no response, error
occurrence, etc.
2. Transaction of The MMC
(1) Detection of the command message frame
The MMCs connected on the line are initially at a receiving status and monitoring the
line. When 1.5 character times or more vacant status has appeared on the line, the
end of preceding frame is assumed and, within following 1.5 character times, a
receiving status is posted. When data appears on the line, the MMCs receive it. While
1.5 character times more vacant status is detected again, the end of that frame is
assumed. Data, which appeared on the line from the first 3.5 character times or more
vacant status to the next 3.5 character times or more vacant status, is fetched as one
frame.
(2) Response of MMC
After frame detection, The MMC carries out that frame as a command message. If the
command message is destined to the own station, a response message is returned. Its
processing time is 1 to 10ms (depends on contents of command message). After
sending a command message, therefore, the master station must observe the
following.
1‐1. Receiving status is posted within 1.5 character times after sending a
command message.
1‐2. 3.5 character times or more vacant status precedes the response
message sending.
1‐3. Interval between bytes of response message must be smaller than 1.5
character times.
3.5 Function Code Description 3.5.1 Read Data Registers [Function Code: 03]
Read the contents of a contiguous block of data registers in the MMC.
Broadcast is not possible.
1. Message composition
Command message composition
Address Function Code Starting Register Quantity of
Registers
CRC‐16
x01~x09 x03 x0000~xFFFF x0001~x007D Low‐order byte High‐order byte
14
1 byte 1 byte 2 byte 2 bytes 2 bytes
Response message composition
Address Function Code Byte Count * Register Value CRC‐16
x01~x09 x03 x02~xFA Low‐order byte High‐order byte
1 byte 1 byte 1 bytes N x 2 bytes 2 bytes
* N = Quantity of Registers; Byte Count = N × 2
2. Message transmission (example)
The following show an example of reading the set‐point of channel 1 [data register x0000] from address
No.1.
Command message composition
Address Function Code Starting Register Quantity of Registers CRC‐16
x01 x03 x0000 x0001 x840A
Response message composition
Address Function Code Byte Count Register Value CRC‐16
x01 x03 x02 x03E8 xB8FA
The response data show that the set‐point of channel 1 is x03E8 (1000).
3.5.2 Read Input Registers [Function Code: 04]
Read the contents of a contiguous block of input registers (x1000~x1FFF) in the MMC.
Broadcast is not possible.
1. Message composition
Command message composition
Address Function Code Starting Register Quantity of
Registers
CRC‐16
x01~x09 x04 x1000~x1FFF x0001~x007D Low‐order byte High‐order byte
1 byte 1 byte 2 bytes 2 bytes 2 bytes
Response message composition
Address Function Code Byte Count * Register Value CRC‐16
x01~x09 x04 x02~xFA Low‐order byte High‐order byte
1 byte 1 byte 1 byte N x 2 bytes 2 bytes
* N = Quantity of Registers; Byte Count = N × 2
2. Message transmission (example)
The following show an example of reading the Process Value (PV) of channel 1 [Input register x1000] from
address No.1.
Command message composition
Address Function Code Starting Register Quantity of Registers CRC‐16
x01 x04 x1000 x0001 x350A
Response message composition

15
Address Function Code Byte Number Register Value CRC‐16
x01 x04 x02 x001B xF93B
The response data show that the Process Value (PV) of channel 1 is x001B (27).
3.5.3 Write Single Coil [Function Code: 05]
Set the EEPROM write‐in flag to save parameters setting into non‐volatile memory in the
MMC.
The built‐in non‐volatile memory (EEPROM) in the MMC has 1 million guaranteed rewrite
cycles. To prevent the EEPROM be written frequently, the parameters written by
communication with Function Code x06 and x10 are kept in the internal memory (RAM)
instead of in the EEPROM.
Please note that all those data without saving in the EEPROM will be lost after turning off the
power.
The MMC will reset the EEPROM write‐in flag automatically after saving all those RAM data
into EEPROM.
Broadcast is possible
1. Message composition
Command message composition
Address Function Register Address Register Value CRC‐16
x01~x09 x05 x0000 xFF00 Low‐order byte High‐order byte
1 byte 1 byte 2 bytes 2 bytes 2 bytes
Response message composition
Address Function Register Address Register Value CRC‐16
x01~x09 x05 x0000 xFF00 Low‐order byte High‐order byte
1 byte 1 byte 2 bytes 2 bytes 2 bytes
2. Message transmission (example)
The following show an example of setting the EEPROM write‐in flag.
Command message composition
Address Function Code Register Address Register Value CRC‐16
x01 x05 x0000 xFF00 x8C3A
Response message composition
Address Function Code Register Address Register Value CRC‐16
x01 x05 x0000 xFF00 x8C3A
After the transmission, the MMC save the RAM data into EEPROM and reset the EEPROM write‐in flag.
3.5.4 Write Single Register [Function Code: 06]

16
Write a single data register (x0000~xFFFF) in the MMC.
Please note that the register value will not be retained after power off until the EEPROM
write‐in flag is set with function code x05.
Broadcast is possible
1. Message composition
Command message composition
Address Function Register Address Register Value CRC‐16
x01~x09 x06 x0000~xFFFF Low‐order byte High‐order byte
1 byte 1 byte 2 bytes 2 bytes 2 bytes
Response message composition
Address Function Register Address Register Value CRC‐16
x01~x09 x06 x0000~xFFFF Low‐order byte High‐order byte
1 byte 1 byte 2 bytes 2 bytes 2 bytes
2. Message transmission (example)
The following show an example of setting the Input signal type [data register x0024] of address No.1 to K type
thermocouple.
Command message composition
Address Function Code Register Address Register Value CRC‐16
x01 x06 x0024 X0001 x0801
Response message composition
Address Function Code Register Address Register Value CRC‐16
x01 x06 x0024 x0001 x0801
3.5.5 Write Multiple Registers [Function Code: 10]
Write a block of contiguous data registers in the MMC.
Please note that these register values will not be retained after power off until the EEPROM
write‐in flag is set with function code x05.
Broadcast is possible
1. Message composition
Command message composition
Address Function
Code
Starting Register Quantity of
Registers
Byte
Count*
Registers
Value
CRC‐16
x01~x09 x10 x0000~xFFFF x0001~x007B N x 2 Low‐order byte High‐order byte
1 byte 1 byte 2 bytes 2 bytes 1 byte N x 2 2 bytes
* N = Quantity of Registers; Byte Count = N × 2
Response message composition

17
Address Function
Code
Starting
Register
Quantity of Registers CRC‐16
x01~x09 x10 x0000~xFFFF x0001~x007B Low‐order byte High‐order byte
1 byte 1 byte 2 bytes 2 bytes 2 bytes
2. Message transmission (example)
The following show an example of setting the low limit [data register x002B]to 0 (x0000) and high limit [data
register x002C] to 1000 (x03E8) in address No.1.
Command message composition
Address Function
Code
Starting
Register
Quantity of
Registers
Byte
Count
Register Value Register Value CRC‐16
x01 x10 x002B x0002 x04 x0000 x03E8 xB0BA
Response message composition
Address Function Code Starting Register Quantity of Registers CRC‐16
x01 x10 x002B x0002 x31C0
4 Parameters Description and Data Register Map
4.1 Parameters Description 4.1.1 User
1. SV (Set‐Point)
Description: The Set‐Point is the target of the controlled process.
Range: High limit ~ Low limit
Unit: °C, °F or Engineering unit
2. Ramp (Ramp rate)
Description: The controller can act as either a fixed set point controller or as a single ramp
controller. If the ramp rate is set to a value other than “0”, the process will increase or
decrease at the setting rate during initial power up or with set point change.
Range: 0 ~ 30000
Unit: °C, °F or Engineering unit per Min.
3. Soft (Soft start time)
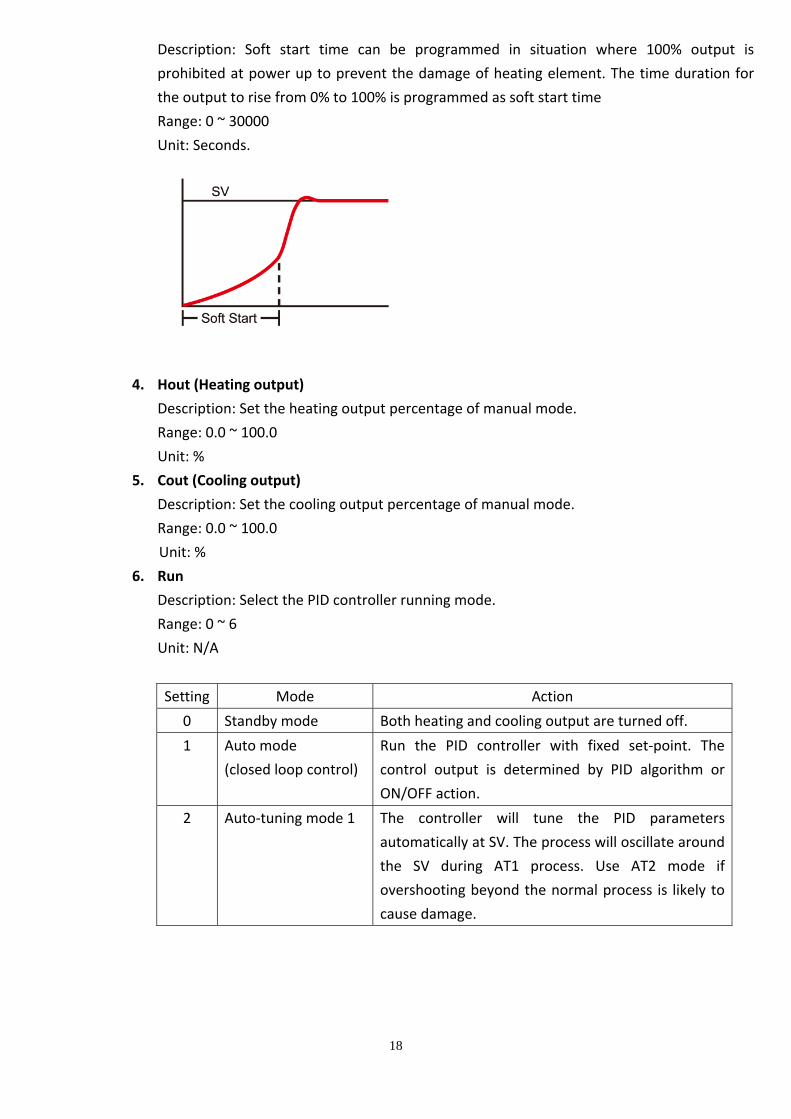
18
Description: Soft start time can be programmed in situation where 100% output is
prohibited at power up to prevent the damage of heating element. The time duration for
the output to rise from 0% to 100% is programmed as soft start time
Range: 0 ~ 30000
Unit: Seconds.
4. Hout (Heating output)
Description: Set the heating output percentage of manual mode.
Range: 0.0 ~ 100.0
Unit: %
5. Cout (Cooling output)
Description: Set the cooling output percentage of manual mode.
Range: 0.0 ~ 100.0
Unit: %
6. Run
Description: Select the PID controller running mode.
Range: 0 ~ 6
Unit: N/A
Setting Mode Action
0 Standby mode Both heating and cooling output are turned off.
1 Auto mode
(closed loop control)
Run the PID controller with fixed set‐point. The
control output is determined by PID algorithm or
ON/OFF action.
2 Auto‐tuning mode 1 The controller will tune the PID parameters
automatically at SV. The process will oscillate around
the SV during AT1 process. Use AT2 mode if
overshooting beyond the normal process is likely to
cause damage.
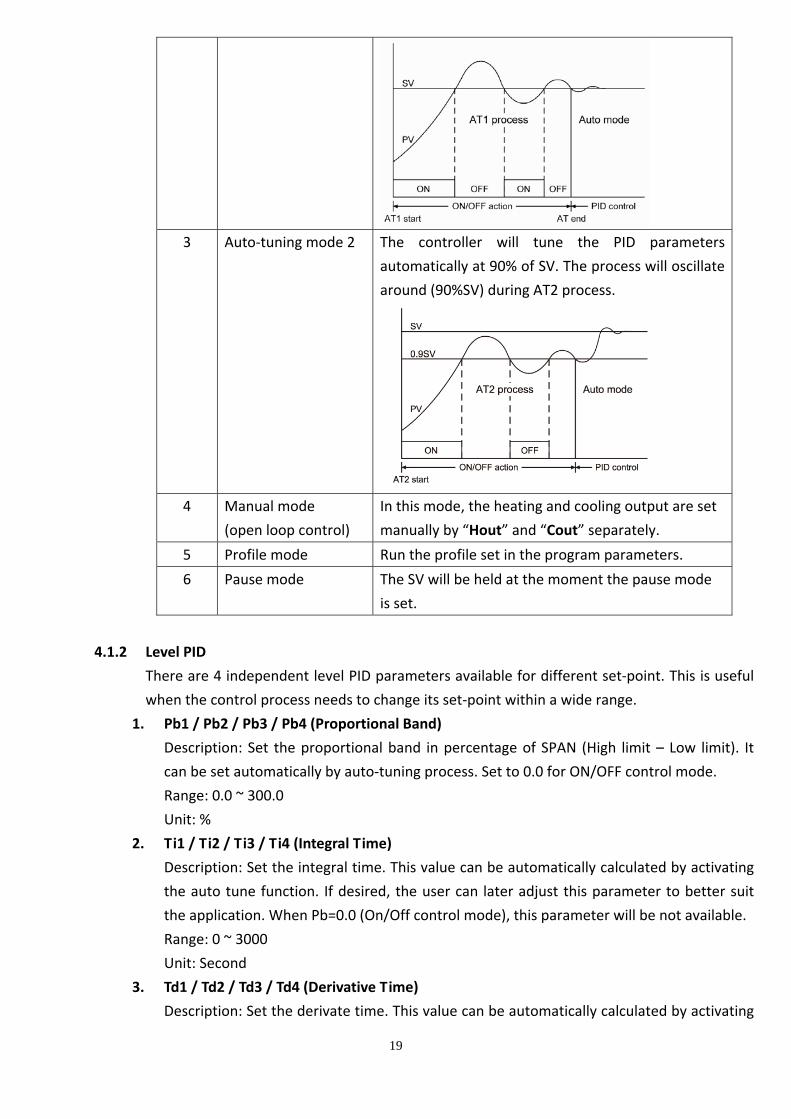
19
3 Auto‐tuning mode 2 The controller will tune the PID parameters
automatically at 90% of SV. The process will oscillate
around (90%SV) during AT2 process.
4 Manual mode
(open loop control)
In this mode, the heating and cooling output are set
manually by “Hout” and “Cout” separately.
5 Profile mode Run the profile set in the program parameters.
6 Pause mode The SV will be held at the moment the pause mode
is set.
4.1.2 Level PID
There are 4 independent level PID parameters available for different set‐point. This is useful
when the control process needs to change its set‐point within a wide range.
1. Pb1 / Pb2 / Pb3 / Pb4 (Proportional Band)
Description: Set the proportional band in percentage of SPAN (High limit – Low limit). It
can be set automatically by auto‐tuning process. Set to 0.0 for ON/OFF control mode.
Range: 0.0 ~ 300.0
Unit: %
2. Ti1 / Ti2 / Ti3 / Ti4 (Integral Time)
Description: Set the integral time. This value can be automatically calculated by activating
the auto tune function. If desired, the user can later adjust this parameter to better suit
the application. When Pb=0.0 (On/Off control mode), this parameter will be not available.
Range: 0 ~ 3000
Unit: Second
3. Td1 / Td2 / Td3 / Td4 (Derivative Time)
Description: Set the derivate time. This value can be automatically calculated by activating
20
the auto tune function. If desired, the user can later adjust this parameter to better suit
the application. When Pb=0.0 (On/Off control mode), this parameter will be not available.
Range: 0 ~ 750
Unit: Second
4. MR1 / MR2 / MR3 / MR4 (Manual Reset)
Description: For PID control, this value is set automatically after auto‐tuning process. For P
control, it is used to compensate the deviation between process value and set point.
Range: 0.0 ~ 51.0
Unit: %.
5. AR1/AR2/AR3/AR4 (Anti‐Reset Windup)
Description: The Anti‐Reset windup (ARW) inhibits the integral action until the PV is within
the ARW band thus reducing overshoot on start‐up. It is set automatically by auto‐tuning
process. It is set in percentage of proportional band.
Range: 0.0 ~ 100.0
Unit: %.
6. CPb1/CPb2/CPb3/CPb4 ( Proportional Band )
Description: Set the cooling proportional band in percentage of SPAN (High limit – Low
limit). It can be set automatically by auto‐tuning process. Set to 0.0 for ON/OFF control
mode.
Range: 0.0 ~ 300.0
Unit: %
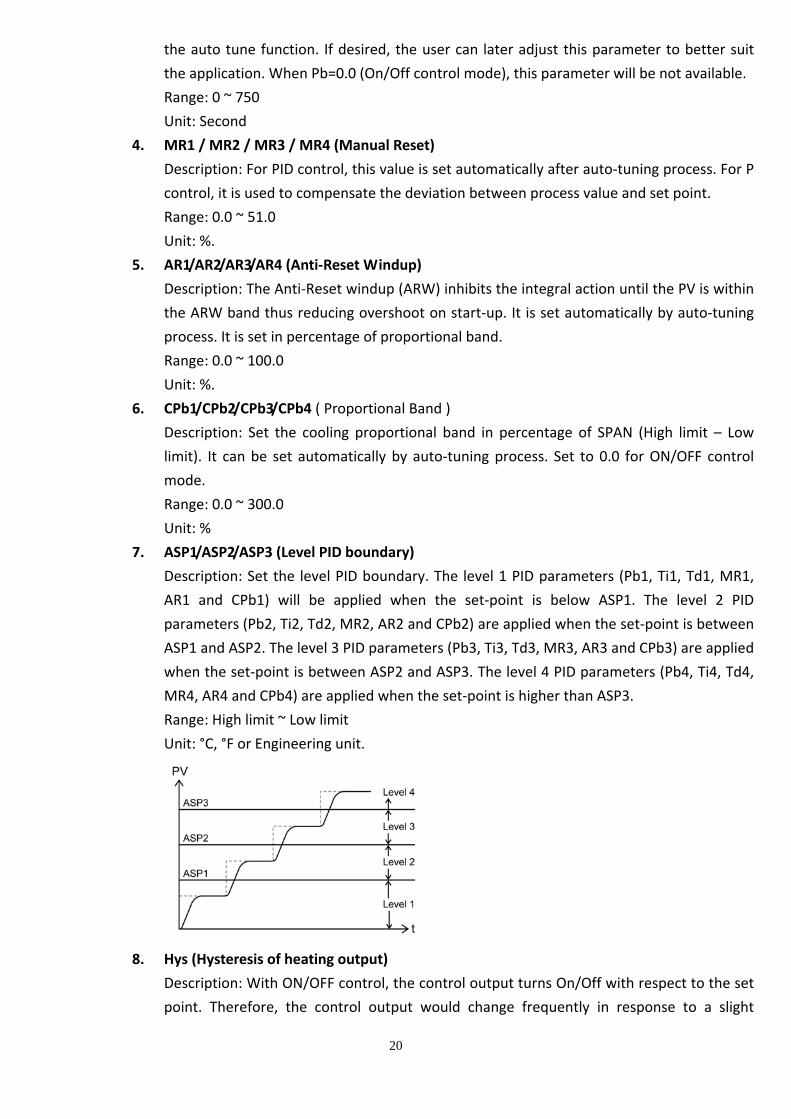
7. ASP1/ASP2/ASP3 (Level PID boundary)
Description: Set the level PID boundary. The level 1 PID parameters (Pb1, Ti1, Td1, MR1,
AR1 and CPb1) will be applied when the set‐point is below ASP1. The level 2 PID
parameters (Pb2, Ti2, Td2, MR2, AR2 and CPb2) are applied when the set‐point is between
ASP1 and ASP2. The level 3 PID parameters (Pb3, Ti3, Td3, MR3, AR3 and CPb3) are applied
when the set‐point is between ASP2 and ASP3. The level 4 PID parameters (Pb4, Ti4, Td4,
MR4, AR4 and CPb4) are applied when the set‐point is higher than ASP3.
Range: High limit ~ Low limit
Unit: °C, °F or Engineering unit.
8. Hys (Hysteresis of heating output)
Description: With ON/OFF control, the control output turns On/Off with respect to the set
point. Therefore, the control output would change frequently in response to a slight

21
change in process value. This might shorten the service life of the output device. To
prevent this, a hysteresis is provided in the ON/OFF control.
Range: 0 ~ 30000
Unit: °C, °F or Engineering unit
9. CHys (Hysteresis of cooling output)
Description: The hysteresis applied on cooling output.
Range: 0 ~ 30000
Unit: °C, °F or Engineering unit
10. DB (Dead Band)
Description: this setting defines the area in which both heating and cooling outputs are
inactive, known as dead band, or the area in which they are both active, known as overlap.
A positive value results in a dead band, while a negative value results in an overlap.
Range: ‐30000 ~ 30000
Unit: °C, °F or Engineering unit
4.1.3 Option
1. Type (Input Signal Type)
Description: Select the input signal type.
Range: 0 ~ 13
Unit: N/A
Setting Type Max. measuring range
0 J ‐50 ~ 1000°C
1 K ‐50 ~ 1370°C
2 T ‐270 ~ 400°C
3 E ‐50 ~ 950°C
4 B 0 ~ 1800°C
5 R ‐50 ~ 1750°C
6 S ‐50 ~ 1750°C
7 N ‐50 ~ 1300°C
8 C ‐50 ~ 1800°C
9 PT100 (DIN) ‐200 ~ 850°C
10 PT100 (JIS) ‐200 ~ 600°C
11 mA ‐30000 ~ 30000 count
12 mV ‐30000 ~ 30000 count
13 V ‐30000 ~ 30000 count
22
2. SCAL (Low Scale of Linear Input)
Description: Set the low scale corresponding to low linear input signal (see the cut‐off
function for further detail). This parameter is effective only for linear input (mA, mV and V)
type.
Range: 0 ~ 30000
Unit: Count
3. SCAH (High Scale of Linear Input)
Description: Set the high scale corresponding to high linear input signal (see the cut‐off
function for further detail). This parameter is effective only for linear input (mA, mV and V)
type.
Range: 0 ~ 30000
Unit: Count
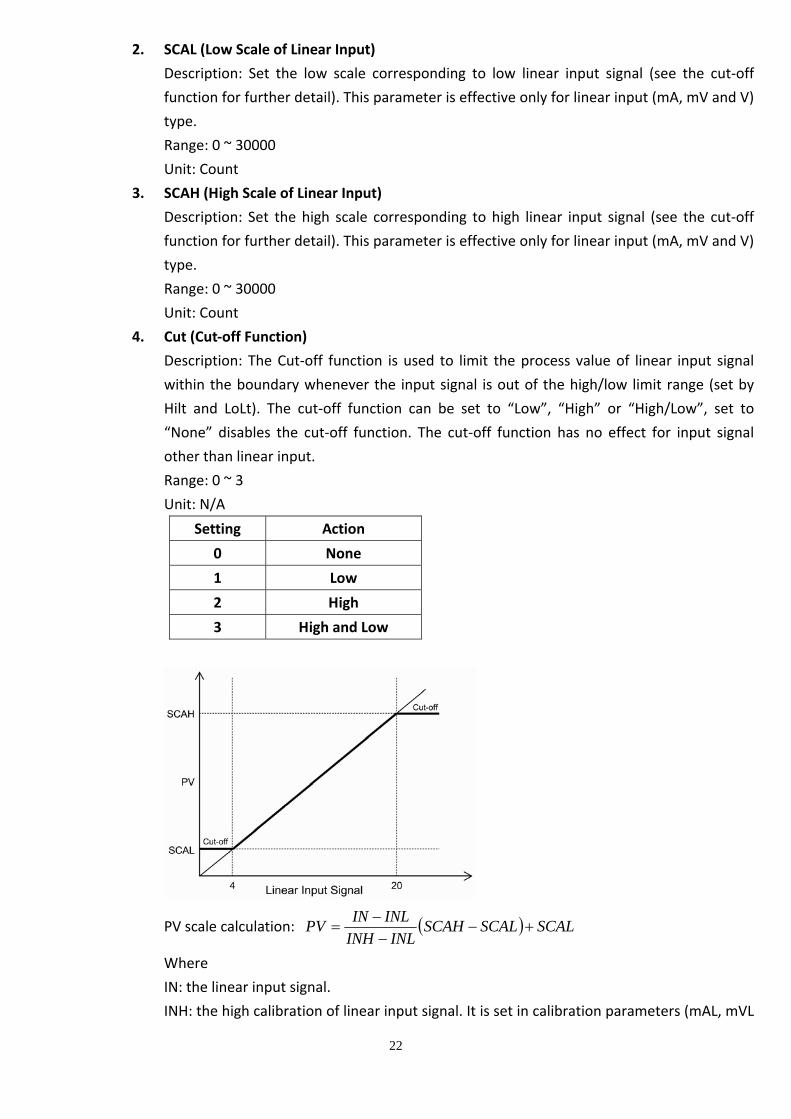
4. Cut (Cut‐off Function)
Description: The Cut‐off function is used to limit the process value of linear input signal
within the boundary whenever the input signal is out of the high/low limit range (set by
Hilt and LoLt). The cut‐off function can be set to “Low”, “High” or “High/Low”, set to
“None” disables the cut‐off function. The cut‐off function has no effect for input signal
other than linear input.
Range: 0 ~ 3
Unit: N/A
Setting Action
0 None
1 Low
2 High
3 High and Low
PV scale calculation: SCALSCALSCAHINLINH
INLINPV
Where
IN: the linear input signal.
INH: the high calibration of linear input signal. It is set in calibration parameters (mAL, mVL

23
and VL).
INL: the low calibration of linear input signal. It is set in calibration parameters (mAH, mVH
and VH).
Example:
For a 4~20mA input signal, the INL is set by mAL=4.00mA and the INH is set by
mAH=20.00mA. Set SCAL=0.0 SCAH=100.0 (Of course, you may select other scale value and
decimal point to alter the resolution) and LoLt=0.0 HiLt=100.0.
For a 12mA input, the PV will be 50.0.
For a 22mA input, the PV will be 112.5 with cut‐off function set to “None” or 100.0 with
cut‐off function set to “High” or “High/Low”.
For a 0mA input, the PV will be ‐25.0 with cut‐off function set to “None” or 0.0 with cut‐off
function set to “Low” or “High/Low”
5. Unit
Description: Select the process value indication in °C or °F when the input signal type is set
to thermocouple or PT100. Select engineering unit for linear input (mA, mV or V).
Range: 0 ~ 2
Unit: N/A
Setting Unit
0 °C
1 °F
2 Engineering unit
6. DP (Decimal Point)
Description: Select the decimal point position.
Range: 0 ~ 3. The setting 2 and 3 is available for linear input only.
Unit: N/A
Setting Decimal Point
0 0000
1 000.0
2 00.00
3 0.000
7. Act (Control Action of Output 1)
Description: Set the output 1 to be heating or cooling action.
Range: 0 or 1
Unit: N/A
Setting Action
0 Direct action (Cooling)
1 Reverse action (Heating)
24
8. LoLt (Low Limit)
Description: Set the low limit of measuring range. When the PV goes below the low limit,
an error flag set and the control outputs are set according to the EROP (Error Protection).
Range: refer to the type description
Unit: °C, °F or Engineering unit
9. HiLt (High Limit)
Description: Set the high limit of measuring range. When the PV goes beyond the high limit,
an error flag set and the control outputs are set according to the EROP (Error Protection).
Range: refer to the type description
Unit: °C, °F or Engineering unit
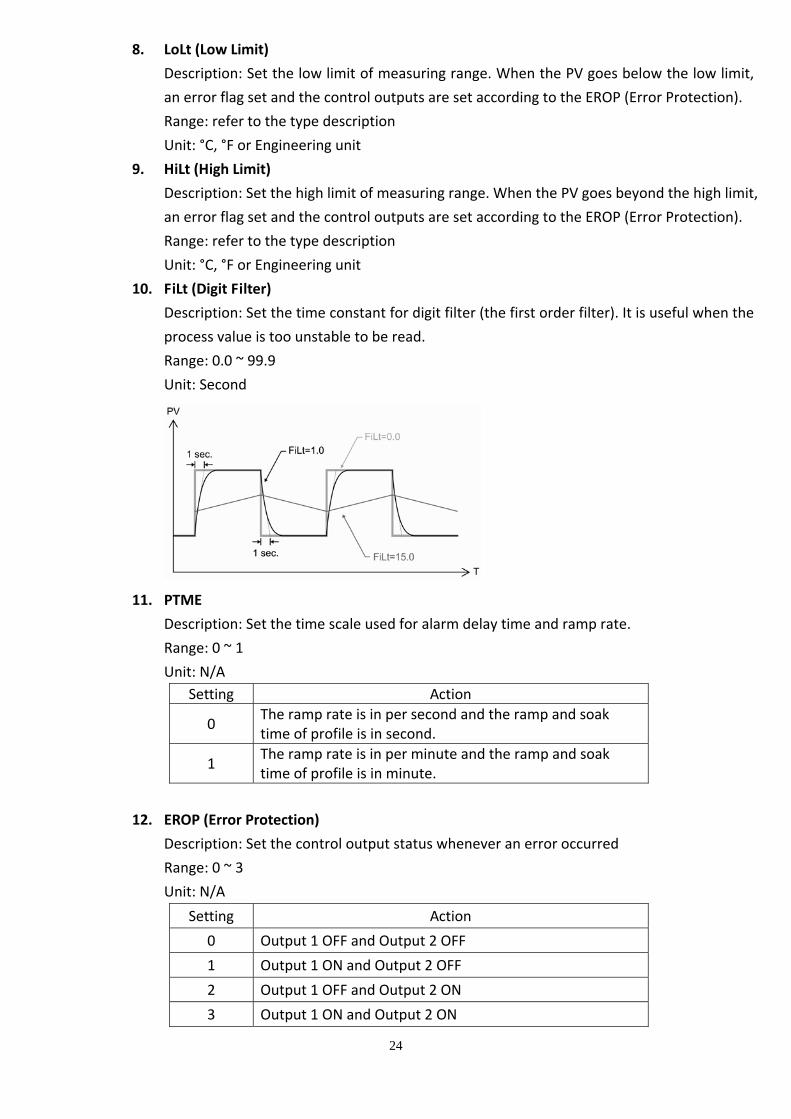
10. FiLt (Digit Filter)
Description: Set the time constant for digit filter (the first order filter). It is useful when the
process value is too unstable to be read.
Range: 0.0 ~ 99.9
Unit: Second
11. PTME
Description: Set the time scale used for alarm delay time and ramp rate.
Range: 0 ~ 1
Unit: N/A
Setting Action
0 The ramp rate is in per second and the ramp and soak time of profile is in second.
1 The ramp rate is in per minute and the ramp and soak time of profile is in minute.
12. EROP (Error Protection)
Description: Set the control output status whenever an error occurred
Range: 0 ~ 3
Unit: N/A
Setting Action
0 Output 1 OFF and Output 2 OFF
1 Output 1 ON and Output 2 OFF
2 Output 1 OFF and Output 2 ON
3 Output 1 ON and Output 2 ON

25
13. SPOF (Set‐Point offset)
Description: Shift the set point value with an offset. The actual control target is shifted
with this offset from set point value but not added to SV display.
Range: ‐30000 ~ 30000
Unit: °C, °F or Engineering unit
14. PVOF (Process Value offset correction)
Description: Shift the PV with an offset to correct the sensor offset error.
Range: ‐30000 ~ 30000
Unit: °C, °F or Engineering unit
15. PVGA (Process Value gain correction)
Description: Process Value gain correction
Range: 0.0000 ~ 2.0000
Unit: N/A
4.1.4 Control Output
1. 01CT / 02CT
Description: Set the control output 1 (01CT) and output 2 (02CT) cycle time. Set to 0 for
linear output, 1 for pulsed voltage to drive SSR and 15 for relay output.
Range: 0 ~ 60
Unit: Second
2. 01CH / 02CH
Description: Linear output high scale adjustment.
Range: 0 ~ 8000
Unit: N/A
3. 01CL / 02CL
Description: Linear output low scale adjustment.
Range: 0 ~ 8000
Unit: N/A
4. 01UH / 02UH
Description: Control output 1 and control output 2 high limit.
Range: 0 ~ 100.0
Unit: %

26
5. 01UL / 02UL
Description: control output 1 and control output 2 low limit
Range: 0 ~ 100.0
Unit: %
4.1.5 Program
1. STAT (State)
Description: The state of power failure for profile execution. Set to 0, the profile will be
started from segment 1 while the power is recovered. Set to 1, the profile will be
continued from where the profile had been interrupted by power failure while the power
is recovered.
Range: 0 or 1
Unit: N/A
2. STAR (Start)
Description: Define the segment 1 of profile starting from. Set to 0, the segment 1 will
start from 0. Set to 1, it will start from the PV of the instant that profile is execution.
Range: 0 or 1
Unit: N/A
3. Band
Description: Set a tolerance band. The soak time start to count down when the PV reaches
the band.
Range: 0 ~ 30000
Unit: °C, °F or Engineering unit
4. RT1~RT8 (Ramp Time)
Description: Set the time that the process will take to ramp up/down to next segment
set‐point.
Range: 0 ~ 30000
Unit: Second
5. SP1~SP8 (Set‐Point of segment)
Description: Segment set‐point.
Range: Low limit ~ High limit
Unit: °C, °F or Engineering unit
6. ST1~ST8 (Soak Time)
27
Description: Set the soak time that the PV will remain at the segment set‐point.
Range: 0 ~ 30000
Unit: Second
7. JP1~JP8 (Jump Function)
Description: Select which segment will be jump to after soak time is up or set the end of
the profile.
Range: 0 ~ 10. 10 is not available for JP8
Unit:
Setting Action
0 End of the profile
1 Jump to Segment 1
2 Jump to Segment 2
3 Jump to Segment 3
4 Jump to Segment 4
5 Jump to Segment 5
6 Jump to Segment 6
7 Jump to Segment 7
8 Jump to Segment 8
9 Hold. PV will be hold at the segment set‐point
10 Next. Link to next segment
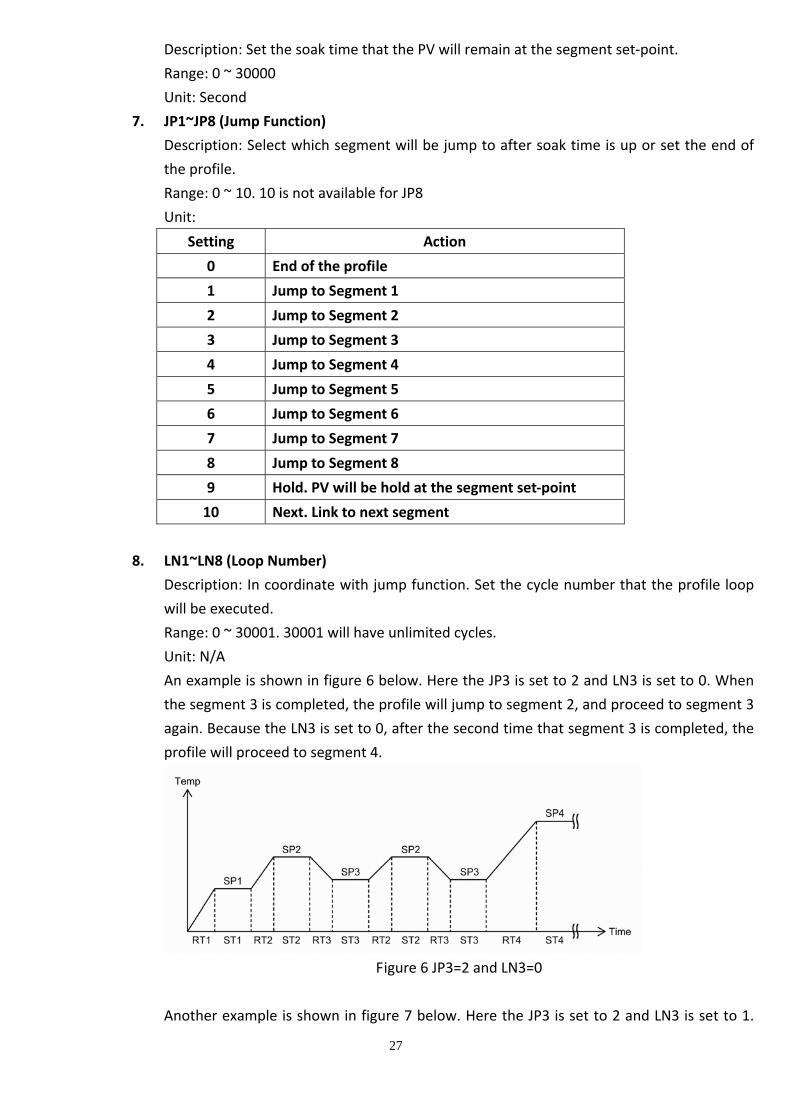
8. LN1~LN8 (Loop Number)
Description: In coordinate with jump function. Set the cycle number that the profile loop
will be executed.
Range: 0 ~ 30001. 30001 will have unlimited cycles.
Unit: N/A
An example is shown in figure 6 below. Here the JP3 is set to 2 and LN3 is set to 0. When
the segment 3 is completed, the profile will jump to segment 2, and proceed to segment 3
again. Because the LN3 is set to 0, after the second time that segment 3 is completed, the
profile will proceed to segment 4.
Figure 6 JP3=2 and LN3=0
Another example is shown in figure 7 below. Here the JP3 is set to 2 and LN3 is set to 1.

28
When the segment 3 is completed, the profile will jump to segment 2, and proceed to
segment 3 again. Because the LN3 is set to 1, so the profile will excuse the loop once again
until the third time that segment 3 is completed, the profile proceed to segment 4.
Figure 7 JP3=2 and LN3=1
4.1.6 Calibration
The following parameters are for calibration purpose only. Do not change its setting unless
you are familiar with calibration procedure
1. RTDL
Description: Low calibration of RTD input.
Range: ‐200.0 ~ 850.0
Unit: °C
2. RTDH
Description: High calibration of RTD input.
Range: ‐200.0 ~ 850.0
Unit: °C
3. mAL
Description: Low calibration of milliamp input signal. The setting value will correspond to
SCAL for PV scale.
Range: ‐25.00 ~ 25.00
Unit: mA
4. mAH
Description: High calibration of milliamp input signal. The setting value will correspond to
SCAH for PV scale.
Range: ‐25.00 ~ 25.00
Unit: mA
5. mVL
Description: Low calibration of millivolt input signal. The setting value will correspond to
SCAL for PV scale.
Range: ‐65.00 ~ 65.00
Unit: mV
6. mVH
Description: High calibration of millivolt input signal. The setting value will correspond to

29
SCAH for PV scale.
Range: ‐65.00 ~ 65.00
Unit: mV
7. VL
Description: Low calibration of voltage input signal. The setting value will correspond to
SCAL for PV scale.
Range: ‐10.00 ~ 10.00
Unit: V
8. VH
Description: High calibration of voltage input signal. The setting value will correspond to
SCAH for PV scale.
Range: ‐10.00 ~ 10.00
Unit: V
4.2 Alarm Section
The MMC system provides 16 hardware alarms (alarm 1 ~ 16) and 16 virtual alarms (alarm 17 ~ 32).
Each alarm can be freely assigned to any input channels. The hardware alarm outputs are
provided by the connectors (Alarm 1~8 and Alarm 9~16) as shown in the figure. In the other hand,
the statuses of virtual alarms are indicated by the flag of register ALFG2.
The alarm parameters of each alarm are explained below.
1. ALPV (Alarm Process Value)
Description: Select which channel’s process value (PV1 ~ PV32) to be the alarm input. The
selected process value will be compared with alarm set‐point to trigger alarm action according
the alarm function.
Range: 0 ~ 31.
Unit: N/A

30
Setting Alarm Input Setting Alarm Input
0 PV1 16 PV17
1 PV2 17 PV18
2 PV3 18 PV19
3 PV4 19 PV20
4 PV5 20 PV21
5 PV6 21 PV22
6 PV7 22 PV23
7 PV8 23 PV24
8 PV9 24 PV25
9 PV10 25 PV26
10 PV11 26 PV27
11 PV12 27 PV28
12 PV13 28 PV29
13 PV14 29 PV30
14 PV15 30 PV31
15 PV16 31 PV32
2. ALSP (Alarm Set‐Point)
Description: The set‐point of alarm even.
Range:
Unit: °C, °F or Engineering unit
3. ALFU (Alarm Function)
Description: Select the alarm function
Range: 0 ~ 7
Setting Alarm Function Action
0 Alarm Disable None
1 Manual Alarm is set or reset by the setting of ALFG register.
2 Process High Alarm
3 Process Low Alarm
4 Deviation High Alarm

31
5 Deviation Low Alarm
6 Deviation Band High Alarm
7 Deviation Band Low Alarm
Unit: N/A
4. ALHY (Alarm Hysteresis)
Description: The hysteresis of alarm action
Range: 0 ~ 30000
Unit: °C, °F or Engineering unit
5. ALMD (Alarm Mode)
Description: Select the alarm mode.
Range: 0 ~ 3
Setting Alarm Mode Action
0 Normal Mode
1 Standby Mode Prevents an alarm on power up. The alarm is active after alarm condition has been cleared and then alarm occurs again.
2 Latch Mode
The alarm output will be latched as the alarm occurs. The alarm output will not change its state even if the alarm condition has been cleared unless the power is off.
3 Standby & Latch mode Both standby and Latch mode are applied.
Unit: N/A
The alarm action for deviation band high alarm with different alarm mode is shown below.

32
6. ALDT (Alarm Delay Time)
Description: Alarm delay time is set to postpone the alarm action by the setting time.
Range: 0 ~ 30000
Unit: Second
7. ALFG1/ALFG2 (Alarm Status Flag)
Description: The alarm status flag register. Each bit of the register indicates the status of alarm even. The
bit is set to “1” when the alarm is turned on and is reset to “0” when the alarm is turned off. It is read/write
available if the ALFU is set to “manual”. Otherwise, it is read only.
Bit 15 14 13 12 11 10 9 8 7 6 5 4 3 2 1 0
ALFG1 A16 A15 A14 A13 A12 A11 A10 A9 A8 A7 A6 A5 A4 A3 A2 A1
Bit 15 14 13 12 11 10 9 8 7 6 5 4 3 2 1 0
ALFG2 A32 A31 A30 A29 A28 A27 A26 A25 A24 A23 A22 A21 A20 A19 A18 A17
Range: 0 or 1 for each bit
Unit: N/A
4.3 Data Register Map Table of Data Registers : Function code [03,06] Word data (read‐out/write‐in)
Register Channel
Parameter Read/Write #1 #2 #3 #4 #5 #6 #7 #8
USER
SV R/W x0000 x0080 x0100 x0180 x0200 x0280 x0300 x0380
Ramp R/W x0001 x0081 x0101 x0181 x0201 x0281 x0301 x0381

33
Soft R/W x0002 x0082 x0102 x0182 x0202 x0282 x0302 x0382
Hout R/W x0003 x0083 x0103 x0183 x0203 x0283 x0303 x0383
Cout R/W x0004 x0084 x0104 x0184 x0204 x0284 x0304 x0384
Run R/W x0005 x0085 x0105 x0185 x0205 x0285 x0305 x0385
PID
Pb1 R/W x0006 x0086 x0106 x0186 x0206 x0286 x0306 x0386
Ti1 R/W x0007 x0087 x0107 x0187 x0207 x0287 x0307 x0387
Td1 R/W x0008 x0088 x0108 x0188 x0208 x0288 x0308 x0388
Mr1 R/W x0009 x0089 x0109 x0189 x0209 x0289 x0309 x0389
Ar1 R/W x000A x008A x010A x018A x020A x028A x030A x038A
CPb1 R/W x000B x008B x010B x018B x020B x028B x030B x038B
ASP1 R/W x000C x008C x010C x018C x020C x028C x030C x038C
Hys R/W x000D x008D x010D x018D x020D x028D x030D x038D
CHys R/W x000E x008E x010E x018E x020E x028E x030E x038E
DB R/W x000F x008F x010F x018F x020F x028F x030F x038F
Pb2 R/W x0010 x0090 x0110 x0190 x0210 x0290 x0310 x0390
Ti2 R/W x0011 x0091 x0111 x0191 x0211 x0291 x0311 x0391
Td2 R/W x0012 x0092 x0112 x0192 x0212 x0292 x0312 x0392
Mr2 R/W x0013 x0093 x0113 x0193 x0213 x0293 x0313 x0393
Ar2 R/W x0014 x0094 x0114 x0194 x0214 x0294 x0314 x0394
CPb2 R/W x0015 x0095 x0115 x0195 x0215 x0295 x0315 x0395
ASP2 R/W x0016 x0096 x0116 x0196 x0216 x0296 x0316 x0396
Pb3 R/W x0017 x0097 x0117 x0197 x0217 x0297 x0317 x0397
Ti3 R/W x0018 x0098 x0118 x0198 x0218 x0298 x0318 x0398
Td3 R/W x0019 x0099 x0119 x0199 x0219 x0299 x0319 x0399
Mr3 R/W x001A x009A x011A x019A x021A x029A x031A x039A
Ar3 R/W x001B x009B x011B x019B x021B x029B x031B x039B
CPB3 R/W x001C x009C x011C x019C x021C x029C x031C x039C
ASP3 R/W x001D x009D x011D x019D x021D x029D x031D x039D
Pb4 R/W x001E x009E x011E x019E x021E x029E x031E x039E
Ti4 R/W x001F x009F x011F x019F x021F x029F x031F x039F
Td4 R/W x0020 x00A0 x0120 x01A0 x0220 x02A0 x0320 x03A0
Mr4 R/W x0021 x00A1 x0121 x01A1 x0221 x02A1 x0321 x03A1
Ar4 R/W x0022 x00A2 x0122 x01A2 x0222 x02A2 x0322 x03A2
CPb4 R/W x0023 x00A3 x0123 x01A3 x0223 x02A3 x0323 x03A3
OPTION
Type R/W x0024 x00A4 x0124 x01A4 x0224 x02A4 x0324 x03A4
SCAL R/W x0025 x00A5 x0125 x01A5 x0225 x02A5 x0325 x03A5
SCAH R/W x0026 x00A6 x0126 x01A6 x0226 x02A6 x0326 x03A6
Cut R/W x0027 x00A7 x0127 x01A7 x0227 x02A7 x0327 x03A7

34
Unit R/W x0028 x00A8 x0128 x01A8 x0228 x02A8 x0328 x03A8
Dp R/W x0029 x00A9 x0129 x01A9 x0229 x02A9 x0329 x03A9
Act R/W x002A x00AA x012A x01AA x022A x02AA x032A x03AA
LoLt R/W x002B x00AB x012B x01AB x022B x02AB x032B x03AB
HiLt R/W x002C x00AC x012C x01AC x022C x02AC x032C x03AC
FiLt R/W x002D x00AD x012D x01AD x022D x02AD x032D x03AD
PTME R/W x002E x00AE x012E x01AE x022E x02AE x032E x03AE
EROP R/W x002F x00AF x012F x01AF x022F x02AF x032F x03AF
SPOF R/W x0030 x00B0 x0130 x01B0 x0230 x02B0 x0330 x03B0
PVOF R/W x0031 x00B1 x0131 x01B1 x0231 x02B1 x0331 x03B1
PVSE R/W x0032 x00B2 x0132 x01B2 x0232 x02B2 x0332 x03B2
CONTROL OUTPUT
01CT R/W x0033 x00B3 x0133 x01B3 x0233 x02B3 x0333 x03B3
01CH R/W x0034 x00B4 x0134 x01B4 x0234 x02B4 x0334 x03B4
01CL R/W x0035 x00B5 x0135 x01B5 x0235 x02B5 x0335 x03B5
01UH R/W x0036 x00B6 x0136 x01B6 x0236 x02B6 x0336 x03B6
01UL R/W x0037 x00B7 x0137 x01B7 x0237 x02B7 x0337 x03B7
02CT R/W x0038 x00B8 x0138 x01B8 x0238 x02B8 x0338 x03B8
02CH R/W x0039 x00B9 x0139 x01B9 x0239 x02B9 x0339 x03B9
02CL R/W x003A x00BA x013A x01BA x023A x02BA x033A x03BA
02UH R/W x003B x00BB x013B x01BB x023B x02BB x033B x03BB
02UL R/W x003C x00BC x013C x01BC x023C x02BC x033C x03BC
PROGRAM
STAT R/W x003D x00BD x013D x01BD x023D x02BD x033D x03BD
STAR R/W x003E x00BE x013E x01BE x023E x02BE x033E x03BE
BAND R/W x003F x00BF x013F x01BF x023F x02BF x033F x03BF
RT1 R/W x0040 x00C0 x0140 x01C0 x0240 x02C0 x0340 x03C0
SP1 R/W x0041 x00C1 x0141 x01C1 x0241 x02C1 x0341 x03C1
ST1 R/W x0042 x00C2 x0142 x01C2 x0242 x02C2 x0342 x03C2
SF1 R/W x0043 x00C3 x0143 x01C3 x0243 x02C3 x0343 x03C3
LN1 R/W x0044 x00C4 x0144 x01C4 x0244 x02C4 x0344 x03C4
RT2 R/W x0045 x00C5 x0145 x01C5 x0245 x02C5 x0345 x03C5
SP2 R/W x0046 x00C6 x0146 x01C6 x0246 x02C6 x0346 x03C6
ST2 R/W x0047 x00C7 x0147 x01C7 x0247 x02C7 x0347 x03C7
SF2 R/W x0048 x00C8 x0148 x01C8 x0248 x02C8 x0348 x03C8
LN2 R/W x0049 x00C9 x0149 x01C9 x0249 x02C9 x0349 x03C9
RT3 R/W x004A x00CA x014A x01CA x024A x02CA x034A x03CA
SP3 R/W x004B x00CB x014B x01CB x024B x02CB x034B x03CB
ST3 R/W x004C x00CC x014C x01CC x024C x02CC x034C x03CC
SF3 R/W x004D x00CD x014D x01CD x024D x02CD x034D x03CD

35
LN3 R/W x004E x00CE x014E x01CE x024E x02CE x034E x03CE
RT4 R/W x004F x00CF x014F x01CF x024F x02CF x034F x03CF
SP4 R/W x0050 x00D0 x0150 x01D0 x0250 x02D0 x0350 x03D0
ST4 R/W x0051 x00D1 x0151 x01D1 x0251 x02D1 x0351 x03D1
SF4 R/W x0052 x00D2 x0152 x01D2 x0252 x02D2 x0352 x03D2
LN4 R/W x0053 x00D3 x0153 x01D3 x0253 x02D3 x0353 x03D3
RT5 R/W x0054 x00D4 x0154 x01D4 x0254 x02D4 x0354 x03D4
SP5 R/W x0055 x00D5 x0155 x01D5 x0255 x02D5 x0355 x03D5
ST5 R/W x0056 x00D6 x0156 x01D6 x0256 x02D6 x0356 x03D6
SF5 R/W x0057 x00D7 x0157 x01D7 x0257 x02D7 x0357 x03D7
LN5 R/W x0058 x00D8 x0158 x01D8 x0258 x02D8 x0358 x03D8
RT6 R/W x0059 x00D9 x0159 x01D9 x0259 x02D9 x0359 x03D9
SP6 R/W x005A x00DA x015A x01DA x025A x02DA x035A x03DA
ST6 R/W x005B x00DB x015B x01DB x025B x02DB x035B x03DB
SF6 R/W x005C x00DC x015C x01DC x025C x02DC x035C x03DC
LN6 R/W x005D x00DD x015D x01DD x025D x02DD x035D x03DD
RT7 R/W x005E x00DE x015E x01DE x025E x02DE x035E x03DE
SP7 R/W x005F x00DF x015F x01DF x025F x02DF x035F x03DF
ST7 R/W x0060 x00E0 x0160 x01E0 x0260 x02E0 x0360 x03E0
SF7 R/W x0061 x00E1 x0161 x01E1 x0261 x02E1 x0361 x03E1
LN7 R/W x0062 x00E2 x0162 x01E2 x0262 x02E2 x0362 x03E2
RT8 R/W x0063 x00E3 x0163 x01E3 x0263 x02E3 x0363 x03E3
SP8 R/W x0064 x00E4 x0164 x01E4 x0264 x02E4 x0364 x03E4
ST8 R/W x0065 x00E5 x0165 x01E5 x0265 x02E5 x0365 x03E5
SF8 R/W x0066 x00E6 x0166 x01E6 x0266 x02E6 x0366 x03E6
LN8 R/W x0067 x00E7 x0167 x01E7 x0267 x02E7 x0367 x03E7
CALIBRATION
RTDL R/W x0068 x00E8 x0168 x01E8 x0268 x02E8 x0368 x03E8
RTDH R/W x0069 x00E9 x0169 x01E9 x0269 x02E9 x0369 x03E9
mAL R/W x006A x00EA x016A x01EA x026A x02EA x036A x03EA
mAH R/W x006B x00EB x016B x01EB x026B x02EB x036B x03EB
mVL R/W x006C x00EC x016C x01EC x026C x02EC x036C x03EC
mVH R/W x006D x00ED x016D x01ED x026D x02ED x036D x03ED
VL R/W x006E x00EE x016E x01EE x026E x02EE x036E x03EE
VH R/W x006F x00EF x016F x01EF x026F x02EF x036F x03EF
Troom R/W x0070 x00F0 x0170 x01F0 x0270 x02F0 x0370 x03F0
Revered N/A x0071 x00F1 x0171 x01F1 x0271 x02F1 x0371 x03F1
Revered N/A x0072 x00F2 x0172 x01F2 x0272 x02F2 x0372 x03F2
Revered N/A x0073 x00F3 x0173 x01F3 x0273 x02F3 x0373 x03F3
Revered N/A x0074 x00F4 x0174 x01F4 x0274 x02F4 x0374 x03F4

36
Revered N/A x0075 x005 x0175 x01F5 x0275 x02F5 x0375 x03F5
Revered N/A x0076 x00F6 x0176 x01F6 x0276 x02F6 x0376 x03F6
Revered N/A x0077 x00F7 x0177 x01F7 x0277 x02F7 x0377 x03F7
Revered N/A x0078 x00F8 x0178 x01F8 x0278 x02F8 x0378 x03F8
Revered N/A x0079 x00F9 x0179 x01F9 x0279 x02F9 x0379 x03F9
Revered N/A x007A x00FA x017A x01FA x027A x02FA x037A x03FA
Revered N/A x007B x00FB x017B x01FB x027B x02FB x037B x03FB
Revered N/A x007C x00FC x017C x01FC x027C x02FC x037C x03FC
Revered N/A x007D x00FD x017D x01FD x027D x02FD x037D x03FD
Revered N/A x007E x00FE x017E x01FE x027E x02FE x037E x03FE
Revered N/A x007F x00FF x017F x01FF x027F x02FF x037F x03FF
This register map is showing channel 1 to channel 8 parameters. For those register address of channel 9 to channel 32, it
can be calculated as followed:
Register Address = Base Address + (Channel No. ‐ 1) * x0080H
Where the Base Address is the data register address of channel 1 parameter.
For example:
The base address of SV is x0000H
The SV register address of channel 6 (x06H) is
x0280H = x0000H + (x06H ‐ 1) * x0080H
And the SV register address of channel 16 (x10H) is
x0780H = x0000H + (x10H ‐ 1) * x0080H
Register ALARM
Parameter Read/Write #1 #2 #3 #4 #5 #6 #7 #8
ALPV R/W x1000 x1008 x1010 x1018 x1020 x1028 x1030 x1038
ALSP R/W x1001 x1009 x1011 x1019 x1021 x1029 x1031 x1039
ALHY R/W x1002 x100A x1012 x101A x1022 x102A x1032 x103A
ALFU R/W x1003 x100B x1013 x101B x1023 x102B x1033 x103B
ALMD R/W x1004 x100C x1014 x101C x1024 x102C x1034 x103C
ALDT R/W x1005 x100D x1015 x101D x1025 x102D x1035 x103D
Revered N/A x1006 x100E x1016 x101E x1026 x102E x1036 x103E
Revered N/A x1007 x100F x1017 x101F x1027 x102F x1037 x103F
Register ALARM
Parameter Read/Write #9 #10 #11 #12 #13 #14 #15 #16
ALPV R/W x1040 x1048 x1050 x1058 x1060 x1068 x1070 x1078
ALSP R/W x1041 x1049 x1051 x1059 x1061 x1069 x1071 x1079
ALHY R/W x1042 x104A x1052 x105A x1062 x106A x1072 x107A
ALFU R/W x1043 x104B x1053 x105B x1063 x106B x1073 x107B
ALMD R/W x1044 x104C x1054 x105C x1064 x106C x1074 x107C
ALDT R/W x1045 x104D x1055 x105D x1065 x106D x1075 x107D

37
Revered N/A x1046 x104E x1056 x105E x1066 x106E x1076 x107E
Revered N/A x1047 x104F x1057 x105F x1067 x106F x1077 x107F
Register ALARM
Parameter Read/Write #17 #18 #19 #20 #21 #22 #23 #24
ALPV R/W x1080 x1088 x1090 x1098 x10A0 x10A8 x10B0 x10B8
ALSP R/W x1081 x1089 x1091 x1099 x10A1 x10A9 x10B1 x10B9
ALHY R/W x1082 x108A x1092 x109A x10A2 x10AA x10B2 x10BA
ALFU R/W x1083 x108B x1093 x109B x10A3 x10AB x10B3 x10BB
ALMD R/W x1084 x108C x1094 x109C x10A4 x10AC x10B4 x10BC
ALDT R/W x1085 x108D x1095 x109D x10A5 x10AD x10B5 x10BD
Revered N/A x1086 x108E x1096 x109E x10A6 x10AE x10B6 x10BE
Revered N/A x1087 x108F x1097 x109F x10A7 x10AF x10B7 x10BF
Register ALARM
Parameter Read/Write #25 #26 #27 #28 #29 #30 #31 #32
ALPV R/W x10C0 x10C8 x10D0 x10D8 x10E0 x10E8 x10F0 x10F8
ALSP R/W x10C1 x10C9 x10D1 x10D9 x10E1 x10E9 x10F1 x10F9
ALHY R/W x10C2 x10CA x10D2 x10DA x10E2 x10EA x10F2 x10FA
ALFU R/W x10C3 x10CB x10D3 x10DB x10E3 x10EB x10F3 x10FB
ALMD R/W x10C4 x10CC x10D4 x10DC x10E4 x10EC x10F4 x10FC
ALDT R/W x10C5 x10CD x10D5 x10DD x10E5 x10ED x10F5 x10FD
Revered N/A x10C6 x10CE x10D6 x10DE x10E6 x10EE x10F6 x10FE
Revered N/A x10C7 x10CF x10D7 x10DF x10E7 x10EF x10F7 x10FF
Bit
Parameter Register 15 14 13 12 11 10 9 8 7 6 5 4 3 2 1 0
ALFG1 x110E A16 A15 A14 A13 A12 A11 A10 A9 A8 A7 A6 A5 A4 A3 A2 A1
ALFG2 x110F A32 A31 A30 A29 A28 A27 A26 A25 A24 A23 A22 A21 A20 A19 A18 A17
Register CHANNEL
Parameter Read/Write #1 #2 #3 #4 #5 #6 #7 #8
PV R x1130 x1140 x1150 x1160 x1170 x1180 x1190 x11A0
OUT1 R x1131 x1141 x1151 x1161 x1171 x1181 x1191 x11A1
OUT2 R x1132 x1142 x1152 x1162 x1172 x1182 x1192 x11A2
FLAG R x1133 x1143 x1153 x1163 x1173 x1183 x1193 x11A3
WKNO R x1134 x1144 x1154 x1164 x1174 x1184 x1194 x11A4
TL R x1135 x1145 x1155 x1165 x1175 x1185 x1195 x11A5
TH R x1136 x1146 x1156 x1166 x1176 x1186 x1196 x11A6
PV0 R x1137 x1147 x1157 x1167 x1177 x1187 x1197 x11A7

38
SV0 R x1138 x1148 x1158 x1168 x1178 x1188 x1198 x11A8
PBAND R x1139 x1149 x1159 x1169 x1179 x1189 x1199 x11A9
ARW R x113A x114A x115A x116A x117A x118A x119A x11AA
POUT R x113B x114B x115B x116B x117B x118B x119B x11AB
IOUT R x113C x114C x115C x116C x117C x118C x119C x11AC
DOUT R x113D x114D x115D x116D x117D x118D x119D x11AD
CPOUT R x113E x114E x115E x116E x117E x118E x119E x11AE
RESERVED N/A x113F x114F x115F x116F x117F x118F x119F x11AF
This register map is showing channel 1 to channel 8 parameters. For those register address of channel 9 to channel 32, it
can be calculated as followed:
Register Address = Base Address + (Channel No. ‐ 1) * x0010H
Where the Base Address is the register address of channel 1 parameter.
For example:
The base address of PV is x1130H
The PV register address of channel 6 (x06H) is
x1180H = x1130H + (x06H ‐ 1) * x0010H
And the PV register address of channel 16 (x10H) is
x1220H = x1130H + (x10H ‐ 1) * x0010H