microsoft word 2010 - cci learning solutions inc
TRANSCRIPT

Microsoft®
Word 2010
Microsoft® Office Specialist 2010 SeriesCOURSEWARE 3240–1 EXAM 77– 881
Achieve more
For Evaluation Only

For E
valu
atio
n Onl
y
3240-1 v1.00 © CCI Learning Solutions Inc. 31
Microsoft® Office Specialist 2010
Microsoft®
Word 2010 Core Certification
Lesson 2: Manipulating Text Lesson Objectives This lesson teaches you to create simple documents and introduces you to some file management tools available in Word. Upon completion of this lesson, you should be able to:
change views
select text
use cut, copy and paste
use the clipboard
move text with drag-and-drop
use Paste Options
use Paste Special
find text or items with Browse by
replace text or items
For E
valu
atio
n Onl
y

Lesson 2 Manipulating Text
32 3240-1 v1.00 © CCI Learning Solutions Inc.
1.1
Changing the View You can customize the way a document displays to suit your particular requirements by choosing the appropriate options from the View tab.
Print Layout
Use this view to adjust the overall layout of information on the document page, or to show how the printed document will look. As you are focusing on the layout of the printed document, you will be able to see graphical elements you cannot see with the Draft view, e.g. headers/footers, pictures and columns.
Full Screen Reading
Useful when reading a document as pages are adapted to the size of your monitor for ease of reading. The Ribbon is hidden so you can focus on reading the document at the maximum size for your monitor; a series of buttons appears across the top of the screen with options for use in this mode.
Web Layout Useful when creating a Web page: text wraps to the screen size; backgrounds and pictures appear the same as when using a Web browser.
Outline Enables you to create the outline of a document where you can promote or demote headings within a hierarchical layout, or collapse a document so that only the headings and subheadings appear. This makes it very easy to rearrange the topics in a document (i.e., move the headings and the appropriate text moves with it).
Draft Appropriate for most typing, editing and formatting tasks.
An alternative to using the View tab is to use one of the commonly accessed view buttons located at the bottom right of the screen:
1 Click the File tab and then click Open.
2 Navigate to the student data files location and double-click Tolano Adventures Employee List to open this file.
You should be viewing the document in Print Layout view which you can check on the rulers across the top and left side of the screen.
3 At the lower right of the screen, click the Draft view button.
Learn the Skill In this exercise, you will try the different views using both the View tab and View buttons.
Print Web Layout Layout Draft
Full Screen Outline Reading
You can turn this feature on or off when opening and reading documents sent as attachments to an e-mail.
MMM Viewing a Document
Online Exercise
For E
valu
atio
n Onl
y

Manipulating Text Lesson 2
3240-1 v1.00 © CCI Learning Solutions Inc. 33
Notice the vertical ruler no longer appears and the text appears at the far left, enabling you to focus on text.
4 In the View buttons area, click the Full Screen Reading view button.
5 At the top of the screen, click the to go to the next page.
You should now be viewing different pages of this document. At the bottom of the screen you will see a navigation tool to help you “turn” the page:
or
6 Click Close at the top right corner of the screen to exit this view.
7 Then press + to close the document.
Suppose you want to post a document on the company Web site and you want to check the document layout before sending it to the webmaster.
8 Open the Biking Tours document from your student data files location.
Note the position of the graphic and how the text flows around it in the Print Layout view.
9 Click the View tab and then, in the Document Views group, click Web Layout.
For E
valu
atio
n Onl
y

Lesson 2 Manipulating Text
34 3240-1 v1.00 © CCI Learning Solutions Inc.
Notice where the picture is located compared to the Print Layout. This is useful when preparing documents in an environment such as the Internet where users may be viewing the document on a variety of computers. The Internet has a standard language used to enable everyone to see the same information, no matter which operating system is in use. So, documents like this will need minor modifications if the graphic is to stay at the right side.
10 Close this document.
Now take a look at when you might use the Outline view.
11 Open Staff Agenda in the student data files location.
This is a list that will be expanded later as the managers decide what is to be included at the retreat.
12 On the View tab, in the Document Views, click Outline.
Notice how Word has changed the layout to a list format where you can set up different levels for the types of information to be discussed. For example, the Coffee and refreshments item is really a subset of the information for the hotel and conference room – currently they are at the same level. You can begin to organize the information here even though you may not have all the details. This exercise will be performed later in this courseware. This is an introduction to how you could use this view.
13 On the View tab, in the Document Views, click Print Layout.
14 Close the Staff Agenda document.
For E
valu
atio
n Onl
y

Manipulating Text Lesson 2
3240-1 v1.00 © CCI Learning Solutions Inc. 35
Adjusting the Zoom To enlarge or reduce the text display on the screen:
Click the View tab, in the Zoom group, click the appropriate option, or
the Zoom level button on the status bar, or
the Zoom slider or the incremental buttons on either side of the slider on the status bar.
When you use one of the first two methods, the Zoom dialog box appears with further options:
The ability to enlarge the text display is useful when you are working with a small font size, whereas the ability to reduce the display is useful when you are working with landscape orientation.
You can set the zoom percentage between 10% to 500%, or you can have Word automatically adjust the magnification so that you can see the entire width of the page or text on the screen. When changing the view, the position of the insertion point will determine the zoom area.
100% Zoom
You can also use the wheel on the mouse to zoom in or out on the document. Press CTRL as you move the wheel up to increase the zoom or down to decrease the zoom.
1.1
For E
valu
atio
n Onl
y


Lesson 2 Manipulating Text
38 3240-1 v1.00 © CCI Learning Solutions Inc.
Note the following when working with split windows:
Click in the appropriate window to access that document, or
press or + to move from one window to the other document window, or
drag the split bar up or down to display more or less of either document window.
To remove the split pane:
On the View tab, in the Window group, click Remove Split, or
double-click the split bar between the windows.
1 Ensure Tolano Adventures Employee List is active on the screen.
Suppose you want to see the names of the Travel Directors in New York and Sydney at the same time.
2 On the View tab, in the Window group, click Split.
3 Move the mouse down until you are at approximately half the screen size for the document.
4 Click in the bottom window and press + to move quickly to the end of the document.
5 Scroll up to show the names of the two Travel Directors in this location.
You can now view these names and then adjust the upper window to show the Travel Director there.
6 Click in the top window and scroll the document up if you cannot see who the Travel Director is in the New York office.
7 Position the cursor at the top of the bottom pane, above the ruler, and then drag to the bottom of the screen.
The split window no longer appears on the screen.
Learn the Skill In this exercise, you will learn how to split a window and use the windows to view different parts of the document.
For E
valu
atio
n Onl
y

Manipulating Text Lesson 2
3240-1 v1.00 © CCI Learning Solutions Inc. 39
Arranging Windows If you want to view more than one document at the same time, you can create one or more new windows to view documents side by side. You can choose to arrange the windows horizontally or vertically. As with splitting the window, you can click in each pane to work with that document, or press + to move to the next pane.
To view the documents vertically, you can use the View Side by Side command in the Window group of the View tab. You can only compare two documents at one time, although you can open several documents for selection.
Synchronous Scrolling
Both windows scroll at the same time by the same amount (synchronous). Whendeactivated, you can scroll in each window separately.
Reset Window Position
Use to reset the window position if you moved or altered the window in any way.
When you have more than two documents for comparisonand you activate View Side by Side, Word automatically puts the names of the inactive documents in a window listing the file names for selection.
If you prefer to see a separate window for each document, on the View tab, in the Window group, click Arrange All and Word displays the documents in windows stacked one above the other, similar to: Fo
r Eva
luat
ion
Only

Lesson 2 Manipulating Text
40 3240-1 v1.00 © CCI Learning Solutions Inc.
1 Ensure Tolano Adventures Employee List is active on the screen. Then open TEC Employees List.
2 On the View tab, in the Window group, click Arrange All.
While this appears to be the same option as splitting the window, notice how two documents are open and each document appears in its own window. The active document also appears to be “elevated” and is brighter than the other document window.
Suppose you decide you would rather view the documents side by side.
3 On the View tab, in the Window group, click View Side by Side.
4 Click in the Tolano Adventures Employee List window.
Your cursor should now be blinking in this window so you can make any changes.
5 Scroll down the page in this window.
Notice how the TEC Employees List document scrolls at the same time by the same number of lines. This is because the files are set to scroll in a synchronous manner. This is useful if you are comparing changes from one version of a document to another, e.g. which colors and sizes did the New York office use for the text, so you can copy these for your version of that document. However, if you want to look at different areas of both documents, you will need to turn the synchronous scrolling off.
6 With the cursor still in the Tolano Adventures window, on the View tab, in the Window group, click Synchronous Scrolling to turn off the feature.
7 Now try scrolling up or down in this document.
You should be able to scroll in this document in any manner you want without affecting the other document.
Suppose you need to create a new window for Tolano Adventures so you can show the names of the Travel Directors along with the Environmental department.
8 On the View tab, in the Window group, click New Window.
Learn the Skill In this exercise, you will open multiple documents and then arrange the windows to view and work with each document.
For E
valu
atio
n Onl
y

Manipulating Text Lesson 2
3240-1 v1.00 © CCI Learning Solutions Inc. 41
A new window should appear with a copy of the Tolano Adventures Employee List.
9 On the View tab, in the Window group, click Arrange All.
You should now have three windows with each document in a separate window.
10 Close one of the Tolano Adventures documents and then maximize the screens.
Selecting Text Selecting text is a fundamental step in Word prior to formatting, moving, copying, or any other manipulation of text.
Selecting a piece of text or an item such as a picture tells Word to which item you want to apply the next action. Selecting may also be called highlighting; do not confuse this with the Highlight feature in Word. Once you select text, the selection stays on the text in anticipation that you want to apply multiple actions for that selection. The only exception to this is when you delete or replace the selection with new text.
The image below shows two lines of text selected.
Use the non-printing characters to help you select specific types of text, such as the line containing the title and the paragraph mark instead of just the text for the title; select the column figures and the tab character that follows. Use Show/Hide ¶ to display the non-printing characters; this command is on the Home tab, in the Paragraph group.
If you inadvertently make the wrong selection or you wish to remove the selection, click anywhere to deselect the text or press any arrow direction key, and then begin the selection procedure again.
Selecting Consecutive Text You can select text using the mouse or keyboard and occasionally you may want to use a combination of mouse and keyboard to select larger pieces of text.
The basic method of selecting text is to click the mouse at the beginning of the text to be selected, and then drag to highlight the text.
You can increase or decrease the selection as long as you continue to hold the mouse button. You can also select forwards or backwards from the starting point.
When using the keyboard, position the insertion point, hold down , and then press the arrow keys to move the cursor to select the text. Release when the text is selected.
To select an entire word, double-click the word.
To select an entire sentence, hold and click anywhere within the sentence.
To select an entire paragraph, triple-click anywhere within that paragraph.
To select the entire document, use of the following methods:
On the Home tab, in the Editing group, click Select and then click Select All, or
press + .
For E
valu
atio
n Onl
y

Lesson 2 Manipulating Text
42 3240-1 v1.00 © CCI Learning Solutions Inc.
Selecting Non-Consecutive Text Word offers the ability to select text anywhere in the document, regardless of whether the text is consecutive or not. To select multiple pieces of text, you must select the first piece of text and then press and hold as you select the next piece of text. Press and hold to continue selecting more text anywhere in the document.
You can also select blocks of text using . Position the cursor at the beginning of the block of text to be selected, press and hold as you click and drag to select the block.
Both these options can only be activated using these keys with the mouse to select text.
Using the Selection Bar An alternative way to select larger amounts of text is with the selection bar. The selection bar is located in the white area at the left edge of the text, in the area that is the left margin. When the mouse cursor is positioned in the selection bar, it changes to a white, right pointing arrow as seen in the following:
To select a line of text, click at the left of the line of text in the selection bar.
To select an entire paragraph, double-click at the left of that paragraph in the selection bar.
To select the entire document, triple-click anywhere in the selection bar, or press and hold and then click once anywhere in the selection bar.
To select multiple lines, click and drag down to select the text.
You can also use to select non-consecutive text using the selection bar by selecting a line or paragraph first, and then hold as you select the next line or paragraph.
1 With Tolano Adventures Employee List active on the screen, click at the beginning of the word Adventures in the title line.
2 Click and drag across the word to select the first four characters.
3 Click anywhere away from the selection to deselect the characters.
4 Double-click the word, Adventures.
The entire word now highlights on the screen.
Learn the Skill In this exercise, you will try selecting different amounts of text in the document to make changes to the document.
For E
valu
atio
n Onl
y

Manipulating Text Lesson 2
3240-1 v1.00 © CCI Learning Solutions Inc. 43
5 To select the entire New York location, click at the beginning of New York and drag to the end of (Head Office).
6 Click anywhere away from the selection to deselect the characters.
7 Now move your cursor to the Selection bar at the left of the New York line, ensuring your arrow points to the right.
8 Click and drag down two lines, thereby selecting all three lines of the location quickly.
9 To select only the actual address information, in the Selection bar area, click at the left of the address text.
Only this line now highlights.
10 Press to move quickly to the beginning of this line, then press + twice.
Notice the cursor has moved two words to the right, but did not select anything. To select both words and not just move to other words, you need to use the key.
11 Press and hold the key, then press + three times.
This time all the words are selected; by using the key, you can extend a selection in either direction.
12 Press and then press the key twice.
Notice how Word has continued to select the text in step 11 and also to the end of Nick Klassen’s name.
13 Click anywhere to deselect the text.
Editing Text Whenever you add, delete, or change text, you are editing. Many of the commands used for editing are available on the Home tab for quick and easy selection. When editing it is important to select the text before you perform the next action; otherwise, the action occurs at the cursor position.
Using Undo Use the Undo feature to reverse an action (e.g. deleting, formatting, adding text or setting tabs). To activate Undo:
In the Quick Access Toolbar, click Undo, or
Click the button itself to undo the last action or command performed.
Click the arrow for this button to undo up to the last 100 consecutive actions or commands performed. You can only undo sequential actions, e.g., undo from the first Typing at the top of the list to the second Picture. You cannot undo selective actions.
press + to undo the last action performed. Repeat this key sequence to undo each action.
For E
valu
atio
n Onl
y

Lesson 2 Manipulating Text
44 3240-1 v1.00 © CCI Learning Solutions Inc.
Using Repeat To repeat the action just performed:
In the Quick Access Toolbar, click Repeat, or
press + .
Using Cut, Copy and Paste If you want to re-use text in another document or in another location in the current document, instead of retyping the information, use the Cut, Copy and Paste commands.
Cut Cut or remove the item from the original location in the current document, and place the item in the Clipboard.
Copy Copy the item from the original location in the current document, and place the item in the Clipboard.
Paste Insert an item from the Clipboard into a document at the current cursor position.
Word uses the Clipboard to temporarily store any cut or copied items such as text or graphics. You can then paste these items to the required location.
To cut or move an item, after selecting it: On the Home tab, in the Clipboard group, click Cut, or
press + , or
right-click the item and then click Cut.
To copy an item, after selecting it: On the Home tab, in the Clipboard group, click Copy, or
press + , or
right-click the item and then click Copy.
To paste an item, after placing the insertion point where you want to paste the item: On the Home tab, in the Clipboard group, click Paste, or
press + , or
right-click the item and then click Paste, or
click the item in the Office Clipboard, or
click the arrow at the right of the item in the Office Clipboard, and then click Paste.
Once you paste an item, you will see the Paste Options button appear at the bottom right of the pasted item. When you point at this item, the button displays an arrow you can click to preview how the pasted item will appear in this location. The number and type of options vary based on what item was pasted, e.g. text only, formatted text, pictures.
Keep Source Formatting (K)
Keep the formatting for this item as it was set in the original document.
Merge Formatting (M)
Merge the formatting for this item from the original document with the formatting set in this document.
Use Destination Styles (S)
Use a style that exists for this document on the pasted item.
Keep Text Only (T) Remove any formatting that existed with the original item and keep the text only.
Set Default Paste Set how you want all pasted items of this type to appear.
For E
valu
atio
n Onl
y

Manipulating Text Lesson 2
3240-1 v1.00 © CCI Learning Solutions Inc. 45
Using the Office Clipboard While the traditional Windows Clipboard offers the ability to store only one item at a time, the Office Clipboard offers the ability to store and retrieve up to 24 items. It will also show you a preview of the item, along with an icon representing the software program where the items are available.
To display the Clipboard task pane, on the Home tab, in the Clipboard group, click the Office Clipboard Task Pane.
Paste All Paste all the items currently in the Clipboard in the same order as they appear in the Clipboard.
Clear All Clear all items from the Clipboard.
Options Select options on how the Clipboard will work, such as when it appears, or to display an icon in the Taskbar Notification area to remind you this feature is active for collecting items.
The option to collect up to 24 items is useful if you are working on a report in which you would like to include text from another report, sales numbers from an Excel file, or text or pictures from the company Web site. You can collect up to 24 items from any of these programs.
Once you reach the maximum, you will need to clear individual or all items from the Clipboard to collect new items. Alternatively, you can continue to collect items and the oldest entry in the Clipboard deletes automatically.
When you move the mouse cursor over an item in the Clipboard, you will see the options available to you. A drop-down arrow appears to the right of the item and, when you click that arrow, a menu appears with other options. Use Delete to delete this item from the Clipboard; to paste this item into the document in the current location, use Paste.
1 With Tolano Adventures Employee List active and the three lines of text selected, press the key.
The lines of text should disappear from the screen.
2 On the Quick Access Toolbar, click Undo.
The deleted text now re-appears on the screen.
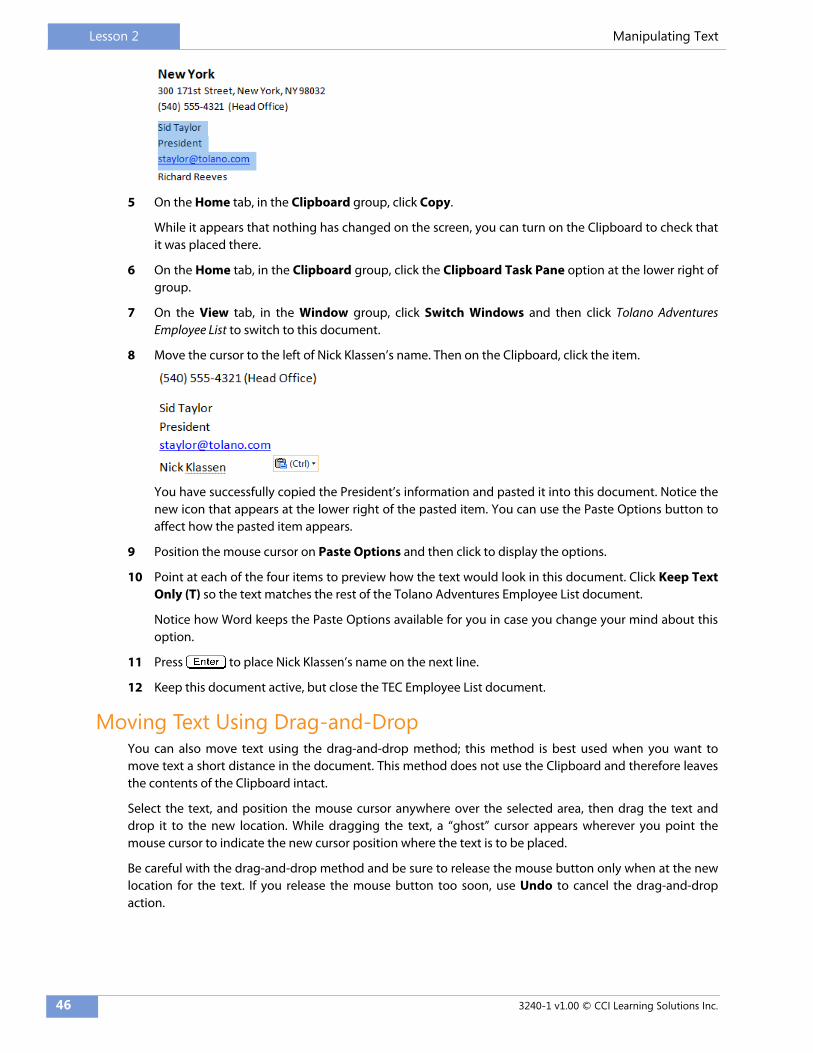
Suppose you want to copy the President’s information from the TEC Employee List to this document.
3 Open TEC Employee List. Move the mouse cursor to the Selection Bar area and to the left of Sid Taylor’s name.
4 Click and drag to select the three lines of information for Sid Taylor.
Learn the Skill In this exercise, you will practice selecting items for text replacement, undoing these changes, and then copying and pasting text blocks into the same as well as another document.
MMMUsing the Clipboard
Online Exercise
For E
valu
atio
n Onl
y
Lesson 2 Manipulating Text
46 3240-1 v1.00 © CCI Learning Solutions Inc.
5 On the Home tab, in the Clipboard group, click Copy.
While it appears that nothing has changed on the screen, you can turn on the Clipboard to check that it was placed there.
6 On the Home tab, in the Clipboard group, click the Clipboard Task Pane option at the lower right of group.
7 On the View tab, in the Window group, click Switch Windows and then click Tolano Adventures Employee List to switch to this document.
8 Move the cursor to the left of Nick Klassen’s name. Then on the Clipboard, click the item.
You have successfully copied the President’s information and pasted it into this document. Notice the new icon that appears at the lower right of the pasted item. You can use the Paste Options button to affect how the pasted item appears.
9 Position the mouse cursor on Paste Options and then click to display the options.
10 Point at each of the four items to preview how the text would look in this document. Click Keep Text Only (T) so the text matches the rest of the Tolano Adventures Employee List document.
Notice how Word keeps the Paste Options available for you in case you change your mind about this option.
11 Press to place Nick Klassen’s name on the next line.
12 Keep this document active, but close the TEC Employee List document.
Moving Text Using Drag-and-Drop You can also move text using the drag-and-drop method; this method is best used when you want to move text a short distance in the document. This method does not use the Clipboard and therefore leaves the contents of the Clipboard intact.
Select the text, and position the mouse cursor anywhere over the selected area, then drag the text and drop it to the new location. While dragging the text, a “ghost” cursor appears wherever you point the mouse cursor to indicate the new cursor position where the text is to be placed.
Be careful with the drag-and-drop method and be sure to release the mouse button only when at the new location for the text. If you release the mouse button too soon, use Undo to cancel the drag-and-drop action.
For E
valu
atio
n Onl
y

Manipulating Text Lesson 2
3240-1 v1.00 © CCI Learning Solutions Inc. 47
1 Scroll in the document until you see Robin Black’s name in the Cape Town location.
2 Select the three lines with her information.
3 Position the mouse cursor anywhere in the selection and drag up until at the beginning of the Cape Town heading.
4 At that location, release the mouse button.
The text is now moved into this location.
Suppose another Administrative Assistant will also be moving to the New York office.
5 Scroll in the document until you see the information for Christy Akira in the Tokyo office.
6 Select the three lines for Christy’s information and drag the selection to the beginning of the Cape Town heading.
Notice how the process to drag and drop this piece of text remains the same although it can be a bit tricky finding the right location as you move around in the document.
7 Close this document without saving.
Using Paste Special You can also paste a special item such as a picture from a Web page into a document. The Paste Special command enables you to copy an object from another program into your document and, depending on that object, it can link to the original to update both copies, as in the scenario to update sales figures or Web pages.
Learn the Skill In this exercise, you practice moving text using the drag-and-drop method to move some text around in the Tolano Adventures Employee List document.
For E
valu
atio
n Onl
y

Lesson 2 Manipulating Text
48 3240-1 v1.00 © CCI Learning Solutions Inc.
On the Home tab, in the Clipboard group, click the arrow for Paste and then click Paste Special.
The options that appear in the subsequent window will vary based on the item being copied or cut.
1 Open Sales Figures for Staff Retreat and then open Popular Tours Breakdown.
2 Copy the entire table of figures in Popular Tours Breakdown and then switch to the Sales Figure document.
3 Move to the bottom of this document and then on the Home tab, in the Clipboard group, click the arrow for Paste. Click Paste Special.
Assume we may need to update the figures for the tours breakdown as more details become available for the Staff Retreat. We also want the updated figures regardless of whether the change is made in the original file or in the Sales Figure document.
4 Click Paste link and then click Microsoft Word Document Object.
Notice how Word has pasted the table of figures into the document, but it doesn’t appear any different to a regular paste command.
5 Click once in the table of figures.
Word now displays the table with a border around it to remind you it is an object, as chosen in step 4.
6 Double-click the 175 figure in the 2011 column for Ice Climbing.
You should now be viewing the Popular Tours Breakdown document where you can make a change to that number.
Learn the Skill This exercise demonstrates how to paste a set of annual figures in another document and set a link so you can update the figures as needed.
For E
valu
atio
n Onl
y

Manipulating Text Lesson 2
3240-1 v1.00 © CCI Learning Solutions Inc. 49
2.2
7 Double-click the 175 figure in this document and type: 250.
8 Switch to the Sales Figure document.
The change for this figure is now reflected in this document as well.
9 Close the Sales Figures and the Popular Tours Breakdown documents without saving.
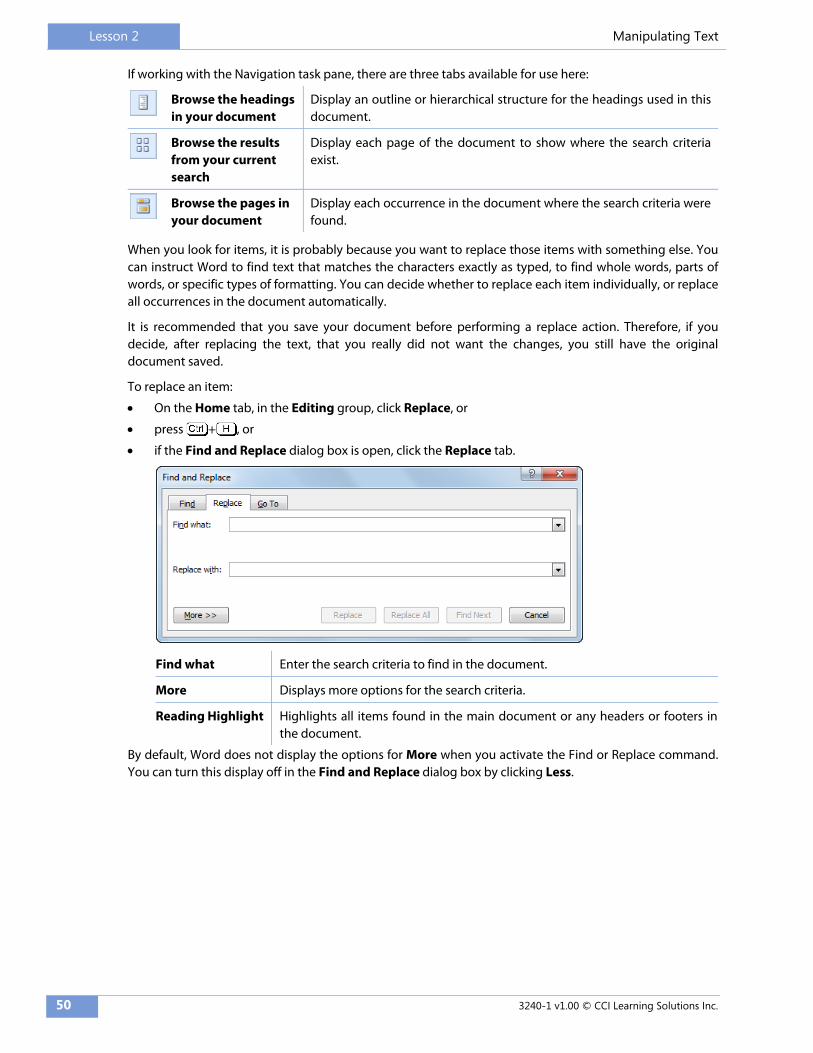
Finding and Replacing Items Use the Find feature to move the insertion point to a specified location within a document. You can find a specific word, phrase, symbol or code, or any combination of these. Once found, you can choose to replace the item with something else, or continue working with your document.
To activate the Find feature:
On the Home tab, in the Editing group, click Find, or
press + , or
click the Find tab in the Find and Replace dialog box, or
near the bottom of the vertical scroll bar, click Select Browse Object and then click Find.
Note that the first two options shown previously display the Navigation task pane at the left of the screen, and the latter two options display the Find and Replace dialog box.
For E
valu
atio
n Onl
y
Lesson 2 Manipulating Text
50 3240-1 v1.00 © CCI Learning Solutions Inc.
If working with the Navigation task pane, there are three tabs available for use here:
Browse the headings in your document
Display an outline or hierarchical structure for the headings used in this document.
Browse the results from your current search
Display each page of the document to show where the search criteria exist.
Browse the pages in your document
Display each occurrence in the document where the search criteria were found.
When you look for items, it is probably because you want to replace those items with something else. You can instruct Word to find text that matches the characters exactly as typed, to find whole words, parts of words, or specific types of formatting. You can decide whether to replace each item individually, or replace all occurrences in the document automatically.
It is recommended that you save your document before performing a replace action. Therefore, if you decide, after replacing the text, that you really did not want the changes, you still have the original document saved.
To replace an item:
On the Home tab, in the Editing group, click Replace, or
press + , or
if the Find and Replace dialog box is open, click the Replace tab.
Find what Enter the search criteria to find in the document.
More Displays more options for the search criteria.
Reading Highlight Highlights all items found in the main document or any headers or footers in the document.
By default, Word does not display the options for More when you activate the Find or Replace command. You can turn this display off in the Find and Replace dialog box by clicking Less. Fo
r Eva
luat
ion
Only

Manipulating Text Lesson 2
3240-1 v1.00 © CCI Learning Solutions Inc. 51
Match case Search for any text that has the exact casing as typed into the Find what box.
Find whole words only
If you enter a small amount of text in the Find what box, we recommend you select this option if it is the complete word to be found in the document. For instance, if you type red in the Find what box without selecting this option, Word finds all occurrences of these characters including red, hundred, bred, redline, credible, etc.
Use wildcards This feature searches for files or folders in Windows. The ? character represents a single character at a time, e.g., entering c?t finds words like cat or cot but not cart, chat, or crater. The * character represents any number of characters regardless of the word length, e.g. entering br* finds words like breath, bred, broth, or brother. To see a full list of wildcards available, use the Help option.
Sounds like If you are unsure of the exact spelling of a word, you can use phonetic spelling to narrow the search criteria.
Find all word forms
Use this when you want Word to find all forms of the word, regardless of whether it is a noun, verb, adjective, or adverb. Word also ignores the tense form (e.g. wants, wanting, wanted) and whether it is the singular or plural form (e.g. book or books).
Match prefix Use this when you do not know the full length or all the letters in the word to find. Insert as many characters as you know of the beginning of the word. Word then matches only those words that begin with these characters (e.g. typing psyc* finds psychology, psychic, psyche, and psychometrics.
Match suffix Opposite of prefix; insert as many characters as you know of the end of the word. Word then matches only those words that end with these characters, e.g. *try would find symmetry, try, and poetry.
Ignore punctuation characters
Ignore any punctuation characters such as commas, colons, semi-colons, and periods.
For E
valu
atio
n Onl
y

Lesson 2 Manipulating Text
52 3240-1 v1.00 © CCI Learning Solutions Inc.
Ignore white-space characters
White space refers to regular or non-breaking spaces or tab characters. Select this to ignore any characters, such as double spaces, that may exist in the document.
Format
Select any formatting attributes applied to the text. You could also use the corresponding buttons or shortcut keys to enter a formatting attribute to find.
Special Search for special characters such as paragraph marks, page breaks, and tab characters.
No Formatting Clear any options selected previously in the Find what box with the Format button.
Each time you activate the Find feature, Word displays the last search criteria entered. Once you exit Word, the boxes in the Find and Replace dialog box will clear as will the Office Clipboard.
1 Open Memo on Live Meeting.
You will now try some different methods to find an item in this memo.
2 On the Home tab, in the Editing group, click Find.
3 Click in the Search Document field, type: Microsoft and press .
Word has found the first occurrence of this item in the document and highlighted it on the screen. If you refer to the Navigation pane, you should notice that Word has also indicated the number of occurrences of this search text in the document.
4 In the Search field, type: web for the new search criteria and press . Then click the Browse the results from your current search tab in the Navigation pane.
Notice how Word not only highlights each occurrence in the document, it also provides a list in the Navigation pane as a quick reference to how the search criteria are used. If this document had multiple pages, you could also click the Browse by pages in your document option to see where else the search criteria appear.
Suppose you want to find all occurrences of this word and replace them with another spelling.
5 Close the Navigation pane.
6 On the Home tab, in the Editing group, click Replace.
Learn the Skill In this exercise, you will find and replace specific items in the document.
Use a non-breaking space to keep words together such as data at the end of a line or page. Create a non-breaking space character by pressing CTRL+SHIFT +SPACEBAR instead of a regular space.
For E
valu
atio
n Onl
y

Manipulating Text Lesson 2
3240-1 v1.00 © CCI Learning Solutions Inc. 53
Word provides the last search criteria in the Find what field.
7 Click in the Replace with field and type: Web.
8 Click Replace to find and replace the first occurrence.
9 Click Replace All to find and replace any remaining occurrences.
10 Click Yes to search from the beginning of the document for any occurrences prior to the first occurrence.
At this point, Word has found all occurrences of the search criteria and replaced them.
11 Click OK to complete this task.
12 Close the document without saving.
Review Questions 1. Explain what the differences are between using the Print Layout and Draft view
modes.
2. Discuss the difference between using Paste versus Paste Special.
3. How could you use the Paste Options for text you have copied?
4. Give an example of why you might want to collect multiple items to the Office Clipboard.
5. When might you use the Browse the pages in your document tab in the Navigation pane?
Lesson Summary This lesson teaches you to create simple documents and introduces you to some file management tools available in Word. Upon completion of this lesson, you should be able to:
change views
select text
use cut, copy and paste
use the clipboard
move text with drag-and-drop
use Paste Options
use Paste Special
find text or items with Browse by
replace text or items
MMMGo online for
Additional Review and
Activities
For E
valu
atio
n Onl
y

Lesson 2 Manipulating Text
54 3240-1 v1.00 © CCI Learning Solutions Inc.
For E
valu
atio
n Onl
y

For E
valu
atio
n Onl
y

www.ccilearning.com
INTRODUCING MICROSOFT OFFICE SPECIALIST 2010The new Microsoft Office Specialist (MOS) 2010 certification features a series of certification levels, providing a continuum for skills qualification and validation. They include core credentials in any one of the most popular Microsoft Office 2010 products, and Expert and Master credentialing for advanced users.
Microsoft Office Specialist (Core Certification)The Microsoft Office Specialist Core certification validates skills with the Microsoft Office 2010 suite. Exams are available on these Office products: Word 2010, Excel® 2010, PowerPoint® 2010, Access® 2010, Outlook® 2010, SharePoint® 2010 and Project® 2010.
Microsoft Office ExpertThe Microsoft Office Expert certification validates advanced skills in specific Microsoft Office applications. Gaining the credential requires that a candidate pass either of these exams: Word 2010 Expert or Excel® 2010 Expert.
Microsoft Office MasterThe Microsoft Office Master Certification denotes fluency in several important Microsoft Office applications. To achieve this designation, a candidate must pass four exams: Word 2010 Expert, Excel® 2010 Expert and PowerPoint® 2010, and either Outlook 2010 or Access® 2010.
Become Certified in Microsoft Office Specialist 2010The Microsoft Office Specialist 2010 certification is Microsoft‘s only certification program for the Microsoft Office suite of products. The Microsoft Office Specialist certification is a valuable credential that recognizes the skills needed to use the full features and functionality of Office 2010 applications while improving and validating desktop computing skills. This credential provides students, information workers and job seekers with the knowledge and expertise that pave the pathway to success.
Why certification is important:There is an increasing demand for Microsoft Office skills as more and more businesses begin to embrace newer technologies. Microsoft Office Specialist certification allows users to prove their skill sets while effectively preparing them for academic, professional and personal success.
This distinguished credential helps individuals differentiate themselves in a competitive job market and enables hiring managers to simplify and shorten the hiring process. It allows teachers to prepare their students with desktop computing skills and expertise. Corporations get the most out of their technology investment by ensuring their employees have the desktop computing skills to tackle the toughest tasks and projects. Most importantly — people who are certified are able to do their jobs better and faster than ever before. Research shows that a comprehensive level of skill proficiency, proven by certification, is directly linked to an immediate increase in “on-the-job” performance.
Based on global industry standards, Microsoft Office Specialist 2010 certification is an important and prominent credential for all individuals.
Proven results:In a recent survey on digital skills, 93% of respondents in one study reported becoming more skilled in the Microsoft® Office applications they certified in—with 71% claiming “moderate” or “great” increases. In addition, six out of 10 MOS-certified respondents said they take on more complex or difficult assignments since passing their exams.1
Learn more
CCI Learning Solutions Inc
Word 2010 Exam 77‑881Excel 2010 Exam 77‑882PowerPoint 2010 Exam 77‑883Outlook 2010 Exam 77‑884Access 2010 Exam 77‑885
SharePoint 2010 Exam 77‑886Project 2010 Exam 77‑178
Expert Word 2010 Exam 77‑887Expert Excel 2010 Exam 77‑888
For E
valu
atio
n Onl
y