microsoft® office powerpoint® 2013
TRANSCRIPT
1
Microsoft® Office PowerPoint® 2013
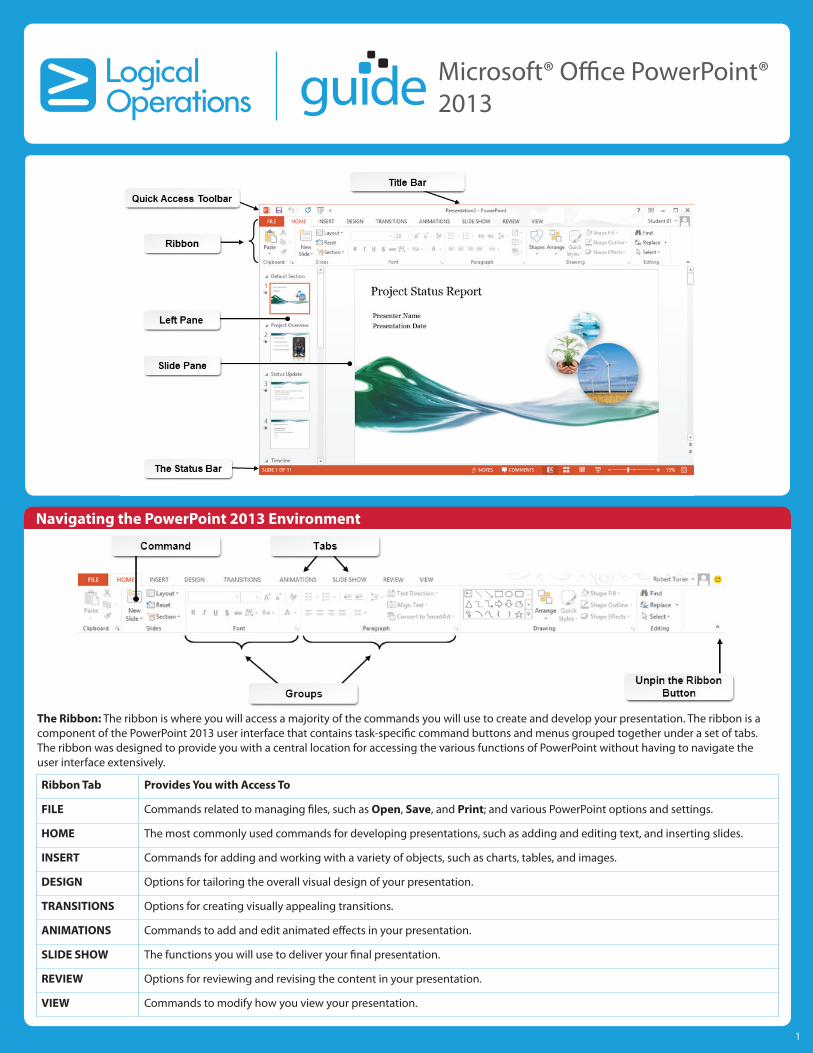
Navigating the PowerPoint 2013 Environment
Ribbon Tab Provides You with Access To
FILE Commands related to managing files, such as Open, Save, and Print; and various PowerPoint options and settings.
HOME The most commonly used commands for developing presentations, such as adding and editing text, and inserting slides.
INSERT Commands for adding and working with a variety of objects, such as charts, tables, and images.
DESIGN Options for tailoring the overall visual design of your presentation.
TRANSITIONS Options for creating visually appealing transitions.
ANIMATIONS Commands to add and edit animated effects in your presentation.
SLIDE SHOW The functions you will use to deliver your final presentation.
REVIEW Options for reviewing and revising the content in your presentation.
VIEW Commands to modify how you view your presentation.
The Ribbon: The ribbon is where you will access a majority of the commands you will use to create and develop your presentation. The ribbon is a component of the PowerPoint 2013 user interface that contains task-specific command buttons and menus grouped together under a set of tabs. The ribbon was designed to provide you with a central location for accessing the various functions of PowerPoint without having to navigate the user interface extensively.

22
View and Navigate a Presentation in the Normal View1. If necessary, display the presentation in the Normal view by selecting VIEW→Presentation Views→Normal.2. Navigate the slides.
• Use the scroll bar to navigate the slides in the left pane, and then select the desired slide to view it in the side pane.• Use the scroll bar in the side pane to navigate the slides.• Right-click the scroll bar in the left pane or the slide pane, and then select the desired navigation action.• Press the Up Arrow key or the Down Arrow key to navigate the slides in either the left pane or the slide pane.
View and Navigate a Presentation in the Slide Sorter View1. Select VIEW→Presentation Views→Slide Sorter.2. Navigate the slides.
• Use the scroll bar to navigate the slides.• Right-click the scroll bar, and then select the desired navigation action.• Use the arrow keys to navigate the slides.
Viewing and Navigating a Presentation
Create a Blank Presentation1. Open PowerPoint 2013.2. From the Start screen, select Blank Presentation.Enter Text on a Slide1. Select the desired text placeholder.
• Type the desired text.2. Deselect the text placeholder.Add Slides1. If necessary, select the HOME tab.2. Select the New Slide button.Delete Slides1. In the left pane, select the desired slide.2. Press the Delete key.Save a New Presentation1. Select FILE.2. In the Backstage view, select either Save or Save As. 3. Name and save your presentation.
a. From the Save As screen, in the Places pane, select a general destination for your file, such as your computer or a SkyDrive account.b. From the right pane, select the desired directory, or select Browse.c. In the Save As dialog box, navigate to the desired folder.d. In the File name field, enter a name for the presentation.e. Select Save.
Save an Existing Presentation1. Select File.2. Select Save.
Save Your Presentation in an Alternate File Format 1. Launch the presentation.2. Select the FILE tab to access the Backstage View.3. Select the Export tab, and then select Change File Type.4. In the right pane, select the desired file type, or, in the Other File Types section, select Save as Another File Type.5. Select Save As.6. In the Save As dialog box, enter a name for the file in the File name field.7. If necessary, in the Save as type field, select the down arrow and then select the desired file type from the drop-down menu.8. Select Save to save the file.
Creating and Saving a Presentation
The Save As ScreenThe Save As screen provides you with access to the commands you will use to name and save your PowerPoint presentations. PowerPoint 2013 allows you to save you files both locally on your computer or a connected storage device, and online. The Save As screen is divided into two panes, which allow you to navigate to and save your presenta-tions in the desired location.
PowerPoint 2013 is Integrated with the Cloud
Presentation OptionsThere are three basic options for creating presentations in PowerPoint 2013:
• Blank Presentations: Contain a single slide with no design formatting.• Online Templates and Themes: Are created using one of the thousands of templates or themes available from Office.com.• Included Themes: Are created using one of the themes included with PowerPoint 2013.
Create a Blank Presentation1. Open PowerPoint 2013.2. From the Start screen, select Blank Presentation.Create a Presentation from an Included Theme1. From the Start screen, select the desired theme.2. In the theme’s window, select Create.Create a Presentation from an Office.com Template or Theme1. From the Start screen, search for an Office.com template or theme.
• In the Search online templates and themes field, enter a search query, and then select the Start searching button.• Or, select the Suggested searches link.
2. Select the desired template or theme.3. In the template or theme’s window, select Create.
Selecting Presentation Types

3
PowerPoint 2013 offers you several options for selecting the text you wish to edit. Selected text will display highlighted on the screen.Select a Specific Section of Text
• Click and drag the mouse pointer to select the desired text.• Or, place the insertion point next to the desired text. Press and hold down the Shift key, and then use the arrow keys to extend the highlighted portion of text in any direction.
Select a Single Word of Text• Double-click the desired text.
Select a Paragraph or Bullet List Item• Triple-click the desired text.
Select Noncontiguous Sections of Text• Use any of the text selection methods to select the first section of text. Then, press and hold the Ctrl key while selecting the next section of text.
Select All Text Within a Selected Text Placeholder• Press Ctrl+A.
Select a Single Object1. Select HOME→Editing→Select.2. From the drop-down menu, select Select Objects.3. Select the desired object.Select Multiple Objects1. Select the first object.2. Press and hold either the Ctrl or the Shift key.3. Select the remaining desired objects.Select Multiple Objects by Using the Selection Marquee1. Click and drag the mouse pointer to surround all desired objects with the blue selection marquee.2. Release the mouse button to select all objects within the selection marquee.
Text and Object Selection Methods
Text boxes can be added or removed, resized, moved around the slide, and formatted in various ways. Text placeholders can contain multiple lines of text. By default, typed text will wrap down to the next line when it reaches the text placeholder border.The Sizing HandlesYou can use the sizing handles to increase or decrease the size of on-slide objects, such as text boxes and images. By clicking and dragging the sizing handles, you will adjust the size of the object.The Rotation HandleYou can use the rotation handle to rotate on-slide objects. Text within text boxes and text placeholders will rotate with the object.
Text Boxes
Add a Text Box1. Navigate to the desired slide.2. Select INSERT→Text→Text Box.3. Place the mouse pointer on the slide at the desired location.4. Click and drag the mouse to create the text box.5. Release the mouse button to finish drawing the text box.6. Type the desired text in the text box.7. Click anywhere outside the text box to deselect it.Remove a Text Box1. Navigate to the desired slide.2. Select the border of the text box.3. Press the Delete key to delete the text box and all the text it contains.Move a Text Box1. Select the desired text box.2. Point the mouse pointer at the text box border until the mouse pointer displays as the Move icon.3. Drag the text box to the desired location.4. Release the mouse button to drop the text box in place.5. Click anywhere outside the text box to deselect it.
Working with Text Boxes
Edit Existing Text1. Select the desired text.2. Type the new text over the existing text.3. Deselect the text box.Delete Existing Text1. Select the desired text.2. Press the Delete key.Cut and Paste Text1. Select the desired text from your presentation, from another presentation, or from another document. 2. Copy the text to the clipboard by: Selecting HOME→Clipboard→Cut.
• Pressing Ctrl+X.• Right-clicking the text and selecting Cut.
3. Navigate to the desired slide.4. Place the mouse pointer at the desired location.5. Paste the text by:
• Selecting HOME→Clipboard→Paste.• Pressing Ctrl+V.• Right-clicking and selecting Paste.
Copy and Paste Text1. Select the desired text.2. Copy the text to the clipboard by:
• Selecting HOME→Clipboard→Copy.• Pressing Ctrl+C.• Right-clicking and selecting Copy.
3. Navigate to the desired location and paste the text.
Editing Text

4
Arrange Slides in the Normal View1. If necessary, select VIEW→Presentation Views→Normal.2. In the left pane, arrange the slides by dragging and dropping slides to the desired locations.Arrange Slides in the Normal View by Cutting/Copying and Pasting1. Select the slide you wish to copy or cut.2. Copy the slide to the clipboard by copying or cutting the slide.3. Select the slide after which you wish to paste the slide from the clipboard.4. Paste the slide. Arrange Slides in the Slide Sorter View1. Select VIEW→Presentation Views→Slide Sorter.2. Arrange the slides by dragging and dropping them, or cutting/ copying and pasting them to the desired locations.
Arranging Slides
Add a Slide of a Particular Layout1. Navigate to the slide after which you would like to add a slide.2. Access the HOME tab on the ribbon.3. Insert a new slide.
a. In the Slides group, select the New Slide down-arrow to display the gallery of slide layouts. b. Select the desired slide layout.
Change the Layout of a Slide1. Navigate to the desired slide.2. Select HOME→Slides→Layout.3. From the drop-down menu, select the desired slide layout.Duplicate Slides1. Select the desired slides.2. Select HOME→Clipboard→Copy down-arrow.3. From the drop-down menu, select Duplicate.Add Slides from an Existing Presentation1. Navigate to the slide after which you wish to add slides.2. Select HOME→Slides→New-Slide down-arrow.3. From the Reuse Slides pane, select Browse, and then select Browse File from the drop-down menu.4. In the Browse dialog box, navigate to the presentation from which you wish to reuse slides, and then select Open.5. Select the desired slides from the Reuse Slides pane, and then close the Reuse Slides pane. Delete Slides1. Select the desired slides.2. Press the Delete key. Modify the Size and Orientation of the Slides in a Presentation1. Launch the desired presentation.2. Switch from the landscape orientation to the portrait orientation.
• Select Design→Customize→Slide Size.• From the drop-down menu, select Customize Slide Size.• In the Slide Size dialog box, in the Orientation pane, in the Slides section, select the Portrait radio button.• Select OK.• In the Microsoft PowerPoint dialog box, select the desired option.
3. Modify the slide size.• Select Design→Customize→Slide Size, and then select Custom Slide Size.• In the Slides sized for field, select the down-arrow, and then select the desired option.• Or, use the Width and Height spin boxes to set a custom size for the slides.
Adding, Deleting, and Modifying Slides
Themes are combinations of colors, fonts, and effects that give your presentation a consistent look and feel throughout. Themes help to define the background color of slides and the color and style of objects such as charts and tables. You can apply themes to individual slides, groups of slides, or your entire presentation.Theme VariantsTheme variants are collections of closely related themes that share many of the same layout and design elements, but with some changes.
Themes
Arrange Slides in the Normal View1. Access the DESIGN tab.2. In the Themes group, select the More button to expand the Themes gallery.3. Preview the available themes by pointing the mouse pointer at the various theme thumbnails.4. Select the desired theme.Select a theme Variant1. Apply the desired theme to the presentation.2. If necessary, access the DESIGN tab, and then select the More button on the gallery in the Variants group.3. Point the mouse pointer at the various theme variants in the gallery to preview the theme variants.4. Select the desired theme variant.Modify an Existing Theme1. Select VIEW→Master Views→Slide Master.2. In the Background group, change the attributes of the currently applied theme by:
• Selecting Colors, and then selecting a color theme from the gallery.• Selecting Fonts, and then selecting a font theme from the gallery.• Selecting Effects, and then selecting an effect from the gallery.
Create a Custom Color Theme1. Select VIEW→Master Views→Slide Master.2. In the Background group, select Colors, and then select Customize Colors.3. In the Theme colors section of the Create New Theme Colors dialog box, select four background/text colors, six accent colors, a hyperlink color, and a followed hyperlink color.4. Preview the new theme colors in the Sample section of the Create New Theme Colors dialog box.5. Enter a name for your new color theme in the Name field.6. Select Save.7. In the Close group, select Close Master View.
Working with Themes

5
Apply Character Formatting1. Select the desired text.2. Apply the desired character formatting by accessing the HOME tab, and then:
• Select the desired formatting options from the Font group.• Or, select the dialog box launcher in the Font group, select the desired formatting options from the Font dialog box, and then select OK.
Apply WordArt Styles1. Select the desired text.2. Apply the desired WordArt style.
a. Access the DRAWING TOOLS contextual tab.b. In the WordArt Styles group, select the More button to display the WordArt Styles gallery.c. Select the desired WordArt style.
1. If necessary, change the WordArt style.a. Select the desired text.b. Select the new WordArt style from the WordArt Styles gallery.
Replace One Font with Another1. Select HOME→Editing→Replace down-arrow, and then select Replace Fonts.2. In the Replace Font dialog box, select the font type you would like to replace from the Replace drop-down menu.3. Select the desired new font type from the Width drop- down menu.4. Select Replace. Use the Format Painter1. Select the text from which you wish to copy the format.2. Select HOME→Clipboard→Format Painter.3. Click and drag the mouse pointer to highlight the text to which you wish to apply the formatting, and then release the mouse button.
Formatting Characters
WordArt styles are predetermined formatting configurations that can be applied to text on a slide. These formatting configurations can be applied to selected text or to all text within a text placeholder.
WordArt Styles
Create a Bulleted or Numbered List1. Place the insert point where you would like to begin your list.2. On the HOME tab, from the Paragraph group, select either the Bullets or the Numbering button.3. Begin typing the list.4. Enter a line break by pressing the Enter or Return key to generate each bulleted or numbered item.Turn Existing Text into a Bulleted or Numbered List1. Highlight the text you wish to convert to a list.2. Select either the Bullets or the Numbering button.Format Bullets or Numbered Lists1. Select the desired bulleted list or numbered list text.2. Select the down-arrow from either the Bullets or the Numbering button, and then select Bullets and Numbering to launch the Bullets and Numbering dialog box.3. Select a style for the bullets, the numbers, or the letters.4. Select the desired options for Size, Color, Picture, Customize, or Start at.5. Select OK.Increase of Decrease the Margin Indent of Bulleted or Numbered Items1. Select an individual bullet or numbered item, or select a group of bullet points or numbered items.2. Select either the Decrease List Level button or the Increase List Level button.
Working with Bulleted and Numbered Lists
Modify Text Alignment1. Select the desired text.2. Align the text horizontally.
a. If necessary, access the HOME tab.b. In the Paragraph group, select the desired text alignment button.
3. Align the text vertically.a. In the Paragraph group, select Align Text.b. From the drop-down menu, select the desired option.
Use the AutoFit Feature1. Select the desired text.2. Access the TEXT BOX tab on the Format Shape pane.
a. Select Home→Paragraph→Align Text.b. From the drop-down menu, select More Options.c. Verify the Textbox tab is selected in the Format shape pane.
3. Use the radio buttons to select the desired AutoFit option.
Formatting Paragraphs

6
Shapes are common geometric objects that you can add to your PowerPoint presentations. PowerPoint 2013 contains a variety of pre-existing shapes that you can use to build complex figures or illustrations. You can also use shapes as text boxes, giving you further options for displaying text in your presentations.
Shapes
Insert a Picture1. Select the desired slide.2. Select INSERT→Images→Pictures.3. In the Insert Picture dialog box, navigate to the desired picture.4. Select the desired picture, and then select Insert.Insert Clip Art1. Select the desired slide.2. Select INSERT→Images→Online Pictures.3. Search for Clip Art.
a. In the Insert Pictures window, in the Office.com Clip Art section, enter a search query in the Search Office.com field.b. Select the Search button.c. From the search results, select the desired image, and then select Insert.
Insert a Screenshot1. Select the desired slide.2. Select INSERT→Images→Screenshot.3. Insert the screenshot by:
• Selecting the desired window in the Available Windows pane.• Or, selecting Screen Clipping, clicking and dragging the mouse pointer to select the desired area of the screen, and then releasing the mouse button.
Inserting Clip Art and Images
Select Text Box Formatting from the Shape Styles Gallery1. Select the desired text box.2. Access the DRAWING TOOLS contextual tab.3. In the Shape Styles group, select the More button to display the Shape Styles gallery.4. Select an option from the gallery.Add a Picture Fill to a Text Box1. Select the desired text box.2. Select HOME→Drawing→Shape Fill.3. Select Picture.4. From the Insert Pictures window, perform one of the following procedures:
• Select From a file. Then, in the Insert Picture dialog box, navigate to the desired image, and then select Insert.• Or, select one of the other options, navigate to or search for the desired image, and then select Insert.
Add a Textured Fill to a Text Box1. Select the desired text box.2. Select HOME→Drawing→Shape Fill.3. From the drop-down menu, select Texture.Format the Outline of a Text Box1. Select the desired text box.2. Select HOME→Drawing→Shape Outline.3. From the drop-down menu, select the desired outline color.4. Open the Shape Outline drop-down menu.5. Select Weight, and then select a line weight to set the line width for the outline.6. Open the Shape Outline drop-down menu.7. Select Dashes, and then select a dashed line style for the outline.Apply an Effect to a Text Box1. Select the desired text box.2. Select HOME→Drawing→Shape Effects.3. Select an effect to display its gallery.4. Select the desired effect.
Set Text Box Formatting as the Default Text Box Formatting1. Select the text box with the desired formatting.2. Right-click the text box.3. Select Set as Default Text Box from the pop-up menu.
Formatting Text boxes

7
Add a Shape to a Slide1. Navigate to the desired slide.2. Select INSERT→Illustrations→Shapes to display the shapes gallery.3. Select the desired shape from the gallery.4. Draw the shape on the slide by clicking and dragging the mouse pointer in the desired location on the slide.Add Text to a Shape1. Select the desired shape.2. Type the desired text.Wrap Text to Fit a Shape1. Select the desired shape.2. Access the DRAWING TOOLS contextual tab.3. From the Shape Styles group, click the dialog box launcher to display the Format Shape pane.4. If necessary, select TEXT OPTIONS, and then select the Textbox tab.5. If necessary, expand the TEXT BOX section.6. If necessary, check the Wrap text in shape check box.Format a Shape1. Select the desired shape.2. Access the DRAWING TOOLS contextual tab.3. Apply a quick style by selecting the desired option from the Shape Styles gallery in the Shape Styles group.4. Apply custom formatting.
• In the Shape Styles group, select the dialog box launcher to display the Format Shapes pane.• If necessary, select SHAPE OPTIONS.• Select and configure the desired options, and then close the Format Shapes pane.
Set Shape Formatting as the Default Shape Formatting1. Select the shape with the desired formatting.2. Right-click the shape, and then select Set as Default Shape from the pop-up menu.
Inserting Shapes
Create a Custom Shape by Combining Shapes1. On the desired slide, arrange the desired shapes as needed.2. Select the desired shapes.3. On the DRAWING TOOLS contextual tab, in the Insert Shapes group, select Merge Shapes.4. From the Merge Shapes drop-down menu, select the desired option.Create a Custom Shape Using Edit Points1. Select the desired shape.2. On the DRAWING TOOLS contextual tab, in the Insert Shapes group, select Edit Shape.3. From the Edit Shape drop-down menu, select Edit Points.4. Edit the shape of the selected shape.
• Drag the black edit points to modify the outline of the shape.• With a black edit point selected, drag a white edit point to change the curve of the line between the two adjacent black edit points.
Creating Custom Shapes
Replace One Image with Another1. Select the desired image.2. Select PICTURE TOOLS→Adjust→Change Picture.3. In the Insert Pictures window, select the desired image by:
• Selecting From a file, and then, in the Insert Picture dialog box, navigating to the desired image and selecting Open.• Entering a search query in either the Search Office.com field or the Search Bing field, selecting the Search button, select ing the desired image from the search results, and then selecting Insert.• Or, selecting your SkyDrive account, navigating to the desired image, and then selecting Insert.
Crop an Image1. Select the desired image.2. Select PICTURE TOOLS→Size→Crop.3. Drag the cropping handles to frame the portion of the image that you would like to keep.4. If necessary, point the mouse pointer at the image away from the cropping handles until the mouse pointer displays as the Move icon. Then, drag the image to fine tune the framing,5. In the Size group, select Crop.Apply Image Effects1. Select the desired image.2. Access the PICTURE TOOLS contextual tab.3. Apply image corrections.
• In the Adjust group, select Corrections.• From the gallery, select the desired option.
4. Change the color of the image.• In the Adjust group, select Artistic Effects.• From the gallery, select the desired option.
5. Apply an artistic effect.• In the Adjust group, select Artistic Effects.• From the gallery, select the desired option.
6. If necessary, access the Format Picture pane, adjust the desired options for any of the above effects, and then select Close. Format a Picture1. Select the picture you wish to format.2. Access the PICTURE TOOLS contextual tab.3. Format the picture border.
• From the Picture Styles group, select Picture Border.• Select the desired options (i.e., border style, color).
4. Apply a picture effect from the Picture Styles group by selecting the Picture Effects drop-down menu.
• From the drop-down menu, select an effect category.• Select an effect from the gallery.
Editing Objects
PowerPoint 2013 allows you to combine multiple shapes to create new, custom shapes. Once merged, the new shape typically displays as a single object, and all edits to the object will affect the entire shape.
Custom Shapes

8
Copyright © 2013 Logical Operations, Inc. All rights reserved. Reproduction in whole or in part in any form or medium without the express written permission of Logical Operations is prohibited. Logical Operations is an independent provider of integrated training solutions for individuals, businesses, educational institutions and government agencies. No use of another parties’ name, product name or screen shots should be construed to imply sponsorship or endorsement of our products or services by, nor any affiliation of such entity with, Logical Operations. Logical Operations and the Logical Operations logo are trademarks of Logical Operations, Inc. All other product and service names used may be common law or registered trademarks of their respective holders.
091033LG rev 1.0
www.logicaloperations.com • 1-800-456-4677
Add a Transition1. Select the desired slide.2. Access the TRANSITIONS tab.
• Select a transition.• In the Transition to this Slide group, select the More button.• Select the desired transition effect.
Modify a Transition1. Navigate to the desired slide, and select the TRANSITIONS tab.2. Change from one transition effect to another.
• Select the More button to expand the Transition on this Slide gallery.• Select the new transition.
3. Change the effect options for the transition.• Select Effect Options to display the drop-down menu.• Select the desired effect option.
4. Modify the duration of the transition by using the spin buttons on the Duration field in the Timing group.5. Add a sound to the transition.
• In the Timing group, on the Sound field, select the down-arrow.• Select the desired sound effect.
Add an Audio File to a Presentation1. Select the desired slide.2. Select INSERT→Media→Audio.3. Insert the audio file.
• Select Online Audio, enter a search term and select Search, select the desired audio clip, and then select Insert.• Or, select Audio on My PC, navigate to the desired audio file, and then select Insert.
Add a Video from a File1. Navigate to the desired slide.2. Select INSERT→Media→Video, and then select Video on My PC.3. In the Insert Video dialog box, navigate to the desired video file, and then select Insert.Add an Online Video1. Navigate to the desired slide.2. Select INSERT→Media→Video, and then select Online Video.3. Insert the video.
• In the Insert Video window, in the Bing Video Search field, enter a search term, and then select Search.• From the search results, select the desired video clip, and then select Insert.
4. Preview the video.• On the VIDEO TOOLS contextual tab, select PLAYBACK→Preview→Play.• Preview the video using the navigation controls embedded in the video.
Record Audio to a PresentationTo record audio to a presentation:1. Select the desired slide.2. Select INSERT→Media→Audio, and then select Record Audio.3. In the Record Sound dialog box, select the Record button. 4. Speak into the microphone or play the desired sound.5. Select Stop. 6. If desired, select Play to preview the recording.7. In the Name field, enter a name for the file, and then select OK.
Adding Media and Transitions
Create a Table Using the Insert Table Drop-Down Menu1. Navigate to the desired slide and access the INSERT tab.2. In the Tables group, select the Table button to display the Insert Table drop-down menu.3. Drag the mouse pointer to select the desired number of columns and rows, and then select the appropriate cell to create the table.Create a Table Using the Insert Table Dialog Box1. Access the INSERT tab.2. In the Tables group, select the Table button to display the Insert Tables drop-down menu.3. Select Insert Table to display the Insert Table dialog box.4. Use the spin boxes to select the desired number of columns and rows and select OK to create the table.Create a Chart1. Navigate to the desired slide.2. Access the INSERT tab and, from the Illustrations group, select Chart.3. In the Insert Chart dialog box, select the desired chart type from the tabs in the left pane.4. Select the desired chart subtype and select OK.5. Enter the appropriate data in the data worksheet, and then close the data worksheet.Edit Chart Data1. Select the chart for which you would like to edit the data.2. Access the DESIGN tab in the CHART TOOLS contextual tab.3. In the Data group, select Edit Data to open the data worksheet for the chart.4. Make the desired changes in the Excel worksheet, and then close the worksheet.5. Verify that the chart reflects the data changes in the presentation.
Adding Tables and Charts
Present a Slide Show1. Open the desired presentation.2. Access the SLIDE SHOW tab, and, in the Start Slide Show group, select From Beginning or From Current Slide.3. Press the Enter key or the Spacebar, or click the mouse button to advance through the slides.4. Press the Back Arrow key to go back to the previous slide.5. Press the Esc key to exit the slide show.Time Your Slides to Automatically Advance1. Launch the desired presentation and navigate to the first slide.2. Access the TRANSITIONS tab on the ribbon.3. In the Timing group, in the Advance Slide section, check the After check box. Use the spin buttons to set the desired slide duration in the After field.4. If desired, uncheck the On Mouse Click check box to disable mouse-click and keystroke slide advancing.5. Set the timing for the remaining slides.
• In the Timing group, select Apply To All to use the same timing for all slide advancement.• Or, navigate to each slide to set the timing options separately.
6. Start the slide show.• Access the SLIDE SHOW tab, and select From Beginning or From Current Slide.
7. Press the Esc key to exit the slide show.
Presenting a Slide Show