microsoft powerpoint of contents chapter 1 -about microsoft powerpoint 1 1.1 the powerpoint 2007...
TRANSCRIPT

Mobile MOUSePowerPoint 2010Version # 1.0
Microsoft PowerPoint2007 / 2010 / 2013 Essentials
Version Number: PP29092012Last Revision: Friday, 4 January 2013
Author: Manual Masters and Mobile MOUSe
SAMPLE

About this Course…
Microsoft PowerPoint is the presentation application included with Microsoft Office. In this course you will learn about customizing Microsoft PowerPoint as well as critical aspects (theory and practical) regarding designing successful and efficient presentations in Microsoft PowerPoint. In this course you will learn how to master and come to grips with the essential features of this defacto presentation application, increasing your productivity, efficiency and overall presentation skills. This course is divided up into various logically progressing sessions that will also focus on the core skills to help you pass the MOS certification.
Chapters in the Workbook…
Chapter 1 – About Microsoft PowerPoint
Chapter 2 – Presentation Basics
Chapter 3 – Working with Graphic Elements
Chapter 4 – Themes, Slide Masters and Templates
Chapter 5 – Finalizing the Presentation
What you Will Need…
In order to complete the exercises in this workbook, the following is required…
A desktop computer (or laptop) running Microsoft Windows 2000, XP, Vista or Windows 7 (or later).
Microsoft Office PowerPoint 2007 or PowerPoint 2010 / 2013.
A set of PowerPoint Essentials Practice Files.
SAMPLE
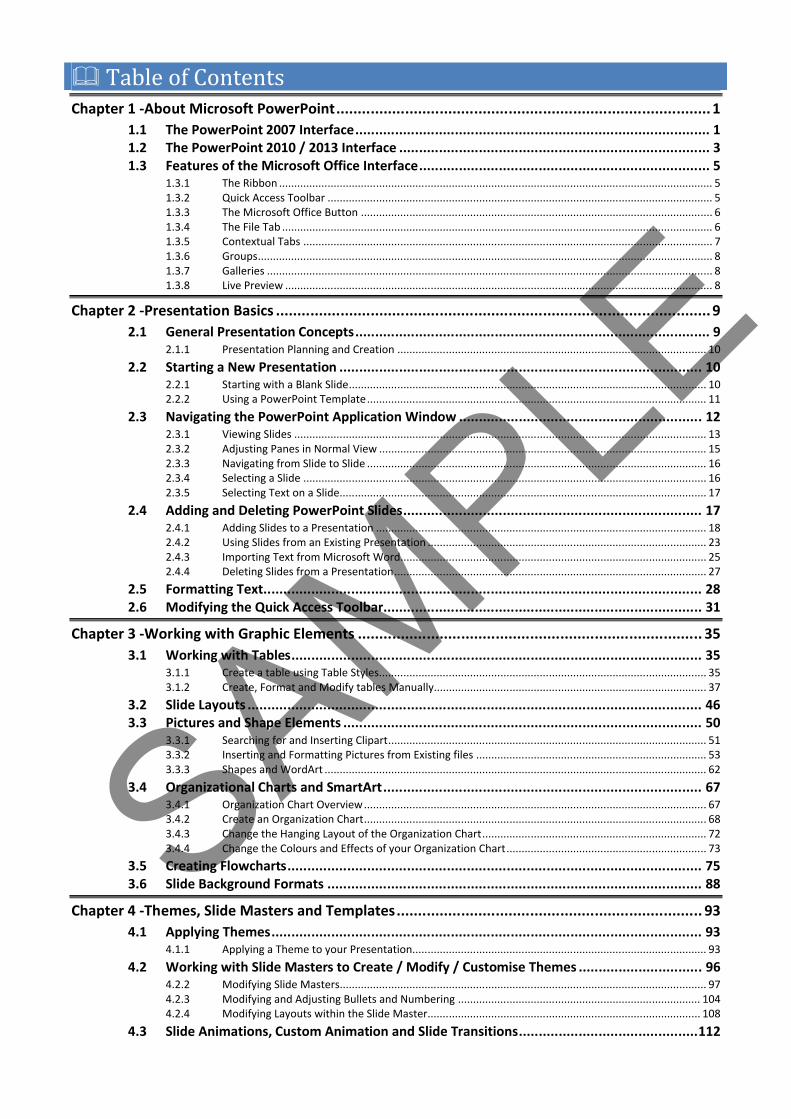
Table of ContentsChapter 1 -About Microsoft PowerPoint....................................................................................... 1
1.1 The PowerPoint 2007 Interface......................................................................................... 11.2 The PowerPoint 2010 / 2013 Interface .............................................................................. 31.3 Features of the Microsoft Office Interface......................................................................... 5
1.3.1 The Ribbon ............................................................................................................................................... 51.3.2 Quick Access Toolbar ............................................................................................................................... 51.3.3 The Microsoft Office Button .................................................................................................................... 61.3.4 The File Tab .............................................................................................................................................. 61.3.5 Contextual Tabs ....................................................................................................................................... 71.3.6 Groups...................................................................................................................................................... 81.3.7 Galleries ................................................................................................................................................... 81.3.8 Live Preview ............................................................................................................................................. 8
Chapter 2 -Presentation Basics ..................................................................................................... 92.1 General Presentation Concepts......................................................................................... 9
2.1.1 Presentation Planning and Creation ...................................................................................................... 10
2.2 Starting a New Presentation ........................................................................................... 102.2.1 Starting with a Blank Slide...................................................................................................................... 102.2.2 Using a PowerPoint Template................................................................................................................ 11
2.3 Navigating the PowerPoint Application Window ............................................................. 122.3.1 Viewing Slides ........................................................................................................................................ 132.3.2 Adjusting Panes in Normal View ............................................................................................................ 152.3.3 Navigating from Slide to Slide ................................................................................................................ 162.3.4 Selecting a Slide ..................................................................................................................................... 162.3.5 Selecting Text on a Slide......................................................................................................................... 17
2.4 Adding and Deleting PowerPoint Slides........................................................................... 172.4.1 Adding Slides to a Presentation ............................................................................................................. 182.4.2 Using Slides from an Existing Presentation ............................................................................................ 232.4.3 Importing Text from Microsoft Word..................................................................................................... 252.4.4 Deleting Slides from a Presentation....................................................................................................... 27
2.5 Formatting Text.............................................................................................................. 282.6 Modifying the Quick Access Toolbar................................................................................ 31
Chapter 3 -Working with Graphic Elements ................................................................................ 353.1 Working with Tables....................................................................................................... 35
3.1.1 Create a table using Table Styles............................................................................................................ 353.1.2 Create, Format and Modify tables Manually.......................................................................................... 37
3.2 Slide Layouts .................................................................................................................. 463.3 Pictures and Shape Elements .......................................................................................... 50
3.3.1 Searching for and Inserting Clipart......................................................................................................... 513.3.2 Inserting and Formatting Pictures from Existing files ............................................................................ 533.3.3 Shapes and WordArt .............................................................................................................................. 62
3.4 Organizational Charts and SmartArt................................................................................ 673.4.1 Organization Chart Overview................................................................................................................. 673.4.2 Create an Organization Chart................................................................................................................. 683.4.3 Change the Hanging Layout of the Organization Chart.......................................................................... 723.4.4 Change the Colours and Effects of your Organization Chart.................................................................. 73
3.5 Creating Flowcharts........................................................................................................ 753.6 Slide Background Formats .............................................................................................. 88
Chapter 4 -Themes, Slide Masters and Templates....................................................................... 934.1 Applying Themes............................................................................................................ 93
4.1.1 Applying a Theme to your Presentation................................................................................................. 93
4.2 Working with Slide Masters to Create / Modify / Customise Themes ............................... 964.2.2 Modifying Slide Masters......................................................................................................................... 974.2.3 Modifying and Adjusting Bullets and Numbering ................................................................................ 1044.2.4 Modifying Layouts within the Slide Master.......................................................................................... 108
4.3 Slide Animations, Custom Animation and Slide Transitions.............................................112
SAMPLE

Table of Contents4.3.1 Slide Animation PowerPoint 2007 (including Custom Animation) ....................................................... 1134.3.2 Slide Transitions (PowerPoint 2007) .................................................................................................... 1194.3.3 Slide Animation PowerPoint 2010 / 2013 (including Custom Animation)............................................ 1224.3.4 Slide Transitions (PowerPoint 2010 / 2013)......................................................................................... 1284.3.5 Custom Animation and Motion Paths .................................................................................................. 1304.3.6 Inserting Headers and Footers to Slides............................................................................................... 133
4.4 Templates and Themes..................................................................................................1354.4.1 The Difference between Themes and Templates ................................................................................ 1354.4.2 Creating or Modifying a Template ....................................................................................................... 1354.4.3 Generating a Presentation from a Template........................................................................................ 1384.4.4 Creating or Modifying a Theme............................................................................................................ 139
Chapter 5 -Finalizing the Presentation ...................................................................................... 1435.1 Working with Data from Other Sources..........................................................................143
5.1.1 Importing Data from Microsoft Excel................................................................................................... 1435.1.2 Inserting Movies and Sounds ............................................................................................................... 148
5.2 Setting Up the Slide Show..............................................................................................1535.3 Working with Notes Pages and Handouts.......................................................................156
5.3.1 Preparing Handouts and Notes ............................................................................................................ 1565.3.2 The Handout Master ............................................................................................................................ 1565.3.3 Notes Master ....................................................................................................................................... 1585.3.4 Adding Notes to a Presentation ........................................................................................................... 160
5.4 Printing Presentations ...................................................................................................1615.4.1 Using Print Preview (PowerPoint 2007) ............................................................................................... 1625.4.2 Printing Outlines, Handouts, Speaker Notes and Slides (PowerPoint 2007) ........................................ 1645.4.3 Using Print Preview (PowerPoint 2010 / 2013).................................................................................... 1675.4.4 Printing Outlines, Handouts, Speaker Notes and Slides (PowerPoint 2010 / 2013)............................. 1685.4.5 Exporting a Presentation as Handouts in Microsoft Word................................................................... 170
5.5 Delivering a Slide Presentation ......................................................................................1725.5.2 Package for CD ..................................................................................................................................... 175
5.6 Photo Albums................................................................................................................1775.6.1 Creating a Photo Album ....................................................................................................................... 1785.6.1 Captions ............................................................................................................................................... 1795.6.2 Changing Album Image Appearance .................................................................................................... 180
Chapter 6 -Additional Certification Exercises ............................................................................ 1836.1 Adding Hyperlinks to Slides............................................................................................1836.2 Saving Presentations .....................................................................................................1876.3 Collaboration ................................................................................................................190
6.3.1 Spell Checker........................................................................................................................................ 1916.3.2 Comments............................................................................................................................................ 192
6.4 Protecting a PowerPoint Presentation............................................................................1936.5 Creating Charts (Graphs) with Microsoft Chart ...............................................................1956.6 Line and Paragraph Spacing ...........................................................................................1986.7 Timings through Rehearsal ............................................................................................200
6.7.2 Editing Slide Timings ............................................................................................................................ 202
6.8 Recording a Presentation...............................................................................................2036.9 Optimising the Presentation for Compatibility and Portability ........................................206
6.9.1 Embedding Fonts ................................................................................................................................. 2066.9.2 Replacing Fonts .................................................................................................................................... 207
6.10 More on Themes ...........................................................................................................2086.10.1 Modifying / Creating Theme Colours (within the Slide Master)........................................................... 2086.10.2 Modifying / Creating Theme Fonts (within the Slide Master) .............................................................. 209
SAMPLE

How to Interpret this Manual
WHEN YOU SEE THIS… IT MEANS…
You MUST read this, because it could have an effect on the final outcome of an action you perform.
This is optional to read, but these tips often point out quicker ways of doing things, or alternative methods.
You are about to start an exercise in the workbook.
Bold Text Objects that you click on, like buttons, tabs or menus are often listed in Bold. Locations and folders are also listed in Bold.
Where is Waldo? Type the text that is formatted this way...
F+G+LKeyboard shortcuts are displayed like this. In this example you would press and hold CTRL, hold SHIFT and then press ESC once (while still holding CTRL and SHIFT).
This is an example of a more detailed explanation for your actions.
Paragraphs that are formatted like this usually contain explanations and reasoning behind the actions you are being instructed to perform.
Home > Copy Click the tab, click the button
“This is a paragraph...” This is existing typed text in a document you are currently working on.
SAMPLE

Exercise Files
DOWNLOADING THE EXERCISE FILES
In addition to the exercises you will complete in class, there are also exercises in this workbook. These workbook exercises can only be completed in conjunction with your practice files. In order to locate your exercise files visit: www.mobilemouse.com.au/downloads.php
To install the practice files perform the following steps...
1. Start Internet Explorer (or whichever web browser you use), click in the Address Bar and type the following address: http://www.mobilemouse.com.au/downloads.phpand then press ENTER
2. Scroll down the page and click the link: Microsoft PowerPoint Practice Files
3. At the screen that appears, click the Save button
Figure A : File Download Security
4. At the Save As dialog box, click the Desktop link on the left hand side of the screen, click Save
Figure B : Saving The File To Be Downloaded
SAMPLE

Exercise Files5. Depending on your internet connection, the time it takes to download the practice files may vary.
Once the download completes, close any open programs.
6. On your Windows Desktop you should see Mobile MOUSe - PowerPoint Practice Files.exe (or Mobile MOUSe - Word Practice Files). Double click this file to start the installation process; you may be presented with the following screen...
Figure C : Security Warning
7. If presented with the above image, click the Run button, which will present the following screen…
Figure D : Starting The Installation
8. Click Next
9. Click Next, which takes you to the following screen...
SAMPLE
Exercise Files
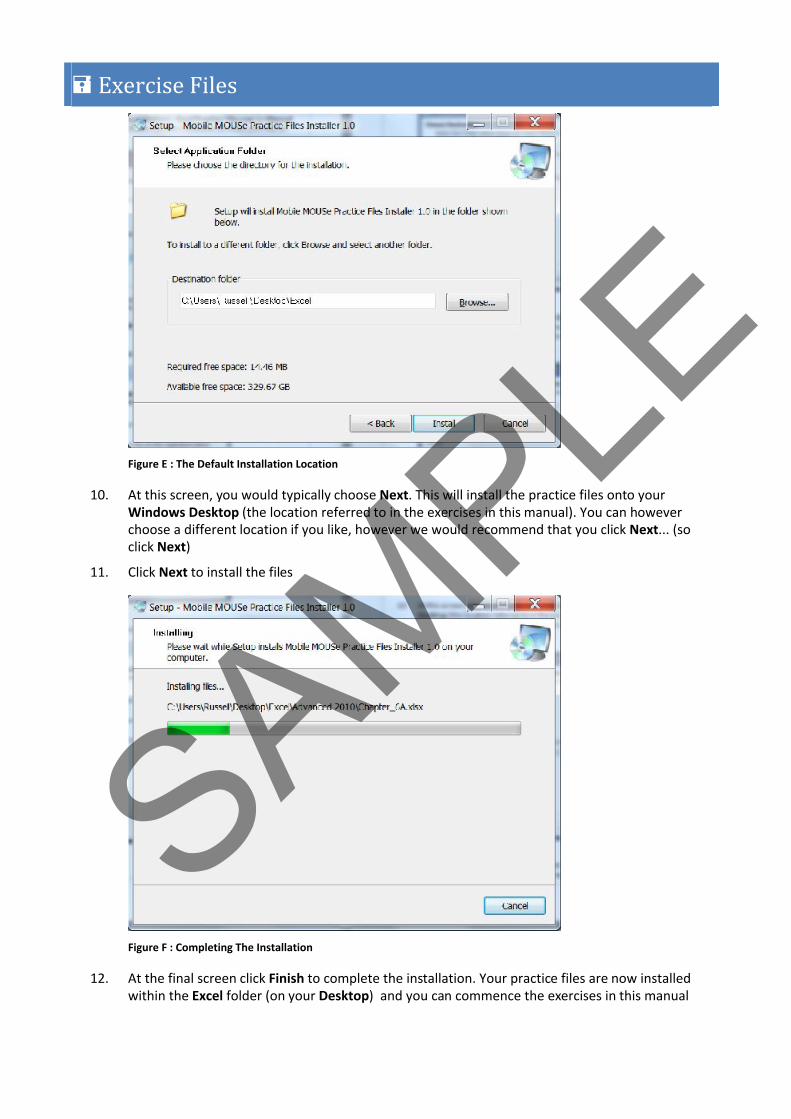
Figure E : The Default Installation Location
10. At this screen, you would typically choose Next. This will install the practice files onto your Windows Desktop (the location referred to in the exercises in this manual). You can however choose a different location if you like, however we would recommend that you click Next... (so click Next)
11. Click Next to install the files
Figure F : Completing The Installation
12. At the final screen click Finish to complete the installation. Your practice files are now installedwithin the Excel folder (on your Desktop) and you can commence the exercises in this manual
SAMPLE
About Microsoft PowerPoint PowerPoint 2007 / 2010 / 2013 Essentials : PG 1
Copyright 2010 – Mobile MOUSe & MANUAL Masters.No part of this manual may be reproduced without permission from Page 1Mobile MOUSe and MANUAL Masters.
Chapter 1 - About Microsoft PowerPointThis chapter covers the following concepts…
The PowerPoint 2007 / 2010 / 2013 Interface An Overall Review of the Microsoft Office Interface
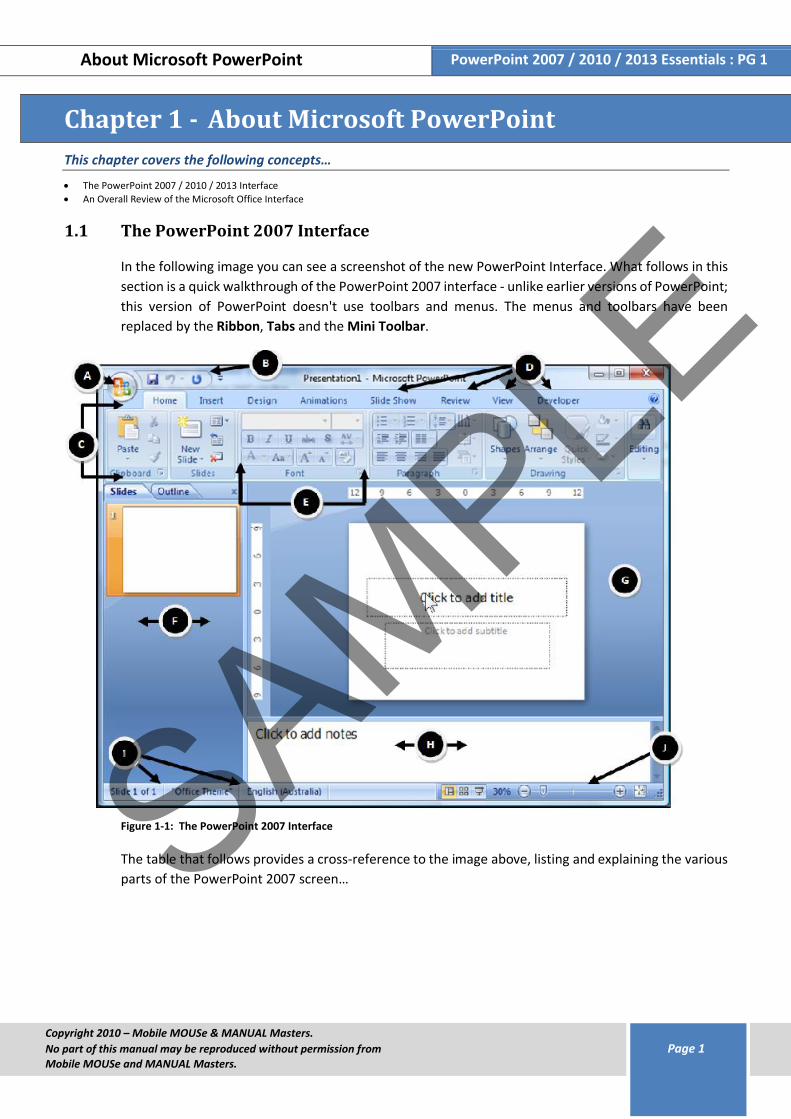
1.1 The PowerPoint 2007 Interface
In the following image you can see a screenshot of the new PowerPoint Interface. What follows in this section is a quick walkthrough of the PowerPoint 2007 interface - unlike earlier versions of PowerPoint; this version of PowerPoint doesn't use toolbars and menus. The menus and toolbars have been replaced by the Ribbon, Tabs and the Mini Toolbar.
Figure 1-1: The PowerPoint 2007 Interface
The table that follows provides a cross-reference to the image above, listing and explaining the various parts of the PowerPoint 2007 screen…SAM
PLE

About Microsoft PowerPoint PowerPoint 2007 / 2010 / 2013 Essentials : PG 2
Copyright 2010 – Mobile MOUSe & MANUAL Masters.No part of this manual may be reproduced without permission from Page 2Mobile MOUSe and MANUAL Masters.
Table 1-1: PowerPoint 2007 Screen Elements
Option… Is the…A Office Button. This is a replacement for the File Menu (in older versions of PowerPoint). Here are
the options to create New presentations, Save and Open presentations, Print and more.B Quick Access Toolbar. A small toolbar next to the Office Button, which you can customize and add
more icons to launch options you would use most frequently. C Ribbon. This has almost all of the commands that PowerPoint users need. The commands are
organized as buttons within groups on the various Tabs of the Ribbon.D Tabs. The Ribbon is comprised of tabs. Each tab presents different icons within groups.E Group. A Group is a set of icons.F Outline Pane. Contains two tabs - the Slides tab and the Outline tab. The Slides tab shows
thumbnails of the slides in the presentation. The Outline tab shows the slides in Outline view.G Slide Pane. Displays the slide and its content.H Notes Pane. This is used for speaker notes or audience participant notes for the current slide.I Status Bar. Provides info about the presentation like slide numbers, theme name etc…J Zoom Slider. Used to quickly zoom in and out of the presentation.
QUICK NOTES..................................................................................................................................................................................................................................................
..................................................................................................................................................................................................................................................
..................................................................................................................................................................................................................................................
..................................................................................................................................................................................................................................................
..................................................................................................................................................................................................................................................
..................................................................................................................................................................................................................................................
..................................................................................................................................................................................................................................................
..................................................................................................................................................................................................................................................
..................................................................................................................................................................................................................................................
..................................................................................................................................................................................................................................................
..................................................................................................................................................................................................................................................
..................................................................................................................................................................................................................................................
..................................................................................................................................................................................................................................................
..................................................................................................................................................................................................................................................
..................................................................................................................................................................................................................................................
..................................................................................................................................................................................................................................................
..................................................................................................................................................................................................................................................
..................................................................................................................................................................................................................................................
..................................................................................................................................................................................................................................................
..................................................................................................................................................................................................................................................
SAMPLE

About Microsoft PowerPoint PowerPoint 2007 / 2010 / 2013 Essentials : PG 3
Copyright 2010 – Mobile MOUSe & MANUAL Masters.No part of this manual may be reproduced without permission from Page 3Mobile MOUSe and MANUAL Masters.
1.2 The PowerPoint 2010 / 2013 Interface
In the following image you can see a screenshot of the new PowerPoint Interface. What follows in this section is a quick walkthrough of the PowerPoint 2010 / 2013 interface - unlike earlier versions of PowerPoint; this version of PowerPoint doesn't use toolbars and menus. The menus and toolbars have been replaced by the Ribbon, Tabs and the Mini Toolbar.
Figure 1-2 : The PowerPoint Window
The table that follows provides a cross-reference to the image above, listing and explaining the various parts of the PowerPoint 2010 / 2013 screen…SAM
PLE

About Microsoft PowerPoint PowerPoint 2007 / 2010 / 2013 Essentials : PG 4
Copyright 2010 – Mobile MOUSe & MANUAL Masters.No part of this manual may be reproduced without permission from Page 4Mobile MOUSe and MANUAL Masters.
Table 1-2 : The Various elements of the PowerPoint 2010 / 2013 Interface
Option… Is the…A File Tab. This is a replacement for the File Menu (in older versions of PowerPoint, this is
PowerPoint 2007’s equivalent of the Office Button). Here are the options to create New presentations, Save and Open presentations, Print and more.
B Quick Access Toolbar. A small toolbar next to the Office Button, which you can customize and add more icons to launch options you would use most frequently.
C Ribbon. This has almost all of the commands that PowerPoint users need. The commands are organized as buttons within groups on the various Tabs of the Ribbon.
D Tabs. The Ribbon is comprised of tabs. Each tab presents different icons within groups.E Group. A Group is a set of icons.F Outline Pane. Contains two tabs - the Slides tab and the Outline tab. The Slides tab shows
thumbnails of the slides in the presentation. The Outline tab shows the slides in Outline view.G Slide Pane. Displays the slide and its content.H Notes Pane. This is used for speaker notes or audience participant notes for the current slide.I Status Bar. Provides info about the presentation like slide numbers, theme name etc…J Zoom Slider. Used to quickly zoom in and out of the presentation.
QUICK NOTES..................................................................................................................................................................................................................................................
..................................................................................................................................................................................................................................................
..................................................................................................................................................................................................................................................
..................................................................................................................................................................................................................................................
..................................................................................................................................................................................................................................................
..................................................................................................................................................................................................................................................
..................................................................................................................................................................................................................................................
..................................................................................................................................................................................................................................................
..................................................................................................................................................................................................................................................
..................................................................................................................................................................................................................................................
..................................................................................................................................................................................................................................................
..................................................................................................................................................................................................................................................
..................................................................................................................................................................................................................................................
..................................................................................................................................................................................................................................................
..................................................................................................................................................................................................................................................
..................................................................................................................................................................................................................................................
..................................................................................................................................................................................................................................................
..................................................................................................................................................................................................................................................
..................................................................................................................................................................................................................................................
SAMPLE

About Microsoft PowerPoint PowerPoint 2007 / 2010 / 2013 Essentials : PG 5
Copyright 2010 – Mobile MOUSe & MANUAL Masters.No part of this manual may be reproduced without permission from Page 5Mobile MOUSe and MANUAL Masters.
1.3 Features of the Microsoft Office Interface
While the overall look and feel of the new version of Microsoft Office is new, most people quickly become accustomed to the way the new way the various programs work.
1.3.1 The Ribbon
The traditional menus and toolbars have been replaced by the Ribbon. The tabs on the Ribbon display the commands that are most relevant for each of the tasks in the programs. For example, there are a set of tabs that are relevant to picture editing, tabs for working with animations, inserting objects, adjusting designs, reviewing and adjusting the way you view your presentations. The Home tabprovides easy access to the most frequently used commands.
Figure 1-3 : A Portioned view of the PowerPoint 2007 Ribbon (the Home tab is selected)
Figure 1-4 : A Portioned view of the PowerPoint 2010 / 2013 Ribbon (the Home tab is selected)
1.3.2 Quick Access Toolbar
The Quick Access Toolbar is where you will find (or place) your own frequently used commands. Essentially, you can use the Quick Access Toolbar to create shortcuts to the various features of PowerPoint.
Figure 1-5 : The Quick Access Toolbar (PowerPoint 2007)
Figure 1-6 : The Quick Access Toolbar (PowerPoint 2010 / 2013)SAMPLE

About Microsoft PowerPoint PowerPoint 2007 / 2010 / 2013 Essentials : PG 6
Copyright 2010 – Mobile MOUSe & MANUAL Masters.No part of this manual may be reproduced without permission from Page 6Mobile MOUSe and MANUAL Masters.
1.3.3 The Microsoft Office Button
Many of the most valuable features in previous versions of Microsoft Office were not about the document formatting and editing experience at all. Instead, they were about all the things you can do with a document: share it, protect it, print it, publish it, and send it. In spite of that, previous releases of the Microsoft Office applications lacked a single central location where a user can see all of these options in one place.
The new interface brings together the capabilities of the Microsoft Office system into a single entry point: the Microsoft Office Button. This offers two major advantages. First, it helps users find these valuable features. Second, it simplifies the editing of documents by freeing up the Ribbon to focus on the actual creation and formatting of the documents.
Figure 1-7 : The Office Button
1.3.4 The File Tab
Many of the most valuable features in previous versions of Microsoft Office were not about the document formatting and editing experience at all. Instead, they were about all the things you can do with a document: share it, protect it, print it, publish it, and send it. In spite of that, previous releases of the Microsoft Office applications lacked a single central location where a user can see all of these options in one place.
The new interface brings together the capabilities of the Microsoft Office system into a single entry point: the File Tab. This offers two major advantages. First, it helps users find these valuable features. Second, it simplifies the editing of documents by freeing up the Ribbon to focus on the actual creation and formatting of the documents. The File Tab is essentially the File Menu from much earlier versions of Microsoft Office (and has replaced the Office Button in Office 2007). The File Tab in Office 2010 / 2013 also grants access to something known as Backstage View. Backstage View is where you manage your documents and related data about them - create, save, and send documents, inspect documents for hidden metadata or personal information, set options such as turning on or off AutoCompletesuggestions, and more.SAM
PLE

About Microsoft PowerPoint PowerPoint 2007 / 2010 / 2013 Essentials : PG 7
Copyright 2010 – Mobile MOUSe & MANUAL Masters.No part of this manual may be reproduced without permission from Page 7Mobile MOUSe and MANUAL Masters.
Figure 1-8 : The File Tab (Office 2010)
Figure 1-9 : The File Tab (Office 2013)
1.3.5 Contextual Tabs
Certain sets of commands are only relevant when objects of a particular type are being edited. For example, the commands for editing a picture are not relevant until a picture within a document is clicked and the user is focusing on modifying it. Contextual tabs only appear when they are needed and make it easier to find and use the commands needed for the operation at hand.
Figure 1-10 : The Picture Tools Contextual tab is only displayed when a picture is selected
SAMPLE

About Microsoft PowerPoint PowerPoint 2007 / 2010 / 2013 Essentials : PG 8
Copyright 2010 – Mobile MOUSe & MANUAL Masters.No part of this manual may be reproduced without permission from Page 8Mobile MOUSe and MANUAL Masters.
1.3.6 Groups
Groups are at the heart of the redesigned applications. Each tab contains sets of groups. Groups provide a set of choices relevant to a particular concept. The traditional dialog box interfaces are still available for those wishing a greater degree of control over the result of the operation.
Figure 1-11 : The Font group pictured here, presents clear "pick and click" choices
1.3.7 Galleries
Galleries provide users with a set of clear "pick and click" results to choose from when working on their documents. By presenting a simple set of potential results, rather than a complex dialog box with numerous options, Galleries simplify the process of producing professional looking work.
Figure 1-12 : A Screenshot of a Gallery
1.3.8 Live Preview
Live Preview is a new technology that shows the results of applying an editing or formatting change as the user moves the pointer over certain options. This new, dynamic capability streamlines the process of laying out, editing, and formatting which allows users to create excellent results with less time and effort.
Figure 1-13: Live Preview displays formatting as you move your mouse over the effect
SAMPLE
Presentation Basics PowerPoint 2007 / 2010 / 2013 Essentials : PG 9
Copyright 2010 – Mobile MOUSe & MANUAL Masters.No part of this manual may be reproduced without permission from Page 9Mobile MOUSe and MANUAL Masters.
Chapter 2 - Presentation BasicsWe will now cover the following concepts…
Creating Presentations from Scratch Adding and Deleting slides from a presentation Navigating a presentation Modifying the Content within a presentation Working with Outline View Importing Slides from other existing presentations Importing Text from a Word document Formatting text on slides Customizing the Quick Access Toolbar
Outcomes of this chapter (what you will learn)…
How to effectively navigate a presentation How to effectively add or modify content in a presentation How to import data from other presentations and Microsoft Word How to effectively format text How to customize the Quick Access Toolbar
2.1 General Presentation Concepts
In this chapter, we’ll focus on the text of your presentation. You’ll learn about several different possibilities for starting a new presentation, adding text, editing text and deleting text from your presentation.
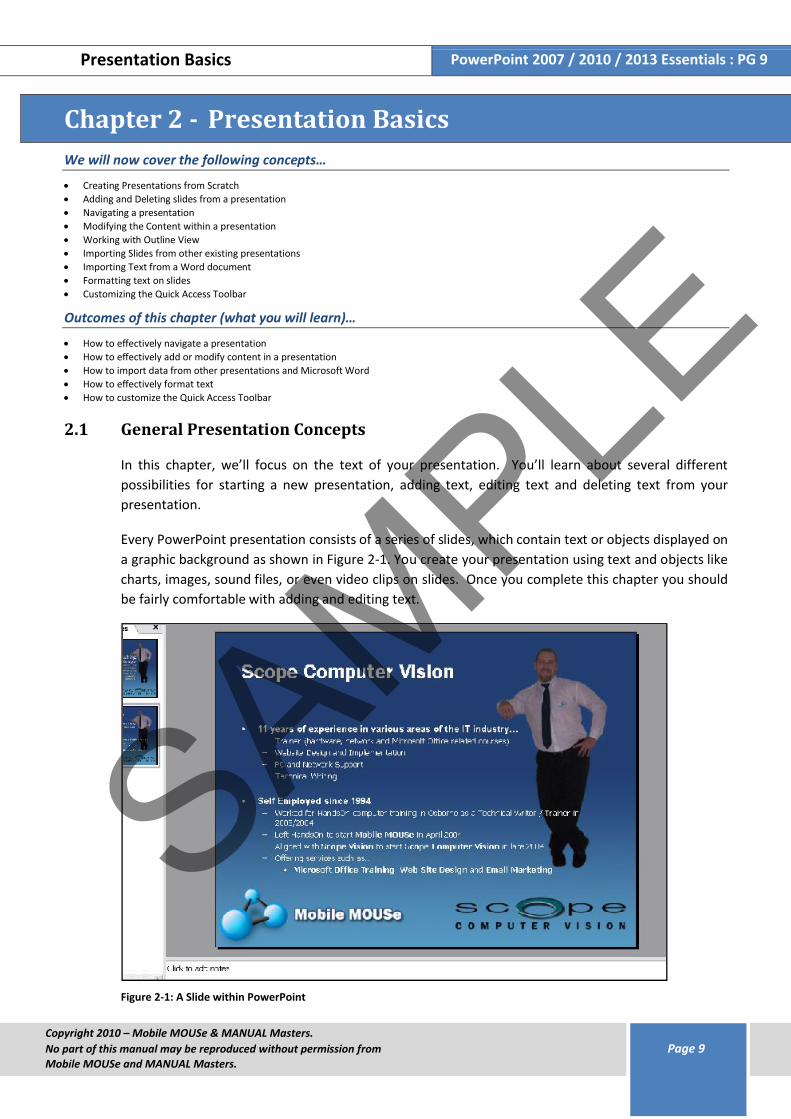
Every PowerPoint presentation consists of a series of slides, which contain text or objects displayed on a graphic background as shown in Figure 2-1. You create your presentation using text and objects like charts, images, sound files, or even video clips on slides. Once you complete this chapter you should be fairly comfortable with adding and editing text.
Figure 2-1: A Slide within PowerPoint
SAMPLE

Presentation Basics PowerPoint 2007 / 2010 / 2013 Essentials : PG 10
Copyright 2010 – Mobile MOUSe & MANUAL Masters.No part of this manual may be reproduced without permission from Page 10Mobile MOUSe and MANUAL Masters.
2.1.1 Presentation Planning and Creation
For every presentation you create in PowerPoint, you should perform the following steps.
1. Plan the presentation and gather materials you’ll want to include: clipart, tables, charts, and other graphic objects.
2. Create the presentation; creating slides, entering and editing text, and arranging slides.
3. Apply and modify the presentation design.
4. Format individual slides (if so desired).
5. Add objects to the presentation: charts, tables, and pictures.
6. Apply and modify transitions, animation effects, and links for electronic presentations.
7. Create audience materials and speaker notes.
8. Rehearse the presentation and add slide timings.
9. Deliver the presentation.
You don’t have to work through all the steps sequentially. You can create and modify a few slides, add objects, animation, speaker notes and then insert more slides. You may find working directly on the slides distracting, in which case you can generate your presentation content as an outline and then work on the aesthetics later.
2.2 Starting a New Presentation
PowerPoint 2007 / 2010 / 2013 makes getting started a snap. You have essentially three choices: start with a blank slide, start with a wizard, or start with a template.
2.2.1 Starting with a Blank Slide
When you launch PowerPoint, the options for starting a presentation appear in the task pane. You can open an existing presentation or create a new presentation using one of several listed options. The blank slide in the centre of the window is set up as a title slide, ready and waiting for your text. The following exercise walks you through the process of adding text.
Exercise 2.a. Adding text to a blank slide
1. Launch PowerPoint from the Windows Start Menu or from the Windows Desktop. A blank slide is displayed in the main part of the PowerPoint window
2. Click within the Click to Add Title text box. A cursor appears, centred with the text box
3. Type the title of your presentation. For this exercise, type: Sample Presentation
4. Click within the Click to Add Subtitle text box. Once again, a centred cursor appears
5. Type your name. Then press J6. Type some additional information about yourself, such as your company name or job title
SAMPLE

Presentation Basics PowerPoint 2007 / 2010 / 2013 Essentials : PG 11
Copyright 2010 – Mobile MOUSe & MANUAL Masters.No part of this manual may be reproduced without permission from Page 11Mobile MOUSe and MANUAL Masters.
7. Close the file without saving the changes (by clicking the File tab (Microsoft Office Button in PowerPoint 2007) and choosing Close, or by pressing F+W, then choosing No at the resulting dialog box)
As evidenced in Step 5 of the previous exercise, pressing J in a text box allows you to create a new line of text within that text box. PowerPoint also supports word wrap. If the content you enter is longer than the width the text box, the text wraps to the next line automatically, just as it does when it reaches the right margin in a Word document.
When you add text to a slide, the text also appears on the slide miniature in the slide pane at the left side of the PowerPoint window.
2.2.2 Using a PowerPoint Template
In versions of PowerPoint earlier than PowerPoint 2007, to change the look of your presentation —such as the types and sizes of bullets, background design and fill colours, and placeholder sizes and positions — you applied a design template. With Office PowerPoint 2007 / 2010 / 2013, you apply a theme to achieve the same result. For more information about how apply a theme to change the look of your presentation, see Applying Themes on page 93.
As already mentioned; you can start with a blank slide and create your presentation from scratch. This method helps you to focus on text without the distraction of backgrounds, graphics and placeholdertext supplied by existing presentations, or you can simply choose from one of PowerPoint’s many built-in Templates.
You can apply templates that are built-in to PowerPoint, created by you and then saved to your computer, or use templates downloaded from Microsoft Office Online.
In PowerPoint 2007 / 2010 / 2013, you can apply templates to structure style and page layout and give you a jump-start on a new, blank presentation. If you choose to start with a template, you get the backgrounds, graphics and depending on the template, varying amounts of placeholder’s text. Follow the steps in the following exercise to discover two different ways to start a presentation using template.
In the following exercise, you will generate a new presentation from one of PowerPoint’s built-in templates.
Exercise 2.a. Starting a Presentation by using a Template
1. Click the File tab, and then click New
2. In the New Presentation dialog box, do one of the following:
Under Templates, click Blank and recent, Installed Templates, or Installed Themes, click the built-in template that you want, and then click Create.
SAMPLE

Presentation Basics PowerPoint 2007 / 2010 / 2013 Essentials : PG 12
Copyright 2010 – Mobile MOUSe & MANUAL Masters.No part of this manual may be reproduced without permission from Page 12Mobile MOUSe and MANUAL Masters.
Under Templates, click New from existing, locate and then click the other presentation file that contains the template, and then click Create New.
Under Templates, click My templates, select a custom template that you created, and then click OK.
Under Microsoft Office Online, click a template category, select a template, and then click Downloadto download the template from the Microsoft Office website.
3. Having experimented with one or more of the options above, Close the presentation without saving your changes (by clicking the File tab (Microsoft Office Button in PowerPoint 2007) and choosing Close, or by pressing F+W, then choosing No at the resulting dialog box)
2.3 Navigating the PowerPoint Application Window
MICROSOFT OFFICE CERTIFICATIONThis concept addresses the Adjust views competency of the Microsoft Office Specialist Certification (Exam 77-883).
PLEASE NOTE: This training resource does not necessarily cover all of the requirements of this exam objective as this objective may include but is not limited to: adjusting views by using ribbon or status bar commands.
Visit http://www.microsoft.com/learning/en/us/mos-certification.aspx for the latest Microsoft Office Certification requirements.
MICROSOFT OFFICE CERTIFICATIONThis concept addresses the Manipulate the PowerPoint window competency of the Microsoft Office Specialist Certification (Exam 77-883).
PLEASE NOTE: This training resource does not necessarily cover all of the requirements of this exam objective as this objective may include but is not limited to: working with multiple presentation windows simultaneously.
Visit http://www.microsoft.com/learning/en/us/mos-certification.aspx for the latest Microsoft Office Certification requirements.
In order to work comfortably in PowerPoint, it is necessary to have a general understanding of the multi-paned PowerPoint application window and each of the following topics, specifically;
Viewing slides
Navigating from slide to slide
Selecting a slide (or slides)
In this section, you’ll learn about PowerPoint views and how to switch between them. You’ll practice navigating through a presentation as well as selecting slides one at a time as well as more than one slide at a time. SAM
PLE

Presentation Basics PowerPoint 2007 / 2010 / 2013 Essentials : PG 13
Copyright 2010 – Mobile MOUSe & MANUAL Masters.No part of this manual may be reproduced without permission from Page 13Mobile MOUSe and MANUAL Masters.
2.3.1 Viewing Slides
The term view refers to how you look at and work on your presentation. PowerPoint offers several different views, all of which are accessible from the View tab and three views from the View buttons (namely, Normal View, Slide Sorter view, and Slide Show View). The other views, (including the various Master Views) and Notes Pages View, have special features that we will discuss in more detail at a later stage. While you’ll quickly adopt one view as your favourite, you inevitably work in all of the views while you’re building a presentation.
You can change to any view by clicking the appropriate view button at the bottom-right corner of the PowerPoint window or by choosing the view name from the View tab.
Figure 2-2: The Normal, Slide Sorter and Slide Show buttons
NORMAL VIEW
This is the probably the most commonly used view in PowerPoint. The outline (with text… if any) is displayed on the left; your first slide is shown in the main part of the PowerPoint window. The smaller pane at the bottom of the window allows you to add notes for this slide (We will cover notes at a later stage).
Normal View is a tri-pane view that allows you to see three different aspects of your presentation within one window. The sections of the tri-pane window are resizable so you can choose the element(s) of the presentation you wish to focus on.
The Outline Pane in Normal View has two tabs: Outline and Slides. Outline is suited to working with text, whereas for visually oriented people, the Slide option, displays the slides themselves rather than the text of the slides. To see slide miniatures in the left pane, as shown in the figure overleaf click the Slides tab.
In PowerPoint 2013 you can switch to between the Outline pane and the Slide pane by clicking the Normal View Button.
Figure 2-3: Normal View (with the Slides pane active) lets the user display slide miniatures in the left pane
SAMPLE

Presentation Basics PowerPoint 2007 / 2010 / 2013 Essentials : PG 14
Copyright 2010 – Mobile MOUSe & MANUAL Masters.No part of this manual may be reproduced without permission from Page 14Mobile MOUSe and MANUAL Masters.
When you’re viewing slide miniatures in the left pane and the pane has not been widened enough, the tabs at the top of the pane show icons rather than words.
If you accidentally close the left pane that displays outline and slide miniatures, you can bring it back by clicking View and clicking Normal.
In PowerPoint 2013 you can switch to between the Outline pane and the Slide pane by clicking the Normal View Button.
Figure 2-4: Normal View (with the Outline pane active) lets the user display outline text in the left pane
SLIDE SORTER VIEW
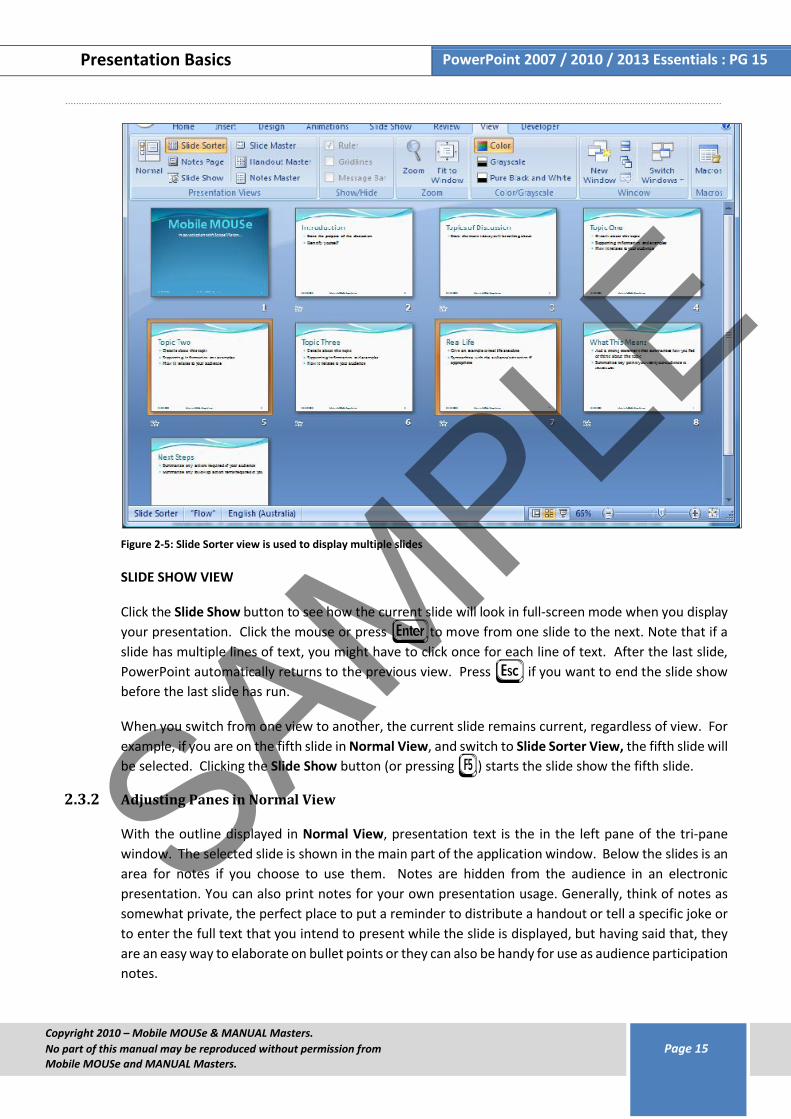
Slide Sorter view (shown in the figure below) allows you to see many slides at once. The number of slides shown depends on the zoom setting, your monitor size, and your screen resolution. PowerPoint defaults to 66% zoom, which allows you to see approximately 12 slides at once. If you want to adjust the number of slides visible, simply increase or decrease the zoom level. The focus in Slide Sorter view is on entire slides: selecting, deleting moving, and so on. You can’t edit text on a slide from within Slide Sorter view.
QUICK NOTES..................................................................................................................................................................................................................................................
..................................................................................................................................................................................................................................................
..................................................................................................................................................................................................................................................
..................................................................................................................................................................................................................................................
..................................................................................................................................................................................................................................................
..................................................................................................................................................................................................................................................
..................................................................................................................................................................................................................................................
SAMPLE
Presentation Basics PowerPoint 2007 / 2010 / 2013 Essentials : PG 15
Copyright 2010 – Mobile MOUSe & MANUAL Masters.No part of this manual may be reproduced without permission from Page 15Mobile MOUSe and MANUAL Masters.
..................................................................................................................................................................................................................................................
Figure 2-5: Slide Sorter view is used to display multiple slides
SLIDE SHOW VIEW
Click the Slide Show button to see how the current slide will look in full-screen mode when you display your presentation. Click the mouse or press J to move from one slide to the next. Note that if a slide has multiple lines of text, you might have to click once for each line of text. After the last slide, PowerPoint automatically returns to the previous view. Press L if you want to end the slide show before the last slide has run.
When you switch from one view to another, the current slide remains current, regardless of view. For example, if you are on the fifth slide in Normal View, and switch to Slide Sorter View, the fifth slide will be selected. Clicking the Slide Show button (or pressing o) starts the slide show the fifth slide.
2.3.2 Adjusting Panes in Normal View
With the outline displayed in Normal View, presentation text is the in the left pane of the tri-pane window. The selected slide is shown in the main part of the application window. Below the slides is an area for notes if you choose to use them. Notes are hidden from the audience in an electronic presentation. You can also print notes for your own presentation usage. Generally, think of notes as somewhat private, the perfect place to put a reminder to distribute a handout or tell a specific joke or to enter the full text that you intend to present while the slide is displayed, but having said that, they are an easy way to elaborate on bullet points or they can also be handy for use as audience participation notes.
SAMPLE

Presentation Basics PowerPoint 2007 / 2010 / 2013 Essentials : PG 16
Copyright 2010 – Mobile MOUSe & MANUAL Masters.No part of this manual may be reproduced without permission from Page 16Mobile MOUSe and MANUAL Masters.
For efficiency’s sake you may wish to resize the panes in Normal View so that the one you’re working in is larger. Simply point to any of the pane dividers, and your mouse pointer will change to the resize tool ( ). Click and drag to move the pane divider.
If you don’t see the Notes Pane, point to the pane divider directly above the Zoom Slider. Click and drag upward to open the Notes Pane.
Figure 2-6: the Notes pane
2.3.3 Navigating from Slide to Slide
There are several different ways to move between slides in Normal View. You can click any slide in the outline to move to that slide, or, if slide miniatures are displayed in the left pane, simply click the slide that you want to view. You can also use the vertical scroll bar to move forward and backward through your slides or use the Y and Z keys to move through the slides. As you drag the vertical scroll box, the slide number and slide title are displayed in a screen tip.
If you want to navigate to the next or the previous slide, you can use the Next Slide and Previous Slide buttons located at the bottom of the vertical scroll bar.
2.3.4 Selecting a Slide
You must select a slide in order to edit or delete it. The selected slide also determines the placement of new slides you that you may add to your presentation. In Normal View, the slide displayed in the main part of the application window is the selected slide. In Slide Sorter view, the selected slide(s) show a thicker darker border around the outside (like slides 5 and 7) in Figure 2-5 on page 15.
In the following exercise you will learn to select slides so you can move them, delete them, or apply transitions to them.
Exercise 2.a. Selecting Slides
1. Open Chapter_2C.pptx (located in the Desktop \ PowerPoint folder) or one of your own presentations, and switch to Slide Sorter View
SAMPLE
Presentation Basics PowerPoint 2007 / 2010 / 2013 Essentials : PG 17
Copyright 2010 – Mobile MOUSe & MANUAL Masters.No part of this manual may be reproduced without permission from Page 17Mobile MOUSe and MANUAL Masters.
2. Click Slide 3 to select it (note the darker border around the outside of the slide)
3. Click any other slide to select it, (which automatically deselects Slide 3)
4. To select several contiguous (adjacent) slides, click the first (let’s click Slide 1), and then hold Gand click the last desired slide (click Slide 5 for this exercise). Slides 1 through 5 are now selected, and you may release the G key
5. Click the empty space below or between slides to deselect slides 1 to 5
6. To select multiple non-contiguous slides (slides not directly next to each other), click the first slide(click Slide 1 again), and then hold F and click each additional slide you wish to select, while still holding F (click Slides 3, 4, and 6 for this exercise)
7. Release the F key when you’ve finished selecting. If you’ve done this steps correctly, slides 1, 3 4 and 6 should have a darker border
8. Click the empty space below or between slides to deselect them all
9. Switch to Normal View (View > Normal or click ) and select the Slides tab in the Outline pane
10. Try selecting multiple contiguous and non-contiguous slide miniatures using the same keyboard / mouse combinations you used in steps 4 through 7 above
11. Close the presentation without saving your changes (by clicking the File tab (Microsoft Office Buttonin PowerPoint 2007) and choosing Close, or by pressing F+W, then choosing No at the resulting dialog box)
2.3.5 Selecting Text on a Slide
Many of the methods used to select text in Word and Excel work the same as they would in PowerPoint. Double-click a word to select it. To select a block of text, click at the beginning to place the insertion point and mark the start of the selection. Then hold G and click at the end. All text between the click and the G + Click is selected. To select an entire bullet point, click the bullet or icon in front of the text or triple-click anywhere within the point.
If you select a first-level point that has second-level points underneath it, the second-level points are also selected. Click and then drag to select only the main point. In the outline pane, selecting the title using any method other than dragging selects the entire slide.
2.4 Adding and Deleting PowerPoint Slides
MICROSOFT OFFICE CERTIFICATIONThis concept addresses the Add and remove slides competency of the Microsoft Office Specialist Certification (Exam 77-883).
PLEASE NOTE: This training resource does not necessarily cover all of the requirements of this exam objective as this objective may include but is not limited to: inserting an outline, reusing slides from a saved presentation, reusing slides from a slide library, duplicating selected slides, deleting multiple slides simultaneously, and including non-contiguous slides in a presentation.
Visit http://www.microsoft.com/learning/en/us/mos-certification.aspx for the latest Microsoft Office Certification requirements.
SAMPLE

Presentation Basics PowerPoint 2007 / 2010 / 2013 Essentials : PG 18
Copyright 2010 – Mobile MOUSe & MANUAL Masters.No part of this manual may be reproduced without permission from Page 18Mobile MOUSe and MANUAL Masters.
Now that you’re off to a running start, it’s time to rid the presentation of unnecessary slides and add a few of your own. The following sections will show you how to add slides in a variety of different ways and how to delete the slides that you no longer need.
2.4.1 Adding Slides to a Presentation
Once you’ve mastered PowerPoint application window, you’re ready to begin customizing the presentation for use as you originally intended.
You have a number of choices for adding slides:
Adding slides by typing in the Outline Pane
Adding slides by clicking the New Slide button on the Home tab
Adding slides from another presentation
Most users work in the Outline Pane when it’s necessary to concentrate on text rather than objects or entire slides. You can’t work with objects directly in the Outline Pane, and the text-only interface helps you focus on content rather than format. Remember, you can resize the Outline Pane to give you more room to work, yet you can still see in the right pane how the text fits on the slide.
In previous versions of PowerPoint, there was a limitation in that you could have a maximum of five text levels below the slide title. In PowerPoint 2007 / 2010 / 2013 there isn’t a five level limitation per se, but it is generally not that common to require more than five indent levels of text in most presentations. Text entered at any level other than the title level is a point or a sub point. Each level in the outline usually has a unique bullet.
QUICK NOTES..................................................................................................................................................................................................................................................
..................................................................................................................................................................................................................................................
..................................................................................................................................................................................................................................................
..................................................................................................................................................................................................................................................
..................................................................................................................................................................................................................................................
..................................................................................................................................................................................................................................................
..................................................................................................................................................................................................................................................
..................................................................................................................................................................................................................................................
..................................................................................................................................................................................................................................................
..................................................................................................................................................................................................................................................
..................................................................................................................................................................................................................................................
..................................................................................................................................................................................................................................................
..................................................................................................................................................................................................................................................
..................................................................................................................................................................................................................................................
SAMPLE

Presentation Basics PowerPoint 2007 / 2010 / 2013 Essentials : PG 19
Copyright 2010 – Mobile MOUSe & MANUAL Masters.No part of this manual may be reproduced without permission from Page 19Mobile MOUSe and MANUAL Masters.
Figure 2-7: Bulleted slide text
The following exercise provides an introduction to outline levels. In this exercise you will work with a PowerPoint outline, moving text from level to level within the Outline Pane.
Exercise 2.a. ADDING TEXT AND SLIDES WITHIN THE OUTLINE PANE
1. Open Chapter_2D.pptx located in the Desktop \ PowerPoint folder. Make sure you are in Normal View
2. Click the Outline tab to display the Outline Pane, and (if necessary) resize the pane to make it wider.
In PowerPoint 2013 you can switch to between the Outline pane and the Slide pane by clicking the Normal View Button.
3. Within the Outline Pane, click at the end of the bullet point text: “Identify yourself”, press J to create a new line
The blank bullet point appears on the same level as the previous one. The assumption is that you’ll type some text for the new bullet point, but we’ll skip it for the time being.
4. Press e twice to return the insertion point to the end of previous line
5. Press J once again to move to a new line and create a new blank bullet
6. Press N on the keyboard, to move the new bullet point to the next indent level (demote)
7. Type: Qualifications . Press J8. Type: Employment History . Press J9. Type: Project Experience
SAMPLE

Presentation Basics PowerPoint 2007 / 2010 / 2013 Essentials : PG 20
Copyright 2010 – Mobile MOUSe & MANUAL Masters.No part of this manual may be reproduced without permission from Page 20Mobile MOUSe and MANUAL Masters.
10. Press G+N to promote the new bullet point back to a first level bullet
11. Press G+N again to promote the bullet point, converting to bullet point into the title of a new slide
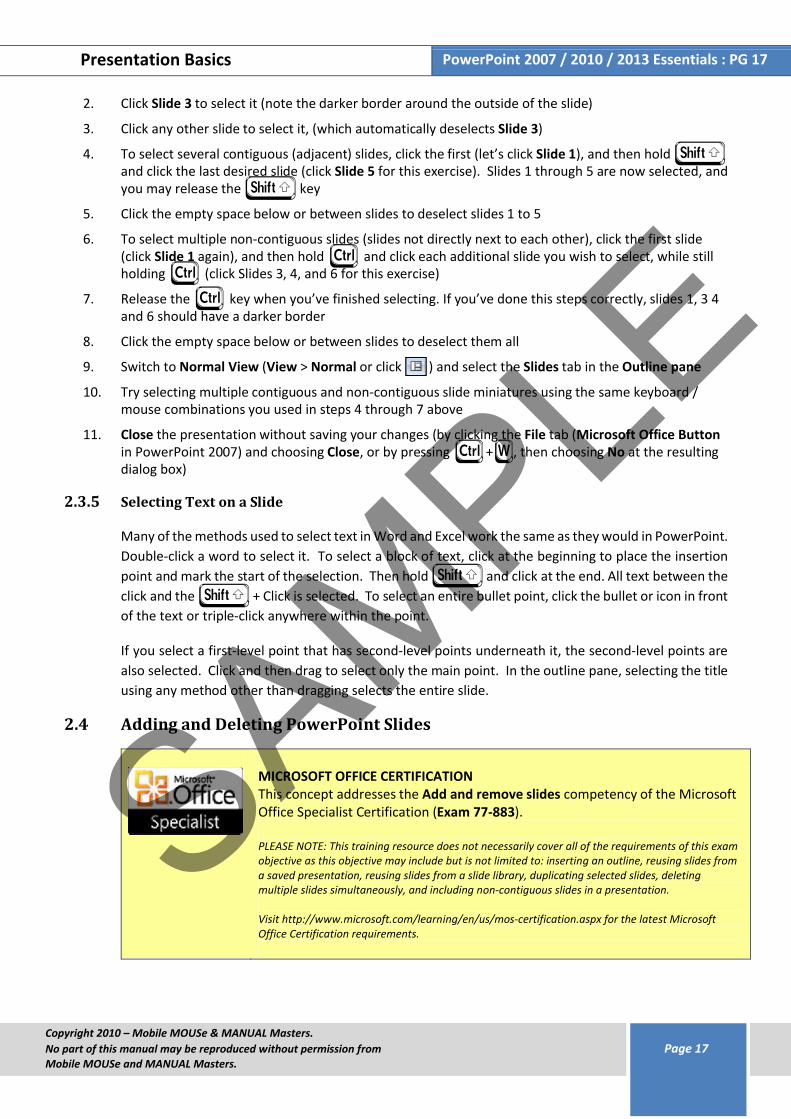
12. Right mouse click the text for the new slide 3. From the resulting menu choose Demote (as seen in the following figure)
Figure 2-8: Right clicking an object in the Outline Pane, and choosing Demote
13. Right mouse click the text “Project Experience”, from the resulting menu choose Demote
The text is demoted once again to a second level bullet.
14. Right mouse click the text “Project Experience”, from the resulting menu choose Promote
15. Press G+N to promote the text back to a slide title (a new slide 3)
16. Press the X key to move the cursor to the end of the line (or click at the end of the text: “Project Experience”)
When you’re working in the outline pane, pressing J at the end of a bullet point gives you a new bullet on the same level. So pressing J at the end of a slide title should give you a new slide.
17. Press J to create a new blank slide 4
18. Type the following: The late shift . Press N to demote slide 4 to a bullet point on slide 3
19. Click the upper half of the New Slide button on the Home tab
20. Press e once to get rid of the new slide
21. Save the presentation by pressing F+S (or by clicking the File tab (Microsoft Office Button in PowerPoint 2007) and choosing Save)
22. Leave the presentation open for the following exercise
In the next exercise you’ll learn how to add and move text using the Outline Pane.
SAMPLE
Presentation Basics PowerPoint 2007 / 2010 / 2013 Essentials : PG 21
Copyright 2010 – Mobile MOUSe & MANUAL Masters.No part of this manual may be reproduced without permission from Page 21Mobile MOUSe and MANUAL Masters.
Exercise 2.b. Moving text and slides Using the Outline pane
1. Continue on with the file left open from the previous exercise or alternatively open the file entitled Chapter_2E.pptx (located in the Desktop \ PowerPoint folder)
2. If necessary, display the Outline Pane in Normal View
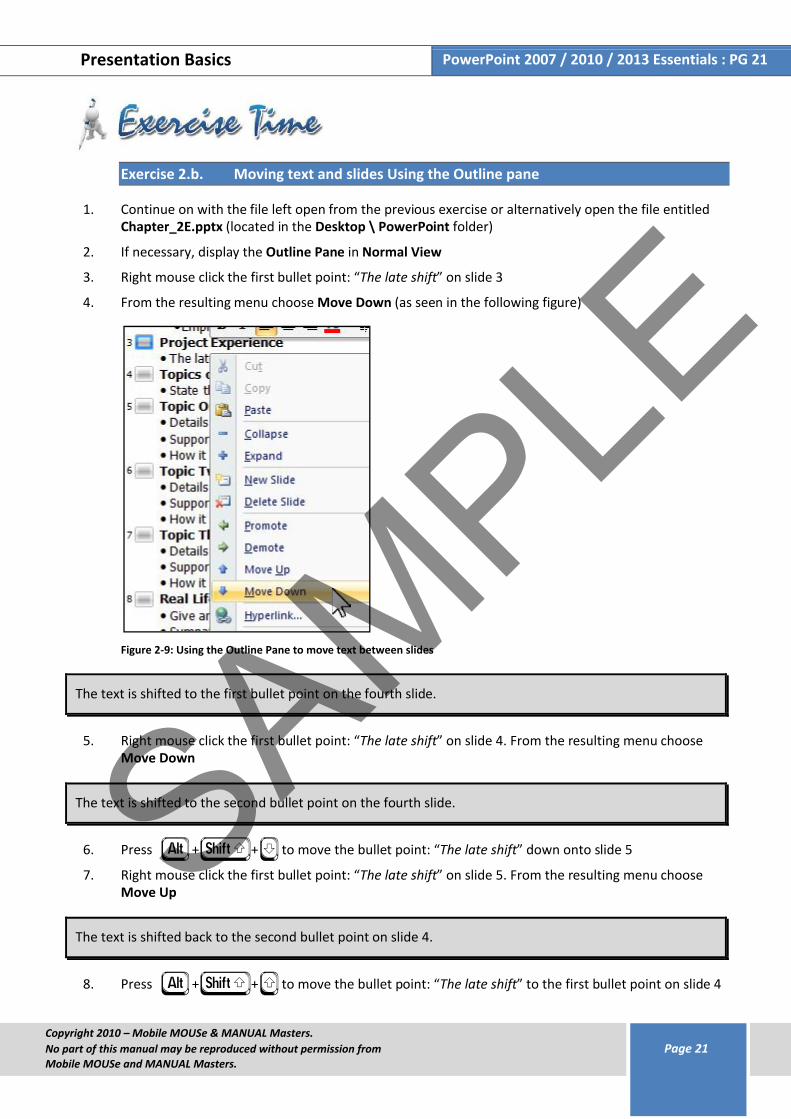
3. Right mouse click the first bullet point: “The late shift” on slide 3
4. From the resulting menu choose Move Down (as seen in the following figure)
Figure 2-9: Using the Outline Pane to move text between slides
The text is shifted to the first bullet point on the fourth slide.
5. Right mouse click the first bullet point: “The late shift” on slide 4. From the resulting menu choose Move Down
The text is shifted to the second bullet point on the fourth slide.
6. Press E+G+d to move the bullet point: “The late shift” down onto slide 5
7. Right mouse click the first bullet point: “The late shift” on slide 5. From the resulting menu choose Move Up
The text is shifted back to the second bullet point on slide 4.
8. Press E+G+b to move the bullet point: “The late shift” to the first bullet point on slide 4
SAMPLE

Presentation Basics PowerPoint 2007 / 2010 / 2013 Essentials : PG 22
Copyright 2010 – Mobile MOUSe & MANUAL Masters.No part of this manual may be reproduced without permission from Page 22Mobile MOUSe and MANUAL Masters.
9. Right mouse click any text within the Outline Pane. From the resulting list of choices, choose Collapse> Collapse All (as seen in the following figure)
Figure 2-10: Collapsing all bullet points on every slide
By collapsing all bullet points in the Outline Pane, allows you to see more slides at once.
By firstly collapsing all slides and then expanding individual slides, allows you to focus on the text for a particular slide.
10. Click anywhere within the title of slide 4 “Topics of Discussion”, press E+G+b (or right click the text: “Topics of Discussion” and choose Move Up), to re-arrange slide 4 to become slide 3
11. Right mouse click the text “Topics of Discussion” (the title of slide 3). From the resulting list of choices, click Expand (as seen in the following figure)
Figure 2-11: Expanding a single slide
12. Right mouse click any text within the Outline Pane. From the resulting list of choices, choose Expand> Expand All
Figure 2-12: A portioned view of the completed presentation outline
SAMPLE

Presentation Basics PowerPoint 2007 / 2010 / 2013 Essentials : PG 23
Copyright 2010 – Mobile MOUSe & MANUAL Masters.No part of this manual may be reproduced without permission from Page 23Mobile MOUSe and MANUAL Masters.
13. Save the presentation by pressing F+S (or by clicking the File tab (Microsoft Office Button in PowerPoint 2007), and choosing Save)
14. Close the presentation (by clicking the File tab (Microsoft Office Button in PowerPoint 2007) andchoosing Close)
You can also use drag and drop to move text just like you would in a Word document. Remember,as you move over a bullet or slide icon in the outline, the pointer shape changes to a four-way arrow, the tool for moving text and objects. To move a point and all the sub points beneath it,simply drag the bullet preceding the point that you would like to move.
You can also use N and G +N to promote or demote text when working with the
text directly on the slide. You can also use E +G + d andE+G + b to rearrange text when working with the text directly on the slide.
If you choose to use drag and drop to arrange text, by dragging the selection toward its new location, a two-way arrow replaces the four-headed arrow, and a horizontal line appears in the outline. If you drag and drop the horizontal line, the selected point(s) move to the new location.
When you use drag and drop to rearrange points, be sure to move the mouse vertically. Horizontal dragging causes the selected text to change levels. If you drag a bullet point horizontally to the right, a vertical line appears in the outline. Drag and drop the horizontal line to the right to demote the text or to the left to promote text.
2.4.2 Using Slides from an Existing Presentation
If you have slides you’ve used in other presentations or if your computer has existing presentations slides that you would like to recycle, you can quickly re-insert them into your own presentation. The following exercise shows you how.
Exercise 2.a. Adding Slides form Another Presentations
1. Click the File tab (Microsoft Office Button in PowerPoint 2007), click Open (or press F+O). Open the file entitled: Chapter_2F.pptx (located in the Desktop \ PowerPoint folder)
At the moment this presentation only consists of one slide (if your presentation consists of many slides simply click directly after the slide where you want to insert your imported slide(s)).
SAMPLE
Presentation Basics PowerPoint 2007 / 2010 / 2013 Essentials : PG 24
Copyright 2010 – Mobile MOUSe & MANUAL Masters.No part of this manual may be reproduced without permission from Page 24Mobile MOUSe and MANUAL Masters.
2. In the Slides Pane, click directly after slide 1
In PowerPoint 2013 you can switch to between the Outline pane and the Slide pane by clicking the Normal View button.
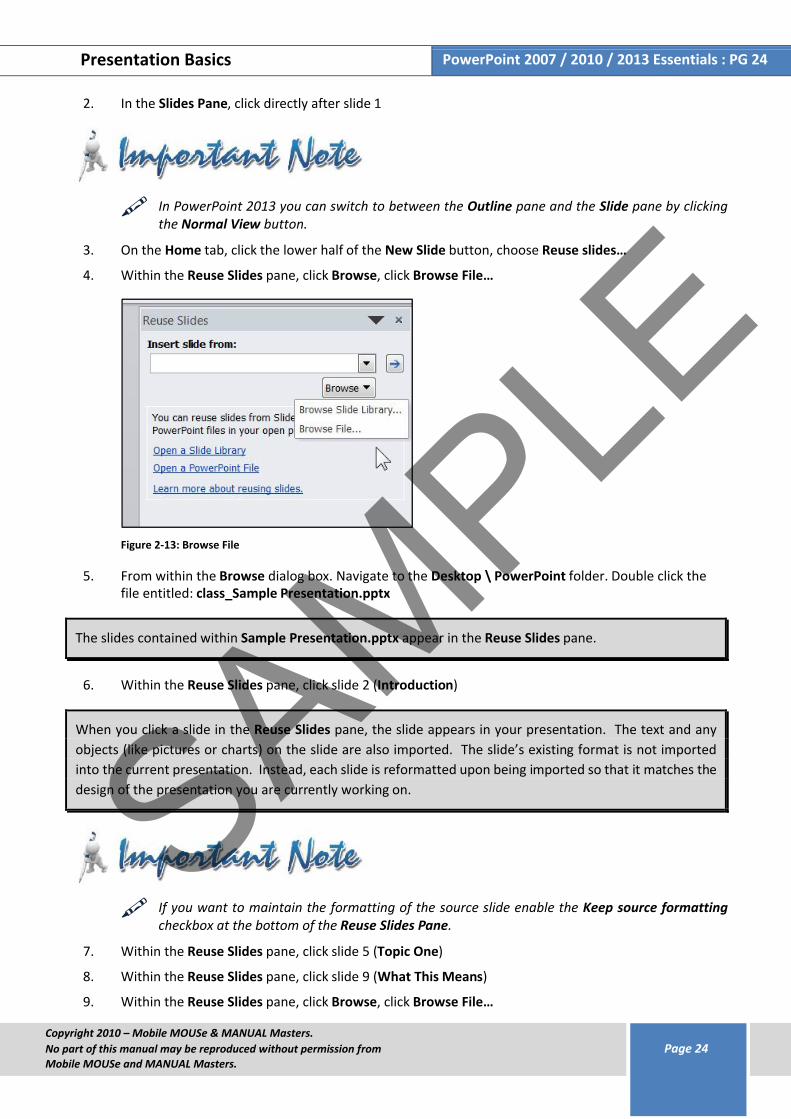
3. On the Home tab, click the lower half of the New Slide button, choose Reuse slides…
4. Within the Reuse Slides pane, click Browse, click Browse File…
Figure 2-13: Browse File
5. From within the Browse dialog box. Navigate to the Desktop \ PowerPoint folder. Double click the file entitled: class_Sample Presentation.pptx
The slides contained within Sample Presentation.pptx appear in the Reuse Slides pane.
6. Within the Reuse Slides pane, click slide 2 (Introduction)
When you click a slide in the Reuse Slides pane, the slide appears in your presentation. The text and any objects (like pictures or charts) on the slide are also imported. The slide’s existing format is not imported into the current presentation. Instead, each slide is reformatted upon being imported so that it matches the design of the presentation you are currently working on.
If you want to maintain the formatting of the source slide enable the Keep source formattingcheckbox at the bottom of the Reuse Slides Pane.
7. Within the Reuse Slides pane, click slide 5 (Topic One)
8. Within the Reuse Slides pane, click slide 9 (What This Means)
9. Within the Reuse Slides pane, click Browse, click Browse File…
SAMPLE

Presentation Basics PowerPoint 2007 / 2010 / 2013 Essentials : PG 25
Copyright 2010 – Mobile MOUSe & MANUAL Masters.No part of this manual may be reproduced without permission from Page 25Mobile MOUSe and MANUAL Masters.
10. From within the Browse dialog box. Navigate to the Desktop \ PowerPoint folder. Double click the file entitled: class_Project Meeting.pptx
The slides contained within Project Meeting.pptx appear in the Reuse Slides pane.
11. Within the Reuse Slides pane, click slide 5 (Current Technology)
12. Within the Reuse Slides pane, click slide 2 (Client Contact Information)
13. On the Reuse Slides pane, click the drop-down arrow for Insert slide from:
Previously reused presentations appear in the list of Insert slide from:
Figure 2-14: Selecting a previously reused presentation
14. Click the class_Sample Presentation.pptx option and then click the Go button
The slides from Sample Presentation.pptx reappear in the Reuse Slides Pane.
15. Within the Reuse Slides pane, click slide 10 (Next Steps)
The slide is inserted into your presentation.
16. Save the presentation by pressing F+S (or by clicking the File tab (Microsoft Office Button in PowerPoint 2007), and choosing Save)
17. Close the Reuse Slides Pane.
18. Leave the presentation open for the following exercise
2.4.3 Importing Text from Microsoft Word
If your presentation text originated in a Microsoft Word Outline, there’s no need to retype it in PowerPoint, simply import the outline. Each Heading 1 style formatted text in Word becomes a PowerPoint slide title. Heading 2 style text in Microsoft Word is imported as a first level bullet point in PowerPoint. Heading 3 style formatted text in Microsoft Word is imported as a second level bullet point in PowerPoint. Heading 4 style formatted text in Microsoft Word is imported as a third level bullet point in PowerPoint… and so forth.
SAMPLE

Presentation Basics PowerPoint 2007 / 2010 / 2013 Essentials : PG 26
Copyright 2010 – Mobile MOUSe & MANUAL Masters.No part of this manual may be reproduced without permission from Page 26Mobile MOUSe and MANUAL Masters.
Styles are integral to the formatting of documents in Microsoft Word. For more information on how to create and apply styles see our Microsoft Word course material.
In addition to using a Microsoft Word document outline as an entire presentation, you can also use a Word outline as additional content in a partially completed presentation. In the following exercise, you will insert outline text from Word into your current presentation…
Exercise 2.a. Adding Slides from a Word Document
1. Continue on with the file left open from the previous exercise or alternatively open the file entitled Chapter_2G.pptx (located in the Desktop \ PowerPoint folder)
2. In Normal or Slide Sorter View, select the slide you want the inserted text to follow. Click slide 1 for this exercise
3. On the Home tab, within the Slides group, click the lower half of the New Slide button, choose Slides from Outline…
4. Within the Insert Outline dialog box, browse to the Desktop \ PowerPoint folder, select the word document entitled Microsoft Word Outline.docx
5. Click Insert (If you are prompted to install a converter to complete the import, click Yes)
Slides 2-9 that have now been inserted are the slides imported from the Microsoft Word Outline.
When you insert a Word outline, the complete document appears as part of your presentation. If you only want a portion of the outline, delete the extra slides after importing. If you have a rather lengthy outline from which you need only a few slides, you may consider copying those sections to a new Word document and importing from there.
6. Save the presentation with a different name, by clicking the File tab (Microsoft Office Button in PowerPoint 2007), and choosing Save As (or by pressing v)
7. Within the Save As dialog box, browse to the Desktop \ PowerPoint folder (if you are not already there). In the File Name text box, type the following name for the file: Imported Slides
8. Click the Save buttonSAM
PLE

Presentation Basics PowerPoint 2007 / 2010 / 2013 Essentials : PG 27
Copyright 2010 – Mobile MOUSe & MANUAL Masters.No part of this manual may be reproduced without permission from Page 27Mobile MOUSe and MANUAL Masters.
Figure 2-15: Saving the presentation as Imported Slides.pptx
9. Leave the presentation open for the following exercise
2.4.4 Deleting Slides from a Presentation
The following exercise introduces you to several methods to delete slides from a presentation. Use the one that makes the most sense, depending on which view you’re working in when you need to delete a slide(s).
Exercise 2.a. Deleting Slides from a Presentation
1. Continue on with the file left open from the previous exercise or alternatively open the file entitled Chapter_2H.pptx (located in the Desktop \ PowerPoint folder)
2. Switch to Slide Sorter View
3. Select the slide(s) you wish to delete. For this exercise, select slide 2 (Client Contact Information) and slide 3 (Project Liaison). Remember to hold F, when clicking slide 3
4. Press V on the keyboard or click Home > Delete (found in the Slides group) to remove the slides
5. Click the Undo button on the Quick Access Toolbar to bring the slides back
6. Switch to Normal View and display the Outline Pane. Click the slide icon preceding the title of slide 2 (Client Contact Information)
7. Hold G and click the slide icon preceding the title of slide 4 (Client Background). Release the
G key. The text on all slides 2-4 is selected
QUICK NOTES..................................................................................................................................................................................................................................................
..................................................................................................................................................................................................................................................
..................................................................................................................................................................................................................................................
..................................................................................................................................................................................................................................................
SAMPLE

Presentation Basics PowerPoint 2007 / 2010 / 2013 Essentials : PG 28
Copyright 2010 – Mobile MOUSe & MANUAL Masters.No part of this manual may be reproduced without permission from Page 28Mobile MOUSe and MANUAL Masters.
..................................................................................................................................................................................................................................................
Figure 2-16: Selecting and deleting slides in the Outline Pane
8. Press V on the keyboard or click Home > Delete (found in the Slides group) to remove the slides
As another alternative, you can display slide miniatures in the left pane (rather than the outline) and then select and delete slides just as you did in Slide Sorter View.
9. Save the presentation by pressing F+S (or by clicking the File tab (Microsoft Office Button in PowerPoint 2007), and choosing Save)
10. Leave the presentation open for the following exercise
2.5 Formatting Text
MICROSOFT OFFICE CERTIFICATIONThis concept addresses the Enter and format text competency of the Microsoft Office Specialist Certification (Exam 77-883).
PLEASE NOTE: This training resource does not necessarily cover all of the requirements of this exam objective as this objective may include but is not limited to: using text effects, changing the indentation, alignment, line spacing, and direction of text, changing the formatting of bulleted and numbered lists, entering text in a placeholder text box, converting text to SmartArt, copying and pasting text, using Paste Special, and using Format Painter.
Visit http://www.microsoft.com/learning/en/us/mos-certification.aspx for the latest Microsoft Office Certification requirements.
In general, you can navigate to any slide and format the text by selecting it and changing formats using the various options on the Home tab. This process isn’t really any different than formatting text in any other Microsoft Office program.
SAMPLE

Presentation Basics PowerPoint 2007 / 2010 / 2013 Essentials : PG 29
Copyright 2010 – Mobile MOUSe & MANUAL Masters.No part of this manual may be reproduced without permission from Page 29Mobile MOUSe and MANUAL Masters.
If you’re planning to make the same formatting changes to every slide in a presentation, don’t do it one slide at a time. PowerPoint has tools for making global changes with just a few clicks. We will look at this at a later stage in this manual.
Earlier on, we imported a Word outline to create new slides in a presentation. Although importing the text is much faster than retyping it, there may still be some clean-up work to be done. In the following exercise you’ll use various options on the Home tab to clean-up and format the text Imported Slides.pptx presentation.
Exercise 2.a. Formatting Text on a Slide
1. Continue on with the file left open from the previous exercise or alternatively open the file entitled Chapter_2i.pptx (located in the Desktop \ PowerPoint folder)
2. Display slide 2 (Current Technology) in Normal View
3. In the Outline Pane, click the Slides tab (to preview thumbnails of your slides)
In PowerPoint 2013 you can switch to between the Outline pane and the Slide pane by clicking the Normal View button.
4. Select all the bulleted text (on the slide itself) and click the Bullets button the Home tab,removing the bullets
5. Without deselecting the text click the Center Align button (also on the Home tab)
6. On the Home tab (within the Font group), change the font to Tahoma
7. On the Home tab (within the Font group), change the font size to 24pt
8. On the Home tab (within the Font group), keep clicking the Decrease font size button to decrease the font size to 18pt
9. On the Home tab (within the Font group), keep clicking the Increase font size button to decrease the font size back up to 24pt
10. Click once within the title text box (Current Technology) on slide 2 (on the actual slide). Point to the frame around the text box. The pointer becomes a 4-way arrow. Click on this frame to select the entire text box
11. On the Home tab (within the Font group), click the Character spacing button, from the resulting choices, choose Very Loose
12. On the Home tab (within the Font group), click the Shadow button
SAMPLE

Presentation Basics PowerPoint 2007 / 2010 / 2013 Essentials : PG 30
Copyright 2010 – Mobile MOUSe & MANUAL Masters.No part of this manual may be reproduced without permission from Page 30Mobile MOUSe and MANUAL Masters.
13. On the Home tab (within the Font group), click the drop –down arrow on the Font colourbutton, choose a colour for the font
14. On the Home tab (within the Clipboard group), click the button
15. In the Slides Pane, click slide 3. Click the slide title “Project Goals”
The Format Painter has transferred the formatting from the selected title text box on slide 2 onto the title text box on slide 3. The Format Painter is now “de-activated”.
16. On the Home tab (within the Clipboard group), double click the button
By double clicking the Format Painter button, the Format Painter stays active and will only turn off when you press L or click the Format Painter button again.
17. In the Slides Pane, click slide 4. Click the slide title “Implementation and Timeline”
18. In the Slides Pane, click slide 5. Click the slide title “Assignments”
19. In the Slides Pane, click slide 6. Click the slide title “Next Steps”
20. On the Home tab (within the Clipboard group), click the button again (or press
L) to deactivate the Format Painter
21. In the Slides Pane, click slide 4
Slide 4 has quite a few bullet points. This can be somewhat distracting or confusing to read for some audience members. Using AutoFit Options presents some options for just such a situation.
22. Click once to activate the text frame around the bulleted list on slide 4. Click the AutoFit Optionsbutton to see a menu of choices…
Figure 2-17: Overflowing text frames automatically display the AutoFit Options button
23. Choose Split Text Between Two Slides
Notice how this slide (Implementation and Timeline) is now split over two slides.
SAMPLE