microsoft powerpoint 2010 - kennesaw state university 2010 table of contents introduction 1 training...
TRANSCRIPT
Microsoft
PowerPoint 2010
Copyright © 2010 KSU Dept. of Information Technology Services
This document may be downloaded, printed or copied for educational use without further
permission of the Information Technology Services Department (ITS), provided the content is
not modified and this statement is not removed. Any use not stated above requires the written
consent of the ITS Department. The distribution of a copy of this document via the Internet or
other electronic medium without the written permission of the KSU - ITS Department is
expressly prohibited.
Published by Kennesaw State University – ITS 2010
The publisher makes no warranties as to the accuracy of the material contained in this
document and therefore is not responsible for any damages or liabilities incurred from its use.
Microsoft, Microsoft Office, and Microsoft PowerPoint are trademarks of the Microsoft
Corporation.
Information Technology Services

PowerPoint 2010
Table of Contents
INTRODUCTION 1
TRAINING OBJECTIVES 2
THE MICROSOFT POWERPOINT 2010 INTERFACE 2
NAVIGATION 8
CHANGING VIEWS 9
HOW TO CREATE A NEW PRESENTATION 10
SAVING A PRESENTATION 10
APPEARANCE 12
TEXT 16
CLIP ART 18
IMAGES FROM A FILE 19
DRAW SHAPES 19
HYPERLINKS 20
HEADER AND FOOTER 21
TRANSITION 22
TIMING THE PRESENTATION 23
PRESENTING 24
PRINTING 25
1
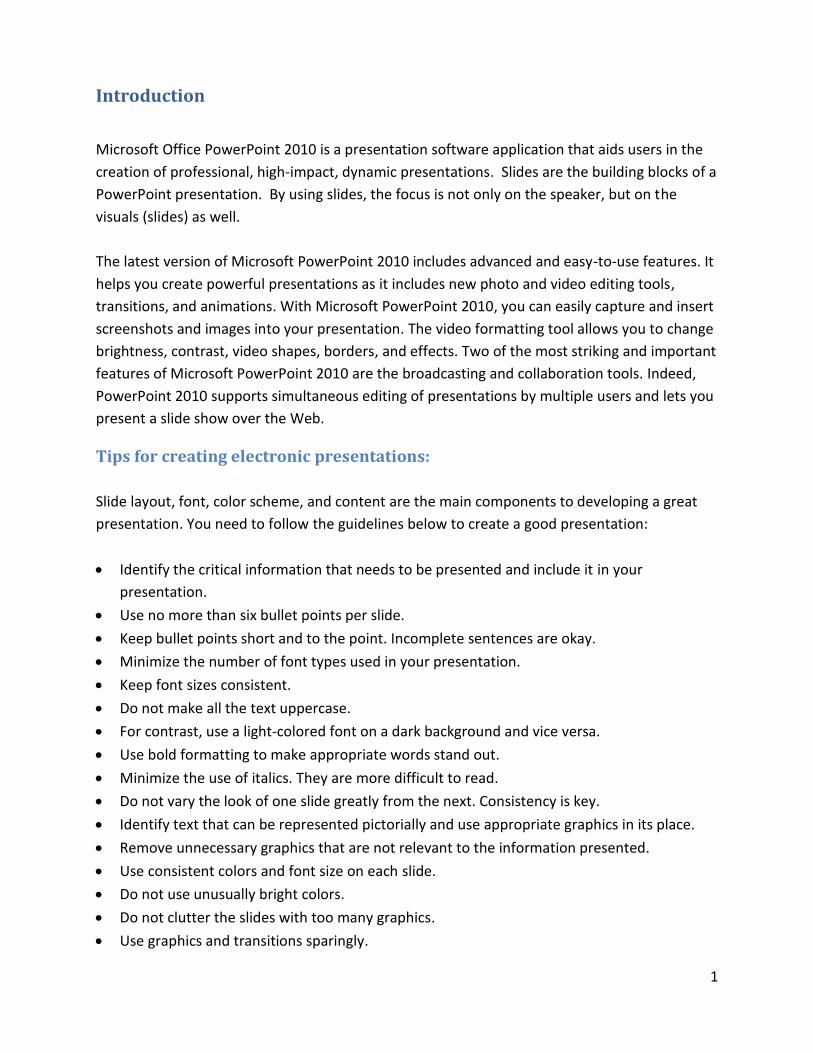
Introduction
Microsoft Office PowerPoint 2010 is a presentation software application that aids users in the
creation of professional, high-impact, dynamic presentations. Slides are the building blocks of a
PowerPoint presentation. By using slides, the focus is not only on the speaker, but on the
visuals (slides) as well.
The latest version of Microsoft PowerPoint 2010 includes advanced and easy-to-use features. It
helps you create powerful presentations as it includes new photo and video editing tools,
transitions, and animations. With Microsoft PowerPoint 2010, you can easily capture and insert
screenshots and images into your presentation. The video formatting tool allows you to change
brightness, contrast, video shapes, borders, and effects. Two of the most striking and important
features of Microsoft PowerPoint 2010 are the broadcasting and collaboration tools. Indeed,
PowerPoint 2010 supports simultaneous editing of presentations by multiple users and lets you
present a slide show over the Web.
Tips for creating electronic presentations:
Slide layout, font, color scheme, and content are the main components to developing a great
presentation. You need to follow the guidelines below to create a good presentation:
Identify the critical information that needs to be presented and include it in your
presentation.
Use no more than six bullet points per slide.
Keep bullet points short and to the point. Incomplete sentences are okay.
Minimize the number of font types used in your presentation.
Keep font sizes consistent.
Do not make all the text uppercase.
For contrast, use a light-colored font on a dark background and vice versa.
Use bold formatting to make appropriate words stand out.
Minimize the use of italics. They are more difficult to read.
Do not vary the look of one slide greatly from the next. Consistency is key.
Identify text that can be represented pictorially and use appropriate graphics in its place.
Remove unnecessary graphics that are not relevant to the information presented.
Use consistent colors and font size on each slide.
Do not use unusually bright colors.
Do not clutter the slides with too many graphics.
Use graphics and transitions sparingly.

2
Training Objectives
Become familiar with PowerPoint’s interface.
Create a new presentation.
Save a presentation for later use.
Add slides to a presentation.
Work with galleries.
Work with themes and background styles.
Use the various PowerPoint views.
Enter and edit text.
Insert graphics and other objects.
Add transitions and animations.
Time the presentation.
Play the slideshow.
Print handouts.
The Microsoft PowerPoint 2010 Interface
There are a number of prominent changes to the look and functionality of Microsoft
PowerPoint. Let us have a look at its latest interface.
The Ribbon
Figure 1 - The Ribbon
The ribbon is a panel that contains functional groupings of buttons and drop-down lists
organized by tabs. The ribbon is designed to help you quickly find the commands that you need
to complete a task.
The ribbon is made up of a set of tabs that pertain to the different functionalities of
PowerPoint, such as designing slides, inserting media onto slides, or applying animations. Each
tab is further divided into logical groups (of buttons), such as the Font group shown above.
There are also “contextual tabs” that appear, depending on what you are working on.

3
For example, if you have inserted pictures, the Picture Tools tab appears whenever a picture is
selected (see Figure 2).
Figure 2 - Contextual Tab
The Quick Access Toolbar
Figure 3 - Quick Access Toolbar
The Quick Access Toolbar is a small toolbar at the top left of the application window that you
can customize to contain the buttons for the functions that you use most often.
To customize the Quick Access Toolbar:
Click on the drop-down arrow on the far right.
1. Click on any listed command to add it
to the Quick Access Toolbar.
2. Click on More Commands… to choose
from a comprehensive list of commands.
Figure 4 - Customize Quick Access Toolbar

4
3. Select a command from the list by clicking on it.
4. Click on the Add button.
5. Repeat steps 4 & 5 to add additional commands.
6. Click on the OK button to confirm your selection.
Figure 5 - Customize the Quick Access Toolbar with additional commands

5
Galleries
Figure 6 - Themes Gallery under the Design tab
A Gallery is a collection of pre-defined formats which can be applied to various elements in
Office applications, such as the Themes Gallery in PowerPoint. A Gallery most often appears as
a result of clicking on an item on one of the Ribbon Tabs.
The selections in a Gallery incorporate a feature called Live Preview. When the mouse cursor
hovers over a selection in a Gallery, your document takes on the formatting attributes of that
selection in order to give you a preview of how that selection will look when applied to your
document.
Mini Toolbar
Figure 7 - Mini Toolbar
The Mini Toolbar is a semi-transparent toolbar that appears when you select text. When the
mouse cursor hovers over the Mini Toolbar, it becomes completely solid and can be used to
format the selected text.
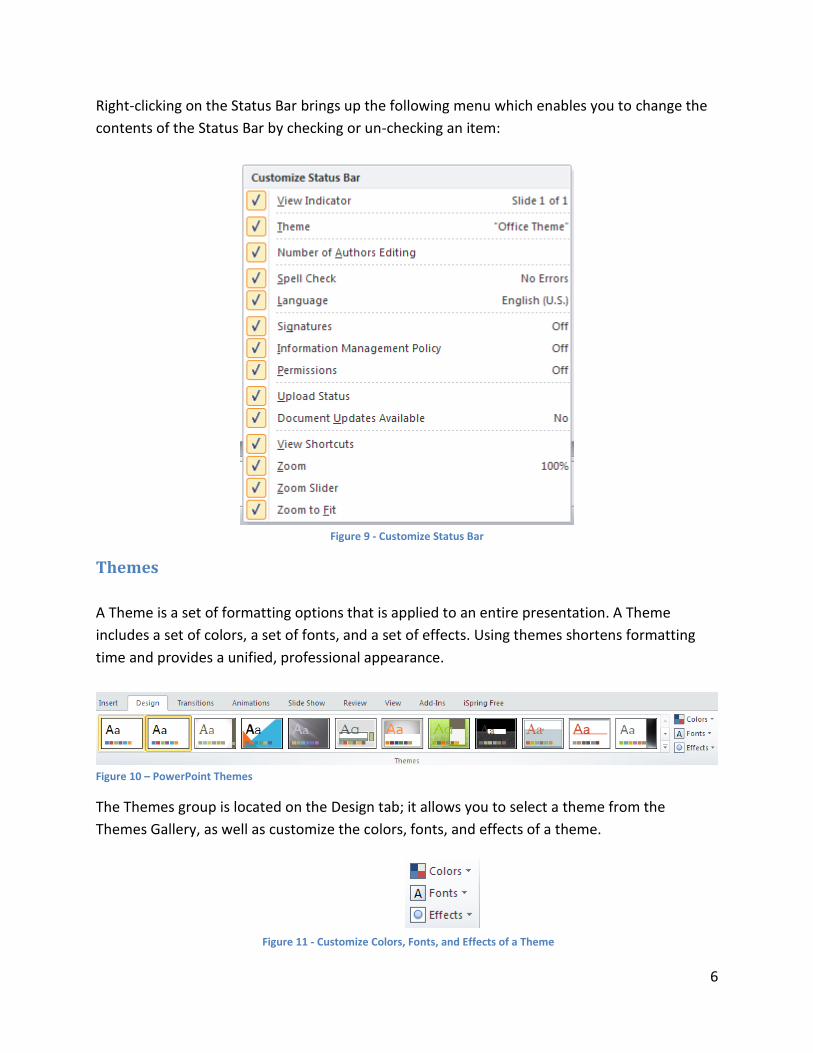
Status Bar
The Status Bar can be customized to display specific information. Below is the default Status Bar
for PowerPoint:
Figure 8 - Status Bar
6
Right-clicking on the Status Bar brings up the following menu which enables you to change the
contents of the Status Bar by checking or un-checking an item:
Figure 9 - Customize Status Bar
Themes
A Theme is a set of formatting options that is applied to an entire presentation. A Theme
includes a set of colors, a set of fonts, and a set of effects. Using themes shortens formatting
time and provides a unified, professional appearance.
Figure 10 – PowerPoint Themes
The Themes group is located on the Design tab; it allows you to select a theme from the
Themes Gallery, as well as customize the colors, fonts, and effects of a theme.
Figure 11 - Customize Colors, Fonts, and Effects of a Theme
7
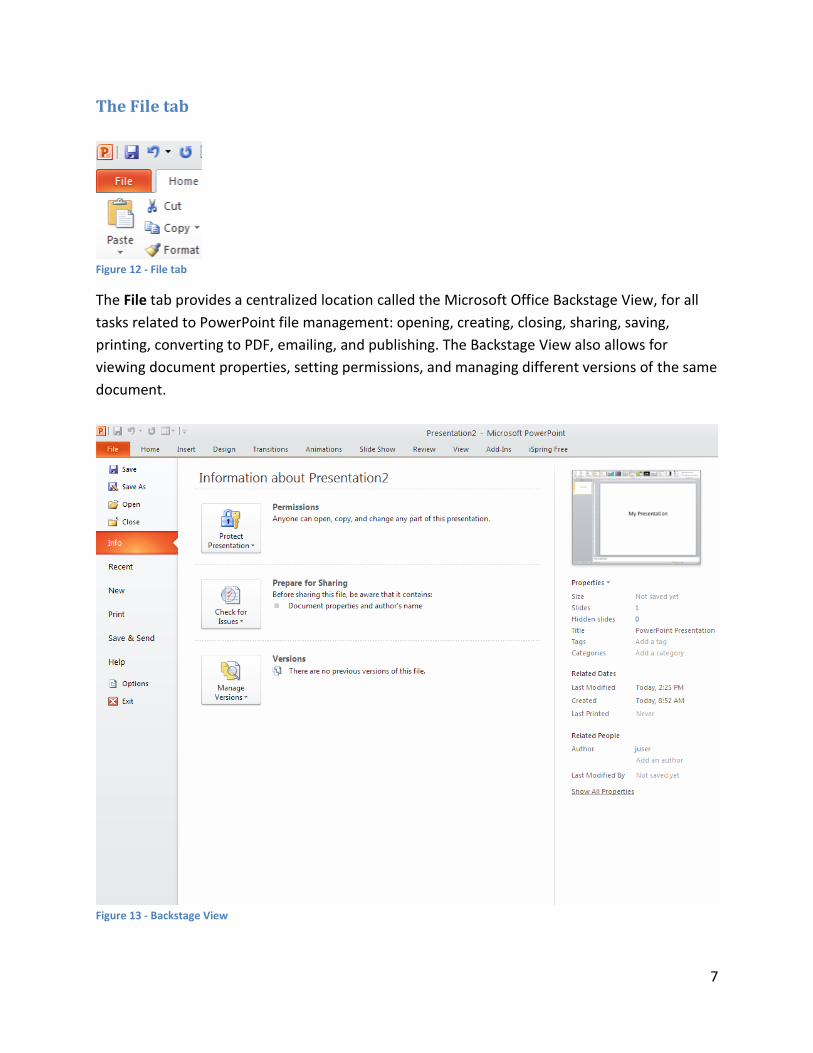
The File tab
Figure 12 - File tab
The File tab provides a centralized location called the Microsoft Office Backstage View, for all
tasks related to PowerPoint file management: opening, creating, closing, sharing, saving,
printing, converting to PDF, emailing, and publishing. The Backstage View also allows for
viewing document properties, setting permissions, and managing different versions of the same
document.
Figure 13 - Backstage View

8
Navigation PowerPoint 2010 opens in the Normal View showing the Slides tab on the left side of the
window.
Figure 14 - Normal View
Slides Tab
The Slides tab displays all the slides available in a presentation and helps to navigate through
the presentation. The slides are listed in sequence and you can shuffle the slides by dragging a
slide from the current location and placing it in the preferred location. In the slide pane, you
can see how your text looks on each slide. You can add graphics, movies, and sounds, create
hyperlinks, and add animations to individual slides.
Outline Tab
Use the outline pane to organize and develop the content of your presentation.
Slides & Outline tabs
Slide Pane
Slide Preview
Notes Pane
9
Notes Pane
It can be helpful to use the Notes Pane to remind yourself of speaking points for your
presentation. These personal notes can also be printed out for future referencing. Notes
entered in the Notes Pane will not appear on the slide show.
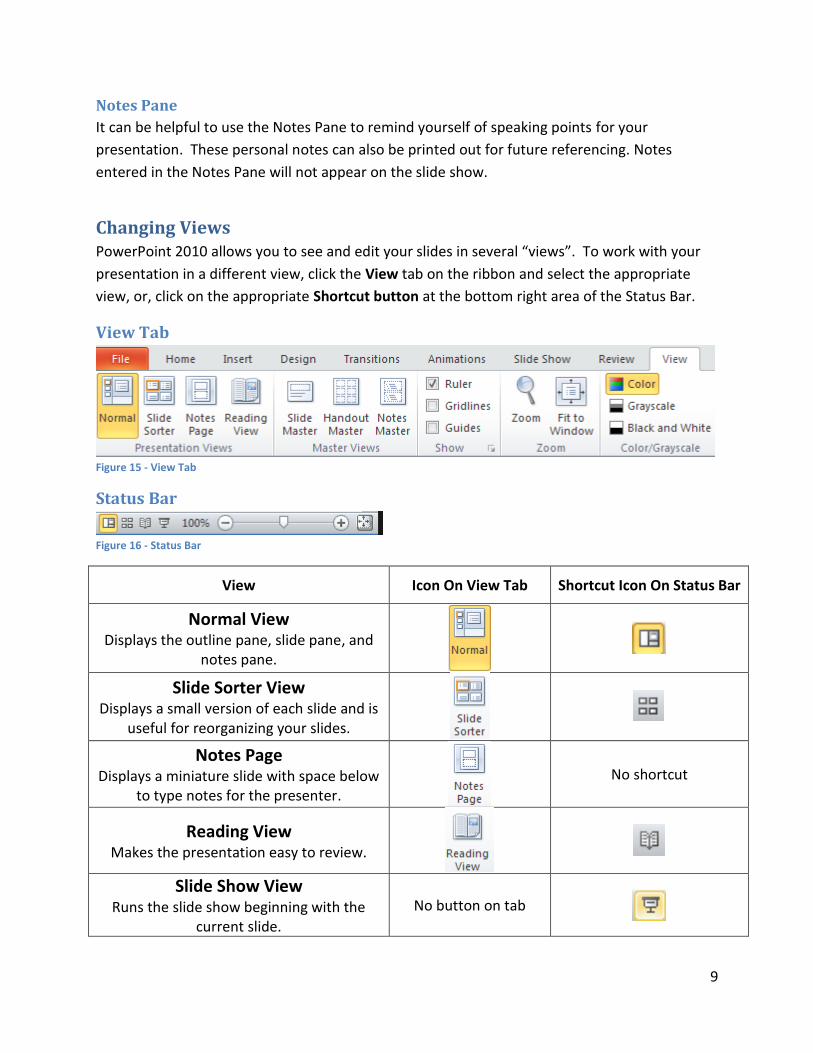
Changing Views PowerPoint 2010 allows you to see and edit your slides in several “views”. To work with your
presentation in a different view, click the View tab on the ribbon and select the appropriate
view, or, click on the appropriate Shortcut button at the bottom right area of the Status Bar.
View Tab
Figure 15 - View Tab
Status Bar
Figure 16 - Status Bar
View Icon On View Tab Shortcut Icon On Status Bar
Normal View
Displays the outline pane, slide pane, and notes pane.
Slide Sorter View Displays a small version of each slide and is
useful for reorganizing your slides.
Notes Page Displays a miniature slide with space below
to type notes for the presenter.
No shortcut
Reading View Makes the presentation easy to review.
Slide Show View Runs the slide show beginning with the
current slide. No button on tab

10
How to Create a New Presentation 1. Click on the File tab.
2. Choose New.
3. Select Blank presentation.
4. Click on the Create button.
Figure 17 - Creating a new presentation
Saving a Presentation You created a new presentation. Now, you may want to save the presentation so that you can
use it later. The Save command, available from the File tab, is used to save a newly created
presentation or to save the changes made to an existing presentation. When saving a file for
the first time, you are prompted to enter a file name for the presentation, and you are asked in
which location you would like the file to be saved.
File Formats
PowerPoint 2010 uses PowerPoint Presentation (.pptx) as the default file format. Additional
formats include PowerPoint 97-2003 (.ppt), PowerPoint Show (.ppsx), PowerPoint Show 97-
2003 (.pps), Windows Media Video (.wmv), as well as GIF, JPEG, PNG, TIF and BMP. The
PowerPoint Show is a presentation that always opens in Slide Show view rather than in Normal
view.

11
How to Save a Presentation
1. Click the File tab.
2. Choose Save to save the presentation with a new name in any location.
a. If necessary, create a new folder in which to save your presentation.
i. Using the Save in: drop-down list, navigate to the location where you
want to create a new folder.
ii. Right-click and choose New→Folder.
iii. Type a name for the new folder and press Enter
3. In the File Name text box, type the name of the file.
4. Click Save As, and then do one of the following:
For a presentation that can be opened only in PowerPoint 2010 or
PowerPoint 2007, in the Save as type list, select PowerPoint Presentation
(*.pptx).
For a presentation that can be opened in either PowerPoint 2010 or
earlier versions of PowerPoint, select PowerPoint 97-2003 Presentation
(*.ppt).
5. Click Save.
Note: From now on, you can press CTRL+S or click Save near the top of the screen to save
your presentation quickly at any time.
Appearance
Slides
You are familiar with creating a new presentation and saving the changes you make to a
presentation. You may need to add slides to the presentation to include more information.
Before you begin creating a presentation it is important that you decide on a design and layout.
Slides and layouts are the basic building blocks of any presentation. For a presentation to be
effective, care should be taken to apply the right slide layouts. Being able to add the
appropriate slide layout to your presentation will enable you to present information more
relevantly to your audience. PowerPoint offers several built-in slide layouts to deliver visually
effective presentations.
Adding a New Slide
Figure 18 - Saving a presentation

12
Appearance
Slides
You are familiar with creating a new presentation and saving the changes you make to
an existing presentation. You may need to add slides to the presentation to include
more information.
Before you begin creating a presentation it is important that you decide on a design and
layout. Slides and layouts are the basic building blocks of any presentation. For a
presentation to be effective, care should be taken to apply the right slide layouts. Being
able to add the appropriate slide layout to your presentation will enable you to present
information more relevantly to your audience. PowerPoint offers several built-in slide
layouts to deliver visually effective presentations.
Adding a New Slide
1. On the Home tab, in the Slides group, click New Slide to display the default list of
layouts.
2. From the New Slide drop-down list, select a layout to insert.
Figure 19 - New Slide options

13
Types of Slide Layouts
Title Slide
This layout includes placeholders for a main title and a subtitle.
Title And Content
This layout includes a placeholder to enter slide title and a place for text, charts, tables, pictures, clip art,
and SmartArt graphics.
Section Header
This layout allows space for section and sub-section titles.
Two Content
Much like the Title and Content slide layout, this layout offers a place for slide title text and two
content places for text, charts, tables, pictures, clip art, and SmartArt graphics.
Comparison
This layout is just like the Two Content layout with the addition of two text placeholders to aid in
compare and contrast slides.
Title Only
This layout offers a place to enter title text.
Blank
This is a blank slide with no placeholders.
Content With Caption
With this slide you can enter a title, text, and content such as additional text, charts, tables,
pictures, clip art, and SmartArt graphics.
14
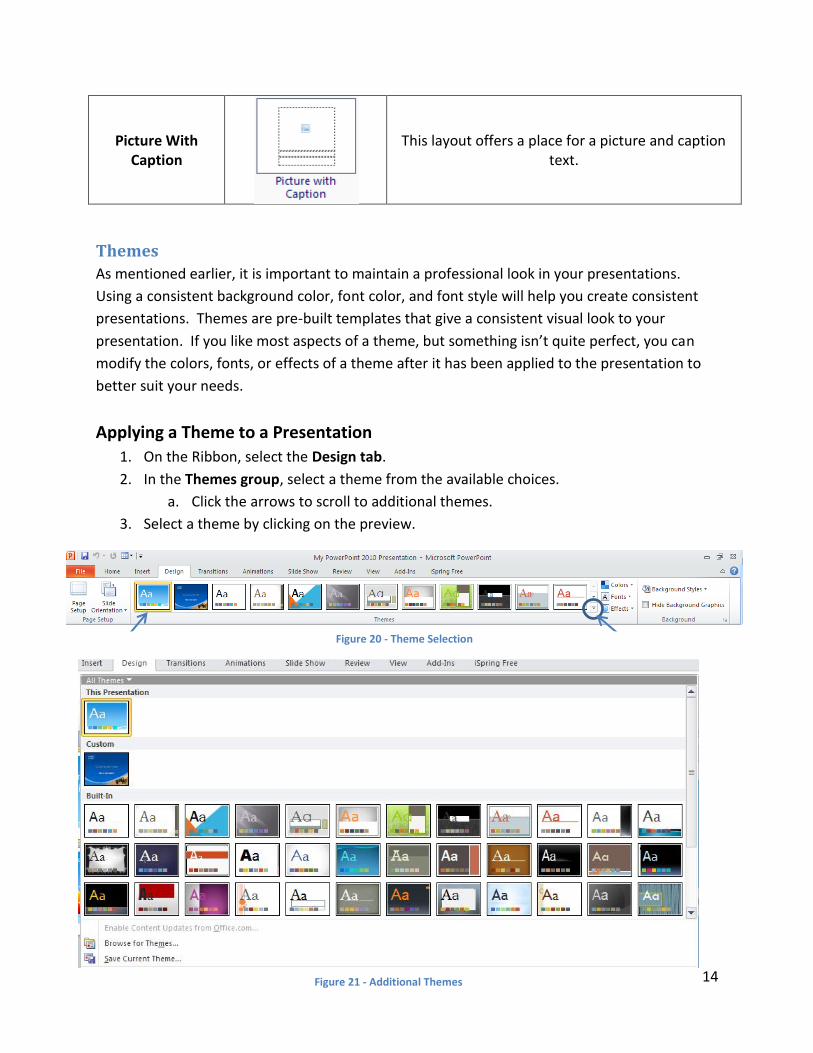
Picture With Caption
This layout offers a place for a picture and caption text.
Themes
As mentioned earlier, it is important to maintain a professional look in your presentations.
Using a consistent background color, font color, and font style will help you create consistent
presentations. Themes are pre-built templates that give a consistent visual look to your
presentation. If you like most aspects of a theme, but something isn’t quite perfect, you can
modify the colors, fonts, or effects of a theme after it has been applied to the presentation to
better suit your needs.
Applying a Theme to a Presentation
1. On the Ribbon, select the Design tab.
2. In the Themes group, select a theme from the available choices.
a. Click the arrows to scroll to additional themes.
3. Select a theme by clicking on the preview.
Figure 20 - Theme Selection
Figure 21 - Additional Themes
15
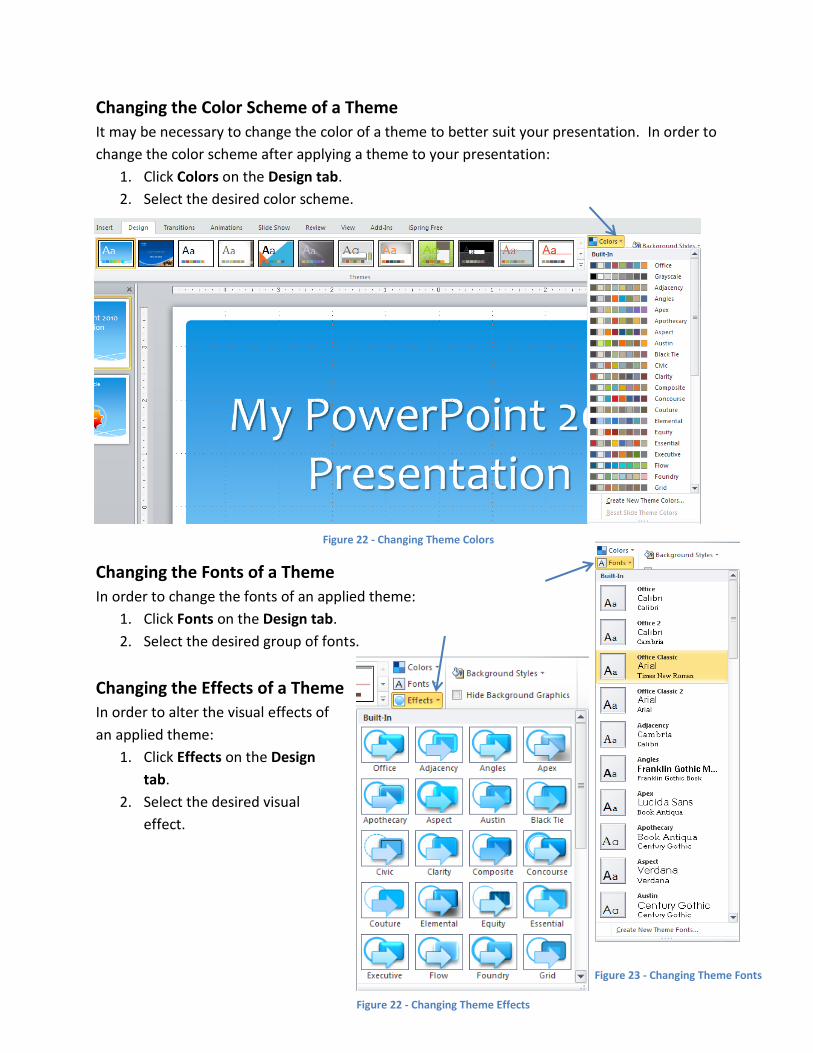
Changing the Color Scheme of a Theme
It may be necessary to change the color of a theme to better suit your presentation. In order to
change the color scheme after applying a theme to your presentation:
1. Click Colors on the Design tab.
2. Select the desired color scheme.
Changing the Fonts of a Theme
In order to change the fonts of an applied theme:
1. Click Fonts on the Design tab.
2. Select the desired group of fonts.
Changing the Effects of a Theme
In order to alter the visual effects of
an applied theme:
1. Click Effects on the Design
tab.
2. Select the desired visual
effect.
Figure 22 - Changing Theme Colors
Figure 23 - Changing Theme Fonts
Figure 22 - Changing Theme Effects
16
Text A presentation is not all about pictures and background color; it depends mostly on the text.
The message of your presentation is conveyed through the text. The visual aids are simply
cosmetics to help support your message.
Entering Text
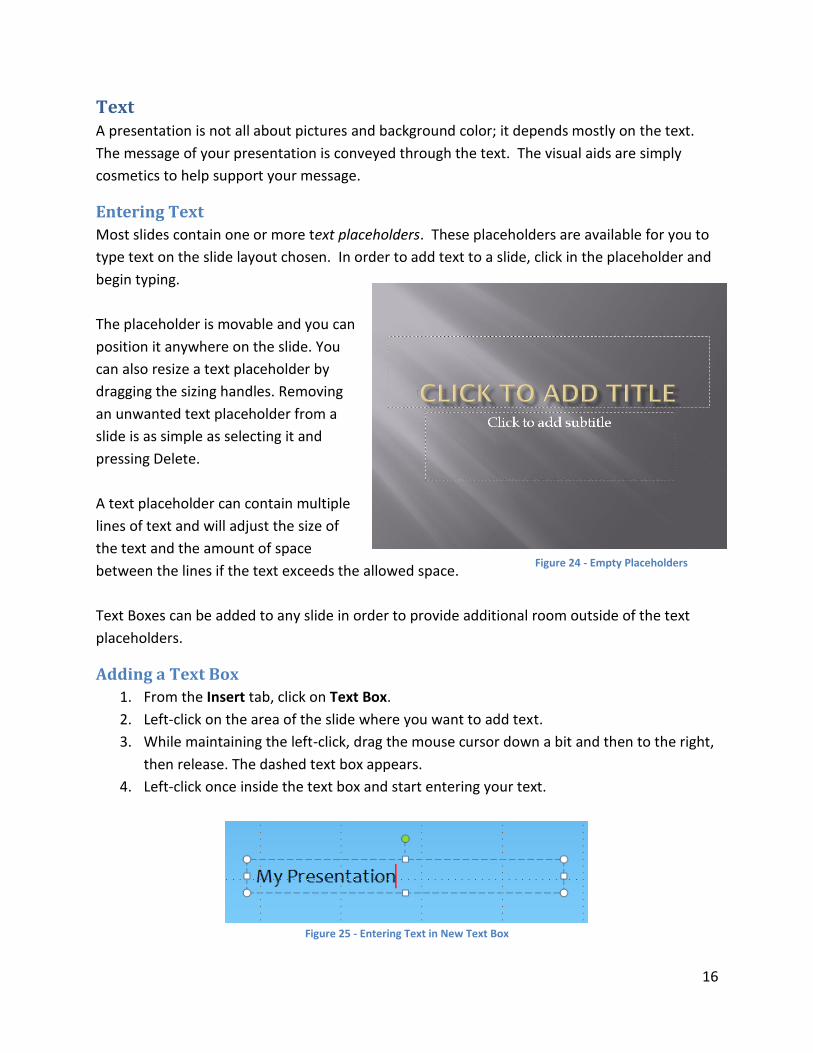
Most slides contain one or more text placeholders. These placeholders are available for you to
type text on the slide layout chosen. In order to add text to a slide, click in the placeholder and
begin typing.
The placeholder is movable and you can
position it anywhere on the slide. You
can also resize a text placeholder by
dragging the sizing handles. Removing
an unwanted text placeholder from a
slide is as simple as selecting it and
pressing Delete.
A text placeholder can contain multiple
lines of text and will adjust the size of
the text and the amount of space
between the lines if the text exceeds the allowed space.
Text Boxes can be added to any slide in order to provide additional room outside of the text
placeholders.
Adding a Text Box
1. From the Insert tab, click on Text Box.
2. Left-click on the area of the slide where you want to add text.
3. While maintaining the left-click, drag the mouse cursor down a bit and then to the right,
then release. The dashed text box appears.
4. Left-click once inside the text box and start entering your text.
Figure 25 - Entering Text in New Text Box
Figure 24 - Empty Placeholders

17
Editing Text
When creating a presentation, it is likely that you will be doing some editing. In order to edit
text on a presentation:
1. Select the text (by left-clicking and maintaining the left-click while dragging the mouse
cursor across the text).
2. Use the Font Group on the Home tab or right-click on the selected text and choose
formatting options from the Mini Toolbar.
3. Make necessary changes to the font and click outside of the text placeholder to accept
the changes.
Graphics
Another way to add emphasis to your presentation is to have visual aids or graphics. Although
we learned earlier that the most important part of your presentation is the message, it is
always helpful to use graphics to get your point across more concisely and in a shorter period of
time.
Figure 26 - Formatting Text

18
Clip Art Clip art is pictures that are available in PowerPoint that can be inserted into your presentations.
A collection of clip arts is available in the form of a gallery—the Clip Art gallery. In addition to
pictures, the Clip Art gallery also contains a wide variety of photographs, movies (animated clip
arts), and sounds that are ready for you to insert and use on your slides.
Inserting Clip Art
When inserting clip art onto a preselected slide layout:
1. Go to the Insert tab.
2. Click the Clip Art button. This will open the Clip Art Gallery.
3. In the Search For field, type the name of the object you wish to find clip art for.
4. Click Go.
5. Scroll through the given results to find your desired clip art.
6. Once found, click on the image to insert it onto your slide.
Figure 23 - Inserting a Clip Art
19
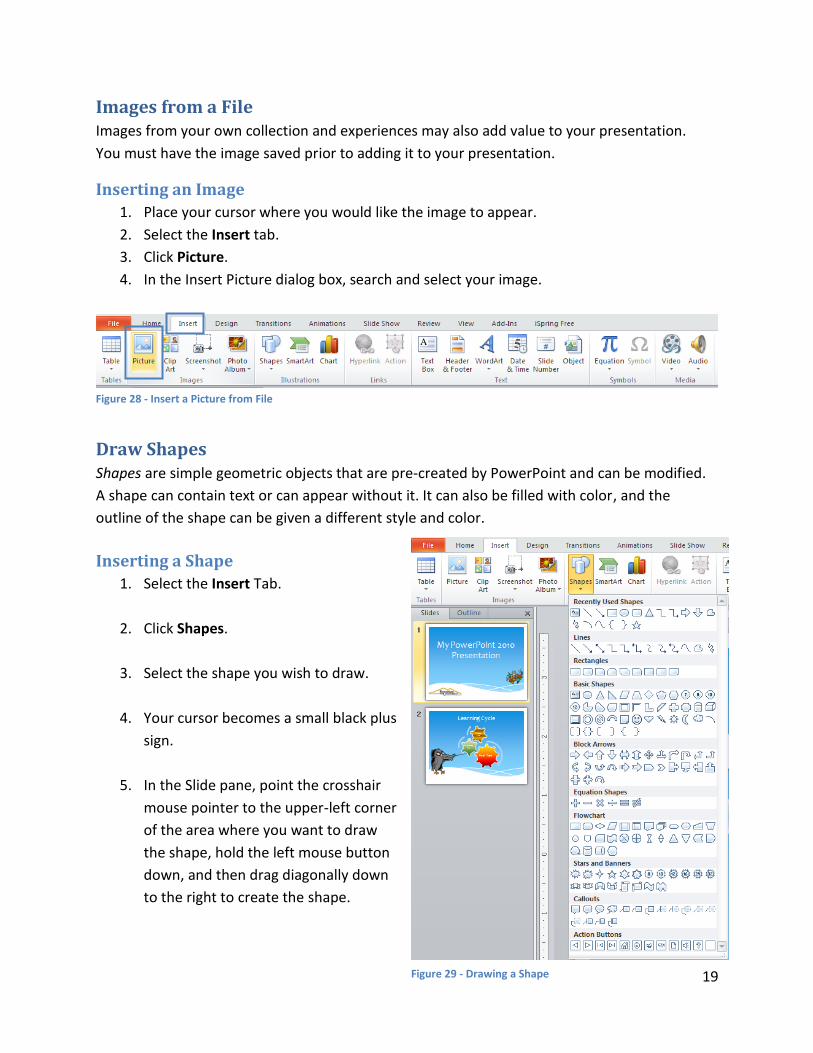
Images from a File Images from your own collection and experiences may also add value to your presentation.
You must have the image saved prior to adding it to your presentation.
Inserting an Image
1. Place your cursor where you would like the image to appear.
2. Select the Insert tab.
3. Click Picture.
4. In the Insert Picture dialog box, search and select your image.
Figure 28 - Insert a Picture from File
Draw Shapes Shapes are simple geometric objects that are pre-created by PowerPoint and can be modified.
A shape can contain text or can appear without it. It can also be filled with color, and the
outline of the shape can be given a different style and color.
Inserting a Shape
1. Select the Insert Tab.
2. Click Shapes.
3. Select the shape you wish to draw.
4. Your cursor becomes a small black plus
sign.
5. In the Slide pane, point the crosshair
mouse pointer to the upper-left corner
of the area where you want to draw
the shape, hold the left mouse button
down, and then drag diagonally down
to the right to create the shape.
Figure 29 - Drawing a Shape

20
Altering a Shape
1. You can now move your shape if necessary by clicking on the object, holding down the
left mouse button, and dragging it to another location.
2. You may also alter the look of your shape by selecting the shape and clicking the Format
Tab.
3. In the Shape Styles group, scroll through additional styles and click on the desired style
to apply it to the shape.
Hyperlinks You may have an additional document or a great website to enhance your presentation.
Adding hyperlinks into your presentation can allow you to quickly jump to supplemental
information while you are presenting.
Adding a Hyperlink
Figure 31 - Hyperlink
1. Select the text that you would like to change to a hyperlink
2. Select the Insert tab.
3. Click Hyperlink.
Figure 30 - Altering a Shape
21
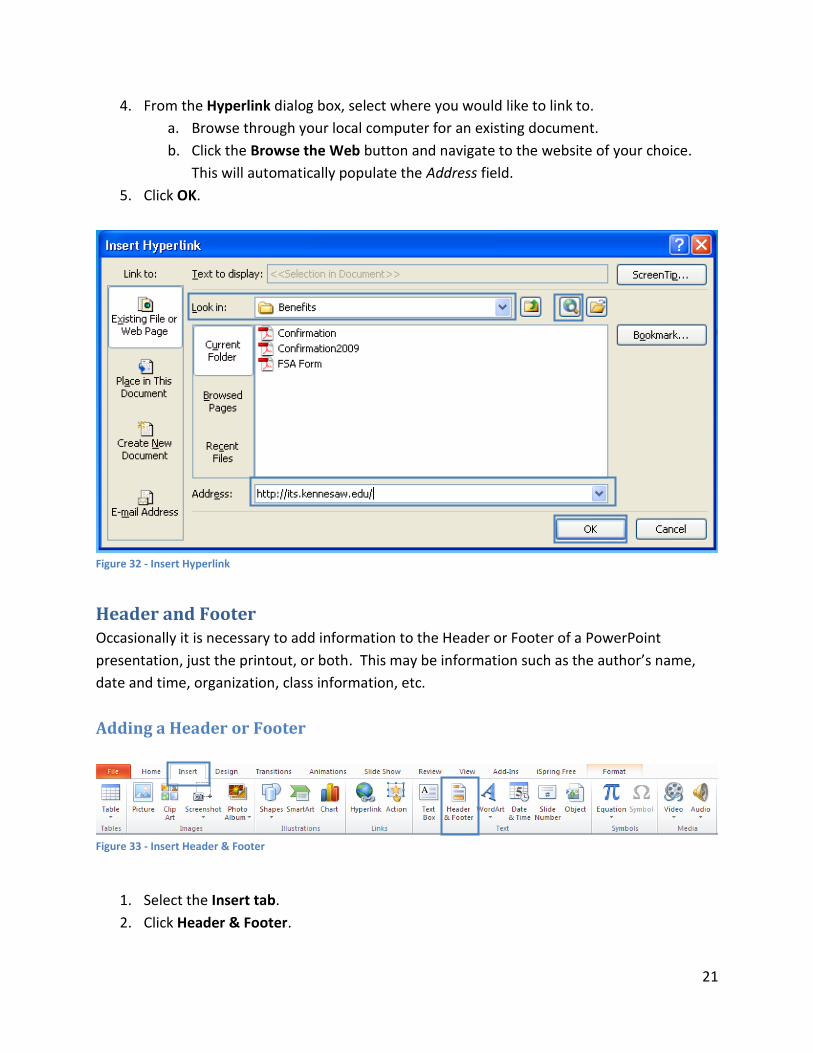
4. From the Hyperlink dialog box, select where you would like to link to.
a. Browse through your local computer for an existing document.
b. Click the Browse the Web button and navigate to the website of your choice.
This will automatically populate the Address field.
5. Click OK.
Figure 32 - Insert Hyperlink
Header and Footer Occasionally it is necessary to add information to the Header or Footer of a PowerPoint
presentation, just the printout, or both. This may be information such as the author’s name,
date and time, organization, class information, etc.
Adding a Header or Footer
Figure 33 - Insert Header & Footer
1. Select the Insert tab.
2. Click Header & Footer.
22
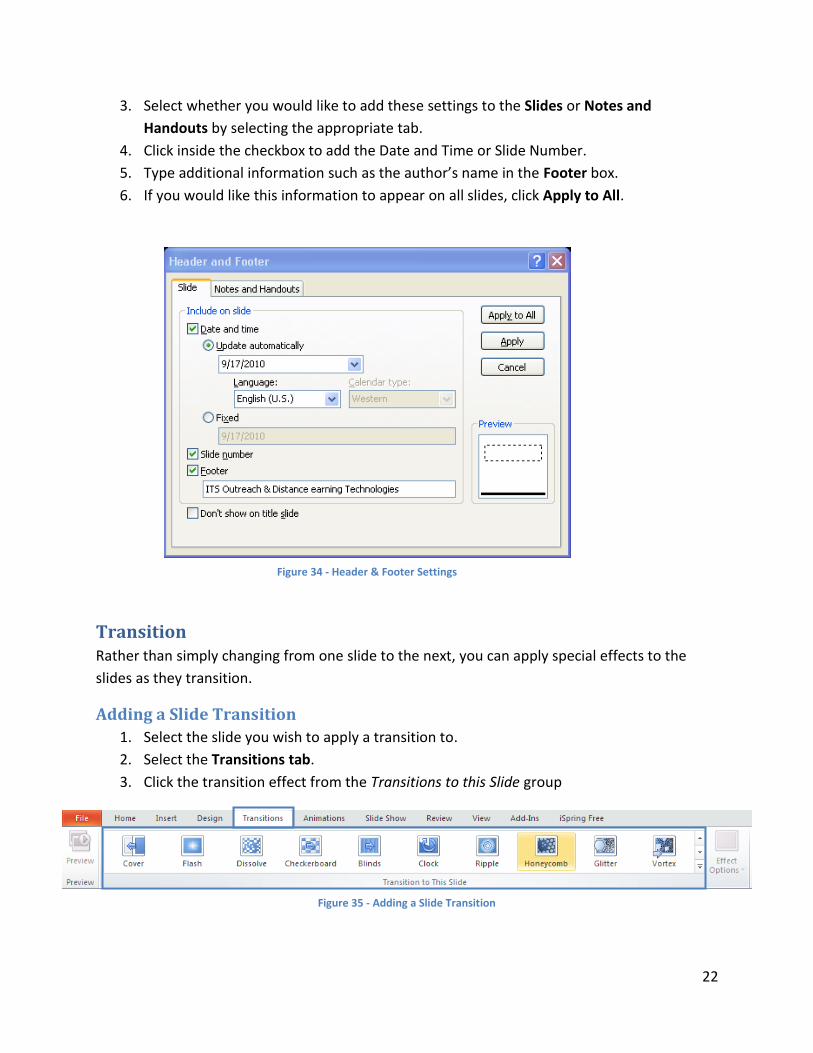
3. Select whether you would like to add these settings to the Slides or Notes and
Handouts by selecting the appropriate tab.
4. Click inside the checkbox to add the Date and Time or Slide Number.
5. Type additional information such as the author’s name in the Footer box.
6. If you would like this information to appear on all slides, click Apply to All.
Transition Rather than simply changing from one slide to the next, you can apply special effects to the
slides as they transition.
Adding a Slide Transition
1. Select the slide you wish to apply a transition to.
2. Select the Transitions tab.
3. Click the transition effect from the Transitions to this Slide group
Figure 34 - Header & Footer Settings
Figure 35 - Adding a Slide Transition

23
If you would like the same transition for all slides in the presentation, click Apply To All in the
Timing group.
Figure 36 - Apply Transition to All Slides
Changing the Properties of a Transition
Occasionally you may that the transition speed is too fast or too slow. You may also want to
add sound to a transition effect to enhance your presentation as well as control how the slide
advances. In order to change these settings:
1. On the Timing group, click the down arrow for Sound or Duration on the Transitions
tab.
2. Make your selection. Click on the Preview button in the Preview group to test your
settings.
3. If you would like the same setting for all slides within the presentation, click Apply to
All.
4. You can also set how the slide will advance; either by a mouse click or after a certain
amount of time has elapsed.
Timing the Presentation
A good way to determine how long it will actually take you to do the presentation is to use the
Rehearse Timings tool.
1. On the Slide Show tab, in the Set Up group, click Rehearse Timings.
Figure 37 - Changing Properties of Transition

24
The Rehearsal toolbar appears and the Slide Time box begins timing the presentation.
The Rehearsal toolbar
Next (advance to next slide)
Pause
Slide Time
Repeat
Total presentation time
2. While timing your presentation, do one or more of the following on the Rehearsal
toolbar:
To move to the next slide, click Next.
To temporarily stop recording the time, click Pause.
To restart recording the time after pausing, click Pause.
To set an exact length of time for a slide to appear, type the length of time in the
Slide Time box.
To restart recording the time for the current slide, click Repeat.
3. After you set the time for the last slide, a message box displays the total time for the
presentation and prompts you to do one of the following:
To keep the recorded slide timings, click Yes.
To discard the recorded slide timings, click No.
Slide Sorter view appears and displays the time of each slide in your presentation.
Presenting Now that you have created your PowerPoint Presentation and applied numerous details, it is
time to present. PowerPoint presentations are meant to be supplemental information, not a
script. Review your presentation for content and try to avoid reading directly from the slides.
It can be helpful to use the Notes Pane to add speaking points. These notes can be printed
later.

25
Presenting
1. Select the Slide Show tab.
2. Click From Beginning to begin the presentation from the first slide or click From Current
Slide to begin the presentation from the slide which currently appears in the Slide
Preview pane.
3. You can advance to the next slide by pressing Enter, the Spacebar, or by clicking the left
mouse button. You will also notice arrows to the right and left if you mouse over the
bottom-left corner of the slide. Clicking one of these arrows will advance the
presentation to the next slide or the previous slide.
4. Pressing the Escape (Esc) key will end your presentation and return you back to the
Normal View.
Printing PowerPoint 2010 allows you to print your presentation in order to aid you in presenting or to
give your audience something to take notes on. There are multiple formats available when
printing; you should choose a format which best suits your presentation and audience needs.
Printing Your Presentation
1. Click the File tab.
2. Click on Print.
3. Indicate the number of copies.
Figure 39 - Number of Copies
4. Select the printer.
Figure 38 - Playing the Slide Show

26
From the Settings section:
5. Click on Print All Slides. If you do not need to print all slides, you may select another
option in the window.
Figure 40 - Print Slides Options
6. Click on Full Page Slides to access Print Layout options such as Handouts and Notes
Pages.
Figure 40 - Print Layout Options

27
7. Make your selection from the Print Layout drop down.
Note: If you select Handouts, choose the amount of slides that should appear on the
printed page from the Handouts box. The 3 Slides option allows for notes to be written
on the handout.
8. Click on Print One Sided to access options to print on both sides of the paper.
9. Click on Color to access options to print in grayscale or black & white.
10. Once you are ready to print, click on the Print button.
Figure 41 - Print Button