micca mplay user manual
TRANSCRIPT

Copyright © 2009-2011 Micca, Ltd. All rights reserved.
Attention Customers! Thank you for purchasing a Micca product. Should you have any enquiries or need assistance, please contact our technical support team before contacting the store for assistance: email [email protected].
Most common questions and answers regarding this product can be found at the following FAQ: http://content.miccastore.com/faq

Copyright © 2009-2011 Micca, Ltd. All rights reserved.
Quick Start Guide
IMPORTANT – If the image on the TV shows “No Signal ”, looks discolored
or distorted, this means the Micca MPLAY has not be en set to the correct
TV System mode in the settings menu. When using the MPLAY’s component
video output, the player’s video out output mode must be set to HD Mode. When
using MPLAY’s composite video output, the player’s video output mode must be
set to NTSC Composite.
Wrong Output Mode Correct Output Mode
When the output mode is incorrect, the image might be too distorted to see the
Settings menu. In this case, press the <SET> button on the remote, then press
the <TV Mode> button repeatedly to cycle the Micca MPLAY through its output
modes until the correct mode is selected.
IMPORTANT – If a MP4/AVI/MOV movie will not play on the Micca MPLAY, it
is most likely encoded in an unsupported format. Please check the following FAQ
for additional information: http://content.miccastore.com/node/130
IMPORTANT – The Micca MPLAY supports all USB flash drives or hard disk
drives up to 2TB in capacity. The drive must be uncompressed FAT32 or
NTFS and not use the GUID partition table. Please check the following FAQ for
additional information: http://content.miccastore.com/node/159

Copyright © 2009-2011 Micca, Ltd. All rights reserved.
IMPORTANT!
For your personal safety, please read the following instructions carefully.
� To reduce the risk of fire, electrical shock or damage to the player, do not
expose this device to humidity, rain, sand or excessive heat (caused by
heating equipment or direct sunlight).
� Use the player in a well ventilated environment to ensure proper cooling.
� Do not open the player beyond which is required to install the internal hard
disk drive, as there is risk of electric shock. Contact a professional for repair.
� Please follow the instructions enclosed with the player for key operation and
maintenance.
Usage Notice
� Before plugging in this device, make sure your power supply voltage matches
the product. The working voltage of this player is marked on the AC power
adapter. Only use the AC power adapter that is supplied with this device.
� Do not touch the socket with a wet hand.
� Turn off the power when the device will not be used.
� Do not place heavy objects on top of the player.
� Do not use strong solvents to clean the surface of the player such as alcohol,
benzene, or thinner.

Copyright © 2009-2011 Micca, Ltd. All rights reserved.
I. General Introduction
Thank you for purchasing a Micca product.
The Micca MPLAY is a standalone digital media player. It is capable of playing
digital videos, music and pictures stored on SD/SDHC/MMS flash cards, as well
as USB 2.0 compliant storage devices such as USB drives, or portable hard disk
drives. The Micca MPLAY supports a wide range of media file formats, allowing
its users to enjoy digital contents anywhere in the home.
Play Media Files on All TVs and HDTVs
The Micca MPLAY works with all NTSC and PAL televisions, from older analog
TVs to the newest plasma and LCD HDTVs. Everything you need is provided so
there are no extra cables to buy. Its component video output provides 720p video
output with excellent image quality.
Perfect Throughout the House
The Micca MPLAY is costs less than a DVD player and is much more versatile
than due to its capability to playback a wide range of video and audio formats
from common storage devices. It is therefore the perfect replacement for aging
DVD players. It’s so affordable, put one anywhere there is a TV!
Compact and Convenient
The Micca SLIM is exceptionally compact, smaller than a paperback novel, and
takes up very little space. There is no need for a dedicated shelf. Its user
interface is fast, responsive, and intuitive to use. It can easily be used to play
movies and photos on a big screen TV without a computer.

Copyright © 2009-2011 Micca, Ltd. All rights reserved.
II. Features and Specifications The Micca MPLAY offers the following key features and specifications
• 720P high definition component video output
• Compatible with all NTSC/PAL TVs and HDTVs, including
CRT/LCD/Plasma/Projection
• Plays a wide range of popular media formats
• Fast, responsive, and easy to navigate user interface
• Convenient auto resume and continuous multi-file playback
• Play media files from USB hard drives, USB flash drives, or
SD/SDHC/MMC flash cards
• Full function IR remote control in addition to on-device buttons
• Ultra compact and portable for use in the home or on the go.
File Type Video Codec Audio Codec Notes
Video
*.AVI MPEG4, DivX, Xvid
MP3, AAC, AC-3, PCM
720 x 576 Max *.MP4, *.MOV MPEG4 AAC, AC-3, OGG
*.VOB (DVD) MPEG2 AC-3, MPEG, PCM
*.MPG, *.DAT MPEG1/2 MPEG MP3
*.RMVB, *.RM RealVideo RealVideo, AAC, MP3 1024 x 576 Max
*.3GP MPEG4 AAC 640 x 480 Max
Audio
*.MP3 MPEG Layer-3 32kbps-320kbps
*.WMA Windows Media Audio
32kbps-192kbps
Photo *.JPG, *.GIF, *.BMP, *.PNG
JPG 7800 x 5280 Max

Copyright © 2009-2011 Micca, Ltd. All rights reserved.
III. Item Check List Before starting, check that the following items have been included with your
Micca MPLAY. If anything is missing, contact your retailer.
1 Micca MPLAY Media Player
2 IR Remote Control
3 3.5mm to 3 RCA Component Video Cable
4 3.5mm to 3 RCA AV Output Cable
6 5.0VDC AC Power Adapter

Copyright © 2009-2011 Micca, Ltd. All rights reserved.
IV. MPLAY Device Layout The Micca MPLAY has built-in buttons for performing basic playback controls
without the IR remote control. The buttons from left to right are: Enter, Return, Up,
Down, Left, and Right. These buttons serves as the same functions as the
following IR remote control buttons:
���� Maps to OK button
� Maps to Stop/Return button
���� Maps to Up button
���� Maps to Down button
���� Maps to Left button
���� Maps to Right button
The back of the MPLAY has the following items:

Copyright © 2009-2011 Micca, Ltd. All rights reserved.
• Master Power Switch – Turns the MPLAY on or off without using the IR
remote control. When this switch is Off, the MPLAY cannot be turned on
with the remote. When this switch is On, the MPLAY can be turned on or
put into standby mode with the IR remote.
• AV Output Connection – Outputs stereo audio and composite video signal
for use with analog TVs. Only use the AV cable that was supplied with the
MPLAY to ensure correct polarity.
• YPrPb Component Connection – Outputs 720p video signal for use with
HDTVs. Note that this connection contains video signals only. The AV Out
connection must be used to provide audio. Only use the component cable
that was supplied with the MPLAY to ensure correct polarity.
• DC 5V – DC power input. Use only the AC adapter that was supplied with
the MPLAY to ensure correct voltage, current, and polarity. Incorrect AC
adapter usage can cause damage to the MPLAY.

Copyright © 2009-2011 Micca, Ltd. All rights reserved.
V. IR Remote Control The Micca MPLAY is equipped with an IR remote control. While the player’s
built-in buttons can be used to navigate and select files for playback, the remote
control is designed to provide more comprehensive access to all of the player’s
features and functions.
Buttons on the remote control are laid out in a logical and familiar manner. The
specific function of each button will be described in the relevant sections in which
they are used.
The remote control requires a CR2025 3V Lithium battery for operation. To
install battery, slide open the battery compartment cover on the back of the
remote. Ensure that the battery is inserted in the correct polarity as indicated in
the battery compartment.
When not planning to use the remote for a long period, remove the battery from
the remote to prevent damage from potential battery leakage.
� Do not use batteries of different types as this may lead to damage to the batteries and remote, and injury to the user.
The remote is most effective when used within 20ft of the Micca MPLAY player,
and within a 60-degree angle with respect to the IR remote sensor on the player.
Strong ambient lighting may degrade the effective range and angle of the remote.
Batteries typically last for 1 year with normal use. If the batteries become too
weak, the remote’s effective range will be decreased dramatically and its
operation may become intermittent. When this happens, replace the batteries.

Copyright © 2009-2011 Micca, Ltd. All rights reserved.
VI. Connecting the Micca MPLAY
A. Power Only use the supplied AC power adapter to provide 5.0VDC power to the Micca
MPLAY. Using a different power adapter may damage the player. Do not cut off
power to the device while the unit is turned on as this may cause serious damage
to attached storage devices and result in data loss.
The MPLAY has a master power switch on the back. During normal use, set this
switch to on and use the remote to turn the MPLAY on or put it into standby
mode. Set this switch to off if not planning to use the MPLAY for a long time to
conserve power. Make sure that the player is in standby mode before
disconnecting power.
B. AV Output The Micca MPLAY can be connected to analog TVs through its AV Out
connector. Only use the supplied 3.5mm-to-RCA AV cable to ensure correct
signal polarity and avoid damage to the player and TV/display.
The RCA cable connectors are color coded to match the AV input on TVs and
display devices as follows:
Red Right Audio Channel
White Left Audio Channel
Yellow Composite Video
The Micca MPLAY must be set to NTSC or PAL Composite mode for the analog
AV output to function. If there is no picture displayed after connecting the AV
Output and turning on the Micca MPLAY, press the <Setup> button on the
remote and then press the <TV Mode> button to switch between output modes
until the correct mode has been selected. There will be a short delay when

Copyright © 2009-2011 Micca, Ltd. All rights reserved.
switching output modes so please wait a few seconds between presses of the
<TV Mode> button.
C. Component Video Output The Micca MPLAY can be connected to HDTVs through its YPrPb (Component)
video connector. The Micca MPLAY’s component video output resolution is fixed
at 1280x720p. The component video output only contains video signals, thus the
AV Output cable must be used at the same time for audio signals. Only use the
supplied 3.5mm-to-RCA AV and Component cables to ensure correct signal
polarity and avoid damage to the player and TV/display.
The RCA cable connectors are color coded to match the AV input on TVs and
display devices as follows:
Green Component Y Signal
Blue Component Pb Signal
Red Component Pr Signal
Red Right Audio Channel
White Left Audio Channel
The Micca MPLAY must be set to HD Mode for the component connection to
output a correct signal. If the picture looks distorted, press the <Setup> button on
the remote and then press the <TV Mode> button to switch between output
modes until the correct mode has been selected. There will be a short delay
when switching output modes so please wait a few seconds between presses of
the <TV Mode> button.

Copyright © 2009-2011 Micca, Ltd. All rights reserved.
VII. Micca MPLAY Startup When powered on, the Micca MPLAY displays a brief loading screen and then
the [Home] screen. By default the [Home] screen will have the [Setup] icon plus
icons representing compatible storage devices found during start up.
During start up the Micca MPLAY configures attached storage devices in the
following order: external USB drive, SD card, internal hard disk drive. The
storage device icons on the [Home] screen are arranged in this same order. The
internal hard disk drive, if installed and properly partitioned and formatted, will be
represented by a [USB] icon.
It is possible to remove and insert external USB devices or SD cards with the
Micca MPLAY powered on. Displayed storage device icons will adjust
automatically.
Use the <����> and <����> buttons on the remote to highlight a storage device and
press the <OK> button to select it and bring up the [Select Media] screen.

Copyright © 2009-2011 Micca, Ltd. All rights reserved.
The [Select Media] screen presents five icons for access to different types of
media files on the selected storage device:
Movie Navigate and playback compatible video files
Music Navigate and playback compatible audio files
Photo Navigate and display compatible picture files.
Text Navigate and display .TXT files
File Navigate and playback all compatible files
Use the <����> and <����> buttons on the remote to highlight the desired media
type and press the <OK> button to select it. Refer to sections for individual
media types for additional information.
� Use the <Photo>, <Music>, and <Movie> buttons on the remote to quickly switch between media playback modes.

Copyright © 2009-2011 Micca, Ltd. All rights reserved.
VIII. Movie Mode In Movie mode, the Micca MPLAY displays a file/folder directory on the left side
of the screen, and a preview box on the right. Navigate the files and folders to
locate video files you wish to play. Use the <����> and <����> buttons to highlight a
compatible video file and press the <OK> button on the remote control to play it.
By default, the Micca MPLAY will continuously and repeatedly play all video files
in a folder in alphabetical order until stopped or turned off.
� Quickly jump to movie mode by pressing the <Movie> button on the remote control.
NOTE: Only files with compatible video file extensions AVI, MPG, MP4, MOV,
VOB, MPG, DAT, RM, RMVB, and 3GP are visible in the file/folder directory.
Video files with incompatible file extensions, such as MKV or WMV will are not
visible. Video files with compatible file extensions but incompatible codec such
as H.264 will not play and will generate an error when full screen playback is
attempted.
In movie mode, the following navigation controls are available while browsing the
file/folder directory:
���� Go up one folder level, currently preview video stops
���� Enter the highlighted folder, no effect if a file is highlighted
���� Highlight the previous file or folder, currently preview video stops
���� Highlight the next file or folder, currently preview video stops
OK ����
Play the highlighted file full screen
In movie mode, the following playback controls are available while playing a
video file full screen:

Copyright © 2009-2011 Micca, Ltd. All rights reserved.
���� Rewind the current playing video file in 2X, 3X, or 4X speeds
Fast forward the current playing video file in 2X, 3X, or 4X speeds
Skip back to the previous video file
���� Skip forward to the next video file
���� Pause or play the current video file
���� Stop playing the current file and return to file/folder directory
AUD Changes the audio track (If more than one is available)
VOL+ Increase playback volume
VOL- Decrease playback volume
Mute Mute playback volume
OSD Toggle the on screen display menu
Zoom Zoom in on the current video in at 2X, 4X, or 8X magnification. During
zoom, the <����>, <����>, <����> and <����> buttons can be used to scroll.
SUB
Displays available subtitles, toggles subtitle text size between normal
or 2X. Subtitle files in the .SRT or .SUB file format are supported and
should be placed in the same folder as the video file.
16:9/4:3 Toggles between various playback aspect ratios
OK Display the on screen display menu

Copyright © 2009-2011 Micca, Ltd. All rights reserved.
The on screen display menu presents a selection of playback control icons on
screen. The menu contains navigation icons for Rewind, Skip Back, Skip
Forward, Fast Forward, Play/Pause, Stop, Zoom, and jump-to time mark. With
the on screen display visible, the following controls are available:
���� Highlight icon to the left
���� Highlight icon to the right
OK Execute the highlighted playback control command
To jump to a time mark in the current video, press the <OSD> button to bring up
the on screen display menu. Use the <����> and <����> buttons on the remote
control to highlight the hour, minute, or second section. Use the <����> and <����>
buttons on the remote to enter the desired time mark. When finished, press the
<OK> key on the remote to jump to the entered time mark.

Copyright © 2009-2011 Micca, Ltd. All rights reserved.
IX. Music Mode In Music mode, the Micca MPLAY displays a file/folder directory on the left side
of the screen, and a playback box on the right. Navigate the folders to locate
music files you wish to play. Highlight a compatible audio file and it will
automatically start to play after a short delay. By default, the Micca MPLAY will
continuously and repeatedly play all music files in a folder in alphabetical order
until stopped or turned off.
� Quickly jump to music mode by pressing the <Music> button on the remote control.
NOTE: Only files with compatible music file extensions MP3 and WMA are visible
in the file/folder directory.
In music mode, the following navigation and playback controls are available while
browsing the file/folder directory:
���� Go up one folder level, currently playing music stops
���� Enter the highlighted folder, no effect if a file is highlighted

Copyright © 2009-2011 Micca, Ltd. All rights reserved.
���� Highlight the previous file or folder, currently playing music stops
���� Highlight the next file or folder, currently playing music stops
���� Rewind the current playing music file in 2X, 4X, or 8X speeds
Fast forward the current playing music file in 2X, 4X, or 8X speeds
Skip back to the previous music file
���� Skip forward to the next music file
���� Pause or play the currently highlighted music file
���� Stop playing the current music file
VOL+ Increase playback volume
VOL- Decrease playback volume
Mute Mute playback volume

Copyright © 2009-2011 Micca, Ltd. All rights reserved.
X. Photo Mode In Photo mode, the Micca MPLAY will locate all photos on the current storage
device, arrange them in alphabetical order by folder and file name, and display all
photos as thumbnails in a 3-by-5 grid.
Navigate the thumbnails to locate photos you wish to view using the <����>, <����>,
<����> and <����> buttons. To view a photo full screen, press the <OK> button on
the remote control after highlighting it.
� Quickly jump to picture mode by pressing the <Photo> button on the remote control.
NOTE: Only files with compatible picture file extensions JPG, GIF, PNG, and TIF
are visible in the thumbnail grid.
In picture mode, the following navigation controls are available while browsing
thumbnails:
���� Highlight the picture to the left of current photo
���� Highlight the picture to the right of current photo
Copyright © 2009-2011 Micca, Ltd. All rights reserved.
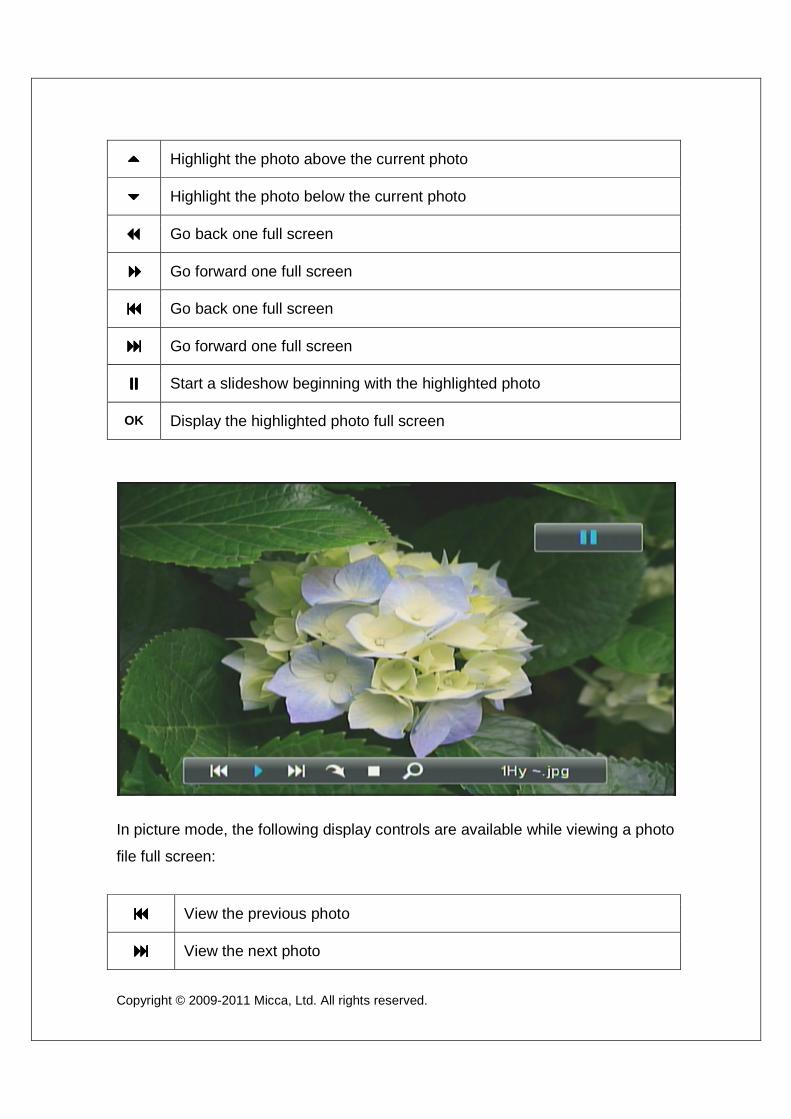
���� Highlight the photo above the current photo
���� Highlight the photo below the current photo
���� Go back one full screen
Go forward one full screen
Go back one full screen
���� Go forward one full screen
���� Start a slideshow beginning with the highlighted photo
OK Display the highlighted photo full screen
In picture mode, the following display controls are available while viewing a photo
file full screen:
View the previous photo
���� View the next photo

Copyright © 2009-2011 Micca, Ltd. All rights reserved.
The on screen display menu presents a selection of viewing control icons on
screen. The menu contains navigation icons for Skip Back, Skip Forward,
Play/Pause, Rotate, Stop, and Zoom. With the on screen display menu visible,
the following controls are available:
���� Highlight icon to the left
���� Highlight icon to the right
OK Execute the highlighted viewing control command
���� Start a slideshow beginning with the current picture
���� Return to thumbnail grid
OSD Toggle the on screen display menu
Zoom Zoom in on the current picture in at 2X, 4X, 8X or 16X magnification.
The <����>, <����>, <����> and <����> buttons can be used to scroll.
OK Display the on screen display menu

Copyright © 2009-2011 Micca, Ltd. All rights reserved.
XI. Text Mode In Text mode, the Micca MPLAY displays a file/folder directory on the left side of
the screen, and a file information box on the right.
Navigate the files and folders to locate text files you wish to read using the <����>,
<����>, <����> and <����> buttons. To read a text file, press the <OK> button on the
remote control after highlighting it.
� Quickly jump to text mode by pressing the <Text> button on the remote control.
NOTE: Only text files with compatible file extension TXT are visible in the
file/folder directory.
In text mode, the following navigation and controls are available while browsing
the file/folder directory:
���� Go up one folder level
���� Enter the highlighted folder, no effect if a file is highlighted

Copyright © 2009-2011 Micca, Ltd. All rights reserved.
���� Highlight the previous file or folder
���� Highlight the next file or folder
OK ����
Read the current highlighted text file
In text mode, the following controls are available while reading a text file:
���� Jump back to beginning of file
���� ����
Scroll up one line
����
Scroll down one line
���� Start a slideshow beginning with the current picture
���� Return to file/folder directory list

Copyright © 2009-2011 Micca, Ltd. All rights reserved.
XII. File Mode In File mode, the Micca MPLAY displays a file/folder directory on the left side of
the screen, and a file information box on the right. Navigate the folders to locate
medial or text files you wish to playback or read.
Use the <����> and <����> buttons to highlight a compatible medial file and its
information will be displayed in the file information box on the right. To play a
media file, press the <OK> button on the remote control after highlighting it.
NOTE: Only files with compatible media file extensions are visible in the
file/folder directory. For a list of what file extensions are visible for each media
type, please refer to their respective sections of this user manual.
In file mode, the following navigation controls are available while browsing the
file/folder directory:
���� Go up one folder level
���� Mark a file for copy or delete (See directions below)

Copyright © 2009-2011 Micca, Ltd. All rights reserved.
���� Highlight the previous file or folder
���� Highlight the next file or folder
OK ����
Play the highlighted file full screen
The Micca MPLAY has the ability to copy or delete files from attached storage
devices such as the internal hard disk drive, external USB flash drives, or SD
flash memory card.
� Copying and deleting files from the Micca MPLAY through a computer is generally more convenient.
The following steps describe the process of deleting a file:
1. Highlight the file in the file/folder directory and press the <����> button on
the remote control to mark it. Multiple files in the same folder can be
marked at the same time.

Copyright © 2009-2011 Micca, Ltd. All rights reserved.
2. Press the <OSD> button on the remote control. The information box on
the right side of the screen will prompt the user to select copy or delete
operations.
3. Highlight [Delete] and press the <OK> button on the remote control. The
information box will now prompt the user to confirm or cancel.
4. To confirm deletion of the marked file(s), highlight the [����] icon on the
screen and press the <OK> button on the remote control. To cancel the
operation, highlight the [X] icon and press <OK>.
5. Once the delete operation has completed, the information box will display
a [Finished] button; press <OK> to clear this confirmation.
The following steps describe the process of copying a file:
1. Highlight the file in the file/folder directory and press the <����> button on
the remote control to mark it. Multiple files in the same folder can be
marked at the same time.
2. Press the <OSD> button on the remote control. The information box on
the right side of the screen will prompt the user to select copy or delete
operations.

Copyright © 2009-2011 Micca, Ltd. All rights reserved.
3. Highlight [Copy] and press the <OK> button on the remote control. The
information box will display a list of currently available storage devices for
the user to select as the copy target.
4. Highlight the desired storage device and press the <����> button on the
remote control. The information box will display available folders on the
selected storage device.
5. Navigate into subfolders as needed using the <����>, <����>, <����> and <����>
buttons on the remote control. The selected target directory will be
displayed at the top of the information box.
6. Once the correct target directory is displayed in the information box, press
the <OK> button on the remote control to confirm copying of the selected
file(s).
7. Once the copy operating has completed, the information box will display a
[Finished] button; press <OK> to clear this confirmation.

Copyright © 2009-2011 Micca, Ltd. All rights reserved.

Copyright © 2009-2011 Micca, Ltd. All rights reserved.
XIII. Firmware Update As features and improvements are added to the Micca MPLAY, new firmware
releases are made available to owners. These firmware updates can be
downloaded from http://download.miccastore.com and installed on an as needed
basis. Please follow these instructions below to update the firmware:
1. Decompress the firmware file and locate the .img file.
2. Copy the .img file onto a USB memory stick. Insert the USB memory stick
into the Micca MPLAY player.
3. Turn on the Micca MPLAY. Select the [USB] icon and press <OK> on the
remote control to bring up the [Select Media] menu.
4. From the [Select Media] menu, highlight [File] and press <OK> on the
remote control.
5. Locate the .img file, highlight it, and press <OK> on the remote control.
6. Highlight the [����] icon, and press <OK> on the remote to confirm update.
7. The update process will start and progress will be shown until it is
complete. The player will restart automatically at end of update. Do not
Copyright © 2009-2011 Micca, Ltd. All rights reserved.
do anything to interrupt the update process as this would render the
player inoperable.
8. After the player restarts, go to the [Setup] screen to restore your settings.
If you do not see anything on the TV after the player restarts, press the
<TV Mode> button to switch between output modes until the correct
mode has been selected. There will be a short delay when switching
output modes so please wait a few seconds between presses of the <TV
Mode> button.

Copyright © 2009-2011 Micca, Ltd. All rights reserved.
XIV. Settings Menu The settings menu contains numerous configuration parameters that control the
behavior of the Micca MPLAY during use.
Below is a list of these parameters:
[Language]
Sets the operating language of the Micca MPLAY
Available values: English, Simplified Chinese
[Slideshow duration]
Sets the time between pictures in slideshow mode
Available values: 3/5/15 Seconds, 1/15 minutes, 1 Hour
[Slideshow mode]
Sets the picture-to-picture transition effect in picture slideshow mode
Available values: Random, Fading, Bottom-to-Top, Top-to-Bottom, Left-to-Right,
Right-to-Left, Door-Close, Door-Open, Horizontal-Cross, Vertical-Cross, Off.
[Music repeat mode]

Copyright © 2009-2011 Micca, Ltd. All rights reserved.
Sets the repeat behavior when playing audio files in music mode
Available values: Repeat one (the selected file will be repeatedly played), Repeat
all (all files in the same folder will be repeatedly played in sequence).
[Movie repeat mode]
Sets the repeat behavior when playing video files in movie mode
Available values: Repeat one (the selected file will be repeatedly played), Repeat
all (all files in the same folder will be repeatedly played in sequence).
[Display mode]
Sets the display aspect ratio when using AV Out for video connection
Available values: 16:9, 4:3
[TV System]
Sets the video output mode of the Micca MPLAY
Available values: PAL Composite, NTSC Composite, HD Mode (720P)
[Autorun]
Sets the Micca MPLAY to automatically playback available video, picture, and
audio files when turned on
Available values: Disable, Enable
[Default]
When selected, resets all settings back to factory default