mfms system
TRANSCRIPT

7/31/2019 mFMS System
http://slidepdf.com/reader/full/mfms-system 1/108
Version 2.0
Department of Fertilizers
Government of India

7/31/2019 mFMS System
http://slidepdf.com/reader/full/mfms-system 2/108
Operation Manual
Page 2
Table of Contents
Table of Contents ................................................................................................................................. 2 Introduction about this manual ............................................................................................................. 8 How to use the manual ......................................................................................................................... 8 Application Interface & Navigation ..................................................................................................... 9 List of Abbreviations ............................................................................................................................ 9 About mFMS Project ......................................................................................................................... 10 Introduction to the Mobile Application of mFMS ............................................................................. 11 Prerequisite/Configuration of the Device ........................................................................................... 11 1 Things To Do Before You Start .................................................................................................. 12 2 Welcome Messages ..................................................................................................................... 13 3 Deployment in the Device........................................................................................................... 15
3.1 Deployment of the Application in the mobile through Cable ............................................. 15 3.2 Deployment of the Application in the mobile through Bluetooth ....................................... 16
3.2.1 From Computer to Mobile ............................................................................................ 16 3.2.2 From Mobile to Mobile ................................................................................................ 21
4 Installation/Uninstallation procedure for mFMS Application .................................................... 23 4.1 Installation procedure of the application in JAVA enabled phones .................................... 23 4.2 Installation procedure of the application in Android OS phones ........................................ 23 4.3 Uninstallation procedure of the application in Java enabled phones ................................... 24 4.4 Uninstallation procedure of the application in Android OS phones .................................... 24
5 Starting the Application .............................................................................................................. 25 6 Registration ................................................................................................................................. 27
6.1 Case I: For Dealer Having Single User Access ................................................................... 27 6.2 Case II: For Dealer Having Multiple User Access .............................................................. 29

7/31/2019 mFMS System
http://slidepdf.com/reader/full/mfms-system 3/108
Operation Manual
Page 3
7 Moblie Operations for Java Enabled Devices for Wholesaler .................................................... 32 7.1 Configurations ..................................................................................................................... 33
7.1.1
Add Company .............................................................................................................. 34
7.1.2 Add Product .................................................................................................................. 35 7.1.3 Delete Product .............................................................................................................. 36 7.1.4 Delete Company ........................................................................................................... 37
7.2 Entering Ack Details ........................................................................................................... 38 7.2.1 Enter Receipt Details .................................................................................................... 38 7.2.2
Receipt Details (Continued) ......................................................................................... 39
7.2.3 Enter PIN ...................................................................................................................... 39 7.2.4 Confirmation Message ................................................................................................. 40
7.3 Entering Sales Details .......................................................................................................... 42 7.3.1 Select Enter Sales Details ............................................................................................. 42 7.3.2 Enter Sales Details ....................................................................................................... 42 7.3.3
Enter Sales Details (Continued) ................................................................................... 43
7.3.4 Enter PIN ...................................................................................................................... 44 7.3.5 Confirmation Message ................................................................................................. 44
7.4 Updating Stock Details ........................................................................................................ 46 7.4.1 Select Update Stock Details ......................................................................................... 46 7.4.2 Update Stock Details .................................................................................................... 47 7.4.3
Update Stock Details (Continued) ................................................................................ 47
7.4.4 Enter PIN ...................................................................................................................... 48 7.4.5 Confirmation Message ................................................................................................. 48
7.5 Manual Receipt Ack ............................................................................................................ 50 7.5.1 Select Manual Ack details ............................................................................................ 50

7/31/2019 mFMS System
http://slidepdf.com/reader/full/mfms-system 4/108
Operation Manual
Page 4
7.5.2 Manual Recpt Ack ........................................................................................................ 51 7.5.3 Enter PIN ...................................................................................................................... 51 7.5.4 Confirmation Message ................................................................................................. 52
7.6 View Sales Details ............................................................................................................... 53 7.6.1 Select View Sales details .............................................................................................. 53 7.6.2 View Sales Details ....................................................................................................... 54 7.6.3 View Sale Details ......................................................................................................... 55
8 Moblie Operations for Java Enabled Devices for Retailers ........................................................ 56 8.1 Configurations ..................................................................................................................... 57
8.1.1 Add Company .............................................................................................................. 57 8.1.2 Add Product .................................................................................................................. 59 8.1.3 Delete Product .............................................................................................................. 60 8.1.4 Delete Company ........................................................................................................... 60
8.2 Entering Ack Details ........................................................................................................... 62 8.2.1
Enter Receipt Details .................................................................................................... 62
8.2.2 Receipt Details (Continued) ......................................................................................... 63 8.2.3 Enter PIN ...................................................................................................................... 63 8.2.4 Confirmation Message ................................................................................................. 64
8.3 Updating Stock Details ........................................................................................................ 66 8.3.1 Select Update Stock Details ......................................................................................... 66 8.3.2
Update Stock Details .................................................................................................... 66
8.3.3 Update Stock Details (Continued) ................................................................................ 67 8.3.4 Enter PIN ...................................................................................................................... 67 8.3.5 Confirmation Message ................................................................................................. 68
8.4 Manual Receipt Ack ............................................................................................................ 70

7/31/2019 mFMS System
http://slidepdf.com/reader/full/mfms-system 5/108
Operation Manual
Page 5
8.4.1 Select Manual Ack details ............................................................................................ 70 8.4.2 Manual Recpt Ack ........................................................................................................ 71 8.4.3 Enter PIN ...................................................................................................................... 71 8.4.4 Confirmation Message ................................................................................................. 72
9 Moblie Operations for Android Phones for Wholesaler ............................................................. 73 9.1 Configurations ..................................................................................................................... 74
9.1.1 Add Company .............................................................................................................. 74 9.1.2 Add Product .................................................................................................................. 75 9.1.3 Delete Product .............................................................................................................. 76 9.1.4 Delete Company ........................................................................................................... 76
9.2 Entering Acknowledgement Details .................................................................................... 78 9.2.1 Enter Receipt Details .................................................................................................... 78 9.2.2 Receipt Details (Continued) ......................................................................................... 79 9.2.3 Enter PIN ...................................................................................................................... 80
9.3 Entering Sales Details .......................................................................................................... 81 9.3.1 Select Enter Sales Details ............................................................................................. 81 9.3.2 Enter Sales Details ....................................................................................................... 81 9.3.3 Enter Sales Details (Continued) ................................................................................... 82 9.3.4 Enter PIN ...................................................................................................................... 83
9.4 Updating Stock Details ........................................................................................................ 85 9.4.1
Select Update Stock Details ......................................................................................... 85
9.4.2 Update Stock Details .................................................................................................... 86 9.4.3 Update Stock Details (Continued) ................................................................................ 86 9.4.4 Enter PIN ...................................................................................................................... 87 9.4.5 Notification Message .................................................................................................... 87

7/31/2019 mFMS System
http://slidepdf.com/reader/full/mfms-system 6/108
Operation Manual
Page 6
9.5 Manual Acknowledgement details ...................................................................................... 88 9.5.1 Select Manual Ack details ............................................................................................ 88 9.5.2
Manual Acknowledgement Details .............................................................................. 89
9.5.3 Enter PIN ...................................................................................................................... 89
9.6 View Sales Details ............................................................................................................... 90 9.6.1 Select View Sales details .............................................................................................. 90 9.6.2 View Sales Details ....................................................................................................... 91 9.6.3 View Sale Details ......................................................................................................... 91
10
Moblie Operations for Android Phones for Retailer ............................................................... 92
10.1 Configurations ..................................................................................................................... 93 10.1.1 Add Company .............................................................................................................. 93 10.1.2 Add Product .................................................................................................................. 94 10.1.3 Delete Product .............................................................................................................. 95 10.1.4 Delete Company ........................................................................................................... 95
10.2
Entering Acknowledgement Details .................................................................................... 97
10.2.1 Enter Receipt Details .................................................................................................... 97 10.2.2 Receipt Details (Continued) ......................................................................................... 98 10.2.3 Enter PIN ...................................................................................................................... 99
10.3 Updating Stock Details ...................................................................................................... 100 10.3.1 Select Update Stock Details ....................................................................................... 100 10.3.2 Update Stock Details .................................................................................................. 100 10.3.3 Update Stock Details (Continued) .............................................................................. 101 10.3.4 Enter PIN .................................................................................................................... 101 10.3.5 Notification Message .................................................................................................. 102
10.4 Manual Acknowledgement details .................................................................................... 103

7/31/2019 mFMS System
http://slidepdf.com/reader/full/mfms-system 7/108
Operation Manual
Page 7
10.4.1 Select Manual Acknowledgement details .................................................................. 103 10.4.2 Manual Acknowledgement Details ............................................................................ 104 10.4.3 Enter PIN .................................................................................................................... 104
11 FAQs ..................................................................................................................................... 105 12 References ............................................................................................................................. 108

7/31/2019 mFMS System
http://slidepdf.com/reader/full/mfms-system 8/108
Operation Manual
Page 8
Introduction about this manual
Purpose of this document:
The purpose of this document is to show the installation & operation of Mobile Based Application
of mFMS (Mobile Based Fertilizer Management System). The mFMS project and its objectives are
discussed in section 1 whereas the mobile application of mFMS is discussed in the section 2 and the
subsequent sections.
This document details the workflow of the entire application which is intended to help the
wholesaler and the retailer in easy understanding of the application. This manual guides its users by
providing a clear idea about how things have to be done in the application. Each and every step is
clearly mentioned in the manual.
Who are the users for whom the manual is intended for:
This manual is intended for the different users who are wholesalers and retailers to make their data
entries for stock, sale, receipt, manual receipt acknowledgement and view sale details whichever
is/are applicable and to the configure the application. A particular user which may either be a
wholesaler/retailer needs to refer only their respective section in this manual based on the operating
system of their mobile i.e a wholesaler should refer sections with the wholesaler as heading and a
retailer should refer sections with the retailer as heading.
What the manual contains:
This manual is designed to provide step-by-step guidance to the users, using actual screenshots
from the application.
How to use the manual
This manual is intended to guide the users in a step-by-step manner to share the application, deploy
the application and make data entries. Each screenshot guides to complete all these tasks.
The table of contents indicates clearly where one can refer these sections for getting the assistance
in any of the operation mentioned above. The manual also describes certain frequently asked
questions (FAQs) that one may have about the application.

7/31/2019 mFMS System
http://slidepdf.com/reader/full/mfms-system 9/108
Operation Manual
Page 9
Application Interface & Navigation
Interfaces Meaning Description
Text Box Enables dealer to enter text or modify the
displayed text
Drop down list
or
Enables dealer to select a single item from
a list of items
For example,
Radio Buttons To make a single choice out of all
available options
Checkbox To choose more than one option out of all
available options
Inbox To go to the inbox of the mobile phone
Continue To go to the next screen
Back To go to the previous screen
Menu To display the menu
Finish To go to the homepage of the application
Exit To exit out of the application
Date Picker To select the date from the calendar
List of Abbreviations
mFMS Mobile Based Fertilizer Monitoring System
FMS Fertilizer Monitoring System
IVRS Interactive Voice Response System

7/31/2019 mFMS System
http://slidepdf.com/reader/full/mfms-system 10/108
Operation Manual
Page
10
About mFMS Project
Honorable Finance Minister, Government of India, in the budget speech of 2011-12 referred to a
task force constituted to work out the modalities for the proposed system of direct transfer of
subsidy for kerosene, LPG and fertilizer.
The Government of India constituted a task force on direct transfer of subsidies on kerosene, LPG
and fertilizer under the chairmanship of Shri Nandan Nilekani to recommend and implement a
solution for direct transfer of subsidies.
For these purposes, an application called ‘mFMS’ is developed to enable the transition and meet the
overall objective of initiative.
Objective
“The objective of the mFMS is to monitor the movement of the fertilizer from the Manufacturer to
Warehouse to Wholesalers and from Wholesalers to Retailers. The proposed system will help in
monitoring the movement of Fertilizer’s consignments and its stock position at various warehouses,
wholesaler, and retailer. The system will also act as a tool for Government Bodies to track and
ensure the timely distribution of fertilizers to the farmers”
An integrated solution consisting of multiple access channels has been found through
• Web
• Mobile

7/31/2019 mFMS System
http://slidepdf.com/reader/full/mfms-system 11/108
Operation Manual
Page
11
Introduction to the Mobile Application of mFMS
A user which may either be a wholesaler/retailer can make the data entry either through any of these
interfaces:
1. Web Application
2. Mobile Application
This manual covers the workflow of mobile application of mFMS for Java/Android mobiles for the
different users of the application discussed in separate sections. For making the entries, the dealer
ID for the respective wholesaler/retailer should already been generated through the Web
Application of mFMS and that should reach the user through a SMS from the server of mFMS.
Prerequisite/Configuration of the Device
Java enabled device*
• A minimum of 256 KB of ROM for the MIDP 2.0, CLDC 1 implementation
• A minimum of 128 KB of RAM for the Java runtime heap
• A minimum of 8 KB of non-volatile writable memory for persistent data
Android enabled device*
Minimum 10MB of phone memory to install the application
By default Android devices have sufficient memory which is almost in GB. The best device
to support the application is Android 2.2 version.
* The mobile specification can be seen from the website www.gsmarena.com. Some suggested
models mentioned in FAQs (Page 163).

7/31/2019 mFMS System
http://slidepdf.com/reader/full/mfms-system 12/108
Operation Manual
Page
12
1 Things To Do Before You Start
The manual intends to help the dealer to make their data entries for stock, sale and receipt
acknowledgement whichever is/are applicable and to configure the application. But before
performing these operations, there are few mandatory steps which need to be followed. A user is
supposed to make a checklist to confirm whether these steps have been followed sequentially or
not.
1. The user should be registered for performing any action in the application.
2. If registered, deployment of the application in the mobile phone.
3. After deployment, install the application.
4. Once the deployment is over, register as per the dealer type.
5. Finally enter the desired module where the action has to be performed.

7/31/2019 mFMS System
http://slidepdf.com/reader/full/mfms-system 13/108
Operation Manual
Page
13
2 Welcome Messages
Important On successful registration, the dealer gets 3 welcome messages (because of
160 character SMS limit) from the mFMS server which has 6 digit dealer ID, PIN for mobile
app, IVRS number and web login password. TD-FMSDOF would come as sender name. A
sample has been shown below.
Message 1:
Message 2:
Message 3:
7/31/2019 mFMS System
http://slidepdf.com/reader/full/mfms-system 14/108
Operation Manual
Page
14
Deployment
in the
Device

7/31/2019 mFMS System
http://slidepdf.com/reader/full/mfms-system 15/108
Operation Manual
Page
15
3 Deployment in the Device
A user can deploy the mMFS application in their mobile by any of the methods explained below:
3.1 Deployment of the Application in the mobile through Cable
Fig1: Application transfer from computer to mobile phone through Data Cable
For performing this operation, these steps need to be performed:
Step1: Connect one end of the data cable to the USB port of the computer and another to the
mobile handset.
Step2: After making the connection, go to the location the where the application is saved in the
PC.
Step3: Select the application and send it to the handset.
Topics covered in this module:
Deployment of the Application in the mobile through Cable
Deployment of the Application in the mobile through Bluetooth
(i) From PC/laptop to mobile
(ii) From mobile to mobile

7/31/2019 mFMS System
http://slidepdf.com/reader/full/mfms-system 16/108
Operation Manual
Page
16
Important Some mobile phones get connected to the PC directly through the data cable but for
some mobiles, PC suite needs to be installed in the PC for successful transfer of the mFMS
application.
3.2 Deployment of the Application in the mobile through Bluetooth
3.2.1 From Computer to Mobile
Fig 2: Application transfer from computer to mobile phone through Bluetooth
This mode of application transfer is possible with those mobile phones which have Bluetooth
facility and the similar facility is available with the PC/Laptop. Follow the steps below to allow the
application transfer:
Step1: Switch on the Bluetooth of the mobile.
Go to the Menu option> Connectivity> Bluetooth. Select the radio button with ‘On’ option from
‘On or Off” options or simply select ‘On’ from the list of ‘On or Off’, whichever is displaying.
Important Make sure that the Bluetooth visibility is On otherwise it would not appear in the
list once the searching is complete by the PC/Laptop.
Step 2: Switch on the Bluetooth of the computer/laptop. In case, the dealer does not know how toswitch the Bluetooth on, read the information below.

7/31/2019 mFMS System
http://slidepdf.com/reader/full/mfms-system 17/108
Operation Manual
Page
17
Bluetooth
Installation
onPC/Laptop
Case I: When the PC does not has built-in Bluetooth
Add a Bluetooth adapter (sometimes called Bluetooth dongle) to your computer
if it doesn't already have one. It can be done by plugging the adapter into the
USB port.
Important For the computer to detect this external hardware, Bluetoothdongle driver should be installed.
Case II: Some computers come with a built-in Bluetooth adapter, especiallylaptops. Turn on the adapter using the ‘switch on’ key of the laptop.
After switching on the Bluetooth service, the icon can be located in the right
hand bottom corner of the desktop (task bar). It would be somewhat similar to
one displayed below:
Fig 3: Icon on the right hand side of the task bar
The Bluetooth’s icon is
If the Bluetooth service has got enabled successfully, configure the service in
the following ways:
Start Control Panel Devices and Printers
Just click “ Add a device” button.
How to search the mobile and do the pairing?
Step 1: Turn the Bluetooth device of the PC/Laptop on.
Step 2: Make it discoverable.
Method for making the device discoverable can vary widely from one type of device to another. Some Bluetooth enabled devices are always in discoverable
mode.
In laptop, right click the Bluetooth icon, go to “Open settings” menu and enable
the check box to turn your PC discoverable.

7/31/2019 mFMS System
http://slidepdf.com/reader/full/mfms-system 18/108
Operation Manual
Page
18
Fig 4: Bluetooth settings options
Step 3: Allow the Bluetooth of the computer to search any other Bluetooth device in its range which
is the mobile phone.
Pairing
of PC/Laptop
with the
Mobile
When a Bluetooth enabled device is in discovery mode, it broadcasts a wireless
signal that allows it to be detected by other devices or computers. This is
sometimes called Pairing Mode. When most devices are discoverable, they arealso in pairing mode, ready to be paired with your computer.
How to share the mFMS folder from the PC/Laptop to the mobile?
Step 1: Go to the location where the mFMS folder is saved.
Step 2: Select the folder and the folder would get highlighted. Right click on the
folder and select open as shown in the Fig 5.

7/31/2019 mFMS System
http://slidepdf.com/reader/full/mfms-system 19/108
Operation Manual
Page
19
Fig 5: mFMS folder selection
Step 3: Right click on the file which has to be shared. Go to ‘Send to’ >
Bluetooth.
Fig 6: File transfer through Bluetooth
Step 4: Select the Bluetooth device to which the file is to be transferred and it
would get highlighted.

7/31/2019 mFMS System
http://slidepdf.com/reader/full/mfms-system 20/108
Operation Manual
Page
20
Fig 7: Device selection from the searched result
Tip If the device is not listed in the list of searched Bluetooth devices, click on
‘ search again’ option (appearing left hand bottom of Fig 7) to search the device
again. Then it would come in the list.
Step 5: Click Ok.
Tip This would not start sending the file. A pop-up would come on the screen
of the mobile which would seek permission ( Allow or Deny) from mobile user
whether he/she wants to receive this file. If the mobile user allows the
permission by selecting ‘Yes / Allow’ for the file to be shared, the process of
sending the file from the PC/Laptop begins.
Fig 8: Seeking permission for file transfer
Step 4: Once the Bluetooth of the mobile is detected by the computer and the pin is shared and the
application can be transferred from the computer to the mobile.

7/31/2019 mFMS System
http://slidepdf.com/reader/full/mfms-system 21/108
Operation Manual
Page
21
FileTransfer
Receiving the permission from the mobile, the PC/Laptop starts to send the fileto the mobile.
Fig 9: File transfer
The location where this file is saved varies from mobile to mobile. The application sent to the
mobile phone is received in the ‘ Received Files’ folder of the memory card/phone or in the
‘ Application/Games’ folder of the phone.
3.2.2 From Mobile to Mobile
Fig 10: Application transfer from mobile to mobile phone using Bluetooth
This mode of application transfer is possible when both the mobile phones have the Bluetooth
facility. Follow these steps to allow application transfer:
Step1: Switch on the Bluetooth of the mobile phones. Go to the Menu option> Connectivity>
Bluetooth. Select the radio button with ‘On’ option from ‘On or Off’ or sim ply select ‘On’ from the
list of ‘On’ or ‘Off’, whichever is displaying.
Important Make sure that the Bluetooth visibility is On for both the mobiles otherwise it
would not appear in the list once the search is over.
Step 2: Connect both the phones through Bluetooth by searching the other mobile from any of the
available two mobiles.
Step 3: Once the device is detected, share the pin. The pairing is over and then the application can
be transferred from the one mobile phone to the other.

7/31/2019 mFMS System
http://slidepdf.com/reader/full/mfms-system 22/108
Operation Manual
Page
22
InstallationProcedure
of the
Application

7/31/2019 mFMS System
http://slidepdf.com/reader/full/mfms-system 23/108
Operation Manual
Page
23
4 Installation/Uninstallation procedure for mFMS Application
The mFMS folder shared either through the CD/pen drive/Bluetooth contains files with the
extension .jar / .jad/.apk. . The file with .jar extension is for the Nokia handsets while the .jad file is
for others especially for the Samsung mobiles. The file with .apk extension is for the Android
handsets.
4.1 Installation procedure of the application in JAVA enabled phones
Copy mobileclient_v_2.45.jar/.jad
When the . jar/.jad file is clicked, it guides to install the application in phone/external memory card
or the application opens. In case of successful installation, the application can be located in
Installed apps/Received files for Nokia phones.
Games/ Apps for Samsung/LG etc. phones.
4.2 Installation procedure of the application in Android OS phonesCopy mobileclient_v1.38.apk
Click the file and it guides to install in phone/external memory card. After the successful
installation, the application can be located in
Applications for Samsung/LG/Micromax phones.
Topics covered in this module:
Installation procedure of the mFMS application for Java enabled phones
Installation rocedure of the mFMS a lication for Android enabled hones
WHEN A NEW APPLICATION IS AVAILABLE
On receiving information/SMS at the launch of new version or when the handset is changed
or reinstalling handset
Finish all pending tasks from the mobile – such as sale receipt of acknowledgements
Uninstall older version
Download latest version from mfms.nic.in
Install the application

7/31/2019 mFMS System
http://slidepdf.com/reader/full/mfms-system 24/108
Operation Manual
Page
24
4.3 Uninstallation procedure of the application in Java enabled phonesGo to Menu Setting Applications Manage Applications mFMS Uninstall.
4.4 Uninstallation procedure of the application in Android OS phonesGo to Menu Setting Applications Manage Applications mFMS Uninstall.

7/31/2019 mFMS System
http://slidepdf.com/reader/full/mfms-system 25/108
Operation Manual
Page
25
5 Starting the Application
The user needs to search the location in their mobile phone where this application is saved and then
install the application. Normally the application is saved in the ‘ Received Files’ folder and when it
is once installed, it can be found in the list of applications by going through
Menu> Application>mFMS.
Important There is no need to install the application each time when the dealer has to make
the entry. The application once installed can be used for data entry multiple number of times.
To make an entry, select the application. It gets highlighted as compared to other applications
already there in the list of applications. Click once to run the mMFS application and go to the
section where the desired task is to be performed.

7/31/2019 mFMS System
http://slidepdf.com/reader/full/mfms-system 26/108
Operation Manual
Page
26
Registration

7/31/2019 mFMS System
http://slidepdf.com/reader/full/mfms-system 27/108
Operation Manual
Page
27
6 Registration
The first step required after installation of the application is the registration process. The screen for
registration appears after clicking once on the application icon. As the application is common for all
the users, the step of registration is required by the application to identify the present user of theapplication out of the different users. The registration process is mandatory for all the users as the
data entry is possible after this step.
Note This is one time activity and needs not to be done each time before data entry.
6.1 Case I: For Dealer Having Single User Access
On the registration page, the user needs to enter their respective dealer ID and after setup
confirmation; the respective user access is permitted. That means if the retailer id is entered for
registration, then the application would enter the retailer’s access area.
The dealer ID which needs to be entered here is the same 6 digit dealer ID which is mentioned inthe SMS from the server of the application after successful registration. In the example below, 6
Digit Wholesaler ID is entered.
Fig 11a: Java enabled mobile screen Fig 11b: Android OS enabled mobile screenFig 11: Common registration screen for the users
Important After entering the dealer ID, click the Menu button (in case of Java Phone) to get
Next Button to proceed/ Exit button to exit registration.
The next step is to enter the PIN as shown in the figure 12 and the application will get registered in
the mobile.

7/31/2019 mFMS System
http://slidepdf.com/reader/full/mfms-system 28/108
Operation Manual
Page
28
Fig 12a: Java enabled mobile screen Fig 12b: Android OS enabled mobile screen
Fig 12: Registration of wholesaler
Important Entering the PIN, click the Menu button (in case of Java Phone) to get Save button
to proceed/ Exit button to exit registration.
The application seeks permission to send text message in case of Java phones, if it is confirmed,
information message displays on the screen confirming application successful registration as shown
in Figure 13.
Fig 13a: Confirmation Message in Java Phones Fig 13b: Information Message in Java Phones
Fig 13: Successful Registration
Message structure:
On successful registration, the dealer gets a message with the following structure:
mFMS mobile client application android/java version ** installed successfully.

7/31/2019 mFMS System
http://slidepdf.com/reader/full/mfms-system 29/108
Operation Manual
Page
29
6.2 Case II: For Dealer Having Multiple User Access
In some cases, a dealer act as two different user types especially in the case of those dealers who
can be wholesaler for some companies and retailer for some other companies as well.
On the registration page, the user needs to enter the dealer IDs of both wholesaler and retailer and
after successful setup, the user gets access for both wholesaler and retailer and the desired access
area be accessed one at a time.
The dealer ID which needs to be entered here is the same 6 digit dealer ID which is mentioned in
the SMS from the server of the application after successful registration.
Fig 14a: Java enabled mobile screen Fig 14b: Android OS enabled mobile screen
Fig 14: Registration for both wholesaler and retailer
Important After entering both the dealer IDs, click the Menu/Next button to give permission
to register. Click the Exit button to exit registration.
The next step is to enter the PIN as shown in the figure 15 and the application will get registered in
the mobile.
7/31/2019 mFMS System
http://slidepdf.com/reader/full/mfms-system 30/108
Operation Manual
Page
30
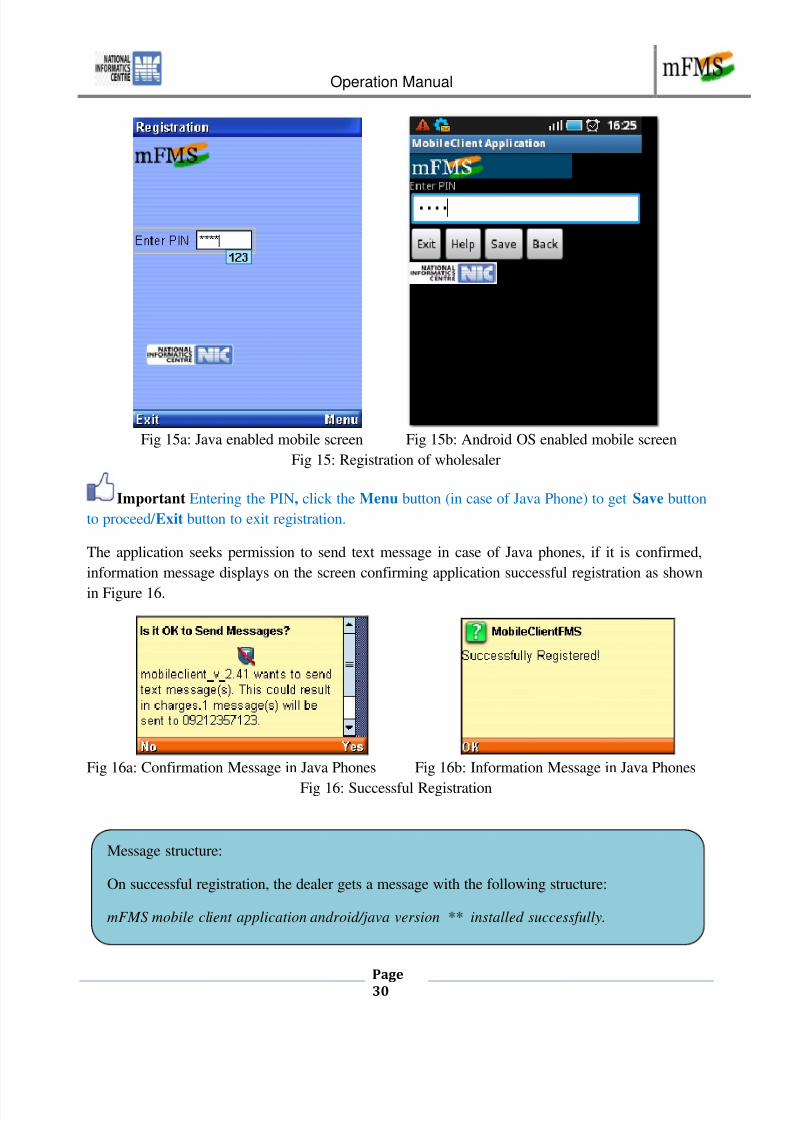
Fig 15a: Java enabled mobile screen Fig 15b: Android OS enabled mobile screen
Fig 15: Registration of wholesaler
Important Entering the PIN, click the Menu button (in case of Java Phone) to get Save button
to proceed/ Exit button to exit registration.
The application seeks permission to send text message in case of Java phones, if it is confirmed,
information message displays on the screen confirming application successful registration as shown
in Figure 16.
Fig 16a: Confirmation Message in Java Phones Fig 16b: Information Message in Java Phones
Fig 16: Successful Registration
Message structure:
On successful registration, the dealer gets a message with the following structure:
mFMS mobile client application android/java version ** installed successfully.

7/31/2019 mFMS System
http://slidepdf.com/reader/full/mfms-system 31/108
Operation Manual
Page
31
On successful registration, the screen which is displayed in the Fig 17 appears which allows the
dealer to select an option, in whose user access area the dealer wants to enter. Here the dealer has
the right to enter either of the two user access areas.
Fig 17a: Java enabled mobile screen Fig 17b: Android OS enabled mobile screen
Fig 17: Selecting an option
Important Select the radio button in front of the user name to enter the desired access area
followed by clicking on the Next/Continue button. Click the Exit button to exit registration.
Important If because of any reason, the access area is different to what is desired,
just uninstall the application and enter the desired user area by entering the concerned
dealer ID/IDs. The application needs not to be deployed again, simply uninstall, followed
by reinstallation and finally register as per the desired user access area.

7/31/2019 mFMS System
http://slidepdf.com/reader/full/mfms-system 32/108
Operation Manual
Page
32
7 Moblie Operations for Java Enabled Devices for Wholesaler
Entering the application, the wholesaler will be taken to the welcome screen which is the homepage
of the application as shown in Fig 18.
Fig 18: Homepage of wholesaler application
The panel on top displays some information about the application like it is mobile client application
of FMS (Fertilizer Management System) for the wholesaler. On the centre of the screen, six options
are displayed, which are:
1. Enter Ack Details (Described in detail in Section 7.2)
Topics covered in this module:
Enter Ack Details
Entering Sales Details
Update Stock Details
Manual Ack Details
View Sales Details
Configuration

7/31/2019 mFMS System
http://slidepdf.com/reader/full/mfms-system 33/108
Operation Manual
Page
33
2. Enter Sale Details (Described in detail in Section 7.3)
3. Update Stock Detail (Described in detail in Section 7.4)
4. Manual Ack Details (Described in detail in Section 7.5)
5. View Sales Details (Described in detail in Section 7.6)
6. Configure (Described in detail in Section 7.1)
On the bottom of the screen, there are two options:
Menu: Clicking here the user gets the option of Help, Next & Back .
Exit: For coming out of the application
A wholesaler can select any one of these 6 options depending on the requirement by clicking on the
radio button in front of it.
Note If the wholesaler is entering the application for the first time, the wholesaler must go to
configuration option to add companies & add product for sale and stock transaction, so that a list of
companies/products can be generated in the drop down list.
7.1 Configurations
For configuration, configuration has to be selected by clicking on the radio button in front of it.
This module of the application allows the wholesaler to Add Company, Delete Company, Add
product and Delete product with a radio button in front of each of them.
Fig 19: Configuration

7/31/2019 mFMS System
http://slidepdf.com/reader/full/mfms-system 34/108
Operation Manual
Page
34
Important Click the Next button to proceed. Click Menu button to get the Home / Exit/Help
button.
7.1.1 Add CompanyThis section allows the wholesaler to add the company/companies for whom it acts as a wholesaler.
When the drop down list is clicked, the whole list of companies can be seen but the wholesaler in
supposed to select the concerned company for whom it acts as a wholesaler. When you add
company the corresponding products of the company are automatically added.
7.1.1.1 Select Add Company
Fig 20: Company addition
Important Click the Next button to go to the next page as displayed in Fig 21. Click the Menu
button to get Home / Exit/Help buttons. When the Next button is clicked, it automatically links to
the next section for data entry.
7/31/2019 mFMS System
http://slidepdf.com/reader/full/mfms-system 35/108
Operation Manual
Page
35
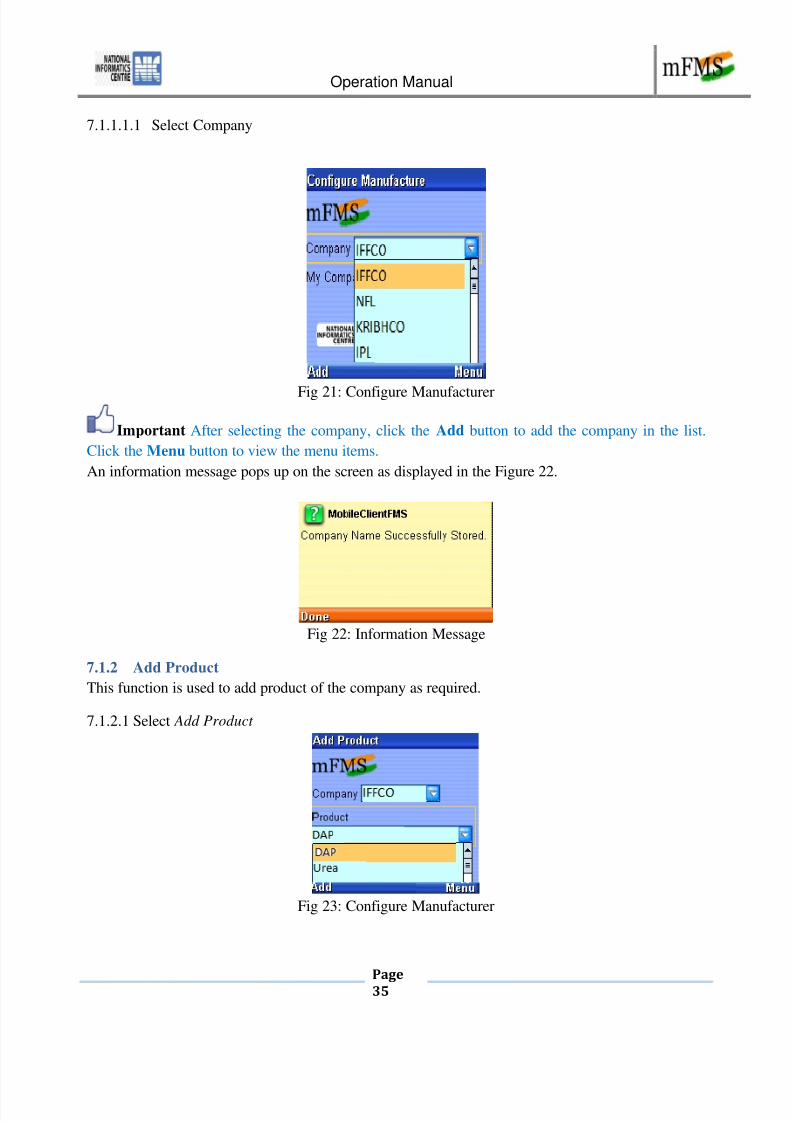
7.1.1.1.1 Select Company
Fig 21: Configure Manufacturer
Important After selecting the company, click the Add button to add the company in the list.
Click the Menu button to view the menu items.
An information message pops up on the screen as displayed in the Figure 22.
Fig 22: Information Message
7.1.2 Add Product
This function is used to add product of the company as required.
7.1.2.1 Select Add Product
Fig 23: Configure Manufacturer

7/31/2019 mFMS System
http://slidepdf.com/reader/full/mfms-system 36/108
Operation Manual
Page
36
Important After selecting the company and then the product, click the Add button to add the
product in the list. Click the Menu button to get Back/Exit/Help button.
An information message pops up on the screen as displayed in the Figure 24.
Fig 24: Information Message
7.1.3 Delete Product
7.1.3.1 Select Delete Product
Fig 25: Delete product
Important After selecting the company and then the product, click the Delete button to delete
the product in the list. Click the Menu button to get Back/Exit/Help button.
An information message pops up on the screen as displayed in the Figure 26.
Fig 26: Information Message

7/31/2019 mFMS System
http://slidepdf.com/reader/full/mfms-system 37/108
Operation Manual
Page
37
7.1.4 Delete Company
The wholesaler can delete a company or companies from the list of companies already added in My
Company List . When the drop down list is clicked, the list of added companies can be seen and then
selecting a particular company and giving the delete command, it can be deleted.
7.1.4.1 Select Delete Company
Fig 27: Delete Company
Important After selecting the company, click the Delete button to delete the company. Click
the Menu button to get Back/Exit/Help option.

7/31/2019 mFMS System
http://slidepdf.com/reader/full/mfms-system 38/108
Operation Manual
Page
38
7.2 Entering Ack Details
7.2.1 Enter Receipt Details
Select the transaction id from the drop down menu. The application takes the corresponding values
for Your ID, Seller ID and Invoice Number from the port message. Select the Date of
acknowledgement from the date picker.
Fig 28: Receipt details
Transaction ID – It is the 16 digit transaction ID which the wholesaler received through SMS and
needs to be selected from the drop down menu.
Your ID – It is the 6 digit dealer ID of the wholesaler which gets entered by default.
Seller ID – It is the ID of the company which is the seller of the fertilizer.
The wholesaler can acknowledge receipt of the sale by the company through this module.
Both the seller and buyer will receive a notification SMS after successful sale transaction.The wholesaler receives a data message on the mobile as shown on ‘Data Message’ below.
Click Start in the Data Message. Select the transaction id (16 digits). Press ‘Continue’ to see
next product details. Wholesaler can change the ‘quantity’ in case of short supply. Press
‘Finish’ to enter PIN and acknowledge transaction. Wholesaler will receive a notification
SMS after successful sale transaction.
Data Message

7/31/2019 mFMS System
http://slidepdf.com/reader/full/mfms-system 39/108
Operation Manual
Page
39
Invoice Number – It is the invoice number of the sale made by the seller company.
Date – It is the date of acknowledgement.
Important The mobile will take the date of the day by default. The date can be selected withthe help of calendar which would appear after clicking on the date picker. Make sure that any future
date is not entered as it would not accept it.
Important After entering receipt details, click the Continue button to go to the next page.
Click the Menu to go the menu option.
7.2.2 Receipt Details (Continued)
The next screen is Fig 29 which is the data entry screen for Company, Product, Unit of Qty and
Quantity.
Fig 29: Receipt details
Company – It is the seller company’s name from whom the stock is received.
Product – It is the product of the selected company received as stock.
Unit of Qty – It is the Unit of quantity like 50 kg bags, Metric ton etc.
Quantity- It is the quantity which is received.
Important After entering/selecting the values, click the Menu button to get Continue button
to update receipt of other products as well i.e in case of multiple entries. Click Finish to submit the
receipt in case of single entry.
7.2.3 Enter PIN
The mobile application asks for the four digits PIN from the wholesaler.
7/31/2019 mFMS System
http://slidepdf.com/reader/full/mfms-system 40/108
Operation Manual
Page
40
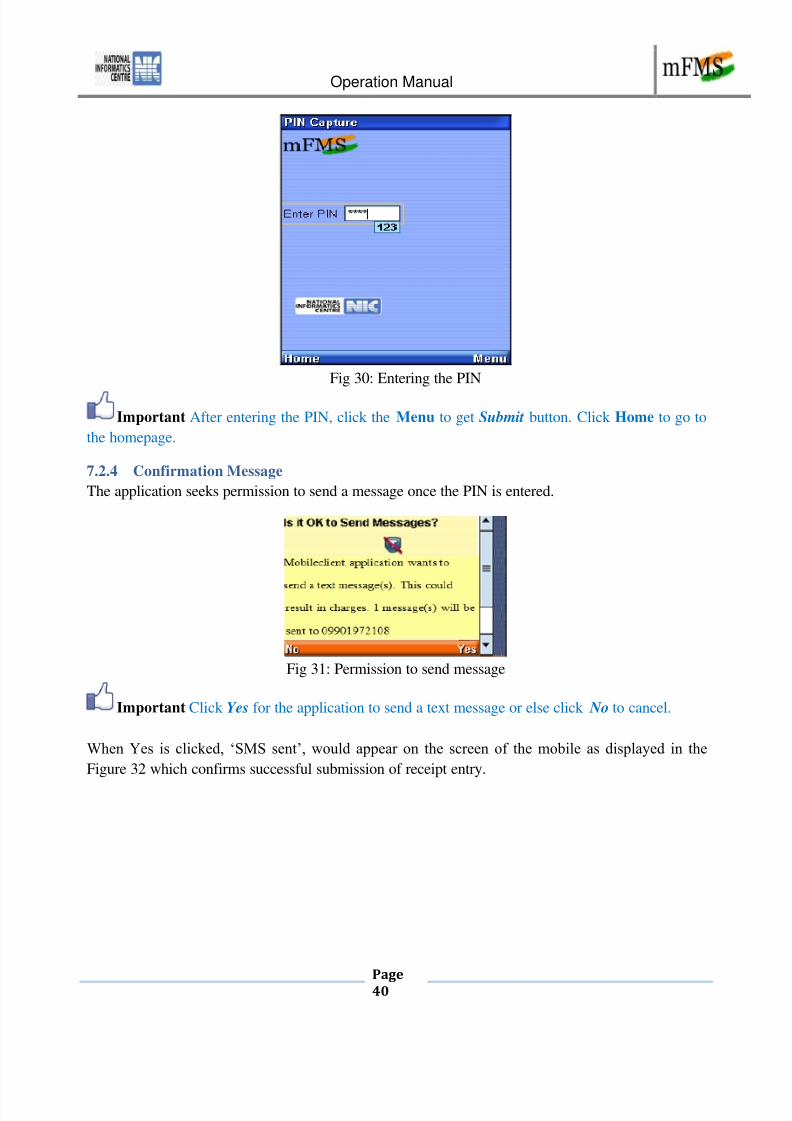
Fig 30: Entering the PIN
Important After entering the PIN, click the Menu to get Submit button. Click Home to go to
the homepage.
7.2.4 Confirmation Message
The application seeks permission to send a message once the PIN is entered.
Fig 31: Permission to send message
Important Click Yes for the application to send a text message or else click No to cancel.
When Yes is clicked, ‘SMS sent’, would appear on the screen of the mobile as displayed in the
Figure 32 which confirms successful submission of receipt entry.

7/31/2019 mFMS System
http://slidepdf.com/reader/full/mfms-system 41/108
Operation Manual
Page
41
Fig 32: Information message
Important Click Done to go to the homepage.
7.2.4.1 Notification Message
The wholesaler receives a notification SMS from the server of mFMS which contains the
wholesaler ID, Date, Time and Transaction ID.
Message Structure:
A receipt of sale Txn <<transaction ID>> has been acknowledged by <<buyer ID>> on
<<date with time>> successfully. Receipt transaction id is <<transaction ID>>
Example: A receipt of sale Txn <<16 digits>> has been acknowledged by <<111111>> on
<<25.5.12 at 12.00am>> successfully. Receipt transaction id is <<16 digits>>.

7/31/2019 mFMS System
http://slidepdf.com/reader/full/mfms-system 42/108
Operation Manual
Page
42
7.3 Entering Sales Details
In this module, the wholesaler enters his sale details to wholesaler/retailer. Press ‘Continue” to enter
product details, press ‘Finish’ to enter PIN to confirm sale transaction.
The Wholesaler will receive a notification SMS.
To enter this module, follow the steps below.
7.3.1 Select Enter Sales Details
For entering sales details, Enter Sales Details has to be selected by clicking on the radio button in
front of it.
Fig 33: Selecting Enter Sale Details
Important After selecting Enter Sale Details, click the Menu button to get the Next button to
go to the next page as displayed in Fig 34. Click the Exit button to exit from the application. When
the Continue button is clicked, it automatically links to the next section for data entry.
7.3.2 Enter Sales Details
The next screen is data entry screen for Buyer ID, Invoice Number and Date.

7/31/2019 mFMS System
http://slidepdf.com/reader/full/mfms-system 43/108
Operation Manual
Page
43
Fig 34: Entering Sale Details
Your ID – It is the 6 digit dealer ID which the application takes by its own.
Buyer ID – It is the dealer ID to whom the sale is made.
Invoice Number – It is the invoice number of the sales receipt.
Date – It is the date when the sale is made. If the entry is being made after few days of the sale, put
the date when the sale was made.
Important The mobile will take the date of the day by default. If the date does not come by its
own, fill the date in the form of DDMMYYYY (Eg. - 26012011 for 26Jan 2011). The date can also
be selected with the help of calendar which would appear after clicking on the date picker. Makesure that any future date is not entered as it would not accept it.
After entering the sales details, click the Continue button to go to the next page as displayed in Fig35. Click the Menu button to get the Exit button to exit from the application. When the Continue
button is clicked, it automatically links to the next section for data entry.
7.3.3 Enter Sales Details (Continued)
The next screen is Fig 35 which is data entry screen for Company, Product, Unit of Qty and
Quantity.
Fig 35: Entering Sale Details
7/31/2019 mFMS System
http://slidepdf.com/reader/full/mfms-system 44/108
Operation Manual
Page
44
Company – It is the manufacturer’s name of whose the goods are sold.
Product – It is the product of the selected company which is sold by the wholesaler to the buyer.
Unit of Qty – It is the unit of quantity which is sold like 50kg bags, Metric ton etc.
Quantity - It is the quantity being sold to the retailer.
Important After entering/selecting the values, click Menu button to get the Continue button to add
multiple sales entries and if only one sale detail has to be added, click Finish button to enter the
PIN as displayed in Fig 36.
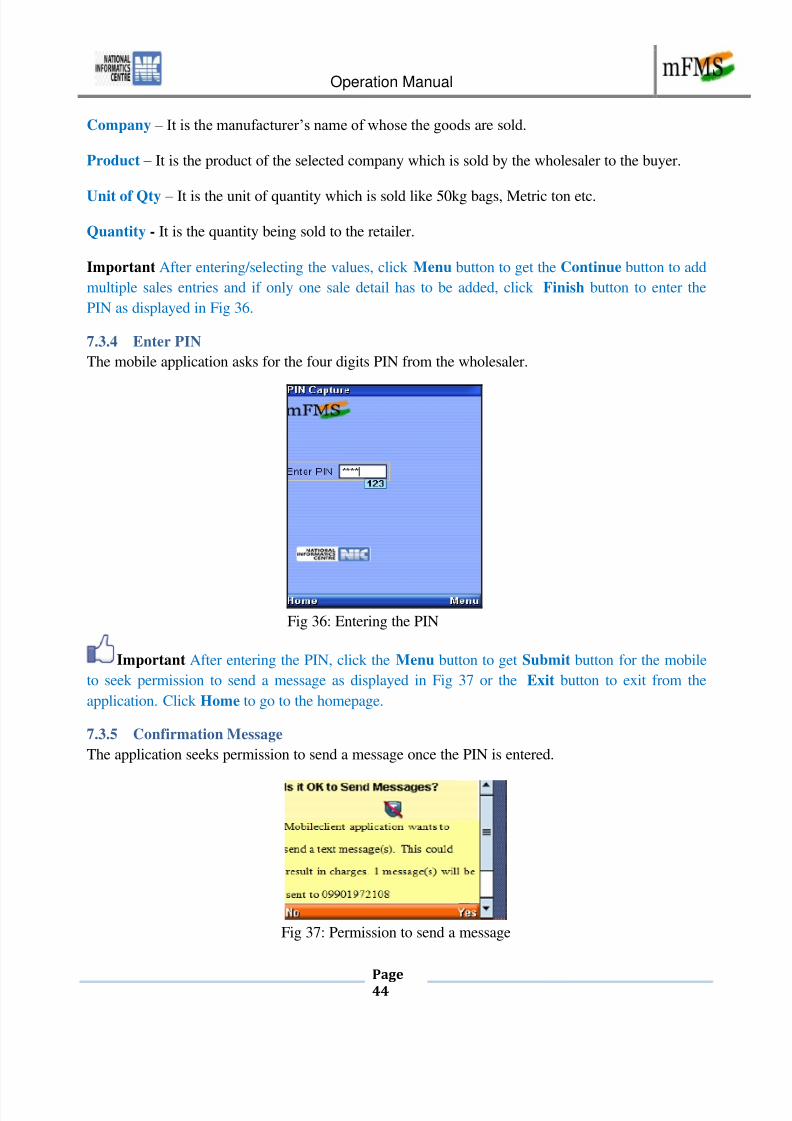
7.3.4 Enter PIN
The mobile application asks for the four digits PIN from the wholesaler.
Fig 36: Entering the PIN
Important After entering the PIN, click the Menu button to get Submit button for the mobile
to seek permission to send a message as displayed in Fig 37 or the Exit button to exit from the
application. Click Home to go to the homepage.
7.3.5 Confirmation Message
The application seeks permission to send a message once the PIN is entered.
Fig 37: Permission to send a message

7/31/2019 mFMS System
http://slidepdf.com/reader/full/mfms-system 45/108
Operation Manual
Page
45
Important Click Yes for the application to send a text message or else click No to cancel.
When Yes is clicked, ‘SMS sent’, would appear on the screen of the mobile as displayed in the
Figure 38 which confirms successful submission of sales entry.
Fig 38: Information message
Important Click Done to go to the homepage.
7.3.5.1 Inbox MessageThe wholesaler as well as the buyer receives a SMS from the server of mFMS which would contain
the invoice number, issue date, wholesaler ID, retailer ID and transaction ID.
Message Structure:
Seller’s mobile:
A sale Transaction with Invoice Number <<invoice no>> dated <<invoice date>> by
<<seller ID>> <<seller Name>> to <<buyer ID>> is successful. Transaction Id is
<<transaction ID>>
Example: A sale Transaction with Invoice No <<15 digits>> dated <<25-05-2012>> by
<<11111>> << xxx>> to <<222222>> is successful. Transaction Id is <<16 digits>>.
Buyer’s mobile:
<<Seller Name>> <<seller ID>> raised an invoice <<invoice number >> dated <<invoice
date>> to <<buyer id >> <<buyer type>> under Txn <<transaction ID>>. Please
acknowledge.
Example: <<Yyy>> <<111111>> raised an invoice <<15 digits>> dated <<25-05-12>> to
<<222222>> <<buyer type>> under Txn <<16 digits>>. Please acknowledge.

7/31/2019 mFMS System
http://slidepdf.com/reader/full/mfms-system 46/108
Operation Manual
Page
46
7.4 Updating Stock Details
This module of the application allows the wholesaler to update the stock details. Click Continue
button to update more than 1 product. On submission of the stock update, the wholesaler receives a
notification SMS.
To enter this module, follow the steps below.
7.4.1 Select Update Stock Details
For entering Update Stock Details, Update Stock Details has to be selected by clicking on the radio
button in front of it.
Fig 39: Updating Stock Details
Important Click the Menu button to get Continue button to go to the next page as displayed
in Fig 40. Click the Exit button to exit from the application. When the Continue button is clicked, it
automatically links to the next section for data entry.

7/31/2019 mFMS System
http://slidepdf.com/reader/full/mfms-system 47/108
Operation Manual
Page
47
7.4.2 Update Stock Details
Fig 40: Updating Stock Details
Your ID – It is the 6 digit dealer ID and the application enters this value by its own.
Date – It is the date when this stock update is made.
Important The mobile will take the date of the day by default. If the date does not come by itsown, fill the date in the form of DDMMYYYY (Eg. - 26012011 for 26Jan 2011). The date can also
be selected with the help of calendar which would appear after clicking on the date picker. Make
sure that neither any future date nor any date before 10 days from the date of the day is notentered/selected. It would not accept in these cases.
After updating stock details, click the Continue button to go to the next page. Click the Menu
button to get Back button to go to the previous screen or Exit button to exit from the application.
When the Continue button is clicked, it automatically links to the next section for data entry.
7.4.3 Update Stock Details (Continued)
The next screen is Fig 41 which is the data entry screen for Company, Product, Unit of Qty and
Quantity.
Fig 41: Entering Stock Details
Company – It is the manufacturer company’s name of whose stock is taken.

7/31/2019 mFMS System
http://slidepdf.com/reader/full/mfms-system 48/108
Operation Manual
Page
48
Product – It is the product of the selected company whose stock is taken into consideration.
Unit of Qty – It is the Unit of quantity like 50 kg bags, Metric ton etc.
Quantity- It is the quantity available in the stock.
Important After entering/selecting the values, click the Menu button to get Continue button
to update stocks of other products in case of multiple entries. Click Finish to enter the PIN in case
of single entry.
7.4.4 Enter PIN
The mobile application asks for the four digits PIN from the wholesaler.
Fig 42: Entering the PIN
Important After entering the PIN, click the Menu button to get Finish button for your mobile
to seek permission to send a message as displayed in Fig 43. Click the Home button to go to the
homepage of the application.
7.4.5 Confirmation Message
The application seeks permission to send a message once the PIN is entered.

7/31/2019 mFMS System
http://slidepdf.com/reader/full/mfms-system 49/108
Operation Manual
Page
49
Fig 43: Seeking permission to send message
Important Click Yes for the application to send a text message or else click No to cancel.
When Yes is clicked, ‘SMS sent’, would appear on the screen of the mobile as displayed in theFigure 44 which confirms successful submission of stock entry.
Fig 44: Information message
Important Click Done to go to the homepage.
7.4.5.1 Notification Message
The wholesaler receives a SMS from the server of mFMS which would contain date, time,wholesaler ID and transaction ID.
On successful submission of the stock details with mFMS server, the wholesaler would get the
following SMS:
Important Click the Inbox to go to the Inbox. To exit, click the Exit button.
Message Structure:
“Fertilizer Stock update has been received on <yyyy-mm-dd><hr:min:sec> by < wholesaler
ID 6 digits> successfully. Transaction Id is <16 digits>”
Example: “Fertilizer Stock update has been received on <2011-01-26><09:00:00> by
<1000000> successfully. Transaction Id is <100000000000000000>”

7/31/2019 mFMS System
http://slidepdf.com/reader/full/mfms-system 50/108
Operation Manual
Page
50
7.5 Manual Receipt Ack
In case the transcation is not displayed in ‘Enter Ack Details”, the wholesaler can acknowledge the
receipt by entering 16 digit transaction ID. On submission, the wholesaler receives a notification
SMS. This option acknowledges the full invoice under the transaction ID.
To enter this module, follow the steps below.
7.5.1 Select Manual Ack details
For entering Manual Ack Details, Manual Ack Details has to be selected by clicking on the radio
button in front of it.
Fig 45: Updating Stock Details
Important Click the Menu button to get Continue button to go to the next page as displayed
in Fig 46. Click the Exit button to exit from the application. When the Continue button is clicked, it
automatically links to the next section for data entry.
7/31/2019 mFMS System
http://slidepdf.com/reader/full/mfms-system 51/108
Operation Manual
Page
51
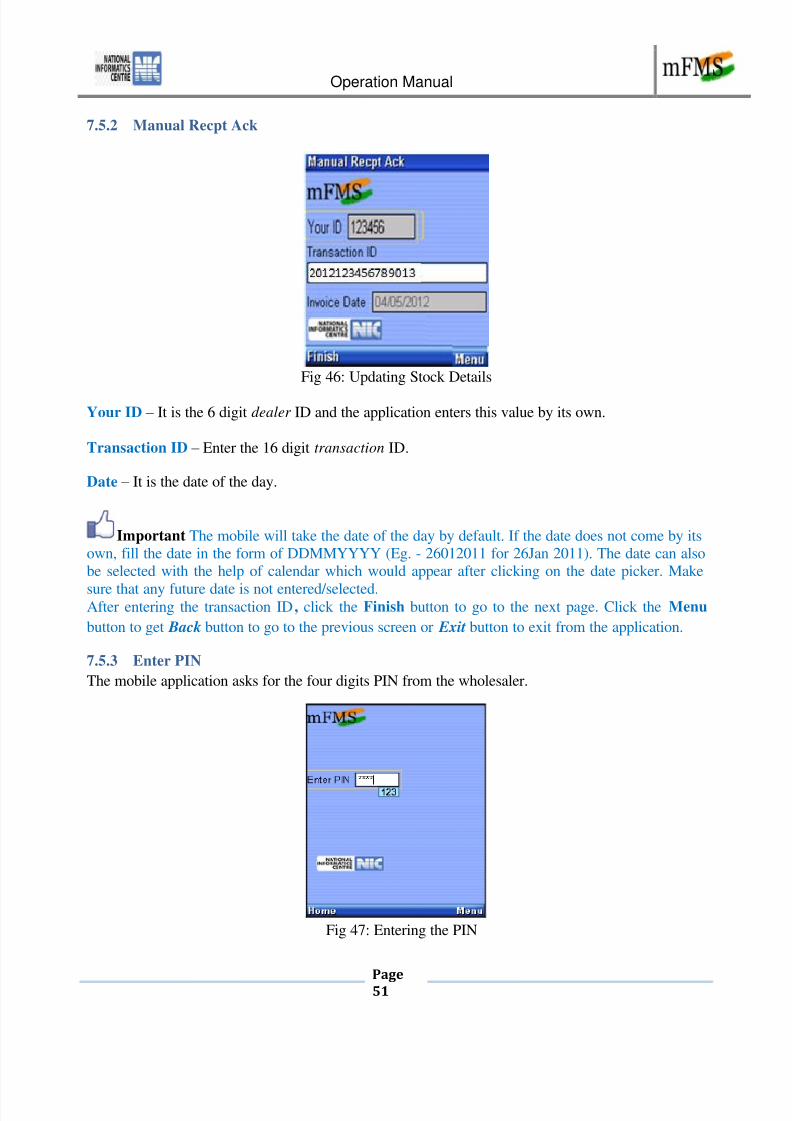
7.5.2 Manual Recpt Ack
Fig 46: Updating Stock Details
Your ID – It is the 6 digit dealer ID and the application enters this value by its own.
Transaction ID – Enter the 16 digit transaction ID.
Date – It is the date of the day.
Important The mobile will take the date of the day by default. If the date does not come by itsown, fill the date in the form of DDMMYYYY (Eg. - 26012011 for 26Jan 2011). The date can alsobe selected with the help of calendar which would appear after clicking on the date picker. Make
sure that any future date is not entered/selected.After entering the transaction ID, click the Finish button to go to the next page. Click the Menu
button to get Back button to go to the previous screen or Exit button to exit from the application.
7.5.3 Enter PIN
The mobile application asks for the four digits PIN from the wholesaler.
Fig 47: Entering the PIN

7/31/2019 mFMS System
http://slidepdf.com/reader/full/mfms-system 52/108
Operation Manual
Page
52
Important After entering the PIN, click the Menu button to get Finish button for your mobile
to seek permission to send a message as displayed in Fig 48. Click the Home button to go to the
homepage of the application.
7.5.4 Confirmation Message
The application seeks permission to send a message once the PIN is entered.
Fig 48: Seeking permission to send message
Important Click Yes for the application to send a text message or else click No to cancel.
When Yes is clicked, ‘SMS sent’, would appear on the screen of the mobile as displayed in the
Figure 49 which confirms successful submission of stock entry.
Fig 49: Information message
Important Click Done to go to the homepage.

7/31/2019 mFMS System
http://slidepdf.com/reader/full/mfms-system 53/108
Operation Manual
Page
53
7.6 View Sales Details
The last 3 sale details done by the wholesaler through mobile can be viewed through this module.
The invoice number needs to be selected and the corresponding sale details would display.
To enter this module, follow the steps below.
7.6.1 Select View Sales details
For entering View Sales Details, View Sales Details has to be selected by clicking on the radio
button in front of it.
Fig 50: View Sales Details
Important Click the Menu button to get Continue button to go to the next page as displayed
in Fig 51. Click the Exit button to exit from the application. When the Continue button is clicked, it
automatically links to the next section for data entry.

7/31/2019 mFMS System
http://slidepdf.com/reader/full/mfms-system 54/108
Operation Manual
Page
54
7.6.2 View Sales Details
Fig 51: View Sales Details
Invoice Number – Select the invoice number whose sale detail has to be seen.
Your ID – It is the 6 digit dealer ID and the application enters this value by its own.
Buyer ID – It is the 6 digit dealer ID of the buyer and the application enters this value by its own.
Invoice Date – It is the date of the invoice.
Important Selecting the invoice number, click the Continue button to go to the next page.
Click the Menu button to get Back button to go to the previous screen or Exit button to exit from
the application.

7/31/2019 mFMS System
http://slidepdf.com/reader/full/mfms-system 55/108
Operation Manual
Page
55
7.6.3 View Sale Details
Fig 52: Entering the PIN
Important After viewing the details, click the Menu button to get the Home button to go to
the homepage of the application or Exit button to exit the application. Click Back to go to the back page.

7/31/2019 mFMS System
http://slidepdf.com/reader/full/mfms-system 56/108
Operation Manual
Page
56
8 Moblie Operations for Java Enabled Devices for Retailers
Entering the application, the retailer will be taken to the welcome screen which is the homepage of
the application as shown in Fig 53.
Fig 53: Homepage of retailer application
The panel on top displays some information about the application like it is mobile client application
of FMS (Fertilizer Management System) for the retailer. On the centre of the screen, 4 options are
displayed, which are:
1. Enter Ack Details (Described in detail in Section 8.2)
2. Update Stock Detail (Described in detail in Section 8.3)
3. Manual Ack Details (Described in detail in Section 8.4)
Topics covered in this module:
Enter Ack Details
Update Stock Details
Manual Ack Details
Configuration

7/31/2019 mFMS System
http://slidepdf.com/reader/full/mfms-system 57/108
Operation Manual
Page
57
4. Configure (Described in detail in Section 8.1)
On the bottom of the screen, there are two options:
Menu: Clicking here the user gets the option of Help, Next & Back .
Exit: For coming out of the application
A retailer can select any one of these 4 options depending on the requirement by clicking on the
radio button in front of it.
Note If the retailer is entering the application for the first time, the retailer must go to configuration
option to add companies & add product for stock transactions, so that a list of companies/products
can be generated in the drop down list.
8.1 Configurations
For configuration, configuration has to be selected by clicking on the radio button in front of it.
This module of the application allows the retailer to Add Company, Delete Company, Add Product
and Delete Product with a radio button in front of each of them.
Fig 54: Configuration
Important Click the Next button to proceed. Click Menu button to get the Home / Exit/Help
button.
8.1.1 Add Company
This section allows the retailer to add the company/companies for whom it acts as a retailer. When
the drop down list is clicked, the whole list of companies can be seen but the retailer is supposed to

7/31/2019 mFMS System
http://slidepdf.com/reader/full/mfms-system 58/108
Operation Manual
Page
58
select the concerned company for whom it acts as a retailer. When you add company the
corresponding products of the company are automatically added
8.1.1.1 Select Add Company
Fig 55: Company Addition
Important Click the Next button to go to the next page as displayed in Fig 56. Click the Menu
button to get Home / Exit/Help buttons. When the Next button is clicked, it automatically links to
the next section for data entry.
8.1.1.1.1 Select Company
Fig 56: Configure Manufacturer
Important After selecting the company, click the Add button to add the company in the list.
Click the Menu button to view the menu items.
An information message pops up on the screen as displayed in the Figure 57.

7/31/2019 mFMS System
http://slidepdf.com/reader/full/mfms-system 59/108
Operation Manual
Page
59
Fig 57: Information Message
8.1.2 Add Product
This function is used to add product of the company as required.
8.1.2.1 Select Add Product
Fig 58: Configure Manufacturer
Important After selecting the company and then the product, click the Add button to add theproduct in the list. Click the Menu button to get Back/Exit/Help button.
An information message pops up on the screen as displayed in the Figure 59.
Fig 59: Information Message

7/31/2019 mFMS System
http://slidepdf.com/reader/full/mfms-system 60/108
Operation Manual
Page
60
8.1.3 Delete Product
8.1.3.1 Select Delete Product
Fig 60: Delete Product
Important After selecting the company and then the product, click the Delete button to deletethe product in the list. Click the Menu button to get Back/Exit/Help button.
An information message pops up on the screen as displayed in the Figure 61.
Fig 61: Information Message
8.1.4 Delete Company
The retailer can delete a company or companies from the list of companies already added in My
Company List . When the drop down list is clicked, the list of added companies can be seen and then
selecting a particular company and giving the delete command, it can be deleted.
8.1.4.1 Select Delete Company
Fig 62: Delete Company
7/31/2019 mFMS System
http://slidepdf.com/reader/full/mfms-system 61/108
Operation Manual
Page
61
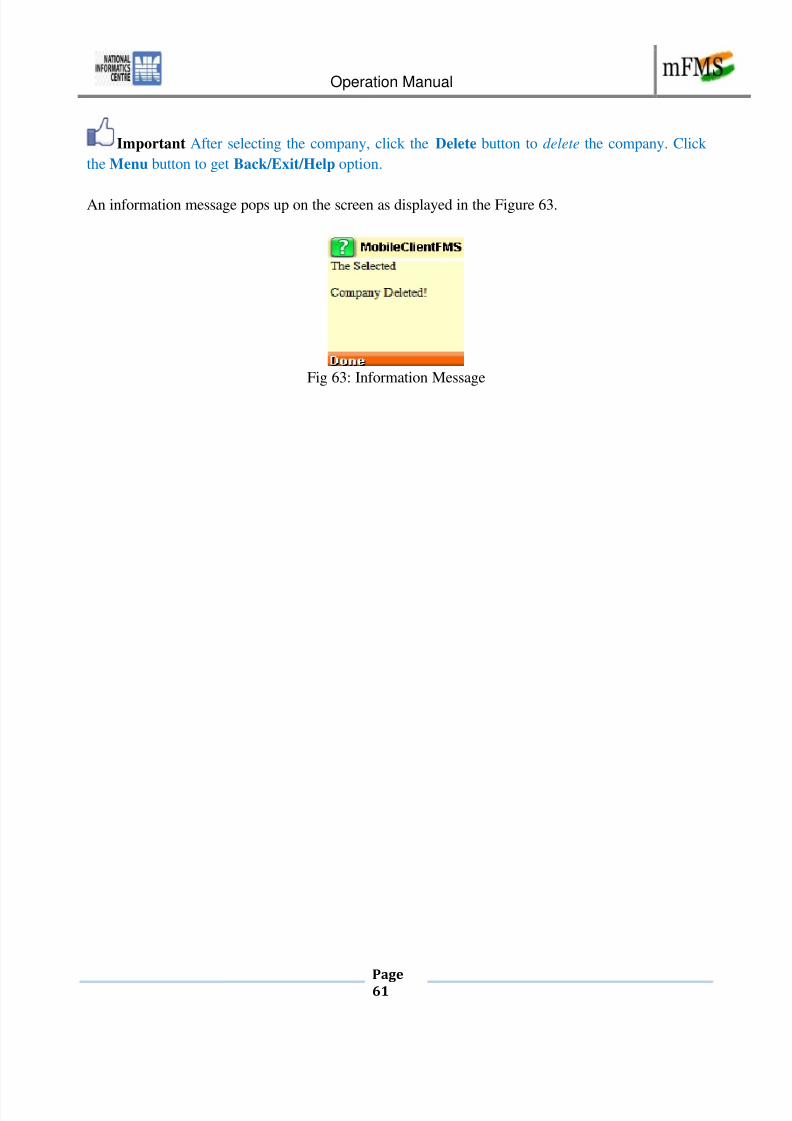
Important After selecting the company, click the Delete button to delete the company. Click
the Menu button to get Back/Exit/Help option.
An information message pops up on the screen as displayed in the Figure 63.
Fig 63: Information Message
7/31/2019 mFMS System
http://slidepdf.com/reader/full/mfms-system 62/108
Operation Manual
Page
62
8.2 Entering Ack Details
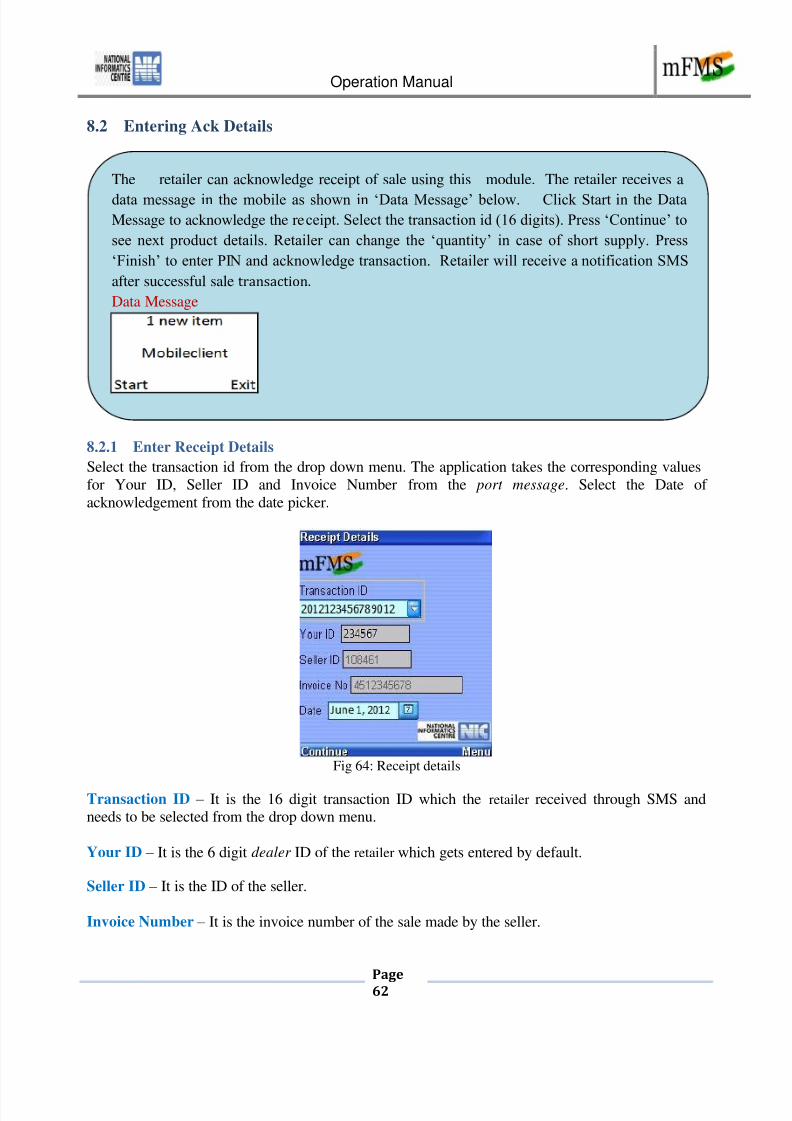
8.2.1 Enter Receipt Details
Select the transaction id from the drop down menu. The application takes the corresponding values
for Your ID, Seller ID and Invoice Number from the port message. Select the Date of
acknowledgement from the date picker.
Fig 64: Receipt details
Transaction ID – It is the 16 digit transaction ID which the retailer received through SMS andneeds to be selected from the drop down menu.
Your ID – It is the 6 digit dealer ID of the retailer which gets entered by default.
Seller ID – It is the ID of the seller.
Invoice Number – It is the invoice number of the sale made by the seller.
The retailer can acknowledge receipt of sale using this module. The retailer receives a
data message in the mobile as shown in ‘Data Message’ below. Click Start in the Data
Message to acknowledge the receipt. Select the transaction id (16 digits). Press ‘Continue’ to
see next product details. Retailer can change the ‘quantity’ in case of short supply. Press
‘Finish’ to enter PIN and acknowledge transaction. Retailer will receive a notification SMS
after successful sale transaction.
Data Message

7/31/2019 mFMS System
http://slidepdf.com/reader/full/mfms-system 63/108
Operation Manual
Page
63
Date – It is the date of acknowledgement.
Important The mobile will take the date of the day by default. The date can be selected with
the help of calendar which would appear after clicking on the date picker. Make sure that any futuredate is not entered as it would not accept it. After entering receipt details, click the Continue button to go to the next page. Click the Menu to
go the menu option.
8.2.2 Receipt Details (Continued)
The next screen is Fig 65 which is the data entry screen for Company, Product, Unit of Qty and
Quantity.
Fig 65: Receipt details
Company – It is the seller company’s name from whom the stock is received.
Product – It is the product of the selected company received as stock.
Unit of Qty – It is the Unit of quantity like 50 kg bags, Metric ton etc.
Quantity- It is the quantity which is received.
Important After entering/selecting the values, click the Menu button to get Continue button
to update receipt of other products as well i.e in case of multiple entries. Click Finish to submit the
receipt in case of single entry.
8.2.3 Enter PIN
The mobile application asks for the four digits PIN from the retailer.

7/31/2019 mFMS System
http://slidepdf.com/reader/full/mfms-system 64/108
Operation Manual
Page
64
Fig 66: Entering the PIN
Important After entering the PIN, click the Menu to get Submit button. Click Home to go to
the homepage.
8.2.4 Confirmation Message
The application seeks permission to send a message once the PIN is entered.
Fig 67: Permission to send message
Important Click Yes for the application to send a text message or else click No to cancel.
When Yes is clicked, ‘SMS sent’, would appear on the screen of the mobile as displayed in the
Figure 68 which confirms successful submission of receipt entry.
Fig 68: Information message

7/31/2019 mFMS System
http://slidepdf.com/reader/full/mfms-system 65/108
Operation Manual
Page
65
Important Click Done to go to the homepage.
8.2.4.1 Notification Message
The retailer receives a notification SMS from the server of mFMS which contains the retailer ID,Date, Time and Transaction ID.
Message Structure:
A receipt of sale Txn <<transaction ID>> has been acknowledged by <<buyer ID>> on
<<date with time>> successfully. Receipt transaction id is <<transaction ID>>
Example: A receipt of sale Txn <<16 digits>> has been acknowledged by <<111111>> on
<<25.5.12 at 12.00am>> successfully. Receipt transaction id is <<16 digits>>.

7/31/2019 mFMS System
http://slidepdf.com/reader/full/mfms-system 66/108
Operation Manual
Page
66
8.3 Updating Stock Details
The retailer can update the stock through this module. Click Continue button to update more than 1
product. On submission of the stock update, the retailer receives a notification SMS.
To enter this module, follow the steps below.
8.3.1 Select Update Stock Details
For entering Update Stock Details, Update Stock Details has to be selected by clicking on the radio
button in front of it.
Fig 69: Updating Stock Details
Important Click the Menu button to get Continue button to go to the next page as displayed
in Fig 70. Click the Exit button to exit from the application. When the Continue button is clicked, it
automatically links to the next section for data entry.
8.3.2 Update Stock Details
Fig 70: Updating Stock Details

7/31/2019 mFMS System
http://slidepdf.com/reader/full/mfms-system 67/108
Operation Manual
Page
67
Your ID – It is the 6 digit dealer ID and the application enters this value by its own.
Date – It is the date when this stock update is made.
Important The mobile will take the date of the day by default. If the date does not come by itsown, fill the date in the form of DDMMYYYY (Eg. - 26012011 for 26Jan 2011). The date can also
be selected with the help of calendar which would appear after clicking on the date picker. Make
sure that neither any future date nor any date before 10 days from the date of the day is notentered/selected. It would not accept in these cases.
After updating stock details, click the Continue button to go to the next page. Click the Menu
button to get Back button to go to the previous screen or Exit button to exit from the application.
When the Continue button is clicked, it automatically links to the next section for data entry.
8.3.3 Update Stock Details (Continued)
The next screen is Fig 71 which is the data entry screen for Company, Product, Unit of Qty andQuantity.
Fig 71: Entering Stock Details
Company – It is the manufacturer company’s name of whose stock is taken.
Product – It is the product of the selected company whose stock is taken into consideration.
Unit of Qty – It is the Unit of quantity like 50 kg bags, Metric ton etc.
Quantity- It is the quantity available in the stock.
Important After entering/selecting the values, click the Menu button to get Continue button
to update stocks of other products in case of multiple entries. Click Finish to enter the PIN in case
of single entry.
8.3.4 Enter PIN
The mobile application asks for the four digits PIN from the wholesaler.
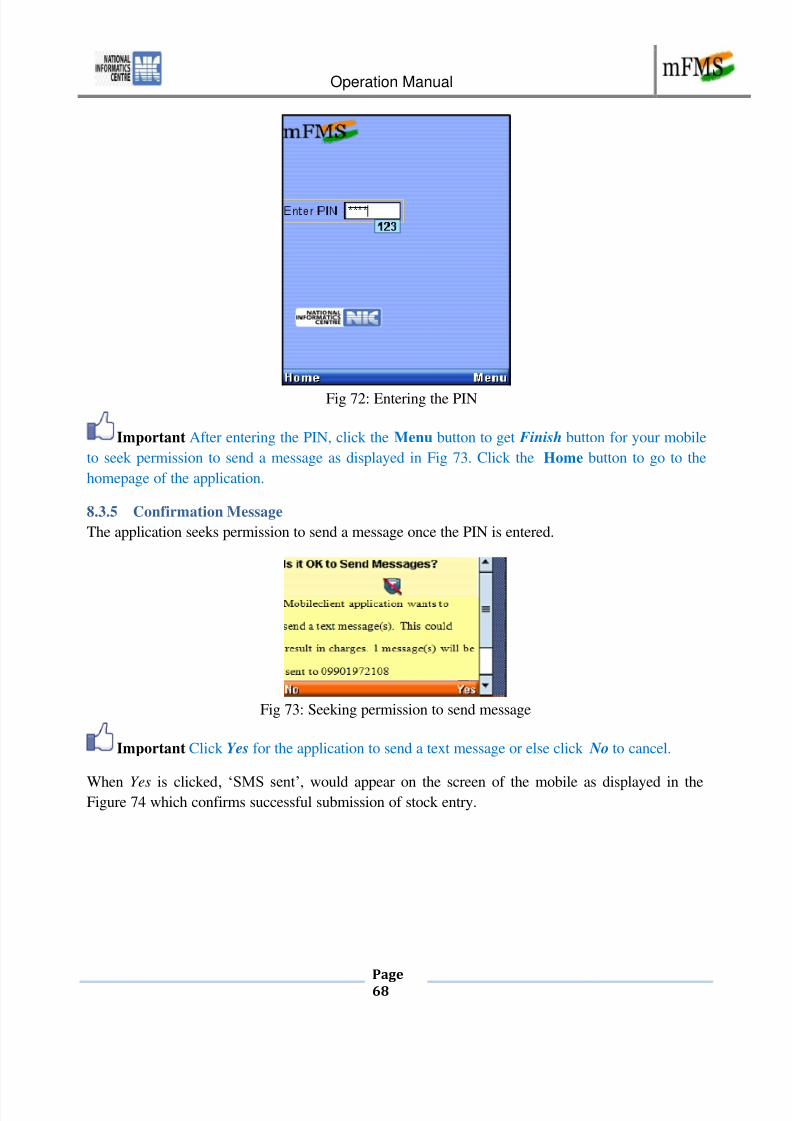
7/31/2019 mFMS System
http://slidepdf.com/reader/full/mfms-system 68/108

7/31/2019 mFMS System
http://slidepdf.com/reader/full/mfms-system 69/108
Operation Manual
Page
69
Fig 74: Information message
Important Click Done to go to the homepage.
8.3.5.1 Notification Message
The retailer receives a SMS from the server of mFMS which would contain date, time, retailer ID
and transaction ID.
Important Click the Inbox to go to the Inbox. To exit, click the Exit button.
Message Structure:
“Fertilizer Stock update has been received on <yyyy-mm-dd><hr:min:sec> by < retailer ID
6 digits> successfully. Transaction Id is <16 digits>”
Example: “Fertilizer Stock update has been received on <2011-01-26><09:00:00> by
<1000000> successfully. Transaction Id is <100000000000000000>”

7/31/2019 mFMS System
http://slidepdf.com/reader/full/mfms-system 70/108
Operation Manual
Page
70
8.4 Manual Receipt Ack
In case the transaction is not displayed in ‘Enter Ack Details”, the retailer can acknowledge the
receipt by entering 16 digit transaction ID. On submission, the retailer receives a notification
SMS. This option acknowledges the full invoice under the transaction ID.
To enter this module, follow the steps below.
8.4.1 Select Manual Ack details
For entering Manual Ack Details, Manual Ack Details has to be selected by clicking on the radio
button in front of it.
Fig 75: Updating Stock Details
Important Click the Menu button to get Continue button to go to the next page as displayed
in Fig 76. Click the Exit button to exit from the application. When the Continue button is clicked, it
automatically links to the next section for data entry.

7/31/2019 mFMS System
http://slidepdf.com/reader/full/mfms-system 71/108
Operation Manual
Page
71
8.4.2 Manual Recpt Ack
Fig 76: Updating Stock Details
Your ID – It is the 6 digit dealer ID and the application enters this value by its own.
Transaction ID – Enter the 16 digit transaction ID.
Date – It is the date of the day.
Important The mobile will take the date of the day by default. If the date does not come by itsown, fill the date in the form of DDMMYYYY (Eg. - 26012011 for 26Jan 2011). The date can also
be selected with the help of calendar which would appear after clicking on the date picker. Make
sure that any future date is not entered/selected.After entering the transaction ID, click the Finish button to go to the next page. Click the Menu
button to get Back button to go to the previous screen or Exit button to exit from the application.
8.4.3 Enter PIN
The mobile application asks for the four digits PIN from the retailer.
Fig 77: Entering the PIN

7/31/2019 mFMS System
http://slidepdf.com/reader/full/mfms-system 72/108
Operation Manual
Page
72
Important After entering the PIN, click the Menu button to get Finish button for your mobile
to seek permission to send a message as displayed in Fig 78. Click the Home button to go to the
homepage of the application.
8.4.4 Confirmation Message
The application seeks permission to send a message once the PIN is entered.
Fig 78: Seeking permission to send message
Important Click Yes for the application to send a text message or else click No to cancel.
When Yes is clicked, ‘SMS sent’, would appear on the screen of the mobile as displayed in the
Figure 79 which confirms successful submission of stock entry.
Fig 79: Information message
Important Click Done to go to the homepage.

7/31/2019 mFMS System
http://slidepdf.com/reader/full/mfms-system 73/108
Operation Manual
Page
73
9 Moblie Operations for Android Phones for Wholesaler
Entering the application, the wholesaler will be taken to the welcome screen which is the homepage
of the application as shown in Fig 80.
Fig 80: Homepage of wholesaler application
The panel on top displays some information about the application like it is mobile client application
of FMS (Fertilizer Management System) for the wholesaler. On the centre of the screen, six options
are displayed, which are:
1. Enter Acknowledgement Details (Described in detail in Section 9.2)
Topics covered in this module:
Enter Acknowledgement Details
Entering Sales Details
Update Stock Details
Manual Acknowledgement Details
View Sales Details
Configuration

7/31/2019 mFMS System
http://slidepdf.com/reader/full/mfms-system 74/108
Operation Manual
Page
74
2. Enter Sale Details (Described in detail in Section 9.3)
3. Update Stock Detail (Described in detail in Section 9.4)
4. Manual Acknowledgement Details (Described in detail in Section 9.5)
5. View Sales Details (Described in detail in Section 9.6)
6. Configure (Described in detail in Section 9.1)
A wholesaler can select any one of these 6 options depending on the requirement by clicking on the
radio button in front of it.
Note If the wholesaler is entering the application for the first time, the wholesaler must go to
configuration option to add companies & add product for sale and stock transaction, so that a list of
companies/products can be generated in the drop down list.
9.1 ConfigurationsFor configuration, configuration has to be selected by clicking on the radio button in front of it.
This module of the application allows the wholesaler to Add Company, Delete Company, Add
Product and Delete Product with a radio button in front of each of them.
Fig 81: Configuration
Important Click the Next button to proceed. Click Menu button to get the Home / Exit/Help
button.
9.1.1 Add Company
This section allows the wholesaler to add the company/companies for whom it acts as a wholesaler.
When the drop down list is clicked, the whole list of companies can be seen but the wholesaler in
supposed to select the concerned company for whom it acts as a wholesaler. When you add
company the corresponding products of the company are automatically added.

7/31/2019 mFMS System
http://slidepdf.com/reader/full/mfms-system 75/108
Operation Manual
Page
75
9.1.1.1 Select Add Company
Fig 82: Company addition
Important Click the Next button to go to the next page as displayed in Fig 83. When the Next
button is clicked, it automatically links to the next section for data entry.
9.1.1.1.1 Select Company
Fig 83: Configure Manufacturer
Important After selecting the company, click the Add button to add the company in the list.
9.1.2 Add Product
‘Add Product’ function is used to add product of the company as required.
9.1.2.1 Select Add Product
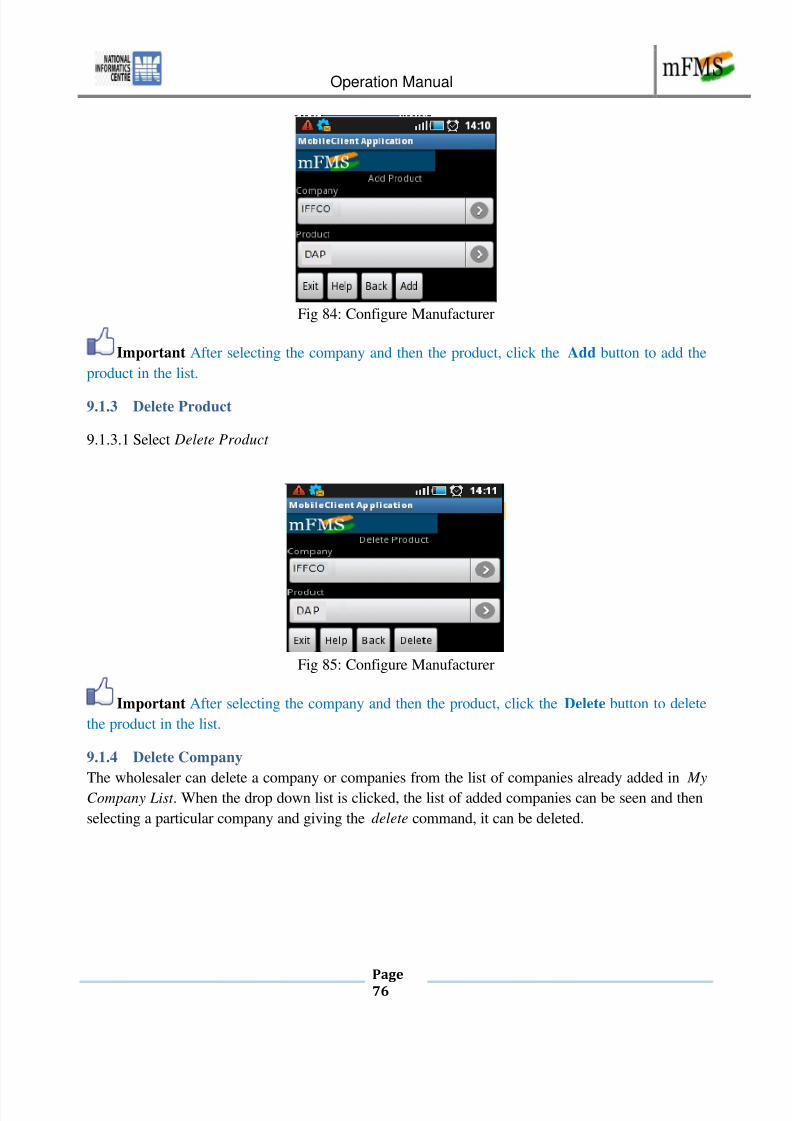
7/31/2019 mFMS System
http://slidepdf.com/reader/full/mfms-system 76/108
Operation Manual
Page
76
Fig 84: Configure Manufacturer
Important After selecting the company and then the product, click the Add button to add the
product in the list.
9.1.3 Delete Product
9.1.3.1 Select Delete Product
Fig 85: Configure Manufacturer
Important After selecting the company and then the product, click the Delete button to delete
the product in the list.
9.1.4 Delete Company
The wholesaler can delete a company or companies from the list of companies already added in My
Company List . When the drop down list is clicked, the list of added companies can be seen and then
selecting a particular company and giving the delete command, it can be deleted.
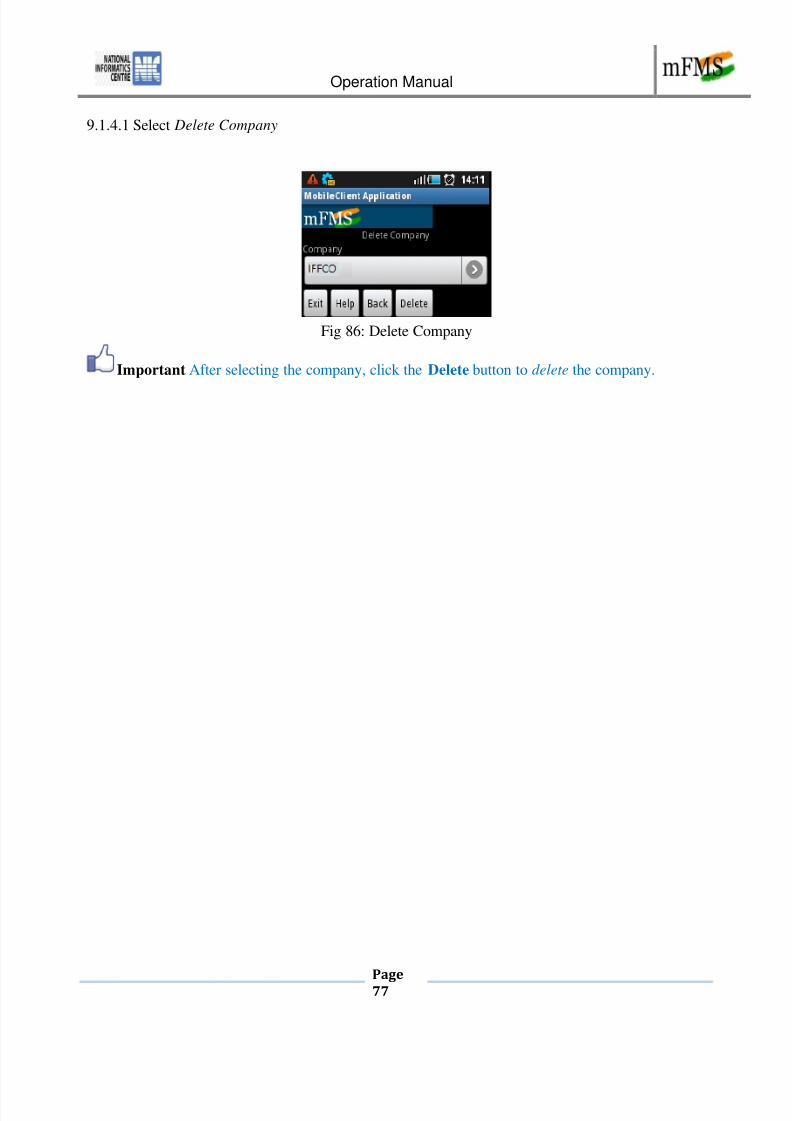
7/31/2019 mFMS System
http://slidepdf.com/reader/full/mfms-system 77/108
Operation Manual
Page
77
9.1.4.1 Select Delete Company
Fig 86: Delete Company
Important After selecting the company, click the Delete button to delete the company.

7/31/2019 mFMS System
http://slidepdf.com/reader/full/mfms-system 78/108
Operation Manual
Page
78
9.2 Entering Acknowledgement Details
9.2.1 Enter Receipt Details
Select the transaction id from the drop down menu and click Go button.
Fig 87: Selecting transaction ID
The application takes the corresponding values for Your ID, Seller ID and Invoice Number
corresponding to that transaction ID.
The wholesaler can acknowledge receipt of sale using this module. The wholesaler receives
a data message in the mobile as shown in ‘Data Message’ below. Click OK in the DataMessage to acknowledge the receipt. Select the transaction id (16 digits). Press ‘Continue’ to
see next product details. Wholesaler can change the ‘quantity’ in case of short supply. Press
‘Finish’ to enter PIN and acknowledge transaction. Wholesaler will receive a notification
SMS after successful sale transaction.
Data Message

7/31/2019 mFMS System
http://slidepdf.com/reader/full/mfms-system 79/108
Operation Manual
Page
79
Fig 88: Receipt details
Transaction ID – It is the 16 digit transaction ID.
Your ID – It is the 6 digit dealer ID of the wholesaler which gets entered by default.
Seller ID – It is the ID of the company which is the seller of the fertilizer.
Invoice Number – It is the invoice number of the sale made by the seller company which is
received through SMS.
Date – It is the date of acknowledgement.
Important The mobile will take the date of the day by default. The date can be selected with
the help of calendar which would appear after clicking on the date picker. Make sure that any futuredate is not entered as it would not accept it. After selecting the receipt details, click the Continue button
to go to the next page.
9.2.2 Receipt Details (Continued)
The next screen is Fig 89 which is the data entry screen for Company, Product, Unit of Qty and
Quantity.
Fig 89: Receipt details

7/31/2019 mFMS System
http://slidepdf.com/reader/full/mfms-system 80/108
Operation Manual
Page
80
Company – It is the seller company’s name from whom the stock is received.
Product – It is the product of the selected company received as stock.
Unit of Qty – It is the Unit of quantity like 50 kg bags, Metric ton etc.
Quantity- It is the quantity which is received.
Important After entering/selecting the values, click the Continue button to update receipt of
other products as well i.e in case of multiple entries. Click Finish to submit the receipt in case of
single entry.
9.2.3 Enter PIN
The mobile application asks for the four digits PIN from the wholesaler.
Fig 90: Entering the PIN
Important After entering the PIN, click the Submit button. Click Home to go to the
homepage.
9.2.3.1 Notification Message
The wholesaler receives a notification SMS from the server of mFMS which contains the
wholesaler ID, Date, Time and Transaction ID.
Message Structure:
A receipt of sale Txn <<transaction ID>> has been acknowledged by <<buyer ID>> on
<<date with time>> successfully. Receipt transaction id is <<transaction ID>>
Example: A receipt of sale Txn <<16 digits>> has been acknowledged by <<111111>> on
<<25.5.12 at 12.00am>> successfully. Receipt transaction id is <<16 digits>>.

7/31/2019 mFMS System
http://slidepdf.com/reader/full/mfms-system 81/108
Operation Manual
Page
81
9.3 Entering Sales Details
In this module, the wholesaler enters his sale details to wholesaler/retailer. Press ‘Continue” to enter
product details, press ‘Finish’ to enter PIN to confirm sale transaction. The wholesaler will receive a
notification SMS.
To enter this module, follow the steps below.
9.3.1 Select Enter Sales Details
For entering sales details, Enter Sales Details has to be selected by clicking on the radio button in
front of it.
Fig 91: Selecting Enter Sale Details
Important After selecting Enter Sale Details, click the Next button to go to the next page as
displayed in Fig 92. Click the Exit button to exit from the application. When the Next button is
clicked, it automatically links to the next section for data entry.
9.3.2 Enter Sales Details
The next screen is data entry screen for Buyer ID, Invoice Number and Date.

7/31/2019 mFMS System
http://slidepdf.com/reader/full/mfms-system 82/108
Operation Manual
Page
82
Fig 92: Entering Sale Details
Your ID – It is the 6 digit dealer ID which the application takes by its own.
Buyer ID – It is the dealer ID to whom the sale is made.
Invoice Number – It is the 15 digit invoice number of the sales receipt.
Date – It is the date when the sale is made. If the entry is being made after few days of the sale, put
the date when the sale was made.
Important The date can be selected with the help of calendar which would appear afterclicking on the date picker. Make sure that any future date is not entered as it would not accept it. After entering the sales details, click the Continue button to go to the next page as displayed in Fig
93. Click the Home button to go to the homepage of the application. When the Continue button is
clicked, it automatically links to the next section for data entry.
9.3.3 Enter Sales Details (Continued)
The next screen is Fig 93 which is data entry screen for Company, Product, Unit of Qty and
Quantity.
Fig 93: Entering Sale Details
Company – It is the manufacturer’s name of whose the goods are sold.

7/31/2019 mFMS System
http://slidepdf.com/reader/full/mfms-system 83/108
Operation Manual
Page
83
Product – It is the product of the selected company which is sold by the wholesaler to the retailer.
Unit of Qty – It is the unit of quantity which is sold like 50kg bags, Metric ton etc.
Quantity - It is the quantity being sold to another dealer.
Important After entering/selecting the values, click the Continue button to add multiple sales
entries and if only one sale detail has to be added, click Finish button to enter the PIN as displayed
in Fig 94.
9.3.4 Enter PIN
The mobile application asks for the four digits PIN from the wholesaler.
Fig 94: Entering the PIN
Important After entering the PIN, click the Submit button to submit. Click the Exit button to
exit from the application. Click Home to go to the homepage.
9.3.4.1 Notification Messages
The wholesaler as well as the buyer receives a SMS from the server of mFMS which would contain
the invoice number, issue date, wholesaler ID, retailer ID and transaction ID.

7/31/2019 mFMS System
http://slidepdf.com/reader/full/mfms-system 84/108
Operation Manual
Page
84
Message Structure:
Seller’s mobile:
A sale Transaction with Invoice Number <<invoice no>> dated <<invoice date>> by
<<seller ID>> <<seller Name>> to <<buyer ID>> is successful. Transaction Id is
<<transaction ID>>
Example: A sale Transaction with Invoice No <<15 digits>> dated <<25-05-2012>> by
<<11111>> << xxx>> to <<222222>> is successful. Transaction Id is <<16 digits>>.
Buyer’s mobile:
<<Seller Name>> <<seller ID>> raised an invoice <<invoice number >> dated <<invoice
date>> to <<buyer id >> <<buyer type>> under Txn <<transaction ID>>. Please
acknowledge.
Example: <<Yyy>> <<111111>> raised an invoice <<15 digits>> dated <<25-05-12>> to
<<222222>> <<buyer type>> under Txn <<16 digits>>. Please acknowledge.

7/31/2019 mFMS System
http://slidepdf.com/reader/full/mfms-system 85/108
Operation Manual
Page
85
9.4 Updating Stock Details
The wholesaler can update the stock through this module. Click on Continue button to update more
than 1 product. On successful submission of the stock update, the wholesaler receives a notification
SMS.
To enter this module, follow the steps below.
9.4.1 Select Update Stock Details
For entering Update Stock Details, Update Stock Details has to be selected by clicking on the radio
button in front of it.
Fig 95: Updating Stock Details
Important Click the Next button to go to the next page as displayed in Fig 96. Click the Exit
button to exit from the application. When the Next button is clicked, it automatically links to the
next section for data entry.
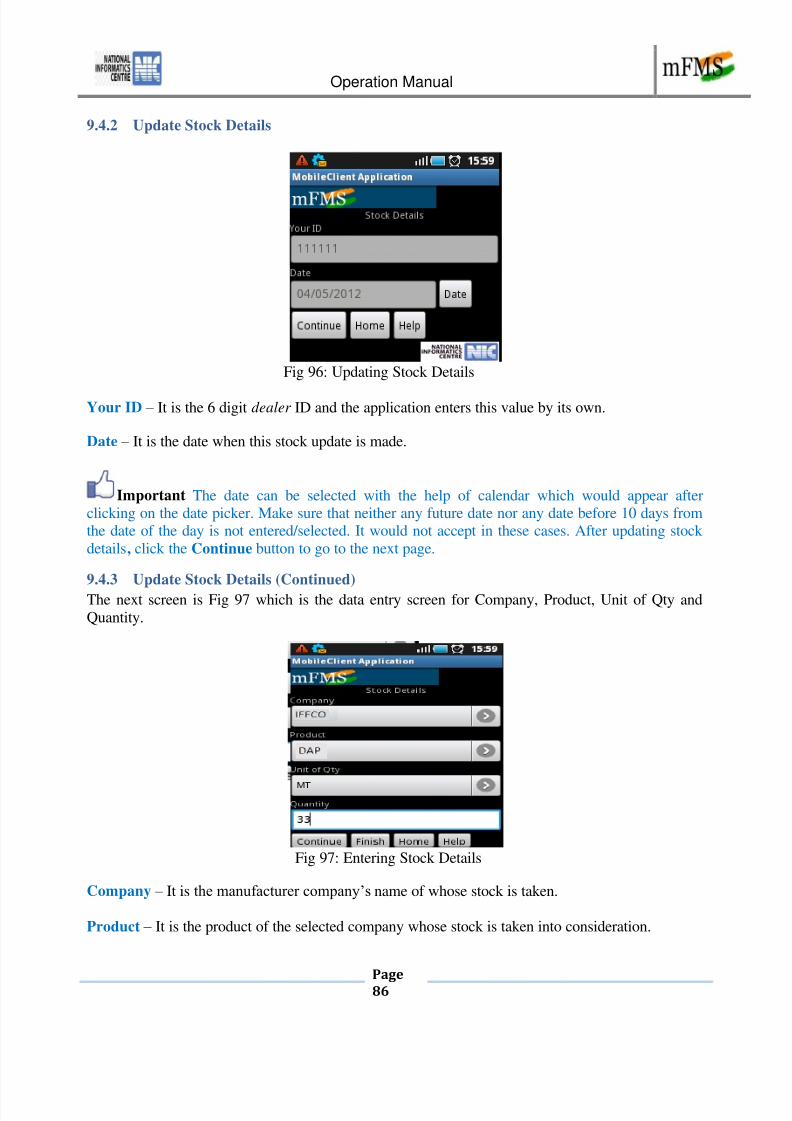
7/31/2019 mFMS System
http://slidepdf.com/reader/full/mfms-system 86/108
Operation Manual
Page
86
9.4.2 Update Stock Details
Fig 96: Updating Stock Details
Your ID – It is the 6 digit dealer ID and the application enters this value by its own.
Date – It is the date when this stock update is made.
Important The date can be selected with the help of calendar which would appear afterclicking on the date picker. Make sure that neither any future date nor any date before 10 days fromthe date of the day is not entered/selected. It would not accept in these cases. After updating stock
details, click the Continue button to go to the next page.
9.4.3 Update Stock Details (Continued)
The next screen is Fig 97 which is the data entry screen for Company, Product, Unit of Qty and
Quantity.
Fig 97: Entering Stock Details
Company – It is the manufacturer company’s name of whose stock is taken.
Product – It is the product of the selected company whose stock is taken into consideration.

7/31/2019 mFMS System
http://slidepdf.com/reader/full/mfms-system 87/108
Operation Manual
Page
87
Unit of Qty – It is the Unit of quantity like 50 kg bags, Metric ton etc.
Quantity- It is the quantity available in the stock.
Important After entering/selecting the values, click the Continue button to update stocks of
other products in case of multiple entries. Click Finish to enter the PIN in case of single entry.
9.4.4 Enter PIN
The mobile application asks for the four digits PIN from the wholesaler.
Fig 98: Entering the PIN
Important After entering the PIN, click the Submit button. Click the Home button to go to
the homepage of the application.
9.4.5 Notification Message
The wholesaler receives a SMS from the server of mFMS which would contain date, time,wholesaler ID and transaction ID.
Message Structure:
“Fertilizer Stock update has been received on <yyyy-mm-dd><hr:min:sec> by < wholesaler
ID 6 digits> successfully. Transaction Id is <16 digits>”
Example: “Fertilizer Stock update has been received on <2011-01-26><09:00:00> by
<1000000> successfully. Transaction Id is <100000000000000000>”

7/31/2019 mFMS System
http://slidepdf.com/reader/full/mfms-system 88/108
Operation Manual
Page
88
9.5 Manual Acknowledgement details
In case the transaction is not displayed in ‘Enter Ack nowledgement Details”, the wholesaler can
acknowledge the receipt by entering 16 digit transaction ID. On submission, the wholesaler receives
a notification SMS. This option acknowledges the full invoice under the transaction ID.
To enter this module, follow the steps below.
9.5.1 Select Manual Ack details
For entering Manual Acknowledgement Details, Manual Acknowledgement Details has to be
selected by clicking on the radio button in front of it.
Fig 99: Updating Stock Details
Important Click the Next button to go to the next page as displayed in Fig 100. Click the Exit
button to exit from the application. When the Next button is clicked, it automatically links to the
next section for data entry.

7/31/2019 mFMS System
http://slidepdf.com/reader/full/mfms-system 89/108
Operation Manual
Page
89
9.5.2 Manual Acknowledgement Details
Fig 100: Updating Stock Details
Your ID – It is the 6 digit dealer ID and the application enters this value by its own.
Transaction ID – Enter the 16 digit transaction ID.
Date – It is the date of the day.
Important The mobile will take the date of the day by default. The date can also be selectedwith the help of calendar which would appear after clicking on the date picker. Make sure that any
future date is not selected. After entering the transaction ID, click the Finish button to go to thenext page. Click the Exit button to exit from the application.
9.5.3 Enter PIN
The mobile application asks for the four digits PIN from the wholesaler.
Fig 101: Entering the PIN
Important After entering the PIN, click the Submit button. Click the Home button to go to
the homepage of the application.

7/31/2019 mFMS System
http://slidepdf.com/reader/full/mfms-system 90/108
Operation Manual
Page
90
9.6 View Sales Details
The last 3 sale details done by the wholesaler through mobile can be viewed through this module.
The invoice number needs to be selected and the corresponding sale details would display.
To enter this module, follow the steps below.
9.6.1 Select View Sales details
For entering View Sales Details, View Sales Details has to be selected by clicking on the radio
button in front of it.
Fig 102: View Sales Details
Important Click the Next button to go to the next page or click the Exit button to exit from
the application. When the Next button is clicked, it automatically links to the next section for data
entry.

7/31/2019 mFMS System
http://slidepdf.com/reader/full/mfms-system 91/108
Operation Manual
Page
91
9.6.2 View Sales Details
Fig 103: View Sales Details
Invoice Number – Select the invoice number whose sale detail has to be seen.
Your ID – It is the 6 digit dealer ID and the application enters this value by its own.
Buyer ID – It is the 6 digit dealer ID of the buyer and the application enters this value by its own.
Invoice Date – It is the date of the invoice.
Important Selecting the invoice number, click the Continue button to go to the next page.
Click the Exit button to exit from the application.
9.6.3 View Sale Details
Fig 104: Entering the PIN
Important Click Continue to view sale of other products. After viewing the details, click the
Home button to go to the homepage of the application.

7/31/2019 mFMS System
http://slidepdf.com/reader/full/mfms-system 92/108
Operation Manual
Page
92
10 Moblie Operations for Android Phones for Retailer
Entering the application, the retailer will be taken to the welcome screen which is the homepage of
the application as shown in Fig 105.
Fig 105: Homepage of retailer application
The panel on top displays some information about the application like it is mobile client application
of FMS (Fertilizer Management System) for the retailers. On the centre of the screen, 4 options are
displayed, which are:
1. Enter Acknowledgement Details (Described in detail in Section 10.2)
2. Update Stock Detail (Described in detail in Section 10.3)
3. Manual Acknowledgement Details (Described in detail in Section 10.4)
4. Configure (Described in detail in Section 10.1)
Topics covered in this module:
Enter Acknowledgement Details
Update Stock Details
Manual Acknowledgement Details
Configuration

7/31/2019 mFMS System
http://slidepdf.com/reader/full/mfms-system 93/108
Operation Manual
Page
93
A retailer can select any one of these 4 options depending on the requirement by clicking on the
radio button in front of it.
Note If the retailer is entering the application for the first time, the wholesaler must go to
configuration option to add companies & add product for stock transaction, so that a list of companies/products can be generated in the drop down list.
10.1 Configurations
For configuration, configuration has to be selected by clicking on the radio button in front of it.
This module of the application allows the retailer to Add Company, Delete Company, Add Product
and Delete Product with a radio button in front of each of them.
Fig 106: Configuration
Important Click the Next button to proceed.
10.1.1 Add Company
This section allows the retailer to add the company/companies for whom it acts as a retailer. When
the drop down list is clicked, the whole list of companies can be seen but the retailer in supposed to
select the concerned company for whom it acts as a retailer. Select the company from the dropdown
list and press on ‘Add’ button. When you add company the corresponding products of the company
are automatically added.
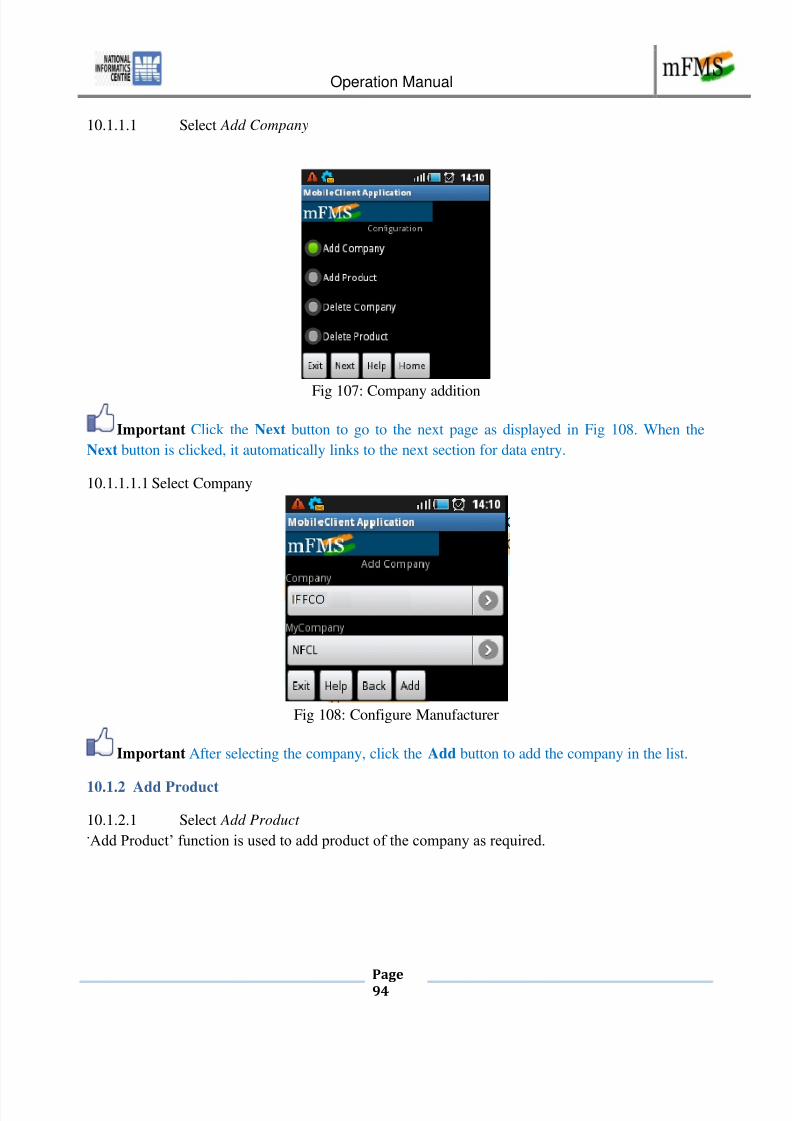
7/31/2019 mFMS System
http://slidepdf.com/reader/full/mfms-system 94/108
Operation Manual
Page
94
10.1.1.1 Select Add Company
Fig 107: Company addition
Important Click the Next button to go to the next page as displayed in Fig 108. When the
Next button is clicked, it automatically links to the next section for data entry.
10.1.1.1.1 Select Company
Fig 108: Configure Manufacturer
Important After selecting the company, click the Add button to add the company in the list.
10.1.2 Add Product
10.1.2.1 Select Add Product
‘Add Product’ function is used to add product of the company as required.

7/31/2019 mFMS System
http://slidepdf.com/reader/full/mfms-system 95/108
Operation Manual
Page
95
Fig 109: Configure Manufacturer
Important After selecting the company and then the product, click the Add button to add the
product in the list.
10.1.3 Delete Product
10.1.3.1 Select Delete Product
Fig 110: Configure Manufacturer
Important After selecting the company and then the product, click the Delete button to delete
the product in the list.
10.1.4 Delete Company
The retailer can delete a company or companies from the list of companies already added in MyCompany. When the drop down list is clicked, the list of added companies can be seen and then
selecting a particular company and giving the delete command, it can be deleted.

7/31/2019 mFMS System
http://slidepdf.com/reader/full/mfms-system 96/108
Operation Manual
Page
96
10.1.4.1 Select Delete Company
Fig 111: Delete Company
Important After selecting the company, click the Delete button to delete the company.

7/31/2019 mFMS System
http://slidepdf.com/reader/full/mfms-system 97/108
Operation Manual
Page
97
10.2 Entering Acknowledgement Details
10.2.1 Enter Receipt Details
Select the transaction id from the drop down menu and click Go button.
Fig 112: Selecting transaction ID
The application takes the corresponding values for Your ID, Seller ID and Invoice Number
corresponding to that transaction ID.
The retailer can acknowledge receipt of sale using this module. The retailer receives a data
message in the mobile as shown in ‘Data Message’ below. Click OK in the Data Messageto acknowledge the receipt. Select the transaction id (16 digits). Press ‘Continue’ to see next
product details. Retailer can change the ‘quantity’ in case of short supply. Press ‘Finish’ to
enter PIN and acknowledge transaction. Retailer will receive a notification SMS after
successful sale transaction.
Data Message
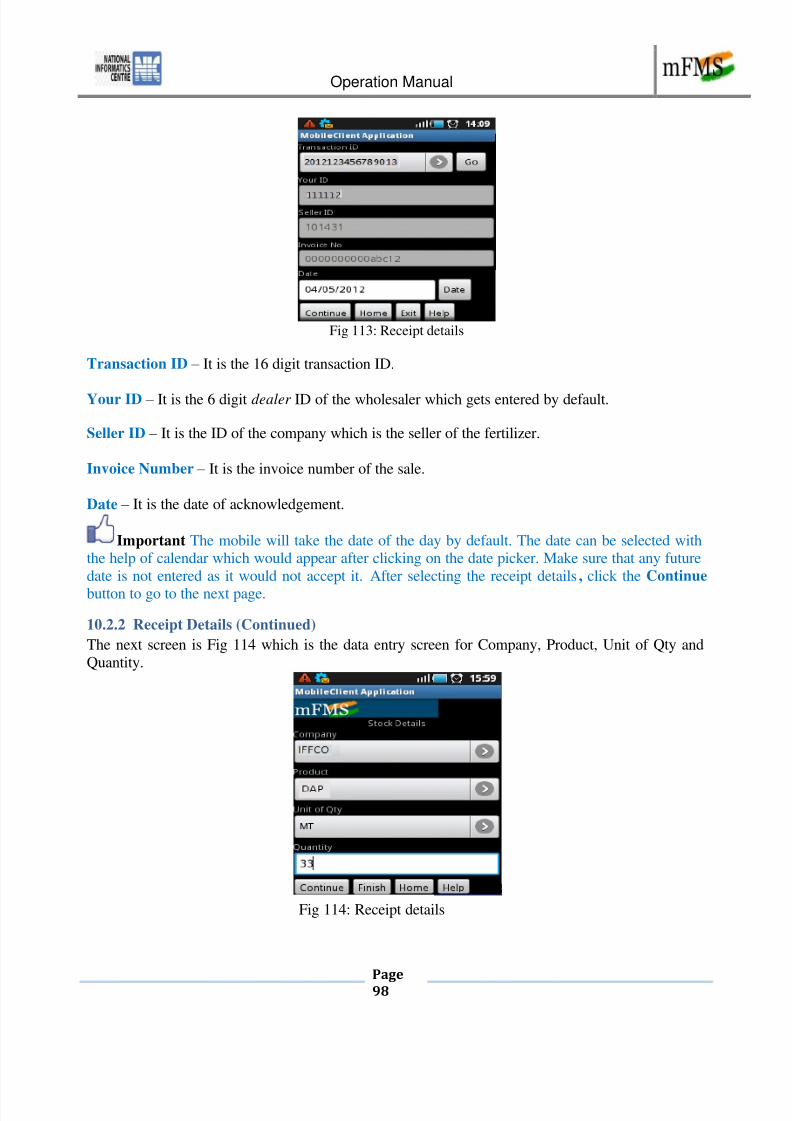
7/31/2019 mFMS System
http://slidepdf.com/reader/full/mfms-system 98/108
Operation Manual
Page
98
Fig 113: Receipt details
Transaction ID – It is the 16 digit transaction ID.
Your ID – It is the 6 digit dealer ID of the wholesaler which gets entered by default.
Seller ID – It is the ID of the company which is the seller of the fertilizer.
Invoice Number – It is the invoice number of the sale.
Date – It is the date of acknowledgement.
Important The mobile will take the date of the day by default. The date can be selected withthe help of calendar which would appear after clicking on the date picker. Make sure that any future
date is not entered as it would not accept it. After selecting the receipt details, click the Continue
button to go to the next page.
10.2.2 Receipt Details (Continued)
The next screen is Fig 114 which is the data entry screen for Company, Product, Unit of Qty and
Quantity.
Fig 114: Receipt details

7/31/2019 mFMS System
http://slidepdf.com/reader/full/mfms-system 99/108
Operation Manual
Page
99
Company – It is the seller company’s name from whom the stock is received.
Product – It is the product of the selected company received as stock.
Unit of Qty – It is the Unit of quantity like 50 kg bags, Metric ton etc.
Quantity- It is the quantity which is received.
Important After entering/selecting the values, click the Continue button to update receipt of
other products as well i.e in case of multiple entries. Click Finish to submit the receipt in case of
single entry.
10.2.3 Enter PIN
The mobile application asks for the four digits PIN from the retailer.
Fig 115: Entering the PIN
Important After entering the PIN, click the Submit button. Click Home to go to the
homepage.
10.2.3.1 Notification Message
The retailer receives a notification SMS from the server of mFMS which contains the retailer ID,
Date, Time and Transaction ID.
Message Structure:
A receipt of sale Txn <<transaction ID>> has been acknowledged by <<buyer ID>> on
<<date with time>> successfully. Receipt transaction id is <<transaction ID>>
Example: A receipt of sale Txn <<16 digits>> has been acknowledged by <<111111>> on
<<25.5.12 at 12.00am>> successfully. Receipt transaction id is <<16 digits>>.

7/31/2019 mFMS System
http://slidepdf.com/reader/full/mfms-system 100/108
Operation Manual
Page
100
10.3 Updating Stock Details
The retailer can update the stock through this module. Click on Continue button to update more than
1 product. On successful submission of the stock update, the retailer receives a notification SMS.
To enter this module, follow the steps below.
10.3.1 Select Update Stock Details
For entering Update Stock Details, Update Stock Details has to be selected by clicking on the radio
button in front of it.
Fig 116: Updating Stock Details
Important Click the Next button to go to the next page as displayed in Fig 117. Click the Exit
button to exit from the application. When the Next button is clicked, it automatically links to the
next section for data entry.
10.3.2 Update Stock Details
Fig 117: Updating Stock Details

7/31/2019 mFMS System
http://slidepdf.com/reader/full/mfms-system 101/108
Operation Manual
Page
101
Your ID – It is the 6 digit dealer ID and the application enters this value by its own.
Date – It is the date when this stock update is made.
Important The date can be selected with the help of calendar which would appear afterclicking on the date picker. Make sure that neither any future date nor any date before 10 days from
the date of the day is not entered/selected. It would not accept in these cases. After updating stock details, click the Continue button to go to the next page.
10.3.3 Update Stock Details (Continued)
The next screen is Fig 118 which is the data entry screen for Company, Product, Unit of Qty and
Quantity.
Fig 118: Entering Stock Details
Company – It is the manufacturer company’s name of whose stock is taken.
Product – It is the product of the selected company whose stock is taken into consideration.
Unit of Qty – It is the Unit of quantity like 50 kg bags, Metric ton etc.
Quantity- It is the quantity available in the stock.
Important After entering/selecting the values, click the Continue button to update stocks of
other products in case of multiple entries. Click Finish to enter the PIN in case of single entry.
10.3.4 Enter PIN
The mobile application asks for the four digits PIN from the retailer.

7/31/2019 mFMS System
http://slidepdf.com/reader/full/mfms-system 102/108
Operation Manual
Page
102
Fig 119: Entering the PIN
Important After entering the PIN, click the Submit button. Click the Home button to go to
the homepage of the application.
10.3.5 Notification Message
On successful submission of the stock details with mFMS server, the retailer would get the
following SMS:
Message Structure:
“Fertilizer Stock update has been received on <yyyy-mm-dd><hr:min:sec> by < retailer ID
6 digits> successfully. Transaction Id is <16 digits>”
Example: “Fertilizer Stock update has been received on <2012-01-26><09:00:00> by
<1000000> successfully. Transaction Id is <100000000000000000>”

7/31/2019 mFMS System
http://slidepdf.com/reader/full/mfms-system 103/108
Operation Manual
Page
103
10.4 Manual Acknowledgement details
In case the transaction is not displayed in ‘Enter Ack nowledgement Details”, the retailer can
acknowledge the receipt by entering 16 digit transaction ID. On submission, the retailer receives a
notification SMS. This option acknowledges the full invoice under the transaction ID.
To enter this module, follow the steps below.
10.4.1 Select Manual Acknowledgement details
For entering Manual Acknowledgement Details, Manual Acknowledgement Details has to be
selected by clicking on the radio button in front of it.
Fig 120: Updating Stock Details
Important Click the Next button to go to the next page as displayed in Fig 121. Click the Exit
button to exit from the application. When the Next button is clicked, it automatically links to the
next section for data entry.

7/31/2019 mFMS System
http://slidepdf.com/reader/full/mfms-system 104/108
Operation Manual
Page
104
10.4.2 Manual Acknowledgement Details
Fig 121: Updating Stock Details
Your ID – It is the 6 digit dealer ID and the application enters this value by its own.
Transaction ID – Enter the 16 digit transaction ID.
Date – It is the date of the day.
Important The mobile will take the date of the day by default. The date can also be selectedwith the help of calendar which would appear after clicking on the date picker. Make sure that any
future date is not selected. After entering the transaction ID, click the Finish button to go to the
next page. Click the Exit button to exit from the application.
10.4.3 Enter PIN
The mobile application asks for the four digits PIN from the retailer.
Fig 122: Entering the PIN
Important After entering the PIN, click the Submit button. Click the Home button to go to
the homepage of the application.
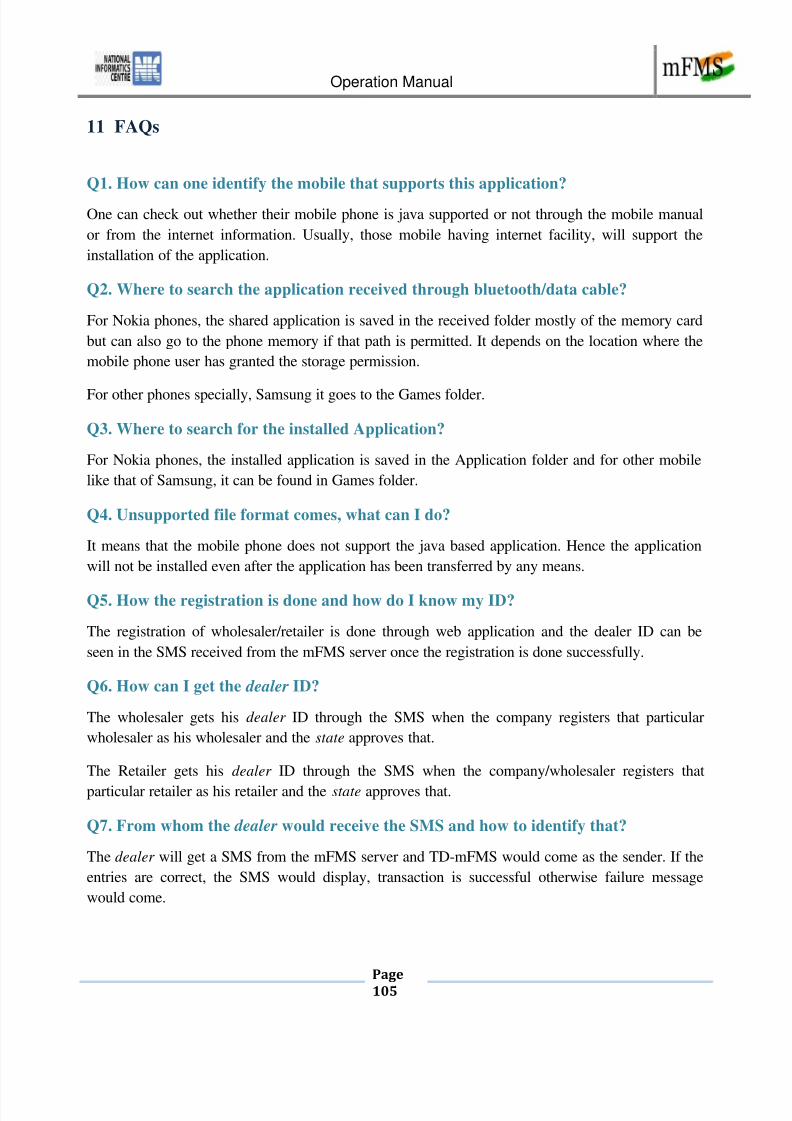
7/31/2019 mFMS System
http://slidepdf.com/reader/full/mfms-system 105/108
Operation Manual
Page
105
11 FAQs
Q1. How can one identify the mobile that supports this application?
One can check out whether their mobile phone is java supported or not through the mobile manual
or from the internet information. Usually, those mobile having internet facility, will support the
installation of the application.
Q2. Where to search the application received through bluetooth/data cable?
For Nokia phones, the shared application is saved in the received folder mostly of the memory card
but can also go to the phone memory if that path is permitted. It depends on the location where the
mobile phone user has granted the storage permission.
For other phones specially, Samsung it goes to the Games folder.
Q3. Where to search for the installed Application?
For Nokia phones, the installed application is saved in the Application folder and for other mobile
like that of Samsung, it can be found in Games folder.
Q4. Unsupported file format comes, what can I do?
It means that the mobile phone does not support the java based application. Hence the application
will not be installed even after the application has been transferred by any means.
Q5. How the registration is done and how do I know my ID?
The registration of wholesaler/retailer is done through web application and the dealer ID can be
seen in the SMS received from the mFMS server once the registration is done successfully.
Q6. How can I get the dealer ID?
The wholesaler gets his dealer ID through the SMS when the company registers that particular
wholesaler as his wholesaler and the state approves that.
The Retailer gets his dealer ID through the SMS when the company/wholesaler registers that
particular retailer as his retailer and the state approves that.
Q7. From whom the dealer would receive the SMS and how to identify that?
The dealer will get a SMS from the mFMS server and TD-mFMS would come as the sender. If the
entries are correct, the SMS would display, transaction is successful otherwise failure message
would come.
7/31/2019 mFMS System
http://slidepdf.com/reader/full/mfms-system 106/108
Operation Manual
Page
106
Q8. What to do when transactions details have been entered but the SMS is not
received?
Due to congestion on the server or because of some network problem, SMS may not reach
immediately. Wait for sometime.
Q9. My mobile supports java application but mobile client application is not working.
Reason?
It may be due to any of the following reason if these are not met:
• A minimum of 256KB of ROM for the MIDP 2.0, CLDC 1 implementation
• A minimum of 128KB of RAM for the Java runtime heap
• A minimum of 8KB of non-volatile writable memory for persistent data
Q10. If I have entered wrong entry/data, how can I make alteration?
Wholesaler: A fresh entry will have to be made and the company will have to deny the
acknowledgement sent by the wholesaler. The company will have to be informed about this.
Retailer: A fresh entry will have to be made and the wholesaler will have to deny the
acknowledgement sent by the retailer. The wholesaler will have to be informed about this.
Q11. While submitting the data, the mobile has shutdown due to low battery. How can
I retrieve the data?
The data will have to be re-entered.
Q12. If the phone hangs, what shall I do to access the application again?
Come out of the application and try to access again. If the problem persists, it may be due to any of
the following reason if these are not met:
• A minimum of 256KB of ROM for the MIDP 2.0, CLDC 1 implementation
• A minimum of 128KB of RAM for the Java runtime heap
• A minimum of 8KB of non-volatile writable memory for persistent data
Q13. Does the mobile need Internet facility?
For filling any type of data entry and send those, the dealer needs not the internet connection in the
mobile.

7/31/2019 mFMS System
http://slidepdf.com/reader/full/mfms-system 107/108
Operation Manual
Page
107
Q14.While the application is running, can I attend incoming calls on my mobile?
The phone calls can be attended while accessing the application and it work as normal after the call
is taken.
Q15. If I lost or got my sim damaged by water or somehow, how can I recover the
application?
In case the mobile is lost and there will be a new sim and it will have to get registered by the
company in case of a wholesaler and get the application installed again.
In case of retailer, the retailer will have to get registered by the wholesaler and have the application
installed again.
Q16. If I change my SIM card, what to do next?
Follow the same steps as explained in question 15 but the application will need not be installed if
the same mobile phone is used.
Q17. How the application responds in out of coverage area of the mobile?
The application will open and the data entries can be made but it would not be sent to the server of
mFMS application as there is no network in the mobile.
Q18. If I am making a data entry through the mobile application, will that reflect in
web application?
All access channels (Web & Mobile) are linked, so whatever is done on any of these access
channels, it will reflect in others.
Q19. Which are the recommended handsets to support the application?
J2ME:
Company Models
Nokia 6300
E-63
C5C1-01
2700
C2-01
X2
2700C
7310
7210 Supernova

7/31/2019 mFMS System
http://slidepdf.com/reader/full/mfms-system 108/108
Operation Manual
5230
3201
5130
6270
2323C
5233
201
Sony K800I
W200I
W700I
W20
CEDAR
Samsung Wave
GHJ150
Wave 525GT C3222
C3212
GTB5310
GT E2152
Hero
E3210
ANDROID:
Samsung Galaxy POPGalaxy ACE
HTC A333
Q18 I am not able to register what could be the reasons?