mendeley - ble.lshtm.ac.uk · mendeley desktop window. mendeley will automatically extract the...
TRANSCRIPT

Mendeley ORGANISE YOUR REFERENCES
LONDON SCHOOL OF HYGIENE & TROPICAL MEDICINE | OCTOBER 2018
© SIAMAND SALEHIAN, LSHTM TECHNOLOGY ENHANCED LEARNING (TEL) TEAM


Page 1
Table of Contents What is Mendeley? .......................................................................................................................................2
Creating an account, installing the desktop app, web importer and MS Word Plugin ................................3
Adding references manually .........................................................................................................................6
Search online databases and import references to Mendeley .....................................................................9
Importing references from other bibliographic software.......................................................................... 11
Adding PDFs ............................................................................................................................................... 12
Drag and drop files or folders ................................................................................................................ 12
From the File menu ................................................................................................................................ 14
Using the Web Importer from the browser, whilst searching web pages ............................................. 15
The Watched Folder ............................................................................................................................... 16
The File Organizer .................................................................................................................................. 18
Creating a Folder ........................................................................................................................................ 19
Removing duplicates .................................................................................................................................. 24
Deleting references .................................................................................................................................... 26
MS Word plugin ......................................................................................................................................... 27
Insert citations and generate bibliographies in MS Word ......................................................................... 29
Inserting citations into your document ................................................................................................. 29
Citation style .......................................................................................................................................... 30
Insert a bibliography .............................................................................................................................. 31
Removing field codes ............................................................................................................................. 32
Editing citations...................................................................................................................................... 33
Groups ........................................................................................................................................................ 36
Changing member status ........................................................................................................................... 38
Closing a group ........................................................................................................................................... 39

Page 2
What is Mendeley?
Mendeley is a free Reference Manager program that allows you to manage your
references, collaborate with others online and discover research data. It combines
a desktop application and web program (available for Windows 7 or later, Mac OS
X10.10 or later and Linux) as well as Mendeley for Android and iOS. Upon
registration, Mendeley provides 2GB free file storage space to the user, which is
upgradable at a cost.
Mendeley users can format their citations and bibliographies in over 1,200 different
citation formats, covering more than 7,500 scientific journals. The Citation Plugin
lets you cite as you write, and it is fully compatible with Word (including Word for
Mac) and LibreOffice.
This document compares the desktop and web features of Mendeley, showing
where the same features are available in both desktop and web versions.
Further support may be obtained from (click on the image that reflects your study
enrolment to be taken to the correct Moodle page):
This guide has been designed to support users in their adaptation of Mendeley. It is
intended to be constructive so should be read in that spirit.
Note:
Mendeley Desktop will no longer support OS Mavericks and below
As a result of supporting High Sierra, Mendeley Desktop will no longer be able to
support OS X Mavericks (OS X 10.9.5 and below). Automatic update notifications for
users on OS X 10.9.5 and below will be switched off, users will remain on Desktop
1.17.13 and won't be able to upgrade. Please note that any bugs or issues
encountered on OS X Mavericks won't be fixed.
Moodle for
face-to-face
students
Moodle for
Distance
Learning
students

Page 3
Creating an account, installing the desktop app, web
importer and MS Word Plugin
Access Mendeley by going to https://www.mendeley.com
Click on Create account on the top right corner
Enter your detail and click Continue
On the next page select your Field of study and Academic status. Click Create
account.

Page 4
On the Please enter your institution screen you can either click Skip this step or
enter your current institution and click Save and continue.
You have now successfully registered and can download the desktop app as well as
the tablet and mobile app from the App Store or Google Play.
If accessing Mendeley on a School PC, Mendeley is available on the School's
Application Window under the Research section as well as through the Horizon
remote desktop.
In Mendeley desktop, click on Tools and select Install Web Importer and
follow the instructions to add the extension to your web browser
(compatible with Chrome, Firefox, Safari and IE).
You can also install the Word plugin by clicking Install MS Word Plugin
which then appears under the References tab in Word.

Page 5

Page 6
Adding references manually
You can enter references manually either in Mendeley desktop or Mendeley web.
To add a reference manually in Mendeley desktop:
Either from the File menu, select Add Entry Manually…
Or click on the triangle next to the Add icon and select Add Entry Manually
to open up the New document window.
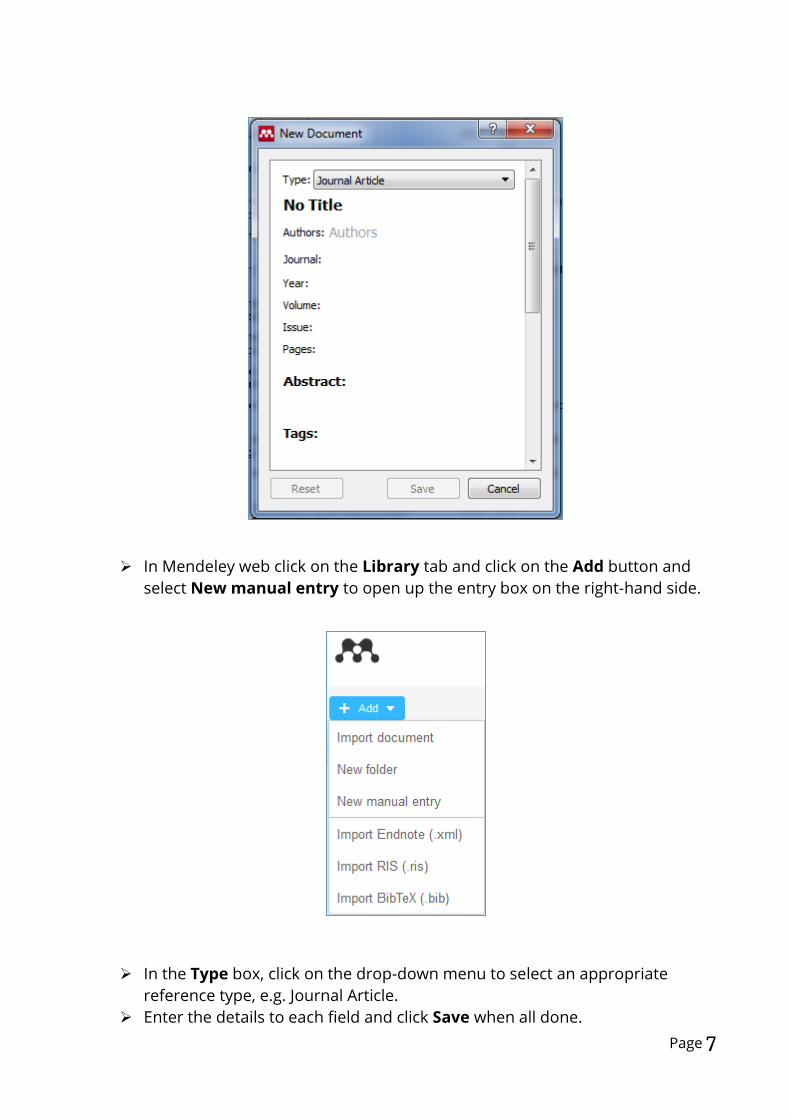
In the Type box, click on the drop-down menu to select an appropriate
reference type, e.g. Journal Article.
Enter the details to each field and click Save when all done.
Page 7
In Mendeley web click on the Library tab and click on the Add button and
select New manual entry to open up the entry box on the right-hand side.
In the Type box, click on the drop-down menu to select an appropriate
reference type, e.g. Journal Article.
Enter the details to each field and click Save when all done.

Page 8

Page 9
Search online databases and import references to
Mendeley
To import a reference from an online database such as PubMed:
Go to the PubMed website https://www.ncbi.nlm.nih.gov/pubmed/ and
search for a journal article.
Select the article and click on the Menedely extension on your browser and
then click Save. This will add the reference to your Web and desktop library if
they are both open.
Mendeley
extension in Firefox

Page 10

Page 11
Importing references from other bibliographic software
You can import libraries from other bibliographic software managers, such as
EndNote, into Mendeley web or desktop.
Export your EndNote library as either.XML or .RIS format.
In Mendeley desktop from the File menu, select Import and choose
EndNote XML or RIS depending on the file format that you have saved your
Endnote Library in.
In Mendeley web click on the Library tab then the Add button and select
Import EndNote (.xml) or Import RIS (.ris) depending on the file format
that you have saved your Endnote Library in.

Page 12
Adding PDFs
There are a few ways in which you can add PDFs to your Mendeley library. These
include:
Drag and drop files or folders
From the File menu
Using the Web Importer from the browser, whilst searching web pages
Using the Watched Folder
Using the File Organizer
Drag and drop files or folders
You can add papers to Mendeley by simply dragging and dropping a PDF into the
Mendeley desktop window. Mendeley will automatically extract the bibliographic
details from the paper and create a new library entry.
You can also drag and drop a folder containing multiple PDFs in the same way.
Mendeley will work its way through the folder and create a new library entry for
each PDF in the folder.

Page 13
Note: To attach a file, such as a PDF or Word document, to an existing entry in your
Mendeley library do the following:
In Mendeley desktop select the reference for which you want to attach your
file to.
On the right panel select the Details tab and scroll down to the Files field.
Click on Add file… and locate your file in the Attach Files window. Click
Open.
To delete the attached file simply click the cross sign in front of the file.

Page 14
From the File menu
You can also achieve the same result by:
Selecting the File menu and Add Files… or Add Folder…
Or click on the triangle next to the Add icon button and select Add Files or
Add Folder.

Page 15
Using the Web Importer from the browser, whilst searching web
pages
You can use Mendeley Web Importer to save PDF, or web content directly to your
online Mendeley library.
To add the Web Importer to your browser do one of the following:
Click on the link below and follow the instructions to add the appropriate
Web Importer to your browser.
https://www.mendeley.com/reference-management/web-importer
In Mendeley desktop click on Tools and select Install Web Importer and
follow the instructions to add the extension to your web browser (compatibe
with Chrome, Firefox, Safari and IE).
Do not forget to click the Sync button in Mendeley desktop to synchronise all the
changes between your desktop and the web. You should sync frequently in
order to ensure that your most recent changes are saved to the cloud.
Page 16
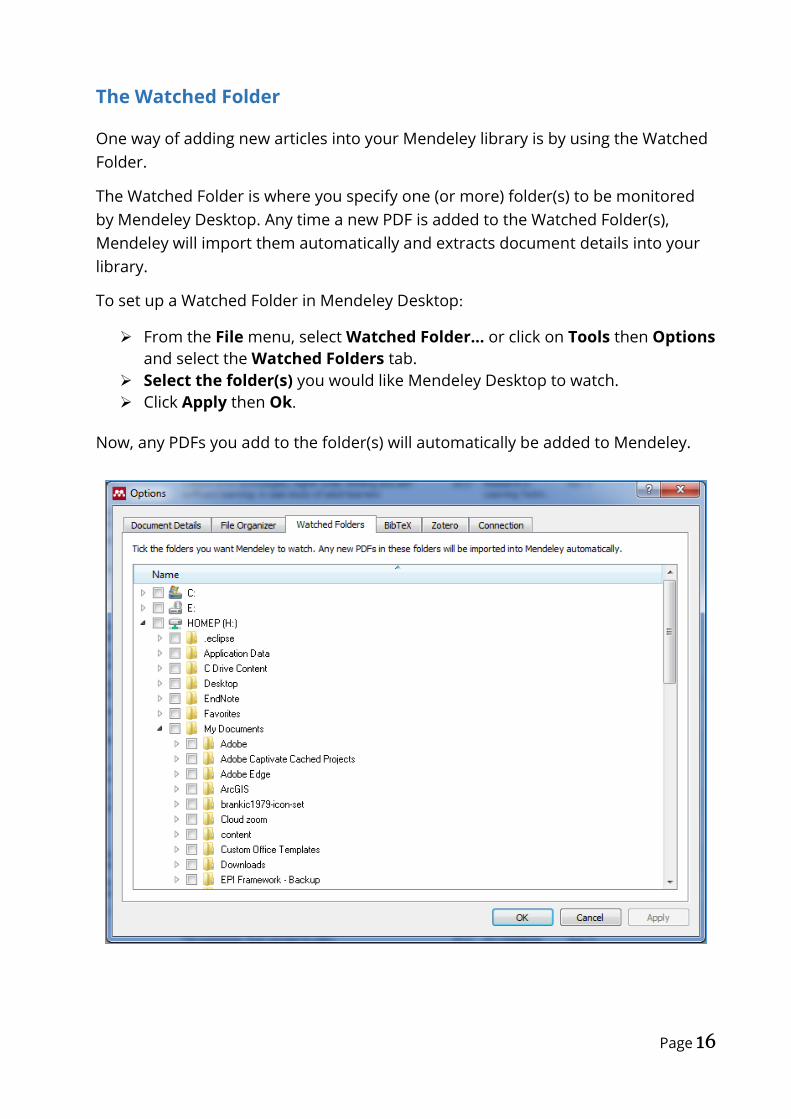
The Watched Folder
One way of adding new articles into your Mendeley library is by using the Watched
Folder.
The Watched Folder is where you specify one (or more) folder(s) to be monitored
by Mendeley Desktop. Any time a new PDF is added to the Watched Folder(s),
Mendeley will import them automatically and extracts document details into your
library.
To set up a Watched Folder in Mendeley Desktop:
From the File menu, select Watched Folder… or click on Tools then Options
and select the Watched Folders tab.
Select the folder(s) you would like Mendeley Desktop to watch.
Click Apply then Ok.
Now, any PDFs you add to the folder(s) will automatically be added to Mendeley.

Page 17
Note: Due to the fact that Watched Folders are constantly monitored by Mendeley
Desktop, it is recommended that you do not select a folder that is already
being synchronized and monitored by other services such as Dropbox, OneDrive,
Google Drive, etc. This can lead to conflicts and possible loss of data.
Page 18
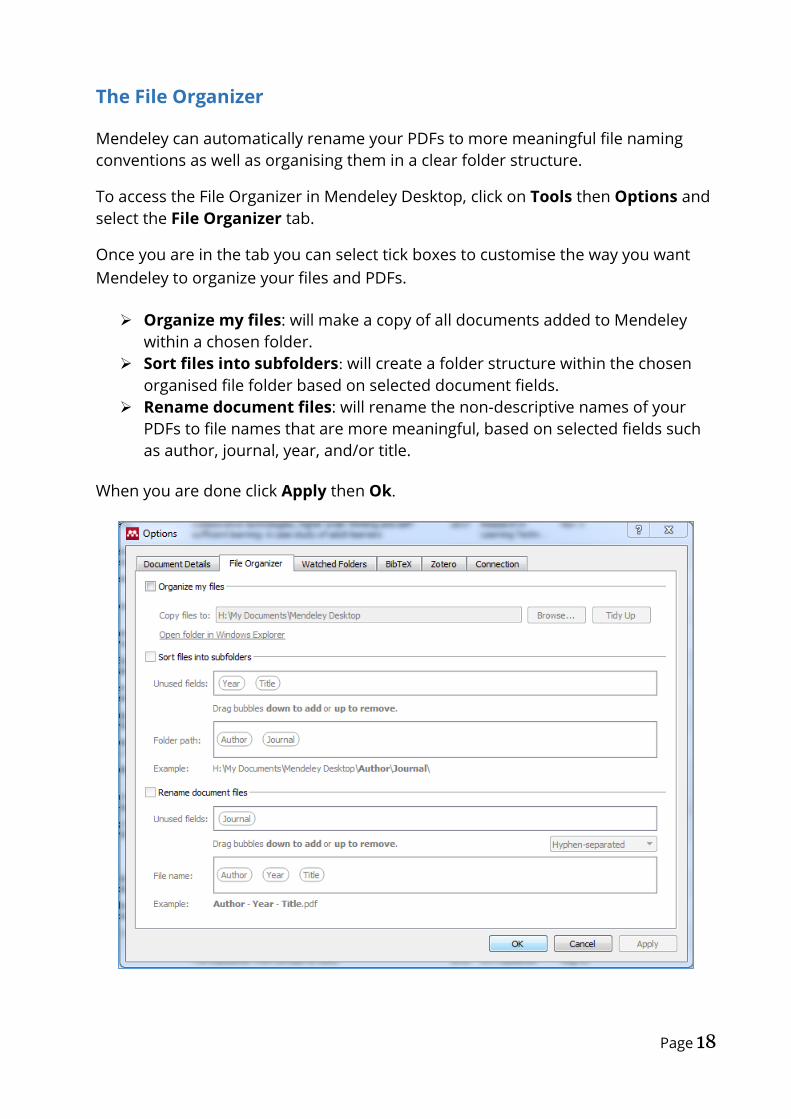
The File Organizer
Mendeley can automatically rename your PDFs to more meaningful file naming
conventions as well as organising them in a clear folder structure.
To access the File Organizer in Mendeley Desktop, click on Tools then Options and
select the File Organizer tab.
Once you are in the tab you can select tick boxes to customise the way you want
Mendeley to organize your files and PDFs.
Organize my files: will make a copy of all documents added to Mendeley
within a chosen folder.
Sort files into subfolders: will create a folder structure within the chosen
organised file folder based on selected document fields.
Rename document files: will rename the non-descriptive names of your
PDFs to file names that are more meaningful, based on selected fields such
as author, journal, year, and/or title.
When you are done click Apply then Ok.

Page 19
Creating a Folder
Folders make it easy to break a large library into subsets for later viewing. A folder
in Mendeley does not relocate the reference itself but simply points to a subset of
references that already exist in the library.
That means that the same reference can be added to multiple folders and
Mendeley won’t create a duplicate. Also that means you can delete a reference
from a folder or delete the entire folder without any effect on the references within
your main library.
To create a new folder in Mendeley desktop do one of the following:
Right click anywhere in the left panel and select New Folder.
Click on the Folders button on the main toolbar.
Use the Create Folder… option under My Library in the left panel.

Page 20
Click on Edit and select New Folder or use keyboard shortcut
Ctrl+Shift+NB.
Enter the name for your folder.
You can also create a subfolder. To create a subfolder, select an existing folder and
perform one of the following options:
Right click and select New Folder.
Click on the Folders button on the main toolbar.
Click on Edit and select New Folder or use keyboard shortcut Ctrl+Shift+N.

Page 21
You can also select a folder and drag it onto an existing folder to create a subfolder.
To add a reference to a folder or a subfolder, select the reference from your
main library, click and drag it onto the folder or the subfolder.
To remove a reference from the folder or the subfolder, right click on the
reference and select Remove from Folder.

Page 22
To create a new folder in Mendeley web, click on the Create Folder… under
the FOLDERS section and type the name for your folder and hit the return
key on your keyboard.
To create a subfolder in Mendeley web, click on the three dots next to the
folder and select Add subfolder… from the menu, then type the name for
your subfolder in the opening text box and click OK.
To add a reference to a folder or a subfolder in Mendeley web, select the
reference from your main library, click and drag it onto the folder or the
subfolder.
Alternatively select the reference from your main library, click on the Add to
from the toolbar, select your destination folder and click on the Add to
button.

Page 23
To remove a reference from the folder or the subfolder in Mendeley web,
select the reference and select Remove from folder from the toolbar.

Page 24
Removing duplicates
To find and remove duplicates in Mendeley desktop:
Select All Documents, a specific folder or a sub-folder.
From the Tools menu select the Check for Duplicates and if there is any you
will see the list of the duplicates.
Click on the triangle next to a reference that you would like to examine to
open up the collapsed menu.
Check each reference to make sure Mendeley has chosen the correct data
and selects the details that you would like to keep from each document on
the right hand side column.
When you are satisfied with your selection, click on the Merge Documents
button on the right hand side panel under the Details tab.

Page 25
When you are done click on the Close button on the top right corner to close
the duplicate window and go back to your original place.

Page 26
Deleting references
To delete a reference in Mendeley desktop:
Select the reference(s) in the All Documents window by clicking on them.
From the File menu, select Delete Documents or press the Delete key on
your keyboard.
Deleted references are moved to the All Deleted Documents under Trash
where they will remain until you choose Empty Trash from the File menu,
right clicking on the All Deleted Documents and selecting Empty Trash or
by clicking the Empty button on the main toolbar.
Note: You can also restore any or all references by selecting all (Ctrl+A or right
clicking on any of the references and selecting Select All) or an individual one and
either:
Under File select Restore Documents.
Click the Restore button on the main toolbar.
Right click on the selected reference(s) and select Restore Documents.

Page 27
MS Word plugin
Before you can use Mendeley desktop with Microsoft Word you must first install a
plugin.
Before installing the Word plugin, make sure that both Word and Outlook
are closed.
In Mendeley desktop, from the Tools menu, select the Install MS Word
Plugin.
Once the plugin is installed successfully a message will appear confirming
the installation has been successful.

Page 28
Should now be able to find the Mendeley plugin under the References tab
inside Microsoft Word.

Page 29
Insert citations and generate bibliographies in MS Word
Inserting citations into your document
The Mendeley Cite-O-Matic tool can be used to insert citations, generate a
Bibliography, edit citations, change styles and more.
Move the cursor to the required position for the citation in your document.
From the References ribbon in your Word document, click on the Insert
Citation button under Mendeley Cite-O-Matic tool.
In the search tool window, you can either type your search term by Author,
Title or Year to find the article you are trying to cite or you can click on the Go
To Mendeley button to go to your Mendeley library and find your reference.
If you use the search box to find your reference, as you start typing search
query articles matching your request will be displayed. Select the relevant
article from the list and click OK and your in-text citation will be added into
your document according to the selected style.

Page 30
You can also go directly to your Mendeley library by clicking on Go To
Mendeley button.
In your Mendeley library, click to highlight the required reference(s).
You can use Shift+click to highlight a range of references or Ctrl+click to
select multiple references not in a range.
From your Mendeley library, click on the Cite button. Your citation will be
added to your Word document where your cursor is positioned.
Citation style
From the References tab in your Word document, select your preferred style
from the Style drop-down menu. If your preferred style does not appear in the list, select More Styles… from
the bottom of the list and select from a more comprehensive style list.

Page 31
Insert a bibliography
You can create a bibliography in your document at any point of your writing. Once
you have created a bibliography Mendeley will automatically update the document
bibliography whenever you insert an in-text citation.
Make sure your cursor is placed in the position where you would like your
bibliography to appear.
From the References tab in your Word document, click on the Insert
Bibliography button within the Mendeley Cite-O-Matic tool.
The bibliography will be generated according to your citation style.

Page 32
Removing field codes
You may need to remove field codes from your document
If requested by a publisher before submission.
If sharing the document with a colleague using an incompatible word
processor.
To remove field codes:
From the References tab in your Word document, click on the Export as
drop-down list and select Without Mendeley Fields.
If you have not already saved your document you will be prompted to do so.
Mendeley will prompt you to save a duplicate copy of your document,
identical in format, but without filed codes.

Page 33
Remember, if you need to make any changes to your references, you must use
your original document with Mendeley field codes.
Editing citations
Use the Edit Citation option to modify the way an individual citation appears in the
text. The change only affects the display of the edited in-text citation.
To edit a citation:
Click on the citation that you are trying to modify on your word document.
This will highlight the citation.
The Insert Citation button in Mendeley Cite-O-Matic will change to Edit
Citation.
Click on the Edit Citation button and in the edit citation window click on the
author that you want to modify the citation for.
In the new window you can add Prefix, Suffix and/or choose Suppress
author.

Page 34
Anything typed in the Prefix and Suffix boxes will always be displayed in the
in-text citation. Use of the Page drop-down menu is determined by the
output style.
Note: Using the Page drop-down menu is determined by the output style
therefore, the result of adding pages in this field will be displayed in Author-Date
style such as Harvard but not in Numbered style such as Vancouver. Therefore, if
you are using a Numbered style and need to display a page on a citation, you can

Page 35
use Suffix to add your page number as this is a free text field and will display
whatever being typed in your in-text citation.
In the example below, the author is excluded from the Venter citation, a prefix is
added to Aregawi citation, and suffix to the Rodríguez citation.
[Note: the document has been formatted using the Author-Date output style]

Page 36
Groups
Mendeley offers opportunities for collaboration by using its Groups functionality.
Groups allow you to create and join other teams whether you are aiming to work
on a specific project with other team members, showcasing and distributing
reading lists or just looking to join a wider discussion on a particular subject.
Mendeley free account members receive 100MB of dedicated free group storage
and there are three types of groups in Mendeley:
1) Public: are totally public and anyone with a Mendeley account can join to
these groups and add new references to the group.
2) Invite-only: are publicly visible but only invited people can join and share
references. In Invite-only groups, PDF files cannot be shared.
3) Private: are designed to allow team members to work collaboratively
together. Private groups are not visible in the list of Groups on the Mendeley
website and only invited members can join. Full text PDFs and notes can be
shared and annotated in Private groups.
Mendeley users with a free account can create and own five private and/or Invite-
only groups with a maximum of 25 member in each group. You can however,
create as many as Public groups as you like.
To create a group in Mendeley desktop:
Click on Create Group… under Groups in the left panel.
In the Create Group… window name your group, select the type of your
group and click on Create button to create your group.

Page 37
Click on your group under Groups in the left panel and use the tabs to look
at the group’s feed under the Overview tab, current documents under the
Documents tab or to view members status or invite a new member by
clicking on the Members tab.
To create a group in Mendeley web:
Login to your Mendeley online.
Click on the Groups tab.
Under My Groups click on the Create a new group button.
In the Create new group window name your group, select the type of your
group and click on the Create button to create your group.

Page 38
Changing member status
Each invited user to a group will enter as member. The group owner has the power
to modify a user’s status and rights within that group.
To change a member status In Mendeley desktop:
Click on your specific group under Groups in the left panel.
Click on the Members tab.
Click on Edit in front of a specific user and from the dropdown list, choose
one of the following:
Promote to Admin: to give the ability of administrating the group
such as approving or rejecting membership applications.
Transfer Ownership: to transfer ownership of the account to another
member. Remember by doing so your group storage for that group
will also be transferred to their account.

Page 39
Remove from group: to stop a user having access to that group.
To change a member status In Mendeley web:
Login to your Mendeley online account.
Click on the Groups tab.
Under My Groups, click on your specific group.
Click on the Members tab.
Click on Edit in front of a specific user and from the dropdown list choose
one of the following:
Promote to Admin: to give the ability of administrating the group
such as approving or rejecting membership applications.
Transfer Ownership: to transfer ownership of the account to another
member. Remember by doing so your group storage for that group
will also be transfer to their account.
Remove from group: to stop a user having access to that group.
Closing a group
To delete a group in Mendeley desktop:
Right click on the group name under Groups in the left panel and select
Remove Group

Page 40
In the Delete group confirmation window click on the Delete group button
(remember this action cannot be undone)
To delete a group in Mendeley web:
Login to your Mendeley online account.
Click on the Groups tab.
Under My Groups click on your specific group.
Click on the Settings tab.
Click on the Delete this group on the right hand side panel
A confirmation window will open. Click on the Continue button to delete
that group (remember this action cannot be undone)