meat grinder attachment mg-50 - cuisinart.com · do not use more than one ... frozen meat should...
TRANSCRIPT

Meat Grinder Attachment
INSTRUCTION AND RECIPE BOOKLET
MG-50For your safety and continued enjoyment of this product, always read the Instruction Book carefully before using.


2
IMPORTANT SAFEGUARDSWhen using electrical appliances, basic safety precautions should always be taken, including the following:
1. READ ALL INSTRUCTIONS BEFORE USING.
2. Switch off and unplug your Cuisinart® Stand Mixer before fitting or removing the Meat Grinder Attachment, after use and before cleaning.
3. Close supervision is necessary when any appliance is used by or near children or individuals with certain disabilities. Cuisinart does not recommend the use of this appliance by children or individuals with certain disabilities.
4. NEVER FEED FOOD BY HAND; ALWAYS USE THE PUSHER. Avoid contact with moving parts and fitted attachments. To reduce the chances of bodily injury and/or damage to the stand mixer or Meat Grinder Attachment, keep hands, clothing, cooking utensils, etc., away from the moving parts during operation.
5. Do not use fingers to scrape food away from grinding plate while appliance is operating. Injury may result.
6. The use of attachments not recommended or sold by Cuisinart may cause fire, electric shock or injury.
7. Do not use more than one attachment at a time.
8. Do not use the stand mixer or attachment if it is damaged or if the cord is damaged. Have it checked and serviced before
resuming use.
9. Do not use this attachment for anything other than its intended use.
10. Do not use outdoors.
11. Warning: The cutter is sharp; handle with care both when using and when cleaning.
12. To protect against the risk of electric shock, do not put the base power unit in water or other liquids.
13. Do not let cord hang over edge of table or counter.
14. Never leave your Meat Grinder Attachment unattended while the stand mixer is running.
15. The attachments are intended for use with the basic appliance SM-50.
16. Do not operate your appliance in an appliance garage or under a wall cabinet. When storing in an appliance garage always unplug the unit from the electrical outlet. Not doing so could create a risk of fire, especially if the appliance touches the walls of the garage or the door touches the unit as it closes.
SAVE THESE INSTRUCTIONSFOR HOUSEHOLD USE ONLYRefer to stand mixer manual for stand mixer operating instructions.
3
IMPORTANT: Always unplug the Cuisinart® Stand Mixer from outlet when assembling and disassem-bling.
CONTENTSImportant Safeguards .................... 2
Unpacking Instructions.................. 3
Parts and Features ........................ 4
Assembling Meat Grinder Attachment .................................... 5
Sausage Maker ............................. 5
Cleaning and Maintenance ............ 7
Tips and Hints ............................... 7
Recipes ......................................... 8
Warranty ....................................... 11
UNPACKING INSTRUCTIONS1. Place the gift box containing your
Cuisinart® Meat Grinder Stand Mixer Attachment on a flat sturdy surface before unpacking.
2. Remove the instruction booklet and tray.
3. Remove the grinding plates, sausage-making ring, cutter, ring nut and both sausage nozzles. Be careful when removing the grinding plates.
4. Lift the corrugated insert that contains the grinder body out of the gift box and remove the grinder body. Remove the pusher/wrench.
5. Unscrew the ring nut and remove the protective cardboard insert from in front of the cutter. Use caution; the blades are sharp.
To assemble the meat grinder attachment, follow Assembly Instructions on page 5. Replace all packaging materials inside box and save the box for repackaging.
WARNING: RISK OF FIRE OR ELECTRIC SHOCKThe lightning flash with arrowhead symbol within an equilateral triangle is intended to alert the user to the presence of uninsulated, dangerous voltage within the product’s enclosure that may be of sufficient magnitude to constitute a risk of fire or electric shock to persons.
The exclamation point within an equilateral triangle is intended to alert the user to the presence of important operating and maintenance (servicing) instructions in the literature accompanying the appliance.

4
WARNING: RISK OF FIRE OR ELECTRIC SHOCKThe lightning flash with arrowhead symbol within an equilateral triangle is intended to alert the user to the presence of uninsulated, dangerous voltage within the product’s enclosure that may be of sufficient magnitude to constitute a risk of fire or electric shock to persons.
The exclamation point within an equilateral triangle is intended to alert the user to the presence of important operating and maintenance (servicing) instructions in the literature accompanying the appliance.
PARTS AND FEATURES 1. Grinder Body 2. Feed Screw Pin 3. Cutter 4. Ring Nut 5. Wrench 6. Tray 7. Pusher with Storage 8. Pusher Lid 9. Sausage-Making Ring 10. Large Sausage Nozzle
for thicker sausages
11. Small Sausage Nozzle for thinner sausages
12. Two Grinding Plates a. Medium, use for grinding
raw meat, cooked meats for spreads and bread-crumbs
b. Coarse, use for grinding raw or cooked meats, firm vegetables, dried fruits and cheese
1 2 3
4 5 7
8
6
11109 12b12a

5
Assembling Meat Grinder AttachmentAssemble the meat grinder at-tachment prior to attaching to the stand mixer.1. Insert the feed screw pin into
the open end of the attach-ment.
2. Place the cutter with the flat side facing out toward you over the feed screw pin (this is an important step or the meat grinder will not work).
3. Place the grinding plate over the cutter on the feed screw pin.
4. Screw on the ring nut by turning it clockwise and hand tighten.
When you are finished meat grinding, and if the ring nut is too tight to remove, use the wrench to loosen.
Attaching to stand mixer1. Make sure stand
mixer is OFF.2. Gently pull port
cover off front of mixer head to remove.
3. Turn the stand mixer attachment knob counter-clockwise until outlet opening is unobstructed.
4. Insert the square metal end of the assembled at-tachment into the opening. If necessary, turn it to the right slightly so the small round knob on the attachment is below the notch on right side of opening, and turn it back and forth slightly until the knob slips into the notch and attachment locks into place.
5. Turn the stand mixer attachment knob clockwise to secure grinder to mixer.
6. Fit the tray onto the top of the meat grinder and put a mixing bowl under the grinder to catch food.
MEAT GRINDER
6
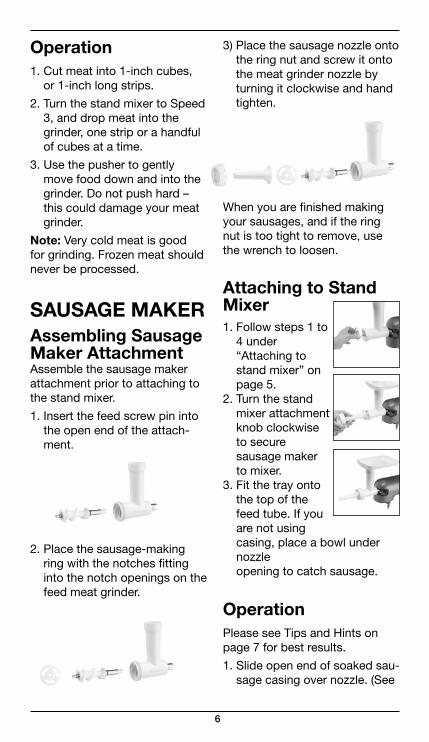
Operation1. Cut meat into 1-inch cubes,
or 1-inch long strips.2. Turn the stand mixer to Speed
3, and drop meat into the grinder, one strip or a handful of cubes at a time.
3. Use the pusher to gently move food down and into the grinder. Do not push hard – this could damage your meat grinder.
Note: Very cold meat is good for grinding. Frozen meat should never be processed.
SAUSAGE MAKERAssembling Sausage Maker AttachmentAssemble the sausage maker attachment prior to attaching to the stand mixer.1. Insert the feed screw pin into
the open end of the attach-ment.
2. Place the sausage-making ring with the notches fitting into the notch openings on the feed meat grinder.
3) Place the sausage nozzle onto the ring nut and screw it onto the meat grinder nozzle by turning it clockwise and hand tighten.
When you are finished making your sausages, and if the ring nut is too tight to remove, use the wrench to loosen.
Attaching to Stand Mixer1. Follow steps 1 to
4 under “Attaching to stand mixer” on page 5.
2. Turn the stand mixer attachment knob clockwise to secure sausage maker to mixer.
3. Fit the tray onto the top of the feed tube. If you are not using casing, place a bowl under nozzle opening to catch sausage.
OperationPlease see Tips and Hints on page 7 for best results.1. Slide open end of soaked sau-
sage casing over nozzle. (See
7
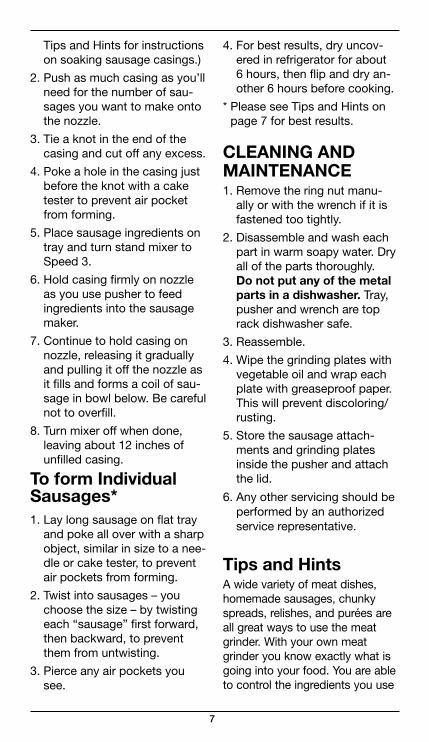
Tips and Hints for instructions on soaking sausage casings.)
2. Push as much casing as you’ll need for the number of sau-sages you want to make onto the nozzle.
3. Tie a knot in the end of the casing and cut off any excess.
4. Poke a hole in the casing just before the knot with a cake tester to prevent air pocket from forming.
5. Place sausage ingredients on tray and turn stand mixer to Speed 3.
6. Hold casing firmly on nozzle as you use pusher to feed ingredients into the sausage maker.
7. Continue to hold casing on nozzle, releasing it gradually and pulling it off the nozzle as it fills and forms a coil of sau-sage in bowl below. Be careful not to overfill.
8. Turn mixer off when done, leaving about 12 inches of unfilled casing.
To form Individual Sausages*1. Lay long sausage on flat tray
and poke all over with a sharp object, similar in size to a nee-dle or cake tester, to prevent air pockets from forming.
2. Twist into sausages – you choose the size – by twisting each “sausage” first forward, then backward, to prevent them from untwisting.
3. Pierce any air pockets you see.
4. For best results, dry uncov-ered in refrigerator for about 6 hours, then flip and dry an-other 6 hours before cooking.
* Please see Tips and Hints on page 7 for best results.
CLEANING AND MAINTENANCE1. Remove the ring nut manu-
ally or with the wrench if it is fastened too tightly.
2. Disassemble and wash each part in warm soapy water. Dry all of the parts thoroughly. Do not put any of the metal parts in a dishwasher. Tray, pusher and wrench are top rack dishwasher safe.
3. Reassemble.4. Wipe the grinding plates with
vegetable oil and wrap each plate with greaseproof paper. This will prevent discoloring/rusting.
5. Store the sausage attach-ments and grinding plates inside the pusher and attach the lid.
6. Any other servicing should be performed by an authorized service representative.
Tips and HintsA wide variety of meat dishes, homemade sausages, chunky spreads, relishes, and purées are all great ways to use the meat grinder. With your own meat grinder you know exactly what is going into your food. You are able to control the ingredients you use

Aditamento moledor/embutidor de carne
MANUAL DE INSTRUCCIONES Y
LIBRO DE RECETAS
MG-50Para su seguridad y para disfrutar plenamente de este producto, siempre lea cuidadosamente las instrucciones antes de usarlo.

2
MEDIDAS DE SEGURIDAD IMPORTANTESAl usar aparatos eléctricos, siempre debe tomar precauciones básicas de seguridad, incluso las siguientes:
1. LEA TODAS LAS INSTRUCCIONES ANTES DE USARLO.
2. Apague y desconecte la batidora de pie Cuisinart® antes de instalar/retirar el aditamento moledor/embutidor de carne, después del uso y antes de la limpieza.
3. Supervise el uso de este aparato cuidadosamente cuando sea usado por o cerca de niños o personas con ciertas discapacidades. Cuisinart no recomienda que los niños o personas con ciertas discapacidades usen este aparato.
4. NUNCA INTRODUZCA LA MANO EN LA BOCA DE ALIMENTACIÓN; SIEMPRE USE EL EMPUJADOR. Evite el contacto con las piezas móviles y los accesorios/aditamentos. Para evitar el riesgo de heridas y/o daños al aparato o al aditamento, mantenga las manos, el cabello, la ropa y los utensilios alejados de las piezas móviles durante el funcionamiento.
5. No toque las rejillas mientras el aparato está funcionando; esto puede provocar heridas.
6. El uso de accesorios/aditamentos no recomendados o vendidos por Cuisinart presenta un riesgo de incendio, electrocución o heridas.
7. No use más de un aditamento a la vez.
8. No utilice el aparato ni el aditamento si estuvieran dañados o si el cable estuviera dañado; Regréselos a un centro de servicio autorizado para que los revisen y los reparen.
9. No utilice este aditamento para ningún otro fin que no sea el indicado.
10. No lo utilice en exteriores.
11. Advertencia: la cuchilla es muy afilada; manipúlela con sumo cuidado, tanto durante el uso como durante la limpieza.
12. Para reducir el riesgo de electrocución, no coloque la base del aparato en agua u otro líquido.
13. No permita que el cable cuelgue del borde de la mesa o de la encimera.
14. Nunca descuide ni abandone el aditamento moledor/embutidor de carne mientras la batidora de mano está funcionando.
15. Este accesorio ha sido diseñado para ser usado con la batidora de pie Cuisinart SM-50.
16. No haga funcionar el aparato bajo o adentro de un armario. Siempre desconecte el aparato antes de guardarlo en un armario.Dejar el aparato conectado presenta un riesgo de incendio, especialmente si éste toca las paredes o la puerta del armario cuando cierra.
GUARDE ESTAS INSTRUCCIONES
3
PARA USO DOMÉSTICO SOLAMENTEConsulte el manual de uso de la batidora de mano para las instrucciones de uso.IMPORTANTE: siempre desconecte el cable de la toma de corriente antes de instalar/retirar accesorios/aditamentos.
ÍNDICEMedidas de seguridad importantes 2
Instrucciones de desembalaje ....... 3
Piezas y características .................. 4
Uso como moledora de carne ........ 5
Uso como embutidora de carne ....5
Limpieza y mantenimiento ............. 7
Consejos y sugerencias ................. 8
Recetas .......................................... 9
Garantía ........................................ 12
INSTRUCCIONES DE DESEMBALAJE1. Ponga la caja sobre una superficie
espaciosa, plana y segura.
2. Retire el manual de instrucciones y la tolva de la caja.
3. Retire las rejillas, el aro para embutidos, la cuchilla, la tuerca de sujeción y los embudos para embutidos. Tenga cuidado al manipular las rejillas; son muy cortantes.
4. Retire el inserto de cartón que contiene el cuerpo del aditamento moledor/embutidor y saque este. Saque el empujador y la llave.
5. Desenrosque la tuerca de sujeción y quite el inserto de cartón que protege la cuchilla. Tenga cuidado, ya que los filos de la cuchilla son muy filosos.
Para ensamblar el aditamento moledor/embutidor, siga las instrucciones de ensamblaje que se encuentran en la página 5. Le aconsejamos que conserve el material de embalaje.
ADVERTENCIA: RIESGO DE INCENDIO O ELECTROCUCIÓNEl símbolo representado por un relámpago con punta de flecha dentro de un triángulo equilátero tiene como fin alertar al usuario de la presencia de voltajes peligrosos no aislados en el interior del aparato, los cuales pueden ser de suficiente magnitud para constituir un riesgo de incendio o electrocución.
El signo de exclamación dentro de un triángulo equilátero tiene como fin alertar al usuario de la presencia de instrucciones importantes de operación y mantenimiento (servicio) en la documentación que acompaña al equipo.
4
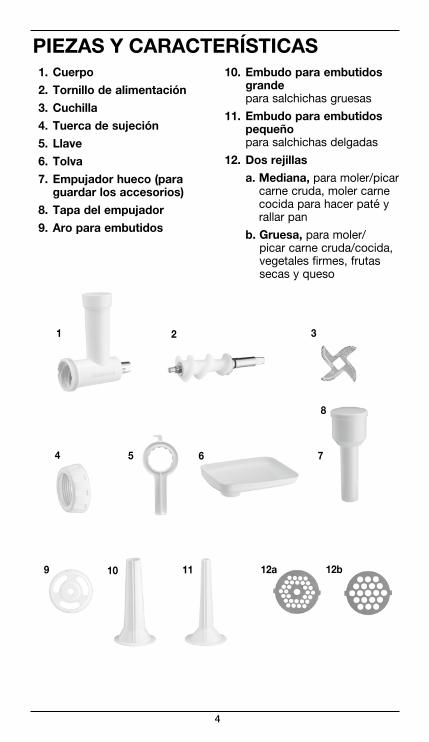
PIEZAS Y CARACTERÍSTICAS 1. Cuerpo 2. Tornillo de alimentación 3. Cuchilla 4. Tuerca de sujeción 5. Llave 6. Tolva 7. Empujador hueco (para
guardar los accesorios) 8. Tapa del empujador 9. Aro para embutidos
10. Embudo para embutidos grande para salchichas gruesas
11. Embudo para embutidos pequeño para salchichas delgadas
12. Dos rejillas a. Mediana, para moler/picar
carne cruda, moler carne cocida para hacer paté y rallar pan
b. Gruesa, para moler/picar carne cruda/cocida, vegetales firmes, frutas secas y queso
1 2 3
4 5 7
8
6
11109 12b12a
5
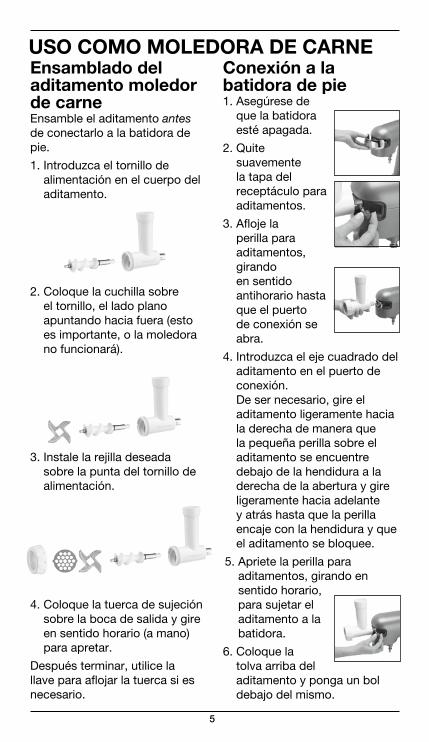
Ensamblado del aditamento moledor de carneEnsamble el aditamento antes de conectarlo a la batidora de pie.1. Introduzca el tornillo de
alimentación en el cuerpo del aditamento.
2. Coloque la cuchilla sobre el tornillo, el lado plano apuntando hacia fuera (esto es importante, o la moledora no funcionará).
3. Instale la rejilla deseada sobre la punta del tornillo de alimentación.
4. Coloque la tuerca de sujeción sobre la boca de salida y gire en sentido horario (a mano) para apretar.
Después terminar, utilice la llave para aflojar la tuerca si es necesario.
Conexión a la batidora de pie1. Asegúrese de
que la batidora esté apagada.
2. Quite suavemente la tapa del receptáculo para aditamentos.
3. Afloje la perilla para aditamentos, girando en sentido antihorario hasta que el puerto de conexión se abra.
4. Introduzca el eje cuadrado del aditamento en el puerto de conexión. De ser necesario, gire el aditamento ligeramente hacia la derecha de manera que la pequeña perilla sobre el aditamento se encuentre debajo de la hendidura a la derecha de la abertura y gire ligeramente hacia adelante y atrás hasta que la perilla encaje con la hendidura y que el aditamento se bloquee.
5. Apriete la perilla para aditamentos, girando en sentido horario, para sujetar el aditamento a la batidora.
6. Coloque la tolva arriba del aditamento y ponga un bol debajo del mismo.
USO COMO MOLEDORA DE CARNE
6
Operación1. Cortar la carne
en cubos o tiras de 1 pulgada (2.5 cm).
2. Encienda la batidora al nivel 3 y eche la carne en el aditamento moledor, una tira o unos cubos a la vez.
3. Empuje suavemente los alimentos con el empujador. No haga mucha presión; esto podría dañar el aditamento.
Nota: la carne debe estar muy fría. Nunca intente moler carne congelada.
USO COMO EMBUTIDORA DE CARNEEnsamblado del aditamento embutidor de carneEnsamble el aditamento antes de conectarlo a la batidora de pie.1) Introduzca el tornillo de
alimentación en el cuerpo del aditamento.
2) Coloque el aro para embutidos en la punta del tornillo de alimentación.
3) Introduzca el embudo deseado en la tuerca de sujeción y coloque la tuerca sobre la boca de salida, girando en sentido horario (a mano) para apretar.
Después de terminar, utilice la llave para aflojar la tuerca si es necesario.
Conexión a la batidora de pie1. Siga los pasos 1–4 de la
sección “Conexión a la batidora de pie” en la página 5.
2. Apriete la perilla para aditamentos, girando en sentido horario, para sujetar el aditamento a la batidora.
3. Coloque la tolva encima de la boca de alimentación. Si no usa tripa, coloque un bol bajo la boca de salida.
OperaciónVéase la sección “Consejos y sugerencias” en la página 7 para resultados óptimos.1. Deslice la
extremidad de la tripa remojada por encima del embudo (véase la sección “Consejos y sugerencias”
7
para instrucciones acerca de cómo remojar las tripas).
2. Empuje cuanta tripa necesite, según la cantidad de salchichas.
3. Haga un nudo en la extremidad de la tripa y corte el exceso de tripa.
4. Haga un agujero en la tripa (usando una aguja o un probador de pastel) justo arriba del nudo para evitar que se formen burbujas de aire en la salchicha.
5. Coloque los ingredientes en la tolva y encienda la batidora al nivel 3.
6. Sostenga firmemente la tripa mientras empuja los ingredientes en el aditamento embutidor con el empujador.
7. Suelte la tripa a medida que se llene, mientras sigue sosteniendo la tripa vacía sobre el embudo. Tenga cuidado de no llenar la tripa de más.
8. Deje aproximadamente 12 pulgadas (30 cm) de tripa vacía. Después de terminar, apague el aparato.
Para formar ristra de salchichas*1. Coloque la salchicha larga
sobre una bandeja plana y haga agujeros todo a lo largo con una aguja o un probador de pastel para evitar que se formen burbujas de aire.
2. Tuerza la tripa en los lugares deseados, primero en una dirección y luego en otra para evitar que la tripa se
desenrolle.3. Pinche las burbujas de aire.4. Para obtener mejores
resultados, permita que la salchicha se seque (destapada) en el refrigerador por aproximadamente 6 horas. Luego, voltéela y permita que se seque por 6 horas más antes de cocinar.
* Véase la sección “Consejos y sugerencias” en la página 7 para resultados óptimos.
LIMPIEZA Y MANTENIMIENTO1. Después de retirar el
aditamento de la batidora de pie, afloje la tuerca de sujeción manualmente o con la llave provista para retirarla.
2. Desarme el aditamento y lave todas las piezas en agua jabonosa tibia. Seque bien todas las piezas. No meta ninguna pieza metálica al lavavajillas. La tolva, el empujador y la llave son aptos para lavavajillas (bandeja superior solamente).
3. Vuelva a ensamblar el aditamento.
4. Cepille las rejillas con aceite vegetal y envuélvalas individualmente en papel encerado para evitar la decoloración y la oxidación.
5. Coloque las rejillas y los embudos adentro del empujador y cierre la tapa.
6. Cualquier otro servicio debe ser realizado por un técnico autorizado.
8
Consejos y sugerenciasEl aditamento moledor/embutidor es perfecto para preparar una variedad de salchichas caseras, patés, picadillos y purés. Moler su propia carne le permite elegir los ingredientes, controlando el tipo de carne, la cantidad de grasa, la cantidad de sal y las especias en las recetas finales.
Para moler/picar:
• Refrigere la carne antes de molerla/picarla. Si la carne se entibia, refrigérela antes de molerla/picarla. Para resultados óptimos, mantenga la carne a una temperatura inferior a 45 °F (7 °C).
• Corte la carne en cubos de 1–2 pulgadas (1.5–2.5 cm), quitando la piel pero no la grasa.
• Los cortes más baratos y grasosos son perfectos para moler/picar. La grasa da sabor a la carne molida y a las salchichas, y las mantiene jugosas.
• Rejilla gruesa – úsela para conseguir una textura gruesa, por ej. para moler/picar res para hacer chile o ingredientes para hacer picadillos y salsas.
• Rejilla mediana – úsela para conseguir una textura mediana, por ej. para moler/picar carne para hacer salchichas, albóndigas o pan de carne.
• Cerciórese de refrigerar la carne molida/picada inmediatamente. Cocine o
congele la carne dentro de 1–2 días.
• Cuando use la moledora para rallar pan, cerciórese de usar pan seco o tostado.
• Después de moler/picar carne o rellenar salchichas, procese una rebanada de pan; esto limpiará el mecanismo interno y el embudo.
Para hacer salchichas:
• Remoje las tripas en agua por 30–60 minutos para suavizarlas, y luego enjuáguelas en agua tibia para eliminar el exceso de sal.
• Cerciórese de llenar toda la tripa, y luego haga agujeros todo a lo largo antes de torcer la tripa para hacer ristras.
• Una tripa de cerdo de 2 pies (60 cm) tiene capacidad para 1 libra (455 g) de carne.
• Si no encuentra tripa, visite su carnicería local o busque en Internet, en sitios especializados.
• Pruebe la mezcla antes de rellenar la tripa, cocinando una pequeña cantidad en un sartén.