measuring, ordering and installation instructions · measuring, ordering and installation...
TRANSCRIPT

Revised 6/091
Measuring, Ordering and Installation InstructionsMeasuringWhen measuring a window opening it is ideal to measure the width of the window opening at the top, center and bottom. Similarly measure the height of the window left, center and right side. If the shutter is to be functional you need to allow for 1/4" clearance around all 4 sides to the smallest window opening size. You must also allow for a 1/4" gap between the two shutters at the center of the window.
HardwareIt is very important that you determine the type of hinge and pintel required to fit your window and wall application.
Flat Hinge Item # 0" Offset 800320001 1/2" Offset 800330002 1/4" Offset 80034000
6" l-Hinge Item # 1/2" Offset 800120001 1/2" Offset 800130002 1/4" Offset 80014000
10" strap Hinge Item # 0" Offset 206940001/2" Offset 800150001 1/2" Offset 800160002 1/4" Offset 80017000
12" strap Hinge Item # 1/2" Offset 206980001 1/2" Offset 20699000
Revised 6/09 2
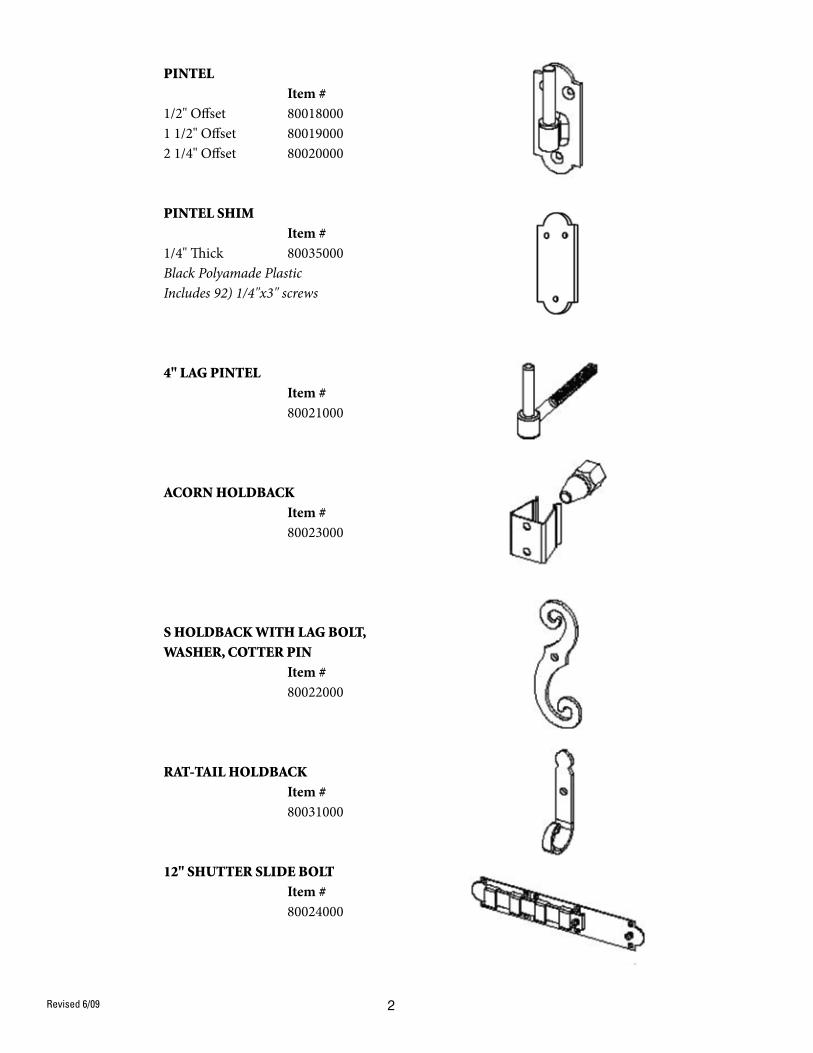
pintel Item # 1/2" Offset 800180001 1/2" Offset 800190002 1/4" Offset 80020000
pintel sHiM Item # 1/4" Thick 80035000Black Polyamade PlasticIncludes 92) 1/4"x3" screws
4" lag pintel Item # 80021000
acorn Holdback
Item # 80023000
s Holdback witH lag bolt,
wasHer, cotter pin
Item # 80022000
rat-tail Holdback Item # 80031000
12" sHutter slide bolt Item # 80024000

Revised 6/093
First step is to determine the position of the Pintel on the Window casement.Measure the depth of the surface that the Pintel will be mounted on and the adjacent wall surface. This will determine the Pintel height and Hinge combination that best fits the application.

Revised 6/09 4
pintel and strap Hinge coMbination
The ideal setup is to have the Shutter flush with the casement when the Shutter is in the closed position. The Pintel Shims can be added to make small adjustments of 1/4", 1/2" and 3/4".
Option #1

Revised 6/095
pintel and strap Hinge coMbination
The ideal setup is to have the Shutter flush with the casement when the Shutter is in the closed position. The Pintel Shims can be added to make small adjustments of 1/4", 1/2" and 3/4".
Option #2
Revised 6/09 6
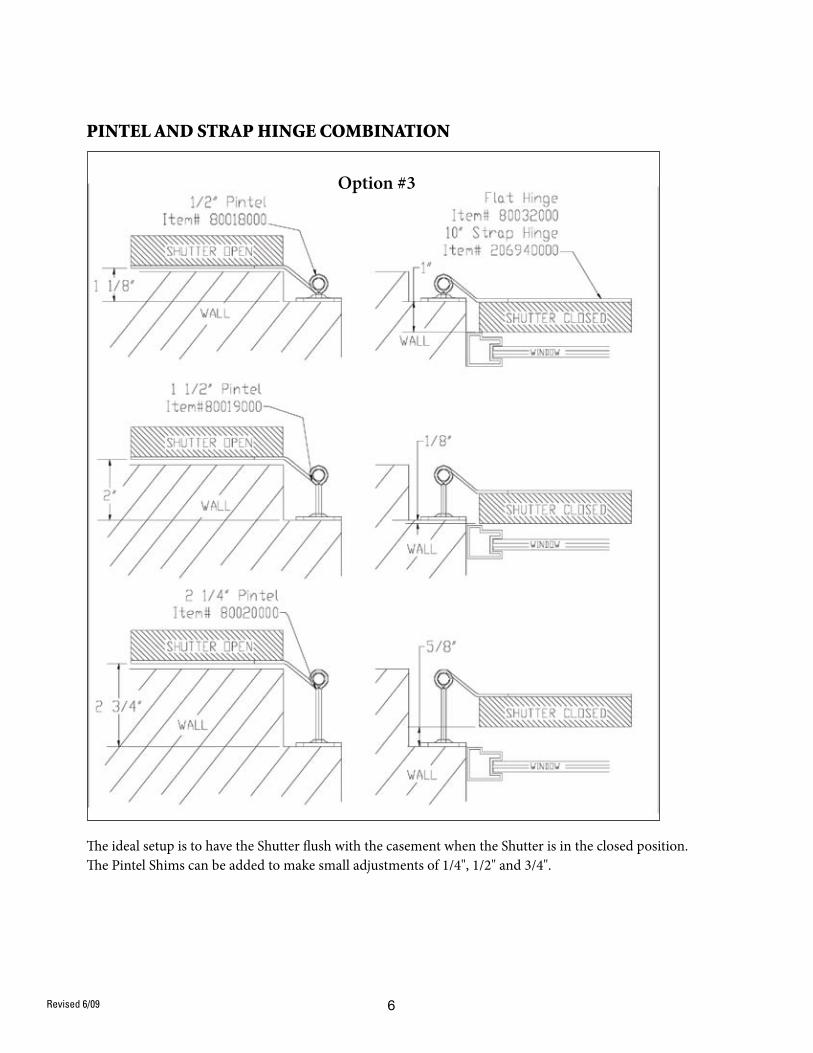
pintel and strap Hinge coMbination
The ideal setup is to have the Shutter flush with the casement when the Shutter is in the closed position. The Pintel Shims can be added to make small adjustments of 1/4", 1/2" and 3/4".
Option #3

Revised 6/097
pintel and strap Hinge coMbination
The ideal setup is to have the Shutter flush with the casement when the Shutter is in the closed position. The Pintel Shims can be added to make small adjustments of 1/4", 1/2" and 3/4".
Option #4
1/2" Pintel is not compatible with these hinges.

Revised 6/09 8
pintel and strap Hinge coMbination
The ideal setup is to have the Shutter flush with the casement when the Shutter is in the closed position. The Pintel Shims can be added to make small adjustments of 1/4", 1/2" and 3/4".
Option #5
1/2" and 1 1/2" Pintel is not compatible with these hinges.

Revised 6/099
pintel sHiM
All hardware is made from 304 Stainless Steel and is Powder coated Black finish.
sHipMent• Whenyoureceiveyourorder,pleaseinspectthecartonsforvisualdamage.• Removetheshuttersfromthepackagesandinspectforanyconsealeddamage.• Countthenumberofshuttersandhardwarereceivedascomparedtothepackingslip.• IfyouaremissinganyitemsorthereisanydamagepleasecontactAtlanticShutterat866-288-2726 before proceeding. • InorderforAtlanticSuttertofileafreightclaimwemustfiletheclaimwithin5daysofdelivery. • AtlanticShutterWILLNOTACCEPTanydamageclaimsifwearenotnotifiedwithin5days from the delivery date.
FinisHAtlantic Shutters are provided either primed or finished.
warranty• architectural collection shutters Limitedlifetimewarrantyonstructure.15-yearwarrantyonfinish.•
classic collection shutters 10-yearwarrantyonstructureandfinish.

Revised 6/09 10
Installation InstructionsHold the shutters in place in the window opening.Using shims center the shutter in the opening to create a 1/4" gap around all 4 sides of the shutter, and 1/4" gap between the center of the 2 shutters.
Identify the location of the Hinges and Pintels.We recommend that the following number of Hinges be used for different height shutters. Height up to 48" – 2 Hinges per shutter Heights from 49" to 96" – 3 Hinges per shutter Height from 97" to 120" – 4 Hinges per shutter
Identify the locations of the Pintel on the wall and mount each pointing in the upward position, except for the two bottom pintel. These will be mounted after the Strap Hinges are assembled to the shutter and after the shutter has been hung on the top pintel for final assembly.
After the shutter is hung reverse the 2 bottom Pintel pointing downward. This will prevent the shutter from being blown off.

Revised 6/0911
Installation Instructions cont.With the Shutters setting in the window opening, attach the Strap Hinge to each Pintel and rotate the Hinge to lay flush with the face of the shutter. Mark the location of the screw holes.
Removetheshutterfromthewindowopening. Drill 1/8" diameter pilot holes through the face of the stiles. Be careful not to drill through the opposite side of the stile. Mount the Hinges with the screws provided with the Hardware. Slide Bolts are normally mounted on the center rail of the outside of the shutter in the open position. They function best when located in the center of the shutter. Laytheshutteronasetofhorsessidebyside.Alignthepairintheclosedposition. Align the large body of the Slide Bolt to the inside edge of the shutter and mark the hole locations.Drill 1/8" diameter pilot holes through the face of the stiles. Be careful not to drill through the opposite side of the stile.Screw the large body of the Slide Bolt to the shutter.AligntheLatchportionoftheSlideBoltwiththeedgeoftheoppositeshutterandmarktheholelocations.
Revised 6/09 12
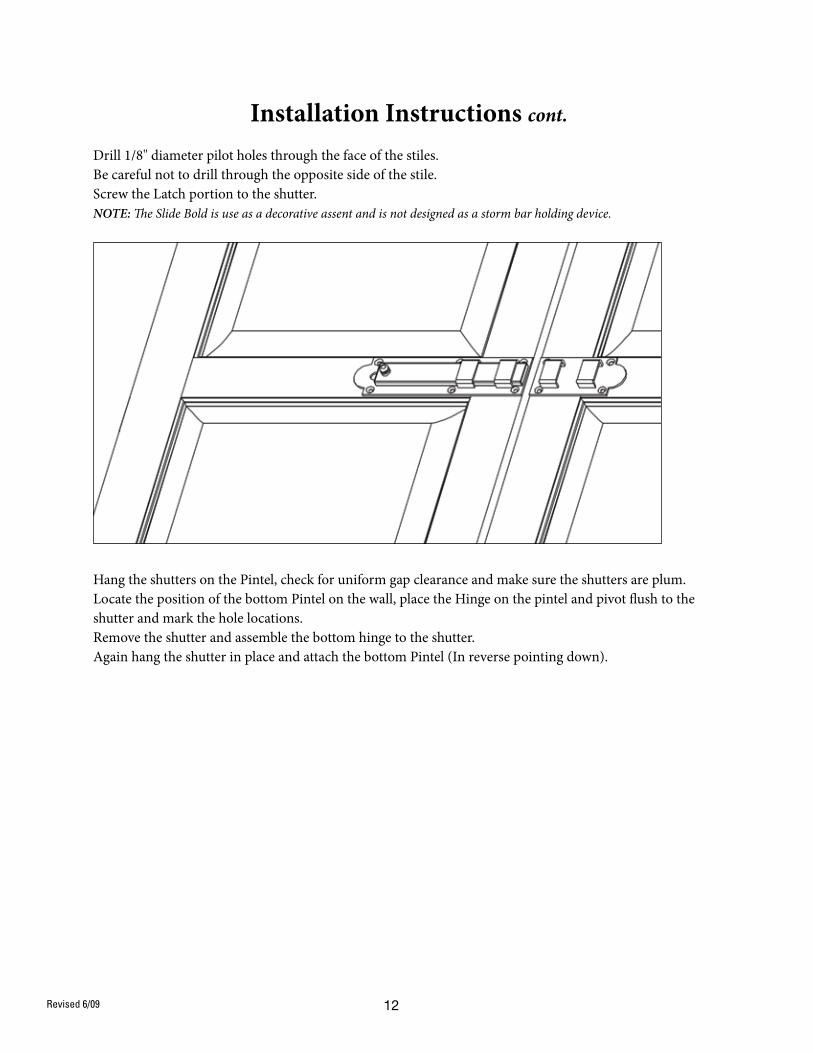
Installation Instructions cont.Drill 1/8" diameter pilot holes through the face of the stiles. Be careful not to drill through the opposite side of the stile.ScrewtheLatchportiontotheshutter.NOTE: The Slide Bold is use as a decorative assent and is not designed as a storm bar holding device.
Hang the shutters on the Pintel, check for uniform gap clearance and make sure the shutters are plum.LocatethepositionofthebottomPintelonthewall,placetheHingeonthepintelandpivotflushtotheshutter and mark the hole locations.Removetheshutterandassemblethebottomhingetotheshutter.Again hang the shutter in place and attach the bottom Pintel (In reverse pointing down).

Revised 6/0913
Installation Instructions cont.
Withtheshuttersintheclosedposition,locatetheAcornHoldBackClip1"downfromtheuppercorner and 11/16" from the edge of the style. Mark the hole location and Drill 1/8" diameter pilot holes through the face of the stiles. Be careful not to drill through the opposite side of the stile.ScrewtheHoldBackClipinposition.It is recommended that you use 2 Acorn per shutter.Shutters larger than 55" in height require 2 sets of Acorns per shutter.Repeattheabovesteponthebottomcorneroftheshutter.
IMPORTANT: Acorn Holdbacks are recommended for use on the top outside corner and bottom outside corner of each shutter. DO NOT install Acorn Holbacks in the middle of the shutter.

Revised 6/09 14
Installation Instructions cont.
SwingtheshutteropenandmarkthelocationfortheAcornCliponthewall.Ifmountinginawoodsurfacedrilla1/4"pilotholeandmounttheAcornClip.Ifmountinginamasonrysurfaceuse the appropriate anchor.

Revised 6/0915
Installation Instructions cont.
After the Acorn clips are attached to the wall and the shutter is locked in the open position you can installtheSHoldbackortheRat-tailHoldback.
ToinstalltheSHoldbackoraRat-tailHoldback,measure11/2"downfromthebottomedge, and 1 3/4" in from the outside edge of the shutter. If mounting in a wood surface drill a 1/4" pilot hole. If mounting in a masonry surface use the appropriate anchor.ScrewtheSHoldbackorRat-tailHoldbackinplace.
TheSHoldbackandRat-tailisrecommendedasadecorativeuseasopposedtoafunctionalone.

Revised 6/09 16