manual for using the citrix terminal server in the ... · manual for using the citrix terminal...
TRANSCRIPT

IC RL IT PLM WEB Page 1/15
Data Exchange via ProjektPortal
Manual for using the Citrix Terminal Server in the ProjektPortal
Febr. 2013
V1.1

I MO IT PLM WEB, 07.03.2013 Beschreibung Terminalserver_CITRIX_en.doc
Page 2/15
Manual for using the Citrix Terminal Server in the ProjektPortal Document information Dateiname Beschreibung Terminalserver_CITRIX_en.doc Eigentümer: IC RL IT PLM WEB Verantwortlicher: Margarita Kahlert Bearbeiter: Andrea Raithel
Revision Version Name Dep. Date Description 1.0 Petra Waldmann I MO IT PLM
WEB 28.02.11 Description Terminal Server Citrix
in English
1.1 Andrea Raithel IC RL IT PLM WEB
08.02.13 Update
I MO IT PLM WEB, 07.03.2013 Beschreibung Terminalserver_CITRIX_en.doc
Page 3/15
1 Register
1 Register................................................................................................................. 3
2 Introduction............................................................................................................ 4
3 Terminal Server session via ProjektPortal ............................................................. 6 3.1 Configuration of a Session..................................................................................... 7 3.1.1 Client Software...................................................................................................... 7 3.1.2 Configuration of the user surface........................................................................... 8 3.2 Start of a Session .................................................................................................. 9 3.3 Finishing a Session .............................................................................................. 9 3.4 Outlook on Terminal Server................................................................................. 10 3.4.1 Installing Outlook................................................................................................. 10 3.5 Installing printer ................................................................................................... 12
4 Support................................................................................................................ 15

I MO IT PLM WEB, 07.03.2013 Beschreibung Terminalserver_CITRIX_en.doc
Page 4/15
2 Introduction
This documentation is a user manual for the ProjektPortal administrators as well as for the users of the Citrix Terminal Server in the ProjektPortal. With this manual especially the first access to Terminal Services shall be made easier, so the priority will be the first configuration of a Terminal Server session. This documentation is only a quick guide. Detailed information for using the Terminal Server you will find in the Intranet via the link: https://intranet.mobility.siemens.com/fa_oi/en/pub/portfolio/it_6/terminal_services.htm Using requirements:
Access to the ProjektPortal. You may request this access via the following link, if not yet existing.
https://intranet.mobility.siemens.com/fa_oi/en/pub/portfolio/it_4/adminwizard.htm
After this access will be installed for you, you may ask for access to Terminal Services via the ATF Customer Portal
You will find the ATF Customer Portal via - Start - ATF Customer Portal
After you have got access to the ATF Customer Portal please choose “Orders” – “Ordering” – “User services & software” – “Server based computing (terminal services) – “Access to server-based application (terminal services)” – “Manage terminal server access” Please choose your account and then via the button “Next” your access to terminal services

I MO IT PLM WEB, 07.03.2013 Beschreibung Terminalserver_CITRIX_en.doc
Page 5/15
As soon as your request for terminal services will be confirmed you may use terminal
services via ProjektPortal.

I MO IT PLM WEB, 07.03.2013 Beschreibung Terminalserver_CITRIX_en.doc
Page 6/15
3 Terminal Server session via ProjektPortal After a click to the tab „Terminal Server“ you will find the User Settings. In the User Settings please fill in your user name, your windows password and the domain name (the same data you use for your normal workspace /CAT Client).
Via the tab “Preferences” you may configure your terminal server session, via the button “Log on” you will have access to the web interface “.

I MO IT PLM WEB, 07.03.2013 Beschreibung Terminalserver_CITRIX_en.doc
Page 7/15
3.1 Configuration of a Session
Before getting access to the Terminal Server you may configure your settings for the Terminal Server Session via "Preferences" .
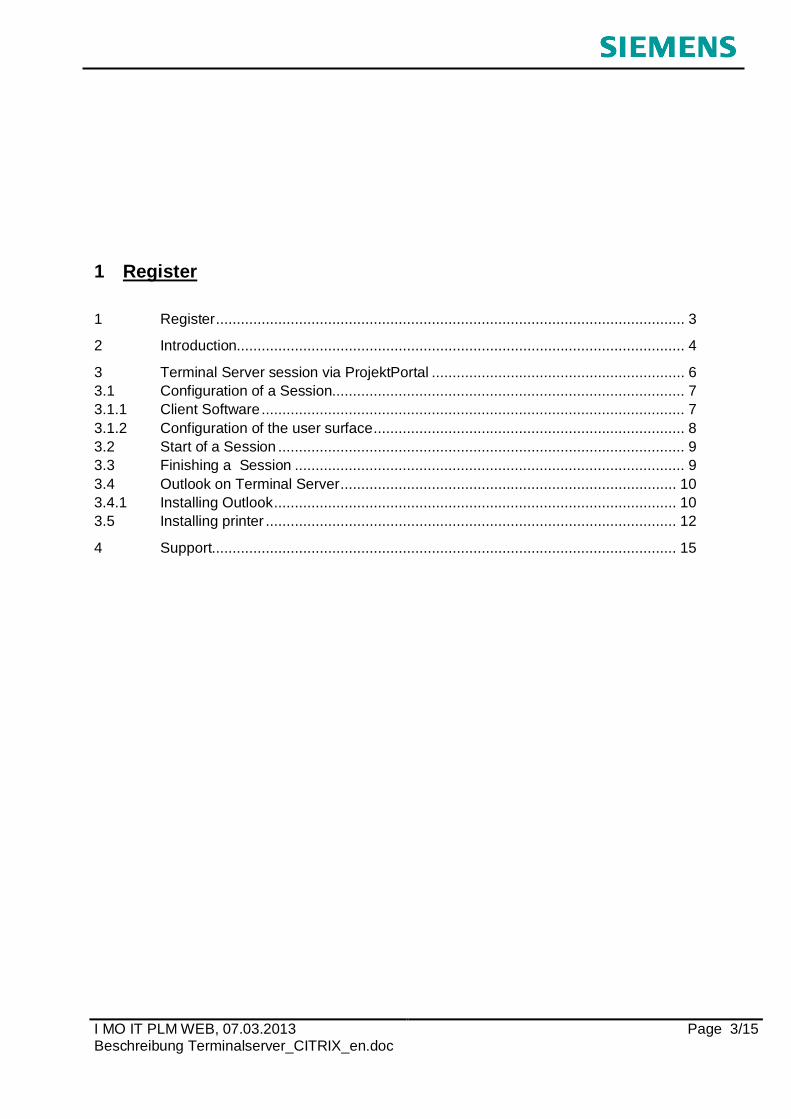
3.1.1 Client Software
You can choose there the necessary software (client) for getting access to terminal services. The standard software is „Select Automatically“. Should you notice problems with the functions of the terminal server, you may possibly change to
- Native Client or - Java Client
Caution! „Native Client” means the “Citrix Client”. This client should be installed on every CAT Client PC. If not, you may install it, but for this you need local administration rights for your PC. Should it not be possible to install the „Citrix Client“ (for example because of no administration rights) you also may choose „Java-Client“. With this setting it is normally not necessary to install additional software on the Client, but you do not find all functions in your session.
I MO IT PLM WEB, 07.03.2013 Beschreibung Terminalserver_CITRIX_en.doc
Page 8/15
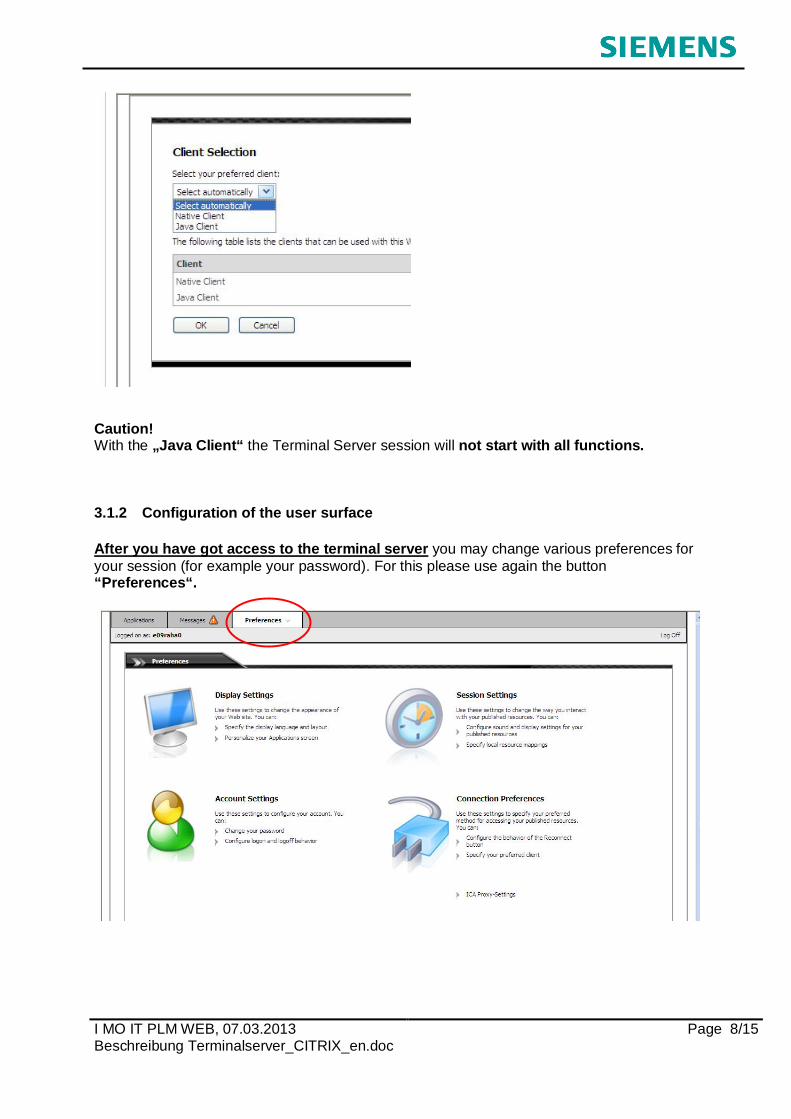
Caution! With the „Java Client“ the Terminal Server session will not start with all functions. 3.1.2 Configuration of the user surface
After you have got access to the terminal server you may change various preferences for your session (for example your password). For this please use again the button “Preferences“.

I MO IT PLM WEB, 07.03.2013 Beschreibung Terminalserver_CITRIX_en.doc
Page 9/15
3.2 Start of a Session
For starting a Terminal Server session please click to the „Desktop“ icon. (Should you like to use only the Outlook application, you may also open the “Outlook” icon). Now the connection with the Terminal Server will be set and the window for the session will be opened.
Important Note: To avoid problems with Outlook during a session please make sure that you did not open Outlook at the same time on your normal working surface / CAT-Client!
3.3 Finishing a Session
Please always finish a Terminal Server session with “Start”/”Shut down” and not by closing the window, because in this case your session will be closed, but remains stored on the terminal server.

I MO IT PLM WEB, 07.03.2013 Beschreibung Terminalserver_CITRIX_en.doc
Page 10/15
When finishing a session please take care not mixing up the terminal server session with the surface of your normal working place / CAT-Client and to close this surface unintentionally. 3.4 Outlook on Terminal Server
3.4.1 Installing Outlook
One of the most important measures during the manual installing of Outlook is the connection of your personal files, your personal directory and the connection of the SCD-search. The following chapter describes the necessary steps. 3.4.1.1 Connecting personal files
Tip: If you would like to connect one or several personal files, your local Outlook must be closed.
Please choose in the ProjektPortal via the opened Outlook 2003 in the main menu “File“ / „Open“ / „Outlook Data File”.
After that please name the place of your personal file: “h:\exchange\user.pst“. Should your file „user.pst“ be stored on another disk drive (notebook users often use their local hard disc), please adapt it accordingly. Please confirm with „OK“, your personal files are now at your disposal.

I MO IT PLM WEB, 07.03.2013 Beschreibung Terminalserver_CITRIX_en.doc
Page 11/15
3.4.1.2 Connecting your personal directory
Please start Outlook via terminal server and please choose in the main menu “Tools“ / „E-Mail-accounts“
Now please choose „add a new directory or address book“ / „additional address books“. Please choose „additional address books“ / „Next“ / “Personal address book” / “Next”. Please fill in „H:\exchange\adrbuch.pab“ and press „Browse“. If your file „adrbuch.pab“ is stored on another disk drive please fill in accordingly.
In the next window please choose “OK” once again. Please confirm your settings once again with „OK“ and after that please finish Outlook. After a new start of Outlook your personal directory will be at your disposal.

I MO IT PLM WEB, 07.03.2013 Beschreibung Terminalserver_CITRIX_en.doc
Page 12/15
3.4.1.3 Connecting with SCD-Search
Please first finish Outlook in your terminal server session and then please choose „Start“ / „Communication“ / „DirXdiscover“ / „Configuration“ / „Add to Outlook Profile“
Please confirm this with “OK”. After a new start of Outlook the SCD-Search will be at your disposal.
3.5 Installing printer
Currently the following printers allow printing out of Terminal Server: AGFA-AccuSet v52.3 Apple Color LW 12/660 PS Brother HL-1250 Brother HL-2060 Canon Bubble-Jet BJ-10e Canon iR C2380/2550 PCL6 Canon iR-ADV C5030/5035 PCL5c Canon iR2200-3300 PCL5e Canon iR2200-3300 PS3 Canon iR3035/iR3045 PCL6 Citrix Universal Printer Epson Stylus COLOR 600 ESC/P 2 HP Business Inkjet 2200/2250 HP Business Inkjet 2250 PS HP Business Inkjet 2280 PS HP Business Inkjet 2300 PCL 6 HP Business Inkjet 2600 PCL 5C HP Business Inkjet 2800 PCL 5c HP C LaserJet 4500-PS HP Color LaserJet 3700 PCL 5c HP Color LaserJet 3800 PCL 5c HP Color LaserJet 4500 HP Color LaserJet 4550 PS

I MO IT PLM WEB, 07.03.2013 Beschreibung Terminalserver_CITRIX_en.doc
Page 13/15
HP Color LaserJet 4600 PS HP Color LaserJet 4650 PCL 5c HP Color LaserJet 5500 PCL5c HP Color LaserJet 5500 PS HP Color LaserJet 5550 PCL 5c HP Color LaserJet 5550 PCL 6 HP Color LaserJet 5550 PS HP Color LaserJet 8550 PS HP Color LaserJet PS HP Designjet 4520 HPGL2 HP Designjet 800PS 42 by HP HP DeskJet 1220C hp deskjet 6122 series HP DeskJet 660C HP DeskJet 930C/932C/935C HP DeskJet 970Cse HP DeskJet 970Cxi hp deskjet 990c HP LaserJet 2200 Series PS (MS) HP LaserJet 4000 Series PCL HP LaserJet 4000 Series PCL 5e HP LaserJet 4000 Series PCL6 HP LaserJet 4000 Series PS HP LaserJet 4050 Series PCL 5e HP LaserJet 4050 Series PCL6 HP LaserJet 4050 Series PS HP LaserJet 4100 PCL 5e HP LaserJet 4100 PS HP LaserJet 4100 Series PCL HP LaserJet 4200 PCL 5e HP LaserJet 4200 PS HP LaserJet 4200L PCL 5e HP LaserJet 4250 PCL 5e HP LaserJet 4250 PCL 6 HP LaserJet 4250 PS HP LaserJet 5000 Series PCL 5e HP LaserJet 5100 PCL 5e HP LaserJet 5200 PCL 5e HP LaserJet 5200 PS HP LaserJet 5L HP LaserJet 8150 Series PCL 5e HP LaserJet P2015 Series PCL 5e HP LaserJet Series II HP PSC 950 HP Universal Printing PCL 5 HP Universal Printing PCL 5 (v5.0) HP Universal Printing PCL 5 (v5.3) HP Universal Printing PCL 5 (v5.4) HP Universal Printing PCL 6 HP Universal Printing PCL 6 (v4.7) HP Universal Printing PCL 6 (v5.0) HP Universal Printing PCL 6 (v5.1) HP Universal Printing PS HP Universal Printing PS (v5.3) Kyocera KM-C2520

I MO IT PLM WEB, 07.03.2013 Beschreibung Terminalserver_CITRIX_en.doc
Page 14/15
Microsoft Office Document Image Writer Driver Microsoft Office Live Meeting 2007 Document Writer Driver Microsoft XPS Document Writer PDF-XChange 4.0 Ricoh Aficio AP3200 PCL RICOH Aficio MP 201 PCL 5e RICOH Aficio MP 201 PS RICOH Aficio MP 2550 PCL 5e RICOH Aficio MP C2000 PCL 5c RICOH Aficio MP C2000 PCL 6 RICOH Aficio MP C2050 PCL 5c RICOH Aficio MP C2800 PCL 6 Ricoh Aficio MP01 Xerox Phaser 7760GX PS Should you try to connect a printer which is not allowed, you will receive an error message; in this case please contact your local helpdesk.
For the manual setting of a supported printer in a terminal server session please choose „Start“ / „Settings“ / „Printers and Faxes“).

I MO IT PLM WEB, 07.03.2013 Beschreibung Terminalserver_CITRIX_en.doc
Page 15/15
Then please choose „Add Printer“ and „Next“. Now please choose „network printer or printer connected with another PC“ and „Continue“. All network printers have a sticker with the printer’s name. Please choose „connection with the following printer“ and please fill in your printer’s name. Syntax: \\server name\printer. Then please choose „Next“. If you like to use this printer as your standard printer please choose „Yes“. Then please choose „Next“. In the next window please choose „Finish“, then the printer is at your disposal. 4 Support Hotline: 0180-5774357 The Hotline is at your disposal from Monday until Friday from 7.00 a.m. - 5.00 p.m.. During the rest of the time you may leave a message to an answering machine. E-mail: [email protected] In case of problems, questions or innovations you also may contact us via e-mail. We will contact you as soon as possible.