manual for s7 and s5 interface cable and adapters
TRANSCRIPT

Operating instructions english
for S7-Interface-Cable:
MPI/PPI MPI–II, MPI-LAN, MPI-USB
MPI-MODEM, S5ToMPI MPI-NETZ-Adapter
MPI-Cablemanager S5-Interface-Cable :
PG-COM PG-UNI
PG-UNI-II PG-USB
USB-Serial-Converter Adapter for PG-UNI / PG-UNI-II :
Netz-Adapter PG-ISO-Adapter CP525-Adapter
CP525-K-Adapter SINUM-Adapter AG-150-Adapter WF470-Adapter
Mitsubishi-Interface-Cable: SC-09
Version 3.4
© Copyright 1996-2007 by PI
Handbook Cable & Adapter
2 © Copyright 1996-2007 by PI
Contents
1 MPI/PPI...................................................................... 9
1.1 Functional Description ..................................................9 1.2 MPI/PPI as TS-Adapter ..............................................10 1.3 MPI/PPI as HMI-Adapter ............................................11 1.4 Pin assignment ...........................................................12
1.4.1 Pinning RS232 (PC-side) ........................................... 12 1.4.2 Pinning MPI (PLC-side).............................................. 13
1.5 Connecting the cable..................................................14 1.6 The display .................................................................15 1.7 Technical data ............................................................16 1.8 Tips and Troubleshooting MPI/PPI-Cable ..................18 1.9 Accessories: MPI-NETZ-Adapter ...............................22
1.9.1 Circuit diagram MPI-NETZ-Adapter ........................... 22
2 MPI-II ....................................................................... 23
2.1 Functional Description ................................................23 2.2 MPI-II as TS-Adapter..................................................23 2.3 MPI-II as HMI-Adapter................................................25 2.4 Pin assignment ...........................................................26
2.4.1 Pinning RS232 (PC-side) ........................................... 26 2.4.2 Pinning MPI (PLC-side).............................................. 27 2.4.3 External Power-Connector ......................................... 28
2.5 Connecting the cable..................................................29 2.6 Display and Keyboard of the MPI-II Cable..................30
2.6.1 The Keyboard............................................................. 32 2.6.2 Main Menu.................................................................. 33 2.6.3 Info ............................................................................. 33
2.6.3.1 Version ........................................................................33 2.6.4 Bus ............................................................................. 34
2.6.4.1 Adressen .....................................................................34 2.6.5 Config ......................................................................... 35
2.6.5.1 Mode ...........................................................................35 2.6.5.2 USBStrom ...................................................................36 2.6.5.3 Data.............................................................................37 2.6.5.4 MPI-BUS .....................................................................37
2.6.5.4.1 Baudrate .......................................................................38

Handbook Cable & Adapter
© Copyright 1996-2007 by PI 3
2.6.5.4.2 HSA...............................................................................39 2.6.5.4.3 local Nr..........................................................................39
2.6.5.5 PG/PC .........................................................................39 2.6.5.5.1 Baudrate .......................................................................40
2.6.5.6 Protocol .......................................................................40 2.6.5.7 Language ....................................................................41 2.6.5.8 in Flash........................................................................41 2.6.5.9 Set Def. .......................................................................42
2.7 Software-Installation for USB .....................................42 2.7.1 Siemens-S7 / PG-2000 .............................................. 42
2.8 Technical data ............................................................43
3 S5TOMPI ................................................................. 44
3.1 Functional-Description................................................44 3.2 Connecting the Interface ............................................44 3.3 Configuration on the Cable.........................................45
3.3.1 Mode .......................................................................... 45 3.3.2 S7Config..................................................................... 46
3.3.2.1 CPU.............................................................................47 3.3.2.1.1 StatNumr.......................................................................47 3.3.2.1.2 SlotNr ............................................................................48 3.3.2.1.3 Function ........................................................................48
3.3.2.2 MPI Bus.......................................................................49 3.3.2.2.1 Address.........................................................................49 3.3.2.2.2 Profile ............................................................................50
3.3.2.3 SPSFlag ......................................................................50 3.3.2.4 Comm DB....................................................................51
3.3.3 S5Konfig..................................................................... 51 3.3.3.1 CPU.............................................................................52 3.3.3.2 SPSFlag ......................................................................52 3.3.3.3 Comm DB....................................................................52
3.4 the Display..................................................................53 3.4.1 display ........................................................................ 53 3.4.2 Error messages .......................................................... 54
3.5 SPS-Flag ....................................................................56 3.5.1 the commandbyte....................................................... 56 3.5.2 the status byte ............................................................ 56
3.6 the communications-data block ..................................57
4 MPI-USB.................................................................. 59
4.1 functional description..................................................59

Handbook Cable & Adapter
4 © Copyright 1996-2007 by PI
4.2 MPI-USB as HMI-Adapter ..........................................59 4.3 Pinning........................................................................60
4.3.1 Pinning USB (PC-side)............................................... 60 4.3.2 Pinning MPI (PLC-Side) ............................................. 60 4.3.3 External powersupply ................................................. 61
Connecting the adapter......................................................62 4.4 Display and Keyboard of the MPI-USB cable .............63
4.4.1 The keyboard ............................................................. 64 4.4.2 Main menu.................................................................. 65
4.5 Installation of the software for the MPI-USB cable .....66 4.5.1 Siemens-S7 / PG-2000 .............................................. 66
4.6 Technical data ............................................................67
5 MPI-LAN.................................................................. 68
5.1 Functional description.................................................68 5.2 Connecting the cable..................................................68 5.3 Display and keyboard of the MPI-LAN........................69
5.3.1 The Keyboard............................................................. 71 5.3.2 Main menu.................................................................. 72 5.3.3 Info ............................................................................. 72
5.3.3.1 Version ........................................................................73 5.3.4 Bus ............................................................................. 73
5.3.4.1 Adresses .....................................................................74 5.3.5 Config ......................................................................... 75
5.3.5.1 Mode ...........................................................................76 5.3.5.2 MPI..............................................................................76
5.3.5.2.1 Baudrate .......................................................................77 5.3.5.2.2 HSA...............................................................................77 5.3.5.2.3 LocalNr..........................................................................78
5.3.5.3 Language ....................................................................78 5.3.5.4 In Flash .......................................................................79 5.3.5.5 Erase...........................................................................79 5.3.5.6 IP-Adr ..........................................................................79 5.3.5.7 Protocol .......................................................................80 5.3.5.8 Password ....................................................................80
5.4 Technical data ............................................................81
6 PLC-VCOM APPLICATION .................................... 82
6.1 Functional Description ................................................82 6.2 Installation of PLC-VCom ...........................................82

Handbook Cable & Adapter
© Copyright 1996-2007 by PI 5
6.3 Setting up PLC VCom / using PLC VCom..................83 6.3.1 Setting up PLC-VCom for Cables............................... 84
7 MPI-MODEM............................................................ 88
7.1 Description..................................................................88 7.2 MPI-Modem as TS-Adapter........................................88 7.3 TeleService Function..................................................89
7.3.1 Setting up the hardware ............................................. 89 7.3.2 Configure the MPI – Modem ...................................... 89 7.3.3 TS – Software Configuration ...................................... 90 a. SIMATIC Step7 v5.3 with TeleService v6.0 .................. 90 b. MPI – Cablemanager v2.07 .......................................... 94
7.4 Pin assignment ...........................................................96 7.4.1 Pinning RS232 (PC-side) ........................................... 96 7.4.2 Pinning MPI (PLC-side).............................................. 97 7.4.3 External power connector........................................... 98 7.4.4 Light emitting diode’s.................................................. 99 7.4.5 Analogue phone connector ...................................... 100
7.5 Connecting the MPI-Modem.....................................101 7.6 Display and keyboard of the MPI-Modem.................101
7.6.1 The keyboard ........................................................... 105 7.6.2 Main menu................................................................ 106 7.6.3 Info ........................................................................... 106
7.6.3.1 Version ......................................................................107 7.6.3.2 Signalquality..............................................................107 7.6.3.3 Signallevel.................................................................107
7.6.4 Bus ........................................................................... 108 7.6.4.1 Adresses ...................................................................108
7.6.5 Config ....................................................................... 109 7.6.5.1 PG/PC .......................................................................109
7.6.5.1.1 MPI Accs.....................................................................110 7.6.5.1.2 PPI-Accs .....................................................................111 7.6.5.1.3 TrnModem (transparent modem mode) ......................112 7.6.5.1.4 ExtModem (external modem mode)............................113
7.6.5.2 Data...........................................................................114 7.6.5.3 Modem ......................................................................114
7.6.5.3.1 Dial mode....................................................................115 7.6.5.3.2 phone book .................................................................115 7.6.5.3.3 baudrate......................................................................116 7.6.5.3.4 Modemtype .................................................................116

Handbook Cable & Adapter
6 © Copyright 1996-2007 by PI
7.6.5.3.5 Speaker.......................................................................117 7.6.5.3.6 Busy identification .......................................................117 7.6.5.3.7 Ring counter................................................................118 7.6.5.3.8 Extension ....................................................................118 7.6.5.3.9 Outline code................................................................118
7.6.5.4 MPI-Bus ....................................................................119 7.6.5.4.1 Baudrate .....................................................................119 7.6.5.4.2 HSA.............................................................................120 7.6.5.4.3 Local nr. ......................................................................120 7.6.5.4.4 Master .........................................................................121 7.6.5.4.5 Profil ............................................................................121
7.6.5.5 Protocol .....................................................................122 7.6.5.6 Language ..................................................................123 7.6.5.7 Erase.........................................................................123 7.6.5.8 Reset .........................................................................123 7.6.5.9 Password ..................................................................124 7.6.5.10 Telemessage (optional) ...........................................124
7.6.5.10.1 SMS ............................................................................125 7.6.5.10.2 Fax ..............................................................................126 7.6.5.10.3 Voice ...........................................................................127
7.6.6 Hang up.................................................................... 127 7.6.7 Call ........................................................................... 127
7.7 Technical data ..........................................................129
8 THE MPI-CABLEMANAGER ................................ 130
8.1 Language..................................................................130 8.2 Interface....................................................................131 8.3 Update......................................................................132 8.4 Teleservice ...............................................................134
8.4.1 Telephone-Book ....................................................... 134 8.4.2 Connect .................................................................... 135 8.4.3 Extra ......................................................................... 136
8.4.3.1 Setup .......................................................................139
8.4.3.2 TS-function ............................................................139
8.4.3.3 Adapter configuration .........................................140
8.4.3.3.1 Network ...................................................................140
8.4.3.3.2 Modem.....................................................................142
8.4.3.3.3 Serial parameter..................................................144
8.4.3.3.4 Password................................................................145 8.4.3.4 GSM / ISDN /SMS.....................................................147

Handbook Cable & Adapter
© Copyright 1996-2007 by PI 7
8.4.3.4.1 GSM-Modem...............................................................147 8.4.3.4.2 ISDN-Modem ..............................................................149 8.4.3.4.3 Analog-Modem............................................................151 8.4.3.4.4 Messages....................................................................151 8.4.3.4.5 SMS-Processing .........................................................154
8.4.3.5 Import configuration............................................155
8.4.3.6 Export configuration............................................155
8.5 Tuning.......................................................................156 8.6 Connection of a TS-Adapter .....................................159 8.7 Update over Tele-Network........................................160 8.8 Connecting the A20 Terminal ...................................162 8.9 Siemens-Original-Software and MPI/PPI/HMI/TS-Adapter with 115200 Baud...............................................163
8.9.1 MPISpeed-TrayIcon ................................................. 165
9 PG-COM / PG-UNI / PG-UNI-II.............................. 168
9.1 Operatin Instruction ..................................................168 9.2 Circuit diagram PG-COM..........................................169 9.3 Circuit diagram PG-UNI............................................170 9.4 Circuit diagram PG-UNI-II.........................................171
10 PROLONGATION OF PG-UNI AND PG-UNI-II.. 172
11 UNI-PROLONGATION-SET ............................... 172
12 PG-USB............................................................... 172
12.1 Pinning ...................................................................173 12.2 PG-USB-prolongation ............................................173 12.3 Driver-Installation ...................................................174 12.4 Original-S5 in a MS-DOS-Box................................175 12.5 Driver for Windows 98............................................177
12.5.1 Installation.............................................................. 177 12.5.2 Deinstallation ......................................................... 178 12.5.3 Configuration / Start............................................... 178 12.5.4 Frequently asked questions................................... 181
13 USB-SERIAL-CONVERTER............................... 186
13.1 Description .............................................................186 13.2 Driver installation ...................................................186

Handbook Cable & Adapter
8 © Copyright 1996-2007 by PI
14 ADAPTORS FOR PG-UNI / PG-UNI-II / PG-USB187
14.1 Netzadapter (not for PG-USB): ..............................187 14.1.1 Circuit diagram NETZ-Adapter .............................. 188
14.2 PG-ISO-Adapter.....................................................189 14.2.1 Circuit diagram PG-ISO-Adapter ........................... 189
14.3 CP525-Adapter ......................................................190 14.3.1 Plug design............................................................ 190
14.4 CP525-Adapter for PG-USB ..................................190 14.4.1 Plug design............................................................ 190
14.5 CP525-K-Adapter...................................................191 14.5.1 Plug design............................................................ 191
14.6 CP525-K-Adapter for PG-USB...............................191 14.6.1 Plug design............................................................ 191
14.7 SINUM-Adapter......................................................192 14.7.1 Plug design............................................................ 192
14.8 SINUM-Adapter for PG-USB..................................192 14.8.1 Plug design............................................................ 192
14.9 AG150-Adapter ......................................................193 14.9.1 Plug design............................................................ 193
14.10 AG150-Adapter for PG-USB ..................................193 14.10.1 Plug design ......................................................... 193
14.11 WF470-Adapter......................................................194 14.11.1 Plug design ......................................................... 194
14.12 WF470-Adapter for PG-USB..................................194 14.12.1 Plug design ......................................................... 194
14.13 25pol. PC-Connector (male/female).......................195 14.14 Special Versions ....................................................195
15 RELEASE TABLE .............................................. 196
16 SC-09 .................................................................. 197
16.1 Pin configuration RS232 ........................................197 16.2 Pin configuration RS422/485 .................................198 16.3 Plug design ............................................................199

Handbook Cable & Adapter
© Copyright 1996-2007 by PI 9
1 MPI/PPI
1.1 Functional Description
The MPI/PPI-Cable connects the programming-device or a PC over the serial port (COM- Interface) with the MPI-Interface of a S7-300/400 also with the PPI-Interface of a S7-200. The cable finds by himself what a kind of PLC is plugged in and the required baud rate in the first time of communication of the connected programming-device or PC. In operation with the programming software PG-95/2000 or S7-for-Windows, the cable will work up to 115.2 kBaud at his PC-side. The MPI/PPI-Cable works with the current output voltages of the PLC and doesn’t need any external voltages. The internal electronic (and RS232) to the bus driver and also to the 24V input are decoupled.

Handbook Cable & Adapter
10 © Copyright 1996-2007 by PI
1.2 MPI/PPI as TS-Adapter
TS (Tele Service) The TS-possibility allows the connection of a modem, to make a connection with a 2nd Modem and a PC to a S7-300/400. The Cable must be connected between the modem (with a special adapter piece, no Gender-Changer) and the PLC. To work with the MPI-Cable in his TS-function, you must make the following actions:
1) The cable must be configured as a TS-Adapter (instead of “PG” or “Pg” the LCD display shows “TS” or “Ts”). You can turn on/off these function with the free program “MPI-Kabel Manager”.
2) The program inside of the cable must have a version greater than V1.45. This version number will be displayed for a short time behind the plugging to a S7 PLC. You can update the cable software with the free program “MPI-Kabel Manager”.
3) You need the TeleService-software from Siemens in your PC to work with the cable. The configuration of the cable can be made with the TeleService-software from Siemens or with the “MPI-Kabel Manager”.
4) The connection of the modem to the MPI-cable must made with a special adapter plug (no Gender-Changer or so)
Order Description MPI / PPI – Cable 3m Order.No. 9350 MPI / PPI – Cable 5m Order.No. 9350.05m MPI / PPI – Cable 10m Order.No. 9350.10m MPI / PPI – Cable 15m Order.No. 9350.15m Power Supply for MPI-Cable Order.No. 9350-4 Interfacecable 9pin to Modem Order.No. 9350-TS T-Connector to MPI / PPI - Bus Order.No. 9361-7

Handbook Cable & Adapter
© Copyright 1996-2007 by PI 11
The adapter for the TS-function only works with the MPI / PPI – Cable with the order-number 9350 !
1.3 MPI/PPI as HMI-Adapter
HMI (Human Machine Interface): The HMI-possibility allows the connection of a operator panel (who has not an internal MPI-port, but the HMI-protocol and a RS232-interface) with a S7-300/400. The cable must be connected between the operator panel and the PLC. The HMI-protocol must be a part of the operator panel. Behind the version V1.45 of the software inside the cable, you can use the cable as a HPI adapter. Some operating panels are made to work with a Siemens-HMI-Adapter. The pining to our cable is different. You may turn the wires 2 and 3 in a little adapter. Please look into the handbook of the operator panel what you need for the correct pinning.

Handbook Cable & Adapter
12 © Copyright 1996-2007 by PI
1.4 Pin assignment
1.4.1 Pinning RS232 (PC-side)
Pin No. Notation Signalname Direction
(of cable) 1 DCD Data Carrier Detect Out 2 TXD Transmitted Data Out 3 RXD Received Data In 4 DSR Data Set Ready In 5 GND Signal Ground 6 DTR Data Terminal Ready Out 7 CTS Clear to Send In 8 RTS Request to Send Out 9 NC Not Connected Shield On connector casing The shield is connected with the RS232 connector via the shield of the adapter casing. This cable is designed to be connected directly on a COM interface of a PC. The cable can be lengthened by a 1:1-cable to the PC up to 15m maximum. The cable should have a good quality and the shield should be connected at both sides at the SUB-D case.

Handbook Cable & Adapter
© Copyright 1996-2007 by PI 13
1.4.2 Pinning MPI (PLC-side)
Pin No.
Notation Description Direction (of cable)
1 NC Not Connected 2 M24V Ground of the 24V In 3 Ltg_B Data line B BiDir. 4 RTS-AS Request to Send from the PLC In 5 M5V Ground of the 5V In 6 P5V 5V output Out 7 P24V 24V Supply input In 8 Ltg_A Data line A BiDir. 9 RTS-PG Request to Send to the PLC Out Shield On connector casing
The shield is attached with the MPI/PPI connector via the shield of the adapter casing. To find directly attended PLC´s , RTS-AS and M5V must be connected in the cable. P5V means a output of the cable and works only as an output for a bus-termination with resistors. This 5V output doesn’t drive any load and have a 100R resistor inside his direction. Attention: Don’t lengthen the connection by a 1:1 cable to the PLC, because there are 24V and 5V inside of the cable. The quality of the bus-signal will be risen down! To lengthen the connection, please use a MPI-NETZ-Adapter and connect only the signals Ltg_A and Ltg_B 1:1 and the shield at both sides of the metal-casing at the SUB-D connector

Handbook Cable & Adapter
14 © Copyright 1996-2007 by PI
1.5 Connecting the cable
This cable will be connected with his short side to the MPI- or the PPI-Interface of the PLC. The MPI/PPI-Cable works with the current output voltages of the PLC and doesn’t need any external voltages. The cable requires a PLC to get the 24V out of it. You can use an optional power supply to work with an external 24V voltage. So the cable can be lengthen. The longer side of the cable must be connect with the programming-device or with an PC to the COM-Port. When the MPI/PPI-Cable gets the power it shows the software-version in the display and begins with the test of its internal components. Then it checks the bus if there is a PLC on a MPI-bus or on a PPI-bus connected. If the connected bus is a PPI-Bus, the cable will set its transfer rate at its acquirements. If it finds a MPI-PLC he set its transfer rate at the MPI-Bus confirmed baud-rate. On the display all relevant data is displayed. The cable will find at a MPI-Connection the active baud rate to the programming-device or to the PC in the first time of communication and set his baud rate himself. If you want to connect the cable to the 25-pin connector of the PC, you can use an adapter (9 pin to 25 pin sub miniature D-connector) to work with this port. In the PC-Software you must adjust some parameters like the baud rate (19,2 or 38,4 kbaud) and the connected COM-PORT (COM1 or COM2) and the used adapter as ´PC-Adapter´.

Handbook Cable & Adapter
© Copyright 1996-2007 by PI 15
1.6 The display
In that LCD-Display all relevant working parameters of the cable will be reported.
Example of Display: Number of
the bus-participants
PG-Communi-cation Baudrate-Selection (see bottom)
Participant-number of the connected PG/PC
PG communi-cation ▀ to the cable ▄ to the PG/PC
# 01 PG 00 ▄! 04 AG 04
! = the displayed PLC is directly connected ? = the displayed PLC is not directly connected
There will be the founded bus-participants displayed (the active ones)
Participant-number of the PLC, you just work with it

Handbook Cable & Adapter
16 © Copyright 1996-2007 by PI
Baudrate - Modes
PD 115.2kBaud or automatic Baud rate – Selection TD 115.2kBaud or automatic Baud rate – Selection if
TS PG 38.4kBaud TS 38.4kBaud if TS Pg 19.2kBaud Ts 19.2kBaud if TS pG 57.6kBaud tS 57.6kBaud if TS
1.7 Technical data
Description Technical Specifications Dimensions without cables 146 x 41x 29mm (l x w x h) Case type ABS, V0 Cable type UL2464, 28AWG, double
shielded Interfaces To the MPI-BUS To the PPI-BUS To the PG/PC
RS485 (187,5 kbaud) RS485 (9,6 and 19,2 kbaud) RS232 19,2 kbaud or 38,4 kbaud 115,2 kBaud with PG-95/2000
Supply voltage DC 24V +/- 20% The 24V will be taken out of the connected PLC or of the connected adapter.
Power disurpation I=80mA (typ) Output current 5V This 5V output doesn’t drive any
load and have a 100R resistor in his series. Use it only as bustermination.

Handbook Cable & Adapter
© Copyright 1996-2007 by PI 17
Type of protection IP20 Galv. decoupling The internal electronic (and
RS232) to the bus driver and also to the 24V input are decoupled. The shield from the MPI/PPI side to the RS232 side are through connected

Handbook Cable & Adapter
18 © Copyright 1996-2007 by PI
1.8 Tips and Troubleshooting MPI/PPI-Cable
The MPI-Cable shows PPI but it is connected to a S7-300/400 PLC: At the first using of a new PLC, it can occur that the cable shows in its display PPI. The fact is that the PLC wants to have the first reset to be initialised, to make a communication over the MPI-bus. The plug in and the plug out of the batteries or flash-cards make the same problems with the PLC at its MPI-bus. So you must make a reset. You can see it when the STOP-LED flashes (with long impulses), SF-LED is set, eventually the BATF-LED, too. The reset of a S7-PLC: 1) Key switch round about 3 sec to the position MRES (the
STOP-LED flashes, then continuous light) 2) Stop holding the key switch, switch then after a short
time to the position MRES back (the STOP-LED flashes fast, then continuous light)
3) Turning the key switch to RUN-P (the STOP-LED stops lightning and the RUN-LED starts lightning)
That’s it Now the reset of the PLC is over, the PLC is ready to work with the MPI-bus, the MPI/PPI-Cable will work now with the PLC it can be plugged and will find the PLC with the station-address 2.

Handbook Cable & Adapter
© Copyright 1996-2007 by PI 19
The MPI-Cable shows nothing on the display: The MPI/PPI-Cable needs 24V out of the PLC to work. Please take care that there is 24V. For example, the Sinumerik have none. If there is no 24V output at the MPI-bus connector, you should use the MPI-Netzadapter. You must use him too if you want to make a long cable between the MPI/PPI-Cable and the PLC because it is not allowed to make a long connection with power supplying in the cable (look at the point MPI-Netzadapter for details). The MPI/PPI-Cable displays the first line its display correctly, but in the second row „? AG “: The MPI-Cable shows that a MPI-bus is connected but it can not receive any correct data. The fact can be that someone have changed the hardware-configuration of the CPU. The MPI baud rate must have 187,5kBaud or 19,2kBaud that the MPI-Cable can make a communication with the PLC. Please take care that the baud rate in the hardware-configuration is turned back to 187,5kBaud or 19,2kBaud. The MPI/PPI-Cable displays correct data but the connection to the programming software does not work correctly: 1) The cable finds by himself what a kind of PLC is
plugged in and the required baud rate in the first time of communication of the connected programming-device or PC. If you switch the baud rate in your software, the cable does not recognize that not immediately, the cable want to communicate with the first setting. Retry it.
2) Take a look into your programming-software for the
COM settings and the installed adapter-type

Handbook Cable & Adapter
20 © Copyright 1996-2007 by PI
3) Do you use the MPI-Cablemanager and have selected
the TS function in the cable? Please use the MPI-Cablemanager to switch back to the normal function of the cable or select the driver „TS-Adapter“ with „Access“ defined to direct.
4) Is there any other application in the background of your
system that uses the same COM port, too? If yes, please close that program.
Bus-informations und Cable-version without plugged PC: You must plug the cable into a PLC and in the first time the cable shows his software version, and then it shows all important businformations (look also to the point “The display”). The programmingsoftware displays all PLCs in the MPI system, and can make a connection to the PLC, but you can not open or save a block: Look at the number of the PLC who you have selected in your hardware-configuration. The numbers are different. Transfer the Hardwareconfiguration or make new settings. The Cable is connected on a S7-300/400 , but it displays for a few time PPI when you switch on the PLC: In the moment of power on, the MPI bus does not be drived from the PLC, so the cable thinks that must be a PPI PLC. But if the PLC is ready with his start up, it will drive the MPI bus and will give the cable the protocols. Now the cable will

Handbook Cable & Adapter
© Copyright 1996-2007 by PI 21
switch his display from PPI to the right MPI text. That can be for approximately five seconds. Programming over the Profibus It is possible to program a PLC over the PROFIBUS, to do this the following must reside: 1.) In the Hardware-Configuration the Destination-PLC the PROFIBUS-Protocol-Type must be set to „Default“ or „DP/FMS“. 2.) The MPI-Cable needs when connected to a 2-wire-cable (passive Station) an external 24V power supply 3.) The local station-address must be unique 4.) The PROFIBUS-Baud rate must be possible with the MPI-Cable It is to notice, that the Profibus-Cyle-Time is lengthen (more stations in bus), The Destination PLC must be changed the Hardware-Configuration.

Handbook Cable & Adapter
22 © Copyright 1996-2007 by PI
1.9 Accessories: MPI-NETZ-Adapter
The MPI-NETZ-Adapter generates the power supply for the MPI/PPI-Cable, so you can connect this cable with a 2-wire connection to the PLC. You must connect only the signals Ltg_A and Ltg_B 1:1 and the shield at both sides of the metal-casing at the SUB-D connector
1.9.1 Circuit diagram MPI-NETZ-Adapter
PLC-side9-pin female 9-pin male
P24V (7)M24V (2)
MPI/PPI Cable-side
Ltg_B (3)RTS-AS (4)M5V (5)P5V (6)
Ltg_B (3)RTS-AS (4)M5V (5)P5V (6)
Ltg_A (8)RTS-PG (9)
Ltg_A (8)RTS-PG (9)
24V VoltageInput
The Shield is connected at both SUD-D metallcasing
- bluered +

Handbook Cable & Adapter
© Copyright 1996-2007 by PI 23
2 MPI-II
2.1 Functional Description
The MPI-II-Cable connects the programming device or PC over the serial Interface (COM-Port) or the PC over the USB-Bus with the MPI- or DP/FMS-Connector of the S7-300/400 PLC. The Cable selects automatically on the first access which Port and which Baud rate is used. With our PLC-Programming-Application PG-95/PG-2000 or S7-for-Windows works the MPI-II-Cable with up to 115.2kBaud on the PC - Side. Dedicated for Siemens-Applications the MPI-Speed-driver is delivered, which could use Baudrates up to 115.2 kBaud. Together with the VCOM-driver you could program your PLC over the USB-Port of the PC. On the MPI-Side you could use Baud rates from 19k2 up to 12Mbaud. The Baudrates 3M,6M and 12Mbaud could only used when configured on the MPI-II-Cable by keyboard.An automatic selection of the MPI-Baudrate is possible. The MPI-II-Cable is power-supplied from the PLC and needs then no external supply. Over an external connector it is possible to supply 24V to the Cable (if the Connection has only the 2 Data-Lines). All Voltages are decoupled together (24V Input to MPI-Bus and internal Power-Supply).
2.2 MPI-II as TS-Adapter
TS (Tele Service) The TS-function allows the connection of a modem, to make a dial-up-network connection with a 2nd Modem and a PC to a S7-300/400. The Cable must be connected to TS-Adapter (with a special pinning, no Gender-Changer) which is between the modem and the PLC .

Handbook Cable & Adapter
24 © Copyright 1996-2007 by PI
To work with the MPI-II-Cable in his TS-function, you must make the following actions: 1) The cable must be configured as a TS-Adapter (instead of “PG” or “Pg” the LCD display shows “TS” or “Ts”). You can turn on/off these function with the free program “MPI-Cable Manager”. 2) You need the TeleService-software from Siemens in your PC to work with the cable. The configuration of the cable can be made with the TeleService-software from Siemens or with the “MPI-Kabel Manager”. 3) The connection of the modem to the MPI-II-cable must made with a special adapterplug (no gender-changer or so) Order Description Interfacecable 9pin to Modem Order.No. 9350-TS The adapter for the TS-function only works with the MPI-II Cable with the order-number 9352 !

Handbook Cable & Adapter
© Copyright 1996-2007 by PI 25
2.3 MPI-II as HMI-Adapter
HMI (Human Machine Interface): The HMI-possibility allows the connection of a operator panel (who has not an internal MPI-port, but the HMI-protocol and a RS232-interface or USB) with a S7-300/400. The cable must be connected between the operator panel and the PLC. The HMI-protocol must be a part of the operator panel. Behind the version V1.45 of the software inside the cable, you can use the cable as a HPI adapter. Some operating panels are made to work with a serial Siemens-HMI-Adapter. The pining to our cable is different. You may turn the wires 2 and 3 in a little adapter. Please look into the handbook of the operator panel what you need for the correct pinning. This applys NOT to HMI-Terminals which are connected over USB.
Handbook Cable & Adapter
26 © Copyright 1996-2007 by PI
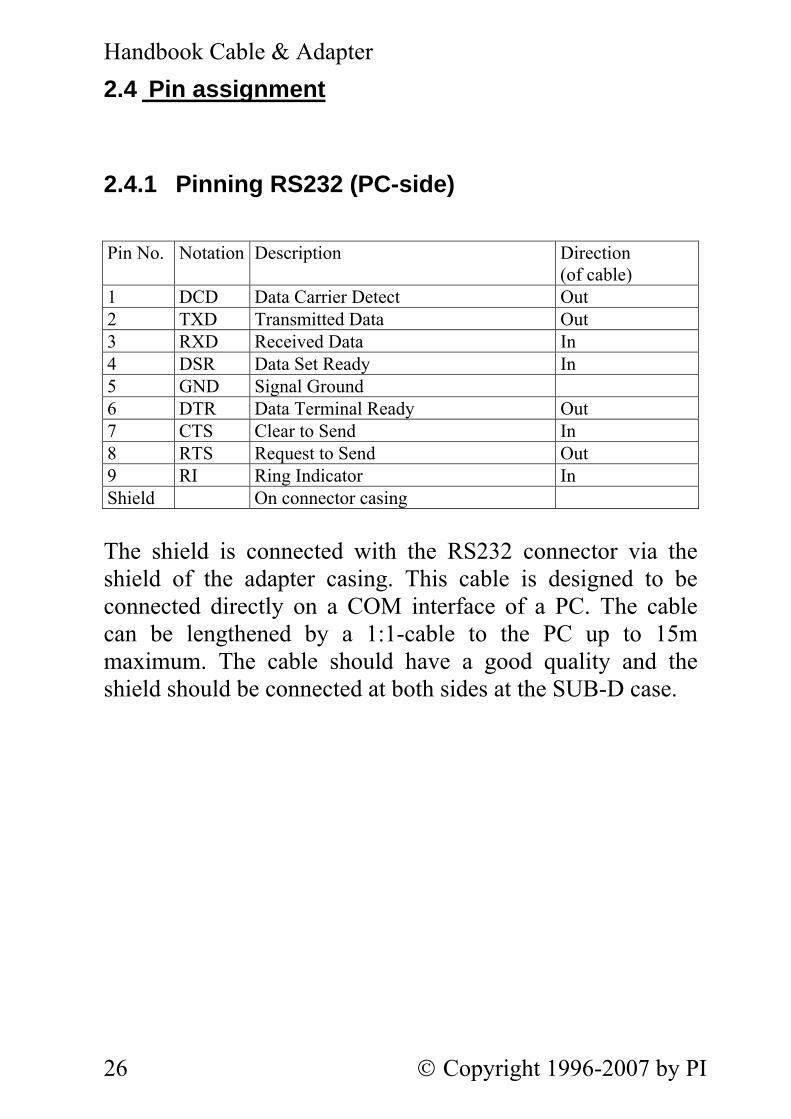
2.4 Pin assignment
2.4.1 Pinning RS232 (PC-side)
Pin No. Notation Description Direction
(of cable) 1 DCD Data Carrier Detect Out 2 TXD Transmitted Data Out 3 RXD Received Data In 4 DSR Data Set Ready In 5 GND Signal Ground 6 DTR Data Terminal Ready Out 7 CTS Clear to Send In 8 RTS Request to Send Out 9 RI Ring Indicator In Shield On connector casing The shield is connected with the RS232 connector via the shield of the adapter casing. This cable is designed to be connected directly on a COM interface of a PC. The cable can be lengthened by a 1:1-cable to the PC up to 15m maximum. The cable should have a good quality and the shield should be connected at both sides at the SUB-D case.

Handbook Cable & Adapter
© Copyright 1996-2007 by PI 27
2.4.2 Pinning MPI (PLC-side)
Pin No. Notation Description Direction
(of cable) 1 NC Not Connected 2 M24V Ground of the 24V In 3 Ltg_B Data line B BiDir. 4 RTS-AS Request to Send from the PLC In 5 M5V Ground of the 5V In 6 P5V 5V output Out 7 P24V 24V Supply input In 8 Ltg_A Data line A BiDir. 9 RTS-PG Request to Send to the PLC Out Shield On connector casing The shield is attached with the MPI connector via the shield of the adapter casing. To find directly attended PLC´s , RTS-AS and M5V must be connected in the cable. P5V means a output of the cable and works only as an output for a bus-termination with resistors. This 5V output doesn’t drive any load and have a 100R resistor inside his direction. Attention: Don’t lengthen the connection by a 1:1 cable to the PLC, because there are 24V and 5V inside of the cable. The quality of the bus-signal will be risen down! To lengthen the connection, please use a MPI-NETZ-Adapter and connect only the signals Ltg_A and Ltg_B 1:1 and the shield at both sides of the metal-casing at the SUB-D connector, insert eventually Terminating-Resistors (at END of Bus).

Handbook Cable & Adapter
28 © Copyright 1996-2007 by PI
2.4.3 External Power-Connector
Description Notation In/Out (of Cable) Pin No. 24V Power P24V In 1 Ground 24V M24V In 2
1 2 + - USB

Handbook Cable & Adapter
© Copyright 1996-2007 by PI 29
2.5 Connecting the cable
This cable will be connected with his short side to the MPI- or the DP/FMS-Interface of the PLC. The MPI-II -Cable works with the current output voltages of the PLC and doesn’t need any external voltages. The cable requires a PLC to get the 24V out of it. You can also use an optional power supply to work with an external 24V voltage. So the cable can be lengthen. The longer side of the cable must be connect with the programming-device or with an PC to the COM-Port. USB is connected with a Type A to A cable. When the MPI-II-Cable gets the power it shows the software-version in the display and begins with the test of its internal components. On the display all relevant data is displayed. The cable will find at a MPI-Connection the active baud rate to the programming-device or to the PC in the first time of communication and set his baud rate himself. If you want to connect the cable to the 25-pin connector of the PC, you can use an adapter (9 pin to 25 pin sub miniature D-connector) to work with this port. In the PC-Software you must adjust some parameters like the baud rate (19,2 / 38,4 57,6 or 115,2kBaud) and the connected COM-PORT (COM1 or COM2) and the used adapter as ´PC-Adapter´. The PLC-Programmingapplication PG95/PG-2000 or S7-for-Windows wotks the MPI- II - Cable with up to 115,2kBaud on the PC-Side. For the S7-Original-software is an additional driver is needed for the higher baudrates 57.6 and 115.2 kBaud.
Handbook Cable & Adapter
30 © Copyright 1996-2007 by PI
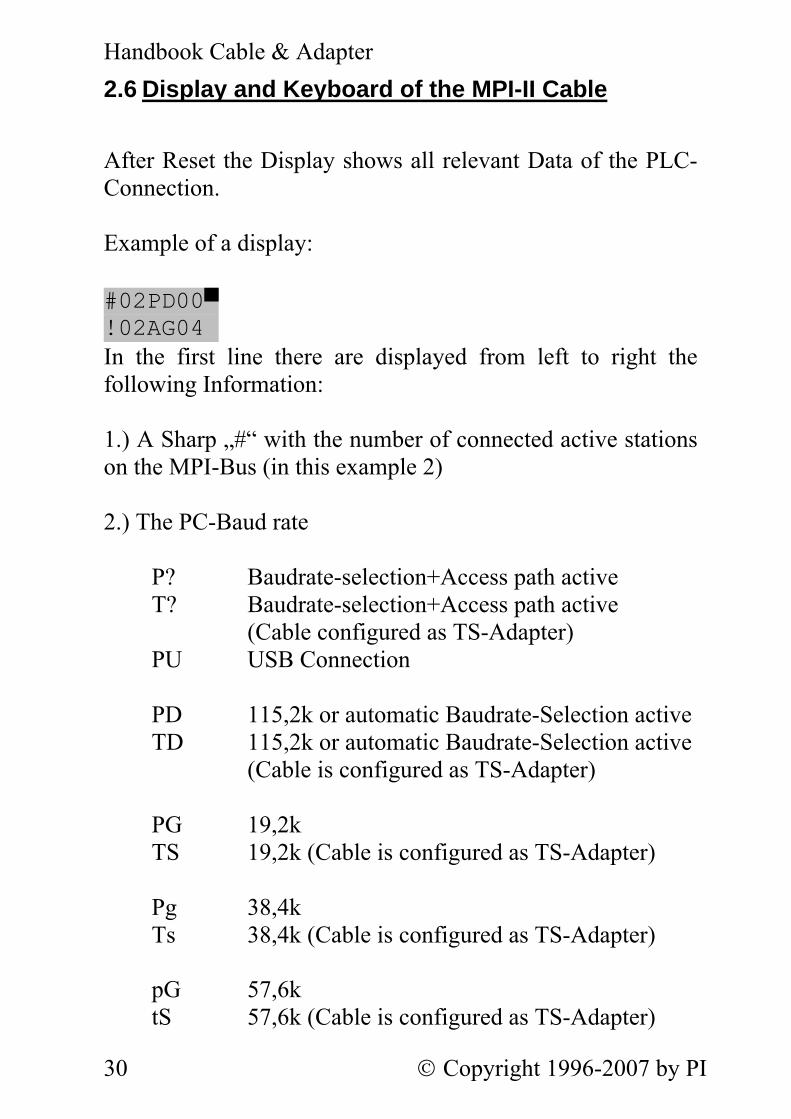
2.6 Display and Keyboard of the MPI-II Cable
After Reset the Display shows all relevant Data of the PLC-Connection. Example of a display:
#02PD00▀ !02AG04 In the first line there are displayed from left to right the following Information: 1.) A Sharp „#“ with the number of connected active stations on the MPI-Bus (in this example 2) 2.) The PC-Baud rate P? Baudrate-selection+Access path active T? Baudrate-selection+Access path active
(Cable configured as TS-Adapter) PU USB Connection PD 115,2k or automatic Baudrate-Selection active TD 115,2k or automatic Baudrate-Selection active
(Cable is configured as TS-Adapter) PG 19,2k TS 19,2k (Cable is configured as TS-Adapter) Pg 38,4k Ts 38,4k (Cable is configured as TS-Adapter) pG 57,6k tS 57,6k (Cable is configured as TS-Adapter)

Handbook Cable & Adapter
© Copyright 1996-2007 by PI 31
3.) The station-number of MPI – II Cable (In S7-Manager under „Extras / PG/PC-Interface“ with “Properties/Net/locale station number“). The default is 0.
4.) When communicating a tiled bar (top is to PLC, bottom is PD)
In the second line there are display from left to right the following information: 1.) An ampersand „!“ if connected directly to a PLC or a question-mark „?“ if not directly connected. They are displayed negated on passive Stations which are not in the Token-Ring. 2.) The station-numbers of all active and connected stations in the MPI-Bus. Every ¾ second another station is displayed.
3.) The Protocol-Type which is used between Cable and PC:
AG unknown, because no communication or
Before-V5.0 Protocols Ag V5.1-Protocols ag V5.0-Protocols
4.) The PLC which is momentarily is connected to the PC-Software (in our example is the Station 4 connected).

Handbook Cable & Adapter
32 © Copyright 1996-2007 by PI
2.6.1 The Keyboard
The keyboard on the back of the cable is used for navigating through menus and for configuring the cable. There are the following keys sensing and colored:
⇑ ⇐ ↵
⇓ ⇒ ↵ Confirm the input. Saves the
configuration permanently into the flash-memory.
Change into a menu or menu-point
ENTER
⇑ Increasing a value, selecting a menu-point UP
⇓ Decreasing a value, selecting a menu-point
DOWN
⇐ Cancellation of a input/selection, the selection is not saved, one menu-level back
LEFT
⇒ Go into a sub-menu RIGHT

Handbook Cable & Adapter
© Copyright 1996-2007 by PI 33
2.6.2 Main Menu
You select the main-menu with ENTER, with ENTER again you reactivate the default-display. On the Main-menu you could also select the default-display with LEFT.
MENU ↵ #02PD00▀ Message !02AG04
With UP/DOWN you could choose the following menu-points:
Message activate default-display Info Information over the MPI-II cable Bus MPI-Bus information’s Config Configuration of the cable
2.6.3 Info
With RIGHT or ENTER you select the following sub-menu, which has momently only one element::
Info Version With LEFT you will leaving this sub-menu to the main-menu. With ENTER you will enter the submenu.
2.6.3.1 Version With RIGHT or ENTER you will enter the following display, which will display the actual operation system version of the cable:
Version 1.52

Handbook Cable & Adapter
34 © Copyright 1996-2007 by PI
With LEFT or ENTER you will leave this sub-menu-point to the menu info.
2.6.4 Bus
With RIGHT or ENTER you enter the following sub-menu which has only one element:
Bus Address With LEFT you leave this sub-menu to the main-menu. With ENTER you enter the sub-menu.
2.6.4.1 Adressen With RIGHT or ENTER you enter the following display, which shows the connected stations on the MPI-Bus:
Adressen D 018 With UP or DOWN you browse the addresses, where in the second line the following chars are possible:
D The MPI-II Cable is connected directly to this station
A This station is active in the BUS
P This station is passive like for example some OP’s,FM or Profibus-Slaves.

Handbook Cable & Adapter
© Copyright 1996-2007 by PI 35
With LEFT or ENTER you leave this sub-menu to the menu info.
2.6.5 Config
With RIGHT or ENTER you enter the following sub-menu where you could select the following sub-menus:
Config Mode With UP/DOWN you could choose the following sub-menus:
Mode For selecting the function of the Cable. Data locks configuration MPI -BUS Configuration of the MPI-Parameter PG/PC Configuration of the PC-Parameter Protocol PC-seitiges Protokoll einstellen Language Selection of the Menu-Language Set Def. the Default-Properties are loaded. The User-
Configuration is erased Password input Systempassword
With LEFT you leave this sub-menu to the main-menu. With ENTER you enter the sub-menu.
2.6.5.1 Mode With RIGHT or ENTER you enter the following sub-menu where you could select following menu-points::
Mode MPI With UP/DOWN you select the following menu-points:

Handbook Cable & Adapter
36 © Copyright 1996-2007 by PI
MPI SER The Cable works in a MPI-Bus Over a serial RS232 MPI USB The Cable works in a MPI-Bus Over an USB-Port PPI 9K6 The Cable is connected to a S7-200 with 9.6kBaud. PPI 19K2 The Cable is connected to a S7-200 with 19.2kBaud. PPIUSB96 The Cable is connected to a S7-200 with 9.6kBaud and is used over the USB-Port of the PC PPIUSB19 The Cable is connected to a S7-200 with 19.2kBaud and is used over the
USB-Port of the PC With LEFT you will leave this sub-menu to the menu mode.
2.6.5.2 USBStrom If you connect the Cable to an USB-Port, the PC reads how much current is used over the USB-Port. With this Menu-point you could change the current With RIGHT or ENTER you enter the following sub-menu where you could select following menu-points::
USBStrom 000 mA With UP/DOWN you select the following menu-points:
000 mA Default-value for a MPI-II Cable with serial and USB-Port. The Cable is powered from the PLC. 360 mA Default for a MPI-USB Cable which has only a USB-Port. The Power is used from the USB-Port.

Handbook Cable & Adapter
© Copyright 1996-2007 by PI 37
Some PC’s are blocking the Device-driver if the Hub could not power the cable.
2.6.5.3 Data With RIGHT or ENTER you enter the following sub-menu where you could select following menu-points::
Data locked With UP/DOWN you select the following menu-points:
unlocked This is the default, the PC overwrites the settings in Menu-point „Config/MPI-BUS“ (HSA, loc.Stationaddress, Baudrate)
locked The settings from PC are ignored, the settings done in „Config/MPI-BUS“ are used (HSA, loc.Stationaddress, Baudrate)
2.6.5.4 MPI-BUS With RIGHT or ENTER you enter the following sub-menu, in which you could choose following sub-menus:
MPI/PPI Baudrate With UP/DOWN you could enter the following sub-menus:
Baudrate MPI-Baud rate configuration, the baud rate selected here is used, even when another is selected over the PG/PC on connection to PLC.
HSA select highest station address local Nr select local stations address for the cable

Handbook Cable & Adapter
38 © Copyright 1996-2007 by PI
with LEFT you leave this sub-menu to the menu config. With ENTER you enter the sub-menu. 2.6.5.4.1 Baudrate With RIGHT or ENTER you enter the following sub-menu:
MPI-Baud 187.5k With UP/DOWN you could choose between the following baud rates. With ENTER the baud rate is selected:
12M 6M 3M 1.5M 500k 187.5k 93.75k 45.45k 19.2k „from PC“ The Configuration is transfered from the PC, the Auto-Baudrate search at power-on is not executed. If no setting is transferred from pc the standard-baudrate 187K5 is used.
„Auto“ The Auto-baudrate search at power-on is executed and the settings are used from PC. The PC overwrites the settings of the auto- baudrate search. If the MPI-Bus is “worse” (Parity-error) this function could not detect the baudrate, in this case the standard-baudrate 187K5 is used. To search baudrates there must at least one other active Station in the MPI-BUS.
With LEFT (Cancel) or ENTER (Select) you leave the sub-menu to the menu MPI.

Handbook Cable & Adapter
© Copyright 1996-2007 by PI 39
2.6.5.4.2 HSA With RIGHT or ENTER you enter the sub-menu:
HSA 31 With UP/DOWN you could choose between the following values, with ENTER you select the value:
126 63 31 15 With LEFT or ENTER you leave this sub-menu to the menu MPI.
2.6.5.4.3 local Nr With RIGHT or ENTER you enter the following Sub-Menu:
localeNo 0A With UP/DOWN the local station number is increased/decreased with one. With RIGTH/LEFT the station number is increased/decreased by 16. The local station number is displayed in hexadecimal.
With ENTER you leave this sub-menu to the menu MPI.
2.6.5.5 PG/PC With RIGHT or ENTER you enter the following sub-menu:
PG/PG Zugriff

Handbook Cable & Adapter
40 © Copyright 1996-2007 by PI
With UP/DOWN you could select the following sub-menus:
Baudrate configure the communication-baud rate to the PC. With LEFT you leave this sub-menu to the menu config. With ENTER you enter the selected sub-menu. 2.6.5.5.1 Baudrate With RIGHT or ENTER you enter the following sub-menu:
PG-Baud 19.2k With UP/DOWN you could choose the following selections, with ENTER you choose the selection:
115.2k 57.6k 38.4k 19.2k 9.6k 4800 2400 others At menu-point others the baud rate could be selected in 50Baud, normally not used.
With LEFT or ENTER you leave this sub-menu to PG/PC.
2.6.5.6 Protocol With RIGHT or ENTER you enter the following sub-menu:
Protocol Auto

Handbook Cable & Adapter
© Copyright 1996-2007 by PI 41
With UP/DOWN you could choose the following selections, with ENTER you choose the selection:
Auto This is the default. The protocol-type is detected and used automatically from the cable (from S7 V5.0ff on faster protocols could be used) V5.1 Always uses proctocol-type V5.1 V5.0 Alt Always uses proctocol-type V5.0
2.6.5.7 Language With RIGHT or ENTER you enter the following sub-menu:
Language German With UP/DOWN you could select the following languages:
German Language of menu is German English Language of menu is English With LEFT you leave this Sub-Menu to the Menu config. With ENTER you choose the language and the sub-menu is leaved to config.
2.6.5.8 in Flash The configuration is saved permanently in the OnBoard-Flash. The following configuration-data is saved:
MPI-Baudrate Language

Handbook Cable & Adapter
42 © Copyright 1996-2007 by PI
2.6.5.9 Set Def. The default-configuration is saved to OnBoard-Flash without question.
2.7 Software-Installation for USB
Connect the MPI-II-cable with a type-A to A USB-cable with the PC. Insert the delivered Demo-CD in the CD-ROM-drive and Start the installation of the „PLC - VCom“. (For a detailed description of the PLC – VCom application please read the “Cable and adapter manual” chapter 5.0 PLC-VCom).
2.7.1 Siemens-S7 / PG-2000
At the Installation of the USB-Driver a new virtual COM-Port is inserted in the system, which could be used from several applications. Choose in the corresponding Property-Dialog this new inserted COM-Port to access over USB to the MPI.

Handbook Cable & Adapter
© Copyright 1996-2007 by PI 43
2.8 Technical data
Description Technical specifications Dimensions without cables 146 x 41x 29mm (l x w x h) Case type ABS, V0, Cable type UL2464, 28AWG, double shielded Interfaces To the MPI-BUS To the PG/PC
RS485 (187,5 kbaud) RS232 19,2 kbaud or 38,4 kbaud 115 kBaud with PG95 USB 1.0 with type A to A-cable
Supply voltage DC 24V +/- 20% The 24V will be taken out of the connected PLC or of the connected adapter.
Power disurpation Typ. I = 100mA at 24V (5V input not used)
Output current 5V This 5V output doesn’t drive any load and have a 100R resistor in his series. Use it only as bus termination.
Type of protection IP20 Galv. decoupling The internal electronic (and RS232) to the
bus driver and also to the 24V input are decoupled. The shield from the MPI/PPI side to the RS232 side are connected through
Order Description MPI-II-Cable 3m Order.No. 9352 MPI-II-Cable 5m Order.No. 9352.05m MPI-II-Cable 10m Order.No. 9352.10m MPI-II-Cable 15m Order.No. 9352.15m Power supply for MPI-Cable Order.No. 9350-4 Interface cable 9pin to modem Order.No. 9350-TS T-connector to MPI / PPI - Bus Order.No. 9361-7 USB cable type A to A Order.No. 9352.1

Handbook Cable & Adapter
44 © Copyright 1996-2007 by PI
3 S5ToMPI
3.1 Functional-Description
The S5ToMPI-Cable inter-connects a S5 to a S7-PLC for DataBlock-Exchange . The PLC controls this function. In one or both PLC’s a Communication-DB is needed, in which the Source- and Destination-Datablocks are defined. The data is transferred as possible as can. This function is compatible to the SPS-Option by the TeleLink (same structure). The S5ToMPI-Cable has (except the bridge-function) the same technical-structure as the MPI-II Cable, so this description outlines only the changes to the MPI-II Cable. Usage, menu and technical datasheet could be re-read at chapter 2.
3.2 Connecting the Interface
The S5ToMPI-Cable is connected to the S7-PLC with the short end, the longer side is connected to a TTY-RS232 Converter. Take care that both sides have the same ground potential. Connect the follwing pins as minimum on RS232: Pin Description 2 Transmit Data from S5anMPI-Cable to a TTY-RS232
Converter 3 Recieve Data from TTY-RS232 Converter to the
S5anMPI-Cable 5 Ground The further configuration is done by keyboard on the cable.

Handbook Cable & Adapter
© Copyright 1996-2007 by PI 45
3.3 Configuration on the Cable
Press the Key ENTER to display the main menu. With Cursor UP the menu is changed to „Config“, press ENTER to go into the Sub-Menu „Config“. Select with UP/DOWN the menupoint „S5toMPI“, all other Sub-Menu entries reacts in the same way as described in chapter 2. Pressing RIGHT or ENTER the following submenu is displayed, in which you could choose between the following menu-points: S5toMPI Mode Pressing UP/DOWN you could choose between the following menu-points:
Mode Switch the mode ON/OFF S7Config Configuration of S7-MPI Side S5Config Configuration of S5-MPI Side With LEFT the submenu is leaved and switched to the menu Config. With ENTER the menupoint is chosen.
3.3.1 Mode
Pressing RIGHT or ENTER the following submenu is displayed, in which you could choose between the following menu-points: Mode OFF Pressing UP/DOWN you could choose between the following menu-points:

Handbook Cable & Adapter
46 © Copyright 1996-2007 by PI
OFF The S5ToMPI-Kabel works as MPI-II Cable (no Bridge-function) S5 -> S7 The S5-PLC is controlling the transfered Data-Blocks in the communication-DB S7 -> S5 The S7-PLC is controlling the transfered Data-Blocks in the communication-DB S5 < > S7 both PLC’s S5 and S7 are controlling the transfered Data-Blocks in the communication-DB With LEFT the sub-menu is leaved to the menu „S5toMPI“. With ENTER this selection is saved to Flash-Memory. After Resetting the Cable the function is activated and the polling of the SPSFlags is started (see further).
It is a good idea to select the mode as last.
3.3.2 S7Config
By pressing ENTER or RIGHT the following submenu appears: S7Config CPU By pressing UP/DOWN you can choose the following options:
CPU Settings of the station-number of the S7 with which will be communicated.
MPI Bus Configuration of the MPI-bus. SPSFlags Configuration of the command/statusflag CommDB Configuration of the Communikations-DBs

Handbook Cable & Adapter
© Copyright 1996-2007 by PI 47
With the key LEFT you will leave this submenu. Using ENTER jumps into the menu.
3.3.2.1 CPU With the keys RIGHT or ENTER the following menu appears on the LCD:
S7 CPU StatNumb By pressing UP/DOWN you can choose the following options:
StatNumb Configuration of the station number of the S7 Slot Slot configuration of the S7CPU Function Define functions number Using the key LEFT leaves this menu, using the keys ENTER or RIGHT jumps to the selected menu- 3.3.2.1.1 StatNumr By pressing RIGHT or ENTER, the following submenu appears on the LCD:
StatNumb 002 By pressing UP/DOWN the station number will be incremented/decremented by one. The station number is displayed as a 3 character-wide value and can take the values between 000 and 126. Default value is 2.
With ENTER you can confirm your changes, LEFT will discard them.

Handbook Cable & Adapter
48 © Copyright 1996-2007 by PI
3.3.2.1.2 SlotNr By pressing RIGHT or ENTER the following menu appears:
SlotNo 00 By pressing UP/DOWN, the number of the slot will be increased/decreased by one. The slot number is displayed as a 2 character-wide number and can take values between 00 and 31. Default value is 0. (some double-width CPU cards need the slot number set to 3).
Using ENTER confirms your changes, LEFT discards them. 3.3.2.1.3 Function By pressing RIGHT or ENTER the following menu appears on the LCD:
Function 03 By pressing UP/DOWN the function number will be increased/decreased by one. The function number is displayed as a 2 character-wide, decimal number, which can take the values between 00 and 03. Default value is 03. This setting has to be changed only in special cases. The default setting is working for most cases.
Pressing ENTER saves your changes, LEFT will discard them.

Handbook Cable & Adapter
© Copyright 1996-2007 by PI 49
3.3.2.2 MPI Bus By pressing ENTER or RIGHT the following menu appears:
MPI-Bus Address By pressing UP/DOWN you can choose the following options:
Address local station address of the S5ToMPI-cable Profil configure the time-profile of the MPI/DP-Bus 3.3.2.2.1 Address With the keys ENTER or RIGHT you can configure the following option:
Address 01 By pressing UP/DOWN the address will be increased/decreased by one. The address is displayed as a 3 character-wide number and can take a values between 000 and 127. Default setting is 001. This is the station number of the cable. ENTER saves your changes, LEFT discards them.

Handbook Cable & Adapter
50 © Copyright 1996-2007 by PI
3.3.2.2.2 Profile With the keys RIGHT or ENTER the following menu appears:
Profil MPI By pressing the the keys UP/DOWN you can choose the following options:
MPI MPI-Bus DP Profibus, Profile DP UNI Profibus, Profile Universell (DP/FMS) Standard Profibus, Profile Standard Confirm you changes with ENTER, discard them with LEFT.
3.3.2.3 SPSFlag Pressing ENTER or RIGHT, the following menu appears on the LCD:
SPSFlag MW000254 By pressing UP/DOWN the address will be increased/decreased by one. The address is displayed as a 6 character-wide, decimal number which can takes a value 00000 and 65534. Default setting is 000254. This is the command and status flag. The flag must be an even number.
Confirm you changes with ENTER or leave the menu by pressing LEFT.

Handbook Cable & Adapter
© Copyright 1996-2007 by PI 51
3.3.2.4 Comm DB By pressing ENTER or RIGHT the following menu appears:
Comm DB DB 000 By pressing UP/DOWN the datablocknumber of the communications-datablock will be increased/decreased by one. It is displayed as a 6 character-wide, decimal number which can take the values between 00000 and 65534. Default setting is 000254.
Confirm your changes with ENTER or discard them with LEFT.
3.3.3 S5Konfig
With ENTER or RIGHT the following menu appears: S5Config S5 CPU By pressing UP/DOWN the following options can be configured:
S5 CPU Settings of the S5 with which will be communicated.
SPSFlag Configuration of the command/status flag CommDB Configuration of the communications-DBs Confirm your changes by pressing ENTER, discard them with LEFT.

Handbook Cable & Adapter
52 © Copyright 1996-2007 by PI
3.3.3.1 CPU With ENTER or RIGHT the following menu appears:
S5 CPU Slave 00 By pressing UP/DOWN the S5-CPU number will be increased/decreased by one. If the CPU-number is equal to 0, the S5 will be accessed directly. If you set the CPU-number to a value between 1 and 30, the connection will be established over the path of the PG.
The CPU-number is displayed as a 2 character-wide decimal number and can take a value between 00 and 30. Default setting is 00.
Confirm your changes with ENTER, discard them with LEFT.
3.3.3.2 SPSFlag Pressing ENTER jumps to the following menu:
SPSFlag MW 254 By pressing UP/DOWN the address will be increased/decreased by one. The address is displayed as a 3 character-wide decimal number and can take a value between 000 and 254. Default value is 000254. This is the command and status flag. Only even flags are allowed.
Confirm your changes with ENTER, discard them with LEFT.
3.3.3.3 Comm DB By pressing ENTER or RIGHT the following menu appears:

Handbook Cable & Adapter
© Copyright 1996-2007 by PI 53
Comm DB DB 000 By pressing UP/DOWN the datablocknumber of the communication-datablock will be increased/decreased by one. It is displayed as a 3 character-wide, decimal number and can take a value between 000 and 254. Default setting is 000254.
Confirm your changes with ENTER, discard them with LEFT.
3.4 The Display
3.4.1 Display
If the device’s power is on, all relevant parameters of the S5toMPI-cabel will be displayed. Example of a display:
S500S708 010S>010 The first line displays the following information:
1.) „S5“ followed by a 2 character-wide, decimal CPU number (00=direct connected S5,1..30=S5 connected via a 4 wire line)
2.) „S7“ mit nachfolgender 2stelliger, dezimaler Stationsnummer

Handbook Cable & Adapter
54 © Copyright 1996-2007 by PI
The second line displays the following information: (from left to right)
1.) 3 character-wide, decimal: the last used datablock-number of the S5.
2.) ID character of what action is performed at the moment: S> send-command from S5 to the S7 F< fetch-command from S5 to the S7 <S send-command from S7 to the S5 >F fetch-command of the S7 from the S5 empty action performed
2.) 3 character-wide, decimal: the last used datablocknumber on the S7.
3.4.2 Error messages
In the case of an error, additional information will be displayed in the lower line of the LCD. (Also the error is logged in the status byte of the SPS-Flag) Example of a display:
S500S708 Q010F5Er Display comments ? AG There is no fetch- or send-query in the command-
byte. MWS5noRD Could not read SPS-flag from the S5 MWS7noRD Could not read SPS-flag from the S7 K<DBNr>S5Er Communication-DB <DBNr> in the S5 not
available or too short K<DBNr>S7Er Communications-DB <DBNr> in the S7 not
available or too short S5ParmEr Parameter error in the communications-DB of the

Handbook Cable & Adapter
© Copyright 1996-2007 by PI 55
S5, could not execute command S7ParmEr Parameter error in the communications-DB of the
S7, could not execute command Q<DBNr>S5Er Could not execute send command from the S5:
the source-DB <DBNr> in the S5 is not available or too short.
Q<DBNr>S7Er Could not execute send command from the S5: the source-DB <DBNr> in the S7 is not available or too short
Z<DBNr>S5Er Could not execute send command of the S5: ist the destination-DB <DBNr> int the S7 is not available or too short.
Z<DBNr>S7Er Could not execute send command of the S7: the destination-DB <DBNr> in the S5 is not available or too short.
Q<DBNr>F5Er Could not execute fetch-command from the S5: the source-DB <DBNr> of the S7 is not available or too short
Q<DBNr>F7Er Could not execute fetch command from the S7: the source-DB <DBNr> of the S5 is not available or too short
Z<DBNr>F5Er Could not execute fetch command from the S5: the destination-DB <DBNr> of the S5 is not available or too short
Z<DBNr>F7Er Could not execute fetch-commandBfrom the S7: the destination-DB <DBNr> of the S7 is not available or too short.

Handbook Cable & Adapter
56 © Copyright 1996-2007 by PI
3.5 SPS-Flag
The communication between the S5 and S7 is controlled with the SPS-Flag. Also useful status information is returned via the SPS-Flag. The SPS-flag must be set to an even value. The higher byte of the word is the command-byte the lower byte displays the status MW 12 MB12=commandobyte MB13=statusbyte
3.5.1 the commandbyte
With this byte the direction of data is controlled. 00h = no command will be executed 01h = send-command: The source-block will be
written to the destination-block of the remote station
02h = fetch-command: The source-block will be read from the remote station and transferred to a datablock of this plc.
04h = Do a Reset of the cable All other values are not defined and not allowed. The command will only executed if the status byte is 00h.
3.5.2 the status byte
This byte displays the status of the transfer from the S5ToMPI cable. To start the next transmission, this byte must be set to 00h from the PLC as acknowledge.

Handbook Cable & Adapter
© Copyright 1996-2007 by PI 57
00h = start of transmission, S5ToMPI-Cable has not yet recognized the start or acknowledge last transfer. 01h = transmission successfully executed 02h = transmitting data, you have to check for TIMEOUT, the transfer should be executed after 45 seconds 03h = the source-datablock is not available or too short 04h = the destination-datablock is not available or too short 05h = general fault, retry command 06h = communication-DB not available or too short 07h = parameter error in communication-DB 08h = No answer from remote PLC
3.6 the communications-data block
If the command-byte is detected correctly, the configured communications-datablock will be read from the station. The structure of this data block is for the S7: Address Format Comment 000 CHAR 001 CHAR
2 characters sourcetype ‚DB’
002 UINT Source-datablocknumber 004 UINT Begin word 006 UINT Length in words 008 CHAR 009 CHAR
2 characters destinationtype ‚DB’
010 UINT Destination-datablocknumber 012 UINT Begin word 014 UINT Length in words

Handbook Cable & Adapter
58 © Copyright 1996-2007 by PI
The structure of this data block is for the S5: Address Format Comment 000 KC 2 characters sourcetype ‚DB’ 001 KF Source-datablocknumber 002 KF Begin word 003 KF Length in words 004 KC 2 characters destinationtype ‚DB’ 005 KF Destination-datablocknumber 006 KF Begin word 007 KF Length in words Source/Destinationtype = Only ‚DB’ is allowed at the moment, so only datablocks will be transfered (no DX at S5!) Source/DestinationDB = At S5 DB between 001 and 255 allowed
At S7 DB between 00001 and 65534 allowed
BeginDW = At S5 DW between 000 and DW 254 allowed At S7 DW between 00001 and 65534 allowed Length = maximum: 256 words, no 0 Allowed. Both lengths have to be the same In case of an error, the error code 07h –parameter error- will be displayed in the status byte. Please keep in mind, that changing the communication-DB in S7 eventually not changes the values. Look in the „Data-view” of the DB. Declaration and Data-View could have different values, which could lead to wrong or faulty behavior.!
Handbook Cable & Adapter
© Copyright 1996-2007 by PI 59
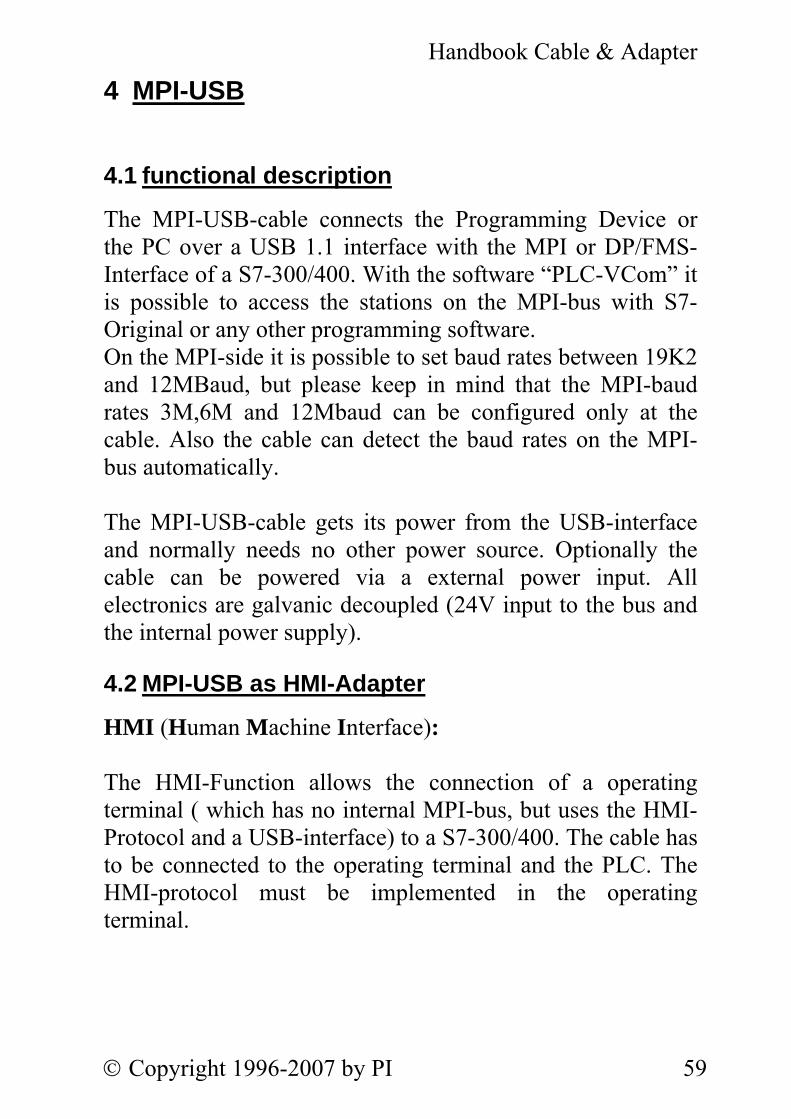
4 MPI-USB
4.1 functional description
The MPI-USB-cable connects the Programming Device or the PC over a USB 1.1 interface with the MPI or DP/FMS-Interface of a S7-300/400. With the software “PLC-VCom” it is possible to access the stations on the MPI-bus with S7-Original or any other programming software. On the MPI-side it is possible to set baud rates between 19K2 and 12MBaud, but please keep in mind that the MPI-baud rates 3M,6M and 12Mbaud can be configured only at the cable. Also the cable can detect the baud rates on the MPI-bus automatically. The MPI-USB-cable gets its power from the USB-interface and normally needs no other power source. Optionally the cable can be powered via a external power input. All electronics are galvanic decoupled (24V input to the bus and the internal power supply).
4.2 MPI-USB as HMI-Adapter
HMI (Human Machine Interface): The HMI-Function allows the connection of a operating terminal ( which has no internal MPI-bus, but uses the HMI-Protocol and a USB-interface) to a S7-300/400. The cable has to be connected to the operating terminal and the PLC. The HMI-protocol must be implemented in the operating terminal.

Handbook Cable & Adapter
60 © Copyright 1996-2007 by PI
4.3 Pinning
4.3.1 Pinning USB (PC-side) pinnr. shortform Comment direction
(cable-view) 1 Vcc Power supply Input 2 D- Data line - Input & Output 3 D+ Data line + Input & Output 4 GND Ground Input Note: At Vcc a maximum of 400mA can be taken. Important: Please do not lengthen this side, this side also leads 5V power supply (maximum cable length are 10m).
A longer cable would decrease the quality of the signal on the bus and therefore lead to severe errors in the transmission !
4.3.2 Pinning MPI (PLC-Side) pinnr. shortform Comment direction
(cable-view) 1 NC Not connected 2 M24V Ground 24V Input 3 Ltg_B Data line B Input & Output 4 RTS-AS Ready-to-Send from AS Input 5 M5V Ground 5V Input 6 P5V 5V Output Output 7 P24V 24V Input Input 8 Ltg_A Data line A Input & Output 9 RTS-PG Ready-to-Send to AS Output shield At both SUB-D cases

Handbook Cable & Adapter
© Copyright 1996-2007 by PI 61
Note: The SUB-D plug is shielded. The RTS-AS and M5V must lie on this shield to detect direct stations. P5V is a ouput of the cable and is needed for bus terminating reasons. These 5V are not usable and secured with a 100R resistor. Important: Do not lengthen this side. This side leads both 24V and 5V. This would decrease the quality of signals on the bus !
To lengthen the MPI – USB cable, please supply the cable externally with 24V power, and lengthen only signals line_A und line_B 1:1. Be sure to put the shield on the SUB-D plug. Also be sure to use terminating resistors where applicable (at the bus ends).
4.3.3 External powersupply
Signalname shortform In/Out (cable-view) Pinnr. 24V supply P24V In 1 Ground 24V M24V In 2
1 2 + -

Handbook Cable & Adapter
62 © Copyright 1996-2007 by PI
Connecting the adapter
The short side of the cable has to be connected to the MPI- bzw. PPI-Interface of the PLC Go into a sub-menu. The MPI-USB-cable gets ist power from the USB and does not need an external power source. The longer side of the cable has to be plugged in the USB-port of the PG or the PC. For the connection over USB a type A to tpye A USB cable is needed. As the cable is plugged in the USB port, it displays its softwareversion and performs a power-on-self-test. The display shows all relevant information of the MPI-USB cable- The software „PLC - VCom“, which is included with your cable, installs a “virtual” com-port in your system. So your programming software hast to be set to this comport when using the MPI-USB cable. For further information please refer to the section “PLC - VCom” in this manual. Otherwise use the detailed description in chapter 5.0 PLC – VCom of the “Cable and adapter manual”.

Handbook Cable & Adapter
© Copyright 1996-2007 by PI 63
4.4 Display and Keyboard of the MPI-USB cable
The displays shows all important information of the of the MPI-USB cable: Example of a display:
#02PU00▀ !02AG04 The first line displays the following information from left to rigtht 1.) A hash „#“ followed by the number of active, detected stations on the MPI-bus (in this example 2) 2.) The PC-baud rate: P? baud rate detection+accesspath active PU USB connection 3.) The station number of the MPI-USB cable when accessing the bus. (you can change it in the S7-Manager in the menu „Options SetPG/PCInterface Properties local connections address“). Default value is 0.
4.) When data is transferred to the PLC, a black cursor will be displayed in the upper right corner of the lcd. When data is transferred to the PC, the black cursor will be displayed in the lower right corner.

Handbook Cable & Adapter
64 © Copyright 1996-2007 by PI
In the second line of the display, the following information is displayed: 1.) An exclamation mark „!“ when directly connected to the PLC ore a question mark „?“ when not directly connected to the PLC. These are inverted when using passive stations which are not in the token-ring. 2.) The station numbers of the active stations in the MPI busI. All ¾ second another station will be displayed.
3.) The type of protocol from the cable to the pc: AG unknown, as there was no communication yet, or
before V5.0 protocols Ag V5.1-protocol ag V5.0-protocol 4.) The station connected to the pc-software at the moment. In our example the station 4.
4.4.1 The keyboard
The keyboard on the back of the cable is needed for navigation through the menu tree. There are the following keys:
⇑ ⇐ ↵
⇓ ⇒

Handbook Cable & Adapter
© Copyright 1996-2007 by PI 65
↵ Confirm the input. Saves the
configuration permanently into the flash-memory.
Change into a menu or menu-point
ENTER
⇑ Increasing a value, selecting a menu-point AUF
⇓ Increasing a value, selecting a menu-point AB
⇐ Cancellation of a input/selection, the selection is not saved, one menu-level back
LINKS
⇒ Go into a sub-menu RECHTS
4.4.2 Main menu
You can jump to the main menu by pressing ENTER. Pressing ENTER again returns to the standard display. On the Main-menu you could also select the default-display with LEFT.
MENU ↵ #02PD00▀ Meldung !02AG04
Because the MPI-USB cable is technical identical to the MPI-II Cable (except that the MPI-USB has no RS232 Interface), the functions of the menu are described in chapter 2.

Handbook Cable & Adapter
66 © Copyright 1996-2007 by PI
4.5 Installation of the software for the MPI-USB cable
Put the Demo-CD, which came with your cable, in your CD-Rom drive and start the installation of ”PLC - VCom”. (For a detailed description of the PLC – VCom application please read the “Cable and adapter manual” chapter 5.0 PLC-VCom).
4.5.1 Siemens-S7 / PG-2000
With the installation of PLC-VCom a additional, virtual com-port will be installed in your system. With it, you are able to use the cable within your programming software. For further information refer to the section “PLC - VCom” in this manual. Otherwise read the chapter 5.0 PLC – VCom of the “Cable and adapter manual” for a detailed description.

Handbook Cable & Adapter
© Copyright 1996-2007 by PI 67
4.6 Technical data
Description Technical specifications Dimensions without cables 146 x 41x 29mm (l x w x h) Case type ABS, V0 Cable type UL2464, 28AWG, double shielded Interfaces To the MPI-BUS To the PG/PC
RS485 (19,2/93,5/187,5/500kBaud 1.5/3/6/12Mbaud) USB 1.0 Type A-A cable
Supply voltage DC 24V +/- 20% The 24V will be taken out of the connected PLC or of the connected adapter.
Power disurpation Typ. I = 360mA at 5V Output current 5V This 5V output doesn’t drive any load
and have a 100R resistor in his series. Use it only as bus termination.
Type of protection IP20 Galv. decoupling The internal electronic to the bus driver
and also to the 24V input are decoupled. The shield from the MPI/PPI side to the USB side are connected through
Ordering MPI – USB – Cable 3m Ord. No. 9352-USB MPI – USB – Cable 5m Ord. No. 9352-USB.05m Cheap-Conn (optional) Ord. No. 9350-9-CHP

Handbook Cable & Adapter
68 © Copyright 1996-2007 by PI
5 MPI-LAN
5.1 Functional description
The MPI-LAN connects your PC with the MPI Interface over a TCP/IP network. Beside the MPI-LAN cable, you need the software „PLC - VCom“ on the PC with the SPS Programming software (such as PG2000). (For a detailed description of the PLC – VCom application please read the “Cable and adapter manual” chapter 5.0 PLC-VCom). The MPI-LAN cable, connected with a ordinary network card of a PC or a switch, automatically detects the speed of your network (10/100mbit). The default-IP-Address is 192.168.1.56 If there is a DHCP-Server accessible, an IP-Address is requested from this DHCP-Server!
5.2 Connecting the cable
The MPI-LAN cable will be connected with his short side to the MPI Interface. The cable works with the current output voltages of the PLC and doesn’t need any external voltages. The cable requires a PLC to get the 24V out of it. You can also use an optional power supply to work with an external 24V voltage. So the cable can be lengthened. The longer side of the cable must be connected with the network interface of your PC or switch. Connected with a current supplier, the MPI-LAN performs a power-on-self-test. The LCD of the cable is showing all relevant data.

Handbook Cable & Adapter
© Copyright 1996-2007 by PI 69
To establish communication with the PC and the cable, install the software „PLC-VCom“ which came with your cable. (Please refer to the section PLC - VCom).
5.3 Display and keyboard of the MPI-LAN
After Reset the Display shows all relevant Data of the PLC-Connection. Example for Display:
#02PD00▀ !02AG04 In the first line there are displayed from left to right the following Information: 1.) A Sharp „#“ with the number of connected active stations on the MPI-Bus (in this example 2) 2.) The PC-Baud rate PD 115,2k or automatic Baudrate-Selection active TD 115,2k or automatic Baudrate-Selection active
(Cable is configured as TS-Adapter) PG 19,2k TS 19,2k (Cable is configured as TS-Adapter) Pg 38,4k Ts 38,4k (Cable is configured as TS-Adapter) pG 57,6k tS 57,6k (Cable is configured as TS-Adapter)

Handbook Cable & Adapter
70 © Copyright 1996-2007 by PI
3.) The station-number of MPI – II Cable (In S7-Manager under „Extras / PG/PC-Interface“ with “Properties/Net/locale station number“). The default is 0.
4.) When communicating a tiled bar (top is to PLC, bottom to PG)
In the second line there are display from left to right the following information: 1.) An ampersand „!“ if connected directly to a PLC or a question-mark „?“ if not directly connected. 2.) The station-numbers of all active and connected stations in the MPI-Bus. Every ¾ second another station is displayed.
3.) static Text „AG“ (means PLC)
3.) The PLC which is momentarily is connected to the PC-Software (in our example is the Station 4 connected).

Handbook Cable & Adapter
© Copyright 1996-2007 by PI 71
5.3.1 The Keyboard
The keyboard on the back of the cable is used for navigating through menus and for configuring the cable. There are the following keys sensing and colored:
⇑ ⇐ ↵
⇓ ⇒ ↵ Confirm the input. Saves the
configuration permanently into the flash-memory.
change into a menu or menu-point
ENTER
⇑ Increasing a value, selecting a menu-point UP
⇓ Decreasing a value, selecting a menu-point
DOWN
⇐ Cancellation of a input/selection, the selection is not saved, one menu-level back
LEFT
⇒ Go into a sub-menu RIGHT

Handbook Cable & Adapter
72 © Copyright 1996-2007 by PI
5.3.2 Main menu
You select the main-menu with ENTER, with ENTER again you reactivate the default-display. On the Main-menu you could also select the default-display with LEFT.
MENU ↵ #02PD00▀ Message !02AG04 With UP/DOWN you could choose the following menu-points:
Message activate default-display Info Information over the MPI-II cable Bus MPI-Bus information’s Config Configuration of the cable
5.3.3 Info
With RIGHT or ENTER you select the following sub-menu, which has momently only one element::
Info Version With LEFT you will leaving this sub-menu to the main-menu. With ENTER you will enter the submenu.

Handbook Cable & Adapter
© Copyright 1996-2007 by PI 73
5.3.3.1 Version With RIGHT or ENTER you will enter the following display, which will display the actual operation system version of the cable: Version 1.01 With LEFT or ENTER you will leave this sub-menu-point to the menu info.
5.3.4 Bus
With RIGHT or ENTER you enter the following sub-menu which has only one element:
Bus Address With LEFT you leave this sub-menu to the main-menu. With ENTER you enter the sub-menu.

Handbook Cable & Adapter
74 © Copyright 1996-2007 by PI
5.3.4.1 Adresses With RIGHT or ENTER you enter the following display, which shows the connected stations on the MPI-Bus:
Adressen D 018 With UP or DOWN you browse the addresses, where in the second line the following chars are possible:
D The MPI-LAN Cable is connected directly to this station
A This station is active in the BUS
P This station is passive like for example some OP’s,FM or Profibus-Slaves.
With LEFT or ENTER you leave this sub-menu to the menu info.

Handbook Cable & Adapter
© Copyright 1996-2007 by PI 75
5.3.5 Config
With RIGHT or ENTER you enter the following sub-menu where you could select the following sub-menus:
Config Mode With UP/DOWN you could choose the following sub-menus:
Mode For selecting the function of the Cable. Protocol For setting the MPI Protocol MPI Configuration of the MPI-Parameter PG/PC Configuration of the PC-Parameter Language Selection of the Menu-Language in Flash Permanently Saves the Configuration Erase erases the Configuration, the Default-
Properties are loaded IP-Adr configure the ip-address of your cable Password changing the password of your configuration
settings
With LEFT you leave this sub-menu to the main-menu. With ENTER you enter the sub-menu.

Handbook Cable & Adapter
76 © Copyright 1996-2007 by PI
5.3.5.1 Mode With RIGHT or ENTER you enter the following sub-menu where you could select following menu-points::
Mode MPI With UP/DOWN you select the following menu-points:
MPI The cable acts in a MPI-Bus PPI The cable is connected to a S7-200 With LEFT you will leave this sub-menu to the menu mode.
5.3.5.2 MPI With RIGHT or ENTER you enter the following sub-menu, in which you could choose following sub-menus:
MPI/PPI Baudrate With UP/DOWN you could enter the following sub-menus:
Baudrate MPI-Baud rate configuration, the baud rate selected here is used, even when another is selected over the PG/PC on connection to PLC.
HSA select highest station address local Nr select local stations address for the cable with LEFT you leave this sub-menu to the menu config. With ENTER you enter the sub-menu.

Handbook Cable & Adapter
© Copyright 1996-2007 by PI 77
5.3.5.2.1 Baudrate With RIGHT or ENTER you enter the following sub-menu:
MPI-Baud 187.5k With UP/DOWN you could choose between the following baud rates. With ENTER the baud rate is selected:
12M 6M 3M 1.5M 500k 187.5k 93.75k 45.45k 19.2k With LEFT (Cancel) or ENTER (Select) you leave the sub-menu to the menu MPI.
5.3.5.2.2 HSA With RIGHT or ENTER you enter the sub-menu:
HSA 31 With UP/DOWN you could choose between the following values, with ENTER you select the value:
126 63 31 15 With LEFT or ENTER you leave this sub-menu to the menu MPI.

Handbook Cable & Adapter
78 © Copyright 1996-2007 by PI
5.3.5.2.3 LocalNr With RIGHT or ENTER you enter the following Sub-Menu:
lokaleNr 0A With UP/DOWN the local station number is increased/decreased with one. With RIGTH/LEFT the station number is increased/decreased by 16. The local station number is displayed in hexadecimal.
With ENTER you leave this sub-menu to the menu MPI.
5.3.5.3 Language With RIGHT or ENTER you enter the following sub-menu:
Language German With UP/DOWN you could select the following languages:
German Language of menu is German English Language of menu is English With LEFT you leave this Sub-Menu to the Menu config. With ENTER you choose the language and the sub-menu is leaved to config.

Handbook Cable & Adapter
© Copyright 1996-2007 by PI 79
5.3.5.4 In Flash The configuration is saved permanently in the OnBoard-Flash. The following configuration-data is saved:
IP address MPI-Baudrate Language
5.3.5.5 Erase The default-configuration is saved to OnBoard-Flash without question.
5.3.5.6 IP-Adr In this menu you can change the IP address of your MPI-LAN cable. Please make sure that the IP-Address given to your cable is unique. Ask your network administrator to obtain a unique IP address for your network. Selecting this menu with ENTER/RIGHT, the following screen on the LCD appears: >9<.168. 001.055 With LEFT/RIGHT you can move the cursor (> <). By pressing UP/DOWN you can edit the selected character of the IP address. Confirm your changes with ENTER.

Handbook Cable & Adapter
80 © Copyright 1996-2007 by PI
5.3.5.7 Protocol By selecting this menu with ENTER/RIGHT, you can specify the type of the protocol on the mpi bus. To apply your changes press ENTER, to discard them, use LEFT.
5.3.5.8 Password Selecting this menu with ENTER/RIGHT, you can edit the password to protect your configuration settings. By pressing LEFT/RIGHT you can move the cursor, pressing UP/DOWN changes the selected character of the password. Confirm your new password with ENTER.

Handbook Cable & Adapter
© Copyright 1996-2007 by PI 81
5.4 Technical data
Description Technical specifications Dimensions without cables 146 x 41x 29mm (l x w x h) Case type ABS, V0, Cable type UL2464, 28AWG, double
shielded Interfaces To the MPI-BUS To the PG/PC
RS485 (187,5 kbaud) RJ45 (10/100Mbit)
Supply voltage DC 24V +/- 20% The 24V will be taken out of the connected PLC or of the connected adapter.
Power disurpation Typ. I = 100mA at 24V (5V input not used)
Output current 5V This 5V output doesn’t drive any load and have a 100R resistor in his series. Use it only as bus termination.
Type of protection IP20 Galv. decoupling The internal electronic to the bus
driver and also to the 24V input are decoupled.
Order Description MPI-LAN-Cable 3m Order.No. 9352-LAN

Handbook Cable & Adapter
82 © Copyright 1996-2007 by PI
6 PLC-VCom Application
6.1 Functional Description
The PLC-VCom application is needed for use with the following devices:
• MPI-LAN Cable • MPI-USB Cable • MPI-II Cable (USB-mode) • S5.LAN Cable
It creates a new, virtual com-port in your system, with which the programming software of your PC (such as PG2000) can communicate with the device. The virtual COM-Port is only view-, select- and accessible when the PLCVCOM is in the „connected“ state, that means a cable is present and usable.
6.2 Installation of PLC-VCom
Start the installation with the file named „Setup.exe“ of your installation CD. After you have entered the path and the entry for the start menu, the installation begins. After the installation has copied the data for the PLC-VCom, you will be asked whether you want to install the USB driver or not.
If you don’t planning to use any USB devices (e.g. you’re using a MPI-LAN Cable), please answer this question with “no”.

Handbook Cable & Adapter
© Copyright 1996-2007 by PI 83
If you use a cable with USB support (such as MPI-II, MPI-USB), connect the cable with your PC and choose “yes”. If you’re working under Windows XP, answer the “Windows XP driver certification”-question with “continue installation”. After this, you’ll have to select an appropriate com-port for PLC-VCom. Please choose a free com-port of your system, not used by a physical serial com-port. After rebooting your computer, the installation has finished.
6.3 Setting up PLC VCom / using PLC VCom
After installing the software, a small icon in the right lower corner of your windows taskbar appears. This icon shows the status of the connection with your MPI-II / MPI-USB / MPI-LAN /S5 LAN Cable. The icon informs you about the following states:
PLC-VCom is not connected with a device.
PLC-VCom has established a connection to a device and is now ready for use.

Handbook Cable & Adapter
84 © Copyright 1996-2007 by PI
The icon changes in the case data is sent or received via the virtual com-port of PLC - VCom: send-status receive status
To configure a device, just click on the icon with the left mouse button. The configuration dialog of the PLC - VCom will be shown: status of the MPI-LAN Cable IP address of the MPI-LAN
configure the Cable
com-port of PLC-VCom exit PLC-VCom switch language English/German minimize PLC-
VCom
6.3.1 Setting up PLC-VCom for Cables
To set up your Cable, click on the button „configure“. This will start the „LAN IP VCOM Wizard“:

Handbook Cable & Adapter
© Copyright 1996-2007 by PI 85
Here the found cables are displayed, select one and
then OK to choose Use the button „search“, to again search all Cables in your network. If you already know the IP address of the MPILAN/S5 - Cable you want to connect, you can enter it in the ip address field by hand. After confirming your changes with the apply-button, and plugging in the MPI-LAN Cable in your network/PC, PLC-VCom shows the status „connected“. The device can be used (through the com-port entered in PLC-VCom) with your programming software (such as PG2000). If you have to change the IP address of your MPI-LAN Cable, you can do this by using the function integrated in the MPI-LAN Cable. Also you can do this by using the software “MPI-LAN Manager”, which came with your cable. To start the MPI-LAN Manager, click on the appropriate icon in the start menu. After starting the manager, all reachable MPI-LAN devices in your network will be displayed with information about the cable:
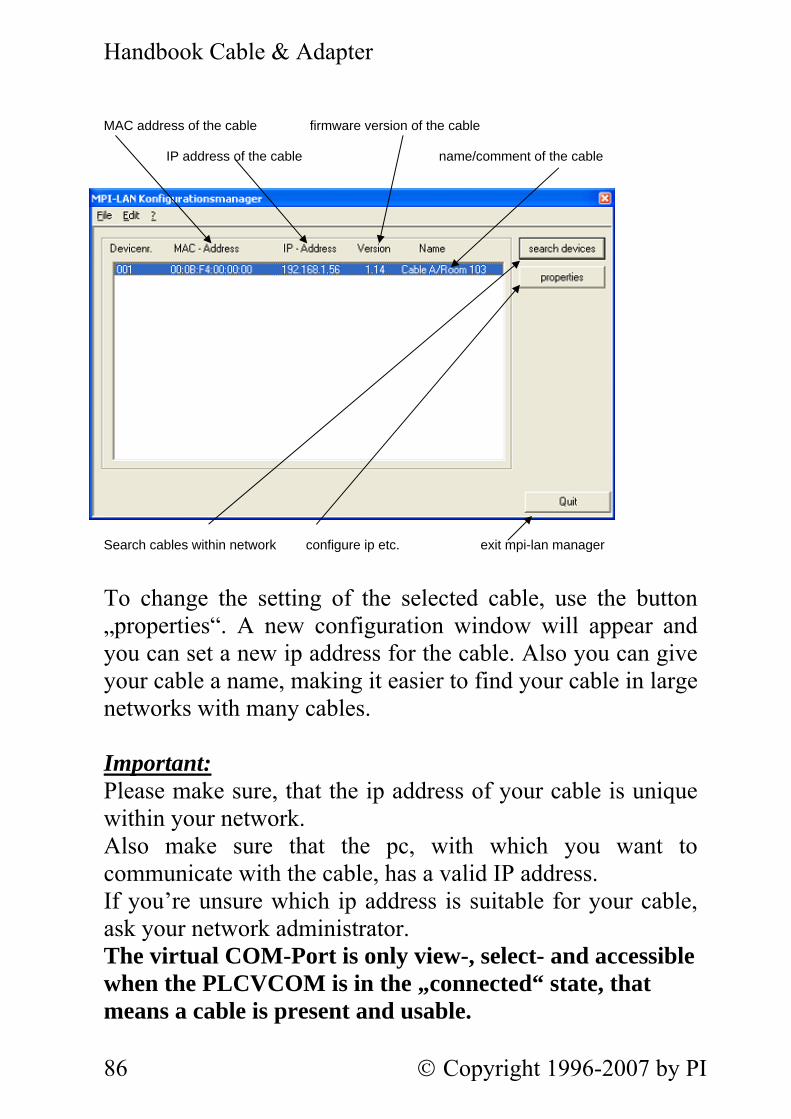
Handbook Cable & Adapter
86 © Copyright 1996-2007 by PI
MAC address of the cable firmware version of the cable IP address of the cable name/comment of the cable Search cables within network configure ip etc. exit mpi-lan manager
To change the setting of the selected cable, use the button „properties“. A new configuration window will appear and you can set a new ip address for the cable. Also you can give your cable a name, making it easier to find your cable in large networks with many cables. Important: Please make sure, that the ip address of your cable is unique within your network.
Also make sure that the pc, with which you want to communicate with the cable, has a valid IP address. If you’re unsure which ip address is suitable for your cable, ask your network administrator.
The virtual COM-Port is only view-, select- and accessible when the PLCVCOM is in the „connected“ state, that means a cable is present and usable.

Handbook Cable & Adapter
© Copyright 1996-2007 by PI 87

Handbook Cable & Adapter
88 © Copyright 1996-2007 by PI
7 MPI-Modem
7.1 Description
The MPI-Modem connects the programming device or PC over the serial Interface (COM-Port) or by Modem to the PC over an analog telephone line with the MPI- or DP/FMS-Connector of the S7-300/400 PLC. The MPI-Modem selects automatically on the first access which Port and which Baud rate is used. With our PLC-Programming-Application PG-95/PG-2000 or S7-for-Windows works the MPI-Modem with up to 115.2kBaud on the PC - Side. On the MPI-Side you could use Baud rates from 19k2 up to 12MBaud. It is possible use the MPI-Modem on a MPI-Connection with only the 2 Data-Lines.
7.2 MPI-Modem as TS-Adapter
The TS-possibility allows the connection of a modem, to make a connection with a 2nd Modem and a PC to a S7-300/400. The MPI-Modem must be connected to an analoge telephone line and the PLC . To work with the MPI-Modem in his TS-function, you must make the following actions: 1) You need the TeleService-software from Siemens in your PC to work with the MPI-Modem. The configuration of the MPI-Modem can be made with the TeleService-software from Siemens or with the “MPI-Kabel Manager”. 2) On the PC side you need another modem.

Handbook Cable & Adapter
© Copyright 1996-2007 by PI 89
7.3 TeleService Function
First you need to set up the hardware in order to use this function. You need to configure the MPI – Modem and the software you want to use.
7.3.1 Setting up the hardware
For establishing a connection with your PLC by using the standard telephone network you need the MPI - Modem and a standard modem. With this equipment you will be able to get access to your PLC from all over the world*. *needs to be connected with the telephone network. Connect the MPI – Modem: The MPI interface (on the right) of the MPI – Modem has to be connected with the PLC. Connect the telephone cable with the plug (bottom, left) on the modem. Connect the standard modem: Connect the telephone cable with the Line-In plug of the standard modem. Do not forget to connect the serial interface with your computer. For setting up the modem by using Windows you should read the manual from the manufacturer of the modem.
7.3.2 Configure the MPI – Modem
° MENU ° °Config °
Enter the menu by pressing and select the menu „Config“ with the arrows.
Password ° >0< °
Enter the password (standard is “0”) and confirm with .
°Config ° ° PG/PC °
Search for the sub menu “PG/PC“ and get in with ENTER ( ).
°PG/PC ° MPI Accs °
In the menu “PG/PC“ navigate to the configuration point “MPI Accs“.
MPI Accs ° °MODEM ° Set it to “MODEM”.
°Modem ° baudrate ° After confirming you will be back in the

Handbook Cable & Adapter
90 © Copyright 1996-2007 by PI
“Config“ menu. From there search to the sub menu “Modem“ and select “baudrate“.
baudrate ° automatic ° Set it to “automatic“.
The MPI – Modem is prepared for the TeleService Software. The status display (menu “Message”) contains the message “MODEM BEREIT”. The used TeleService software is usually executet on the computer which is connected with the standard modem.
7.3.3 TS – Software Configuration
a. SIMATIC Step7 v5.3 with TeleService v6.0 b. MPI – Cablemanager v2.07
a. SIMATIC Step7 v5.3 with TeleService v6.0
a1. Start your Step7 software. a2. Left-click on Extras PG/PC-Schnittstelle einstellen…
a3. In the rising dialog select the TS Adapter using the Benutzte Schnittstellenparametrierun - listbox. a4. Click on Properties and activate, in the registry card Lokaler Anschluß, the Modemanschluß Button. Confirm this configuration with OK. a5.Close the dialog with OK.
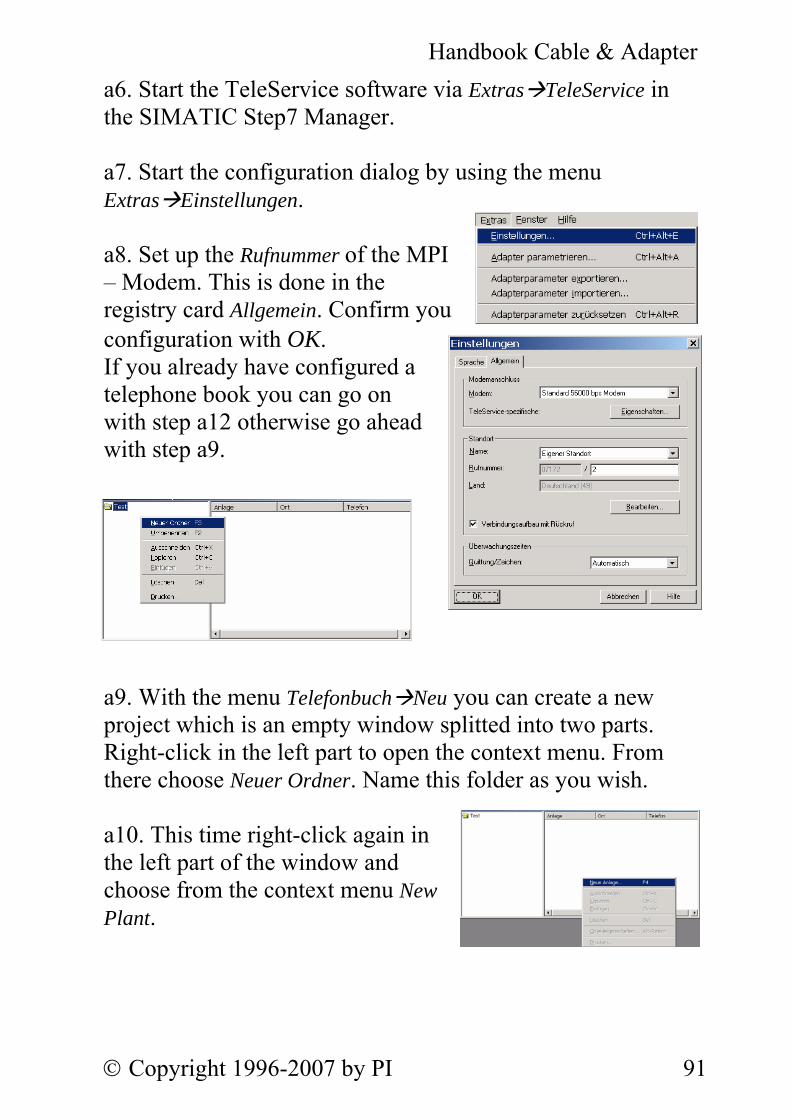
Handbook Cable & Adapter
© Copyright 1996-2007 by PI 91
a6. Start the TeleService software via Extras TeleService in the SIMATIC Step7 Manager. a7. Start the configuration dialog by using the menu Extras Einstellungen. a8. Set up the Rufnummer of the MPI – Modem. This is done in the registry card Allgemein. Confirm you configuration with OK. If you already have configured a telephone book you can go on with step a12 otherwise go ahead with step a9.
a9. With the menu Telefonbuch Neu you can create a new project which is an empty window splitted into two parts. Right-click in the left part to open the context menu. From there choose Neuer Ordner. Name this folder as you wish. a10. This time right-click again in the left part of the window and choose from the context menu New Plant.

Handbook Cable & Adapter
92 © Copyright 1996-2007 by PI
a11. Name the new device and configure as calling number the station address of the MPI – Modem in the second textbox from Rufnummer. Confirm you configuration with OK. a12. Select the newly created device (or one of your devices you have created earlier) and click on Verbindung Aufbauen. a13. A new dialog appears. Choose the modem you want to use/is connected with you computer and wether the connection should be established with a callback or not. Connection establishment with call-back The function “direct call-back“ is used to shift the phone costs to the called number. In the next step you will be asked (only if activated) to enter the username, a password and the source phone number. The MPI – Modem gets the command to perform a call back to the given phone number. From now on the connection will be established by the modem. You can work on the PLC but the connection has been established by the modem far away from your position. a14. Start the connection with Wählen. As soon as the connection is established you have to logon to the TS adapter. Standard – User is ADMIN

Handbook Cable & Adapter
© Copyright 1996-2007 by PI 93
without a password. Additional you can setup the callback number. Be sure that this callback number is not the same like the MPI – Modem which has been used to create this connection. a15. As soon as the dialog disappears the connection is established. Now open the dialog to configure the adapter. (Extras Adapter parametrieren).
a16. Registry card Netz: Configure the net - parameters like the Nettype, the transferrate, the highest station addresse and the profile. This step is important for the software to communicate with the hardware. a17. Registry card Modem: Use this dialog for the modem configuration. Set up parameters like the initialization string and the string for the disconnect. a18. Registry card Zugriffsschutz: Create new users with their own callback numbers. Also you can set a new password (which is not set in standard) for the administrator. Confirm with OK. The connection is now established successfully. With Verbindung Trennen you can close the connection.

Handbook Cable & Adapter
94 © Copyright 1996-2007 by PI
b. MPI – Cablemanager v2.07
b1. Start the MPI – Cablemanager by using the entry in your start menu. b2. Choose from the registry card Teleservice the registry card Extra and click on Check adapter. b3. A new dialog appears. Choose MODEM because this connection should be established via modem. b4. In the call-settings set up the Phone-Number by using the station address of the MPI – Modem. Confirm with OK. b5. After the connection is established new buttons will appear in the dialog. Click on Adapter configuration. b6. The next dialog asks for the TeleService software version you want to use with the MPI – Modem. This description uses the version 6.0. Answer the question with yes.

Handbook Cable & Adapter
© Copyright 1996-2007 by PI 95
b7. The adapter configuration dialog offers a lot of parameters to configure. b8. The registry card Net finden Sie die Netzbezogenen Einstellungen. Diese Einstellung ist wichtig damit Software und Hardware auf dem gleichen Netz kommunizieren. b9. The registry card Modem offers the initialization string and a lot more parameters like the position- and the calling – setup. b10. In the registry card Password you can set up the administrator password (which is not set by default) and create new users. Every user, even the administrator, can have its own back-calling number.
The connection is established successfully.

Handbook Cable & Adapter
96 © Copyright 1996-2007 by PI
7.4 Pin assignment
7.4.1 Pinning RS232 (PC-side)
Pin No. Notation Description Direction
(of cable) 1 DCD Data Carrier Detect Out 2 TXD Transmitted Data Out 3 RXD Received Data In 4 DSR Data Set Ready In 5 GND Signal Ground 6 DTR Data Terminal Ready Out 7 CTS Clear to Send In 8 RTS Request to Send Out 9 RI Ring Indicator In Shield On connector casing The shield is connected with the RS232 connector via the shield of the adapter casing. This MPI-Modem is designed to be connected directly on a COM interface of a PC. The cable can be lengthened by a 1:1-cable to the PC up to 15m maximum. The cable should have a good quality and the shield should be connected at both sides at the SUB-D case.
RS232
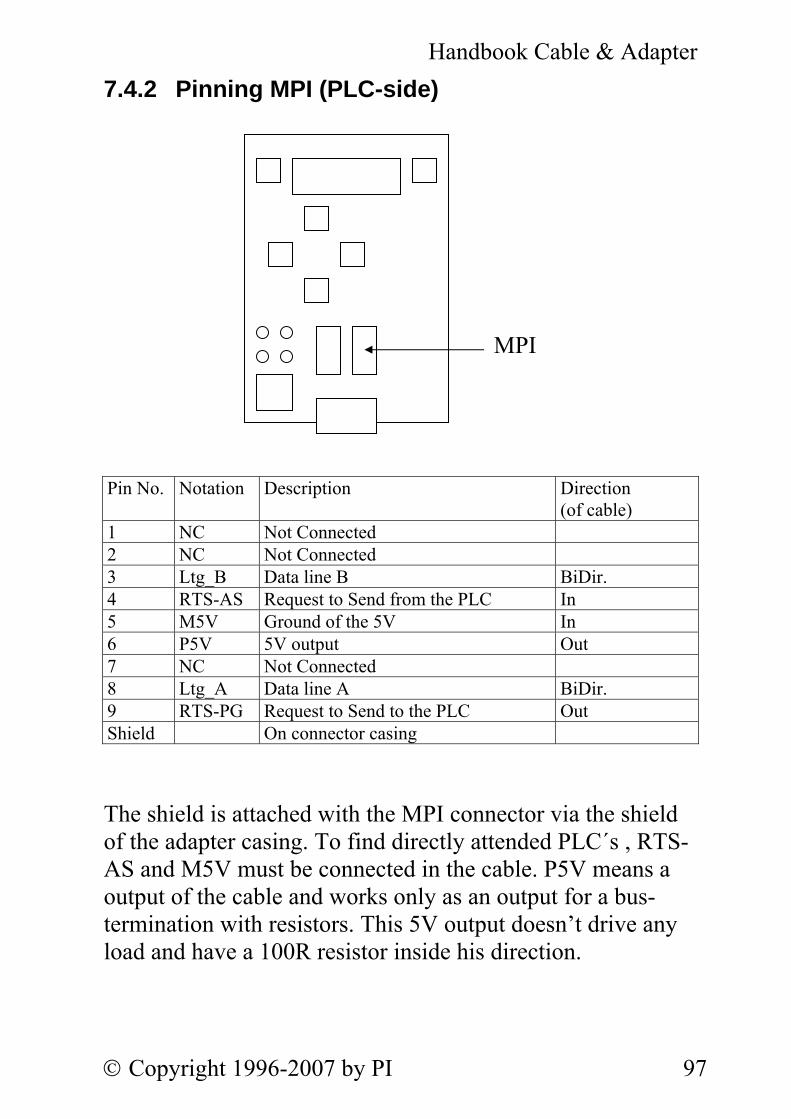
Handbook Cable & Adapter
© Copyright 1996-2007 by PI 97
7.4.2 Pinning MPI (PLC-side)
Pin No. Notation Description Direction
(of cable) 1 NC Not Connected 2 NC Not Connected 3 Ltg_B Data line B BiDir. 4 RTS-AS Request to Send from the PLC In 5 M5V Ground of the 5V In 6 P5V 5V output Out 7 NC Not Connected 8 Ltg_A Data line A BiDir. 9 RTS-PG Request to Send to the PLC Out Shield On connector casing The shield is attached with the MPI connector via the shield of the adapter casing. To find directly attended PLC´s , RTS-AS and M5V must be connected in the cable. P5V means a output of the cable and works only as an output for a bus-termination with resistors. This 5V output doesn’t drive any load and have a 100R resistor inside his direction.
MPI
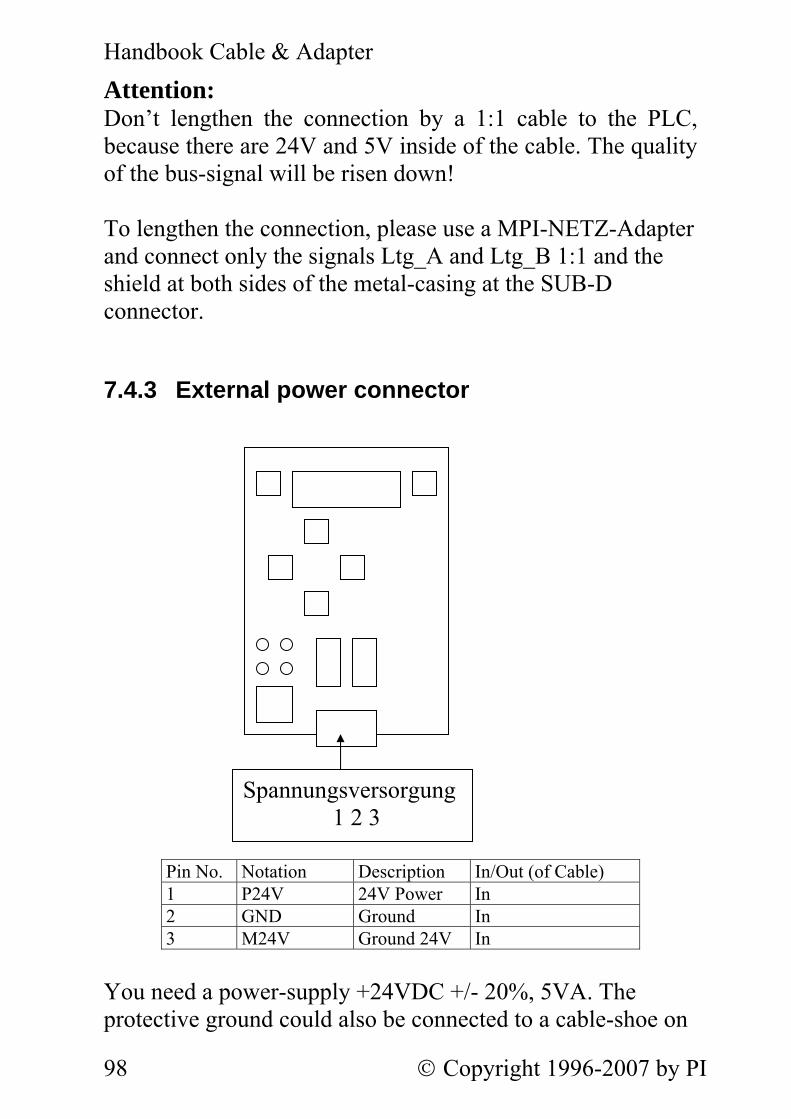
Handbook Cable & Adapter
98 © Copyright 1996-2007 by PI
Attention: Don’t lengthen the connection by a 1:1 cable to the PLC, because there are 24V and 5V inside of the cable. The quality of the bus-signal will be risen down! To lengthen the connection, please use a MPI-NETZ-Adapter and connect only the signals Ltg_A and Ltg_B 1:1 and the shield at both sides of the metal-casing at the SUB-D connector.
7.4.3 External power connector
Pin No. Notation Description In/Out (of Cable) 1 P24V 24V Power In 2 GND Ground In 3 M24V Ground 24V In
You need a power-supply +24VDC +/- 20%, 5VA. The protective ground could also be connected to a cable-shoe on
Spannungsversorgung 1 2 3

Handbook Cable & Adapter
© Copyright 1996-2007 by PI 99
the bottom of the powder-coated metal-case. The Powder-coated case is isolating, mounting to the back-plane does not connect to protective ground !
7.4.4 Light emitting diode’s
LED Color Position Power Green upper left Error Red upper right Phone connection established Yellow lower left MPI-Connection Yellow lower right
Power Error
Modem Connect
MPI Connect

Handbook Cable & Adapter
100 © Copyright 1996-2007 by PI
7.4.5 Analogue phone connector
Pin No Notation Description In/Out (of cable) 1 NC Not connected 2 A’ Pass-through line A Out 3 A Line A In 4 B Line B In 5 B’ Pass-through line B Out 6 NC Not connected
Analogue female Phone-Connector RJ-11/12, in China use the DDE-Net (recommended).
RJ-11/12

Handbook Cable & Adapter
© Copyright 1996-2007 by PI 101
7.5 Connecting the MPI-Modem
This MPI-Modem will be connected with the right connector to the MPI- or the DP/FMS-Interface of the PLC. The MPI-Modem is power supplied with an external 24V voltage. The left connector could connected to the programming-device or with an PC to the COM-Port. When the MPI-Modem gets the power it shows the software-version in the display and begins with the test of its internal components. On the display all relevant data is displayed. The cable will find at a MPI-Connection the active baud rate to the programming-device or to the PC in the first time of communication and set his baud rate himself. If you want to connect the cable to the 25-pin connector of the PC, you can use an adapter (9 pin to 25 pin sub miniature D-connector) to work with this port. In the PC-Software you must adjust some parameters like the baud rate (19,2 or 38,4 kbaud) and the connected COM-PORT (COM1 or COM2) and the used adapter as ´TS-Adapter´.
7.6 Display and keyboard of the MPI-Modem
After Reset the Display shows all relevant Data of the PLC-Connection. Example for Display:
#02TD00▀|MODEM BE !02AG04 | In the first line there are displayed from left to right the following Information:

Handbook Cable & Adapter
102 © Copyright 1996-2007 by PI
1.) A Sharp „#“ with the number of connected active stations on the MPI-Bus (in this example 2) 2.) The PC-Baud rate MD 115,2k or automatic Baudrate-Selection active (Modem) TD 115,2k or automatic Baudrate-Selection active
(serial line) MS 19,2k (Modem) TS 19,2k (serial line) Ms 38,4k (Modem) Ts 38,4k (serial line) mS 57,6k (Modem)
tS 57,6k (serial line)
3.) The station-number of MPI – II Cable (In S7-Manager under „Extras / PG/PC-Interface“ with “Properties/Net/locale station number“). The default is 0.
4.) When communicating a tiled bar (top is to PLC, bottom to PG)
In the second line there are display from left to right the following information:
1.) The first Char defines which type of PLC and which connection is used
! Active Station in MPI-Bus, directly connected

Handbook Cable & Adapter
© Copyright 1996-2007 by PI 103
? Active Station in MPI-Bus, far distance ! Passive Station in MPI-Bus, directly connected ? Passive Station in MPI-Bus, far distance 2.) The station-numbers of all active and connected stations in the MPI-Bus. Every ¾ second another station is displayed.
3.) static Text „AG“ (means PLC)
4.) The PLC which is momentarily is connected to the PC-Software (in our example is the Station 4 connected).
On the right side of the display, separated by “|”, is the modem-state displayed.
In the first line the following messages could appear:
Message Description MODEM READY The modem is booted and ready MODEM ERROR The modem reports an error NO ANSWER The modem don’t send an answer RING The modem is called CON.END The connection is terminated CONNECT <Bd> The modem is connected to a line with
the displayed Baudrate NO CARRIER The carrier is lost. LINE BUSY The phone-line or number is busy BLACKLISTED The called number is not allowed in
the modem
Handbook Cable & Adapter
104 © Copyright 1996-2007 by PI
NR.DELAYED The number called is too often or fast
redialed. The dialing is not allowed for a minute
FAX Fax-call detected DATA Data-call detected UNKNOWN MESS. The modem generates an unknown
message DIALING The phone-number which is dialed is
shown in the bottom line ENTRY EMPTY The Fast-Access Entry is Empty wrong PIN The PIN-number configured is wrong SIMCard wrong The SIM-Card is not inserted, or not
correctly placed. In the GSM-Version the display shows in the bottom line additional information about the GSM-Network:
Display Description SIM/PIN SIM Card not inserted or PIN-Number wrong RegDend Registration denied in the GSM-network Unknown Unknown state ROAM:<xx> Connection established to a provider which is
roaming. This could produce higher costs GSM:<xx> Connection established to a provider. Srch:<xx> Searching provider in GSM-network,
not yet found At „ROAM“,“GSM“ and „Srch“ additionally the Recieve-Quality is duisplayed (greater values are better). -- no recieve (antenna not connected?) 01 very bad 31 best and optimal

Handbook Cable & Adapter
© Copyright 1996-2007 by PI 105
7.6.1 The keyboard
The keyboard on the MPI-Modem is used for navigating through menus and for configuring the MPI-Modem. There are the following keys sensing and colored:
↵ Confirm the input. Saves the configuration
permanently into the flash-memory.
Change into a menu or menu-point
ENTER
⇑ Increasing a value, selecting a menu-point UP
⇓ Decreasing a value, selecting a menu-point DOWN
⇐ Cancellation of a input/selection, the selection is not saved, one menu-level back
LEFT
⇒ Go into a sub-menu RIGHT
Esc Go to state-message area ESC
⇓
⇑
Es
⇐ ⇒
↵

Handbook Cable & Adapter
106 © Copyright 1996-2007 by PI
7.6.2 Main menu
You select the main-menu with ENTER, with ENTER again you reactivate the default-display. On the Main-menu you could also select the default-display with LEFT.
MENU ↵ #02PD00▀ Message !02AG04
With UP/DOWN you could choose the following menu-points:
Message activate default-display Info Information over the MPI-MODEM cable Bus MPI-Bus information’s Config Configuration of the cable Hang up tells the modem to hang up Call establishes a connection
7.6.3 Info
With RIGHT or ENTER you select the following sub-menu:
Info Version Info Signal quality Info Signal level

Handbook Cable & Adapter
© Copyright 1996-2007 by PI 107
7.6.3.1 Version With RIGHT or ENTER you will enter the following display, which will display the actual operation system version of the cable:
Version 1.01 With LEFT or ENTER you will leave this sub-menu-point to the menu info.
7.6.3.2 Signalquality With RIGHT or ENTER you will enter the following display, which will display the actual signal quality of the connection:
Signalquality 255 With LEFT or ENTER you will leave this sub-menu-point to the menu info.
7.6.3.3 Signallevel With RIGHT or ENTER you will enter the following display, which will display the actual signal quality of the connection:
Signallevel 21 With LEFT or ENTER you will leave this sub-menu-point to the menu info.

Handbook Cable & Adapter
108 © Copyright 1996-2007 by PI
7.6.4 Bus
With RIGHT or ENTER you enter the following sub-menu which has only one element:
Bus Address With LEFT you leave this sub-menu to the main-menu. With ENTER you enter the sub-menu.
7.6.4.1 Adresses With RIGHT or ENTER you enter the following display, which shows the connected stations on the MPI-Bus:
Adressen D 018 With UP or DOWN you browse the addresses, where in the second line the following chars are possible:
D The MPI-MODEM Cable is connected directly to this station
A This station is active in the BUS
P This station is passive like for example some OP’s,FM or Profibus-Slaves.
With LEFT or ENTER you leave this sub-menu to the menu info.

Handbook Cable & Adapter
© Copyright 1996-2007 by PI 109
7.6.5 Config
With RIGHT or ENTER a Password request is displayed. The Standard Password is “0”.With ENTER you enter the following sub-menu where you could select the following sub-menus:
Config PG/PC With UP/DOWN you could choose the following sub-menus:
PG/PC For selecting the function of the Cable. Data Selection if locked (at MPI-Modem default) Modem configure the Modem MPI-BUS Configuration of the MPI-Parameter Protocol Communication protocol to PC Language Selection of the Menu-Language Set.Def erases the Configuration, the Default-
Properties are loaded Reset Resets the modem Password Define a new Password
With LEFT you leave this sub-menu to the main-menu. With ENTER you enter the sub-menu.
7.6.5.1 PG/PC With RIGHT or ENTER you enter the following sub-menu where you could select following menu-points:
PG/PC MPI Accs With UP/DOWN you select the following menu-points:

Handbook Cable & Adapter
110 © Copyright 1996-2007 by PI
MPI Accs The cable acts in a MPI-Bus PPI Accs The cable is connected to a S7-200 With LEFT you will leave this sub-menu to the menu mode. 7.6.5.1.1 MPI Accs With RIGHT or ENTER you enter the following sub-menu where you could select following menu-points::
MPI Accs Serial With UP/DOWN you select the following menu-points:
Serial Connect the PC over the serial line RS232 MODEM Connect the PC over Telephone-line with the internal MODEM. With LEFT you leave this sub-menu to the main-menu. With ENTER you enter the sub-menu. 7.6.5.1.1.1 Serial
With RIGHT or ENTER you enter the following sub-menu where you could select following menu-points::
Ser.Baud 19.2k With UP/DOWN you select the following menu-points, with ENTER the selection is used:
19.2k Baudrate 19200 38.4k Baudrate 38400

Handbook Cable & Adapter
© Copyright 1996-2007 by PI 111
57.6k Baudrate 57600 115.2k Baudrate 115200 Auto The MPI-Modem selects automatically the baudrate With LEFT (Cancel) or ENTER (Select) you will leave this Menu and go to PG/PC.
7.6.5.1.1.2 Modem
With ENTER the Modem is the Accespoint. 7.6.5.1.2 PPI-Accs With RIGHT or ENTER you enter the following sub-menu where you could select following menu-points::
MPI-Accs Serial With UP/DOWN you select the following menu-points:
Serial Connect the PC over the serial line RS232 MODEM Connect the PC over Telephone-line with the internal MODEM. With LEFT you leave this sub-menu to the main-menu. With ENTER you enter the sub-menu. With RIGHT or ENTER you enter the following sub-menu where you could select following menu-points:

Handbook Cable & Adapter
112 © Copyright 1996-2007 by PI
7.6.5.1.2.1 Serial
Ser.Baud 9.6k With UP/DOWN you select the following menu-points, with ENTER the selection is used:
9.6k Baudrate 9600 19.2k Baudrate 19200 With LEFT you leave this sub-menu to the main-menu. 7.6.5.1.2.2 Modem
With RIGHT or ENTER you enter the following sub-menu where you could select following menu-points::
ModmBaud 9.6k With UP/DOWN you select the following menu-points, with ENTER the selection is used:
9.6k Baudrate 9600 19.2k Baudrate 19200 With LEFT you leave this sub-menu to the main-menu. 7.6.5.1.3 TrnModem (transparent modem mode) This option makes the device use a external modem, instead of the built-in, internal modem of the device. The external modem must be connected with the RS232 interface of the mpi-modem. Select this option by pressing ENTER or

Handbook Cable & Adapter
© Copyright 1996-2007 by PI 113
RIGHT, then you’ll be asked of the baudrate with wich the external modem will be driven: Ser.Baud 19.2k
Choose the desired baudrate and confirm your changes with ENTER, or discard them with LEFT. After this, you will be asked of the AT-Initstring of your external modem. With the keys LEFT/RIGHT you can move the cursor, this UP/DOWN you can edit the characters of the AT-initstring. To obtain more information about the appropriate initstring, refer to the documentation included with your external modem. The modem now restarts and will use the modem which is externally connected to the RS232 interface of the mpi-modem. 7.6.5.1.4 ExtModem (external modem mode) With this option you can use the mpi-modem as a ordinary, external modem. To use it this way, just connect the mpi modem via the RS232 interface and use it like a external modem. Choose this mode by pressing ENTER, you will be asked of the baudrate with which the RS232 interface will be driven. Select your desired speed and confirm your changes with ENTER. After the modem has rebooted, the external modem-mode is active.
Handbook Cable & Adapter
114 © Copyright 1996-2007 by PI
To return to the normal mode, select Config->PG/PC->MPI Accs in the menu.
7.6.5.2 Data With RIGHT or ENTER you enter the following sub-menu where you could select following menu-points:: PCConfig locked With UP/DOWN you select the following menu-points: locked The MPI-Bus is fully configurated in the MPI-
Modem or by TeleService-Software. unlocked MPI-Bus Parameters are transfered defined by
PC-Software (not expected for MPI-Modem) With LEFT/ESC you leave this Sub-Menu to Config discarding your changes, ENTER saves your changes.
7.6.5.3 Modem With RIGHT or ENTER you enter the following sub-menu where you could select following menu-points::
Modem dial mode With UP/DOWN you select the following menu-points:
Dial mode dial by tone or pulse Phonebook edit entries in the phonebook Baudrate Modem-baudrate over telephone line

Handbook Cable & Adapter
© Copyright 1996-2007 by PI 115
Modemtype select modemtype Speaker Speaker loudness Busy identify select busy identify Ring counter autmatic connection Extension use extension Outline code if extension then define the outline code With LEFT you leave this sub-menu to the main-menu. With ENTER you enter the sub-menu. 7.6.5.3.1 Dial mode With RIGHT or ENTER you enter the following sub-menu where you could select following menu-points::
Dial mode Tone With UP/DOWN you select the following menu-points, with ENTER your selection is used:
tone dialing with tones pulse dialing with pulses 7.6.5.3.2 phone book With RIGHT or ENTER you enter the following sub-menu where you can choose the phonebook entry to edit.
phonebook entry: 1 Use UP und DOWN to select the phonebook entry. By pressing ENTER you can edit the entry.

Handbook Cable & Adapter
116 © Copyright 1996-2007 by PI
phonebook entry: > < With UP/DOWN/RIGHT/LEFT you can edit the phonebook entry. ENTER saves your changes, ESC will cancel the action. 7.6.5.3.3 baudrate With RIGHT or ENTER you enter the following sub-menu where you could select following menu-points::
Baudrate 300 Bd With UP/DOWN you select the following menu-points, with ENTER your selection is used:
300 1200 2400 4800 7200 9600 12000 14400 16800 19200 21600 24000 26400 28000 31200 33600 automatic The Modem selects the appropriate baudrate by self. 7.6.5.3.4 Modemtype With RIGHT or ENTER you enter the following sub-menu where you could select following menu-points::
Modemtyp D
Handbook Cable & Adapter
© Copyright 1996-2007 by PI 117
With UP/DOWN you select the following menu-points, with ENTER your selection is used:
D Germany USA USA Auto Automatic Selection wich telephone type is used. 7.6.5.3.5 Speaker With RIGHT or ENTER you enter the following sub-menu where you could select following menu-points::
Lautsprecher Aus With UP/DOWN you select the following menu-points, with ENTER your selection is used:
Off Speaker is off Silent Speaker is silent Middle Speaker is on normal Loudness Loud Speaker is at maximum Loudness 7.6.5.3.6 Busy identification With RIGHT or ENTER you enter the following sub-menu where you could select following menu-points::
Busy identify YES With UP/DOWN you select the following menu-points, with ENTER your selection is used:

Handbook Cable & Adapter
118 © Copyright 1996-2007 by PI
YES busy identify is used NO busy identiy is NOT used 7.6.5.3.7 Ring counter With RIGHT or ENTER you enter the following sub-menu where you could select following menu-points::
Ring counter 1 With UP/DOWN you select the ring counter, the value can be between 0 (no answer on call) to 9. 7.6.5.3.8 Extension With RIGHT or ENTER you enter the following sub-menu where you could select following menu-points:
Extension YES With UP/DOWN you select the following menu-points, with ENTER your selection is used:
YES extension is used NO extension is NOT used 7.6.5.3.9 Outline code With RIGHT or ENTER you enter the following sub-menu where you could select following menu-points:
Outline code

Handbook Cable & Adapter
© Copyright 1996-2007 by PI 119
With UP/DOWN/RIGHT/LEFT you can select the extension which is preceded before all outgoing calls. With ENTER the selection is used.
7.6.5.4 MPI-Bus With RIGHT or ENTER you enter the following sub-menu, in which you could choose following sub-menus:
MPI-BUS Baudrate With UP/DOWN you could enter the following sub-menus:
Baudrate MPI-Baud rate configuration, the baud rate selected here is used, even when another is selected over the PG/PC on connection to PLC.
HSA select highest station address local Nr select local stations address for the cable Master select if MPI-Modem is the only active Station on MPI-BUS Profil select the MPI/DP-Bus-profile with LEFT you leave this sub-menu to the menu config. With ENTER you enter the sub-menu. 7.6.5.4.1 Baudrate With RIGHT or ENTER you enter the following sub-menu:
MPI-Baud 187.5k With UP/DOWN you could choose between the following baud rates. With ENTER the baud rate is selected:

Handbook Cable & Adapter
120 © Copyright 1996-2007 by PI
12M 6M 3M 1.5M 500k 187.5k 93.75k 45.45k 19.2k from PC the baudrate which is transfered from PC is used With LEFT (Cancel) or ENTER (Select) you leave the sub-menu to the menu MPI. 7.6.5.4.2 HSA With RIGHT or ENTER you enter the sub-menu:
HSA 31 With UP/DOWN you could choose between the following values, with ENTER you select the value:
126 63 31 15 With LEFT or ENTER you leave this sub-menu to the menu MPI.
7.6.5.4.3 Local nr. With RIGHT or ENTER you enter the following Sub-Menu:
lokaleNr 0A With UP/DOWN the local station number is increased/decreased with one. With RIGTH/LEFT the station

Handbook Cable & Adapter
© Copyright 1996-2007 by PI 121
number is increased/decreased by 16. The local station number is displayed in hexadecimal.
With ENTER you leave this sub-menu to the menu MPI. 7.6.5.4.4 Master With RIGHT or ENTER you enter the following Sub-Menu:
Multi master With UP/DOWN you select the following menu-points, with ENTER your selection is used:
Multimaster The MPI-Modem is in a MPI-Bus- System which has at least one additional active station (this is the default) PGPC is singMast The MPI-Modem is connected to a single OP for Updateing purposes another PLC is not connected. In this very special case the MPI-Modem must drive the MPI-Bus stand-alone. With LEFT/ESC (discarding changes) or ENTER (saving changes) you leave this sub-menu to the menu MPI. 7.6.5.4.5 Profil With RIGHT or ENTER you enter the following Sub-Menu:
Profil MPI

Handbook Cable & Adapter
122 © Copyright 1996-2007 by PI
With UP/DOWN you select the following menu-points, with ENTER your selection is used:
MPI The MPI-Modem is connected to a MPI-Bus, This is the default case (left Interface) DP The MPI-Modem is connected to a Profibus with the profile-type DP (Decentral Peripheral) DP/FMS The MPI-Modem is connected to a Profibus with the profile-type DP/FMS Standard The MPI-Modem is connected to a Profibus with the profile-type Standard Wich Profile-type is used could be reviewed in the hardware-configuration of your PLC. With LEFT/ESC (discarding changes) or ENTER (saving changes) you leave this sub-menu to the menu MPI.
7.6.5.5 Protocol With RIGHT or ENTER you enter the following Sub-Menu:
Protocol Auto With UP/DOWN you select the following menu-points, with ENTER your selection is used:
Auto The MPI-Modem detects itself the protocol type which should be used from PC.

Handbook Cable & Adapter
© Copyright 1996-2007 by PI 123
V5.1 The MPI-Modem tries to using the (faster) Protocol-types for communication to PC. V5.0 Alt The MPI-Modem communicates only with the (older) protocol_types up to PC-Adapter V5.0 With LEFT/ESC (discarding changes) or ENTER (saving changes) you leave this sub-menu to the menu Config.
7.6.5.6 Language With RIGHT or ENTER you enter the following sub-menu:
Language German With UP/DOWN you could select the following languages:
German Language of menu is German English Language of menu is English With LEFT you leave this Sub-Menu to the Menu config. With ENTER you choose the language and the sub-menu is leaved to config.
7.6.5.7 Erase The default-configuration is saved to OnBoard-Flash with the correct password.
7.6.5.8 Reset With RIGHT or ENTER you enter the following sub-menu:
Handbook Cable & Adapter
124 © Copyright 1996-2007 by PI
Reset > < To do a reset of the MPI-Modem the password must be given. With UP/DOWN you select the Chars and with RIGHT/LEFT the Position is changed. The Reset occurs only with ENTER and of course a correct Password, Cancel with repeated LEFT in this case you go back to the upper menu Config.
7.6.5.9 Password By pressing ENTER or RIGHT you can change your password: Old PW > < Input your old password. The standard-password is „0“ New PW > < Input the new password. Again > < Input the new password again. PW übern PW:0___
7.6.5.10 Telemessage (optional) This menu configures the (optional available) Telemessaging functions. With the Telemessaging function it is possible to send a fax, a sms, or a voice message after a signal on the mpi-bus.

Handbook Cable & Adapter
© Copyright 1996-2007 by PI 125
7.6.5.10.1 SMS By pressing ENTER or RIGHT you can configure the settings of the sms mode: 7.6.5.10.1.1 Text
Here you can edit the text which will be sent as a sms. By pressing LEFT/RIGHT you can move the cursor, by pressing UP/DOWN you can edit the selected character of the message. Confirm your changes by pressing ENTER, discard them with ESC. 7.6.5.10.1.2 Tel.nr.
With this option, you can edit the telefone number of the recipient of the short message. By pressing LEFT/RIGHT you can move the cursor, by pressing UP/DOWN you can edit the selected character of the message. Confirm your changes by pressing ENTER, discard them with ESC. You’ll also be asked to select a protocol and a sms service number to finish the configuration. SMS providers often use different protocols and server numbers.

Handbook Cable & Adapter
126 © Copyright 1996-2007 by PI
Choose the sms server number and the protocol accordingly the following table:
Provider Protocol Nr. of Service Center D1 TAP 01712521002 D2 UCP 01722278025
E-Plus TAP 01771167 7.6.5.10.1.3 Test
By pressing ENTER or RIGHT you can test your settings by sending a test message. 7.6.5.10.2 Fax
7.6.5.10.2.1 Text
Here you can edit the text, which will be sent as a fax. By pressing LEFT/RIGHT you can move the cursor, by pressing UP/DOWN you can edit the selected character of the message. Confirm your changes by pressing ENTER, discard them with ESC. 7.6.5.10.2.2 Tel.nr
With this option, you can edit the telephone number of the recipient of the fax message. By pressing LEFT/RIGHT you can move the cursor, by pressing UP/DOWN you can edit the selected character of the message.

Handbook Cable & Adapter
© Copyright 1996-2007 by PI 127
Confirm your changes by pressing ENTER, discard them with ESC. 7.6.5.10.2.3 test
By pressing ENTER or RIGHT you can test your settings by sending a fax message. 7.6.5.10.3 Voice
7.6.5.10.3.1 Tel.nr
With this option, you can edit the telephone number of the recipient of the voice message. By pressing LEFT/RIGHT you can move the cursor, by pressing UP/DOWN you can edit the selected character of the message. Confirm your changes by pressing ENTER, discard them with ESC. 7.6.5.10.3.2 Test
By pressing ENTER or RIGHT you can test your settings by sending a voice message.
7.6.6 Hang up
With RIGHT or ENTER you tell the modem to close an active connection and to hang up.
7.6.7 Call
With RIGHT or ENTER you select the following sub-menu: phonebook entry: 1

Handbook Cable & Adapter
128 © Copyright 1996-2007 by PI
UP and DOWN selects the phonebook entry, with ENTER the modem dials the number stored in the entry.

Handbook Cable & Adapter
© Copyright 1996-2007 by PI 129
7.7 Technical data
Description Technical specifications Dimensions without cables 165 x 90 x 50mm (L x W x H) Case type Powder-coated, metallic case
(Isolating, connect protective ground to connector on the bottom of the Device with a 6.3mm cable-shoe or power-connector)
Interfaces To the MPI-BUS To the PG/PC To Telephone-line
RS485(19,2/93,5/187,5/ 500kBaud, 1.5/3/6/12Mbaud) RS232 19,2 / 38,4 / 57,6 / 115,2kBaud MODEM upto 33.6k RJ-11/12
Supply voltage DC 24V +/- 20% The 24V will be taken out of the connected PLC or of the connected adapter.
Power disurpation 5VA (Typ. I = 200mA at 24V) Galvanic decoupling The internal electronic (and
RS232) to the bus driver and also to the 24V input are decoupled. The shield from the MPI/PPI side to the RS232 side are connected through
Order Description MPI-Modem 3m Order.No. 9352
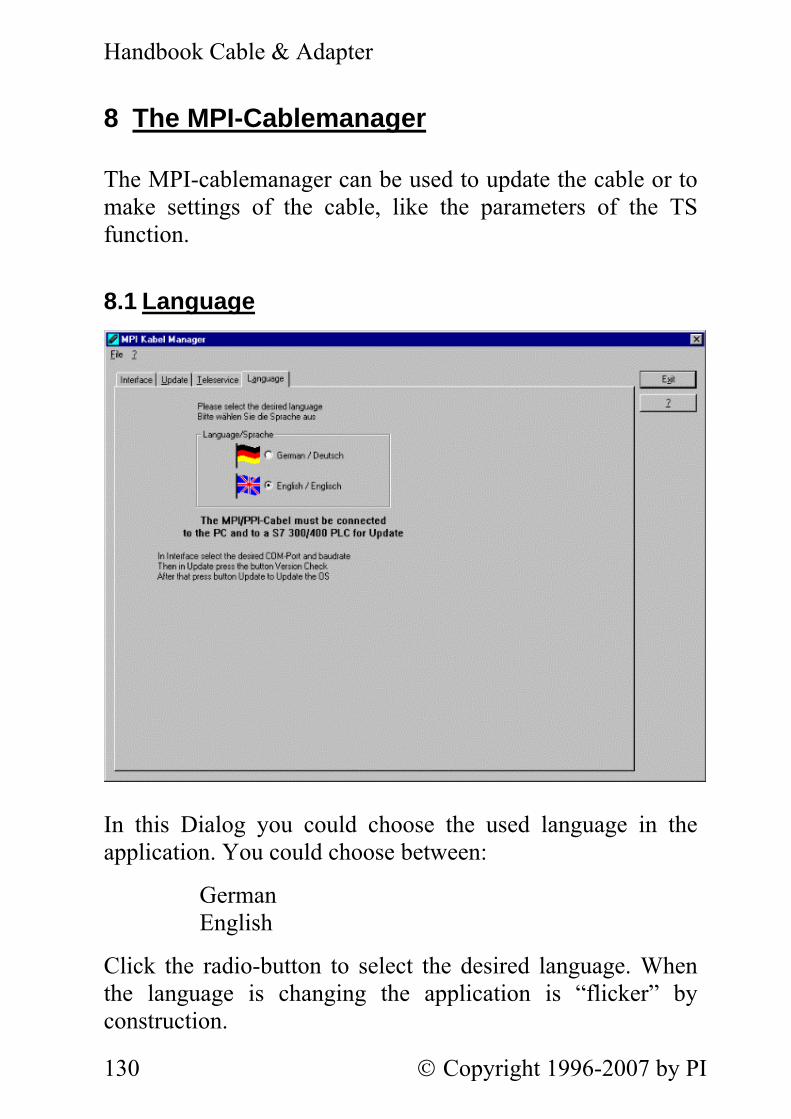
Handbook Cable & Adapter
130 © Copyright 1996-2007 by PI
8 The MPI-Cablemanager
The MPI-cablemanager can be used to update the cable or to make settings of the cable, like the parameters of the TS function.
8.1 Language
In this Dialog you could choose the used language in the application. You could choose between:
German English
Click the radio-button to select the desired language. When the language is changing the application is “flicker” by construction.

Handbook Cable & Adapter
© Copyright 1996-2007 by PI 131
8.2 Interface
In this dialog you could define the COM-port and transfer-rate which is used for communication with the MPI-cable. If you click on search, all 16 possible COM-ports are tested if there is a MPI-cable. If there is a MPI-cable detected then the corresponding COM-port and baud-rate is selected. The settings of the COM-port can also be set manually.

Handbook Cable & Adapter
132 © Copyright 1996-2007 by PI
8.3 Update
In this dialog you could display the actual version-information about the MPI-cable and the version which is situated on disk. Click on “check version” to read the desired version-info from disk and cable. This button must be pressed before you could update the MPI-cable. The version info is displayed at the disk and the cable on the screen.. Double-Click on the disk to select the operating system which is updated by yourself with an file-open-dialog. To start the update procedure, click “Update”. While update do not plug out the cable from the PLC or turn off the power supply (The cable will lost all data)!

Handbook Cable & Adapter
© Copyright 1996-2007 by PI 133
If the update is breaking before finished, it could be that the MPI-Cable displays in the first line of the LCD „Load 1.50“ and in the second line „CheckUpd“. Close the MPI-Cable-Manger and restart it. After “check version” (which could time about 30 seconds) and following „Update“ the broken update is restarted and finished.
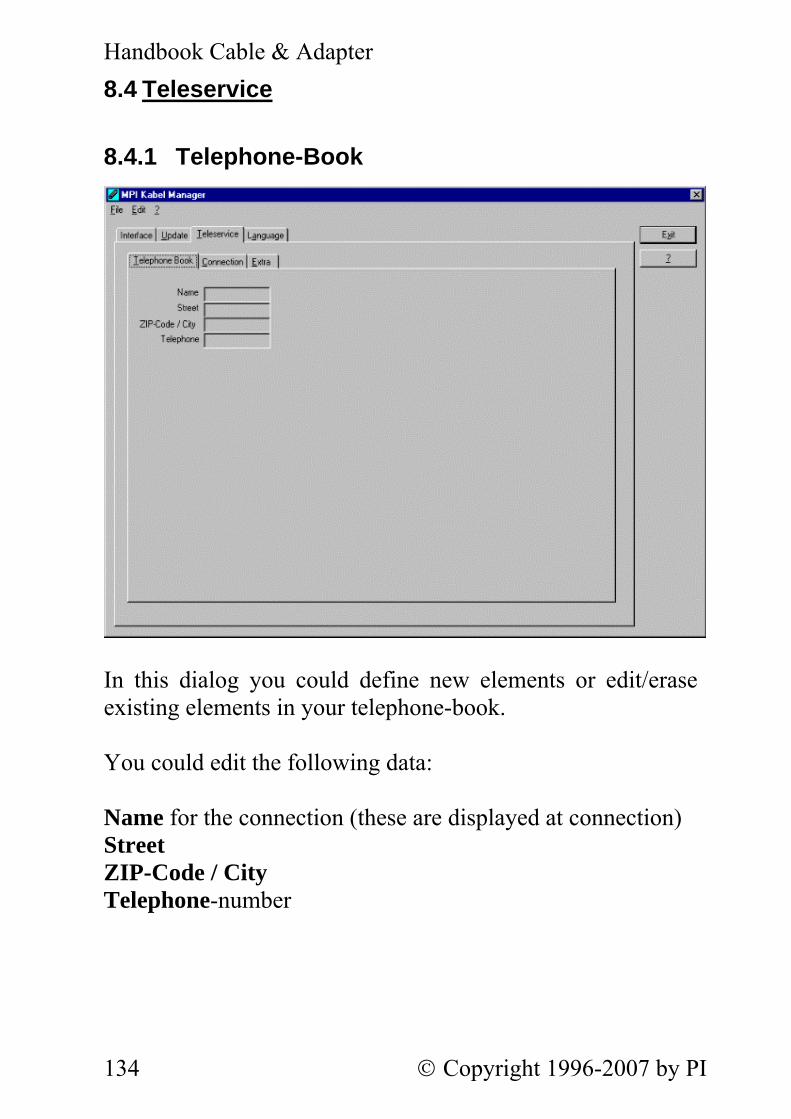
Handbook Cable & Adapter
134 © Copyright 1996-2007 by PI
8.4 Teleservice
8.4.1 Telephone-Book
In this dialog you could define new elements or edit/erase existing elements in your telephone-book. You could edit the following data: Name for the connection (these are displayed at connection) Street ZIP-Code / City Telephone-number
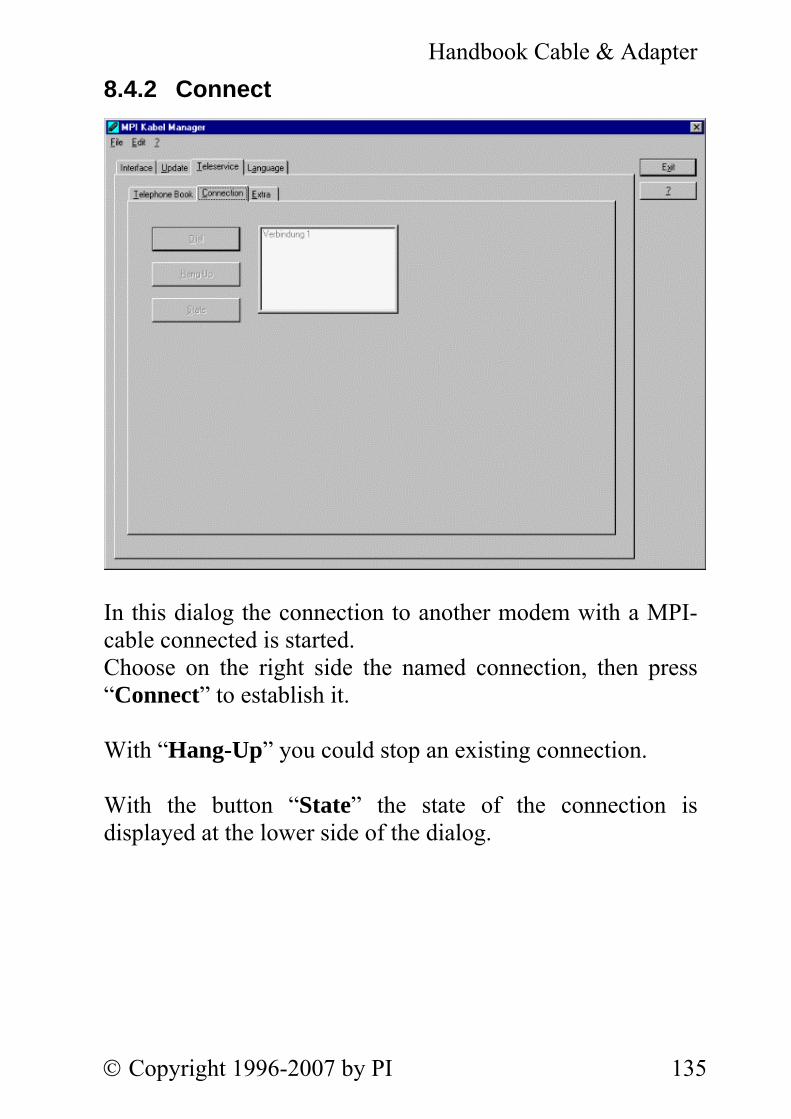
Handbook Cable & Adapter
© Copyright 1996-2007 by PI 135
8.4.2 Connect
In this dialog the connection to another modem with a MPI-cable connected is started. Choose on the right side the named connection, then press “Connect” to establish it. With “Hang-Up” you could stop an existing connection. With the button “State” the state of the connection is displayed at the lower side of the dialog.

Handbook Cable & Adapter
136 © Copyright 1996-2007 by PI
8.4.3 Extra
After selecting the tab „TeleService“ the following dialog is displayed:
If you press the button „Check adapter“ the cable is checked and the state-information is read from the cable. This information is displayed in the following dialog:

Handbook Cable & Adapter
© Copyright 1996-2007 by PI 137
In this dialog, all configuration to the TS-adapter is done. The actual state of the MPI-cable is displayed right of the button “TS-function”, where the following 4 possible messages could appear: “TS-Adapterfunction is NOT active. To activate press TS-function” The MPI-cable acts like an PC-Adapter. There will no answer for TS-specific protocols, the attached modem will not initialised and the baud-rate to the PG/Modem is not fixed. The baud-rate is detected automatically.
Handbook Cable & Adapter
138 © Copyright 1996-2007 by PI
“TS-Adapterfunktion is ACTIVE. To disable press TS-function ” The MPI-cable acts like an TS-Adapter. There will an answer to TS-specific protocols, the adapter could now configured. An attached modem will be initialised and the baud-rate to the modem is fixed. “SNDERR” or “RCVERR” There is a communication error at sending or receiving data from the MPI-cable. Disconnect the MPI-cable from the power supply (PLC). Change to the tab connect and after that back to extra. If the problem remains, check the connection to the MPI-cable, especially the COM-port in the dialog interface.

Handbook Cable & Adapter
© Copyright 1996-2007 by PI 139
8.4.3.1 Setup
In this dialog the used modem, the position of the modem and the timeout of the connection could be configured.
8.4.3.2 TS-function With this button you select the function of the MPI-cable as TS- or PC-adapter. Right of this button the actual state of the MPI-cable is displayed. The state of the MPI-cable could also detected on the LCD-display, if the state is PC-adapter in the middle of the first line „PG“ or „Pg“ is displayed. When the state is TS-adapter you could see in the middle of the first line on the LCD-Display „TS“ or „Ts“.

Handbook Cable & Adapter
140 © Copyright 1996-2007 by PI
8.4.3.3 Adapter configuration
8.4.3.3.1 Network
station-related you could configure if The TS-Adapter is the one and only master in the MPI-bus (he must talk with all passive devices) Which local station-address is used for the TS-Adapter. Please consider that a programming device has normally the number 0, operator panel have 1, PLC’s use 2, FM/CP’s 3 etc. Please: Never use the same station-number for 2 different stations !

Handbook Cable & Adapter
© Copyright 1996-2007 by PI 141
Network-related you could configure:
The transfer-speed on the MPI-bus (for now configure 187,5kBaud or 19,2kBaud!)
The highest station-address in the bus (the less you use, the more performance on the MPI-bus, must be corresponding with the configuration in the PLC’s)

Handbook Cable & Adapter
142 © Copyright 1996-2007 by PI
8.4.3.3.2 Modem
In this dialog you could configure the modem-related setup. The Init-String is composed out of several commands to the modem: AT start command &F use factory settings E0 echo off L1 loudness of speaker is low M1 speaker is on at connection Q0 enables result codes to the DTE V1 enables long-form (verbose) result codes &C1 DCD follows the state of the carrier S0=1 automatic connection after 1 ring

Handbook Cable & Adapter
© Copyright 1996-2007 by PI 143
The Hang-Up-String is composed of 2 elements: +++ change to command-mode AT start command H hang-up connection There are 2 possible calling technics: MFV tone, the telephone-number is transfer by several
frequencies IWV pulse, the telephone-number is transferred with the
count of several pulses on the line When you must a pre-call to establish a call outside your company, you could define it at Outline code. When the modem should wait for a free line, so you should set the corresponding checkbox. At number of retries you could configure the number of retries for a connection before the call is stopped. When using a retry you could choose the seconds which the application should wait between calls.

Handbook Cable & Adapter
144 © Copyright 1996-2007 by PI
8.4.3.3.3 Serial parameter
In this dialog the transfer-rate between modem and TS-Adapter is selected. The transfer-rate could chosen between those values: 2400, 4800, 9600, 19.2k, 38.4k, 57.6k, and 115.2kBaud The Parity could be chosen, but this is modem-dependant because some modems could not transfer the parity-bit: None (no parity-check) Odd (the numbers of one-bits are odd) Even (the numbers of one-bits are even)

Handbook Cable & Adapter
© Copyright 1996-2007 by PI 145
8.4.3.3.4 Password
The access over a telephone-line on the PLC could be configured in this dialog.. The administrator could change the configuration over a telephone line, where the 2 user could not change the configuration.

Handbook Cable & Adapter
146 © Copyright 1996-2007 by PI
The user-Name is max. 8 chars long. Every user and the administrator could use a password which is used to log into the PLC over a telephone-line. After 3 wrong retries the connection is hanged up, so you must call again (Not so with an original TS-adapter). After changing the password for one user/administrator you must re-type it again correctly before it is used. In call-back-number you could define a telephone-number which is used for call-back from the TS-adapter. After you connect with the TS-adapter, you are asked for your user-name and password. When the correct password and user-name is transferred, the connection is hanged-up and the TS-adapter is calling back this configured call-back-number.

Handbook Cable & Adapter
© Copyright 1996-2007 by PI 147
8.4.3.4 GSM / ISDN /SMS
8.4.3.4.1 GSM-Modem
PIN PIN-Number of the SIM-Card, up to 8 numeric chars, (only for TELE-SERVICE GSM). With the Button „Provider“ the provider could be choosen.. Reading of the list of providers could be elapse more than a minute. At end the possible provider are listed for selection. With „Automatic“ the GSM-Modem tries to connect automatically to a provider. On the right side of the button, the actual used selection is displayed.

Handbook Cable & Adapter
148 © Copyright 1996-2007 by PI
Display Description Automatic The Provider is automatically searched and
selected from the GSM-Modem. Manual The Provider is selected manually from the
GSM-Modem no network registered
No connection to the GSM-network, the recieve-quality is too bad
set format The format of the provider is set manual/ automatic
The modem tries to select manually the provider, if this fails an automatic search is done
unknown Unknow response from GSM-Modem Beneath the button „Refresh“ which reads from the Modem the recieve quality, the quality is displayed. Display Description Unknown Unknown state of the GSM-network no registration: The modem is not registered in the
GSM network, no provider found registration denied: Registration in the GSM-network is
denied Search network: In Search for a GSM-Provider GSM: Attached to GSM GSM(ROAMING) Attached to GSM, but with a Roaming-
Partner.This could lead to high costs!

Handbook Cable & Adapter
© Copyright 1996-2007 by PI 149
The Receive Quality is displayed, also as value together with the bit-error-rate. Value Description 99 No network, no receive 00 Very,very bad receive-quality 01 Very bad receive-quality 02 bis 09 Bad receive-quality 10 bis 17 Medium receive-quality 18 bis 25 Normal receive-quality 26 bis 30 Good receive-quality 31 Best receive-quality 8.4.3.4.2 ISDN-Modem

Handbook Cable & Adapter
150 © Copyright 1996-2007 by PI
Type Choose the type of the ISDN-network switch: AT&T 5ESS Nothern Telecom DMS-100 EuroISDN NET3 (Standard) INS64 US NI-1 VN4 DN/MSN Directory Number resp. Muliple Subscriber Number Is used for both ISDN-channels. When using the number 255 no DN/MSN is used. Protocol Choose the transfer-protocol-type: Modem-like V.120 X.75 (Standard) ML-PPP SoftBonding HDLC CLEAR

Handbook Cable & Adapter
© Copyright 1996-2007 by PI 151
8.4.3.4.3 Analog-Modem
You could choose the Location of the Modem. 8.4.3.4.4 Messages The possible error conditions for the modem, mpi-bus-problems or other problems are displayed in this text-field. Firstly, the modem-related information is shown: Message Modem ready Modem error No dialtone detected no answer from modem Modem detects ring End of Connection Modem connected No carrier detected from modem Phone-line or telephone busy

Handbook Cable & Adapter
152 © Copyright 1996-2007 by PI
Phone-number is blacklisted in modem Phone-number delayed. Access denied for 1 minute. Fax-call detected Data-call detected unknown error The selected direct-access-number not configured The configured PIN-Number is wrong for the inserted SIM-Card The SIM-Card is not or wrong inserted or the SIM-Card is a 5V Type Following the possible MPI-Bus error-messages Message MPI/Profibus-Configuration erroneous Timeout at MPI/Profibus detach from device. The local station-address is used twice in the MPI/Profibus. A20/M20/TC35 Modem The MPI/Profibus is not correctly configured The HSA is not configured optimal The MPI/Profibus-Baudrate is not detectable Overflow in the internal MPI-Readbuffer Overflow in the internal LAN-Readbuffer Overflow in the serial Buffer The selected MPI/Profibus-Baudrate is wrong Overflow in internal LAN-Writebuffer LAN-Recieve-Error LAN-Send-Error The PD-Numberr is wrong The transfered SAP is wrong/unknown ErrCode 01: The Destination address (XXX) of a Stateprotocol > 127 detected.In the MPI/Profibus-Bus there are no stations possible which stationnumber is

Handbook Cable & Adapter
© Copyright 1996-2007 by PI 153
greater as 127. (FC=YYh) ErrCode 02: At state-protocol the Source-Adress is detected as 127 . This is the Broadcast-address which is not possible. ErrCode 03: Es wurde ein Statusprotokoll empfangen dessen Zieladresse (XXX bzw. YYY) gar nicht im MPI-Bus vorhanden ist. (FC=ZZh) ErrCode 04: Es wurde ein Statusprotokoll von XXX empfangen, in dessen Funktionscode (YYh) das Bit 7 gesetzt ist. Dieses Bit ist per Spec. auf 0 zu setzen. ErrCode 05: Es wurde ein Statusprotokoll von XXX empfangen, der Funktionscode (YYh) bedeutet aber das der Teilnehmer nicht bereit ist in den Bus zu gehen. ErrCode 06: Unbekannter Funktionscode von XXX im Statusprotokoll empfangen (FC=YYh) ErrCode 11: Es wurde ein Datenprotokoll von einem nicht im Bus befindlichen Teilnehmer (XXX) an das Kabel gesendet. Zum Senden von Daten muß aber der Teilnehmer das Token erhalten. (SSAP=YYh, FC=ZZh,Länge=UUU) ErrCode 12: Datenprotokoll mit Source-adresse 255 (Broadcast) ist unsinnig (CPU=XXX,SSAP=YYh,FC=ZZh,Länge=UUU) ErrCode 13: Es wurde ein Datenprotokoll von einem nicht im Bus befindlichen Teilnehmer an das Kabel gesendet. Zum Senden von Daten muß aber der Teilnehmer das Token erhalten. (CPU=XXX,SSAP=YYh,FC=ZZh,Länge=UUU) ErrCode 14: Bit 7 im Funktionscode gesetzt, laut Spec. Muß selbiges 0 sein. (CPU=XXX,SSAP=YYh,FC=ZZh,Länge=UUU) ErrCode 15: Obere 4 Bit des Funktionscode im empfangenen Datenprotokoll sind falsch/unbekannt. (CPU=XXX,SSAP=YYh,FC=ZZh,Länge=UUU)

Handbook Cable & Adapter
154 © Copyright 1996-2007 by PI
ErrCode 16: Unbekannter Funktionscode an das Kabel gesendet. (CPU=XXX,SSAP=YYh,FC=ZZh,Länge=UUU)ErrCode 17: Ziel-SAP sind bis 3Fh bei Datenprotkollen definiert.(CPU=XXX,SSAP=YYh,FC=ZZh,DSAP=UUh) ErrCode 18: Quell-SAP sind bis 3Fh bei Datenprotkollen definiert. (CPU=XXX,SSAP=YYh,FC=ZZh,SSAP=UUh) ErrCode 19: Empfang eines Datenprotkolls mit Ziel-SAP=0, Verbindungsaufbau von anderem Bus-Teilnehmer mit unserem Kabel. (CPU=XXX,SSAP=YYh,FC=ZZh,DSAP=UUh) ErrCode 1A: Teilnehmer senden Daten an unser Kabel welche als Quell-SAP 0 haben, das heißt der Teilnehmer hat vorher keinen Verbindungsaufbau gemacht oder die ausgehandelte SAP verloren. (CPU=XXX,SSAP=YYh,FC=ZZh,DSAP=UUh) ErrCode 1B: Datenprotokoll empfangen, Daten-funktionscode unbekannt. (CPU=XXX,SSAP=YYh,FC=ZZh,DFC=UUh) ErrCode 1C Datenprotokoll empfangen, Daten-funktionscode unbekannt. (CPU=XXX,SSAP=YYh,FC=ZZh,DFC=UUh) ErrCode 1D: Es wurde ein StatusProtokoll mit gesetzten Fehlercode empfangen. (CPU=XXX,FPGA=YYh,RAM=ZZh) ErrCode 1E: FPGA hat einen interrupt ausgelöst obwohl keine Daten vorhanden. (SD1=XXh,SD1=YYh,CPU=ZZZ,FC=UUh) ErrCode 20: unbekanntes Protokoll bei PPIMUltimaster. (FC=XXh,Länge=YYY) ErrCode 21: unbekannte Baudrate bei PPIMultimaster (Baudrate=XXh) After that additional hints are displayed. 8.4.3.4.5 SMS-Processing SMS Switches Processing OFF / Only Receive /

Handbook Cable & Adapter
© Copyright 1996-2007 by PI 155
Only Send / Receive and Send. Attention: before setting ON check Configuration, after activating the device will go into the MPI-BUS and tries to connect to the defined PLC.Receive of SMS only with TELESERVICE-GSM TS local station-address (should not be used twice in the MPI/Profibus!) CPU from this station-address the Flagword and Data-block is accessed for communication MW communication-flagword (the first byte is the command, the second is the state). Use even operand-addresses. DB communication-data-block. Provider 1/2/3/4 Configure the SMS-Provider to use, including type, phone-number and char-code.
8.4.3.5 Import configuration With this button you could import the parameter from an ASCII-file. This file is compatible to the original file-format.
8.4.3.6 Export configuration With this button you could export the parameter to an ASCII-file which has the same file-format as the original.

Handbook Cable & Adapter
156 © Copyright 1996-2007 by PI
8.5 Tuning
This tab is only used in some special cases. If you press the button „Check Adapter“ the cable is connected und after that the following dialog is displayed:

Handbook Cable & Adapter
© Copyright 1996-2007 by PI 157
There are the following configuration possible, they will be transferred to the MPI-Cable by pressing the button „Übertragen“. The configuration is saved permanently in the Flash-ROM: Time to send At ProTool RT the communication could break down, because the MPI- Cable is transferring the answer- protocol to fast. In this property you could insert a time in 0.1ms ticks. Insert at first 300, to great values are preventing the communication. HMI-Cable-Version Some Touch-panels have the problem, that when they get a wrong version-information they never retry to connect (and then the correct version is transferred). In this case

Handbook Cable & Adapter
158 © Copyright 1996-2007 by PI
the HMI-version-information could be transferred immediately. A20-Terminal When using the A20 or M20- Terminal, the control-lines on the serial port are not used., in that case the tele-service-function is not working. With this property the control-lines are no longer used and therefore the A20/M20 can communicate over tele-service. Bootconfiguration Normally the MPI-Cable automatically selects the correct bus-type, no changes are needed. In special-cases the MPI-Bus could be selected as PPI. For example: This application and the PLC are powered on at the same time. The application is communicating immediately with the cable, the PLC is booting, in this case the MPI-Bus is not driven. The MPI-Bus is erroneous, so no communication is starting. If this occurs you could choose, that the cable is working as MPI-Adapter only.. Language You could select the language which is used from the cable (German or English)

Handbook Cable & Adapter
© Copyright 1996-2007 by PI 159
8.6 Connection of a TS-Adapter
The connection of the TS-adapter is done like shown in the next picture:
The adapter which is used between TS-adapter and modem could be bought as an attachment from us. The pinning of this adapter is: MODEM MPI-cable 9pol.Sub-D, male 9pol.Sub-D, male
The shield is connected at both Sub-D metal casing
Handbook Cable & Adapter
160 © Copyright 1996-2007 by PI
8.7 Update over Tele-Network
The update of versions before V1.41 from the green cable is not possible with this software! The green cable must be changed at our company in hardware! The connection of the Tele-Network looks like shown in the next picture:
To perform an update over the telephone line you should do the following Steps: Connect the two Tele-Network-modems (make a call) At the PG-Tele go to menu „special/transparentmode“ Define the source-COM as: PG,19200,8,O,2 Define the destination-COM as: AG,19200,8,O,2 Go to a DOS-Box or under MS-DOS in the directory where the MPI-cable-manager is located

Handbook Cable & Adapter
© Copyright 1996-2007 by PI 161
Start the batch file with the serial COM-Port as parameter: LD.BAT 1 for COM1 LD.BAT 2 for COM2 The Update has 3 Steps, do not disconnect the phone-line while the update is in progress (it causes the lost of all data)! The end of the update is signaled !

Handbook Cable & Adapter
162 © Copyright 1996-2007 by PI
8.8 Connecting the A20 Terminal
The A20 Terminal (M20) is a GSM - Modem/Handy which transfers data over the GSM - network. To connect to a A20 terminal over the tele-service you must do the following: 1.) The operating system of the MPI-cable must V1.67ff 2.) The operating system of the A20 Terminal must V4.2ff 3.) The MPI-cable must configured in A20-Terminal mode.
In the tab „Tuning“ setting the checkbox „A20 Terminalmode“ and transferring do the job.
4.) The modem-init-string must be changed (erasing „&C1“): From: AT&FE0L1M1Q0V1&C1S0=1 To: AT&FE0L1M1Q0V1S0=1 5.) The TeleService - software V5.0ff must be Installed 6.) In S7-Manager (V5.0ff) under „Extras/PG-PC Interface“ must the driver „TS-Adapter“ be selected 7.) In the properties must be selected the „modem“. 8.) In S7-Manager choose the menu point „Extras/TeleService“. 9.) In the TeleService - Manager under „Extras/Properties“ the „Timeout QVZ/Chars“ must be „5000/4000ms“. 10.) Between A20 Terminal and MPI-cable must be a TS – Adapter connected (no standard – changer !).

Handbook Cable & Adapter
© Copyright 1996-2007 by PI 163
8.9 Siemens-Original-Software and MPI/PPI/HMI/TS-Adapter with 115200 Baud
To use the higher baud-rates over 38,4kbaud on the PC-side the following dependencies must be present: 1.) The MPI-Adapter needs the operating system V1.77 or higher (update with MPI-cable-manager) 2.) The S7-software needs V5.0 with ServicePack 3 or higher from Siemens) 3.) The driver PC-Adapter“ in the S7-Manager under „Extras / PG/PC-Interface“ should be selectable. (installation of this driver) The MPI-Speed-driver must be installed (on our homepage at www.tpa-partner.de, in MPI-cable) After that the driver „MPI/PPI/HMI/TS - Adapter 57k6/115k2 Baud“ in „Extras / PG/PC-Interface“ is selectable and under the properties of this driver you could choose the higher baud rates:

Handbook Cable & Adapter
164 © Copyright 1996-2007 by PI
In this dialog are all possible settings at one place: COM-Port serial interface at which the MPI/PPI-adapter is connected Transferspeed You could choose between the following baud rates: 19200 Baud 38400 Baud (Default) 57600 Baud (only MPI -adapter) 115200 Baud (only MPI-adapter) PG/PC is only Master This setting should always switched OFF. Station-address This is the local station-number of the MPI/PPI-adapters. Each member in an MPI/Profibus must have a different number, which could
edited in this field. Default is 0. Timeout Protocol-timeout, there are the following values possible: 10s 30s (Default) 100s MPI-Bus This is the transfer speed at the MPI/Profibus. The default is 187.5kBaud, the MPI/PPI-adapter could also use 19200 Baud
(S7-300/400 as master and S7-200 as Slave)

Handbook Cable & Adapter
© Copyright 1996-2007 by PI 165
highest station-address This is the highest possible station-address at the MPI/Profibus. All higher station-numbers are not linked in the bus.
8.9.1 MPISpeed-TrayIcon
If the system detects a Siemens-Version V5.1 ServicePack 2 or higher, a little TrayIcon is additionally installed, which shows the state of the driver.:
MPISpeed is yet NOT active or
MPISpeed is yet ACTIVE With a right Mouse-click a Sub-Menu is displayed:
Öffnen Opens a window which shows the state and properties of the driver.. RUN The MPI-Speed-Driver is always active, even when the S7-application is not loaded. STOP The MPI-Speed-Driver is never active.

Handbook Cable & Adapter
166 © Copyright 1996-2007 by PI
AUTO The MPI-Speed-Driver is activated, when the original S7-application is started and the driver „MPI-Speed 57/115kBit/s“ is selected Beenden Exits this application. A double-click on the MPISpeed-TrayIcon or selecting „Öffnen“ in the menu, the state-window is opened:
In this window the following information’s are displayed: MPI-Speed Shows the actual selection: „IMMER EIN“ MPI-Speed is active „IMMER AUS“ MPI-Speed is never active „wenn S7 gestartet“ MPI-Speed is active when S7 is started. S7-Manager only displayed when the selection is „AUTO“. „AKTIV“ S7 runs and MPI -Speed is selected as Driver „aktiv“ S7 runs but another driver is selected „nicht aktiv“ S7 is NOT running Baudrate used Baudrate Interface used COM-Interface

Handbook Cable & Adapter
© Copyright 1996-2007 by PI 167
The menu has the following points: Schließen Closes the state-window. RUN The MPI-Speed-Driver is always active, even when no original S7-application is running. STOP The MPI-Speed-Driver is never active. AUTO The MPI-Speed-Driver is activated automatically, when the original S7-application is running and the driver „MPI-Speed 57/115kBit/s“ was selected. Beenden Exits this application.

Handbook Cable & Adapter
168 © Copyright 1996-2007 by PI
9 PG-COM / PG-UNI / PG-UNI-II
(CONVERTER RS232-TTY)
The PG-COM, PG-UNI and the PG-UNI-II connect the unit PC about the serial interface (COM 9-pol) with the PG-Port of a Siemens SIMATIC-S5 (TTY/20mA).
9.1 Operatin Instruction
The PG-COM uses the 5VDC-powersupply of the Siemens PLC to supply of the internal electronics of the cable.
The PG-UNI and the PG-UNI-II however uses the 20mA-current sources of the Siemens PLC around to produce the power supply of the internal electronics.
The PG-UNI-II is a further advancement of the PG-UNI. The difference is, that in the PG-UNI-II is integrated for the supervision of the interface-communication two LED’s. The PG-UNI-II is protected against ESD shocks and the SUB-D plug casing is a metal casing. In fact of this, the PG-UNI-II is made to work in a harsh environment.
green LED: Communication to the RS232-interface yellow LED: Communication to the TTY-interface

Handbook Cable & Adapter
© Copyright 1996-2007 by PI 169
9.2 Circuit diagram PG-COM
PC (RS-232) PLC o.e. (TTY) 9-pin female 15-pin male RXD (2) (7) TTY OUT -
Vcc (6) TTY OUT +(3) +5V (14) +5V (9) TTY IN + (2) TTY IN - (5) Ground (12) Ground (15) Ground
Ground (5) TXD (3)
Order description PG-COM (3m) Art.Nr. 9359 PG-COM (5m) Art.Nr. 9359.05m PG-COM (10m) Art.Nr. 9359.10m PG-COM (15m) Art.Nr. 9359.15m (15m is the maximum length of the PG-COM. You can’t get delivered a longer cable in any way).

Handbook Cable & Adapter
170 © Copyright 1996-2007 by PI
9.3 Circuit diagram PG-UNI
PLC o.e. (TTY) PC (RS-232) 9-pin female 15-pin male
(10) Ground (12) Ground (11) 20 mA
Ground (5)
(6) TTY OUT +RXD (2)
(13) 20 mA (9) TTY IN + (2) TTY IN - TXD (3)
(7) TTY OUT -
Vcc
Order description PG-UNI (10cm) Art.Nr. 9359-3.10C PG-UNI (3m) Art.Nr. 9359-3 PG-UNI (5m) Art.Nr. 9359-3.05m PG-UNI (10m) Art.Nr. 9359-3.10m (for greater lengths of the PG-UNI-cable see point 10 page 172)

Handbook Cable & Adapter
© Copyright 1996-2007 by PI 171
9.4 Circuit diagram PG-UNI-II
PLC o.e. (TTY) PC (RS-232) 9-pin female 15-pin male
(10) Ground (12) Ground (11) 20 mA
Ground (5)
(6) TTY OUT + RXD (2)
(13) 20 mA (9) TTY IN + (2) TTY IN - TXD (3)
(7) TTY OUT -
Vcc
LED yellow
LED green
Order description PG-UNI-II (3m) Art.Nr.9359-2 PG-UNI-II (5m) Art.Nr.9359-2.05m PG-UNI-II (10m) Art.Nr.9359-2.10m (for greater lengths for the PG-UNI-II see point 10 page 172)

Handbook Cable & Adapter
172 © Copyright 1996-2007 by PI
10 Prolongation of PG-UNI and PG-UNI-II
It is possible with the PG-UNI-prolongation, to prolongate the PG-UNI up to 300m at the TTY side. You can prolongate on the same way the PG-UNI-II, too.
Order Description PG-UNI-Verlängerung Art.Nr. 9390 (PG-UNI-prolongation)
PG-UNI + Verlängerung Art.Nr. 9359-3 + 9390 (PG-UNI-prolongation)
PG-UNI-II + Verlängerung Art.Nr. 9359-2 + 9390 (PG-UNI-II + prolongation)
11 UNI-prolongation-set
The UNI-Verlängerungsset (UNI-prolongation-set) contains the complete material (without prolongation cable) which is necessarily for the making of a UNI-prolongation. A corresponding wiring diagram for the soldering to the SUB-D plugs is enclosed. Recommended cable: 2x2x0,25mm2 in twisted pairs with shield.
Order Description PG-UNI-Verlängerungsset Art.Nr. 9359-7 (PG-UNI-prolongation-set)
12 PG-USB
The PG-USB is a active cable for connecting a Siemens X4/X5-Port to the PC USB-Port. The cable needs no external

Handbook Cable & Adapter
© Copyright 1996-2007 by PI 173
supply to work. It takes its power out of the PC. This supply is also be used to make the cable active on his PLC-side. The cable is be connected to the 15pin TTY port of the PLC or CP and is connected to the PC USB-Port. The software-driver are run able for Windows 98, Me and WIN2000. The driver is not certified for Windows XP, but do only ignore the messages doing installation. The communication with this cable uses a virtual COM-port. Only original 32bit-programms can work with this driver.
12.1 Pinning
PLC (TTY) PC (RS-232) USB-Jack type A 15-pin male D-Sub
(6) TTY OUT +USB (3) D+
(9) TTY IN + (2) TTY IN -
USB (2) D- (7) TTY OUT -
Converter
USB TTY
USB (1) +5V USB (4) GND LED
GreenTxD
LED Orange
RxD
PG-USB (3m) Art.Nr. 9359-1
12.2 PG-USB-prolongation
The PG-USB is active on his PLC-side. To increase the lengthening, you need only a 4 wire cable. You must connect the following pins: 2-2/6-6/7-7/9-9. Both shielding-sides

Handbook Cable & Adapter
174 © Copyright 1996-2007 by PI
should be connected at the metal-case of the SUB-D-plug. Recommended cable: 2x2x0,25mm2 in twisted pairs with shield. Maximum length: 100m.
12.3 Driver-Installation
The cable would be connected to your pc to a free USB-Port for first time. Your PC specially your OS recognises the cable and looks for the correct driver. Please give for the OS the DemoCD for source. Your OS recognises the data for installation and install the correct driver. Follow the parameters of the driver for installation. After installation of the driver, you should select in your PC DeviceManager „View Devices By Type“ „Ports (COM & LPT)“ the USB serial port. Click properties, select port settings and change the parameters to following: Bits per second: 9600 Data: 8 Parity: Even Stop bits: 2 Protocol: No These parameters are active, after closing this dialog. Please change in your application the COM-Port to the virtual COM-port, so you can work with this driver.
Handbook Cable & Adapter
© Copyright 1996-2007 by PI 175
12.4 Original-S5 in a MS-DOS-Box
Because the Original-S5 is running in a MS-DOS-Box, a special installation is needed. Inserting the Mega-Toolbox CD, there will be starting a little application, which displays the following dialog:
Click on PG-USB to expand the menu. Click on „S5 Patch“ to start the installation assistant which guides you through the driver installation.

Handbook Cable & Adapter
176 © Copyright 1996-2007 by PI
Choose the desired language. Select the PG-USB cable and confirm with „OK“. Press „Install“ and choose the folder where the S5 software is installed. The installation routine is now searching for the S5 software. Next you have to select the used COM port. Then the S5 patch will be installed. Press „End“ as soon as the installation is completed. Attention: For the Step5-Original application there must be one COM1 to COM4 selected. If necessary change the COM port. Go to the Control Center, select “System”. In the Tab “Hardware“, click button „Device manager“. In the Device-Manager the virtual COM-Port is listed in the section “Interfaces (COM and LPT)”, Right click „USB Serial Port (COMx)“, in the Context Menu choose “Properties”. In the following dialog select the tab „Port Settings“. Click onto the button „Advanced“, in the next dialog you could choose the COM-Port.

Handbook Cable & Adapter
© Copyright 1996-2007 by PI 177
12.5 Driver for Windows 98
Under Windows 98 could not access directly a virtual COM-Port out of a MSDOS-Box like XP or 2000. Therfore a additionally driver-installation „S5VCOM for Win98“ is needed.
12.5.1 Installation
1.) Connect the PG-USB - Cable to your PC on an USB-Port. 2.) If not done yet, install the Driver for the PG-USB Cable (Accessing the S5-PLC from Windows-Applications 3.) Test the connection to the S5-PLC with a Windows-application (f.e. PG2000 from this CD) 4.) Start the application SETUP.EXE from the Installation-CD for „S5VCOM für Win98“ 5.) Select the Installation-Path click Next 6.) Select the Name of the Startmenu click Next 7.) After the End of the Installation the PC must be rebootet S5 VCOM is installed into the Autostart-Directory and is started every time the PC boots.

Handbook Cable & Adapter
178 © Copyright 1996-2007 by PI
12.5.2 Deinstallation
1.) in “Start Properties Settings“ click on Software 2.) select „S5 VCOM für Win98“ and click on “change/delete“ 3.) Do you really want to delete the application, click “Yes“ 4.) If not used any more, you could deinstall the driver for the PG-USB Cable „FTDI USB<->Serial“ 5.) Reboot your PC (recommended)
12.5.3 Configuration / Start
After Installation and rebootof the PC, the S5VCom-Driver will start automatically. If an error occurs while Installation or Starting of driver, a message is shown. If correctly installed, on the bottom-right Corner of the Screen a new Tray-Icon is displayed:

Handbook Cable & Adapter
© Copyright 1996-2007 by PI 179
This Tray-Icon shows, if a PG-USB-Cable is connected or not, and if a communication is in progress:
PG-USB Cable is not connected or detected
PG-USB Cable is conncted, but no communication
PG-USB Cable is connected, the interface is communicating S = Sending (from PC to S5) E = Reciever (from S5 to PC) If you double-click on the Tray-Icon a new Dialog is displayed:
In the section State is displayed which Interface-Cable is used for communication and if a connection exists. In the section virtual Port the following information is shown:

Handbook Cable & Adapter
180 © Copyright 1996-2007 by PI
On the left side is the COM - Port which is used from Windows-Software (You could choose this COM-Port in the Settings under „System/Hardware/Device Manager/COM and LPT-Interface “ at „USB Serial Port/Properties/Extend“.
On the right side is the COM-Port (IO-Ports) of the MS-DOS Box shown. This COM-Port should selected in the S5-Software.

Handbook Cable & Adapter
© Copyright 1996-2007 by PI 181
According which COM - Ports already exists, the next free COM-Port will be used: existing COM from S5VCOM used NONE COM1 [03F8h,IRQ4] COM1 COM2 [02F8h,IRQ3] COM2 COM1 [03F8h,IRQ4] COM1,COM2 COM3 [03E8h,IRQ4] COM1,COM3 COM2 [02F8h,IRQ3] COM2,COM3 COM1 [03F8h,IRQ4] COM1,COM2,COM3 COM4 [02E8h,IRQ3] In the section Program you could exit the application, change the language of the application or minimize to the tray-icon.
12.5.4 Frequently asked questions
Trying to execute the Installation a message is displayed, which states that this software is not installed under Windows XP/NT/2000. The S5VCOM-Driver is ONLY needed for Windows 95/98/Me. The other Operating Systems like Windows XP/2000 has this driver built-in and we don’t need it then. There is a message displayed, that the PG-USB-Driver is not installed The S5VCOM-driver use the normal Windows-driver for the PG-USB Cable, so this driver must be installed before this S5VCOM-Driver. Connect the PG-USB Cable in an USB-Port and follow the Installation- Instructions. (This driver is on the CD)

Handbook Cable & Adapter
182 © Copyright 1996-2007 by PI
While copying the files to the hard-disk an error-message is displayed which states that copying is not possible This could be several Causes. Eventualy you have too less disk-space or the application is already installed or the Tray-Icon is already running After restart of the PC a message is displayed which states that the file Settings.ini could not be opened. The settings are saved in this file in the Installation- driectory of the S5VCOM-driver. If this file does not exists, it will be created at exit of the application or this file is write-protected or you have no write-access to this file After restart of the PC a message is displayed which states that Drive is not loaded and the Tray-Icon is closed. There is no usefull COM-Port founded, so the driver is not loaded.Start a MSDOS Box and type in: „debug <ENTER>“ „d 40:0<ENTER> „ There will be displayed a Hexdump of the BIOS- Configuration (in which the existing COM-Ports also situated) Input „q<ENTER>“ to exit the application:

Handbook Cable & Adapter
© Copyright 1996-2007 by PI 183
In the first 4*2Byte are displayed the existing COM-Ports F8 03 COM1 F8 02 COM2 E8 03 COM3 E8 02 COM4 00 00 Empty (here not existing) In the displayed Snap-Shot there is no free COM -Port If an Empty slot is existing, so only the corresponding IRQ could not be used. COM1 and COM3 use both the same IRQ4 COM2 and COM4 use both the same IRQ3 S5VCOM uses COM3 in the MSDOS-Box, my S5-Software could only use COM1 or COM2 (f.e.: S5 V3.02) Try to switch the existing COM1/2 to COM3/4 (eventualy by Jumper)

Handbook Cable & Adapter
184 © Copyright 1996-2007 by PI
My Windows-Software could not communicate with the PG-USB - Kabel, the setting is correct and the cable works before. There is a message that the COM - Port is used or not accessible. The S5VCOM-Driver opens this COM - Port to communicate even when no MSDOS - Box is opened. The Windows-application want to open the same COM – Port. Exit the S5VCOM-application (Tray-Icon), after that the COM-Port is usable nder Windows, the access out of the MSDOS - Box is then not possible. Restart the application from the AutoStart – directory to reactivate the MSDOS – Box. The Access under Windows and under MSDOS is excluded together ! It don’t works, allthough the driver is loaded and the Tray-Icon is startet. Double-click onto the Tray-Icon, select from the System- Menu „Info about …“:

Handbook Cable & Adapter
© Copyright 1996-2007 by PI 185
A new dialog is displayed, in this dialog the version of the driver is shown. Click with the right Mousekey over the Image, there will pop-up some buttons, click ONLY onto the button VCOMLOG:
Confirm this with "OK". There will be a new file in the Installation-directory from S5VCOM named „VCOM.LOG“, send us this file together with the version and a description of your problem. If your problem could not be solved, call our support.

Handbook Cable & Adapter
186 © Copyright 1996-2007 by PI
13 USB-Serial-Converter
13.1 Description
The USB-Serial-Converter is used to convert serial signals (from the serial end) to a USB interface.
13.2 Driver installation
The installation is equal to the PG-USB driver installation. First insert the SOFTW_TREIBER_CD into your drive and wait until the auto start loads the Mega dialog. If this dialog does not appear within a few seconds please click on mega.exe in the root path of the disc.
Expand the “PG-USB” menu and click on “Plug & Play Installation” to start the driver installation assistant.

Handbook Cable & Adapter
© Copyright 1996-2007 by PI 187
Order Description USB-Serial-Converter Order No. 9350-1-RS232 14 Adaptors for PG-UNI / PG-UNI-II / PG-USB
14.1 Netzadapter (not for PG-USB):
The Netzadapter generates the 20mA current sources for the send- and the receive-path at the TTY-interface. (necessary at passive TTY-interfaces as e.g. IP266 and other pieces of equipment without or faulty current sources) The power supply of the Netzadapter is been carried out through 12-24VDC.

Handbook Cable & Adapter
188 © Copyright 1996-2007 by PI
14.1.1 Circuit diagram NETZ-Adapter
PG-UNI / PG-UNI-II PLC
15-pin female 15-pin male
Current-source
Current-source
20 mA (11)
20 mA (13)
GND int. (12) (12) GND int. (1-10, 14, 15) (1-10, 14, 15)
Order Description Netz-Adapter Art.Nr. 9359-4

Handbook Cable & Adapter
© Copyright 1996-2007 by PI 189
14.2 PG-ISO-Adapter
The PG-ISO-Adapter generates the 20mA current sources for this send and receive path at the TTY-interface from the Siemens-side-available power supply of 5 and/or 24V. Decoupling up to 1000V.
14.2.1 Circuit diagram PG-ISO-Adapter
PLC 15-pin female 15-pin male
(5) GND int. (12) GND int. (15) GND int. (3) +5V (14) +5V (4) +24V (10) GND int.
20 mA (11) 20 mA (13) GND int. (10)
PG-UNI / PG-UNI-II
(9) TTY IN + (2) TTY IN -(6) TTY OUT +(7) TTY OUT -
TTY IN + (9) TTY IN – (2) TTY OUT+ (6) TTY OUT- (7)
Order Description PG-ISO-Adapter Art.Nr. 9359-8

Handbook Cable & Adapter
190 © Copyright 1996-2007 by PI
14.3 CP525-Adapter
The CP525-Adapter connects the PG-UNI / PG-UNI-II with the PG-Port from a CP525. (For the connection at other CP assemblies see release table point 14.)
14.3.1 Plug design
PG-UNI / PG-UNI-II-side: 15pol. SubD-female with locking bolts CP-side: 25pol. SubD-male with sliding coupling Order Description CP-525-Adapter Art.Nr. 9359-5
14.4 CP525-Adapter for PG-USB
The CP525-Adapter connects the PG-USB with the PG-Port from a CP525. (For the connection at other CP assemblies see release table point 12.)
14.4.1 Plug design
PG-USB-side: 15pol. SubD-female with locking bolts CP-side: 25pol. SubD-male with sliding coupling Order Description CP-525-Adapter for PG-USB Art.Nr. 9359-5-USB

Handbook Cable & Adapter
© Copyright 1996-2007 by PI 191
14.5 CP525-K-Adapter
The CP525-K-Adapter connects the PG-UNI / PG-UNI-II with the Communication-Port of a CP525. This adapter is also suitable for following assemblies: CP524, SAS523/525.
14.5.1 Plug design
PG-UNI / PG-UNI-II-side: 15pol. SubD-female with locking bolts CP-side: 25pol. SubD-male with sliding coupling Order Description CP-525-K-Adapter Art.Nr. 9359-5K
14.6 CP525-K-Adapter for PG-USB
The CP525-K-Adapter connects the PG-USB with the Communication-Port of a CP525. This adapter is also suitable for following assemblies: CP524, SAS523/525.
14.6.1 Plug design
PG-USB-side: 15pol. SubD-female with locking bolts CP-side: 25pol. SubD-male with sliding coupling Order Description CP-525-K-Adapter for PG-USB Art.Nr. 9359-5K-USB

Handbook Cable & Adapter
192 © Copyright 1996-2007 by PI
14.7 SINUM-Adapter
The SINUM-Adapter connects the PG-UNI-cable with a SINUMERIK.
14.7.1 Plug design
PG-UNI /PG-UNI-II-side: 15pol. SubD-female with locking bolts Sinumerik-side: 25pol. SubD-male with sliding coupling Order Description Sinum-Adapter Art.Nr. 9359-6
14.8 SINUM-Adapter for PG-USB
The SINUM-Adapter connects the PG-USB-cable with a SINUMERIK.
14.8.1 Plug design
PG-USB-side: 15pol. SubD-female with locking bolts Sinumerik-side: 25pol. SubD-male with sliding coupling Order Description Sinum-Adapter for PG-USB Art.Nr. 9359-6-USB
Handbook Cable & Adapter
© Copyright 1996-2007 by PI 193
14.9 AG150-Adapter
The AG150-Adapter connects the PG-UNI / PG-UNI-II with a AG150-Simatic (AS511). PG-UNI / PG-UNI-II only in connection with the Netzadapter, because the interface port of the AG150 is passive.
14.9.1 Plug design
PG-UNI / PG-UNI-II-side (Netzadapter-side): 15pol. SubD-female with locking bolts PLC-side: 25pol. SubD-female with sliding coupling Order Description AG-150-Adapter Art.Nr. 9359-5-150
14.10 AG150-Adapter for PG-USB
The AG150-Adapter connects the PG-USB with a AG150-Simatic (AS511).
14.10.1 Plug design
PG-USB-side: 15pol. SubD-female with locking bolts PLC-side: 25pol. SubD-female with sliding coupling Order Description AG-150-Adapter for PG-USB Art.Nr. 9359-5-150-USB

Handbook Cable & Adapter
194 © Copyright 1996-2007 by PI
14.11 WF470-Adapter
The WF470-Adaper connects the PG-UNI / PG-UNI-II with a WF470. PG-UNI / PG-UNI-II only in connection with the Netzadapter, because the interface-port of the WF470 is passive.
14.11.1 Plug design
PG-UNI / PG-UNI-II-side (Netzadapter-side): 15pol. SubD-female with locking bolts WF470-side: 25pol. SubD-female with sliding coupling Order Description WF470-Adapter Art.Nr. 9359-5-WF470
14.12 WF470-Adapter for PG-USB
The WF470-Adaper connects the PG-USB with a WF470.
14.12.1 Plug design
PG-USB-side: 15pol. SubD-female with locking bolts WF470-side: 25pol. SubD-female with sliding coupling Order Description WF470-Adapter for PG-USB Art.Nr. 9359-5-WF470-USB

Handbook Cable & Adapter
© Copyright 1996-2007 by PI 195
14.13 25pol. PC-Connector (male/female)
The PG-UNI and the PG-COM will be delivered as default with a 9-pol. Sub-D plug. The following variants are offered as special version: - 25pol female (COM2 at standard-IBM comp. PC´s) - 25pol male (e.g. COM1 Siemens PG720) Order Description Zuschlag 25pol.Stecker Art.Nr. 9310 (please indicate if female or male-plug)
14.14 Special Versions
You can allways on every time ask us for speciall versions, adaptors for your cables, for speciall machines. Call us and tell us, what you need, give us the correct pinning, we will proof it and will produce it, if you want.

Handbook Cable & Adapter
196 © Copyright 1996-2007 by PI
15 RELEASE TABLE
Devicetype
PG-UNI + PG-UNI-II PG-USB PG-COM PG-ISO-SET (1000V) = PG-UNI + PG-ISO-Adapter
S5-90U Release Release Release Release
S5-95U Release Release Release Release
S5-100U Release Release Release Release
S5-115U Release with CPU-944 + PG-ISO-Adapter 1)
Release Release Release
S5-135U Release Release Release Release
S5-155U Release Release Release Release
S5-AG110S + AG150-Adapter + NETZ-Adapter
+ AG-150-Adapter for PG-USB-Kabel
- + AG150-Adapter + NETZ-Adapter 2)
S5-AG130W/B + AG150-Adapter + NETZ-Adapter
+ AG-150-Adapter for PG-USB-Kabel
- + AG150-Adapter + NETZ-Adapter 2)
S5-AG150A/K/S/U + AG150-Adapter + NETZ-Adapter
+ AG-150-Adapter for PG-USB-Kabel
- + AG150-Adapter + NETZ-Adapter 2)
CP-143 Release Release - Release
CP-521 + CP521-Adapter - - + CP521-Adapter 2)
CP-523 + CP523-Adapter - - + CP523-Adapter 2)
CP-525 + CP525-Adapter + CP525-Adapter for PG-USB-Cable
- + CP525-Adapter 2)
CP-526 Release Release - Release
CP-527 Release Release - Release
CP-528 Release Release - Release
CP-544 Release Release - Release
CP-5430 Release Release - Release
CP-5431 Release Release - Release
IP-246 Release Release - Release
IP-247 Release Release - Release
IP-252 Release Release Release Release
IP-266 + NETZ-Adapter Release - + NETZ-Adapter 2)
WF-470 + WF470-Adapter + NETZ-Adapter
+ WF470-Adapter for PG-USB-cable
- + WF470-Adapter + Netz-Adapter 2)
SIN-805 + SINUM-Adapter + Sinum-Adapter for PG-USB-Kabel
- + SINUM-Adapter 2)
SIN-810 + SINUM-Adapter + Sinum-Adapter for PG-USB-Kabel
- + SINUM-Adapter 2)
SIN-820 + SINUM-Adapter + Sinum-Adapter for PG-USB-Kabel
- + SINUM-Adapter 2)
SIN-840 + SINUM-Adapter + Sinum-Adapter for PG-USB-Kabel
- + SINUM-Adapter 2)
SIN-850 + SINUM-Adapter + Sinum-Adapter for PG-USB-Kabel
- + SINUM-Adapter 2)
SIN-880 + SINUM-Adapter + Sinum-Adapter for PG-USB-Kabel
- + SINUM-Adapter 2)
Maximum prolongation
300m over UNI-prolongation 100m over PG-USB-prolongation
- 300m over UNI-prolongation
1) At the CPU 944 up to and including year of construction 12.’94 it is necessary to use an ISO-Adapter. 2) The ISO-Adapter cannot be used since the assembly doesn’t deliver the necessary power supply on the PG interface at this constellation.

Handbook Cable & Adapter
© Copyright 1996-2007 by PI 197
16 SC-09
(CONVERTER RS232-RS422/485)
The SC-09 connects the serial interface from a PC (COM 9-pol) with the programming interface from a Mitsubishi-PLC (Fx - and A - Serie). It is possible to connect with the contained adapter PLC’s which has a 25-pol. Sub-D or a 8-pol. Mini-DIN programming port.
16.1 Pin configuration RS232
Pin.Nr. notation signalname In/Out 1 N.C. Not Connectet 2 TXD Transmitted Data Out 3 RXD Received Data In 4 N.C. Not Connectet 5 GND Signal Ground 6 N.C. Not Connectet 7 CTS Clear to Send In 8 RTS Request to Send Out 9 N.C. Not Connectet Shield Shield on GND (Pin 5)

Handbook Cable & Adapter
198 © Copyright 1996-2007 by PI
16.2 Pin configuration RS422/485
Pin.Nr. notation signalname In/Out 1 N.C. Not Connectet 2 TXD+ Transmitted Data + Out 3 RXD+ Received Data + In 4 RTS+ Request to Send + Out 5 CTS+ Clear to Send + In 6 N.C. Not Connectet 7 GND Signal Ground 8 GND Signal Ground 9 N.C. Not Connectet 10 N.C. Not Connectet 11 N.C. Not Connectet 12 VCCin +5V DC Input Voltage In 13 VCCin +5V DC Input Voltage In 14 N.C. Not Connectet 15 TXD- Transmitted Data - Out 16 RXD- Received Data - In 17 RTS- Request to Send - Out 18 CTS- Clear to Send - In 19 N.C Not Connectet 20 connect connection to Pin 21 21 connect connection to Pin 20 22 N.C. Not Connectet 23 N.C. Not Connectet 24 VCCin +5V DC Input Voltage In 25 VCCin +5V DC Input Voltage In Shield Shield on GND

Handbook Cable & Adapter
© Copyright 1996-2007 by PI 199
16.3 Plug design
Mitsubishi PLC: Alternatively 25pol. SUB-D or 8pol.Mini-DIN-connector PC: 9pol. SUB-D female with PC-locking screws Order Description SC-09-Kabel (3m) Art.Nr. 9359.M