manager’s user guide - welcome to mmc e-learning...
TRANSCRIPT

1
KRONOS 5.1 WORKFORCE TIMEKEEPER™
Manager’s User Guide
Version 3.1
Revised: 2/5/09

1
Welcome! This course will provide each participant with the tools needed to learn timekeeping concepts and procedures using the Kronos Workforce Central software suite. By the end of this class you should be able to:
Use and explain Workforce Central (WFC) Data Collection Sources Complete daily and pay period tasks in WFC Understand basic WFC terminology Navigate through the system Use online Help features Review and interpret employee information using Genies Enter and edit employee schedules in WFC Edit individual or numerous employee time and attendance data Approve timecards at the end of each pay period Run and print WFC reports Process timecard totals to the Payroll Dept.

2
Table of Contents Welcome……………………………………………………………...........................…...2
Chapter 1 – Introduction
Chapter Objectives…………………………………………………………....…..8
What is Kronos WFC……………………………………...................................9
Implementation Process………………………………………………….......…10
Frequent Tasks………………………………………………………………......11
Support Model………………………………………………………………....…12
Interface Processes………………………………………………………....…..13
Data Collection Sources………………………………………………....…......14
Time Clock…………………………………………………………………....….15
Time Stamp………………………………………………………………..........16
Configuration in WFC……………………………………………………..……17
Section Review………………………………………………………………....18
Chapter 2 – Navigation
Chapter Objectives...................................................................................20
Navigation.................................................................................................21
Components.............................................................................................22
Elements..................................................................................................23
Navigation Bar..........................................................................................24
Workspace...............................................................................................25
Menus and Dialog Boxes.........................................................................27
Section Review........................................................................................28
Chapter 3 – Genies
Chapter Objectives...................................................................................30
Genies......................................................................................................31
Types of Genies..........................................................................32
Viewing Information within the Genie..........................................33
Selecting Employees within a Genie...........................................33
Navigating between a Genie and the Launch Buttons................34
Section Review...........................................................................35
Chapter 4 - Timecard Basics and Editing
Chapter Objectives...................................................................................37
Timecard Basics and Editing....................................................................38
Selecting Employees................................................................................38
Timecard Grid..........................................................................................39

3
Timecard Menus.....................................................................................40
Totals and Schedule Window View.........................................................41
Accruals...................................................................................................42
Audits Tab...............................................................................................43
Exceptions...............................................................................................44
Timecard Indicators and Colors..............................................................44
Phantom Punches...................................................................................48
HELP.......................................................................................................48
Punches..................................................................................................49
Standard Rounding....................................................................50
Meal Rounding...........................................................................50
Breaks........................................................................................50
Editing Punches.........................................................................51
Information for Managers who Manage WFC............................51
Add Punches..............................................................................52
Add a Same Day Punch................................................52
Add a Missing Punch that Crosses Midnight.................53
Adding and Deleting Rows.........................................................53
Comments..................................................................................54
Attaching a Comment....................................................55
Delete a Punch with a Comment...................................57
Delete a Comment.........................................................57
Editing an Existing Punch...........................................................57
Edit Punch Dialog Box...................................................58
Override a Punch........................................................................59
Cancel a Meal Deduction...............................................60
Pay Codes................................................................................................61
Enter a Comment to a Pay Code................................................61
Delete a Pay Code Amount........................................................62
Enter a Pay Code Amount for a Salary Employee......................62
Holiday Hours (See Appendix F - Automatic Posting of Holiday Hours)
Print a Timecard........................................................................................64
Print a Time Detail Report from the Timecard.............................65
Transfers...................................................................................................66
Labor Account Transfers..............................................................67
Perform a Labor Account Transfer in the Timecard........67
Apply a Labor Account Transfer to an Entire Shift..........68

4
Apply a Labor Account Transfer to a Portion of a Shift......69
Work Rule Transfer.........................................................................71
Apply a Work rule Transaction to an Entire Shift...............72
Adjust an Individual Schedule......................................................................73
Section Review............................................................................................75
Chapter 5 - Group Edits & Approvals
Chapter Objectives.......................................................................................78
Group Edits...................................................................................................79
Approve a Timecard.....................................................................................80
Approve Multiple Timecards.........................................................................80
Group Edit Results.......................................................................................82
Section Review.............................................................................................83
Chapter 6 - Managing Employee Schedules
Chapter Objectives.......................................................................................85
Managing Employee Schedules....................................................................86
Pattern Templates........................................................................................87
How Schedules are Built..............................................................................87
Schedule Editor............................................................................................88
Schedule Grid Totals....................................................................................89
Display Options (View Menu).......................................................................89
Identifying Schedule Indicators.....................................................................91
Basic Schedule Edits....................................................................................92
Shift Window.................................................................................................93
Add a Shift using the Shift Window.................................................94
Delete a Shift...................................................................................95
Edit an Existing Shift.......................................................................95
Schedule a Labor Account Transfer............................................................96
Schedule a Labor Account Transfer for an Entire Shift..................96
Schedule a Labor Account Transfer for a Partial Shift...................99
Work Rule Transfer...................................................................................101
Schedule a Work Rule Transfer for an Entire Shift......................101
Schedule a Work Rule Transfer for a Partial Shift.......................102
On-Call......................................................................................................103
Schedule a Pay Code Amount in Advance...............................................104
Perform a Pay Code Edit.............................................................106
Edit an Existing Pay Code...........................................................107
Scheduling Tools.....................................................................................108

5
Add a pattern to an employee.......................................................108
Add a pattern to multiple employees.............................................110
Section Review...........................................................................................111
Chapter 7 - Running Reports
Chapter Objectives....................................................................................114
Running Reports........................................................................................115
Using the Reports Launch Button .............................................................117
Timecard Editor Reports............................................................................117
Absent Employees........................................................................118
Accrual Summary.........................................................................119
Comments....................................................................................121
Employees Currently Earning Time (On Premises)......................121
Employee Transactions and Totals..............................................122
Exceptions....................................................................................122
Hours by Labor Account...............................................................123
Hours by Labor Account (Graph).................................................123
Punch Origin................................................................................124
Schedule by Labor Account (Monthly).........................................124
Schedule by Labor Account (Weekly).........................................124
Timecard Audit Trail....................................................................125
Time Detail..................................................................................125
HyperFind Query......................................................................................126
QuickFind Genie.........................................................................126
HyperFind in Genies or Reports.................................................127
Create a HyperFind (Ad Hoc) Query..........................................128
Saving the Query........................................................................130
View Query for Genies and Reports...........................................130
Editing Conditions/Additional Options.........................................131
Section Review........................................................................................132
Chapter 8 – Manager Training Wrap-Up
Kronos Roles...........................................................................................135
Best Practices..........................................................................................135
Final Questions........................................................................................136
Additional Help.........................................................................................136
Glossary..............................................................................................................142

6
Appendix
A - Kronos Pay Codes
B – Kronos Comments
C – Punch Rounding Rules
D – Absentee Call In Report
E – Request for Time Off
F – Automatic Posting of Holiday Hours

7
INTRODUCTION CHAPTER 1

8
Chapter Objectives: At the end of this Chapter participants will be able to:
Describe the Workforce Central suite Use and explain Workforce Central (WFC) Data Collection Sources Complete daily and pay period tasks in WFC Understand basic WFC terminology

9
What is Kronos WFC?
Workforce Central (WFC) is a software application that enables managers to utilize MMC’s Web browser – Internet Explorer – to enter, review, and edit the time their employees spend in job-related activities. Managers can then approve an employee’s time as well as use the system to assign base schedules, track accruals, generate reports, and transfer time information to the payroll system. The WFC software is also known as Kronos Workforce Timekeeper. The WFC displays are customized according to hospital, department policies and procedures in combination with the rights profile assigned to individual managers and timekeepers. The WFC system is a schedule driven software that tracks employee attendance information. The software can compare the time actually worked to the scheduled time, if managers input schedules into the system. WFC offers the following functionality:
• A web-based application available through the intranet
• Easy navigation throughout the software along with fast data feed back provided by Genies
• A task specific application allowing the user to obtain the exact information needed when they need it

10
Implementation Process The WFC Implementation consists of the following phases. Each phase provides an appropriate amount of time and testing allowing for the best possible end result; correct paychecks for all employees. System Set-Up
SuperUsers will work with the project team to configure pay policies in WFC. Unit Testing
SuperUsers will work with the project team to perform initial testing of employee data loads, calculations, totals, and all pay scenarios.
Pilot Group A select group of departments and employees will begin using the WFC system on a daily basis for a specified period of time.
Parallel Testing Parallel testing will examine the WFC schedules, time input, interfaces and payroll processing of new time data from start to finish.
All employees of the pilot departments will participate in parallel testing. Each employee will enter in and out punches at the time clock or via the WFC timestamp method. Managers/supervisors will create schedules, validate employee data, input timecard edits and verify total information.
During the parallel phase, employees and supervisors will use the legacy system and WFC simultaneously.
Go-Live
This is the date that all punches at the time clock, manual edits, and time in the new WFC system actually formulate the paycheck information. You will no longer use any other method of capturing time data. Once you are live, as the Payroll Support/SuperUser person, you will be the first point of contact to correct any unresolved issues from your timekeepers and managers/supervisors once they’ve been trained on the new system.

11
Frequent Tasks
Manager and Supervisor Timekeeping Tasks: Daily:
Maintain employees’ base schedules as necessary. Approve and enter non-worked hours into Schedule Editor or Timecard. Enter pay code edits. Enter approved adjustments from department edit log or employee
requests. Enter and review alternate labor account and work rule transfers. Check for additional exceptions and missing punches not reported and
follow up with employee(s). Review overtime.
Pay Period:
Utilize a Genie view to clear remaining missed punches. Run the Employee Transactions and Totals report to review for any
discrepancies. Make all necessary adjustments. Approve all time cards. Inform Payroll the data is ready for processing. Utilize a Genie view or run reports which assist with managing absences,
activities, and labor costs.

12
Support Model Employees call their Manager for:
• Problems clocking in or out • Missed Punches • Broken time clocks • Anything timecard related; hour’s calculation, policy questions, and badge issues.
Managers call the MMC Kronos team for:
• Issues with reconciling • Understanding how to enter and correct items on timecards • Schedule issues • Policy Issues • Supervisor delegation issues • How hours are calculated for the various pay rules • Problems with an approval • Questions or requests about Reports • Employee Group Changes and Support; question - why a manager can or cannot
see employees (requires security change)
13
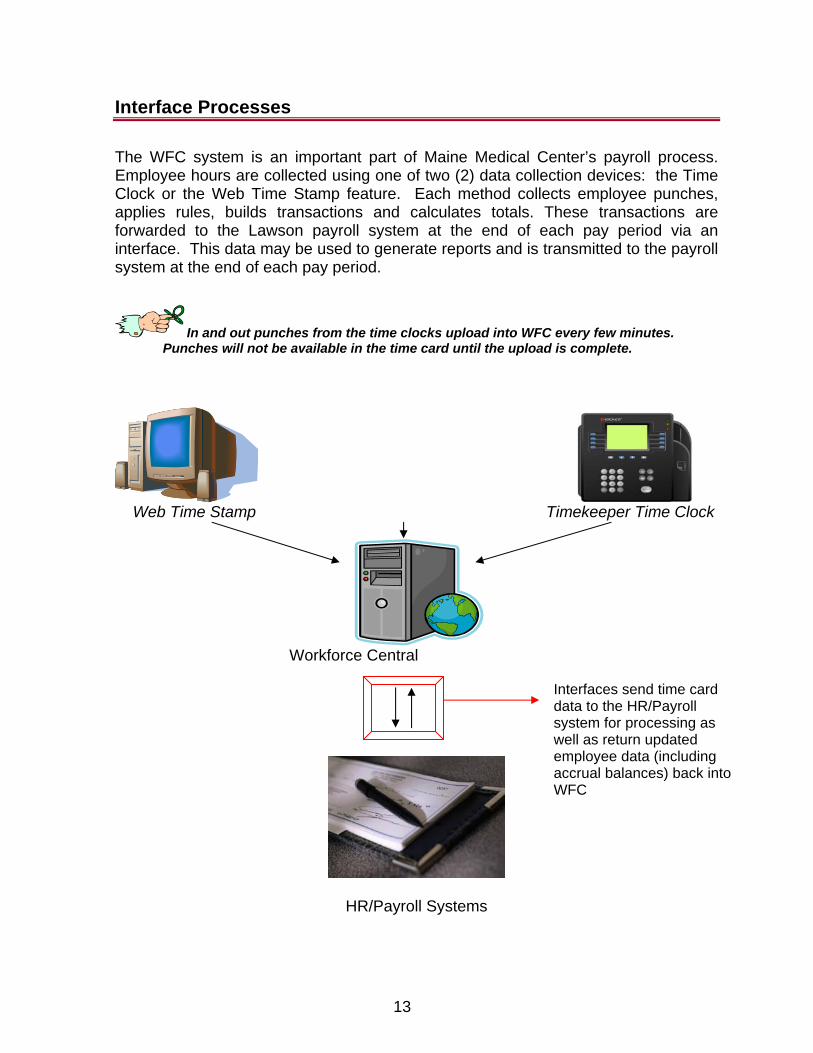
Interface Processes The WFC system is an important part of Maine Medical Center’s payroll process. Employee hours are collected using one of two (2) data collection devices: the Time Clock or the Web Time Stamp feature. Each method collects employee punches, applies rules, builds transactions and calculates totals. These transactions are forwarded to the Lawson payroll system at the end of each pay period via an interface. This data may be used to generate reports and is transmitted to the payroll system at the end of each pay period.
In and out punches from the time clocks upload into WFC every few minutes. Punches will not be available in the time card until the upload is complete.
Web Time Stamp Timekeeper Time Clock
Workforce Central
HR/Payroll Systems
Interfaces send time card data to the HR/Payroll system for processing as well as return updated employee data (including accrual balances) back into WFC

14
Data Collection Sources Time Clocks
• Employee swipes badge • Enter labor and/or work rule transfers (if needed) – future feature • Time clock stores the transaction • Transactions uploaded to Kronos WFC database • Transaction available for viewing or edit in WFC
Web Time Stamp Online Access
• Employee logs into Kronos WFC • Enter labor and/or work rule transfers (if needed) – future feature • Employee presses ‘Record Time Stamp’ • Transaction stored in Kronos WFC database • Transaction available for viewing or edit in WFC
As a Manager or Supervisor, you may have a dual role in WFC – keeping time for others as well as for yourself.

15
Time Clock
1. Numeric Keypad 2. Navigational Keys 3. Function Keys 4. Display Screen 5. Lights 6. Badge Reader 7. Additional Keys—esc, Help, Backspace/delete, Clear, and Enter.
Swipe your badge
• Swipe Accepted – Green light, single beep, name in Display Screen
• Swipe Declined – Yellow light, triple beep, error message in Display Screen
7
6
5 4
3
2
1

16
Time Stamp Time Stamp view is used to record an in or out punch and to perform labor and/or work transfers online.
To Time Stamp in and out: Click on Record Time Stamp
Web Time Stamp does not allow employees to change their start or stop times. They can only punch in, punch out and input transfers. The time on the screen displays the MMC IS network time – not the local PC machine time.

17
Configuration in WFC
Pay Rule Each employee is assigned a default Pay Rule, which includes other building blocks such as a default Work Rule, appropriate holidays for special pay and benefits, pay period definition, and processing order.
Work Rule Work rules define specific information on how an employee’s worked time will be calculated and how the hours are distributed to various types of pay. A work rule is a profile of various time and attendance settings based on pay policies. However, if pay policy differs for a specific job or task, a work rule override can be used via the work rule transfer for a specific shift or a portion of a shift.
It includes rules such as:
Rounding Shift Differential Bonuses
Overtime Guarantees Holidays
Premium Days Meal Breaks Apply Pay Code
Pay Code 40 REG 10 OT
Pay codes hold hours accumulated by employees throughout the pay period. Pay codes drive how an employee gets paid. Some are productive (such as REG) and others are Non-Productive (such as PTO). In the payroll system, pay codes are further defined as flat rate per hour, percent based, or non-paid. The configuration within WFC is designed to create various pay codes and accumulate hours based on defined work rules.
Pay Codes can also be established for tracking and reporting purposes only. This option may or may not be currently available for use. Contact the Kronos WFC team for verification or to schedule a tracking code setup.

18
SECTION REVIEW
Key points covered in this Chapter include:
o Understanding the Kronos WFC implementation o How to use and explain WFC data collection sources o How to complete daily and pay period tasks in WFC o Understanding basic WFC terminology

19
CHAPTER 2 NAVIGATION

20
Chapter Objectives: At the end of this Chapter participants will be able to:
Log on to WFC Navigate through the system Recognize key components and elements of the basic WFC screens
Log off of WFC Access On-Line Help

21
Navigation You can log onto Kronos WFC through the Intranet:
1. Click on the Internet Explorer icon. 2. For TEST, enter the following URL:
http://vmkronostest/wfc/portal
3. For PRODUCTION, enter the following URL:
http://kronos/wfc/portal
This will take you to the Kronos WFC home page. Once you have entered your full user name and password, click on the [Log On] button.
If there is no activity in Kronos for 30 minutes, a message appears requiring your password again. If you don’t respond to this message in a timely manner, the system will log you out completely and return to the logon screen.
You can setup an icon on your desktop to automatically access Kronos. Refer to the MMC Kronos website for instructions.

22
Components The Workforce Central consists of a number of components, some or all of which you may need to access. Components that managers typically access include the following: Genies: Genies are views of detailed or summary data. Certain edits can be
made within the Genies. Timecard: Use the Timecard to enter, review, edit, and approve worked and
non-worked time as well as view the employees’ accrual balance(s) and payment by pay code or labor account.
Schedule: Assign each hourly employee a base schedule to provide additional
functionality to the system including: exception tracking, restriction enforcement, and schedule pay code edits and/or transfers in advance.
Reports: Extract time and attendance information in a summarized or detail view for distribution or assessment of employee or departmental activities and labor costs. Report data is placed in an easy to read format. Dependent on the access level, reports can be printed or viewed on the screen.

23
Elements Each component contains four display elements:
Browser toolbar and menu Header Workspace Navigation bar
The WFC screens are considered “Static” screens. By closing the program at the [x] you will only close the screen view; you will still be logged into your session in the database even though the screens are not visible to you.
To log off, make sure you click the Log off option in the navigation bar! DO NOT click the [X] arrow or the internet explorer back arrow to close the window.
Browser toolbarand menu Header Workspace Navigation Bar
Menu
24
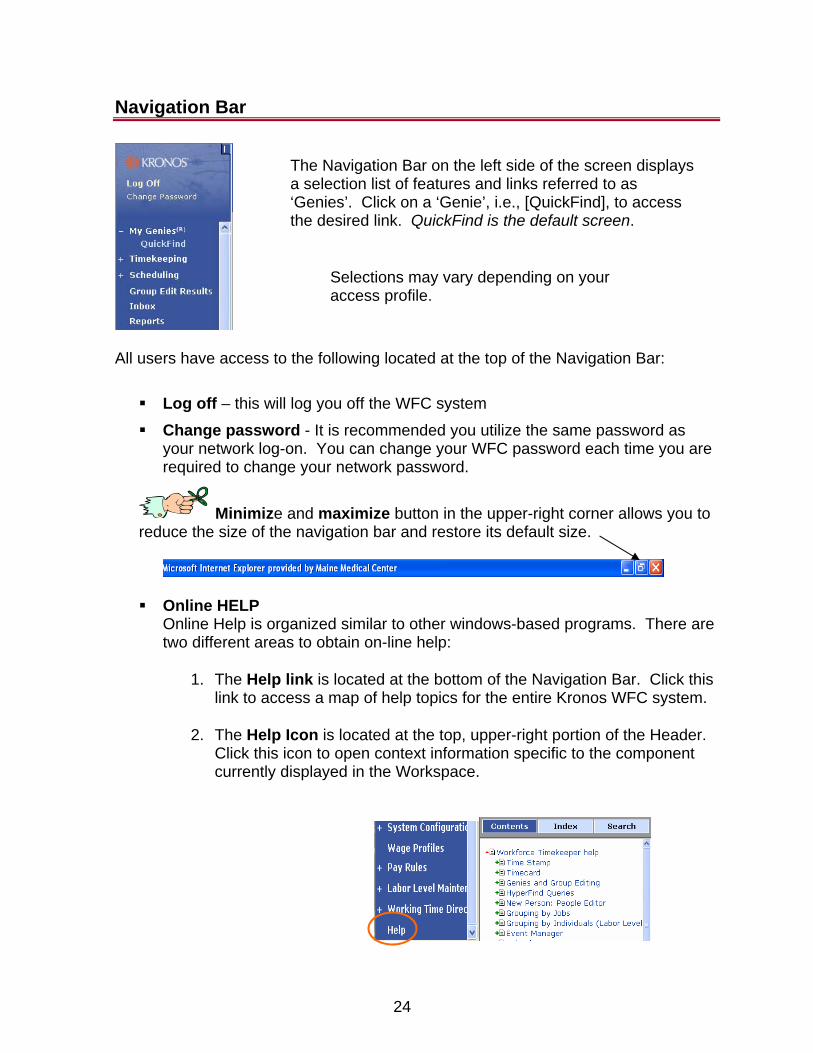
Navigation Bar
All users have access to the following located at the top of the Navigation Bar:
Log off – this will log you off the WFC system
Change password - It is recommended you utilize the same password as your network log-on. You can change your WFC password each time you are required to change your network password.
Minimize and maximize button in the upper-right corner allows you to reduce the size of the navigation bar and restore its default size.
Online HELP
Online Help is organized similar to other windows-based programs. There are two different areas to obtain on-line help:
1. The Help link is located at the bottom of the Navigation Bar. Click this link to access a map of help topics for the entire Kronos WFC system.
2. The Help Icon is located at the top, upper-right portion of the Header.
Click this icon to open context information specific to the component currently displayed in the Workspace.
The Navigation Bar on the left side of the screen displays a selection list of features and links referred to as ‘Genies’. Click on a ‘Genie’, i.e., [QuickFind], to access the desired link. QuickFind is the default screen.
Selections may vary depending on your access profile.
25
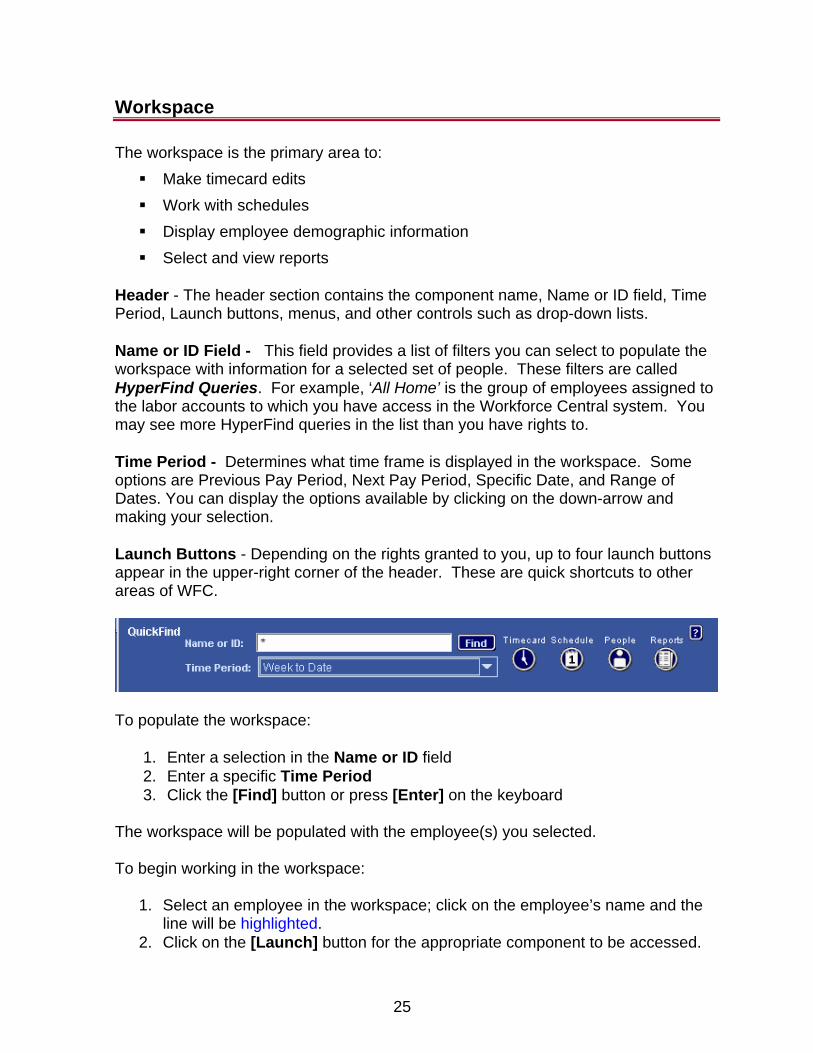
Workspace The workspace is the primary area to:
Make timecard edits Work with schedules Display employee demographic information Select and view reports
Header - The header section contains the component name, Name or ID field, Time Period, Launch buttons, menus, and other controls such as drop-down lists. Name or ID Field - This field provides a list of filters you can select to populate the workspace with information for a selected set of people. These filters are called HyperFind Queries. For example, ‘All Home’ is the group of employees assigned to the labor accounts to which you have access in the Workforce Central system. You may see more HyperFind queries in the list than you have rights to. Time Period - Determines what time frame is displayed in the workspace. Some options are Previous Pay Period, Next Pay Period, Specific Date, and Range of Dates. You can display the options available by clicking on the down-arrow and making your selection. Launch Buttons - Depending on the rights granted to you, up to four launch buttons appear in the upper-right corner of the header. These are quick shortcuts to other areas of WFC.
To populate the workspace:
1. Enter a selection in the Name or ID field 2. Enter a specific Time Period 3. Click the [Find] button or press [Enter] on the keyboard
The workspace will be populated with the employee(s) you selected. To begin working in the workspace:
1. Select an employee in the workspace; click on the employee’s name and the line will be highlighted.
2. Click on the [Launch] button for the appropriate component to be accessed.

26
To return to the original group of employees, select [QuickFind] in the Navigation Bar and you will be returned to the QuickFind screen. Refresh - To display the most current database information, click [Actions] in the Menu bar when viewing a timecard and select [Refresh]...or…when viewing an employee schedule, click the [Refresh] button next to the Time Period field.
Do not use the Internet Explorer Refresh button – it will not refresh the information appropriately. This will ensure that you are viewing the most recent changes made to employee and application data.
• The Last Refreshed time displays the most recent time you clicked the
Refresh button.

27
Menus and Dialog Boxes A menu is located in the bar across the Header and will allow you to use various functions within the system. Menu bar selections will change depending on the component selected.
To access a menu function option:
1. Click once on the menu item at the top of the workspace 2. If there is a drop-down menu, select the task option by scrolling down and
selecting it (another “click”).
Different component and Genie views will have different menu options.
“Click”

28
SECTION REVIEW Navigating
Key points covered in this Chapter included: o The basic functionality of WFC through each of the components o Common WFC terminology o How to Log on to WFC o Components contained in the basic WFC screen o How to Log off of WFC o Utilize On-Line Help
Exercise – Navigating o off Exercise 1
1. Click the [Log off] link at the top of the Navigation bar 2. You are now logged off
What should you remember about logging off? Goal: Log on to
3. Choose “Workforce Central” in the favorites list in the Web browser.
4. Enter your User ID in the Name Field
5. Enter your password in the Password Field
6. Click [Log on] 7. Locate the Navigation Bar on your screen 8. Locate the Workspace 9. Select several drop-down menus within the work space and view the menu
options 10. Locate the launch buttons at the top-right of the workspace 11. Continue navigating until the instructor moves forward with the next section.

29
CHAPTER 3 GENIES

30
Chapter Objectives: At the end of this Chapter participants will be able to:
Identify the different types of Genies Interpret employee information using Genies Sort and display specific employees in the Genies Use Launch Buttons to retrieve time and attendance data

31
Genies What is a “Genie”?
Workforce Genies are pre-configured views that display time input, attendance and scheduling information in an easy to read format. Genies provide useful information to supervisors on one screen and help speed up the approval and scheduling processes. These tools can filter and sort data to easily identify records that need attention and assist with “management by exception”. The Genies displayed are part of your profile. Not all system users will see the same Genies. Some of the benefits of using Genies: Provide a starting point for accessing information in the various components of
the WFC application Provide an at-a-glance view of critical information to quickly identify exceptions
and employees time and attendance issues Streamlined navigation for daily, weekly, or pay period tasks, eliminating
unnecessary steps Provide assistance in completing the daily timecard review and approval
Genies address three (3) main areas:
Who: A specific list of employees based on your access rights. You pick “who” by selecting a filter or HyperFind query in the Show field.
When: During a specific time period. You select “when” by selecting a time interval in the Time Period field.
What: Displays employee(s) information based on your selection criteria. This is the information that is viewable in the workspace.

32
WHEN: The “Time Period” drop-down list allows you to change the date range displayed.
WHO: The “Show” drop-down list allows you to change the employee selection
Selecting a Genie
WHAT: Click on the name of the Genie in the navigation bar. The information is displayed in the workspace.
Types of Genies
Workforce Genies for Time and Attendance – Provides a view of time and attendance related data and shows the information at a detailed level. They can also help you quickly find employees.
Workforce Genies for Scheduling – Provides a view of schedule related data to assist in creating, editing, and reviewing schedules
Your access will determine which list of Genies you will see in the Navigation menu. Four (4) common Genies:
• Quick Find – used to locate an employee • Reconcile Timecard – used to highlight timecard inconsistencies • Pay Period Close – used to identify areas that need attention prior to
approval/sign-off at the end of a pay period • Schedule Editor – used to create, edit, and maintain employee schedules

33
Viewing information within the Genie You can sort the information within a Genie by selecting any of the column headers. The column used for the sort-display of the Genie shows a grey arrow in the column names. The arrow is pointing either up or down depending on whether the information is sorted in ascending or descending order.
The last column selected becomes the primary sort while the first column selected becomes the secondary sort.
Selecting Employees within a Genie
To select a single employee:
Click on the employee name and double-click or select a launch button To select multiple employees:
Click and drag
[Ctrl] + click o continue to hold both [Ctrl] down while clicking on other
employees to select
[Shift] + click o used for selecting multiple employees in sequence or without
skipping employees
Once you have the employees highlighted in yellow, click on a Launch Button to access information for that group of employees.

34
Navigating between a Genie and the Launch Buttons Make an employee selection as described previously.
Click the Timecard, Schedule or Reports launch button
The Chapter you selected will be launched. For example, Timecard. The date selection from the Time Period field is the time interval used for the
[Launch] Button selection. You can also select an employee and double-click. Different Genies lead to
different screens when you double-click on an employee name. For example, the Genies regarding employee time, exceptions, etc., lead to the Timecard.
1. Select employee(s) 2. Click [Launch] button
Based on your access profile you will see only the buttons to which you have access.
35
SECTION REVIEW
Key points covered in this Chapter include:
o Interpret employee information using Genies o Identify the different types of Genies o Sort and display specific employees in the Genies o Use Launch Buttons to get to time and attendance data
Exercise – Workforce Genies Exercise 1 pay period, and identify columns
1. What Genies do you see in the Navigation Menu? _________________________________________________________________________________________________________________________________________________________________ _____________
2. Highlight the Reconcile Timecard Genie 3. Select all home employees 4. Select the previous pay period 5. What are the columns of data in the Reconcile Timecard Genie?
___________________________________________________________________________________________________________________________________________________________________ _____
Goal: Sort by columns, select employees
6. Sort by one of the columns in ascending order 7. Sort again by descending order 8. Select multiple employees within the Genie 9. How will Genies benefit you in your job role?
_____________________________________________________________________________________________________________________________________________________________________ _________

36
Chapter 4 Timecard Basics
and Editing

37
Chapter Objectives: At the end of this Chapter participants will be able to:
Access employee timecards Understand the components of the timecard Recognize exceptions Rounding rules Edit log Add, edit, and delete punches Calculate totals Add, edit, and delete pay codes Add comments Print a timecard Process a labor account transfer Process a work rule transfer Adjust an individual schedule

38
Timecard Basics and Editing Timecard Editor Selecting Employees To open an employee timecard from one of the Workforce Genies:
1. Make an employee selection as described in Module 2
2. Click the [Timecard] launch button
You can access multiple employees’ timecards from the Genie by holding down the CTRL key and clicking on each employee’s name then clicking the launch button.
The Timecard contains three areas:
1. Header - Displays the employee’s name, ID number, and Launch buttons to other functions within the WFC system.
2. Timecard Grid - Contains dates for the selected timeframe, a menu bar for performing timekeeping tasks, and time entry totals. Edits to punches and pay codes are performed here.
3. Timecard Tabs - Displays additional information about employee hours. Three main tabs always appear: Totals & Schedules, Accruals, and Audits. Additional tabs may appear as applied to the employee’s time data such as Comments, Moved Amounts, and Sign Offs & Approvals.
Header
Timecard Grid
Timecard Tabs

39
Timecard Grid Included in the Timecard grid:
• Add or delete a line
• Day and date in time period selected
• Pay codes and amounts
• In and out punches
• Transfer information
• Shift hours, daily hours & date range cumulative hours
• Exceptions (flagged in red such as the in-punch below on 4/2)
• Comments (flagged with a note icon)
A quick way to double check an employee’s home information while working within the timecard - hover your mouse over the employee’s name. After a few seconds, a window will appear with information such as Pay Rule, Primary Account, and the department to which the employee is assigned.

40
Timecard Menus
The menu options for the Timecard functions are located at the top of the Timecard workspace.
[Save] - Saves the timecard data.
Other most commonly used menu items are Actions and Approvals. Each has a drop-down with the following options: Actions
• Refresh - Abandons changes without saving and displays last saved data
• Calculate Totals - Displays the results of your changes without saving
• Email - Opens e-mail dialog box (NOT currently in use)
• Print - Opens print dialog box
• Print Screen - Allows you to print the open screen
Approvals (covered in more detail in next section)
• Approval - Timecard sign-off (approval). This indicates the timecard is ready for payroll processing.
• Remove Approval - Removes the Manager’s approval
Other menus • Punch - Edits an existing punch.
• Amount - Allows for historical edits.
• Accruals - Allows you to view accrual information based on the most recent update from the Lawson payroll record.
• Comment - Add/Delete a comment from an existing punch or pay code amount.
• Reports - Short-cut to the Time Detail report for employee and time period displayed in timecard.
Employee name display

41
Totals and Schedule Window View
By default, the Totals and Schedule Window makes up the bottom portion of the timecard screen. It displays a summary of the employee’s worked hours for the selected time period, categorized by labor accounts and jobs. Employee’s schedule assignment for the selected time period is displayed under the Schedule section of the window. This is a view only display – edits to the schedule need to be made in the Schedule Editor genie.
The tabs displayed vary based on what is contained in your timecard. Ex: If you have added comments to the timecard, the “Comments” tab will be displayed.
Totals
Notice the “<” next to the Account column. This allows you to minimize the Account column and roll-up the totals by pay code. Example: In the Timecard above, there will be one Totals line item for SHIFT 3 with the total number of hours earned at that code.
Totals Schedule
Allows you to see totals by: • Day • Shift • All (for date range) - default

42
Accruals Accruals are units of time that employees earn for days off such as: PTO, etc. The Accruals tab is located at the bottom of the timecard. It allows you to view accrued time earned by a specific employee. You cannot directly edit accrual balances in the timecard. However, edits made to the timecard will affect accrual balances. Ex: Entering a PTO pay code edit will deduct hours from the remaining PTO balance.
The accruals tab provides a detailed view of the employee’s accrual balances including:
Accrual Code. The code that identifies and holds the type of accrual balance, such as PTO.
Accrual Code Type - The unit associated with an accrual code. Accrual codes are measured in hours.
Balance as of Selected Date - The balance on the date selected within the timecard (Date cursor is on within the timecard grid).
Units - (Hours)
Furthest Projected Taking Date - The furthest date in the future where time that affects this accrual code may be scheduled.
Projected Takings - The total amount of time scheduled to be used between the end of the visible pay period and the Furthest Projected Taking Date.
Projected Credits - N/A; located in Payroll System.
Projected Balance - N/A; located in Payroll System.
Balance Without Projected Credits - The planned future balance without the projected credits.
Balances are imported on a bi-weekly basis from the payroll system; Wednesday night following payroll processing.
43
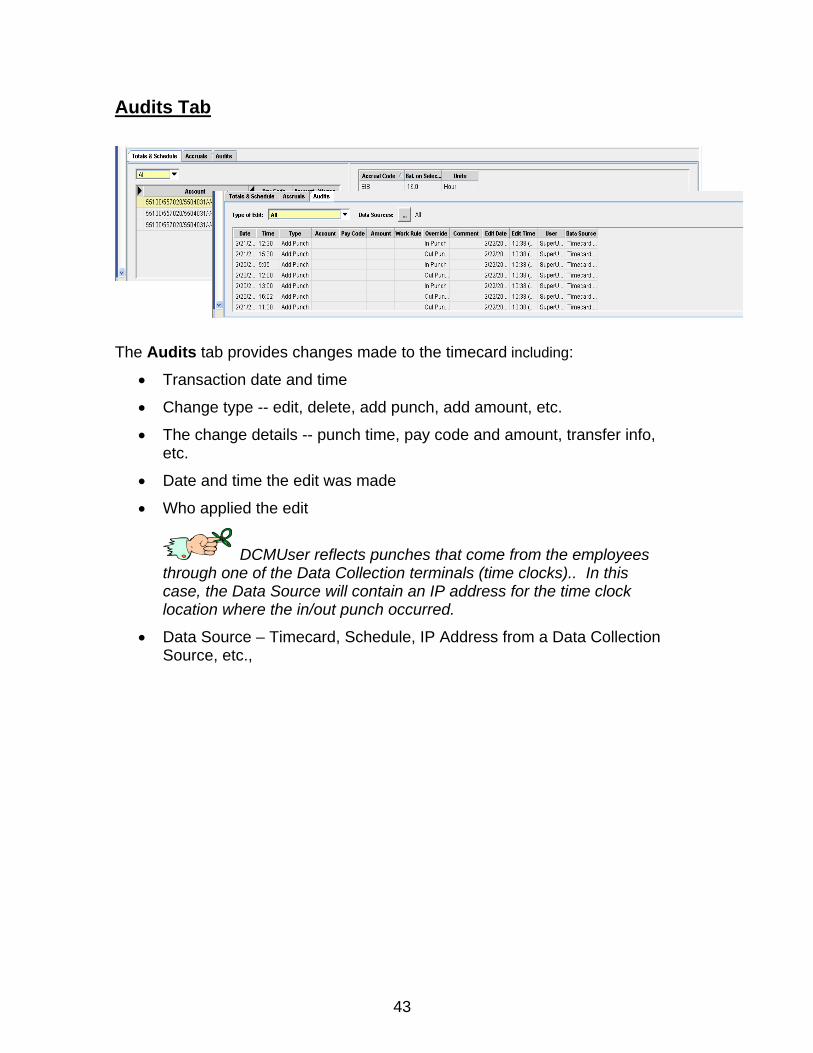
Audits Tab
The Audits tab provides changes made to the timecard including:
• Transaction date and time
• Change type -- edit, delete, add punch, add amount, etc.
• The change details -- punch time, pay code and amount, transfer info, etc.
• Date and time the edit was made
• Who applied the edit
DCMUser reflects punches that come from the employees through one of the Data Collection terminals (time clocks).. In this case, the Data Source will contain an IP address for the time clock location where the in/out punch occurred.
• Data Source – Timecard, Schedule, IP Address from a Data Collection Source, etc.,

44
Exceptions An exception is a missed punch or one that doesn’t match what was scheduled. To flag an exception it is necessary to utilize the Kronos Base Schedule Chapter. Entries posted to an employee schedule will determine the exception(s) flagged within the employee timecard.
Timecard Indicators and Colors The appearance of timecard cells change to indicate a number of different conditions:
1. A solid red cell indicates a missed in punch or a missed out punch. If you move the mouse over the red box, a message provides more information.
2. A red outline in a cell indicates an exception, such as a late punch, early
punch, or long interval.
To determine the cause of an exception, place your cursor over the exception punch.
1. Missed Punch 2. Exception

45
3. A red border around a date cell indicates an unexcused absence day.
4. A blue border around a date cell indicates an excused absence.
The red and blue outlined cells will only appear if the department uses the Base Schedule feature
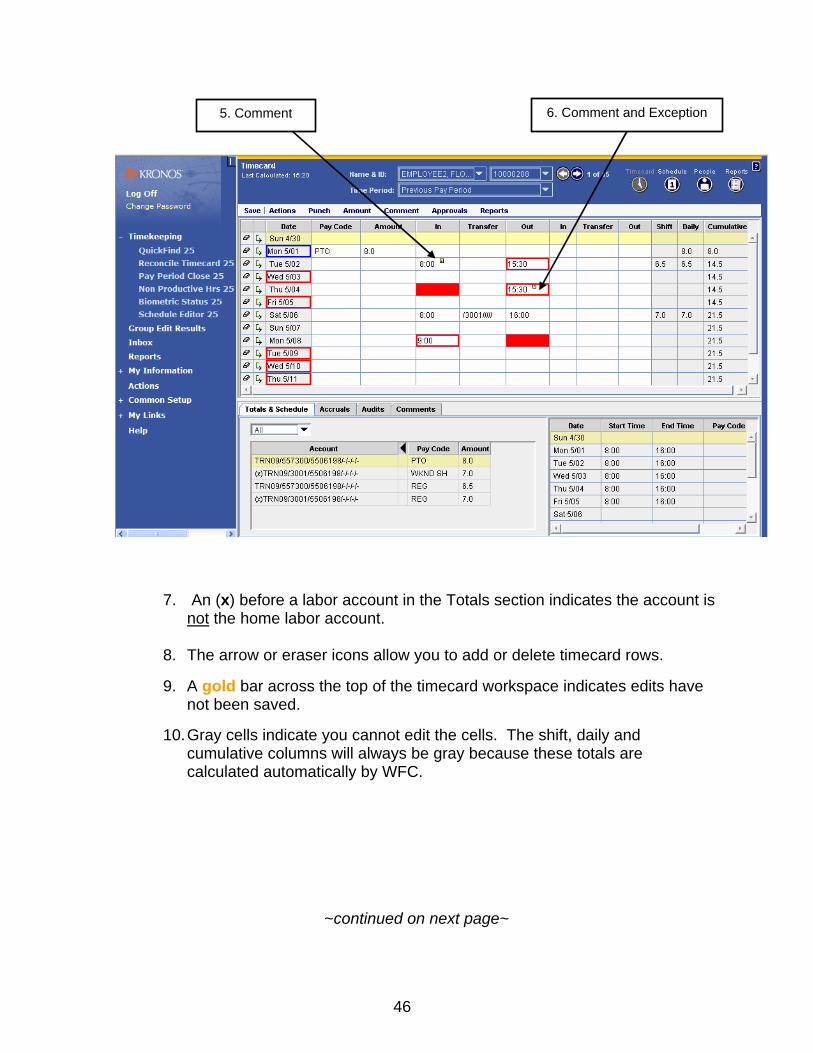
5. A small yellow note icon in the punch or amount cell indicates a comment about the cell’s contents. Select the Comment tab at the bottom of the timecard workspace to view the comment.
6. A small yellow note icon and red outline indicate that a punch or an amount
has a comment and an exception.
4. Excused Absence(blue border)
3. Unexcused Absence (red border)
46
7. An (x) before a labor account in the Totals section indicates the account is not the home labor account.
8. The arrow or eraser icons allow you to add or delete timecard rows.
9. A gold bar across the top of the timecard workspace indicates edits have not been saved.
10. Gray cells indicate you cannot edit the cells. The shift, daily and
cumulative columns will always be gray because these totals are calculated automatically by WFC.
~continued on next page~
5. Comment 6. Comment and Exception

47
~continued on next page~
7. Not Home Labor Account
10. Cannot Edit Gray Cells
9. Gold Bar, Edits Not Saved
8. Add and Delete Rows
An (x) after the date in the Schedule section at the bottom of the timecard indicates a transfer.

48
Along with Phantom punches are ‘Phantom pay codes’ or duration amounts. These come from items that have been scheduled in the Schedule Editor genie. They are also purple in color and cannot be edited if there is a gray background. These punches and pay codes can be edited by the Manager.
Help At the beginning of class we discussed the different ways of accessing on-line help information. Let’s take a look at an example:
Choose Help from the Navigation Bar. Search for “Timecard Indicators and Colors”. This is a handy reference to print and use to assist in editing timecards.
Phantom Punches - In the timecard workspace, you may see punches that appear purple in color. These punches are known as ‘phantom punches’. The system added them to the timecard based on an employee’s schedule assignment, i.e., Salary Employees, Scheduled Call or Call response, etc.

49
Punches Punches come from your Data Collection Source(s). If for some reason the punch is timed incorrectly (e.g. a staff member forgot to punch out, left the building and then returned and punched), it is possible to override punch times on the timecard. Please note that timecards are a legal document portraying when a staff member is on the premises working. Correcting punches is inevitable. However, it is not appropriate to change a correctly entered punch that alters actual worked time.
Most default time is displayed in the timecard as hourly time. You do not have to enter times in HH:MM am/pm format. You may enter the time without the colon and use either an “a” (for AM) or a “p” (for PM). Example: “745a” means 7:45 AM and “530p” means 5:30 PM. When entering time directly into the cell, you may also enter time in military (24hr) format such as 0700 or 1500. The system will automatically change the view to hourly time.
Edits should be done daily! Departments may be audited periodically to assess the compliancy of daily edits. In the event of a systematic problem, MMC Payroll has the ability to assist with a small amount of edits through one of the contingency plans described later in this manual.

50
Standard Rounding Rounding applies to all punches excluding meals.
All current tardiness policies still apply!
8:15
8:00
8:30
8:45
8:08
8:23
8:07 8:53 8:52
8:37
8:38
Examples: If you punch in at 8:07, time will be calculated as 8:00 If you punch in at 8:08, time will be calculated as 8:15 If you punch in at 8:22, time will be calculated as 8:15 If you punch in at 8:23, time will be calculated as 8:30

51
Meal Deductions Only those employees leaving the premises for lunch will be required to punch in and out for the meal deduction. However, those employees that have signed a waiver to omit their lunch break must cancel the meal deduction at the time clock.
The system is programmed to automatically deduct 30 minutes for a meal according to the State Statue. (e.g. after 6 worked hours). There is no need to punch out or in (if employee remains on the premises); the system will automatically deduct time from the scheduled work day. Breaks Employee should not clock in and out for personal breaks (non-meal time away from work station) or breaks that are expected to be less than twenty (20) minutes in duration. These are typically “shift breaks” – the normal 15 minute breaks an employee is allowed to take, smoke breaks, or other brief absences from the employee’s work station. Supervisors are responsible for monitoring employee breaks and setting expectations for the proper reporting of non-worked time. Editing Punches Examples:
o Add an in or out punch - staff member forgot or was unable to punch in or out. o Delete an in or out punch- staff member swiped twice because they didn’t hear
or see the ’Swipe Accepted’ indicator displayed by the time clock o Delete a scheduled department transfer - staff member was unable to transfer
due to work load or patient care As a manager, you are ultimately responsible to keep the best interests of MMC and your employees in mind. It is critical to document all actions whether you are editing your own timecard or an employee’s timecard. Any punch edits or changes to a timecard need to be documented accordingly, whether logged on an Exception Log and signed by the employee, or through internal E-mail to/from the employee’s official MMC email account.

52
Information for Managers who Manage WFC Source: The Payroll Source, A textbook and desk reference by the American Payroll Association: 10-4 "The records required by the FLSA must be available for inspection by the Wage and Hour Division and kept "safe and accessible" by the employer either at the worksite or at a central location where its records are customarily maintained. If the records are maintained at a central location, they must be available within 72 hours of a notice of inspection from the Division." Penalties’ for Poor Recordkeeping violations Willful violations of the recordkeeping requirements can bring a criminal penalty of up to $10,000 and/or imprisonment for up to 6 months (6 months for 2nd and subsequent convictions)." Poor Recordkeeping has Other Costs In addition to the statutory penalties for recordkeeping violations, employers can suffer other severe financial losses as well. If an employee (or group of employees) files suit claiming an employer failed to pay the required minimum wage and/or overtime pay and the employer has incomplete records, the court will also most likely accept the employee's evidence of hours worked and wages received."

53
Add Punches Add a Same Day Punch
A missed In Punch or Out Punch will be indicated by a solid red cell in the timecard. To add a punch to a shift that starts and ends on the same day:
1. Launch the employee’s timecard. Example: Use the Daily Punch Review Genie to identify employees with missing punches or other exceptions.
2. Open the employee timecard and highlight the cell to add the punch.
3. Enter the missed in or out punch.
4. Select: 1) ‘Actions’ from the menu bar and 2) ‘Calculate Totals’ from the drop-down menu.
Calculate Totals will display the results of your changes without saving. There may be times when you want to view pending edits prior to saving. Calculate totals will allow you to make punch edits/changes to a timecard, process those changes, and view the outcome prior to saving.
5. If satisfied with total results, save your work.
1
2
54
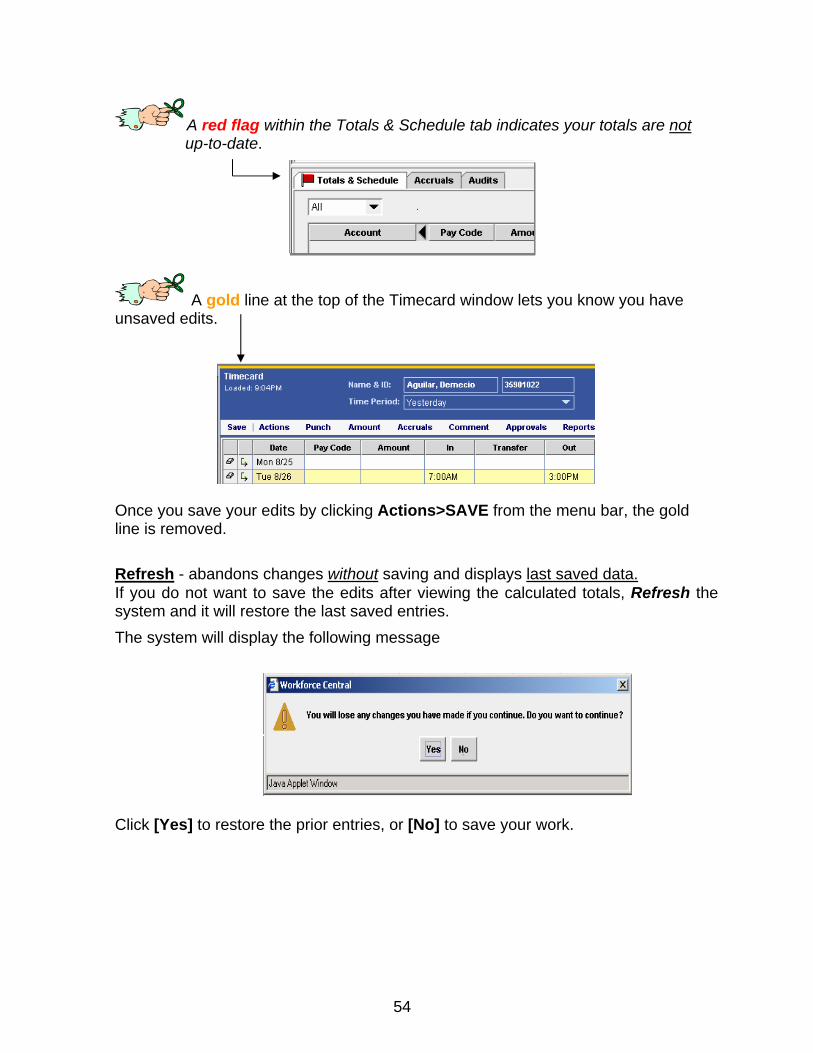
A red flag within the Totals & Schedule tab indicates your totals are not up-to-date.
A gold line at the top of the Timecard window lets you know you have unsaved edits.
Once you save your edits by clicking Actions>SAVE from the menu bar, the gold line is removed. Refresh - abandons changes without saving and displays last saved data. If you do not want to save the edits after viewing the calculated totals, Refresh the system and it will restore the last saved entries. The system will display the following message
Click [Yes] to restore the prior entries, or [No] to save your work.

55
Add a Missed in Punch for a Shift that Crosses Midnight A missed In Punch for a shift that crosses midnight will require a specific sequence of edits. To add a punch that crosses midnight, follow these steps:
1. Launch the employee’s timecard. Example: Use the Reconcile Timecard Genie to identify employees with missing punches or other exceptions. Then review your exception log for this employee to submit the missing punch.
2. The missing punch will appear as shown below.
3. Click on the indicated cell and enter the missed punch.
4. The screen will now appear like this:
5. What happened? The out punch occurred on Monday 11/3 but the actual in punch occurred on Sunday 11/2. Therefore, you must enter the in punch on the actual date it occurred. Select the cell, enter the in punch and then click out of the cell.

56
6. The screen will return with the following:
7. The system now understands the in punch crossed midnight and the out punch occurred the following day. It calculates the appropriate time.
8. Although the timecard calculated the time correctly on Sunday, 11/2, we must remove the in punch generated for Monday, 11/3. Click on the cell, press [delete] and then click on a cell below the deleted punch. The timecard will be recalculated and displayed correctly.
Note: The red border that appears around each in punch indicates the shift was not scheduled. Right click on each punch aligned with a red border and the system will provide the details of the highlight.

57
Adding and Deleting Rows What do you do if you need to enter a punch and there are no more “IN” or “OUT” cells available?
1. The (arrow button) will add a row to the timecard.
2. The (eraser button) will delete the entire row and its transactions.
Punches cannot reside on the same row as pay code and amounts. Therefore, another row must be added. More details to follow in the next section. Comments Comments are items that can be used to attach additional information to an employee’s time stamp or edit. A comment may be used to explain why an employee has an exception.
Comments are pre-defined and must be selected from a drop-down list. Comments can be used as a reporting tool or a way of explaining a punch or an edit. They can also be used as a search filter for a specific activity using a Hyperfind Query (Chapter 7). For example, if your employee is late you will notice an exception, viewed as a red outlined box around a punch cell in the Timecard grid. The exception will only advise you that the employee was late, but not WHY he/she was late. You can attach a comment that notes the employee was late because of car trouble, etc.
1
2

58
Schedules must be used in the Schedule Editor genie to generate this type of absence exception so the WFC system can calculate the difference between when the employee was scheduled to punch for a shift and when they actually did punch for their shift.
Comments can be attached to either in or out punches, pay code amounts, or schedules as mentioned in the previous Chapter.

59
Attaching a Comment From the timecard editor -
1. Select the item that requires a comment. 2. Select Comment from the Timecard menu. A drop-down menu will appear. 3. Select Add.
4. The comment menu will be displayed. Scroll through the list and highlight your selection. Click [OK]. The comment will be added.
Comments may also be added to existing punches and pay code amounts by right clicking on the item and selecting “Add comment.”
1
2
3
60
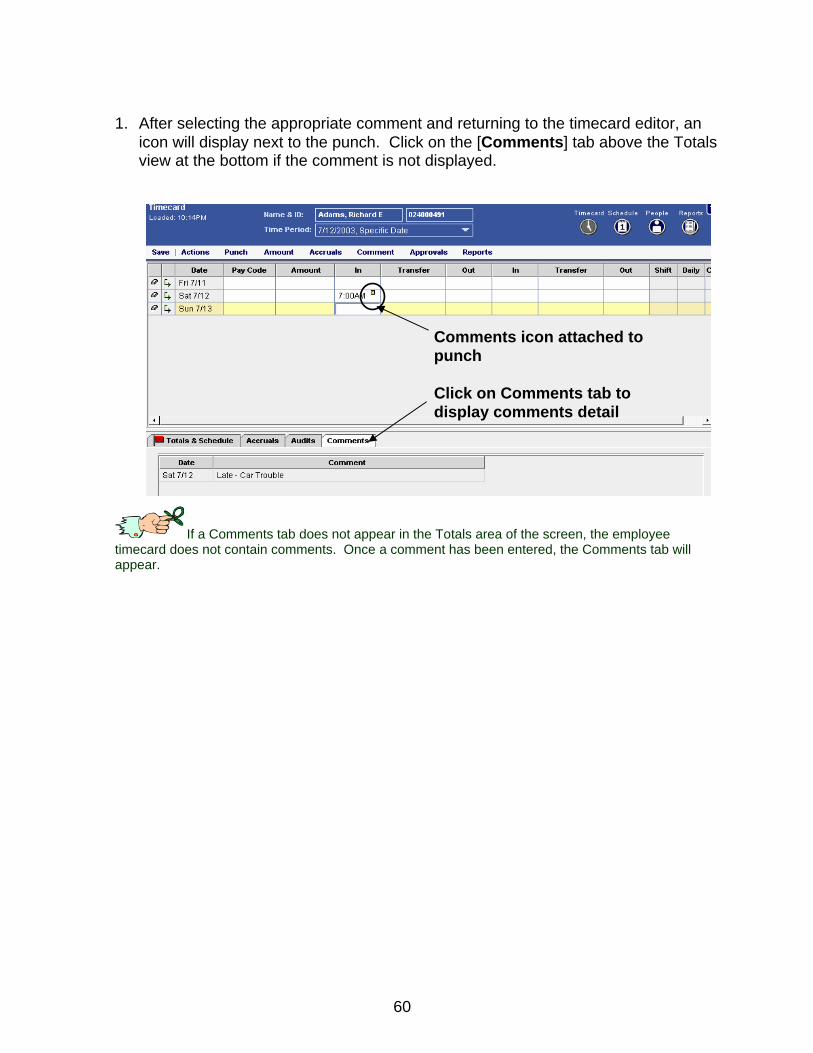
1. After selecting the appropriate comment and returning to the timecard editor, an
icon will display next to the punch. Click on the [Comments] tab above the Totals view at the bottom if the comment is not displayed.
If a Comments tab does not appear in the Totals area of the screen, the employee timecard does not contain comments. Once a comment has been entered, the Comments tab will appear.
Comments icon attached to punch Click on Comments tab to display comments detail

61
Delete a Punch with a Comment
1. Select the punch to be deleted 2. Add a comment as to why you are deleting the punch such as “Double Punch”.
3. Select the punch and press the [delete] key on your keyboard.
4. Select [Save].
Delete a Comment To delete a comment from a punch or an amount:
1. Select the punch or amount attached to the comment. The comment should appear in the Comments tab in the lower-half of the timecard window.
2. Right-click on the comment displayed and select [Delete] when displayed. 3. You will be prompted with a message asking if you are sure you want to
delete. Click [Yes].
Any punch that has entered the system (by Timekeeper Terminal or Timecard Editor) will always appear in the Audit trail as a delete edit. You may delete a punch, but it is never completely erased from the system. Edit an Existing Punch
1. It is unlawful to edit an existing punch received at the time clock. The actual time recorded when the employee swiped his/her badge at the time device is the legal time recorded and should not be changed.
Edit Punch Dialog Box
[SAVE] the edit. This adds the comment to the Audit Trail forever.

62
The Edit Punch dialog box provides you with information specific to a punch:
Date the punch was submitted Time of the employee’s actual punch Rounded Time of the actual punch Time Zone, Override, cancel deduction, exception, and comment applied.
It also allows you to override a punch or cancel a deduction within that punch:
It may become necessary to tell the system what “type” of punch it is such as an In, Out, or New Shift punch.
An employee’s work rule may have an automatic deduction from the total hours worked for the day. An automatic meal deduction is one example, deducting the employee’s standard lunch so the employee does not have to punch out for lunch.

63
To Override a Punch
1. Right-click on the time cell requiring an override 2. Select [Edit Punch] 3. In the Edit Punch dialog box, go to [Override] and click the down-arrow. A
drop-down menu will appear. Scroll through the menu and select the appropriate new punch type (in-punch, out-punch, new shift, etc.)
4. Click [OK] 5. In the Timecard menu, click [Save].
Remember to save your work!

64
Cancel a Meal Deduction
1. Right-click on an OUT punch cell for the day the employee worked through their meal break.
2. Select [Edit Punch] and a drop-down menu will appear. 3. Click on [Cancel Deduction] and select the appropriate deduction rule. 4. Click [OK]. 5. Click [Save]. 6. A red exception box will highlight the punch to note the exception.
Things to remember when canceling a meal deduction: • It is recommended you cancel a lunch deduction by accessing the OUT
punch. (Do not select the IN punch.) • You can reverse the cancellation by selecting NONE from the cancel
deduction drop-down list.
Remember to save your work!

65
Pay Codes To enter a Pay Code amount for an HOURLY employee:
1. Click in the Pay Code column on the row displaying the day/date associated with the pay code to be entered. A drop-down menu will appear.
2. Select the appropriate pay code.
3. In the Amount column, enter the appropriate amount of time. Enter the hour, colon and actual minutes. If quarter hours are entered, it will be converted to minutes. (Example: 8.75 will be displayed as 8:45.)
4. Click [Save].
Enter a Comment to a Pay Code Amount Method A
1. Scroll down the Amount column and select the appropriate cell. 2. Select [Comment] in the menu bar; . 3. Click [Add] from the drop-down menu. 4. Scroll down and select the appropriate comment. 5. Click [OK]. 6. Click [Save].
Column can be expanded to view the full Pay Code name
You cannot enter a pay code on a line which contains existing punches; you must add a new line and enter the pay code on the new line.
66
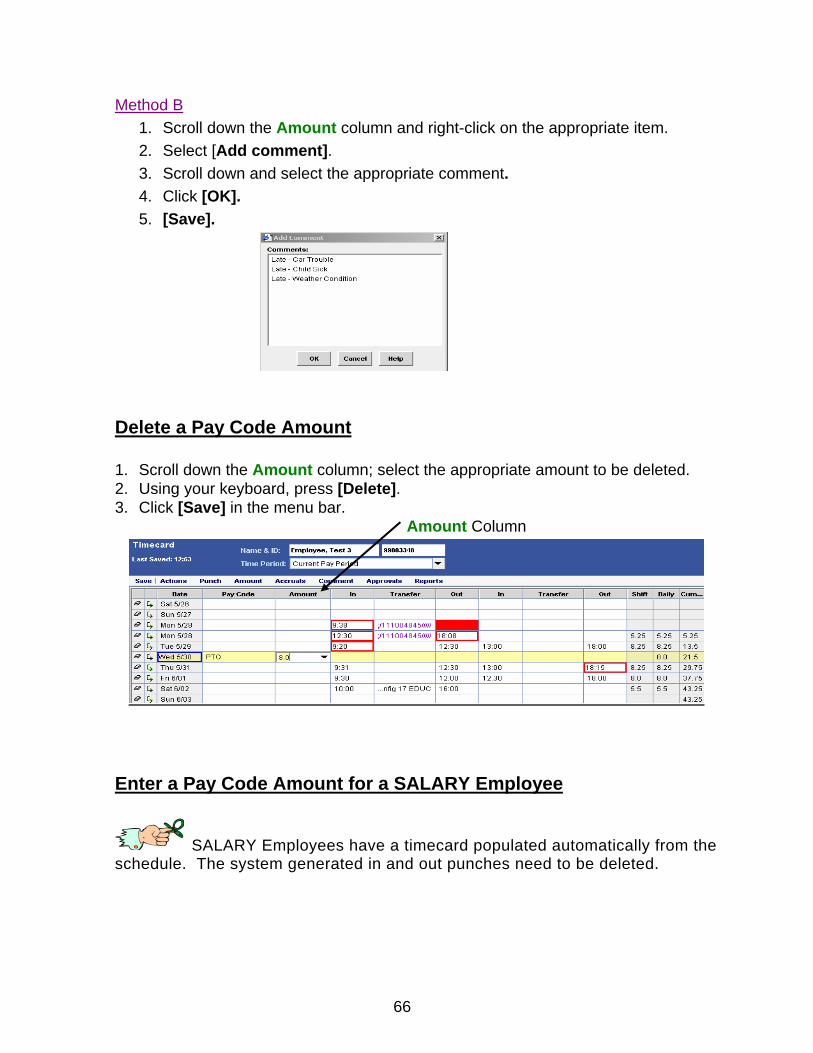
Method B 1. Scroll down the Amount column and right-click on the appropriate item. 2. Select [Add comment]. 3. Scroll down and select the appropriate comment. 4. Click [OK]. 5. [Save].
Delete a Pay Code Amount 1. Scroll down the Amount column; select the appropriate amount to be deleted. 2. Using your keyboard, press [Delete]. 3. Click [Save] in the menu bar. Amount Column
Enter a Pay Code Amount for a SALARY Employee
SALARY Employees have a timecard populated automatically from the schedule. The system generated in and out punches need to be deleted.
67
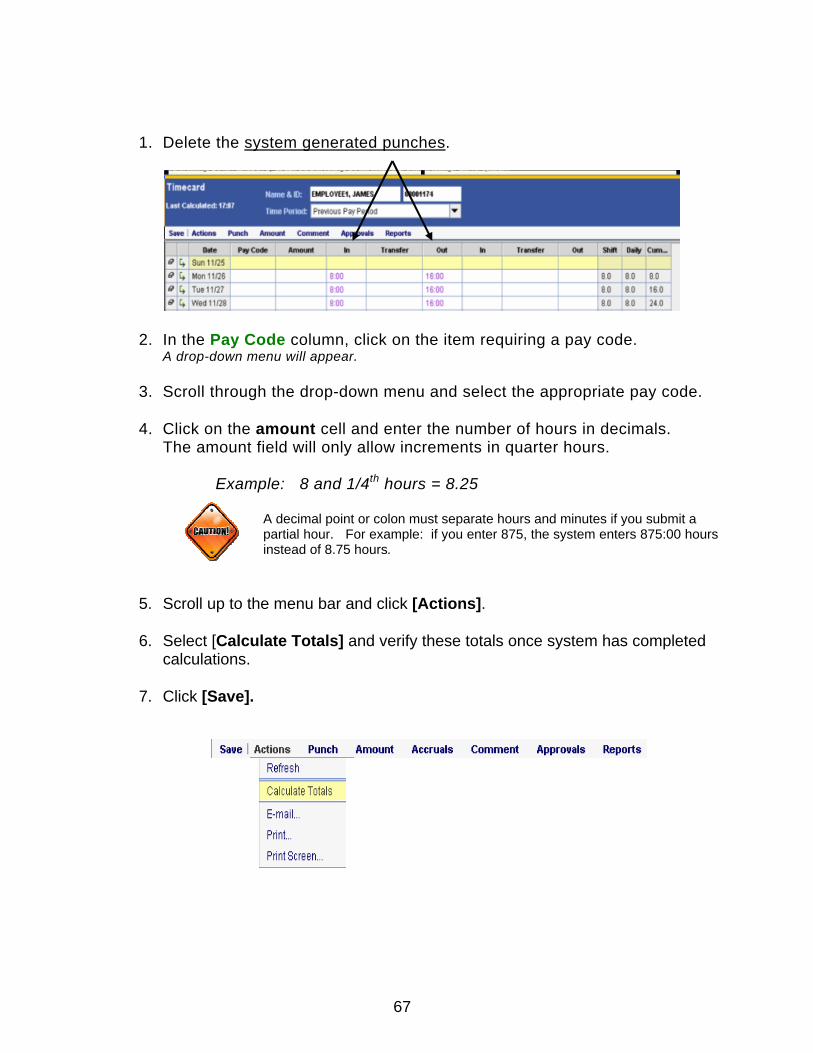
1. Delete the system generated punches.
2. In the Pay Code column, click on the item requiring a pay code. A drop-down menu will appear. 3. Scroll through the drop-down menu and select the appropriate pay code. 4. Click on the amount cell and enter the number of hours in decimals. The amount field will only allow increments in quarter hours.
Example: 8 and 1/4th hours = 8.25
A decimal point or colon must separate hours and minutes if you submit a partial hour. For example: if you enter 875, the system enters 875:00 hours instead of 8.75 hours.
5. Scroll up to the menu bar and click [Actions]. 6. Select [Calculate Totals] and verify these totals once system has completed
calculations.
7. Click [Save].
68
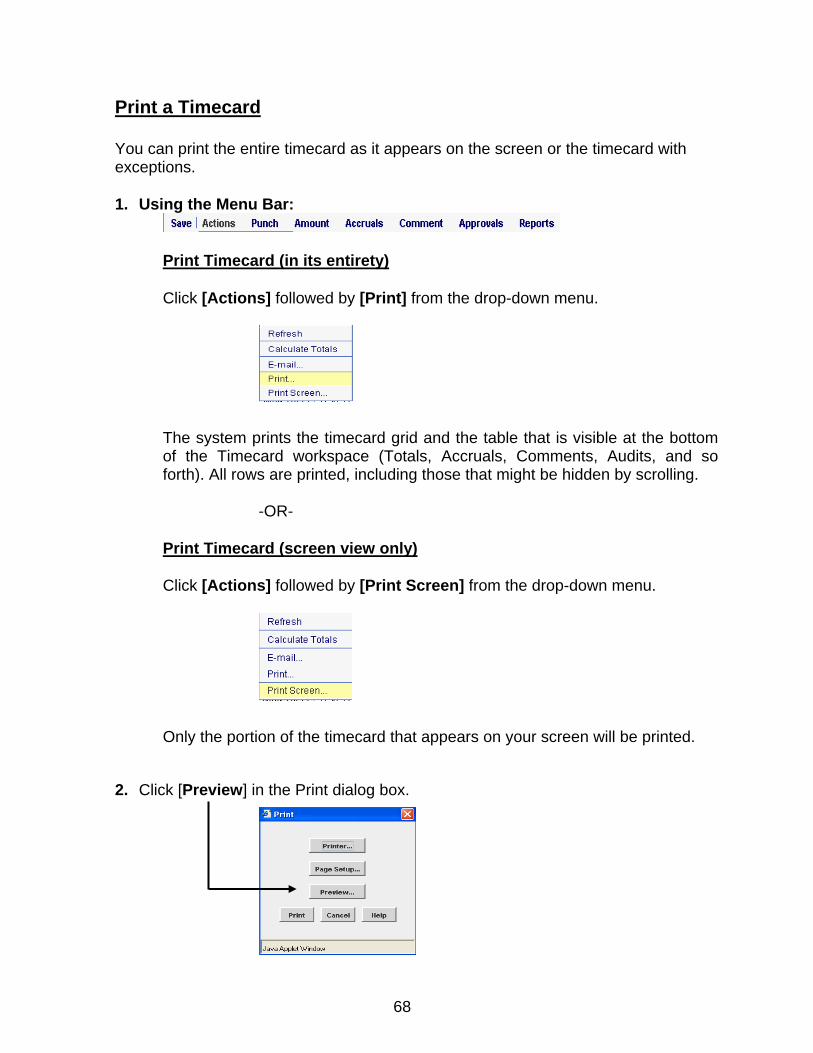
Print a Timecard You can print the entire timecard as it appears on the screen or the timecard with exceptions. 1. Using the Menu Bar: Print Timecard (in its entirety)
Click [Actions] followed by [Print] from the drop-down menu.
The system prints the timecard grid and the table that is visible at the bottom of the Timecard workspace (Totals, Accruals, Comments, Audits, and so forth). All rows are printed, including those that might be hidden by scrolling.
-OR- Print Timecard (screen view only)
Click [Actions] followed by [Print Screen] from the drop-down menu.
Only the portion of the timecard that appears on your screen will be printed.
2. Click [Preview] in the Print dialog box.

69
3. Click [Yes] if you see the warning, ‘An applet would like to print. Is this OK?’
If you select [Printer]: The system will display a dialog box to allow you to select a different printer other then your default Windows printer.
If you select [Preview]: The system will display what can be sent to the printer.
If you select [Page Setup] The page layout can be modified from portrait to landscape.
Print a Time Detail Report from the Timecard The Time Detail Report contains similar information to the printed Timecard, except it includes any exceptions and comments.
1. Select Reports > Time Detail
2. Select File > Print or click the Print Icon from the Browser Tool Bar to print the report
If you use the browser’s Print command, only the navigation bar is printed.

70
3. Printed Report
Transfers A transfer will override an employee’s default:
1. Home Labor Account 2. Work Rule
A Work Rule transfer allows you to apply a different set of rules to the employee’s shift or span of time. The new set of work rules will calculate the shift, span of time and generate hours into the appropriate Pay Codes.
When might you apply a labor level transfer?

71
When might you apply a work rule transfer?
Do you think it is possible to both a Labor Account Transfer and a work rule transfer together at the same time?
Labor Account Transfers Charging time to an employee account other than their “home account” is called a labor account transfer. Employee’s can transfer at several Labor Levels including Process Level, Department, Job, and Position.
Before applying a transfer, all missed punches should be corrected so that you begin with a complete set of punches. Perform a Labor Account Transfer in the Timecard

72
• The transfer applies to the span of time between the IN and OUT punches where the Transfer column is located.
• If an employee enters a transfer at the time clock, the transfer will display in the timecard automatically.
• If adding a transfer to the timecard, remember the following: o The transfer applies to the span of time between the IN and OUT
punches where the column is located. In the below example, a transfer added to Monday’s time will apply to the hours between 7:00am and 3:30pm.
o To apply the hours to only a PORTION of a shift, you must add a new punch at the time the transfer occurs. Select the transfer drop-down in the cell immediately following the new IN punch.
Apply a Labor Account Transfer to the Entire Shift
1. In the timecard workspace, click the Transfer column cell between the IN and OUT punches.
A drop-down list will display your most recent transfers. 2. Select one of the following:
a. A labor account from the list of last entered accounts
b. Search (opens the Select Transfer dialog box)
Enter labor account transfer here (entire shift is transferred) Transfer is applied to a portion of the shift “Phantom” punches added by the system.
When a transfer IN punch is added, the system adds this OUT punch. In other words: When you tell the system the employee started doing something different, the system “knows” he/she stopped doing what they were before.

73
3. On the right, click the radio button for the Labor Level.
A list of all available (those you have access to) labor level entries will be listed in the Search results box.
4. Click on the correct entry. It will appear in the “name” box next to the labor level entry along
with its description. 5. On the right, click the labor level to which you need to transfer.
A list of all available (those you have access to) labor level entries will be listed in the Search results box.
6. Click on the correct entry. It will appear in the “name” box next to the labor level entry along
with its description. 7. If you need to add transfers for more than one labor level (such as
Department, Job, and Position), repeat steps 4-6 above. 8. Click [OK] when all labor level entries required have been added.
Apply a Labor Account to a Portion of a Shift 1. In the timecard workspace, add a new IN-punch at the time
required (when the employee started a new activity, cost center, confirmation number, etc.) – the time when something changed.

74
2. Click the transfer cell following the IN-punch defining when the transfer should start.
A drop-down list will display your most recent transfers. 3. Select one of the following:
a. A labor account from the list of last entered accounts
b. Search (opens the Select Transfer dialog box)
4. To the right, click the radio button for the Labor Level.
A list of all available (those you have access to) labor level entries will be listed in the Search results box.
5. Click on the correct entry. It will appear in the “name” box next to the labor level entry along with its
description. 6. To the right, click the radio button for the labor level to which you need to transfer.

75
A list of all available (those you have access to) labor level entries will be listed in the Search results box.
7. Click on the correct entry. It will appear in the “name” box next to the labor level entry along with its
description. 8. If you need to add transfers for more than one labor level (such as Department,
Job, and Position), repeat steps 5 - 7 above. 9. Click [OK] when all labor level entries required have been added.
10. To transfer an employee back to their home Labor Account, follow the same
steps as above and choose the employee’s home Labor Account from the Select Transfer dialog box.
Instances of multiple transfers in the same day require you to continue to enter the time of each transfer into the IN-Punch cell and then perform the transfer. The only time you would enter a time in the Out-Punch cell is if the employee did not punch out at the end of their shift for the day. Work Rule Transfer An employee working under a rule other than their “home work rule” is called a Work Rule Transfer. A Work Rule Transfer allows you to apply a different set of rules to

76
an employee’s shift and the appropriate pay rules are associated with the worked time. A Work Rule Transfer also allows you to track various non-productive hours.
Common Work Rule Transfers include CALL-Restricted, CALL-NonRestricted, and CALL Response.
The same concepts apply to work rule transfers as to labor level transfers. Apply a Work Rule Transfer to an Entire Shift
1. In the timecard workspace, click in the Transfer column cell between the IN and OUT punches.
2. A drop-down list will display your most recent transfers. 3. Select one of the following:
a. A Work Rule from the list of last selected
b. Search (opens the Select Transfer dialog box)
4. Click on the Work Rule drop-down box. A list of all available work rules will be listed in the Search results
box. 5. Click on the correct Work Rule. 6. Click [OK].

77
Work Rule and Labor Account Transfers continue to be in effect until the entire shift ends or a new (or the default) Work Rule Transfer is entered into the Time Card.
Situations may arise that require you to transfer both a Labor Account and a Work Rule. Follow the procedure for making a Labor Level Transfer and in the same screen choose the appropriate Work Rule Transfer. Adjust an Individual Schedule There may be times when you’ll need to adjust an employee’s scheduled start or end time or apply a work rule on the scheduled work day or off-day before completing the approval of his/her timecard. Found in the Header Bar, click on the [Schedule] Icon. This will take you to the Schedule Editor. From here you can:
• Add a new shift [Shift > New]
When transferring an employee out of an activity, not only do you need to transfer them to their home Labor Account, but back to their home Work Rule as well!

78
• Schedule a pay code and an amount (including comments) (Pay Code menu) • Change the scheduled start or end time by typing the new times in the cell, or
by double-clicking on the shift cell. (You can also click on the shift cell, then select [Shift > Edit].
• Schedule a work rule or labor account transfer (Shift > Edit, Transfer column) *Note: After saving a work rule or labor account transfer the “Type” changes to “Transfer”.
• Once your changes are complete, click [SAVE]. To go back to this employee’s timecard, click the [Timecard] launch button.
In order to see the new schedule changes in the timecard workspace you must refresh (retrieve) the current information from the database. Select [Actions > Refresh].

79
SECTION REVIEW
Key points covered in this Chapter include: o How to access an individual or multiple employee timecards o Identify the different components in the timecard o Rounding rules o Add, edit, and delete punches o The difference between Calculate Totals, Save and Refresh o Add, edit, and delete pay codes o Add a comment to a punch or a pay code o Print a timecard or a timecard report o Process a full or partial shift labor account transfer o Process a full or partial shift work rule transfer o Adjust an individual schedule through the timecard
Exercise – Workforce Genies Exercise 1Select pay period, and identify columns Editing previous timeframe for employee ______________________ Go to Previous Time Frame for Employee: Monday: Add an IN punch at 7:30 am Add an OUT punch at 3:30 pm Tuesday Add an IN punch at 7:05 am Add an OUT punch at 3:25 pm Wednesday Add an OUT punch for 3:00 pm Add an OUT punch for 4:00 pm Thursday Add an IN punch at 7:00 am Add an OUT punch at 12:00 pm Add an IN punch at 12:25 pm Add an OUT punch at 3:35 pm Add an IN punch at 11:00 pm Add an OUT punch at 2:00 am [SAVE]
80
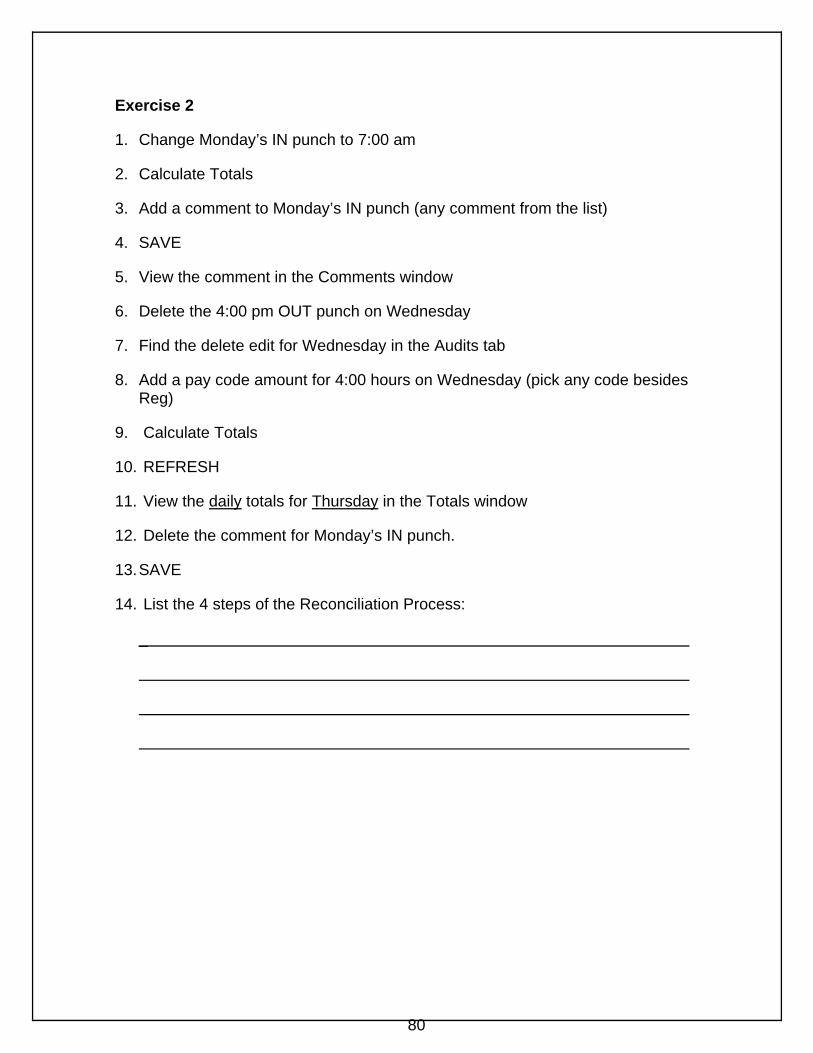
Exercise 2
1. Change Monday’s IN punch to 7:00 am
2. Calculate Totals
3. Add a comment to Monday’s IN punch (any comment from the list)
4. SAVE
5. View the comment in the Comments window
6. Delete the 4:00 pm OUT punch on Wednesday
7. Find the delete edit for Wednesday in the Audits tab
8. Add a pay code amount for 4:00 hours on Wednesday (pick any code besides Reg)
9. Calculate Totals
10. REFRESH
11. View the daily totals for Thursday in the Totals window
12. Delete the comment for Monday’s IN punch.
13. SAVE
14. List the 4 steps of the Reconciliation Process:
_

81
-o previous timeframe for employee ________________________
Chapter 5 Group Edits/Approval

82
Chapter Objectives: At the end of this Chapter participants will be able to:
Perform a Group Edit Approve a Timecard Approve Multiple Timecards Display the Group Edit Results

83
Group Edits With the group-editing feature, you can edit a group of employee timecards at a single time. The most commonly used group edits include Add or Delete hours and Approval. To make a group edit using Workforce Genies:
• Hold down the [Ctrl] or [Shift] key and select one or more employees.
o To select all employees, select [Actions > Select All]. • Select [Amount > Add] from the Menu Bar.
• Complete the applicable dialog box.
• Click [OK].
Example: Employees choose to use PTO hours on a holiday.
To view the results, press the Group Edit Results button in the Navigation Bar as described at the end of this Chapter.

84
Approve a Timecard Approving a timecard indicates the data is correct and ready for payroll processing. No changes can be made to the timecard once it has been approved by the Manager. The timecard data is then forwarded to the Payroll Office for additional review and sign-off.
Sign-off can only be completed by the Payroll Office and may only be applied to the previous pay period.
Approve Multiple Timecards
1. Select an employee Timecard by double clicking on the name (approve an individual time card).
2. Or... make employee selections by highlighting the names within the Pay Period Close Genie (approve a group of employees at one time).
3. In the Header Bar, select the date(s) to approve from the Time Period drop-down list (previous pay period).
4. Select Approvals > Approve.
• Sign-off can only be performed after the previous pay period has ended. (Pay period ends on Saturday night at 12:00 am. Sign-off can be applied any time following that, not before.)
• Timecards MUST be approved each week and forwarded to the Payroll Office for pre-processing.
• Ensure ALL edits have been saved prior to Approval. The edit will display in WFC correctly but will not transfer over if you perform an Approval without saving your work.

85
5. You will receive a prompt to confirm your request to approve the previous pay period:
8. Click [Yes] to proceed with the approval, or [No] to cancel the procedure.
9. To view the approval of an employee’s timecard, access the employee’s
timecard and select the Sign Off & Approval tab in the Totals & Schedule view.
Once a timecard is signed off, the timecard will be shaded gray. Also, the Add Row button and the Erasure buttons will be gone. All information on the timecard can be seen and reported on but not edited.
If the manager/payroll user has a timecard with a missed punch and they cannot contact the employee to determine what the punch should be BUT need to sign off the timecard and process payroll, they should add the missing punch based on the schedule. Follow the process for over-under payments when there are errors in payments due to missing/fixed punches.
86
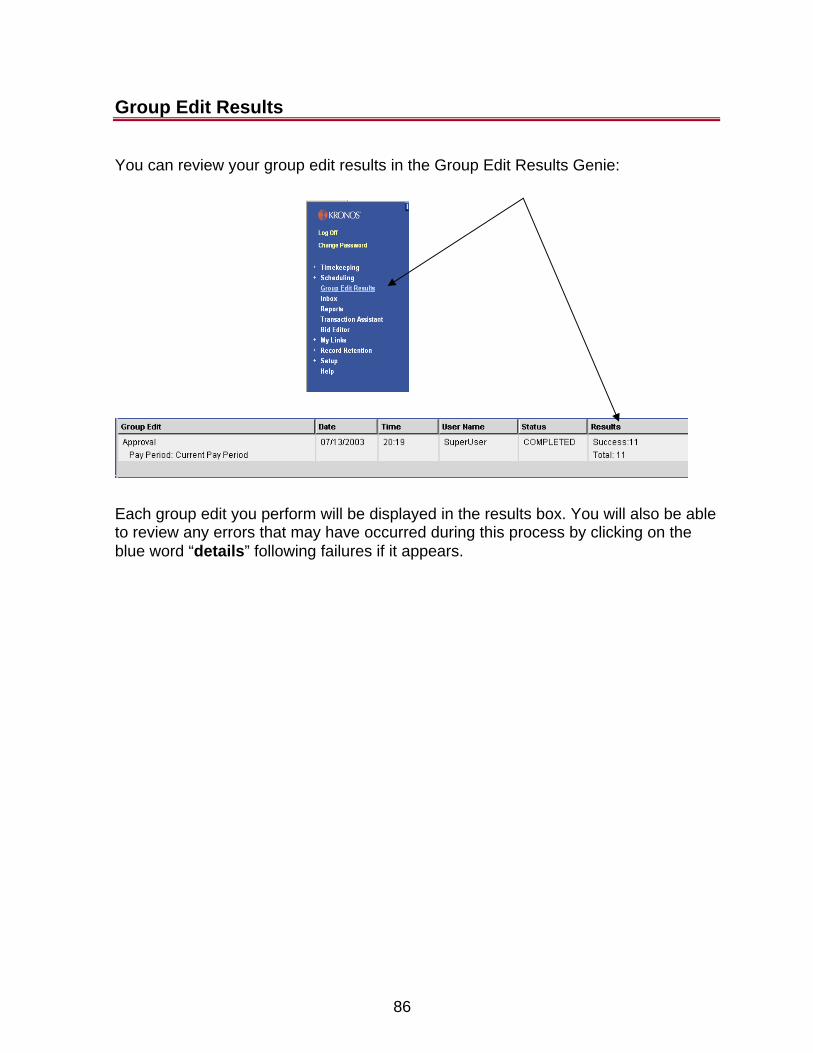
Group Edit Results
You can review your group edit results in the Group Edit Results Genie:
Each group edit you perform will be displayed in the results box. You will also be able to review any errors that may have occurred during this process by clicking on the blue word “details” following failures if it appears.

87
SECTION REVIEW Group Edits
Key points covered in this Chapter include: o Explain the concept of group edits o Explain the benefits of group edits o Perform group edits o Approve an individual Timecard o Approve multiple Timecards o Display the status of group edits
Edit Exercise 1
1. Select [Reconcile Timecards] Genie
2. Select [Current Pay Period] 3. Select a series of employees (use the [Shift] or [Ctrl] key)
4. Select Amount > Add and then complete a pay code selection; the hours given, the effective date and any appropriate comment, if necessary
5. Click [OK] 6. Select [Group Edit Results] to verify Group Pay Code Edit
___________________________________________________________________ Goal: Approve employee timecards and verify group edit results
Exercise 2 1. Select [Reconcile Timecards] Genie
2. Select the [Previous Pay Period] 3. Select [All Employees] 4. Select [Approvals > Approve] 5. Answer [Yes] to the prompt
6. Open the [Pay Period Close] Genie and review the Approval column. (you may need to Refresh your screen)
7. Select [Group Edit Results] to verify the Approval

88
Chapter 6 Managing Employee
Schedules

89
Chapter Objectives: At the end of this Chapter participants will be able to:
Define scheduling terms Understand how scheduling pieces are built Use the Schedule Editor to build and edit employee schedules Schedule pay code edits

90
Managing Employee Schedules What is a schedule? A schedule is made up of one or more shifts (scheduled shift start and shift end) that can be assigned to an employee to track when the employee should work. Schedules are not required in Kronos, but they are available to provide additional functionality to the system such as exception tracking; late punches, early punches, unauthorized overtime, etc. Schedules may also contain off days, labor level and work rule transfers and pay code amounts such as PTO or Jury Duty.
What is a shift? A shift is displayed as a shift start and shift end time with other information that may be assigned to it (such as transfers). It is a span of time when an employee is expected to work (e.g. 9a - 5p). What is a shift template? A shift template is a shift with a name that you can assign to employees over and over again (e.g. 0700-1900). The template contains all the shift attributes except for date and employee name, so when you assign a schedule using a shift template, you do not have to re-enter details for the shift.
Many shift templates have already been created in Kronos WFC and can be selected from a pre-defined list.

91
Pattern Templates A pattern template defines when a shift repeats to make up a schedule. It can include off days, transfers and pay code amounts. Example of a pattern: 7a – 3p Monday through Friday recurring every week
Many shift pattern templates have already been created for you in Kronos WFC and can be selected from a pre-defined list.
Totals Be sure to include scheduled lunch time in your shifts for non-exempt employees, e.g. an 8 hour day may be scheduled as 8.5 hours to include a 30 minute lunch deduction. The totals in the shift editor screen will also include this addition of time. These totals represent the span of time between shift start and end, not hours worked. How Schedules are Built
1. Shift templates are created. 2. Schedule periods are defined (by pay period). 3. Pattern templates are created. 4. Patterns or shifts are assigned to individual employees. 5. Edits are made to employee scheduled shifts as necessary.

92
Schedule Editor The Schedule Editor is where all employee schedules will be assigned and maintained. It displays employee schedules by employee name, date, and pay rule. The Schedule Editor is displayed by schedule period (not pay period) even though the schedule period may be the same as your pay period. It may also be displayed differently (for instance, if the business runs a bi-weekly payroll, but wants to manage and view schedules weekly instead of bi-weekly). You also have the option to select a range of dates, etc.
The Schedule Editor contains three areas:
1. Header - Displays the group of employees you chose to view in the Name or ID field, the date range chosen, and Launch buttons to other functions within the WFC system.
2. Schedule Grid – Contains employee names in alphabetical order (you have
the option to sort in descending order or by pay rule), the Pay Rule each employee is assigned to, and the total scheduled hours for the employee in that time frame, and the scheduled shift for each day for the individual. The bottom of the Schedule Editor displays the number of total scheduled hours for the day with the number of employees scheduled for the day.
3. Comments Tab - Displays the date, shift or pay code, employee name, and
the comment attached.

93
Schedule Grid Totals
The totals contained in the Schedule Editor may show a higher number than you expected if a meal break is included within the schedules. The Menu Bar is also located in the Schedule Grid.
Display Options (View) Menu
• The default view is the Daily view and Shift times. If necessary, you may change your view to 4 hour, 1 hour, or 15 minute intervals. You may also change your view to Shift Labels (e.g. 9a – 5p).
• [View>Schedule] outline. This provides you with a summarized view of
the employee’s schedule.
Save Change
Add, edit, or delete a shift
Add, edit, or delete a Pay Code
Select all, cut, copy, or paste
Based on the latest Lawson data
Display Options

94
• To view an employee’s accrual balance prior to applying scheduled time
off, choose [View>Accruals]. This will display the employee’s available balance.
• To view an employee’s schedule edits, choose [View>Audits]. This will display detailed changes made to an employee’s schedule.
• Comments Tab at the bottom of the Schedule Editor Screen contains all comments that have been added to shifts or pay code edits in the Schedule Editor.

95
Identifying Schedule Indicators When a transfer or pay code edit is scheduled, a schedule indicator will display within the Schedule Editor as well as within the Schedule window in the Timecard.
• Bolded schedules represent either an exempt employee or an employee that does not belong to you and is scheduled to transfer into your area or department.
• Shaded schedules represent the employee has transferred in (or out) of
your department and you cannot edit them.
• (x) Indicates a Labor Account or Work Rule transfer.
• A pay code edit will be indicated by the pay code type and amount shown in a shift cell.

96
Basic Schedule Edits The Schedule Editor provides the tools for schedulers to build and maintain employee schedules. Reviewing and editing schedules is an important part of the scheduling process. Some common schedule edits performed on a regular basis include:
• Adding a shift • Deleting a shift • Schedule a Pay Code edit • Schedule a Labor Account Transfer • Schedule a Work Rule Transfer
There are three ways of adding a shift within the Schedule Editor:
1. Cell editing 2. Copy and Paste 3. Add/Edit Shift window
Cell Editing To add a shift using cell editing, click on the desired empty cell within the Schedule Editor. Type the correct shift start and end times. An 8:00 a.m. to 5:00 p.m. shift can be typed as 8a-5p or 8-17 if you prefer military time. On your keyboard, press the [Tab] key or click in a different cell to complete the input. Click [Save]. Copy and Paste Move your cursor to the cell to be copied and right-click. A shortcut menu appears. Click [Copy]. Move your cursor to the new cell location and right-click. The shortcut menu appears again. Click [Paste]. The shift will now appear in the new location. Click [Save].

97
Shift Window The Shift window provides the ability to make detailed edits to shifts within a schedule. This window can be used to schedule a regular shift or schedule more detailed shifts which contain transfers. A shift may also be broken down into smaller pieces called segments. A segment is a portion of a shift that requires special identification. Segments have five different types:
1. Regular – used for hours worked in an employee’s home labor account. 2. Break – A portion of a shift for non-worked time such as a meal break. Not
used at MMC. 3. Transfer – A portion of the shift during which the employee is working outside
their home labor account, work rule or both. 4. Unavailable – Used to reflect times that an employee is not available to work. 5. Off – A portion of a shift that is linked to a work rule. This segment is
commonly used to record on-call pay.
NOTE REGARDING “TYPE” When using rounding rules, the shift’s TYPE must be either Regular or Transfer (it will not link to a shift with a type of OFF or Unavailable, possibly impacting the rounding of the in/out punches)! Using Regular or Transfer will ensure a shift is linked to a schedule.

98
Add a Shift Using the Shift Window To view the appropriate employee, right-click on the desired date. Select Add>Shift.
This will open the Add Shift window.
The date day/date you selected in the Schedule Editor will auto fill into the start and end date. The default Shift Type is regular. This is referring to a regular type of shift, not a pay code. The other segment types are available for selection from this drop-down list. Type the start time of the shift in the Start Time cell. Select the Insert Shift button in the upper-right corner and choose from the predefined list…OR…tab over and type the end time of the shift in the End Time cell. Verify the Scheduled Hours cell reflects the total hours for the shift. Click [OK]. Click [Save].
If the shift crosses the day divide (midnight), be sure to change the end date to reflect the correct end time!
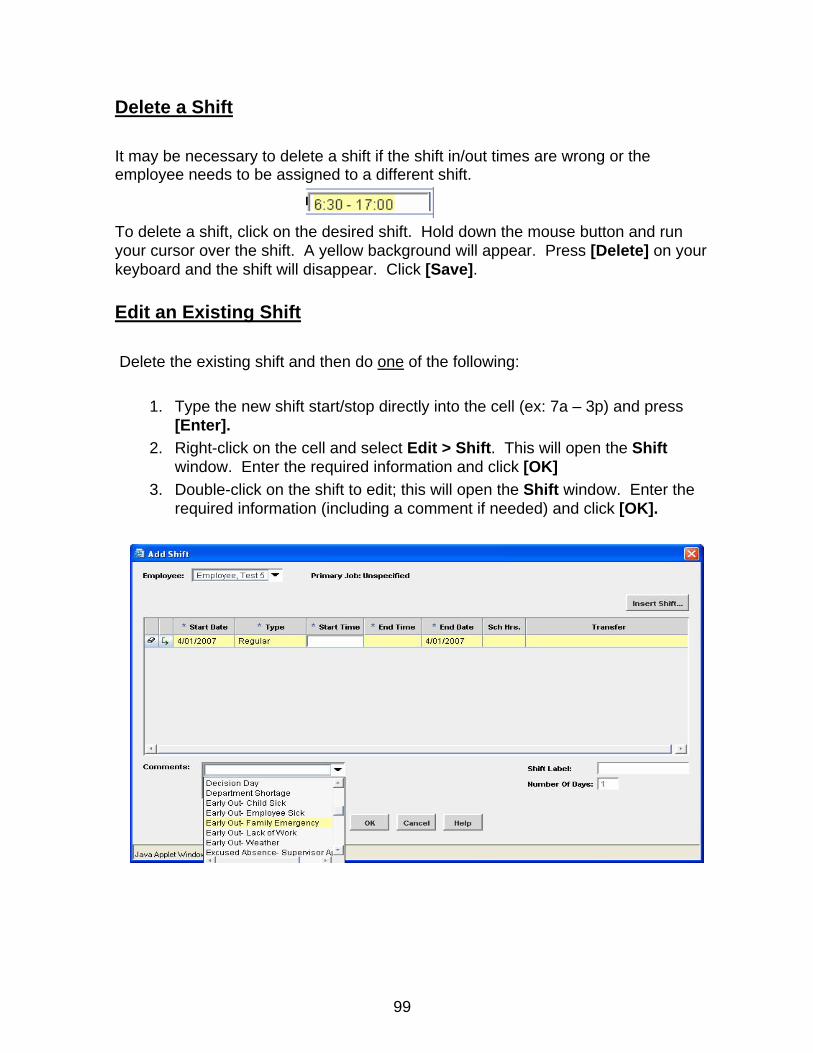
99
Delete a Shift It may be necessary to delete a shift if the shift in/out times are wrong or the employee needs to be assigned to a different shift.
To delete a shift, click on the desired shift. Hold down the mouse button and run your cursor over the shift. A yellow background will appear. Press [Delete] on your keyboard and the shift will disappear. Click [Save]. Edit an Existing Shift Delete the existing shift and then do one of the following:
1. Type the new shift start/stop directly into the cell (ex: 7a – 3p) and press [Enter].
2. Right-click on the cell and select Edit > Shift. This will open the Shift window. Enter the required information and click [OK]
3. Double-click on the shift to edit; this will open the Shift window. Enter the required information (including a comment if needed) and click [OK].
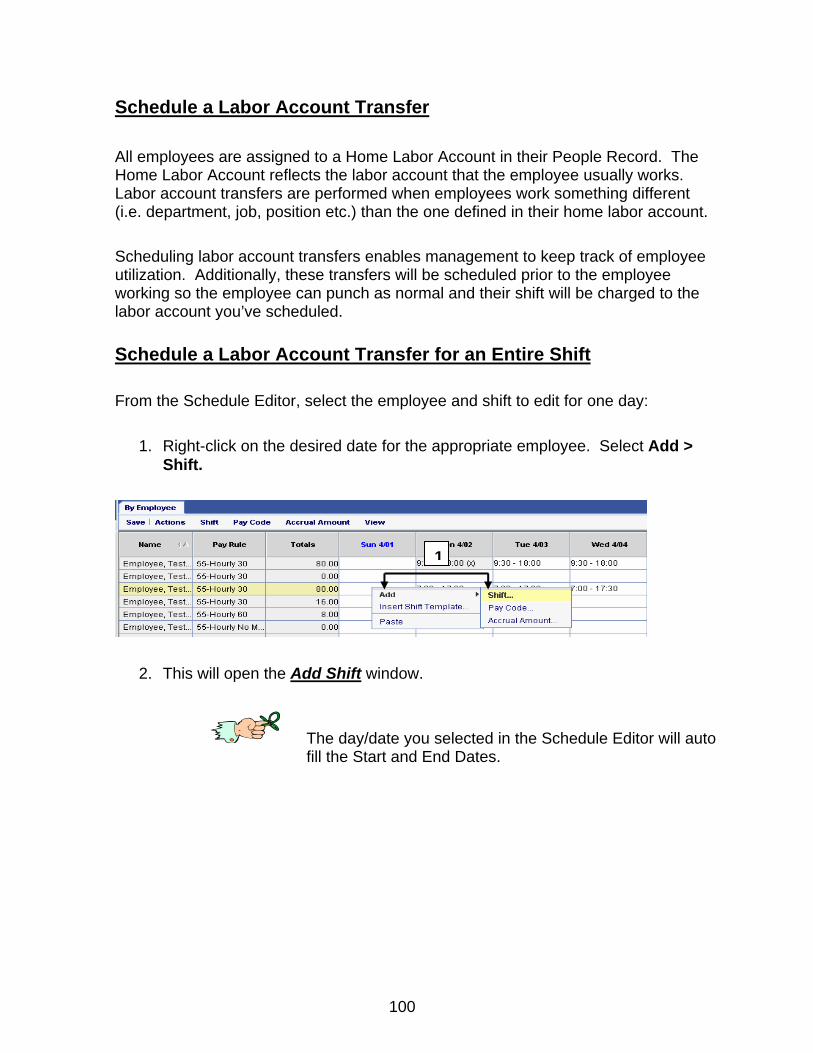
100
Schedule a Labor Account Transfer All employees are assigned to a Home Labor Account in their People Record. The Home Labor Account reflects the labor account that the employee usually works. Labor account transfers are performed when employees work something different (i.e. department, job, position etc.) than the one defined in their home labor account. Scheduling labor account transfers enables management to keep track of employee utilization. Additionally, these transfers will be scheduled prior to the employee working so the employee can punch as normal and their shift will be charged to the labor account you’ve scheduled. Schedule a Labor Account Transfer for an Entire Shift From the Schedule Editor, select the employee and shift to edit for one day:
1. Right-click on the desired date for the appropriate employee. Select Add > Shift.
2. This will open the Add Shift window.
The day/date you selected in the Schedule Editor will auto fill the Start and End Dates.
1

101
3. The default Shift Type is regular. This is referring to a regular type of shift, not a pay code. Choose Transfer from the drop-down box.
4. Type the start time of the shift in the Start Time cell. Tab over and type the
end time of the shift in the End Time cell. Verify the Scheduled Hours cell reflects the total hours for the shift.
5. In the Transfer column, click on the drop-down arrow and select Search (or
select one from the last 5 transfer entries you’ve performed in this session).
43 5

102
The Select Transfer dialog box will appear:
6. Make the desired Labor Account transfer selections by choosing the radio
button of the level you need. 7. Highlight the entry in the left-hand box, Available Entries.
If the Choose Transfer from the drop-down box shift crosses the day divide, be sure to change the End Date to reflect the correct End Time!
8. Click [OK] and then click [Save] from the Actions menu.
Remember to save your changes!
67

103
Schedule a Labor Account Transfer for a Partial Shift At times an employee may be scheduled to transfer for a portion of a shift instead of an entire shift. To perform a Labor Account Transfer to a portion of an employee’s shift: From the Schedule Editor, select the employee and shift to edit for one day:
1. Right click on the desired date for the appropriate employee. Select Add > Shift.
2. This will open the Add Shift window. 3. The date day/date you selected in the Schedule Editor will auto fill into the
Start and End Date. 4. Confirm that Regular appears in they Type field. 5. Type the start time of the shift in the start Time cell. Tab over and type the
end time of the Regular shift in the End Time cell. 6. Add a line by using the green arrow.
7. Click in the Type field in the second row and select Transfer.
1
2
3 34
5 5
6 7 8 8 9

104
8. Type the start and end time of when the employee worked in the new labor account in the cells.
9. In the Transfer column, click on the drop-down arrow and select Search.
The Select Transfer dialog box will appear:
10. Make the desired Labor Account transfer selection by choosing the “radio button” at the level you need.
11. Highlight the entry in the left-hand box, Available Entries. 12. Click [OK] 13. Click [Save]
Remember, when selecting Transfer from the drop-down box, the End Date and End Time must be changed if the shift crosses the day divide.
1011
12

105
Work Rule Transfer Work rules are used in WFC to apply different types of rules to an employee’s hours. Work rule transfers are commonly used when an employee works at a different level, and rules regarding pay, exceptions shift lengths need to be changed or a notation needs to be made to track non-productive hours.
Common Work Rule Transfers include CALL RESPONSE, MMC-HOURLY No Meal, etc.. Schedule a Work Rule Transfer for an Entire Shift
1. Right click on the desired employee for the appropriate date and select Add > Shift. 2. This will open the Add Shift window:
3. The day/date you selected in the Schedule Editor will auto fill the Start and End Dates.
4. The default Shift Type is regular. This is referring to a regular type of shift, not
a pay code. Choose Transfer from the drop-down box. 5. Type the start time of the shift in the Start Time cell. Tab over and type the
end time of the shift in the End Time cell. Verify the Scheduled Hours cell reflects the total hours for the shift.
2
4
3 3
5 5 6

106
6. In the Transfer column, click on the drop-down arrow and select Search (or
select one from the last 5 transfer entries you’ve performed in this session). This will open the Select Transfer dialog box:
7. Make the desired Work Rule transfer selection by choosing from the list in the bottom-left corner. A Labor Account Transfer may also be done to “charge” the hours to another Department, job, or position by selecting them from a radio button.
8. Click [OK]
9. Click [Save] in the Actions menu.
Schedule a Work Rule Transfer for a Partial Shift To perform a Work Rule transfer for a partial shift, follow the same steps as defined in “Schedule a Labor Account Transfer for a Partial Shift”, except choose from the Work Rule list in the Select Transfer dialog box.
7
8
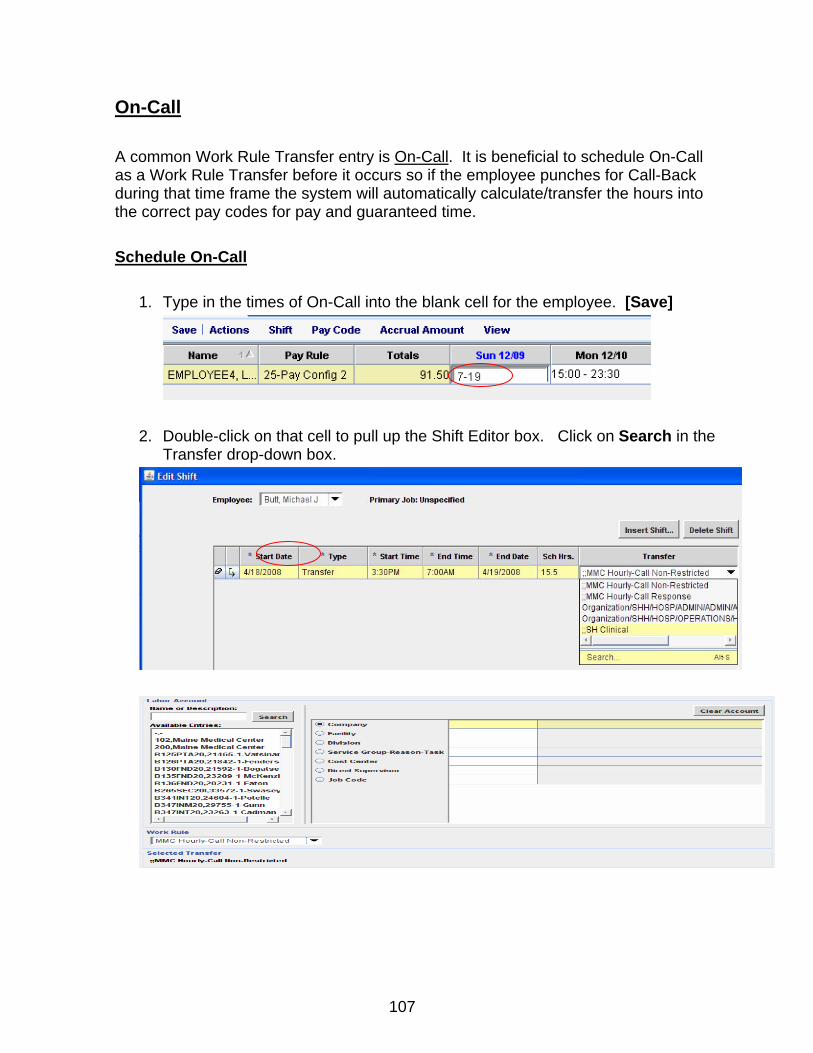
107
On-Call A common Work Rule Transfer entry is On-Call. It is beneficial to schedule On-Call as a Work Rule Transfer before it occurs so if the employee punches for Call-Back during that time frame the system will automatically calculate/transfer the hours into the correct pay codes for pay and guaranteed time. Schedule On-Call
1. Type in the times of On-Call into the blank cell for the employee. [Save]
2. Double-click on that cell to pull up the Shift Editor box. Click on Search in the
Transfer drop-down box.
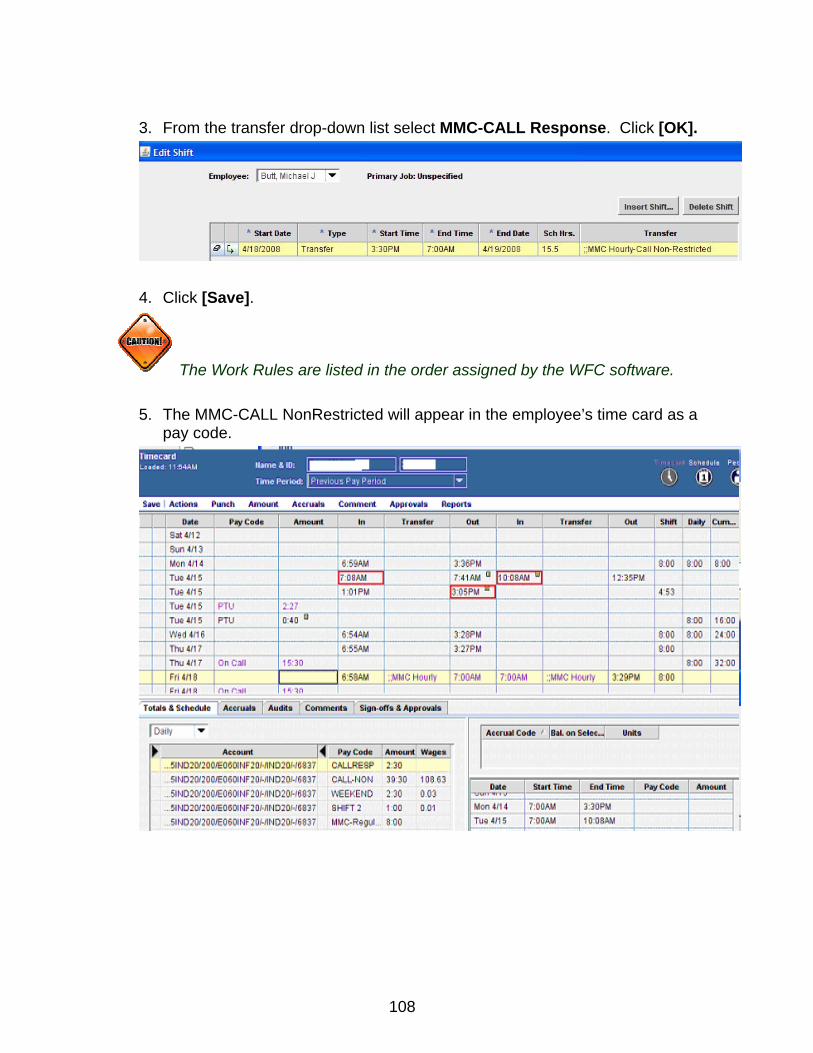
108
3. From the transfer drop-down list select MMC-CALL Response. Click [OK].
4. Click [Save].
The Work Rules are listed in the order assigned by the WFC software.
5. The MMC-CALL NonRestricted will appear in the employee’s time card as a pay code.
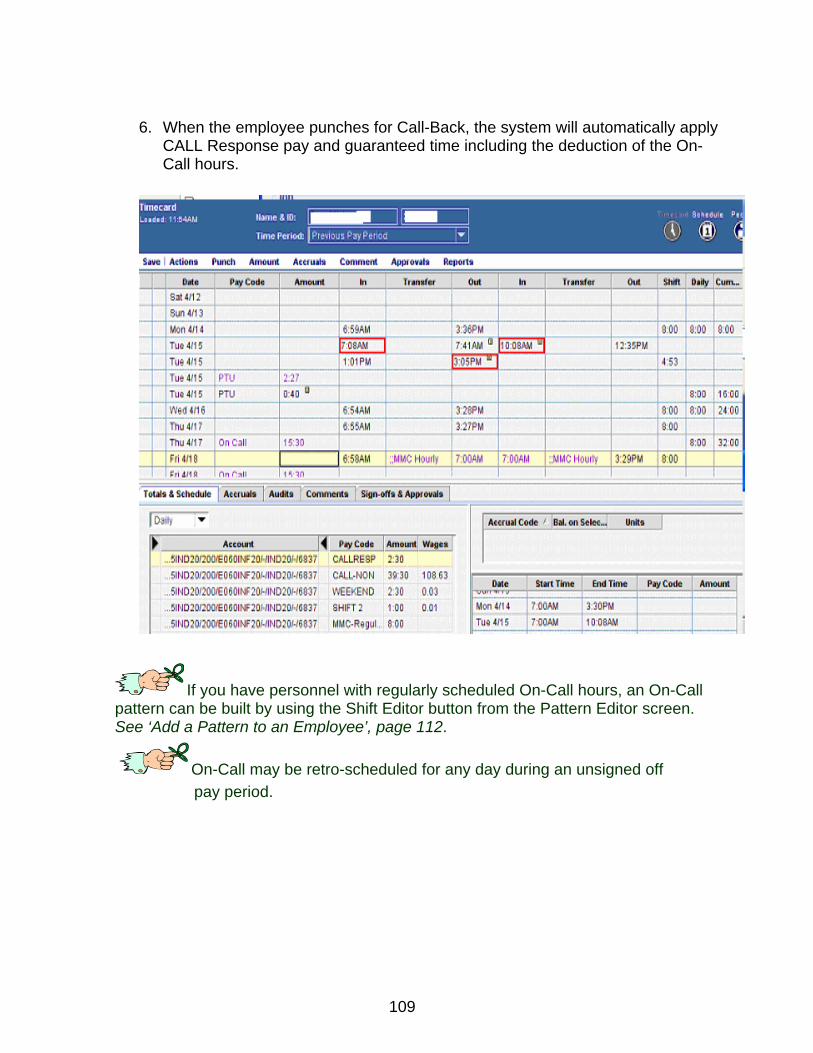
109
6. When the employee punches for Call-Back, the system will automatically apply
CALL Response pay and guaranteed time including the deduction of the On-Call hours.
If you have personnel with regularly scheduled On-Call hours, an On-Call pattern can be built by using the Shift Editor button from the Pattern Editor screen. See ‘Add a Pattern to an Employee’, page 112.
On-Call may be retro-scheduled for any day during an unsigned off pay period.

110
Schedule a Pay Code Amount in Advance Pay codes hold hours accumulated by the employee through the pay period. Pay Code edits are used to add hours to a specific pay code and can be scheduled in advance. They are commonly used to compensate an employee for time off. Select the employee from the Schedule Editor as well as the day to edit: Perform a Pay Code Edit
1. Right-click on the cell and select Add > Pay Code
2. This will open the Pay Code Editor window
3. Select the appropriate Pay Code from the list. 4. Enter the Amount. 5. Enter the Display Start Time. This is the time the pay code hours will be
displayed in the schedule (typically the start of a regular shift) 6. If the edit is going to repeat on consecutive days, enter the Number of Days
the edit will apply to (Example: if you enter the number 3, the edit will apply to the effective date and the two days following)
7. If applicable, select a comment from the drop-down menu.

111
8. Verify the “Override Shift” option – this box checked removes the scheduled shift and replaces it with the scheduled pay code amount
9. Click [OK] to close the Add Pay Code window.
Edit an Existing Pay Code
1. Right-click on the cell and select Edi t> Pay Code. This will open the Pay Code Editor window.
2. Enter the required information.
3. Click [OK].
4. Double-click on the shift to edit.
This will open the Pay Code Editor window.
5. Enter the required information. 6. Click [OK].

112
Scheduling Tools Scheduling tools facilitate creating and maintaining schedules which can be repeated over time. These tools “accessorize” scheduling in order to make the act of creating a schedule more efficient. Add a Pattern to an Employee From the Schedule Editor, select the employee requiring a pattern.
1. Right click on the employee’s name. 2. Select: Add Pattern>Shift… or…Pay Code
Every Exempt employee MUST receive a permanent pattern. These permanent patterns can be edited as long as the scheduled hours total correctly for that employee each pay period.

113
The Pattern Editor Screen will appear:
3. In this Pattern Editor screen, initiate one of the following: a. Highlight the days the employee is expected to work (add
additional lines if needed). Select the [Insert Shift] button and choose from the existing shifts available to you. If the pattern repeats over more than one week, change the Recurring interval to the number of weeks (or days).
b. Select the [Insert Pattern] button and choose from the existing patterns available to you.
4. Click [OK]. 5. Enter the start and pattern date. The start date is the date the employee will
begin working that schedule. The pattern date is the date the schedule pattern begins. Optimally, you want these dates to be the same day (e.g. both begin on a Sunday).
6. Check “Forever” which means leave that schedule in place until you change it
or apply another pattern OR apply an end date if that pattern ends. Check “Override other Patterns” if this pattern should override any other pattern the employee(s) has previously been assigned to. Do not select this option if the new pattern should be saved (added) in addition to existing assigned schedules. When left unchecked, there is a potential of double-scheduling.
7. Click [OK].
a
b

114
The Schedule Editor will display the employee’s schedule.
Add a Pattern to Multiple Employees 1. Hold the [control] key and select the individuals
2. Right-click and follow the same procedure as adding a pattern to an individual. (See previous section.)
Remember to SAVE your work!

115

116
Schedules
SECTION REVIEW
Key points covered in this Chapter include: o Define Scheduling terms o Understand how scheduling pieces are built o Use the Schedule Editor to build and edit employee schedules o Schedule transfers to different Work Rules o Schedule pay code edits
Goal: Create shift and pattern templates
Exercise 1 Goal: Edit an Individual’s Shift and Add a Pay code Amount
1. Select one of the employee’s that do not have a schedule assigned to them. 2. Enter a permanent schedule pattern of your choice. 3. Select one of the employees that are assigned a Pattern Template. 4. Edit the scheduled shift for Thursday and make that shift 6a – 2p 5. Add a work rule transfer to the shift for Thursday (use your imagination as to
which one to select) 6. Add a pay code edit (PTO Day) for Friday.
a. Make sure the pay code overrides the shift for Friday. b. For this example, the pay code amount should start at 6am and should
have the amount equal to the scheduled shift length for that day). 7. Save your work!

117
Exercise 2 Goal: Edit an Individual’s Shift and Add a Pay code Amount
1. Select one of the employees that are assigned a schedule. 2. Add a schedule on an off day for 7pm to 7am. 3. Add a work rule transfer to the shift for Thursday (use your imagination as to
which one to select) 4. Add a pay code edit for Friday (use your imagination on what pay code you
want to select). a. Make sure the pay code overrides the shift for Friday if it needs to. b. For this example, the pay code amount should start at 6am and should
have the amount equal to the scheduled shift length for that day). 5. Save your work!
NOTES:

118
Chapter 7 Running Reports

119
Chapter Objectives: At the end of this Chapter participants will be able to:
Access the Reports function in WFC Understand different report categories Run reports Describe some common daily and weekly reports Understand the HyperFind workspace Create a temporary HyperFind query Edit a temporary HyperFind query Reports List with Examples

120
Running Reports You may access the Reports Chapter in one of two ways:
1. Select Reports from the navigation bar
2. Select Reports using the [launch] button.
The Reports page will appear:
3. Click the [+] to expand the category for the desired report type, if you are unsure which category to select expand the “All” category.
4. Select a report – a report description is listed on the right when you click on the report name.
Navigation
Launch Button
1
2

121
5. Make sure the employee selection is correct in the “Show” window. Change the employee selection if required.
6. If the Specific Date dialog box opens, enter or select a date using the same format that appears in the dialog box and click OK.
7. To change the time period, click the Time Period drop-down arrow and select the new time period.
8. To change the report options and refine your reporting criteria, select a report, and then select Set Options.
Be sure to always check the Set Options tab prior to running your report, this option allows you to narrow down your criteria and “customize” your report.
9. Specific report options: Options that you can set differ for each report. Example – certain reports allow you to select specific pay codes to include in the report. The exceptions report allows you to select absence options.
10. From the Select Reports menu, select Run Report. 11. Click the Check Run Status tab. The report should be the first report listed.
12. Click Refresh Status until report is completed.
13. Double-click on the report or choose View Report from the menu bar to view it. Print the report by using the [Print] button on the Internet Explorer bar. You may also save it to your desktop from Adobe and email the report to another person.
Statuses of the Refresh Status include:
Waiting Complete Updating Failed Running
There are several reports to choose from, but some suggested reports to run on a daily or weekly basis are: Actual vs. Schedule by Labor Account (if using Schedule Editor genie) Exceptions
Employee Hours By Labor Account Hours by Labor Account
Employee Transactions and Totals Schedule by Labor Account - Weekly
Time Detail

122
Using the Reports Launch Button to Run a Report You can also generate launch reports from another component. For example, you could use the following procedure to run a report for people in your group who have unexcused absences.
1. From the navigation bar, select My Genies > Reconcile Timecard 2. From the Genie workspace, select a Time Period and highlight the
employees who show unexcused absences
3. Click the Reports [launch] button. 4. The Reports workspace opens. The employee selection and timeframe are
the same as the selected within the Genie 5. Select and run the report 6. The report will contain only the employees who were selected in the
Reconcile Timecard workspace Reports
Timecard Editor Reports All reports may not be available to all users. The Super users should work with the WFC team to decide which reports will be made available to Supervisors and to Managers.
Absent Employees Accrual Summary Accrual Detail Comments Employee Currently Earning Time Employee Transactions and Totals Exceptions Hours by Labor Account Hours by Labor Account with Graph Summary Labor Levels Person Attribute Person Job Assignment Primary Account Detail Punch Origin Schedule by Labor Account – Monthly Schedule by Labor Account – Weekly Timecard Audit Trail Time Detail

123
ABSENT EMPLOYEES This report displays employees who are absent ; whether they are excused or unexcused absences and displays data for the selected date range. Only absences through the current day are displayed; future scheduled absences do not appear in the report. This is only useful if employee schedules are entered and maintained into WFC.

124
ACCRUAL SUMMARY This report displays starting accrual balances, earnings/credits, takings/debits, and the ending balance for each accrual code in the selected time period. If a reset has occurred, the date, day, and amount of the reset appears in the report.
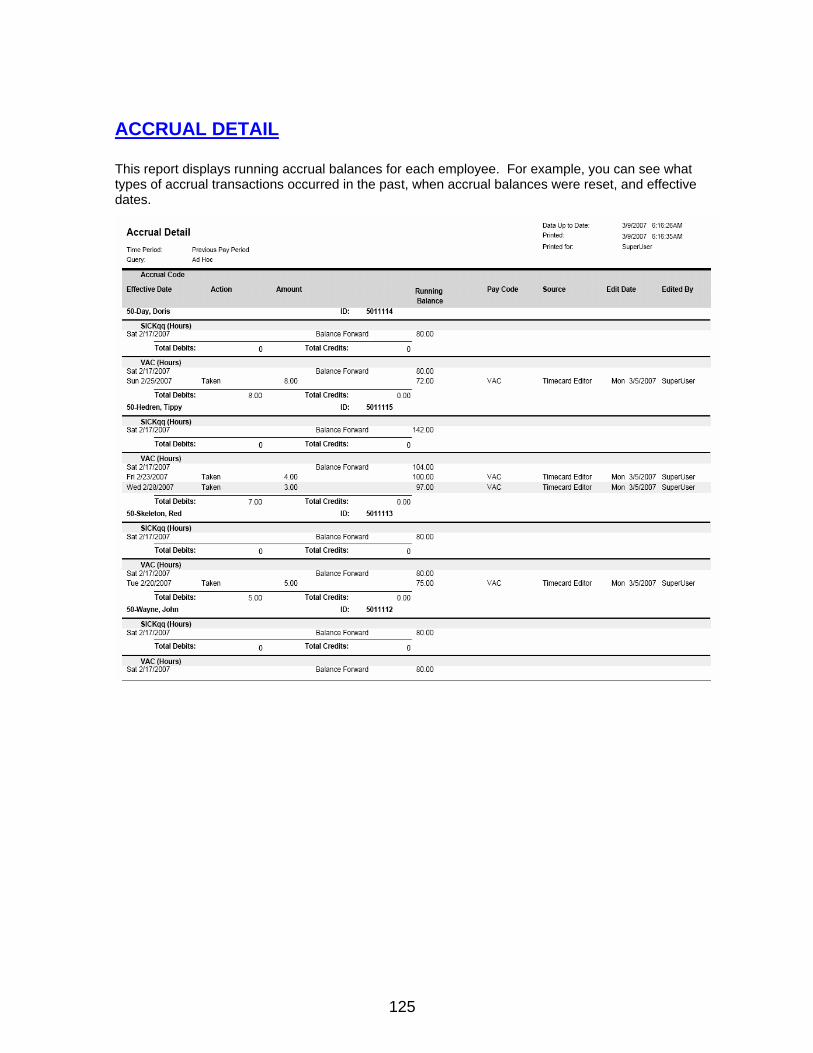
125
ACCRUAL DETAIL This report displays running accrual balances for each employee. For example, you can see what types of accrual transactions occurred in the past, when accrual balances were reset, and effective dates.

126
COMMENTS Lists all the comments entered in the system, including the comment code and activation status.
EMPLOYEE CURRENTLY EARNING TIME (On Premise) Displays the employees who have an in-punch (or start time entered) and no out-punch (or no end time entered) between the time of the in-punch and the time the report is generated.

127
EMPLOYEE TRANSACTIONS and TOTALS Displays pay code transaction data and totals by employee as well as a grand total. Pay codes, their respective time amount totals. Combined pay codes display separately with their respective time or money amount totals
EXCEPTIONS Displays exceptions and comments attached to the start of end of a shift, break or meals, as well as absences for each employee within the specified time period. Most exceptions are tracked using employee schedules. This report is less helpful if employee schedules are not entered and maintained into WFC.
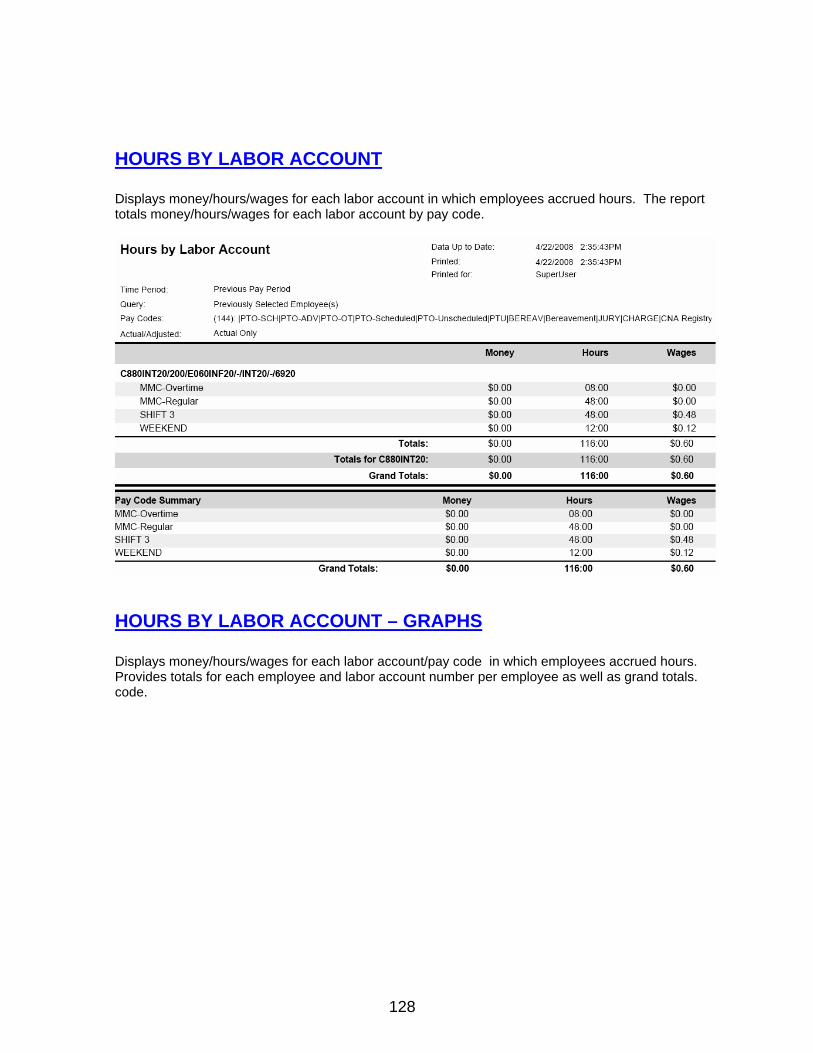
128
HOURS BY LABOR ACCOUNT Displays money/hours/wages for each labor account in which employees accrued hours. The report totals money/hours/wages for each labor account by pay code.
HOURS BY LABOR ACCOUNT – GRAPHS Displays money/hours/wages for each labor account/pay code in which employees accrued hours. Provides totals for each employee and labor account number per employee as well as grand totals. code.

129
PUNCH ORIGIN Displays in/out punch dates and times for selected employees, including source information: server, client IP address, user name, and application.
SCHEDULE BY LABOR ACCOUNT – MONTHLY Shows schedules for the selected labor accounts. Employees are sorted by labor account. Shifts have shift labels. It displays 28 days/page – requires LEGAL size paper.
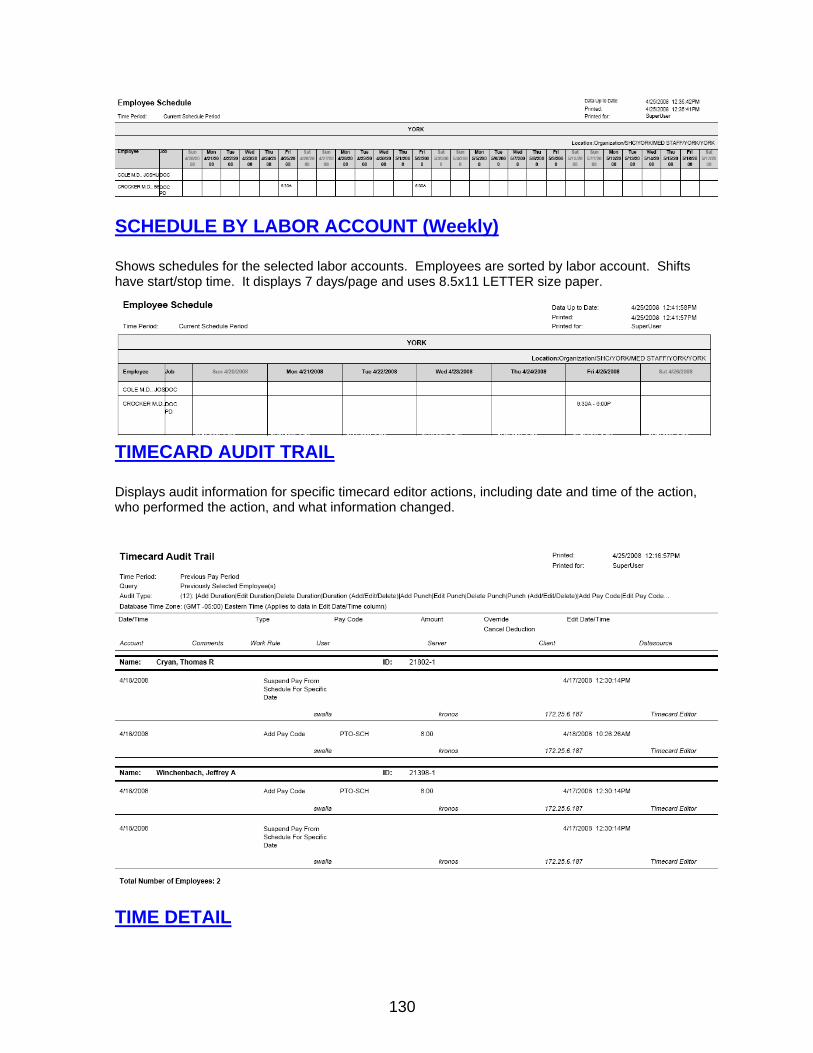
130
SCHEDULE BY LABOR ACCOUNT (Weekly) Shows schedules for the selected labor accounts. Employees are sorted by labor account. Shifts have start/stop time. It displays 7 days/page and uses 8.5x11 LETTER size paper.
TIMECARD AUDIT TRAIL Displays audit information for specific timecard editor actions, including date and time of the action, who performed the action, and what information changed.
TIME DETAIL

131
Displays detailed data about each employee’s punches, duration, and pay code edits. Summary data is displayed per employee, totaling time and money by labor level and pay code (excluding combined pay codes) and then by pay code only (separately listing combined pay codes). Note: MMC does not, currently, use combined pay codes.
THE END OF TIME DETAIL REPORT SUMMARY SHOWS PAY CODE TOTALS FOR ALL EMPLOYEES INCLUDED IN THIS REPORT
HyperFind Query Searching for Employees Workforce Central provides two ways to search the database for employees: QuickFind Genie on the Navigation Bar and HyperFind that you can use in Genies or Reports.

132
QuickFind Genie QuickFind lets you search for one or more people by Name or ID number.
1. Select QuickFind under the Genies heading on the navigation bar
2. In the Name or ID field, enter an employee name or ID with or without a wildcard (*)
3. Click [Find] The employees matching your selection will be displayed in the workspace. HyperFind in Genies or Reports HyperFind is a query tool you can use to search for employees with specific attributes. When generating reports, reviewing Genies, scheduling employees, and editing timecards, you can use an ad-hoc (one time use) query to search for people in the system. The most commonly used categories of filters are General Information and time Management. Searching for Employees
Ad Hoc (temporary) Queries are valid for your current session, once you log out of WFC your Ad Hoc Queries will be deleted.

133
Create a Hyperfind (Ad Hoc) Query 1. From within one of the Genies or Reports:
• Select the “Show” drop-down box • Select “Edit Ad Hoc”
This will open the HyperFind Queries window/workspace.
2. Select a filter from the left side of the Select Conditions tab
Anything in this list of filters can be reported on.

134
3. Select: Include or Exclude people who meet this condition
4. Select a condition. The condition options will vary based on the filter selected
5. Click [Add Condition] – the filter and condition will then be added to the “Selected Conditions” window at the bottom of the screen.
6. Repeat steps 4-6 as necessary to complete query.
7. To verify your selections from multiple filters, you may look at the View Query tab.
The conditions MUST show in the Selected Conditions window in order for them to be part of your selection criteria. You may also look for them in the View Query window.
A “Test” button is located in the header of this screen. It is there for you to test the results of your query before utilizing it.

135
Saving the Query 1. Select Save As, under the Conditions tab
2. Click [OK]
View Query for Genies and Reports 1. Select the Genie or Report you wish to view the people in.
2. From the Show field, click on the first option “Ad Hoc”.
3. Proceed to view, make changes, or run a report on selected query employees listed.

136
Editing Conditions/Additional Options To edit the conditions or make additional conditions to your query, select the Edit button next to the Show field.
Click on the Edit Conditions Tab. This allows you to delete or edit conditions added to the query.
To add additional conditions, return to the Select Conditions Tab.
In this example, on the Select Conditions tab, the user selected the filter for Exceptions and added the exception “Early In”. The user only wanted “Missed Punches”, “Late In” and “Early Out”. To delete the unwanted condition: • Click on the Edit Conditions tab • Select the condition and from the menu • Select Delete Condition

137
SECTION REVIEW Reports
Key points covered in this Chapter include: o Access The Reports function in WFC o Understand different report categories o Run reports o Describe some common daily and weekly reports o Create a Hyperfind query for use in Genies or Reports
Reports Exercise 1
1. Select Reports 2. Select the Timecard category 3. Select the Exceptions report 4. Make the appropriate employee selection 5. Select an appropriate range of dates from the Time Period drop-down list 6. Click Options and then click Exceptions 7. Click Remove All to deselect the list of exceptions 8. Select only the “Missed Punch” exception 9. Click [Add] 10. From Set Options, click Run Report 11. From the Check Status tab, verify the status indicates “Complete” 12. Double-click the report to open

138
Exercise 2 Goal: Create a Time Detail Report
1. Select Reports 2. Select the Timecard category 3. Select the Time Detail report 4. Make the appropriate employee selection from the Show drop-down list 5. Select an appropriate range of dates from the Time Period drop-down list 6. Click the Set Options tab and then click Options>Actual/Adjusted 7. Select Actual or Adjusted for Historical edits. 8. Click [Run Report] 9. From the Check Status tab, verify the status indicates “Complete” 10. Double-Click the report to view.
Take a few minutes to scroll through the Time detail Reports Hours by Labor Account Report Exercise 3
1. Select Reports 2. Select the Roll-up Genie category 3. Select the Employee Hours by Labor Account report 4. Make the appropriate employee selection 5. Select an appropriate range of dates from the Time Period drop-down list 6. Click Options 7. Select Pay Code and click on Remove All to deselect the list of default Pay
Codes 8. Select 3 or 4 Pay Codes from the list (Regular, OT, etc) 9. Click [Add] 11. Click [Run Report] 12. From the Check Status tab, verify the status indicates “Complete” 13. Double-Click the report to view.
You may need to click “Refresh Status” in order to verify the report has finished processing.

139
Chapter 8 Manager Training Wrap-Up

140
Manager Training Wrap-Up:
1. Kronos Roles 2. Best Practice 3. Review 4. Where to get Support and ask questions after go-live
Kronos Roles As a Manager/Supervisor/Director, you should:
• Review, edit, and sign off timecards each pay period. • Reconcile timecards for your staff – both hourly and exempt. • Approve timecards by 11am on Monday after the pay period ends.
As an Employee, you should:
• Clock time at the time clocks • Fill out Edit Logs or send E-mail to supervisor for any missed punches • If you are an exempt and your Department requires it, be sure to have your
schedule adjustments in on the last day of the pay period. Best Practices To facilitate the pay period close process, you should:
1. Review/edit timecards on a daily basis for the previous day 2. Primarily pay attention to those timecards that have exceptions 3. Resolve exceptions that require action such as missed punches
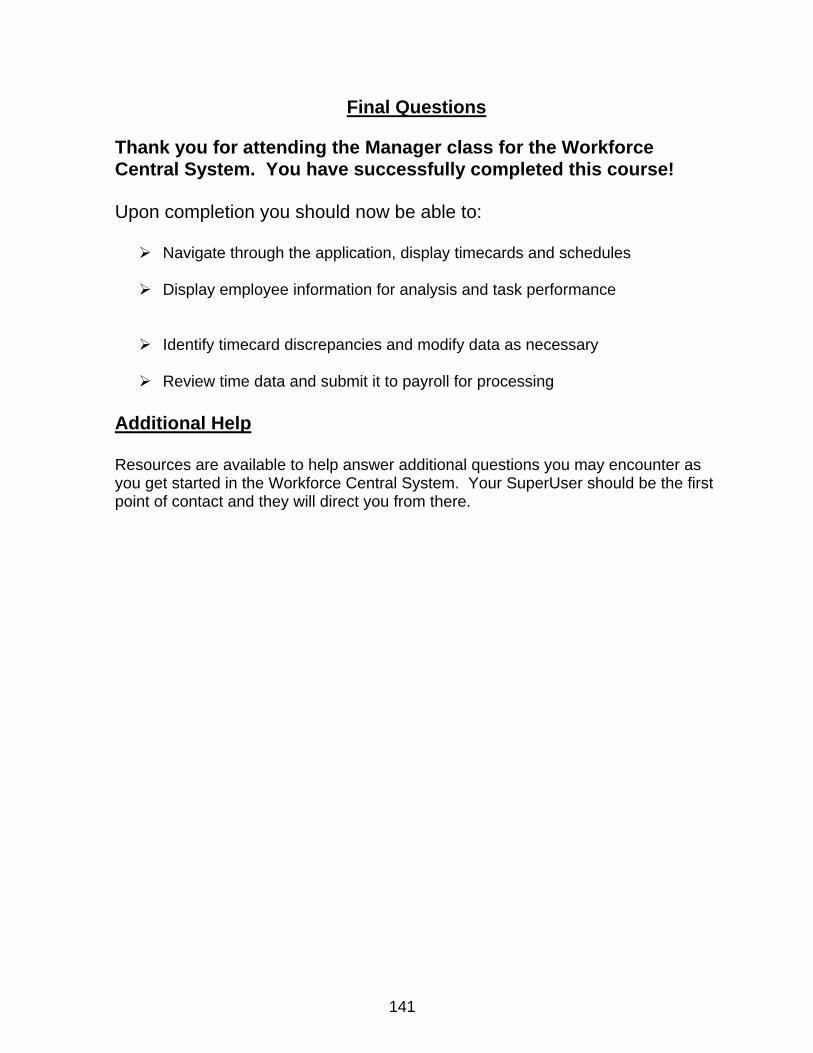
141
Final Questions Thank you for attending the Manager class for the Workforce Central System. You have successfully completed this course! Upon completion you should now be able to:
Navigate through the application, display timecards and schedules
Display employee information for analysis and task performance
Identify timecard discrepancies and modify data as necessary
Review time data and submit it to payroll for processing
Additional Help Resources are available to help answer additional questions you may encounter as you get started in the Workforce Central System. Your SuperUser should be the first point of contact and they will direct you from there.

142
GLOSSARY Accrual Units of time employees earn for days
off Accrual Profile Assigned to the employee record and
determines which buckets an employee has available to use for non-worked time. Also determines the increments an employee can take for non-worked time (e.g. 15 minute increments)
Approval An electronic signature which indicates the employee information has been reviewed and approved
Calculate Totals Displays the results of your changes without saving
Comment Provides additional information on punch or pay code from a pre-defined list
Delegation Allows you to give another manager the rights to your editing functions while you are temporarily out of the office
Display Profile Attached to an employee’s record and determines which WFC Genies a user will see
Employee Group Labor Level Set Determines who a manager will see as his/her “home” employee
Exceptions Flags that indicate the employee deviated from scheduled shift start and stop times and/or meal break times.
Exempt Salaried Employee Function Access Profile Determines what users can access and
the types of functions that users can perform within the WFC system.
Genie Online reports that managers can use to find employees. View Options for detailed or summary data.
Group Edits Edit a group of employee timecards at a single time
Hyperfind Searches that can be used to locate employees with the database

143
Kronos Connect An interface that allows employee and
timecard data to transfer between the payroll and WFC systems
Kronos Workforce Timekeeper Workforce Central System Labor Account Account number that mimics
accounting structure to determine where time is charged
Labor Level Entry A single component of a Labor Level Labor Level Transfer Set A group of Labor Level entries that a
manager can use to transfer time Launch Buttons Assist in navigation between
components MBO Number Hospital System Identification number
located before each rule and following each Genie
Navigation Bar Displays a list of features and links Non-Exempt Hourly Employee Pattern Defines when a shift repeats to make
up a schedule
Pattern Template Pre-built schedules you can assign to employees
Pay Code Holds hours accumulated by employees throughout the pay period e.g. Overtime
Pay Rule Defines how time and attendance information processes for each employee
Phantom Punches Added by the WFC System RAT Rule Analysis Tool. Reports the
processing steps used to calculate an employee(s) total(s) for a selected time period
Refresh Abandons changes without saving and displays last saved data
Schedule One or more shifts that can be assigned to an employee to track when the employee should work
Segment A portion of a shift Shift Shift start and end times Shift Template Pre-built shifts you can assign to
employees Sign-Off Indicates final approval and is ready for
payroll processing
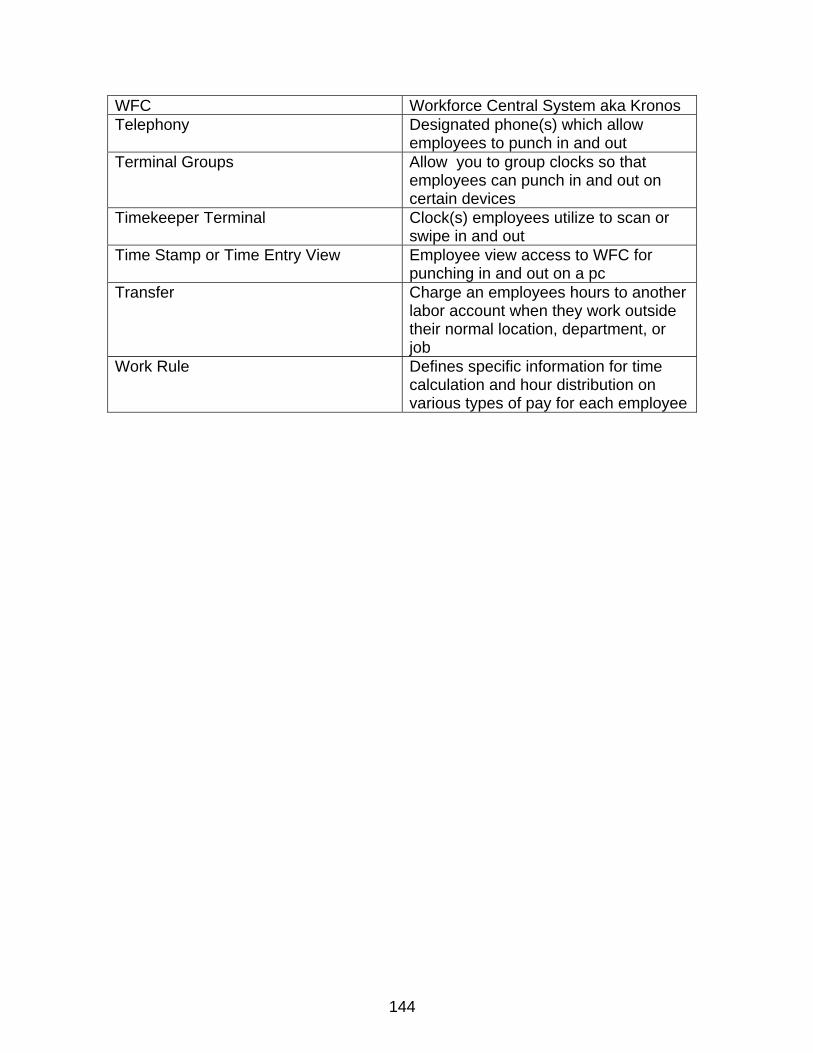
144
WFC Workforce Central System aka Kronos Telephony Designated phone(s) which allow
employees to punch in and out Terminal Groups Allow you to group clocks so that
employees can punch in and out on certain devices
Timekeeper Terminal Clock(s) employees utilize to scan or swipe in and out
Time Stamp or Time Entry View Employee view access to WFC for punching in and out on a pc
Transfer Charge an employees hours to another labor account when they work outside their normal location, department, or job
Work Rule Defines specific information for time calculation and hour distribution on various types of pay for each employee

145
Appendix A – MMC Pay Codes
Check Here Kronos Pay Code Type
Regular Time
Shift 2 Time
Shift 3 Time
Reg-Hol Time
Maj-Hol Time
Weekend Time
CNA Registry Time
Interpreter Services Differential Time
Premium Time
RN Registry Differential Time
ADMIN - Productive Time
ADMIN - Non Productive Time
CALLRESP Time
CALL-NON Time
CALL-REST Time
Charge Time
Edu/Con Time
Fac Admin Time
Kin Time
RPL Time
Orient-A Time
Orient-D Time
Orient-E Time
Orient-N Time
Orient-P Time
NPP-10D Time
NPP-14N Time
Teach Time
Unit Admin Time
Yellow Time
Bereav Time
C-Future Time
Check Here Kronos Pay Code Type
CNL-USM Time
Dis-Resp Time
EIP Time
Flex Hours Time
Frzn Sic Time
Fsick Time
Housing Time
Jury Time
Leave Time
Military Time
No Show Time
Off Time
PTO Time
PTO-Adv Time
PTO-OT Time
PTU Time
Reg-RN (WR Registry)* Time
Reg-RN (WR Registry)* Time
Req Off Time
SAB Time
Sus-Paid Time
Sus-Unpaid Time
Unpaid-Abs Time
Wrk-Inj Time
Wrk Comp Time
Addit Services Money
Cert Bonus Money
CRNA Money
ER Coverage Money
Spot Cash Money
SHH STP Money
Trans Cov Money

146
Appendix B – Timekeeper Punch Editing Rules As a timekeeper, you represent the institution in ensuring that employees’ worked hours are accurately recorded. Non-compliance could cause unfavorable financial and legal ramifications to the institution. It is very important that you are thoroughly knowledgeable about the Timekeeper Punch Editing Rules as the following:
1. Refrain from ever altering a swiped punch (one that is input at a time clock by an employee swiping his/her badge).
2. Leave all swiped punched intact even when an IN or OUT punch is missing
which has caused a distorted sequence (system may associate punches with incorrect IN/OUT columns until all missing punches are added).
3. If a punch is determined to be missing, then add the missing IN or OUT punch,
and write the reason on the Timecard Exception Report Form for future auditing purposes. The timekeeper should always advise the employee to write the reason for any missing punches (such as forgotten or lost badge) on the Timecard Exception Report Form to support timekeeper’s editing.
4. When editing a punch to cancel a Meal Deduction or override a Kronos
misinterpretation, write the reason on the Timecard Exception Report Form for future auditing purposes. The original swiped punch (date and time) should be left intact.
5. Leave all punched unauthorized overtime hour(s) as is. The department’s
overtime approval policy should be made clear to the employee to avoid unauthorized overtime hours in the future; but once the time is worked, it must be paid, regardless of whether or not it was authorized.
6. If applicable, edit the Account Number for a transfer of charged hours. Advise
the employee it is their responsibility to report any transfer data to the timekeeper so the punch can be edited to complete the transfer.
7. To prevent inadvertent punches, advise employees to press the appropriate
function (F) keys at the time clock BEFORE swiping badge to obtain accrued leave balances. If an inadvertent swiped punch is entered, delete the punch and write the reason on the Timecard Exception Report Form for future auditing purposes.
8. For unwanted edits, use the ‘REFRESH’ function to remove unsaved edits
(including edits performed after the most recent SAVE). After selecting SAVE, the edits become permanent records in the Kronos Audit Trail.

147
9. If two punches are badge-swiped back to back (e.g., employee wasn’t sure if the first punch was read by the clock), delete the second punch for a double IN punch or the first punch for a double OUT punch. Write the reason on the Kronos Exception Log Form for future auditing purposes.
Note: The reason for deleting the first or second punch as described above is to ensure that the maximum amount of worked time is recorded for the employee.
10. Never share your Kronos ID and password with anyone. Everyone who accesses Kronos should request an individual security ID.
The Timecard Exception Report Form can be found on the Kronos intranet site. The completed forms should be kept within the department for future auditing purposes. Direct all questions to:

148
Appendix A – Kronos Pay Codes and Comments
Lawson Code Kronos Pay Code Type
01 Regular Time
12 Shift 2 Time
13 Shift 3 Time
8 Reg-Hol Time
04 Maj-Hol Time
14 Weekend Time
16 CNA Registry Time
18 Interpreter Services Differential Time
3 Premium Time
17 RN Registry Differential Time
01 ADMIN - Productive Time
01 ADMIN - Non Productive Time
15 CALLRESP Time
06 CALL-NON Time
07 CALL-REST Time
02 Charge Time
01 Edu/Con Time
01 Fac Admin Time
01 Kin Time
01 RPL Time
01 Orient-A Time
01 Orient-D Time
01 Orient-E Time
01 Orient-N Time
01 Orient-P Time
01 NPP-10D Time
01 NPP-14N Time
01 Teach Time
01 Unit Admin Time
911 Yellow Time
90 Bereav Time
89 C-Future Time
Lawson Code Kronos Pay Code Type
* CNL-USM Time
120 Dis-Resp Time
123 EIP Time
69 Flex Hours Time
107 Frzn Sic Time
112 Fsick Time
51 Housing Time
92 Jury Time
999 Leave Time
93 Military Time
* No Show Time
* Off Time
104 PTO Time
110 PTO-Adv Time
105 PTO-OT Time
106 PTU Time
* Reg-RN (WR Registry)* Time
* Reg-RN (WR Registry)* Time
* Req Off Time
119 SAB Time
01 Sus-Paid Time
* Sus-Unpaid Time
102 Unpaid-Abs Time
97 Wrk-Inj Time
* Wrk Comp Time
29 Addit Services Money
30 Cert Bonus Money
36 CRNA Money
39 ER Coverage Money
54 Spot Cash Money
43 SHH STP Money
38 Trans Cov Money
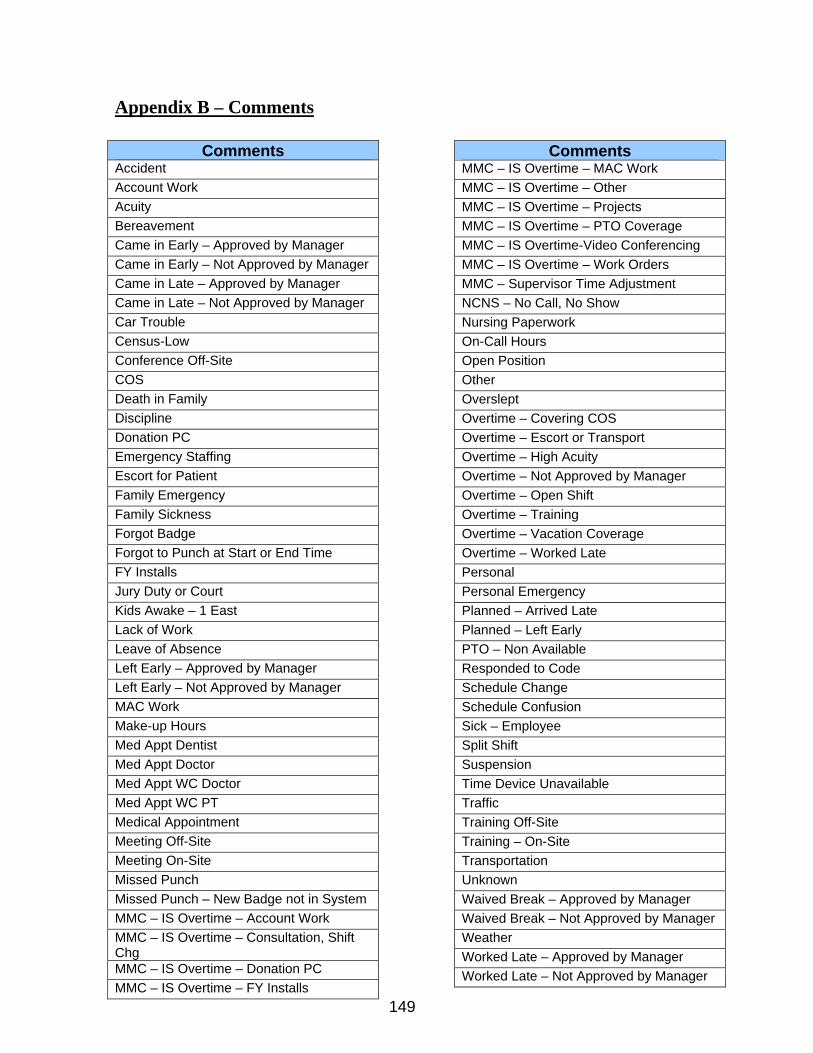
149
Appendix B – Comments
Comments Accident Account Work Acuity Bereavement Came in Early – Approved by Manager Came in Early – Not Approved by Manager Came in Late – Approved by Manager Came in Late – Not Approved by Manager Car Trouble Census-Low Conference Off-Site COS Death in Family Discipline Donation PC Emergency Staffing Escort for Patient Family Emergency Family Sickness Forgot Badge Forgot to Punch at Start or End Time FY Installs Jury Duty or Court Kids Awake – 1 East Lack of Work Leave of Absence Left Early – Approved by Manager Left Early – Not Approved by Manager MAC Work Make-up Hours Med Appt Dentist Med Appt Doctor Med Appt WC Doctor Med Appt WC PT Medical Appointment Meeting Off-Site Meeting On-Site Missed Punch Missed Punch – New Badge not in System MMC – IS Overtime – Account Work MMC – IS Overtime – Consultation, Shift Chg MMC – IS Overtime – Donation PC MMC – IS Overtime – FY Installs
Comments MMC – IS Overtime – MAC Work MMC – IS Overtime – Other MMC – IS Overtime – Projects MMC – IS Overtime – PTO Coverage MMC – IS Overtime-Video Conferencing MMC – IS Overtime – Work Orders MMC – Supervisor Time Adjustment NCNS – No Call, No Show Nursing Paperwork On-Call Hours Open Position Other Overslept Overtime – Covering COS Overtime – Escort or Transport Overtime – High Acuity Overtime – Not Approved by Manager Overtime – Open Shift Overtime – Training Overtime – Vacation Coverage Overtime – Worked Late Personal Personal Emergency Planned – Arrived Late Planned – Left Early PTO – Non Available Responded to Code Schedule Change Schedule Confusion Sick – Employee Split Shift Suspension Time Device Unavailable Traffic Training Off-Site Training – On-Site Transportation Unknown Waived Break – Approved by Manager Waived Break – Not Approved by Manager Weather Worked Late – Approved by Manager Worked Late – Not Approved by Manager
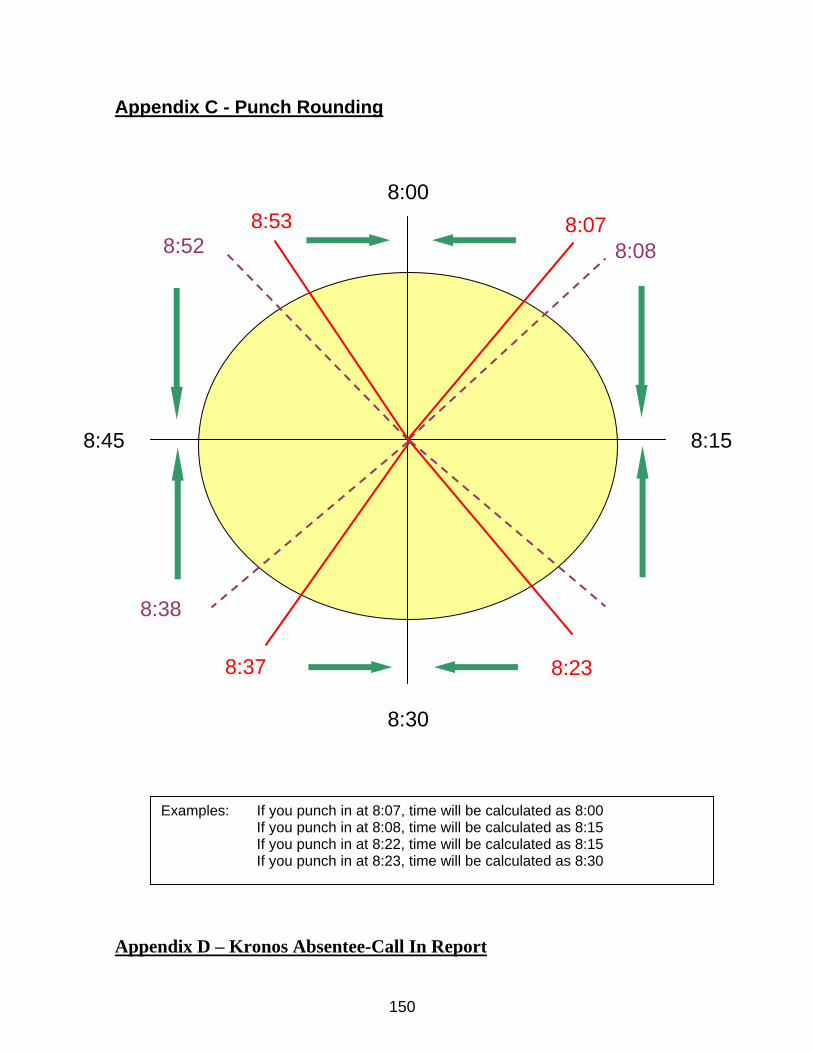
150
Appendix C - Punch Rounding Appendix D – Kronos Absentee-Call In Report
8:15
8:00
8:30
8:45
8:08
8:23
8:07 8:53 8:52
8:37
8:38
Examples: If you punch in at 8:07, time will be calculated as 8:00 If you punch in at 8:08, time will be calculated as 8:15 If you punch in at 8:22, time will be calculated as 8:15 If you punch in at 8:23, time will be calculated as 8:30

151
Appendix F – Absentee-Call In Report (cont.)
Department No. Department Name Contact Name Contact Phone # Date Employee
ID# Employee
Name Reason for Absence
Code Selections:
In Out Pay Code
Selections:
EE Init Supv Init
Office Use
Ex: 10/24/08 200-13453 Paula Ellis 9 8 am 5 pm PTU 1 2 3 4 5 6 7 8 9 10 11 12 13 14 15 16 17 18 19 20 21 22 23 24 25
Kronos Pay Codes # Kronos Code Description 1 PTU PTO - Unscheduled 2 EIP Extended Illness 3 FSick Sick Leave 4 MMC – Jury Jury Duty 5 UNPD-ABS Unpaid Absence 6 WRK-INJ Work Injury
Kronos Comments – See page 2 or back of form

152
Appendix E – Kronos Request for Time Off
Kronos Comments 1 Accident 2 Bereavement 3 Census-Low 4 Death in Family 5 Family Emergency 6 Family Sickness 7 Jury Duty or Court 8 Lack of Work 9 Leave of Absence
10 Med Appt Dentist 11 Med Appt Doctor 12 Med Appt WC Doctor 13 Med Appt WC PT 14 Medical Appointment 15 NCNS – No Call, No Show 16 Other 17 Personal 18 Personal Emergency 19 PTO – Non Available 20 Schedule Change 21 Schedule Confusion 22 Sick – Employee 23 Unknown 24 Weather

153
I request permission to be absent working day(s)/hour(s) from / / through / / to be charged as:
Type of Leave Requested
* For the time to be coded by HR Benefits, an email will need to be submitted to the HR Benefits box that contains the following information in order for HR Benefits Leave Administration to code time: Employee ID, Employee Name, # of Hours for each day, date(s) of absence and applicable leave code.
Comments
Employee Signature Manager Approval HR Approval (if required)
Appendix F – Automatic Posting of Holiday Hours
Emp Name Title Dept
Emp ID Mailbox# Telephone
Category # of Hours Leave Type
PTO-Advance PTO-OT PTO-Scheduled Paid Time Off
PTU
Holiday Maj-Holiday
Extended
Illness EIP
Category # of Hours Leave Type
UNPD-ABS Leave Without
Pay Leave
Bereavement
Jury
Military* Administrative
Leave
Work Injury*

154
Holiday Defined
Designated MMC holidays begin at 11 p.m. the day before the holiday and run through 11 p.m. on the day of the holiday. This method of holiday assignment allows for the many shifts worked in and around the holiday. In an employee schedule, the holiday appears on the date the holiday time span begins:
Holiday Hours Assigned
Automatic posting of holiday hours will only appear in the timecard and will not be displayed until the pay period, in which the holiday resides, becomes the ‘Current Pay Period’. Prerequisites for Automatic Posting of Holiday Hours
1. An employee must be assigned to his normal work hours in the schedule during the time span designated for the holiday. The MMC holiday credit rule calculates and assigns the normal work hours to the holiday.
Example: If an employee normally works Monday through Friday, 7:00 am to 3:30 pm, the schedule should reflect the normal working hours regardless if the holiday falls during this time.
2. The employee time card will be populated automatically with the name of the holiday and the system calculated number of hours the employee would have normally worked.
The blue-box displayed around the date of the holiday specifies the absence is excused.
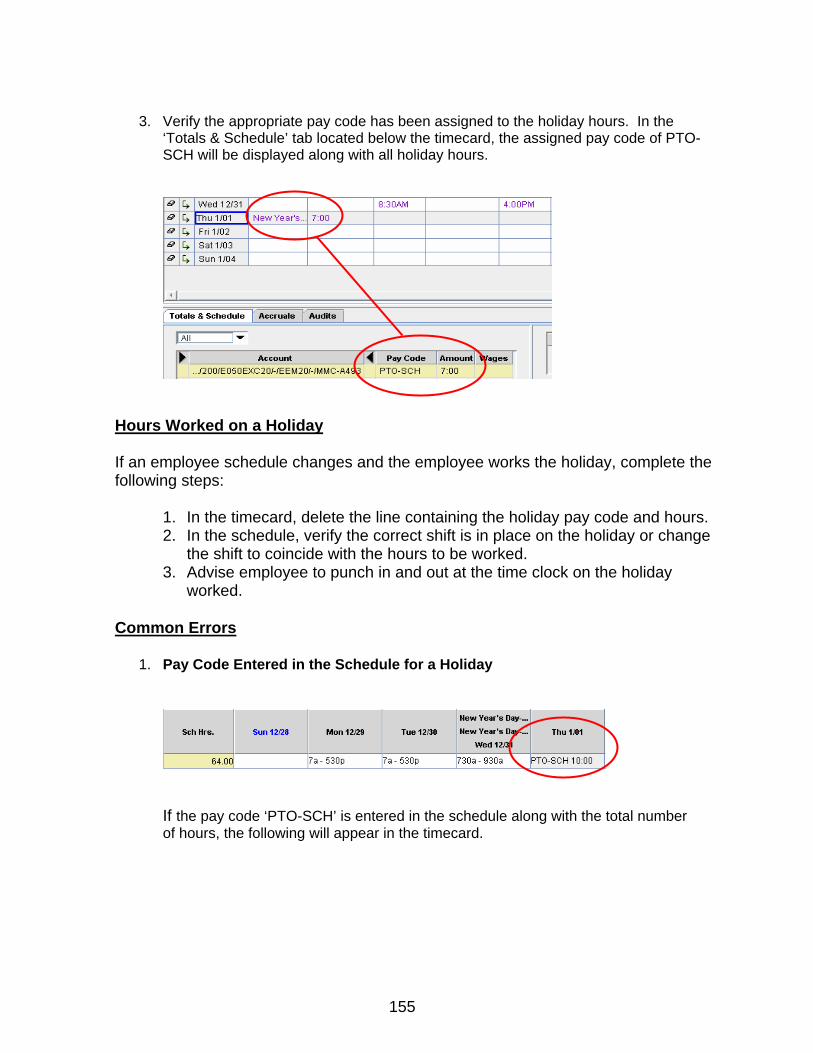
155
3. Verify the appropriate pay code has been assigned to the holiday hours. In the
‘Totals & Schedule’ tab located below the timecard, the assigned pay code of PTO-SCH will be displayed along with all holiday hours.
Hours Worked on a Holiday If an employee schedule changes and the employee works the holiday, complete the following steps:
1. In the timecard, delete the line containing the holiday pay code and hours. 2. In the schedule, verify the correct shift is in place on the holiday or change
the shift to coincide with the hours to be worked. 3. Advise employee to punch in and out at the time clock on the holiday
worked. Common Errors
1. Pay Code Entered in the Schedule for a Holiday
If the pay code ‘PTO-SCH’ is entered in the schedule along with the total number of hours, the following will appear in the timecard.

156
Although the employee will be paid correctly, a duplicate entry will appear.
2. Hours to be Worked not Entered in Schedule
If the normal work hours are not entered in the schedule, the timecard will appear as follows:
The employee will not get paid for the holiday hours. Managers should correct the problem in the schedule, save the change and refresh the timecard to update the holiday hours.