make a presentation - cloud object storage | store & … · · 2014-10-2112 slide, notes and...
TRANSCRIPT

Make a Presentation
BSBCMM401A

2
Make a Presentation
BSBCMM401A
Expand your thinking...
Stu
den
t W
ork
bo
ok

3
COPYRIGHT NOTICE
© Albrighton Consulting
This training program has been designed and developed by Albrighton Consulting and is
intended for internal use only and must not be provided to any third party.
This document is copyright and may not be reproduced or copied in any form or scanned or
stored in any type of information retrieval system without the written permission of
Albrighton Consulting.

4
Contents Introduction ..................................................................................................................... 6
Prepare your presentation ................................................................................................ 8
The four P’s............................................................................................................................. 8
Planning your presentation ............................................................................................ 15
Planning ................................................................................................................................ 15
Purpose ............................................................................................................................. 15
Audience ........................................................................................................................... 15
Method of presentation ................................................................................................... 15
Storyboard ........................................................................................................................ 15
To create a PowerPoint presentation .................................................................................. 16
Handouts .......................................................................................................................... 19
Apply transitions ............................................................................................................... 21
To view your slide show. .................................................................................................. 23
Apply animation................................................................................................................ 23
Timing and pace ................................................................................................................... 25
Music, sound and video ....................................................................................................... 26
Add music or sound .......................................................................................................... 26
To add a movie ................................................................................................................. 27
Presentations are prepared within designated timelines ................................................ 28
Produce your presentation ............................................................................................. 30
Proofreading your presentation ....................................................................................... 30
Check spelling ................................................................................................................... 31
Storing your presentation................................................................................................. 32
Storage of presentations includes: ................................................................................... 33
Present your presentation .............................................................................................. 34
The following are a few tips to remember when presenting to your audience. ................. 34
Tips for speaking with confidence .................................................................................... 34
Tips for using body language ............................................................................................ 34
Tips for using visual aids ................................................................................................... 35
Tips for keeping your message simple ............................................................................. 36

5
6
Introduction
Presentation skills are a necessary part of any study program and today more people use
some form of electronic presentation to support their work.
This workbook uses PowerPoint as the basis of the skills program and it is part of the Office
2007 suite. Later versions will be much similar.
Make sure you find out if there is an organisational template with which you should prepare
your presentation.

7

8
Prepare your presentation
The purpose, audience and mode of presentation are determined in consultation with the
content author and or presenter.
The four P’s
When you create a presentation, always remember the four P’s;
Prepare Know who your audience will be and the purpose of your presentation
Plan the structure and timing of your presentation
Practice and Review your presentation, rehearse how you will present it and get
feedback from others so that you feel positive and confident about doing it. It is
often good to resent it to someone who is not attached to the presentation
Present make sure you are familiar with the content and build a good rapport with
your audience quickly
There are many ways in which information is required to be presented to either individuals
or groups; therefore the use of electronic presentations is an invaluable tool to anybody
delivering a presentation. Electronic presentations using computers, projection screens and
specific presentation software have replaced the old overhead slide presentation or using
slide projectors.
There are many advantages of electronic presentations and these include the
opportunities to do;
Slide transition effects can be applied as each new slide appears
Sounds, speech and music and video can be added to slides
Slides are easily edited and updated
An entire presentation can be stored on a, flash drive or cloud server and viewed
online
Possible to utilise preset colour schemes and layouts to suit specific types of
presentations to meet organisational procedures and policies
Accessible via web pages or intranet

9

10
Electronic presentations can be used to communicate information in many areas, listed
below are some of the more common applications.
Business plans
Flow charts
Workshop designs and plans
Brainstorming sessions
Company meetings
Financial overviews
Employee orientation
Inductions
Managing organisational change
Product and service overviews
Marketing plans
Selling a product or service
Project overviews
Training
When you create an electronic presentation you need to
establish:
Who is your audience and what do they know
about the topic.
What is the purpose of the presentation?
Is it to inform, motivate, persuade or teach?
Mode of presentation often includes:
Speaker
Self-running presentation
Available for browsing by individuals
Presentation conference
On-line / Internet / intranet
Display on one computer, control from another
These elements will help you to determine:
The content

11
The level of the content
The overall look
The style
The length of the presentation
The needs of the presenter
Whether you will be required to generate accompanying notes
What other equipment may be needed, such as projection screens and laptops
When you are conducting a presentation always remember that you must keep the
audience engaged at all times. There is a common belief that too many slides can kill your
audience interaction very quickly therefore it as important to keep the slides to a few key
points and then elaborate. Use them as prompts only.
Always try to give handouts of the slides or a brief summary of your presentation, that they
have been shown as well as extra information and activities. When going through the
presentation take time to discuss and interact rather than power through the slides.
Remember that the timing is critical so don’t let the
discussion wander.
Presentation requirements may include:
Web documents
Speaker notes
Handouts
Outlines
Paper printouts of presentation / slide show
Computer equipment and peripherals for on-screen presentation
Data show
Video projectors
Laptop computer
Internet access
Network access
Digital pointer
Annotation pen
12
Slide, notes and handout masters are designed to incorporate organisational and task
requirements in relation to image and preferred style/s
When creating an electronic presentation, speaker notes or an audience handout, you need
to be aware of your organisation’s preferred style. There may be particular requirements
you have to follow. For example, you may have to include the company logo in one corner
of the slide, or use the company corporate colours. Many organisations require a particular
look for the material they produce. By using the logo, company colours and a specific design
layout, they create a consistent and professional image that is instantly recognisable to
customers.
An organisation will often provide you with a style guide similar to the previous example. Or
provide you with an example of exactly what a presentation should include and how it
should look. Format the master slide just-as you would format a regular slide by formatting
text, formatting lists, adding background patterns and effects, and setting footers.
Click the Close button on the Master Toolbar to quit editing the master slide and return to
the presentation.
Organisational requirements may include:
Corporate image
Company logo
Company colour scheme
Music
Organisation name, time, date, occasion etc in header / footer
Organisational video clip

13
Software functions are utilised for consistency of design and layout to meet identified
presentation requirements
Using software functions
To prepare an electronic PowerPoint presentation you will need to have access to a
computer and Microsoft PowerPoint.
To design your presentation you need to develop an understanding of the software
functions and features of PowerPoint. This will enable you to prepare a presentation that
has a consistent style and a visual impact.
Create a slide show
Apply a design template
Add content
Write or draw on slides
Apply a style
Create handouts and speaker notes.
PowerPoint uses slides to build an electronic presentation.
A slide is a single frame in a presentation and a presentation comprises a group of slides.
Before you start to design your presentation, it will be helpful to become familiar with the
names of some of the PowerPoint functions.
Look at the functions and descriptions in the following table.
FUNCTION DESCRIPTION
Placeholders Boxes with dotted lines that appear when you create a
new slide
Slide Allows you to change the style of text and have the style
reflected throughout the whole presentation
Notes Master Allows you to create notes when working on your
presentation
Importing other Allows you to import information from other applications

14
applications such as Word or Excel, and add them to your presentation
Handout Master Allows you to create handouts to go with your
presentation
Colour schemes Are a selection of background colour that you can apply
to your presentation
Templates Templates contain colour schemes and text formatting to
design a presentation with a particular look

15
Planning your presentation
Planning To plan your presentation before you begin, this means working out:
What the presentation is about (the purpose)
Who the presentation is for (the audience)
how you are going to present the information (the method)
Then you need to prepare the content of your presentation. The best way to do this is to
create a storyboard to help you map out the
information you are going to present.
Purpose
What is your presentation going to be about? In
most cases your presentation will be related to your
workplace project and so many of the questions
above will
Audience
Decide on an audience for your presentation. It may include colleagues at work or fellow
students. If you are a distance student, your audience might include family members or
friends. When considering your audience, decide how much they already know about the
subject you have chosen. This will dictate the simplicity or complexity of the content of your
presentation.
Method of presentation
Unless you decide on an alternative method with your manager, you will show your
presentation in front of an audience.
Storyboard
Once you have decided on your purpose, audience and method of presentation you can
create a storyboard. Remember that a storyboard is basically an outline of the major points

16
of your presentation. It should give a general idea of where text, pictures or diagrams will go
and the order in which you will talk about them.
To create a storyboard, you first need to decide on an outline for the main points you want
to develop in your presentation. Once you have done this, decide how many slides will be
needed for each main point. Also, remember to include an introductory and conclusion
slide.
To create a PowerPoint presentation
In your Programs list open up Microsoft PowerPoint
You will see the PowerPoint opening page will start with a blank slide.
Click on the layout menu in the top left corner

17
You can select the layout that is appropriate for your content for each slide you create, or if
you have a corporate template, you should follow this theme.
To add a new slide, click on the ‘new slide’ menu and select from the menu, the slide layout
that fits you next slide content.
Put your information into the slide and continue to add as many slides as required for your
content.
Take note that as you build your PowerPoint presentation the slides are displayed on the left
hand side of the screen as below:
18
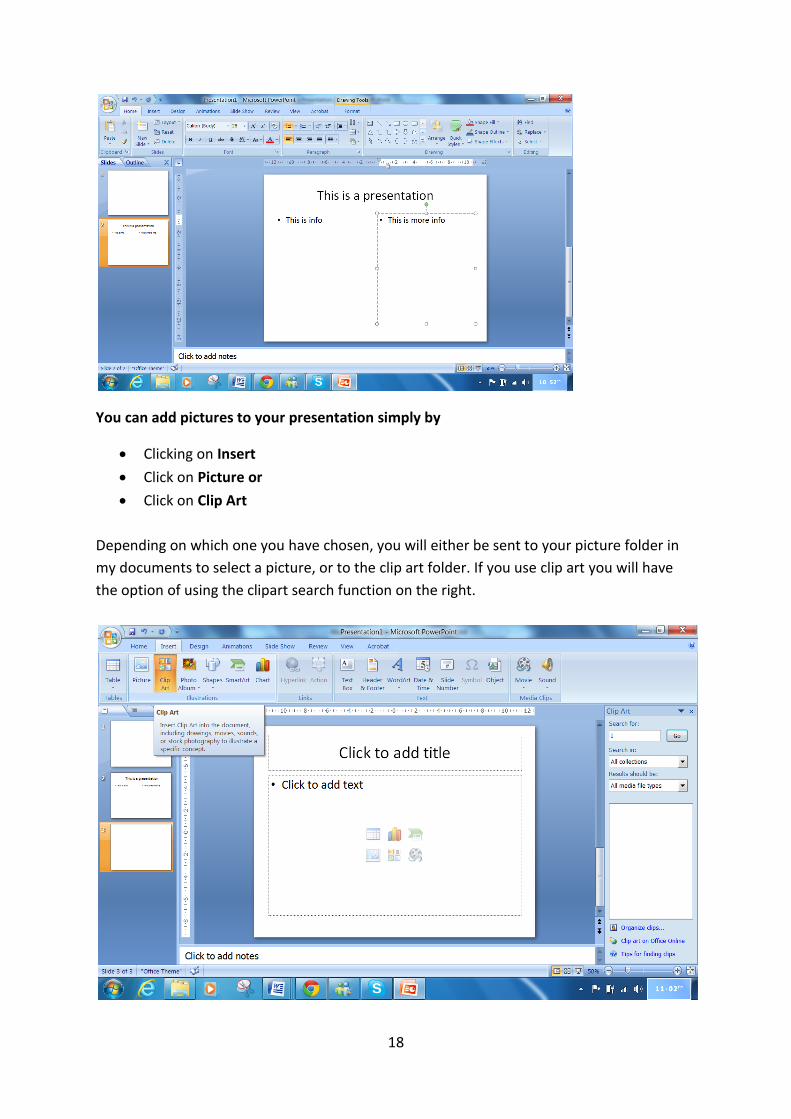
You can add pictures to your presentation simply by
Clicking on Insert
Click on Picture or
Click on Clip Art
Depending on which one you have chosen, you will either be sent to your picture folder in
my documents to select a picture, or to the clip art folder. If you use clip art you will have
the option of using the clipart search function on the right.

19
This will bring up a file of Clip Art pictures for you to insert by clicking on the picture you
have chosen and it will automatically be inserted into your slide.
Handouts
PowerPoint also allows you to create audience handouts that can be viewed, edited or
printed along with a presentation. Handouts are basically thumbnails of slides printed
together on a sheet of paper.
Earlier, you used the Slide Master to make the style of your slides consistent. You are now
going to use the Handout Master to add information to your handouts. This will then be
reproduced on all of the handouts in your presentation. The information you add using the
Handout Master will only appear on your handouts, not on your slides.
To create a Handout
Click on View
Click on Handout Master
The following screen will appear allowing you to develop your Master Slide for your
handouts and change your fonts, format, colour and text styles

20
You can also add a date, footer and a slide number to each of your slides.
Presentation features are balanced for visual impact and emphasis
PowerPoint also has features that allow you to add visual impact and emphasis to the
content of your presentation. It is important to find the right balance of these features. You
don’t want to distract or take away from the important information in your talk.
Before you start adding features to your presentation, you should become familiar with
some of their names.

21
Presentation
Description
Transition This controls the way slides are presented. For example, they
might enter from the left to the right or from the right to the left
Animation This defines how content on the slide is presented. For example,
text can fly into or dissolve on the slide
Graphics Pictures can be added to slide using Clip Art or by scanning
photographs or other pictures into the computer and adding via
the pictures menu
Timing and pace You can automatically control the transition time between each
slide
Music, sound and
video
Video and audio files can be added to enhance a presentation
Apply transitions
Transitions control the way slides are presented. When your slide show is running, each
slide can be presented using a different transition. There are many transitions to choose
from.
To add a Transition
Change to Animations Screen
22
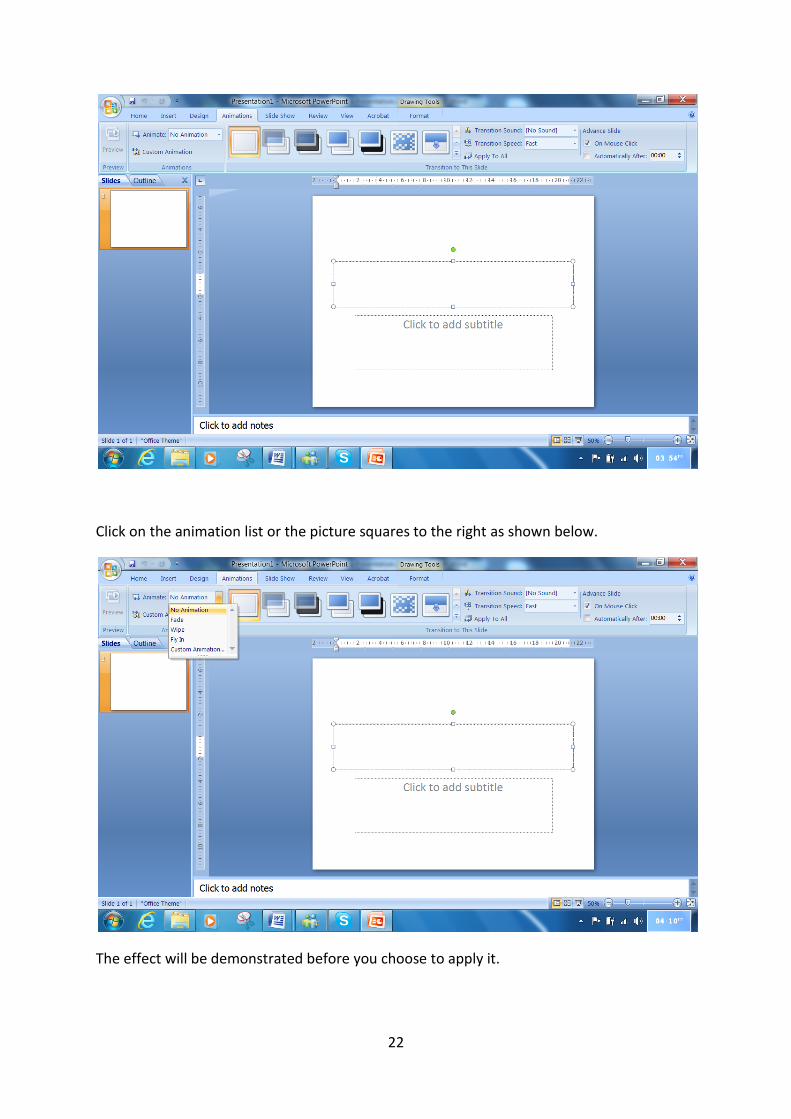
Click on the animation list or the picture squares to the right as shown below.
The effect will be demonstrated before you choose to apply it.
23
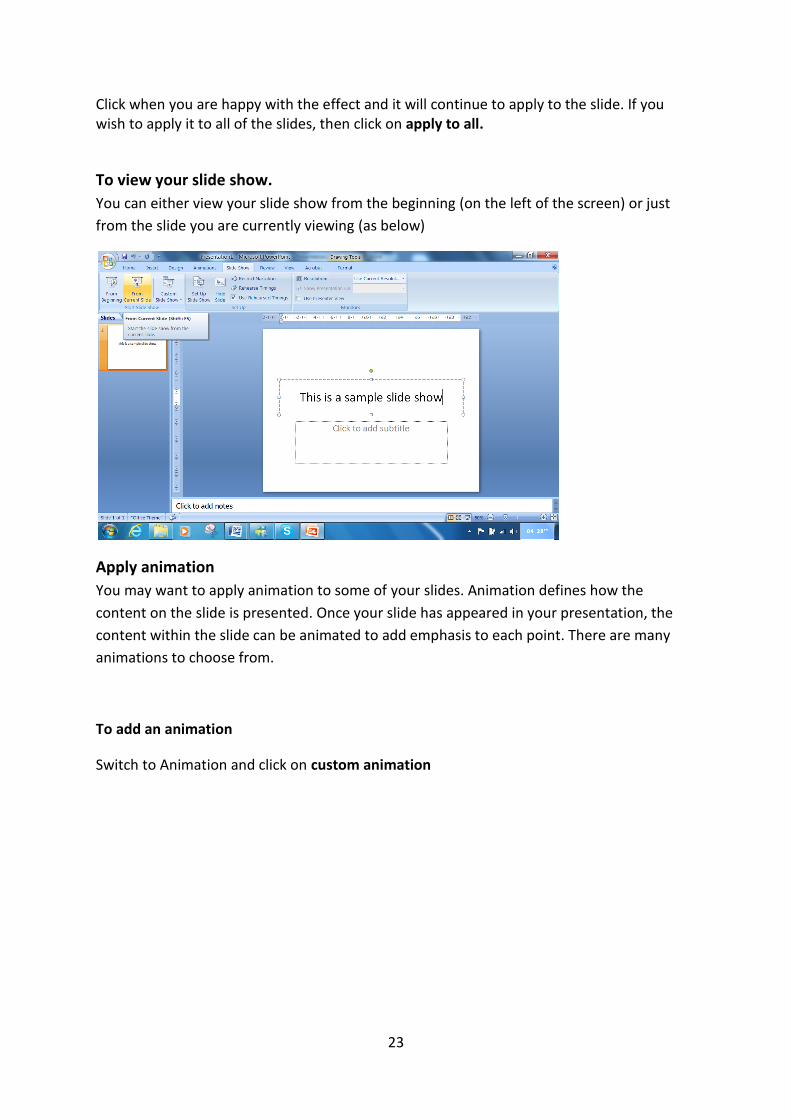
Click when you are happy with the effect and it will continue to apply to the slide. If you wish to apply it to all of the slides, then click on apply to all.
To view your slide show.
You can either view your slide show from the beginning (on the left of the screen) or just
from the slide you are currently viewing (as below)
Apply animation
You may want to apply animation to some of your slides. Animation defines how the
content on the slide is presented. Once your slide has appeared in your presentation, the
content within the slide can be animated to add emphasis to each point. There are many
animations to choose from.
To add an animation
Switch to Animation and click on custom animation

24
When you do this the custom animation menu will drop down on the far right where you
will be able to select how the words on you slide transition to the screen.
Highlight the Title Slide
Click on Add Effect
A drop down box will appear and you will be able to try a number of entrances for the words on the slide
25
You need to animate the title and text separately. Changes will only apply to the areas
highlighted and or each bullet point.
View your animations by clicking on and view the whole Slide Show by clicking on
Click on Save
Timing and pace The timing and pace of a presentation are also important you can pre-set the time and pace
using PowerPoint. Using this function, you can have slides that appear after a certain
amount of time has passed. The amount of time you set will depend on how much
information is contained within the slide, and how much emphasis you want to place on the
information.
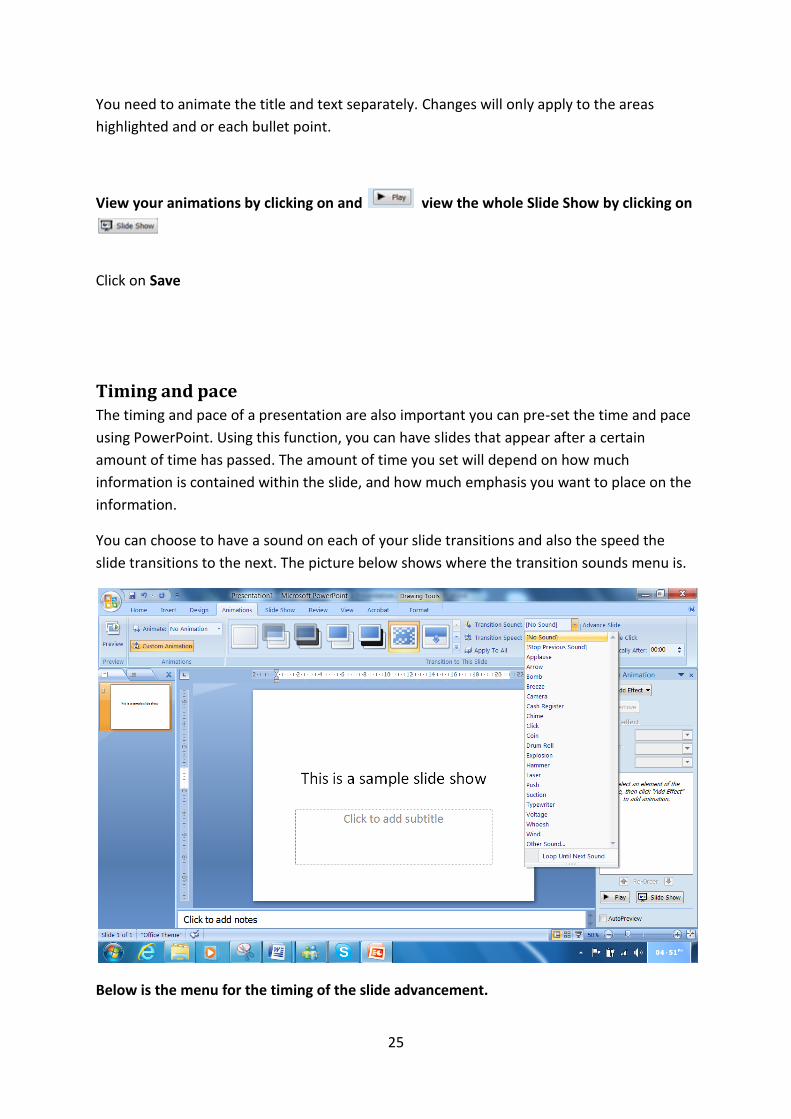
You can choose to have a sound on each of your slide transitions and also the speed the
slide transitions to the next. The picture below shows where the transition sounds menu is.
Below is the menu for the timing of the slide advancement.

26
You can advance slide either on the mouse click or you can set it to advance automatically
by adjusting the timing on the top right hand of the slide.
You can apply this timing to all your slides or set a time for each slide individually. If you are unhappy with the effects, go back to the menu pane and make alterations
Save your work
Music, sound and video To make a multimedia presentation you can add music, sound or video. These are added
from files on your computer. Don’t forget to make sure you have speakers to be able to play
sound and music in your presentation.
Add music or sound
To add music or sound to your presentation click on the sound icon on the right of the
screen. This will give you some menu options. To add a file select sound from file which will
take you to the file menu of your music or sound files. Select the file you want and it will be
added to the screen. You can also select some sounds from the clip art file, from a cd in the
cd drive, or record a sound directly onto the slide by using an onboard microphone or an
external one.

27
If you choose to insert a file from the clip art gallery, click on selection and that menu will
appear, as below.
Click on the sound you wish to add
To add a movie
To add a movie click on the movie icon and repeat the steps as for adding a sound. Make
sure you regularly save your work.

28
You can also add movies, sound, graphs and pictures by clicking on the icon in the middle of
the slide if you have selected a slide with the options of these items such as below.
Presentations are prepared within designated timelines
Whatever your work task, you will always have to work within a designated timeline. This
means having the work ready by a specified time. You may have to prepare a presentation
for a client or meet a deadline, such as a conference.
Always find out when the presentation is required and enter this date in your diary. Clarify
and plan the task to work out how long it is likely to take. Careful planning means there will
be no last-minute panic. If you are developing an electronic presentation for someone else,

29
always ask when a draft of the material is required. The presenter will generally want to
rehearse the material and may suggest further amendments or adjustments.
A checklist can sometimes help you plan a work task. Preparing presentations will become
less problematic once you are familiar with the requirements of your organisation. Discuss the timelines that are required by your organisation to meet and how you manage
the time.

30
Produce your presentation
To produce an electronic presentation means to create it and have it ready for viewing. To
do this you may need to use the advanced features in your application software to
streamline and customise the presentation for different audiences.
Once you have produced your presentation, you need to rehearse. This is the only way to
make sure that the pace and timing suits the content and the needs of the audience. You
also need to proofread the presentation for spelling, consistency and style before it is
viewed.
Before printing speaker notes or audience outlines, you need to understand the
requirements of the presenter and the audience. To overcome any problems you might
encounter when producing your presentation, you need to know how to access help from
either paper-based or online help documents. You also need to be aware of the policies in
your workplace for saving and storing presentation
material.
Presentation is checked for spelling, consistency
and style in accordance with task requirements
Proofreading your presentation
Although you might write the text in your
presentation very carefully, there will still be some mistakes. It is better to find these during
a rehearsal than in front of an audience. You can proofread your work by closely reading it
yourself. Then, get someone else to read it. You can also use the spelling and grammar
checks installed in word processing and electronic presentation software.
Your presentation needs to be checked for spelling, grammar, consistency and style.
PowerPoint is equipped with an internal dictionary that can help you correct words that are
misspelled in your presentation. As well as checking spelling, PowerPoint can also check
style to make sure that each slide is consistent. Check with your manager to determine the
requirements of your organisation. Then, make the necessary alterations to the style of your
presentation.

31
Check spelling
To check the spelling of your presentation, you will notice a red line under words that are
misspelt as you type them. You can right lick on your mouse or laptop and a suggested word
will appear. Selected the correct word from the drop down list or type in the correction
manually.
Presentation is rehearsed to adjust pace and timing in accordance with task requirements
When producing an electronic presentation, you need to rehearse your work to make sure it
has the right pace and timing. If a presentation is run too slowly, the audience might grow
bored. On the other hand, if it is run too quickly, people might get frustrated that they can’t
follow the content. You must also allow enough time to explain points to the audience and
get feedback. An audience can scan information on a slide quickly, so you need to change
slides every 30—60 seconds. This will give a comfortable pace to your talk and keep the
audience interested.
In PowerPoint you can set timings using Slide Transitions or Rehearse Timings from the
Slide Show menu option.

32
Tip
When running your presentation, use the Back Space key to return to a previous slide and
the Enter key to move to the next slide.
Alternatively you can use a slide pointer which you can click and the slide will progress to
the next. They also have a pointer built in to highlight a certain part of the screen.
The Pause key will stop the presentation. If the timings you have set do not suit the
presentation on the day, use these keys to adjust the pace of your presentation.
Presentation materials are printed in accordance with presenter / audience requirements
Once you have checked your presentation for spelling, grammar, consistency and style, you
may want to print out the information. Hard copies are useful to refer to while the
presentation is running. The information you print
may be for your own use, or for someone else in
the organisation. If you are printing materials for
someone else, make sure that you discuss what
they need before printing, as alterations may be
required.
You can print out handouts, notes, outlines or
slides. You need to decide on the appropriate
materials for each presentation and have the
printed copies available within the designated
timeline. If you want to customise these
presentation materials (e.g. by adding headers and footers), you will need to use the
Handout Master and Notes Master before writing the materials. Remember that if you add
information using the Masters it will only appear on the printout, not on your slides.
Presentation is stored, in accordance with organisational requirements and the
application exited without information loss/damage
Storing your presentation
How you store your presentation depends on the requirements of your organisation and
who needs to have access to the presentation. If your presentation needs to be available to
all your colleagues, you would store it in an appropriate place on the organisation’s server.
Your colleagues can then access the presentation from their workstation if they have
PowerPoint installed on their computers.

33
If your presentation needs to be available to a large number of people, you may need to
store your presentation as a webpage. To place your presentation on the web, you need to
save a copy to a file which sits on the web server.
Find out about your organisation’s requirements for storing hard copy information, such as
print outs or overhead slides. Presentations are usually produced as part of a project an
organisation is undertaking, and the project may have a designated filing space. Before
storing any documents you must always refer to you r organisations policies and
procedures. Each company has different procedures and be found on the organisational
Intranet.
Storage of presentations includes:
Storage in folders / sub-folders
Storage on hard/floppy disk drives, CDROM, tape backup
Organisation policy for backing up files
Organisation policy for filing hard copies
Filing locations
Security
Authorised access

34
Present your presentation
The following are a few tips to remember when presenting to your
audience.
Tips for speaking with confidence
Vary your speaking pace to suit your purpose. Speaking fast helps you excite
and energize your audience, while a slow pace creates a mood of anticipation.
For most of your presentation, the best pace would be slow enough for listeners
to follow but quick enough to sustain their interest.
Use a low pitch to project authority. Many people interpret a low-pitched voice
as authoritative and influential. Likewise, completing a sentence with a
downward inflection (a lowering of pitch) communicates confidence and
certainty.
Control loudness. Speak loudly enough to be heard but not so loudly as to
irritate or offend listeners. To dramatise a moment, try lowering the volume of
your voice. Stress important words and phrases with a bit more loudness.
Sharpen your articulation. Clear, crisply articulated words and phrases convey
confidence and competence. Such language is also easy to follow.
Use pauses for impact. A correctly timed pause can help you emphasise
information and create a desired mood in your audience. It can also alert your
audience to pay attention to a special point. The key is to pause just before the
point you want to emphasise—for example, "Our sales increased . . . twenty-five
percent this year." Count "one, two, three" to yourself while pausing, and
maintain eye contact with your listeners during the pause.
Tips for using body language
Face your audience squarely. Show interest by looking directly at your audience.
Stay relaxed, and be expressive. Tilt your head slightly to one side, arch your
eyebrows, and nod intermittently to show you understand or agree. Smile to
project warmth and confidence and to establish rapport.
Assume an open posture. Convey openness and receptivity by unbuttoning your
jacket, sitting forward in your chair, and moving closer to your audience. Ensure
that your hands are visible and unclenched. When standing or walking before an
audience, adopt an upright stance with relaxed arm movements. Move around
any barriers that stand between you and your audience, such as desks or
lecterns.

35
Match body language to message. Ensure that your facial expressions, gestures,
and posture match your message. For example, to if you are trying to convey
openness to others' ideas, avoid crossing your arms and leaning away from your
audience.
Maintain eye contact. Communicate interest and empathy by looking your
listeners in the eye. Blink normally and adopt an open gaze rather than a narrow-
eyed stare.
Touch. In many business and social settings, a handshake is the safest and most
positive way to convey friendliness and warmth. Keep your handshake firm and
brief. As much as possible, ensure that your hand is dry and warm before shaking
hands with others.
Relax. Adopt a comfortable, relaxed, yet attentive pose to let your audience
know you're ready to listen. But don't be so relaxed that you slouch—you'll
appear bored. And avoid fidgeting and other random movements; they
communicate impatience, boredom, and nervousness.
Tips for using visual aids
Match the visual aid to your message. The purpose of using graphics is to
communicate information about your proposal, not to dazzle your audience. For
example, if you're pitching a no-frills product to a prospective client, use a
simple, straightforward graphic instead of a fancy slide show. Or, if you want to
involve your audience in seeing a calculation unfold, consider using a flipchart or
chalkboard.
Convey one idea per visual aid. If you cram too many concepts onto one slide or
diagram, you'll overwhelm your audience.
Keep the number of visual aids to a minimum. Don't present more than one
slide or overhead every two minutes. A 20-minute presentation should therefore
contain no more than 10 slides.
Keep text to a minimum. Graphic depictions of information are much more
memorable than blocks of text or bulleted lists. Keep any text brief and
straightforward. Use short, uncomplicated words. Use no more than six lines per
visual and six words per line.
Check text readability. Make sure visual aids are readable at a distance and in a
darkened room. Avoid using many different typefaces on one graphic.
Don't talk to your visual aids. Look at your audience while explaining a chart,
diagram, or graphic.
Use colours thoughtfully. Use just two different colours of text, with one
consistent background colour that shows up in all your visual aids. Select colours
that create positive feelings for different audiences. For example, while red may
have negative associations for accountants because it represents losses, the

36
colour may have positive associations for health-care professionals who interpret
red as a sign of vitality.
Create persuasive charts. Whether you're using pie, line, bar, or scatter charts,
make the chart's message the title of the visual aid—for example, "Number of
New Hires" or "ABC Has Smallest Market Share." Select the appropriate type of
chart for your purpose. For instance, use pie charts to show percentages, bar
charts to compare the sizes of items in a particular group (e.g., sales for six
different textile companies), and line charts (or graphs) to depict trends over
time.
Tips for keeping your message simple
Use concrete language that is clear and to the point. As much as possible, avoid
abstract, ambiguous, and wordy language. For example, it is more effective to
say, "Sales dropped 10% this year" rather than "At certain points in the year,
sales numbers were up, then they were down, causing an overall negative impact
on forecasted numbers."
Avoid technical jargon. People who use complicated terms as a means to
impress others often come across as pretentious. Jargon also has a tendency to
confuse audiences. Use simple, commonly understood words instead.
Make every word count. Avoid redundancy; for example, "Our company has
been very successful and profitable this year" (profitable is successful) or "The
new office building is showy and ostentatious" (ostentatious means showy).
Draw conclusions. Don't make your audience members guess your message.
Help them arrive at the correct conclusions.

37
You will find us at:
Albrighton Consulting 17 Beach Road, Christies Beach SA 5165
Telephone: (08) 8186 3600 [email protected]