lumenstudiotm - lumenpulseappv1.lumenpulse.com/_files/products/files/292_en_lumenpulse_lumen... ·...
TRANSCRIPT
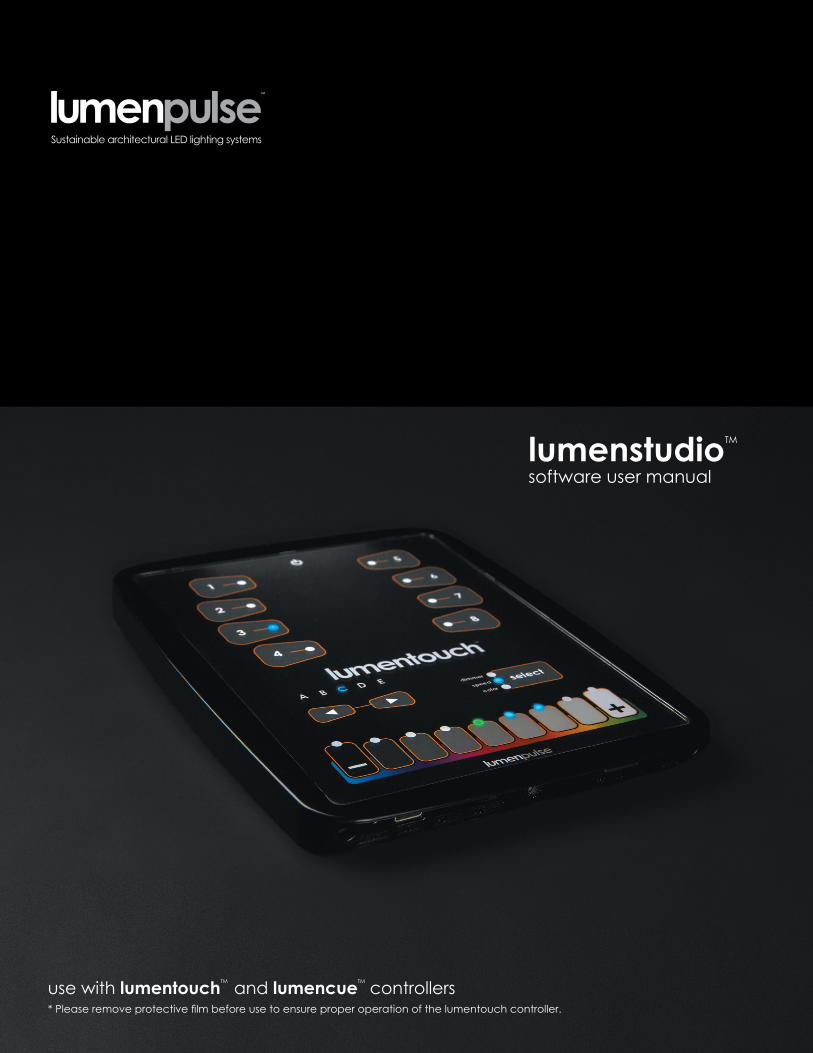
use with lumentouchTM and lumencueTM controllers* Please remove protective film before use to ensure proper operation of the lumentouch controller.
software user manual lumenstudioTM
LUMENID is a trademark of Lumenpulse.WINDOWS is a trademark of the MICROSOFT CORPORATION.All rights reserved. No parts of this work may be reproduced in any form or by any means - graphic, electronic, ormechanical, including photocopying, recording, taping, or information storage and retrieval systems - without thewritten permission of the publisher.Products that are referred to in this document may be either trademarks and/or registered trademarks of therespective owners. The publisher and the author make no claim to these trademarks.While every precaution has been taken in the preparation of this document, the publisher and the author assumeno responsibility for errors or omissions, or for damages resulting from the use of information contained in thisdocument or from the use of programs and source code that may accompany it. In no event shall the publisherand the author be liable for any loss of profit or any other commercial damage caused or alleged to have beencaused directly or indirectly by this document.Copyright © 2013 Lumenpulse, all rights reserved.
lumenstudio™ software user manual 3
Table Of Contents
I Welcome ......................................................................................................................................... 4
II Contents .......................................................................................................................................... 5
III Installation ......................................................................................................................................... 6
IV Creating A New Show ..................................................................................................................... 8
1. Adding Your DMX Devices .......................................................................................................... 81.1. The Fixtures Patch ............................................................................................................ 81.2. The Areas Patch .............................................................................................................. 9
2. Creating Your Scenes ................................................................................................................. 112.1. Fixtures Selection ............................................................................................................. 11
2.1.1. The Fixtures Mode ................................................................................................... 122.1.1.1. Setting Up The Positions .................................................................................. 122.1.1.2. Selecting The Fixtures ...................................................................................... 13
2.1.2. The Rects Mode ..................................................................................................... 142.2. Scenes Construction ......................................................................................................... 14
2.2.1. Adding An Effect To The Timelines .............................................................................. 152.2.2. The Effects ............................................................................................................. 16
2.2.2.1. Static Level .................................................................................................... 172.2.2.2. Gradient ...................................................................................................... 182.2.2.3. Curve .......................................................................................................... 192.2.2.4. Color Mixing ................................................................................................ 202.2.2.5. Matrix .......................................................................................................... 212.2.2.6. Picture .......................................................................................................... 222.2.2.7. Gif .............................................................................................................. 232.2.2.8. Video .......................................................................................................... 242.2.2.9. Text ............................................................................................................. 252.2.2.10. Color Manager ........................................................................................... 26
2.2.3. Rect Layers ............................................................................................................. 272.2.4. RGBW Options ...................................................................................................... 28
V Playing Your Scenes In Live Mode ........................................................................................................ 29
VI Calendar Mode ............................................................................................................................. 30
VII Uploading A Show - Direct to Device .................................................................................................. 31
VIII Uploading A Show - Direct to SD card ............................................................................................... 37
IX Locking The User Interface .................................................................................................................. 43
lumenstudio™ software user manual 4
I Welcome
This software has been specifically designed for the Lumentouch controller and the Lumencue. It is the perfect tool to simply create your architectural show and to control the latest generation of Lumenpulse products.
We will see how to setup and create your show within the next chapters. Then, we will see how to upload your show into the Lumentouch or Lumencue memory and to assign your scenes to the touch-sensitive buttons.
Please note that this a quick start type of guide and may not to apply to all installations.
Welcome to the lumenstudio software
lumenstudio™ software user manual 5
II Contents
Lumentouch hardware (stand alone wall mounted DMX controller) · User manual (on the CDROM) · Installation CDROM · Mini-USB cable · Micro SDCARD and adapter · 9V DC power supply (120-240V AC input voltage) with connector block for DMX connection · EXT Port connector
Lumencue hardware (stand alone USB based DMX512 lighting controller) · User manual · Mini-USB cable · Mini-SDCARD and adapter · 9V power supply
To be fully operational, these packages should be used with a PC having the following features :
· Windows XP, VISTA or 7 (32-bit or 64-bit) · 1024x768 screen resolution (1280x1024 recommended) · 512MB Memory (1GB recommended) · Clock frequency : 1 Ghz · Microsoft DirectX 9.0 compatible video card to use Easy View 3D software
Lumentouch Package Contains:
Lumencue Package Contains:
lumenstudio™ software user manual 6
III Installation
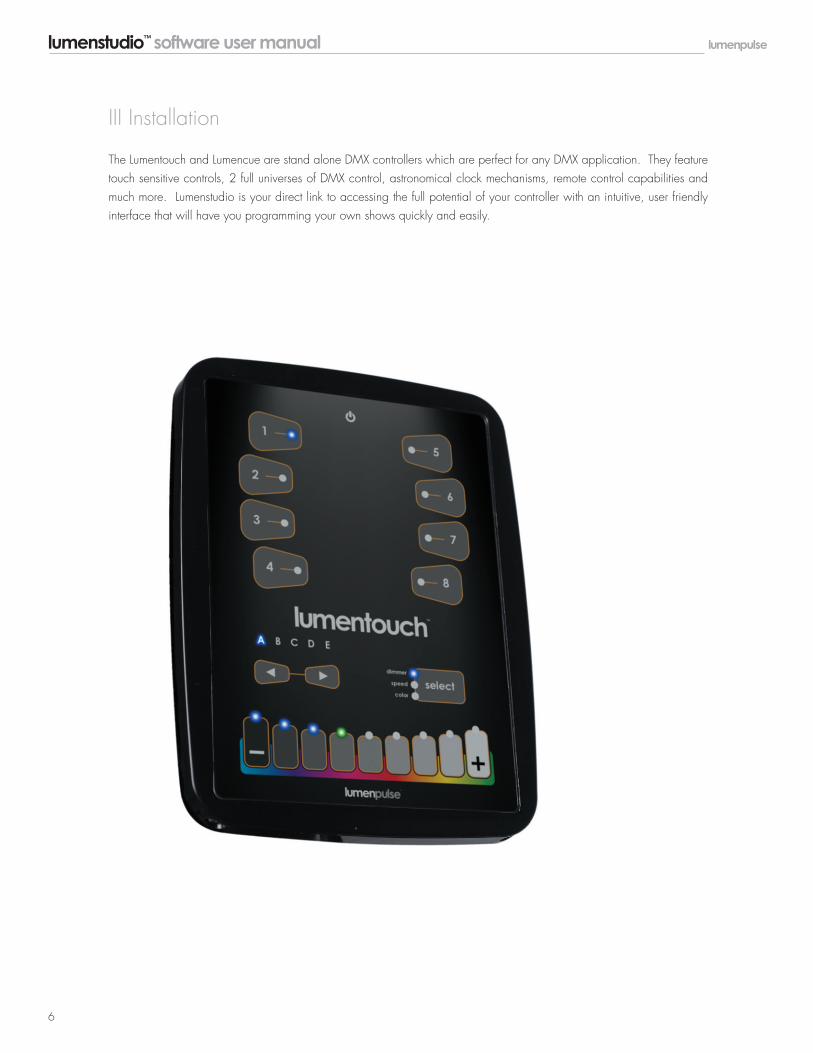
The Lumentouch and Lumencue are stand alone DMX controllers which are perfect for any DMX application. They feature touch sensitive controls, 2 full universes of DMX control, astronomical clock mechanisms, remote control capabilities and much more. Lumenstudio is your direct link to accessing the full potential of your controller with an intuitive, user friendly interface that will have you programming your own shows quickly and easily.
lumenstudio™ software user manual 7
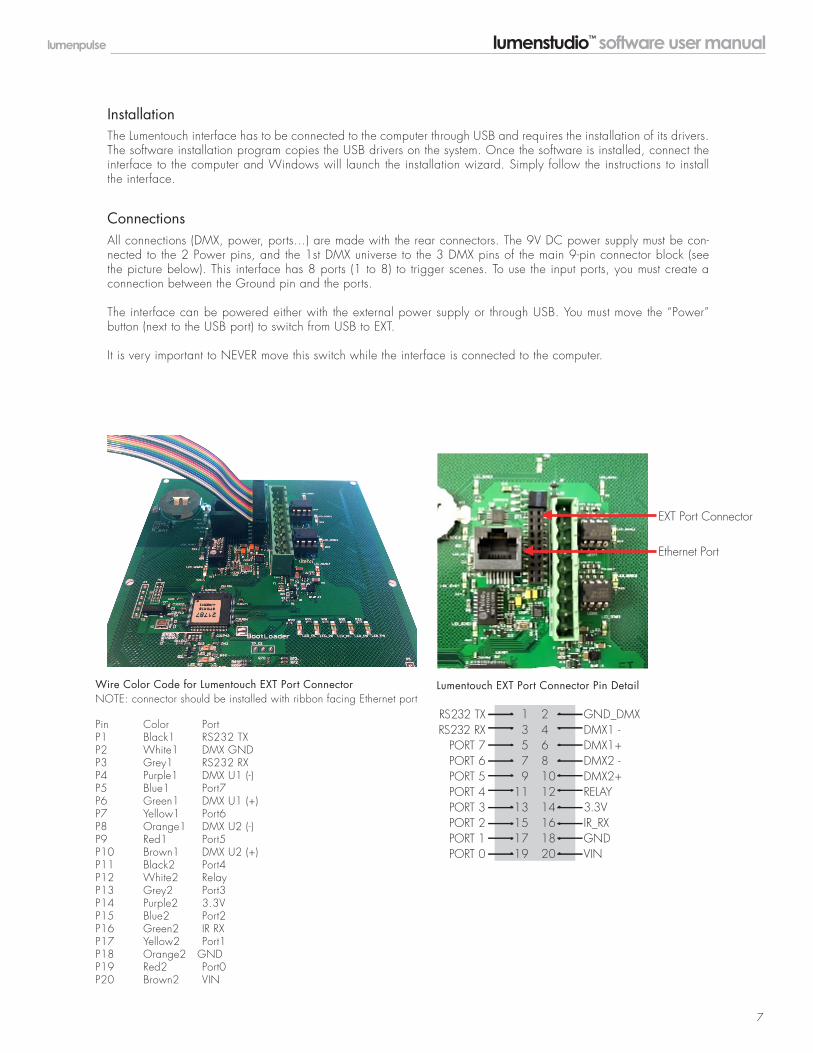
The Lumentouch interface has to be connected to the computer through USB and requires the installation of its drivers. The software installation program copies the USB drivers on the system. Once the software is installed, connect the interface to the computer and Windows will launch the installation wizard. Simply follow the instructions to install the interface.
All connections (DMX, power, ports…) are made with the rear connectors. The 9V DC power supply must be con-nected to the 2 Power pins, and the 1st DMX universe to the 3 DMX pins of the main 9-pin connector block (see the picture below). This interface has 8 ports (1 to 8) to trigger scenes. To use the input ports, you must create a connection between the Ground pin and the ports.
The interface can be powered either with the external power supply or through USB. You must move the “Power” button (next to the USB port) to switch from USB to EXT.
It is very important to NEVER move this switch while the interface is connected to the computer.
Wire Color Code for Lumentouch EXT Port ConnectorNOTE: connector should be installed with ribbon facing Ethernet port
Pin Color PortP1 Black1 RS232 TXP2 White1 DMX GNDP3 Grey1 RS232 RXP4 Purple1 DMX U1 (-)P5 Blue1 Port7P6 Green1 DMX U1 (+)P7 Yellow1 Port6P8 Orange1 DMX U2 (-)P9 Red1 Port5P10 Brown1 DMX U2 (+)P11 Black2 Port4P12 White2 RelayP13 Grey2 Port3P14 Purple2 3.3VP15 Blue2 Port2P16 Green2 IR RXP17 Yellow2 Port1P18 Orange2 GNDP19 Red2 Port0P20 Brown2 VIN
Lumentouch EXT Port Connector Pin Detail
Installation
Connections
RS232 TXRS232 RX
PORT 7PORT 6PORT 5PORT 4PORT 3PORT 2PORT 1PORT 0
13579
1113151719
2468101214161820
GND_DMXDMX1 -DMX1+DMX2 -DMX2+RELAY3.3VIR_RXGNDVIN
EXT Port Connector
Ethernet Port
lumenstudio™ software user manual 8
IV Creating A New Show
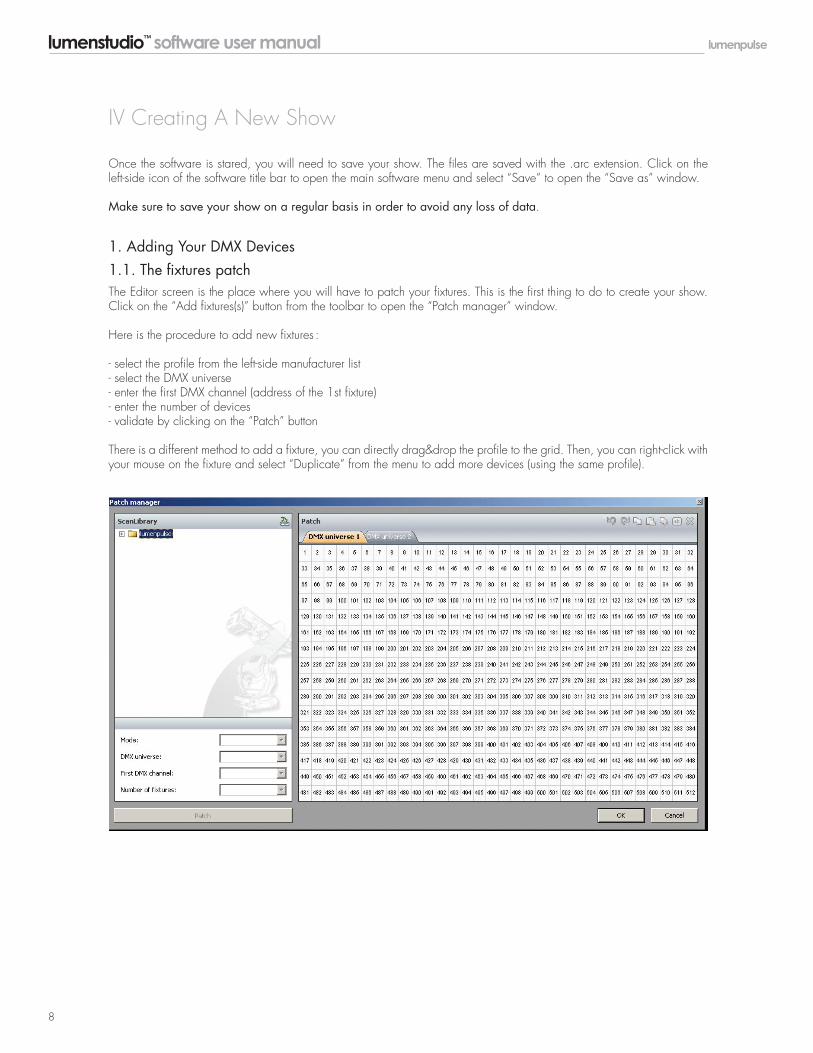
Once the software is stared, you will need to save your show. The files are saved with the .arc extension. Click on the left-side icon of the software title bar to open the main software menu and select “Save” to open the “Save as” window.
Make sure to save your show on a regular basis in order to avoid any loss of data.
The Editor screen is the place where you will have to patch your fixtures. This is the first thing to do to create your show. Click on the “Add fixtures(s)” button from the toolbar to open the “Patch manager” window.
Here is the procedure to add new fixtures :
- select the profile from the left-side manufacturer list- select the DMX universe- enter the first DMX channel (address of the 1st fixture)- enter the number of devices- validate by clicking on the “Patch” button
There is a different method to add a fixture, you can directly drag&drop the profile to the grid. Then, you can right-click with your mouse on the fixture and select “Duplicate” from the menu to add more devices (using the same profile).
1. Adding Your DMX Devices1.1. The fixtures patch
lumenstudio™ software user manual 9
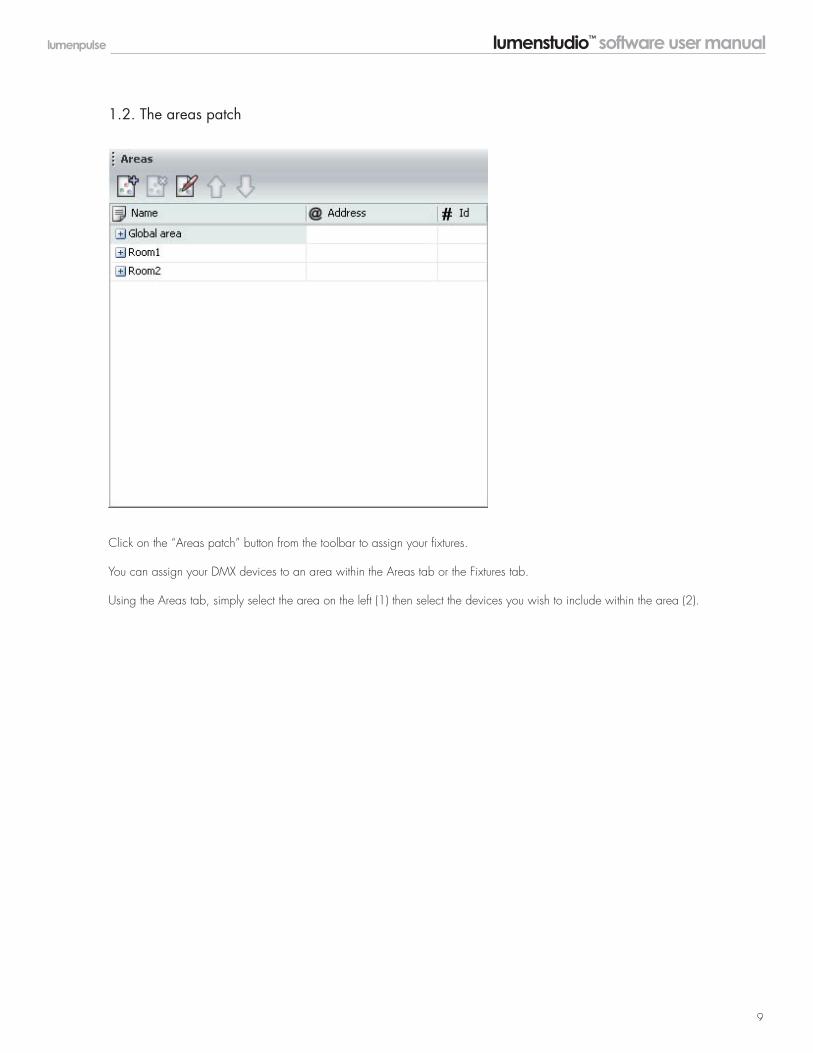
Click on the “Areas patch” button from the toolbar to assign your fixtures.
You can assign your DMX devices to an area within the Areas tab or the Fixtures tab.
Using the Areas tab, simply select the area on the left (1) then select the devices you wish to include within the area (2).
1.2. The areas patch
lumenstudio™ software user manual 10
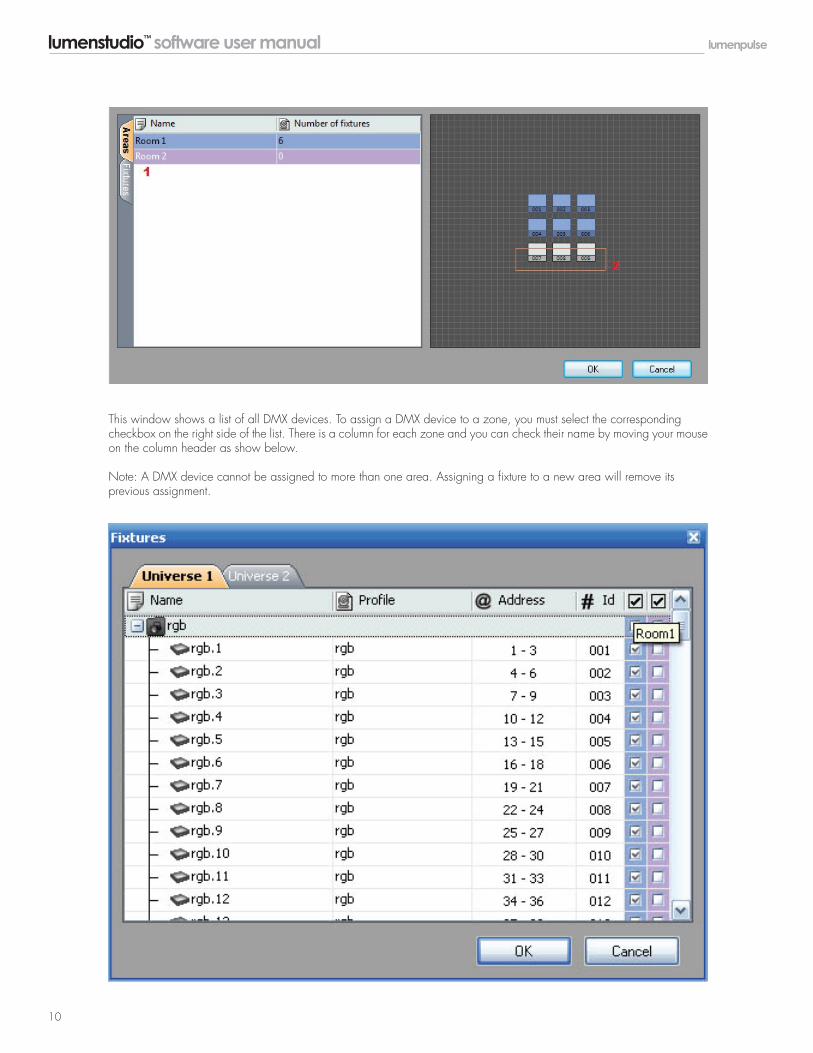
This window shows a list of all DMX devices. To assign a DMX device to a zone, you must select the corresponding checkbox on the right side of the list. There is a column for each zone and you can check their name by moving your mouse on the column header as show below.
Note: A DMX device cannot be assigned to more than one area. Assigning a fixture to a new area will remove its previous assignment.
lumenstudio™ software user manual 11
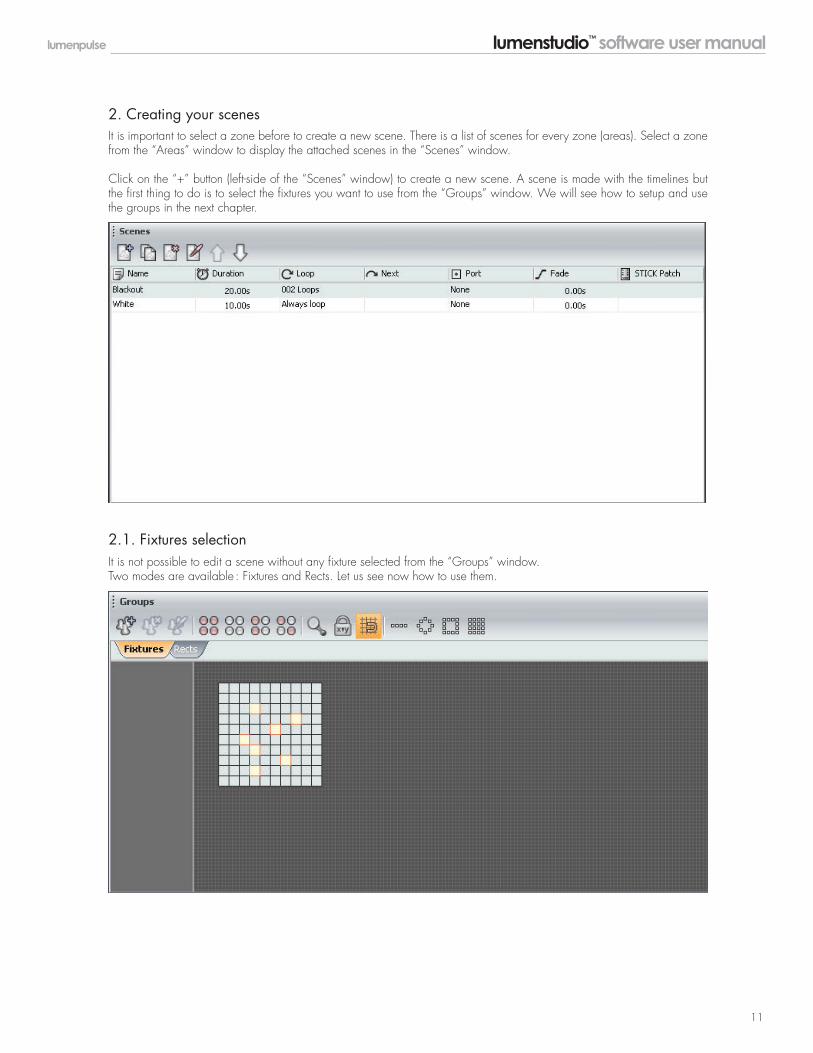
2. Creating your scenes
2.1. Fixtures selection
It is important to select a zone before to create a new scene. There is a list of scenes for every zone (areas). Select a zone from the “Areas” window to display the attached scenes in the “Scenes” window.
Click on the “+” button (left-side of the “Scenes” window) to create a new scene. A scene is made with the timelines but the first thing to do is to select the fixtures you want to use from the “Groups” window. We will see how to setup and use the groups in the next chapter.
It is not possible to edit a scene without any fixture selected from the “Groups” window. Two modes are available : Fixtures and Rects. Let us see now how to use them.
lumenstudio™ software user manual 12
It is important to setup the positions of your fixtures in order to visualize them correctly.It is often easier to build your sequences if you have an idea of your fixtures actual positions.
To alter to position of a fixture, simply select the fixture and drag to the desired location within the group window. Use the line, circle, square or matrix icons on the group toolbar to quickly arrange your fixtures into a shape.
This section explains how to set up a matrix of fixtures, such as a colored wall matrix or an LEDdancefloor. In the example below, we will be using the “Matrix” tool to set up a 10x10 matrix.
Procedure to create a 10x10 matrix :
- Select all fixtures using your mouse or the “Select all” button from the toolbar - Click on the “Matrix” button from the toolbar - Enter 10 x 10 in the Matrix window - Validate by clicking on “OK”
2.1.1. The fixtures mode
2.1.1.1. Setting up the positions
lumenstudio™ software user manual 13
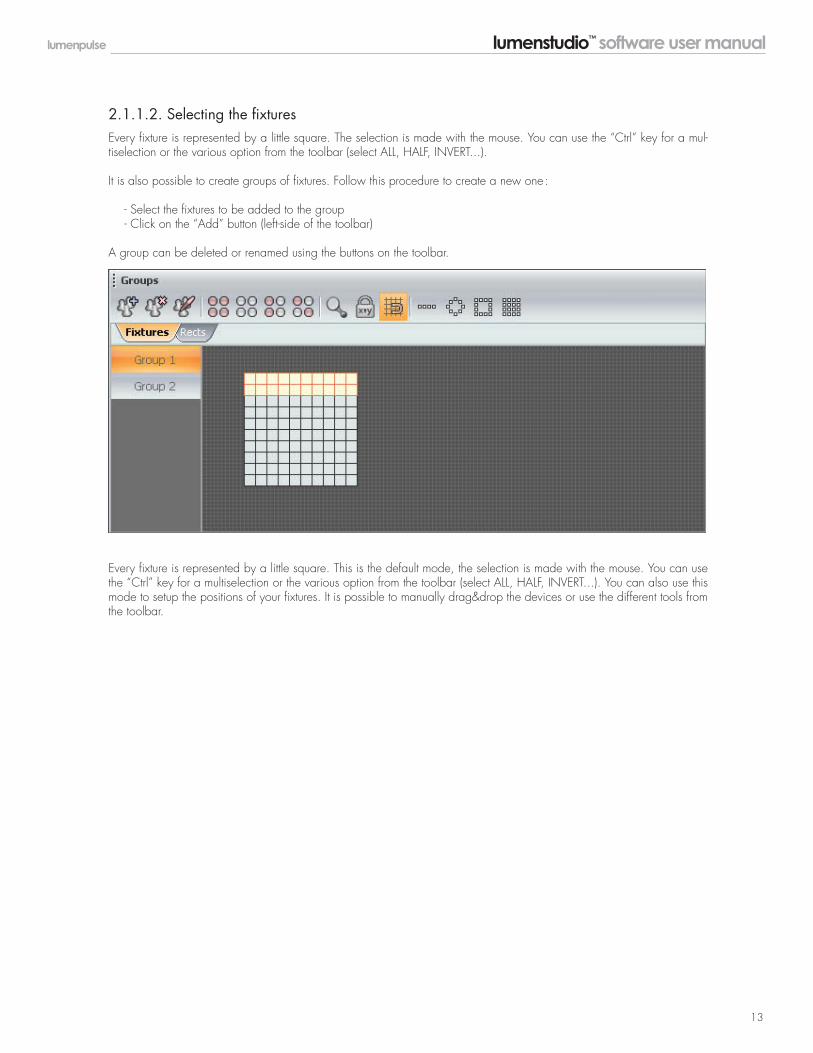
Every fixture is represented by a little square. The selection is made with the mouse. You can use the “Ctrl” key for a mul-tiselection or the various option from the toolbar (select ALL, HALF, INVERT...).
It is also possible to create groups of fixtures. Follow this procedure to create a new one :
- Select the fixtures to be added to the group - Click on the “Add” button (left-side of the toolbar)
A group can be deleted or renamed using the buttons on the toolbar.
Every fixture is represented by a little square. This is the default mode, the selection is made with the mouse. You can use the “Ctrl” key for a multiselection or the various option from the toolbar (select ALL, HALF, INVERT...). You can also use this mode to setup the positions of your fixtures. It is possible to manually drag&drop the devices or use the different tools from the toolbar.
2.1.1.2. Selecting the fixtures
lumenstudio™ software user manual 14
2.2. Scenes construction
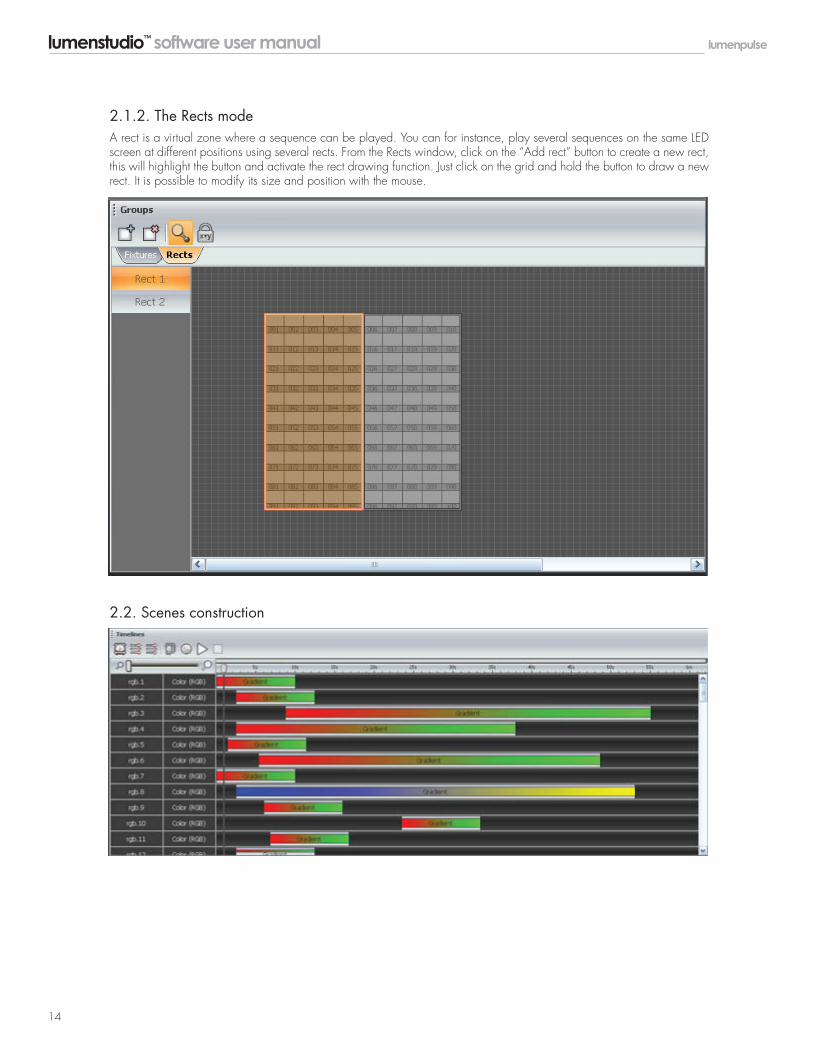
A rect is a virtual zone where a sequence can be played. You can for instance, play several sequences on the same LED screen at different positions using several rects. From the Rects window, click on the “Add rect” button to create a new rect, this will highlight the button and activate the rect drawing function. Just click on the grid and hold the button to draw a new rect. It is possible to modify its size and position with the mouse.
2.1.2. The Rects mode
lumenstudio™ software user manual 15
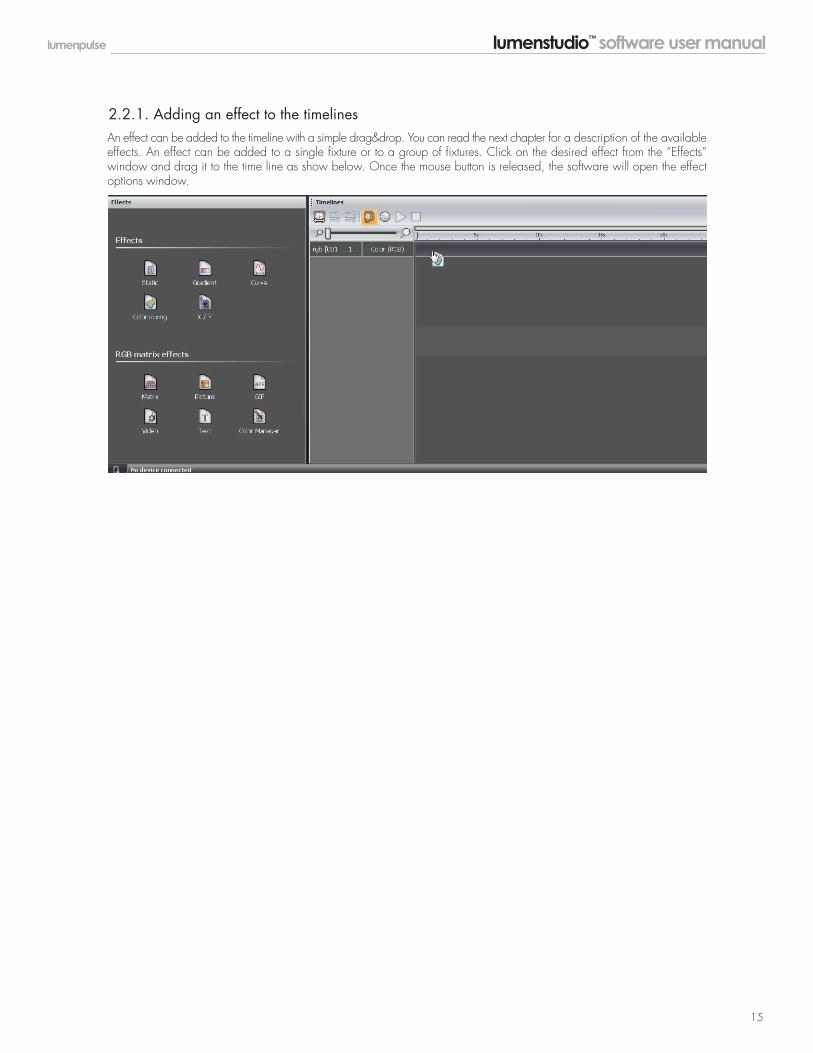
An effect can be added to the timeline with a simple drag&drop. You can read the next chapter for a description of the available effects. An effect can be added to a single fixture or to a group of fixtures. Click on the desired effect from the “Effects” window and drag it to the time line as show below. Once the mouse button is released, the software will open the effect options window.
2.2.1. Adding an effect to the timelines
lumenstudio™ software user manual 16
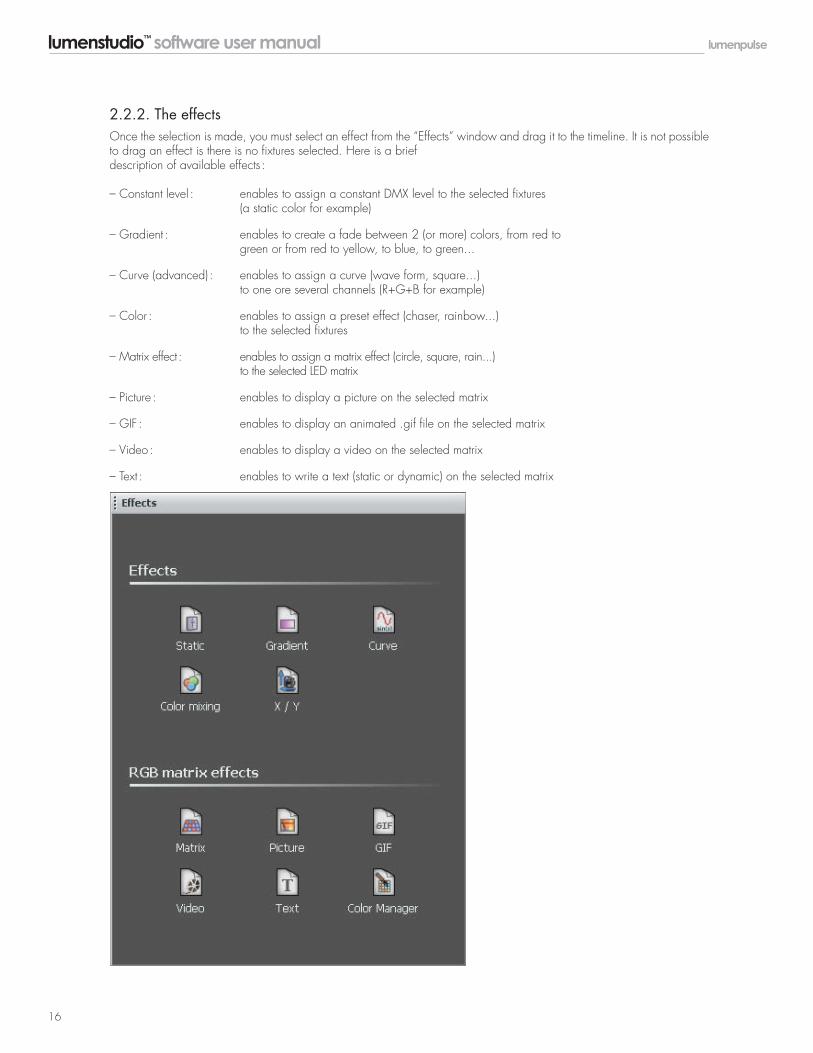
Once the selection is made, you must select an effect from the “Effects” window and drag it to the timeline. It is not possible to drag an effect is there is no fixtures selected. Here is a briefdescription of available effects :
– Constant level : enables to assign a constant DMX level to the selected fixtures (a static color for example)
– Gradient : enables to create a fade between 2 (or more) colors, from red to green or from red to yellow, to blue, to green...
– Curve (advanced) : enables to assign a curve (wave form, square...) to one ore several channels (R+G+B for example)
– Color : enables to assign a preset effect (chaser, rainbow...) to the selected fixtures
– Matrix effect : enables to assign a matrix effect (circle, square, rain...) to the selected LED matrix
– Picture : enables to display a picture on the selected matrix
– GIF : enables to display an animated .gif file on the selected matrix
– Video : enables to display a video on the selected matrix
– Text : enables to write a text (static or dynamic) on the selected matrix
2.2.2. The effects
lumenstudio™ software user manual 17
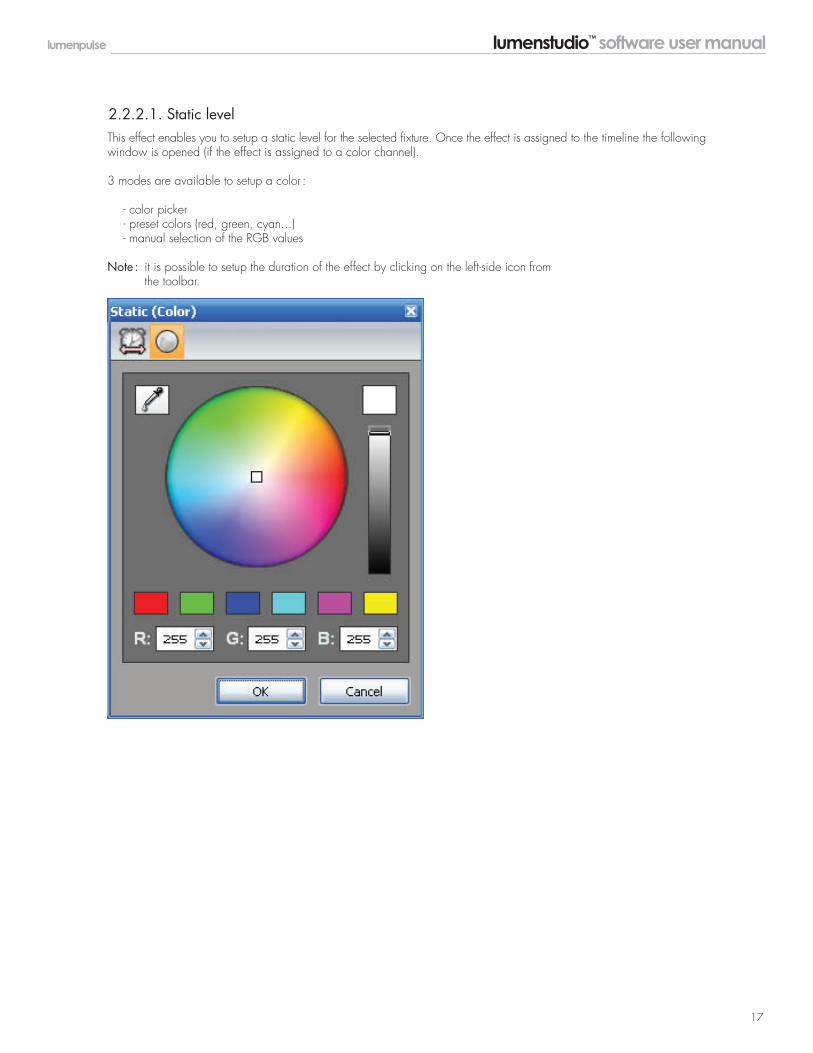
This effect enables you to setup a static level for the selected fixture. Once the effect is assigned to the timeline the following window is opened (if the effect is assigned to a color channel).
3 modes are available to setup a color :
- color picker - preset colors (red, green, cyan...) - manual selection of the RGB values
Note : it is possible to setup the duration of the effect by clicking on the left-side icon from the toolbar.
2.2.2.1. Static level

lumenstudio™ software user manual 18
This effect allows you to create a fade between DMX values (color, positions...). In the case of a color gradient, it is possible to add more points. You must double click on the gradient zone to add a new step. Then, you can select it and change the color or its position within the gradient.
Phasing : It is possible to add a delay between your fixtures using the “Phasing” option. It is very useful to create a rainbow effect for instance.
Do not forget to use the “Play” button to preview your effect. It is possible to edit an effect by double clicking on it from the time line.
2.2.2.2. Gradient

lumenstudio™ software user manual 19
This tool allows you to have more control over the individual channels of your fixtures and is extremely useful with LEDs. The first thing to do is to select the channel you want to work with (Red, Green...) and then select a waveform from the list (Sinus, Square...).
Several options are available like Amplitude, Offset. We advise that you play with these options to see how they work with your fixtures.
Phasing : It is possible to add a delay between your fixtures using the “Phasing” option. It is very useful to create a rainbow effect for instance.
You must click on the “Fixtures order” button (3rd button from the left in the toolbar) to setup a direction for your phasing. The following window is opened and you can use the UP and DOWN buttons to change the order or record a complete new direction using the “rec” button”.
2.2.2.3. Curve
lumenstudio™ software user manual 20
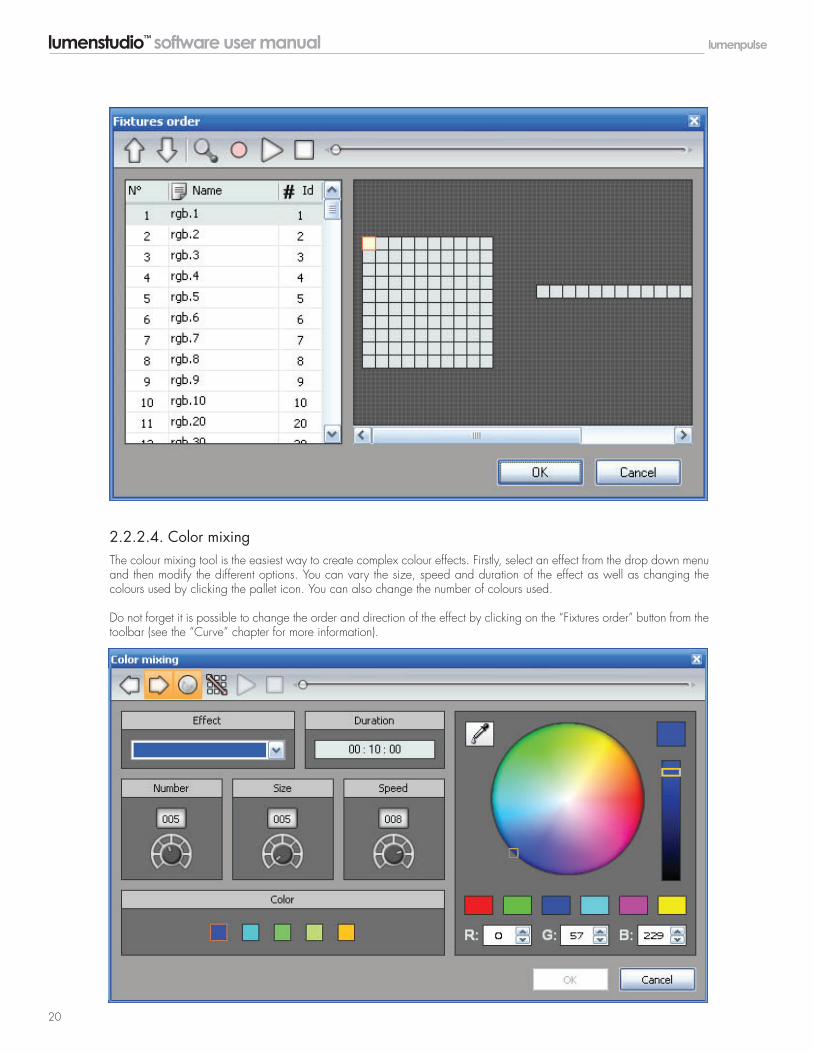
The colour mixing tool is the easiest way to create complex colour effects. Firstly, select an effect from the drop down menu and then modify the different options. You can vary the size, speed and duration of the effect as well as changing the colours used by clicking the pallet icon. You can also change the number of colours used.
Do not forget it is possible to change the order and direction of the effect by clicking on the “Fixtures order” button from the toolbar (see the “Curve” chapter for more information).
2.2.2.4. Color mixing
lumenstudio™ software user manual 21
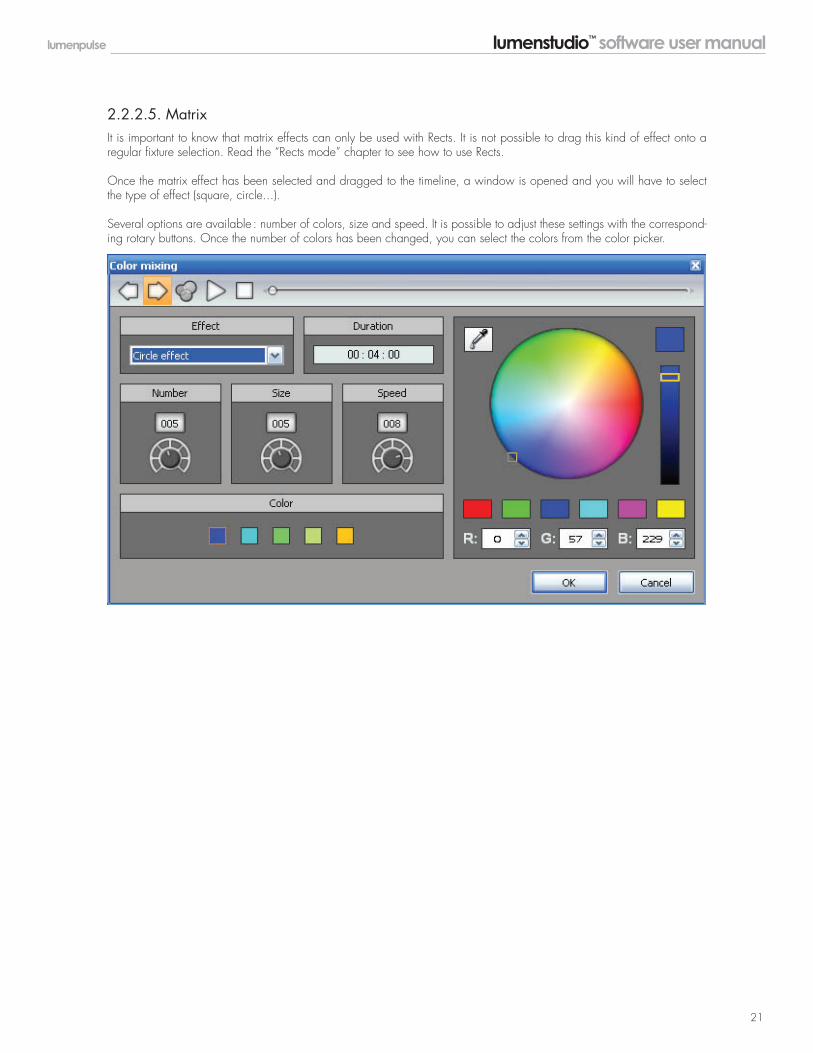
It is important to know that matrix effects can only be used with Rects. It is not possible to drag this kind of effect onto a regular fixture selection. Read the “Rects mode” chapter to see how to use Rects.
Once the matrix effect has been selected and dragged to the timeline, a window is opened and you will have to select the type of effect (square, circle...).
Several options are available : number of colors, size and speed. It is possible to adjust these settings with the correspond-ing rotary buttons. Once the number of colors has been changed, you can select the colors from the color picker.
2.2.2.5. Matrix
lumenstudio™ software user manual 22
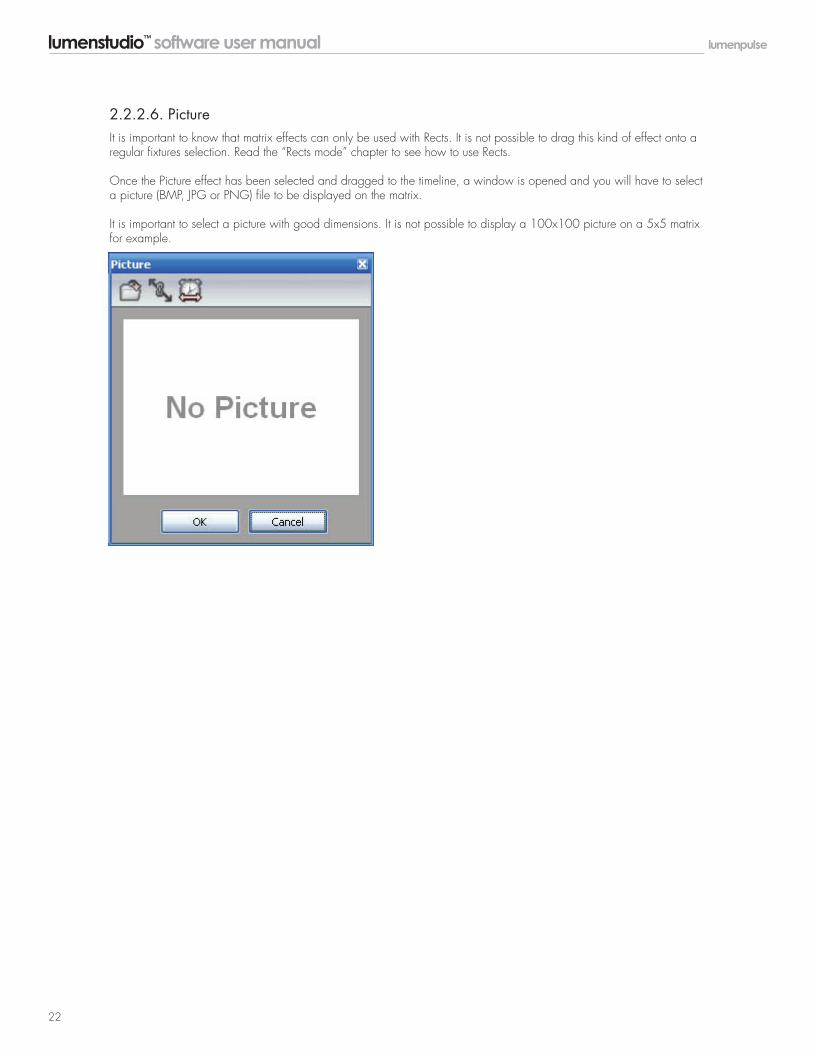
It is important to know that matrix effects can only be used with Rects. It is not possible to drag this kind of effect onto a regular fixtures selection. Read the “Rects mode” chapter to see how to use Rects.
Once the Picture effect has been selected and dragged to the timeline, a window is opened and you will have to select a picture (BMP, JPG or PNG) file to be displayed on the matrix.
It is important to select a picture with good dimensions. It is not possible to display a 100x100 picture on a 5x5 matrix for example.
2.2.2.6. Picture
lumenstudio™ software user manual 23
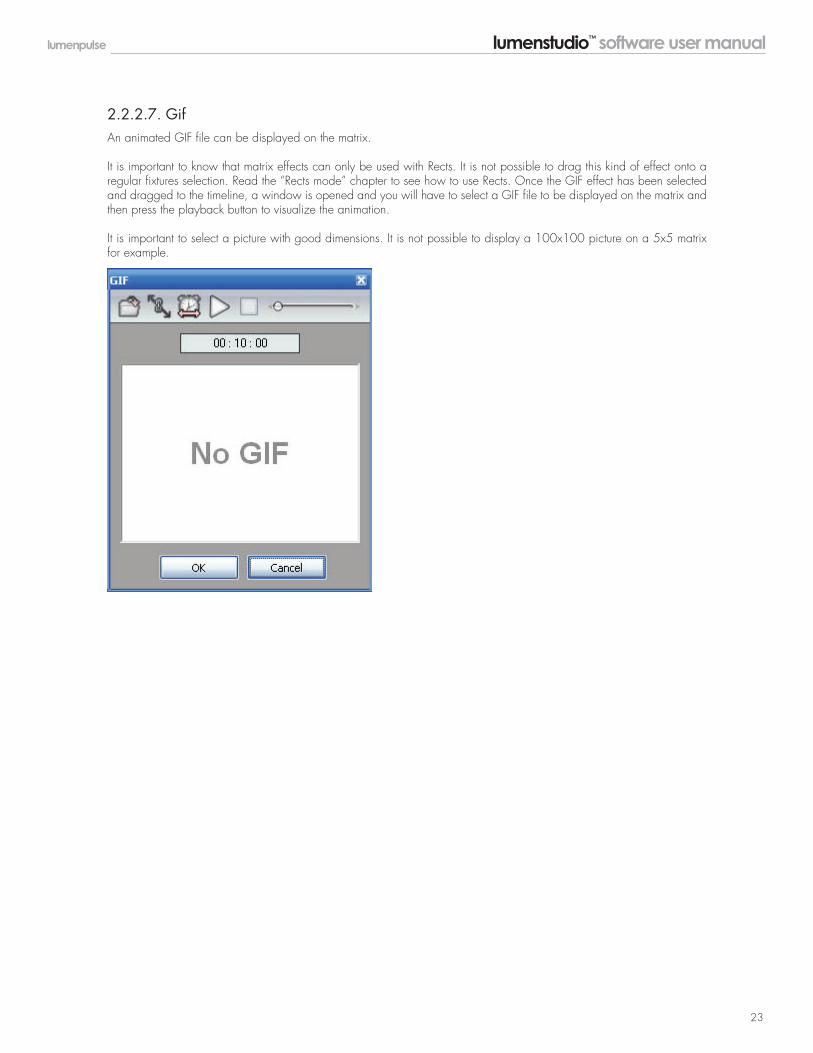
An animated GIF file can be displayed on the matrix.
It is important to know that matrix effects can only be used with Rects. It is not possible to drag this kind of effect onto a regular fixtures selection. Read the “Rects mode” chapter to see how to use Rects. Once the GIF effect has been selected and dragged to the timeline, a window is opened and you will have to select a GIF file to be displayed on the matrix and then press the playback button to visualize the animation.
It is important to select a picture with good dimensions. It is not possible to display a 100x100 picture on a 5x5 matrix for example.
2.2.2.7. Gif
lumenstudio™ software user manual 24
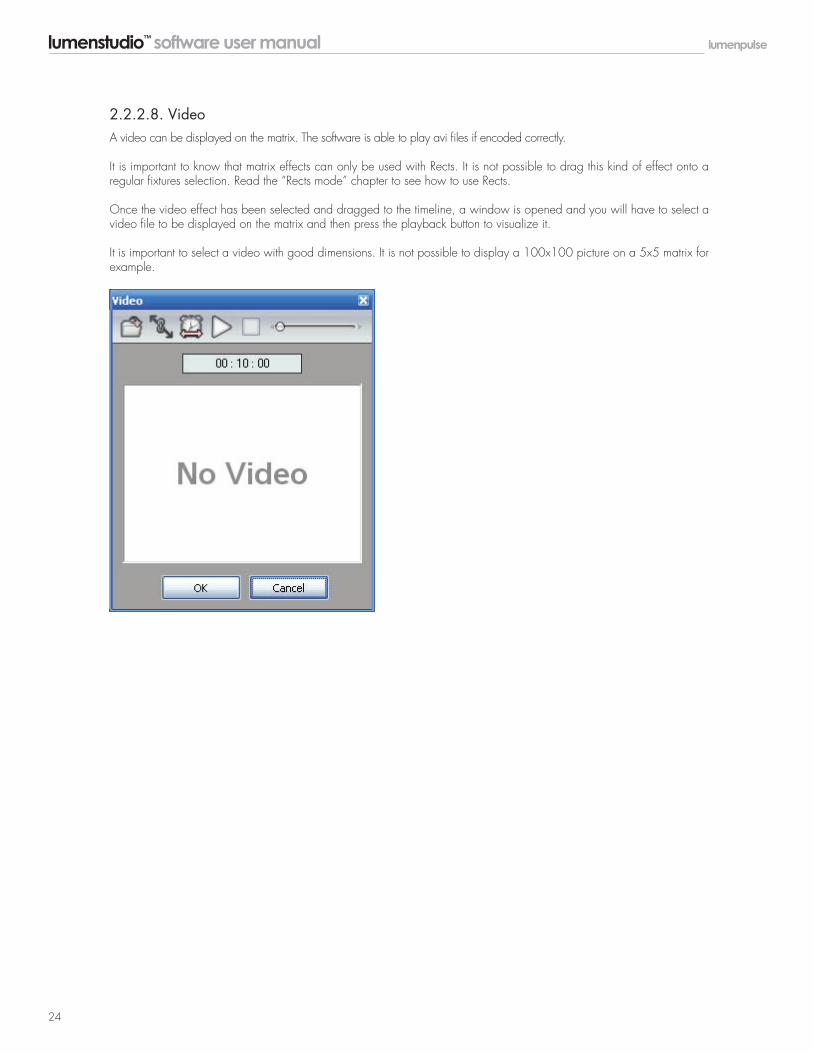
A video can be displayed on the matrix. The software is able to play avi files if encoded correctly.
It is important to know that matrix effects can only be used with Rects. It is not possible to drag this kind of effect onto a regular fixtures selection. Read the “Rects mode” chapter to see how to use Rects.
Once the video effect has been selected and dragged to the timeline, a window is opened and you will have to select a video file to be displayed on the matrix and then press the playback button to visualize it.
It is important to select a video with good dimensions. It is not possible to display a 100x100 picture on a 5x5 matrix for example.
2.2.2.8. Video
lumenstudio™ software user manual 25
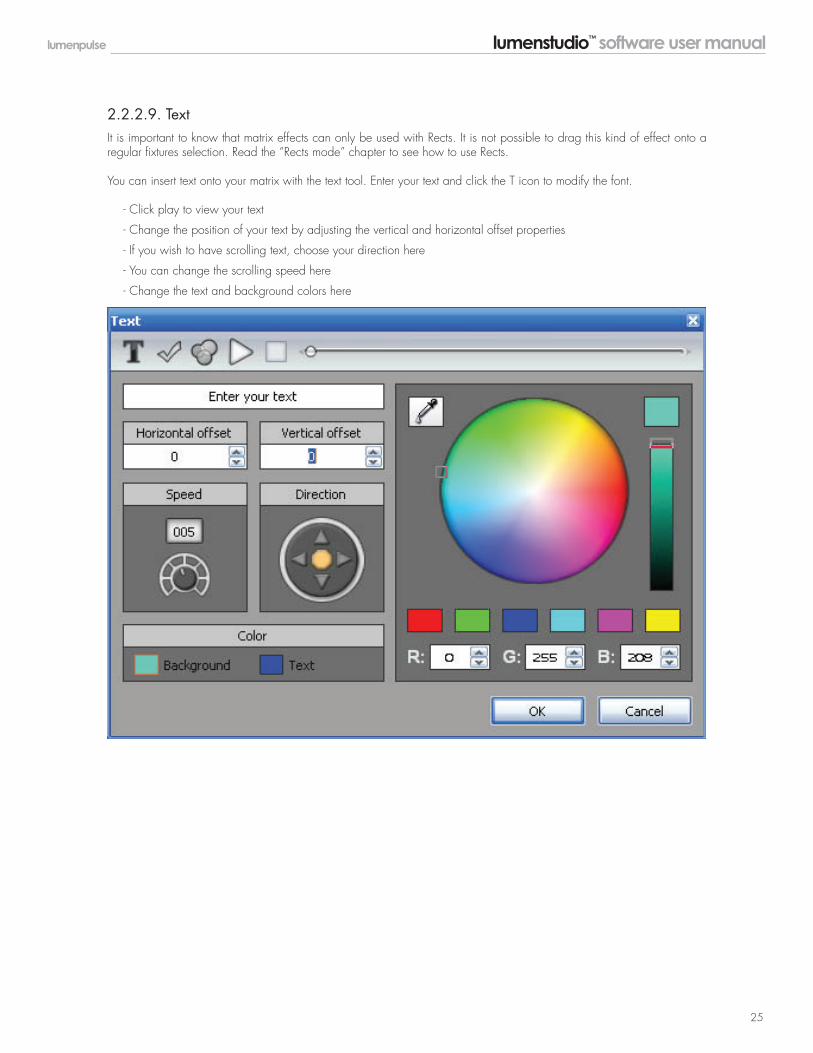
It is important to know that matrix effects can only be used with Rects. It is not possible to drag this kind of effect onto a regular fixtures selection. Read the “Rects mode” chapter to see how to use Rects.
You can insert text onto your matrix with the text tool. Enter your text and click the T icon to modify the font.
- Click play to view your text
- Change the position of your text by adjusting the vertical and horizontal offset properties
- If you wish to have scrolling text, choose your direction here
- You can change the scrolling speed here
- Change the text and background colors here
2.2.2.9. Text
lumenstudio™ software user manual 26
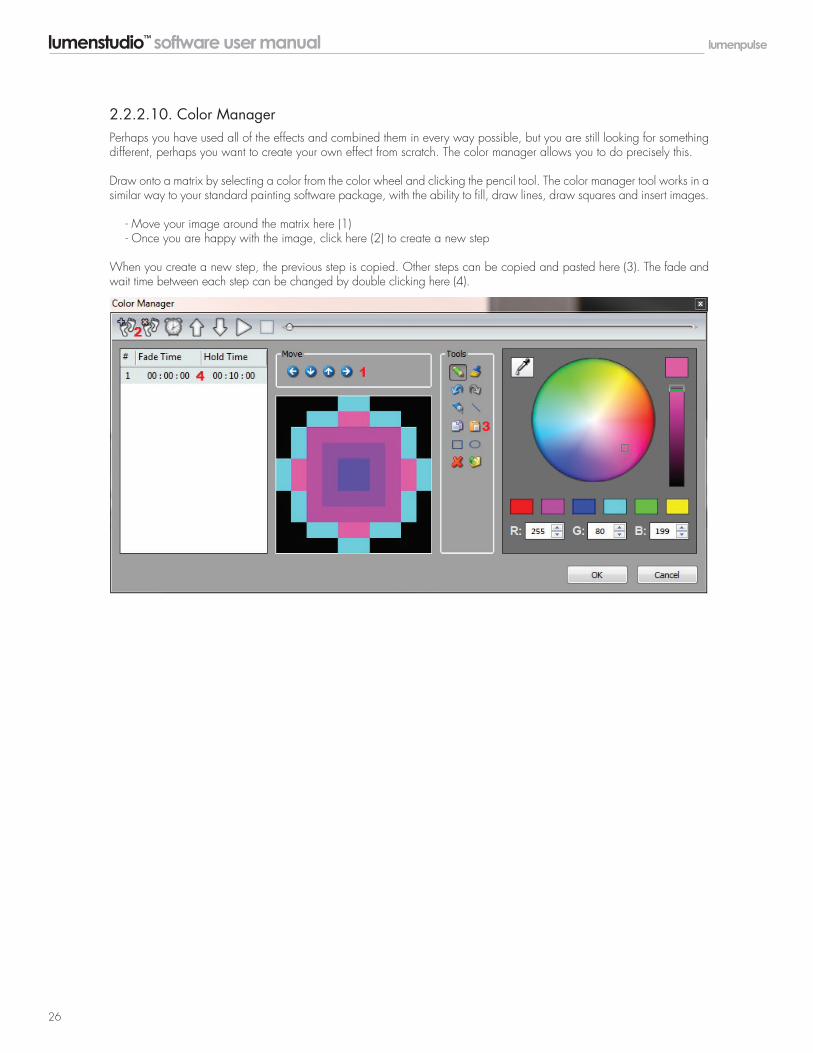
Perhaps you have used all of the effects and combined them in every way possible, but you are still looking for something different, perhaps you want to create your own effect from scratch. The color manager allows you to do precisely this.
Draw onto a matrix by selecting a color from the color wheel and clicking the pencil tool. The color manager tool works in a similar way to your standard painting software package, with the ability to fill, draw lines, draw squares and insert images.
- Move your image around the matrix here (1) - Once you are happy with the image, click here (2) to create a new step
When you create a new step, the previous step is copied. Other steps can be copied and pasted here (3). The fade and wait time between each step can be changed by double clicking here (4).
2.2.2.10. Color Manager
lumenstudio™ software user manual 27
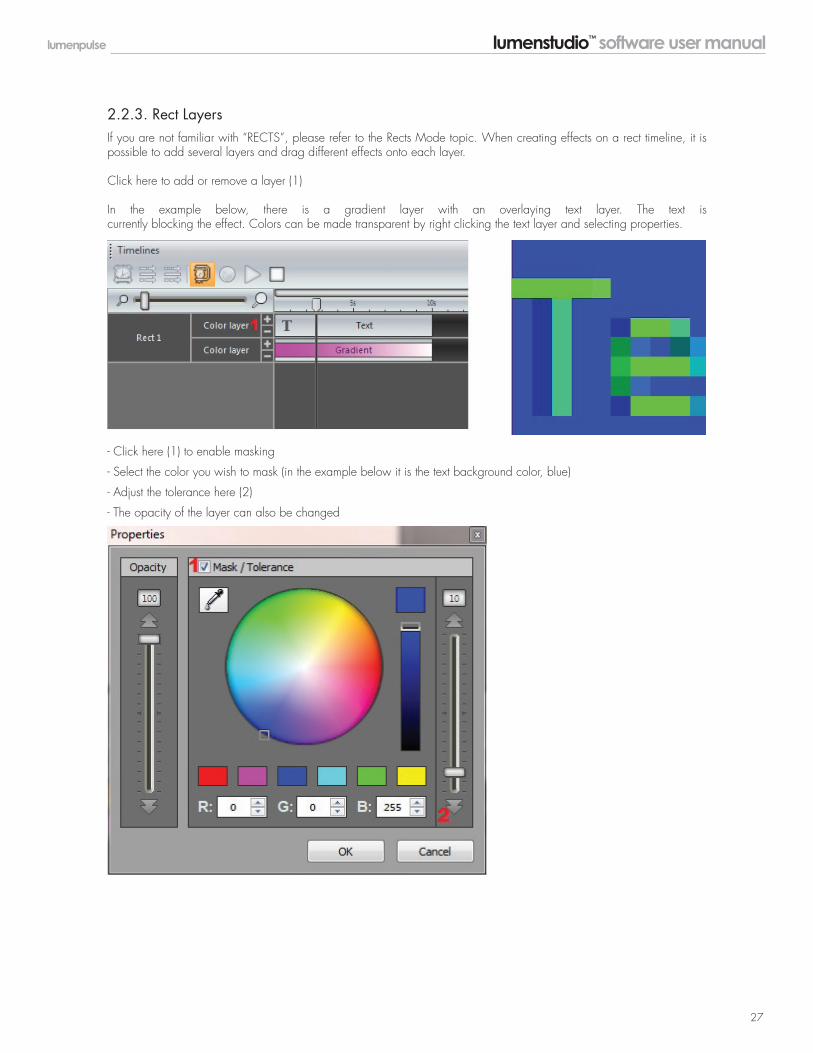
If you are not familiar with “RECTS”, please refer to the Rects Mode topic. When creating effects on a rect timeline, it is possible to add several layers and drag different effects onto each layer.
Click here to add or remove a layer (1)
In the example below, there is a gradient layer with an overlaying text layer. The text is currently blocking the effect. Colors can be made transparent by right clicking the text layer and selecting properties.
- Click here (1) to enable masking
- Select the color you wish to mask (in the example below it is the text background color, blue)
- Adjust the tolerance here (2)
- The opacity of the layer can also be changed
2.2.3. Rect Layers
lumenstudio™ software user manual 28
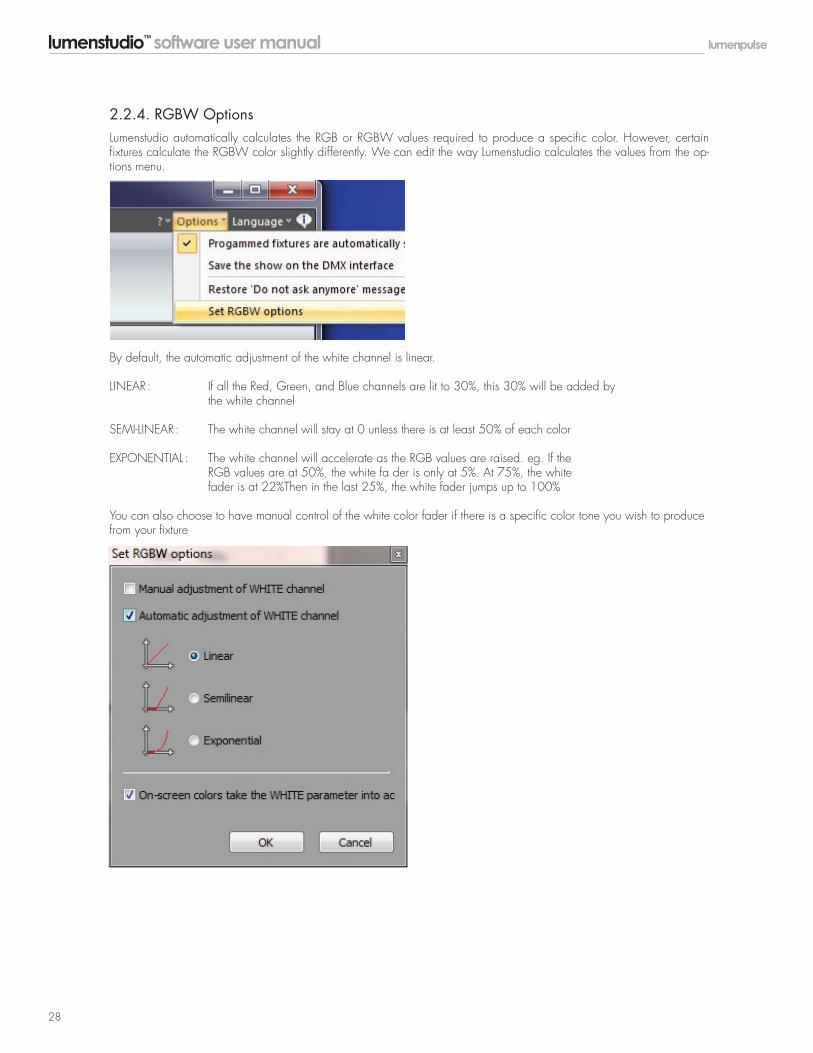
Lumenstudio automatically calculates the RGB or RGBW values required to produce a specific color. However, certain fixtures calculate the RGBW color slightly differently. We can edit the way Lumenstudio calculates the values from the op-tions menu.
By default, the automatic adjustment of the white channel is linear.
LINEAR : If all the Red, Green, and Blue channels are lit to 30%, this 30% will be added by the white channel
SEMI-LINEAR : The white channel will stay at 0 unless there is at least 50% of each color
EXPONENTIAL : The white channel will accelerate as the RGB values are raised. eg. If the RGB values are at 50%, the white fa der is only at 5%. At 75%, the white fader is at 22%Then in the last 25%, the white fader jumps up to 100%
You can also choose to have manual control of the white color fader if there is a specific color tone you wish to produce from your fixture
2.2.4. RGBW Options
lumenstudio™ software user manual 29
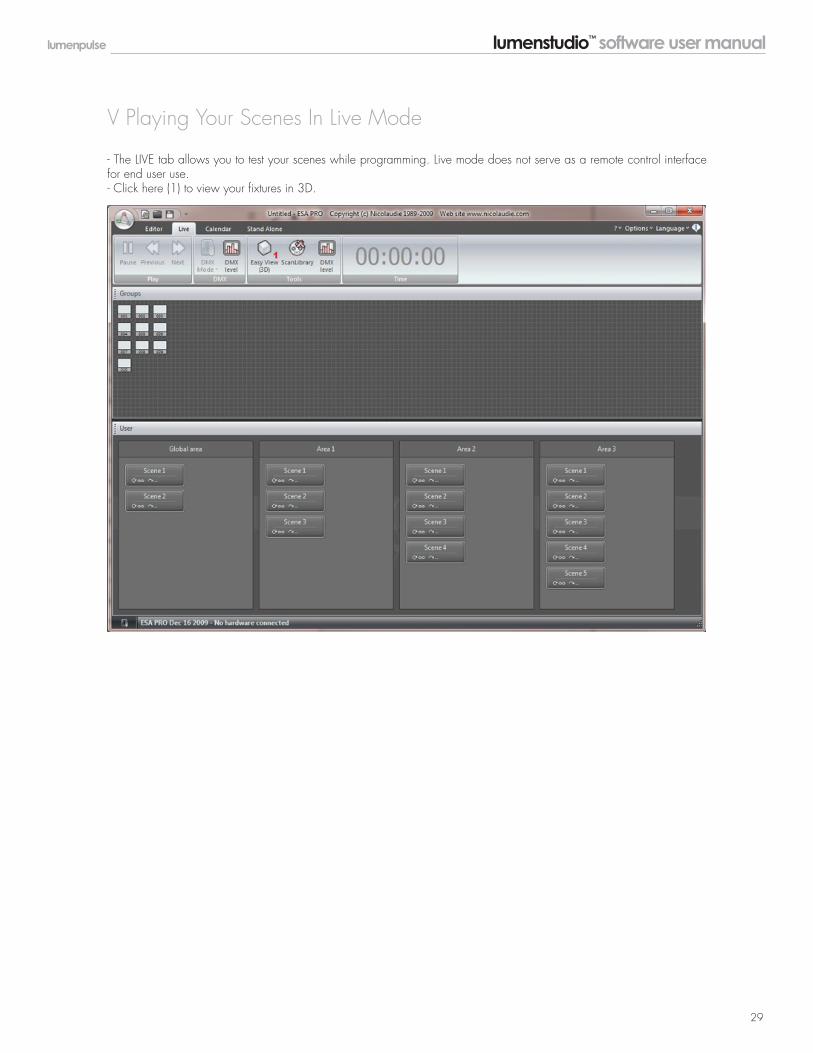
- The LIVE tab allows you to test your scenes while programming. Live mode does not serve as a remote control interface for end user use.- Click here (1) to view your fixtures in 3D.
V Playing Your Scenes In Live Mode
lumenstudio™ software user manual 30
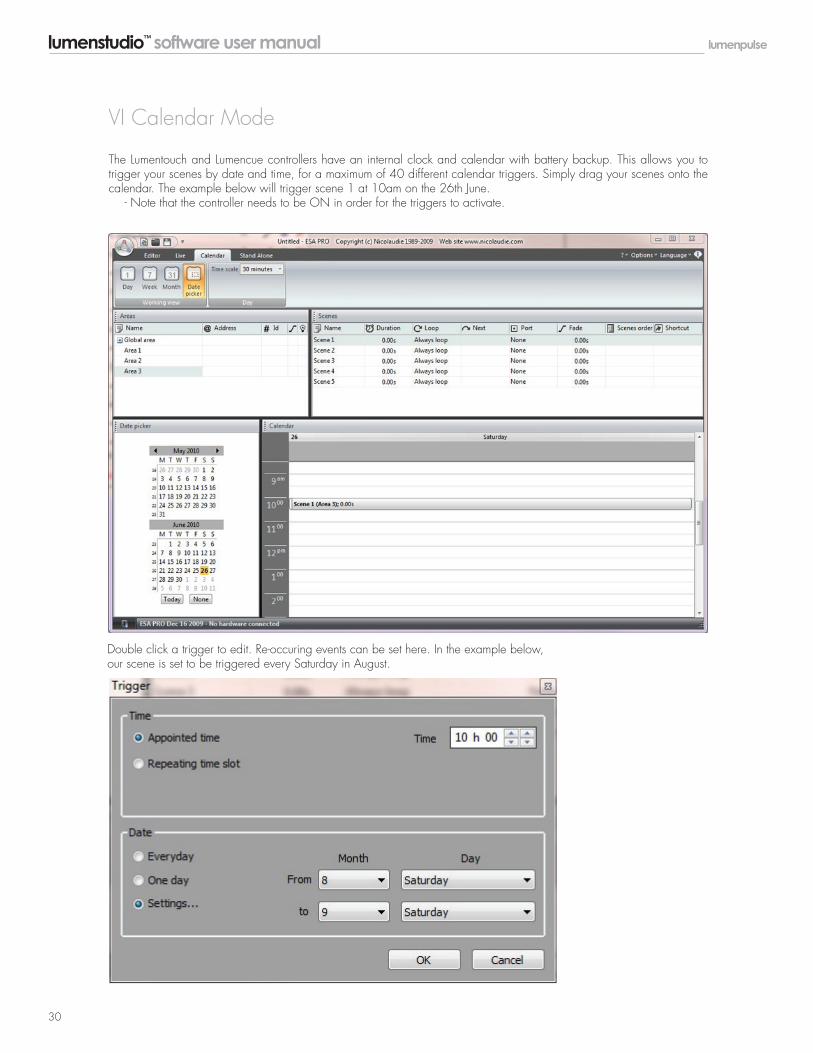
The Lumentouch and Lumencue controllers have an internal clock and calendar with battery backup. This allows you to trigger your scenes by date and time, for a maximum of 40 different calendar triggers. Simply drag your scenes onto the calendar. The example below will trigger scene 1 at 10am on the 26th June. - Note that the controller needs to be ON in order for the triggers to activate.
Double click a trigger to edit. Re-occuring events can be set here. In the example below,our scene is set to be triggered every Saturday in August.
VI Calendar Mode
lumenstudio™ software user manual 31
To begin, before plugging your Lumentouch into your computer be sure that the switch on the bottom marked USB/EXT is switched to USB. Next, plug the USB cable from your laptop/computer to the mini-USB port on the bottom of the Lumen-touch beside the USB/EXT switch.
NOTE: REMOVE PROTECTIVE FILM FROM LUMENTOUCH, this will affect the touch capabilities.
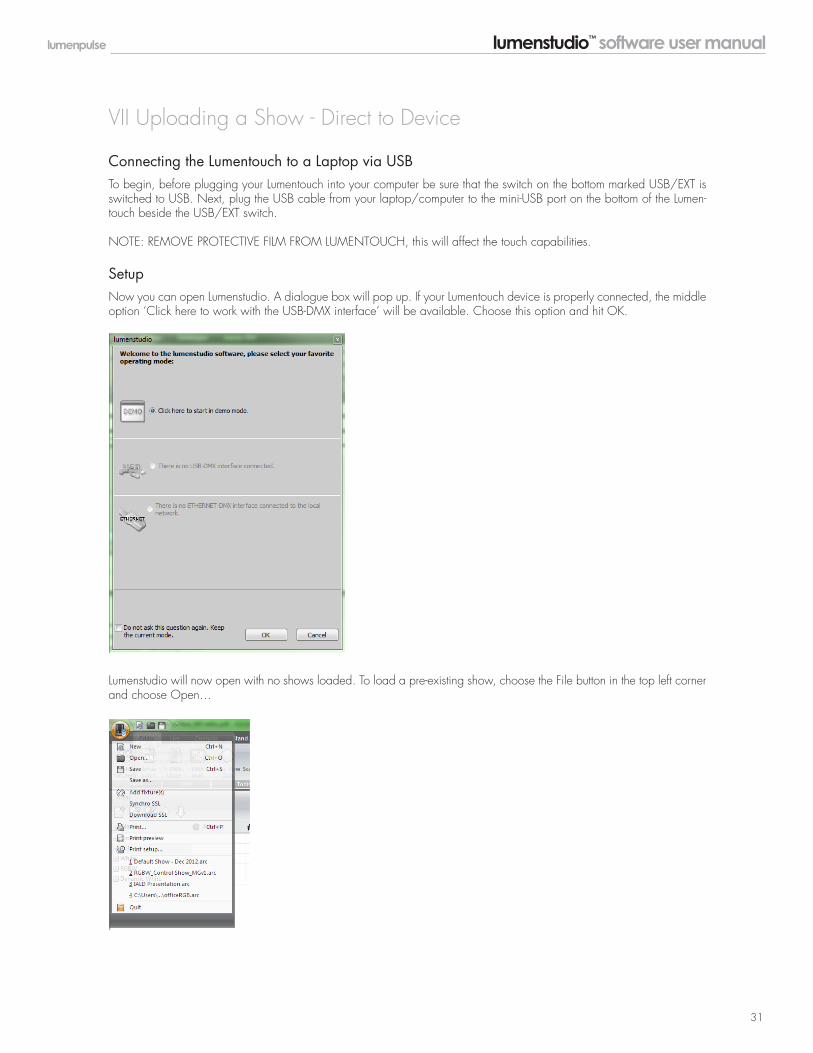
Now you can open Lumenstudio. A dialogue box will pop up. If your Lumentouch device is properly connected, the middle option ‘Click here to work with the USB-DMX interface’ will be available. Choose this option and hit OK.
Lumenstudio will now open with no shows loaded. To load a pre-existing show, choose the File button in the top left corner and choose Open…
VII Uploading a Show - Direct to Device
Connecting the Lumentouch to a Laptop via USB
Setup
lumenstudio™ software user manual 32
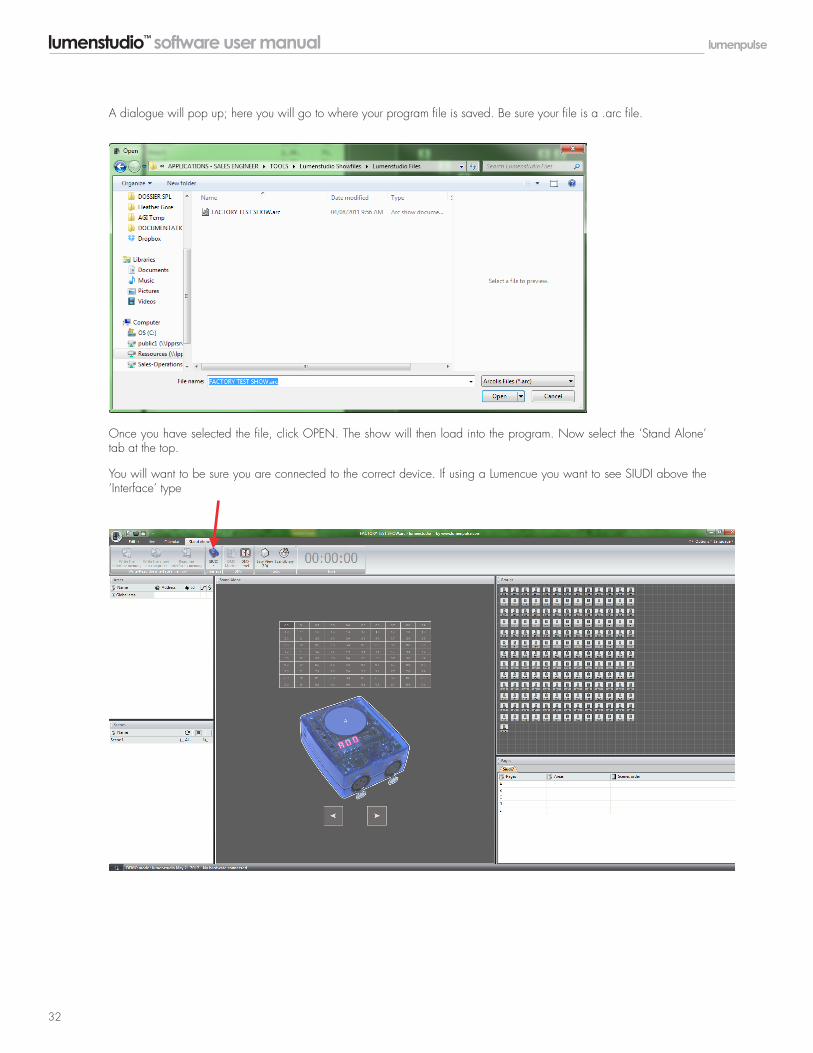
A dialogue will pop up; here you will go to where your program file is saved. Be sure your file is a .arc file.
Once you have selected the file, click OPEN. The show will then load into the program. Now select the ‘Stand Alone’ tab at the top.
You will want to be sure you are connected to the correct device. If using a Lumencue you want to see SIUDI above the ‘Interface’ type
lumenstudio™ software user manual 33
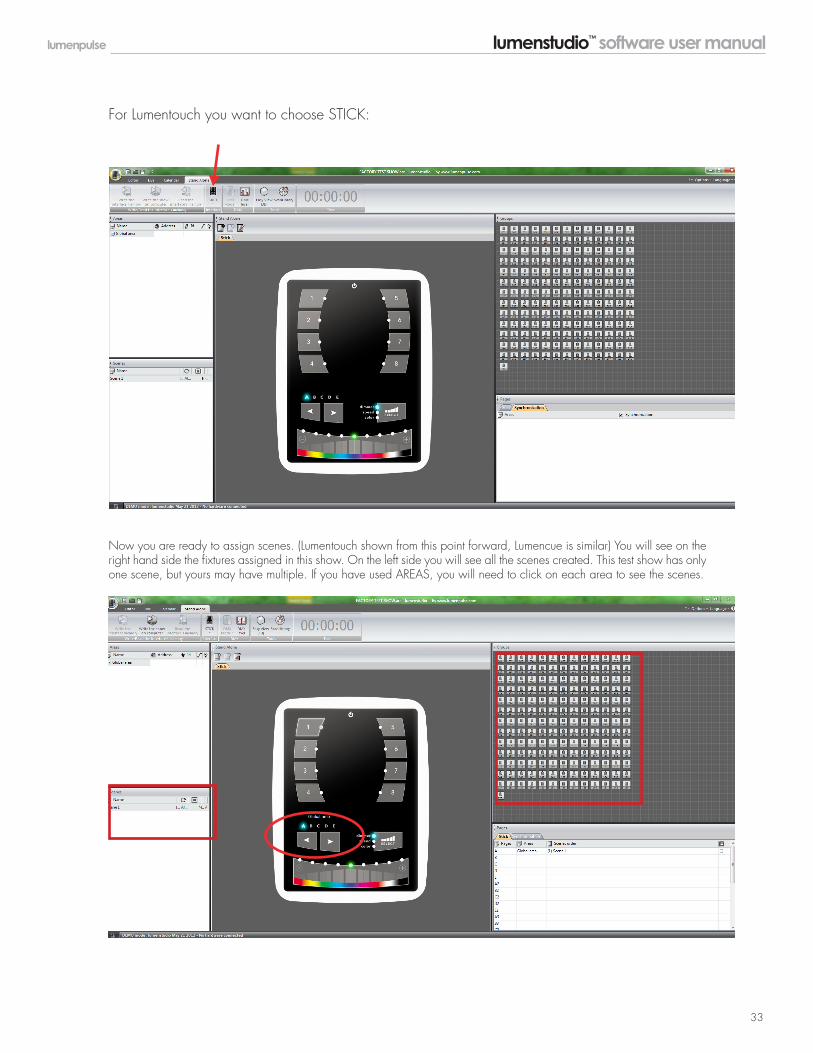
Now you are ready to assign scenes. (Lumentouch shown from this point forward, Lumencue is similar) You will see on the right hand side the fixtures assigned in this show. On the left side you will see all the scenes created. This test show has only one scene, but yours may have multiple. If you have used AREAS, you will need to click on each area to see the scenes.
For Lumentouch you want to choose STICK:
lumenstudio™ software user manual 34
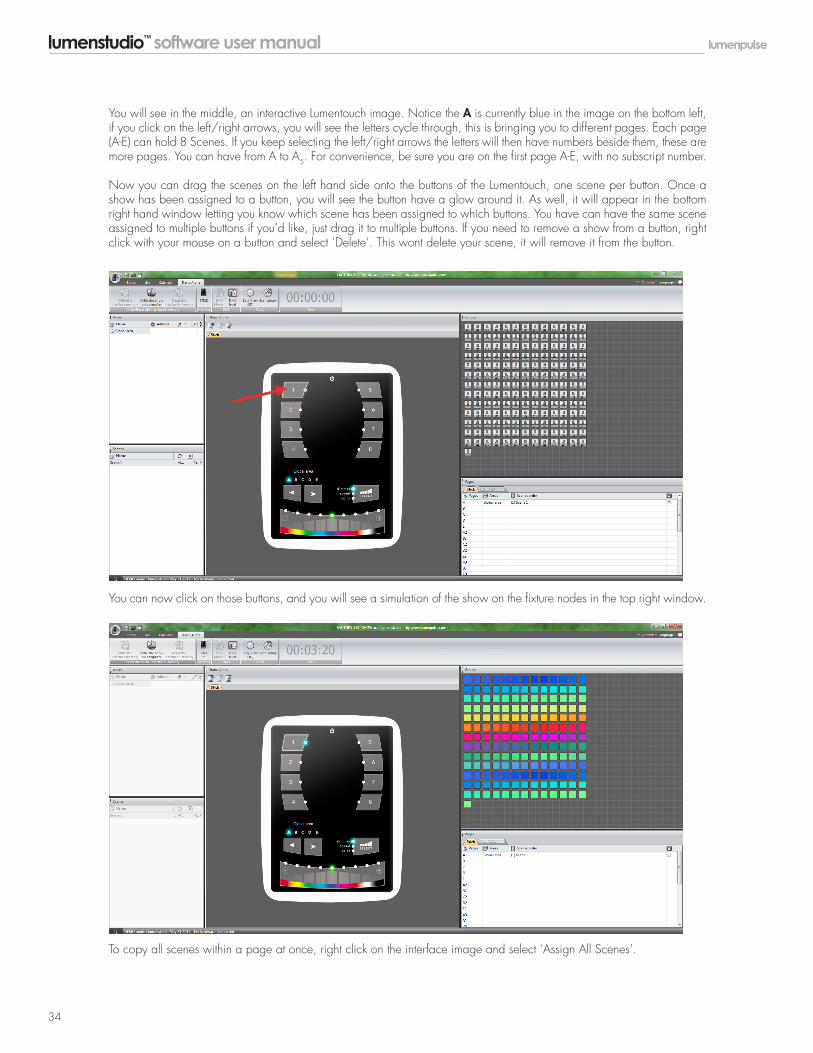
You will see in the middle, an interactive Lumentouch image. Notice the A is currently blue in the image on the bottom left, if you click on the left/right arrows, you will see the letters cycle through, this is bringing you to different pages. Each page (A-E) can hold 8 Scenes. If you keep selecting the left/right arrows the letters will then have numbers beside them, these are more pages. You can have from A to A5. For convenience, be sure you are on the first page A-E, with no subscript number.
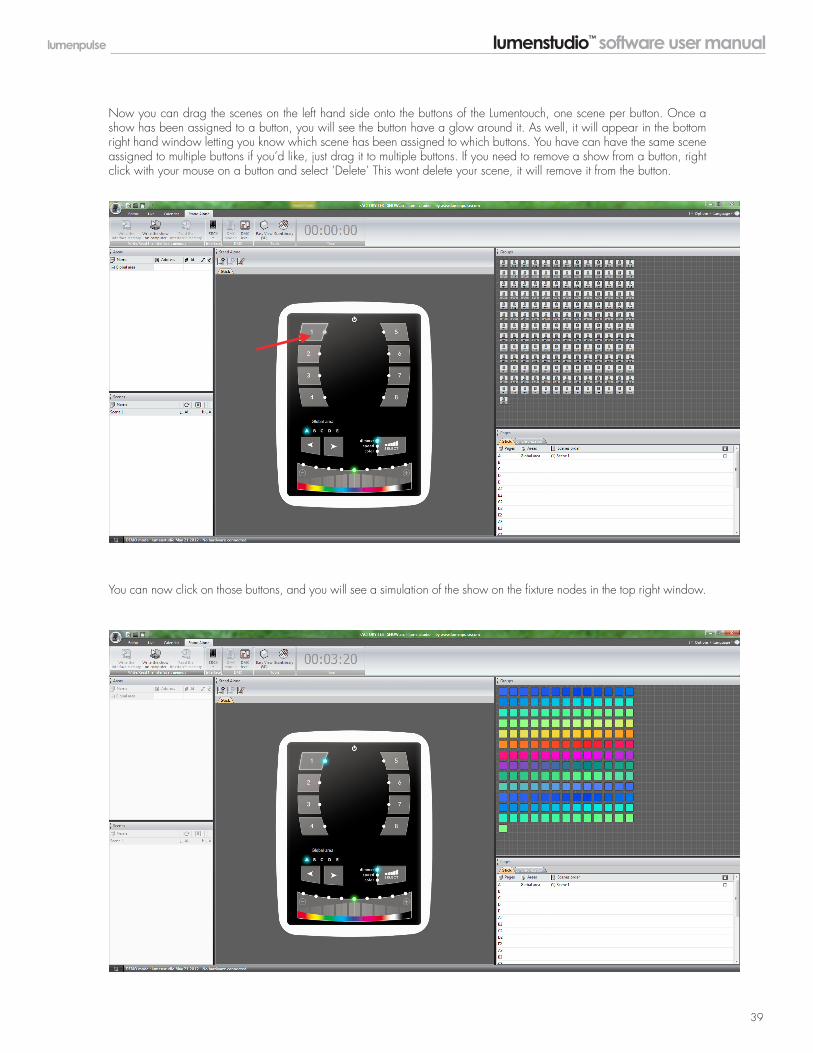
Now you can drag the scenes on the left hand side onto the buttons of the Lumentouch, one scene per button. Once a show has been assigned to a button, you will see the button have a glow around it. As well, it will appear in the bottom right hand window letting you know which scene has been assigned to which buttons. You have can have the same scene assigned to multiple buttons if you’d like, just drag it to multiple buttons. If you need to remove a show from a button, right click with your mouse on a button and select ‘Delete’. This wont delete your scene, it will remove it from the button.
You can now click on those buttons, and you will see a simulation of the show on the fixture nodes in the top right window.
To copy all scenes within a page at once, right click on the interface image and select ‘Assign All Scenes’.
lumenstudio™ software user manual 35
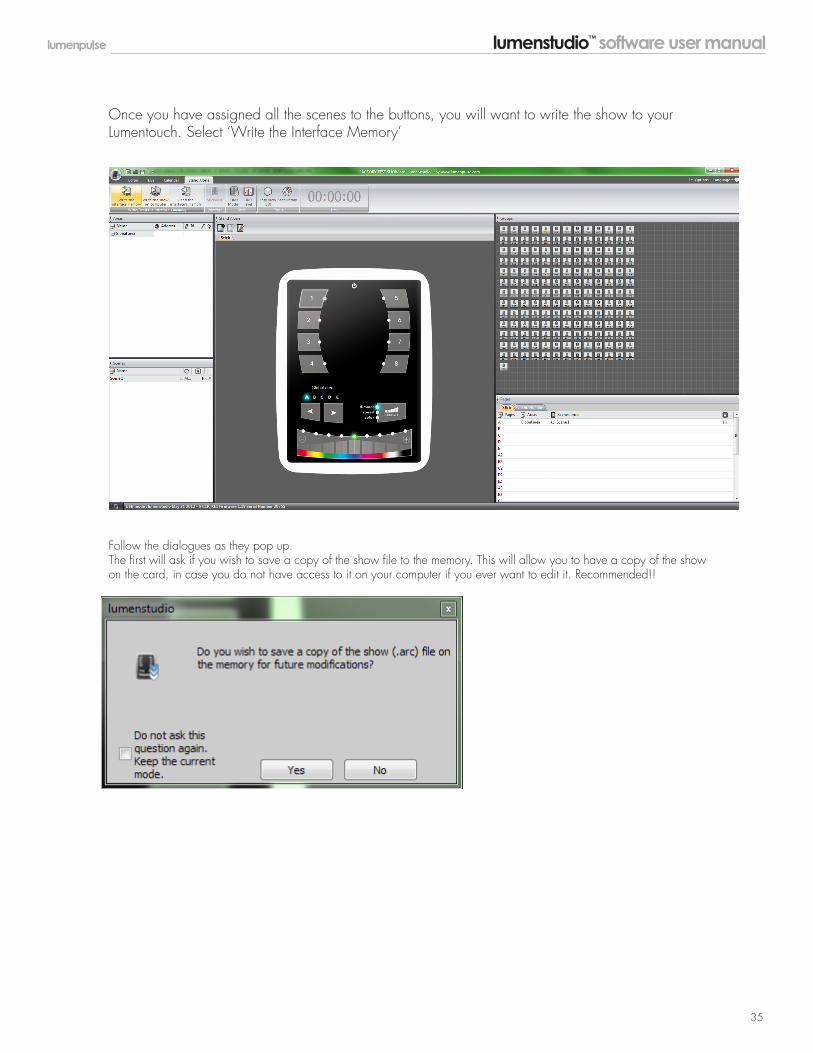
Follow the dialogues as they pop up. The first will ask if you wish to save a copy of the show file to the memory. This will allow you to have a copy of the show on the card, in case you do not have access to it on your computer if you ever want to edit it. Recommended!!
Once you have assigned all the scenes to the buttons, you will want to write the show to yourLumentouch. Select ‘Write the Interface Memory’
lumenstudio™ software user manual 36
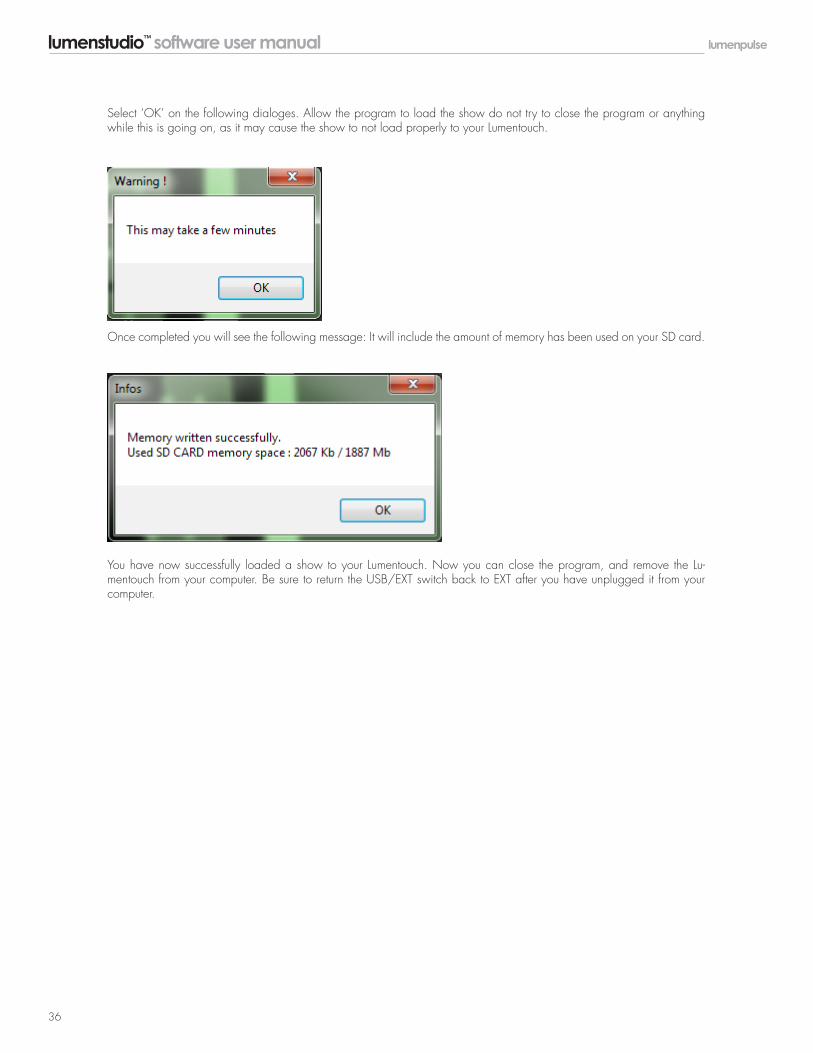
Select ‘OK’ on the following dialoges. Allow the program to load the show do not try to close the program or anything while this is going on, as it may cause the show to not load properly to your Lumentouch.
Once completed you will see the following message: It will include the amount of memory has been used on your SD card.
You have now successfully loaded a show to your Lumentouch. Now you can close the program, and remove the Lu-mentouch from your computer. Be sure to return the USB/EXT switch back to EXT after you have unplugged it from your computer.
lumenstudio™ software user manual 37
VIII Uploading a Show - Direct to SD Card
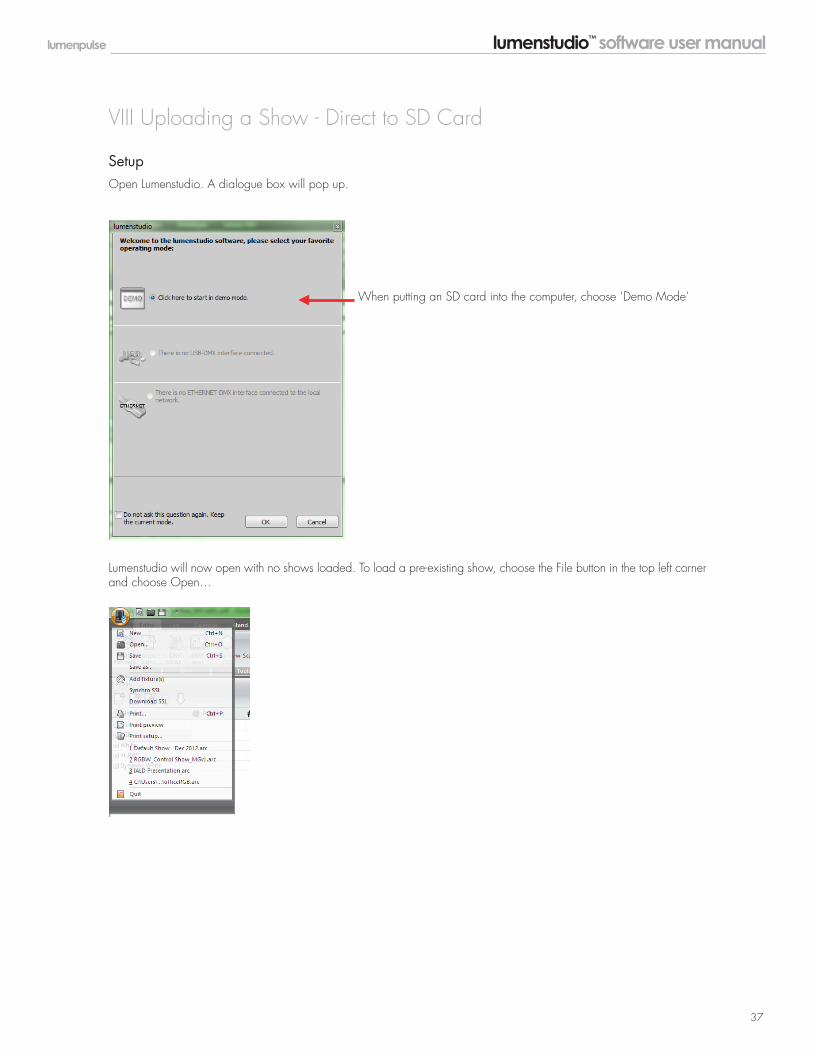
Open Lumenstudio. A dialogue box will pop up.
Lumenstudio will now open with no shows loaded. To load a pre-existing show, choose the File button in the top left corner and choose Open…
When putting an SD card into the computer, choose ‘Demo Mode’
Setup
lumenstudio™ software user manual 38
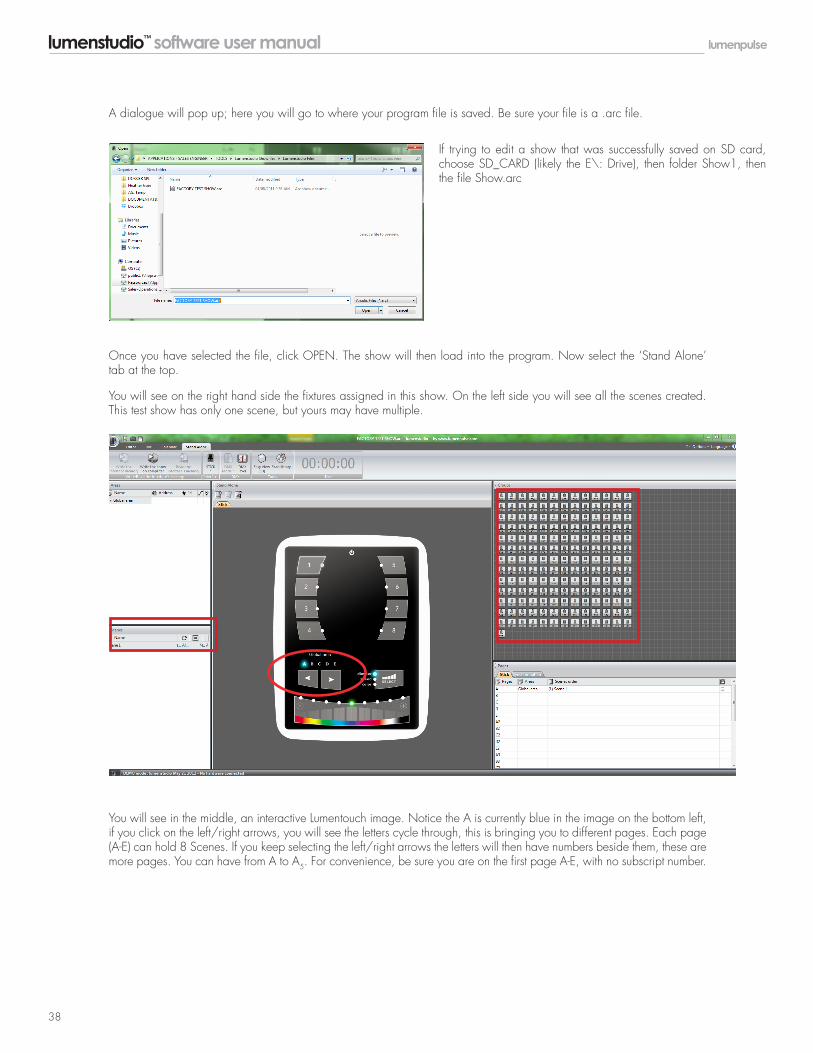
If trying to edit a show that was successfully saved on SD card, choose SD_CARD (likely the E\: Drive), then folder Show1, then the file Show.arc
A dialogue will pop up; here you will go to where your program file is saved. Be sure your file is a .arc file.
Once you have selected the file, click OPEN. The show will then load into the program. Now select the ‘Stand Alone’ tab at the top.
You will see on the right hand side the fixtures assigned in this show. On the left side you will see all the scenes created. This test show has only one scene, but yours may have multiple.
You will see in the middle, an interactive Lumentouch image. Notice the A is currently blue in the image on the bottom left, if you click on the left/right arrows, you will see the letters cycle through, this is bringing you to different pages. Each page (A-E) can hold 8 Scenes. If you keep selecting the left/right arrows the letters will then have numbers beside them, these are more pages. You can have from A to A5. For convenience, be sure you are on the first page A-E, with no subscript number.
lumenstudio™ software user manual 39
You can now click on those buttons, and you will see a simulation of the show on the fixture nodes in the top right window.
Now you can drag the scenes on the left hand side onto the buttons of the Lumentouch, one scene per button. Once a show has been assigned to a button, you will see the button have a glow around it. As well, it will appear in the bottom right hand window letting you know which scene has been assigned to which buttons. You have can have the same scene assigned to multiple buttons if you’d like, just drag it to multiple buttons. If you need to remove a show from a button, right click with your mouse on a button and select ‘Delete’ This wont delete your scene, it will remove it from the button.

lumenstudio™ software user manual 40
Once you have assigned all the scenes to the buttons, you will want to write the show to yourLumentouch. Select ‘Write the Show on Computer’. A dialogue will pop up, save it onto the SDCard. It will overwrite what is on the card. Another dialogue will pop up asking which device typeto save for, choose ‘1024 CHANNELS (STICK)’ for LTO or ‘1024 Channels (SUIDI7) for LCU..
lumenstudio™ software user manual 41
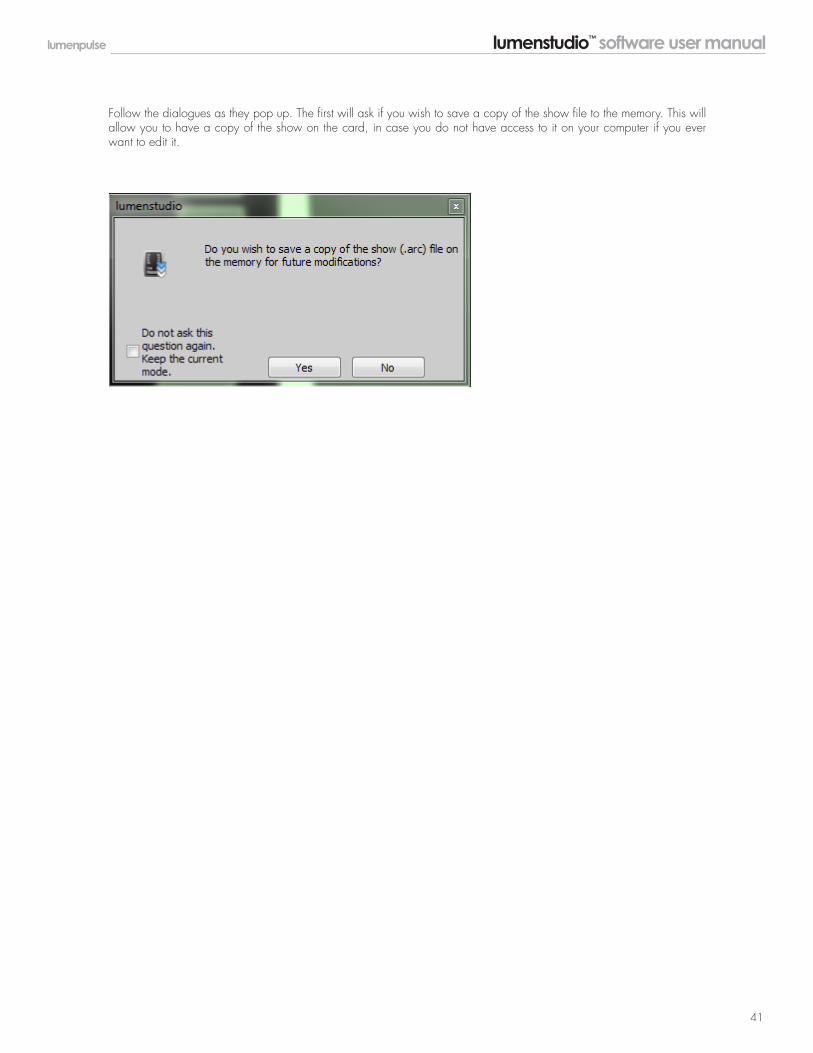
Follow the dialogues as they pop up. The first will ask if you wish to save a copy of the show file to the memory. This will allow you to have a copy of the show on the card, in case you do not have access to it on your computer if you ever want to edit it.
lumenstudio™ software user manual 42
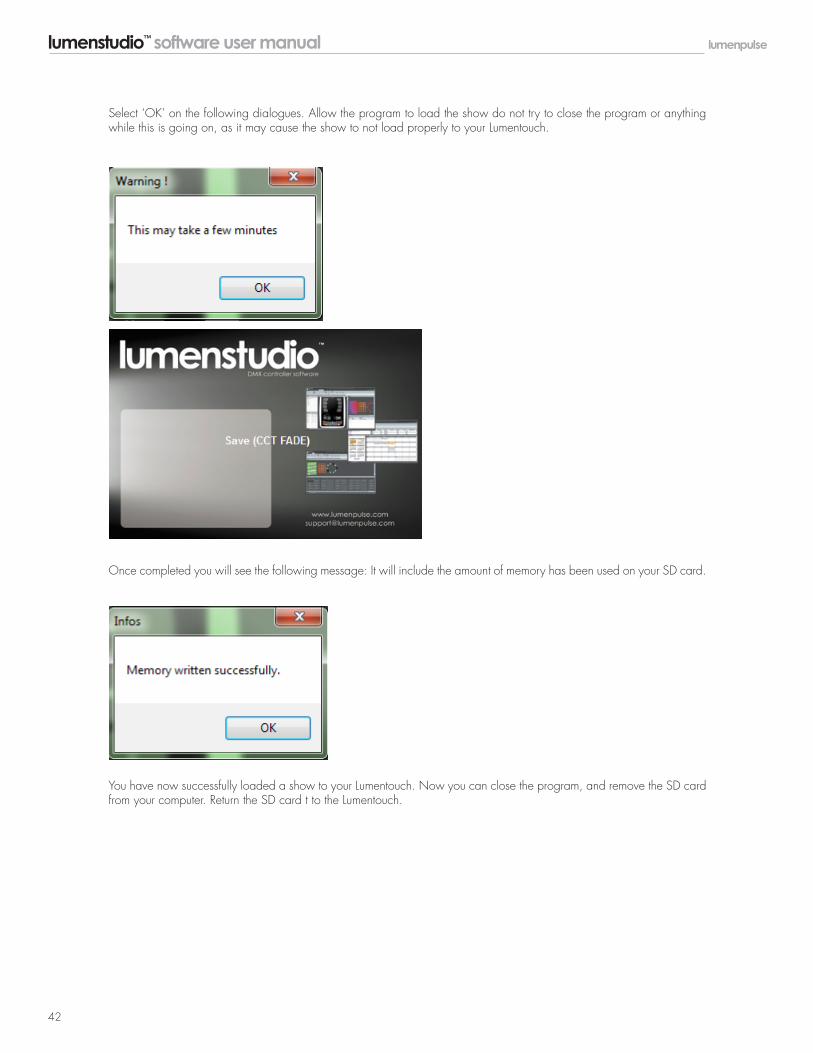
Select ‘OK’ on the following dialogues. Allow the program to load the show do not try to close the program or anything while this is going on, as it may cause the show to not load properly to your Lumentouch.
Once completed you will see the following message: It will include the amount of memory has been used on your SD card.
You have now successfully loaded a show to your Lumentouch. Now you can close the program, and remove the SD card from your computer. Return the SD card t to the Lumentouch.
lumenstudio™ software user manual 43
The purpose of the lock is to prevent unwanted user from operating the LTO.
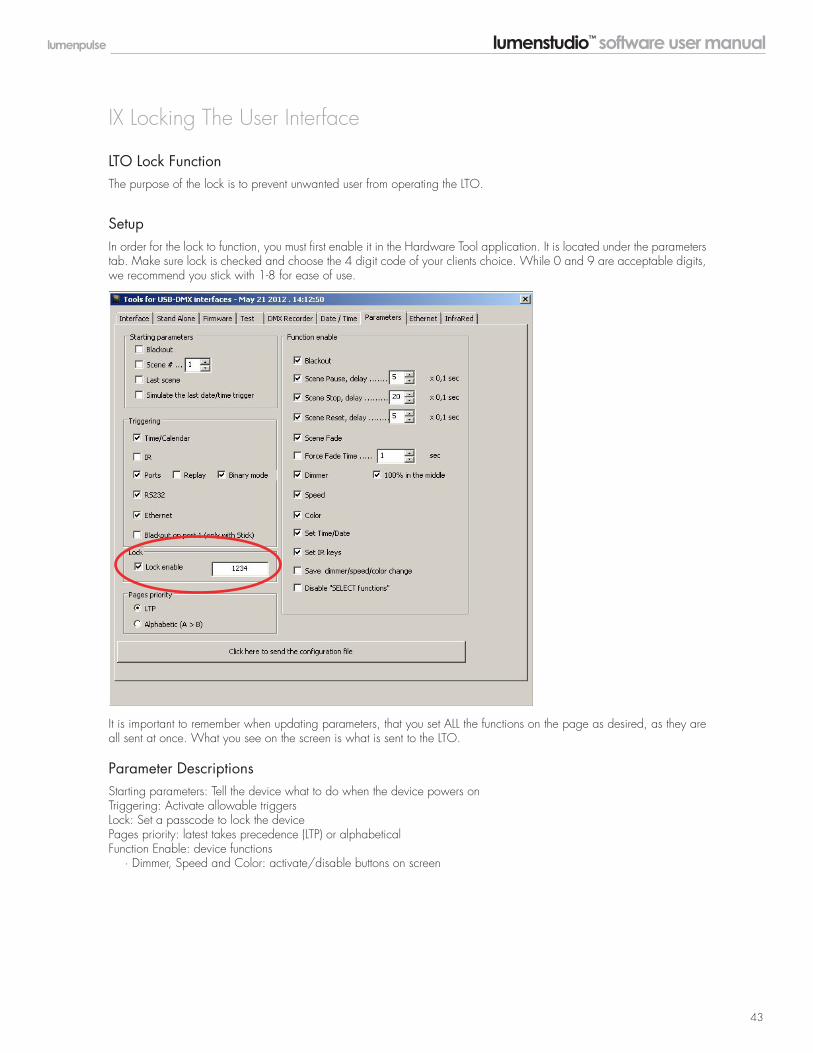
In order for the lock to function, you must first enable it in the Hardware Tool application. It is located under the parameters tab. Make sure lock is checked and choose the 4 digit code of your clients choice. While 0 and 9 are acceptable digits, we recommend you stick with 1-8 for ease of use.
It is important to remember when updating parameters, that you set ALL the functions on the page as desired, as they are all sent at once. What you see on the screen is what is sent to the LTO.
Starting parameters: Tell the device what to do when the device powers onTriggering: Activate allowable triggersLock: Set a passcode to lock the devicePages priority: latest takes precedence (LTP) or alphabeticalFunction Enable: device functions · Dimmer, Speed and Color: activate/disable buttons on screen
IX Locking The User Interface
LTO Lock Function
Setup
Parameter Descriptions
lumenstudio™ software user manual 44
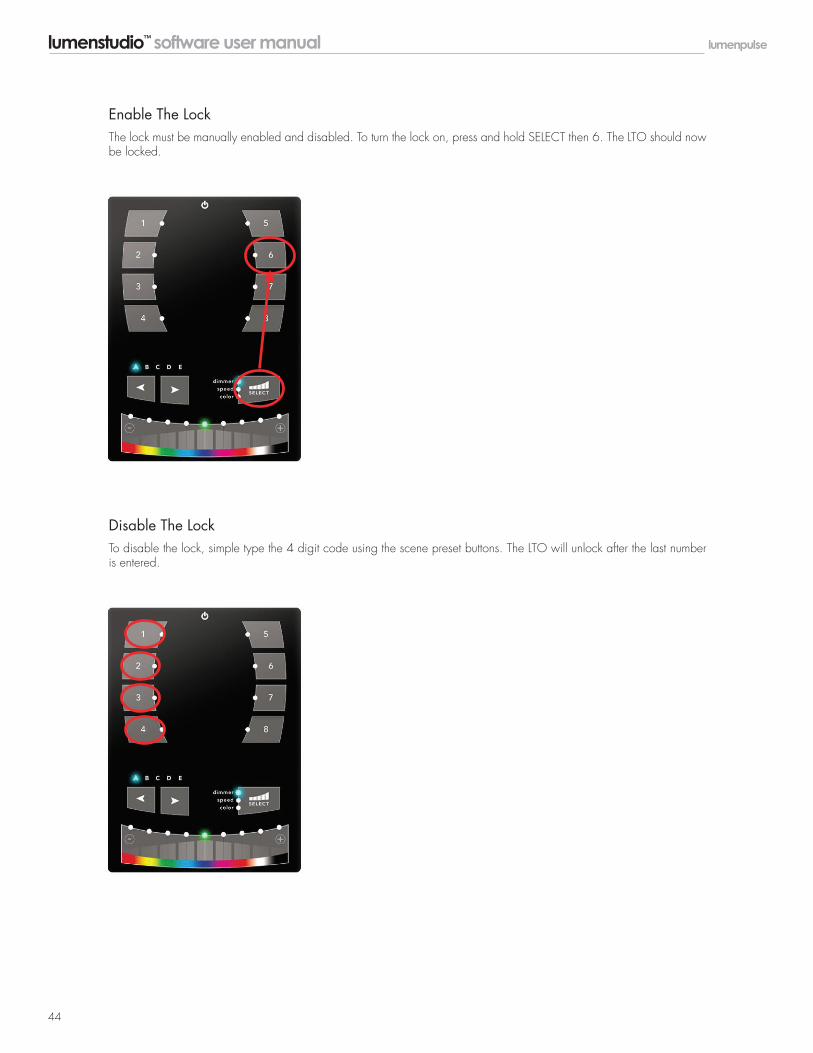
The lock must be manually enabled and disabled. To turn the lock on, press and hold SELECT then 6. The LTO should now be locked.
To disable the lock, simple type the 4 digit code using the scene preset buttons. The LTO will unlock after the last number is entered.
Enable The Lock
Disable The Lock
Corporate Headquarters1751 Richardson, Suite 1505 Montreal, QC Canada H3K 1G61.877.937.3003 P 514.937.3003 F 514.937.6289
[email protected] www.lumenpulse.com
US Headquarters268 Summer Street, 2nd Floor Boston, MA 02210 USA1.877.937.3003 P 617.307.5700 F 617.350.9912
EMEA HeadquartersThe Leathermarket 11/13 Weston Street Unit no 13.3.2 London UK SE1 3ER P: +44 (0) 2031 765370 F: +44 (0) 2031 765377