london buses spider production manual
TRANSCRIPT
Transport for LondonMAYOR OF LONDON
London Buses
Spider production manualJanuary 2011

Spider production manual
Page 1
1. That all of the bus stops and every route in the Route finder concur with the information
shown in CONFIRM.
2. That all 24-hour route logos are shown against the correct routes and that none are missing.
3. That any additional comments in BURP have been covered.
4. That the position of every bus stop in the hub area concurs with what is shown in the GIS section of BusNet.
5. That every destination has the correct stops shown “on the routes that have changed in the hub area”.
6. That the assigned route service change is “firm” in BusNet (or confirmed by London Buses that it is definitely happening).
7. That there are no additional service changes, that are unassigned in BURP, which are due to go live within a few weeks of the already assigned change.
8. That sign-off is the latest agreed standard and that the TfL number assigned corresponds with BURP.
9. That any changes to the Spider Map Production Guidelines assigned since the previous spider map update has been included, for example London Overground roundels placed against interchange to their stations.
10. If a new bus route needs to be added, or a major extension or diversion to a route is happening, which would require the spider map to be redrawn, that every route linear and bus stop name is checked in the area that has been updated.
Ten items to ALWAYS check when proofing a spider map:

Spider production manual
Page 2
CONTENTS Spider updates, new spider maps and delivery of proofs ................................... 4
Map make up ....................................................................................................... 6 General ...................................................................................................................................... 6 Headings .................................................................................................................................... 6 Yellow tinted area and centre hub .............................................................................................. 7 Use of colours for route lines ...................................................................................................... 8 Other colours .............................................................................................................................. 8 Routes to include ...................................................................................................................... 10 Symbols ................................................................................................................................... 12 Other details and loop workings ............................................................................................... 13 Footers ..................................................................................................................................... 16
Stop names used on spider maps ..................................................................... 18 Inside the 1½ mile yellow tinted area ....................................................................................... 19 Outside the 1½ mile yellow tinted area ..................................................................................... 20
Hub ..................................................................................................................... 21
Key ..................................................................................................................... 23
Destination finder .............................................................................................. 26
Hail & Ride sections .......................................................................................... 28
A4 standalone spiders and A4 conversions ...................................................... 30 A4 standalone production ......................................................................................................... 30 A4 conversions ......................................................................................................................... 30 Save to web .............................................................................................................................. 31
‘Cloned’ DR spiders ............................................................................................ 32
Other multi-modal spiders ................................................................................. 33
Route service changes ...................................................................................... 34
Tramlink and Docklands Light Railway ............................................................ 35
Amendments and updates of spider maps ........................................................ 36
Projectplace ...................................................................................................... 37
Invoicing and payment ...................................................................................... 38
Miscellaneous .................................................................................................... 39
Appendix ............................................................................................................ 40 When spiders will be updated................................................................................................... 40 Guide to font sizes used ........................................................................................................... 41 Night bus route linears that appear on day spiders – specifications ......................................... 43
How to use Projectplace ................................................................................... 45 Workflow ............................................................................................................................. .. 45
Moving files to and from Projectplace ........................................................................ 45 File upload ............................................................................................................................ 45 File download ........................................................................................................................ 45 Notification of uploaded files ................................................................................................. 46
Deleting unwanted files ................................................................................................... 46 Monitoring archive size ......................................................................................................... 46 Erasing files .................................................................................................................. ........ 46
Changing the archive structure .................................................................................... 47 Edit folders ............................................................................................................................ 47

Spider production manual
Page 3
Sub folders ............................................................................................................................ 47 Access to folders .................................................................................................................. 47 Version management ............................................................................................................ 47 History .................................................................................................................................. 47
Edit contacts information ............................................................................................... 48 Contacts................................................................................................................................ 48
Control project membership ........................................................................................... 48 Edit project members ............................................................................................................ 48 Administering member groups .............................................................................................. 48 Issue management ............................................................................................................... 49

Spider production manual
Page 4
Spider updates, new spider maps and delivery of proofs 1.1 When a new or updated map is required, TfL will instruct their supplier by email via the
BURP (Bus Users Route Publicity) database, which will advise what changes are required and the latest date the first proof is required.
1.2 For a new map, TfL will additionally give the route numbers to be included on the spider,
together with a map of the hub area required, which will indicate approximate positions of bus stops (although the supplier should check all details from the CONFIRM data). This will usually be sent via a separate email.
1.3 Suppliers should contact David Bowker if they notice any additional routes or stops in the
hub area that were not included in the original instruction. 1.4 TfL will normally give at least five working days (ten for a new spider map) before delivery
of first proof is required. 1.5 Suppliers will receive a weekly .xml file via email containing all the CONFIRM data
required for the production of the maps. 1.6 If suppliers have difficulty in receiving bus data to enable them to continue production of
the spider, they must inform TfL as soon as possible. 1.7 The first part of the TfL number should be added to the first proof (and subsequent proofs),
minus the month and year. The last part of the TfL number should be added only when the supplier receives approval to send to print.
1.8 All proofs should have a proof mark stamped on it at the bottom right hand corner showing
the proof number and the date of the proof sent to TfL (not the ‘required by’ date), which should be removed prior to printing.
1.9 The ‘Date Required’ notified to the suppliers is the latest date for delivery. Unless
otherwise notified, the supplier should send through proofs to TfL as they complete them. 1.10 If the supplier believes they need more time to produce a first proof, they must inform TfL
as soon as possible. 1.11 TfL will normally send proof comments or approval within five working days of receipt of
proofs from the supplier. However, if the map is at a stage ready for print, but the bus changes are still provisional, the communication gap from TfL to the supplier may be longer.

Spider production manual
Page 5
1.12 TfL will send an email (usually via BURP) detailing any amends to be made, together with a date the next proof is required (normally 1-3 days).
1.13 The spider file should be sent to TfL’s nominated printer within 24-hours of approval, the
details of which will appear on the ‘Send to print’ instruction. 1.14 Once the spider has been approved, an email should be sent (without a PDF) to the
person approving the spider, confirming the approved spider is available on Projectplace. 1.15 The suppliers should ensure that files sent to TfL’s nominated printer can be read and
printed to the satisfaction of TfL.

Spider production manual
Page 6
Map make up General 2.1 The general make up should have the spider in the top half. Below that should be the Key,
Route finder and Destination finder – in that order (in ‘landscape’ format, with very few ‘portrait’ exceptions). DR posters should be orientated as portrait, and QR posters and A4 sheets should be orientated as landscape.
2.2 The spider should be geographically correct as much as possible. 2.3 The River Thames is the only landmark to be shown on the spider and should be shown in
every instance except in certain circumstances in which TfL will advise the supplier. This should be either 7mm or 15mm (depending on space) size in height (including 1.25pt [0.35mm] key line), drawn angular (i.e. with straight edges and not free-flowing), with the ‘River Thames’ text in 13pt. The River Thames should be drawn as geographically accurate as possible in the hub.
2.4 Routes should come off the centre map (even if drawn at an angle) at the nearest
horizontal, vertical or 45˚ angle to the road in the centre. 2.5 Where a separate night bus spider has been produced, all the night bus information
should be removed from the day equivalent with a note added ‘For night bus information, please see separate poster’.
2.6 Where a day spider has a night spider equivalent, the night spider should have the
following note added ‘For day bus information, please see separate poster’. 2.7 Night bus only spiders should contain the new night bus illustration in the heading bar, and
the new text box with the words ‘Night bus services’. See below for examples of these, and see the separate specifications guide for sizes etc.
Headings 2.8 The word ‘services’ is not to be used in headings. The modes of transport are to be plural.
Examples of these are ‘Buses and trams from Wimbledon’; ‘Buses from Eltham, Well Hall’; ‘Buses and boats from Greenwich’. Suppliers should also ensure the title of the spider map matches the title shown in BURP including normal brackets i.e. ( ), but excluding names in triangle brackets i.e. < >.
Spider production manual
Page 7
2.9 An ampersand should not be used unless it forms part of the name of the area, e.g. Elephant & Castle is okay, but Norbury & Thornton Heath is not. In titles where two names are required, ‘and’ should be spelt out in full.
2.10 In exceptional circumstances, two lines may be needed for the title. The suppliers must
discuss the implications of two lines with TfL before providing first proof.
2.11 On day spiders (including ones where night bus information is shown), the heading background colour should be red with white text.
2.12 On night bus only spiders, the heading background colour should be black with white text.
2.13 On multi-modal (e.g. buses and trams) spiders, the heading background colour should be corporate blue with white text.
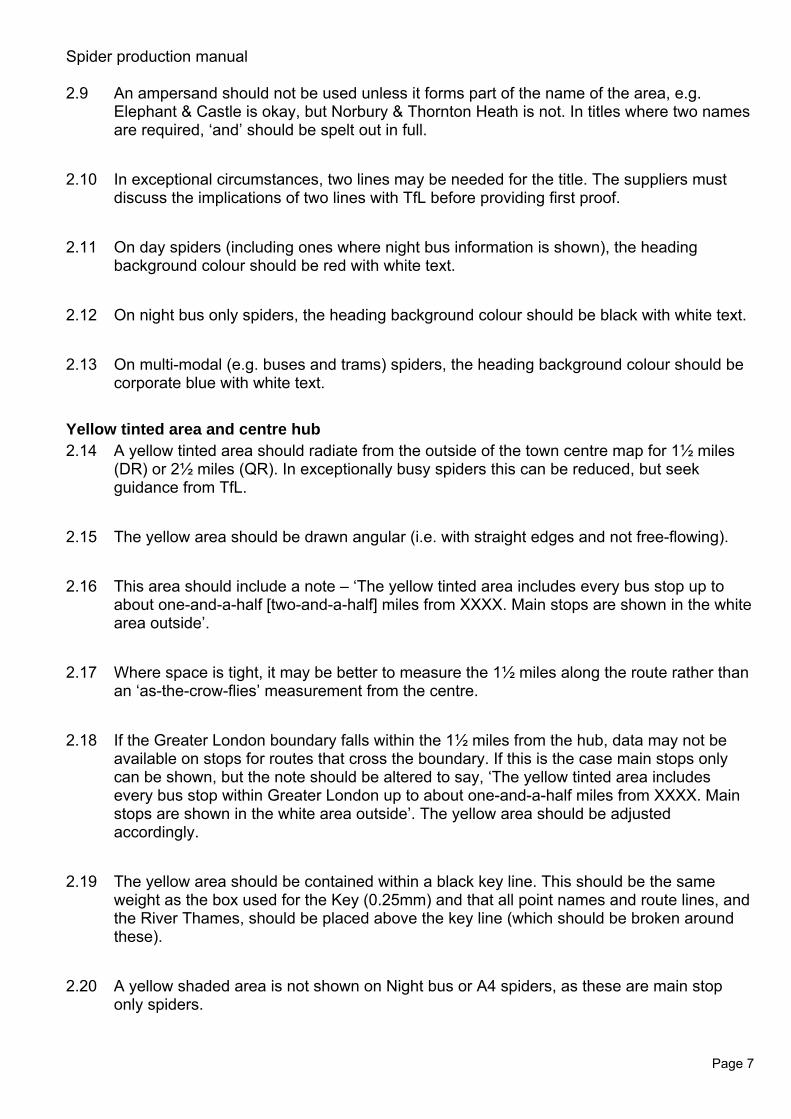
Yellow tinted area and centre hub 2.14 A yellow tinted area should radiate from the outside of the town centre map for 1½ miles
(DR) or 2½ miles (QR). In exceptionally busy spiders this can be reduced, but seek guidance from TfL.
2.15 The yellow area should be drawn angular (i.e. with straight edges and not free-flowing). 2.16 This area should include a note – ‘The yellow tinted area includes every bus stop up to
about one-and-a-half [two-and-a-half] miles from XXXX. Main stops are shown in the white area outside’.
2.17 Where space is tight, it may be better to measure the 1½ miles along the route rather than
an ‘as-the-crow-flies’ measurement from the centre. 2.18 If the Greater London boundary falls within the 1½ miles from the hub, data may not be
available on stops for routes that cross the boundary. If this is the case main stops only can be shown, but the note should be altered to say, ‘The yellow tinted area includes every bus stop within Greater London up to about one-and-a-half miles from XXXX. Main stops are shown in the white area outside’. The yellow area should be adjusted accordingly.
2.19 The yellow area should be contained within a black key line. This should be the same
weight as the box used for the Key (0.25mm) and that all point names and route lines, and the River Thames, should be placed above the key line (which should be broken around these).
2.20 A yellow shaded area is not shown on Night bus or A4 spiders, as these are main stop
only spiders.

Spider production manual
Page 8
Use of colours for route lines 2.21 To help those with colour-blindness, similar colours must not run alongside each other.
This means that two dark blue colours, or two light blue colours, or blue and green, or red and green, or orange and yellow or two dark greens etc., should not be used together. In some cases it may be unavoidable, but suppliers should ensure that there is a good contrast between different colours.
2.22 Where routes cross others, the lower number of routes should cross on top of the higher
number (i.e. one on top of two, or two on top of four). Where equal, the lighter colour should be on top of the stronger colour.
2.23 Where very light colours are used, such as yellow or light pink, black numbers should be
used in the coloured block. On darker colours, white numbers should be used. Additionally, the stop spots should be outlined in black.
2.24 On night only DRs, the colours used for 24-hour routes should be the same colour as used
on the day spider. ‘N’ prefixed routes that have a day equivalent (e.g. 171/N171) should also have the same colour.
2.25 Where a 24-hour symbol is used within the termini box on a route line, the colour of the
route line should not be similar to the symbol. 2.26 Route lines should be seen as going over the key line of the yellow area mile radius, and
therefore the key line should be ‘cut’ around the route lines. 2.27 Where lighter colours are used for route lines and it seems appropriate for using a black
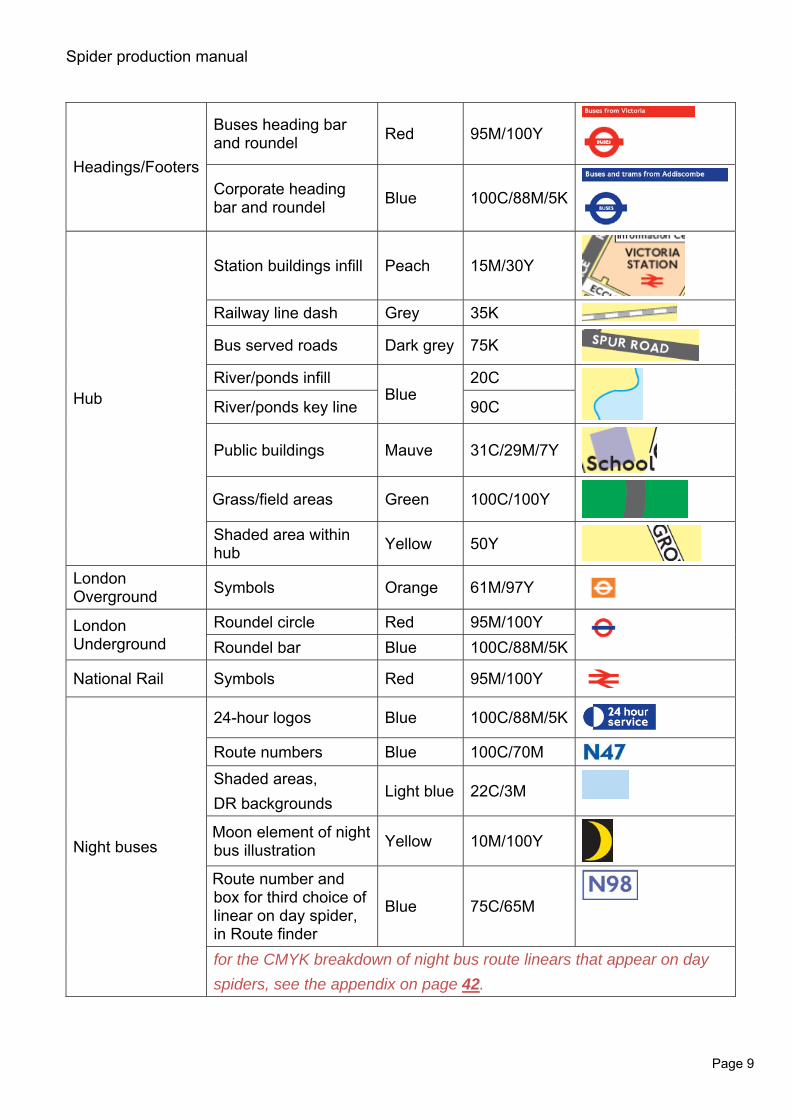
coloured key line for the stop dots, the stroke size for this should be 0.1mm. Other colours 2.28 The following colours are the correct CMYK specifications for 4-colour process printing:
Element For Generic colour
CMYK make-up
Example
1½ and 2½ mile radius
All maps where applicable Yellow 15Y
Black Everything pure black Black 100K
Destination finder A, B, C etc. section headings Dark grey 75K
Docklands Light Railway (DLR) Symbols Turquoise 87C/38Y
Hail & Ride Hail & Ride symbols Orange 30M/100Y
Spider production manual
Page 9
Headings/Footers
Buses heading bar and roundel Red 95M/100Y
Corporate heading bar and roundel Blue 100C/88M/5K
Hub
Station buildings infill Peach 15M/30Y
Railway line dash Grey 35K
Bus served roads Dark grey 75K
River/ponds infill Blue
20C
River/ponds key line 90C
Public buildings Mauve 31C/29M/7Y
Grass/field areas Green 100C/100Y
Shaded area within hub Yellow 50Y
London Overground Symbols Orange 61M/97Y
London Underground
Roundel circle Red 95M/100Y
Roundel bar Blue 100C/88M/5K
National Rail Symbols Red 95M/100Y
Night buses
24-hour logos Blue 100C/88M/5K
Route numbers Blue 100C/70M Shaded areas, DR backgrounds
Light blue 22C/3M
Moon element of night bus illustration Yellow 10M/100Y
Route number and box for third choice of linear on day spider, in Route finder
Blue 75C/65M
for the CMYK breakdown of night bus route linears that appear on day spiders, see the appendix on page 42.
Spider production manual
Page 10
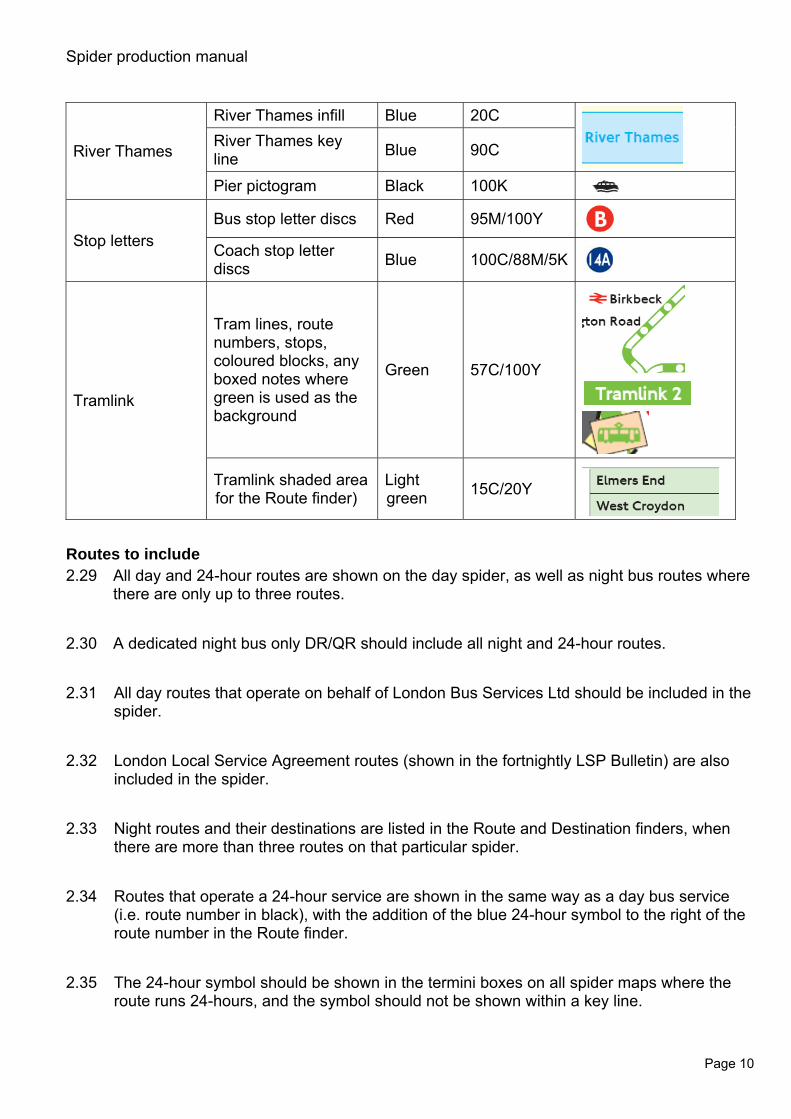
River Thames
River Thames infill Blue 20C
River Thames key line Blue 90C
Pier pictogram Black 100K
Stop letters Bus stop letter discs Red 95M/100Y Coach stop letter discs Blue 100C/88M/5K
Tramlink
Tram lines, route numbers, stops, coloured blocks, any boxed notes where green is used as the background
Green 57C/100Y
Tramlink shaded area for the Route finder)
Light green 15C/20Y
Routes to include 2.29 All day and 24-hour routes are shown on the day spider, as well as night bus routes where
there are only up to three routes.
2.30 A dedicated night bus only DR/QR should include all night and 24-hour routes. 2.31 All day routes that operate on behalf of London Bus Services Ltd should be included in the
spider. 2.32 London Local Service Agreement routes (shown in the fortnightly LSP Bulletin) are also
included in the spider. 2.33 Night routes and their destinations are listed in the Route and Destination finders, when
there are more than three routes on that particular spider. 2.34 Routes that operate a 24-hour service are shown in the same way as a day bus service
(i.e. route number in black), with the addition of the blue 24-hour symbol to the right of the route number in the Route finder.
2.35 The 24-hour symbol should be shown in the termini boxes on all spider maps where the
route runs 24-hours, and the symbol should not be shown within a key line.

Spider production manual
Page 11
2.36 School routes 600-699 are not shown (except 603, 607 and some LSP routes which are not school routes).
2.37 School journeys that deviate off a main route should not be shown. 2.38 Routes 900-999 (previously known as Mobility buses) are not shown, although they should
be shown in the Route finder, and listed under ‘Other buses’. 2.39 Sections of route that have an extension to the main route with very limited journeys (such
as the odd early morning journey) should not be included on the map, but should, wherever possible, be included in the index with a relevant symbol and note if necessary and arrowed off from the main route.
2.40 London Service Permit (LSP) routes are not shown on the spider. However, these can be
shown in the Route finder only, where space permits. 2.41 Green Line coaches, National Express coaches and other regular coach services are not
shown on the map, but may be listed in the Route finder only subject to being ample space. However, these services will only be shown on selected spiders of which TfL will advise.
2.42 Coach services are defined as any route within the 700 series (except route 724 which is a
bus service), National Express services and any other pre-booked long distance services. 2.43 Where we include LSP bus services, the separate section in the Route finder should be
titled as ‘Other buses’. If we include coach services only, the separate section in the Route finder should be entitled as ‘Coaches’. If the DR shows both LSP bus services and coach services, the separate section in the Route finder should be entitled as ‘Other buses and coaches’.
2.44 LSP bus services should be listed in the Route finder with the route number(s), ‘Towards’
and ‘Bus stops’. 2.45 Coach services should be listed in the Route finder without route numbers, and deleting
the route number column heading as well (retain the column itself so it is consistent with other table layouts in the DR), but add the towards and stop details (see Green Line and National Express below).
2.46 Providing they are the only coach services serving the area, you should stipulate 'Green
Line coaches', and/or 'National Express coaches' in place of the generic 'coaches', adding the towards as appropriate. • National Express should stipulate 'towards all destinations' or 'towards London' or
'towards all northern destinations’ as appropriate. • Green Line should stipulate 'towards Luton Airport' or 'towards Luton Airport and
Stevenage' i.e. list final destinations.

Spider production manual
Page 12
2.47 Coaches that run less than hourly are not shown. 2.48 Sightseeing services are not shown. 2.49 A route that has a seasonal extension should be included on the map as a hatched line (in
most cases), with a note advising when it runs. 2.50 Routes 607, X26 and X68 (and other ‘X’ prefixed or suffixed routes) should be named
‘Limited stop’ where necessary. 2.51 Special occasion routes, such as routes 36X and 205X should not be shown. Symbols 2.52 The following symbols should be used to denote certain route bifurcations etc. (symbols
created using Arial, MapInfo Cartographic and Wingdings fonts):
Mondays to Fridays only Mondays to Fridays except evenings Mondays to Saturdays only Mondays to Saturdays except evenings
▲ Saturdays only Monday to Friday daytimes off-peak (or Monday to Saturday daytimes off-peak)
Except evenings Evenings only Limited stop
▼ Special journeys only [may be qualified with a note e.g. only runs on a particular weekday or one bifurcated journey etc..] (use this one in the first instance)
⌧ Special journeys only [may be qualified with a note e.g. only runs on a particular weekday or one bifurcated journey etc..] (use this one in the second instance)
§ [bold] Summer Sundays only
2.53 Note that there is no need to differentiate between ‘except evenings’ and ‘except late evenings’ – all cases are merely ‘except evenings’.
2.54 We may need additional symbols as and when situations arise, but TfL will advise the
supplier.

Spider production manual
Page 13
2.55 Where arrows are used, please use the following arrowheads: For arrowing off route lines For showing direction of travel
(in Adobe Illustrator, the style number is 11, with a scale of 40%. The stroke will be as per the route line)
(in Adobe Illustrator, the style number is 11, with a scale of 45%, and stroke of 3pt). Colour as per respective route line.
Other details and loop workings 2.56 Where routes interchange with National Rail, London Overground, London Underground,
Docklands Light Railway, Tramlink or London River Services, the respective symbols should be shown in their respective colours against the name on the spider and in the Destination finder.
2.57 If when collating CONFIRM data the suppliers become aware that a bus stop has been
suspended, guidance should be sought from TfL as to how long it is likely to remain that way. Long term suspensions of one year or more will have to be excluded from the spider. Suspensions of less than three months should remain on the spider as if the stop is still being served. TfL will offer guidance on what to do if the stop is being suspended between three and twelve months.
2.58 If CONFIRM data produces a stop number starting with ‘TF’ this should be ignored
completely. 2.59 If CONFIRM data produces a stop number starting with ‘H’, see section 8 on Hail & Ride. 2.60 “OC stops” are used in a couple of ways. For example, at Lewisham on route 273 which
starts in Tesco’s store, there is no physical stop but TfL need to have a location for BusNet, Caesar and iBus purposes. On other routes such as 107 and 258 that run outside the London boundary, there are stops which do not belong to TfL but need to be announced for iBus so OC locations are used. These locations are also used where there is no physical stop but TfL need to have a timing point for a schedule. Therefore, please treat “OC stops” as normal stops listed in CONFIRM where a reference point is required within Greater London, but caution should be used for “OC stops” outside of the London boundary as the location descriptions for these may be inaccurate or incomplete, so please use as a guide only.
2.61 Limited stop routes that pass a bus stop without stopping should either run alongside its
non-express counterpart, but no ‘spot’ should be shown and, for example ‘(not X26)’ should be inserted after the stop name on the spider, or should be drawn away from any bus stops on other routes where the limited stop route does not serve.
2.62 Where a route operates as a loop working, the loop should not be continuous – it should
end at the last stop/point (with boxed route terminal) before it returns back along the same line of route as the approach and then arrowed onwards

Spider production manual
Page 14
2.63 Where a route operates as a loop working in both directions, the loop should also not be continuous – it should also end at the last stop/point before it returns along the same line of route as the approach, but in these cases two separate lines of route are to be shown for each direction of the loop. Example:
Also, dark colours should be used for these route lines, particularly if the route is Hail & Ride, to aid clarity.
2.64 Loops within routes – should be shown, with direction of travel indicated by arrows. However, if a bus spurs off to serve one or two stops at the same location (i.e. two stops – one on each side of the road) then these should be combined as one stop/point.
Spider production manual
Page 15
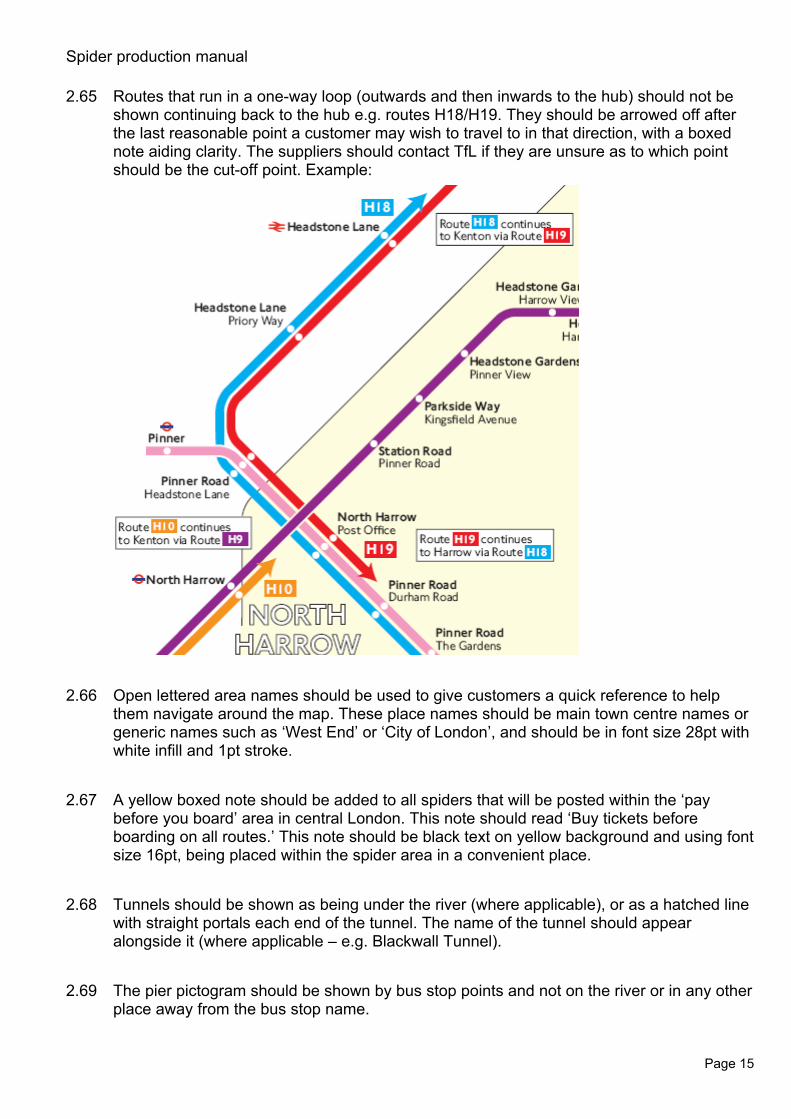
2.65 Routes that run in a one-way loop (outwards and then inwards to the hub) should not be shown continuing back to the hub e.g. routes H18/H19. They should be arrowed off after the last reasonable point a customer may wish to travel to in that direction, with a boxed note aiding clarity. The suppliers should contact TfL if they are unsure as to which point should be the cut-off point. Example:
2.66 Open lettered area names should be used to give customers a quick reference to help
them navigate around the map. These place names should be main town centre names or generic names such as ‘West End’ or ‘City of London’, and should be in font size 28pt with white infill and 1pt stroke.
2.67 A yellow boxed note should be added to all spiders that will be posted within the ‘pay
before you board’ area in central London. This note should read ‘Buy tickets before boarding on all routes.’ This note should be black text on yellow background and using font size 16pt, being placed within the spider area in a convenient place.
2.68 Tunnels should be shown as being under the river (where applicable), or as a hatched line
with straight portals each end of the tunnel. The name of the tunnel should appear alongside it (where applicable – e.g. Blackwall Tunnel).
2.69 The pier pictogram should be shown by bus stop points and not on the river or in any other
place away from the bus stop name.

Spider production manual
Page 16
Footers 2.70 On day and night bus DRs, the footer should be in black and the roundel in red. 2.71 On corporate DRs (e.g. combined bus and tram or bus and boat DRs), the footer should
be in corporate blue and the roundel in blue. 2.72 The larger 2-line footer should always be used where space permits. Where space does
not permit this, the 1-line footer may be used. 2.73 Where the blue background is used for night bus only spiders, the blue background should
bleed to the left and right edges of the spider, with the footer area in white. 2.74 The 1-line footer should consist of ‘MAYOR OF LONDON’ (on 2 lines); Travel Information
symbol and contact number; ‘Transport for London’ (on 1 line), plus the relevant roundel. 2.75 The 2-line footer should consist of the Travel Information symbol and contact number;
Website symbol and address – all on the first line – with ‘MAYOR OF LONDON’ (on 1 line); ‘Transport for London’ (on 1 line), plus the relevant roundel – all on the second line.
2.76 Both footers require the Travel Information call charges statement. This should be ‘*You pay no more than 5p per minute if calling from a BT landline. There may be a connection charge. Charges from mobiles or other landline providers may vary.’
2.77 The correct fonts and sizes should be as follows:
1-line footer: Element Font size Typeface Width Picture file(s) ‘MAYOR OF LONDON’
30pt NJ Font Bold n/a No
Symbols and relevant contact details
n/a n/a 21mm Yes
‘Transport for London’
30pt NJ Font Medium n/a No
Roundel n/a n/a 45mm Yes
Travel Information call charges statment
12pt NJ Font Book n/a No
Please turn over for the 2-line footer details, and examples of both...
Spider production manual
Page 17
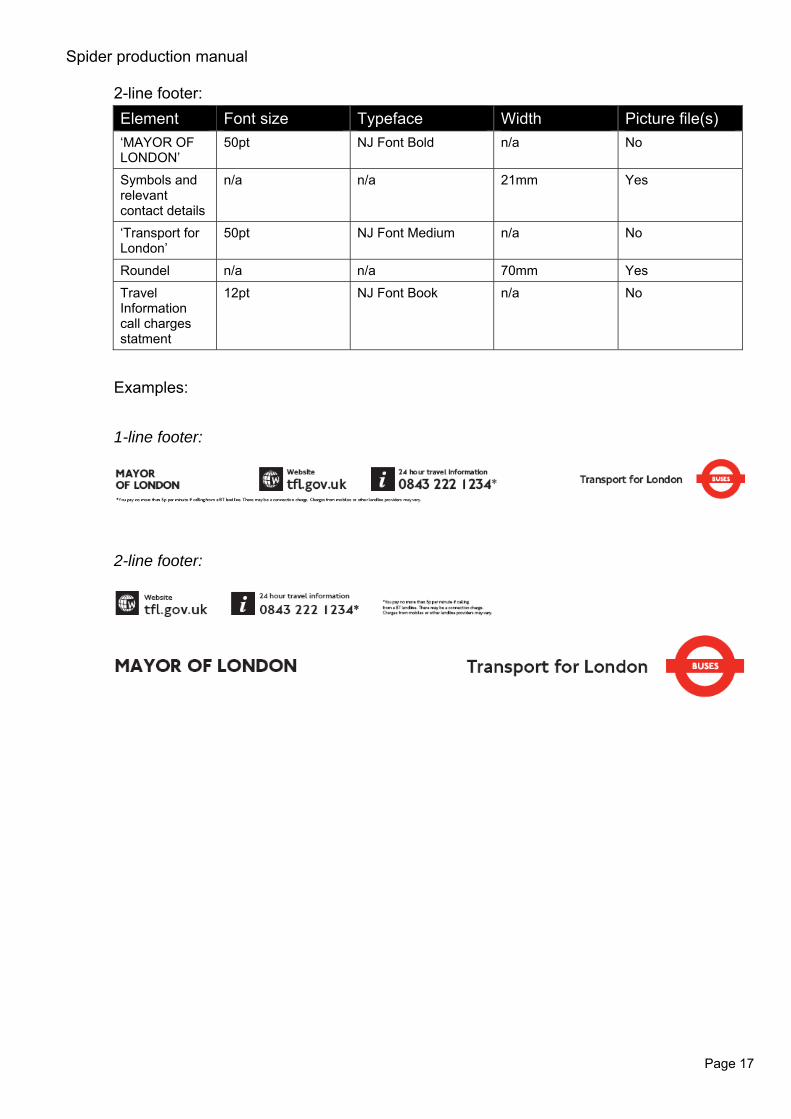
2-line footer: Element Font size Typeface Width Picture file(s) ‘MAYOR OF LONDON’
50pt NJ Font Bold n/a No
Symbols and relevant contact details
n/a n/a 21mm Yes
‘Transport for London’
50pt NJ Font Medium n/a No
Roundel n/a n/a 70mm Yes
Travel Information call charges statment
12pt NJ Font Book n/a No
Examples:
1-line footer: 2-line footer:

Spider production manual
Page 18
Stop names used on spider maps 3.1 The choice of stop name on a spider map is a complicated issue, the rules of which differ
inside the 1½ mile yellow tinted area to those stops outside. Furthermore, the stop name chosen may be the same as the stop name in CONFIRM, or may be the main road the route travels down with the CONFIRM name as a qualifier, or another name may be required.
3.2 When using the Routes & Runs data in CONFIRM, the suppliers should ensure they only
use the run number that takes the route from the area. The stops in the run towards the hub should be ignored.
3.3 All references to the 1½ mile yellow tinted area, also applies to the 2½ mile yellow tinted
area on Quad-Royal posters. 3.4 Where qualifiers are used on night bus only DRs, they should be the same as the day bus
DRs where the same route is shown on both types of DRs. 3.5 The ‘Station’ qualifier should not be used – merely the symbol(s) that represent the
mode(s) of transport i.e. Tottenham Court Road , or Canning Town or Eltham .
3.6 Transport logos/symbols should be at the same height as per the capital letter of the
relevant station/stop name. 3.7 An ampersand should not be used unless it forms part of the name of the stop, e.g.
Elephant & Castle is okay, but for Selfridges & Harrods it is not. ‘And’ should therefore be spelt out in full.
3.8 London River Services piers should be indicated at all places where they provide an
interchange with bus routes shown on the map. 3.9 TfL will soon be developing a database with stop names for stops within the yellow area
(where this needs to differ from the road name/bus stop name standard) and stop names for main points outside it for each bus route. When it is completed, the suppliers are to use names from this database for the route lines. This is to ensure a consistent approach across all stop names throughout London on our spider maps.
3.10 Junction names – where two roads cross each other, the road the bus is actually serving
should be the main name with the junction road being the qualifier.

Spider production manual
Page 19
3.11 Junction names – where two or more bus routes cross each other, the more major road should be listed as the main point with the minor road being listed as the qualifier, i.e. an A road goes before a B road or a B road goes before an unclassified road. If the roads are of the same type, then they should be listed in alphabetical order, i.e. Alpha Road should be the main name and Beta Road the secondary name. This may not apply where the main A (or B) road has been diverted away from its historical routeing, e.g. where the High Street has been pedestrianised. In these cases it would be preferable to use ‘High Street’ rather than the name of the diverted A or B road. Additionally, we may prefer to use the most recognisable road instead of the alphabeticalised format.
3.12 Where there are a number of roads that cross each other, and a junction name cannot be
determined under 3.9 or 3.10, then the stop name that first appears alphabetically should be used.
3.13 Deviations during certain hours should be shown by drawing it on the spider, with stop
names and a note added to explain the period of operation. Limited journey deviations should not be shown.
Inside the 1½ mile yellow tinted area 3.14 The first choice name should be the road that the bus travels down (e.g. ‘Site Name’ in
CONFIRM), followed by the bus stop name in lighter type. 3.15 If the stop is a station then the stop name should be that station followed by the mode of
transport’s symbol(s), without using the word ‘Station’. 3.16 Where a route is said to serve a station, but is some distance from that station, the spider
name should be as in 3.13 followed by ‘for xxx [and mode of transport symbol(s)]’ 3.17 If the stop name shown in CONFIRM is a recognised point, e.g. hospital, shopping centre,
etc., then that name should be used on its own. 3.18 Places of interest will be used as the main name if that is what is shown as the name in
CONFIRM. 3.19 If the place of interest is not shown in the stop name, then the CONFIRM name should be
shown first with, for example ‘for Tower of London’ as the qualifier all in black type. 3.20 A completely different name to the main road or bus stop name is sometimes necessary,
especially where routes cross each other and that junction has a well-known name, e.g. Waterworks Corner, or Charlie Brown’s Roundabout.

Spider production manual
Page 20
Outside the 1½ mile yellow tinted area 3.21 Point names (including qualifiers and point names on night bus only DRs), where possible,
should be consistent across all spider maps that are produced (for example, where one route is on three spider maps, the point names for that route should be the same). However, there maybe the odd exception e.g. Brixton Hill would be the sole name on a night bus spider, but qualified on the Day spider (inside 1½ miles) or where we need to break the route because a day route turns off the main road and a Night route does not.
3.22 Junction names – where two or more bus routes cross each other, the more major road
should be listed as the main point with the minor road being listed as the qualifier, i.e. an A road goes before a B road or a B road goes before an unclassified road. If the roads are of the same type, then they should be listed in alphabetical order, i.e. Alpha Road should be the main name and Beta Road the secondary name. This may not apply where the main A (or B) road has been diverted away from its historical routeing, e.g. where the High Street has been pedestrianised. In these cases it would be preferable to use ‘high street’ rather than the name of the diverted A or B road. Additionally, we may prefer to use the most recognisable road instead of the alphabeticalised format.
3.23 Very long roads (e.g. Harrow Road or Uxbridge Road), or common names (e.g. London
Road or High Street) must have an area name attached to the stop name in brackets, e.g. Harrow Road, (Kensal Green). High Streets should be preceded with the area name without brackets e.g. Lewisham, High Street.
3.24 Point names outside of the yellow area should consist of main town centre points, stations,
hospitals, main road names (where no other point is suitable e.g. a station), interchange points (with other bus routes where their route lines cross), and other main objectives for that route (e.g. housing estates).
3.25 Main points are not necessarily the exact stop names and do not necessarily require the
road names before the stop name (if used). 3.26 If a road name is used as a main point, it should be qualified if the bus that is serving it
does not serve the road in its entirety.

Spider production manual
Page 21
Hub 4.1 The hub should consist of bus served roads, relevant/main non-bus served roads, places
of interest or main points within a town centre, stations, green areas, water areas (such as ponds and rivers) and bus stops.
4.2 The hub will normally be horizontal or vertical, but in certain circumstances it may be
preferable to draw it at 45˚ angle. 4.3 The hub should have a yellow background shading (see page 9 for the CMYK breakdown).
4.4 Bus stops should be plotted using the ‘X-Y’ coordinates from CONFIRM. 4.5 Road names should be spread across the full length of the roads, and should be in font
size 12pt (lowered to 10pt minimum in very congested hubs). 4.6 The font size that should be used for the bus stop font (regardless of single or double
letters) and Hail & Ride lozenges is 12pt. See below:
4.7 The hub should be contained within a black border at the same weight (0.25mm) as the
border used for the yellow area mile radius. 4.8 Dead-stand stops (i.e. where passengers do not board or alight) should be shown, where
space permits and a point letter is shown. 4.9 Alighting point stops should be shown. 4.10 Uppercase letters are not to be used except in road names. 4.11 The hub should be at least 6” (150mm) along its longest side. If this is not achievable,
contact TfL for guidance. 4.12 All non-bus served roads and pedestrianised areas that branch off bus served roads
should be shown providing there is not too much clutter and should be drawn to the full geographic length within the hub. These roads/areas should be drawn in white (not light grey) with a black key line (width 0.25mm). If there is too much clutter, the first roads that should be omitted are cul-de-sacs and passageways, followed by smaller roads.

Spider production manual
Page 22
4.13 Non-bus served roads that do not branch off bus served roads should not be shown unless a landmark or station etc. is located along such roads.
4.14 All bus served roads and stops should be shown in the hub on all spiders regardless of
whether or not the route lines feature on the map or not. 4.15 Stop discs should be circular with arrow pointers. 4.16 Railway lines should be shown as a grey and white dashed line with a black key line, and
should be shown as going under or over the roads as appropriate. 4.17 Lines that are under the ground are not shown. 4.18 Line names should not be shown except where there are two stations with the same
name. 4.19 A date should not be shown in the hub. 4.20 A Key should not be shown in the hub. 4.21 The symbols to be used to identify the modes of transport within the hub should be the
National Rail crowsfoot symbol, London Underground roundel, London Overground symbol, boat pictogram (for river boats), DLR box (for Docklands Light Railway), and the Tramlink pictogram (not roundel).

Spider production manual
Page 23
Key 5.1 The Key should go before the Route finder, and should preferably fit to one column, but
two columns is acceptable on busy spiders providing it is in a tabular format. 5.2 It should include a list of all symbols used in the spider, Route finder or Destination finder. 5.3 The difference between black, blue and green route numbers should be explained here,
only where more than one colour is used. 5.4 National Rail, London Underground, London Overground, DLR, Boat, Tramlink and other
symbols should be explained. 5.5 A symbol should not be used in the Key, if it does not appear on the spider map. 5.6 The bus stop drawing and text explaining red lettered discs on the stop should go after all
other symbols. This should be as follows:
5.7 The Key should comprise of the following where necessary (using the exact wordings
shown below):
1 Day buses in black N1 Night buses in blue 1 Tram routes in green [LUL] Connections with London Underground [LO] Connections with London Overground [NR] Connections with National Rail [DLR] Connections with Docklands Light Railway [LRS] Connections with river boats [TL] Connections with Tramlink
Spider production manual
Page 24
Route finder 6.1 This should go on the left-hand side, below the spider and after the Key. In exceptional
circumstances, it can go to the left of the spider, but always after the Key. 6.2 The headings used in the Route finder table should be ‘Bus route’, ‘Towards’, ‘Bus stops’
for bus listings, and ‘Tram route’, ‘Towards’, ‘Tram stops’ for tram listings, both of which should not have a shaded background.
6.3 In the Route finder, where used, headings should be ‘Night buses’ and ‘Other buses’ or ‘School buses’, being plural in all cases, even if there is only one route, and should appear after the main Route finder.
6.4 Stop letters should be presented in strict alphabetical order in the table e.g. A AA AB AC
A1 A2 B C D DD EE F FF F2 6.5 The red discs (for bus stop letters), green lozenges (for tram stop letters) and orange
lozenges (for Hail & Ride stops) should be in a typeface of 12pt with text in white, or black (for Hail & Ride stops).
6.6 The Route finder should list all of the bus routes in their coloured blocks, in numerical order (letter prefixed routes should come after the numbered routes), together with the final destination and the stop letters for that destination. This section should be headed ‘Day buses’ (where no 24-hour routes are listed) or ‘Day buses including 24-hour services’ (where 24-hour routes are also listed). Coincidentally, night only DRs should have this section headed ‘Night buses’ (where no 24-hour routes are listed) or ‘Night buses including 24-hour services’ (where 24-hour routes are also listed).
6.7 The final destinations for each route should be ordered alphabetically wherever possible. 6.8 Where a route extends to another point on certain days of the week, then that destination
should be shown too, together with a brief explanation of when it runs. In these circumstances it will be necessary to add a qualifier to the main service (e.g. ‘Daily’), to avoid possible confusion as to when the main service runs. This should be shown with the appropriate symbol and the associated note added to the Key.
Spider production manual
Page 25
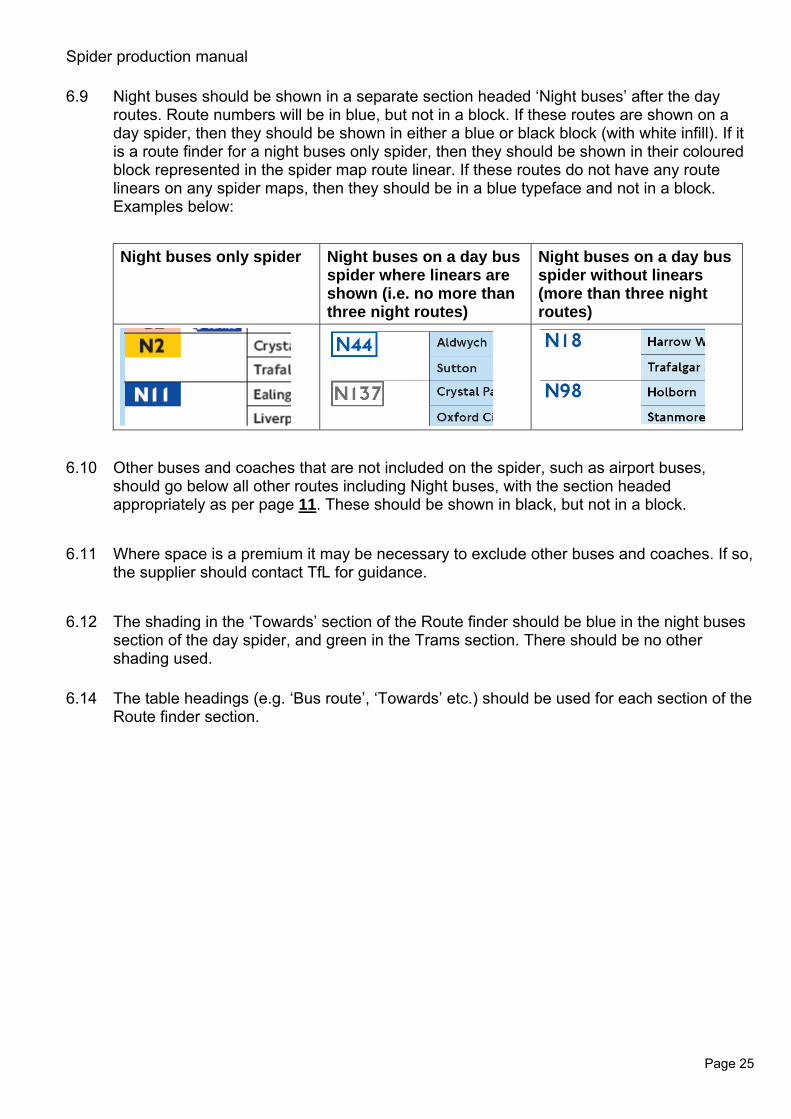
6.9 Night buses should be shown in a separate section headed ‘Night buses’ after the day routes. Route numbers will be in blue, but not in a block. If these routes are shown on a day spider, then they should be shown in either a blue or black block (with white infill). If it is a route finder for a night buses only spider, then they should be shown in their coloured block represented in the spider map route linear. If these routes do not have any route linears on any spider maps, then they should be in a blue typeface and not in a block. Examples below: Night buses only spider Night buses on a day bus
spider where linears are shown (i.e. no more than three night routes)
Night buses on a day bus spider without linears (more than three night routes)
6.10 Other buses and coaches that are not included on the spider, such as airport buses,
should go below all other routes including Night buses, with the section headed appropriately as per page 11. These should be shown in black, but not in a block.
6.11 Where space is a premium it may be necessary to exclude other buses and coaches. If so,
the supplier should contact TfL for guidance. 6.12 The shading in the ‘Towards’ section of the Route finder should be blue in the night buses
section of the day spider, and green in the Trams section. There should be no other shading used.
6.14 The table headings (e.g. ‘Bus route’, ‘Towards’ etc.) should be used for each section of the
Route finder section.

Spider production manual
Page 26
Destination finder 7.1 The headings used in the Destination finder table should be ‘Destination’, ‘Bus routes’,
‘Bus stops’ for bus listings, and ‘Destination’, ‘Bus/tram routes’, ‘Stops’ for combined bus and tram listings, all of which should not have a shaded background.
7.2 All of the points shown on the spider should be listed in the index, wherever possible. 7.3 Stop letters should be presented in strict alphabetical order in the table e.g. A AA AB AC
A1 A2 B C D DD EE F FF F2 7.4 The red (or blue) discs (for bus stop letters), green lozenges (for tram stop letters) and
orange lozenges (for Hail & Ride stops) should be in a typeface of 12pt (in exceptional circumstances this maybe reduced to a minimum of 10pt) with text in white, or black (for Hail & Ride stops). If space is an issue, please consult TfL before reducing the size.
7.5 The list of route numbers and stop letters should be aligned to the top of the individual
entry. 7.6 The index should also list the places of interest separately. In some cases this will mean
having the name twice, a) as a qualifier under the main stop name and b) as a main name in its own right.
7.7 Other major places, such as hospitals and main shopping centres, may also need to be
placed in the Destination finder separately in its own right. 7.8 The destinations should be listed in strict alphabetical order. Symbols (including roundels,
National Rail etc.) should be ignored as part of the entry. The qualifier in lighter text should form part of the alphabetical order after the main name. Therefore, for example, ‘Blackheath ’ should come before ‘Blackheath Sun-in-the-Sands’, which should come before ‘Blackheath Road’.
7.9 ‘St’ should be filed alphabetically as ‘Saint’ without a full-stop after ‘St’. 7.10 ‘The’ before a name should not be filed under ‘T’. A road such as ‘The Avenue’, should be
filed as ‘Avenue, The’. 7.11 Where there are a very large number of points shown on the spider, it may be necessary
to omit some from the index. The first to be omitted should be minor roads or stops nearest to the centre.
7.12 An entry in the Destination finder should not be spill over into a second column, even when
there are space constraints.

Spider production manual
Page 27
7.13 Where there are a number of entries that are referring to the same area name/location, with the routes and stops exactly the same, and all that is different are the qualifiers, they should be combined into one entry (i.e. ‘Shooters Hill Bull and Police Station’ [one entry], not ‘Shooters Hill Bull’ and ‘Shooters Hill Police Station’ [two entries]).
7.14 If one bus route serves the entire length of a road, or if two or more bus routes serve the
same stops along the entire length of a road, then the qualifiers should be omitted from the Destination finder section for those entries.
7.15 Where a main point name has to be placed over two or more lines, all but the first line of the main point name should be indented. However, the qualifer should not.

Spider production manual
Page 28
Hail & Ride sections 8.1 Some sections of route do not have fixed bus stops, although they may in some cases
have a timetable frame. If the CONFIRM number starts with an ‘H’ this is usually a timetable frame only and should be treated as a Hail & Ride section of road.
8.2 Some Hail & Ride sections do not have any identification number in CONFIRM. If there is
a large gap in the spacing of stops, this may indicate a Hail & Ride section. CONFIRM should, however, indicate the beginning and end of a Hail & Ride section using stop code ‘HC’.
8.3 Hail & Ride sections of route on a spider should be shown as an open line of the same
colour as the main part of the route. 8.4 Any route that has Hail & Ride should have the strongest colour chosen for its route line. 8.5 It should be indicated as ‘Hail & Ride section’ alongside. 8.6 The only name used on these sections should be the main road being served, with no
qualifying points, unless it does not serve the whole length of road where a qualifying point should be used, in these cases a landmark or side road.
8.7 Hail & Ride roads within the hub in the centre of the map should be indicated as such with
H&R1 and H&R2 for each side of the road therefore indicating the direction of travel for the points in the Route finder and Destination finder sections.
8.8 The numbers 1, 2 etc. may be used twice (or more) if there are no changes to the routes
stopping on the section of roads indicated. 8.9 The H&R1 and H&R2 symbols should be placed with normal stop letters in all relevant
entries in the Route finder and Destination finder sections. 8.10 A note should be added to the map where these symbols are used and should read ‘Route
XXX operates as Hail & Ride on the sections of roads marked H&R1 and H&R2 on the map. Buses stop at any safe point along the road. There are no bus stops at these locations, but please indicate clearly to the driver when you wish to board or alight.’ This note should be placed in the ‘Key’ section.
8.11 If there is more than one route that operates on a Hail & Ride basis, then continue to
sequence the H&R numbers (e.g. H&R3, H&R4 etc.). 8.12 The H&R symbols should look like the following:

Spider production manual
Page 29
8.13 For clarity and consistency, we should present the term ‘Hail & Ride’ with an uppercase ‘H’ and ‘R’ and using an ampersand to represent ‘and’.
Spider production manual
Page 30
A4 standalone spiders and A4 conversions A4 standalone production 9.1 Only main stops should be shown. 9.2 No yellow shaded area is required i.e. do not include the ½ mile radius. 9.3 Include the relevant Route finder(s) as per the DR spider map. 9.4 No footer is required i.e. no Travel Information contact details or roundels etc. 9.5 The heading should be black copy on white background rather than white copy on red
background. 9.6 No Destination finder is required. 9.7 No Key is required, except where symbols are used. 9.8 The Route finder should wherever possible remain as a single block rather than spread
across the spider, and include the relevant sub headings as per the DR. 9.9 The minimum size text should be 7pt for the main stop name with the qualifier being 5.5pt. 9.10 The font used throughout the A4 spider (including qualifiers) should be NJ Font Medium.
9.11 The Route finder should show stop letters in a red typeface and not within a red stop disc,
with a black comma and space separating each point letter. These should be the same size as other elements in the Route finder.
9.12 The hub used should replicate the DR spider in its entirety.
A4 conversions 9.13 All QR (where there is no DR equivalent) and DR spiders should be converted to A4
format (except where an A5 spider exists in its own right) by deleting the Destination finder, footers and red/blue/black header. The Route finder should then be moved to the left-hand side of the A4 sheet and the spider element scaled down as appropriate; finally adding the title ‘Buses from xxxxx’ (which should be font size 18pt) in the top left-hand corner. The layout may be changed if it becomes impossible to fit in this way.
9.14 There will be no need to re-supply this to Marcomms for approval, but the suppliers should
ensure the conversion makes best use of space as an A4 format and that the title is correctly spelt.
Spider production manual
Page 31
9.15 The suppliers should add the TfL number from the approved DR/QR spider, together with the same ‘Correct from’ statement as is on the approved spider, only for A4 conversions.
9.16 Where there is a DR and a QR version of a spider, the QR should not be converted. 9.17 The suppliers should charge the agreed price for this service and add it to the cost of the
main spider, rather than charging this element separately. 9.18 The suppliers should ensure this converted file is used for the web only. It should not be
sent to print or placed on Projectplace. Save to web 9.19 Once converted, the supplier should save the file to TfL’s web site by logging on to TfL’s
‘Utilities Extranet’ and selecting the five-digit TfL number relating to the approved spider. 9.20 The conversion to A4 and saving to the web must be carried out no earlier than the week
before the information correct from date. The supplier is responsible for diarising this.

Spider production manual
Page 32
‘Cloned’ DR spiders 10.1 Cloned DR spiders are where two DRs are exactly the same and the only thing that differs
is the heading. There are very few of these around nowadays. 10.2 These should be treated as one job as the only thing that will need changing is the title (i.e.
no further costs should be incurred as a result). 10.3 You will be advised what DR will require cloning and what the title should be via
instructions from BURP. 10.4 A proof does not need to be sent to us for approval – it should be sent to print once the
title has been changed and also sent to the web team and TfL in the normal way. 10.5 BURP will ask the person approving the original spider whether or not to update the clone. 10.6 Upon receiving instructions to proceed with a clone update, the supplier should change the
title, yellow area name, TfL spider name and TfL number and send it to print without further reference to TfL.

Spider production manual
Page 33
Other multi-modal spiders 11.1 Suppliers should not take instruction to produce spider maps from other sections without
reference to the TfL BURP team.

Spider production manual
Page 34
Route service changes 12.1 The BURP instructions will detail service changes that are required to be shown on a
spider update, which in most cases should give sufficient information to start work on the map.
12.2 CONFIRM may not have all of the stop and route details for these changes, so the supplier
must identify the route and stops wherever possible. The suppliers will be responsible for ensuring that correct data is used where a proposed route is being included on the spider.
12.3 An extension to a route quite often follows the line of a current route, which makes this
identification easier. However, new routes along previously unserved roads may prove more difficult. The supplier should contact TfL whenever it becomes impossible to determine the exact routeing, especially when there are new roads and stops within the hub.
12.4 TfL may request the supplier to obtain ‘X-Y’ coordinates for new sections of roads or private estates where the exact routeing cannot be established (on geographic maps).
12.5 Where routes are being shown as diverted or extended in the Service Change Bulletin, the
stopping arrangements may be affected. The suppliers should ensure correct data is used for these changes.
12.6 The suppliers must check bus stop location details within in the hub, including routes
calling, point letters and other relevant stop information on every update. 12.7 The suppliers should check bus stop names along every route, every time a spider is
updated, comparing these with the name on the previous spider. This is to ensure name changes are included on the updated map.
12.8 If it becomes necessary for TfL to authorise a first proof before the revised route has been
allocated to the CONFIRM data, the suppliers must indicate this fact on the first proof by adding a stamp on the spider to this effect.

Spider production manual
Page 35
Tramlink and Docklands Light Railway 13.1 Tram routes should be shown as a hatched green line, inside and outside the hub. 13.2 Where Tramlink is shown, the title of the map should be ‘Buses and trams from…..’ and
corporate blue TfL header and sign-off should be used. 13.3 On spider maps where the tram line is not shown within the hub, then all bus stops that
connect with Tramlink should have the tram symbol against that bus stop name. 13.4 Where Tramlink forms part of the spider, the Tramlink symbol should only be shown if it
connects with a bus route line on that spider. 13.5 All tram stop destinations should be listed with route number in green. In the stops column,
insert ‘Tram stop’ in green. 13.6 Docklands Light Railway should not be shown on the spider and is treated the same way
as National Rail and Tube lines.

Spider production manual
Page 36
Amendments and updates of spider maps 14.1 TfL will instruct suppliers when to make amendments or updates to spider maps already in
existence through the BURP database. 14.2 Any updates should be to the latest design requirements (as specified in the Corporate
Guidelines), unless instructed otherwise. In other words, TfL will not specifically say that a map needs such changes, but it will be the suppliers’ responsibility to make these changes.
14.3 Delivery requirements of amended spiders should be the same as new spiders, unless
instructed differently by TfL. 14.4 The suppliers should ensure they always check the stopping arrangements in CONFIRM
when updating spiders.

Spider production manual
Page 37
Projectplace 15.1 All files (except A4 conversions) should only be saved to Projectplace, whether proofs or
final versions, following these guidelines on timescales. 15.2 Suppliers should ensure files are saved in the correct part of Projectplace, and must email
the person at TfL checking/approving the maps that they have placed the file on Projectplace.
15.3 When opening or downloading files from Projectplace, suppliers must ensure that it is the
latest available, by checking the TfL number on the bottom right before it is used in other material such as Supersite vicinity maps. This number will normally be shown on the works order instructions for such material.
15.4 When files are no longer required in each individual’s folder, they should be deleted by
TfL. This is to assist in future file uploading in terms of speed, to preserve space, and so new files with the same or similar names can be uploaded without duplicating previous versions.
15.5 When suppliers receive an approval from TfL, they must place the approved file into the relevant section of the ‘Archive’ folder in Projectplace.
15.6 The file name of the spider should be in this format: “name of spider”-“month”-“year”, using the hyphens too.
15.7 Please see separate documentation on how to use Projectplace, from page 43.

Spider production manual
Page 38
Invoicing and payment 16.1 Spider maps and other similar work should only be paid for once the item has been
approved, rather than paying as TfL orders the work. Suppliers should invoice once a month.
16.2 TfL will normally raise the necessary Purchase Order within 3-4 working days from receipt
of suppliers quote. 16.3 The suppliers should charge the set amount agreed for each type of new or updated
spider map. 16.4 If TfL cancels a works order, no payment should be made to the supplier unless they have
already carried out some or all of the work. If they have already worked on it, they must contact TfL within 3-4 working days to agree costs. This may be the full agreed (new/updated) price, or a reduced amount, depending on the amount of work carried out. TfL may require the supplier to proof some or all of the work done.
16.5 If the supplier has been paid under 16.4 and the works order is subsequently resurrected
with no further changes required, the supplier should not be paid again. However, if additional changes are required, then that should be treated as a new works order and charged appropriately.
16.6 If TfL hold on to work for more than three months from the original ‘Required by’ date, the
supplier should be entitled to ask for payment for work already done, even though it has not been completed. In these circumstances, the supplier must contact TfL before raising their quote.
16.7 If additional service changes are applied to a works order after the first proof has been
supplied to TfL, no further costs should be paid to the supplier unless it is more than three months after the original ‘Required By’ date. The only exception to this is if TfL ask for a major new route to be added, or significant re-routing of an existing route, which would require significant redrawing of the spider.
16.8 A4 spider maps should be quoted for separately. 16.9 Where double-royal spiders are reformatted into A4 format for the web, the additional cost
of this should be added to the original DR and such spiders quoted separately from non-reformatted spiders.
16.10 If a works order requires an expanded hub, it should be treated as a normal update and
charged appropriately. However, if that expansion of the hub is significant with additional routes, it may be treated as a new spider. TfL will advise the supplier which maps they consider to be new when they order the map.

Spider production manual
Page 39
Miscellaneous 17.1 At the bottom right-hand side of the Destination finder, but above the logos (and within the
blue shaded part of a night bus spider) should be the name of the poster followed by DR (or QR). Additionally, the borough code (or codes) should be inserted after this (the borough codes are shown within the original instructions). At the end of this line should be the TfL number (shown as TFL1234.xx.xx on first or subsequent proofs, or TFL1234.08.06 on the final ‘approved’ file). After the TfL number, an ‘F’, ‘P’ or ‘T’ should be added in brackets to denote which supplier has produced the map. Examples of these are: WANDSWORTH ROAD DR (LAM) TFL9762.12.06 (P) or TOTTENHAM COURT ROAD DR (WES, CDN) TFL9906.12.06 (P)
17.2 Above the Destination finder and under the map on the right should be ‘© Transport for
London’ and ‘Information correct from (plus the date)’ This date should be the date of the service change (of which should normally be the later one if there is more than one date). If it is a brand new map or ‘refresh’ that does not incorporate a service change then just the month and year should be shown. A straight reprint will retain its original service change date.
17.3 The London River Services piers pictogram should be indicated at all places where LRS
provide an interchange with bus routes shown on the map. 17.4 A4 spider maps should include ‘© Transport for London’, ‘Information correct from (plus
the date)’ and the TfL number – all of which should be placed in the bottom right-hand corner of the sheet. This should fit onto two lines, with the first line consisting of ‘Information correct from’, and the second line being ‘© Transport for London’ and then the TfL number.
17.5 These guidelines do not replace procurement agreements. 17.6 These guidelines should be read in connection with the Corporate Guidelines.
Spider production manual
Page 40
Appendix When spiders will be updated This section is for guidance only and decisions made by TfL as to if, or when, a map is to be updated will depend on whether there are additional changes to be made to a map in a short period afterwards. Changes requiring amendments to spider maps • Route withdrawn • Route diverted or cut back from end of route • New route introduced, or significant route extension • Alterations to stopping arrangements • Major service changes Changes where we may wish to consider amendments to spider maps • New night bus route (except if required to be shown on a Night only DR then this will require a
definite amendment) • Night bus route withdrawn or diverted • Conversion to 24-hour service • Route withdrawn or introduced in the evenings or at other times • Introduction of infrequent service or infrequent extension of a route • Withdrawal or introduction of summer services. If a service is withdrawn for the season only
and will be reintroduced the following season, then the map will not be updated, providing the route specifies that it is only served during the summer period
• Conversion from Hail & Ride to fixed stops • When a map has not been updated for a year or more and minor changes have since taken
place Changes where amendments to spider maps may not be done until next time (unless that map had not been updated for some while) • Local extension, diversion, curtailment of route • Very minor stopping alterations – moving of stops or just one minor route altered • Addition of major new landmark • New station along a route except when within the hub

Spider production manual
Page 41
Guide to font sizes used • The font that should be used for all elements of the spider is NJ Font Medium. However,
there are exceptions: o NJ Font Book should be used for all qualifiers in the map, Route finder and
Destination finder sections, and the note about red discs above the ‘Key’ section. This applies to DRs and QRs only. See point 9.10 for A4s.
o See pages 15 and 16 for the correct fonts for the footer. • The font sizes shown below are what should be used for all elements of the spider map: Category For Font size Notes
Main heading Main heading 74pt For DRs and QRs.
Main heading 18pt For A4s.
Sub headings
‘Route finder’, ‘Destination finder’ 30pt
‘Key’, ‘Day buses including 24-hour services’, ‘Day buses’, ‘Night buses’, ‘Other buses’ etc..
20pt
All table headings e.g. ‘Bus route’, ‘Towards’, ‘Destination’, ‘Bus stops’
12pt
Alpha headings e.g. ‘A’, ‘B’ etc. in Destination finder 18pt
Notes
‘Red discs’ (under the ‘Key’ section) 12pt
Any boxed notes 12pt Except yellow boxed note.
Yellow boxed note (for Pay Before You Board) 16pt
Key All entries in the ‘Key’ section 12pt
Stop names and route numbers
All points in the map, Route finder section and Destination finder sections
12pt
Including qualifiers for stop names and route numbers in the coloured blocks in the map*, but excluding route numbers in the coloured blocks in the Route finder section. * This maybe reduced to a minimum of 10pt on busy maps, but never in the destination finder section.
Route numbers in the Route finder section 18pt Including route numbers in the
coloured blocks.
Stop letters Stop letters in red discs font 12pt

Spider production manual
Page 42
Hub
Building and station names, and places of interest
12pt or 10pt
Depending on size of buildings/area – use larger font in the first instance. Station names should be shown as ‘Victoria’ i.e. upper case letter first followed by lower case.
All road names 12pt This maybe reduced on occasions where there are space constraints, but should not be smaller than 10pt.
Miscellaneous
TfL number and copyright statement 11pt
All open lettered area names 28pt The stroke for the letters should be
1pt.
‘River Thames’ text 13pt The key line for the River Thames is 1.25pt.
‘Limited stop’ and ‘Hail & Ride’ text alongside route lines
12pt or 10pt For clarity purposes, use the size font that is most appropriate. Use NJ Font Book. Text can follow angle of route line.
• There may be exceptional circumstances where font sizes differ from the above chart – in
these cases, the supplier must contact TfL for guidance before pursuing with different font sizes than shown on this page.

Spider production manual
Page 43
Night bus route linears that appear on day spiders – specifications Each linear consists of six lines. The thickest line is drawn first with the following lines pasted in front of each other in a descending order. Use the coloured lines in this order depending on how many routes need to be shown (maximum of three).
Colours (C;M;Y;K) Stroke (mm) Blue linear
C M Y K 2.5 8 6 0 6 2.1 10 6 0 12 1.75 10 6 0 20 1.5 55 35 0 0 0.6 35 0 0 0 0.2 10 0 0 0
• Box and route number for Route finder: 100C/70M
Stroke (mm) Black linear C M Y K 2.5 0 0 0 10 2.1 10 6 0 12 1.75 10 6 0 20 1.5 0 0 0 70 0.6 0 0 0 25 0.2 0 0 0 5
• Box and route number for Route finder: 100K
Stroke (mm) Purple linear C M Y K 2.5 8 6 0 6 2.1 10 6 0 12 1.75 10 6 0 20 1.5 75 65 0 0 0.6 40 40 0 0 0.2 15 15 0 0
• Box and route number for Route finder: 75C/65M

Spider production manual
Page 44

Spider production manual
Page 45
How to use Projectplace
Workflow 1. Supplier to upload the latest file to the appropriate folder. Subsequent versions should be
uploaded with the same file name. Version control will save them in one place. 2. Supplier to request review of chosen file, choosing the recipient. No need to fill in the date
required or any message. 3. TfL will receive and proof files by clicking a link in the email. Sign off immediately by
clicking ‘I have finished my review‘ in the web browser, to allow a subsequent version to be reviewed.
4. When approved, the supplier should upload to the relevant printer folder. An arrow next to the uploaded file allows you to copy and an arrow next to the archive folder allows you to paste the file to ARCHIVE at the same time.
5. Supplier to inform the printer by email. TfL can monitor which files are at print by looking on Projectplace or by setting up a daily/weekly report.
6. TfL infrastructure will be informed of uploaded files by configuring their own activity reports from Projectplace.
Moving files to and from Projectplace
File upload • Go to the Document archive, showing a list of folders. (Folders are named with FAO for the
attention of the intended recipient). • Click on the name or folder for the intended recipient. • When in the correct folder, either:
- Drag the file to be uploaded from the file explorer window to the Projectplace window, or - Click the upload file symbol at the top of the window and thereafter browse to the file to
be uploaded.
File download • Find the required file in the relevant folder. Then either:
- Click on the filename and in the subsequent dialogue box choose whether to open or save the document to disk, or
- Tick the checkbox for the file (you can choose several files in this way) and click the compressed file symbol to retrieve the files as a zipped file. Open or save to disk. Requires you to expand the files locally with Winzip.

Spider production manual
Page 46
Notification of uploaded files • When the file is uploaded, tick the checkbox to choose that document. A toolbar will appear
at top including request review. This will give you a list of project members. Choose the members to be notified and they will automatically receive an email asking for a review and linking to the relevant document.
• When inviting a new member, you are asked to tick boxes requesting daily activity report or weekly project summary. Both are ticked as default. This will generate a daily/weekly email listing all project activity for the previous day/week. Included in this report are: - Whereabouts and names of changed files. - Which project member has made the change. - Time of change.
• To change the notification you receive by email, click on Personal, then Personal Preferences then go to tab Activity reports here you can choose daily or weekly reports, and whether to report changes, deleted files, moved files etc..
• When logging in, you are presented with a project overview. Red flags denote changes to the project (i.e. newly added, renamed or deleted files). If you have a personal FAO folder and files have been put there, a flag will appear against your folder.
Deleting unwanted files
Monitoring archive size • The Project has space for 1GB of files. The total used is not visible, but a message will be
sent when the total size approaches the limit. • The size of each folder in the archive is visible in the archive contents list. Here it will be
obvious which folders contain numerous or excessively large files. • We recommend that files be deleted when used as a way of tracking progress. Alternatively
print files, for example, could be erased one week after printing.
Erasing files • Identify a file to be erased within an open folder. • Tick the checkbox for all files to be deleted. • The toolbar above will illuminate with a cross symbol for deleting files. • Files can be retrieved from the waste bin by selecting and choosing undelete. Files in the
waste bin still add to the total archive size. The administrator should permanently destroy files from the waste bin periodically when freeing space in the archive.

Spider production manual
Page 47
Changing the archive structure
Edit folders • Navigate to document archive overview. • Click on the icon in the toolbar with a folder and + to add folder. • Name the folder and click on the tick box to enable version control. Any comment filled in
here will appear in the description of the folder in the folders overview. • The folder overview shows the name and size of each folder, a red flag to show recent
activity in the folder, the date of the last update and who modified the content. • The small pull down menu next to each folder includes commands to rename folder, cut +
paste and delete folders and edit the description of the folder.
Sub folders • The small pull down menu next to each folder symbol includes Add Folder. The added folder
will appear as a sub folder. • Sub folders work in exactly the same way as all folders, but allow organised grouping.
Access to folders • The small pull down menu next to the folder includes Access. This controls specific member
access to the particular folder. • Click on Access. • Un-tick the box for inheriting permissions. • Choose which type of access is open to which groups. • Apply and press OK.
Version management • The small pull down menu next to the folder includes Version Management. See that this is
enabled on all folders. • Folders with version management enabled are symbolised with a 1.x • The contents of that folder will have a version number in brackets next to it. • Clicking the file name will open the latest version of the file, if it has been updated and
replaced, while leaving old versions in tact. • Clicking on the version number will open a list of older versions of that file, with full access to
retrieve them. Also included are details of the activity of that file.
History • Each file and folder has a pull down menu next to it, including the command History. • This will show all activity on this file, when and by whom.

Spider production manual
Page 48
Edit contacts information
Contacts • The first toolbox (top) symbol is for adding a new contact. Click, fill in all details and OK. • The next tool is for creating mailing lists from the contact list and naming these lists. • The third tool allows import of contacts from other mail programs. This requires you to create
a vCard or comma separated file and export it from your email software. • Other tools in the toolbar allow:
- Copy, cut + paste and delete. - Send email to contact. - Send SMS to contact. - Export details as vCard, to print or to .xls format.
Control project membership
Edit project members • Only the project administrator and owner can administer project members. • The toolbar (top) includes Add Member and beside that Add Group. • Click Add Member and enter the email addresses (comma separated) of required members.
A group may be chosen for these members, so members to be grouped together should be entered together.
• A personal message, if entered, will appear on the email inviting the recipient to be a member.
• Activity reporting generates automatic emails to these members summarising activity in the project daily/weekly.
Administering member groups • Member groups are used to give access rights to groups (companies) rather than individuals.
Emails or SMS messages can also be sent to whole groups (use pull down menu next to group symbol).
• With the pull down menu next to the group symbol, access rights can be applied per group for each tool in turn i.e. document archive, issue management, contacts, deleted items and members.
• Group access can also be applied to folders or individual documents in the document archive.
Spider production manual
Page 49
Issue management • The Issue management tool acts as an email inbox for the project, which all members (with
access rights) will be able to read. • To use this, the email address for the project must be distributed.
- In the Issue management overview choose send the project’s email address in the get started toolbox. You will be prompted to choose from available members which should receive the email address. These members will receive an email prompting them to save the email address and can now post issues by emailing them to that address.
• Once received as an email, the issue will appear in the inbox. • Opening an issue in the inbox will show that it is possible to attach documents and comment
on the progress of the issue. • As an issue is dealt with it can be moved as work on it progresses with the move/change tab
to investigation, implementation or closed. • The issue can be assigned to the member responsible, given a deadline date and priority.