log into the virtual appliance
TRANSCRIPT

I’ve downloaded a trial version from Netcordia to learn, what NetMRI is about. I’m using a Virtual Appliance
on my VMWare Server. A detailed Step-by-Step instruction of the installation of that Virtual Appliance can
be found: www.bemsel.com/TechTip/RBE-NetMRI-30min.PDF
There are many tasks and options possible with NetMRI. The purpose of this document is to outline the
steps to retrieve a Cisco Router Configuration and track changes by Change Management solution.
1. Log into the virtual appliance
I’ve added through the initial configuration the IP Addresses of my routers. Also, SNMP community and
telnet access as been provided as well.
Retrieve Cisco Router Configuration through Netcordia’s NetMRI
created by: Rainer Bemsel – Version 1.0 – Dated: DEC/18/2009

Retrieve Cisco Router Configuration through Netcordia’s NetMRI page 2 of 5
Next, I had the system doing its job and discover all my routers and some more hosts, I have added.
However, when I tried to see the automatic configuration retrieval there has been an error displayed.
Checking the error log, it was telling me the reason why. The connection was refused.
By clicking on Actions, I could see the details.

Retrieve Cisco Router Configuration through Netcordia’s NetMRI page 3 of 5
It seems that my router does not allow SSH connections.
How to enable SSH on a Cisco Router ? -> here you go
First, you want to check whether SSH has already been enabled.
CSCO-1801-10# show ip ssh
SSH Disabled - version 1.99
If you see the result above it obviously means that SSH has not already been enabled on this device.
On with the configuration:
You will want to configure a hostname on your router. This will be performed in configuration mode. (note the
prompt)
CSCO-1801-10# conf t
If you want to change the hostname, now it’s the time to do so. Command would be hostname Router1
I am not changing the hostname and will now configure a domain name for the device.
CSCO-1801-10(config)#ip domain-name bemsel.home
The domain name has been set. Now we want to generate a RSA key pair.
CSCO-1801-10(config)#crypto key generate rsa modulus 1024
Next we will set a timeout interval.
CSCO-1801-10(config)#ip ssh time-out 120
This will set a time limit of 120 seconds for the SSH session to negotiate. You can also set a maximum
number of retry attempts in case of a failed negotiation.
CSCO-1801-10(config)#ip ssh authentication-retries 3
This will set the maximum amount of retries to 3. Once you’ve logged in and verified the connection is good
you can disable telnet access.
CSCO-1801-10(config)#line vty 0 4
CSCO-1801-10(config)#transport input ssh
Finally, before you save the configuration you need to create a user being used for SSH access.
CSCO-1801-10(config)#aaa new-model
CSCO-1801-10(config)#aaa authentication login default local
CSCO-1801-10(config)#username netuser privilege 15 password nope11
CSCO-1801-10(config)#exit
Now to save your configuration changes to the Cisco device, you want to save the running-config to the
startup config.
CSCO-1801-10#write mem
CSCO-1801-10#show ip ssh
SSH Enabled - version 1.99
Authentication timeout: 120 secs; Authentication retries: 3
Minimum expected Diffie Hellman key size : 1024 bits

Retrieve Cisco Router Configuration through Netcordia’s NetMRI page 4 of 5
Tell NetMRI the new SSH credentials for the Cisco Router This is the global settings
This is the router specific settings. If you have devices with different SSH users/passwords, than you can
modify those device settings locally.
Retrieve Cisco Router Configuration through Netcordia’s NetMRI page 5 of 5
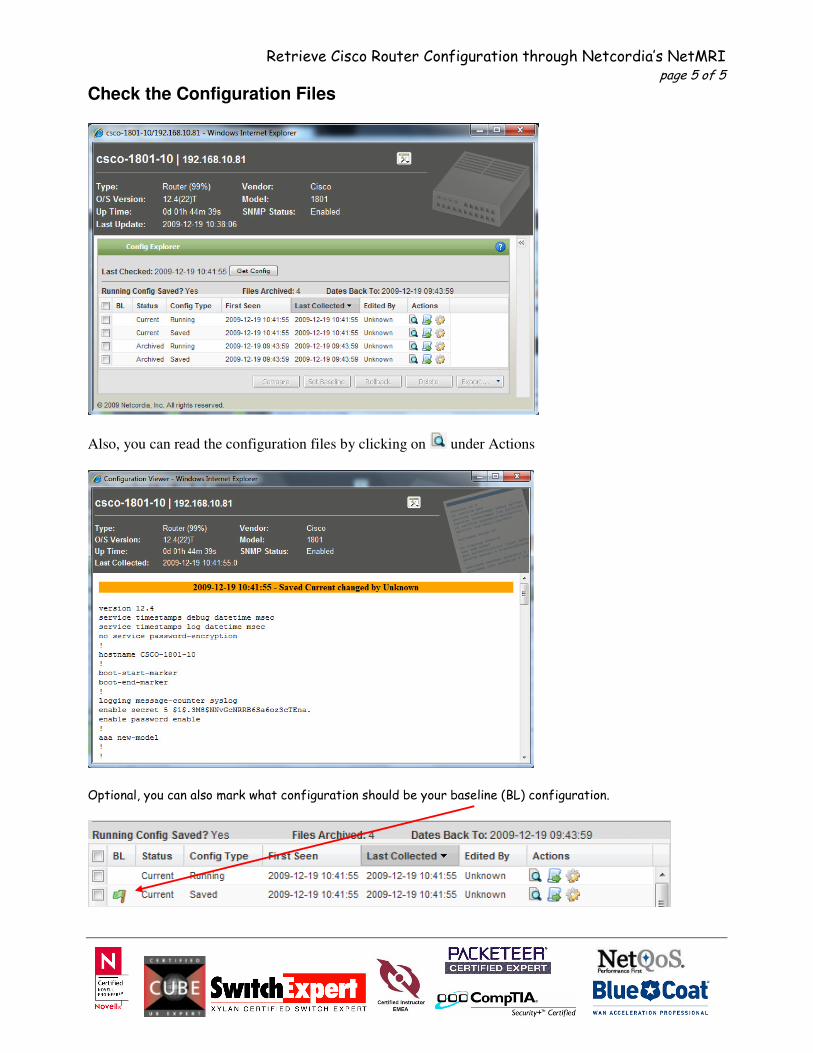
Check the Configuration Files
Also, you can read the configuration files by clicking on under Actions
Optional, you can also mark what configuration should be your baseline (BL) configuration.