locked brummel eye splice - cortland · eye splice – the splice that is necessary to form an eye...
TRANSCRIPT
Splicing Instructions
Locked Brummel Eye SpliceType 1 and Type 2 12-Strand Ropes
Copyright © 2015 by Cortland Company, Inc., all rights reserved.2
Introduction
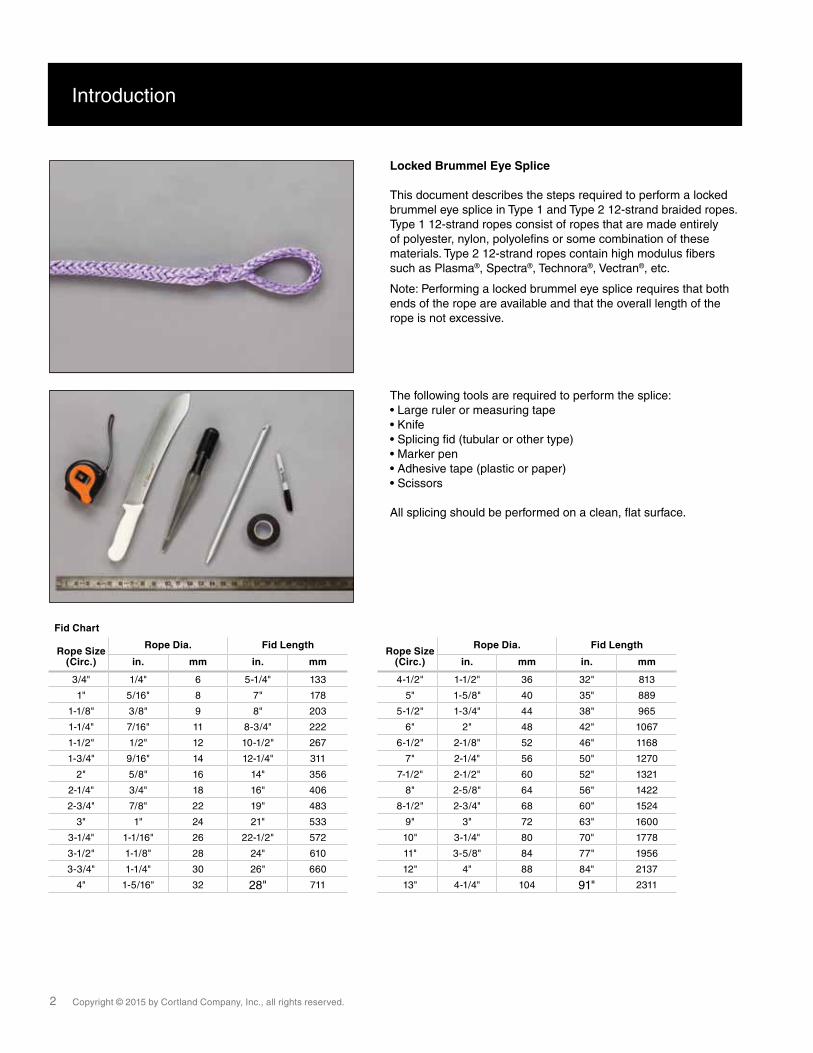
Locked Brummel Eye Splice
This document describes the steps required to perform a locked brummel eye splice in Type 1 and Type 2 12-strand braided ropes. Type 1 12-strand ropes consist of ropes that are made entirely of polyester, nylon, polyolefins or some combination of these materials. Type 2 12-strand ropes contain high modulus fibers such as Plasma®, Spectra®, Technora®, Vectran®, etc.
Note: Performing a locked brummel eye splice requires that both ends of the rope are available and that the overall length of the rope is not excessive.
The following tools are required to perform the splice:• Large ruler or measuring tape• Knife• Splicing fid (tubular or other type)• Marker pen• Adhesive tape (plastic or paper)• Scissors
All splicing should be performed on a clean, flat surface.
Fid Chart
Rope Size (Circ.)
Rope Dia. Fid LengthRope Size
(Circ.)
Rope Dia. Fid Length
in. mm in. mm in. mm in. mm
3/4" 1/4" 6 5-1/4" 133 4-1/2" 1-1/2" 36 32" 813
1" 5/16" 8 7" 178 5" 1-5/8" 40 35" 889
1-1/8" 3/8" 9 8" 203 5-1/2" 1-3/4" 44 38" 965
1-1/4" 7/16" 11 8-3/4" 222 6" 2" 48 42" 1067
1-1/2" 1/2" 12 10-1/2" 267 6-1/2" 2-1/8" 52 46" 1168
1-3/4" 9/16" 14 12-1/4" 311 7" 2-1/4" 56 50" 1270
2" 5/8" 16 14" 356 7-1/2" 2-1/2" 60 52" 1321
2-1/4" 3/4" 18 16" 406 8" 2-5/8" 64 56" 1422
2-3/4" 7/8" 22 19" 483 8-1/2" 2-3/4" 68 60" 1524
3" 1" 24 21" 533 9" 3" 72 63" 1600
3-1/4" 1-1/16" 26 22-1/2" 572 10" 3-1/4" 80 70" 1778
3-1/2" 1-1/8" 28 24" 610 11" 3-5/8" 84 77" 1956
3-3/4" 1-1/4" 30 26" 660 12" 4" 88 84" 2137
4" 1-5/16" 32 28" 711 13" 4-1/4" 104 91" 2311
Copyright © 2015 by Cortland Company, Inc., all rights reserved. 3
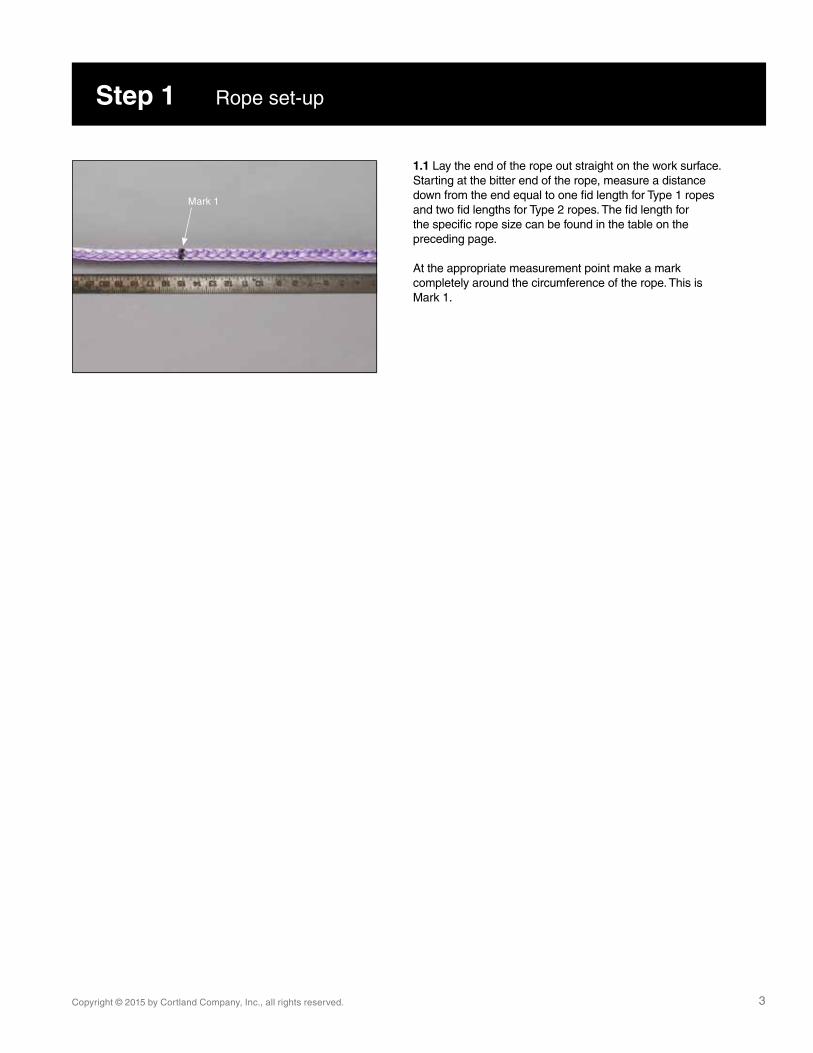
1.1 Lay the end of the rope out straight on the work surface. Starting at the bitter end of the rope, measure a distance down from the end equal to one fid length for Type 1 ropes and two fid lengths for Type 2 ropes. The fid length for the specific rope size can be found in the table on the preceding page.
At the appropriate measurement point make a mark completely around the circumference of the rope. This is Mark 1.
Step 1 Rope set-up
Mark 1

Copyright © 2015 by Cortland Company, Inc., all rights reserved.4
Step 2 Set desired eye size
2.1 Using Mark 1 as a reference point, form an eye in the bitter end of the rope. When the proper size of eye has been determined make a mark on the rope directly opposite Mark 1. This is Mark 2.
eye length
Mark 2
Copyright © 2015 by Cortland Company, Inc., all rights reserved. 5
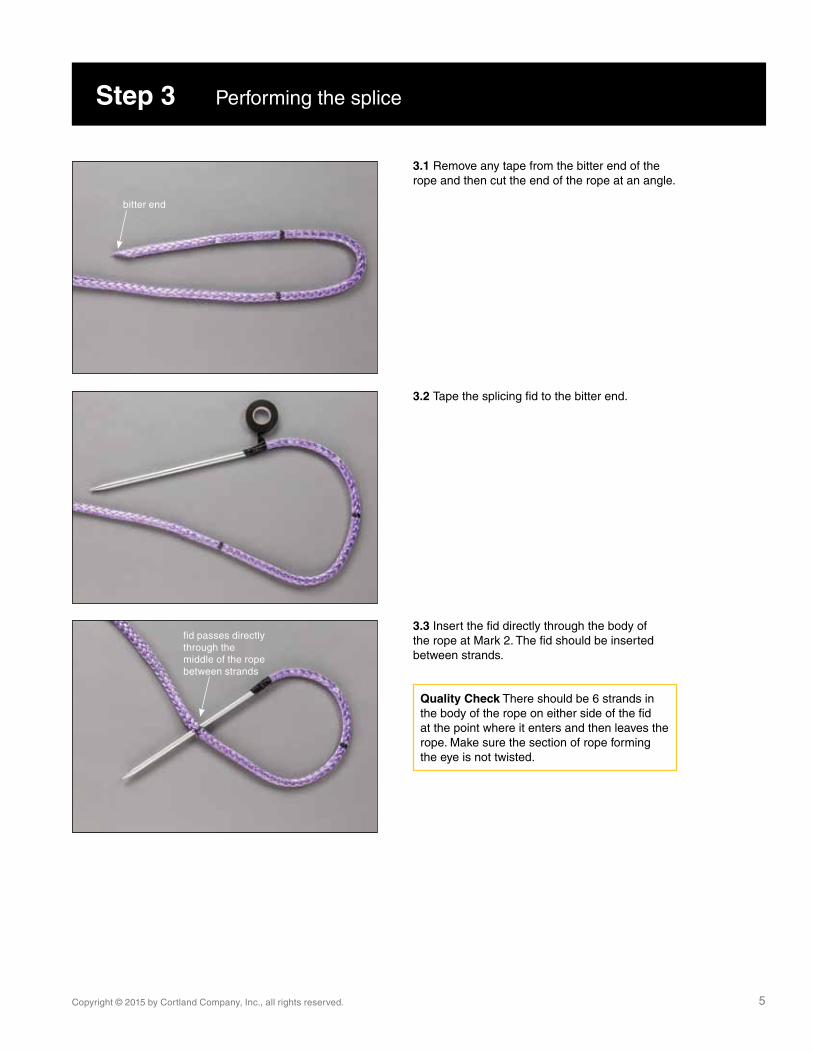
Step 3 Performing the splice
3.1 Remove any tape from the bitter end of the rope and then cut the end of the rope at an angle.
3.2 Tape the splicing fid to the bitter end.
3.3 Insert the fid directly through the body of the rope at Mark 2. The fid should be inserted between strands.
Quality Check There should be 6 strands in the body of the rope on either side of the fid at the point where it enters and then leaves the rope. Make sure the section of rope forming the eye is not twisted.
bitter end
fid passes directly through the middle of the rope between strands
Copyright © 2015 by Cortland Company, Inc., all rights reserved.6
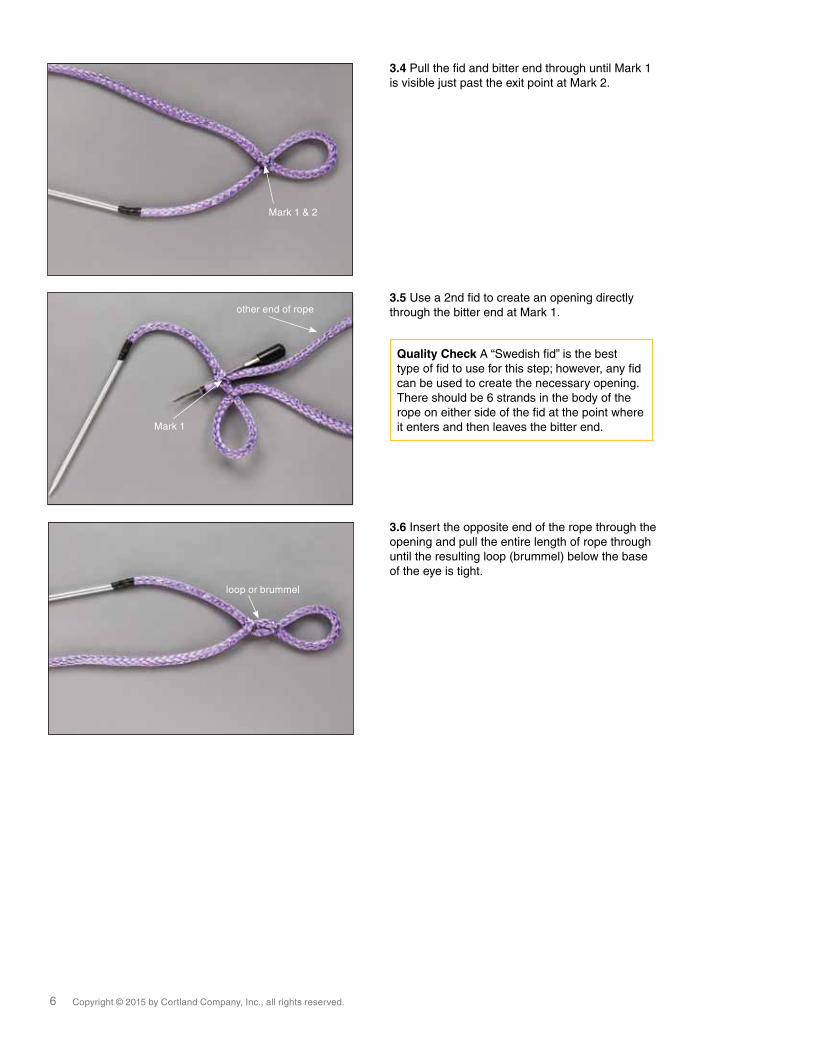
3.4 Pull the fid and bitter end through until Mark 1 is visible just past the exit point at Mark 2.
3.5 Use a 2nd fid to create an opening directly through the bitter end at Mark 1.
Quality Check A “Swedish fid” is the best type of fid to use for this step; however, any fid can be used to create the necessary opening. There should be 6 strands in the body of the rope on either side of the fid at the point where it enters and then leaves the bitter end.
3.6 Insert the opposite end of the rope through the opening and pull the entire length of rope through until the resulting loop (brummel) below the base of the eye is tight.
Mark 1 & 2
Mark 1
other end of rope
loop or brummel
Copyright © 2015 by Cortland Company, Inc., all rights reserved. 7
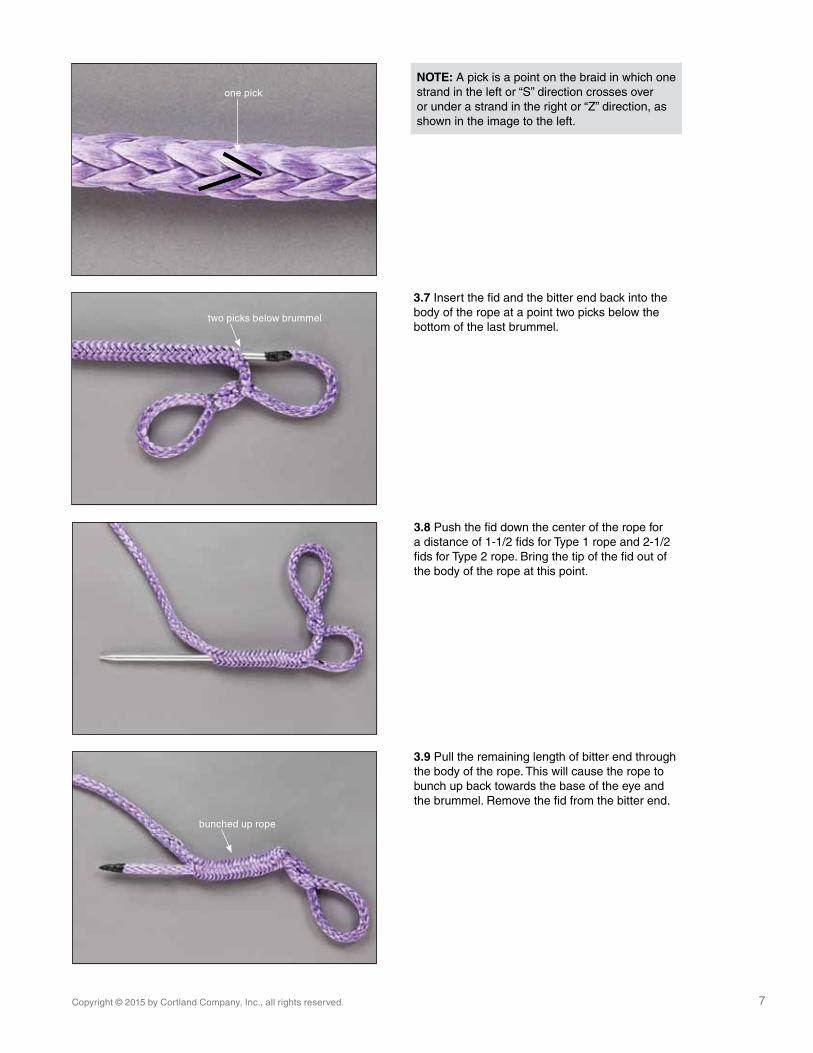
3.7 Insert the fid and the bitter end back into the body of the rope at a point two picks below the bottom of the last brummel.
3.8 Push the fid down the center of the rope for a distance of 1-1/2 fids for Type 1 rope and 2-1/2 fids for Type 2 rope. Bring the tip of the fid out of the body of the rope at this point.
3.9 Pull the remaining length of bitter end through the body of the rope. This will cause the rope to bunch up back towards the base of the eye and the brummel. Remove the fid from the bitter end.
one pick
two picks below brummel
bunched up rope
NOTE: A pick is a point on the braid in which one strand in the left or “S” direction crosses over or under a strand in the right or “Z” direction, as shown in the image to the left.
Copyright © 2015 by Cortland Company, Inc., all rights reserved.8
Step 4 Tapering the bitter end and finishing the splice
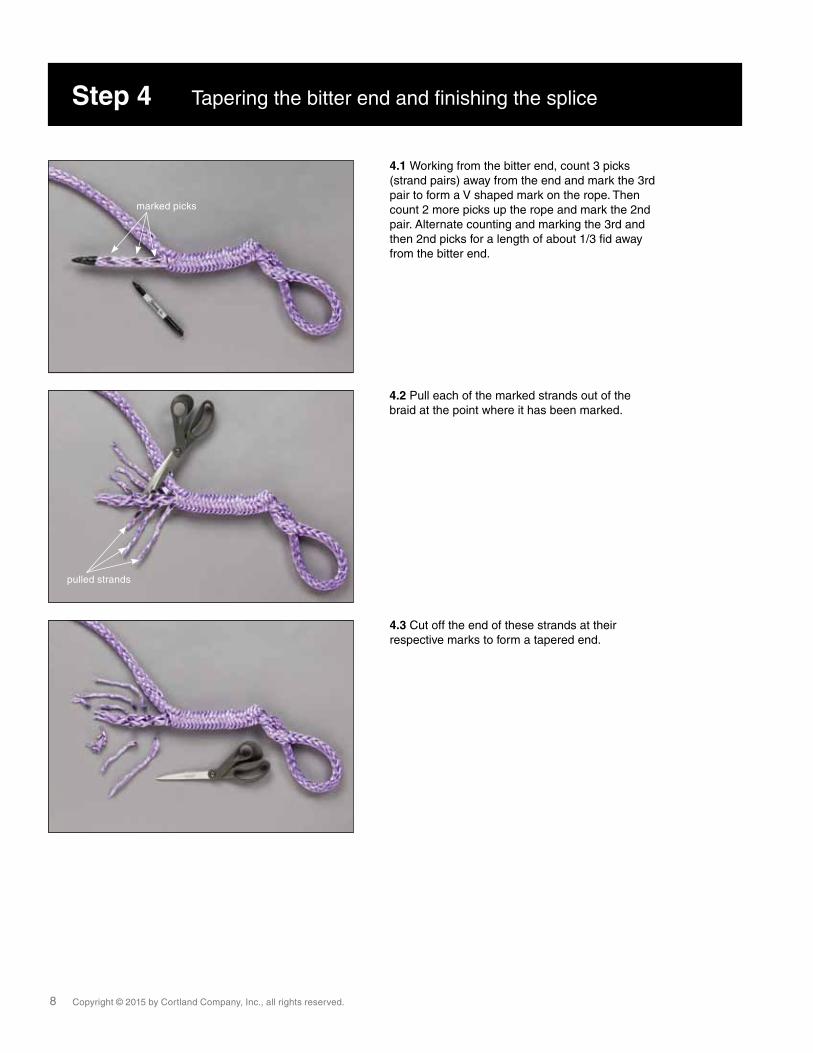
4.1 Working from the bitter end, count 3 picks (strand pairs) away from the end and mark the 3rd pair to form a V shaped mark on the rope. Then count 2 more picks up the rope and mark the 2nd pair. Alternate counting and marking the 3rd and then 2nd picks for a length of about 1/3 fid away from the bitter end.
4.2 Pull each of the marked strands out of the braid at the point where it has been marked.
4.3 Cut off the end of these strands at their respective marks to form a tapered end.
marked picks
pulled strands
Copyright © 2015 by Cortland Company, Inc., all rights reserved. 9
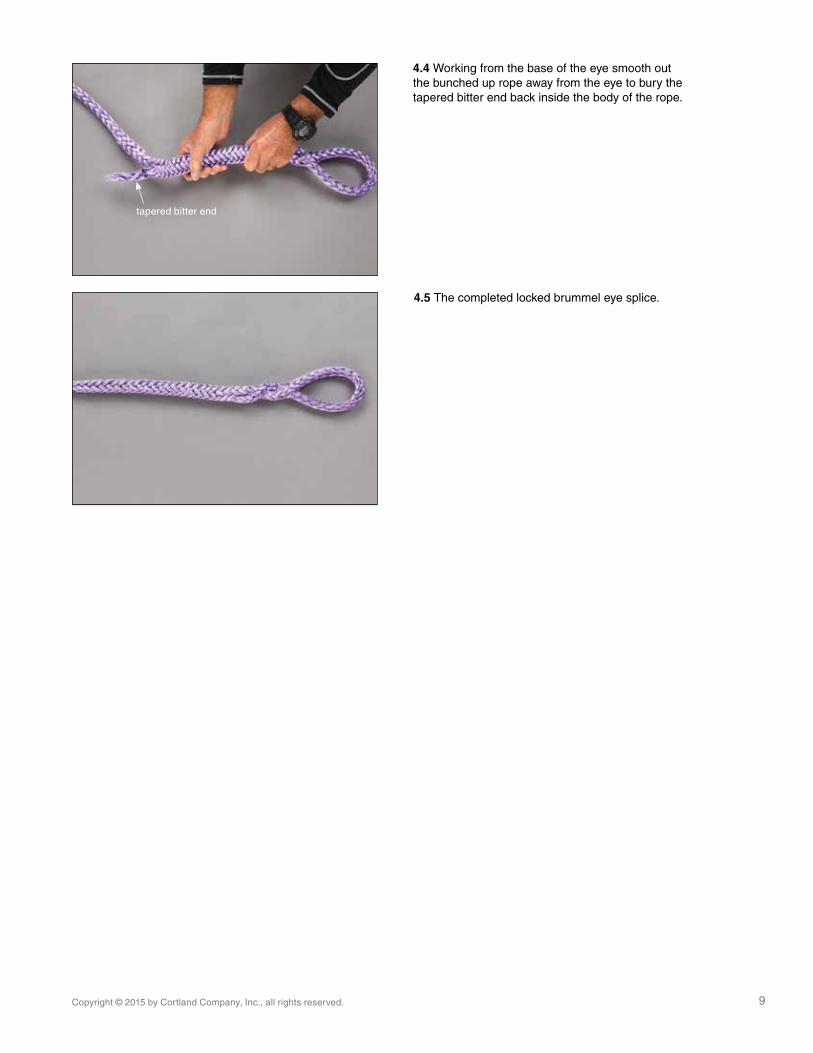
4.4 Working from the base of the eye smooth out the bunched up rope away from the eye to bury the tapered bitter end back inside the body of the rope.
4.5 The completed locked brummel eye splice.
tapered bitter end

Copyright © 2015 by Cortland Company, Inc., all rights reserved.10
Bitter End – End of the rope closest to the working area.
Core – Inner braid of a double braid rope. The core is contained within the cover braid.
Core Dependent Rope – A double-braid rope in which the core carries the entire load and the cover is primarily for protection from abrasion and external damage.
Cover/Sleeve/Jacket – Outer braid of a double braid rope that covers the core braid.
Cross Stitching – A series of sewing stitches using twine that locks a splice into place to prevent it from slipping or being pulled apart. Reference Cortland’s Cross Stitching Instructions, CT_TL_060 document.
Crossover – The point in a splice where the core enters the cover and the cover enters the core.
Eye Allowance – Length of the rope that determines the final eye size.
Eye Splice – The splice that is necessary to form an eye at the end of a rope.
Fid – A metal, wood or plastic tool used as an aid in splicing. Fids typically are tapered at one end and have a method to allow attaching the cover or core of the rope being spliced at the other end. Some fids are also intended to be used as a measuring tool when laying out the splicing marks on the rope.
Fid Length – A fid length is a unit of measurement originally based on the design of tubular fids used for splicing double braids. A fid length is now generally defined as 7 x the rope circumference or 21 x the rope diameter.
Grommet – (or Endless Grommet or Endless Loop) – A line that is spliced into a loop rather than having eyes.
Milk – The act of removing slack in the cover or core by sliding the loose braid back over the rope element that has been buried inside the loose section.
Pick – A point on either the core or cover braid in which one strand in the left or “S” direction crosses over or under a strand in the right or “Z” direction.
Splice – The process used to make an eye or join two ends of rope together.
Standing End – The end of the rope not in use.
Standing Part – The central section of rope away from the end being used or spliced.
Strands – A twisted (S twist or Z twist) bundle of yarn comprising one of the discrete components used to make a braided rope.
S-Twist – A strand in which the fibers are twisted in a left-hand direction.
Taper – Trimming or cutting a strand or braid so that it gradually becomes thinner toward one end.
Thimble – A ring or tear-drop shaped form, often of metal or plastic, that fits on the rope on the inside of an eye splice. It is used to prevent sharp bending of the rope at the top of the eye & to protect the inside of the eye from chafing or cutting.
Unlay (Unbraid) – To take apart and separate the strands of a rope into individual components.
Whipping – Securing rope ends or sections of a rope or splice by wrapping twine tightly around the object to be whipped.
Z-Twist – A strand in which the fibers are twisted in a right-hand direction.
Glossary

Copyright © 2015 by Cortland Company, Inc., all rights reserved. 11
Notes

Cortland is driven by innovative thinking, use of high technology materials and attention to
detail. Our in-depth understanding of demanding operational environments means we can
deliver trusted, proven solutions to our customers worldwide.
Today, Cortland provides innovative, efficient and lightweight rope, slings, cables and
umbilicals; along with mooring design, analysis and installation services to the oil and gas,
heavy marine, subsea, ROV, seismic, defense, aerostat and medical markets. Cortland is a
part of Actuant Corporation (NYSE: ATU), a diversified industrial company with operations in
more than 30 countries. cortlandcompany.com
CT_TL_049_0715_US