limited 2 years warranty - pel international · avant de débuter l’assemblage. ... grande) et...
TRANSCRIPT

INS
TRU
CTI
ON
S D
’AS
SEM
BLA
GE
AS
SEM
BLY
IN
STR
UC
TIO
NS
Les dessins peuvent différer de votre modèleThe drawings may differ from your model
N.B. : Il est important de lire les instructions avant de débuter l’assemblage.
N.B. : It is important to read the instructions before proceeding to assemble the unit.
Vidéo d'assemblage disponible sur notre site : www.pelinternational.com/fr/
Sous la rubrique : Service
Assambling instruction on video available at :
www.pelinternational.com Under : Service
Série 53
Warranty
LIMITED 2 YEARS WARRANTYThank you for purchasing a Pel International product. Our 30 years of experience in the glider business is our promise of excellence and superior quality. We owe our success to your satisfaction and loyalty.
2 years (from the date of purchase and upon presentation of the invoice)This warranty applies against defects in workmanship and the following items;• The chair metallic frame (As long as the original cushion remains on it)• Swivelling system• Reclining system
1 year (from the date of purchase and upon presentation of the invoice)• The roller bearings• The stitching• The fabrics and upholstery• The leather• Urethane foam
This warranty will lose effect in the following cases :• The clothing is altered by any inappropriate product• Commercial or industrial use of the product• Damages such as, burns, liquid spills, torn fabric and excessive rubbing• Squeaking related to a lack of grease or over screwed side panels• The chair is not well assembled **• Abusive product use
** THIS CHAIR BEING SOLD PARTIALLY ASSEMBLED AND INSTRUCTIONSFOR COMPLETING THE ASSEMBLY BEING CLEARLY INDICATED, NO WARRANTY WILL APPLY IF PROBLEMS OCCUR BECAUSE THE CHAIR WAS NOT ASSEMBLED WELL.
Pel International Ltd will, at its own choice, repair or replace any part proven defective upon its own verification and approbation.
SAFETY PRECAUTIONSHere are a few tips to help you appreciate our products.• Children should not be allowed to play on or with this furniture• To prevent dammages, put this furniture away from walls
Sincerely,
Pel International Ltd
PR
INTE
D IN
CA
NA
DA
12
Collect ion
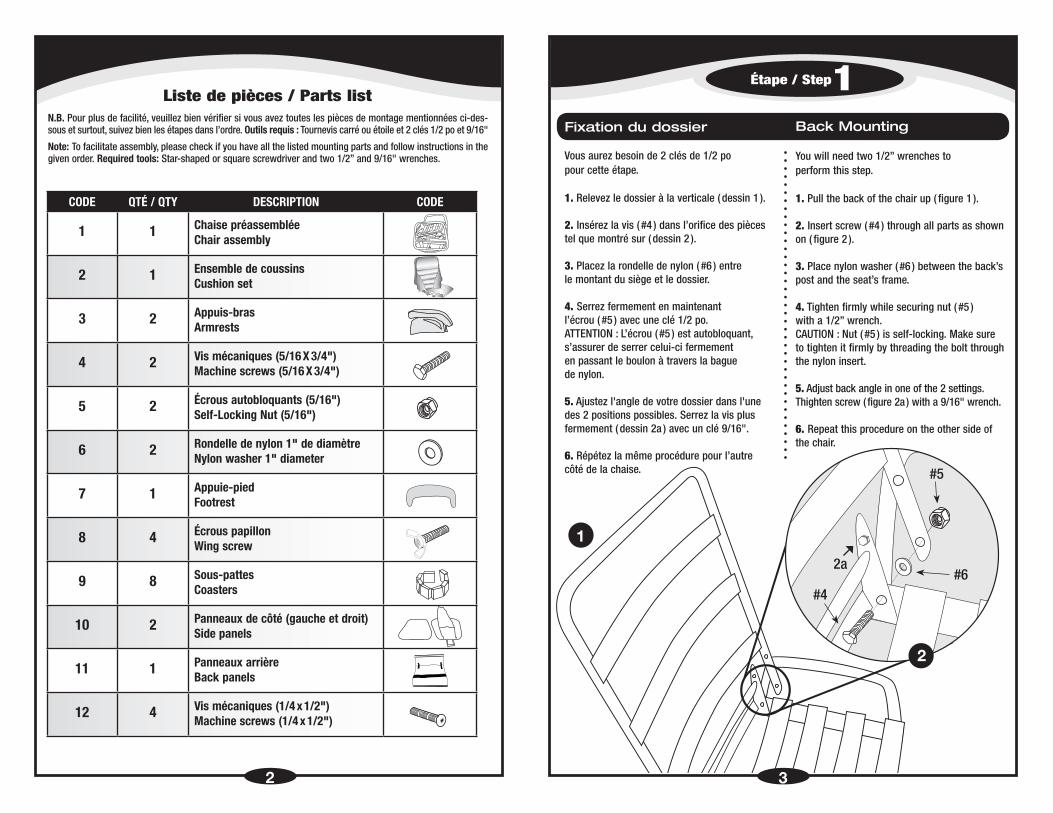
Liste de pièces / Parts list
2
N.B. Pour plus de facilité, veuillez bien vérifier si vous avez toutes les pièces de montage mentionnées ci-des-sous et surtout, suivez bien les étapes dans l’ordre. Outils requis : Tournevis carré ou étoile et 2 clés 1/2 po et 9/16"
Note: To facilitate assembly, please check if you have all the listed mounting parts and follow instructions in the given order. Required tools: Star-shaped or square screwdriver and two 1/2” and 9/16" wrenches.
Étape / Step1Back Mounting
You will need two 1/2” wrenches to perform this step.
1. Pull the back of the chair up ( figure 1 ).
2. Insert screw ( #4 ) through all parts as shown on ( figure 2 ).
3. Place nylon washer ( #6 ) between the back’s post and the seat’s frame.
4. Tighten firmly while securing nut ( #5 ) with a 1/2” wrench.CAUTION : Nut ( #5 ) is self-locking. Make sure to tighten it firmly by threading the bolt through the nylon insert.
5. Adjust back angle in one of the 2 settings.Thighten screw ( figure 2a ) with a 9/16" wrench.
6. Repeat this procedure on the other side of the chair.
Fixation du dossier
Vous aurez besoin de 2 clés de 1/2 po pour cette étape.
1. Relevez le dossier à la verticale ( dessin 1 ).
2. Insérez la vis ( #4 ) dans l’orifice des pièces tel que montré sur ( dessin 2 ).
3. Placez la rondelle de nylon ( #6 ) entre le montant du siège et le dossier.
4. Serrez fermement en maintenant l’écrou ( #5 ) avec une clé 1/2 po.ATTENTION : L’écrou ( #5 ) est autobloquant, s’assurer de serrer celui-ci fermement en passant le boulon à travers la bague de nylon.
5. Ajustez l'angle de votre dossier dans l'une des 2 positions possibles. Serrez la vis plus fermement ( dessin 2a ) avec un clé 9/16".
6. Répétez la même procédure pour l’autre côté de la chaise.
1
CODE QTÉ / QTY DESCRIPTION CODE
1 1 Chaise préassemblée Chair assembly
2 1 Ensemble de coussins Cushion set
3 2 Appuis-bras Armrests
4 2 Vis mécaniques (5/16 X 3/4") Machine screws (5/16 X 3/4")
5 2 Écrous autobloquants (5/16") Self-Locking Nut (5/16")
6 2 Rondelle de nylon 1" de diamètre Nylon washer 1" diameter
7 1 Appuie-pied Footrest
8 4 Écrous papillon Wing screw
9 8 Sous-pattes Coasters
10 2 Panneaux de côté (gauche et droit) Side panels
11 1 Panneaux arrière Back panels
12 4 Vis mécaniques (1/4 x 1/2")Machine screws (1/4 x 1/2")
2
#62a
#4
#5
3

4
2Étape / Step
1
FIXATION DES PANNEAUX DE CÔTÉ
1. Étendre la toile ( #10 ) devant le bras à fermer. La petite bande de velcro indique l'avant. Détacher les velcros ( petite et grande ) et les faire passer entre les deux plaquette de bercement jusqu'à la barre centrale. Attacher les velcros ensemble.
2. Faire entrer les 2 coins du bas du panneau en tissu et l'installer jusqu'en haut. Bien arranger le dacron à l'intérieur à l'aide de vos doigts.
3. Attachez les 2 fermetures éclaires en vous servant de l'oscillation du fauteuil pour aider quand difficile d'accès en faisant attention de ne pas vous blessez.
4. Attachez la petite bandelette du dessus à l'aide du velcro.
5. Répétez la même procédure pour l'autre côté d la chaise.
SIDE PANELS MOUNTING
1. Spread the fabric panel ( #10 ) in front of the arm to cover. The small velcro section indicate the front. Detach the velcro bands and pass them through, in between the bearings, to the middle bar. Reattach the velcro bands together.
2. Insert bottom of the fabric panel first and work your way up replacing the stuffing with your hands on the way up.
3. Zip both zippers entirely using the oscillation of the chair to get to difficult areas. Be careful not to hurt yourself.
4. Attach small velcro band over the arm.
5. Repeat the procedure for the other panel.
2
3Étape / Step
FIXATION DES APPUIS-BRAS
1. Installez les appuis-bras ( #3 ) sur la structure en vous servant des vis papillon ( #8 ) pour les serrez. ( Détachez les velcros afin de vous aidez avec cette étape. )
2. Attachez la petite bande de velcro sur le panneau à l'endroit prévu à cet effet.
ARMS INSTALLATION
1. Fix arms ( #3 ) on frame using wing screws ( #8 ). ( To help you with this step, detach velcro and zip down a bit .)
2. Attach the little velcro stripe to the panel.
#8
342
1
5
#10
#3

7
5Étape / Step
INSTALLATION DU CACHE BASE ARRIÈRE
1. Bien étendre le morceau de tissu au sol ( #11 ) dans le bon sens ( la bande velcro de 1 pouce en bas, celle de 2 pouces vers le haut ).
2. Installez le velcro du bas en premier.
3. Installez celui du millieu.
4. Installez ce qui reste sur la première latte de métal en partant du bas.
BACK PANEL INSTALLATION
1. Spread the panel ( #11 ) on the ground in front of the back to cover. The 1" velcro band goes down and the 2" goes up.
2. Install the 1" velcro band first.
3. Install the middle velcro band.
4. Install the last one on the first metal band starting down.
1
#11
4Étape / Step
6
INSTALLATION DU REPOSE PIED
1. Vissez le repose-pied ( #7 ) sur le mécanisme lève-pied à l'aide des vis ( #12 ). Centrez à l'aide des glissoirs.
FRONT PANEL INSTALLATION
1. Screw the footrest ( #7 ) on the mechanism that raises your feet ( #12 ). Use slides to center the panel.
Vue de haut / top view
Vue de dessous / Bottom view
#12
1
2
3
4
Vue de dos / Back view
4
3
2
#7

9
1
FURNITURE COASTERS INSTALLATION
1. To ensure maximum comfort, every chair is perfectly levelled during conception and manufacturing. However, it is important to install the coasters ( #9 )because we can not anticipate your floor’s level. The coasters will also protect your flooring ( figure 1 ).
FIXATION DES SOUS-PATTES
1. Pour assurer un confort maximum, les chaises ont été parfaitement nivelées lors de la fabrication. Malgré cela, il est important d’installer les sous-pattes ( #9 )car nous ne pouvons pas connaître le niveau de votre plancher. Le revêtement du plancher sera protégé par ces sous-pattes ( dessin 1) .
Vis d’ajustementde la base / Base adjusting screw
7Étape / Step6Étape / Step
2
3
1
FIXATION DES COUSSINS
1. Rassemblez le dos et le siège ( #2 ) avec la fermeture éclair ( dessin 1 ).
2. Insérez l’enveloppe du coussin sur le dossier de métal du dos ( dessin 2 ).
3. Insérez l’enveloppe du coussin sur le siège de métal et fixez le velcro ( dessin 3 ).
CUSHIONS INSTALLATION
1. Zip the seat and back together ( #2 )( figure 1 ).
2. Slide the cushion envelope over metal back ( figure 2 ).
3. Slide the cushion envelope on the metal seat and attach velcro ( figure 3 ).
8
#9
#2

10
Garantie
GARANTIE LIMITéE 2 ANS Merci d’avoir acheté un produit PEL International. Notre gamme de produits est de qualité supérieure et nous vous en assurons l’excellence de par nos 30 années d’expérience dans le domaine. Votre satisfaction et votre fidélité sont l’assurance de notre réussite.
2 ans ( à partir de la date d’achat et sur présentation de la facture )Cette garantie s’applique à tout défaut de fabrication et aux éléments suivants :• le cadre métallique du fauteuil ( garantie sur le cadre métallique sera respectée
tant que le coussin original demeure sur celui-ci )• le système de pivotement• le système d’inclinaison
1 an ( à partir de la date d’achat et sur présentation de la facture )• le système de roulement à billes• les coutures• les tissus et matériaux de recouvrement• le cuir• la mousse d’uréthane
Cette garantie ne s’applique pas dans les cas suivants :• si le tissu a été endommagé par un produit non conforme ou inadéquat• l’usage commercial et industriel du produit• les dommages accidentels tels que brûlures, liquide renversé, déchirures,
frottement excessif• le grincement dû à un manque de graisse ou aux panneaux latéraux vissés
avec excès• le mauvais assemblage du fauteuil**• un usage abusif du produit
** PUISQUE CE FAUTEUIL EST VENDU PARTIELLEMENT ASSEMBLÉ ET QUE LES INSTRUCTIONS POUR L’ASSEMBLAGE SONT CLAIREMENT INDIQUÉES, AUCUNE GARANTIE NE S’APPLIQUE SI DES PROBLÈMES SURVIENNENT À LA SUITE D’UN MAUVAIS ASSEMBLAGE DU FAUTEUIL.
Notre obligation selon cette garantie est de réparer ou de remplacer toute pièce défectueuse après vérification et approbation de PEL International Ltée.
MESURES dE SÉCURITÉVoici quelques conseils vous permettant de mieux apprécier nos produits.• Afin d’éviter des accidents, ne pas laisser les enfants jouer sur ou avec ce fauteuil.• Afin d’éviter des dommages, placer le fauteuil à une distance raisonnable du mur.
En vous remerciant,
Pel International Ltée
11
1. Verify step 1 of the manual and make sure that everything was assembled in accordance with the instructions.
CAUTION: A creaking vinyl fabric is normal.
Votre chaise cogne ou donne des coups
Essayez la chaise entre chacune des étapes suivantes :1. Vérifiez si la base est bien de niveau sur le plancher.2. Vérifiez l’étape #1 de votre manuel et assurez-vous que tout a bien été
assemblé selon les instructions.3. Serrez légèrement les deux vis de la base.
ATTENTION : plus vous serrez, plus la base tournera difficilement.4. Desserrez légèrement le boulon situé sous le côté droit de la chaise face à vous (environ un quart de tour).
1. Desserrez les boulons et appliquez de la vaseline à l’aide d’un cure-dents sur les deux surfaces afin de réduire la friction. Resserrez les boulons comme ils étaient.2. Il est possible que de la peinture se soit introduite dans l’ouverture du roulement à billes. Enlevez le surplus de peinture à l’aide d’une aiguille et ajoutez un peu d’huile. Assurez-vous que les boulons sont bien serrés.
N.B. Ne pas utiliser de WD 40 ou de dégraisseur. Ces produits ne sont pas des lubrifiants et leur utilisation peutréduire considérablement la durée de vie du roulement à billes.
1. Vérifiez que tout a été assemblé selon les instructions de l’étape #1 du manuel.ATTENTION : Il est normal qu’un tissu de vinyle émette des craquements.
Votre chaise grince
Votre chaise émet des craquements
The chair knocks or jerks Try the chair after each of the following:1. Verify if the base is levelled with the floor.2. Verify step 1 of the manual and make sure that everything was assembled in accordance with the instructions.3. Slightly tighten the two screws on the base. CAUTION: The more you screw, the harder it will get to turn the base.4. Slightly unscrew (1/4 turn) the bolt located on the right side of the chair (when you face it).
The chair squeaks 1. Unscrew the bolts and apply Vaseline with a toothpick on both surfaces to reduce friction. Screw the bolts back.2. Paint might have entered into the opening of the ball bearing. Remove any excess paint with a needle and add oil. Make sure that all bolts are tight.
Note: Do not use WD 40 or a scourer. These are not lubricants and their use can greatly reduce the life of the bail bearing.
PROBLÈME SOLUTION
PROBLEM SOLUTION
The chair creaks
Entretien et conseils pratiquesMaintenance and Tips