life reinsurance module
TRANSCRIPT

USER GUIDE | PUBLICDocument Version: 1.0 – 2018-07-27
Life Reinsurance ModuleSAP Reinsurance Management 8.0 FPS02 for SAP S/4HANA
© 2
018
SAP
SE o
r an
SAP affi
liate
com
pany
. All r
ight
s re
serv
ed.
THE BEST RUN

Content
1 Life Reinsurance Module. . . . . . . . . . . . . . . . . . . . . . . . . . . . . . . . . . . . . . . . . . . . . . . . . . . . . . 6
2 Navigation in LRM. . . . . . . . . . . . . . . . . . . . . . . . . . . . . . . . . . . . . . . . . . . . . . . . . . . . . . . . . . . 92.1 Search. . . . . . . . . . . . . . . . . . . . . . . . . . . . . . . . . . . . . . . . . . . . . . . . . . . . . . . . . . . . . . . . . . . . .92.2 Tree Navigation. . . . . . . . . . . . . . . . . . . . . . . . . . . . . . . . . . . . . . . . . . . . . . . . . . . . . . . . . . . . . . 122.3 History Management for Policies and Applications. . . . . . . . . . . . . . . . . . . . . . . . . . . . . . . . . . . . . 202.4 Error Handling. . . . . . . . . . . . . . . . . . . . . . . . . . . . . . . . . . . . . . . . . . . . . . . . . . . . . . . . . . . . . . 222.5 Authorization Checks. . . . . . . . . . . . . . . . . . . . . . . . . . . . . . . . . . . . . . . . . . . . . . . . . . . . . . . . . 23
3 Integrating LRM into Other Components. . . . . . . . . . . . . . . . . . . . . . . . . . . . . . . . . . . . . . . . . 313.1 Connection to the SAP Business Partners. . . . . . . . . . . . . . . . . . . . . . . . . . . . . . . . . . . . . . . . . . . 32
Enter Processing Information. . . . . . . . . . . . . . . . . . . . . . . . . . . . . . . . . . . . . . . . . . . . . . . . . 33Entering Products. . . . . . . . . . . . . . . . . . . . . . . . . . . . . . . . . . . . . . . . . . . . . . . . . . . . . . . . . 36Entering Scope of Data Transmission. . . . . . . . . . . . . . . . . . . . . . . . . . . . . . . . . . . . . . . . . . . .44Entering Validation Checks. . . . . . . . . . . . . . . . . . . . . . . . . . . . . . . . . . . . . . . . . . . . . . . . . . . 47Entering msg.PMQ Validation Checks. . . . . . . . . . . . . . . . . . . . . . . . . . . . . . . . . . . . . . . . . . . 48Entering Fields with Value List. . . . . . . . . . . . . . . . . . . . . . . . . . . . . . . . . . . . . . . . . . . . . . . . .49
3.2 Connection to the FS-RI Basic System. . . . . . . . . . . . . . . . . . . . . . . . . . . . . . . . . . . . . . . . . . . . . 50Creating a Reinsurance Treaty for Use in LRM. . . . . . . . . . . . . . . . . . . . . . . . . . . . . . . . . . . . . .50Accounting. . . . . . . . . . . . . . . . . . . . . . . . . . . . . . . . . . . . . . . . . . . . . . . . . . . . . . . . . . . . . . 53Claim. . . . . . . . . . . . . . . . . . . . . . . . . . . . . . . . . . . . . . . . . . . . . . . . . . . . . . . . . . . . . . . . . . 54Reinsurance Program. . . . . . . . . . . . . . . . . . . . . . . . . . . . . . . . . . . . . . . . . . . . . . . . . . . . . . .54
3.3 Integration of msg.PMQ. . . . . . . . . . . . . . . . . . . . . . . . . . . . . . . . . . . . . . . . . . . . . . . . . . . . . . . 553.4 Integration of Extension Service. . . . . . . . . . . . . . . . . . . . . . . . . . . . . . . . . . . . . . . . . . . . . . . . . . 58
4 Business Object Life. . . . . . . . . . . . . . . . . . . . . . . . . . . . . . . . . . . . . . . . . . . . . . . . . . . . . . . . 604.1 Separating Lives. . . . . . . . . . . . . . . . . . . . . . . . . . . . . . . . . . . . . . . . . . . . . . . . . . . . . . . . . . . . . 614.2 Merging Lives. . . . . . . . . . . . . . . . . . . . . . . . . . . . . . . . . . . . . . . . . . . . . . . . . . . . . . . . . . . . . . . 624.3 Deleting a Life. . . . . . . . . . . . . . . . . . . . . . . . . . . . . . . . . . . . . . . . . . . . . . . . . . . . . . . . . . . . . . 634.4 Creating a Manual Previous Insurance. . . . . . . . . . . . . . . . . . . . . . . . . . . . . . . . . . . . . . . . . . . . . 63
5 Business Object Application. . . . . . . . . . . . . . . . . . . . . . . . . . . . . . . . . . . . . . . . . . . . . . . . . . .655.1 Create Application. . . . . . . . . . . . . . . . . . . . . . . . . . . . . . . . . . . . . . . . . . . . . . . . . . . . . . . . . . . 665.2 Assess Application. . . . . . . . . . . . . . . . . . . . . . . . . . . . . . . . . . . . . . . . . . . . . . . . . . . . . . . . . . . 685.3 Copy Application. . . . . . . . . . . . . . . . . . . . . . . . . . . . . . . . . . . . . . . . . . . . . . . . . . . . . . . . . . . . 705.4 Manually Setting an Application to Invalid. . . . . . . . . . . . . . . . . . . . . . . . . . . . . . . . . . . . . . . . . . . 715.5 Delete Application. . . . . . . . . . . . . . . . . . . . . . . . . . . . . . . . . . . . . . . . . . . . . . . . . . . . . . . . . . . .725.6 Materialize Application Without Policy. . . . . . . . . . . . . . . . . . . . . . . . . . . . . . . . . . . . . . . . . . . . . .73
2 P U B L I CLife Reinsurance Module
Content
5.7 Reset Application to Completed. . . . . . . . . . . . . . . . . . . . . . . . . . . . . . . . . . . . . . . . . . . . . . . . . . 74
6 Business Object Policy. . . . . . . . . . . . . . . . . . . . . . . . . . . . . . . . . . . . . . . . . . . . . . . . . . . . . . . 766.1 Process Movement. . . . . . . . . . . . . . . . . . . . . . . . . . . . . . . . . . . . . . . . . . . . . . . . . . . . . . . . . . . 786.2 Rewinding Movements. . . . . . . . . . . . . . . . . . . . . . . . . . . . . . . . . . . . . . . . . . . . . . . . . . . . . . . . 866.3 Assign or Generate a Life for an Identity. . . . . . . . . . . . . . . . . . . . . . . . . . . . . . . . . . . . . . . . . . . . 86
Search for Name Strings. . . . . . . . . . . . . . . . . . . . . . . . . . . . . . . . . . . . . . . . . . . . . . . . . . . . 90Search for Name Match Codes. . . . . . . . . . . . . . . . . . . . . . . . . . . . . . . . . . . . . . . . . . . . . . . . 93
6.4 Create Policy. . . . . . . . . . . . . . . . . . . . . . . . . . . . . . . . . . . . . . . . . . . . . . . . . . . . . . . . . . . . . . . 946.5 Withdrawing an Insured Person (Policy with Joint Lives). . . . . . . . . . . . . . . . . . . . . . . . . . . . . . . . . 966.6 Terminate a Policy. . . . . . . . . . . . . . . . . . . . . . . . . . . . . . . . . . . . . . . . . . . . . . . . . . . . . . . . . . . .976.7 Reinstating a Policy. . . . . . . . . . . . . . . . . . . . . . . . . . . . . . . . . . . . . . . . . . . . . . . . . . . . . . . . . . .996.8 Delete Policy. . . . . . . . . . . . . . . . . . . . . . . . . . . . . . . . . . . . . . . . . . . . . . . . . . . . . . . . . . . . . . . 1016.9 Reactivating a Policy. . . . . . . . . . . . . . . . . . . . . . . . . . . . . . . . . . . . . . . . . . . . . . . . . . . . . . . . . 1016.10 Conversion of a Policy. . . . . . . . . . . . . . . . . . . . . . . . . . . . . . . . . . . . . . . . . . . . . . . . . . . . . . . . 1026.11 Claim. . . . . . . . . . . . . . . . . . . . . . . . . . . . . . . . . . . . . . . . . . . . . . . . . . . . . . . . . . . . . . . . . . . . 104
Creating and Editing Claims. . . . . . . . . . . . . . . . . . . . . . . . . . . . . . . . . . . . . . . . . . . . . . . . . 105Assessing Claim. . . . . . . . . . . . . . . . . . . . . . . . . . . . . . . . . . . . . . . . . . . . . . . . . . . . . . . . . .109Creating and Editing Claims Using the Claim Fast Entry. . . . . . . . . . . . . . . . . . . . . . . . . . . . . . 112Auto-Adjudication Messages. . . . . . . . . . . . . . . . . . . . . . . . . . . . . . . . . . . . . . . . . . . . . . . . . 115
6.12 Displaying FS-CD Account Balance. . . . . . . . . . . . . . . . . . . . . . . . . . . . . . . . . . . . . . . . . . . . . . . 115
7 Assigning Business Objects. . . . . . . . . . . . . . . . . . . . . . . . . . . . . . . . . . . . . . . . . . . . . . . . . . .116
8 Accounting. . . . . . . . . . . . . . . . . . . . . . . . . . . . . . . . . . . . . . . . . . . . . . . . . . . . . . . . . . . . . . . 1198.1 Period Values. . . . . . . . . . . . . . . . . . . . . . . . . . . . . . . . . . . . . . . . . . . . . . . . . . . . . . . . . . . . . . 1198.2 Profit and Loss Values. . . . . . . . . . . . . . . . . . . . . . . . . . . . . . . . . . . . . . . . . . . . . . . . . . . . . . . . 1218.3 Forward Booking Function. . . . . . . . . . . . . . . . . . . . . . . . . . . . . . . . . . . . . . . . . . . . . . . . . . . . . 1258.4 Reverse Booking Function. . . . . . . . . . . . . . . . . . . . . . . . . . . . . . . . . . . . . . . . . . . . . . . . . . . . . 128
9 Data Transmission. . . . . . . . . . . . . . . . . . . . . . . . . . . . . . . . . . . . . . . . . . . . . . . . . . . . . . . . . 1309.1 Edit a Data Transmission. . . . . . . . . . . . . . . . . . . . . . . . . . . . . . . . . . . . . . . . . . . . . . . . . . . . . . 1329.2 Logs. . . . . . . . . . . . . . . . . . . . . . . . . . . . . . . . . . . . . . . . . . . . . . . . . . . . . . . . . . . . . . . . . . . . .1339.3 System Data Transmission. . . . . . . . . . . . . . . . . . . . . . . . . . . . . . . . . . . . . . . . . . . . . . . . . . . . . 134
10 Background Processes (Batch Processes). . . . . . . . . . . . . . . . . . . . . . . . . . . . . . . . . . . . . . . .13610.1 Background Processes for Accounting. . . . . . . . . . . . . . . . . . . . . . . . . . . . . . . . . . . . . . . . . . . . .137
Aggregation and Transfer. . . . . . . . . . . . . . . . . . . . . . . . . . . . . . . . . . . . . . . . . . . . . . . . . . . 138Opening of a CAP. . . . . . . . . . . . . . . . . . . . . . . . . . . . . . . . . . . . . . . . . . . . . . . . . . . . . . . . . 142Closing of a CAP. . . . . . . . . . . . . . . . . . . . . . . . . . . . . . . . . . . . . . . . . . . . . . . . . . . . . . . . . .143Re-opening of a CAP. . . . . . . . . . . . . . . . . . . . . . . . . . . . . . . . . . . . . . . . . . . . . . . . . . . . . . . 144Calculation of Informational Values. . . . . . . . . . . . . . . . . . . . . . . . . . . . . . . . . . . . . . . . . . . . 145Delete an Unfinished Run. . . . . . . . . . . . . . . . . . . . . . . . . . . . . . . . . . . . . . . . . . . . . . . . . . . 147
Life Reinsurance ModuleContent P U B L I C 3
10.2 Background Processes for Movement Processing. . . . . . . . . . . . . . . . . . . . . . . . . . . . . . . . . . . . . 148Movement Processing. . . . . . . . . . . . . . . . . . . . . . . . . . . . . . . . . . . . . . . . . . . . . . . . . . . . . 148Renewal of a Portfolio. . . . . . . . . . . . . . . . . . . . . . . . . . . . . . . . . . . . . . . . . . . . . . . . . . . . . . 150Rewind a Portfolio. . . . . . . . . . . . . . . . . . . . . . . . . . . . . . . . . . . . . . . . . . . . . . . . . . . . . . . . . 151
10.3 Background Processes for the Data Transmission. . . . . . . . . . . . . . . . . . . . . . . . . . . . . . . . . . . . .155Deletion of a Data Transmission. . . . . . . . . . . . . . . . . . . . . . . . . . . . . . . . . . . . . . . . . . . . . . . 155Update Processing Status of Data Transmission. . . . . . . . . . . . . . . . . . . . . . . . . . . . . . . . . . . 156
10.4 Background Processes for Retrocession. . . . . . . . . . . . . . . . . . . . . . . . . . . . . . . . . . . . . . . . . . . 156Traditional and Portfolio Retrocession. . . . . . . . . . . . . . . . . . . . . . . . . . . . . . . . . . . . . . . . . . .157Recapture a Retrocession Treaty. . . . . . . . . . . . . . . . . . . . . . . . . . . . . . . . . . . . . . . . . . . . . . 158Transfer a Portfolio from One Retrocessionaire to Another Retrocessionaire. . . . . . . . . . . . . . . 160
10.5 Data Cleansing. . . . . . . . . . . . . . . . . . . . . . . . . . . . . . . . . . . . . . . . . . . . . . . . . . . . . . . . . . . . . 162Deletion of No Longer Used Lives. . . . . . . . . . . . . . . . . . . . . . . . . . . . . . . . . . . . . . . . . . . . . . 162Deletion of No Longer Used Comments. . . . . . . . . . . . . . . . . . . . . . . . . . . . . . . . . . . . . . . . . 163Deletion of No Longer Used Objects. . . . . . . . . . . . . . . . . . . . . . . . . . . . . . . . . . . . . . . . . . . . 164
10.6 Invalidation of Applications. . . . . . . . . . . . . . . . . . . . . . . . . . . . . . . . . . . . . . . . . . . . . . . . . . . . 16510.7 Change of Organizational Unit. . . . . . . . . . . . . . . . . . . . . . . . . . . . . . . . . . . . . . . . . . . . . . . . . . 16610.8 Logging. . . . . . . . . . . . . . . . . . . . . . . . . . . . . . . . . . . . . . . . . . . . . . . . . . . . . . . . . . . . . . . . . . 167
Log Display. . . . . . . . . . . . . . . . . . . . . . . . . . . . . . . . . . . . . . . . . . . . . . . . . . . . . . . . . . . . . 168
11 Multiple Deletion of Applications and Lives (Code of Conduct). . . . . . . . . . . . . . . . . . . . . . . . 17011.1 Import of the Deletion Requests into the System. . . . . . . . . . . . . . . . . . . . . . . . . . . . . . . . . . . . . 17011.2 Determination of Deletion Candidates. . . . . . . . . . . . . . . . . . . . . . . . . . . . . . . . . . . . . . . . . . . . . 17111.3 Release of the Deletion Process. . . . . . . . . . . . . . . . . . . . . . . . . . . . . . . . . . . . . . . . . . . . . . . . . 173
12 LRM Validation Checks. . . . . . . . . . . . . . . . . . . . . . . . . . . . . . . . . . . . . . . . . . . . . . . . . . . . . . 17512.1 Configure Flexible Validation Checks. . . . . . . . . . . . . . . . . . . . . . . . . . . . . . . . . . . . . . . . . . . . . . 19212.2 Error Level of Flexible Validation Checks. . . . . . . . . . . . . . . . . . . . . . . . . . . . . . . . . . . . . . . . . . . 19312.3 Problem Classes of Flexible Validation Checks. . . . . . . . . . . . . . . . . . . . . . . . . . . . . . . . . . . . . . . 19312.4 Functional Area of Flexible Validation Checks. . . . . . . . . . . . . . . . . . . . . . . . . . . . . . . . . . . . . . . . 194
13 msg.PMQ Validation Checks. . . . . . . . . . . . . . . . . . . . . . . . . . . . . . . . . . . . . . . . . . . . . . . . . . 195
14 BAPI Interfaces. . . . . . . . . . . . . . . . . . . . . . . . . . . . . . . . . . . . . . . . . . . . . . . . . . . . . . . . . . . .196
15 BAdI Customer Enhancements. . . . . . . . . . . . . . . . . . . . . . . . . . . . . . . . . . . . . . . . . . . . . . . .200
16 SAP Business Workflows and Triggering Events. . . . . . . . . . . . . . . . . . . . . . . . . . . . . . . . . . . 210
17 Business Rule Framework plus (BRFplus). . . . . . . . . . . . . . . . . . . . . . . . . . . . . . . . . . . . . . . . 214
18 Data Transfer from FS-RI to an SAP Business Warehouse. . . . . . . . . . . . . . . . . . . . . . . . . . . . 218
19 General Data Protection Regulation (GDPR). . . . . . . . . . . . . . . . . . . . . . . . . . . . . . . . . . . . . .22019.1 Logging Read Access. . . . . . . . . . . . . . . . . . . . . . . . . . . . . . . . . . . . . . . . . . . . . . . . . . . . . . . . 220
4 P U B L I CLife Reinsurance Module
Content
19.2 Report Function for Personal Data of a Person. . . . . . . . . . . . . . . . . . . . . . . . . . . . . . . . . . . . . . . 22119.3 Deleting Multiple Policies and Applications. . . . . . . . . . . . . . . . . . . . . . . . . . . . . . . . . . . . . . . . . 22519.4 Deleting Single Policies. . . . . . . . . . . . . . . . . . . . . . . . . . . . . . . . . . . . . . . . . . . . . . . . . . . . . . . 22719.5 Deleting Single Lives. . . . . . . . . . . . . . . . . . . . . . . . . . . . . . . . . . . . . . . . . . . . . . . . . . . . . . . . . 22819.6 Display Information on Business Partner. . . . . . . . . . . . . . . . . . . . . . . . . . . . . . . . . . . . . . . . . . .23019.7 Deletion of Unused Business Partners. . . . . . . . . . . . . . . . . . . . . . . . . . . . . . . . . . . . . . . . . . . . 23019.8 Deletion of No Longer Used Lives (Batch). . . . . . . . . . . . . . . . . . . . . . . . . . . . . . . . . . . . . . . . . . 23119.9 Deletion of No Longer Used Comments (Batch). . . . . . . . . . . . . . . . . . . . . . . . . . . . . . . . . . . . . . 23119.10 Deletion of No Longer Used Objects (Batch). . . . . . . . . . . . . . . . . . . . . . . . . . . . . . . . . . . . . . . . 23119.11 Application Log. . . . . . . . . . . . . . . . . . . . . . . . . . . . . . . . . . . . . . . . . . . . . . . . . . . . . . . . . . . . .232
20 Glossary. . . . . . . . . . . . . . . . . . . . . . . . . . . . . . . . . . . . . . . . . . . . . . . . . . . . . . . . . . . . . . . . . 233
21 Typographic Conventions. . . . . . . . . . . . . . . . . . . . . . . . . . . . . . . . . . . . . . . . . . . . . . . . . . . . 236
Life Reinsurance ModuleContent P U B L I C 5

1 Life Reinsurance Module
Use
The Life Reinsurance Module (LRM [page 233]) supplements the function scope of the SAP Reinsurance Management (FS-RI) Basic System by enabling:
● Management of a reinsurer’s portfolio [page 233] in the area of life insurance.● Processing assumed or ceded business for a single risk [page 233].● Accounting [page 233] of single risks and the transfer of values to the FS-RI Basic System.
Features
The functions of LRM can be divided into the two following interconnected groups:
● Data AdministrationData administration provides the following technical functions:○ Data retrieval by manual entry of data in the dialog or by data transmission○ Searching for different objects after starting LRM○ Tree navigation after you selected a business object for processing
● Business ProcessesBusiness processes provide the following business functions:○ Create and change applications○ Application assessment○ Create and change policies○ Retrocession○ Claim processing○ Accounting, including aggregation and transfer of profit and loss values to the FS-RI Basic System.
Business processes can be run in the dialog or in the background. Basis for this is the Movement Processing internal process (with the exception of Application Assessment).
Single Risk in LRM
Technical business objects used in life reinsurance are displayed in LRM using single risks.
6 P U B L I CLife Reinsurance Module
Life Reinsurance Module
The single risk consists of 4 levels and contains the following information:
● Individual data:Life – Uppermost level of a single risk, which is uniquely identified by the life numberIdentity – Personal data that is independent of the type of life insurance (last name, first name or address, for example).Insured Person – Data of a person that depends on the type of insurance (risk loadings, for example).Insured Person Share – Reinsurance information on the insured person (share loadings, for example).
● Primary insurance data:Policy / Application – Policy or application data (commencement date for policy or product name, for example).Policy Component – Data on individual coverages of a policy or an application (insurance type or sum insured, for example).
● Reinsurance data:Policy Component Share – Information on the shares of a policy component that will be reinsured (sum reinsured, for example).
The business objects life, application and policy are mapped in the system as part of the single risk object (see Chapter Business Object Life [page 60], Business Object Application [page 65], Business Object Policy [page 76]).
Multiple subordinate objects can be assigned to a superior object within a single risk. Multiple policies and applications can be assigned to a life, for example.
Structure of the User Manual
The first part of the user manual contains a description of the navigation options available in LRM in Chapter Navigation in LRM [page 9]. This section contains a description of the following function scope:
● Initial program screen● Functionalities of the initial screen● Navigation tree of a selected or new created business object
The Integrating of LRM in Other Components [page 31] chapter contains a description of the other systems to which LRM must be connected. As part of the in-force business management, LRM accesses the following programs:
● SAP Business Partner (see Chapter Connection to the SAP Business Partners [page 32])● FS-RI Basic System (see Chapter Connection to the FS-RI Basic System [page 50])● The msg.PMQ product engine (see Chapter Integration of msg.PMQ [page 55])● Extension Service (see Chapter Integration of Extension Service [page 58])
The chapters Business Object Life [page 60], Business Object Application [page 65], Business Object Policy [page 76] (core part of the user manual) contain a description of the concrete technical business objects and business processes of a reinsurer. Each of this sections contains a description of the business object within the scope of the single risk model followed by a description of individual processes that can be processed using this object. The explanation is provided as part of the processing in the dialog.
The Accounting [page 119] chapter contains a description of the internal processes of forward and reverse booking in LRM.
Chapters Data Transmission [page 130] and Batch Processes [page 136] contain a description of the way in which data is retrieved and how business processes are executed for a portfolio of single risks.
Life Reinsurance ModuleLife Reinsurance Module P U B L I C 7

Chapters BAPI Interfaces [page 196], BAdI Customer Extensions [page 200] and Data Transfer from FS-RI to SAP Business Information Warehouse [page 218] contain a description on further technical aspects of LRM.
8 P U B L I CLife Reinsurance Module
Life Reinsurance Module
2 Navigation in LRM
Initial Screen
Start the LRM module msg.Life Reinsurance Module Single Risk Administration Single Risk Administration (transaction /MSG/VRC_SRA). On the initial screen of the module, you have the following options:
● You can search for the following business objects that exist in the management system on the tab pages of the same name (see Chapter Search [page 9]):○ Policy/Application○ Claim○ Claim Header○ Data Transmission○ Movement
You can also use the Extended Search pushbutton in which you can search using more detailed search criteria for a particular policy component or for a particular insured person, for example.
● You can create new business objects by using the following pushbuttons:○ Life, to create a new life○ Movement, to create a new policy (see Chapter Create Policy) [page 94]○ Data Transmission, to create a new data transmission (see Chapter Data Transmission [page 130])
You get to the navigation tree (see Chapter Tree Navigation [page 12]) after you selected or created a business object. In the navigation tree, you can:
● Enter and change data● Navigate between different business objects of a single risk● Display historical versions of a business object (see Chapter History Management for Policies and
Applications [page 20])
LRM performs certain validation and authorization checks during manual data processing (see Chapter Error Handling [page 22] and Authorization Checks [page 23]).
2.1 Search
Use
The search function is the central access point to the single risk administration. You can search for and navigate to specific business objects by using a large number of criteria (see Chapter Tree Navigation [page 12]).
Life Reinsurance ModuleNavigation in LRM P U B L I C 9
Features
Pushbuttons
The following functions are available by using the following pushbuttons:
● Search for Facultative Cession Requirement: You start the search for lives, for which facultative requirements exist, in the current company code.
● System Data Transmission: You get to the display of the data transmission (see Chapter Data Transmission [page 130])
● Lives: You create a new life without contents (see Chapter Business Object Life [page 60]). When having selected this pushbutton, the system displays this life in single risk administration and you can make modifications.
● Movement: You create a new policy in the form of a movement (see Chapter Business Object Policy [page 76]). When having selected this pushbutton, the system displays this policy or movement in single risk administration and you can make modifications.
● Data Transmission: You create a new data transmission (see Chapter Data Transmission [page 130]).● Start Claim Entry: You start a claim workflow. The workflow needs to be activated in advance.● Open Workflow Inbox: The system displays an overview of workflows in LRM to which your current user has
been assigned.
Search Function
The search is divided into multiple tab pages that you can use to search for different business objects. The tab pages Life, Policies/Applications, Claims, Claim Header, Data Transmission and Movements each contain its own search mask, in which you start a search using different criteria. In addition, the Extended Search pushbutton is available that you can use to switch to the Extended Search dialog. Here, more detailed search criteria are available for searches.
In the Life, Policies/Applications, Claims and Claim Headers tab pages, you can set the Operational Lives/Policies/Claims/Claim Headers or Movement Identities/Policies/Claims/Claim Headers flags to search for operational objects or movement objects.
If compatible search results have been found on other tab pages, the system provides additional preselection criteria on some tab pages, that you can use to limit the number of searched objects.
On the Movements tab page, you can only process preselected quantities if movement results already exist on one of these tab pages: Life, Policies/Applications or Data Transmission. In the tab pages Life, Policies/Applications, Claims and Claim Header, flags for operative results or movement results are automatically adjusted to the settings of the preselected quantities when you perform a search. When you set the Match Code Search in the Life tab page, the search for match codes is activated for the Last Name/Alias Last Name field. This flag is active in the default settings (see Chapter Search for Name Match Codes [page 93]).
Search Results
The search result is displayed in a result list in the lower section of the screen. Depending on the selected tab page, the system displays identities, policies, claim headers, claims, data transmissions or movements. Select a row and in the context menu choose Expand Entire Entry to display all available branches to the business object in a tree structure. With a click on the triangle icon at the beginning of the line, you can hide or unhide the next lower-level for display.
The result list only contains those search results for which, depending on the company code, a display authorization exists. As claim headers are independent of company codes, they are always displayed. For identities, only restricted data records are displayed, depending on the authorization. You can explicitly check
10 P U B L I CLife Reinsurance Module
Navigation in LRM

restricted data records to display all data. For assigned policies or applications, authorization checks are performed depending on the company code.
If you did not specify search criteria, the search determines all results of the business object the tab page of which you are currently on.
The maximum number of hits for a search query is limited to 1,000,000 objects, whereas the system initially only displays 500 hits. You can successively load further 500 entries at the end of the result list.
When you performed a search, the system displays in the Number of Hits field the number of business objects that the system found that match your previously specified search criteria and displays this in the result list. Choose an entry from the result list to sort the entries using multiple functions from the context menu, if required.
Context Menu
For all entries in the result list, right-click to open a context menu, which provides further functions described below:
● Display: The system opens the selected business object.● Fully Expand Entry and Fully Collapse Entry: The system displays all branches of an entry or hides all.● Expand Next Level and Collapse Lowest Level: The system displays a further level or hides further levels for
the currently displayed search results.
Additional functions in the context menu when searching for lives:
● Sort results by name, date of birth or accuracy of hits.● Group results by life or list by person / group.● Display additional data when an authorization check is required.
Additional functions in the context menu when searching for claims:
● Group results by claim header or list by policy claim
Additional functions in the context menu when searching for data transmissions:
● Copy a data transmission. The system opens the mask to create a data transmission and defaults the fields accordingly.
● The Delete function permanently removes the selected data transmission.
Navigation
As an alternative to the Display context menu entry, there are two further options to open a business object:
● Implicit NavigationThe system only finds one search result and automatically navigates to this business object.
● Explicit NavigationThe system finds several business object that meet the specified search criteria. Double-click an entry in the result list and you get to the corresponding business object.
A triangle icon shows entries that you can further expand. A dot icon shows entries that cannot be further expanded.
You return to the search mask when an error occurs whilst opening a business object. The system issues a corresponding error message in the Application Log section.
Extended Search
Life Reinsurance ModuleNavigation in LRM P U B L I C 11

When you use the Extended Search pushbutton, the system provides multiple tab pages with a large number of attributes. You can restrict the number of searched objects by using any attribute. In this case, history results are also included in the search.
In the Maximum Number of Hits field, you can enter the number of business objects, which match your search criteria, to be displayed in the results list. By default, the field is preset with the value “200”.
The business objects that match your search criteria are displayed in table form. You can use the pushbuttons above table to sort and filter the values in the columns in ascending or descending order.
Deleting Search Criteria in the Search Screen
Choose the Reset Search pushbutton to reset all fields in the standard search and to reset them to their initial values in the Extended Search. The maximum number of hits for the Extended Search is set to “200”.
Automatic Data Transfer from the Search Mask to New Business Objects
When you create a new movement or life, the system directly adopts the data, which you entered as search criteria in the search mask, in the new created business object:
● When creating a new life: Last name, first name, date of birth● When creating a new group life: Group name● When creating a new movement: Policy or application number, cedent, last name, first name, date of birth,
company code
2.2 Tree Navigation
Use
After you selected a single risk from the result list by double-clicking it (see Chapter Search [page 9]), you get to a mask in which the selected object is displayed.
The mask is divided into the following sections:
● Navigation tree● Main window (with tab pages for entering or changing data)● Menu bar
Features
Navigation Tree
The layout of the navigation tree displays the hierarchical structure of a single risk in LRM. The structure is divided into up to 4 levels including corresponding nodes. An individual mask view is assigned to a node. Double-click the node to get to the corresponding view. These views differ with regard to the tab pages, context menus for the corresponding node and in the menu bar. The table below lists the functions available on the tab pages, in the context menus and in the menu bar.
12 P U B L I CLife Reinsurance Module
Navigation in LRM
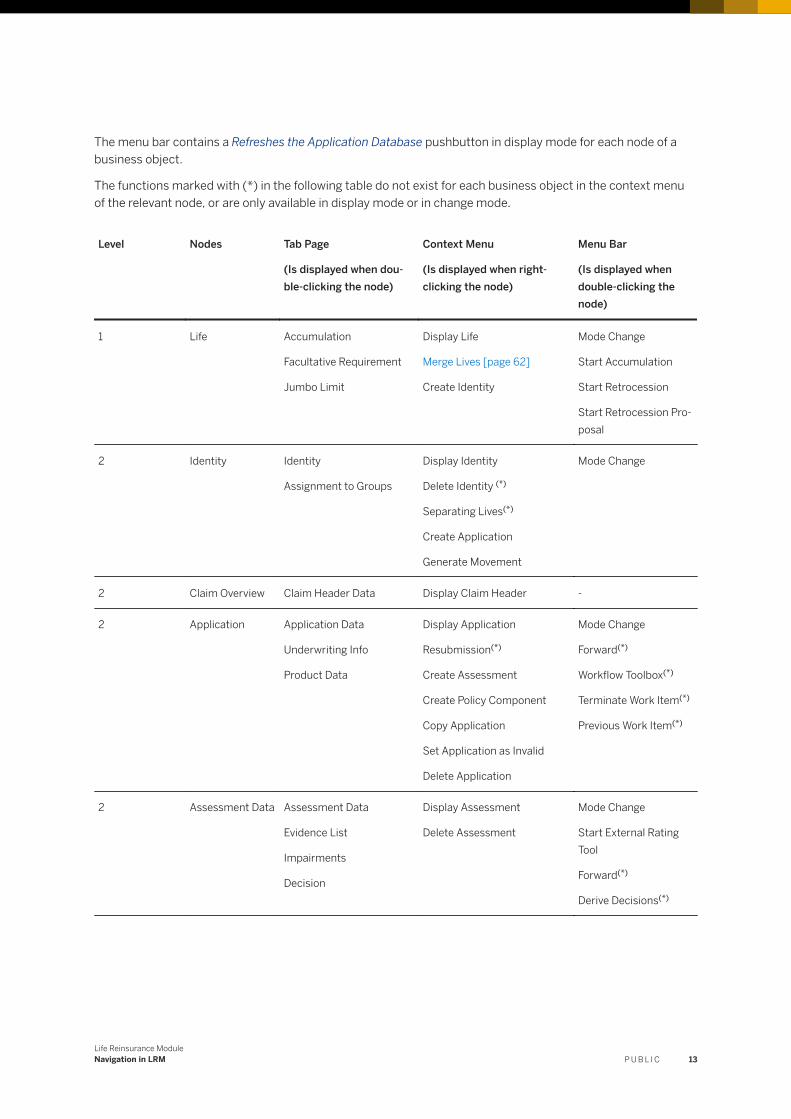
The menu bar contains a Refreshes the Application Database pushbutton in display mode for each node of a business object.
The functions marked with (*) in the following table do not exist for each business object in the context menu of the relevant node, or are only available in display mode or in change mode.
Level Nodes Tab Page
(Is displayed when double-clicking the node)
Context Menu
(Is displayed when right-clicking the node)
Menu Bar
(Is displayed when double-clicking the node)
1 Life Accumulation
Facultative Requirement
Jumbo Limit
Display Life
Merge Lives [page 62]
Create Identity
Mode Change
Start Accumulation
Start Retrocession
Start Retrocession Proposal
2 Identity Identity
Assignment to Groups
Display Identity
Delete Identity (*)
Separating Lives(*)
Create Application
Generate Movement
Mode Change
2 Claim Overview Claim Header Data Display Claim Header -
2 Application Application Data
Underwriting Info
Product Data
Display Application
Resubmission(*)
Create Assessment
Create Policy Component
Copy Application
Set Application as Invalid
Delete Application
Mode Change
Forward(*)
Workflow Toolbox(*)
Terminate Work Item(*)
Previous Work Item(*)
2 Assessment Data Assessment Data
Evidence List
Impairments
Decision
Display Assessment
Delete Assessment
Mode Change
Start External Rating Tool
Forward(*)
Derive Decisions(*)
Life Reinsurance ModuleNavigation in LRM P U B L I C 13

Level Nodes Tab Page
(Is displayed when double-clicking the node)
Context Menu
(Is displayed when right-clicking the node)
Menu Bar
(Is displayed when double-clicking the node)
3 Policy Component (Application)
Policy Component Data
Options
Display Policy Components
Create Insured Person
Create Assumed Policy Component Share
Delete Policy Component
Mode Change
msg.PMQ Call
3 Insured Person (Application)
Insured Person Display Insured Person
Delete Insured Person
Create Assessment
Mode Change
msg.PMQ Call
4 Policy Component Share (Application)
Policy Component Share Data
Processing Data
Period Values
Conditions
Calculation Bases
Display Policy Component Share
Delete Policy Component Share
Create Retro Assignment
Create Insured Person Share
Mode Change
2 Policy Policy Data Display Policy
Delete Policy
Mode Change
3 Policy Component
Policy Component Data
Options
Escalations
Processing Data
History
Display Policy Component
Generate Movement
-
3 Insured Person Insured Person
Loadings
Display Insured Person
Create Claim Movement
Create Claim Fast Entry
-
3 Insured Person (with Claim)
Insured Person
Reinsurance Claim Data
Loadings
Display Insured Person
Create Claim Movement
Create Claim Fast Entry
-
14 P U B L I CLife Reinsurance Module
Navigation in LRM
Level Nodes Tab Page
(Is displayed when double-clicking the node)
Context Menu
(Is displayed when right-clicking the node)
Menu Bar
(Is displayed when double-clicking the node)
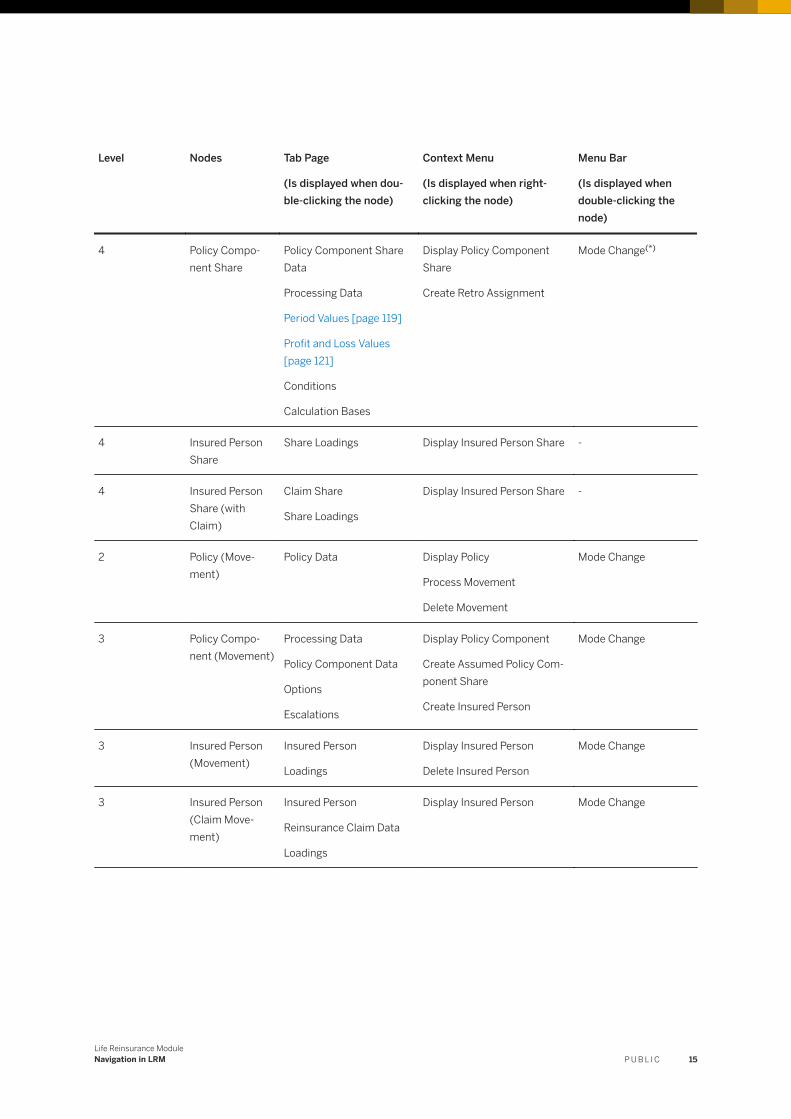
4 Policy Component Share
Policy Component Share Data
Processing Data
Period Values [page 119]
Profit and Loss Values [page 121]
Conditions
Calculation Bases
Display Policy Component Share
Create Retro Assignment
Mode Change(*)
4 Insured Person Share
Share Loadings Display Insured Person Share -
4 Insured Person Share (with Claim)
Claim Share
Share Loadings
Display Insured Person Share -
2 Policy (Movement)
Policy Data Display Policy
Process Movement
Delete Movement
Mode Change
3 Policy Component (Movement)
Processing Data
Policy Component Data
Options
Escalations
Display Policy Component
Create Assumed Policy Component Share
Create Insured Person
Mode Change
3 Insured Person (Movement)
Insured Person
Loadings
Display Insured Person
Delete Insured Person
Mode Change
3 Insured Person (Claim Movement)
Insured Person
Reinsurance Claim Data
Loadings
Display Insured Person Mode Change
Life Reinsurance ModuleNavigation in LRM P U B L I C 15

Level Nodes Tab Page
(Is displayed when double-clicking the node)
Context Menu
(Is displayed when right-clicking the node)
Menu Bar
(Is displayed when double-clicking the node)
4 Policy Component Share (Movement)
Policy Component Share Data
Processing Data
Period Values
Profit and Loss Values
Conditions
Calculation Bases
Display Policy Component Share
Delete Policy Component Share
Create Insured Person Share
Mode Change
4 Insured Person Share (Movement)
Share Loadings Display Insured Person Share
Delete Insured Person Share
Mode Change
4 Insured Person Share (Claim Movement)
Claim Share
Share Loadings
Display Insured Person Share
Delete Insured Person Share - Mode Change
Mode Change
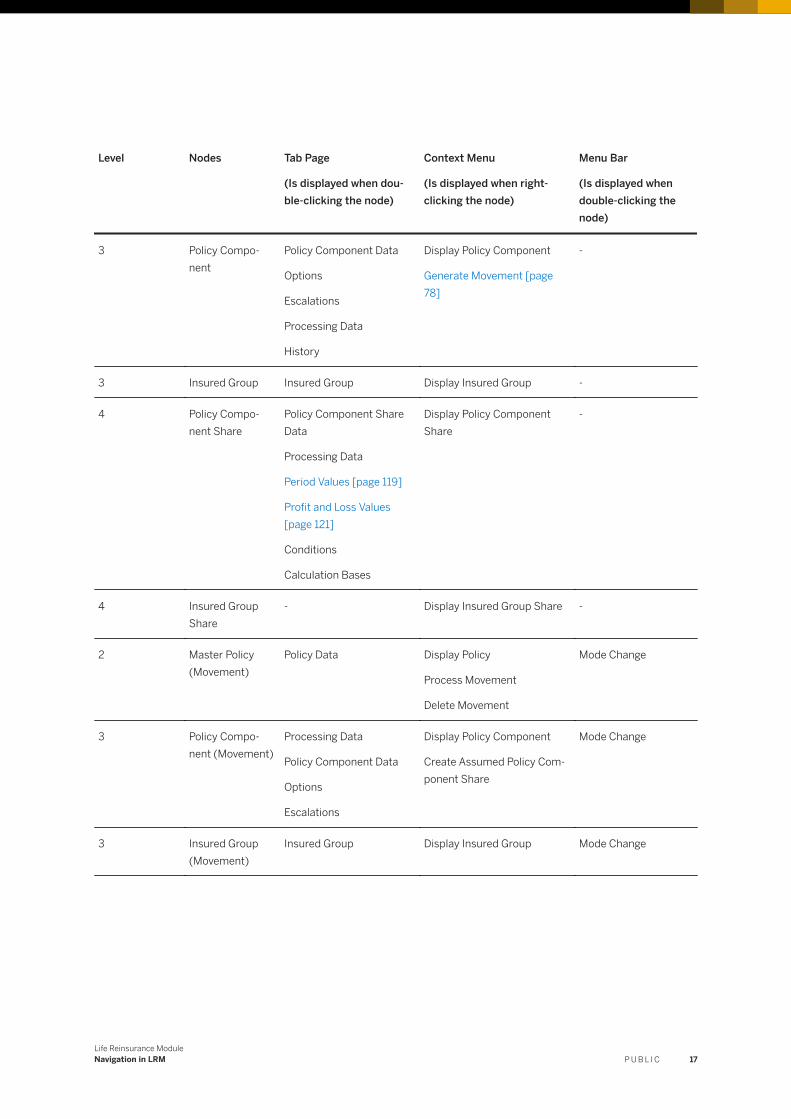
The following table displays the hierarchical structure of the navigation tree for a group risk in LRM. Each node in the navigation tree has its own tab pages, context menus and an individual menu bar. The menu bar contains a Refreshes the Application Database pushbutton in display mode for each node of a business object.
Level Nodes Tab Page
(Is displayed when double-clicking the node)
Context Menu
(Is displayed when right-clicking the node)
Menu Bar
(Is displayed when double-clicking the node)
1 Life Accumulation
Facultative Requirement
Jumbo Limit
Display Life Mode Change
Start Accumulation
Start Retrocession
Start Retrocession Proposal
2 Identity Group
Assigned Identities
Display Group
Generate Movement
Mode Change
2 Master Policy Policy Data Display Policy Mode Change
16 P U B L I CLife Reinsurance Module
Navigation in LRM
Level Nodes Tab Page
(Is displayed when double-clicking the node)
Context Menu
(Is displayed when right-clicking the node)
Menu Bar
(Is displayed when double-clicking the node)
3 Policy Component
Policy Component Data
Options
Escalations
Processing Data
History
Display Policy Component
Generate Movement [page 78]
-
3 Insured Group Insured Group Display Insured Group -
4 Policy Component Share
Policy Component Share Data
Processing Data
Period Values [page 119]
Profit and Loss Values [page 121]
Conditions
Calculation Bases
Display Policy Component Share
-
4 Insured Group Share
- Display Insured Group Share -
2 Master Policy (Movement)
Policy Data Display Policy
Process Movement
Delete Movement
Mode Change
3 Policy Component (Movement)
Processing Data
Policy Component Data
Options
Escalations
Display Policy Component
Create Assumed Policy Component Share
Mode Change
3 Insured Group (Movement)
Insured Group Display Insured Group Mode Change
Life Reinsurance ModuleNavigation in LRM P U B L I C 17
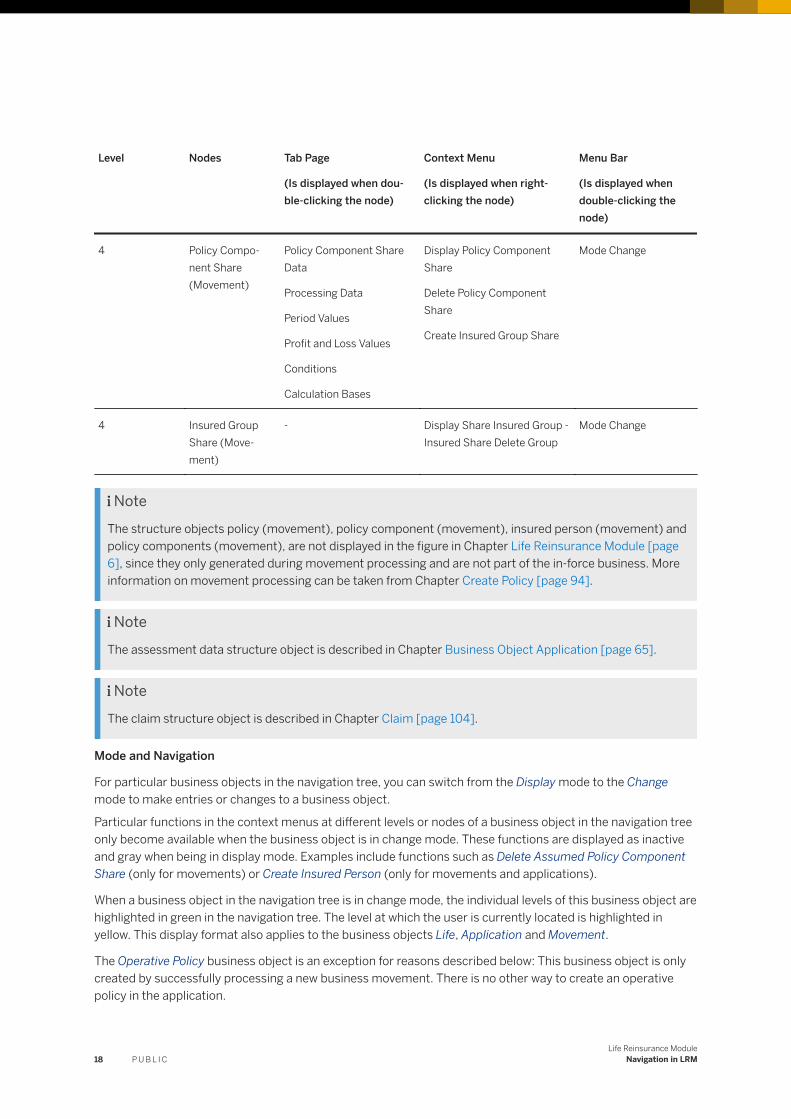
Level Nodes Tab Page
(Is displayed when double-clicking the node)
Context Menu
(Is displayed when right-clicking the node)
Menu Bar
(Is displayed when double-clicking the node)
4 Policy Component Share (Movement)
Policy Component Share Data
Processing Data
Period Values
Profit and Loss Values
Conditions
Calculation Bases
Display Policy Component Share
Delete Policy Component Share
Create Insured Group Share
Mode Change
4 Insured Group Share (Movement)
- Display Share Insured Group - Insured Share Delete Group
Mode Change
NoteThe structure objects policy (movement), policy component (movement), insured person (movement) and policy components (movement), are not displayed in the figure in Chapter Life Reinsurance Module [page 6], since they only generated during movement processing and are not part of the in-force business. More information on movement processing can be taken from Chapter Create Policy [page 94].
NoteThe assessment data structure object is described in Chapter Business Object Application [page 65].
NoteThe claim structure object is described in Chapter Claim [page 104].
Mode and Navigation
For particular business objects in the navigation tree, you can switch from the Display mode to the Change mode to make entries or changes to a business object.
Particular functions in the context menus at different levels or nodes of a business object in the navigation tree only become available when the business object is in change mode. These functions are displayed as inactive and gray when being in display mode. Examples include functions such as Delete Assumed Policy Component Share (only for movements) or Create Insured Person (only for movements and applications).
When a business object in the navigation tree is in change mode, the individual levels of this business object are highlighted in green in the navigation tree. The level at which the user is currently located is highlighted in yellow. This display format also applies to the business objects Life, Application and Movement.
The Operative Policy business object is an exception for reasons described below: This business object is only created by successfully processing a new business movement. There is no other way to create an operative policy in the application.
18 P U B L I CLife Reinsurance Module
Navigation in LRM

Within the operative policy, you can only edit specific tab pages and levels. Levels in the navigation tree are not highlighted in green when being in change mode. Making changes to an operative policy is only permitted at the following levels and on the corresponding tab pages:
● Policy level: Assignment tab page to create assignments● Policy Component Share level: Tab pages Policy Component Share Data to enter consumed retention,
Period Values, Profit and Loss Values● Claim Assessment level: Changes are permitted in all available tab pages
For the business objects Life, Application and Movement, you always have the option to navigate to other business objects within the navigation tree or to look up values both during creation and when making changes.
When a business object is in change mode and you navigate to another business object, the system temporarily sets the business object to display mode. When you navigate back to the business object being edited, the system resets the business object to change mode in order to continue making changes.
CautionException: When you navigate in change mode from an application with current life X to a different insured person (life Y) of a policy (life switch takes place) by double-clicking, the application is automatically saved and set to display mode.
The following special features apply to the Operative Policy business object:
● When you are in change mode on one of the two tab pages at Policy Component Share level, you can only navigate to other tab pages at the same level after you have switched back to display mode. This restriction does not exist for the claim assessment level. You can edit all tab pages at this level.
● You can either navigate to another level within the same business object or to a different business object within the navigation tree.
● When you want to switch to another level, the system checks if you made changes. When changes have been made, a dialog box is displayed that triggers you to decide how to proceed with changes:○ Choose Save to save the changes having been made. You get to the level into which you want to switch.○ Choose Discard,to discard changes having been made. You get to the level into which you want to
switch.○ Choose Cancel. Changes having been made are retained. You return to the level at which you have
been before.The levels that you edited are changed to display mode after save or discard. When you want to return to this level, the level is not changed to change mode (unlike for the business objects Life, Application and Movement). You have to explicitly set this level to change mode.
● If you made changes at one of the two levels and then switch to the display mode by using the Change <-> Display pushbutton in the menu bar, the dialog window is also displayed (same behavior as described above.
● When you want to discard a business object that you created accidentally, proceed as described below:1. Switch to any level of any business object that is part of the current navigation tree.2. Choose Refreshes the Application Database. The new, not yet saved business object is removed from
the navigation tree by updating the data basis. Note that the system does not issue a query whether the changes should be saved or not. The system discards the business object, without issuing a query.
As an alternative, you can restart the application to discard a business object that you created accidentally.
Note that you cannot create further business objects as long as an object is in create or change mode within the current navigation tree. This only applies to business objects. You can always create subobjects within the current object.
Life Reinsurance ModuleNavigation in LRM P U B L I C 19
The following special features apply to the Application business object:
● For an application, you can also switch to change mode on the Application and Underwriting Assessment levels when the application has been completed from a business point of view (underwriting processing status set to “completed”). This way, you can retroactively correct certain fields.
● When you switch to another level or to a different business object, the standard process for saving changes becomes effective. You get to the dialog in which you are prompted if you want to save or not.
2.3 History Management for Policies and Applications
Use
LRM allows history management of business objects (policies and applications). The system saves levels of information of business objects. You can navigate into historical versions of a business object and display historic versions.
Features
You can display historical versions of business objects in LRM using the scroll function. To do so, arrow keys are available in the header area of the input masks of a policy or an application. You can use the left arrow key to switch to an existing, older version; use the right arrow key to switch to an existing, younger version, if applicable. The arrow keys for scrolling are available on all tab pages of the levels Policy, Policy Component, Insured Person, Policy Component Share, Insured Person Share, Underwriting Assessment and Claim Assessment. For policies, you can scroll using the effective date or the processing date, for applications you can only scroll using the processing date.
For a policy, the system displays the Result Status and Result Class fields in the corresponding header section at the Policy Component and Policy Component Share level. Each of these fields contain the result status and the result class for the historical version currently displayed. The system displays the result status of a historical version with an icon next to the Result Status field.
For more information about how result status and result class are determined for a historical version, see Chapter “Result Status and Result Class of a Historical Version”.
Displaying the History
In a policy, you can navigate within individual policy component versions and policy component share versions on the History tab page at policy component level. Use the field contents of the Level column of the Version History table to distinguish whether it is a policy component (“PC”) or a policy component share version (“PCS”).
The versions are displayed in chronological order based on the processing time (date and time). In contrast to historic scrolling, retroactive alterations can also be traced here, since all existing versions are listed.
You can differentiate the displayed versions using the processing times. Therefore, the system only displays policy component share versions, the processing time of which deviates from the processing time of the
20 P U B L I CLife Reinsurance Module
Navigation in LRM

corresponding policy component. If this is the case, you have to create an additional policy component share without making changes to the policy component itself.
The status at the processing time of selected line entry is loaded when you double-click one of the displayed versions. In this case, the navigation tree is completely restructured. The currently loaded version is highlighted in blue in the history display. If you select a policy component share version by double-clicking it, the system loads the corresponding policy component version with the processing time of the selected version. When you historically scroll using the arrow keys or select a particular policy component version or policy component share version by double-click, the system adjusts the line selection in the Version History table.
For each displayed policy component version and policy component share version, the system displays the Result Status and the Result Class of this version, among other information. For more information about how Result Status and Result Class are determined, see Result Status and Result Class of a historic version.
In the Assigned Log Messages table, the system displays all messages that are assigned to the currently selected historical version under the table with the historical versions. When you switch versions either through historical scrolling or by double-clicking a specific policy component version or policy component share version, the system updates the table with the assigned messages.
For each message, the table contains the following columns:
● MsgType (Message Type)● Problem Class● Entity Name● Field Assigned to a Message● Msg No (Message Number)● Message Class● Message Text● Long Text of the message● ValChkNo. (Number of the validation check)● Validation Check Text● Area Description
The system display the Message Type using an icon. If a message is not self-explanatory, you can call the long text for this message by choosing the question mark icon in the Long Text column. The system only displays the validation check number and the validation check text if the system generated the message as a result of a validation check.
Result Status and Result Class of a Historic Version
When the system generates a new policy component version or policy component share version during movement processing, it assigns all the log messages of the “Information” or “Warning” message types from business processes or validation checks to this version.
The system uses these assigned messages to determine the Result Status and the Result Class for the historic version. The assigned message with the highest error level and the highest Problem Class determines the Result Status and the Result Class of the version, as displayed in the following tables:
In this case, the settings of the validation check with number “9999” have the following affect on the system behavior described above.
● When the check is deactivated, the system does not save messages from the processes “Movement Processing”, “BIF Processing”, “PMQ” and “Rewinding at Business Objects”.
Life Reinsurance ModuleNavigation in LRM P U B L I C 21

● When the check is activated, the settings of the check determine which messages from the stated processes at business objects are saved.
Chapter LRM Validation Checks [page 175] contains further information on validation checks with the number “9999”.
Result Status Number of Messages of the “Information” type
Number of Messages of the “Warning” type
Number of Messages of the “Error” type
Number of Messages of the “Abort” type
Information ≥ 1 0 0 0
Warning ≥ 0 ≥ 1 0 0
Error ≥ 0 ≥ 0 ≥ 1 0
Cancelation ≥ 0 ≥ 0 ≥ 0 ≥ 1
Result Class Number of Messages with Problem Class “Additional Information”
Number of Messages with Problem Class “Middle”
Number of Messages with Problem Class “Important”
Number of Messages with Problem Class “Very Important”
Additional Information ≥ 1 0 0 0
Medium ≥ 0 ≥ 1 0 0
Important ≥ 0 ≥ 0 ≥ 1 0
Very Important ≥ 0 ≥ 0 ≥ 0 ≥ 1
2.4 Error Handling
Use
The validity of your entries is consecutively checked whilst entering data. In the event of an error, a message is displayed in the lower section of the screen. Validity checks are performed at the levels field, container and business object.
● The system performs field checks after each entry and before each screen change. The system checks whether you entered permissible values in the data fields on the current tab page.
● The system performs container checks before any switch of the navigation level in the business object model, before switching from policy to policy component, for example. The system checks the entries on the permissibility of the value combination.
● The system performs business object checks when saving or leaving the current business object. The system checks the settings in all fields on permissibility.
22 P U B L I CLife Reinsurance Module
Navigation in LRM

Result
● When the system determines a field error, it blocks the navigation until you have fixed the error by making changes to the entry. You cannot save the current business object.
● When the system determines a container error, it prevents you from leaving the level. The system only allows leaving the level until you changed the entries to a plausible status. You cannot save the current business object.
● When the system determines a business object error, it issues an error message. The business object is not saved. The system only allows saving when you changed the entries to a plausible status.
You can cancel editing the business object. However, this discards all previously made changes.
2.5 Authorization Checks
Use
Authorization checks are used to protect business objects or parts of business objects from being changed by unauthorized persons.
The used procedure (BP role or PD Org) for the authorization check does not need to be specified in general in LRM. In the Customizing, you can define the procedure that the system has to use for each individual responsibility or for each individual use of a responsibility. Proceed as described below:
1. You initially define responsibilities in the Customizing under Maintain Responsibilities without further information on the use.
2. In the Customizing under Maintain Used Responsibilities per Entity, you determine entities to which responsibilities are assigned. You can assign a responsibility to multiple business objects and in business objects to multiple entities.
3. In the Customizing under Maintain Validity of the Responsibilities per Entity and Action, you determine actions for which this responsibility can grant an authorization. In this case, actions are business transactions that are protected by an authorization check, such as displaying an object, for example.
Within LRM, authorization checks are performed at the following locations:
Authorization Checks during Searches
Authorization Check Call Description
Create Life pushbutton in the Search initial dialog You can only create a new life if you have been granted the authorization to create a new life.
Create Movement pushbutton in the Search initial dialog You can only create a new movement if you have been granted the authorization to create a policy or movement processing.
Life Reinsurance ModuleNavigation in LRM P U B L I C 23

Authorization Check Call Description
Display Critical Identity Data A special authorization is required to display all identity data in the entire system. If you have not been granted this special authorization, the following critical data is neither displayed in the search result nor in the identity display:
● Birthplace● Identification type (such as “Identification Card”)● Identifier (such as number of the Identification Card)● Address● Assignments to Groups
When the following conditions are met, the specified critical data is displayed:
● The identity is not linked to a policy or application.● The identity is linked to at least one policy or application
(as insured person) and the authorization to display a policy or application has been granted to your user (controlled by particular authorization objects using the company code).
Search results on the Life tab page When you open a life from the search result list, you only obtain search results from the corresponding policies, applications or movements if the authorization for the company code to which these policies, applications or movements are assigned has been granted to your user.
Search results on the Policies/Applications tab page You only obtain search results for policies, applications or movements (Movement Policies flag set) if the authorization for the company code to which these policies, applications or movements are assigned has been granted to your user.
Search results on the Claims tab page You only obtain search results for claims if the authorization for the company code to which the claims are assigned has been granted to your user.
Search results on the Claim Header tab page When you open a claim header from the search result list, you only obtain search results from the corresponding policies, applications or movements if the authorization for the company code to which these policies and movements, and thus this claim, are assigned has been granted to your user.
Search results on the Data Transmission tab page You can only display a data transmission if the authorization to the company code to which the data transmission is assigned has been granted to your user.
Search results on the Movements tab page You can only display a movement if the authorization to the company code to which the movement is assigned has been granted to your user.
24 P U B L I CLife Reinsurance Module
Navigation in LRM
Authorization Check Call Description
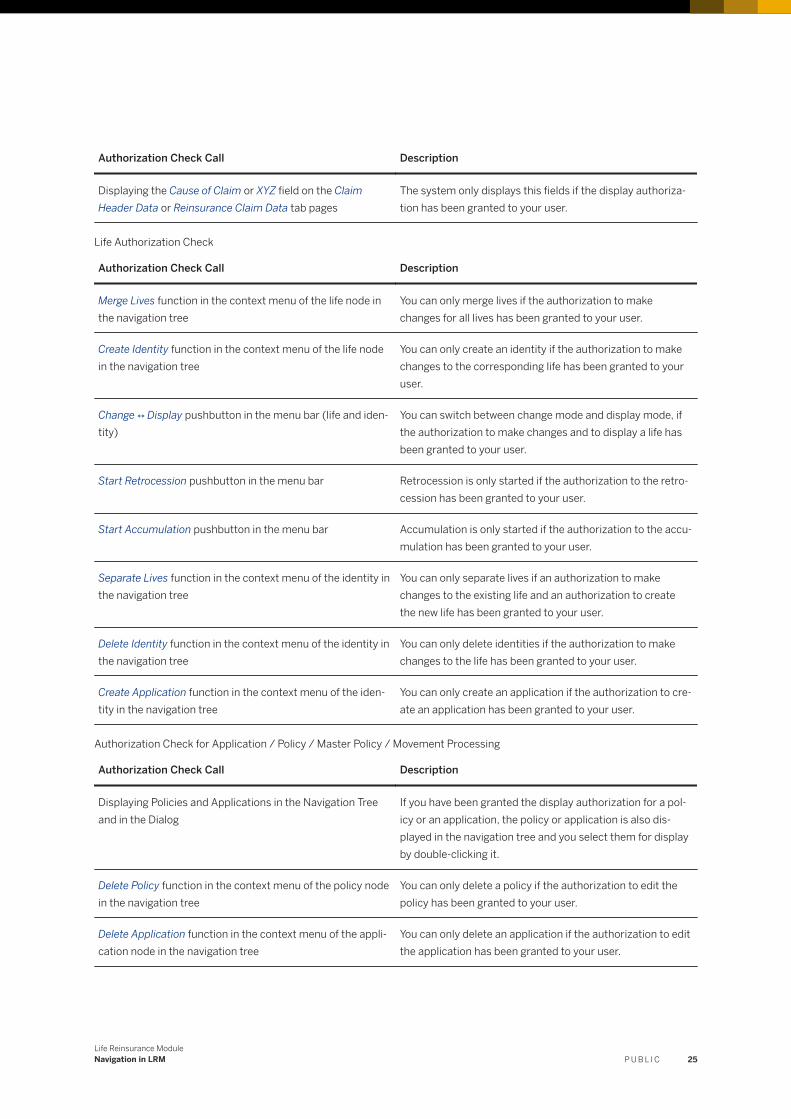
Displaying the Cause of Claim or XYZ field on the Claim Header Data or Reinsurance Claim Data tab pages
The system only displays this fields if the display authorization has been granted to your user.
Life Authorization Check
Authorization Check Call Description
Merge Lives function in the context menu of the life node in the navigation tree
You can only merge lives if the authorization to make changes for all lives has been granted to your user.
Create Identity function in the context menu of the life node in the navigation tree
You can only create an identity if the authorization to make changes to the corresponding life has been granted to your user.
Change ↔ Display pushbutton in the menu bar (life and identity)
You can switch between change mode and display mode, if the authorization to make changes and to display a life has been granted to your user.
Start Retrocession pushbutton in the menu bar Retrocession is only started if the authorization to the retrocession has been granted to your user.
Start Accumulation pushbutton in the menu bar Accumulation is only started if the authorization to the accumulation has been granted to your user.
Separate Lives function in the context menu of the identity in the navigation tree
You can only separate lives if an authorization to make changes to the existing life and an authorization to create the new life has been granted to your user.
Delete Identity function in the context menu of the identity in the navigation tree
You can only delete identities if the authorization to make changes to the life has been granted to your user.
Create Application function in the context menu of the identity in the navigation tree
You can only create an application if the authorization to create an application has been granted to your user.
Authorization Check for Application / Policy / Master Policy / Movement Processing
Authorization Check Call Description
Displaying Policies and Applications in the Navigation Tree and in the Dialog
If you have been granted the display authorization for a policy or an application, the policy or application is also displayed in the navigation tree and you select them for display by double-clicking it.
Delete Policy function in the context menu of the policy node in the navigation tree
You can only delete a policy if the authorization to edit the policy has been granted to your user.
Delete Application function in the context menu of the application node in the navigation tree
You can only delete an application if the authorization to edit the application has been granted to your user.
Life Reinsurance ModuleNavigation in LRM P U B L I C 25
Authorization Check Call Description
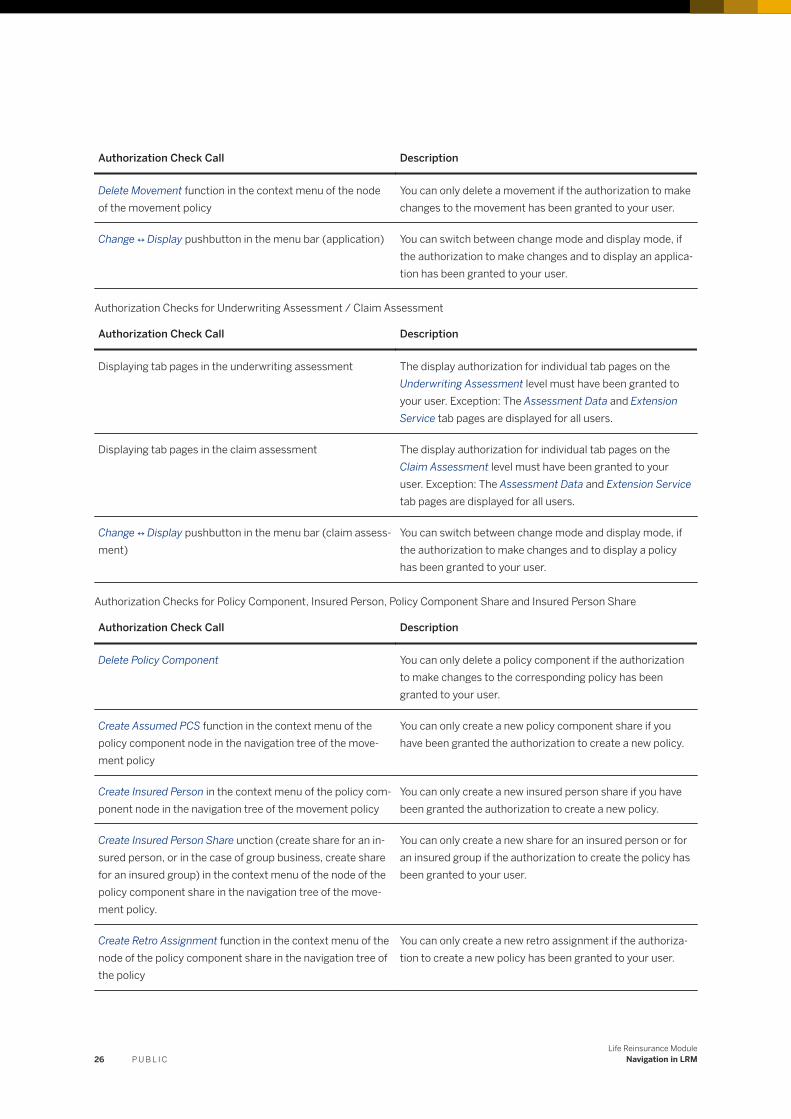
Delete Movement function in the context menu of the node of the movement policy
You can only delete a movement if the authorization to make changes to the movement has been granted to your user.
Change ↔ Display pushbutton in the menu bar (application) You can switch between change mode and display mode, if the authorization to make changes and to display an application has been granted to your user.
Authorization Checks for Underwriting Assessment / Claim Assessment
Authorization Check Call Description
Displaying tab pages in the underwriting assessment The display authorization for individual tab pages on the Underwriting Assessment level must have been granted to your user. Exception: The Assessment Data and Extension Service tab pages are displayed for all users.
Displaying tab pages in the claim assessment The display authorization for individual tab pages on the Claim Assessment level must have been granted to your user. Exception: The Assessment Data and Extension Service tab pages are displayed for all users.
Change ↔ Display pushbutton in the menu bar (claim assessment)
You can switch between change mode and display mode, if the authorization to make changes and to display a policy has been granted to your user.
Authorization Checks for Policy Component, Insured Person, Policy Component Share and Insured Person Share
Authorization Check Call Description
Delete Policy Component You can only delete a policy component if the authorization to make changes to the corresponding policy has been granted to your user.
Create Assumed PCS function in the context menu of the policy component node in the navigation tree of the movement policy
You can only create a new policy component share if you have been granted the authorization to create a new policy.
Create Insured Person in the context menu of the policy component node in the navigation tree of the movement policy
You can only create a new insured person share if you have been granted the authorization to create a new policy.
Create Insured Person Share unction (create share for an insured person, or in the case of group business, create share for an insured group) in the context menu of the node of the policy component share in the navigation tree of the movement policy.
You can only create a new share for an insured person or for an insured group if the authorization to create the policy has been granted to your user.
Create Retro Assignment function in the context menu of the node of the policy component share in the navigation tree of the policy
You can only create a new retro assignment if the authorization to create a new policy has been granted to your user.
26 P U B L I CLife Reinsurance Module
Navigation in LRM
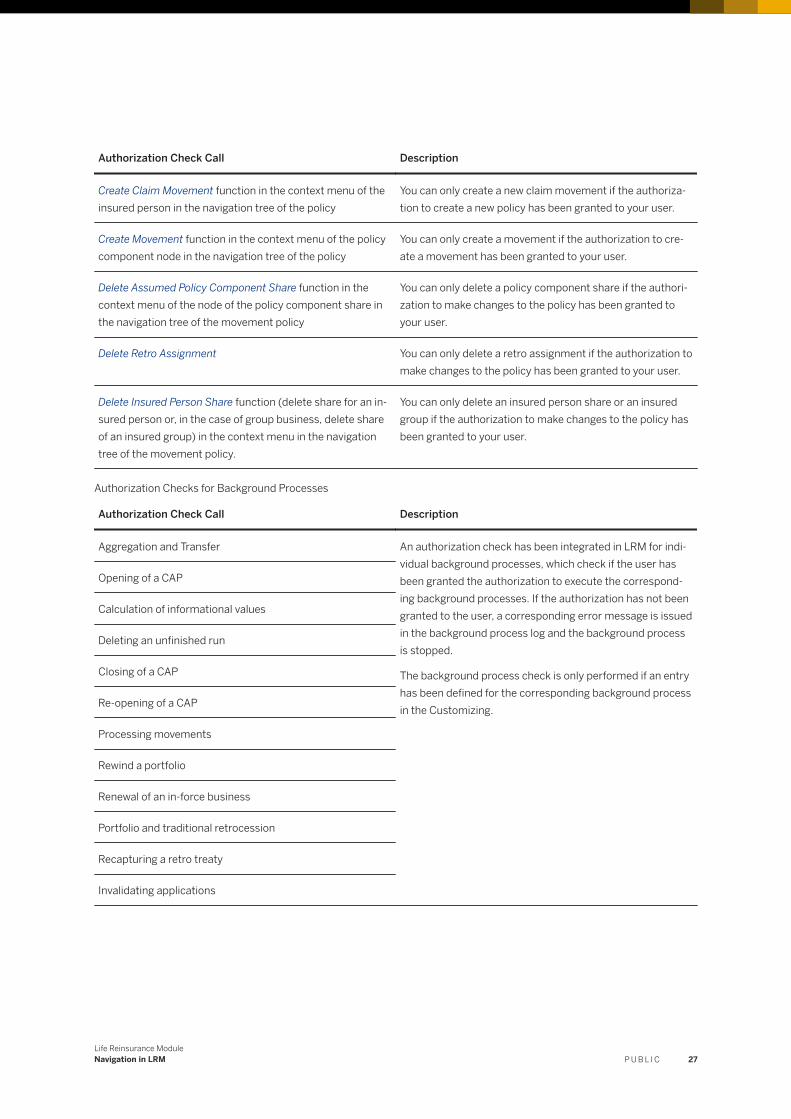
Authorization Check Call Description
Create Claim Movement function in the context menu of the insured person in the navigation tree of the policy
You can only create a new claim movement if the authorization to create a new policy has been granted to your user.
Create Movement function in the context menu of the policy component node in the navigation tree of the policy
You can only create a movement if the authorization to create a movement has been granted to your user.
Delete Assumed Policy Component Share function in the context menu of the node of the policy component share in the navigation tree of the movement policy
You can only delete a policy component share if the authorization to make changes to the policy has been granted to your user.
Delete Retro Assignment You can only delete a retro assignment if the authorization to make changes to the policy has been granted to your user.
Delete Insured Person Share function (delete share for an insured person or, in the case of group business, delete share of an insured group) in the context menu in the navigation tree of the movement policy.
You can only delete an insured person share or an insured group if the authorization to make changes to the policy has been granted to your user.
Authorization Checks for Background Processes
Authorization Check Call Description
Aggregation and Transfer An authorization check has been integrated in LRM for individual background processes, which check if the user has been granted the authorization to execute the corresponding background processes. If the authorization has not been granted to the user, a corresponding error message is issued in the background process log and the background process is stopped.
The background process check is only performed if an entry has been defined for the corresponding background process in the Customizing.
Opening of a CAP
Calculation of informational values
Deleting an unfinished run
Closing of a CAP
Re-opening of a CAP
Processing movements
Rewind a portfolio
Renewal of an in-force business
Portfolio and traditional retrocession
Recapturing a retro treaty
Invalidating applications
Life Reinsurance ModuleNavigation in LRM P U B L I C 27
Authorization Checks for DTA
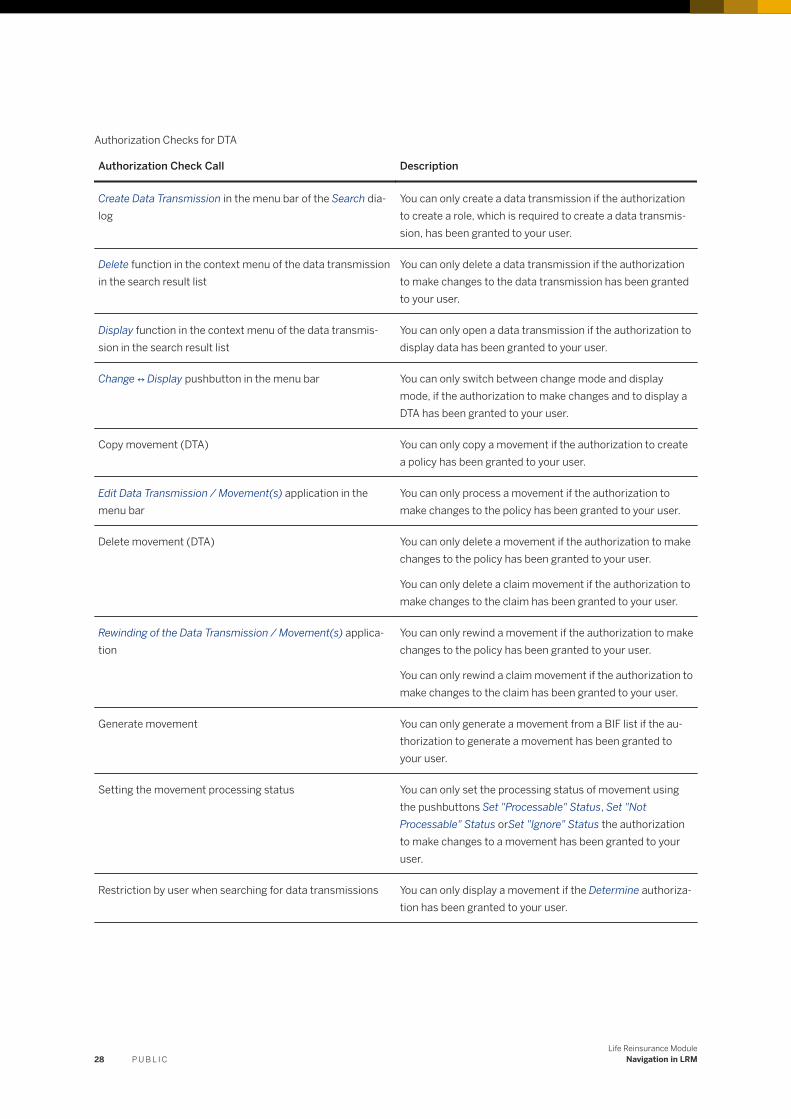
Authorization Check Call Description
Create Data Transmission in the menu bar of the Search dialog
You can only create a data transmission if the authorization to create a role, which is required to create a data transmission, has been granted to your user.
Delete function in the context menu of the data transmission in the search result list
You can only delete a data transmission if the authorization to make changes to the data transmission has been granted to your user.
Display function in the context menu of the data transmission in the search result list
You can only open a data transmission if the authorization to display data has been granted to your user.
Change ↔ Display pushbutton in the menu bar You can only switch between change mode and display mode, if the authorization to make changes and to display a DTA has been granted to your user.
Copy movement (DTA) You can only copy a movement if the authorization to create a policy has been granted to your user.
Edit Data Transmission / Movement(s) application in the menu bar
You can only process a movement if the authorization to make changes to the policy has been granted to your user.
Delete movement (DTA) You can only delete a movement if the authorization to make changes to the policy has been granted to your user.
You can only delete a claim movement if the authorization to make changes to the claim has been granted to your user.
Rewinding of the Data Transmission / Movement(s) application
You can only rewind a movement if the authorization to make changes to the policy has been granted to your user.
You can only rewind a claim movement if the authorization to make changes to the claim has been granted to your user.
Generate movement You can only generate a movement from a BIF list if the authorization to generate a movement has been granted to your user.
Setting the movement processing status You can only set the processing status of movement using the pushbuttons Set "Processable" Status, Set "Not Processable" Status orSet "Ignore" Status the authorization to make changes to a movement has been granted to your user.
Restriction by user when searching for data transmissions You can only display a movement if the Determine authorization has been granted to your user.
28 P U B L I CLife Reinsurance Module
Navigation in LRM
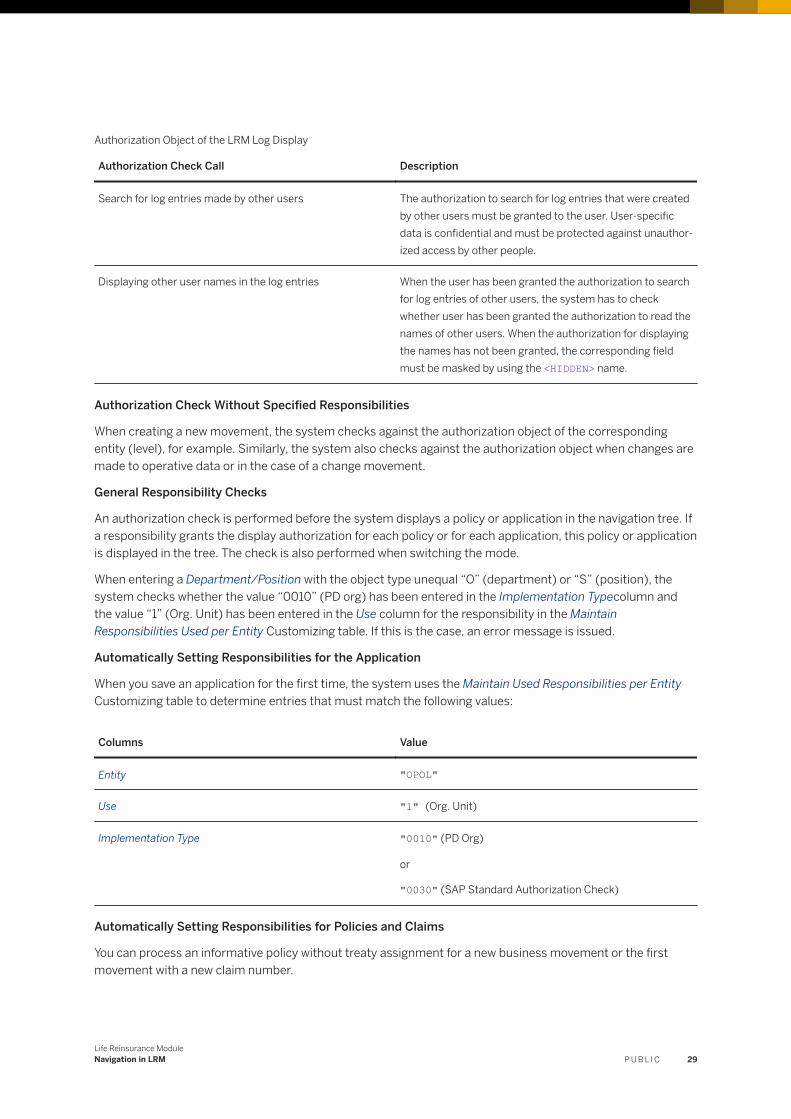
Authorization Object of the LRM Log Display
Authorization Check Call Description
Search for log entries made by other users The authorization to search for log entries that were created by other users must be granted to the user. User-specific data is confidential and must be protected against unauthorized access by other people.
Displaying other user names in the log entries When the user has been granted the authorization to search for log entries of other users, the system has to check whether user has been granted the authorization to read the names of other users. When the authorization for displaying the names has not been granted, the corresponding field must be masked by using the <HIDDEN> name.
Authorization Check Without Specified Responsibilities
When creating a new movement, the system checks against the authorization object of the corresponding entity (level), for example. Similarly, the system also checks against the authorization object when changes are made to operative data or in the case of a change movement.
General Responsibility Checks
An authorization check is performed before the system displays a policy or application in the navigation tree. If a responsibility grants the display authorization for each policy or for each application, this policy or application is displayed in the tree. The check is also performed when switching the mode.
When entering a Department/Position with the object type unequal “O” (department) or “S” (position), the system checks whether the value “0010” (PD org) has been entered in the Implementation Typecolumn and the value “1” (Org. Unit) has been entered in the Use column for the responsibility in the Maintain Responsibilities Used per Entity Customizing table. If this is the case, an error message is issued.
Automatically Setting Responsibilities for the Application
When you save an application for the first time, the system uses the Maintain Used Responsibilities per Entity Customizing table to determine entries that must match the following values:
Columns Value
Entity "OPOL"
Use "1" (Org. Unit)
Implementation Type "0010" (PD Org)
or
"0030" (SAP Standard Authorization Check)
Automatically Setting Responsibilities for Policies and Claims
You can process an informative policy without treaty assignment for a new business movement or the first movement with a new claim number.
Life Reinsurance ModuleNavigation in LRM P U B L I C 29
1. Checking the informative policy without treaty assignment:A few entries must be selected from the following Customizing tables before the check is performed:○ Maintain Responsibilities Used per Entity: The system reads all of the active entries with use "0001"
(Org. Unit) and entity “OPOL” (for policy) or “OCLAIM” (for claim) to determine the responsibility ID for the selection below and for the search.
○ Maintain Responsibility Mapping: The system determines all active entries that match the values in the Used Responsibilities per Entity Customizing table with the same responsibility ID.
For each responsibility ID that is determined, the system checks whether a corresponding entry exists in the responsibilities table at policy level (for new business movement) or at claim level (for the first movement with a new claim number).If this is not the case, movement processing is cancelled and you can manually enter the responsibilities ID and org. unit.
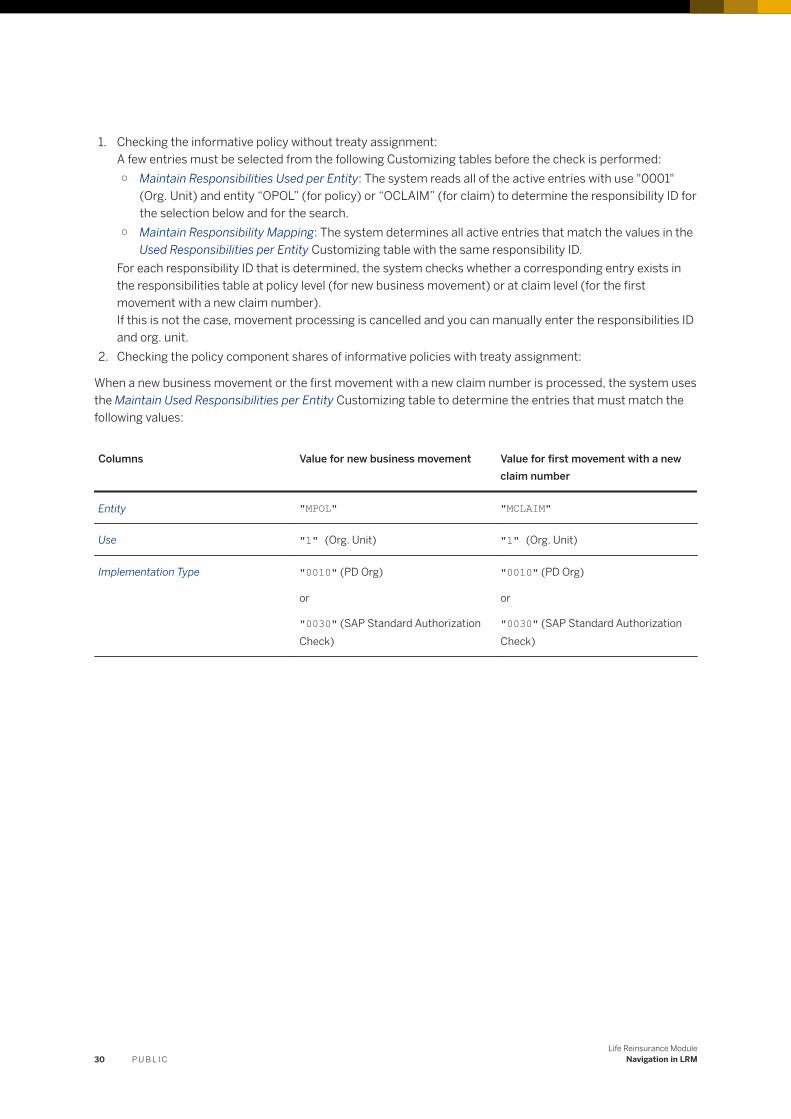
2. Checking the policy component shares of informative policies with treaty assignment:
When a new business movement or the first movement with a new claim number is processed, the system uses the Maintain Used Responsibilities per Entity Customizing table to determine the entries that must match the following values:
Columns Value for new business movement Value for first movement with a new claim number
Entity "MPOL" "MCLAIM"
Use "1" (Org. Unit) "1" (Org. Unit)
Implementation Type "0010" (PD Org)
or
"0030" (SAP Standard Authorization Check)
"0010" (PD Org)
or
"0030" (SAP Standard Authorization Check)
30 P U B L I CLife Reinsurance Module
Navigation in LRM

3 Integrating LRM into Other Components
The following connections must be established to other systems before single risks can be managed in LRM:
● Connection to the SAP business partner to enter information on the cedent, a possible retrocessionaire and on the ceded subproducts (see Chapter Connection to the SAP Business Partners [page 32])
● Connection to the FS-RI Basic System (see Chapter Connection to the FS-RI Basic System [page 50])● Integration of Product Engine msg.PMQ (see Chapter Integration of msg.PMQ [page 55])● Integration of Extension Service (see Chapter Integration of Extension Service [page 58]).
The figure below is the extension of the figure from Chapter Life Reinsurance Module [page 6] and displays the interaction of cedent and reinsurer under the aspect of the data model of LRM.
The figure is divided into four sections:
● Single Risk: This section contains all the information on a single risk in a hierarchical structure. This structure contains data on the insured period and its policies/applications. The following chapters contain information od the data structure:○ Business Object Life [page 60]○ Business Object Application [page 65]○ Business Object Policy [page 76]
● FS-RI Basic System: The Basic System manages information on the reinsurance treaty. The assignment of a policy to a reinsurance treaty is made using the Policy Component Share [page 233]. After a policy has
Life Reinsurance ModuleIntegrating LRM into Other Components P U B L I C 31
been assigned to a reinsurance treaty, the conditions for the policy are defined and thus, the calculation of period values is defined in msg.PMQ.
● Product Engine msg.PMQ: The plan data or data of the subplan code is assigned using the ceded product data or subproduct data of the Policy [page 233] and Policy Component [page 233]. Reinsurance relevant values (see Chapter Period Values [page 119]) that take into account conditions of the reinsurance treaty in msg.PMQ are calculated using this connection.
● Cedent: In this section, information on applications and policies delivered by the cedent are saved here.
3.1 Connection to the SAP Business Partners
Use
The “Cedent” LRM-specific role is required to use the business partner for single risk administration.
Information on creating new roles for a business partner can be found in SAP Business Partner General Information Create Business Partner .
In the “Cedent” role, you can enter all information from the perspective of the reinsurer. Among other things, you can assign ceded products or subproducts internal products or subproducts, which are used by the reinsurer.
Information such as calculation bases (see Chapter Entering Calculation Bases [page 42]) is used in LRM and msg.PMQ in the scope of single risk administration (usually as part of the movement processing, see Chapter Process Movement [page 78]).
How this information is managed is described in the following chapters:
● Entering Processing Information [page 33]● Entering Products [page 36]● Entering Scope of Data Transmission [page 44]● Entering Validation Checks [page 47]● Entering msg.PMQ Validation Checks [page 48]● Entering Fields with Value List [page 49]
Navigation in the Cedent Role
Starting point:
You have created a cedent in the “Cedent” role in the SAP business partner.
Procedure:
1. Within this role, choose the Reinsurance tab page. Choose the Product/Cession Administration pushbutton to switch to the Product/Cession Administration dialog.
2. You get to the first level of the product/cession administration. This level contains the following tab pages Processing Information, Products, Scope of Data Transmission, Validation Checks, msg.PMQ Validation Checks and Fields with Value List.
32 P U B L I CLife Reinsurance Module
Integrating LRM into Other Components
NoteNote that when you switch to the product/cession administration, the system retains the Display or Change mode in which you process a cedent and that you cannot make changes to the mode in the product/cession administration.
In the Create mode, you cannot switch from the business partner to the Product/Cession Administration.
Similar to the Business Partner, the work space (locator) is used in the Product/Cession Administration. As in the business partner, you can display, hide, minimize and maximize the work area.
If you select a different cedent in the work space within the Product/Cession Administration, the data of this cedent is loaded and you get to the Processing Information tab page in the Product/Cession Administration initial dialog.
3.1.1 Enter Processing Information
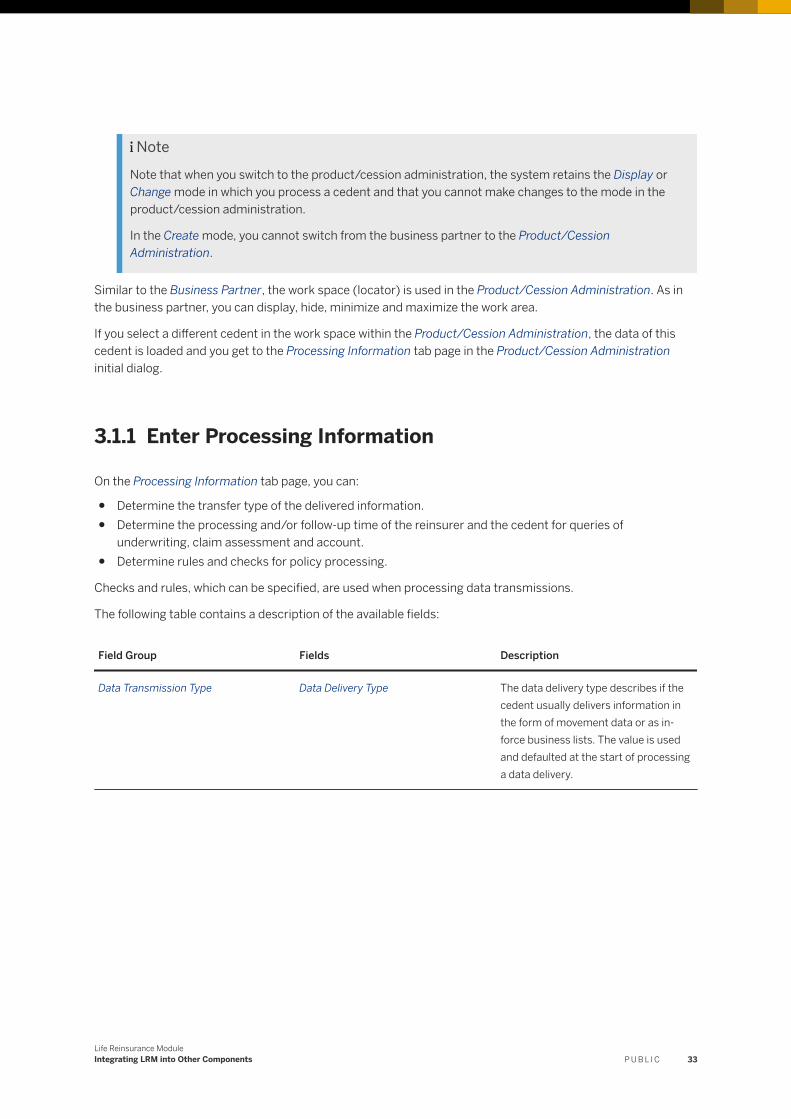
On the Processing Information tab page, you can:
● Determine the transfer type of the delivered information.● Determine the processing and/or follow-up time of the reinsurer and the cedent for queries of
underwriting, claim assessment and account.● Determine rules and checks for policy processing.
Checks and rules, which can be specified, are used when processing data transmissions.
The following table contains a description of the available fields:
Field Group Fields Description
Data Transmission Type Data Delivery Type The data delivery type describes if the cedent usually delivers information in the form of movement data or as in-force business lists. The value is used and defaulted at the start of processing a data delivery.
Life Reinsurance ModuleIntegrating LRM into Other Components P U B L I C 33

Field Group Fields Description
Follow Up Time Reinsurer
Follow Up Time Cedent
Underwriting
Claim Assessment
Account
Time Unit
Fields of this field group specify the processing or response time of the reinsurer and the cedent for inquiries of risk assessment, claim assessment and account. In this case, the response time of the reinsurer determines the period, such as annually or weekly, within which the reinsurer is to respond to inquiries of the cedent. The response time is specified individually for each query type (underwriting, claim assessment, account. You can choose the period from a selection list. Similar to the reinsurer’s response time, the cedent’s response time defines the period within which the cedent is to respond to the reinsurer's query. Here, you can also choose the period for each query type individually. Entries made here serve informational purposes.
Handling Business In-Force - In this field group, you enter rules and checks for policy processing. They are used when processing data transmissions.
- Determination of Alteration Date In this field, you choose the method for determining the alteration date for the different types of movement data (new business, reinstatement, change, lapse, expiry and renewal), if the cedent delivers in-force business lists and the alteration date needs to be determined.
34 P U B L I CLife Reinsurance Module
Integrating LRM into Other Components

Field Group Fields Description
- Preliminary Lapses
Period for Preliminary Lapses
Time Unit
In the Preliminary Lapses field, you determine whether preliminary or final lapses are created if a policy exists in the policy database but not in the in-force business list.
When you set the flag, the fields Period for Preliminary Lapses (period for preliminary lapses) and Time Unit. (time unit) are ready for entry so that you can specify a time unit for the corresponding period. In this period, lapses are treated as being preliminary.
When you do not set the flag in the Preliminary Lapses field, the fields Time of Preliminary Lapses and Time Unit are locked for entry. Existing values are deleted from both fields.
Compare Policies in Data Transmission - Portfolio
- You can choose from different options for further processing a policy or policy component. In this case, the policy or policy component from a data delivery is compared with the dataset.
- Both In-Force In this field, you can choose the movement to be generated if the policy component has the “In-Force” status in both the delivered in-force business list and in the database.
- Expired - In-Force In this field, you can choose the way in which expired policy components are to be further processed, if the policy component has the “In-Force” status in the in-force business list and the “Expired” status in the database.
Processing Control - In this field group, you enter rules and requirements for policy processing. They are used when processing data transmissions.
- Processing a Policy with Closed CAP Set the flag if a new business for this cedent is to be further processed in closed generations as well.
Life Reinsurance ModuleIntegrating LRM into Other Components P U B L I C 35

Field Group Fields Description
- Automatic Processing of Claim Set the flag if claims may be automatically processed.
- Management of Empty (Not Delivered) Entities
Set the flag if the cedent is to deliver only changed or all data structures for a change movement. By default, the system ignores empty entities.
- Claim Processing Choose the way in which the system is to behave when the reported amount of a claim and the calculated amount of the claim do not match. By default, the system cancels and issues an error message.
- Calculation Method for Pro-Rata Settlement Values
Choose the calculation method for proportional calculation of period-related period and P&L values. The following SAP standard calculation methods are available:
● “360-day method ” (all months have 30 days)
● “365-day method” (each day, including leap days)
● “m+act” (entire months are used with 30 days for calculation, the number of remaining days is added)
- Effect of Missing Policy Choose if the system is to generate an artificial policy or error message when the data transmissions contains a policy but this policy is not saved in the database. By default, the system generates an error message.
3.1.2 Entering Products
Use
The Products tab page and its subordinate levels contain all the information on ceded life insurance products and the calculation bases in particular:
● Entering Additional Data for Products [page 39]
36 P U B L I CLife Reinsurance Module
Integrating LRM into Other Components
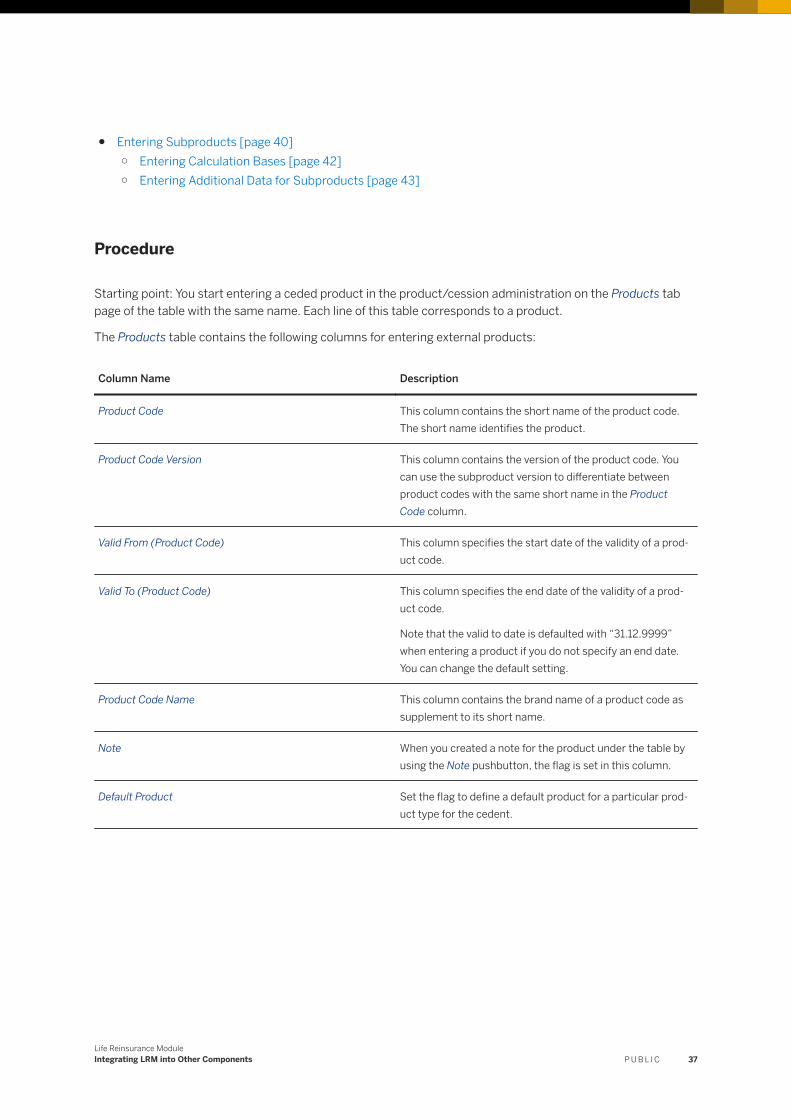
● Entering Subproducts [page 40]○ Entering Calculation Bases [page 42]○ Entering Additional Data for Subproducts [page 43]
Procedure
Starting point: You start entering a ceded product in the product/cession administration on the Products tab page of the table with the same name. Each line of this table corresponds to a product.
The Products table contains the following columns for entering external products:
Column Name Description
Product Code This column contains the short name of the product code. The short name identifies the product.
Product Code Version This column contains the version of the product code. You can use the subproduct version to differentiate between product codes with the same short name in the Product Code column.
Valid From (Product Code) This column specifies the start date of the validity of a product code.
Valid To (Product Code) This column specifies the end date of the validity of a product code.
Note that the valid to date is defaulted with “31.12.9999” when entering a product if you do not specify an end date. You can change the default setting.
Product Code Name This column contains the brand name of a product code as supplement to its short name.
Note When you created a note for the product under the table by using the Note pushbutton, the flag is set in this column.
Default Product Set the flag to define a default product for a particular product type for the cedent.
Life Reinsurance ModuleIntegrating LRM into Other Components P U B L I C 37
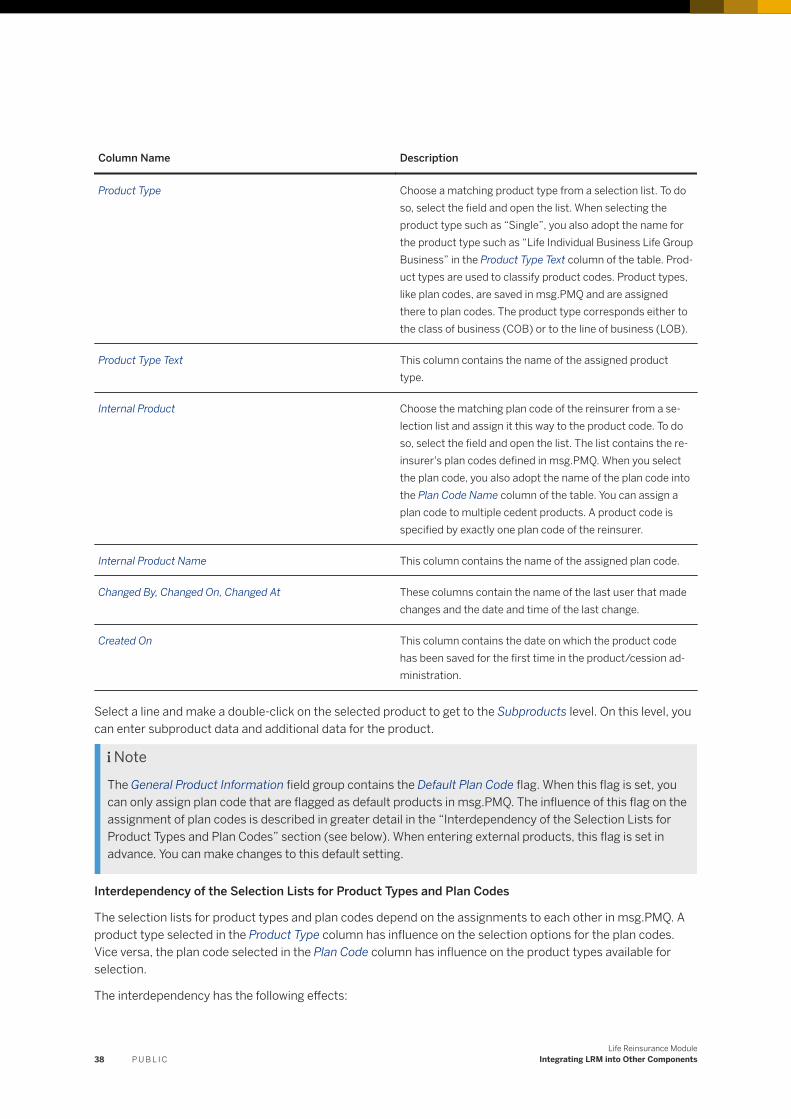
Column Name Description
Product Type Choose a matching product type from a selection list. To do so, select the field and open the list. When selecting the product type such as “Single”, you also adopt the name for the product type such as “Life Individual Business Life Group Business” in the Product Type Text column of the table. Product types are used to classify product codes. Product types, like plan codes, are saved in msg.PMQ and are assigned there to plan codes. The product type corresponds either to the class of business (COB) or to the line of business (LOB).
Product Type Text This column contains the name of the assigned product type.
Internal Product Choose the matching plan code of the reinsurer from a selection list and assign it this way to the product code. To do so, select the field and open the list. The list contains the reinsurer's plan codes defined in msg.PMQ. When you select the plan code, you also adopt the name of the plan code into the Plan Code Name column of the table. You can assign a plan code to multiple cedent products. A product code is specified by exactly one plan code of the reinsurer.
Internal Product Name This column contains the name of the assigned plan code.
Changed By, Changed On, Changed At These columns contain the name of the last user that made changes and the date and time of the last change.
Created On This column contains the date on which the product code has been saved for the first time in the product/cession administration.
Select a line and make a double-click on the selected product to get to the Subproducts level. On this level, you can enter subproduct data and additional data for the product.
NoteThe General Product Information field group contains the Default Plan Code flag. When this flag is set, you can only assign plan code that are flagged as default products in msg.PMQ. The influence of this flag on the assignment of plan codes is described in greater detail in the “Interdependency of the Selection Lists for Product Types and Plan Codes” section (see below). When entering external products, this flag is set in advance. You can make changes to this default setting.
Interdependency of the Selection Lists for Product Types and Plan Codes
The selection lists for product types and plan codes depend on the assignments to each other in msg.PMQ. A product type selected in the Product Type column has influence on the selection options for the plan codes. Vice versa, the plan code selected in the Plan Code column has influence on the product types available for selection.
The interdependency has the following effects:
38 P U B L I CLife Reinsurance Module
Integrating LRM into Other Components
● When you selected a plan code in the Plan Code column, the selection list for product types only contains product types that are assigned to the selected plan code in msg.PMQ.
● If you have not yet selected a plan code in the Plan Code column, the selection list for product types contains all the product types that are defined for all plan codes in msg.PMQ.
● When you selected a product type in the Product Type column, before having selected a plan code in the Plan Code column, the selection list for plan codes only contains the plan codes for selection that match the selected product type.
● If you have not yet selected a product type in the Product Type column, the selection list for plan codes contains all plan codes defined in msg.PMQ.
The following restriction exist for the selection list of plan codes in the Plan Code column:
If you set the Default Internal Product flag in the General Product Information field group on the Products tab page, the selection list for plan codes only contains those plan codes for selection that have defined as default product in msg.PMQ and that match to the product type selected in the Product Type column.
If you have not set the Default Internal Product flag in the General Product Information field group, the selection list for plan codes contains all plan codes defined in msg.PMQ for selection that match the product type selected in the Product Type column. In this case, this are plan codes that have been defined as default product in msg.PM and plan codes for which the default product flag has not been set in msg.PMQ.
3.1.2.1 Entering Additional Product Data
Use
You can assign additional attributes to a product on the Additional Product Data tab page. The attributes are assigned in the Customizing to the Additional Product Data application area and to Plan Code in PMQ. You selected this plan code on the Products tab page.
You can make a default setting for the use of the selected attribute in single risk administration and determine a default value for this attribute. The default value is adopted according to the determined use in single risk administration when creating a new policy and serves only informational purposes in the product/cession administration. You can make changes to the adopted value in single risk administration depending on the preset use.
Procedure
In the product/cession administration, switch to the Additional Product Data tab page as described below:
1. Select a line from the table on the Products tab page.2. Choose the selected product by double-clicking the line. You get to the Product/Cession Adm. - Display
Product on the Subproducts tab page.3. Switch to the Additional Product Data tab page.
Life Reinsurance ModuleIntegrating LRM into Other Components P U B L I C 39

Make the default settings of the attributes for single risk administration as described below:
1. Click the first field in the Attribute Number column. The system displays a selection list with values. Choose the relevant value. The corresponding value for the Attribute column is also adopted in the table.
2. If the attribute depends on the company code, choose a company code and confirm the selection.3. In the Attribute Usage column, choose from a selection list if the corresponding attribute in single risk
administration is to be used as a “Fixed Value”, “Default Value” or “For Information”.4. Choose a default value in the Value column. The entry for the text of the value is also adopted into the Value
Text column. You can enter a free text for information purposes in the Information column.
Enter further attributes in the next lines as described in item 1 to 4.
Result
For the use as “Fixed Value” and “Default Value”, the system takes the entries made here into consideration in single risk administration.
3.1.2.2 Entering Subproducts
Use
On the Subproducts tab page, you enter subproduct codes that belong to the product code, and assign a subplan code to this subproduct code. You selected the product code from the Products tab page.
Procedure
In the product/cession administration, switch to the Subproducts tab page as described below:
1. On the Products tab page, select a line entry from the table.2. Choose a product by double-clicking it. You get to the Subproducts tab page.
On the Subproducts tab page, you enter the subproduct codes for the selected product and assign them to an internal product. Each row of this table corresponds to a subproduct.
When entering subproducts, the columns Subproduct Code, Subproduct Name, Subproduct Version, Valid From and Valid To are defaulted for the first subproduct code using the corresponding values from the selected product code.
You can make changes to the default settings in the columns Subproduct Code, Subproduct Version and Valid From provided that no calculation bases have been entered for the subproduct or that the product code is not specified on the Data Transfer Product/Subproducts tab page. These fields are locked against changes when the data has been entered.
40 P U B L I CLife Reinsurance Module
Integrating LRM into Other Components
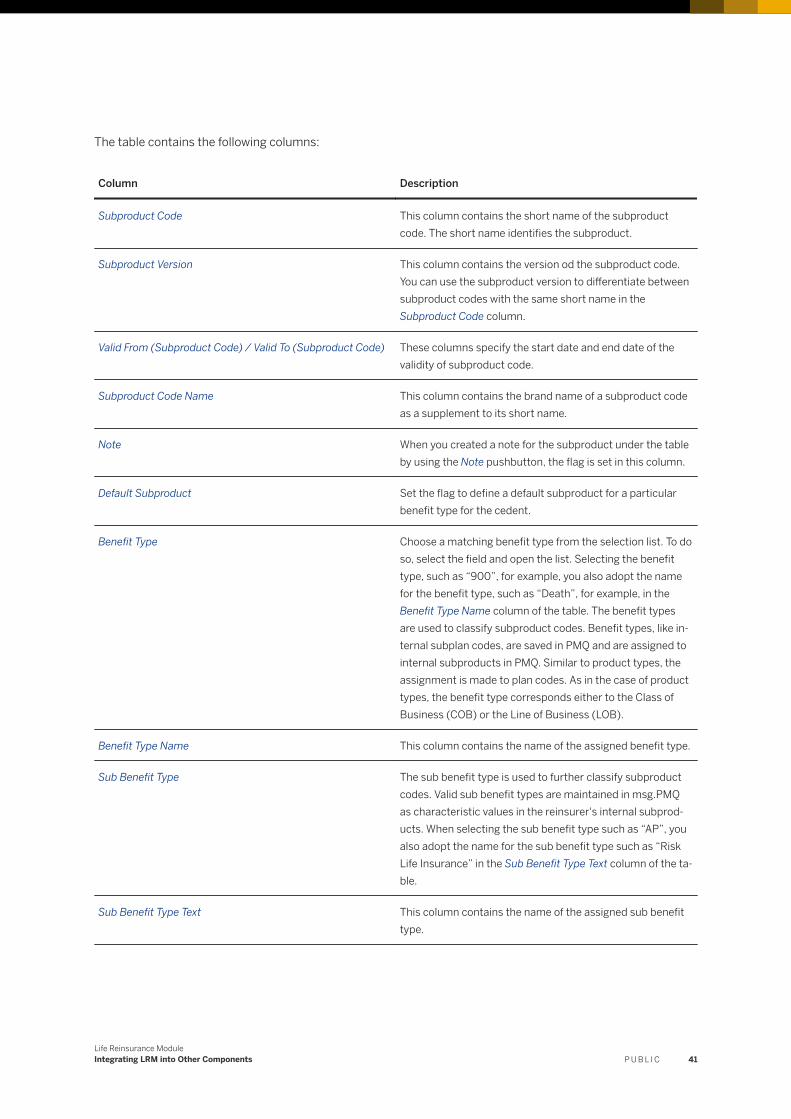
The table contains the following columns:
Column Description
Subproduct Code This column contains the short name of the subproduct code. The short name identifies the subproduct.
Subproduct Version This column contains the version od the subproduct code. You can use the subproduct version to differentiate between subproduct codes with the same short name in the Subproduct Code column.
Valid From (Subproduct Code) / Valid To (Subproduct Code) These columns specify the start date and end date of the validity of subproduct code.
Subproduct Code Name This column contains the brand name of a subproduct code as a supplement to its short name.
Note When you created a note for the subproduct under the table by using the Note pushbutton, the flag is set in this column.
Default Subproduct Set the flag to define a default subproduct for a particular benefit type for the cedent.
Benefit Type Choose a matching benefit type from the selection list. To do so, select the field and open the list. Selecting the benefit type, such as “900”, for example, you also adopt the name for the benefit type, such as “Death”, for example, in the Benefit Type Name column of the table. The benefit types are used to classify subproduct codes. Benefit types, like internal subplan codes, are saved in PMQ and are assigned to internal subproducts in PMQ. Similar to product types, the assignment is made to plan codes. As in the case of product types, the benefit type corresponds either to the Class of Business (COB) or the Line of Business (LOB).
Benefit Type Name This column contains the name of the assigned benefit type.
Sub Benefit Type The sub benefit type is used to further classify subproduct codes. Valid sub benefit types are maintained in msg.PMQ as characteristic values in the reinsurer's internal subproducts. When selecting the sub benefit type such as “AP”, you also adopt the name for the sub benefit type such as “Risk Life Insurance” in the Sub Benefit Type Text column of the table.
Sub Benefit Type Text This column contains the name of the assigned sub benefit type.
Life Reinsurance ModuleIntegrating LRM into Other Components P U B L I C 41

Column Description
Internal Subproduct Choose the matching subplan code of the reinsurer from a select list and assign it this way to the subproduct code. To do so, select the field and open the list. This list contains the subplan codes of the reinsurer that are assigned to the plan code in msg.PMQ, which you assigned to the selected product code in the Plan Code column on the Products tab page. When you adopt the subplan code, you also adopt the name of the subplan code into the Subplan Name column of the table. You can assign a subplan code to multiple subproduct codes. A subproduct code is specified by exactly one reinsurer internal subproduct.
Internal Subproduct Name This column contains the name of the assigned subplan code.
Changed By, Changed On, Changed At These columns contain the name of the last user that made changes and the date and time of the last change.
Created On This column contains the date on which the subproduct code has been saved for the first time in the product/cession administration.
Select the line entry of the generated subproduct. Double-click to get to the Calculation Bases (see Chapter Entering Calculation Bases [page 42]) tab page to enter calculation bases. Switch to the Additional Data for Subproducts tab page, to enter additional data for subproducts (see Chapter Additional Data for Subproducts [page 43]).
NoteThe assignment of benefit types to subplan codes in msg.PMQ has the same effect on the respective value helps in the product/cession administration as the assignment of product types to the plan codes (see Chapter Entering Products [page 36], section “Interdependency of the Input Help on the Product Type and Plan Codes”).
When you enter a benefit type into the Benefit Type column, this affects the number of subplan codes to be selected.
Otherwise, the selection of a subplan code in the Subplan Code column affects the number of available benefit types.
3.1.2.2.1 Entering Calculation Bases
Use
You can use the Calculation Bases tab page to enter calculation bases such as interest rate, probability table to be used (such as mortality table) and costs.
42 P U B L I CLife Reinsurance Module
Integrating LRM into Other Components
Procedure
You get to the Calculation Bases tab page, by selecting a line in the table on the Subproducts tab page, i.e. a plan code, in the product/cession administration and double-clicking it for further editing.
Specify the interest rate, array table name, age calculation method and age correction method in the corresponding fields in the Calculation Bases field group.
Selection lists are available for all other fields with the exception of the Interest Rate field. Values, which are available for selection, are defined in msg.PMQ and depend on the subplan code that you assigned on the Subproducts tab page.
In the fields of the Cost Rates and Bases field group, enter the following cost rates as decimals with their corresponding cost basis:
● Alpha costs● Alpha 1 costs● Beta costs● Gamma costs● Gamma 1 costs● Gamma 2 costs● Gamma 3 costs● Alpha gamma costs
A selection list is available for each field in the field group Cost Base. The values available for selection here, are also defined in msg.PMQ and depend on the assigned subplan code.
3.1.2.2.2 Entering Additional Subproduct Data
Use
You can assign additional attributes to a subproduct on the Additional Subproduct Data tab page. The attributes are assigned in the Customizing to the Additional Subproduct Data application area and to the subplan code in msg.PMQ. You selected this subproduct on the Subproducts tab page.
You can make a default setting for the use of the selected attribute in single risk administration and determine a default value for this attribute. The default value is adopted according to the determined use in single risk administration when creating a new policy and serves only informational purposes in the product/cession administration. You can make changes to the adopted value in single risk administration depending on the preset use.
Life Reinsurance ModuleIntegrating LRM into Other Components P U B L I C 43
Procedure
In the product/cession administration, switch to the Additional Subproduct Data tab page as described below:
1. Select a line from the table on the Subproducts tab page.2. Choose the selected subproduct by double-clicking the line. You get to the Product/Cession Adm. - Display
Subproducts dialog on the Calculation Bases tab page.3. Switch to the Additional Subproduct Data tab page.
Make the default settings of the attributes for single risk administration as described below:
1. In the first field, choose the corresponding value from a selection list in the Attribute Number column. The corresponding value for the Attribute column is also adopted in the table.
2. If the attribute depends on the company code, choose a company code and confirm the selection.3. In the Attribute Usage column, choose from a selection list if the corresponding attribute in single risk
administration is to be used as a “Fixed Value”, “Default Value” or “For Information”.4. Choose a default value in the Value column. The entry for the text of the value is also adopted into the Value
Text column. You can enter a free text for information purposes in the Information column.
Enter further attributes in the next lines as described in item 1 to 4.
Example
For the use as “Fixed Value” and “Default Value”, the system takes the entries made here into consideration in the single risk administration.
3.1.3 Entering Scope of Data Transmission
Use
You use the Scope of Data Transmission, tab page to determine the scope of data transmissions of the cedent to the reinsurer. Each data transmission from the cedent to the reinsurer affects a particular part of the dataset at the reinsurer. When the cedent delivers in-force business lists, it is important to know which part of the cedent data in the dataset of the reinsurer is affected.
This data is required to compare delivered and saved data.
You can find this tab page at the same level as the tab pages Processing Information and Products in the product/cession administration.
In the header area of this tab page, the number and the short description of the cedent are displayed similar to the header areas of the tab pages Processing Information and Products.
44 P U B L I CLife Reinsurance Module
Integrating LRM into Other Components
Procedure
The data transferred by the cedent may vary in their scope. You can determine the different scopes of the data deliveries in the control table in the product/cession administration. The table contains the following columns:
Column Description
Scope ID This column specifies the name (ID) of a data transfer scope that uniquely identifies this scope.
Scope Description You can describe the data transmission scope in more detail in this column.
Changed By, Changed On, Changed At These columns contain the name of the last user that made changes and the date and time of the last change.
Select the line that you previously created and double-click the data transmission scope to enter treaties, products, subproducts and the master policy, if required, that are affected by the selected data transmission. For more information, see Chapters:
● Entering Data Transmission Treaty [page 45]● Entering Product/Subproduct Data Transmission [page 46]● Entering Data Transmission Master Policies [page 46]
3.1.3.1 Entering Data Transmission Treaty
Use
You use the Data Transmission Treaty tab page to enter treaties of the cedent that, in the reinsurer's dataset, are affected by the selected data transmission.
Procedure
You determine the treaty numbers of the affected treaties in the table below:
Column Description
Treaty Number This column contains the number of the affected reinsurance treaty. Choose the treaty number from a selection list.
You get to the treaty management by double-clicking the treaty number. In the treaty management, you obtain information about data stored for this treaty.
Life Reinsurance ModuleIntegrating LRM into Other Components P U B L I C 45
Column Description
Treaty Name This column contains the treaty name. The entry is delivered when selecting the treaty number.
Section This column contains the number of the treaty section. Choose the number from a selection list.
Section Name This column contains the name of the treaty section. The entry is delivered when selecting the number of the treaty section.
Changed By, Changed by, Changed At Displays the name of the last user that made changes and the date and time of the last change.
3.1.3.2 Entering Product/Subproduct Data Transmission
Use
You can use the Data Transmission Product/Subproduct tab page to enter products and subproducts of the cedent that, in the reinsurer's dataset, are affected by the selected data transmission.
You can enter products and subproducts of the cedent that have already been specified and saved on the Products and Subproducts tab pages in the product/cession administration.
If you only specify one cedent, all cedent subproducts assigned to this cedent product are automatically included in the scope.
3.1.3.3 Entering Data Transmission Master Policies
Use
You use the Data Transmission Master Policy tab page to enter master policies of the cedent that are affected in the reinsurer's dataset by the selected data transmission.
NoteYou can also enter master policies that do not yet exist in the reinsurer's dataset. The consideration of the saved master policies is influenced by the setting in the field Data Transmission Category in the data transmission header data. To do this, you create a data transmission in single risk administration and choose the “Master Policies” value in the Data Transmission Category field on the Header Data tab page in the Create Data Transmission dialog.
46 P U B L I CLife Reinsurance Module
Integrating LRM into Other Components
3.1.4 Entering Validation Checks
Use
The Validation Checks tab page in the product/cession administration contains all adjustable LRM validation checks in a table. The different types of validation checks are described in detail in Chapter LRM Validation Checks [page 175].
For each check, you get the following information in a table:
Column Description
Validation Check Number This column contains the number of the validation check.
Validation Check Source This column contains the source of the validation check.
Name of Validation Check This column contains the name of the validation check.
Validation Check Deactivated This column contains the flag for a deactivated plausibility check.
Error Level This column contains the error level of the validation check.
Problem Class This column contains the problem class of the validation check.
Changed By, Changed On, Changed At
These columns contain the name of the last user that made changes and the date and time of the last change.
Created On This column contains the date on which the validation check has been saved for the first time in the product/cession administration.
The table on the Validation Checks tab page also contains the validation checks that have not been configured at the cedent (source of the check is unequal “1 – Cedent Default”). These are displayed in blue. You cannot make changes to the settings for these checks (error level, problem class, flag for deactivated validation check). The system determines and displays the most specific settings for these validation checks.
The value in the Validation Check Source column provides information on the source that the system used to derive the displayed settings. The following values are possible for the source:
Validation Check Source Description
“1 – Cedent Default” The check has been configured at the current cedent.
“2 – Company Code Default” The system derived the check settings from external Cus
tomizing msg.Life Reinsurance Module Basic Settings
Maintain Error Level per Company Code .
Life Reinsurance ModuleIntegrating LRM into Other Components P U B L I C 47
Validation Check Source Description
“3 – Customer Default” The system derived the check settings from external Cus
tomizing msg.Life Reinsurance Module Basic Settings
Maintain Customer Error Level .
“4 – LRM Default” The system derived the check settings from internal Cus
tomizing msg.Life Reinsurance Module – Internal Basic
Settings Maintain Validation Checks .
When selecting a company code in the Company Code field above the table, the system determines whether a standard setting exists at the level of the company code for a check.
When you make changes to the company code and confirm this by using the Enter pushbutton, the system updates the table with the validation checks.
You can use the Add Validation Check and Remove/Reset Validation Check pushbuttons to add or delete validation checks for the current cedent:
● Add Validation Check pushbuttonThe system adds all selected validation checks to the current cedent and displays them in black. You can make changes to the settings for these checks.
● Remove/Reset Validation Check pushbuttonThe system removes all selected validation checks from the current cedent, displays them in blue and with the most specific Customizing settings. You can no longer makes changes to the settings for these checks.
NoteThe system automatically logs all changes having been made to validation checks. You can display these changes by choosing the History Management pushbutton in the menu bar.
Use the Update Validation Checks per Cedent background program from the task list /MSG/LRM, to add, update or delete plausibility checks for several cedents.
3.1.5 Entering msg.PMQ Validation Checks
Use
You can make settings for validation checks on the msg.PMQ Validation Checks tab page in the product/cession administration. These checks are then run as user-defined algorithms for product data when msg.PMQ is called.
You set the default values for these validation checks in the Customizing under msg.Life Reinsurance Module – Internal Basic Settings Maintain Validation Checks . In the Customizing, you define the following settings:
● Validation check number
48 P U B L I CLife Reinsurance Module
Integrating LRM into Other Components
● Description class of the validation check● Description number of the validation check● Message class● Message number● Error level● Problem class● Flag for deactivated validation check● Validation check area● Validation check area number● Validation check area description
All msg.PMQ validation checks available in the Customizing are loaded when a new cedent is created and the product/cession administration is opened for the first time. You can make changes to the adopted settings for error level, problem class and the flag for a deactivated check.
You can load checks that you newly added in the Customizing in existing cedents by using the Update pushbutton.
You can track any changes made to settings for the validation check using the History Management pushbutton.
Use the Update Validation Checks per Cedent background program from the task list /MSG/LRM, to add, update or delete msg.PM-validation checks for several cedents.
The settings saved in the product/cession administration for the checks are transferred each time msg.PMQ is called.
When processing individual movements or movement groups, you can make changes to the Movement Processing background process without having to change the settings in the product/cession administration.
3.1.6 Entering Fields with Value List
Use
On the Fields with Value List tab page in the product/cession administration, you can assign external characteristic values of numerous LRM-specific attributes to your internal values. For example, your cedent delivers movements with values in US Dollar and uses the currency abbreviation “Doll”. In this case, LRM requires a unique assignment to process the movement correctly: The external characteristic value “Doll” must be assigned to the internal “USD” characteristic value.
Procedure
1. In the product/cession administration, switch to the Fields with Value List tab page.2. In the Fields with Value List table, select an attribute such as “Currency”.3. In the second table Allocation of the Values, assign an external characteristic value in the External Value
column to an internal characteristic value in the Internal Value column from the value list or selection list of
Life Reinsurance ModuleIntegrating LRM into Other Components P U B L I C 49

the selected attribute. Choose the characteristic value “USD” from the value list of the Internal Value column and enter the abbreviation “Doll” in the External Value column. In this case, you can assign an external value only once to an internal value. On the other hand, you can assign an internal value from the value list of the attribute multiple times.
4. Choose the Apply pushbutton to adopt the assignments that have been made.
3.2 Connection to the FS-RI Basic System
Use
LRM uses the following components of the FS-RI Basic System:
● Treaty (see Chapter Creating a Reinsurance Treaty for Use in LRM [page 50])● Account (see Chapter Account [page 119])● Claim (see Chapter Claim [page 104])● Reinsurance Program (see Chapter Reinsurance Program [page 54])
3.2.1 Creating a Reinsurance Treaty for Use in LRM
The following special features apply to treaties from the FS-RI Basic System that are to be used in LRM:
Treaty Class Life
Treaties must have the Life treaty class to be used in LRM. For this treaty class, the system provides a selection of fields and tab pages that differs from the selection available for non-life treaties.
Special Features in Life Treaties
The following section contains a description of the prerequisites divided by tab pages that a treaty, which is to be used in LRM, needs to fulfill. Furthermore, reference is made to meanings and functions of fields that deviate or have been enhanced compared with the non life treaty.
Header Data tab page
Validity
The treaty start date determines the earliest possible time when postings can be created for this treaty in the Account [page 119] of LRM. If the start date of the first generation is prior to the treaty start date, postings can only be made in LRM from the treaty start date onwards. In all other cases, postings can be made from the start date of the affected generation.
50 P U B L I CLife Reinsurance Module
Integrating LRM into Other Components
Usability
In principle, only treaties of the Life treaty class, in which the Use in RM (use in Risk Manager) flag has been set, can be used in LRM. The flag can also be deactivated. Prerequisite for deactivating the flag is that the treaty has not been assigned to a Policy Component Share [page 233] in LRM. Only then are postings in the accounting period (client accounting period or CAP) possible.
Together with the Account Transfer from RM and Account Creates Cedent flags, the Use in RM flag controls whether postings created from the cessions are transferred to the Basic System of LRM, or whether the postings are need to be directly entered in the Basic System. If you set the Use in RM flag, you must enter some mandatory data, as this data is absolutely necessary for controlling the processes in LRM. The effectiveness of the condition change method in the account of LRM is urgently required during the forward booking process (see Chapter Forward Booking Function [page 125]), for example. Therefore, an effective date must be selected when using the treaty in LRM.
Client Accounting Period (CAP)
The first open CAP, which is required for the account in LRM, is only created automatically for each section of the treaty if you have set the Use in RM indicator. This can be an existing or a newly added section.
The system requires information on the treaty start date, the generation start date, the end of the accounting year (to create the very first CAP of this treaty), the accounting frequency and, if available, on the end date of the last valid CAP of the treaty (to create the first open CAP for further sections) to calculate the correct validity period (start and end date) for this CAP. The end date of the accounting year cannot be changed once the initial CAP has been generated automatically for the treaty.
Changes to the accounting frequency always affect the validity period of the CAP. The system performs checks to ensure that there are no gaps between the individual CAPs of a treaty and the CAP start date, which always is the same, and the CAP end date of the sections of a treaty within the same period. The accounting frequency can only be changed if all existing CAPs in the LRM account for this treaty, which have been or are valid prior to or on the current system date of the change, are closed and exist for each section up to the same validity period. Since postings cannot exist for CAPs, the validity period of which lies in the future, this means the start date of which is later than the current system date, these CAPs are adjusted according to the new accounting frequency taking unto account of the end date of the last current CAP. The premium calculation mode provides the LRM account with information on whether unearned premiums are to be calculated at cession level. By selecting the accounting level, the system can control whether the numbers are processed completely or only partially when creating the profit and loss values in the accumulation process.
Information on the cession sequence is read in the retrocession process of LRM. The cession sequence consists of a series of benefit types and determines the order in which the benefit types are accrued to fill the retention of the treaty. Cession sequences are created and maintained in Customizing under FS-RI Basic System Treaty Maintain Life Settings Maintain Cession Sequence .
Generations tab page
You can use this tab page to control the status of a treaty. A treaty must have a status that allows postings to be made to be used in LRM. Therefore, the generation status must be set to “In Force” once the treaty has been created and before the treaty is assigned to a single risk.
The generation start date is used to generate the first open CAP for each section of the treaty and is compared to the treaty start date. The generation to which this section had been initially assigned is always used when generating the first open CAP.
Sections tab page
Life Reinsurance ModuleIntegrating LRM into Other Components P U B L I C 51
As soon you flag the treaty for use in LRM, the system automatically creates a first open CAP in the treaty for each section of the treaty. The system only creates a corresponding first open CAP if sections exist. This CAP is required to generate postings of the period values or profit and loss values or both for these sections in the LRM account.
A section can also be excluded from the checks that are performed when changes are made to the accounting frequency. Set the No CAP Check on the section in order for the system to not perform a check. This is to prevent that CAPs are continuously created for sections, which are no longer in use, and for which no postings can occur for the account of LRM A section can no longer be deleted as soon as a closed CAP exists in LRM, or if at least one posting exists for the first open CAP of this section.
For each section, you can specify posting assignments for the accounting methods Premium and Claim. If you determine one of the two methods, the other one is automatically filled with a matching default value. These specifications are used in LRM for analysis and evaluation purposes. The LRM account uses these values for the transfer process to the Basic System.
CAP Log tab page
The CAP log displays the most important pieces of information on all CAPs that currently exist for the treaty in LRM. CAPs cannot be closed or created here. The CAP log provides an overview of the level of the CAPs and their current status. As soon as the treaty has been flagged for use in LRM, the system creates automatically a first open CAP in the treaty for each section of the treaty. Possibly existing CAPs are taken into account when creating a first open CAP because the CAP start date and CAP end date have to match for each section of the treaty in the same period.
The end date of the accounting year can no longer be changed once a first CAP has been created for the treaty. Closing this first open CAPs and creating subsequent CAPs is only performed in the LRM account. Closing and creation of all further CAPs is also only possible in LRM accounting (see Chapter Background Processes for Accounting [page 137]). Making changes to the accounting frequency may cause a corresponding adjustment being necessary for the open CAPs listed here.
Cession Handling tab page
Some of the entries in the cession handling are mandatory entries that are required for controlling the processes in LRM. The mandatory entries differ according to whether the treaty category is assumed or ceded.
The specification of process determines the further procedure within posting routines at single risk level. Here, it is controlled whether values are to be calculated and the way in which these values are to be calculated, if required. For non-service treaties, you can control whether the system assigns manually created profit and loss values at single risk level, which are delivered in a movement or that are created by the system, to a cedent account period in the past or to the currently open cedent account period. For service treaties, the system assigns profit and loss values only to the currently open cedent account period. Therefore, an entry is imperative for treaties that are to be processed in LRM.
Information on whether a notification exists for the processes is read in the forward booking process of the LRM account. If the cedent does not determine the process, it is no longer be performed automatically by the system.
If data from a cedent data delivery is to be audited in LRM, you can specify here for which condition types a posting or period value or both is to be calculated within movement processing for auditing purposes. The audit values are only determined when the audit flag has been set.
A specification is imperative for several reasons for the generation determination for treaties that are used in LRM.
52 P U B L I CLife Reinsurance Module
Integrating LRM into Other Components

This specification is used to determine the section in the retrocession process. In the account, the specification is used to calculate the posting values and to control the transfer to the Basic System.
Specifications for the premium refund are absolutely mandatory in the treaty for the reverse posting process in LRM. Depending on the entry made here, premiums are partially refunded or not refunded at all for the premium periods in cases of a claim or lapse.
Information on the creation of ceded shares is also required for ceded treaties, to be able control the retrocession in LRM to determine whether the amount exceeding the retention is assigned to the most recent inbound policy component share or to all shares from the accumulation.
Conditions tab page
Detailed information on creating conditions in the treaty can be found in Customizing under SAP Reinsurance Management (FS-RI) Basic System Treaty Treaty Levels Treaty Period Conditions for Life Business .
In LRM, period values (see Chapter Period Values [page 119]) are always condition-dependent. A period value always has to be assigned to a condition.
Period values are posted in the respective open CAP based on the conditions at the policy component share level. Therefore, a check must be performed whether and to what extent an existing condition can be changed. This decision depends on the condition’s validity period and the validity period of the respective CAP.
If the validity start date of the condition is prior to the start date of the current CAP, the condition is completely locked, so that changes cannot be made to conditions. On the other hand, condition information can be changed at any time.
Accounting Units tab page
Accounting Units [page 233] can no longer be deleted once a P&L value for this accounting unit has been posted in LRM. This is regardless of whether it is a local or a global accounting unit.
Local accounting units always contain a global accounting unit. The attributes transferred from the underlying global accounting unit have to be expanded to include at least one further attribute when creating a local accounting unit.
3.2.2 Accounting
Definition
An account is a collection of postings within a specific period that have been made for a business partner or for all participations in the treaty.
Use
In LRM, period values and posting values are created for a specific period (forward booking). Posting values (profit and loss values) are used to create accounts.
Life Reinsurance ModuleIntegrating LRM into Other Components P U B L I C 53
Process
The account is created based on the aggregated P&L values (see also Chapter Aggregation und Transfer [page 138]).
3.2.3 Claim
Use
In claim management, you can manually assign a claim from the FS-RI Basic System. You manage claims on the level of the insured person. On the Reinsurance Claim Data tab page, you can choose and assign a claim from the FS-RI Basic System in the Claim field in the Claim Assignment field group.
When you assigned a claim from the FS-RI Basic System, claim postings are aggregated in the account using this claim.
3.2.4 Reinsurance Program
Use
The reinsurance program (RIP) is located in the FS-RI Basic System and represents a hierarchical order of passive reinsurance treaties and a statistical treaty, which can be used to incrementally reinsure a risk in the defined order.
The liability amounts for the individual benefit types can be defined in the statistical treaty for each life and for each policy.
These limits are compared to the current liability amount when processing the statistical treaty. For liability amount that exceed these limits, the remaining liability amount is ceded to the reinsurance treaties rank for rank. When a liability amount remains, a facultative requirement exists and must be covered manually by the person responsible.
Additional information on the RIP for LRM can be found in SAP Reinsurance Management (FS-RI)Comprehensive Components RIP RIP for Risk Manager (Life) .
54 P U B L I CLife Reinsurance Module
Integrating LRM into Other Components

3.3 Integration of msg.PMQ
Use
msg.PMQ is a standard software product. It is a standalone software component for the creation of product-specific data. msg.PMQ consists of the msg.PMQ.Designer development environment and the msg.PMQ.Runtime runtime component.
Connection of msg.PMQ to LRM allows you to create a product-specific Customizing. Owing to one of the programming languages used in msg.PMQ, the program also enables the implementation of individual business algorithms that you can use to Customize the behavior of LRM regarding product-specific data and process flows.
The msg.PMQ integration described in this section is shown from the LRM user point of view and is based on SAP. Separate, comprehensive documentation is available for the specific group of users that focuses on the development of product data for LRM and the technical integration of the data into the SAP system.
Further information on the technical connection between msg.PMQ and LRM can be found in the administration manual for the connection of msg.PMQ to LRM. The administration manual also describes the SAP authorizations required to connect to msg.PMQ.
msg.PMQ.Designer
The msg.PMQ.Designer component is used to develop product-specific data. A graphical interface is available that can be used enter and edit product data.
In this case, product data includes objects, structures, calculations, array tables and tables that describe products. The M10 formula language is available for implementing calculation rules. M10 formula language contains language constructs that are similar to a programming language and additional, integrated, insurance-technical functions.
The integrated msg.PMQ.Designer test suite provides the function scope of the msg.PMQ.Runtime runtime component and enables product data and algorithms to be tested. msg.PMQ.Designer converts product data to a platform-independent data format, a so-called product collection (content).
The msg.PMQ.Designer component contains the msg.PMQ.Designer.Client and msg.PMQ.Designer.Server subcomponents and is a client/server application that runs on Microsoft Windows. Data is stored in a relational database system.
The msg.PMQ.Designer component corresponds to an alternative Java-based variant of msg.PMQ.Designer. Data storage is done using a Source Control Management System (SCMS).
msg.PMQ.Runtime
The msg.PMQ.Runtime component is the runtime component of the msg.PMQ environment.
The runtime component acts as interpreter of the msg.PMQ programming language. It performs user-defined algorithms that exist as a form of a product collection of the msg.PMQ.Designer development environment.
You can use TOMATOSX and TOMATOSXJ as variants of msg.PMQ.Runtime for the connection to SAP systems.
Refer to the documentations TOMATOSX and TOMATOSXJ and the msg.PMQ connection administration manual for an exact description of the installation and configuration.
Life Reinsurance ModuleIntegrating LRM into Other Components P U B L I C 55
When being called, the runtime component executes the following operations:
1. Generation of an object hierarchy as a data structure within the memory area of the runtime environment based on data supplied by LRM via the communication log. This object hierarchy consists of runtime instances, the bases of which is the definition of the product data that is available by the product collection.
2. Assignment of attributes to the different objects of the hierarchy based on the data transferred by LRM using the communication log. If the product data has attributes for which no record is transferred by LRM, msg.PMQ.Runtime assigns default values of the product definition, if defined, for these attributes. Thus, default values should not be defined if the behavior they trigger is not the desired behavior.
3. Sequential execution of the entry points requested by the call. User-defined algorithms are executed in the product data. The object hierarchy, prepared in advance, serves as the basis for these algorithms.
4. Returning the modified attributes of the object hierarchy as part of a communication log. This also includes the return of messages that have been generated during the interpretation of the algorithms and any technical errors that occurred in the runtime environment as further parts the communication return log.
msg.PMQ.Runtime can manage any number of different product collections at the same time. As part of the call, LRM transfers the identification key of the product collection that is to be used for the execution, as a parameter. This mechanism is part of the backup for SAP-based transactions when calling the runtime environment. The identification key of the most recent product collection (content) is determined when the LRM SAP transaction is started and is assigned to the transaction. During the runtime, the transaction always uses the assigned key when calling the runtime environment. This ensures that the calls made by the transaction are bound to version of the product data, even if product data is updated through a product data import during runtime of the transaction.
LRM calls, which were processed by msg.PMQ.Runtime, can be written to files in a file system by using the request options (call options) store_testcase, store_input_testinstance, store_result_testinstance, store_input_tables und store_result_tables. This can be triggered statically using the configuration or by SAP using the user parameters /MSG/7FR_DEBUG. The log files still serve as test descriptions for the msg.PMQ development environment test suite. The generation of log files has a significant impact on the runtime behavior of the runtime component, which is why log files should only be generated for targeted troubleshooting.
The LRM environment menu contains the msg.PMQ Trace Settings menu option. Activating this menu entry provides a dialog that can be used to modify the user parameters /MSG/7FR_DEBUG. The authorization object /MSG/VPMQA with the components /MSG/VWPTY of the category WPTYPE and the component ACTVT are provided by SAP for authorization check of the creator of log files.
The LRM msg.PMQ adapter adds to each request, in case of non-initial parameter /MSG/7FR_DEBUG, the request options store_testcase, store_input_testinstance, store_result_testinstance, store_input_tables and store_result_tables to the request in the cases described below:
● When the SAP-based check of the authorization on the /MSG/VPMQA authorization object against the ACTVT component with the value 01 and /MSG/WPTY with the value DIA is successful, the user's work process is a process of the type dialog (DIA).
● When the SAP-based check of the authorization on the /MSG/VPMQA authorization object against the ACTVT component with the value 01 and /MSG/WPTY with the value BTC is successful, the user's work process is a process of the type background (BTC).
● If the authorization check fails in any of these cases, the /MSG/7FR_DEBUG parameter of the user is reset to the initial value.
Technical Scheme, Product Model and Reference Model
56 P U B L I CLife Reinsurance Module
Integrating LRM into Other Components

The definition of the product model and the management of the product contents with structures, subproducts and product logics are performed using msg.PMQ. The product model is used as the basic definition of product data by msg.PMQ. It includes the possible entities and relationships between these entities.
On the msg.PMQ side, the LRM product data model contains the formal description that is based on a subset of the Policy business object. The user guide for product data of LRM contains a more detailed specification of the product model. The product model is replaced by the technical scheme of msg.PMQ when using the msg.PMQ.Designer.
The data model interface between LRM and msg.PMQ is referred to as the reference model. It contains those attributes of the LRM data model that are intended for the exchange of data between the two systems. The reference model is saved on the corresponding SAP systems and is part of the Customizing that is delivered with LRM. The tool in the customizing can be used to display the reference model assignments and can be found in the customizing under Customizing the msg.PM Connection Reference Model Reference Model Viewer .
From an msg.PMQ user perspective, the product model and the technical schema represent the internal structure of the product data, while the reference model represents the available external data model and its relationship to the internal structure in msg.PMQ.
You can enhance this interface by defining additional attributes using the Extension Service component.
Product Data Import
A product data import can be used to transfer product-specific data from msg.PMQ to the SAP system. The CAIMAN software component is used to import product data. The import is actually an analysis of the product data provided by the export and a subsequent transfer of information to the SAP system.
Importing a product collection (content) into the SAP system extracts the required structure information of the product data and stores it in the customizing tables provided in the SAP system. This includes the defined product object structure, its subobjects and the relationships between the subobjects, as well as the used attributes of the reference model with value ranges for the product objects.
Moreover, the IDs of the algorithms, which are required for the process control for calling the runtime environment, are also extracted. This structure information is the basis for the formulation of calls of the msg.PMQ.Runtime by the LRM msg.PMQ adapter and for the formulation of product-specific processing and dialog functionalities by LRM.
When importing product data, a consistency check against the reference model provided by the SAP system is made. The system also performs further convention checks. More information on convention checks can be taken from the “Administration Manual of the msg.PMQ Connection”.
Furthermore, the compatibility with the previously imported product data in the SAP system is tested. This is to prevent an impairment of the in-force business data that has already been entered in LRM, which would happen if incompatible product data went into effect. More information on the scope of the performed checks and extracted information can be taken from the administration manual of the msg.PMQ connection.
Information on product data, transferred by the import, is not language-dependent technical data of the connection of msg.PMQ to LRM within the SAP system. Language-dependent entries, for the languages defined during the import, are taken from the product data and created in the SAP system.
Sets of values can also be defined for attributes using msg.PMQ. The msg.PMQ/LRM connection interprets these values as key-like technical values. You must provide information in text form for a dialog-based display of these technical values in language-dependent form. To do so, use the Customizing under msg.Life
Life Reinsurance ModuleIntegrating LRM into Other Components P U B L I C 57

Reinsurance Module Basic Settings Maintain Product Characteristic Values . A short text and a long text for SAP-based dialogs can be made available for possible attribute values.
LRM msg.PMQ Adapter
The LRM msg.PMQ Adapter is a subcomponent of LRM. The adapter is responsible for the creation of calls (requests) to the runtime environment and to process returned result data.
When a business process of LRM requires a call to the runtime environment, this process transfers the data that should be transferred to the LRM msg.PMQ Adapter in the form of the Policy business object. The msg.PMQ Adapter then extracts the data that is relevant for the product data from the business object data and makes them available in a communication log for the msg.PMQ.Runtime runtime component. The system determines relevant data on the basis of the imported product data. This allows you to define the quantity of data to be transferred in a variable way, because you determine the relevance of attributes of the reference model in the product data by assigning attributes to the product definitions.
Furthermore, the business process transfers the required entry points for the business algorithms defined in the product data to be executed. The business process also transfers the Customizing, which you set in the product/cession administration of the business partner, for the validation check to msg.PMQ. The msg.PMQ Adapter adds the Customizing to the communications log.
msg.PMQ.Runtime also returns the results in the form of this communications log. Changes to attributes having been made are transferred to the business object when processing the results. The msg.PMQ Adapter filters the result data for each business entry point. The msg.PMQ Adapter assigns a subset of adjustable attributes from the reference model to each technical entry point. The msg.PMQ Adapter does not transfer changes to the business object outside this subset. Attributes of an entry point are not adjusted outside this subset. This filtering is a protection mechanism of the LRM-based business process. Without filtering, it may happen that a business process cannot be correctly processed.
Changes made to attributes of enhancements defined in the Extension Service are transferred to the SAP system in the same way as fields of the delivered reference model. When no extension service node exists at this stage, the msg.PMQ Adapter creates a corresponding extension service node in the business object. Refer to the LRM product data user guide for a list of entry points and the quantity of attributes assigned to them.
The result communications log contains messages that are created using the product algorithms and that are transferred as SAP system-based messages by the msg.PMQ Adapter. Technical runtime errors of msg.PMQ.Runtime are also displayed as messages in the result communication log and are transferred by the msg.PMQ Adapter to messages of the SAP systems. The msg.PMQ Adapter adds the transferred messages to the application log.
Information on the communication log can be found in the TOMATOSX documentation for classic msg.PMQ connections and in the TOMATOSJ documentation for msg.PMQ connections.
3.4 Integration of Extension Service
Use
You use the Extension Service to enhance the user interface by additional field groups for displaying or entering data.
58 P U B L I CLife Reinsurance Module
Integrating LRM into Other Components
The Extension Service manages and saves data entered in those enhancement fields. The Extension Service Generator enhances the application by dialogs and the connection of these to the database.
Prerequisites
In order to set up the Extension Service, it is necessary to define the enhancement, to generate the required enhancements and to define and select dialogs or masks in the form of business views for each enhancement.
With the exception of enhancements for underwriting assessment, business views of all LRM enhancements are defined in the product data of the current business object and generated during the product data import. Business views for underwriting assessment are defined in the Customizing of the Extension Service.
Features
The Extension Service allows the enhancement of the following business objects in LRM:
● Policies● Policy components● Policy component shares● Insured persons● Claims● Conditions and condition bases● Underwriting assessment
Once the Extension Service has been properly set up for the application, new tab page are available in the tab dialogs on which the input fields are displayed according to the enhancement structure and in which enhancement data can be maintained. Only fields that are part of the field quantities of the active business view are displayed.
Life Reinsurance ModuleIntegrating LRM into Other Components P U B L I C 59

4 Business Object Life
Use
The Life business object contains data of an insured person that is required for single risk administration in LRM. It consists of the following structure elements:
● LifeThe Life structure element is a unique key for the insured person (life number). It represents a single risk, which contains all applications and policies of an insured person that exist in the LRM in-force business.
● IdentityThe Identity structure element corresponds to an application or a policy. Multiple identities can exist for a single life if the name is written in different ways, for example.
● Insured PersonThe Insured Person structure element contains information on increased risks of an insured person. Risks correspond to a policy component of a specific application and/or policy.
The following figure illustrates the structure and the relationships of the structure elements to each other:
60 P U B L I CLife Reinsurance Module
Business Object Life

You can use the Life business object to perform the following processes in LRM:
● Accumulate lives (“Life” level)● Separating lives (“Identity” level, see Chapter Separating Lives [page 61])● Merging Lives (“Life” level, see Chapter Merging Lives [page 62])● Retrocede Lives (“Life” level)● Displaying FS-CD Account Balance (“Life” level, see Chapter Displaying FS-CD Account Balance [page
115]).
4.1 Separating Lives
Use
You separate a life by removing an identity from an existing life and by assigning this identity to a new created life.
Prerequisites
You can only separate lives if more than one person is insured in a policy, such as joint life insurance (joint life constellation) and provided that the identity to be removed is not already part of another life.
Procedure
To separate a life, proceed as described below:
1. Start the Single Risk Administration application. You get to the Search initial dialog on the Life tab page.2. Search for the relevant life by using the corresponding search criteria and start the search. The system
displays all lives that match your search criteria in a table.3. Double-click on the required life entry in the table to select it. You get to the Life <Life Number> Display
dialog on the Identity tab page.4. In the navigation tree of the context menu of the corresponding life the navigation tree, choose the
Separate Lives function. This function is only available if the identity is not already part of another life.
Result
The system creates a new life and links it to the identity in question. All entities that depend on this identity, such as policies and applications, are also assigned to the new life.
Life Reinsurance ModuleBusiness Object Life P U B L I C 61
Example
The system attaches a delivered identity to a matching existing life when processing a movement. If you made this assignment accidentally, you can separate the identity from the existing life and assign it separately to a new life, after having completed movement processing.
4.2 Merging Lives
Use
You merge lives by assigning identities of a life to other lives.
Procedure
To merge a life, proceed as described below:
1. Start the Single Risk Administration application. You get to the Search initial dialog on the Life tab page.2. Search for a life, the identity (identities) of which you want to assign to another life, by using the relevant
search criteria and start the search. The system displays all lives that match your search criteria in a table.3. Double-click on the required life entry in the table to select it. You get to the Life <Life Number> Display
dialog on the Identity tab page.4. In the navigation tree of the context menu of the corresponding life, choose the Merge Lives function.5. Open the Merge Lives function using the corresponding entry in the context menu of the life. The system
opens the Find Life dialog.6. In the Find Life dialog, you can search for identities/lives, with which you want to merge the selected life
and/or the corresponding identities, by using the relevant search parameter.You can select identities of the same life or different lives. Each life, to which an identity exists, that you selected from the Find Life dialog, is merged with the life that you selected in the navigation tree.
Result
Identities of newer lives are moved to the oldest life. All entities that depend on this identity, such as policies and applications, are also assigned to the oldest life. Newer lives will then cease to exist. The oldest life is displayed in the navigation tree.
Example
During movement processing, the system cannot find a unique match of an identity of an existing life for the delivered identity. Therefore, the system creates a new life for the delivered identity. However, to create the
62 P U B L I CLife Reinsurance Module
Business Object Life
target assignment, to an existing life, you can merge the newly generated life with an existing life following movement processing.
4.3 Deleting a Life
Use
You can delete a life from the system, if the life has expired from a business point of view, within the scope of GDPR (General Data Protection Regulation). For information on prerequisites and procedure see Chapter General Data Protection Regulation (GDPR) [page 220].
4.4 Creating a Manual Previous Insurance
Use
Manual previous insurances are used when checking the "jumbo limit" of a role.
Manual previous insurances can be regarded as such risks that are not included in the insurer's reinsurance portfolio.
Prerequisites
The life for which the manual previous insurance is to be created must already exist in LRM to create a manual previous insurance.
Procedure
You create a manual previous insurance as described below:
1. Start the Single Risk Administration application. You get to the Search initial dialog on the Life tab page.2. Search for the relevant life by using the corresponding search criteria and start the search. The system
displays all lives that match your search criteria in a table.
Life Reinsurance ModuleBusiness Object Life P U B L I C 63

3. Double-click on the required life entry in the table to select it. You get to the Life <Life Number> Display dialog on the Identity tab page.
4. Choose the life by double-clicking it in the navigation tree. The system switches to the dialog Life <Life Number> Display on the Accumulationt ab page.
5. Switch to the Jumbo Limit tab page.6. Choose the Change <->Display (F5) pushbutton to set the application to the change mode.7. Choose Insert Row pushbutton in the Detailed Insurance Information field group to enter manual insurance
information.8. Enter the necessary data in the selected row. You must at least fill the Benefit Type and Sum fields.9. Choose the Save pushbutton in the SAP toolbar to save manual insurance information at the life.
Result
Once manual previous insurance information has been entered and saved, the system includes them in the when checking the jumbo limit for this life during movement processing or retrocession.
64 P U B L I CLife Reinsurance Module
Business Object Life
5 Business Object Application
Use
You enter data that is used for the underwriting assessment in LRM in the Application business object. It consists of the following structure elements:
● Application DataThe structure of the application data is very similar to the structure of the policy or policy component in single risk administration (see Chapters Business Object Policy [page 76] and Create Policy [page 94]).
● Insured Person DataThe structure of the insured person data is very similar to the structure of the insured person in single risk administration (see Chapter Business Object Life [page 60]).
● Reinsurer and Retrocession DataThe structure of the reinsurer and retrocession data is very similar to the structure of the policy component share in single risk administration (see Chapter Business Object Policy [page 76]).
● Assessment DataAssessment data is only available for the Assessment business process. You enter assessment data as impairments, loadings, exclusions and decisions in several tables.
The following figure illustrates the structure and the relationships of the structure elements to each other.
Life Reinsurance ModuleBusiness Object Application P U B L I C 65

Application data can be used in the following business processes in LRM:
● Application Creation and Application Processing (see ChapterCreate Application [page 66])● Assessment (see ChapterAssess Application [page 68])
5.1 Create Application
Use
You use the Create Application business process to create an application.
Prerequisites
In order to create a new application, the business partner, which submits the application for assessment, must already exist in the reinsurer's in-force business. If the corresponding business partner does not already exist,
66 P U B L I CLife Reinsurance Module
Business Object Application

you have to create the “Cedent” role for business partner in the Basic System (see Chapter Connection to the SAP Business Partners [page 32]).
Procedure
You create an application as described below:
1. Start the single risk administration. You get to the Search initial dialog.2. Choose the Life pushbutton in the menu bar of the dialog. In the Create Life dialog, you get to the Identity
tab page.3. Enter the identity data. Fill at least the fields Last Name, Gender and Date of Birth.4. In the navigation tree of the context menu of the identity, choose the Create Application function. In the
Create Application dialog, you get to the Application Data tab page.
NoteWhen the current company code deviates from the environment company code of the user, the system displays a further dialog before you get to the Create Application dialog. In this dialog, you must use pushbuttons to decide in which company code the system is to create the application.
5. In the Application Data tab page, enter the application number, the cedent, the start date, the currency and the product type of the policy in the corresponding fields.
NoteIn the Customizing, a settings has been made whether the application number must not exceed 20 or 40 characters. Note that the application number can only be checked against the number range interval if it does not exceed 20 characters. If no setting is maintained for the corresponding company code in the Customizing, only applications with a application number that does not exceed 20 characters can be saved by default.
If you do not enter an application number, the system assigns an application number with a length that does not exceed 20 characters.
6. Double-click the policy component in the navigation tree to get to the policy component level. Make the necessary entries on the Policy Component Data tab page.
7. Save the application using the Save pushbutton in the SAP application toolbar.
Result
Once the system saved the application successfully, the application exists in the in-force business.
If no assumed policy component share exist and if the Policy Component Type field is filled at the underlying policy component, the system automatically creates an assumed policy component share for each policy component when saving an application.
Furthermore, the system calls msg.PMQ when saving the application to calculate values for the default setting of different fields.
Life Reinsurance ModuleBusiness Object Application P U B L I C 67

If you activated the workflow in advance, the application assessment workflow is started for each application assessment.
You can perform further activities that are described in detail in Chapter Assessing an Application [page 68].
5.2 Assess Application
Use
You use the Assess Application business process to decide about the acceptance or rejection of applications. You make this decision on the level of the insured person or for each risk with the exception of the overall decision.
Prerequisites
You have already created an application to be assed in the system (see Chapter Create Application [page 66]). In this case, the system automatically creates an “Underwriting Assessment” structure (see figure in Chapter Business Object Application [page 65], element Assessment Data).
Features
“Underwriting Assessment” Structure
Among other things, the “Underwriting Assessment” structure consists of the the following four tab pages. In the context menu of the “Underwriting Assessment” node, choose the Display Assessment function for display:
● Assessment DataAssessment data is information on a restricting identity that the system adopts from the identity data of the application and that you can separately enhance with additional notes.The Underwriting Assessment Stage specifies the progress of an assessment for each risk of the application. It provides the two business requirements “not completed” and “completed”. When you set the status to “Assessment completed ”, the final decision that you enter on the Decision tab page is transmitted to the cedent.
● Evidence ChecklistThe Evidence Checklist tab page contains evidence, such as medical reports, information by the cedent, that is necessary for the application assessment. If evidence is available in electronic form, you can save this evidence as document attachments. To do this, choose the Insert Document as Attachment pushbutton in the Create Attachment column or, in the case of connected SAP ArchiveLink, the pushbutton in the Store Business Document column. If documents exist, you can select them using the pushbutton in the List column. You get to the document list. You can manually remove linked documents from the document list.The system removes the document links if you delete an application that has documents linked to it or if you rewind a movement.
68 P U B L I CLife Reinsurance Module
Business Object Application

● ImpairmentsYou can define risk loadings and exclusions for different risk groups in the Impairments tab page, with details for each risk type (policy component level in the application).
● DecisionOn this tab page, you reach decisions about accepting or rejecting an application based on the application data (policy component data), assessment data, evidence checklist and impairments. The system adopts the entry in the Underwriting Assessment Stage field from the Assessment Data tab page. You can make changes to the entry, if required.The decision process is composed of three steps, which you complete in the following order:1. In the Insured Person Decisions table, you reach the decision if the application is “Accepted”,
“Rejected” or “Postponed”, for example, for each existing policy component or for each insured person of the application separately.
2. In the Assessment Decision field in the Overall Decision field group, you reach acceptance decisions for each “Underwriting Assessment” (for each life). The reason for this is that the application may concern more than one person.
3. In the Overall Decision field in the Overall Decisions field group, you can reach acceptance decisions for the entire application.
The following dependency exists between the decisions made on the individual levels.You can only make a decision on a higher level until all lower-level decisions have been made, i.e. none of the lower-level decisions is pending. When you reached the superior decision, even though decisions at lower levels are still open, the system cannot save the application. The system displays a corresponding error message.In addition to the above-mentioned options for entering decisions manually on different levels, you can also perform an automatic derivation of the decisions. The automatic derivation process consists of the following steps:1. Derivation of the individual impairments -> Impairment groups2. Derivation of impairments -> Insured person decisions3. Derivation of insured person decisions -> Assessment decision4. Derivation of assessment decisions -> Overall acceptance decision5. Setting of the assessment processing status based on the overall acceptance decision
Procedure
Approach for Manual Application Assessment
Proceed as described below to create a new “Underwriting Assessment” or to manually make an application assessment. Prerequisite is that you created and saved an application with the relevant application data (see Chapter Create Application [page 66]):
1. In the navigation tree of the context menu of the “Underwriting Assessment” node, choose the Create UW Assessment function. In the Application <application number> Create dialog, you get to the Assessment Data tab page.
2. Switch to the Evidence Checklist tab page to enter the evidence required for the application.3. Switch to the Impairments tab page to enter risk loadings and exclusions, if required.4. Switch to the Decision tab page and reach decisions in the following order:
1. Decision for the policy component per insured person2. Underwriting assessment decision
Life Reinsurance ModuleBusiness Object Application P U B L I C 69
3. Overall decision5. Set the assessment processing status in the Underwriting Assessment Stage field in the Assessment Data
tab page or on the Decision tab page to “Assessment Completed”.
NoteYou can delete an assessment in the navigation tree using the Delete Assessment function in the context menu of the “Underwriting Assessment” node to be deleted. This also deletes all insured persons of the policy component and the shares of the insured persons to the policy component shares. If you activated the workflow in advance, the application assessment workflow is completed for this application assessment.
Generic Object Services(GOS) for the Application Assessment
In the navigation tree, navigate to the Underwriting Assessment node to open the toolbox. To do this, choose the Services for Object pushbutton in the title line of the Application <application number> Create dialog.
GOS provides the following functions:
● Create Documents● Create Notes● Create an External Document (URL)● Create a Personal Note● Send Objects with Note● Attachment List● Workflow Integration● Possible Connection of an External Archive System● Add to “My Objects”.
5.3 Copy Application
Use
You use the Copy Application business process to copy a single application in the system.
Prerequisites
The application to be copied must be displayed in the navigation tree in display mode. You can only copy the most recent version of an application. Moreover, only applications that are in the user's company code can be copied.
70 P U B L I CLife Reinsurance Module
Business Object Application
Procedure
1. Search for the application that you want to copy in the Search initial dialog so that this application is displayed in the navigation tree.
2. Choose the Copy Application function in the context menu of the main node of the application.
Result
The system displays the copy of the application in the navigation tree in the create mode selected in color without the application number The copy remains assigned to the original life.
The system copies all policy components, all insured persons with their shares and all assessments of the original application. Decisions and the status of the application assessment are set to the same default values used when creating a new application.
NoteThe system does not copy the following entities and the corresponding field contents:
● Archived notes or comments● Attached documents● Assignments● Responsibilities● Policy component shares● Accepted sum insured● Follow-up date
5.4 Manually Setting an Application to Invalid
Use
You can set a single application to invalid in the system. To do so, set the underwriting processing status of the application to “Invalid / Expired” (see also Chapter Invalidating Applications [page 165]).
Life Reinsurance ModuleBusiness Object Application P U B L I C 71

Prerequisites
You can display the application, which you want to set to invalid, in the display mode or change mode in the navigation tree. You can only set an application to “Invalid / Expired”, the underwriting processing status of which is set to “Completed” or “Cannot be Materialized”.
Procedure
1. Use the Search initial dialog to search for the application that you want to set to invalid and choose the application from search result list by double-clicking it. You get to the Application <application number> Display dialog.
2. Check whether the underwriting processing status is set to “Completed” or “Cannot be Materialized” as described below:1. In the navigation tree of the context menu of the application, choose the Display Application function.
You get to the Application <application number> Display dialog.2. Switch to the Underwriting Info tab page. Check the status entry in the Underwriting Processing Status
field.3. When the underwriting processing status is set to “Completed” or “Cannot be Materialized”, choose the
Set Application to Invalid function in the navigation tree of the context menu of the main node of the application.
Result
The system sets the underwriting processing status of the application to “Invalid / Expired”.
5.5 Delete Application
Use
You can delete a single application in the system. If the application contains notes, these are also deleted. If the “Services for Object” application contains (“Generic Object Services” GOS), the link to these objects is also deleted. The information about the deletion procedure is also forwarded to connected external systems.
72 P U B L I CLife Reinsurance Module
Business Object Application
Prerequisites
The application to be deleted must be displayed in change mode in the navigation tree.
From a business perspective, the application must not be completed and must not contain any assignments to other business objects such as other applications, policies or master policies.
You can delete migrated and non-migrated applications.
Applications with an underwriting processing status “Completed”, “Invalid / Expired” or “Cannot be Materialized” have to be taken into reassessment prior to deletion. To do so, choose the Reassessment function in the navigation tree in the context menu of the application node. You can directly delete applications with the “In Process” underwriting processing status. You cannot delete applications with the “Materialized” underwriting processing status.
Procedure
1. Search for the application that you wish to copy in the Search initial dialog so that this application is displayed in the navigation tree.
2. Choose the Change <->Display pushbutton to set the application to the change mode.3. In the navigation tree, choose the Copy Application function in the context menu of the main node of the
application.4. The system displays a confirmation prompt asking if the application should really be deleted. Choose “Yes”
if you want to delete the application. The system checks of the application may be deleted from a business perspective (see Section “Prerequisites”). The system deletes the application if the prerequisites have been met.
Result
The application is no longer be displayed in the navigation tree.
The systems saves all messages texts for validation checks, exceptions and success messages in a log after having deleted an application. You can view the log in LRM log file.
5.6 Materialize Application Without Policy
Use
You can manually materialize an application without the policy having to exist in the system. In this case, you set the underwriting processing status of the application to “Materialized Without Policy”.
Life Reinsurance ModuleBusiness Object Application P U B L I C 73

Prerequisites
The application that you manually want to set to “Materialized Without Policy” must be displayed in the display mode in the navigation tree. You can only set an application to “Materialized Without Policy” if the application has the underwriting processing status “Completed”.
Procedure
Proceed as described below to manually materialize an application without policy.
1. Use the Search initial dialog to search for the application that you want to set to the “Materialized Without Policy” underwriting processing status and choose the application from the search result by double-clicking it. You get to the Application <application number> Display dialog.
2. Check whether the underwriting processing status is “Completed”. To do so, switch to the Underwriting Info tab page. Check the status entry in the Underwriting Processing Status field.
3. When the underwriting processing status is “Completed”, choose the Materialize Application w/o Policy function in the navigation tree of the context menu of the main node of the application.
Result
The system sets the underwriting processing status of the application to “Materialized Without Policy”.
5.7 Reset Application to Completed
Use
You can manually reset an application, which has been materialized manually, for which there is no policy in the system to the “Completed” underwriting processing status.
Prerequisites
The application, which is to be manually reset to completed, must be displayed in display mode in the navigation tree. You can only set an application with a “Materialized Without Policy” underwriting processing status to “Completed”.
74 P U B L I CLife Reinsurance Module
Business Object Application
Procedure
Proceed as described below to reset an application, which has been materialized manually without policy, to the “Completed” underwriting processing status.
1. Use the Search initial dialog to search for the application that you want to set to the “Completed” underwriting processing status by making a double-click on it in the search result list. You get to the Application <application number> Display dialog.
2. Check whether the underwriting processing status is “Materialized Without Policy”. To do so, switch to the Underwriting Info tab page. Check the status entry in the Underwriting Processing Status field.
3. When the underwriting processing status is “Materialized Without Policy”, choose the Reset Application to Complete function in the navigation tree of the context menu of the main node of the application.
Result
The system sets the underwriting processing status of the application to “Completed”.
Life Reinsurance ModuleBusiness Object Application P U B L I C 75
6 Business Object Policy
Use
The Policy business object contains general data of an insurance and is one of the most important business objects in LRM.
Structure
The structure of the Policy takes into account special features of LRM. In addition to the data from the primary insurer, the structure also contains specific reinsurer data. The following three areas are important for the Policy:
● Policy/Policy Component DataA Policy contains one or several Policy Components. A Policy Component maps exactly one risk from a partial insurance such as “Life Insurance” or “Occupational Disability Insurance”, that belong to a particular Benefit Type such as “Life” or “Occupational Disability”.In the event of a claim, data of the corresponding claim on the insured person of a Policy Component is edited and saved.
● Insured Person DataThis data is used to identify and maintain single risks in LRM. Lives, Identity and Insured Person are used for assigning the insured person and affect Policy data. Loadings, which are saved for the insured person, provide additional information on medical, financial, occupational and pastime-related risks of the insured person.
● Reinsurer DataThe share of a policy component, which is specified for recoverage, is referred to as Policy Component Share. The Policy Component Share can also contain information on the retrocession (ceded share). The Period Values, which are relevant for the account, are determined using the data from Policy, Policy Component, Policy Component Share, Insured Person and Conditions of the treaty. Profit and Loss Values (P&L values) are determined using the Period Values. P&L values are assigned to an accounting period. Period and P&L values can either be delivered by the cedent or can be calculated by the reinsurer.The following figure illustrates the structure and the relationships of the structure elements to each other:
76 P U B L I CLife Reinsurance ModuleBusiness Object Policy
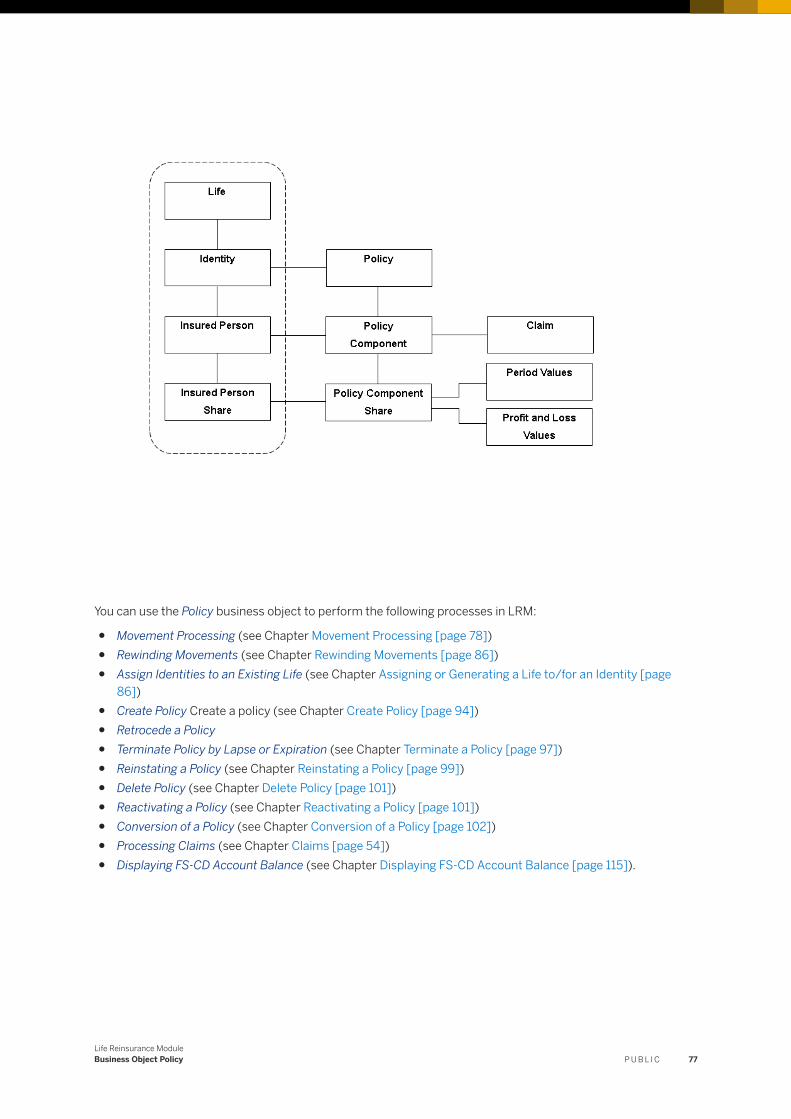
You can use the Policy business object to perform the following processes in LRM:
● Movement Processing (see Chapter Movement Processing [page 78])● Rewinding Movements (see Chapter Rewinding Movements [page 86])● Assign Identities to an Existing Life (see Chapter Assigning or Generating a Life to/for an Identity [page
86])● Create Policy Create a policy (see Chapter Create Policy [page 94])● Retrocede a Policy● Terminate Policy by Lapse or Expiration (see Chapter Terminate a Policy [page 97])● Reinstating a Policy (see Chapter Reinstating a Policy [page 99])● Delete Policy (see Chapter Delete Policy [page 101])● Reactivating a Policy (see Chapter Reactivating a Policy [page 101])● Conversion of a Policy (see Chapter Conversion of a Policy [page 102])● Processing Claims (see Chapter Claims [page 54])● Displaying FS-CD Account Balance (see Chapter Displaying FS-CD Account Balance [page 115]).
Life Reinsurance ModuleBusiness Object Policy P U B L I C 77

6.1 Process Movement
Use
You can use the Processing Movements business process to edit business transactions for a policy/master policy (see Chapter Glossary [page 233]). You cannot edit applications with this business process. The most important business transactions are listed below:
● Create policy● Technical alteration● Expiry/lapse of a policy● Set policy to claimed● Reinstatement of a policy
Movements can be delivered by the cedent and imported into the system, generated manually in the dialog by the user or can be copied in the data transmission.
When movements are delivered by the cedent and imported into the system, the system can prepopulate the fields with default values before the import. The message, indicating that the value is a default value, must be delivered for each field prepopulated with a default value.
You cannot make changes to data of a policy in in-force business or create a new policy without creating a Movement [page 233], re-enter the required data and processing the movement in advance.
Movements are usually processed on the policy component level and underlying entities. The following business transactions may have affect to multiple policy components at the same time within a policy:
● Lapse of a policy● Reinstatement of a policy● Set policy to claimed
These business transactions are processed at the policy level in the same manner as business transactions at the policy component level.
When having processed a movement, the system adopts the delivered changes into the in-force business- A new version of the policy, which contains the modified data, is usually created. The previous, original status of the data is retained in a separate version.
You can only edit business transactions for policies when you process movements or can only make changes to policy data using movement processing.
The following business transactions are an exception. You can edit those directly without creating and processing a movement:
● Assessment of a claim that has already been assigned● Entry of new period values and profit and loss values (P&L values)● Editing the follow-up date in the policy component
78 P U B L I CLife Reinsurance ModuleBusiness Object Policy
Prerequisites
You can only process business transactions for policies or make changes to policy data if you generate and process movements.
The authorization for the relevant company code must have been granted to your user to process movements and thus to make changes.
Process
You can manual start processing a particular movement in the dialog (see Chapter Create Policy [page 94], for example). You can automatically start processing using a background process at particular times, if required (see Chapter Movement Processing [page 148]).
The processing process includes the following logical steps:
1. Determination of the Processing OrderThe processing order is only relevant if more than one movement is processed.In the Processing Order field on the Header Data tab page in the Data Transfer <Data Transmission Number> Change dialog, you can explicitly determine the business processing order of the movement. If this field is empty, the system determines the processing order as described below:○ When the processing data of the cedent is delivered as well, the order is done using this date. The
movements are sorted and processed by the corresponding processing order. This processing order of the movements has priority even if the system would suggest further categories.
○ If the cedent does not deliver a processing date, sorting is done by business objects. Initially, all master policies are automatically used as subsequent policies may refer to them. The policies are then added to the processing order.
Within a master policy or policy, the order number on the policy component level is used to create the processing order. The sequence number is only unique for all movements for a particular master policy or policy. Different master policies or policies may have the same sequence numbers. Thus, the absolute processing order of all movement is not defined but only the order within a specific master policy or policy.
2. Grouping Related Business Transactions (Movement Group)Movements are only grouped if more than one movement needs to be processed. A movement group consists of consecutive movements for which the following processing data match, if available:○ Policy Number○ Effective Date○ Business Transaction○ Processing Date of the Cedent
A group of movements is based on the same policy. This means that the policy data must be exactly the same for each single movement of a movement group. All operations on the policy are only performed once for the entire movement group. The policy must be positioned only once in-force business, if it is no new business.Movements of a group are connected business transactions that are processed either entirely or not at all, never only partially processed. The processing of the entire group is canceled if an error occurs.A movement group generally contains different policy components. However, if the system identifies more than one identical policy component, the system attempts to organize and process the identical policy
Life Reinsurance ModuleBusiness Object Policy P U B L I C 79
component in a reasonable order within the group based on the Cedent Processing Date and Order Number fields. In this case, adhere to the following rules:Multiple policy component shares must be delivered in a single movement. This means that movements do not have be entered for each policy component share with the same policy component (PC), but multiple shares can be delivered with a single movement. The application determination is only performed once for all new PCs (see Section “13. Search for the Underlying Application (Optional)” below).
3. Completion of the Movement (From the Product/Cession Administration / msg.PMQ)For all movements, which already refer to a policy in the in-force business (also not for new business), not delivered fields mean that nothing has been changed compared with the contents at the in-force business. The movement is not completed in this case.However, if the movement is a new policy, not delivered empty fields are completed not delivered empty fields (fields without contents) are completed as far as possible.This completion of the movement depends on the cedent, business transaction, effective date, product or subproduct and can be split into the following three steps:○ Completion of the movement from the product/cession administration
Initially, the system attempts to complete the missing data from the product/cession administration. When doing so, the delivered product or subproduct is used to determine the corresponding data in the product/cession administration.If the cedent did not deliver a product, the system determines the Default Product. You can define the Default Product in the business partner for each cedent and product type.If the cedent did not deliver a subproduct, the system determines the Default Subproduct. You can define the Default Subproduct in the Business Partner for each cedent and benefit type. Data from any level can be completed.Furthermore, additional data for product and subproduct are taken into account. The additional data for products can only contain data from the policy level. However, additional subproduct data can also contain data from one of the lower levels (policy component share level, for example). The system attempts to complete the empty fields in this order. In this case, the calculation bases are also copied to the policy component shares.
○ Completion of the movement from msg.PMQThe remaining empty fields are then completed by msg.PMQ. Usually, default values are provided for the corresponding fields. The reinsurer can select and manage these as required.
○ Completion of the movement through derivation from or calculation based on other delivered fieldsInitially, it is attempted to complete empty fields by means of derivation or calculation of fields already delivered. The system does not re-derive values that have already been delivered for control purposes. Particular internal fields are defaulted by the system. Values delivered by the cedent may be overwritten.
4. Movement Validation Checks (Against the Product/Cession Administration/msg.PMQ)These validation checks are performed independent of the business transaction.During the validation check against the product/cession administration, required entry fields defined in the product/cession administration at the movement are checked whether they are filled. When they are filled, it is checked whether they contain valid values. Furthermore, the values of all non-required entry fields are checked with regard to validity.Valid values are also set for certain fields in msg.PMQ. The system checks whether values have been defined in msg.PMQ for each field in the movement, and if so, whether the delivered values are included in the msg.PMQ value set. The following applies for the fields Premium Payment Type, Joint Life Flag, Maximum Number of Insured Persons, Subplan Category: If a value, which is not included in the msg.PMQ value set, is delivered to one of these fields, the delivered value is replaced by a corresponding default value from msg.PMQ.
80 P U B L I CLife Reinsurance ModuleBusiness Object Policy

Certain cedent validation checks depend on the type of the business transaction. Certain checks can be activated and deactivated in the product/cession administration or the error level can be set (information, warning, error). For more information, see Chapter Connection to the SAP Business Partners [page 32].
5. Search for the affected operative policy (if no new business)The corresponding operative policy, which already exists in the in-force business, with all related policy components and dependent data is loaded on the effective date of the movement based on the business key (policy number, cedent, company code). This may not be the most recent policy. This is not the case for retroactive changes, for example.
6. Movement Validation Checks (Internal)The validation check of the movement depends on the cedent, business transaction, effective date, product or subproduct.Basic validation checks can be performed for the movement data itself. The movement cannot be further processed if it is incorrect or incomplete. It is also not possible to process any subsequent movements (later processing date) for the same policy.It needs to be distinguished between new business and movements that refer to an existing policy. More fields have to be filled for new business, while many fields can be left empty for other movements of existing policies, since they have already have a value in the in-force business. It is differentiated between two basic steps:○ Basic Validation Checks
Only movement data itself is used for the basic validation checks. The structure of a movement is checked (policy and policy component must always be delivered, for example). The system checks on required entry fields such as business policy keys, for example, is performed for each movement regardless of the business transaction. For a policy in new business, additional required entry fields are also checked, such as currency, for example.
○ Extended validation checksFurther data from other movements or the current status of the policy is used for extended checks. These include a check if earlier unprocessed movements exist for the same policy component, for example.
When using default values, the system ensures that existing valid values are not overwritten by the delivered default values.
7. Transfer of Movement Data to the In-Force BusinessIn the case of a new business, the delivered policy component with all dependent data is attached to the existing policy. Existing values remain unchanged. Values on the policy level that are dependent upon the policy component may change.For a non new business policy, the settings and/or control of empty (not delivered) entities of the cedent must be adhered to for the following entities:○ Loadings○ Pastime○ Occupations○ Escalations - Vector 0○ Escalations - Vector 1○ Escalations - Vector 2○ Claim Costs○ Product Data (Policy)○ Product Data (Policy Component)○ Product Data (Policy Component Share)○ Product Data (Insured Person)○ Product Data (Claim)
Life Reinsurance ModuleBusiness Object Policy P U B L I C 81

This setting is made for the corresponding cedents in the product/cession administration or in a data transmission (this does not apply for system DTAs) or directly in a movement of the zero value table. This setting determines that the cedent only delivers changed data, all data or only specific data.○ Delete Operative Data of Empty Entities
Items can also be deleted if the cedent provides all data. In this case, the corresponding data is deleted from the business in-force (but is retained as a version) and replaced with the delivered data.
○ Ignore All Empty EntitiesDeletion not possible for the Cedent Delivers Only Changes setting. The corresponding record is determined in the in-force business for each delivered data record (based on the delivered effective key). Existing data is replaced with the delivered data (empty fields in the movement remain unchanged in the in-force business). The above-mentioned entities do not have a unique business key. Thus, for the Ignore all Empty Entitiessetting, it is not possible to deliver changed records for these tables, since the system cannot uniquely assign a delivered record to an existing record. For that reason, there are only two possibilities:○ Cedent delivers nothing (no records): The entity is not changed.○ Cedent delivers all new records: The delivered records replace all records that exist in the entity.
○ Behavior Can Be Configured in MovementWith this option you can decide for each movement and entity how the system is to handle empty data records for a specific entity. The system only deletes the corresponding operative data records if the Empty Entity Relevant indicator is set in LRM (or the zero value table contains a corresponding entry). It is possible to delete a specific entity completely.However, there is one exception to the Managing Empty (Not Delivered) Entities rule. All new policy component shares and insured persons must be delivered in a movement (excluding claim movements).
8. Assignment Between Master Policy and Single PolicyTo assign a single policy to a master policy, you have to specify the master policy number in the movement for the single policy (new business or change) in the Allocated Master Policy Number field (policy level, Assignments) tab page. The company code and cedent of the single policy must match those of the master policy.A termination (business transaction Expiry or Lapse) or reinstatement of a master policy in the basic policy component (increase number = 0) results in the automatic termination or reinstatement of the dynamic policy components (increase number <> 0) of the master policy and the linked single policies.When attributes of a master policy at the basic policy component (increase number = “0”)) are changed, the dynamic policy components (increase number <> “0”) of the maser policy and the linked single policies are automatically synchronized with the changes as soon as a movement with the Change business transaction is processed on the basic policy component of the master policy.For automatic termination, reinstatement or synchronization, the system generates movements for dynamic policy components (increase number <> 0) of the master policy and for policy components of the single policy that is linked with the master policy. The system saves the generated movements to the same data transmission as the triggering movement in the basic policy component (increase number = 0) of the master policy; the system automatically processes the movements right after the triggering movement.
9. Treaty selection and data transfer from the basic systemGenerally speaking, a covering reinsurance treaty, generation or section must exist for each delivered policy component share.The search for the RI treaty is performed after the movement data has been transferred to the policy, since not all of the data is available until then.The cedent can deliver the values for the treaty, generation or section for a new business policy. However, a check has to be performed to see determine if the treaty also covers the policy component share.If the cedent does not deliver values, all relevant treaties are passed through.
82 P U B L I CLife Reinsurance ModuleBusiness Object Policy
If the system finds several treaties for each policy component share, the system additionally calls a Business Rule Framework plus function (BRFplus function) to find exactly one treaty for each policy component from these treaties. For more information, see Section “Treaty Determination” in Chapter Business Rule Framework plus (BRFplus) [page 214].When a matching treaty is found, the treaty rule stored here is executed and the Gen.. Ref. and Condition Determine Date is set accordingly.The system then searches for a matching generation and section. When the search has been successful, the search result (treaty, period, component) is saved.If the policy is not a new business policy, the system checks if the existing data in the in-force business is still valid.The assigned reinsurance treaty and section of a policy component share may also change over time (if the subproduct is changed, for example).The conditions of the treaty are determined for all assumed and ceded policy component shares of a policy component that are affected by a movement.The relevant conditions are copied for assumed policy component shares. The following approach is used for ceded policy component shares: Once the conditions have been copied from the ceded treaty, the conditions from the linked assumed policy component share are also transferred, the condition type of which has not yet been defined in the ceded treaty.
10. Generating Period Values and P&L Values (Posting)The conditions from the underlying reinsurance treaty are used. However, only those conditions to which posting is possible and that are included in the current booking block are used. The calculation is done by msg.PMQ call. The generated period values are always assigned to the currently open CAP.P&L values are derived from the newly created period values. This is not done in msg.PMQ but in R/3. It is possible that several profit and loss values are calculated from a period value.
11. Retrocession (Optional)Only non-informative and non-claimed policies are retroceded. The retrocession does not change for a claim; instead, the estimated claim is distributed to the existing policy component shares.The retrocession can also change policy components that do not actually belong to the movement, but that do belong to the same life. If the retrocession also performs changes to further policies of this life, the reverse and forwarding booking of these policies is done within retrocession.
12. Checking different limits (optional)Once the underlying RI treaties have been determined, the system can compare the limits set for them. The period values that have already been determined are used as a basis for the limit check. There are two different types of limit checks:○ Limit for New Business
If a covering application is not found for a new business, the system checks the automatic acceptance. This check is only performed if the Test for New Business Limit flag has been set in Customizing for the policy component category of the movement, or if the check is active for the cedent. The cedent validation checks can be used to control whether the new business is transferred even though it exceeds the limit. Moreover, the cedent's underwriting authority in the RI treaty is checked for the new business. This check can be controlled using the cedent validation check settings.
○ Limit for claimHere, the admittance authority for claims is checked. The system can close the claim if this limit is not exceeded. Otherwise, the claim is saved in the system as “Not Completed”.
○ Jumbo LimitIn this case, the Jumbo Limit treaty condition is checked. The system rejects corresponding movements when the jumbo limit is exceeded in the case of a new business, a change or reinstatement. The jumbo limit is used to monitor the sum at risk of all policies/applications for each life. The sum at risk is either the current sum insured/sum insured to be assessed, the original sum
Life Reinsurance ModuleBusiness Object Policy P U B L I C 83

insured or the sum reinsured, depending on how the jumbo limit condition has been defined in the underlying treaty.
13. Search for the Underlying Application (optional)The search for the application is only performed for new business policies (not for master policies since there are no group applications). The system tries to find an application for the entire movement group that covers all policy components. If the cedent delivers an internal or external application number, only the corresponding application is loaded and checked. In this case, applications that have already been set to “invalid” can be assigned. If this application does not cover a policy or does not exist, movement processing can only be continued whilst considering the limits. For more information, see Section “12. Checking Different Limits (Optional)” above.If no internal or external application number is delivered, all (“completed”) applications of the cedent in question are searched and checked. If several matching applications cover or if no application covers, corresponding warnings are issued. Under consideration of the limit checks (see also Section “12. Checking Different Limits (Optional)” above), the new business may still be processed.Comment on Customer-Specific Application AssignmentsAn exit point is provided in the movement processing as a BAdI and can be used to skip the LRM application assignment (see BAdI Customer Extensions). An alternative application assignment can be implemented into the BADI implementation. When the application found by the BAdI is to be materialized and assigned to a policy, the BAdI has to return the corresponding application number. The actual assignment or materialization of the application is performed by LRM. A flag that the BAdI returns to LRM can be used to control how the system proceeds. When the BAdI returns the value “true”, LRM performs an internal application assignment; otherwise, this is skipped.When an application covers a new business, it is assigned to the policy and set to “Materialized”.
14. Automatic Processing of Follow-Up MovementsIf you have set the follow-up action in Customizing under msg.Life Reinsurance Modules Settings for Policy Maintain Follow-Up Action for Event accordingly, processing a movement for a policy component of a single policy may trigger the automatic generation of movements for other policy components of the same life.The system saves the generated follow-up movements to the same data transmission as the triggering movement. After the triggering movement has been processed, the system automatically processes the follow-up movements.
Result
Movement processing process can deliver the following results:
● ErrorWhen the movement processing terminates with an error, changes are not made to the in-force business. The individual movements can be changed for each dialog and then processed again.○ When you started movement processing as a background process and if errors occur, the system
triggers technical events. The technical events can trigger processes that you define, such as the sending of an e-mail to the responsible processor. For more information, see Chapter SAP Business Workflows and Triggering Events [page 210].
● SuccessWhen movement processing has been successful, the resulting changes to the in-force business go into effect on the specified effective date. Several messages are displayed in the dialog during movement processing. These messages are written to the log file during the background process. Movements can be rewound using the dialog (see also Chapter Rewinding Movements [page 86]).
84 P U B L I CLife Reinsurance ModuleBusiness Object Policy

● RewoundA rewound movement could not be processed yet because the effective date is after the currently open CAP, for example.
Movements can be displayed or modified both after successful and unsuccessful processing. In the Search initial dialog, you can search for movements in different ways. Either search in the Movements tab page or choose the Policies / Application tab page and set the flag in the Movement Policies field. For more information, see Chapter Search [page 9].
Saving Notifications
During the generation or processing of movements, the system saves all messages related to the business processes or validation checks directly to the movement. When you rewind a movement and process it again, the system deletes the messages from the previous movement processing run and saves the messages, which occur during re-processing, at the movement.
The settings of the validation check with number “9999” have affect on the system behavior described above. When the check is deactivated, messages from the processes movement processing, BIF processing, msg.PMQ and rewinding at business objects are not saved. When the check is activated, the settings of the check determine which messages from the stated processes at business objects are saved. Chapter LRM Validation Checks [page 175] contains further information on validation checks with the number “9999”.
Displaying Messages
On the Assigned Messages tab page on the policy component level of the movement, the system displays all messages that are currently saved at the Movement.
For each message, the table contains the following columns:
● Message Type● Problem Class of a Message● Entity Name● Field Assigned to a Message● Msg No (Message Number)● Message Class● Message Text● Long Text of the message● ValChkNo. (Number of the validation check)● Validation Check Text● Area Description
The system displays the message type using an icon. If a message is not self-explanatory, you can call the long text for this message by choosing the question mark icon in the Message Long Text column. The system only displays the validation check number and validation check text if the message was generated by a validation check.
Life Reinsurance ModuleBusiness Object Policy P U B L I C 85
6.2 Rewinding Movements
Use
The rewind function can be used to reset one or several policies to a pervious version.
The following options are available in the DTA dialog:
● Rewinding of a Data Transmission● Rewinding Movements
The Rewind a Portfolio background program (see Chapter Rewind a Portfolio [page 151]) also provides the following options:
● Rewinding Policies● Rewinding all policies of a treaty and section● Rewinding a CAP of a treaty and section● Limit rewinding to product code and subproduct code, plan code and subplan code
Procedure
The following section contains a description of the rewind process in a DTA dialog: Start the Single Risk Administration application. You get to the Search initial dialog. Switch to the Data Transmission tab page and search using the search criteria to locate the data transmission.
1. Rewinding a Data TransmissionChoose the data transmission that you want to rewind by double-clicking the corresponding data transmission. You get to the Data Transfer <Data Transmission Number> Display dialog. Choose the Rewind pushbutton in the first line of the dialog. The system then displays another dialog with the query if you really want to rewind the entire data transmission, this means all successfully processed movements, which the data transmission contains. Confirm with “Yes”. Note that it is not possible to rewind an entire system data transmission.
2. Rewinding MovementsTo rewind one or several movements from a data transmission, switch to the Data Transfer <Data Transmission Number> Display dialog on the Movements tab page. This tab page contains a list of the movements in the data transmission. Select the movement that you want to rewind and then choose the Rewind pushbutton in the first line of the dialog. Note that only movements that have been successfully processed can be rewound.
6.3 Assign or Generate a Life for an Identity
Use
Different policies from different primary insurance administrators can exist for a life.
86 P U B L I CLife Reinsurance ModuleBusiness Object Policy

This function enables the system to summarize identities of the different policies in a single life. This way, the system creates the prerequisite for accumulation control and retrocession based on a life.
Features
Delivered identities (in a movement) are automatically assigned to existing lives during movement processing. In this case, the system uses the identity data, which is stored in the movement, to search for matching lives that already exist in the system. This identity data includes last name, first name, nationality of the identities, for example.
When the system finds a matching life, it assigns the identity to it.
If the system does not find a matching life, it generates a new life and assigns the identity to this new life.
The assignment of the delivered identities to existing lives is done across the company code and cedent. This means that when (policy) movements are processed for different company codes or cedents, which have the same identity data, those identities are also merged to one common life in the in-force business list.
Manual Changes
You can manually reedit assignments that have been made by this function. For more information, see Chapters Separating Lives [page 61] and Merging Lives [page 62].
Activities
The system uses the following approach when searching for a life:
1. The system checks whether operational data (including policy number and other technical keys) exists for the delivered identity and if this operative in-force business list already contains identities. If the system finds no possible identities, the next search is started using the life number is used (see item 5). If identities are found, the system resumes processing as described below:
2. The system checks whether an absolutely identical identity exists in the possible identities. Two identities are absolutely identical, if the entries in all of the following fields in two identities are the same:○ First Name○ Title○ Nationality○ Alias Last Name○ Alias First Name○ ID Type (identification type such as “identification card”)○ ID (unique identification number, such as identification card number)○ Place of Birth○ Last Name○ Date of Birth○ Gender
If the system finds an absolutely identical identity in the in-force business list, it adds a reference on the existing identity to the policy to be processed.
Life Reinsurance ModuleBusiness Object Policy P U B L I C 87

If the system finds no absolutely identical identity, it performs a comparison on the entries in the fields ID Type and ID, provided that these fields are not empty. If the system finds an identity with identical ID type and identification number, then this identity is used. If the system does not find an identical identity, it resumes processing as described below:
3. The system checks whether an identical identity exists in the loaded in-force business. If all fields in two identities are the same, or if the following fields of the movement are not filled, but the other fields are the same, these identities are identical:○ First Name○ Title○ Nationality○ Alias Last Name○ Alias First Name○ ID Type○ ID○ Place of Birth
If the system finds an identical identity in the in-force business list, it adds a reference on the existing identity to the policy to be processed. If the system does not find an identical identity, it resumes processing as described below:
4. The system checks whether a similar identity exists in the already loaded in-force business. Two identities are similar if one of the following conditions applies:○ ID Type and ID are the same○ Gender and Date of Birth are the same and Last Name and First Name are similar.○ Group Name is the same (master policies)
If data on identities is changed because of using the Change business transaction, for example, the following special rules apply for identities to be similar:○ only the Last Name is changed (due to marriage, for example)○ only the First Name is changed○ only the Day of Birth and / or the Month of Birth are changed
If the system finds at least one absolutely identical identity in the entire dataset and all found identities belong to the same life, the system adds a reference on the already existing identity to the policy to be processed.If the system does not find an absolutely identical identity in the entire dataset, it compares the entries in the fields ID Type and ID, provided that these fields are not empty.If the system finds at least one identity in the entire in-force business list, the ID type and ID number of which are the same, it adds a reference on the already existing identity to the policy to be processed.If the system does not find an identity for which the ID type and identification number are identical, it searches for identical identities.If the system finds at least one identical identity in the entire dataset and all found identities belong to the same life, it adds a reference on the already existing identity to the policy to be processed.If the system does not find an identical identity in the entire dataset, the system preforms the search for similar identities in the Business Rule Framework plus (BRFplus). In BRFplus, the similarity of all transferred identities is checked. The system can find no, one or several “similar” identities:○ If the system finds one single “similar” identity, the corresponding life is used and a new identity based
on the delivered identity is created.○ If the system finds several “similar” identities, these identities have to be in the same life, so that the
system can use this life and create a new identity based on the delivered identity.
88 P U B L I CLife Reinsurance ModuleBusiness Object Policy

○ If the system does not find any “similar” identities in the first run of BRFplus, the system behaves as described below:○ If the delivered identity contains a life number and all of the identities transferred to BRFplus have
this life number, this life is used and a new identity based on the delivered identity is created.○ When identities, which are transferred to BRFplus, have the same life, result from a search across
the entire dataset and do not have contradicting identifiers, this life is used and a new identity on the basis of the delivered identity is created.
If the system cannot find neither an absolutely identical, nor identical or similar identities or lives, which can be used, in the already loaded in-force business list, it resumes processing as described below:
5. If a life number is specified in the delivered identity, the system searches in the database for this life number. If the system finds a matching life with possible identities for this life number, these identities are rechecked whether they contain absolutely identical, identical or similar identities as described in items 2 to 4. The only difference here is that the delivered identity is no longer compared with the possible identities from the already loaded in-force business list, but it is compared with the result of the search for the life number.If the system does not find absolutely identical, identical or similar identities or lives, which can be used, from the result of the search for the life number, it resumes processing as described below:
6. The system searches for the identity by searching for name strings (see Chapter Search for Name Strings [page 90]).If it is a group, the system searches for the group name. If fields ID Type and ID are filled, the system searches for these fields. If the system does not find possible identities using this data as the bases, it searches on the basis of last name, first name, gender, etc. using the name string search in the entire dataset for possible identities.Identities found using the name string search, are checked regarding absolutely identical, identical or similar identities as described in items 2 to 4. The only difference here is, that the delivered identity is no longer compared with identities from the already loaded in-force business list, but with the result of the name string search.If the system does not find absolutely identical, identical or similar identities or lives, which can be used, from the result of the name string search, the system resumes processing as described below:
7. The system searches for the identity using the search for name match codes (see Chapter Search for Name Match Codes [page 93]).If it is a group, the system does not perform the search for name match codes.The result of the search for name match codes is removed again at the end. If the fields ID Type and ID are filled and the identification type is the same, but the identification number is different, this identity is not used for comparison with the delivered identity. The identities that have been found during the search for match codes are also checked regarding absolutely identical, identical or similar identities as described in items 2 to 4. The only difference here is that the delivered identity is no longer compared with the identities from the already loaded in-force business list, but with the result of the search for name match codes.If the system does not find absolutely identical, identical or similar identities or lives, which can be used, from the result of the search for name match codes, the system resumes processing as described below:The system creates a new life and adds the delivered new identity to this life, if the creation of a new object in this transaction is permitted in principle.
NoteAll the rules for determining similar identities are stored in BRFplus. You can adjust the rules there.
Life Reinsurance ModuleBusiness Object Policy P U B L I C 89
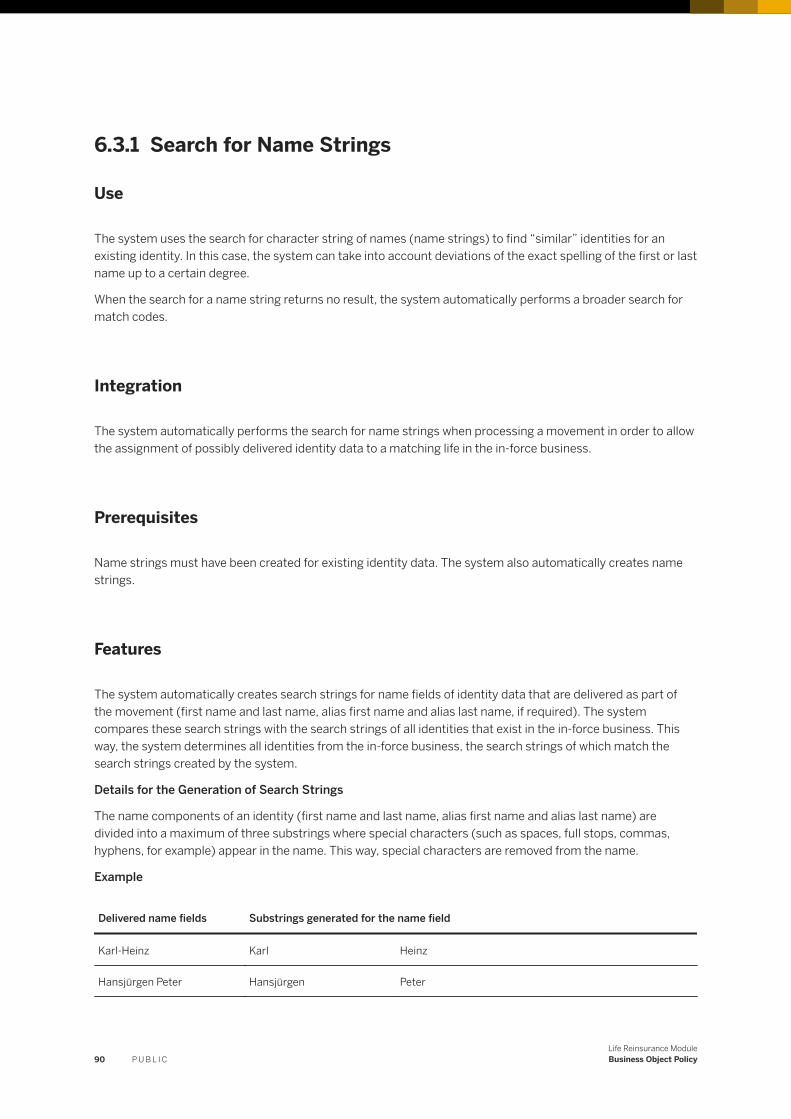
6.3.1 Search for Name Strings
Use
The system uses the search for character string of names (name strings) to find “similar” identities for an existing identity. In this case, the system can take into account deviations of the exact spelling of the first or last name up to a certain degree.
When the search for a name string returns no result, the system automatically performs a broader search for match codes.
Integration
The system automatically performs the search for name strings when processing a movement in order to allow the assignment of possibly delivered identity data to a matching life in the in-force business.
Prerequisites
Name strings must have been created for existing identity data. The system also automatically creates name strings.
Features
The system automatically creates search strings for name fields of identity data that are delivered as part of the movement (first name and last name, alias first name and alias last name, if required). The system compares these search strings with the search strings of all identities that exist in the in-force business. This way, the system determines all identities from the in-force business, the search strings of which match the search strings created by the system.
Details for the Generation of Search Strings
The name components of an identity (first name and last name, alias first name and alias last name) are divided into a maximum of three substrings where special characters (such as spaces, full stops, commas, hyphens, for example) appear in the name. This way, special characters are removed from the name.
Example
Delivered name fields Substrings generated for the name field
Karl-Heinz Karl Heinz
Hansjürgen Peter Hansjürgen Peter
90 P U B L I CLife Reinsurance ModuleBusiness Object Policy
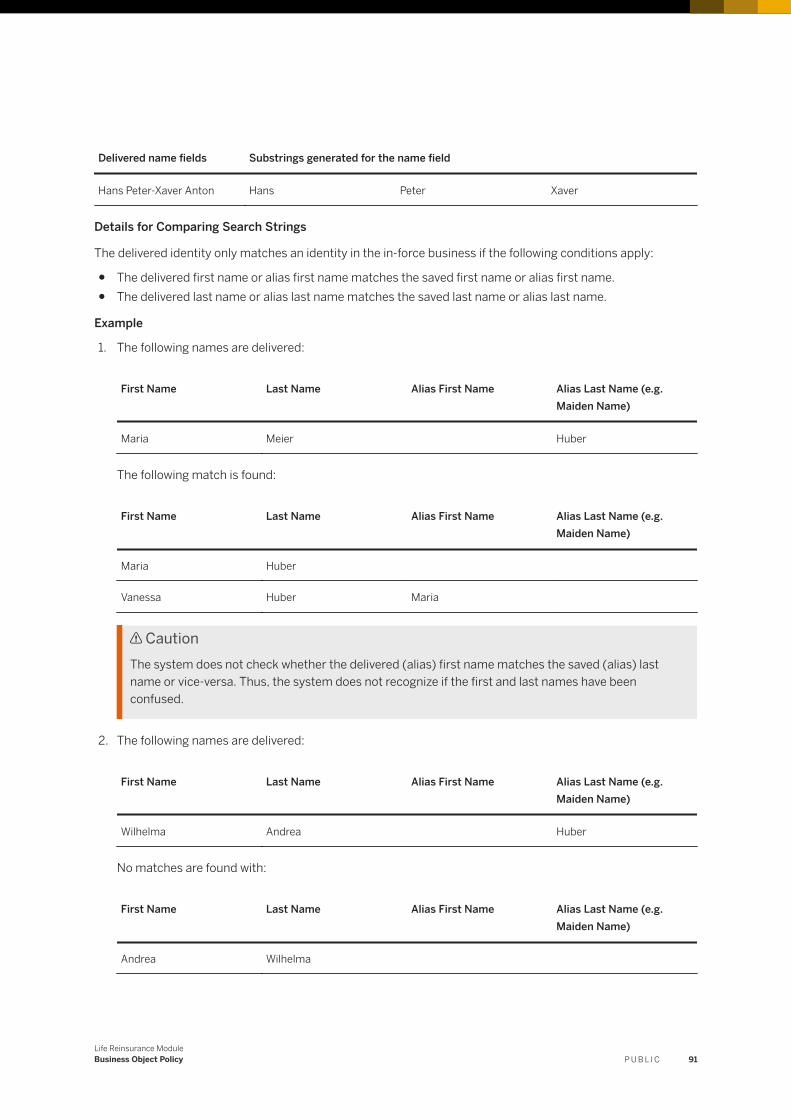
Delivered name fields Substrings generated for the name field
Hans Peter-Xaver Anton Hans Peter Xaver
Details for Comparing Search Strings
The delivered identity only matches an identity in the in-force business if the following conditions apply:
● The delivered first name or alias first name matches the saved first name or alias first name.● The delivered last name or alias last name matches the saved last name or alias last name.
Example
1. The following names are delivered:
First Name Last Name Alias First Name Alias Last Name (e.g. Maiden Name)
Maria Meier Huber
The following match is found:
First Name Last Name Alias First Name Alias Last Name (e.g. Maiden Name)
Maria Huber
Vanessa Huber Maria
CautionThe system does not check whether the delivered (alias) first name matches the saved (alias) last name or vice-versa. Thus, the system does not recognize if the first and last names have been confused.
2. The following names are delivered:
First Name Last Name Alias First Name Alias Last Name (e.g. Maiden Name)
Wilhelma Andrea Huber
No matches are found with:
First Name Last Name Alias First Name Alias Last Name (e.g. Maiden Name)
Andrea Wilhelma
Life Reinsurance ModuleBusiness Object Policy P U B L I C 91

First Name Last Name Alias First Name Alias Last Name (e.g. Maiden Name)
Andrea Maier Wilhelma
Match Criteria
Two name fields (such as delivered first name/saved first name) are an exact match if all three substrings of the name field match.
The system not only checks the name string but also the number of characters of the name string. If the delivered name string has four characters, for example, the system only checks the first four characters of the saved name string irrespective of the fact that the saved name is much longer.
Example
The following name field is delivered (first name, for example):
Name Field Part 1 Name Field Part 2 Name Field Part 3
Hans Peter
No match with the following, existing name fields for the reasons specified below:
Name Field Part 1 Name Field Part 2 Name Field Part 3 Reason
Hans Part 2 deviates
Peter Hans Part 1 and 2 deviate
Hanspeter Part 1 matches, part 2 deviates
Match found for the following existing name fields:
Name Field Part 1 Name Field Part 2 Name Field Part 3 Reason
Hans Peter Xaver Part 3 is not considered, since it was not delivered
Hansjürgen Peter Part 1 only matches the first four characters of the delivered name and the delivered number of characters
92 P U B L I CLife Reinsurance ModuleBusiness Object Policy

6.3.2 Search for Name Match Codes
Use
The system uses the search for name match codes to find “similar” identities for an existing identity. In this case, the system can take into account deviations of the exact spelling of the first or last name up to a certain degree.
Integration
The system executes the search for the name match codes at the following periods of time in the application:
● The system automatically performs the search for name match codes when processing a movement in order to allow the assignment of possibly delivered identity data to a matching life in the in-force business. The search for match codes considered major discrepancies as the search for name strings and is therefore only used when the search for a name string has not been successful.
● You can activate the search for name match codes in the Search initial dialog by setting the flag in the Match Code Search field. When searching by using the first and/or last name as the search criteria, the system displays as a result all identities from the in-force business list that have a similar first and last name. If you do not set the flag, the system displays in the result the identities where the first and last names or some parts of the first and last names are identical.
Prerequisites
Name match code must have been previously created for existing identity data. The system also automatically creates name match codes.
Features
The system automatically creates the corresponding match codes for name fields of identity data, which are delivered as part of the movement (first name and last name, alias first name and alias last name, if required) or those that you enter in the Search initial dialog. The system compares these match codes with the match codes of all identities that exist in the in-force business list. This way, the system determines all identities from the in-force business list, the match code of which match the match codes created by the system.
Details on the Match Code Generation
The system generates the match code from the last name or alias last name as described below:
1. The system removes all vowels from the name string with the exception of the first letter.2. The system removes all double consonants.
Result: The system saves the first four letters of the resulting character string as a match code.
Life Reinsurance ModuleBusiness Object Policy P U B L I C 93
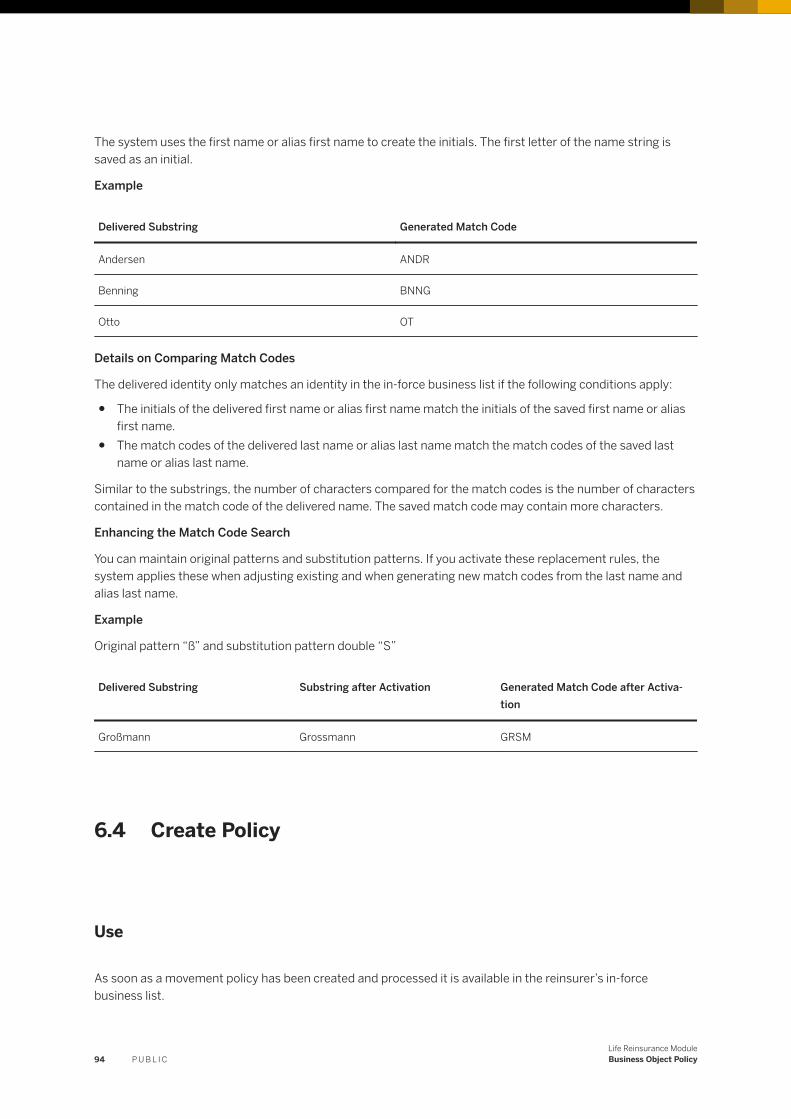
The system uses the first name or alias first name to create the initials. The first letter of the name string is saved as an initial.
Example
Delivered Substring Generated Match Code
Andersen ANDR
Benning BNNG
Otto OT
Details on Comparing Match Codes
The delivered identity only matches an identity in the in-force business list if the following conditions apply:
● The initials of the delivered first name or alias first name match the initials of the saved first name or alias first name.
● The match codes of the delivered last name or alias last name match the match codes of the saved last name or alias last name.
Similar to the substrings, the number of characters compared for the match codes is the number of characters contained in the match code of the delivered name. The saved match code may contain more characters.
Enhancing the Match Code Search
You can maintain original patterns and substitution patterns. If you activate these replacement rules, the system applies these when adjusting existing and when generating new match codes from the last name and alias last name.
Example
Original pattern “ß” and substitution pattern double “S”
Delivered Substring Substring after Activation Generated Match Code after Activation
Großmann Grossmann GRSM
6.4 Create Policy
Use
As soon as a movement policy has been created and processed it is available in the reinsurer’s in-force business list.
94 P U B L I CLife Reinsurance ModuleBusiness Object Policy

You can perform assumed business transactions using this policy.
The reinsurer must create policies in order for newly signed business to be effective in the in-force business.
Prerequisites
To create a new policy, the following requirements must be met:
● The corresponding business partner, from which the policy to be reinsured originates, must already exist in the reinsurer’s in-force business. If it does not exist, then the cedent has to be maintained in the Basic System.
● A suitable and valid reinsurance treaty (RI treaty) must exist. If an RI treaty does not exist, it has to be created in the Basic System.
Procedure
You create a policy as described below:
1. Start the Single Risk Administration application. You get to the Search initial dialog.2. Choose the Movement pushbutton in the first line of the Search dialog. This opens the Create Policy dialog.
The system creates a movement including complete policy structure in the navigation tree. The gear icon symbolizes the policy.
3. In the Policy Data tab page, enter at least the data in the following required entry fields: Policy/Application Number, Business Object (such as "POL" for policy), Cedent, Currency, Start Date and Product Code.
4. In the navigation tree, double-click the node of the policy component. You get to the Processing Data tab page on the policy component level.
5. Enter the necessary data on the Processing Data and Policy Component Data tab pages. In the External Event field, the system automatically enters the business transaction that is set in the Customizing for “New Business”. Choose enter to confirm your entries.
6. In the navigation tree, double-click the node of the insured person. You get to the Insured Person tab page.7. Enter the necessary data on the Insured Person tab page. To do so, select the role category in the Role field
that is set in the Customizing for the “Insured Person” is set.8. In the navigation tree, double-click the node of the policy component share. You get to the Policy
Component Share Data tab page on the policy component share level.9. In the Share Number field, enter the share number and in the Sum Reinsured field, enter the initial sum
reinsured- Choose enter to confirm your entries. You get to the Processing Data tab page. You do not have to explicitly edit processing data on policy component share level, because the corresponding data is adopted from the policy component during movement processing.
10. Choose the Save pushbutton in the SAP toolbar to save the movement for the policy with the assigned policy number.
11. Choose Process Movement in the context menu of the policy node in the navigation tree to process the movement. This function is active when being in change mode. When you are in change mode, the Process Movement function is only active if no other business object is in change mode at the same time.
Life Reinsurance ModuleBusiness Object Policy P U B L I C 95

Result
Once you have triggered movement processing, the system displays error and success messages for the individual processing steps in the Application Log. The system creates a corresponding log file when processing in the background process.
Successful Transfer to the In-Force Business
You can display the new business in-force business after having successfully processed the movement. You may now make changes to policies in the in-force business by creating and processing movements.
Postponing
When the system could not process the new business due to errors, adoption into the in-force business does not take place. You have the option to make changes to the data of the new business data and to reprocess the movement again.
Error
A postponed or parked movement means that the policy cannot be processed at present, because the effective date is later than the currently open Client Accounting Period (CAP) [page 142], for example.
6.5 Withdrawing an Insured Person (Policy with Joint Lives)
Use
You can withdraw an insured person from a policy with joint lives. The insured person is not deleted in this course, but it obtains the role of “Withdrawn Insured Person” role category.
Prerequisites
You can only withdraw an insured person for a policy with joint lives. Withdrawing needs to be done using a change movement.
The system cannot automatically set the role if multiple roles of the “Withdrawn Insured Person” role category have been defined in the Customizing.
A claimed insured person cannot be withdrawn.
96 P U B L I CLife Reinsurance ModuleBusiness Object Policy
Procedure
The following options are available for withdrawing an insured person:
● Choose the insured person at the change movement (in the structure of the movement policy in the navigation tree) and choose the Delete Insured Person function in the context menu to remove the insured person from the movement
● Choose the corresponding insured person from the change movement by double-click. You get to the Insured Person tab page. In the Role field, choose a role of the “Withdrawn Insured Person” role category. The short text for the “Withdrawn Insured Person” role category can be set up in the Customizing, “WIP”, for example.
Choose the Save pushbutton in the SAP toolbar. Choose then the Process Movement function in the context menu of the policy node.
Result
Once the movement has been processed, the withdrawn insured person still exists in the in-force business, but has a new role of the “Withdrawn Insured Person” role category. In the navigation tree, to the left of the name of the insured person, the system displays a corresponding icon for “ Withdrawn Insured Person”.
When a policy component share only exists with one node Insured Person Share for the withdrawn insured person, the system automatically lapses this policy component share.
6.6 Terminate a Policy
Use
When you terminate (lapse or expiry) a policy prematurely or as agreed (scheduled), it remains in the in-force business with a status “Lapsed” or “Expired”.
The system creates a new version, which remains valid, when a policy is terminated or expires. This means that you can reinstate this policy at a later point in time. For more information, see Chapter Reinstating a Policy [page 99].
Prerequisites
A policy that you want to lapse or a policy that is to expire on a particular date, must exist in the in-force business.
Life Reinsurance ModuleBusiness Object Policy P U B L I C 97
Features
When you terminate a policy, you usually terminate individual components. The system only automatically lapses a policy once you have lapsed the last components of a policy. The policy automatically expires once the last component of a policy has expired. On the other hand, a policy is neither lapsed nor expires as long as policy components exist that have neither been lapsed or that expired.
There is also an option to lapse an entire policy with immediate effectiveness. In this case, any components belonging to the policy are automatically lapsed as well.
When data, which is to be saved at the operational policy, is delivered with a lapse, you have to set the Changes allowed in case of lapse movement flag in the Edit Business Partner application in the product/cession administration on the Processing Information tab page. When you set the flag, all data from a lapse movement is transferred to the operational policy. If you do not set the flag, only the fields External Event, Event Reason, Effective Date and other technical fields (e.g. UFI) are transferred to the operative policy. If you do not set the flag and the lapse movement has not been created within the scope of an BIF process, the system issues the following message during processing: “Changes of the lapse are not transferred to the operative policy”.
This message is also displayed if you have not made any changes.
Procedure
Automatic Expiration of the Policy / Automatic Transition to Annuity Payment
Whether the system automatically expires the policy or policy component depends on whether the No Automatic Expiries flag has been set. You can find this flag at treaty level in the corresponding RI treaty on the Cession Handling tab page:
● When the No Automatic Expiries flag is set, the system does not automatically perform a scheduled transition. The cedent must provide the expirations (policy expiration or annuity payment) for each movement.
● When the No Automatic Expiries flag is not set, the system automatically performs a scheduled transition. In order for the system to correctly perform a transition of a policy component as scheduled, all of the assumed and ceded shares belonging to that policy component must be sufficiently forward booked. In the case of transitioning to a benefit payment, this is case if the date of the Booked Until field for all policy component shares (Processing Data tab page, Accounting Information field group), is one day earlier than the benefit payment start (Policy Component Data tab page, Benefit Payment field group, Commencement Date Benefit Payment field). All of the shares have to be forward booked to the end date of the policy component in order for the components to expire as scheduled.
Manual Lapse / Manual Expiration
Proceed as described below to manually lapse single policy components:
1. Start the single risk administration. You get to the Search initial dialog on the Life tab page.2. Switch to the Policies / Applications tab page and perform a search for the policy by using corresponding
search criteria.3. Double-click to select the policy. You get to the Policy <Policy Number> Display dialog.4. In the navigation tree, choose the Generate Movement function in the context menu of the policy
component node to be lapsed. The system creates a corresponding movement for this component. In this case, the system creates a copy of the entire policy structure in the navigation tree. The gear icon
98 P U B L I CLife Reinsurance ModuleBusiness Object Policy

symbolizes the policy and the policy is highlighted in yellow. The corresponding policy structure is highlighted in green.
5. In the navigation tree, double-click the policy component. You get to the Processing Data tab page on the policy component level.
6. Choose the business transaction for “Lapse” in the External Event field of the Movement Processing Information field group to lapse a policy component and/or the business transaction for “Policy Lapse” to lapse all policy components of a policy. You can set the short names for the business transactions “Reversal” and “Policy Lapse” in the Customizing. In addition, specify the desired effective date in the Effective Date field.
7. Choose the Save pushbutton in the SAP toolbar to save the movement.8. Choose the Process Movement function in the navigation tree in the context menu on policy level.
Proceed as described above when a policy is to expire to a particular date. In this case, choose in the value, which has been set in the Customizing for the business event for “Expiration”, in the External Event field.
Result
The policy and/or relevant components have expired in the in-force business when having successfully processed the movement.
The system displays error and success messages for individual processing steps in the Application Log or writes them to the corresponding log file when processing in the background.
It may not be possible to terminate the policy in the in-force business if the processing is incorrect. This may be the case of changes were made to the data of if the component cannot be terminated for business reasons. Business reasons may be that the component has already been lapsed or has expired or contain a terminated claim, for example.
Another reason might be that the system postponed or parked the movement. More information can be found in the “Results” section in Chapter Movement Processing [page 78].
6.7 Reinstating a Policy
Use
You can reinstate lapsed policies. You can make changes and bookings to reinstated policies.
Prerequisites
You can only reinstate a policy that exists in the in-force business. The policy in the in-force business needs to have a status “Lapsed”, “Terminated” or “Claimed”.
Life Reinsurance ModuleBusiness Object Policy P U B L I C 99
Procedure
Proceed as described below to reinstate a terminated policy:
1. Start the Single Risk Administration application. You get to the Search initial dialog on the Life tab page.2. Switch to the Policies / Applications tab page and perform a search for the policy, which you want to
reinstate, by using corresponding search criteria.3. Double-click to select the policy. You get to the Policy <Policy Number> Display dialog.4. In the navigation tree, choose the Generate Movement function in the context menu of the policy
component node to be reinstated. The system creates a corresponding movement for this component. In this case, the system creates a copy of the entire policy structure in the navigation tree. The gear icon symbolizes the policy and the policy is highlighted in yellow. The corresponding policy structure is highlighted in green.
5. In the navigation tree, double-click the policy component. You get to the Processing Data tab page on the policy component level.
6. In the Movement processing information field group, in the field External Event field, choose the business transaction for the “Reinstatement” of a policy component and/or for the “Policy Reinstatement” to reinstate all policy components of the policy. You can set the short names for the business transactions in the Customizing. Specify the desired effective date in the Effective Date field. You may make changes to data on all levels during reinstatement.
7. Choose the Save pushbutton in the SAP toolbar to save the movement.8. Choose the Process Movement function in the navigation tree in the context menu on policy level.
Result
The policy and possible changes has been transferred to the in-force business when having successfully processed the movement. You can edit further business transactions, if required. Reinstatement does not become effective if the movement processing has been incorrect. In this case, you can make changes to data of the movement policy and process the movement again.
The system displays error and success messages in the Application Log or writes them to the corresponding log file when processing in the background.
More information can be found in the “Results” section in Chapter Movement Processing [page 78]).
100 P U B L I CLife Reinsurance ModuleBusiness Object Policy

6.8 Delete Policy
Use
You can delete a policy from the system, if the policy has expired from a business point of view, within the scope of GDPR (General Data Protection Regulation). For information on prerequisites and procedure see Chapter General Data Protection Regulation (GDPR) [page 220].
6.9 Reactivating a Policy
Use
You can reactivate a claimed policy.
In other words, the insured person in the policy is no longer claimed and changes can once again be made to the policy.
Prerequisites
A policy can only be reactivated if a policy already exists in the in-force business. However, the policy must have the status “Claim Ongoing”.
You can also reactive policies with joint lives that have the status In Force. A claim must exist for one or several insured persons.
Procedure
Automatic Reactivation
Whether the system automatically reactivates an insured person depends on whether the No Automatic Expiries flag is set. You can find this flag at treaty level in the corresponding RI treaty on the Cession Handling tab page:
● When the No Automatic Expiries flag is set, the system does not automatically perform a scheduled transition. The cedent must deliver the reactivation of the insured person in a movement.
● When the No Automatic Expiries flag is not set, the system executes the reactivation automatically. In order for the system to correctly perform the reactivation, all of the assumed and ceded shares belonging to the policy component must be sufficiently forward booked. All of the shares have to be forward booked to the
Life Reinsurance ModuleBusiness Object Policy P U B L I C 101
end of the benefit payment mode in order to perform the scheduled reactivation. The end of the benefit payment mode has to be before the end date of the policy components. Refer to Chapter Ending a Policy [page 97] if this is not the case.
Manual Reactivation
Proceed as described below to manually reactivate a claimed policy.
1. Start the single risk administration. You get to the LRM Search initial dialog on the Life tab page.2. Switch to the Policies / Applications tab page and perform a search for the policy to be reactivated by using
corresponding search criteria, for example.3. Double-click to select the policy. You get to the Policy <Policy Number> Display dialog.4. In the navigation tree of the context menu of the insured person, choose the Create Claim Movement
function. The system creates a corresponding movement for this component. In this case, the system creates a copy of the entire policy structure in the navigation tree. The gear icon symbolizes the policy. The entire policy structure is highlighted in green and only the insured person is highlighted in yellow.
5. In the navigation tree, double-click the policy component node. You get to the Processing Data tab page.6. In the Movement Processing Information field group, in the External Event field, choose the business
transaction for “Reactivation”. The short name of the “Reactivation” business transaction can be set in the Customizing. Specify the desired effective date in the Effective Date field.Enter further data into the fields on the Reinsurance Claim Data tab page of the insured person level.
7. Choose the Save pushbutton in the SAP toolbar to save the movement.8. Choose the Process Movement function in the navigation tree in the context menu on policy level.
Result
The system displays error and success messages in the Application Log or writes them to the corresponding log file when processing in the background.
If the movement has been processed successfully, the policy in the in-force business is also reactivated. You can edit further business transactions, if required. Reactivation does not become effective if the movement processing has been incorrect. In this case, you can make changes to data of the movement policy and process the movement again.
More information can be found in the “Results” section in Chapter Movement Processing [page 78]).
6.10 Conversion of a Policy
Use
You can convert an existing in-force business policy into a new policy. To do so, lapse the in-force business policy and process a new policy (with a new policy number), for which the Due to Conversion flag has been set. The system assigns the existing in-force business policy to the new policy during movement processing. For
102 P U B L I CLife Reinsurance ModuleBusiness Object Policy

this automatic assignment, plausibility check no. 67 “Unique operative policy not found for new business from conversion” is evaluated.
Prerequisites
You can only convert an in-force business policy when the Due to Conversion flag has been set in the new policy.
Plausibility check no. 67 must be activated for automatic assignment during movement processing. To successfully perform the automatic assignment, the following fields must be identical in the in-force business policy and in the new policy:
● Life (Name, Date of Birth, Gender)● Cedent● Currency● Commencement Date of the Policy Component (PC)● Risk Begin Date of the Policy Component Share (PCS)● Sum Reinsured
In addition, the system checks for multiple existing insured persons and PCSs, whether at least the same insured persons (with the “Insured Person” role category) and the same assumed PCSs exist in the in-force business policy and in the new policy.
Function Scope
You can process a new business movement with a risk start date at the policy component share, which is earlier than the effective date of the policy component, when converting an in-force business policy. The Due to Conversion flag must have been set as a prerequisite for the new policy component. (From a functional point of view, the new policy, which is a result of the in-force business policy conversion, has the same risk start date as the original in-force business policy.)
To assign the new policy to the in-force business policy, you can also directly specify the in-force business policy, which is to be assigned, in the new movement. This way, the system makes an assignment without having to perform the above-stated checks. You can also make a manual assignment to a different policy after movement processing. Note the general restrictions when assigning business objects (see Chapter Assigning Business Objects [page 116]).
You must lapse the policy component of the in-force business policy so that only the policy component of the new policy is active in the system. Automatic lapsing is not performed.
Claims and other business transactions (such as changes to a policy), which are delivered for the new policy component earlier than the conversion date (effective date of the new policy/PC), cannot be processed.
Result
● When a matching in-force business policy is found during automatic assignment in movement processing, the system assigns this in-force business policy to the new policy.
Life Reinsurance ModuleBusiness Object Policy P U B L I C 103
● When no or multiple matching in-force business polices exist, the system displays a correspondingly set message (information, warning, error or cancelation) in the application log. In the case of error messages of the levels “Error” and “Cancelation”, the system terminates the movement processing.
6.11 Claim
Use
You can enter, manage and assess claims in LRM.
The “Claim” business object is part of an “Insured Person” of a policy component (see also Chapter Business Object Policy [page 76]).
An “Insured Person” with the “WIP” role type (withdrawn insured person) is not considered in the claim process.
Features
The claim management covers processing of claims in the life reinsurance business and contains the following processes:
● Entering claim data, either manually or via data carrier● Assignment of a claim to an existing policy, if possible● Processing the claim within movement processing● Creating or processing bookings● Assignment of claims on policy level for a claim in the FS-RI Basic System
The purpose of claim assessment is to evaluate a claim that was created in the claim management process. This evaluation is only performed in online operation and not in movement processing, as is the case when processing a claim. You can also store information that is relevant for claim assessment or that has been used for claim assessment.
The most important business processes in claim management and claim assessment can be taken from the following Chapters:
● Creating and Editing Claims [page 105]● Creating and Editing Claims Using the Claim Fast Entry [page 112]● Assessing Claim [page 109]
104 P U B L I CLife Reinsurance ModuleBusiness Object Policy

6.11.1 Creating and Editing Claims
Use
You can manually create a claim in the single risk administration of LRM and edit existing claims.
Procedure
You manually create a claim as described below:
1. Start the Single Risk Administration application. You get to the Life tab page in the LRM Search initial dialog.2. Switch to the Policies / Applications tab page and perform a search for the policy, for which you want to
create a claim, by using corresponding search criteria, if required.3. Double-click to select the policy. You get to the Policy <Policy Number> Display dialog. The entire policy
structure is displayed in the navigation tree.4. Choose the Create Claim Movement function in the navigation tree in the context menu of the insured
person that is affected by the claim to be created.The system creates a corresponding claim movement. In this case, the system creates a copy of the entire policy structure in the navigation tree. The gear icon symbolizes the policy. The insured person is highlighted in yellow and the corresponding policy structure is highlighted in green.
5. In this movement tree, navigate to the policy component affected by the claim. On the Processing Data tab page, enter the corresponding business transaction for a new claim or the claim alteration business transaction for changing an existing claimed policy component and the effective date. It is not possible to make changes to policies that already have a policy component set as “Claimed”. In such cases, it is only possible to make changes to the claim. You can enter the business transaction and effective date on the Reinsurance Claim Data tab page under Movement Processing Information. If the business transaction or effective date is entered or changed on either the Processing Data or Reinsurance Claim Data tab page, the entries or changes are transferred to the other tab page as well.
6. You can enter and make changes to claim-relevant data of a claim movement. You can modify, supplement or delete persons of the affected policy component, which do not have the role of the “Insured Person” role category, in a claim movement. Entries can only be made on the following tab pages in a claim movement:○ Processing Data on “Policy Component ” level○ Reinsurance Claim Data on “Insured Person” level○ Claim Share on “Insured Person Share” level○ Period Values and Profit and Loss Values on “Policy Component Share” level
You can also enter exclusive claim-relevant notes.In particular, you can store the name and address of the insurance agent. The Insured Person tab page is available for entries for persons that do not have the role of the “Insured Person” role category. The Insured Person tab page is only available for entering data in the field groups Occupations and Pastime for insured persons with a role of the “Insured Person” role category. All other tab pages are be locked so that entries cannot be made and are only available in display mode. You can set the short name for the “Insured Person” role category in the Customizing.
Life Reinsurance ModuleBusiness Object Policy P U B L I C 105
You can select only business transactions that have been internally flagged as claim-relevant business transactions. This might be the following internal claim business transactions, which have been maintained in the internal Customizing:○ “Policy Claim Alteration”○ “Policy Claim”○ “Reactivation”○ “Claim Change”○ “Claim Announcement”○ “Claim”
7. Choose the insured person of the policy component affected by the claim to which a role of the “Insured Person” role category by double-clicking. Enter the claim-specific data on the Reinsurance Claim Data tab page at the “Insured Person” level and on the Claim Share tab page at the “Insured Person Share” level. Note:○ If a corresponding claim header does not yet exist, a new claim header can be created at the “Insured
Person” level when creating a claim. To do so, fill in the claim header fields in the Claim Classification field group on the Reinsurance Claim Data tab page.
○ You can also assign an existing claim header to the current claim by using the Allocation of Claim Header pushbutton in the menu bar. When you choose the pushbutton, the system displays all claim header that are assigned to the current life in a dialog. Once you selected a matching claim header, the system transfers the data record to the corresponding fields on the Reinsurance Claim Data tab page.The claim header can only be created or changed on the Reinsurance Claim Data tab page. The claim header data is only displayed on the Claim Header Data, Assessment Data and Claim Share tab pages. Exception: The fields Cause of Claim, Secondary Cause of Claim and Type of Claim can also be edited on the Claim Assessment tab page.You can make changes to and/or create an existing claim header note or a new claim header note on any tab page that contains the claim header data.
○ When generating a claim movement, the system presets the following fields on the Reinsurance Claim Data tab page, if they have not been filled for a previous movement of the same claim.○ Claim Notification Date in the Notification field group: A claim notification date is preset using the
delivery date of the data transmission. If the delivery date is empty or if the data transmission is a system data transmission, the system uses the current date for the claim notification date.
○ Claim Status in the Status field group: A claim status is preset with the default value for internal “not defined” claim status.
○ Claim Processing Status is preset with the default value for the internal claim status in process.○ You can fill the fields Amount Notified, Amount Admitted , Amount to be Paid and Amount Calculated on
the Reinsurance Claim Data tab page in the Claim Amounts field group or on the Claim Share tab page in the Claim Share Amounts field group.The fields Amount Rejected and Amount Pending are calculated by the system and are not available for entering data. The system saves the difference between notified amount and admitted amount in the Amount Rejected field. The system saves the difference between admitted amount and amount to be paid in the Amount Pending field.
○ The values in the fields RI Benefit Payment and Benefit Payment Frequency on the Claim Share tab on the “Insured Person Share” level correspond to the values in the fields RI Benefit Payment Mode and Benefit Payment Frequency on the Policy Component Share Data tab on the “Policy Component Share”level.
8. When you fill the amount fields in the Claim Amounts field group on the Reinsurance Claim Data tab page, the system distributes the amounts to claim shares and enters the amount in the corresponding fields of the Claim Share Amounts field group on the Claim Share tab page. The amounts are distributed
106 P U B L I CLife Reinsurance ModuleBusiness Object Policy

proportionally based on the relationship of the initial sums reinsured of the underlying policy component shares.
9. However, if entries are made in the amount fields on the Claim Share tab page, the system adds up the amounts from all assumed claim shares and enters the totals in the corresponding fields on the Reinsurance Claim Data tab page.
NoteThe system calls the process for the distribution of the claim amounts to claim shares each time a new entry is made or when making changes to one or several of the amount fields Amount Notified, Amount Calculated, Amount Admitted, Amount to be Paid on the Reinsurance Claim Data tab page.
In the same way, the system also calls the process used to accumulate the claim amounts at the “Claim per Insured Person” level, if one or more of the amount fields is reentered or changed on the Claim Share tab page.
This approach ensures consistent data between the amounts at the “claim level for each insured person” level and the amounts at the claim share level. The calculated amount can be entered manually on the Reinsurance Claim Data tab enter or use the Generate Calculated Amount to have the system calculate it. The system calculates the amount in msg.PMQ using the formula stored there.Similarly, you can manually enter the liability reserve and the mathematic reserve on the Claim Share tab page or use the Generate Reserves pushbutton to get the system to calculate the reserve. Again, the system calculates the reserves in msg.PMQ using the formula stored there.The current version of the policy and the previous version are transferred to msg.PMQ after the calculation using the functions Generate Calculated Amount and/or Generate Reserves.
10. The claim movement can be processed once all of the necessary claim data has been entered and saved. To do so, choose the Process Movement function in the context menu of the policy node in the movement tree.
NoteYou can find the Automatic Claim Processing flag in the product / cession administration (Maintain Business Partner application) on the Processing Information tab page in the Processing Control field group. The flag only has effect on the way in which claim movements are processed in a non-system data transmission.
If the flag is not set, it is only possible to process claim movements from the navigation tree of the application. It is not possible to process them using a data transmission dialog or a movement processing background process.
If the flag is set, the system automatically processes claim movements. It is also possible to process claims using a background process or data transmission dialog.
11. When the following conditions apply, changes having been made to the fields listed below are not transferred from the movement to the operative claim fields with the same name when processing a claim movement:○ The decision processing status (Decision Processing Status field in the Status field group on the
Assessment Datatab page) has already been set to “Assessment Completed”.○ The claim processing status of the operative claim (Claim Processing Status field in the Status field
group on the Reinsurance Claim Data tab page) is set to “not defined”.○ The Opinion Only flag in the General Claim Data field group on the Reinsurance Claim Data tab page has
not been set.
Life Reinsurance ModuleBusiness Object Policy P U B L I C 107

You can set the short names for the statuses “Assessment Completed” and “Not Defined” in the Customizing.The table below lists all affected fields:
Fields Table
Admitted Term Year(s)
Admitted Term Month(s)
Admitted Term Day(s)
Disability Degree
Opinion Only
Amount Admitted
Continuation of a Claim
Fields in the decision table
Type of Claim
Cause of Claim
Secondary Cause of Claim
Fields in the claim header table
The system issues a message for each field, the changes to which are not transferred to the operative claim fields. The values of the affected fields are reset to the original values.
12. When a claim movement with a “Claim Announcement” event is successfully processed, the flag in the Claimed Announced field in the operative claim is automatically set at the claim level (Reinsurance Claim Data tab page, General Claim Data field group). You cannot perform the events “Reinstatement” and “Reactivation” on these claims. If you want to remove a claim announcement, you have to use the “Reversal of a Claim Announcement” claim event. This event can only be processed if the flag in the Claimed Announced has been set at the claim.
Result
Following successful processing of the claim movement, the system writes movement data to the corresponding operational tables and displays the processed claim in the navigation tree.
When you create a claim assessment, the system attempts to automatically make the decision. To do so, the system calls an BRFplus function for automatic decision. The Manual Decision flag is set, when the system cannot automatically make a decision for at least one claim. When you have activated the Claim Assessment Workflow, it is started for each assessment. The system no longer attempts to complete the claim automatically once you or the system has set the Manual Decision flag.
The system triggers the final claim movement after having completed manual or automatic assessment. The claim status and the claim processing status is set to the internal status “Completed” with the completing claim movement. In addition, the system transfers the claim costs of the assessment to the claim share based on the functional key.
108 P U B L I CLife Reinsurance ModuleBusiness Object Policy
When processing payment requests, claim costs and profit and loss values, the system determines the due date of those amounts based on the Payment Period in Days condition and the netting information before the aggregation and transfer run.
If a change is made to the claim header of a claim and other claims are assigned to this claim header, the system transfers the claim header data into the operative policy, thereby changing all claims.
Exception
When the system automatically reached a decision for each claim, yet not all required documents exist in the evidence checklist (see Evidence Checklist tab page at claim assessment, the system does not automatically completes the claim assessment and does not start the Claim Assessment Workflow.
6.11.2 Assessing Claim
Use
You can assess a claim in the single risk administration of LRM.
Prerequisites
Under the following conditions, the system automatically creates a claim assessment when processing a claim movement.
● You have either set the flag in the Assessment Required field or in the Opinion Only field.● The claim limit that you previously defined in the treaty under the conditions has been exceeded.
NoteYou cannot manually create a claim assessment.
Features
When one of the specified requirements is met, the system automatically creates a node in the Claim Assessment.
Choose the entry affected by the claim un der the Claim Assessment by double-click.
The system defaults the following fields due to the automatic creation of the claim assessment with values that you defined in the Customizing:
● Decision Processing Status on the Assessment Data tab page.● Decision Status on the Decision Table tab page in the Decision Table.
Assessment Data Tab Page
Life Reinsurance ModuleBusiness Object Policy P U B L I C 109

The following editing options are available on the Assessment Data tab page:
● Set decision processing status:When you set the decision processing status to “Complete” in the Decision Processing Status field, the system locks all other fields on any other tab pages of claim assessment against entries being made. To do so, all decisions in the decision table on the Decision Table tab page need to be set to “Rejected” or to “Accepted”. If this is not the case, the fields on all tab pages of the claim assessment remain ready for entry. The system displays an information message and a corresponding error message when saving. You can set the short names for the decisions statuses “Reversal” and “Policy Lapse” in the Customizing.
● Create and edit notes:You can edit and make changes to fields for notes as long as you have not saved the claim assessment.
● Create and edit contacts:You can use the contact table for facilitated management of persons that you contact within the scope of claim assessment, such requesting an expert opinion from the doctor, for example.You can manage the values for the Contact Type in the Customizing. As soon as you selected a contact type, you can choose the GP Role (business partner role) and then the Business Partner using the selection list. You have to select the corresponding line in the table to choose the business partner.
● Create and edit review:You can note the assessment date in the review table and determine if and when a review is required. To do so, enter the corresponding review type.
● Determine claim type and cause of claim:To do so, use the fields Type of Claim, Cause of Claim and Secondary Cause of Claim in the Claim Header Data/Classification field group. You can search for and select the values for the Cause of Claim and Secondary Cause of Claim fields from a hierarchy.
● The claim assessment is saved on the effective date of the claim.
Evidence Checklist Tab Page
The following editing options are available on the evidence checklist tab page:
● You can save evidence documents for the claim assessment and obtained evidence documents as attachments with additional notes, such as accident reports or medical certificates, for example.
● When evidence types are defined as default for the claim assessment in the Customizing, the creates the entries for the evidence types to be requested in the Evidence Checklist table when automatically creating a new claim assessment.Under the following conditions, the system takes into account an evidence type as default evidence type:○ The Claim Only and Default Flag for CA flags are both activated in Customizing and no condition type
has been stored.○ The Claim Only flag is activated in the Customizing and the condition type defined in the Customizing
is entered for a claimed policy component share that belongs to the policy.● The Fulfillment Date field contains the date on which the last requested evidence document has been
delivered or its receipt has been recorded. The system automatically enters the fulfillment data, so that all documents flagged with the Evidence Required flag obtain the date of receipt. It contains the receipt date of the last document that has been received. When no evidence document has been flagged with Evidence Required flag, the Fulfillment Date field contains the date on which the assessment has been created or modified.
Impairments Tab Page
The system displays impairment groups for which you can choose one or several impairments using selection lists on the Impairments tab page. You can add documents as attachments and create notes for each impairment.
110 P U B L I CLife Reinsurance ModuleBusiness Object Policy

The system displays all entered impairments in the Impairment per Claim field group on the Decision Table tab page. You assign impairments to the corresponding claim.
Decision Tab Page
The following editing options are available on the Decision Table tab page:
● In the decision table, you can determine the accepted amount for each claim in the Admitted Amount column and select a decision status using a selection list in the Decision Status column.If you make changes to values in fields that are located on the Reinsurance Claim Data tab page or the Admitted Amount field in the decision table, the system takes into account these changes in the corresponding fields on the Reinsurance Claim Data under the following conditions: You completed and saved the decision with the “Rejected” or “Accepted” decision status in the Decision Status column.If you make changes to values of fields, which are also located on the Decision Table tab page, in a subsequent claim movement on the Reinsurance Claim Data tab page, the system does not adopt these changes in the corresponding fields on the Decision Table tab page because the decision has already been rejected or accepted.
CautionThe Sum Reinsured in the decision table contains the reinsured sums of all assumed, not lapsed and not expired shares of the currently displayed policy component version and the insured person that is affected by the claim.
● In the Claim Costs table, you can determine the amount for each claim cost in the Amount column and select the processing status in the Processing Status column. If you make changes to the decision status of the related decision, the system derives the processing status of the claims costs accordingly, provided that you have not yet set this status.
● In the Impairment per Claim field group, you can choose one or several impairments for the displayed impairment groups using a selection list. The system transfers the impairments entered here to the Impairments tab page.
Claim Decision Index Tab Page
You can enter keywords for each claim assessment in the Claim Decision Index table on the Claim Decision Index tab page. These key words merely serve an informational purpose and have no influence on the claim assessment.
You define the available entries for the selection list in the msg.Life Reinsurance Module Claim SettingsMaintain Claim Decision Index Customizing activity.
Automatic Mode Change
The system checks the decision processing status when switching to the dialog for claim assessment. The system automatically switches from the display mode to the change mode if the decision processing status has not been set to “Assessment Completed” provided that no other business object is in change mode.
On the other hand, when you set and saved the decision processing status to “Assessment Completed” in change mode, the system automatically switches from change mode to display mode.
Life Reinsurance ModuleBusiness Object Policy P U B L I C 111

6.11.3 Creating and Editing Claims Using the Claim Fast Entry
Use
You can create and edit a claim in the single risk administration of LRM using the claim fast entry.
Procedure
Proceed as described below to create a claim using the claim fast entry:
1. Start the Single Risk Administration application. You get to the Search initial dialog.2. Switch to the Policies / Applications tab page and perform a search for the policy, for which you want to
create a claim, by using corresponding search criteria.3. Double-click to select the policy. You get to the Policy <Policy Number> Display dialog. The entire
hierarchical structure of the policy in the in-force business with the node for “Policy Component”, “Insured Person”, “Policy Component Share” and “Insured Person Share” is displayed in the navigation tree.
4. Choose the Create Claim Fast Entry function in the context menu of the “Insured Person” that is affected by the claim. The system creates a claim movement. You get to the Claim Fast Entry - Claim Data dialog.The system defaults data on policy, person and identity with data from the in-force business. When data on claim, claim share and claim header already exists in the in-force business, the system also defaults this data. As the policy component and the insured period have already been set to “Claimed” due to the creation of the claim movement, the system makes changes to the claim data that exists in the in-force business. Corresponding fields for claim data, which do not exist in the in-force business, are added without entries.The Claim Fast Entry - Claim Data dialog contains the claimed person and any persons that do not have “Insured Person” role in a table. You can create persons with a role unlike “Insured Person” role category or delete persons to which the “Insured Person” role category has not be assigned. You can set the short name for the “Insured Person” role category in the Customizing.
5. In the Claim Event field, choose the corresponding business transaction for a claim and determine the effective date. The following business transactions, which have system-internally been flagged as claim-relevant business transactions, are available:○ “Policy Claim Alteration”○ “Policy Claim”○ “Reactivation”○ “Claim Change”○ “Claim Announcement”○ “Claim”○ “Continuation of a Claim”
6. Choose the person involved in the claim in the Change IP column in the Involved Person table and choose the > (next) pushbutton with the black arrow at the bottom at the right in the last line of the dialog. You get to the Claim Fast Entry - Insured Person Data. For persons involved, to which no role of the “Insured Person”
112 P U B L I CLife Reinsurance ModuleBusiness Object Policy
role category has been assigned, all fields and tables are available for input in the Claim Fast Entry - Involved Person dialog.You can use the > Claim (next claim) pushbutton to get to the Claim Fast Entry - Claim Classification and Payment Data. From there, you get to the Claim Fast Entry - Claim/Claim Share Data dialog using the > Claim Share pushbutton. You can also get to the Claim Fast Entry - Claim/Claim Share Data dialog by not setting the flag in the Change IP column but by choosing the >pushbutton.Claim-specific data can be entered in the Claim Fast Entry - Claim Data, Claim Fast Entry - Claim Classification and Payment Data and Claim Fast Entry - Claim / Claim Share Data dialogs. Note the following:1. When generating a claim movement, the system defaults the following fields in the Claim Fast Entry -
Claim Data dialog if they have not been filled for a previous movement of the same claim:○ Claim Date is defaulted using the delivery date of the data transmission (claim notification date). If
the delivery date is empty or if the data transmission is a system data transmission, the system defaults the current date as the claim notification date.
○ Claim Status (claim status) is preset with the default value for internal claim status “Not Defined”○ Claim Processing Status (claim processing status) is preset with the default value for internal claim
status “In Process”.2. Entries can be made in the Amount Notified, Amount Admitted, Amount to Be Paid, Calculated Amount
fields in the Claim Fast Entry - Claim Data and Claim Fast Entry - Claim / Claim Share Data dialogs.7. Fill the claim amount fields in the Claim Fast Entry - Claim Data or Claim Fast Entry - Claim / Claim Share
Data dialogs. The system distributes the claim amounts among the claim shares and enters the amounts in the corresponding fields in the Claim Fast Entry - Claim / Claim Share Data dialog. The amounts are distributed proportionally based on the relationship of the initial sums reinsured of the underlying policy component shares.
8. When you enter amounts in the claim share amount fields in the Claim Fast Entry - Claim / Claim Share Data dialog, the system adds the amounts of all assumed claim shares and enters these added amounts into the corresponding fields in the Claim Fast Entry - Claim Data and Claim Fast Entry - Claim / Claim Share Data dialogs. For every new creation or change to one or more amount fields (Amount Notified, Amount Calculated, Amount Admitted, Amount to be Paid) in the dialogs Fast Entry - Claim Data and Claim Fast Entry - Claim / Claim Share Data, the system calls the process used to distribute the claim amounts to the claim shares. When you enter new or make changes to one or several claim share amount fields in the Claim Fast Entry - Claim / Claim Share Data dialog, the system also calls the process for accumulating of claim share amounts. This approach ensures that both the claim and claim share amount data is consistent.You can manually enter the calculated amount in the Claim Fast Entry - Claim Data or Claim Fast Entry - Claim / Claim Share Data dialogs or you can use the Generate Calculated Amount pushbutton to have the system calculate the amount. The system calculates the amount in msg.PMQ using the formula stored there. The current version of the policy and the previous version are transferred to msg.PMQ as soon as the function has been selected.
9. Once you have entered and saved all required claim data, choose the Process Movement pushbutton to process the claim movement.
10. When the following conditions apply, changes made to the fields described below are not adopted from the movement into the operative claim fields with the same name when processing a claim movement.○ The decision processing status (Decision Processing Status field in the Status field group on the
Assessment Datatab page) has already been set to “Assessment Completed”.○ The claim processing status of the operative claim (Claim Processing Status field in the Status field
group on the Reinsurance Claim Data tab page) is set to “not defined”.
Life Reinsurance ModuleBusiness Object Policy P U B L I C 113
○ The Opinion Only flag in the General Claim Data field group on the Reinsurance Claim Data tab page has not been set.
You can set the short names for the decision and claim status “Assessment Completed” and “Not Defined” in the Customizing.The table below lists all affected fields:
Fields Table
Admitted Term Year(s)
Admitted Term Month(s)
Admitted Term Day(s)
Disability Degree
Opinion Only
Amount Admitted
Continuation of a Claim
Fields in the decision table
Type of Claim
Cause of Claim
Secondary Cause of Claim
Fields in the claim header table
The system issues a message for each field, the changes to which are not transferred to the operative claim fields. The values of the affected fields are reset to the original values.
Result
Following successful processing of the claim movement, the system writes movement data to the corresponding operational tables and displays the processed claim in the navigation tree.
When you create a claim assessment, the system attempts to automatically make the decision. To do so, the system calls an BRFplus function for automatic decision. The Manual Decision flag is set, when the system cannot automatically make a decision for at least one claim. When you have activated the Claim Assessment Workflow, it is started for each assessment. The system no longer attempts to complete the claim automatically once you or the system has set the Manual Decision flag.
The system triggers the final claim movement after having completed manual or automatic assessment. The claim status and the claim processing status is set to the internal status “Completed” with the completing claim movement. In addition, the system transfers the claim costs of the assessment to the claim share based on the functional key.
When processing payment requests, claim costs and profit and loss values, the system determines the due date of those amounts based on the Payment Period in Days condition and the netting information before the aggregation and transfer run.
Exception
114 P U B L I CLife Reinsurance ModuleBusiness Object Policy

When the system automatically reached a decision for each claim, yet not all required documents exist in the evidence checklist (see Evidence Checklist tab page at claim assessment, the system does not automatically completes the claim assessment and does not start the Claim Assessment Workflow.
6.11.4 Auto-Adjudication Messages
Use
The Auto-Adjudication Messages tab page of the claim assessment contains a table with auto-adjudication messages.
The messages are also displayed in the claim assessment workflow under step 3 “Decision Data” on the Auto-Adjudication Messages tap page.
The system issues all result messages of the BRFplus service function Auto-Adjudication in the application log. Result messages of the type “Error” result in movement processing being terminated.
6.12 Displaying FS-CD Account Balance
Use
You can call the FS-CD account balance display for the business objects life (“Life” level) and policy (“Policy”, “Policy Component ”, “Policy Component Share” levels)..
Features
Depending on the respective selected level, the system determines all account numbers from the profit and loss values and transfers these as default setting to the FS-CD account balance display. The FS-CD account balance display is then displayed directly with the selected list type and line layout.
Life Reinsurance ModuleBusiness Object Policy P U B L I C 115
7 Assigning Business Objects
Use
In LRM, you can assign business objects to each other at the following locations:
● Operative data: Assignments tab page on policy level● In movement processing: Policy Data tab page, field group Assignments at policy level
On policy level, you can assign policies to policies, policies to applications (and vice versa), policies to master policies (and vice versa), applications to applications and applications to master policies (and vice versa). You cannot assign a master policy to another master policy.
The system creates the counter assignment when the data is saved. This means that the system enters the current business object as assigned business object for business objects that you have assigned to the current business object. Lives are also joint in the system to a group life. The process is fully automated.
The following rules apply when assigning business objects to each other:
● They must belong to the same cedent.● They must be within the same company code.● You cannot assign a business object to itself.● You cannot assign an already assigned business object to the same business object.
The tables below contain the additional rules that apply for the individual business objects:
Master Policy Business Object
Business Object to be Assigned Rules
Master Policy Assignment not permitted
116 P U B L I CLife Reinsurance Module
Assigning Business Objects
Business Object to be Assigned Rules
Policy ● The same original cedent● The same product code and version● Start and end date of the policy must be within the start and end date of the master
policy.● At least one matching policy component with the same plan code, same version and
same sequence number, whereas the increase number has to be “0”.● The matching policy component must have the following, identical fields:
○ Benefit Payment Mode○ Accounting Fund○ Anniversary○ Regular Benefit Payment Mode○ Reinsurance Premium Rate Guarantee
● Possible combination for the policy component status:
Master Policy Policy
“In Force”, “Annuity Payment” All possible policy component statuses
“Expired”, “Lapsed” “Expired”, “Lapsed”, “Claim Ongoing”, “Claim Terminated”
● Assumed policy component shares of the matching policy component must have the following, identical fields:○ Treaty○ Section○ Reinsurance Method○ Global Accounting Unit○ Risk Start Date
Application ● Underwriting processing status is “Completed”, “Invalid” or “Materialized Without Policy”.
● Overall decision is “Accepted”.
Business Object Policy
Business Object to be Assigned Rules
Master Policy ● You can only assign a master policy to a policy.● Same rules as those for the assignment of master policy to policy.
Policy At least one life number of the insured person must match.
Life Reinsurance ModuleAssigning Business Objects P U B L I C 117
Business Object to be Assigned Rules
Application ● You can only assign an application to a policy.● At least one life number of the insured person must match.● Underwriting processing status is “Completed”, “Invalid” or “Materialized Without
Policy”.● Overall decision is “Accepted”.
Business Object Application
Business Object to be Assigned Rules
Master Policy ● You can only assign a master policy to an application..● Underwriting processing status is “Completed”, “Invalid” or “Materialized Without
Policy”.● Overall decision is “Accepted”.
Policy ● You can only assign a master policy to an application.● You cannot assign further policies once the application has been materialized.● At least one life number of the insured person must match.● Underwriting processing status is “Completed”, “Invalid” or “Materialized Without
Policy”.● Overall decision is “Accepted”.
Application At least one life number of the insured person must match.
118 P U B L I CLife Reinsurance Module
Assigning Business Objects
8 Accounting
Features
Accounting in LRM contains the following processes and functions:
● Edit Period Values, see Chapter Period Values [page 119]● Process Profit and Loss Values, see Chapter Profit and Loss Values [page 121]● Execute Forward Booking, see Chapter Forward Booking Function [page 125]● Execute Reverse Booking, see Chapter Reverse Booking Function [page 128]
8.1 Period Values
Use
Period values are usually automatically created by the system. Period values may be delivered by the cedent or can be added manually. You can display, enter, delete and make changes to period values on the Period Values tab page.
Features
You find the Period Values tab page in the single risk administration by searching for the required policy and double-clicking the node of the policy component share in the navigation tree. The table of the Period Values tab page contains the following data:
Condition Type
When you add a period value, you have to choose a booking-relevant condition type, you also have to determine a period interval and a validity period with start and end date each. You maintain condition types in the Customizing under Settings for Account Maintain Assignment of Condition Types to RML Codes .
Condition Validity
The Condition Valid From contains the validity start date of the condition used for calculation. This value is irrelevant for manual period values.
Involvement
The Involvement column contains the involvement number of the involved business partner.
Original Amount
The Original Amountcolumn contains a booked amount of the period value in the original currency.
Life Reinsurance ModuleAccounting P U B L I C 119

External Event
The External Event column contains a business transaction. The value of the field with the same name is adopted from corresponding policy component.
Event Reason
This column contains the contents of the field with the same name from the corresponding policy component share. You can use this value to specify an external event for each company code in more detail
Period Interval
Period values can be generated for a specific period interval. The period interval is derived from the effective date of the movement, the anniversary of the policy component and the period value frequency. You determine the period interval using the start and end date in the columns Period Start Date and Period End Date.
Validity Period
The amount of a period value always refers to the entire period interval. The validity period with start date and end date in the Validity Start Date and Validity End Date columns is used to determine the actual amount. The period value is valid in this period.
Manual Creation
When you manually created a data record in the in-force business or in movement processing, the system automatically sets the flag in the Manual column. Manual change, such as deletion, are only permitted for manually entered period values.
Delivery Type and Date, “Delivered” Flag
If a period value is delivered, the Delivery Date column contains the date on which the cedent delivered the period value. If the period value has been delivered, the flag in the Delivered column is also set.
Pro-Rata Values, As-At Values
You need to distinguish between the following values in principle:
● Pro-rata-values such as premiums or commissions refer to a time interval (pro rata temporis) that allows linear amount calculation.
● As-at values, such as reserves or lump sum payments, always refer to a day and are not calculated proportionally. As-at values can represent absolute states or differences (deltas). The flag is set in the As at Value column if the period start date and the period end date occur on a day.
Derived Values
When a period value is derived from a P&L value (depending on the delivery type of the cedent), the system sets for this period value the flag in the Derived column.
Audit Values
When the auditing process only created a period value to check the delivered period values, the system sets the flag in the Audit column.
Cash Loss
When the CashLoss flag is set, the period value is cash loss payment. P&L values derived from such period values are directly transferred to the current account or to the basis after they have been generated.
Provisional Values
120 P U B L I CLife Reinsurance Module
Accounting

If it is a provisional value, the flag in the Provisional column is set. When the flag is not set, it is a defined period value.
Filter by Validity Function
You can use the Filter by Validity function (pushbutton with the same name in the menu bar above the table) to restrict the number of displayed period values. The filter is active by default and has the result that only period values with a validity start date that is either the same or after the PCS effective date are displayed. If you activate the Filter by History pushbutton, the system deactivates the filter by validity.
Filter by History Function
You can use the Filter by History function (pushbutton with the same name in the menu bar above the table) to restrict the number of displayed period values. This filter is deactivated by default. Choose the Filter by History pushbutton to activate the filter. The system only displays those period values the creation date/time of which is the same as the processing date/time of the opened history version. If you activate the Filter by Validity pushbutton, the system deactivates the filter by history.
The system displays all period values if no filter has been activated.
Checks for Period Values
The system performs the following checks for entries in the columns of the table for period values:
Field Name Validation Check
Condition Type Required entry field. Only posting-relevant condition types must be used.
Period Start Date, Period End Date Required entry fields. The period start date must be earlier than or the same as the period end date. For as-at values, the period start date and the period end date must be the same. The period interval must be the same as the respective period value frequency.
Validity Start Date, Validity End Date The validity start date must be earlier than or the same as the validity end date. Moreover, the period interval must be within the validity interval.
Original Amount Period values may contain zero amounts. This applies to both pro-rata as wel as-at values.
8.2 Profit and Loss Values
Use
You can enter, make changes to or delete profit and lost values on the Profit and Loss Values tab page.
Life Reinsurance ModuleAccounting P U B L I C 121
Features
You find the Profit and Loss Values tab page in the single risk administration by searching for the required policy and double-clicking the node of the policy component share in the navigation tree. You enter the following data on the Profit and Loss Values tab page:
RML Code, Entry Code, Condition Type
You maintain RML codes in the Customizing under Settings for Account Maintain Assignment of RML Codes to Entry Codes .
RML codes are linked to condition types. You maintain this relationship in the Customizing under Settings for Account Maintain Assignment of Condition Types to RML Codes . The amount that corresponds to the RML code is displayed in the Amount+/- column.
You can use the +/- sign of the value in the Amount +/- column to determine whether the reinsurer considers the amount to be revenue or expenditure. The system determines the +/- sign from the entry code (premium or claim assignment) and the respective treaty category (gross or retro).
External Event
The External Event column contains the business transaction that generated the profit and loss value, for example, the business transaction for “Lapse”. The system uses the business transaction that has been entered on the “Policy Component” level on the Processing Data tab page.
Event Reason
The Event Reason column contains the contents of the field with the same name from the corresponding policy component share. You can not change this value.
Effective Date
This column contains the effective date of the policy component share version assigned to the profit and loss value. Profit and loss values that were generated by a forward booking, reverse booking or entered manually, are always assigned to the directly affected policy component share version.
Validity Period
P&L values can be generated for a specific validity period. For posting values, this validity period is derived from the anniversary of the policy component and the policy premium frequency or annuity payment frequency. You determine the period interval using the start and end date in the columns Validity Start Date and Validity End Date.
Client Accounting Period
Each manually created P&L value is assigned to the currently open accounting period (see Chapter Opening of a CAP [page 142]).
If the movement is delivered for a CAP that is in the past, the movement is still posted to the currently open CAP. In this case, the actual, historical CAP is stored in the settlement period.
Exception: The system determines the client accounting period (CAP) using the validity start date of a profit and loss value or, taking into account the following conditions, when using the start date of the reporting period:
● The treaty used has been defined as a non-service treaty and
122 P U B L I CLife Reinsurance Module
Accounting

● In the Processing field on the Product/Cession Administration tab page, you have selected one of the following processing options:○ “Transactions with Account Data (All CAPs Allow Posting)”○ “Transactions Without Account Data (All CAPs Allow Posting)”○ “Movements (with some account data - all CAPs postable)”○ “Movements (P&L values only - all CAPs postable)”
This way, the system can also book a profit and loss value to a client accounting period (CAP) in the past.
Unique Financial Identifier (UFI)
You can use the Unique Financial Identifier (UFI) to identify financing transactions.
The value of this field is adopted from a corresponding payment request or from claim costs or from the policy component share. It may also be delivered directly for a profit and loss value.
Due Date
The due date for payment-relevant profit and loss values is either transferred from the associated payment request or calculated by the system (depending on the netting information and the “Payment Period” condition).
The due date can also be delivered as part of the movement. Once the date has been set it is no longer overwritten by the system.
Origin of the Value
When a value was created by means of a reverse booking, the system sets the flag in the Reverse Booking column.
When a value was created by means of a renewal, the system sets the flag in the Renewal column.
Accounting Units
Each P&L value is assigned a unique accounting unit (AU). You can differentiate between Global Accounting Unit and Local Accounting Unit. The local accounting unit is used to define the global accounting unit in more detail.
Link to the Basic System
The number in the Accounting column is the number of the basic system account. The corresponding posting value is entered in this account. When you double-click this field, the system switches to the display of the specified basic system account.
The Treaty field is used for assigning posting values to the treaty.
The Section field is used for assigning posting values to the treaty section.
The Begin field contains start date of the generation.
Lapse
When the flag is set in the Lapsed column, the corresponding P&L value is lapsed.
Management Data
The system displays date and time, at which a data record was created or changed in the columns Generation Date and Generation Time. The columns Creator User Name and Changed By (User Name) specify the name of the creator or the person that made changes.
Life Reinsurance ModuleAccounting P U B L I C 123

Filter by History Function
You can use the Filter by History function (pushbutton with the same name in the menu bar above the table) to restrict the number of displayed profit and loss values. This filter is deactivated by default. Choose the Filter by History pushbutton to activate the filter. The system only displays the profit and loss values the creation date/time of which is the same as the processing date/time of the opened history version.
Get FS-CD Information Function
Clearing data in the columns Clearing Date, Clearing Stratus Icon, Clearing Status Text, Clearing Reason Number and Clearing Reason Text can be determined at runtime from FS-CD by using the Get FS-CD Information pushbutton. This function is only available if the underlying company code has been configured for FS-CD. Otherwise, the system does not display this pushbutton. The system switches to the FS-CD business transaction display for corresponding documents when double-clicking the entry in the Clearing Status Text column.
Period Values
The Delivery Date, As-At Date, Manual, Delivered, Audit, Cash Loss, Involvement and Provisional fields have the same meaning as the fields with the same name on the Period Values tab page (see Chapter Period Values [page 119]).
P&L Values Check
The system performs the following checks for entries in the columns of the table for profit and loss values:
Field Name Validation Check
Involvement The share must not be filled. If the share is filled, it must exist in the underlying treaty.
RML Code Required entry field. Only RML codes that have been maintained in Customizing must be used.
Validity Start Date, Validity End Date Required entry fields. The validity start date must be earlier than or the same as the validity end date.
For as-at values, the validity start date and the validity end date must be the same.
The validity interval of non-delivered values must not be longer than the stored premium payment frequency or benefit payment frequency. The validity interval of delivered P&L values are not checked with regard to premium or benefit payment frequency.
The validity start date must not be earlier than the risk start date.
Amount +/- For pro-rata values, the amount must not be “0” . As-at values may have a zero amount, if they do not represent delta values.
124 P U B L I CLife Reinsurance Module
Accounting
8.3 Forward Booking Function
Use
Forward booking is used to create period values and P&L values (profit and loss values) that are either used to generate accounts or postings or to audit the values delivered by the cedent.
Integration
Forward booking is performed during movement processing or by starting the manual renewal.
Prerequisites
You can only process movements if you created a movement in advance. The authorization for the relevant company code must have been granted to your user to process movements and thus to make changes.
Features
The processing attributes are decisive for the type of forward booking: The processing characteristic is determined in the Processing field on the Cession Handling tab page of the treaty. The following section contains a description of the different types of system behavior, which depends on the processing:
Movements with Accounting Data
● Meaning for assumed business: In general, all period values and posting values are provided by the cedents. Forward booking is only necessary if the delivered values should be audited.
● If the cedent is late in delivering the values, a renewal can be performed by creating provisional values (more information can be found in the “Generating Provisional Values” section).
● What it means for ceded business: The period or posting values are determined based on the existing values in the assigned assumed policy component share (linear deviation). The system never calculates values in this case.
Movements (with Some Accounting Data)
● What it means for assumed business: The system calculates all values, which have not been delivered by the corresponding movement. Auditing delivered values depends on the auditing settings on the cession handling level. When auditing has been activated for a particular condition types, audit period values and audit P&L values are created for these condition types, if even no values have been delivered.
● What it means for ceded business: Additional conditions can be defined. These conditions may overwrite or delete the existing values (stop conditions). Depending on the ceded conditions○ Period and P&L values are derived proportionally from existing values of the assigned, assumed policy
component share or
Life Reinsurance ModuleAccounting P U B L I C 125

○ , in the case of a stop condition, not adopted or○ calculated by the system.
Movements with no Accounting Data
● What it means for assumed business: All values are calculated by the system. No auditing is possible.● What it means for ceded business: All values are calculated by the system. No auditing is possible.
Movements (P&L Values Only)
● What it means for assumed business: All period values to be created are derived in a linear way from the P&L values delivered by the cedent. Calculations are not performed in msg.PMQ. It is assumed that all P&L values are delivered.
● What it means for ceded business: The period values/posting values will be determined based on the existing values of the assigned assumed policy component share. The system never calculates values.
Movements (Some with Accounting Data – No Reverse Booking)
The behavior is identical with the behavior described in section “Movements (Some with Accounting Data – No Reverse Booking)” above. Only the reverse booking is different (see Chapter Reverse Booking Function [page 128]).
The beginning of the posting period in the forward booking process corresponds to the effective date of the movement or the effective date of the renewal background program.
The end of the booking period depends on the underlying business transaction and is derived from the end of the currently open accounting period. Providing that no schedule transitions (expiry, transition to the benefit payment phase) exist, that may further restrict the booking period. For policy anniversary mode, the end of the booking period may exceed the end of the open accounting period.
Trans. (Some w. Acct Data - PR/CC - RP - All CAPs Posting)
The behavior is identical with the behavior described in the section “Movements (Some with Accounting Data – No Reverse Booking)” above.
The system does not create period values for condition types that have defined for the usage of payment requests/claim costs. Period values and P&L values are only derived from payment request/claim costs.
The premium payment frequency and/or benefit payment frequency is not used for profit and loss values that are created based on payment requests or claim costs. The validity period of the profit and loss values is taken from the revenue period of the payment request or claim costs. If the treaty is a non-service treaty, a profit and loss value, depending on the Client Accounting Period Start Date field of the data transmission is assigned to the currently open CAP or to a CAP in the past. If the Client Accounting Period Start Date field is empty, the Reporting Period Start Date field is used for the data transmission. When a P&L value has been created on the basis of a payment request and/or claim costs, the CAP determination is made depending on the reporting period start date in the Reporting Period Start Date of the payment request/claim costs. If the treaty has been defined as a service treaty, all profit and loss values are assigned to the CAP that is currently open.
Trans. (Some w. Acct Data - No Rev. - PR/CC - RP - All CAPs)
The behavior is identical with the behavior described in the Section “Trans. (Some w. Acct Data - No Rev. - PR/CC - RP - All CAPs)” above. Only the reverse booking is different (see Chapter Reverse Booking Function [page 128] ).
Transactions (Some with Account Data - No Rev. - Delta PVs)
126 P U B L I CLife Reinsurance Module
Accounting
The behavior is identical with the behavior described in the section “Movements (Some with Accounting Data – No Reverse Booking)” above. It may be possible that period values are delivered as deltas for existing period values.
Trans. (Some w. Acct Data - No Rev.- All CAPs Post - DeltPV)
The behavior is identical with the behavior described in the Section “Trans. (Some w. Acct Data - No Rev.- All CAPs Allow Posting)” above. It may be possible that period values are delivered as deltas for existing period values.
Trans. (Some w. Acct Data-No Rev.-PR/CC-RP-All CAPs-DeltaPV)
The behavior is identical with the behavior described in the Section “Trans. (Some w. Acct Data - No Rev. - PR/CC - RP - All CAPs)” above. It may be possible that period values are delivered as deltas for existing period values.
Generating the Period Values
● Determining the relevant conditions:The posting-relevant conditions are determined based on the matching booking blocks (selection is controlled by specific booking block criteria) and on the conditions in the policy component share (of the underlying treaty).
● Determining the period values to be generated:The period values requiring calculation (pro-rata values, as-at values) are created based on the validity period or effective period, depending on the defined due date. The amount determination is done in msg.PMQ by evaluating the conditions. In addition, period values can also be derived from payment requests/claim costs. Those values can then be used to create profit and loss values.If the value is an as-at value, the period values is created based on the value of the underlying posting-relevant condition category.When the values can be determined by linear interpolation, the adjacent period values are only generated on the period value due date of the posting period. This allows the posting values to be derived at a later point and time as well.When the values cannot be determined by linear interpolation, the period values are generated at the target calculation instance (effective date of the movement, period value due date, end of the CAP, end of the cedent business year). This allows posting values to be derived at a later point and time without having to call msg.PMQ again. These auxiliary period values are displayed in the dialog in the same manner as period values generated in the standard manner (for period value due date).It is also possible to generate the period values beyond the end forward booking period (certificates). The certificates can only be specified in whole years (cession handling).
Derivation of the Posting Values
The posting values are derived from period values that have already been calculated (exception: cedent only delivers posting values) and their validity is limited according to the defined premium payment frequency or benefit payment frequency.
The posting values generated in this manner are assigned to the currently open CAP.
Generating Provisional Values
Provisional values can be generated for the currently open CAP if the cedent is late in delivering the values. In this case, either all of the period values and posting values from the previous year (if available) or the immediate predecessor values are used as the initial values. Any changes to the period value frequency, premium payment frequency or benefit payment frequency are taken into account.
Life Reinsurance ModuleAccounting P U B L I C 127

In principle, P&L values are differentiated between provisions and definite. In the Basic System, they obtain a different estimate status for differentiation purposes.
Result
If the processing is successful, all necessary period values and posting values will be generated for each of the related policy component shares.
If errors occur, the movement processing or the Renewal background program is canceled. In-force business data remains unchanged.
8.4 Reverse Booking Function
Use
You can use the reverse booking function to delete or restrict effective date periods of period values. Depending on the effective date of the movement to be loaded, profit & loss values (P&L values) are linearly or completely cleared.
Integration
The reverse booking process is performed during the movement processing.
Prerequisites
You can only process movements if you created a movement in advance. The authorization for the relevant company code must have been granted to your user to process movements and thus to make changes.
Features
Reverse booking is necessary if movements are imported that have an effective date that is after the most recent update of the period values or profit and loss values of the affected policy component share.
Period values affected by the reverse booking are generally deleted regardless of the selected processing (cession handling) or their effective date is adjusted.
However, the processing attribute plays a key role for the affected P&L values.
Movements with Accounting Data
The reverse booking process is only performed for P&L values that were not delivered (for example, audit values on the assumed side or values copied from the gross on the ceded side).
128 P U B L I CLife Reinsurance Module
Accounting
Movements (with Some Accounting Data)
Any P&L values that were not delivered with the current movement are offset based on the assumed business. From a ceded business perspective, this means that the reverse booking is performed for any P&L values that exist (regardless of how they were created).
Movements with no Accounting Data
The reverse booking is done for all profit and loss values on both the ceded and assumed side (regardless of how they were created).
Movements (P&L Values Only)
The behavior is identical with the behavior described in section “Transactions with Account Data” above.
Movements (Some with Accounting Data – No Reverse Booking)
The reverse booking is only performed for audit values and manually created P&L values. This setting can only be used for assumed treaties.
Reversal
The relevant P&L values are cleared linearly. Reverse postings created in such a way are always cleared in the currently open accounting period. The settlement period is used as a reference to the assigned accounting period of the original, P&L value to be reversed.
Premium Refund
For each posting-relevant condition category, you can define whether the treaty rules of the premium refund should be considered for a claim movement or a lapse movement.
This attribute determines whether the premium-relevant P&L values is booked in reverse proportionally up to the effective date of the movement or if reverse booking is omitted entirely.
Payment Request/Claim Costs (PR/CC)
If a reverse booking is made for a P&L value and a PR/CLC references to it, the system removes the Payment Generated flag of the related PR/CLC.
Result
If processing is successful, any period values affected by the reverse booking have limited effectiveness or the effectiveness has been deleted.
Any P&L values to be reverse booked are offset, either partially or in full.
Movement processing is terminated in the case of errors. In-force business data remains unchanged.
Life Reinsurance ModuleAccounting P U B L I C 129

9 Data Transmission
Use
Data transmissions are used by the cedent to inform the reinsurer in regular intervals on reinsured policies either on paper or in digital form.
The reinsurer applies the data transmitted as reported movements to its in-force business list; thus, keeping it up-to-date.
The data transmission provides all functions required in LRM to import electronic data from the cedent into the SAP system. This data is stored in temporary tables (movement tables) during data transmission. Processing such movement tables is described in Chapter Movement Processing [page 78].
You start data transmission using the Search initial dialog in the Single Risk Administration application (transaction code /MSG/VRC_SRA).
In the Search initial dialog, switch to the Data Transmission tab page. The following editing options are available:
● Search for or editing of existing data transmissions in the management system. You can use different search criteria for the search such as search for cedent, data transmission number, delivery date, for example. Choose the Extended Search pushbutton to search for data transmissions using more detailed search criteria.
● Search for or editing of movements within the system.● Creation of new data transmissions● Deletion of data transmissions
Features
The data transfer is to be regarded as a preliminary process of movement processing and includes the following functions:
● Uploading data to the R/3 system● Cedent-dependent conversion of the delivered original raw data● Possibility to generate movements for the types “In Force Business List” and “In Force Business List with
Ceded Policy Component Shares”● Possibility to trigger movement processing, as well as rewinding processed movements.● Inbound delivery of movements: Transfer of movement data to the movement table● Dialog-supported change options for LRM movements● Deletion option for LRM movements● Copy option for LRM movements● Log Display
130 P U B L I CLife Reinsurance Module
Data Transmission

Procedure
You create a new data transmission as described below:
1. Choose the Data Transmission pushbutton in the menu bar of the Searchinitial dialog. You get to Header Data tab page in the Data Transfer Create dialog.
2. On the Header Data tab page, enter data in the following required entry fields:○ Cedent○ Data Delivery Type○ Scope ID○ Reporting Period Start Date Reporting period start date○ Reporting Period End Date (Reporting period end date)
The system determines the number of the data transmission and the data transmission processing status automatically.After you entered the required entry fields and confirmed your entries, the system copies the values of the fields in the two field groups Processing Control and Handling Business In Force from the corresponding fields in the product / cession administration. These values, which are stored in the data transmission, are used for control purposes during movement processing and when creating movements from business in force lists.The Processing field group contains the following fields, which are used to control the functional flow of movement processing:○ The Retrocession flag specifies whether the system should automatically execute a retrocession for
the current life when processing a movement group.○ The Audit flag specifies whether audit values should generally be generated for the current policy when
processing a movement group.○ The fields Maximum Error Level and Max. No. Cancelled Movements specify under which conditions the
system should cancel the entire processing of the data transmission.○ The Process Backdated Movements field specifies whether the system should generally process
backdated movements or not.○ The Processing Sequence field enables an explicit definition of the functional order in which the system
should process movements from the data transmission.The system data transmission is an exception. Since a system data transmission contains movements from all cedents, the two field groups Processing Control and Handling Business In Force are not available and the values of the corresponding fields are determined from the product/cession administration during movement processing.
3. All movements and BIF records of the data transmission can be displayed, changed, deleted or copied on the Movements tab page. You can restrict the number of movements to be displayed using different filter criteria. You can find various filter criteria in the field groups Policy Attributes, Movement Attributes and Other Attributes.For example, if you want to display movements with errors, you can control this by making entries in the fields Message Class or Message Number of the Movement Attributes field group. This information is saved in the erroneous movements.You can use the User field in the Other Attributes as filter to select all movements created by a specific user or that were last changed on any level. When you set the flag in the Consider "Processed by” field, you can also filter that only those movements are displayed that the user processed or rewound last or to the status of which the user made manual changes.In change mode, you can manually change the processing status of a movement by using the three pushbuttons Processable, Ignore and Not Processable in the menu bar of the result list of the movements.
Life Reinsurance ModuleData Transmission P U B L I C 131
The Maximum Number of Hits for the movements can be set to the maximum value of “999999999”, which basically means the number of hits is not actually limited at all. The default value is “200”.
4. The Result Summary tab page provides an overview of the imported “Business-in-force” data records, the movements generated from them, the defined threshold values and their possible exceeding.
5. You can start the import after having made all entries.For the data transmission and depending on the selected transfer type and the mode (display and/or change), the following pushbuttons are available:○ Choose the Process pushbutton to process a movement.○ Choose the Rewind pushbutton to rewind a movement.○ Choose the Generate Movement pushbutton to create movements for each BIF data record of the data
transmission. The pushbutton is only available in the “BIF” transfer type.○ Choose the Display Log pushbutton to display logs in the same manner as in the LRM Log Display
function (see Chapter Log Display [page 168]).○ Choose the Note pushbutton to create, edit or display notes for the data transmission.
Result
The result of the import are entries in LRM movement tables that can be changed later and that can be loaded to the operative system using the movement processing.
9.1 Edit a Data Transmission
Use
In principle, you can load data records of other systems and convert this data into the internal format of the application. To do so, a data transmission needs to be configured accordingly.
Prerequisites
When no matching data transmission exists, you have to create and edit, if required, a data transmission (see Chapter Data Transmission [page 130]).
132 P U B L I CLife Reinsurance Module
Data Transmission
Features
A data transmission contains the following tab pages:
Tab Page Description
Header Data This tab page contains descriptive attributes of the data transmission and fields to control movement processing. In addition, status information on the import and processing is displayed.
Movements Imported data records are saved within the system as movements, which can be written to the operative data using movement processing. These movements are displayed as a table. It is also possible to process or rewind single movements or all movements directly from the overview. In this case, the processing status is automatically set. You can also set the processing status manually in the change mode. You can modify movements by double-clicking them.
Result Summary Once you have executed the Handling Business In Force process, the system displays an overview of the delivered in-force business lists and the movements generated from them in this section.
The system groups the in-force business lists by benefit type and internal status and displays the total number and percentage, measure by all delivered “Business In-Force” record types (BIF record types).
The system groups the generated movements by internal event and, similar to the in-force business lists, displays the absolute number and the percentage (measured based on all generated movements).
When editing the corresponding Customizing and a threshold value is specified on the Header Data tab page of the data transmission, the system also displays the threshold values and the possible exceeding in percentage.
A correct data transmission can be used to generate movements in the system from the cedent’s raw data.
9.2 Logs
Use
You can display a detailed overview of the performed actions in a data transmission.
Life Reinsurance ModuleData Transmission P U B L I C 133
Only messages from import runs and movement processing are recorded in logs during the data transmission.
Structure
Logs can be divided into log objects.
Import logs and logs on data processing belong to different log objects.
Date, time and user name of the author of the log are also recorded.
Integration
Run messages are displayed immediately on the screen after a run. The log is saved in the background.
Choose the Log Display pushbutton. You get to the LRM Log Display dialog. In this dialog, the same functions are available as in the /MSG/VRC_LOG transaction.
When LRM logging is called in a data transmission, the following search fields are defaulted with values in the dialog.
● The following fields are defaulted in the Log Search field group: User, Date From, Date To, Time From, Time To.
● The fields Object and Subobject are defaulted in the Logical Assignment field group.
9.3 System Data Transmission
Use
The system data transmission is a data transmission that is only used for dialog movements. It cannot be changed internally.
A movement created in the single risk administration is created in the system data transmission.
Structure
From a technical perspective, the following aspects make a system data transmission different from a standard data transmission:
● The Manual flag.● The additional Empty Fields Relevant flag.
134 P U B L I CLife Reinsurance Module
Data Transmission

Integration
Only one system data transmission must exist within the system.
Life Reinsurance ModuleData Transmission P U B L I C 135

10 Background Processes (Batch Processes)
Use
A general introduction to the background processing and job scheduling can be found in the SAP library under BASIS Computing Center Management System (BC-CCM) .
The SAP background processing is used to automate routine tasks and to optimize the use of your company’s SAP research resources. Background processing tells the SAP system to execute programs. Long-running or resource-intensive programs can be executed using background processing at time when there is a lower system load. It also allows you delegate to the system the task of executing reports or programs. No load is placed on your dialog modes. Reports running in the background are not subject to the runtime limitations of the dialog modes.
Task Lists
The idea behind the schedule manager is to allow the user to create task lists, that meet the user’s specific requirements.
List /MSG/LRM is delivered as a sample task list for LRM and as a template for your own task lists. It contains reports provided by LRM.
The SAP sample task list “SAP-DEMO” is called when starting the schedule manager for the first time. The Task List Other Task List menu can be used to select the LRM task list or to create a new task list. The
most-recently selected task list is stored in the user parameters.
Getting Started
In the /MSG/LRM task list dialog of the schedule manager, you can use the User Notes Off pushbutton to display the application help.
To do so, choose the Change Task List pushbutton, to define a variant. You change the mode and you can edit the variants of the report.
Reports, for which variants have not been stored in the task list, cannot be added to the calendar using “drag and drop”.
You can a report the corresponding context menu.
You can use the Details pushbutton to display the details of the selected task.
Schedules
Schedules are not provided since LRM does not contain any periodic, sequential tasks.
Monitor
Reports provided by LRM communicate with the schedule manager monitor. You receive information on the progress of the tasks after the program run.
136 P U B L I CLife Reinsurance Module
Background Processes (Batch Processes)
Integration
The schedule manager is integrated in LRM. Choose msg. Life Reinsurance Module Periodic ProcessingSchedule Manager: to start the schedule manager: Scheduler (transaction SCMA).
Procedure
Proceed as described below to start a background process:
1. Start the schedule manager using transaction SCMA. This opens the Task List dialog.2. Switch to the msg.Life Reinsurance Module task list, if necessary.3. Start the desired background process using the context menu of the corresponding task with the function
Execute. You go to the corresponding dialog of the selected task.4. Fill the parameters according to your requirements, but at least the selected required entry fields.5. Start the background process using the Execute pushbutton in the menu bar of the dialog.
Result
You can display the result of the background process in single risk administration or in the messages in the log file once the background process has been completed.
10.1 Background Processes for Accounting
Features
The following background processes used for accounting in LRM are described in detail:
● Aggregation and Transfer to adopt profit and loss values (P&L values) of the corresponding Client Account Period (CAP) for further processing into the Basic System and to complete the accounting process for the CAP.
● Opening of a CAP to open exactly one CAP for each treaty and section.● Closing of a CAP to close the correspondingly open CAP for each treaty and section.● Re-opening of a CAP to reopen an already closed CAP.● Calculation of Informational Values to determine informational values that are transferred to the FS-RI
accounts.● Delete an Unfinished Run to delete incompletely processed aggregation and transfer runs.
Life Reinsurance ModuleBackground Processes (Batch Processes) P U B L I C 137
Related Information
Aggregation and Transfer [page 138]Opening of a CAP [page 142]Closing of a CAP [page 143]Re-opening of a CAP [page 144]Calculation of Informational Values [page 145]Delete an Unfinished Run [page 147]
10.1.1 Aggregation and Transfer
Use
If a treaty section was fully forward booked for a specific posting period (Client Accounting Period CAP), the corresponding profit and loss values (P&L values) can be adopted in the Basic System for further processing and the accounting process for a CAP can be closed.
NoteThe Aggregation and Transfer background process must be performed before the respective CAP is closed and before the next CAP is opened. Otherwise, the system automatically performs a transfer when the CAP is closed.
Prerequisites
You have generated or manually created all relevant P&L values of the policy component share.
Features
In the task list of the schedule manager, choose the Execute function in the context menu of the Aggregation and Transfer task. You get to the Parameter tab page in the Aggregation and Transfer to Basic System.
Aggregation and Transfer of P&L Values For Field Group
The following variants exist for aggregation and transfer of profit and loss values:
● TreatyAggregation and transfer of all profit and loss values of a business partner and other selection criteria. The selection can be restricted to a business partner, treaty, section, CAP or UFI. It is also possible to aggregate only assumed treaties, ceded treaties or both types of treaties. Key date P&L values are not aggregated and transferred when an UFI has been specified.
138 P U B L I CLife Reinsurance Module
Background Processes (Batch Processes)

● System DSAggregation and transfer of all assumed P&L values of the system data transmission. The selection can also be restricted to a business partner, treaty, section, CAP or UFI. It is only possible to aggregated assumed P&L values. Key date P&L values are not aggregated and transferred when an UFI has been specified.
● DS NumberAggregation and transfer of all assumed P&L values of the specified data transmission. The selection is restricted to the specified data transmission. Further restrictions are not possible.
● DS Processing StatusAggregation and transfer of all assumed P&L values of all data transmissions with the specified data transmission processing status. The selection can also be restricted to a business partner.
Aggregation and Transfer Field Group
In the Aggregation and Transfer field group, you create the following parameters:
● Company CodeSpecify the company code, the treaties of which are edited. By default, the field is preset with the current company code.
● Partner (optional)Specify the cedent, the treaties of which are edited.
● Treaty (optional)Specify the treaty number of the treaty to be edited.
● Section (optional)Specify the section to be edited.
● Assumed (optional)When you set this flag, only assumed treaties are edited. By default, this flag is set.
● Ceded (optional)When you set this flag, only ceded treaties are edited. By default, this flag is set.
● Informational ValuesSet this flag if informational values are created in this background process run. By default, this flag is not set.
● Aggregate Claim PostingsSet the flag if the profit and loss values of a claimed policy component share that, depending on the underlying company code definition, have been defined as relevant for the claim are to be aggregated and transferred for each LRM claim during this background process run. By default, this indicator is not set.
● CAP Start Date (can only be edited in the Aggregation and Transfer sequential background process)For the CAP Start Date, specify the start data of the currently open CAP or the start date of a CAP that is in the past. If you specify the start date of the currently open CAP here, the system aggregates the P&L values of this CAP and transfers them to accounting of the FS-RI Basic System. If you specify the start date of a CAP that is in the past and only if the specified treaty is not a service treaty and if a corresponding value has been set for the processing in the specified treaty, the system aggregates the P&L values of this CAP and transfers them to accounting of the FS-RI Basic System.
● UFI (Unique Financial Identifier, optional)Only profit and loss values with corresponding UFI are edited.
● Data Transmission Processing Status (can only be edited in the Data Transmission Processing Status variant)In this variant, you have to choose a processing status for the selection of data transmissions to be aggregated.
● Data Transmission Number (can only be edited in the Data Transmission Number variant)
Life Reinsurance ModuleBackground Processes (Batch Processes) P U B L I C 139

In this variant, you have to choose the number of a data transmission to be aggregated.● Aggregation Until Date (optional)
When you specify a date, only P&L values with a validity start date earlier or equal to this date are edited.
Settings for Resulting Accounts Field Group
This field group contains the Target Status parameter: Set the accounting status of the accounts to be created. The following statuses are possible:
● “Pending”The Target Status field is defaulted with “Pending”. Accounts are created with the “Pending” accounting status.
● “Further Processing by Batch”In the case of the “Further Processing by Batch” target status, accounts are created depending on the involvement either using the account status “For Batch Release” (if involvement is set) or the account status “To be Split and Released by Batch”.
Unfinished Runs Field Group
This field group contains the Run ID (optional) parameter: When you have chosen a background processing job, you cannot use any other selection criteria. Only the Target Status field in the Settings for Resulting Accounts field group can be changed. All other fields are locked and filled with the corresponding values of the chosen run.
Settings Field Group
● Detailed Log OutputSet the flag if a detailed log is to be displayed in this background process run. If you do not set this flag, the regular log is issued.
● Parallel ProcessingSet the flag if the application is to be executed in several, parallel background processes.
Unfinished Runs Tab Page
The Unfinished Runs tab page contains a list of all not yet completely processed aggregation and transfer runs. You can start or delete runs that you no longer require.
Process Flow
All similar profit and loss values are consolidated as far as possible.
The aggregation is done cross-policy for all policy component shares, which refer to the same treaty and section.
The profit and loss values are consolidated internally before the actual transfer process and the consolidated values are only visible in the corresponding basic postings. Individual P&L values on the “Policy Component Share” level remain unchanged. The individual listing of them is retained. An account is created in the Basic System with the previously aggregated P&L values based on the aggregation criteria.
If a UFI (Unique Financial Identifier) has been set for the profit and loss values they will be aggregated based on the UFI. The system generates an account for each UFI, the UFI of which is stored as an external reference ID in the account header. The system transfers profit and loss values without a UFI to a separate account without an external reference.
When in the Customizing under FS-RI Basic System Basic System Accounting Edit External Reference Categories for Accounts the category of the external reference “L-UFI” does not exist for the area “90”, the system aggregates the P&L values without UFI.
140 P U B L I CLife Reinsurance Module
Background Processes (Batch Processes)
When the Aggregate Claim Postings flag is set on the Parameter tab page, the system transfers the LRM claim number for claim-relevant P&L values to the Claim Reference field of a booking. The Claim Reference field is used as a further aggregation criterion when the postings are aggregated.
Once an account has been successfully created, all of the corresponding P&L values are assigned to the Basic System. This is done by adding the corresponding account number. This assignment is required for the reasons specified below:
● To display the P&L values that have been transferred and into which account these P&L values have been adopted on single risk level.
● To prevent multiple adoption of P&L values to basis.● To obtain a unique assignment of each affected P&L value to a basic account for the event of reverse
booking.
Moreover, the transfer amount is entered in the Transfer Amount field and the Transfer Basic System flag is set. The flag in the Transfer Basic System field is also set for P&L values that neutralize each other but which are taken into account in the run. In this case, the flag is only set in the Transfer Basic System field. The fields Transfer Amount and Account Number remain empty. This way, the amounts are not taken into account multiple times.
The due date of a P&L value is also considered during the aggregation and is transferred to the F/V Due Date field of a posting.
When you set the flag in the Informational Values field, in the Parameter tab page, the system also generates internal accounts and bookings from the values. These are only displayed in the basic account.
The process can be triggered at any time and can be run multiple times in a CAP. The system does not automatically delete existing informational accounts.
To differentiate between transferred P&L values and information values, a separate account is generated for the informational values of a treaty or section with a specific account description generated from “msg.LRM - Informational Values”.
Result
The data delivered by the cedent and the self-calculated data are aggregated in the currently open CAP (or in a CAP that is in the past, if the underlying treaty is a non-service treaty and if you set a corresponding value for the handling) and then transferred to the Basic System. Separate accounts are generated for each treaty, section, currency, estimation status, area and posting period, etc.
Performance Optimization
In order to improve the performance during the aggregation and transfer process when writing back account numbers to the P&L values, you can make changes to the Aggatrans - Write back Account Number business function using the Maintain Business Function Realizations Customizing. The following realizations are available for this:
● Change Using Business Object● Change Directly in Database
If the Change Directly in Database realization has been selected, the account number is written back to the P&L values directly in the appropriate database table. The performance of the process is enhanced as no external systems (Business Warehouse, for example) are supplied with corresponding information. This realization should only be selected if no classic business warehouse is used.
If no realization is defined or is set to inactive, the Change Using Business Object realization is used by default.
Life Reinsurance ModuleBackground Processes (Batch Processes) P U B L I C 141
10.1.2 Opening of a CAP
Use
You can use the Opening of a CAP background process to open exactly one CAP for each treaty and section, provided that no open CAP exists.
Prerequisites
An open CAP does not exist for the respective section.
Only one CAP can be opened for each section in the treaty.
Features
In the task list of the schedule manager, choose the Execute function in the context menu of the Opening of a CAP task. You get to the Opening of a CAP dialog.
Opening of a CAP field group
Determine the following parameters in the Opening of a CAP field group:
● Company CodeSpecify the company code, the treaties of which are edited. By default, the field is preset with the current company code.
● CedentSpecify the cedent, the treaties of which are edited.
● Treaty Number (optional)Specify the treaty number of the treaty to be edited.
● Section (optional)Specify the section to be edited.
Process Flow
The end date of the last closed CAP is determined to open the next possible CAP. The end date is used to calculate the start date of the CAP to be created.
The end date of the new CAP is determined using the start date of the CAP taking into account the accounting frequency in days.
Result
Exactly one open CAP exists for the respective section.
142 P U B L I CLife Reinsurance Module
Background Processes (Batch Processes)
10.1.3 Closing of a CAP
Use
You can use the Closing of a CAP background process to close the respectively open CAP for each treaty and section to close, as long as they are sufficiently forward booked.
Features
In the task list of the schedule manager, choose the Execute function in the context menu of the Closing of a CAP task. You get to the Closing of a CAP dialog.
Closing of a CAP field group
Determine the following parameters in the Closing of a CAP field group:
● Company CodeSpecify the company code, the treaties of which are edited. By default, the field is preset with the current company code.
● CedentSpecify the cedent, the treaties of which are edited.
● Treaty Number (optional)Specify the treaty number of the treaty to be edited.
● Section (optional)Specify the section to be edited.
● Open Next CAPSet the flag when the next CAP is to be automatically opened during this background job. By default, this flag is set.
● Automatic Transfer for Non-ServiceSet this flag, if profit and loss values (P&L values) are to be automatically transferred to the Basic System for non-service treaties during this background process run. When the flag is set, the system automatically transfers any possibly existing P&L values to the Basic System. The CAP is closed afterwards. If the flag is not set, the CAP is also closed even if P&L values exist that have not yet been transferred. By default, this indicator is not set.
● Closing a CAP without RenewalWhen dealing with a service treaty, this flag can be set to skip the validation check used to determine whether the policy component shares of the treaty section have been sufficiently forward booked. By default, this indicator is not set.
● Aggregate Claim PostingsSet the flag if the profit and loss values of a claimed policy component share that, depending on the underlying company code definition, have been defined as relevant for the claim are to be aggregated and transferred for each LRM claim during this background process run. By default, this flag is not set.
● Informational ValuesSet the flag, if informational values are to be determined and transferred to the FS-RI account during this background process run. By default, this flag is set.
Settings field group
Life Reinsurance ModuleBackground Processes (Batch Processes) P U B L I C 143

This field group contains the following parameters:
Parallel Processing
Set the flag if the application is to be executed in several, parallel background processes.
Process Flow
The Closing of a CAP background process has the effect that no further P&L values can be booked in this CAP. This only affects the product/cession administration. Accounts in the Basic System can still be created or released in this CAP.
Before completing to close the CAP, the system checks whether all relevant P&L values have been calculated until the end of the opened CAP and/or have been delivered by the cedent and transferred to the Basic System. Before closing the CAP, all remaining and not yet transferred P&L values are aggregated and transferred to the Basic System. If the underlying treaty is a non-service treaty, in which a corresponding value has been set in the Processing field, you can aggregate P&L values for a CAP in the past and transfer those to the Basic System.
When the flag is set in the Open Next CAP field, the next CAP is opened once the current CAP has been successfully closed (see Chapter Opening of a CAP [page 142]).
When you set the flag in the Aggregate Claim Postings field, the system generates for each LRM claim for claim-relevant profit and loss values a basic system account according to the existing aggregation criteria. Premium-relevant profit and loss values are aggregated and transferred independent of the claim number. When you do not set the flag in the Aggregate Claim Postings, the LRM claim number is not an aggregation criterion in principle.
Result
The respective open CAP has now been closed for cession accounting data. When the flag is set in the Open Next CAP field, the next subsequent CAP is opened automatically. If P&L values still had to be transferred, the corresponding account number has been assigned to them after the transfer.
10.1.4 Re-opening of a CAP
Use
You can use the Re-opening of a CAP background process to reopen already closed CAPs.
Features
In the task list of the schedule manager, choose the Execute function in the context menu of the Re-opening of a CAP task. You get to the Re-opening of a CAP dialog.
Re-opening of a CAP field group
Determine the following parameters in the Re-opening of a CAP field group:
● Company Code
144 P U B L I CLife Reinsurance Module
Background Processes (Batch Processes)
Specify the company code, the treaties of which are edited. By default, the field is preset with the current company code.
● CedentSpecify the cedent, the treaties of which are edited.
● Treaty Number (optional)Specify the treaty number of the treaty to be edited.
● Section (optional)Specify the section to be edited.
Rewind Settings field group
You determine the following parameters in this field group:
● Create Offset AccountsSet the flag if reversal accounts are to be created for affected P&L values that have already been transferred to an account and that have been deleted during the rewinding process in this background process run. When this flag is set, the Aggregation and Transfer background process is performed after having completed the rewinding process. By default, this flag is not set.
● Target Status:Set the accounting status of the accounts to be created. The following statuses are possible:○ “Pending”
The Target Status field is defaulted with “Pending”. Accounts are created with the “Pending” accounting status.
○ “Further Processing by Batch”In the case of the “Further Processing by Batch” target status, accounts are created depending on the involvement either using the account status “For Batch Release” (if involvement is set) or the account status “To be Split and Released by Batch”.
Process Flow
If the most recently created CAP is still open for the respective section, any possibly existing movements and P&L values must be deleted. Once they have been deleted, the open CAP can be deleted, since it no longer contains values. After the open CAP has been deleted, the closed CAP to be reopened is the CAP that was most recently created for the respective in-force business. It can now be reopened.
Result
The most recently closed CAP of a section is opened. If a more recently open CAP exists for that section, it is deleted with all of its booked values.
10.1.5 Calculation of Informational Values
Use
You can use the Calculation of Informational Values background process to determine informational values that are transferred to the FS-RI account.
Life Reinsurance ModuleBackground Processes (Batch Processes) P U B L I C 145
Features
In the task list of the schedule manager, choose the Execute function in the context menu of the Calculation of Informational Values task. You get to the Calculation of Informational Values dialog.
Calculation of Informational Values Field Group
Determine the following parameters in the Calculation of Informational Values field group:
● Company CodeSpecify the company code, the treaties of which are edited. By default, the field is preset with the current company code.
● PartnerSpecify the business partner, the treaties of which are edited.
● Treaty Number (optional)Specify the treaty number of the treaty to be edited.
● Section (optional)Specify the section to be edited.
● CAP Start Date (can only be edited in the Calculation of Informational Values sequential background process)Specify the start data of the currently open CAP or the start date of a CAP that is in the past.If you specify the start date of the currently open CAP here, the system aggregates the P&L values of this CAP and transfers them to accounting of the FS-RI Basic System.If you specify the start date of a CAP that is in the past and only if the specified treaty is not a service treaty and if a corresponding value has been set for the processing in the specified treaty, the system aggregates the P&L values of this CAP and transfers them to accounting of the FS-RI Basic System.
Settings Field Group
This field group contains the following parameters:
Parallel Processing
Set the flag if the application is to be executed in several, parallel background processes.
Process Flow
When you execute the Calculation of Informational Values background process, the system generates internal accounts and bookings from the values. You can only display those in the basic account.
The process can be triggered at any time and can be run multiple times in a CAP. The system does not automatically delete existing informational accounts.
To differentiate between transferred P&L values and information values, a separate account is generated for the informational values of a treaty or section with a specific account description generated from “Life RM - Informational Values”.
Result
Self-calculated data are adopted into the basis of the currently open CAP.
146 P U B L I CLife Reinsurance Module
Background Processes (Batch Processes)
10.1.6 Delete an Unfinished Run
Use
You can use the Delete an Unfinished Run background process to delete incompletely processed aggregation and transfer runs.
Function Scope
In the task list of the schedule manager, choose the Execute function in the context menu of the Delete an Unfinished Run task. You get to the Parameter tab page in the Delete an Unfinished Run dialog.
Delete an Unfinished Run field group
This field group contains the Run ID (optional) parameter: When you have chosen a background processing job, you cannot use any other selection criteria. Changes can only be made to the Target Status field. All other fields are locked and filled with the corresponding values of the chosen run.
Run Properties field group
Determine the following parameters in the Run Properties field group:
● Original ProgramThe name of the program that originally called the Aggregation and Transfer function.
● UserName of the person responsible that originally started the program.
● Start DateDate on which the original program was started.
● Start TimeTime at which the original program was started.
Unfished Runs tab page
The Unfinished Runs tab page contains a list of all not yet completely processed aggregation and transfer runs. You can delete the runs.
Process Flow
When you choose one or several unfinished runs and execute the process, these are finally deleted. Depending on the condition of the unfinished run, transferred accounts are deleted and/or lapsed and already transferred values are deleted again for P&L values.
Result
The unfinished runs is deleted and all already performed processing steps have been withdrawn.
Life Reinsurance ModuleBackground Processes (Batch Processes) P U B L I C 147

10.2 Background Processes for Movement Processing
Features
The following background processes used for movement processing in LRM are described in detail:
● Movement Processing [page 148]● Renewal of a Portfolio [page 150]● Rewind a Portfolio [page 151]
10.2.1 Movement Processing
Use
You can use the Movement Processing background process both for movement processing and to process BIF data transmissions (movements from BIF lists).
The following variants for movement processing are available:
● Generate Movements from BIF● Perform Final Lapse● Run Movement Processing
Features
In the task list of the schedule manager, choose the Execute function in the context menu of the Movement Processing task. You get to the Parameter tab page in the Movement Processing dialog.
You can make the settings for the following fields on the Parameter tab page:
Variants field group
The following variants are available for movement processing:
● Generate Movements from BIFSet the flag when movements from business in force lists, the so-called BIF lists (Business In Force Lists) are to be generated whilst processing the BIF data transmissions. Processing BIF lists is an enhancement of existing movement processing processes. A BIF data record is an incomplete movement that does not contain information on the business transaction or effective date. These pieces of information are determined during BIF processing and added to the BIF data record. The BIF record supplemented in this manner can be processed as a normal movement.
● Perform Final LapseWhen this flag is set, all operative policy components within the scope of the data transmission are subjected to a final lapse, if the preliminary lapse period has expired.
● Run Movement Processing
148 P U B L I CLife Reinsurance Module
Background Processes (Batch Processes)
The system processes all unprocessed movements of the type “Movement Data” according to the selection parameters listed below. By default, this flag is set.
BIF / Movement Processing field group
The parameters that you can edit or modify in this field group depend on the selected variant. Depending on the variant, fields can be locked against input or are flagged as required entry fields.
● Company CodeIf no optional fields are specified, the system processes all data transmissions of the company code and cedent. By default, the field is preset with the current company code.
● PartnerIf no optional fields are specified, the system processes all data transmissions of the company code and cedent.
● Data TransmissionThis field is a required entry field for the variants Generate Movements from BIF and Perform Final Lapse. Only the data transmission with the number entered here is processed.
● PolicyThis field is optional for the variant Run Movement Processing. All movements, which are applied to the policy with this number, are processed in the specified data transmission.
● Sequence NumberThis field is optional for the variant Run Movement Processing. The system only processes movements with the sequence number specified here.
● Automatic RetrocessionSet this flag when a retrocession is to be performed automatically during movement processing. You can use this flag to override the flag in the data transmission header for this background process run.
● Calculate Auditing ValuesSet the flag if the data transmission is to be audited. You can use this flag to override the flag in the data transmission header for this background process run.
Settings field group
● Detailed Log OutputSet the flag if a detailed log is to be displayed in this background process run. If you do not set this flag, the regular log is issued.
● Parallel ProcessingSet the flag if the application is to be executed in several, parallel background processes.
Cedent Validation Checks and msg.PMQ Validation Checks
The tab pages Validation Checks and PMQ Validation Checks in the Movement Processing dialog, contain a list of all LRM and/or msg.PMQ validation checks that are relevant for movement processing.
The Validation Checks tab page displays all LRM validation checks with the exception of validation checks that have been defined by the customer.
The Source column in the Validation Checks table on the Validation Checks tab page displays the source that the system used to derive the displayed settings of the validation checks.
The following values are possible in this column:
● “0” – User Input: Settings were modified by the user.● “1” – Cedent Default: The settings were derived from product/cession administration of the selected
cedent.
Life Reinsurance ModuleBackground Processes (Batch Processes) P U B L I C 149

● “2” – Company Code Default: The settings were derived from external Customizing Maintain Error Level per Company Code.
● “3” – Customer Default: The settings were derived from external Customizing Maintain Customer Error Level.
● “4” – LRM Default: The settings were derived from internal Customizing Maintain Validation Checks.
You can make changes to error level, the problem class and the flag for deactivation of the validation checks for all displayed validation checks in the corresponding columns in the table of Validation Checks tab page. Changed settings override the settings in product/cedent administration and/or from Customizing for the current background process run, without, however, modifying the underlying settings.
The PMQ Validation Checks tab contains a list of all msg.PMQ validation checks. You can modify the error level, the problem class and the flag for deactivating validation checks for each displayed validation check. This means that you can override the settings in product/cedent administration for the current background process run. As in the case of the LRM validation checks, changes to these settings have no effect on the settings in product/cedent administration.
10.2.2 Renewal of a Portfolio
Use
You can use the Renewal of a Portfolio background process to create renewed P&L values for the currently open Client Account Period (CAP) for policies in the portfolio that meet the specified criteria.
Features
In the task list of the schedule manager, choose the Execute function in the context menu of the Renewal of a Portfolio task. You get to the Parameter tab page in the Renewal of a Portfolio dialog.
You can make the settings in the following fields on the Parameter tab page:
Renewal of a Portfolio field group
● Company CodeSpecify the company code for which renewal is to be performed. By default, the field is preset with the current company code.
● PartnerEnter the business partner (cedent), for which the portfolio is renewed.
● Treaty (optional)Enter the contract number of the contract for which the portfolio is renewed.
● Section (optional)Enter the section for which the portfolio is renewed.
● Generate Provisional Values (optional)Set the flag if period values and P&L values should be generated by the system when the cedent does not provide values. By default, this flag is not set.
Settings field group
150 P U B L I CLife Reinsurance Module
Background Processes (Batch Processes)
● Detailed Log Output:Set the flag if all messages that occurred should be written to a log for each processing step. When this flag is not set, a result message is only issued for each successful processing step. If warnings or errors occur, all messages for this processing step are written to the log.
● Parallel ProcessingSet the flag if the application is to be executed in several, parallel background processes.
msg.PMQ Validation Checks
The PMQ Validation Checks tab page in the Renewal of a Portfolio dialog contains a list of the msg.PMQ validation checks from the settings of the cedent, which have been relevant for the prolongation.
You can make changes to error level, the problem class and the flag for deactivation of the validation checks for all displayed validation checks in the corresponding columns in the table of Validation Checks tab page. Changed settings override the cedent settings for this background process run, without changing them in the product/cession administration.
10.2.3 Rewind a Portfolio
Use
You can use the Rewind a Portfolio background process to rewind data transmissions, movements, policies and accounting periods, for example. The following variants are available:
● Rewind a data transmission (can also be executed in the dialog)● Rewind movements (can also be executed in the dialog)● Rewind policies● Rewind all policies of a treaty and section● Rewinding a CAP of a treaty and section
As an option, you can restrict rewinding to:
● Product code and subproduct code● Plan code and subplan code
Features
In the task list of the schedule manager, choose the Execute function in the context menu of the Rewinding a Portfolio task. You get to the Parameter tab page in the Rewind a Portfolio dialog.
You can make the settings in the following fields on the Parameter tab page:
Variants field group
The following variants exist for rewinding a portfolio:
● Rewinding of Data TransmissionSet the flag if all movements of a data transmission are to be rewound. By default, the flag is set for this variant.
Life Reinsurance ModuleBackground Processes (Batch Processes) P U B L I C 151

● Rewinding MovementsSet the flag if a particular quantity of movements is to be rewound.
● Rewinding PoliciesSet the flag if a particular quantity of policies is to be rewound.
● Rewinding of Treaty/SectionSet the flag if all policies of a treaty and section are to be rewound.
● Rewinding of CAPSet this flag if all policies that have been processed in the currently open CAP of a treaty and section are to be rewound..
Rewinding a Portfolio Field Group
The parameters that you can edit or modify in this field group depend on the selected variant. Depending on the variant, fields can be locked against input or are flagged as required entry fields.
● Company CodeSpecify the company code that is affected by the rewinding process. By default, the field is preset with the current company code.
● PartnerYou must enter the business partner (cedent) that is affected by the rewinding process.
● Data TransmissionSpecify the number of the data transmission to be rewound. This field is a required entry field for the variants Rewinding of Data Transmission and Rewinding of Movements.
● PolicySpecify the number of the policy to be rewound. This field is a required entry field for the following two variants:○ Rewinding Movements
The number of a policy identifies the movements in a data transmission, which have been applied to a specified policy and which are to be rewound. Multiple selection is possible for this parameter, i.e. movements can be rewound for multiple policies in a background run.
○ Rewinding PoliciesThe number of the policy to be rewound. Multiple selection is possible for this parameter, i.e. multiple policies can be rewound in a background run.
● Sequence NumberThis field only optional exists for the Rewind Movements variant. The sequence number of a movement specifies which movements are to be rewound for a policy and data transmission.
● TreatyThis field is a required entry field for the variants Rewinding of Treaty/Section and Rewinding of CAP. Specify the number of the treaty, the policies of which are to be rewound.
● SectionThis field is a required entry field for the variants Rewinding of Treaty/Section and Rewinding of CAP. Specify the section of the treaty, the policies of which are to be rewound.
● Processing DateThis field is a required entry field for the variants Rewinding Policies and Rewinding of Treaty/Section. Specify the date from which on all changes are to be revoked.
● Processing TimeThis field is optional for the variants Rewinding Policies and Rewinding of Treaty/Section. It specifies the time of the processing date. All changes that have been made since the processing date for the time specified here, ought to be revoked.
● CAP Start
152 P U B L I CLife Reinsurance Module
Background Processes (Batch Processes)

As soon as you enter a treaty and section for the Rewinding a CAP variant, the system automatically fills this field with the start date of the currently open CAP of the treaty and section that are to be rewound. The field only serves informational purposes.
● CAP EndAs soon as you enter a treaty and section for the Rewinding a CAP variant, the system automatically fills this field with the end date of the currently open CAP of the treaty and section that are to be rewound. The field only serves informational purposes.
● Create Offset AccountsSet this flag if reverse accounts are to be created for affected P&L values that have already been transferred to an account and that have been deleted during the rewinding process in this background program run. When you set the flag, the system performs an aggregation and transfer after having completed the rewinding process. By default, this flag is not set.
● Target Status:Set the accounting status of the accounts to be created. The following statuses are possible:○ “Pending”
The Target Status field is defaulted with “Pending”. Accounts are created with the “Pending” accounting status.
○ “Further Processing by Batch”In the case of the “Further Processing by Batch” target status, accounts are created depending on the involvement either using the account status “For Batch Release” (if involvement is set) or the account status “To be Split and Released by Batch”.
Rewinding Restricted to Field Group
Parameters of this field group are optional. You can use these fields to restrict the rewinding process to policies, policy components or movements to which these parameters apply:
● Product Code● Subproduct Code● Plan Code● Subplan Code
Settings Field Group
Parallel Processing
Set the flag if the application is to be executed in several, parallel background processes.
Validation Checks
The Validation Checks tab page in the Rewinding a Portfolio dialog displays all LRM validation checks that are relevant for the rewinding process with the exception of validation checks that have been defined by the customer.
The Source column in the Validation Checks table on the Validation Checks tab page displays the source that the system used to derive the displayed settings of the validation checks.
The following values are possible in this column:
● “0” – User Input: Settings were modified by the user.● “1” – Cedent Default: The settings were derived from product/cession administration of the selected
cedent.● “2” – Company Code Default: The settings were derived from external Customizing Maintain Error Level
per Company Code.
Life Reinsurance ModuleBackground Processes (Batch Processes) P U B L I C 153
● “3” – Customer Default: The settings were derived from external Customizing Maintain Customer Error Level.
● “4” – LRM Default: The settings were derived from internal Customizing Maintain Validation Checks.
You can make changes to error level, the problem class and the flag for deactivation of the validation checks for all displayed validation checks in the corresponding columns in the table of Validation Checks tab page. Changed settings override the settings in product/cedent administration and/or from Customizing for the current background process run, without, however, modifying the underlying settings.
Process Flow
Start the schedule manager and execute the task Rewinding of a Portfolio or start transaction /MSG/VRP_S_REWIND for sequential execution or /MSG/VRP_P_REWIND for parallel execution. In the following Rewinding a Portfolio dialog, choose the rewinding variant and enter the required entry fields Company Code and Partner parameters as well as the fields that have been flagged as being required entry fields for the selected variant. A selection list of possible input values exists for each parameter.
● Rewinding of Data Transmission variantAll successfully processed movements in the specified data transmission are rewound when executing this background process. Note that it is not possible to rewind an entire system data transmission.
● Rewinding of Movements variantAll successfully processed movements in the specified data transmission and the specified policies (and possible the sequence number) are rewound when executing this background process.
● Rewinding of Policies variantThe specified policies are rewound to the given processing date (and possibly the processing time) when executing this background process.
● Rewinding of Treaty/Section variantPolicies of the specified treaty and section back to the given processing date (and possibly the processing time) are rewound when executing this background process.
● Rewinding of CAP variantChanges that have been made to the policies of the specified treaty and section during the currently open CAP are rewound when executing this background process.
● Rewinding Restricted to variantThe rewinding variants described above determine the relevant policies, policy components and movements that are to be rewound. The system then checks whether the selected policies, policy components and movements match the product code, plan code, subproduct code and subplan code in the Rewinding Restricted to field group.
Having completed the Rewind a Portfolio background process, the system automatically starts the Update Processing Status of Data Transmission background program. This updates the processing status of all data transmissions that have been affected by the Rewind a Portfolio background process.
154 P U B L I CLife Reinsurance Module
Background Processes (Batch Processes)

10.3 Background Processes for the Data Transmission
Features
The following background processes for the data transmission in LRM are described in detail:
● Deletion of a Data Transmission [page 155]● Update Processing Status of Data Transmission [page 156].
10.3.1 Deletion of a Data Transmission
Use
You can use the Deletion of a Data Transmission background process to delete an entire data transmission with all its movements and BIF data records.
Features
In the task list of the schedule manager, choose the Execute function in the context menu of the Deletion of a Data Transmission task. You get to the Deletion of a Data Transmission dialog.
In the Deletion of a Data Transmission dialog, you can make settings in the following fields:
Deletion of a Data Transmission field group
● Company CodeSpecify the company code to which the data transmission is assigned that is to be deleted. By default, the field is preset with the current company code.
● CedentSpecify the cedent of the data transmission.
● Data Transmission NumberSpecify the number of the data transmission to be deleted. If one or more movements cannot be deleted, the system updates the processing status and the number of deleted movements in the data transmission header.
Information on the Data Transmission field group
● Data Transmission DescriptionThis field displays the description of the data transmission.
● Data Transmission Processing StatusThis field displays the current processing status of the data transmission.
● Delivery DateThis field displays the date on which the data transmission has been delivered.
Deletion Restricted To field group
Life Reinsurance ModuleBackground Processes (Batch Processes) P U B L I C 155

Unprocessed Movements
Set the flag if all of the movements of the data transmission, which are not processed successfully, are to be deleted. The data transmission itself is not deleted. By default, this flag is not set.
Settings field group
Parallel Processing
Set the flag if the application is to be executed in several, parallel background processes.
10.3.2 Update Processing Status of Data Transmission
Use
You can use this background process to update the processing status of one or several data transmissions.
Features
In the task list of the schedule manager, choose the Execute function in the context menu of the Update Processing Status of Data Transmission task. You get to the Updating of the DT Processng Status dialog.
In the Updating of the DT Processng Status dialog, you can make settings in the following fields:
● Company CodeIf no additional data transmission has been specified, the system updates all data transmissions that are assigned to the company code and cedent. By default, the field is preset with the current company code.
● CedentIf no additional data transmission has been specified, the system updates all data transmissions that are assigned to the company code and cedent.
● Data Transmission Number (optional)Only the data transmission with the number specified here is processed.
10.4 Background Processes for Retrocession
Features
The following background processes of the retrocession in LRM are described in detail:
● Traditional and portfolio retrocession of all lives to the current company code.● Recapture a retrocession treaty.● Transfer of the portfolio from a retrocessionaire to another retrocessionaire and/or replacing an old
retrocession treaty by a new retrocession treaty.
156 P U B L I CLife Reinsurance Module
Background Processes (Batch Processes)

Related Information
Traditional and Portfolio Retrocession [page 157]Recapture a Retrocession Treaty [page 158]Transfer a Portfolio from One Retrocessionaire to Another Retrocessionaire [page 160]
10.4.1 Traditional and Portfolio Retrocession
Use
You can use the PTF and Traditional Retrocession background process for retrocession of all lives for the current company code.
Prerequisites
● At least one policy or one application that is relevant for the retrocession must exist in the system for the current life.
● A valid reinsurance program (RIP) with corresponding treaties must exist for the current company code. The system terminates the retrocession process with an error when no RIP could be determined.
Features
In the task list of the schedule manager, choose the Execute function in the context menu of the PTF and Traditional Retrocession task. You get to the Retrocession dialog.
In the Retrocession dialog, you can make settings in the following fields:
● Execution Date Retrocession (optional)You can enter the date at which the retrocession is to be performed. This date is used as the start date for the retrocession when performing retrocession using historical versions. This date is deleted if the retrocession using historical versions is not used.
● Company CodeSpecify the company code for which the retrocession is to be performed. By default, the field is preset with the current company code.
● Life Number (optional)You can specify the lives for which the retrocession is to be executed. If you do not specify a life, the retrocession is made using all lives of the current company code.
● Traditional Retrocession (optional)Choose the radio button if a traditional retrocession is to be executed.
● Lapsing of Retro PCS / New RIP Run (optional)When you set the flag, ceded policy component shares are reversed from the date onwards that you entered in the Execution Date Retrocession field. The ceded policy component shares are only deleted if
Life Reinsurance ModuleBackground Processes (Batch Processes) P U B L I C 157
you enter a date in the Execution Date Retrocession field entered a date and selected the Traditional Retrocession.
● PTF Retrocession (optional)Choose the radio button if a portfolio retrocession is to be executed.
● Consideration of Applications (optional)Set the flag to take applications into account during retrocession-
● Consideration of Historic Versions (optional)When you set the flag, the retrocession is executed over all historic versions.When you entered a date in the Execution Date Retrocession field, the retrocession is executed from this date onwards.When you did not enter a date in the Execution Date Retrocession field, the retrocession is started using the first not yet retroceded version.If you do not set the flag, the current version is retroceded and the date in the Execution Date Retrocession is deleted..
● Parallel Processing (optional)This flag is not ready for input and is defaulted depending on the performed transaction. When this flag is set, the process is executed in parallel mode. When this flag is not set, the process is executed in sequential mode.
● Test Run (optional)When you set the flag, data is not saved whilst executing the process.
Process Flow
All lives or any specified lives that belong to the specified company code are processed sequentially.
The system takes into account all operative policies or applications, which are relevant for the retrocession, for each life. The system retrocedes all relevant policies or applications. Based on the valid RIP, all ceded policy component shares are created, if necessary.
Moreover, “Facultative Cession Requirement” is updated for each life.
Result
You can display the result of the background process in single risk administration or in the messages in the log file once the background process has been completed.
10.4.2 Recapture a Retrocession Treaty
Use
You can use the Recapture of Ceded and Assumed Treaties background process to recapture a retrocession treaty.
Features
In the task list of the schedule manager, choose the Execute function in the context menu of the Recapture of Ceded and Assumed Treaties task. You get to the Recapture of Ceded and Assumed Treaties dialog.
158 P U B L I CLife Reinsurance Module
Background Processes (Batch Processes)

In the Recapture of Ceded and Assumed Treaties dialog, you can make settings in the following fields:
● Company CodeSpecify the company code for which recapturing is to be performed. By default, the field is preset with the current company code.
● PartnerSpecify the cedent of the treaty to be recaptured.
● Treaty (optional)Specify the treaty to be recaptured. If you do not specify a treaty, all treaties of the cedent are taken into account.
● Section (optional)Specify the section of the treaty to be recaptured. If you do not specify a section, all sections of the treaty are taken into account.
● Recapture DateSpecify the date at which the treaty is to be recaptured.
● Update Facultative Cession Requirement (optional)When you set the flag, the facultative requirement of all lives, which are affected by recapturing, is updated.
● Parallel Processing (optional)This flag is not ready for input and is defaulted depending on the performed transaction. When this flag is set, the process is executed in parallel mode. When this flag is not set, the process is executed in sequential mode.
● Test Run (optional)When you set the flag, data is not saved whilst executing the process.
Process Flow
Recapturing a treaty affects all of the operative policy components shares (PCS) of policies and applications that were entered in the Treaty field of the treaty to be recaptured and in the Section field of the section to be recaptured.
Both ceded and assumed treaties can be recaptured.
● Only the corresponding ceded PCS are affected when recapturing a ceded treaty.● The corresponding assumed PCS, and any related ceded PCS, are affected when recapturing an assumed
treaty - regardless of the treaty and section. Ceded PCS cannot exist without a corresponding assumed PCS.
The affected PCS are lapsed at the date specified in the Recapture Date field.
● If an affected PCS has a later start date, it is only lapsed to the specified recapture date.● When all of the assumed PCS of a policy component (PC) are lapsed, the PC itself is also lapsed.
For policies, a new version of the PCS is generated, reverse booked, lapsed on the recapture date and then forward booked. Applications that contain an affected PCS are displayed in the log.
Result
Any PCS that used a recaptured treaty or section are lapsed on the recapture date.
The specified treaty or section is no longer actively used by the operative policies or applications from the recapture date onwards.
The system has updated the facultative requirement for all lives affected by recapturing when you have set the flag in the Update Facultative Cession Requirement field.
Life Reinsurance ModuleBackground Processes (Batch Processes) P U B L I C 159
10.4.3 Transfer a Portfolio from One Retrocessionaire to Another Retrocessionaire
Use
You can use Transfer a Portfolio from one Retrocessionaire to another background process to replace an old retrocession treaty by a new retrocession treaty.
Function Scope
In the task list of the schedule manager, choose the Execute function in the context menu of the Transfer a Portfolio from one Retrocessionaire to another task. You get to the Transfer a Portfolio from one Retrocessionaire to another dialog.
In the Start Parameter for Transfer a Portfolio from one Retrocessionaire to another field group, you can make the settings in the following fields:
● Transfer DateEnter the date on which the previous treaty is to be replaced by the new treaty.
● Company CodeSpecify the company code for which the transfer of the portfolio is to be performed. By default, the field is preset with the current company code.
● Partner to Be WithdrawnThis field is defaulted with the owner company and cannot be changed.
● Treaty to Be WithdrawChoose the retrocession treaty to be replaced.
● Treaty Sec. to Be WithdrawnChoose the section of the retrocession treaty to be replaced.
● Replacement PartnerThis field is defaulted with the owner company and cannot be changed.
● Replacement TreatySelect the new retrocession treaty.
● Replacement Treaty Sec.Select the section of the new retrocession treaty.
● Parallel Processing (optional)This flag is not ready for input and is defaulted depending on the performed transaction. When this flag is set, the process is executed in parallel mode. When this flag is not set, the process is executed in sequential mode.
● Test Run (optional)When you set the flag, data is not saved whilst executing the process.
You can make the settings in the following fields in the Generation Reference Date field group:
● Transfer Previous Date
160 P U B L I CLife Reinsurance Module
Background Processes (Batch Processes)
When this flag is set, the same generation reference date, which has been used for the old (to be withdrawn) PCS, is used for the new policy component shares (PCS).
● Use Transfer DateWhen this flag is set, the generation reference date for the new PCS is defaulted with the specified transfer date.
Process
The transfer of a portfolio is a combination of withdrawing a retrocession treaty and subsequent retrocession of affected lives. It is only possible to transfer a ceded treaty.
All operative policy component shares (PCS) of policies and applications are affected which have the treaty to be withdrawn in the Treaty to Be Withdraw field and the treaty section to be withdrawn in the Treaty Sec.to Be Withdrawn field.
For policies, a new version of the PCS is generated, reverse booked, lapsed on the transfer date and then forward booked. The new created PCS is forward booked accordingly. For applications that contain an affected PCS, the old treaty with the corresponding treaty section in the corresponding fields is replaced by the new treaty with the corresponding treaty section replaced in the new version. The affected applications are displayed in the application log.
● Only the corresponding ceded PCS are affected when withdrawing a ceded treaty. The affected PCS are lapsed on the specified transfer date and new corresponding PCS are created. The newly created PCS have the same sum reinsured as the corresponding withdrawn PCS. Both the risk start date and the effective date are set to the transfer date. The new PCS use the specified new retrocession treaty and the corresponding treaty section.
● If an affected PCS has a later start date, it is only lapsed to this date.● If the affected version of the PCS, which is withdrawn, is not the latest version (historical change), the
system then automatically starts the process for retrocession of the affected life taking into account historical versions.
● Depending on the setting, the generation reference date of the newly created ceded PCS is either set to the generation reference date of the corresponding, lapsed PCS or to the determined transfer date.
Result
All PCS that used the withdrawn treaty or section are lapsed on the transfer date. The specified treaty to be withdrawn including the corresponding treaty section is no longer actively used by the operational policies or applications from the transfer date onwards. Instead, a new ceded PCS with the replacing treaty and corresponding treaty section is created for the transfer date. In case of historical changes, the life is then retroceded again over all following versions. If the flag is set in the Use Transfer Date field for the generation reference date, the transfer date of the new PCS is set. If the flag is not set, the transfer date is transferred from the replaced PCS.
Life Reinsurance ModuleBackground Processes (Batch Processes) P U B L I C 161

10.5 Data Cleansing
10.5.1 Deletion of No Longer Used Lives
Use
You can use the Deletion of No Longer Used Lives background process to delete lives, which have no assigned subordinate objects (policy, master policy, application) and which thus are (no longer) business relevant, from the system.
Features
In the task list of the schedule manager in the context menu, select the Execute function in the Deletion of No Longer Used Lives to get to the Deletion of No Longer Used Lives dialog.
In this dialog, you can make settings in the following fields:
● Expiry Period in YearsLives, to which no changes have been made in the specified period, are deleted (number of years earlier than the current system date).
● Test Run (Optional)When you set the flag, data is neither changed nor modified whilst executing the process.
● Parallel ProcessingThis flag is not ready for input and is defaulted by the system depending on the performed transaction.○ When this flag is set, the system executes the process in parallel mode.○ When this flag is not set, the system executes the process in sequential mode.
● Number of Parallel ProcessesThis field is only ready for input when the process is executed in parallel mode. It specifies the maximum number of work processes that is to be used. If you do not specify the number or specify “0”, the system determines and distributes the available resources automatically.
● Package SizeThis field specifies the maximum quantity of data records that are to be processed for each package. This affects the runtime for each package. The field is defaulted with “1000”. When you delete the value or set it to “0”, the system uses “5000” as default value.
● Server Group (Optional)This field is only ready for input when the process is executed in parallel mode. Specifies the name of the server group on which processing is to be started. You can manage the server group by using the RZ12 transaction.
162 P U B L I CLife Reinsurance Module
Background Processes (Batch Processes)

10.5.2 Deletion of No Longer Used Comments
Use
You can use the Deletion of No Longer Used Comments background process to delete comments from the system, which are no longer used in LRM and/or which cannot be assigned to an object in LRM.
Function Scope
In the task list of the schedule manager in the context menu, select the Execute function in the Deletion of No Longer Used Comments to get to the Deletion of No Longer Used Comments dialog.
In this dialog, you can make settings in the following fields:
● Expiry Period in YearsComments, which are not assigned to an object in LRM and to which no changes have been made in the specified period, are deleted. (Number of years earlier than the current system date).
● Test Run (Optional)When you set the flag, data is neither changed nor modified whilst executing the process.
● Detailed Log (Optional)When you set the flag, additional technical messages of the process are issued in the log.
● Parallel ProcessingThis flag is not ready for input and is defaulted by the system depending on the performed transaction.○ When this flag is set, the system executes the process in parallel mode.○ When this flag is not set, the system executes the process in sequential mode.
● Number of Parallel ProcessesThis field is only ready for input when the process is executed in parallel mode. It specifies the maximum number of work processes that is to be used. If you do not specify the number or specify “0”, the system determines and distributes the available resources automatically.
● Package SizeThis field specifies the maximum quantity of data records that are to be processed for each package. This affects the runtime for each package. The field is defaulted with “1000”. When you delete the value or set it to “0”, the system uses “5000” as default value.
● Server Group (Optional)This field is only ready for input when the process is executed in parallel mode. Specifies the name of the server group on which processing is to be started. You can manage the server group by using the RZ12 transaction.
Life Reinsurance ModuleBackground Processes (Batch Processes) P U B L I C 163

10.5.3 Deletion of No Longer Used Objects
Use
You can use the Deletion of No Longer Used Objects background process to delete policies, applications and lives from the system, which are no longer used for the active business in LRM and the legal retention period of which has already expired.
Features
In the task list of the schedule manager in the context menu of the Deletion of No Longer Used Objects task, select the Execute function to get to the Deletion of No Longer Used Objects dialog.
In this dialog, you can make settings in the following fields:
● DeleteNoLngrUsedPol/Appl/LivesObjects (policies/applications) are deleted, which are neither required for the active business nor for the legal retention period, when you set this flag. When all subordinate objects of a life are deleted during a batch, the life itself is also deleted.
● Company CodeYou can use this field to define for which company code the deletion is to be performed. This field is only ready for input when the DeleteNoLngrUsedPol/Appl/Lives flag is set.
● CedentYou can use this field to define for which cedent the deletion is to be performed. This field is only ready for input when the DeleteNoLngrUsedPol/Appl/Lives flag is set.
● Business ObjectYou can use this field to define which type of business objects is to be deleted. You can select the business objects “Policy” and “Application”. When you select “Master Policy”, the system issues a corresponding error message and the batch cannot be executed. When leaving the field empty, policies and applications are taken into account during the deletion process.This field is only ready for input when the Delete No Longer Used Pol/Applc/Lives flag is set.
● Delete No Longer Used LivesWhen you set this flag, the Deletion of No Longer Used Lives function is called.
● Delete No Longer Used NotesWhen you set the flag, the Deletion of No Longer Used Notes function is called.
● Expiry Period in YearsObjects, to which no changes have been made in the specified period, are deleted (number of years earlier than the current system date). This field is only ready for input when the Deletion of No Longer Used Lives flag or the Deletion of No Longer Used Notes flag is set.
● Test Run (Optional)When you set the flag, data is neither changed nor modified whilst executing the process.
● Parallel ProcessingThis flag is not ready for input and is defaulted by the system depending on the performed transaction.
164 P U B L I CLife Reinsurance Module
Background Processes (Batch Processes)

○ When this flag is set, the system executes the process in parallel mode.○ When this flag is not set, the system executes the process in sequential mode.
● Number of Parallel ProcessesThis field is only ready for input when the process is executed in parallel mode. It specifies the maximum number of work processes that is to be used. If you do not specify the number or specify “0”, the system determines and distributes the available resources automatically.
● Package SizeThis field specifies the maximum quantity of data records that are to be processed for each package. This affects the runtime for each package. The field is defaulted with “1000”. When you delete the value or set it to “0”, the system uses “5000” as default value.
● Server Group (Optional)This field is only ready for input when the process is executed in parallel mode. Specifies the name of the server group on which processing is to be started. You can manage the server group by using the RZ12 transaction.
10.6 Invalidation of Applications
Use
You can use the Invalidation of Applications background process to set applications to the “Invalid” underwriting processing status. These applications can no longer be linked to a policy.
Prerequisites
Applications must have the “Completed” underwriting processing status.
Moreover, one of the following conditions must be met:
● The period in days specified in the background process has expired and the application remained unchanged during this period.
● At least one reassessment date of the application on policy component share has been filled and that date is older than the current processing date.
Features
In the task list of the schedule manager, choose the Execute function in the context menu of the Invalidation of Applications task. You get to the Invalidation of Applications dialog.
In the Invalidation of Applications dialog, you can make settings in the following fields:
● Period in DaysSpecify the period in days during which the applications have not be changed (calculated backwards from the current system date).
Life Reinsurance ModuleBackground Processes (Batch Processes) P U B L I C 165
● Company CodeSpecify the company code(s) for which the applications are to be set to “Invalid”.
This background process determines all applications that have the underwriting processing status “Completed” on the current system date and where the status was not changed during the specified period (i.e. a reassessment was not performed) or where at least one reassessment date has been entered for the application on the policy component level and that date is older than the current processing date. The system performs the calculation backwards from the current system date. In this course, the system determines the start date by deducting the specified period (in days) from the current system date.
NoteThe application can run as multiple, parallel background processes.
10.7 Change of Organizational Unit
Use
You can use the Change of Organizational Unit background process to make changes to the responsibility in a policy / master policy, application or claim.
Features
In the task list of the schedule manager, choose the Execute function in the context menu of the Change of Organizational Unit task. You get to the Change of Organizational Unit dialog.
In the Change of Organizational Unit dialog, you can make settings in the following fields:
● Company Code (optional):Specify the company code to restrict the search.
● Partner (optional):Specify the partner to restrict the search.
● Responsibility ID (optional)Specify the Responsibility ID (such as “Policy” or “Application Assessment”) to restrict the search.
● Old Department / PositionIf you do not specify a number for the responsible old department / position, the system searches for a policy, master policy, application, claim or a combination of these, which have no entry for a department / position. At the same time, all other restriction characteristics must match.
● New Department / PositionWhen the system determined policies, master policies, applications, claims or a combination of these, the value in the Old Department / Position field is replaced by the value in the New Department / Position field.
The following flags are already set when starting the Change of Organizational Unit background program:
● Policy
166 P U B L I CLife Reinsurance Module
Background Processes (Batch Processes)
● Master Policy● Application● Claim
The system determines the department / position to be replaced for business objects for which the flag is set.
You can also use the following flags:
● Set Implementation TypeWhen you set this flag, the implementation type is set for the policy, master policy, application or claim. To do so, the Number of Responsibilities field has to be filled, since it is used to determine the implementation type to be set from the Maintain Used Responsibilities per Entity Customizing table. The New Department / Position field may remain empty.
● Update All VersionsWhen you set this flag, all existing versions, including migrated versions, are adjusted based on the specified background job parameters. In this case, all operative objects are adjusted, but no new version is generated.
Checks
You have to fill at least the New Department / Position field and set a flag for a business object (such as policy) to execute the background process.
The system also checks whether the entered old department/position and new department/position exist in the SAP Organizational Management (PD Org).
NoteThe application can run as multiple, parallel background processes.
10.8 Logging
Features
Logging Background Processes
The system creates a log during the run of the background process. You can use the log for information on the process run and error analysis as described below:
● To display the log, use the list that is displayed directly after the process run.● You can use the Log Display [page 168] (/MSG/VRC_LOG) report to retroactively evaluate the log.● Use the transaction Application Log: Delete Logs (SLG2) to delete a log.
NoteLogs are not deleted automatically.
Logging when Deleting Applications
The system writes all messages, which are generated when manually deleting applications using the Delete Application context menu entry in the Single Risk Administration, to a log. You can use this log for error analysis
Life Reinsurance ModuleBackground Processes (Batch Processes) P U B L I C 167

and to document deletions. All reporting functions of logs of the background processes are also available for the logs of the deletion function.
10.8.1 Log Display
Use
The Log Display (/MSG/VRC_LOG) report is an enhancement of the standard log display. You can use the report to display log data that have been additionally recorded by the LRM background processes and the Delete Application function. The report is intended to simplify locating logs from the background processing and the Delete Application function.
Prerequisites
Logs, which contain additional information, must exist in the application log. Such logs can either be created by LRM background processes or by the Delete Application function.
Features
Use the /MSG/VRC_LOG transaction to get to the LRM Log Display dialog. You can use the dialog to search for logs and display them using search criteria. You can restrict the search for logs to a specific period, for example.
Use the Flow Trace pushbutton to switch to the Flow Trace of the LRM Background Programs dialog. The search criteria entered before are also adopted.
The LRM Log Display dialog contains the search fields of the SLG1 transaction and have the same effect when search for logs. The Object and Subobject fields in the Logical Assignment field group are defaulted so that only logs of the LRM background processes and the Delete Application function are selected.
The LRM Log Display dialog contains the following fields in the Batch Run Parameter field group:
● Cedent● Contract Number● Section● CAP Start Date (start date of the accounting period)
You can use these fields to restrict the list of displayed logs to specific cedents, treaties, treaty sections and accounting periods.
The Log Filter field group contains the following fields:
● Policy/Application Number● Subproduct Code
168 P U B L I CLife Reinsurance Module
Background Processes (Batch Processes)

● Message Type
You can use these fields to restrict the list of displayed logs to specific policies or applications, subproduct codes and message types.
Procedure
Use the /MSG/VRC_LOG transaction to get to the LRM Log Display dialog.
You create a log as described below:
1. Fill the fields in the LRM Log Display dialog and perform the log search.2. You get to the LRM Logs dialog. It contains a list of application logs that match the search criteria and a
message list. In the log list, search for the corresponding log.3. Double-click the corresponding log to display the corresponding messages in the message list.
The message list contains information in the following columns:○ Policy/Application Number○ Subproduct Code○ Message Type○ Effective Date○ External Event○ Internal Event○ Area Description○ Insured Person's Last Name○ Insured Person's First Name○ Date of Birth○ Gender
4. Choose a log or a message and then choose the Details pushbutton. You get to a detail view of the corresponding business object. Depending on the contents of the message, the business object can be a policy, an application, a relevant movement, an account or a historic version of a policy component or a policy component share, for which the system generated the message.
Life Reinsurance ModuleBackground Processes (Batch Processes) P U B L I C 169
11 Multiple Deletion of Applications and Lives (Code of Conduct)
Use
Within the scope of a self-commitment of the insurance industry, personal data should not be saved in IT systems longer than necessary adhering to the principle of data economy.
A program for this is available in LRM that you can use to completely and irrevocably delete a great number of applications and identities at one go from the system. Data to be deleted is identified using deletion requests that the cedent sends to the reinsurer.
The process is divided into the following steps:
● Import of the deletion requests into the system● Determination of applications and identities to be deleted that match the deletion request.● Deletion of applications and identities as well as deletion of the deletion requests themselves.
11.1 Import of the Deletion Requests into the System
Procedure
Format the deletion requests sent by the cedent in such a way that they can be imported into the system using the /MSG/BAPI_VODELREQ_CREATE BAPI. See Chapter BAPI Interfaces [page 196] for further information on the interface description.
170 P U B L I CLife Reinsurance Module
Multiple Deletion of Applications and Lives (Code of Conduct)

Result
Following the import, deletion requests are saved in the /MSG/VDODELREQ database table. The table contains the most important fields of the database table:
Field Description
REQUEST ID Unique number of a deletion request (GUID)
COMPANY CODE Company Code
CEDENT Cedent
IMPORT TIMESTAMP Import Time Stamp
APPLICATION NUMBER Application to be deleted (application number as specified in LRM)
APPLICATION NUMBER CEDENT Application to be deleted (application number of the cedent)
SURNAME Last name of the identity to be deleted
FIRSTNAME First name of the identity to be deleted
DATE OF BIRTH Date of birth of the identity to be deleted
MATCHING DONE Flag that displays whether the matching applications / identities have been determined
APPROVED FOR DELETION Flag that displays whether a found deletion candidate is to be actually deleted
11.2 Determination of Deletion Candidates
Procedure
To determine a deletion candidate, proceed as described below:
1. Start the single risk administration. You get to the LRM Search dialog. Choose the “double arrow” pushbutton at the right-hand side of the toolbar. Choose the Deletion Request Dialog function. You get to the Determination of Data to Be Deleted dialog.
2. In the dialog, fill the required entry fields Company Code and Cedent and optionally the Import Date field in the Determination of Data to Be Deleted dialog to restrict the search. Choose the Display Deletion Requests pushbutton. The system displays the deletion requests, which have be imported using the BAPI, in a list in the dialog.
Life Reinsurance ModuleMultiple Deletion of Applications and Lives (Code of Conduct) P U B L I C 171

3. Set the indicator in the field Start Immediately or enter the Start Date Process and Start Time Process the time for which the following process step is to be executed.
4. Choose the Determine Deletion Candidates pushbutton.
NoteIf the deletion request contains claim numbers (LRM application number and / or application number of the cedent), it is an “Application Deletion Request” or an “Identity Deletion Request”.
Application Deletion Request
The system searches for all applications, the application numbers of which match the application numbers in the deletion request and assigns found applications (candidates) to the corresponding deletion request.
No candidate is displayed in the following cases and a warning message is saved in the deletion request:
● Application not found for a deletion request.● A matching application has already been materialized.● A matching application has assignments to other applications and/or policies.
Candidates and a warning message are displayed in the following cases:
● The deletion request contains identity data in addition to the application number. However, the found application does not contain a matching insured person.
● The deletion request contains identity data in addition to the application number. However, the found application also contains additional insured persons.
Identity Deletion Request
The system searches for all identities that match the specified identity data of the deletion request and assigns found identities (candidates) to the corresponding deletion request. The last name (and optionally the first name) and the date of birth must exactly match the candidate data for successful determination (last name or first name not case sensitive).
When the system finds no or multiple identities for a deletion request, a corresponding warning messages is saved in the deletion request.
NoteInsured persons of applications that the system determined as deletion candidates are not displayed here as individual deletion candidates. These insured persons are automatically deleted with the application in a later deletion process.
The application deletion request does not contain any reference to existing applications and are used to remove identities and entire lives from the system.
172 P U B L I CLife Reinsurance Module
Multiple Deletion of Applications and Lives (Code of Conduct)
Result
If you set the flag in the Start Immediately field, the system displays the found deletion candidates immediately under the respective deletion request in the list in the Determination of Data to Be Deleted dialog.
If you have not set the flag in the Start Immediately field, the system started the determination in the background and you have to call the result by using the Update pushbutton in the Determination of Data to Be Deleted dialog.
When the system found candidates without displaying a warning message, the system sets the flags MATCHING_DONE and APPROVED_FOR_DELETION both for the deletion request and for the candidate.
The system only selects the MATCHING_DONE flag if the system displayed warning messages.
11.3 Release of the Deletion Process
Procedure
Release the deletion process as follows:
1. You can overrule the flags that the system automatically sets for APPROVED_FOR_DELETION from the determination process and manually delete or set the flag of individual deletion requests and/or candidates. To do this, choose the Display <-> Change pushbutton in the Determination of Data to Be deleted dialog or remove the flag in the relevant rows.
2. Set the indicator in the field Start immediately or enter the Start Date Process and Start Time Process the time for which the following process step is to be executed.
3. Choose the Delete Selected Entries pushbutton and confirm the displayed confirmation prompt with “Yes”.
NoteIn contrast to the determination process, the system writes the warning or error messages that have been created during the deletion process into the application log (logical assignment FS_RI_BATCH, subobjectV_DEL_REQUEST) and not into the individual deletion request and/or candidates,
Application Candidates
The system rechecks all applications that have been found during the determination process and that have been flagged as APPROVED_FOR_DELETION whether they have been materialized or if they have assignments to other applications and/or policies.
● If this is the case, the system creates a corresponding entry in the application log. The application number of the deleted application is stored in the Policy/Application Number field in the application log.
Life Reinsurance ModuleMultiple Deletion of Applications and Lives (Code of Conduct) P U B L I C 173

● If this is not the case, the system creates all insured persons of each individual application as a new identity candidate, deletes the application, the candidate and/or the entry for the application in the list of candidates and the deletion request itself from the system.
The system deletes identity candidates, which have been collected in this way, together with the identity candidates, which have been determined from the previously imported identity deletion requests, in the next process step.
Identity Candidates
The system checks all identities that have been found during the determination process and that have been flagged as APPROVED_FOR_DELETION whether further applications and/or policies are assigned to these identities.
● If this is the case, the system creates a corresponding entry in the application log.● If this is not the case, the system deletes the identity and the entire life business object if the identity to be
deleted is the only remaining identity in a life.
The system finally also deletes the candidate and/or the entry for the identity in the list of candidates and the deletion request itself from the system.
The system stores the application number of the triggering application in the Policy/Application Number field in the application log for all deleted lives and identities.
The system issues messages for a life and corresponding identities and applications in the application log.
The cedent name, for which the deletion has been done, is also stored in the application log.
Result
If you set the flag in the Start Immediately field, the system removes the deletion requests and the associated candidates from the list in the dialog Determination of Data to Be Deleted.
If you did not set the flag, the system has started the deletion process in the background and you have to update the result list using the Update pushbutton.
Start the LRM application log using the /MSG/VRC_LOG transaction, enter FS_RI_BATCH as object and V_DEL_REQUEST as subobject within the scope of the logical assignment and start the issuing of the log using the F8 key (execute) of your keyboard.
174 P U B L I CLife Reinsurance Module
Multiple Deletion of Applications and Lives (Code of Conduct)
12 LRM Validation Checks
LRM distinguishes between the following types of validation checks:
● Validation checks that are not flexibleThe settings for these checks cannot be changed or configured.
● Flexible validation checksLRM delivers standard settings for these checks. You can make changes to the settings for these checks (error level, problem class and Deactivated flag) at various levels in the Customizing such as for the business partner.
The following table contains a description all LRM validation checks that can be configured:
No. Validation Check Name Group Description
1 Benefit/premium start cannot be after the benefit/premium end of the PC
Dialog Benefit/premium payment start date earlier than or same as benefit/premium payment end date
2 Total sum reinsured must be less than or the same as the sum insured
Movement Cumulative sum reinsured of all policy component shares less than or equal to initial sum reinsured of corresponding policy component
3 Policy must be covered by the scope of the treaty
Movement Movement is processed if the policy corresponds to the attributes of the “Scope” condition of the assigned reinsurance treaty
4 Loading payment term cannot be longer than the premium payment term
Dialog Cedent Checks: Loading payment period must not be longer than the premium payment period. This check is only performed if the start and end of the loading payment period has been specified and if, in addition, the start or end date of the loading payment period is within the start/end of the premium payment duration.
6 Loading payment term is longer than the policy component term
Dialog Loading payment period (“Insured Person” level for movements, Loadings tab page, loading term columns Loading Term Year(s), Loading Term Month(s), Loading Term Day(s)) smaller or equal to the policy component term.
10 Benefit types in the policy are a subset of the benefit types in the application
Movement The benefit types of a policy must be a subset of the application if an application exists for the policy in the in-force business.
Life Reinsurance ModuleLRM Validation Checks P U B L I C 175

No. Validation Check Name Group Description
11 Sum insured in the PC is less than or equal to the sum insured in the application
Movement Sum insured of the policy is less than or equal to the sum insured of the corresponding application (comparison for each policy component)
12 Increased risk at application requires increased risk at policy / insured person
Movement Any loadings that exist for the application must also exist for the corresponding policy
13 PC terms in application and policy do not match
Movement Policy component terms of an application and the corresponding policy are checked for consistency
14 No application was found, although one should exist
Movement Delivers an error message if an application number has been delivered with the data transmission (Linked Application Number field on the policy level of a movement) that does not exist in the system
15 Checking the cedent’s claim authorization limit
Movement Check the conditions in the treaty:
● Acceptance authority for cedent claims per life
● Acceptance authority for cedent claims per policy
● Acceptance authority for cedent claims per claim
17 Checking the automatic acceptance limit
Movement Check the conditions in the treaty:
● Automatic acceptance per life● Automatic acceptance per policy● Automatic acceptance – multiple bene
fit types per life● Automatic acceptance - multiple benefit
types per policy
18 Cedent's underwriting authority exceeded, but no application exists
Movement Check the conditions in the treaty:
● Cedent’s underwriting authority per life● Cedent’s underwriting authority per pol
icy
19 Product does not exist on the as-at date
Movement Checking of start date of the policy and/or policy component for new business (must be within the validity period of the selected cedent product)
176 P U B L I CLife Reinsurance ModuleLRM Validation Checks

No. Validation Check Name Group Description
20 Rewind not possible because attached claim assessment data exists
Rewind When the check is active, the system performs a check when rewinding to determine whether the affected operative policy component has claim assessment data.
This prevents claim assessment data from being lost or changed during the rewinding.
21 Sum reinsured cannot exceed the automatic acceptance of the retro treaty
Retrocession When the check is activated, the initial sum reinsured in the newly created or changed share is checked. To do so, the treaty and section are determined from the policy component share. These values are used to determine valid conditions of the condition type Obligatorium/Autom. Acceptance up to the effective date of the movement. No other checks are performed if no relevant condition is found.
22 Sum reinsured of all ceded PCS must be less than or equal to the reinsurance amount of assumed PCS
Retrocession When this check is activated the initial sum reinsured of the assumed share is checked against the total of all ceded shares belonging to the assumed share. A message is issued in the dialog if the sum of the ceded shares is larger than the assumed share amount. If the check is deactivated, the ceded share can be greater than the corresponding assumed share.
23 Current sum insured POL must be less than or equal to the accepted APPL sum insured
Movement When this check is active, the system checks whether the current sum insured in a policy is less than or equal to the accepted sum insured in the assigned application. The check is performed during movement processing. If the current sum insured in the policy is greater than the accepted sum insured of the application, the system displays a message.
24 Cedent retention in the application must be less than or equal to that in the policy
Movement When this check is active, the system checks whether the cedent retention in the application is less than or equal to the retention in the assigned policy. The check is performed during movement processing. If the retention in the application is greater than that in the policy, the system displays a message.
Life Reinsurance ModuleLRM Validation Checks P U B L I C 177

No. Validation Check Name Group Description
25 Rewind policy with P&L values that have already been transferred to a released account
Rewind When this check is active, the system checks the profit and loss values when rewinding a policy. The system determines whether the profit and loss values in the policy have already been transferred to an account in the FS-RI Basic System and whether the account in question has already been released. When the system detects this case when rewinding a policy, it displays a corresponding message.
26 Policy component was no longer delivered in the claim payment.
In-Force Business Lists
This check controls whether an expiry movement is generated for policy components with a “Claimed Ongoing” status that do not have a benefit payment end date and that are no longer delivered in a BIF data transmission.
27 Date of birth set for the insured person is in the future
Movement / Dialog
When this check is active, the system checks whether the date of birth set for the insured person is in the future, when processing a movement and in the dialog. The configured error level determines whether the system can process the movement successfully.
28 Risk start date of PCS is prior to the start date of the PC
Movement When this check is active, the system checks whether the risk start date of the policy component share is prior to the start date of the policy component, when processing a movement. The configured error level determines whether the system can process the movement successfully.
29 Cause of claim and secondary cause of claim are the same
Movement When this check is active and a claim exists, the system checks whether the cause of the claim and the secondary cause of claim are the same. The configured error level determines whether the system can process the movement successfully.
30 Claim advise date is prior to date cedent advised of claim
Movement When this check is active and a claim exists, the system checks whether the claim advise date is prior to the date the cedent is advised of the claim. The configured error level determines whether the system can process the movement successfully.
178 P U B L I CLife Reinsurance ModuleLRM Validation Checks

No. Validation Check Name Group Description
31 Effective date of the claim announcement and reversal are different
Movement When this check is active and a claim announcement and a claim reversal exist, the system checks whether the effective data of the claim announcement and the effective date of the claim reversal are different. The configured error level determines whether the system can process the movement successfully.
32 Alteration is processed for PC with status “Claimed Terminated”
Movement When this check is active, the system checks whether the operative policy component has the “Claimed Terminated” when processing a movement with business transaction alteration. The configured error level determines whether the system can process the movement successfully.
33 Alteration is processed for PC with status “Claimed Ongoing”
Movement When this check is active, the system checks whether the operative policy component has the status “Claimed Ongoing” when processing a movement with business transaction alteration. The configured error level determines whether the system can process the movement successfully.
34 New claim for a policy is processed
Movement This check is relevant when processing a claim movement with a different claim number of the cedent for which the effective date is after the claim date.
When this check is active, it depends on the set error level whether this claim movement can be processed.
35 Movement is processed on claim date; claim assessment in process
Movement This check is relevant when a movement is processed on the claim date. This movement must affect an operative policy component that is assigned to a claim assessment that has not yet been completed.
When this check is active, the set error level determines whether the movement can be processed for a policy component with a claim assessment that has not yet been completed.
Life Reinsurance ModuleLRM Validation Checks P U B L I C 179

No. Validation Check Name Group Description
36 Claim movement should be processed, decision has not been completed
Movement When this check is active, the system checks whether the claim assessment has been completed when processing a movement. The configured error level determines whether the system can process the movement successfully.
37 Benefit payment start date is not within the BIF list reporting period
In-Force Business Lists
This validation check fails if the check is active and you delivered a BIF record to the system that caused an existing policy component to switch to benefit payment mode, but the scheduled start date of the benefit payment is not within the BIF list reporting period. When you selected “Error” as Error Level, the generated movement obtains the “Do Not Process” processing status. When you selected “Warning” or “Information” as Error Level, the generated movement obtains the “Process” processing status.
38 Unprocessed movements exist for this BIF record
In-Force Business Lists
This validation check fails if the check is active, but unprocessed movements still exist for this BIF record that could change the policy component status and the corresponding data. If you selected “Error” as the error level, the generated movement obtains the “Do Not Process” processing status. If you selected “Warning” or “Information” as the error level, the generated movement obtains the “Process” processing status.
39 Different currency in operative and delivered policy
In-Force Business Lists / Movement
If the check is active, the system performs a check in the following cases to determine whether the currency on the policy level of the corresponding operative policy is differ-ent than the currency in the delivered movement or the delivered BIF record:
● Movement Processing: Processing a Claim or Renewal Movement
● Generating Movements in the BIF Process: For the status delivered for BIF records “Annuity”, “Claimed (Ongoing)”, “In Force”
The continued processing of the movement or the BIF list depends on the error level that has been set.
180 P U B L I CLife Reinsurance ModuleLRM Validation Checks

No. Validation Check Name Group Description
40 Different start date in operative and delivered policy component
In-Force Business Lists / Movement
If the check is active, the system performs a check in the following cases to determine whether the start date on the policy component level of the corresponding operative policy is different than the start date in the delivered movement or the delivered BIF record:
● Movement Processing: Processing a Claim or Renewal Movement
● Generating Movements in the BIF Process: For the status delivered for BIF records “Annuity”, “Claimed (Ongoing)”, “In Force”
The continued processing of the movement or the BIF list depends on the error level that has been set.
41 Different end date in operative and delivered policy component
In-Force Business Lists / Movement
If the check is active, the system performs a check in the following cases to determine whether the end date on the policy component level of the corresponding operative policy is different than the end date in the delivered movement or the delivered BIF record:
● Movement Processing: Processing a Claim or Renewal Movement
● Generating Movements in the BIF Process: For the status delivered for BIF records “Annuity”, “Claimed (Ongoing)”, “In Force”
The continued processing of the movement or the BIF list depends on the error level that has been set.
Life Reinsurance ModuleLRM Validation Checks P U B L I C 181

No. Validation Check Name Group Description
42 Different current sum insured in operative and delivered PC
In-Force Business Lists / Movement
When this check is active, the system performs a check in the following cases to determine whether the current sum insured on the policy component level of the corresponding operative policy is different than the current sum insured in the delivered movement or the delivered BIF record:
● Movement Processing: Processing a Claim or Renewal Movement
● Generating Movements in the BIF Process: For the status delivered for BIF records “Annuity”, “Claimed (Ongoing)”, “In Force”
The continued processing of the movement or the BIF list depends on the error level that has been set.
43 Different Risk Start Date in Operative and Delivered PC Share
In-Force Business Lists / Movement
When this check is active, the system performs a check in the following cases to determine whether the sum reinsured on the policy component share level of the corresponding operative policy is different than the sum reinsured in the delivered movement or the delivered BIF record:
● Movement Processing: Processing a Claim or Renewal Movement
● Generating Movements in the BIF Process: For the status delivered for BIF records “Annuity”, “Claimed (Ongoing)”, “In Force”
The continued processing of the movement or the BIF list depends on the error level that has been set.
182 P U B L I CLife Reinsurance ModuleLRM Validation Checks

No. Validation Check Name Group Description
44 Different initial sum reinsured in operative and delivered PC share
In-Force Business Lists / Movement
When this check is active, the system performs a check in the following cases to determine whether the sum reinsured on the policy component share level of the corresponding operative policy is different than the sum reinsured in the delivered movement or the delivered BIF record:
● Movement Processing: Processing a Claim or Renewal Movement
● Generating Movements in the BIF Process: For the status delivered for BIF records “Annuity”, “Claimed (Ongoing)”, “In Force”
The continued processing of the movement or the BIF list depends on the error level that has been set.
45 Policy is not covered by the scope of the BIF list
In-Force Business Lists
If you selected “Error” as the error level, the generated movement obtains the “Do Not Process” processing status. If you selected “Warning” or “Information” as the error level, the generated movement obtains the “Process” processing status.
46 Age at entry do not match in application and policy
Movement The validation check fails if this check is active and an application exists for a policy, but the age at entry in the policy is different than the age at entry in the application.
The configured error level determines whether the system can process the movement successfully.
47 Subproduct Does Not Exist on As-At Date
Movement This validation check fails if the check is active and a subproduct has been specified for a policy, but the commencement date of the policy (or policy component in case of new business) is outside the validity period of the selected subproduct. The configured error level determines whether the system can process the movement successfully.
Life Reinsurance ModuleLRM Validation Checks P U B L I C 183
No. Validation Check Name Group Description
48 Delivered payment request/claim costs have already been posted
Claim movement
When this check is active, the system checks whether:
● A claim movement with payment request/claim costs (PR/CC) is processed for which the Payment Created flag has not been set
● Other operative PRs/CCs with the same key values (condition/payment date from/payment date to) exist and for which the Payment Created flag has been set.
Whether further processing of the movement is resumed depends on the error level that has been set.
49 Checks for closing the claim assessment failed
Claim Movement
When this check is active, the system checks whether a claim movement is processed once the assessment has been completed causing only the following data has been changed:
● Evidence Checklist● PR/CLC (and period values and profit
and loss values generated from this PR/CLC)
● Processing date of the PC● Event of the PC● Conditions of the assumed PC shares● Claim status● Claim processing status● Effective date● Assessment Required flag● Final Claim Movement flag
184 P U B L I CLife Reinsurance ModuleLRM Validation Checks
No. Validation Check Name Group Description
50 Follow-up movement contains backdated change to affected PC
Movement This check is run when a movement triggers the automatic processing of follow-up movements and the most recent version of an affected policy component (PC) has an effec-tive date that is later than that of the triggering movement.
When the check is active, the follow-up movement is applied to the version of the affected PC that is valid on the effective date of the triggering movement (= backdated change). The configured error level determines whether the system can process the generated follow-up movement automatically.
When the check is deactivated, the follow-up movement is applied to the most recent version of the affected PC.
Life Reinsurance ModuleLRM Validation Checks P U B L I C 185

No. Validation Check Name Group Description
51 Current movement is backdated and claim exists in affected PC
Movement This check is relevant when backdated movements are processed for a claimed policy component.
When the check is active, it overrides the setting in the Process Backdated Movements field in the data transmission or movement. In doing so, the system behavior depends on the error level that has been set:
● Backdated movements can be processed for claimed policy components if the error level is “Information” or “Warning”.
● When the error level is “Cancelation” or “Error”, processing of backdated movements in claimed policy components is cancelled.
When the check is deactivated, the setting in the Process Backdated Movements field in the data transmission or in the movement controls the system behavior when processing backdated movements for claimed policy components.
If this is a retroactive movement with the event “Renewal”, this check is not performed. In this case, the “Delivery Period P&L Values” event is set automatically for processing and there is no retroactive processing. The automatic switch of the events is only made if the treaties of the assumed PC shares are only non-service treaties.
52 Event reason does not match external event
Movement When the check is active, the system checks whether the delivered value in the Event Reason field matches the delivered value in the External Event field. This check is performed based on the settings in the Custom
izing activity under msg.Life Reinsurance
Module Policy Settings Event Reason/
External Event Assignment .
When the check is not active, no check is performed between the fields Event Reason and External Event.
186 P U B L I CLife Reinsurance ModuleLRM Validation Checks

No. Validation Check Name Group Description
53 Lapse delivered for policy component that has already been lapsed
Movement This check is relevant when a lapse movement is processed that affects a policy component that has already been lapsed.
When the check is deactived, the system automatically reinstates the lapsed policy component. This makes it possible for the subsequent lapse movement to be processed successfully.
When the check is active, the system behavior depends on the error level:
● When the error level is “Information” or “Warning”, an automatic reinstatement is performed and a message is issued.
● When the error level is “Cancelation” or “Error”, no automatic reinstatement is performed and the processing of the lapse movement for the previously lapsed policy component is canceled.
54 Insured person(s) risk check failed
Movement When the check is active, the system calls the BRFplus function Insured Person(s) Risk Check. This BRFplus function returns whether a person represents a valid risk or not.
If the person does not represent a valid risk and the selected error level is “Error” or “Cancelation”, the system terminates the movement processing.
55 Jumbo limit in claim case exceeded
Movement When the check is active, the system also checks whether the “Check Jumbo Limit” and/or “Jumbo Limit” conditions of the underlying treaty are exceeded when processing a movement with the “Claim” and/or “Claim Alteration” events.
If one of the above limits has been exceeded and the selected level is “Error” or “Cancelation”, the system terminates the movement processing.
Life Reinsurance ModuleLRM Validation Checks P U B L I C 187

No. Validation Check Name Group Description
56 Minimum cession undershot Movement When the check is active, the system checks whether the “Minimum Cession” condition defined in the treaty is undershot when processing a movement with the “New Business” or “Reinstatement” event.
If the limit is undershot and the selected level is “Cancelation” or “Error”, the system terminates movement processing.
57 Effective date of new business on or after claim date of existing claim
Movement When the check is active, when processing a new business policy or policy component the system checks whether the associated life is already claimed and whether the effective date of the new business is on or after the claim date of an existing claim.
When the error level is “Error” or “Cancelation”, the system does not process the new business movement.
58 Effective date of new business before claim date of existing claim
Movement When the check is active, when processing a new business policy or policy component the system checks whether the associated life is already claimed and whether the effective date of the new business is before the claim date of an existing claim.
When the error level is “Error” or “Cancelation”, the system does not process the new business movement.
59 Trivial amount limit has been undershot
Movement When the check is active, the system checks whether the “Trivial Amount Limit” condition defined in the treaty is undershot when processing a movement with the “Delivery Periods for P&L Values”, “Renewal ” (Prolongation) or “Alteration” events.
If the limit is undershot and the selected level is “Cancelation” or “Error”, the system terminates movement processing.
188 P U B L I CLife Reinsurance ModuleLRM Validation Checks

No. Validation Check Name Group Description
60 Effective date and claim date are different
Movement When the check is active, the system checks whether the effective date and claim date of a new claim are different.
When the error level is “Information” or “Warning”, the system processes the movement. When the error level is “Cancelation” or “Error”, the system terminates processing with a corresponding message.
61 The loss could not be assigned
Claim Movement
If the check is active, the system checks whether a claim can be assigned to the processed claim.
When the error level is “Information” or “Warning”, the system processes the movement. When the error level is “Cancelation” or “Error”, the system terminates processing with a corresponding message.
62 Benefit payment start date of a PR/CLC is before effective date
Claim movement
When the check is active, the system checks whether the benefit payment start date of a payment request/claim costs (PR/CLC) is before the effective date of the policy component.
When the error level is “Cancelation” or “Error”, the system terminates claim movement processing.
63 Different risk start dates on assumed shares
Movement When the check is active, the system checks whether the risk start dates of assumed shares of a retro transaction are different.
When the error level is “Information” or “Warning”, the oldest risk start date is used for the selection of the RIP. When the error level is “Cancel” or “Error”, the system terminates processing with a corresponding message.
Life Reinsurance ModuleLRM Validation Checks P U B L I C 189

No. Validation Check Name Group Description
64 Different RIP determination data on assumed shares
Movement When the check is active, the system checks whether the RIP determination data of the assumed shares of a retro transaction is different.
When the error level is “Information” or “Warning”, the oldest RIP determination date is used for the selection of the RIP. When the error level is “Cancelation” or “Error”, the system terminates processing with a corresponding message.
65 Claims has already been completed
Claim Movement
When the check is active, the system checks whether a claim movement is to be processed for a claim that has already been closed.
When the error level is “Information” or “Warning”, the system processes the movement. When the error level is “Cancelation” or “Error”, the system terminates processing with a corresponding message.
190 P U B L I CLife Reinsurance ModuleLRM Validation Checks

No. Validation Check Name Group Description
66 Effective date is before the BIF list reporting period
In-force Business List
When the check is active and a new business movement from a BIF record is generated without a supplied effective date, the date determined by the system is transferred to the movement. If the effective date is in the delivered BIF record, it is transferred to the movement in any case.
When the error level is “Information” or “Warning”, the processing status of the generated movement is set to “Process”.
When the error level is “Cancelation” or “Error”, the processing status of the generated movement is set to “Do Not Process”.
When the check is deactivated, a supplied effective date in the BIF record is not checked against the reporting period of the data transmission and no message is issued. The processing status of the movement is set to “Process”.
When a BIF record is delivered without effec-tive date and the system determines a new business movement with an effective date, which is before the reporting period of the data transmission, the system sets the reporting period start date of the data transmission as effective date. In addition, the system issues a corresponding warning. The processing status of the movement is set to “Do Not Process”.
67 Unique operative policy not found for new business from conversion
Movement When the check is active and a movement is processed, in which the Due to Conversion flag has been set, the system checks whether a matching policy exists in the system that has been used for the conversion (details see Chapter Conversion of a Policy [page 102]).
When the system cannot determine a policy or no unique policy, the system displays a corresponding message in the application log at the message level “Information” or “Warning”. When the error level is “Cancelation” or “Error”, the system terminates processing with a corresponding message.
Life Reinsurance ModuleLRM Validation Checks P U B L I C 191
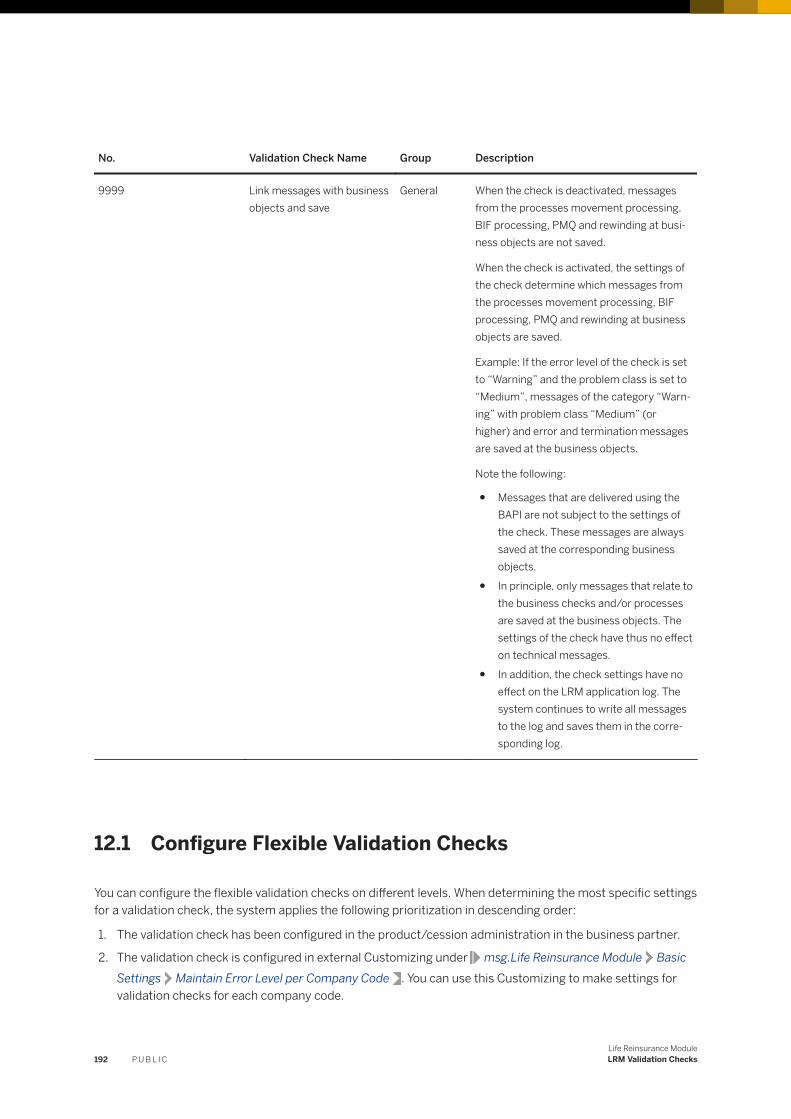
No. Validation Check Name Group Description
9999 Link messages with business objects and save
General When the check is deactivated, messages from the processes movement processing, BIF processing, PMQ and rewinding at business objects are not saved.
When the check is activated, the settings of the check determine which messages from the processes movement processing, BIF processing, PMQ and rewinding at business objects are saved.
Example: If the error level of the check is set to “Warning” and the problem class is set to “Medium”, messages of the category “Warning” with problem class “Medium” (or higher) and error and termination messages are saved at the business objects.
Note the following:
● Messages that are delivered using the BAPI are not subject to the settings of the check. These messages are always saved at the corresponding business objects.
● In principle, only messages that relate to the business checks and/or processes are saved at the business objects. The settings of the check have thus no effect on technical messages.
● In addition, the check settings have no effect on the LRM application log. The system continues to write all messages to the log and saves them in the corresponding log.
12.1 Configure Flexible Validation Checks
You can configure the flexible validation checks on different levels. When determining the most specific settings for a validation check, the system applies the following prioritization in descending order:
1. The validation check has been configured in the product/cession administration in the business partner.
2. The validation check is configured in external Customizing under msg.Life Reinsurance Module Basic Settings Maintain Error Level per Company Code . You can use this Customizing to make settings for validation checks for each company code.
192 P U B L I CLife Reinsurance ModuleLRM Validation Checks
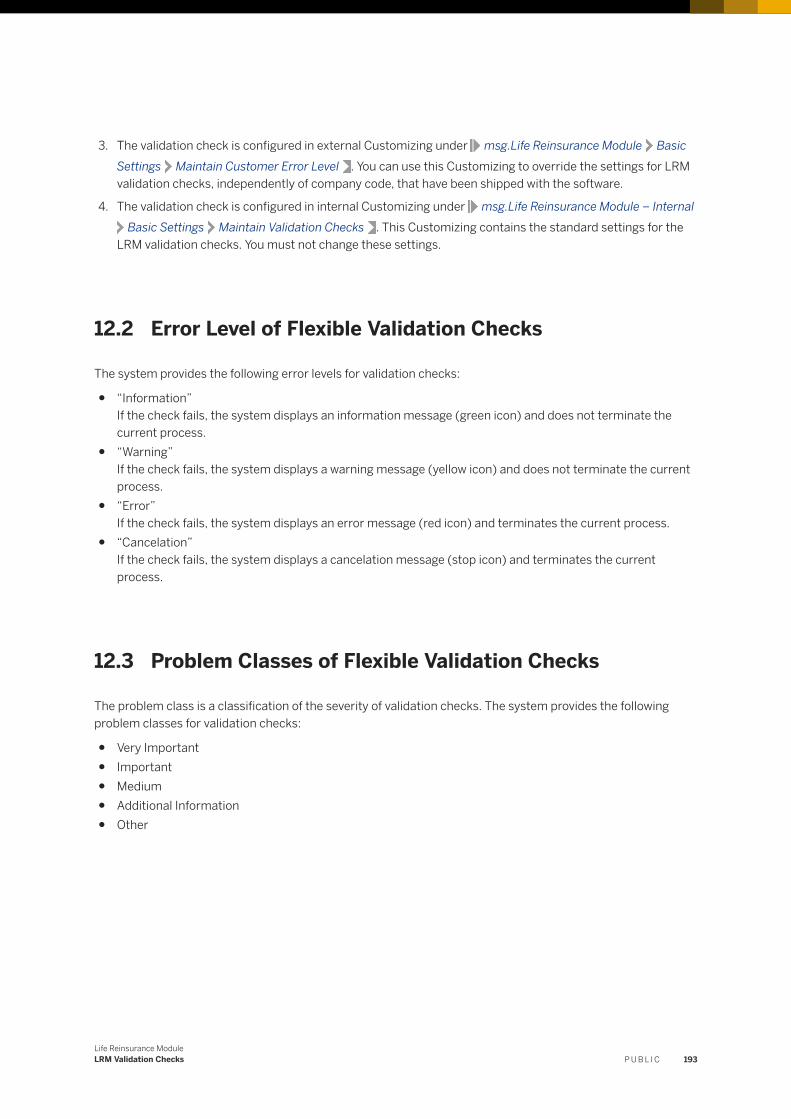
3. The validation check is configured in external Customizing under msg.Life Reinsurance Module Basic Settings Maintain Customer Error Level . You can use this Customizing to override the settings for LRM validation checks, independently of company code, that have been shipped with the software.
4. The validation check is configured in internal Customizing under msg.Life Reinsurance Module – InternalBasic Settings Maintain Validation Checks . This Customizing contains the standard settings for the
LRM validation checks. You must not change these settings.
12.2 Error Level of Flexible Validation Checks
The system provides the following error levels for validation checks:
● “Information”If the check fails, the system displays an information message (green icon) and does not terminate the current process.
● “Warning”If the check fails, the system displays a warning message (yellow icon) and does not terminate the current process.
● “Error”If the check fails, the system displays an error message (red icon) and terminates the current process.
● “Cancelation”If the check fails, the system displays a cancelation message (stop icon) and terminates the current process.
12.3 Problem Classes of Flexible Validation Checks
The problem class is a classification of the severity of validation checks. The system provides the following problem classes for validation checks:
● Very Important● Important● Medium● Additional Information● Other
Life Reinsurance ModuleLRM Validation Checks P U B L I C 193

12.4 Functional Area of Flexible Validation Checks
In the internal Customizing under msg.Life Reinsurance Module – Internal Basic Settings Maintain Validation Checks , a functional area is assigned to each validation check. LRM distinguishes between the following functional areas:
● BIF Processing● Loss Processing● External● Movement Processing● msg.PMQ● Retrocession● Rewind
The system manages these functional areas in the internal Customizing under msg.Life Reinsurance Module – Internal Basic Settings Maintain Validation Check Areas .
You can create your own (external) functional areas for the internal area External.
Note
You must not change the internal areas in the Customizing under Maintain Validation Check Areas , which were delivered with LRM. You can only change settings for areas that you created in the customer name space of the Customizing.
All functional areas that you can select are provided in Customizing under Maintain Validation Checks . You can define functional areas and assign validation checks to these.
Note
You must not change the settings of the LRM validation checks in Customizing Maintain Validation Checks . You can only change validation checks that you created in the customer name space of this Customizing.
194 P U B L I CLife Reinsurance ModuleLRM Validation Checks

13 msg.PMQ Validation Checks
You can create and configure msg.PMQ-based validation checks in LRM.
You have to create and configure msg.PMQ validation checks in the customer namespace of the internal Customizing under msg.Life Reinsurance Module – Internal Basic Settings Maintain Validation Checks .
Each msg.PMQ validation check requires a unique number, a message class and a message number. The combination of message class and message number determines the name of the validation check. If the system is to display a message when a check fails, you also have to assign a combination of message class and message number. In addition, you can determine the standard settings for error level, problem class and the Deactivated flag.
You have to assign the “PMQ” functional area to each msg.PMQ validation check.
You can override the standard settings of the msg.PMQ validation checks in the product/cession administration in the business partner.
Life Reinsurance Modulemsg.PMQ Validation Checks P U B L I C 195
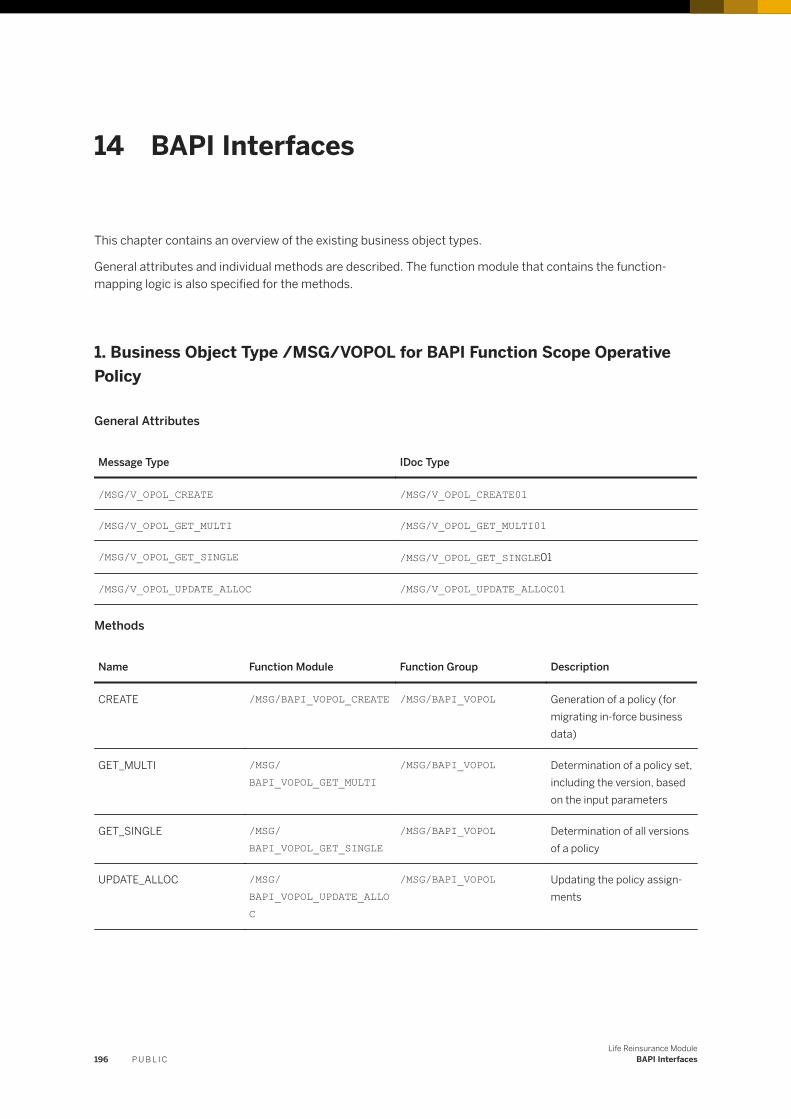
14 BAPI Interfaces
This chapter contains an overview of the existing business object types.
General attributes and individual methods are described. The function module that contains the function-mapping logic is also specified for the methods.
1. Business Object Type /MSG/VOPOL for BAPI Function Scope Operative Policy
General Attributes
Message Type IDoc Type
/MSG/V_OPOL_CREATE /MSG/V_OPOL_CREATE01
/MSG/V_OPOL_GET_MULTI /MSG/V_OPOL_GET_MULTI01
/MSG/V_OPOL_GET_SINGLE /MSG/V_OPOL_GET_SINGLE01
/MSG/V_OPOL_UPDATE_ALLOC /MSG/V_OPOL_UPDATE_ALLOC01
Methods
Name Function Module Function Group Description
CREATE /MSG/BAPI_VOPOL_CREATE /MSG/BAPI_VOPOL Generation of a policy (for migrating in-force business data)
GET_MULTI /MSG/BAPI_VOPOL_GET_MULTI
/MSG/BAPI_VOPOL Determination of a policy set, including the version, based on the input parameters
GET_SINGLE /MSG/BAPI_VOPOL_GET_SINGLE
/MSG/BAPI_VOPOL Determination of all versions of a policy
UPDATE_ALLOC /MSG/BAPI_VOPOL_UPDATE_ALLOC
/MSG/BAPI_VOPOL Updating the policy assignments
196 P U B L I CLife Reinsurance Module
BAPI Interfaces
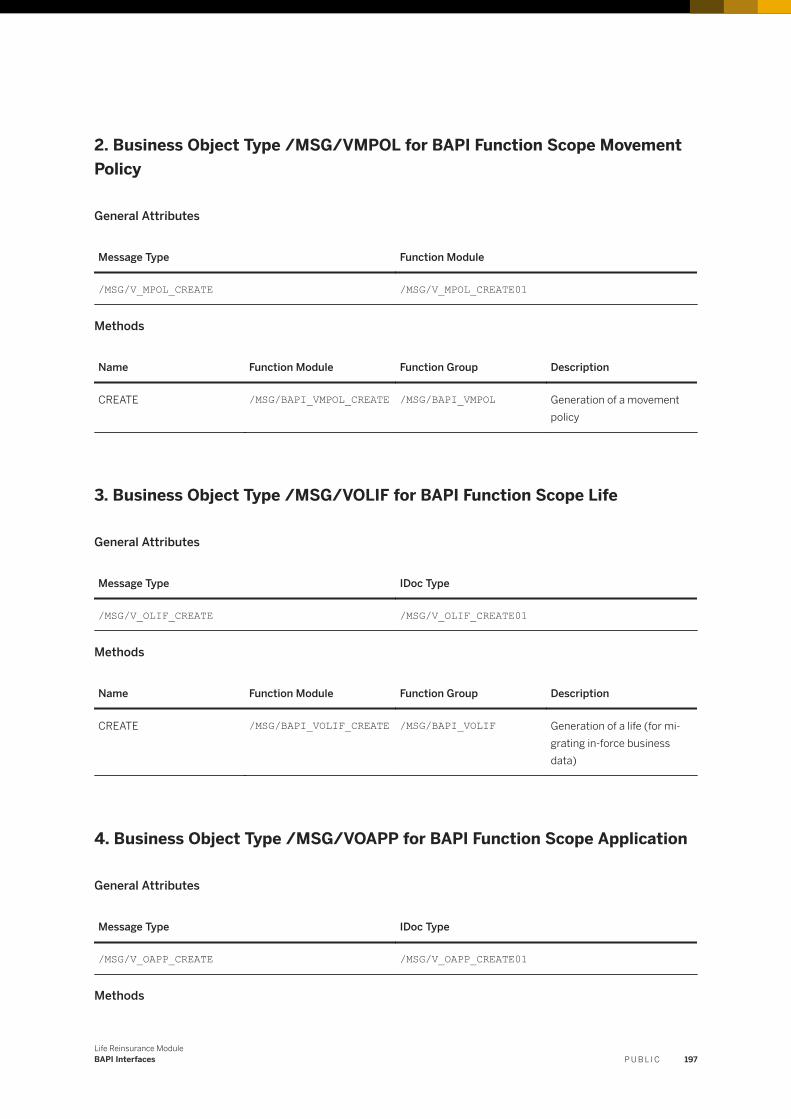
2. Business Object Type /MSG/VMPOL for BAPI Function Scope Movement Policy
General Attributes
Message Type Function Module
/MSG/V_MPOL_CREATE /MSG/V_MPOL_CREATE01
Methods
Name Function Module Function Group Description
CREATE /MSG/BAPI_VMPOL_CREATE /MSG/BAPI_VMPOL Generation of a movement policy
3. Business Object Type /MSG/VOLIF for BAPI Function Scope Life
General Attributes
Message Type IDoc Type
/MSG/V_OLIF_CREATE /MSG/V_OLIF_CREATE01
Methods
Name Function Module Function Group Description
CREATE /MSG/BAPI_VOLIF_CREATE /MSG/BAPI_VOLIF Generation of a life (for migrating in-force business data)
4. Business Object Type /MSG/VOAPP for BAPI Function Scope Application
General Attributes
Message Type IDoc Type
/MSG/V_OAPP_CREATE /MSG/V_OAPP_CREATE01
Methods
Life Reinsurance ModuleBAPI Interfaces P U B L I C 197
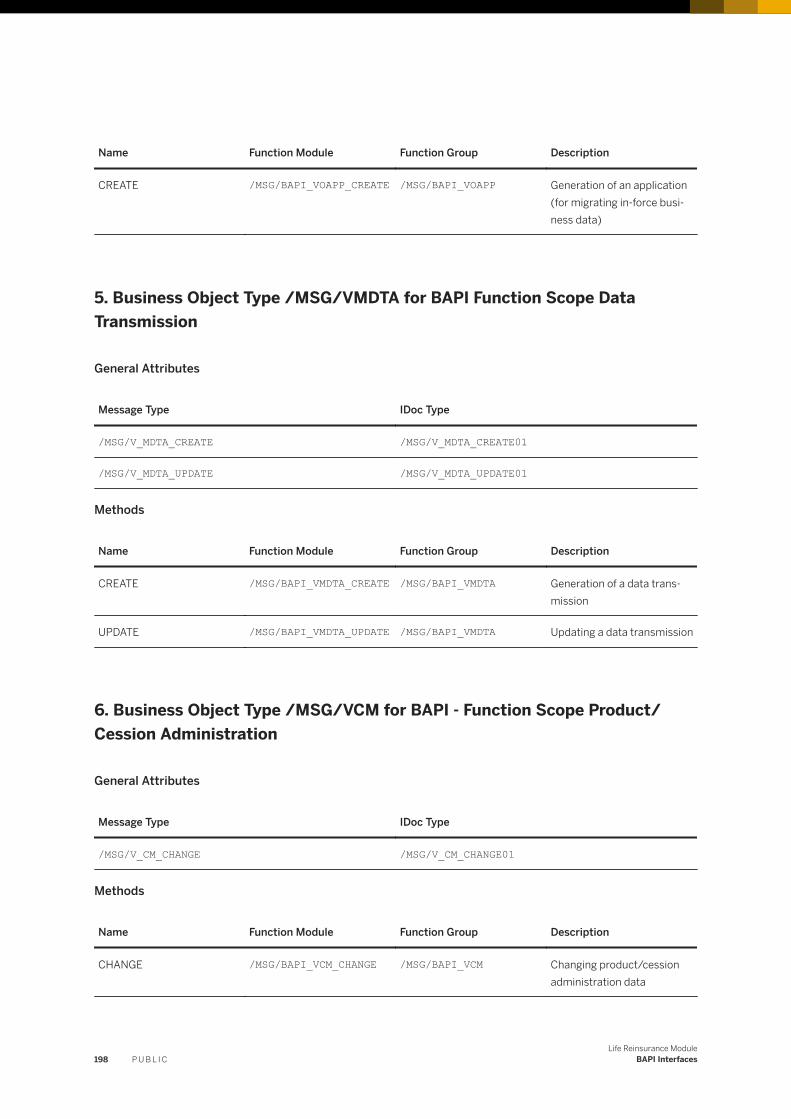
Name Function Module Function Group Description
CREATE /MSG/BAPI_VOAPP_CREATE /MSG/BAPI_VOAPP Generation of an application (for migrating in-force business data)
5. Business Object Type /MSG/VMDTA for BAPI Function Scope Data Transmission
General Attributes
Message Type IDoc Type
/MSG/V_MDTA_CREATE /MSG/V_MDTA_CREATE01
/MSG/V_MDTA_UPDATE /MSG/V_MDTA_UPDATE01
Methods
Name Function Module Function Group Description
CREATE /MSG/BAPI_VMDTA_CREATE /MSG/BAPI_VMDTA Generation of a data transmission
UPDATE /MSG/BAPI_VMDTA_UPDATE /MSG/BAPI_VMDTA Updating a data transmission
6. Business Object Type /MSG/VCM for BAPI - Function Scope Product/Cession Administration
General Attributes
Message Type IDoc Type
/MSG/V_CM_CHANGE /MSG/V_CM_CHANGE01
Methods
Name Function Module Function Group Description
CHANGE /MSG/BAPI_VCM_CHANGE /MSG/BAPI_VCM Changing product/cession administration data
198 P U B L I CLife Reinsurance Module
BAPI Interfaces

NoteExecute transaction BDBG to obtain a detailed overview of the interface parameters.
Life Reinsurance ModuleBAPI Interfaces P U B L I C 199
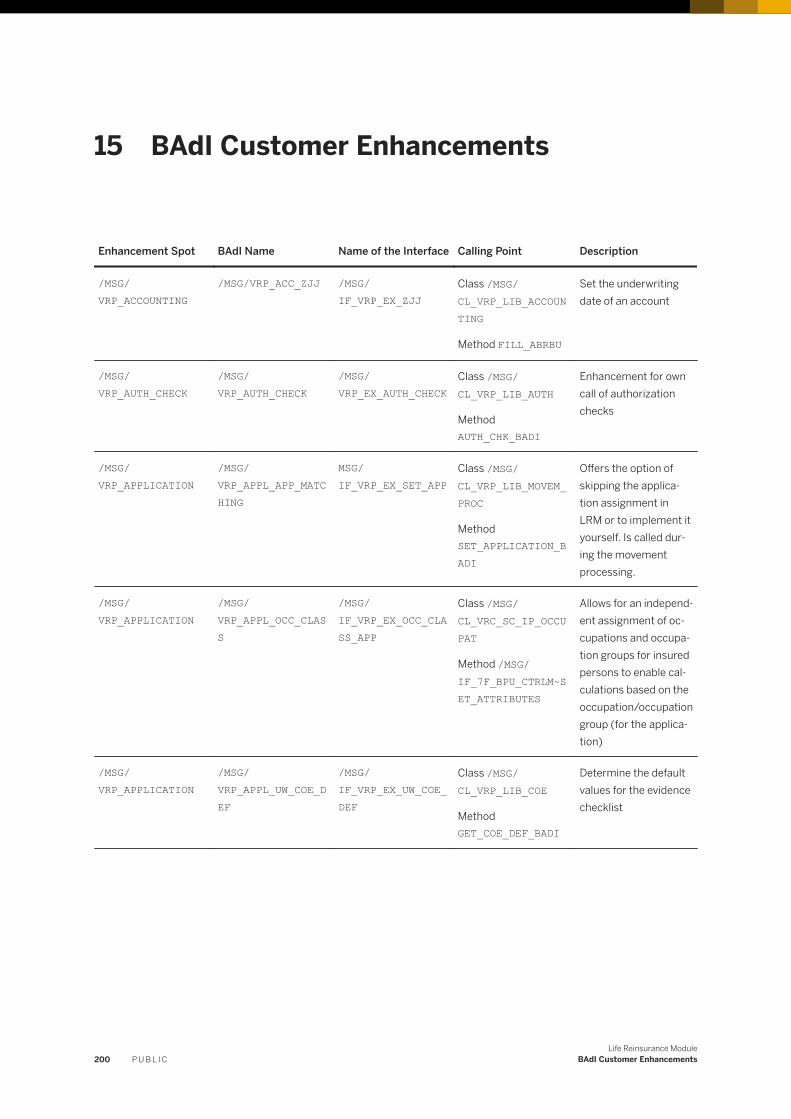
15 BAdI Customer Enhancements
Enhancement Spot BAdI Name Name of the Interface Calling Point Description
/MSG/VRP_ACCOUNTING
/MSG/VRP_ACC_ZJJ /MSG/IF_VRP_EX_ZJJ
Class /MSG/CL_VRP_LIB_ACCOUNTING
Method FILL_ABRBU
Set the underwriting date of an account
/MSG/VRP_AUTH_CHECK
/MSG/VRP_AUTH_CHECK
/MSG/VRP_EX_AUTH_CHECK
Class /MSG/CL_VRP_LIB_AUTH
Method AUTH_CHK_BADI
Enhancement for own call of authorization checks
/MSG/VRP_APPLICATION
/MSG/VRP_APPL_APP_MATCHING
MSG/IF_VRP_EX_SET_APP
Class /MSG/CL_VRP_LIB_MOVEM_PROC
Method SET_APPLICATION_BADI
Offers the option of skipping the application assignment in LRM or to implement it yourself. Is called during the movement processing.
/MSG/VRP_APPLICATION
/MSG/VRP_APPL_OCC_CLASS
/MSG/IF_VRP_EX_OCC_CLASS_APP
Class /MSG/CL_VRC_SC_IP_OCCUPAT
Method /MSG/IF_7F_BPU_CTRLM~SET_ATTRIBUTES
Allows for an independent assignment of occupations and occupation groups for insured persons to enable calculations based on the occupation/occupation group (for the application)
/MSG/VRP_APPLICATION
/MSG/VRP_APPL_UW_COE_DEF
/MSG/IF_VRP_EX_UW_COE_DEF
Class /MSG/CL_VRP_LIB_COE
Method GET_COE_DEF_BADI
Determine the default values for the evidence checklist
200 P U B L I CLife Reinsurance Module
BAdI Customer Enhancements

Enhancement Spot BAdI Name Name of the Interface Calling Point Description
/MSG/VRP_APPLICATION
/MSG/VRP_APPL_RATING_UW
/MSG/IF_VRP_EX_RATING_UW
Class /MSG/CL_VRP_EXEC_RATING_BADI
Method /MSG/IF_7F_BPP_ACTIVITY~EXECUTE
BAdI for calling external rating tools that enable the creation of assessments. Is used to send data to the external rating tool, as well as to receive data from the tool.
/MSG/VRP_MOVEMENT /MSG/VRP_MOV_OCC_CLASS
/MSG/IF_VRP_EX_OCC_CLASS_MOV
Class /MSG/CL_VRC_SC_IP_OCCUPAT
Method /MSG/IF_7F_BPU_CTRLM~SET_ATTRIBUTES
Independent assignment of occupations and occupational groups to insured persons for calculations based on the occupation/occupational group (for the movement).
/MSG/VRP_POLICY /MSG/VRP_POL_RATING_CLAIM
/MSG/IF_VRP_EX_RATING_CLAIM
Class /MSG/CL_VRP_EXEC_RATING_BADI
Method /MSG/IF_7F_BPP_ACTIVITY~EXECUTE
BAdI for calling external rating tools that enable the creation of assessments. Is used to send data to the external rating tool, as well as to receive data from the tool.
Life Reinsurance ModuleBAdI Customer Enhancements P U B L I C 201

Enhancement Spot BAdI Name Name of the Interface Calling Point Description
/MSG/VRP_POLICY /MSG/VRP_POL_COMPLETE_CMPMQ
/MSG/IF_VRP_EX_COMPLETE_CM_PMQ
Class /MSG/CL_VRP_LIB_BO_MOVEMENT
Method COMPLETE_BO_FRM_CM_PMQ
The BADI always runs before the data from msg.PMQ / Cedent Maintenance (CM) is added to the Extension Service node. (Adding the data from msg.PMQ / CM is always done for new business, changes with a subproduct change or if a new PCS is delivered.) Levels possible for the Extension Service: Policy, policy component, insured person, claim and loading. The BADI is called as soon as all of the following conditions are met:
a) An Extension Service has been generated for a corresponding level
b) No Extension Service data is delivered with the movement
c) Data from msg.PMQ / CM is added to the Extension Service
Only in this case the BADI is called before the data is added. The Extension Service “Container” can be generated in the customer implementation of the BAdI, if desired. It ensures that the additional data is provided to the Extension Service. Otherwise,
202 P U B L I CLife Reinsurance Module
BAdI Customer Enhancements

Enhancement Spot BAdI Name Name of the Interface Calling Point Description
data is not added (since the movement does not contain any Extension Service data).
/MSG/VRP_BUSINESS_INFORCE_LIST
/MSG/VRP_BIF_SET_EVENT_EFF_DT
/MSG/VRP_BIF_SET_EV_EFF_DT
Class /MSG/CL_VRP_LIB_MOVEM_BIF
Method GM_CALL_BADI
The call takes place in the BIF Process after the determination of the effective date for the generated movement.
The BAdI can be defined so that to set a certain event, effective date or a particular status for the created movement.
/MSG/VRP_SRA_SEARCH
/MSG/VRP_SEARCH_IDENT_BADI
/MSG/IF_VRP_SEARCH_IDENT_BADI
Class /MSG/CL_VRP_SEARCH_IDENT
Method FIND_DB
Jump to search for identities
/MSG/VRJ_BO_INTERFACE
/MSG/VRJ_MDTA_N /MSG/IF_VRJ_EX_MDTA
Calling of CALL_AFTER_LOAD in class /MSG/CL_VRJ_MDTA in method /MSG/IF_VRJ_MDTA_BO~LOAD_DT
Calling of CALL_BEFORE_SAVE in class CL_VRJ_MDTA in method /MSG/IF_VRJ_MDTA_BO~SAVE_DT
Enables a separate implementation using CALL_AFTER_LOAD for the period after a data transmission has been loaded and via CALL_BEFORE_SAVE for the period before a data transmission is saved.
Life Reinsurance ModuleBAdI Customer Enhancements P U B L I C 203
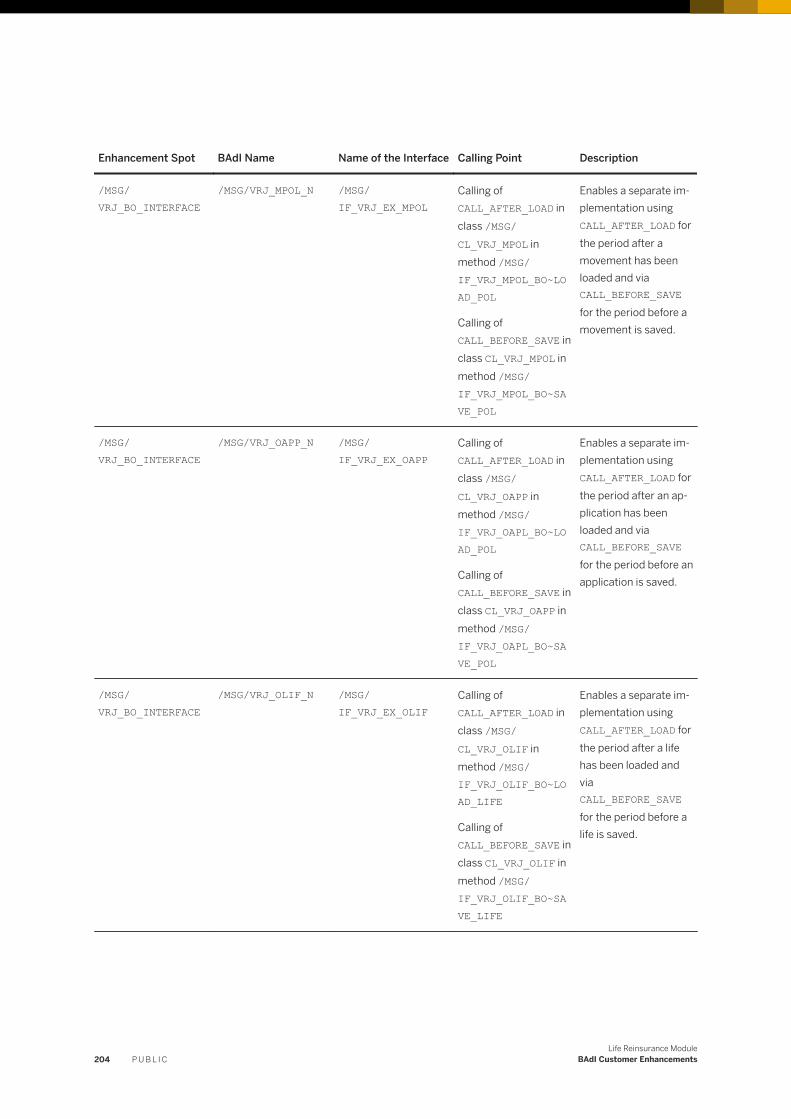
Enhancement Spot BAdI Name Name of the Interface Calling Point Description
/MSG/VRJ_BO_INTERFACE
/MSG/VRJ_MPOL_N /MSG/IF_VRJ_EX_MPOL
Calling of CALL_AFTER_LOAD in class /MSG/CL_VRJ_MPOL in method /MSG/IF_VRJ_MPOL_BO~LOAD_POL
Calling of CALL_BEFORE_SAVE in class CL_VRJ_MPOL in method /MSG/IF_VRJ_MPOL_BO~SAVE_POL
Enables a separate implementation using CALL_AFTER_LOAD for the period after a movement has been loaded and via CALL_BEFORE_SAVE for the period before a movement is saved.
/MSG/VRJ_BO_INTERFACE
/MSG/VRJ_OAPP_N /MSG/IF_VRJ_EX_OAPP
Calling of CALL_AFTER_LOAD in class /MSG/CL_VRJ_OAPP in method /MSG/IF_VRJ_OAPL_BO~LOAD_POL
Calling of CALL_BEFORE_SAVE in class CL_VRJ_OAPP in method /MSG/IF_VRJ_OAPL_BO~SAVE_POL
Enables a separate implementation using CALL_AFTER_LOAD for the period after an application has been loaded and via CALL_BEFORE_SAVE for the period before an application is saved.
/MSG/VRJ_BO_INTERFACE
/MSG/VRJ_OLIF_N /MSG/IF_VRJ_EX_OLIF
Calling of CALL_AFTER_LOAD in class /MSG/CL_VRJ_OLIF in method /MSG/IF_VRJ_OLIF_BO~LOAD_LIFE
Calling of CALL_BEFORE_SAVE in class CL_VRJ_OLIF in method /MSG/IF_VRJ_OLIF_BO~SAVE_LIFE
Enables a separate implementation using CALL_AFTER_LOAD for the period after a life has been loaded and via CALL_BEFORE_SAVE for the period before a life is saved.
204 P U B L I CLife Reinsurance Module
BAdI Customer Enhancements

Enhancement Spot BAdI Name Name of the Interface Calling Point Description
/MSG/VRJ_BO_INTERFACE
/MSG/VRJ_OPOL_N /MSG/IF_VRJ_EX_OPOL
Calling of CALL_AFTER_LOAD in class /MSG/CL_VRJ_OPOL in method /MSG/IF_VRJ_OAPL_BO~LOAD_POL
Calling of CALL_BEFORE_SAVE in class CL_VRJ_OPOL in method /MSG/IF_VRJ_OAPL_BO~SAVE_POL
Enables a separate implementation using CALL_AFTER_LOAD for the period after a policy has been loaded and via CALL_BEFORE_SAVE for the period before a policy is saved.
/MSG/V_Z_CEDENT_MAINTENANCE
/MSG/VZCED_CHECK_AUTH
/MSG/IF_VZCED_EX_CHECK_AUTH
Calling of method CHECK_AUTHORITY in include /MSG/V_Z_CEDENTALLGFORMS in the form of MODUS_CHANGE
Enables a separate implementation of the authorization check based on the given mode and the given cedent.
/MSG/V_Z_CEDENT_MAINTENANCE
/MSG/VZCED_GET_CUST_TAB
/MSG/IF_VZCED_EX_GET_CUST_TAB
Calling of method GET_CUSTOMER_TAB in include /MSG/V_Z_CEDENTALLGFORMS in the form of GET_CM_DATA_IN_X
Enables a separate implementation of the data retrieval from customer-specific tables.
/MSG/V_Z_CEDENT_MAINTENANCE
/MSG/VZCED_PLAUSI_CHECK_1001
/MSG/IF_VZCED_EX_PLAUSI_1001
Calling of method CHECK_PLAUSI_1001 in include /MSG/V_Z_CEDENTF1001 in the form of PUT_TR1001_IN_X
Enables a separate implementation of the carrier validation check for subscreen container 1001.
/MSG/V_Z_CEDENT_MAINTENANCE
/MSG/VZCED_PLAUSI_CHECK_2001
/MSG/IF_VZCED_EX_PLAUSI_2001
Calling of method CHECK_PLAUSI_2001 in include /MSG/V_Z_CEDENTF2001 in the form of PUT_TR2001_IN_X
Enables a separate implementation of the carrier validation check for subscreen container 2001.
Life Reinsurance ModuleBAdI Customer Enhancements P U B L I C 205

Enhancement Spot BAdI Name Name of the Interface Calling Point Description
/MSG/V_Z_CEDENT_MAINTENANCE
/MSG/VZCED_PLAUSI_CHECK_2003
/MSG/IF_VZCED_EX_PLAUSI_2003
Calling of method CHECK_PLAUSI_2003 in include /MSG/V_Z_CEDENTF2003 in the form of PUT_TR2003_IN_X
Enables a separate implementation of the carrier validation check for subscreen container 2003.
/MSG/V_Z_CEDENT_MAINTENANCE
/MSG/VZCED_PLAUSI_CHECK_3001
/MSG/IF_VZCED_EX_PLAUSI_3001
Calling of method CHECK_PLAUSI_3001 in include /MSG/V_Z_CEDENTF3001 in the form of PUT_TR3001_IN_X
Enables a separate implementation of the carrier validation check for subscreen container 3001.
/MSG/V_Z_CEDENT_MAINTENANCE
/MSG/VZCED_SAVE /MSG/IF_VZCED_EX_SAVE
Calling of method PREPARE_SAVE_DATA and method SAVE_DATA in include /MSG/V_Z_CEDENTF1001 in the form of WRITE_X_TO_DB
Enables an enhancement of the implementation of the operations “Prepare for Saving” and “Save” for subscreen container 1001.
/MSG/V_Z_CEDENT_MAINTENANCE
/MSG/VZCED_SCREEN_9011
/MSG/IF_VZCED_EX_SCREEN_9011
Calling of method PUT_DATA_TO_SCREEN_9011 in include /MSG/V_Z_CEDENTF9011 in the form of DATA_FOR_SUBSCREEN_9011
Calling of method GET_DATA_FROM_SCREEN_9011 in include /MSG/V_Z_CEDENTF9011 in the form of DATA_FROM_SUBSCREEN_9011
Calling of method USER_COMMAND in include /MSG/V_Z_CEDENTALLGFORMS in the form of USER_EXITS
Enables a separate implementation for the data transport to screen 9011 and aways from screen 9011. There is also the possibility to handle user commands thrown by screen 9011 using exits
206 P U B L I CLife Reinsurance Module
BAdI Customer Enhancements

Enhancement Spot BAdI Name Name of the Interface Calling Point Description
/MSG/V_Z_CEDENT_MAINTENANCE
/MSG/VZCED_SCREEN_9021
/MSG/IF_VZCED_EX_SCREEN_9021
Calling of method PUT_DATA_TO_SCREEN_9021 in include /MSG/V_Z_CEDENTF9021 in the form of DATA_FOR_SUBSCREEN_9021
Calling of method GET_DATA_FROM_SCREEN_9023 in include /MSG/V_Z_CEDENTF9021 in the form of DATA_FROM_SUBSCREEN_9021
Calling of method USER_COMMAND in include /MSG/V_Z_CEDENTALLGFORMS in the form of USER_EXITS
Enables a separate implementation for the data transport to screen 9021 and aways from screen 9021. There is also the possibility to handle user commands thrown by screen 9021 using exits.
Life Reinsurance ModuleBAdI Customer Enhancements P U B L I C 207

Enhancement Spot BAdI Name Name of the Interface Calling Point Description
/MSG/V_Z_CEDENT_MAINTENANCE
/MSG/VZCED_SCREEN_9023
/MSG/IF_VZCED_EX_SCREEN_9023
Calling of method PUT_DATA_TO_SCREEN_9023 in include /MSG/V_Z_CEDENTF9023 in the form of DATA_FOR_SUBSCREEN_9023
Calling of method GET_DATA_FROM_SCREEN_9023 in include /MSG/V_Z_CEDENTF9023 in the form of DATA_FROM_SUBSCREEN_9023
Calling of method USER_COMMAND in include /MSG/V_Z_CEDENTALLGFORMS in the form of USER_EXITS
Enables a separate implementation for the data transport to screen 9023 and aways from screen 9023. There is also the possibility to handle user commands thrown by screen 9023 using exits
208 P U B L I CLife Reinsurance Module
BAdI Customer Enhancements
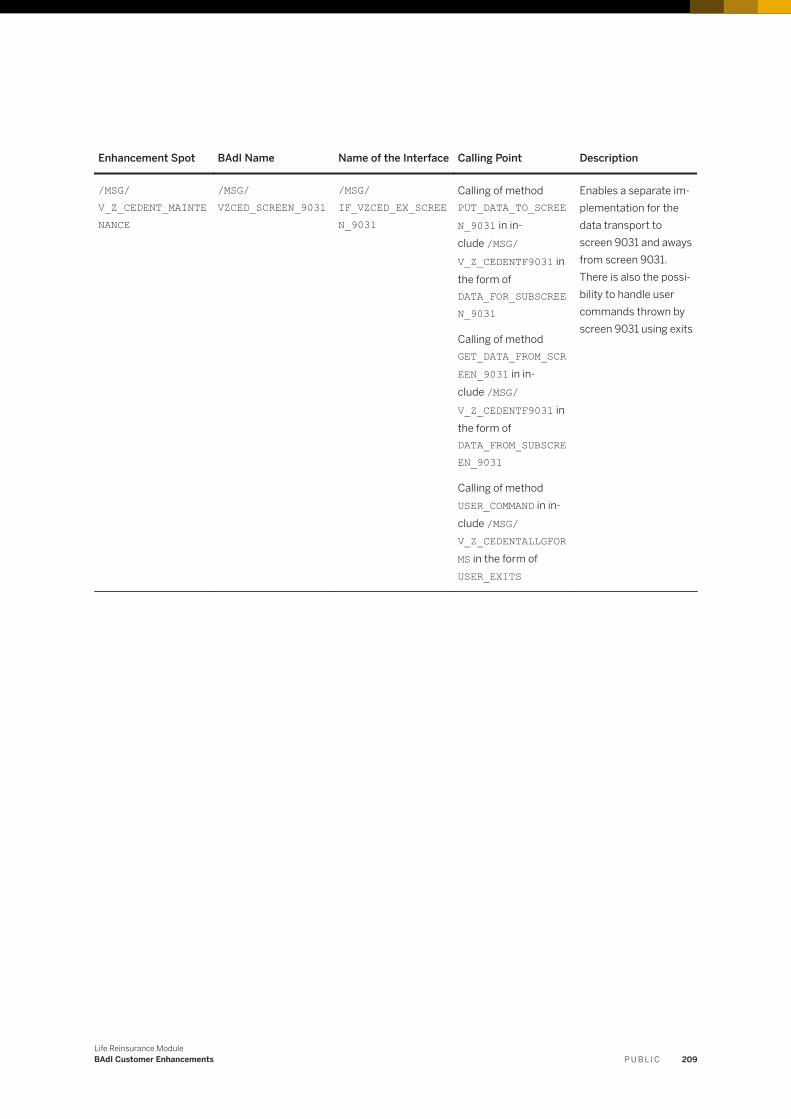
Enhancement Spot BAdI Name Name of the Interface Calling Point Description
/MSG/V_Z_CEDENT_MAINTENANCE
/MSG/VZCED_SCREEN_9031
/MSG/IF_VZCED_EX_SCREEN_9031
Calling of method PUT_DATA_TO_SCREEN_9031 in include /MSG/V_Z_CEDENTF9031 in the form of DATA_FOR_SUBSCREEN_9031
Calling of method GET_DATA_FROM_SCREEN_9031 in include /MSG/V_Z_CEDENTF9031 in the form of DATA_FROM_SUBSCREEN_9031
Calling of method USER_COMMAND in include /MSG/V_Z_CEDENTALLGFORMS in the form of USER_EXITS
Enables a separate implementation for the data transport to screen 9031 and aways from screen 9031. There is also the possibility to handle user commands thrown by screen 9031 using exits
Life Reinsurance ModuleBAdI Customer Enhancements P U B L I C 209
16 SAP Business Workflows and Triggering Events
Use
You can use workflows to send specific tasks to the person responsible. The agents thus obtain messages such as a work item in the inbox of the agent’s SAP Business Workplace.
Features
To trigger the relevant workflow, technical events and/or “Triggers” have been implemented in the application.
Workflows exist for:
● Application Assessment● Claim Entry● Claim Assessment● Claim Assessment Change● Erroneous Movement● Erroneous Data Transmission● E-mail Notification● Exceeding the threshold during BIF processing (also see item “Erroneous Data Transmission”)
Key Transactions
Transaction Code Description
SWU3 Activation and general Customizing of the SAP Business Workflow system
SWDD Workflow builder with assignment to person responsible for each workflow step
SWETYPV Type linkage: Assign “Triggers” (events) to the “Receivers” such as workflow.
Application Assessment Workflow (ID WS00278800, code LRM_UWASS)
Prerequisites:
● You have activated the realization for the Underwriting function in Customizing under Maintain Business Functions and Realizations using the Forward-To pushbutton.
● You have activated the workflow in the type linkage.
210 P U B L I CLife Reinsurance Module
SAP Business Workflows and Triggering Events
● You have assigned possible agents to the following workflow steps:○ Application – Data Input○ Application – Assessment○ Application – Decision○ Application – Peer Review○ Application – Completion
Functionality:
When a new application is saved, the system triggers the event to start the workflow and generates the first work item (workflow step) “Application - Data Input”.
The work item is displayed in all SAP Business Workplace inboxes of all the agents defined in the agent assignment. By executing the work item, you launch LRM and can perform the task there. You perform the “Data Input” task here, for example.
When you have completed the task, select the opened application End Work Item by which the workflow continues and the system creates the next work item. This work item is displayed in the inbox of all assigned agents.
The system completes the workflow, when all decisions, including the overall decision, have been made in the application assessment and you completed the last work item. After updating, the system deletes existing work items from the inboxes of the possible agents.
Special Feature:
When you create and save a further application assessment for an application, the system starts a new, additional workflow for this assessment. You can complete all workflows that exist for an application only when decisions have been made for all assessments including the overall decision.
“Claim Movement” Workflow (ID WS00278803, code LRM_CLMOV)
Prerequisites:
● You have activated the workflow in the type linkage.● You have assigned possible agents to the following workflow steps:
○ “Entry of Claim Data”○ “Claim Administration”
Functionality:
When selecting Start Claim Entry, the system checks whether you are specified as executing agent in the agent assignment. If this is not the case, the system displays a corresponding error message. When you are specified in the agent assignment as executing agent, the system starts the workflow and creates the first work item (workflow step) “Claim Data Entry”. The system assigns the first work item to you as the executing agent, executes it immediately and opens the web application.
When you completed the task, select Exit to close the work item, by which the workflow continues and the system creates the next work item. This work item is displayed in the inbox of all possible agents.
By executing the work item, you start the web application in which you can search for a specific person or policy or create a new policy. A claim movement is entered for the relevant policy or policy component. You can edit and complete this movement only in the web application.
When you have been specified as the executing agent in the agent assignment for the second work item, the system automatically assigns the work item to you and immediately starts the web application.
Life Reinsurance ModuleSAP Business Workflows and Triggering Events P U B L I C 211
“Claim Assessment” Workflow (ID WS00278804, code LRM_CLCA)
Prerequisites:
● You have activated the workflow in the type linkage.● You have assigned possible agents to the following workflow steps:
○ “Perform Claim Assessment”○ “Claim Completion”
Functionality:
When you create or change a claim assessment and the BRFplus function for automatic decisions determines that one or several decisions for each claim need to be manually edited, the system starts the workflow for claim assessment and creates the first work item (workflow step) “Perform Claim Assessment”.
The system displays the work item in the SAP Business Workplace inboxes of each agent defined in the agent assignment. By executing the work item, you start the web application in which you can perform and close the claim assessment.
When you completed the task, select Exit to complete the work item, by which the workflow continues and the system creates the next “Claim Completion” work item. This work item is displayed in the inbox of all possible agents.
If you start the “Complete Claim” work item in the web application, you can finally edit and complete all claims from the claim assessment that have not yet been closed.
“Claim Assessment Change” Workflow (ID WS00278805, code LRM_CAUPDATE)
Prerequisites:
You have activated the workflow in the type linkage.
Functionality:
The claim assessment change workflow is started when the BRFplus function used for auto-adjudication determines that one or more decisions per claim need to be processed manually or if documents are delivered for a claim that has already been closed.
The workflow either starts the “Claim Assessment” workflow or if this workflow has already been started, it is restarted again. The system displays the work item in the SAP Business Workplace inboxes of each agent defined in the agent assignment.
The system then automatically closes the workflow.
“Erroneous Movement”Workflow (ID WS00278810, code LRM_MGRP_ERR)
Prerequisites:
● You have activated the workflow in the type linkage.● You have assigned possible agents to the following workflow step:
○ “Check Errors / Warnings in Movement Group”
Functionality:
When you triggered movement processing as a background process, the system triggers a “Trigger” for a movement group in the following cases:
● The system was unable to successfully process at least one movement in the movement group.
212 P U B L I CLife Reinsurance Module
SAP Business Workflows and Triggering Events
● The system has successfully processed all movements of the movement group; however, for at least one movement of the movement group a message of the category “Warning” occurred.
The workflow is started when the system activates a trigger.
Special Features:
This workflow is an example without further integration in LRM. When you execute the work item, the system starts LRM and you get directly to the corresponding data transmission.
You can use this trigger to create your own use scenarios in order to react to an error or a warning during the movement processing. You can trigger the workflow to send an e-mail to the responsible agent, for example.
“Erroneous Data Transmission” Workflow (ID WS00278820, code LRM_DT_ERR)
Prerequisites:
● You have activated the workflow in the type linkage.● You have assigned possible agents to the following workflow step:
○ “Check Error in Data Transmission”
Functionality:
If you triggered the movement processing as a background process, the system initiates exactly one trigger for each data transmission, which starts the workflow. In particular, this means that the trigger is always activated regardless of whether single movement groups within a data transmission contained errors or not.
The system starts this workflow if a threshold is exceeded during the BIF data record processing.
Special Features:
This workflow is an example without further integration in LRM. When you execute the work item, the system starts LRM and you directly get to the data transmission.
You can use this trigger to create your own use scenarios in order to react to an error during the data transmission or when a threshold has been exceeded. You can trigger the workflow to send an e-mail to the responsible agent, for example.
“E-Mail Notification” Workflow (ID WS00278801, code MSG_P_SEND_M)
Prerequisites:
● You have activated the realization for the Underwriting and Claim function in Customizing under Maintain Business Functions and Realizations using the Forward-To pushbutton.
● You have activated the workflow in the type linkage.● You change the responsibilities via a dialog and not via background processing.
Functionality:
If you manually change the responsibility for an application, a policy or a claim, the workflow automatically sends a notification. When you trigger an automatic change of an application or a claim by selecting Forward, the workflow also sends a notification. The system sends this notification to all participating agents that you added to or deleted from the responsibilities.
Life Reinsurance ModuleSAP Business Workflows and Triggering Events P U B L I C 213

17 Business Rule Framework plus (BRFplus)
Use
Different rules are mapped in BRFplus, which you can adapt to your specific requirements. You start BRFplus using the brf+ transaction.
BRFplus contains specific documentation for each check and function created in BRFplus.
The following rules are mapped in BRFplus:
● Life Determination (/MSG/V_MATCH_LIFE)● Treaty Determination (/MSG/V_SELECT_TREATY)● Auto-Adjudication (/MSG/V_AUTO_ADJUDICATION)● Dynamic Determination of Amounts in Limit Conditions (/MSG/V_LIMIT_CONDITION)● Insured Person(s) Risk Check (/MSG/V_CHECK_RISK)● Check Claim Limit Conditions (/MSG/V_CLAIM_LIMIT_CONDITIONS)
NoteThe transfer parameters to the corresponding function in BRFplus are listed in the “Service Documentation LRM” document.
Features
Life Determination
Identities are matched when the system processes a movement to assign the movement to the correct life. To do so, the system uses the life determination rules in BRFplus.
The system compares an identity with other identities. The system returns the Identity ID and Life ID when having found a similar identity with a matching life. The system returns only the Life ID if only one matching life has been found.
You can enhance, delete or change the following settings for life determination in BRFplus:
● Check for similarity of two identities● Check for similarity of two identities in spite of a date change● Check for similarity of two identities in spite of a last name change● Check for similarity of two identities in spite of a first name change● Check whether the system can use the first similar identity, or whether it must check all possible identities● How the system reacts to several similar identities found● How the system reacts if it does not find a similar identity
214 P U B L I CLife Reinsurance Module
Business Rule Framework plus (BRFplus)

NoteVarious fields in the interface of the /MSG/V_MATCH_LIFE function, such as the Cedent or Company Code fields, are currently not used in the life determination rules. You can use these fields to adapt life determination.
The service documentation contains a description of the interface for life determination in the /MSG/CL_VF_LIFE class and the MATCH_LIFE method.
Treaty Determination
With the BRFplus function Treaty Determination, the system can read a treaty for each policy component share for transferred policies. The standard rule in BRF reads the treaty with the most recent treaty start date for each policy component share. When the system finds several treaties with the same treaty start date, BRFplus reads the first found treaty. The system transfers the treaties to BRFplus, sorted as follows:
● Share Number ascending● Treaty Start Date descending● Treaty Number ascending● Section Number descending
The BRFplus rule for Treaty Determination is deactivated in the standard delivery. You have to activate the rule in order to use it. You can change the rule in BRFplus and create new rules.
NoteVarious fields in the interface of the /MSG/V_SELECT_TREATY function, such as Cedent, Company Code, Subproduct Code or Benefit Type, are currently not used in the rule for Treaty Determination. You can use these fields to create you own rules for Treaty Determination.
The service documentation contains a description of the interface for the treaty determination in the /MSG/CL_VF_TREATY class and the FIND_BY_BRFPLUS method.
Auto-Adjudication
When the system processes a claim movement or an alteration movement for a claim and a decision is required, BRFplus rules can automatically make these decisions under particular circumstances.
NoteLRM only delivers the interface of the function. You must create all rules and return values.
The service documentation contains a description of the interface for auto-adjudication in the /MSG/CL_VF_CLAIM class and the AUTO_ADJUDICATION method.
Dynamic Determination of Amounts in Limit Conditions
The amounts of limit conditions can either be defined as a fixed value for the respective condition in the treaty or be determined dynamically by BRFplus rules at runtime. The following conditions are limit conditions:
● Jumbo Limit● Check Jumbo Limit● Automatic Acceptance● Trivial Amount Limit
Life Reinsurance ModuleBusiness Rule Framework plus (BRFplus) P U B L I C 215
● Retention● Retention Corridor● Cedent's Underwriting Authority● Admittance Authority For Cedent Claims● Cedent's Acceptance Limit● Minimum Cession● Reinsured Percentage
The system only calls the BRFplus function if the corresponding not informative limit condition in the treaty was defined with the value “0”. The system displays a relevant message each time BRFplus is called.
BRFplus returns the value determined by the rules with a currency and a condition base per limit condition. This data is used in subsequent movement processing and retrocession. If the limit condition belongs to a treaty that is assigned to a policy component share, BRFplus also displays the returned data on the Conditions tab page.
Moreover, BRFplus returns a flag set in the Limit Check Successful field. If the value could not be determined, the system displays a corresponding message.
NoteLRM only delivers the interface of the function. You must create all rules and return values.
The service documentation contains a description of the interface for the limit conditions in the /MSG/CL_VF_TREATY class and the DETERMINE_DYN_LIMIT_CONDITION method.
Insured Person(s) Risk Check
The system only calls this BRFplus function if the validation check “54” (Insured Person(s) Risk Check) is active (see LRM Validation Checks [page 175]). For each insured person with a role of the type “Insured Person”, the system transfers the company code and the following risk-relevant values to the BRFplus function:
● Preferred Life Status● Smoker Status● Substandard Risk● Special Risk Category● Flag for Consideration of Special Risk● Table Containing Loadings
The fields Preferred Life Status, Smoker Status and Substandard Risk are taken into account in der BRFplus decision table in the standard system. The system returns a flag saying that the risk is invalid when the system finds a combination that is identical with the delivered value in the decision table /MSG/V_CHECK_RISK_DEC_TAB. In this case, the system issues a message indicating that the risk check has failed for this person. The system terminates movement processing (depending on the configured error level) or concludes it successfully if no other error occurs.
NoteThe other fields in the interface of the function /MSG/V_CHECK_RISK are currently not used in the rule for risk assessment. You can use these field to randomly enhance the columns of the existing decision table /MSG/V_CHECK_RISK_DEC_TAB.
216 P U B L I CLife Reinsurance Module
Business Rule Framework plus (BRFplus)
The service documentation contains a description of the interface for underwriting in the /MSG/CL_VF_INSURED_PERSON class and the CHECK_RISK method.
Check of Claim Limit Conditions
It is possible to check claim limit conditions in a BRFplus function against amounts of the payment requests/claim costs when processing claim movements. The evaluation takes place at the same time when the previous limit checks are performed.
The system only calls the BRFplus function if the corresponding not informative limit condition in the treaty was defined with an empty condition basis.
Only claim limit conditions, the condition basis of which is empty, are also only transferred to BRFplus.
BRFplus also returns a Limit Check Successful flag. If the limit of the payment requests/claim costs is exceeded in BRFplus, this way of creating a claim assessment can be forced.
NoteLRM only delivers the interface of the function. You must create all rules and return values.
The service documentation contains a description of the interface for limit conditions in the /MSG/CL_VF_CLAIM class and the CLAIM_LIMIT_CONDITIONS method.
Life Reinsurance ModuleBusiness Rule Framework plus (BRFplus) P U B L I C 217

18 Data Transfer from FS-RI to an SAP Business Warehouse
Use
If you want to transfer data from FS-RI to an SAP Business Warehouse, the data can be provided using extractors.
Further information about extraction can be taken from the documentation for the implementation guide “Data Transfer to the SAP Business Information Warehouse” of transaction SBIW.
Features
Application Component Hierarchy
Adopt the application component hierarchy using transaction SBIW (“Implementation Guide for Data Transfer to the SAP Business Information Warehouse”), using the Transfer Application Component Hierarchy function under Business Content DataSources.
Postprocessing the Data Sources
Once the application component hierarchy has been successfully transferred, select the Edit DataSources and Application Component Hierarchy function under Postprocessing DataSources.
Check whether there is an “FS-RI” entry with subnodes stated below.
If not, create the entries as described below:
● Create the “FS-RI” subnode under the “SAP” main node.● Name it “Financial Services Reinsurance”.
You must create the following nodes as further subodes of the “FS-RI” entry on the same level of the hierarchy:
● “FS-RI-B”: Financial Services Reinsurance Basic System● “FS-RI-RMN”: Financial Services Reinsurance Risk Manager Non Life● “FS-RI-B-IO”: Master Data Reinsurance Basic System● “FS-RI-RMN-IO”: Master Data Reinsurance Risk Manager Non Life● “FS-RI-LRM”: Financial Services Reinsurance Risk Manager Life
Create the application component hierarchy using the following structure:
SAP Name
FS-RI Financial Services Reinsurance
FS-RI-B Financial Services Reinsurance Basic System
218 P U B L I CLife Reinsurance Module
Data Transfer from FS-RI to an SAP Business Warehouse

SAP Name
FS-RI-RMN Financial Services Reinsurance Risk Manager Non Life
FS-RI-B-IO Master Data Reinsurance Basic System
FS-RI-RMN-IO Master Data Reinsurance Risk Manager Non Life
FS-RI-LRM Financial Services Reinsurance Risk Manager Life
For more information about the procedure, see the documentation for the Edit DataSources and Application Component Hierarchy function.
Life Reinsurance ModuleData Transfer from FS-RI to an SAP Business Warehouse P U B L I C 219

19 General Data Protection Regulation (GDPR)
The new legal general data protection regulation of the European Union (General Data Protection Regulation (GDPR)) contains changed regulations for the protection of natural persons with respect to their personal data. The following chapters contain a description of all functions that are provided by LRM to meet the requirements of the regulation.
19.1 Logging Read Access
Use
When using LRM single risk administration and the web application for claim entry, read access of the following sensible, personal data is recorded by the SRAL Manager of SAP:
● Identity:Nationality, place of birth, life number
● Policy:Policy number, company code, cedent
● Policy Component:Subproduct code, version, sequence number of the subproduct, increase number
● Insured Person:Occupation, pastime, loadings, gender, material status, workplace, preferred life status, smoker status, increased risk, total mortality/morbidity, reassured disability cover type, special risk type, date of birth, last name, first name
● Claim (only LRM single risk administration):Claim date, claim type, cause of claim, secondary cause of claim, claim consequence, degree of invalidity, care provider type, claim location, date of first / last workday, claim end date
● Application Assessment (only LRM single risk administration):Impairments, loadings, size, weight, cigarettes per day
Read access logging must be activated using the SRAL Manager, since the configurations are delivered deactivated by default.
You can display the log by starting the SRALMANAGER transaction. You get to the Read Access Logging dialog. Choose the Monitor tab page and then Read Access Log.
Access to specific data is not possible because of authorization objects. These failed read accesses are therefore not displayed in the access log. Instead, the system issues a message if the authorization check fails.
220 P U B L I CLife Reinsurance Module
General Data Protection Regulation (GDPR)

19.2 Report Function for Personal Data of a Person
Use
You can use the /MSG/VUI_SD_REPORT transaction to start a report that complies a list of all personal data of a person from the business objects life, application, claim and movement. You get to the Data Protection Evaluation search dialog. You must enter a life number. You can determine the number in the LRM single risk administration.
The list contains the following data, including key fields, that identify the actual sensitive data, such as cedent, company code:
Personal Data of a Person
Entity Field
Identity Last Name
First Name
Alias Last Name
Alias First Name
Gender
Title
Date of Birth
Place of Birth
Nationality
Identification Type
ID
Address Street
House Number
Postal Code
City
Place of Residence
Life Reinsurance ModuleGeneral Data Protection Regulation (GDPR) P U B L I C 221
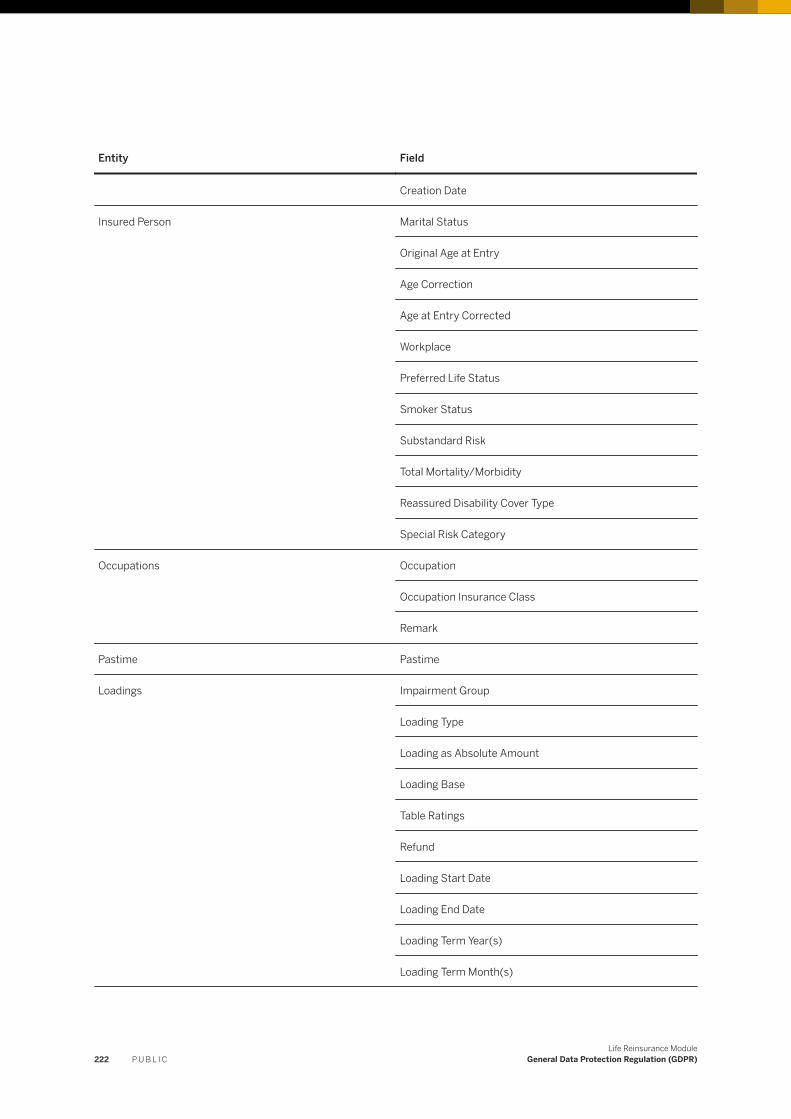
Entity Field
Creation Date
Insured Person Marital Status
Original Age at Entry
Age Correction
Age at Entry Corrected
Workplace
Preferred Life Status
Smoker Status
Substandard Risk
Total Mortality/Morbidity
Reassured Disability Cover Type
Special Risk Category
Occupations Occupation
Occupation Insurance Class
Remark
Pastime Pastime
Loadings Impairment Group
Loading Type
Loading as Absolute Amount
Loading Base
Table Ratings
Refund
Loading Start Date
Loading End Date
Loading Term Year(s)
Loading Term Month(s)
222 P U B L I CLife Reinsurance Module
General Data Protection Regulation (GDPR)

Entity Field
Loading Term Day(s)
Application Assessment Height
Height Unit
Weight
Weight Unit
Cigarettes Per Day
Impairments/Loadings (Assessment) Impairment Group
Impairment Number
Benefit Type
Subproduct Code
Subproduct Sequence Number
Version of a Subproduct Code
Impairment Decision
Loading Extra Premium
Loading Extra Mortality/Morbidity
Flat Extra Loading per mill 1
Flat Extra Loading per mill 2
Duration of Flat Extra Loading in Years 1
Duration of Flat Extra Loading in Years 2
Exclusion 1
Exclusion 2
Exclusion 3
Table Ratings
Total Mortality Rate
Maximum Realistic Survival Duration
Claim Claim Date
Life Reinsurance ModuleGeneral Data Protection Regulation (GDPR) P U B L I C 223

Entity Field
Type of Claim
Cause of Claim
Secondary Cause of Claim
Claim Consequence
Claim Location
Employment Date of Claimant
Date of the Last Working Day of an Insured Person
Claim End Date
Child Claim
Disability Degree
Care Provider Type
Claim Assessment (Impairment) Impairment Number
Impairment Group
Documents Document Title
Document Category
Object Type of the Business Object
Creator
Creation Date
Comments Meaning of Note Object
Meaning of Note ID
Comment
The user having made changes and day and time of the change are issued for each entry in the result list.
If additional fields are to be displayed, you can implement the customer-specific Additional Data tab page.
224 P U B L I CLife Reinsurance Module
General Data Protection Regulation (GDPR)
The following authorization checks are made for the report:
Authorization Checks for the Report
Authorization Check Call Description
Start the report Starting the report is only possible if the authorization for this transaction has been granted to the user.
Search pushbutton To display identity data for a life, the user requires the display authorization for the life.
To ensure that the data of the insured person, policies, applications and application assessment is displayed, the user requires the display authorization for the corresponding company code.
To display user data for personal data, the user requires the display authorization for single risk administration.
It is possible to log by whom the report has been executed and which sensitive data has been read from the system.
Read access logging must be activated using the SRAL Manager, since the corresponding configuration LRM_PD_REPORT is delivered as deactivated by default.
You can display the log by starting theSRALMANAGER transaction. You get to the Read Access Logging dialog. Choose the Monitor tab page and then Read Access Log.
19.3 Deleting Multiple Policies and Applications
Use
LRM supports the manual deletion of multiple policies and applications as part of the General Data Protection Regulation (GDPR).
Prerequisites
The following conditions must be fulfilled to delete policies:
1. The corresponding deletion authorization for policies and movements must have been granted to your user.
2. The following criteria for deleting policies must be met (see Chapter: Deleting Single Policies [page 227]).
Life Reinsurance ModuleGeneral Data Protection Regulation (GDPR) P U B L I C 225
The following conditions must be fulfilled to delete applications:
1. The corresponding deletion authorization for applications must have been granted to your user.2. The following criteria for deleting applications must be met:
1. An application, with the “Materialized Without Policy” underwriting processing status, must not have been edited in the past 10 years.
2. Applications with any other underwriting processing status must not have been edited in the past 2 years.
NoteThe system does not display an application, which has been materialized using a corresponding operative policy, in this search result. This application is deleted, together with the connected policy, without performing further checks, if the policy meets the criteria for deletion.
Procedure
Proceed as described below to delete multiple policies/applications:
1. Start the single risk administration. You get to the msg.LRM Search dialog. Choose the “double arrow” pushbutton at the right-hand side of the toolbar. Choose the Deletion Request Dialog function. You get to the Determination of Data to Be Deleted dialog.
2. Switch to the Delete Expired Policies / Applications tab page. Fill the required entry fields Company Code and Cedent. Click the Search pushbutton at the top left above the table.You can restrict the search result using the following search criteria:○ Business Object○ Policy/Application Number○ Original Cedent Policy Number○ Life Number○ Last Name○ First Name○ Date of Birth○ Maximum Number of Hits
All policies and applications that match the search criteria and that satisfy the prerequisites for deletion are displayed in the result list (see prerequisites mentioned above and Chapter Deleting Single Policies [page 227]).
3. All policies in the result list obtain the Delete flag by default. You must remove the flag for policies that you do not want to delete.
4. Choose the Delete Policies / Applications pushbutton to delete the selected policies.
Result
The system deletes policies/applications flagged with the Delete flag. This is logged in the application log. The corresponding lives are not automatically deleted, even if no other further business objects exist for this life. A
226 P U B L I CLife Reinsurance Module
General Data Protection Regulation (GDPR)

separate batch program exists for this purpose (see Chapter Deletion of No Longer Used Lives (Batch) [page 231]).
Start transaction /MSG/VRC_LOG to display the application log. You get to the msg.LRM Log Display dialog. Enter “FS_RI_BATCH” as object and “V_DEL_POL” as subobject in the Logical Assignment field group and start the log output by using the Execute pushbutton in the dialog or the F8 key on your keyboard.
19.4 Deleting Single Policies
Use
You can individually delete policies that have expired from a business point of view in LRM.
All corresponding movements are deleted in this course. When the policy contains notes, these are also deleted. If the policy contains “Services for Object” (“Generic Object Services” GOS), the link to these objects is also deleted. The information about the deletion procedure is also forwarded to connected external systems.
Prerequisites
The following conditions must be met before you can delete a policy:
1. The policy, which you want to delete, must be displayed in change mode in the navigation tree.2. The policy must not have policy components with one of the following statuses:
○ “In Force”○ “Annuity Payment”○ “Claim Ongoing”○ “Claim Announced”
3. For claimed policies, a payment must already have been created for payment requests and claim costs to which bookings are possible.
4. P&L values, which have not yet been aggregated to an FS-RI account and/or have not yet been taken into account by the aggregation and transfer process, must not exist.
5. None of the movements belonging to the policy must have one of the following statuses:○ “Process”○ “Parked”○ “Erroneous”○ “Rewound”
6. The policy had not been changed in the past 10 years.
NoteAn application, which has been materialized using the operative policy, is also deleted without performing further checks.
Life Reinsurance ModuleGeneral Data Protection Regulation (GDPR) P U B L I C 227
Procedure
Proceed as described below to delete a policy:
1. Start the Single Risk Administration application. You get to the Search initial dialog on the Life tab page.2. Switch to the Policies / Applications tab page and perform a search for the policy, which you want to delete,
by using corresponding search criteria.3. Double-click to select the policy. You get to the Policy <Policy Number> Display dialog.4. Choose the Change <->Display pushbutton in the menu bar to set the policy to the change mode.5. In the navigation tree of the context menu of the main node of the policy to be deleted, choose the Delete
Policy function.The system displays a confirmation prompt as to whether the policy really is to be deleted in a new dialog. Choose “Yes”if you want to delete the policy. The system checks whether the policy may be deleted from a business perspective (see above under “Prerequisites”). If the prerequisites are fulfilled, the system deletes the policy with all dependent objects, such as existing notes, links to GOS objects, assignments to other business objects and all movements that belong to the policy. A materialized application, which has been assigned to the policy, is also deleted without performing further checks.
Result
The system has deleted the policy and the policy is no longer displayed in the navigation tree. When an application has been materialized using this policy, the system also deletes this application and it is no longer displayed in the navigation tree.
The systems saves all message texts from validation checks, exceptions and success messages in a log after having deleted a policy. You can view the log in the log display of LRM (see Chapter Log Display [page 168]).
19.5 Deleting Single Lives
Use
You can individually delete lives that have expired from a business point of view in LRM. All subordinate policies and applications that have been assigned to the life are also deleted (see Chapter Deleting Single Policies [page 227]). When the policy contains notes, these are also deleted. When the policy contains “Services for Object” (“Generic Object Services GOS”), the system also deletes the link to these objects. In addition, the information about the deletion procedure is also forwarded to connected external systems.
228 P U B L I CLife Reinsurance Module
General Data Protection Regulation (GDPR)

Prerequisites
The following conditions must be fulfilled to delete a life:
1. All subordinate policies of the life, in which the life in the role of the “Insured Person” role category exists, need to be checked and permitted for deletion (see Chapter Deleting Single Policies [page 227]).
NoteThe system deletes an application, which has been materialized using an operative policy, without performing further checks.
2. The last processing date of all subordinate applications that have the “Materialized Without Policy” underwriting processing status must be older than 10 years.
3. The last processing date of all other subordinate applications must be older than 2 years.4. The life must not exist in any other application and in any other policy as involved person (role category
unequal “Insured Person”).
Procedure
Proceed as described below to delete a life:
1. Start the Single Risk Administration application. You get to the Search initial dialog on the Life tab page.2. Search for the relevant life by using the corresponding search criteria and start the search. The system
displays all lives that match your search criteria in a table.3. Double-click on the required life entry in the table to select it. You get to the Life <life number> Display
dialog.4. Choose the Change <->Display pushbutton in the menu bar to set the application to the change mode.5. In the navigation tree of the context menu of the main node of the life to be deleted, choose the Delete Life
function. The system displays a dialog as confirmation prompt asking if the life should really be deleted. Select “Yes” if you want to delete the life. The system checks whether the life may be deleted from a business perspective (see the above-mentioned prerequisites). When the prerequisites are fulfilled, the system deletes the life with all dependent objects (policies and applications with all its dependent objects (see Chapter Deleting Single Policies [page 227]).
Result
If only the above-mentioned prerequisites 1 to 3 are met, the life remains and all subordinate objects are removed and deleted from the navigation tree, which contain the life in the role of the “Insured Person” role category. When the prerequisites are not met for all subordinate objects of the life, no objects are deleted.
If all of the above-mentioned prerequisites are met, the system deletes the life and all subordinate objects. You return to the display of the Search initial screen.
The systems saves all message texts from validation checks, exceptions and success messages in a log after having deleted a life. You can view the log in the log display of LRM (see Chapter Log Display [page 168]).
Life Reinsurance ModuleGeneral Data Protection Regulation (GDPR) P U B L I C 229

19.6 Display Information on Business Partner
Use
You can use the /MSG/X_BUPA_INFO FS-RI transaction to display technical information on the usage of a natural business partner (person or group), which contain tables with personal data, for example. Usages in LRM are also displayed, if they exist.
19.7 Deletion of Unused Business Partners
Use
SAP supports the deletion of business partners using Information Lifecycle Management (ILM). To prevent that business partners (such as cedent or claim contact), which are used in LRM, are deleted, LRM provides corresponding functionality for checks being performed in ILM. This functionality is delivered as part of the standard. However, the configuration for using this functionality must be customized.
To activate the functionality (for checking business partners being used in LRM), which is part of the delivery, proceed as described below:
● Call transaction SE16.● In the Table Name field, enter the "V_BUTEOPFM" value and select Table Contents.● Switch to the change mode and select New Entries.● Create the following entry:
○ Application Name: “FSRI”○ Policy Section: “Next Free Item”○ Function Module: /MSG/VR_BUPA_EOP_CHECK
● Save the changes.
230 P U B L I CLife Reinsurance Module
General Data Protection Regulation (GDPR)
19.8 Deletion of No Longer Used Lives (Batch)
Use
When lives have expired from a business point of view, you can delete all of these lives as part of the GDPR (General Data Protection Regulation). Chapter Deletion of No Longer Used Lives [page 162] contains information on the procedure.
19.9 Deletion of No Longer Used Comments (Batch)
Use
You can delete comments from the system, which are no longer used in LRM and/or which cannot be assigned to an object in LRM as part of the GDPR (General Data Protection Regulation). Chapter Deletion of No Longer Used Comments [page 163] contains information on the procedure.
19.10 Deletion of No Longer Used Objects (Batch)
Use
You can delete expired policies/applications and lives as part of the General Data Protection Regulation (GDPR). Chapter Deletion of No Longer Used Objects [page 164] contains information on the procedure. The prerequisites for deleting applications, policies and lives can be taken from the following chapters:
● Deleting Multiple Policies and Applications [page 225]● Deleting Single Policies [page 227]● Deleting Single Lives [page 228]
Life Reinsurance ModuleGeneral Data Protection Regulation (GDPR) P U B L I C 231

19.11 Application Log
The structure of the application log is identical for all deletion processes regarding GDPR.
The system displays messages when deleting a life and the corresponding identities, policies and applications in the application log.
● For each deleted policy and each deleted application, the system enters the policy and/or application number into the Policy/Application Number field in the application log.
● For each deleted life and each deleted identity, the system enters the policy and/or application number of the triggering business object into the Policy/Application Number field.
The system also lists the cedent name, for which the deletion has been made, in the application log.
232 P U B L I CLife Reinsurance Module
General Data Protection Regulation (GDPR)

20 Glossary
Term Description
Cession Sequence The cession sequence is composed of a sequence of benefit types and determines the order in which the benefit types are accrued for filling the retention of the treaty.
Account Usually, this means the creation/provision of posting data on the single risk level.
Accounting Unit (AU) The AU is used to summarize equal cessions for structuring the account.
ALV Grid Control SAP List Viewer is a tool for displaying lists and provides common list functions that can be enhanced by user-specific functions.
Application Components The application components correspond to the policy components in the application.
BAdI (Business Add-Ins) BAdIs provide predefined options/goto points for enhancing a standard system. For more information, see the SAP Help page.
BAPI (Business Application Programming Interface) A BAPI (Business Application Programming Interface) is a standardized programming interface that enables external applications to access business processes and data of the SAP system. For more information, see the SAP Help page.
Dialog processing In this case, the processing of a data transmission/single movement is started by the user (by entering the movement in the dialog, manually starting the processing, displaying the messages on the screen).
Background processing In this case, the data transmission processing is started by Background Processes [page 136] (data transmissions selected using background program parameters, processing started at specific times, messages saved to the system log).
Life Reinsurance ModuleGlossary P U B L I C 233
Term Description
In-Force Business A reinsurer’s in-force business can be separated into four different areas:
● Policy including master policy (any changes made to policies in LRM are only performed using movement processing).
● Application (Applications can be delivered by the cedent using a data transmission. Manual changes are made directly to the in-force business list without movement processing)
● Claim (claim advices/changes can only be performed through a movement. Claim assessment is only performed directly in the in-force business list.)
● Internal Reinsurer Data: Conditions, condition bases for the conditions, calculation bases. This data is generally determined using the underlying reinsurance treaty or through the settings in the product/cession administration (calculation bases). The cedent can deliver this information as well, or the reinsurer can change it within the single risk retroactively. In this case, the data is no longer retrieved from the reinsurance treaty / product/cession administration.
Movement The movement is a data record thta contains changes to a policy or policy component.
BRFplus Business Rule Framework plus (BRFplus) is a business rule management system of SAP. For more information, see the SAP Help page.
CAP Client Accounting Period
COB Class of Business
DTA Data Transmission
Single Risk See Life Reinsurance Module [page 6]
Event Business transaction that is performed for a policy or policy component, “Lapsing of a Policy”, for example.
BP Business Partner
P&L Values Profit and Loss Values
Joint Life (Subproducts) Joint Life (Subproducts)
LOB Line of Business
234 P U B L I CLife Reinsurance Module
Glossary

Term Description
Master Policy The master policy is group business and covers multiple individual policies. All individual policies of the group are assigned to the master policy. The assignment is made in the Assignments tab page on the policy level of the Policy business object. A master policy has the same structure as an individual policy.
LRM “Life Reinsurance Module” – This software module.
msg.PMQ The msg.PMQ product engine is the software product that is used as computational kernel in LRM.
Policy (POL) General data on the insurance (contains one or more policy components).
Policy Component (PC) Data of the partial insurance that belongs to a specific benefit type, “Endowment Insurance” or “Occupational Disability Insurance”, for example.
Policy Component Share (PCS) The share of a policy component, which is reinsured.
RFC Functions in remote system can be called using remote function call (RFC). For more information, see the SAP Help page.
Reinsurance Program (RIP) A hierarchical sequence of passive reinsurance treaties and a statistical treaty, which can be used to reinsure a risk by sections in the determined sequence.
SK Claim Costs
SRAL Reading access to data is logged using the Read Access Logging of SAP (SRAL). For more information, see the SAP Help page.
Status Effective state of a policy/policy component such as policy is “in-force”.
UFI The Unique Financial Identifier (UFI) is used to identify finan-cial transactions.
Policy Version The version of a policy is the current status of a policy for each movement processing.
IP Insured Person
ZA Payment Requests
Life Reinsurance ModuleGlossary P U B L I C 235
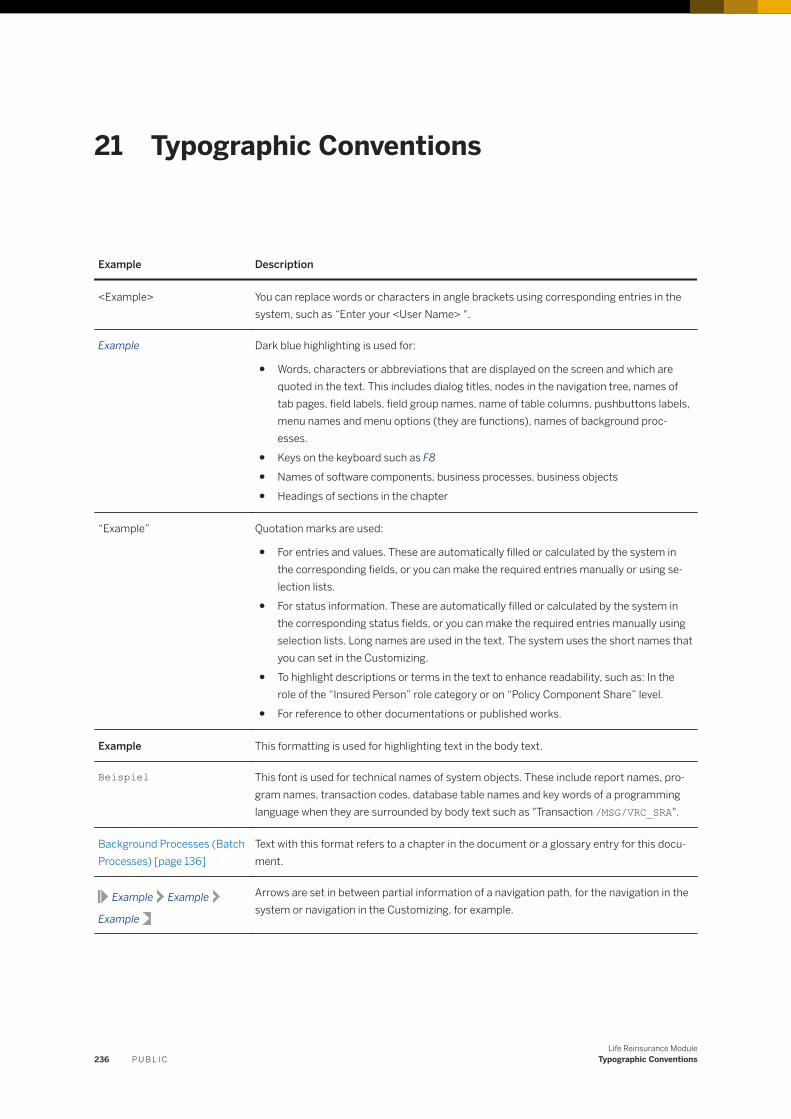
21 Typographic Conventions
Example Description
<Example> You can replace words or characters in angle brackets using corresponding entries in the system, such as “Enter your <User Name> ".
Example Dark blue highlighting is used for:
● Words, characters or abbreviations that are displayed on the screen and which are quoted in the text. This includes dialog titles, nodes in the navigation tree, names of tab pages, field labels, field group names, name of table columns, pushbuttons labels, menu names and menu options (they are functions), names of background processes.
● Keys on the keyboard such as F8● Names of software components, business processes, business objects● Headings of sections in the chapter
“Example” Quotation marks are used:
● For entries and values. These are automatically filled or calculated by the system in the corresponding fields, or you can make the required entries manually or using selection lists.
● For status information. These are automatically filled or calculated by the system in the corresponding status fields, or you can make the required entries manually using selection lists. Long names are used in the text. The system uses the short names that you can set in the Customizing.
● To highlight descriptions or terms in the text to enhance readability, such as: In the role of the “Insured Person” role category or on “Policy Component Share” level.
● For reference to other documentations or published works.
Example This formatting is used for highlighting text in the body text.
Beispiel This font is used for technical names of system objects. These include report names, program names, transaction codes, database table names and key words of a programming language when they are surrounded by body text such as "Transaction /MSG/VRC_SRA".
Background Processes (Batch Processes) [page 136]
Text with this format refers to a chapter in the document or a glossary entry for this document.
Example Example
Example
Arrows are set in between partial information of a navigation path, for the navigation in the system or navigation in the Customizing, for example.
236 P U B L I CLife Reinsurance Module
Typographic Conventions
Important Disclaimers and Legal Information
HyperlinksSome links are classified by an icon and/or a mouseover text. These links provide additional information.About the icons:
● Links with the icon : You are entering a Web site that is not hosted by SAP. By using such links, you agree (unless expressly stated otherwise in your agreements with SAP) to this:
● The content of the linked-to site is not SAP documentation. You may not infer any product claims against SAP based on this information.● SAP does not agree or disagree with the content on the linked-to site, nor does SAP warrant the availability and correctness. SAP shall not be liable for any
damages caused by the use of such content unless damages have been caused by SAP's gross negligence or willful misconduct.
● Links with the icon : You are leaving the documentation for that particular SAP product or service and are entering a SAP-hosted Web site. By using such links, you agree that (unless expressly stated otherwise in your agreements with SAP) you may not infer any product claims against SAP based on this information.
Beta and Other Experimental FeaturesExperimental features are not part of the officially delivered scope that SAP guarantees for future releases. This means that experimental features may be changed by SAP at any time for any reason without notice. Experimental features are not for productive use. You may not demonstrate, test, examine, evaluate or otherwise use the experimental features in a live operating environment or with data that has not been sufficiently backed up.The purpose of experimental features is to get feedback early on, allowing customers and partners to influence the future product accordingly. By providing your feedback (e.g. in the SAP Community), you accept that intellectual property rights of the contributions or derivative works shall remain the exclusive property of SAP.
Example CodeAny software coding and/or code snippets are examples. They are not for productive use. The example code is only intended to better explain and visualize the syntax and phrasing rules. SAP does not warrant the correctness and completeness of the example code. SAP shall not be liable for errors or damages caused by the use of example code unless damages have been caused by SAP's gross negligence or willful misconduct.
Gender-Related LanguageWe try not to use gender-specific word forms and formulations. As appropriate for context and readability, SAP may use masculine word forms to refer to all genders.
Life Reinsurance ModuleImportant Disclaimers and Legal Information P U B L I C 237

www.sap.com/contactsap
© 2018 SAP SE or an SAP affiliate company. All rights reserved.
No part of this publication may be reproduced or transmitted in any form or for any purpose without the express permission of SAP SE or an SAP affiliate company. The information contained herein may be changed without prior notice.
Some software products marketed by SAP SE and its distributors contain proprietary software components of other software vendors. National product specifications may vary.
These materials are provided by SAP SE or an SAP affiliate company for informational purposes only, without representation or warranty of any kind, and SAP or its affiliated companies shall not be liable for errors or omissions with respect to the materials. The only warranties for SAP or SAP affiliate company products and services are those that are set forth in the express warranty statements accompanying such products and services, if any. Nothing herein should be construed as constituting an additional warranty.
SAP and other SAP products and services mentioned herein as well as their respective logos are trademarks or registered trademarks of SAP SE (or an SAP affiliate company) in Germany and other countries. All other product and service names mentioned are the trademarks of their respective companies.
Please see https://www.sap.com/about/legal/trademark.html for additional trademark information and notices.
THE BEST RUN