lica® solution general operator
TRANSCRIPT

Atellica® Solution
General Operator Onsite Training Workbook


i Atellica Solution General Operator Onsite T18001.003 Effective Date: 06/21/21
Siemens Healthineers
Atellica® Solution
General Operator Onsite Training Workbook

ii Atellica Solution General Operator Onsite
©2021 Siemens Healthineers. All rights reserved.

Iii Atellica Solution General Operator Onsite
Table of Contents
1: Welcome
2: System Components
3: Software
4: Reagent and Supply Management
5: Sample Processing
6: Quality Control
7: Calibration
8: Maintenance
9: Troubleshooting 10: Asa 11: Decapper

iv Atellica Solution General Operator Onsite

Welcome
Atellica Solution General Operator Onsite 1-1
1 Welcome
Welcome to Training
Siemens Healthineers would like to welcome you to training on the Atellica® Solution. This course is designed
to teach you the basic skills needed to operate and maintain the Atellica Solution. Our staff welcomes the
opportunity to present this training program to you.
Training Material
This training workbook includes an agenda, learning objectives, and practical exercises.

Welcome
1-2 Atellica Solution General Operator Onsite
Atellica Solution General Operator Onsite Training
Course Objectives
Upon completion of the class, you will be able to:
• Review the system components and their functions
• Navigate the software
• Utilize the instrument Online Help, PEPconnect
• Manage supplies, system fluids and reagents
• Create, process and monitor patient sample orders
• Schedule, process, and review quality controls
• Schedule, process, and review calibrations
• Perform daily and weekly maintenance
• Utilize the Operator Event Log
• Create a Service Support Request
Optional Objectives
• Discuss Atellica Asa software
• Discuss Atellica Decapper

Welcome
Atellica Solution General Operator Onsite 1-3
Atellica Solution General Operator Onsite Training
Agenda • Hardware Overview
• Software Overview
• Reagent and Supply Management
• Sample Processing
• Quality Control
• Lunch
• Calibration
• Maintenance
• Basic Troubleshooting Resources
Optional Objectives:
• Asa and Decapper
• Q&A and Evaluations

Welcome
1-4 Atellica Solution General Operator Onsite
Atellica Solution General Operator Onsite Training
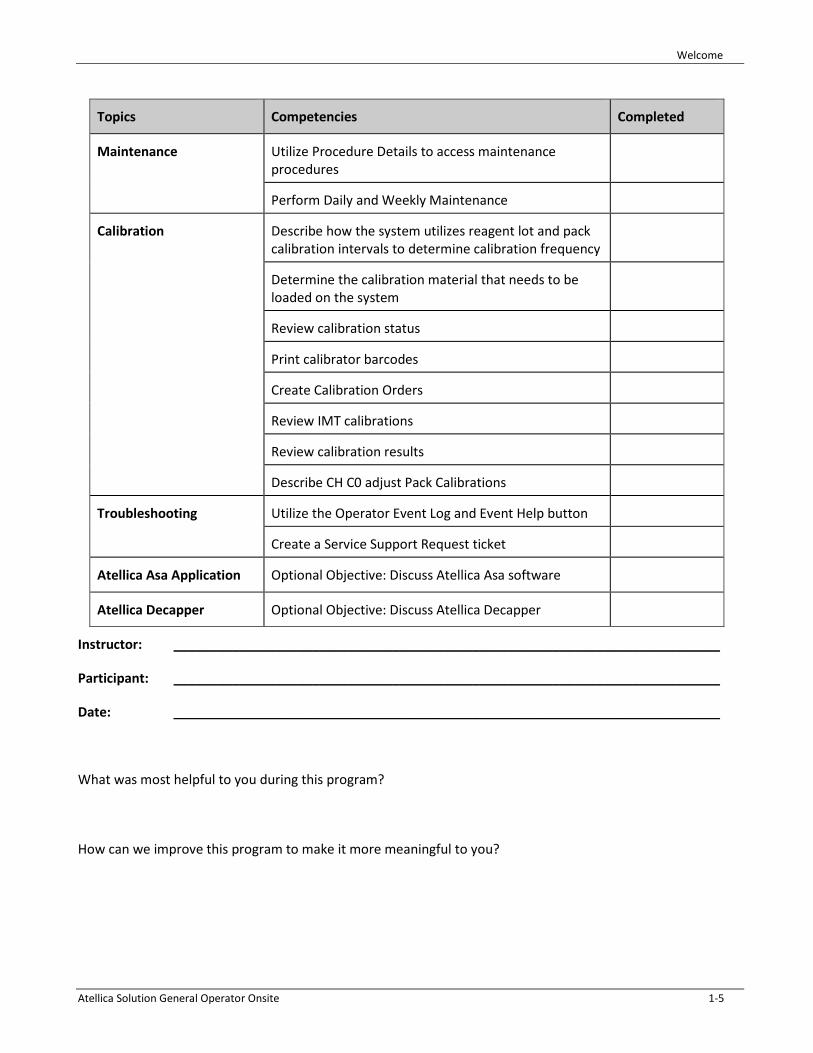
Course Validation Checklist
The participant places a checkmark beside the competency when it is completed. When all competencies are checked, the instructor and participant sign and date below as record of completion.
Topics Competencies Completed
System Components Review the system components and their functions
Software Navigate the Command Bar, Workspace, and Status Bar
Sign into and out of the User Interface
Access PEPconnect
Utilize On-Line Help
View and acknowledge System Alerts
Check System Health
Reagent and Supply Management
Monitor the status of the supply and reagent inventories
Load and unload supplies, consumables, and reagents
Scan IM Master Curve and Assay Test Definition 2D barcode
Empty solid waste
Sample Processing Process patient samples
Monitor patient sample status
Create and edit patient orders
Review patient results
Quality Control Determine Quality Control materials needed
Review QC Scheduler
Create and Process QC Orders
Monitor QC results
Utilize QC Panels
Welcome
Atellica Solution General Operator Onsite 1-5
Instructor: ___________________________________________________________________________
Participant: ___________________________________________________________________________
Date: ___________________________________________________________________________
What was most helpful to you during this program?
How can we improve this program to make it more meaningful to you?
Topics Competencies Completed
Maintenance Utilize Procedure Details to access maintenance procedures
Perform Daily and Weekly Maintenance
Calibration Describe how the system utilizes reagent lot and pack calibration intervals to determine calibration frequency
Determine the calibration material that needs to be loaded on the system
Review calibration status
Print calibrator barcodes
Create Calibration Orders
Review IMT calibrations
Review calibration results
Describe CH C0 adjust Pack Calibrations
Troubleshooting Utilize the Operator Event Log and Event Help button
Create a Service Support Request ticket
Atellica Asa Application Optional Objective: Discuss Atellica Asa software
Atellica Decapper Optional Objective: Discuss Atellica Decapper

Welcome
1-6 Atellica Solution General Operator Onsite
Atellica Solution
Hands-on checklist to be completed after training
The participant places a checkmark beside each task when it is completed. When all competencies are checked, the participant will sign and date below as record of completion.
Topics Competencies Completed
System Components Review the system components and their functions
Software Navigate the Command Bar, Workspace, and Status Bar
Sign into and out of the User Interface
Access PEPconnect
Utilize On-Line Help
View and acknowledge System Alerts
Check System Health
Reagent and Supply Management
Monitor the status of the supply and reagent inventories
Load and unload supplies, consumables, and reagents
Scan IM Master Curve and Assay Test Definition 2D barcode
Empty solid waste
Sample Processing Process patient samples
Monitor patient sample status
Create and edit patient orders
Review patient results
Quality Control Determine Quality Control materials needed
Review QC Scheduler
Create and Process QC Orders
Monitor QC results
Utilize QC Panels

Welcome
Atellica Solution General Operator Onsite 1-7
Participant: ___________________________________________________________________________
Date: ___________________________________________________________________________
Topics Competencies Completed
Maintenance Utilize Procedure Details to access maintenance procedures
Perform Daily and Weekly Maintenance
Calibration Describe how the system utilizes reagent lot and pack calibration intervals to determine calibration frequency
Determine the calibration material that needs to be loaded on the system
Review calibration status
Print calibrator barcodes
Create Calibration Orders
Review IMT calibrations
Review calibration results
Describe CH C0 adjust Pack Calibrations
Troubleshooting Utilize the Operator Event Log and Event Help button
Create a Service Support Request ticket
Atellica Asa Application Optional Objective: Discuss Atellica Asa software
Atellica Decapper Optional Objective: Discuss Atellica Decapper
Welcome
1-8 Atellica Solution General Operator Onsite
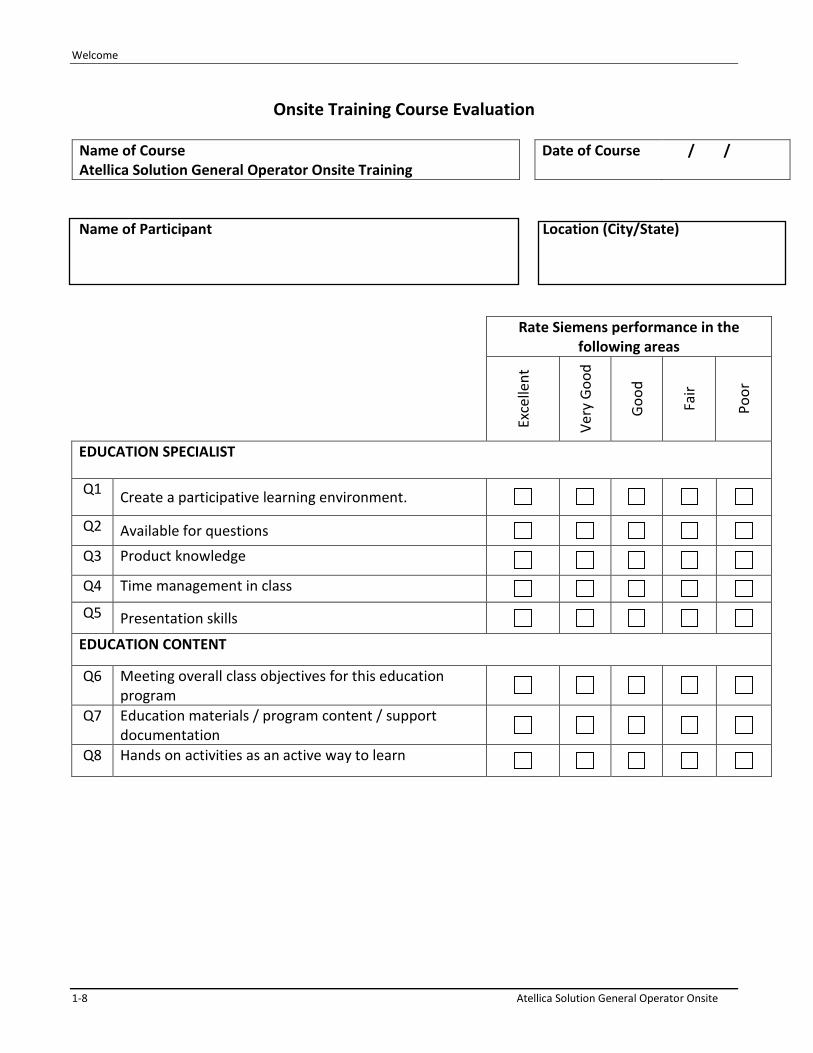
Onsite Training Course Evaluation
Name of Course Atellica Solution General Operator Onsite Training
Date of Course / /
Name of Participant Location (City/State)
Rate Siemens performance in the following areas
Exce
llent
Very
Goo
d
Good
Fair
Poor
EDUCATION SPECIALIST
Q1 Create a participative learning environment.
Q2 Available for questions Q3 Product knowledge Q4 Time management in class Q5 Presentation skills
EDUCATION CONTENT
Q6 Meeting overall class objectives for this education program
Q7 Education materials / program content / support documentation
Q8 Hands on activities as an active way to learn

System Components
Atellica Solution General Operator Onsite 2-1
2 System Components

System Components
2-2 Atellica Solution General Operator Onsite
System Components
Resources • Online Help
• PEPconnect
Objective Upon completion of this exercise, you will be able to identify the system components and their functions for the:
• Sample Handler (SH)
• Chemistry module (CH)
• Immunoassay module (IM)

System Components
Atellica Solution General Operator Onsite 2-3
SH System Components
1. Identify the following SH components in the image below
__A__ Visual status light __D___ Lock/unlock drawer buttons
__B__Monitor, keyboard, and mouse __E___ Sample drawers
__C__ System front cover __ F___ Process Center Computer (PCC)
A
C
B D
E
F

System Components
2-4 Atellica Solution General Operator Onsite
SH System Components
2. Identify the following SH system components in the images below
__A__ Robotic arm
__B__ Cal-QC Storage area
__C__ Tube Characterization System (TCS)
__D__ Carrier
__E__ Atellica MaglineTM Transport
D
A C
B
E
System Components
Atellica Solution General Operator Onsite 2-5
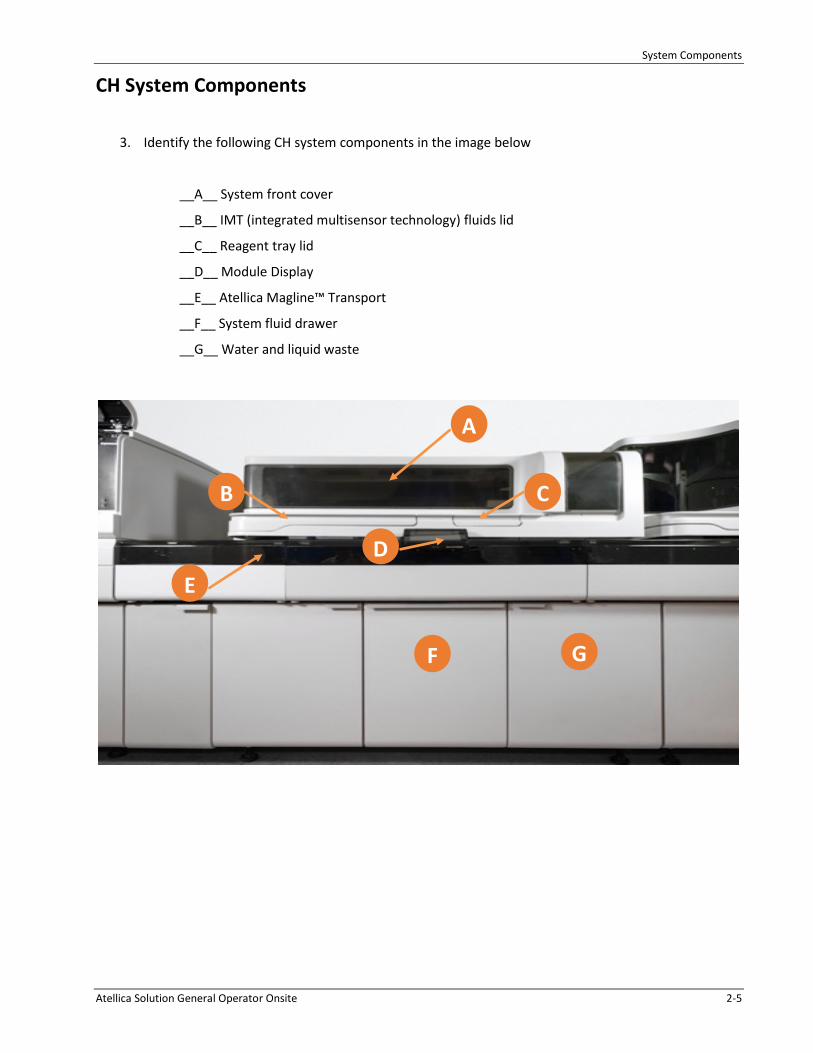
CH System Components
3. Identify the following CH system components in the image below
__A__ System front cover
__B__ IMT (integrated multisensor technology) fluids lid
__C__ Reagent tray lid
__D__ Module Display
__E__ Atellica Magline™ Transport
__F__ System fluid drawer
__G__ Water and liquid waste
D E
F G
B C
A
System Components
2-6 Atellica Solution General Operator Onsite
CH System Components
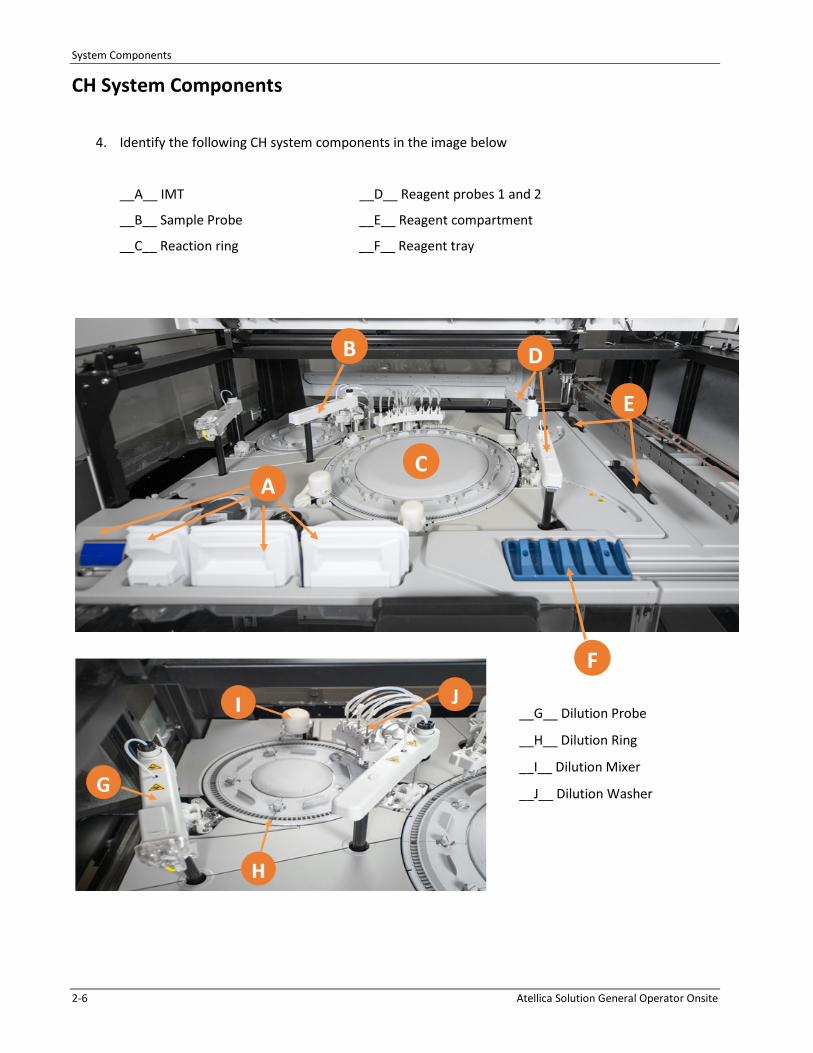
4. Identify the following CH system components in the image below
__A__ IMT __D__ Reagent probes 1 and 2
__B__ Sample Probe __E__ Reagent compartment
__C__ Reaction ring __F__ Reagent tray
A
D
C
B
E
F
__G__ Dilution Probe
__H__ Dilution Ring
__I__ Dilution Mixer
__J__ Dilution Washer

System Components
Atellica Solution General Operator Onsite 2-7
IM System Components 5. Identify the following IM system components in the image below
__A__ System front cover
__B__ Sample tip loading lid
__C__ Cuvette bin lid
__D__ Reagent drawer
__E__ Water and liquid waste drawer
__F__ System fluid drawer
__G__ Solid waste drawer
A
E G
D
B
C
F
System Components
2-8 Atellica Solution General Operator Onsite
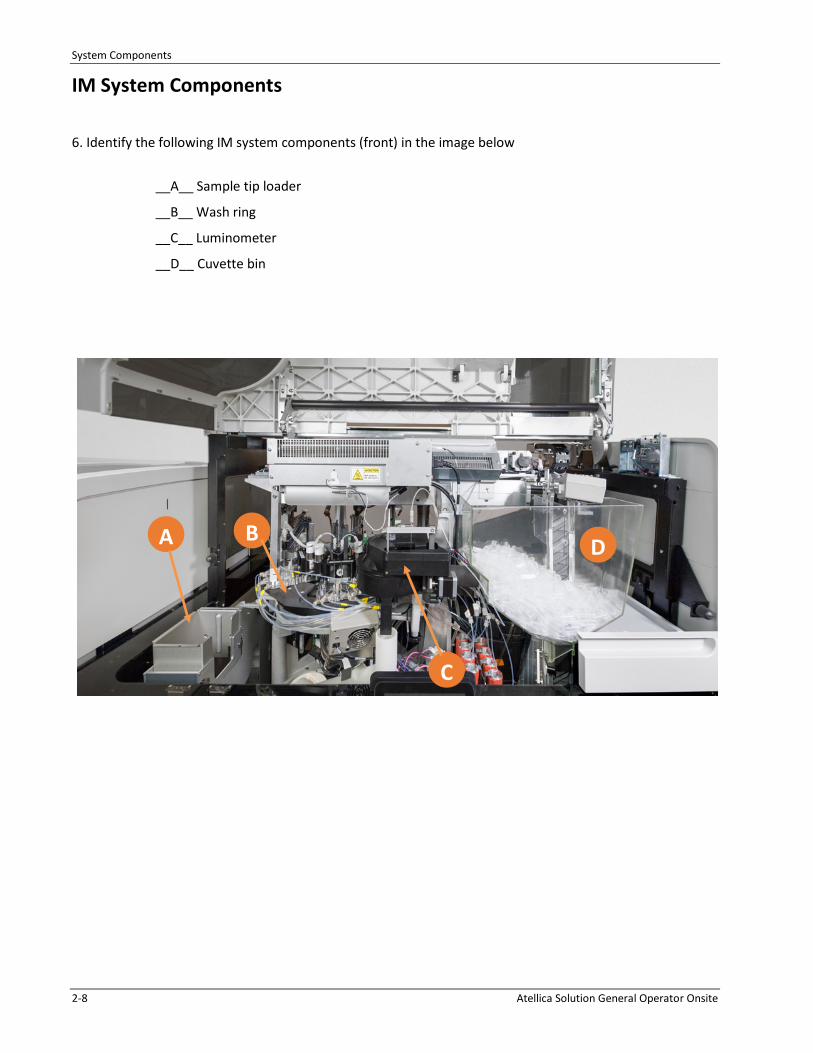
IM System Components 6. Identify the following IM system components (front) in the image below
__A__ Sample tip loader
__B__ Wash ring
__C__ Luminometer
__D__ Cuvette bin
D
C
A
B

System Components
Atellica Solution General Operator Onsite 2-9
7. Identify the following IM system components (rear) in the images below
__A__ Reagent Loader __D__ Reagent probes
__B__ Reagent Compartment __E__ Sample probe
__C__ Incubation ring
E
D
C B
A

System Components
2-10 Atellica Solution General Operator Onsite
Notes
Software
Atellica Solution General Operator Onsite 3-1
3 Software

Software
Atellica Solution General Operator Onsite 3-2
Software
Resources • Online Help
• PEPconnect
• Atellica Solution PEP to Go Key Tasks for Basic Operation
Objectives Upon completion of this exercise, you will be able to:
• Navigate the Command Bar, Workspace, and Status Bar
• Sign out and sign into the System
• Access PEPconnect
• Utilize Online Help
• View and acknowledge System Alerts
• Check System Health

Software
Atellica Solution General Operator Onsite 3-3
Navigate the Software
The software uses three areas of the screen to access system functions and information:
1. Command Bar • Allows the operator to perform and manage laboratory activities
2. Workspace
• Contains task buttons and displays sample and system information
3. Status Bar • Reports current system information and has selectable icons for quick access to system
functions
1
2
3

Software
Atellica Solution General Operator Onsite 3-4
Signing out of the System/Signing into the system To control the user security level, it is recommended that the operator signs out when walking away from the system, and then the next operator signs in with their credentials. Signing out and back in helps the software to run smoothly by refreshing all screens. Signing out of the System
1. On the Status bar, select the sign out icon 2. Select Sign Out 3. Select Yes
Signing into the System 1. At the sign in window, enter the operator ID and password 2. Select Sign In
Software
Atellica Solution General Operator Onsite 3-5
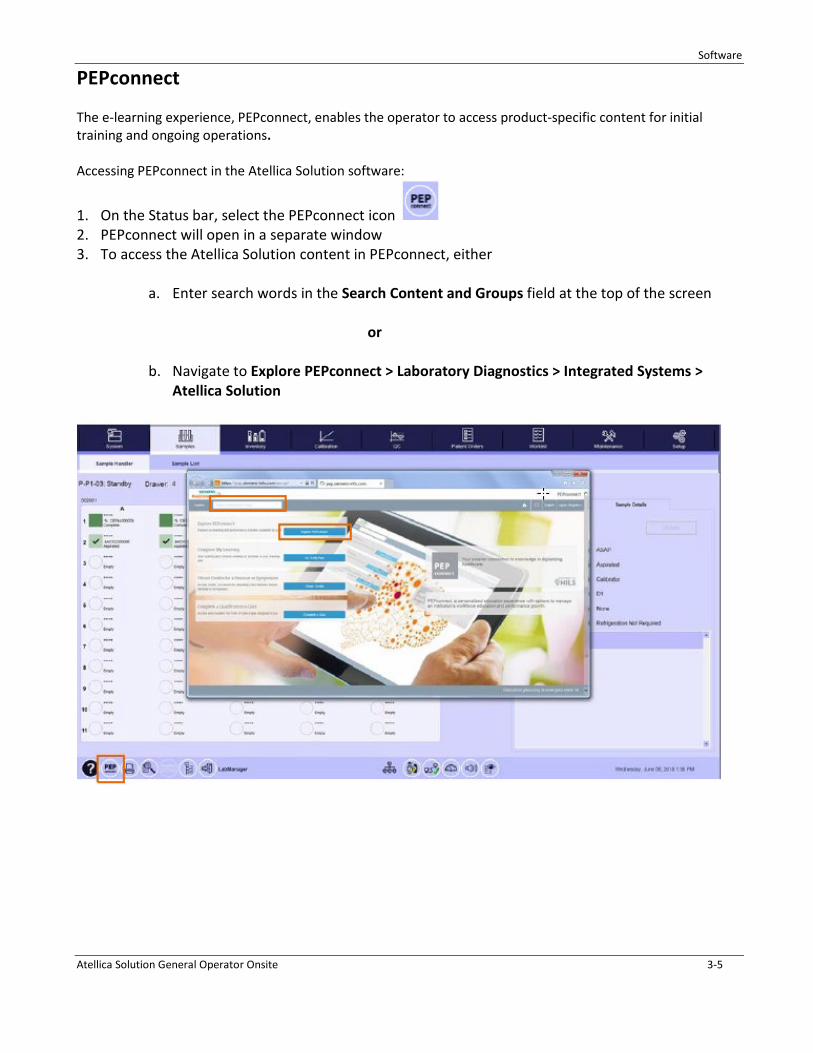
PEPconnect The e-learning experience, PEPconnect, enables the operator to access product-specific content for initial training and ongoing operations. Accessing PEPconnect in the Atellica Solution software:
1. On the Status bar, select the PEPconnect icon 2. PEPconnect will open in a separate window 3. To access the Atellica Solution content in PEPconnect, either
a. Enter search words in the Search Content and Groups field at the top of the screen
or
b. Navigate to Explore PEPconnect > Laboratory Diagnostics > Integrated Systems >
Atellica Solution

Software
Atellica Solution General Operator Onsite 3-6
Atellica Solution Online Help
The Online Help (OLH) icon on the status bar is accessible from every screen. OLH provides links to help topics specific to the screen currently displayed and provides access to the table of contents where the entire Online Help package can be accessed. A Search, Library, and Quick links function provide the operator with quick access to information.

Software
Atellica Solution General Operator Onsite 3-7
System Alerts
The Alert Module displays all active module and system alerts. The color of the Alert Module designates the status of system alerts and defines them as system errors or warnings.
Each tab and subtab of the Command Bar that has an associated alert will display red or yellow until the alert is resolved.
A
B
C
D
A. Solid red tab - there are one or more unacknowledged errors
B. Black tab with a red outline - errors have been acknowledged but error condition(s) still exist
C. Solid yellow tab - there are one or more unacknowledged warnings
D. Black tab with a yellow outline - warnings have been acknowledged but warning condition(s) still exist

Software
Atellica Solution General Operator Onsite 3-8
Viewing and Acknowledging System Alerts The operator can view the Alert Module to display all active Module and system Alerts.
1. Above the Command bar, select the red or yellow tab
2. To Filter the alert list, select a Module or Category
3. To acknowledge individual alerts, select the hand symbol to the right of the alert
4. To acknowledge all alerts, select the Acknowledge Alerts button NOTE: Selecting Acknowledge Alerts does not resolve the system alerts. Action must be taken on the system NOTE: Caution, if an alert is suppressed, the system will never notify you of this type of alert if the same situation recurs.
Software
Atellica Solution General Operator Onsite 3-9
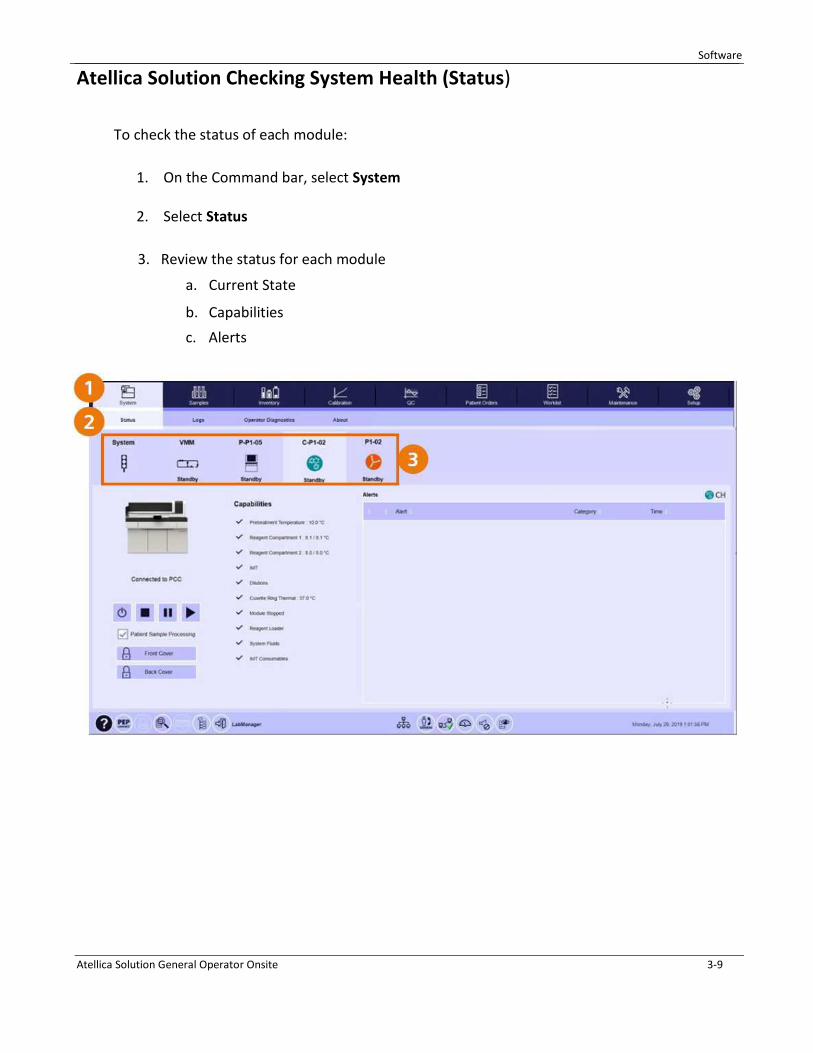
Atellica Solution Checking System Health (Status)
To check the status of each module:
1. On the Command bar, select System
2. Select Status
3. Review the status for each module
a. Current State
b. Capabilities c. Alerts

Software
Atellica Solution General Operator Onsite 3-10
Notes

Reagent and Supply Management
Atellica Solution General Operator Onsite 4-1
4 Reagent and Supply Management

Reagent and Supply Management
4-2 Atellica Solution General Operator Onsite
Reagent and Supply Management
Resources • Online Help
• PEPconnect
• Atellica Solution PEP to Go Key Tasks for Basic Operation
Objectives Upon completion of this exercise, you will be able to:
• Monitor the status of the supply and reagent inventories
• Load and unload supplies, consumables, and reagents
• Scan IM Master Curve and Assay Test Definition 2D barcode
• Empty waste

Reagent and Supply Management
Atellica Solution General Operator Onsite 4-3
Reagent Overview At the Command Bar, select Inventory > Reagent Needs
The reasons for a posted need include the following:
Predictive: Suggested need based on the number of tests per day defined by the operator or system historic assay utilization*
Below Threshold: The reagent inventory level is below the alert threshold
Pending Orders: There are existing orders in the Worklist and no reagent is onboard for the assay
A need is red when the current inventory drops below a threshold defined by the operator on the Reagent Requirements Settings screen or when there are pending orders with no reagent available

Reagent and Supply Management
4-4 Atellica Solution General Operator Onsite
Reviewing the Reagent Overview Screen
At the Command Bar, select Inventory > Reagent Overview > IM
Example of IM Reagent
Example of an IM Kitted Reagent pack

Reagent and Supply Management
Atellica Solution General Operator Onsite 4-5
Reagent Overview: Loading Reagents IM Reagents
Primary reagents must be manually mixed before being loaded on the system:
1. If the reagent pack is pierced, gently press on the self-sealing laboratory film that covers the pierced film area, while mixing, to prevent leakage
2. With the film side up, loosely hold the reagent pack at each end 3. Raise one end of the pack 90◦ to its vertical position 4. Return the pack to a horizontal position 5. Raise the other end of the pack 90◦ again to its vertical position 6. Return the pack to a horizontal position 7. Repeat steps 2–5 a minimum of 20 times or until:
• Any clumps are broken up and no longer visible on the bottom of the pack • No large aggregates are visible floating inside the pack
8. Mix 5–10 times more to ensure complete mixing 9. If the reagent pack is pierced, remove the self-sealing laboratory film 10. Load the reagent pack onto the analyzer
NOTE: Refer to IFU for reagent preparation instructions, select reagents require specialized mixing

Reagent and Supply Management
4-6 Atellica Solution General Operator Onsite
IM Reagent Drawer
Reagent and Supply Management
Atellica Solution General Operator Onsite 4-7
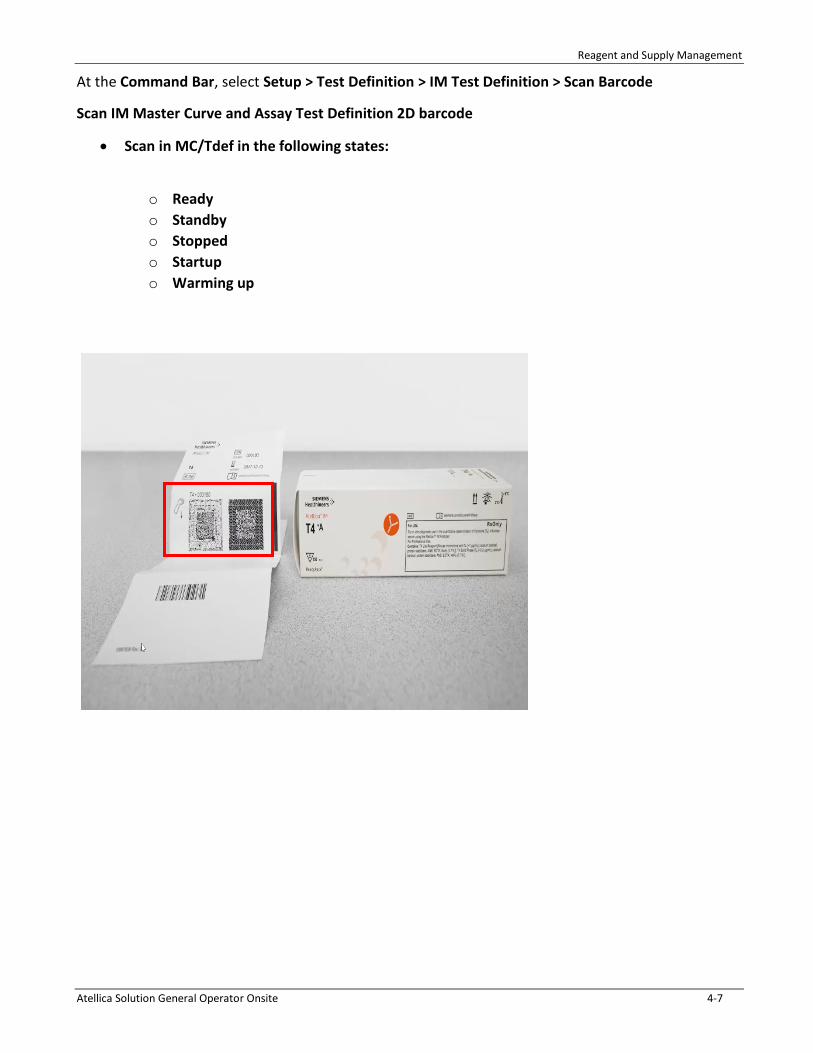
At the Command Bar, select Setup > Test Definition > IM Test Definition > Scan Barcode
Scan IM Master Curve and Assay Test Definition 2D barcode
• Scan in MC/Tdef in the following states:
o Ready o Standby o Stopped o Startup o Warming up

Reagent and Supply Management
4-8 Atellica Solution General Operator Onsite
Loading IM Humidity Packs
• Humidity packs maintain reagent compartment humidity between 70–100%.
• 7 empty humidity packs must be loaded onto the IM module initially.
• The system automatically fills the packs with water during the daily maintenance procedure.
• The system monitors humidity in the reagent compartment and, if the humidity falls below 70%, may require up to 3 additional humidity packs for a total of 10.

Reagent and Supply Management
Atellica Solution General Operator Onsite 4-9
At the Command Bar, select Inventory > Reagent Overview > CH
Chemistry Reagents
Example of Chemistry reagent with paired pack
*NOTE: The Reagent Overview screen shows the current status of only the open wells or packs on board the system. The status of unopened wells is not displayed.
Reagent and Supply Management
4-10 Atellica Solution General Operator Onsite
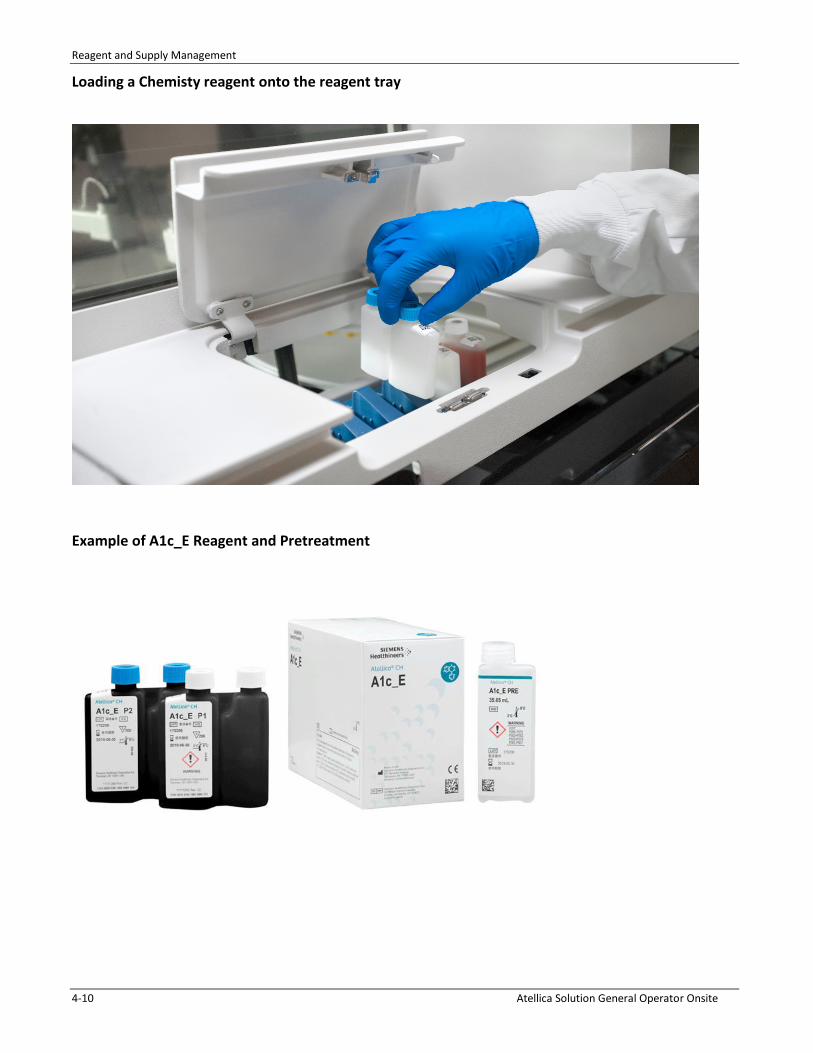
Loading a Chemisty reagent onto the reagent tray
Example of A1c_E Reagent and Pretreatment
Reagent and Supply Management
Atellica Solution General Operator Onsite 4-11
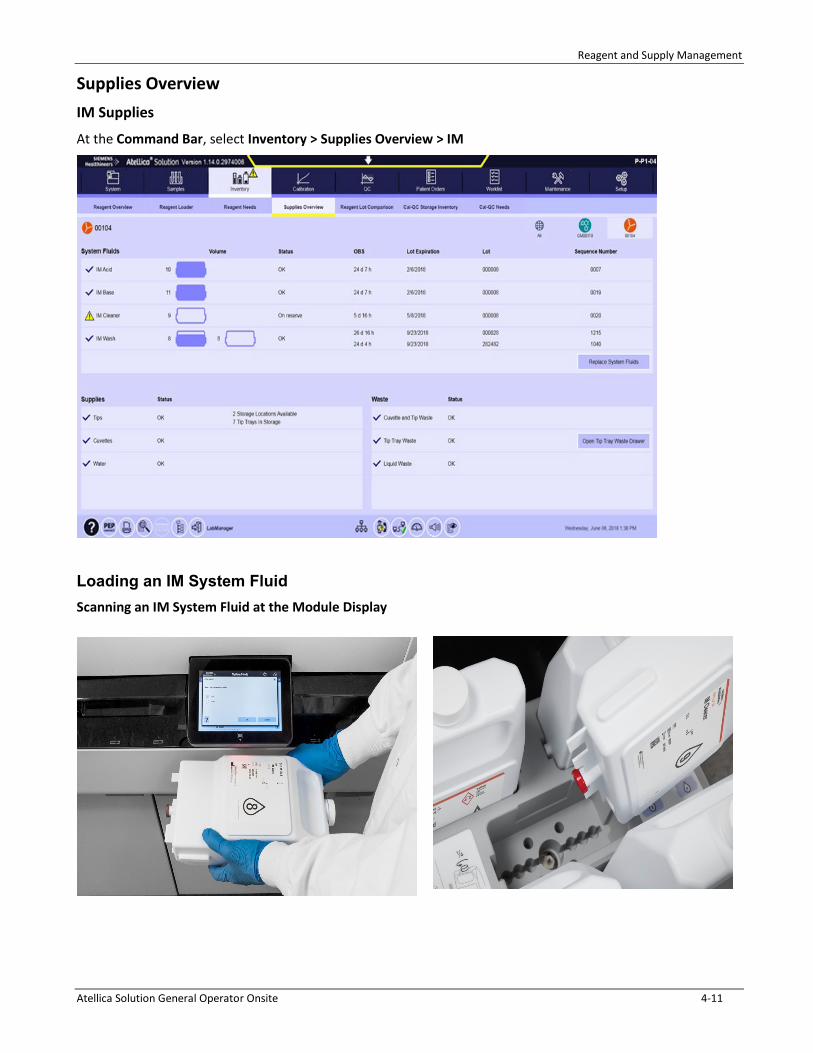
Supplies Overview IM Supplies
At the Command Bar, select Inventory > Supplies Overview > IM
Loading an IM System Fluid Scanning an IM System Fluid at the Module Display
Reagent and Supply Management
4-12 Atellica Solution General Operator Onsite
IM Supplies
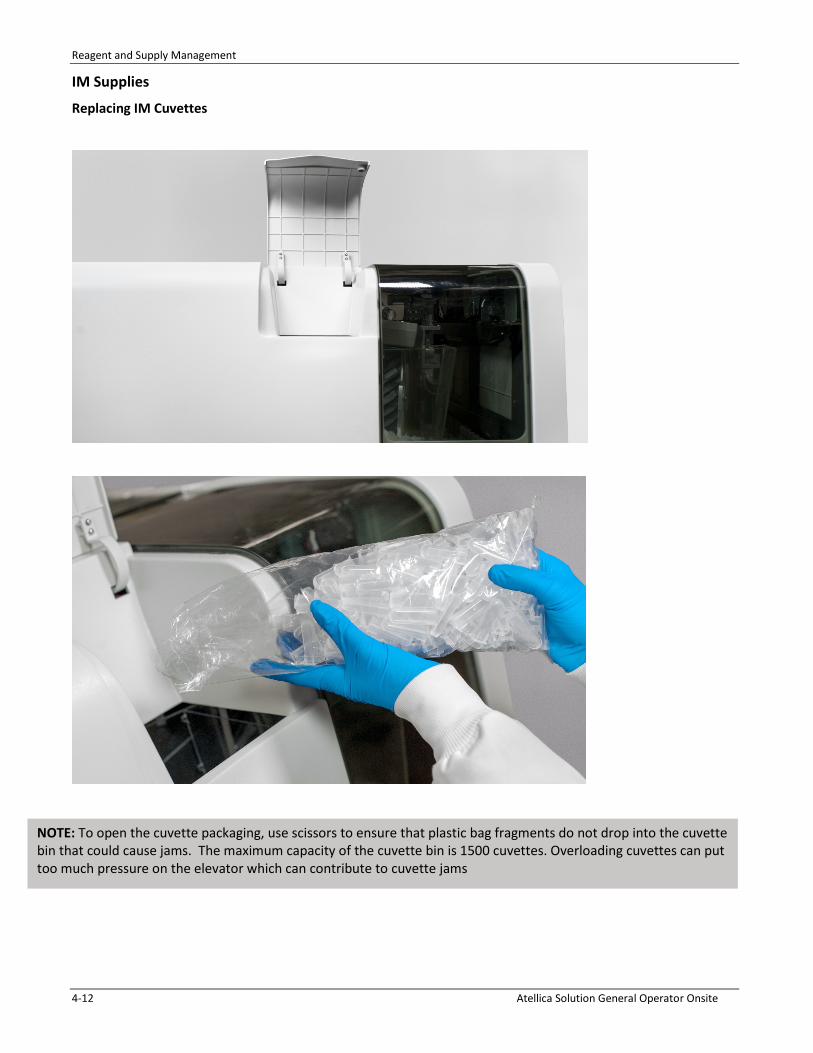
Replacing IM Cuvettes
NOTE: To open the cuvette packaging, use scissors to ensure that plastic bag fragments do not drop into the cuvette bin that could cause jams. The maximum capacity of the cuvette bin is 1500 cuvettes. Overloading cuvettes can put too much pressure on the elevator which can contribute to cuvette jams
Reagent and Supply Management
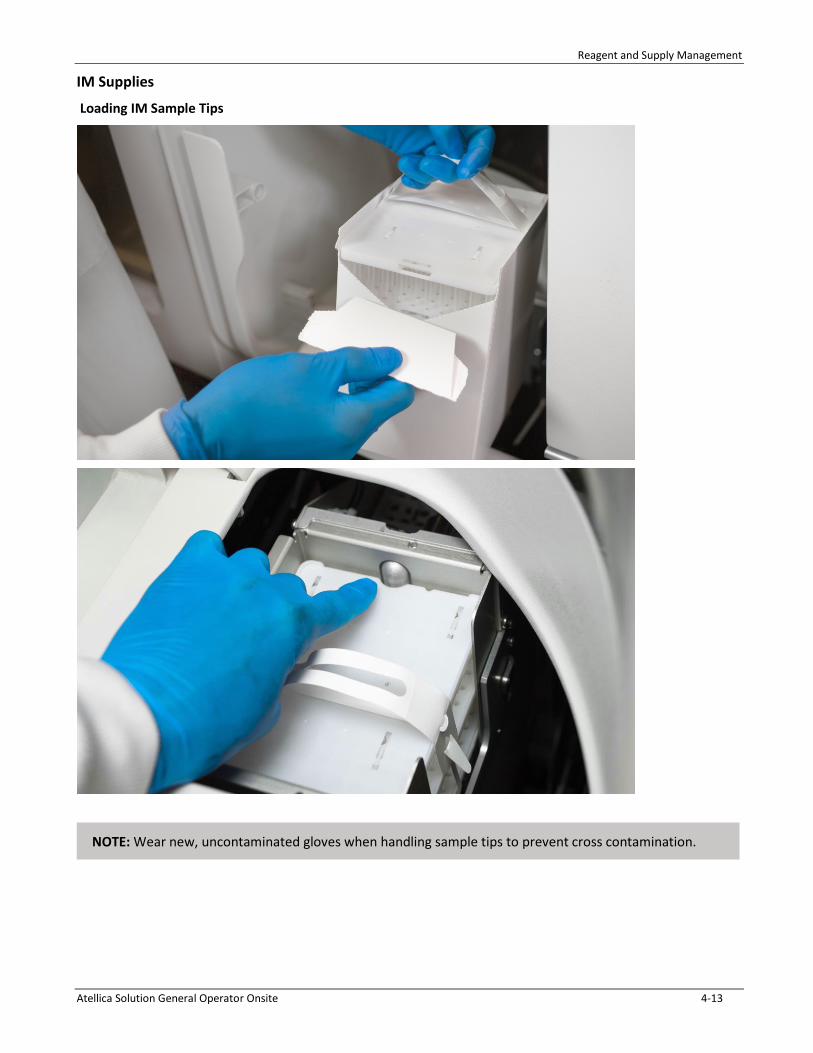
Atellica Solution General Operator Onsite 4-13
IM Supplies Loading IM Sample Tips
NOTE: Wear new, uncontaminated gloves when handling sample tips to prevent cross contamination.

Reagent and Supply Management
4-14 Atellica Solution General Operator Onsite
IM Supplies
IM Waste: Solid waste drawer

Reagent and Supply Management
Atellica Solution General Operator Onsite 4-15
CH Supplies CH System Fluids
At the Command Bar, select Inventory > Supplies Overview > CH
Chemistry System Fluid Drawer

Reagent and Supply Management
4-16 Atellica Solution General Operator Onsite
IMT Supplies
At the Command Bar, select Inventory > Supplies Overview > CH
Steps to replace IMT Fluids:
1. Ensure the analyzer is in Ready, Processing, or Standby state 2. Open the IMT fluids lid 3. Select IMT Supplies on the module display 4. If an IMT Advanced Clean is required at the next multisensor replacement, a window displays with
options to either perform IMT Advanced Clean or replace IMT supplies • If you are only replacing the IMT fluids and are not replacing the A-LYTE multisensor, select
Replace IMT Supplies and wait for the analyzer to pause
5. Scan the IMT fluid, replace and click Save.
NOTE: The system and IMT fluid containers only fit in the designated position when the cannulas puncture the septum .
NOTE: Do not touch the cannulas in the keyed areas at the bottom of the system fluids drawer. The cannulas can puncture skin.

Reagent and Supply Management
Atellica Solution General Operator Onsite 4-17
Replacing the CH Pretreatment Pack from the Module Display
At the Module Display, select Supplies > Instructions for scanning
Pretreatment in the holder on the Chemistry module
Reagent and Supply Management
4-18 Atellica Solution General Operator Onsite
Reagents and Supplies At the Command Bar, select Inventory > Reagent Needs 1. In the Reagent Needs, are there any reagents listed? _____________________________________________ Load reagent as directed by instructor. At the Command Bar, select Inventory > Reagent Overview > CH
1. Group by reagent, locate the RPC’s and WBA. List the RPC’s that are onboard the system.
_______________________________________________________________________
_______________________________________________________________________
_______________________________________________________________________
At the Command Bar, select Inventory > Supplies Overview > CH
1. How many tests are remaining on the A-LYTE multisensor?
_________________________________________________________________________________
At the Command Bar, select Inventory > Supplies Overview > IM
Replace IM Cuvettes
1. What is the recommended way for the cuvette bag to be opened and handled?
______________________________________________________________________
Replace the IM sample tips
1. What step must be performed after the sample tip nest is installed but before closing the sample tip loading lid?
______________________________________________________________________

Reagent and Supply Management
Atellica Solution General Operator Onsite 4-19
Notes

Sample Processing
Atellica Solution General Operator Onsite 5-1
5 Sample Processing
Sample Processing
5-2 Atellica Solution General Operator Onsite
Sample Processing
Resources • Online Help (OLH)
• PEPconnect
• Atellica Solution PEP to Go Key Tasks for Basic Operation
Objectives Upon completion of this exercise, you will be able to:
• Process patient samples
• Monitor patient sample status
• Create patient orders
• Edit patient orders
• Manage patient results
Sample Processing
Atellica Solution General Operator Onsite 5-3
Sample Processing
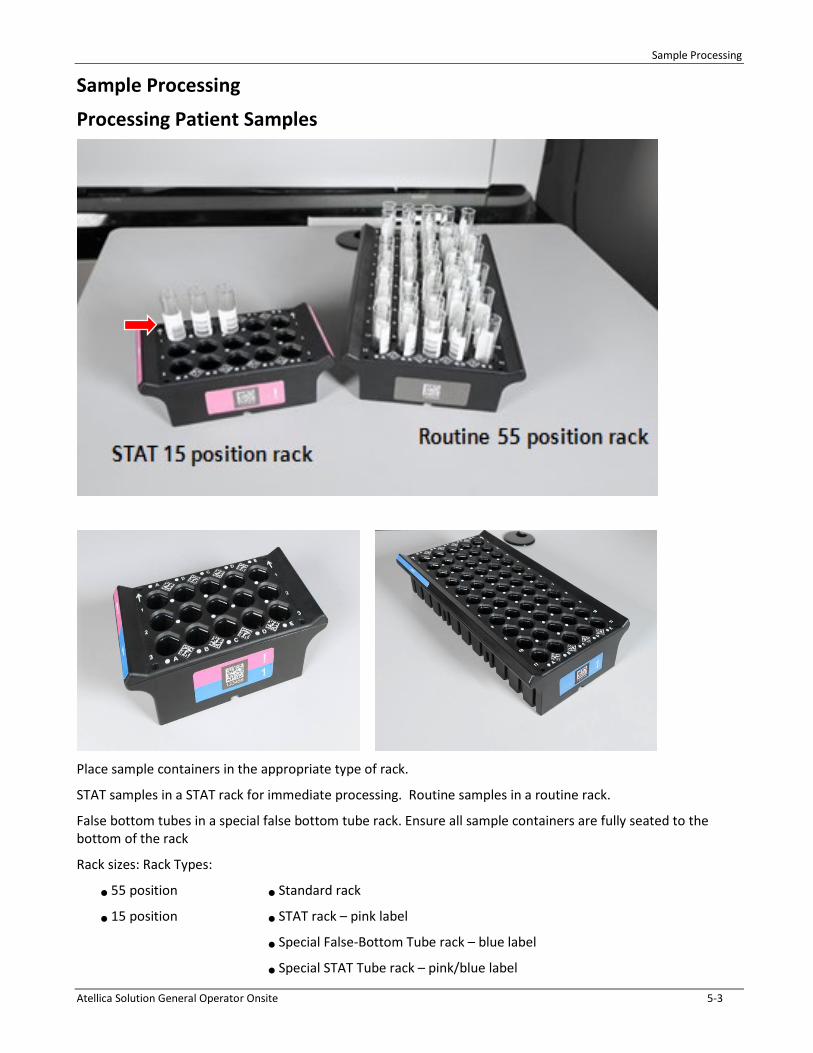
Processing Patient Samples
Place sample containers in the appropriate type of rack.
STAT samples in a STAT rack for immediate processing. Routine samples in a routine rack.
False bottom tubes in a special false bottom tube rack. Ensure all sample containers are fully seated to the bottom of the rack
Rack sizes: Rack Types:
⚫ 55 position ⚫ Standard rack
⚫ 15 position ⚫ STAT rack – pink label
⚫ Special False-Bottom Tube rack – blue label
⚫ Special STAT Tube rack – pink/blue label
Sample Processing
5-4 Atellica Solution General Operator Onsite
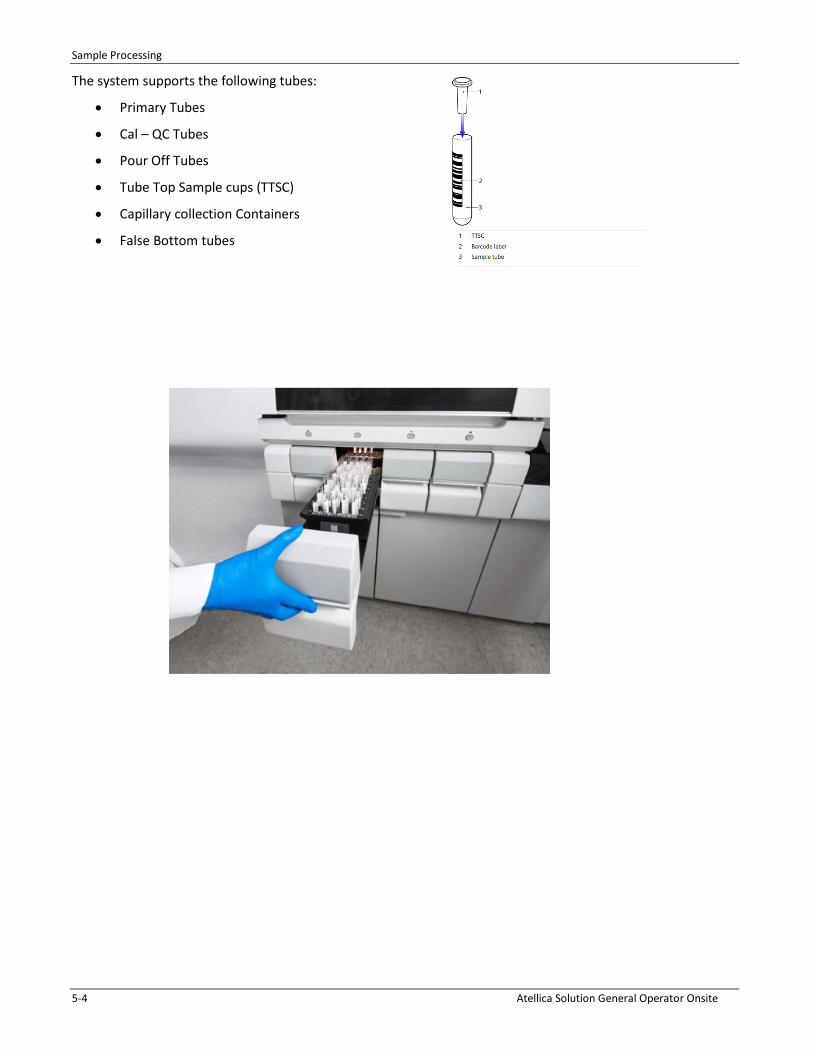
The system supports the following tubes:
• Primary Tubes
• Cal – QC Tubes
• Pour Off Tubes
• Tube Top Sample cups (TTSC)
• Capillary collection Containers
• False Bottom tubes
Sample Processing
Atellica Solution General Operator Onsite 5-5
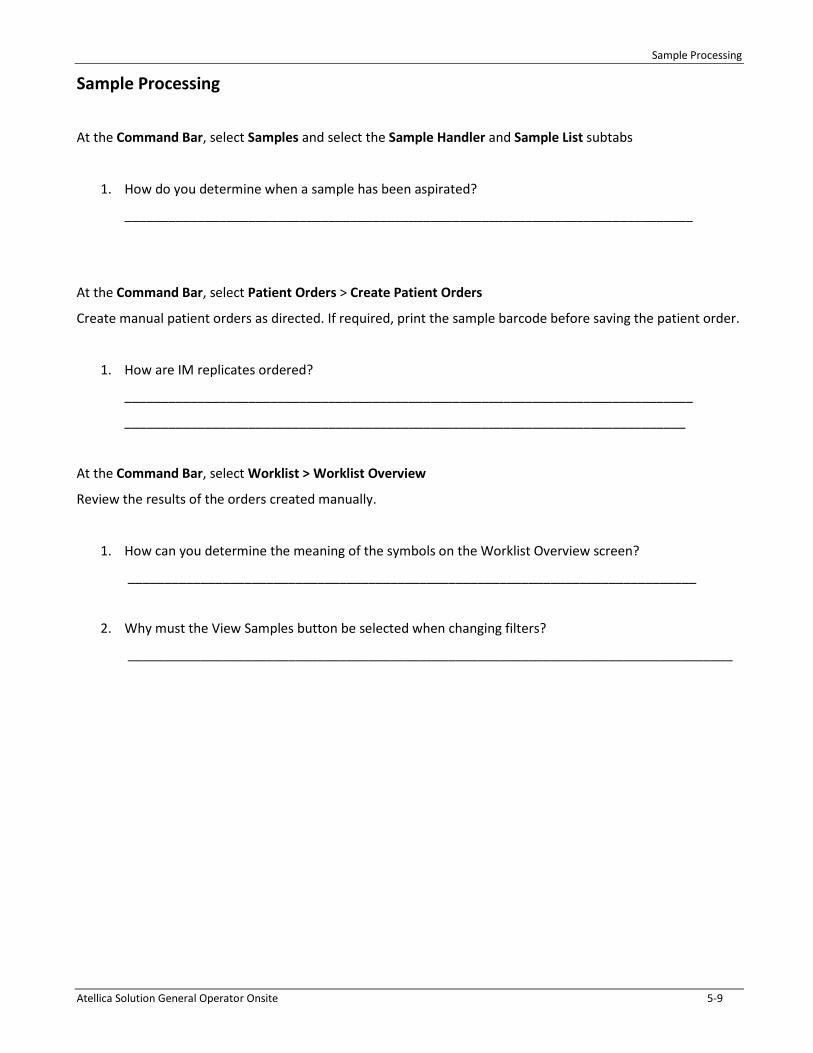
Monitoring Patient Sample Status At the Command Bar, select Samples > Sample Handler
The Sample Handler tab provides an overview of the status of the SH, sample drawers, and all racks and sample containers in the sample drawers.
The system displays a colored glyph for each sample container position in every rack in the sample drawers and descriptive text beside each glyph.
Example:
A round glyph identifies a patient sample container
A square glyph identifies a calibrator or QC container

Sample Processing
5-6 Atellica Solution General Operator Onsite
Some Common Sample Container Position Glyphs:
Sample Container Glyph Glyph Description
The position is empty.
An unidentified container.
The sample status is "Complete."
The sample status is "Aspirated"
The system cannot identify the container because of a barcode read error
*The system detected a sample container with an HIL error flag
An aspiration-related error occurred.
The system cannot perform 1 or more tests on the sample because of a problem with an assay.
The sample container has no orders
The system does not include a Decapper and detected a cap on a container.
A calibrator or QC is not usable
The system detected a container with the sample ID as another container currently on the system
The system detected a container the system does not support
The system detected an error while transferring the container from one point to another.
*NOTE: The system can perform HIL (Hemolysis, Icterus, Lipemia) processing in 1 of 2 ways. The CH Analyzer can pipette a known quantity of sample into an empty cuvette with system water to process HIL tests or use an HIL provider assay.

Sample Processing
Atellica Solution General Operator Onsite 5-7
Managing Patient Results At the Command Bar, select Worklist > Worklist Overview
In Worklist Overview, the operator can interact with orders and tests and filter displayed results.
Collapsing the Filter pane displays 2 additional operator-configured columns.
To filter for Patient Order Results from Worklist Overview: Select Sample Type > Patient
Worklist Glyphs for Flags and Interpretation To find more information about the glyphs that are in the Worklist Overview screen, simply ‘click’ on the particular gylph and it will open up a legend box that will display details about the glyph.

Sample Processing
5-8 Atellica Solution General Operator Onsite
Sample Processing
Creating and Editing Patient Orders At the Command Bar, select Patient Orders > Create Patient Orders
From Create Patient Orders Screen:
1. Type Sample ID
2. Select Specimen
3. Choose Manual Dilution Factor if the sample was diluted off the system
4. Select ‘For Study’ if you DO NOT want the test results to be transmitted to the LIS
5. Choose Processing Priority
6. Enter Patient Demographics (optional)
7. Select Tests
8. Edit Test Orders in the Orders Workspace to add Duplicate orders for CH (using ‘+’ sign); Replicates orders for IM (using Replicates dropdown); System Dilution factors; and system test options that include choosing Reagent pack/well options and specific system modules.
9. Select Print Barcode
Sample Processing
Atellica Solution General Operator Onsite 5-9
Sample Processing
At the Command Bar, select Samples and select the Sample Handler and Sample List subtabs
1. How do you determine when a sample has been aspirated?
______________________________________________________________________________
At the Command Bar, select Patient Orders > Create Patient Orders
Create manual patient orders as directed. If required, print the sample barcode before saving the patient order.
1. How are IM replicates ordered?
______________________________________________________________________________
_____________________________________________________________________________
At the Command Bar, select Worklist > Worklist Overview
Review the results of the orders created manually.
1. How can you determine the meaning of the symbols on the Worklist Overview screen?
______________________________________________________________________________
2. Why must the View Samples button be selected when changing filters?
___________________________________________________________________________________

Sample Processing
5-10 Atellica Solution General Operator Onsite
Notes

Quality Control
Atellica Solution General Operator Onsite 6-1
6 Quality Control

Quality Control
6-2 Atellica Solution General Operator Onsite
Quality Control
Resources • Online Help
• PEPconnect
• Atellica Solution PEP to Go Key Tasks for Basic Operation
Objectives Upon completion of this exercise you will be able to:
• Determine the QC material needs
• Create and process QC orders
• Monitor and review QC results
• Utilize QC panels
• Utilize the QC Scheduler
Quality Control
Atellica Solution General Operator Onsite 6-3
Quality Control
Determining QC Needs
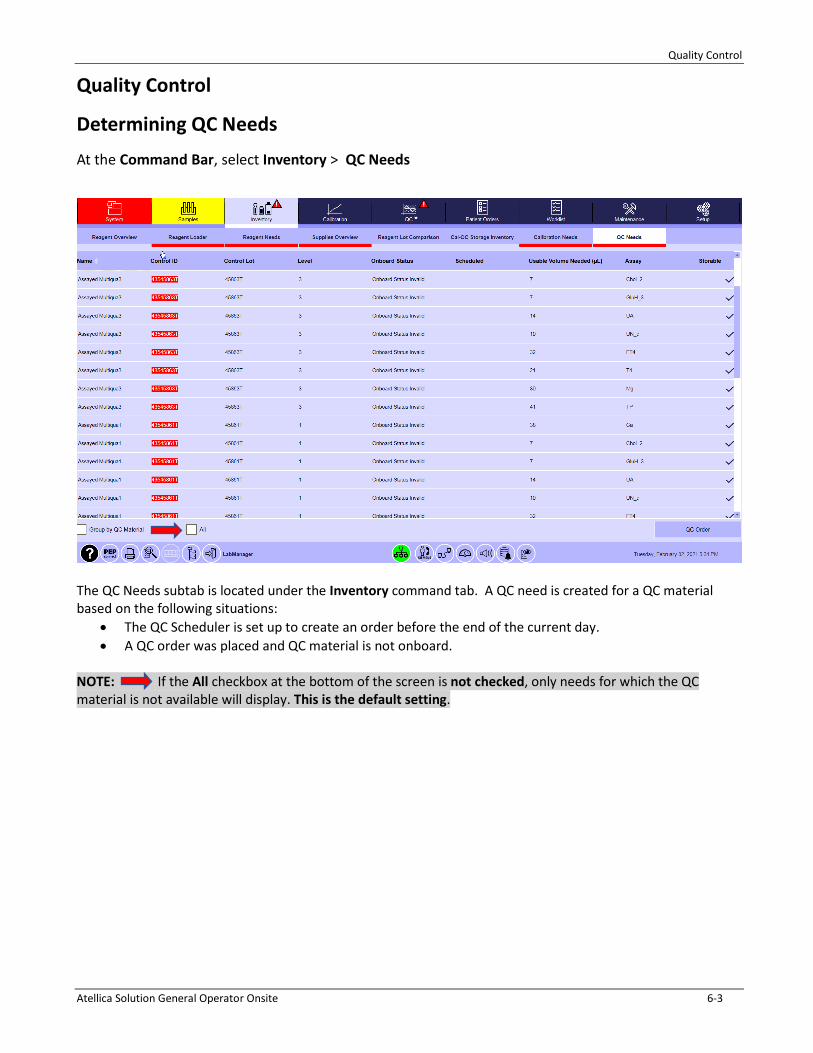
At the Command Bar, select Inventory > QC Needs
The QC Needs subtab is located under the Inventory command tab. A QC need is created for a QC material based on the following situations:
• The QC Scheduler is set up to create an order before the end of the current day. • A QC order was placed and QC material is not onboard.
NOTE: If the All checkbox at the bottom of the screen is not checked, only needs for which the QC material is not available will display. This is the default setting.

Quality Control
6-4 Atellica Solution General Operator Onsite
At the Command Bar, select Inventory > Cal-QC Storage Inventory
The Cal-QC Storage Inventory subtab is used to review the status of material stored in the Cal-QC storage area. Use the Filter section to find specific QC material. Select the checkbox next to the QC material name to view the assays associated with that QC material. NOTE: 12x75 glass tubes are validated by Siemens Healthineers to meet the stability requirements to be stored in the Cal-QC Storage. Additionally, Bio-Rad has validated their prelabeled plastic QC tubes (vials) to be stored in the Cal-QC Storage.

Quality Control
Atellica Solution General Operator Onsite 6-5
Printing Barcodes At the Command Bar, select QC > QC Definitions
Barcode labels are printed from the QC Definitions screen (if needed).
1. At the Command bar, select QC > QC Definitions 2. Select the appropriate Control Name check box.
NOTE: To print multiple barcodes at one time, the operator can select multiple Control Name checkboxes.
3. Select Print Barcode

Quality Control
6-6 Atellica Solution General Operator Onsite
QC Scheduler At the Command Bar, select QC > QC Scheduler
Atellica can be configured to automatically order QC. To view the current defined schedule you can access the QC Scheduler tab.

Quality Control
Atellica Solution General Operator Onsite 6-7
Create QC Test Orders and Results At the Command Bar, select QC > Create QC Orders
At the Command Bar, select QC > Create QC Orders (select panels)
The operator can manually create QC orders using a predefined panel to process QC materials that verify the performance of the system and assays.
NOTE: A QC panel must be defined in the QC Panels subtab before the operator can select a QC panel in the Create QC Orders subtab.
Quality Control
6-8 Atellica Solution General Operator Onsite
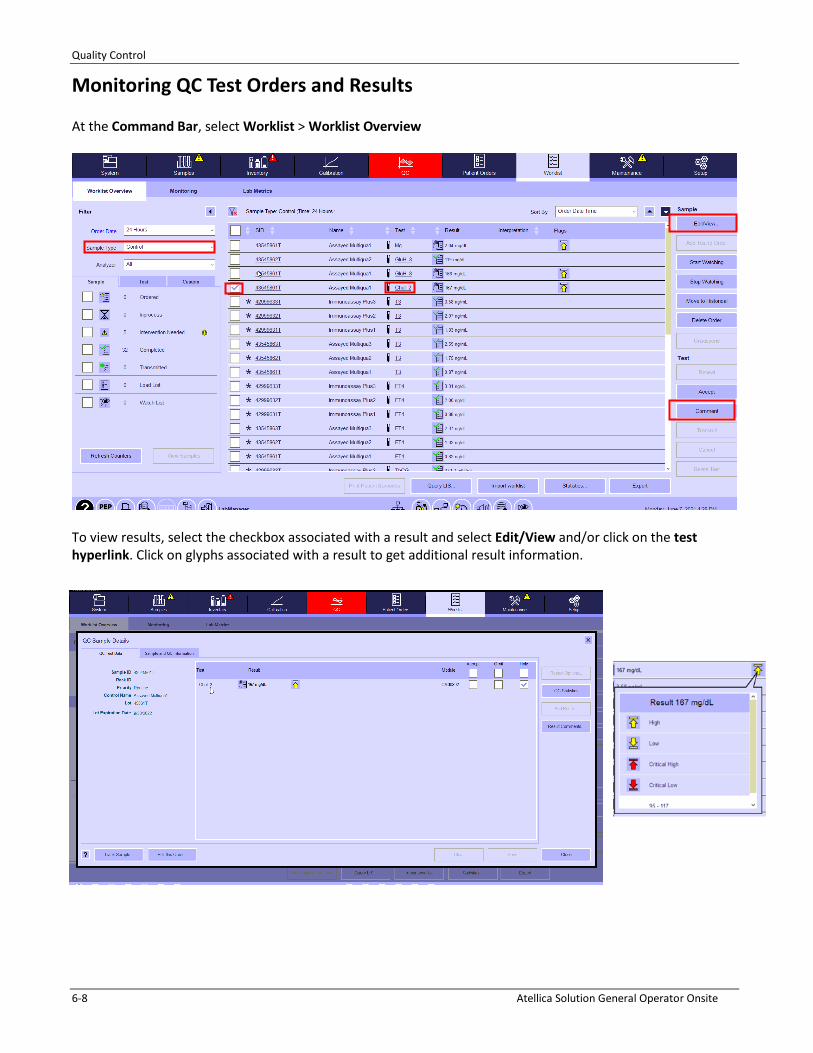
Monitoring QC Test Orders and Results At the Command Bar, select Worklist > Worklist Overview
To view results, select the checkbox associated with a result and select Edit/View and/or click on the test hyperlink. Click on glyphs associated with a result to get additional result information.
Quality Control
Atellica Solution General Operator Onsite 6-9
Quality Control
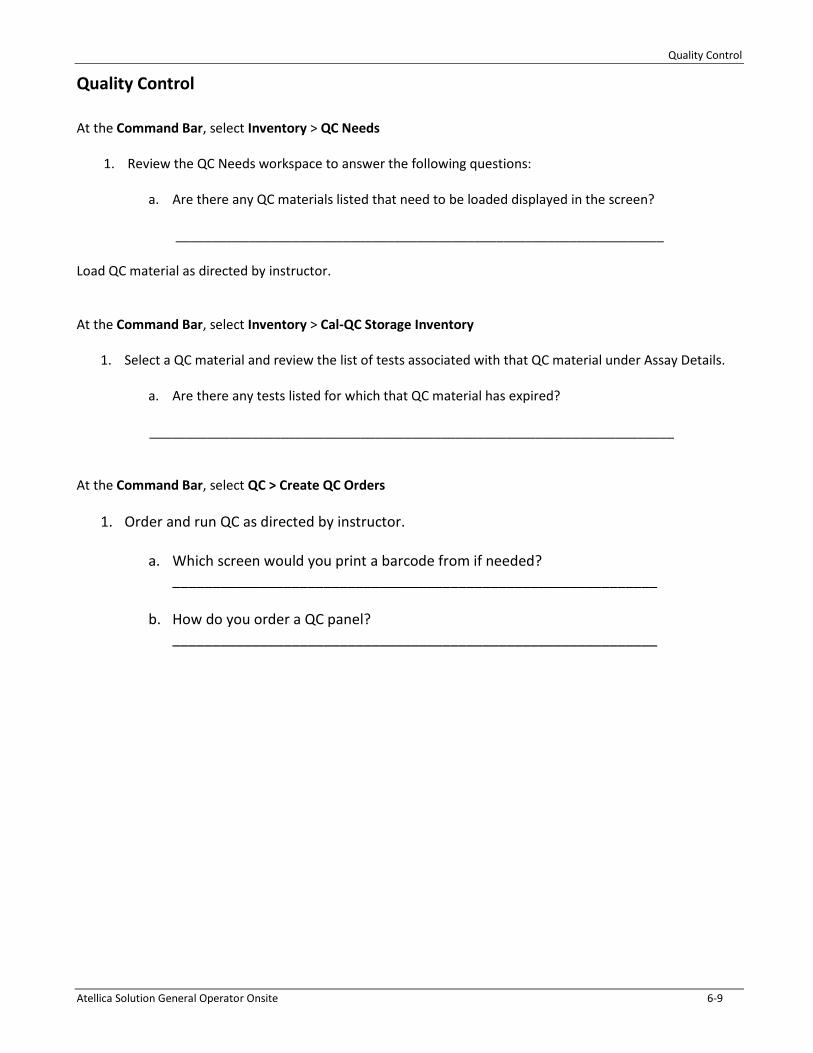
At the Command Bar, select Inventory > QC Needs
1. Review the QC Needs workspace to answer the following questions:
a. Are there any QC materials listed that need to be loaded displayed in the screen? ___________________________________________________________________
Load QC material as directed by instructor.
At the Command Bar, select Inventory > Cal-QC Storage Inventory
1. Select a QC material and review the list of tests associated with that QC material under Assay Details.
a. Are there any tests listed for which that QC material has expired?
________________________________________________________________________
At the Command Bar, select QC > Create QC Orders
1. Order and run QC as directed by instructor.
a. Which screen would you print a barcode from if needed? _____________________________________________________________
b. How do you order a QC panel? _____________________________________________________________

Quality Control
6-10 Atellica Solution General Operator Onsite
Notes

Calibration
Atellica Solution General Operator Onsite 7-1
7 Calibration

Calibration
7-2 Atellica Solution General Operator Onsite
Calibration
Resources • Online Help
• PEPconnect
• Atellica Solution PEP to Go Key Tasks for Basic Operation
Objectives Upon completion of this exercise, you will be able to:
Order calibration
• Describe how the system utilizes reagent lot and pack calibration intervals to determine calibration frequency
• Determine the calibration material that need to be loaded on the system
• Review calibration status
• Order calibration manually
• Print calibrator barcodes
• View and manually create IMT Calibrations
• Review calibration results
• Describe CH C0 adjust pack calibrations

Calibration
Atellica Solution General Operator Onsite 7-3
Calibration Lot and Pack Intervals The system utilizes both reagent lot and reagent pack calibration intervals to determine when a reagent needs to be calibrated:
Lot Calibration Interval • Starts when a reagent pack with a new lot is calibrated within 24 hours after it is loaded on the system
for IM reagents, or 24 hours after the well is pierced for CH reagents
• The lot calibration will be valid for any pack with the same lot that is loaded on the system until the lot calibration interval expires
• A reagent pack that uses lot calibration to calculate results for the duration of the Pack calibration
interval or Lot expiration, whichever comes first
Pack Calibration Interval: • On the CH analyzer, a pack calibration is actually a well calibration. There are 2 wells in most CH packs,
which are treated as separate reagents by the system
• The pack/well calibration interval is valid for an individual pack for IM or well for CH, and not used for subsequent packs/wells placed on the system
• Useful for labs that perform a low volume of tests because they can avoid disposing of reagent packs
due to the QC shifts seen when calibrating aged packs
Example of a CH reagent Example of an IM Reagent
The system tracks lot and pack calibration and displays reminders when calibration or recalibration of an assay reagent pack is due.
NOTE: In order for a calibration to qualify as a lot calibration, the calibration must be done within 24 hours after a new IM pack is loaded on the system or 24 hours after a CH well is pierced. If a new pack/well is not calibrated within 24 hours, the calibration will be a pack calibration.

Calibration
7-4 Atellica Solution General Operator Onsite
Reviewing Calibration Needs The Calibration Needs provides a prediction of the calibrations that need to be performed by the end of the day* based on system settings.
A calibration need is created if one of following applies:
1. A pack or lot calibration will be ordered (based on the Test Definition settings) before the current day ends 2. There is a pending calibration order in the Worklist
A need will also be created if a lot calibration is required and no fresh packs are available. In this case, the Comment field will display “No valid pack onboard”.
On the Command Bar, select Inventory > Calibration Needs
Calibration expiration: Expiration date and time of the current calibration interval
Calibration
Atellica Solution General Operator Onsite 7-5
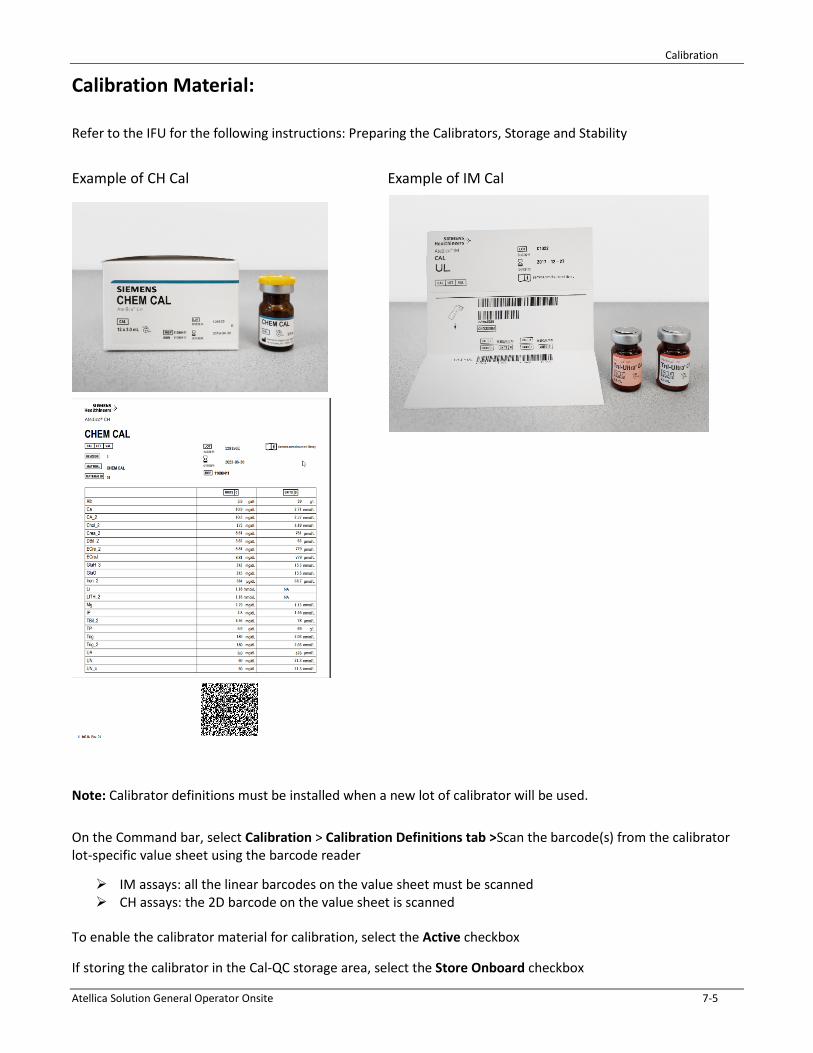
Calibration Material:
Refer to the IFU for the following instructions: Preparing the Calibrators, Storage and Stability
Example of CH Cal Example of IM Cal
Note: Calibrator definitions must be installed when a new lot of calibrator will be used.
On the Command bar, select Calibration > Calibration Definitions tab >Scan the barcode(s) from the calibrator lot-specific value sheet using the barcode reader
IM assays: all the linear barcodes on the value sheet must be scanned CH assays: the 2D barcode on the value sheet is scanned
To enable the calibrator material for calibration, select the Active checkbox
If storing the calibrator in the Cal-QC storage area, select the Store Onboard checkbox

Calibration
7-6 Atellica Solution General Operator Onsite
Print Calibrator Barcodes – Calibrator Definitions Screen
Calibrator barcodes must be printed using the Atellica Solution software to ensure that each barcode has the correct sequence number.
On the Command bar, select Calibration > Calibrator Definitions
Example of an IM Calibration labels:
Calibration
Atellica Solution General Operator Onsite 7-7
Options for Creating Calibration Orders- Manually
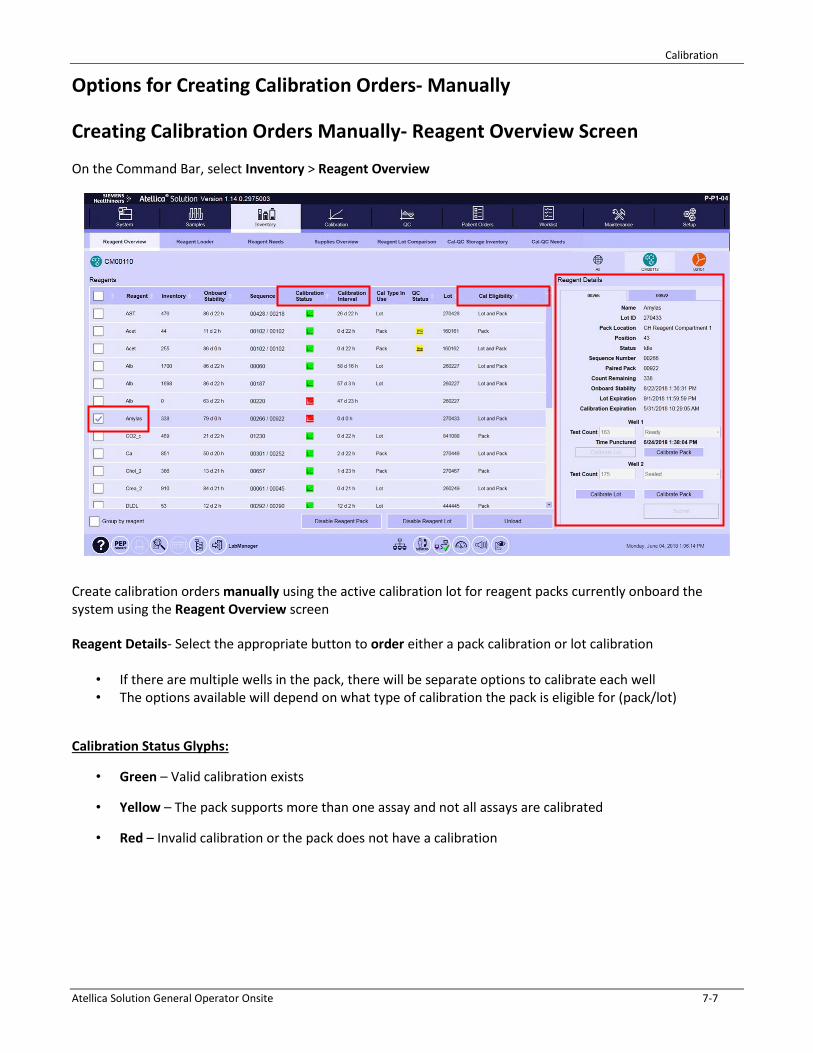
Creating Calibration Orders Manually- Reagent Overview Screen
On the Command Bar, select Inventory > Reagent Overview
Create calibration orders manually using the active calibration lot for reagent packs currently onboard the system using the Reagent Overview screen
Reagent Details- Select the appropriate button to order either a pack calibration or lot calibration
• If there are multiple wells in the pack, there will be separate options to calibrate each well • The options available will depend on what type of calibration the pack is eligible for (pack/lot)
Calibration Status Glyphs:
• Green – Valid calibration exists
• Yellow – The pack supports more than one assay and not all assays are calibrated
• Red – Invalid calibration or the pack does not have a calibration

Calibration
7-8 Atellica Solution General Operator Onsite
Create Calibration Orders Manually- Create Calibration Orders Screen
On the Command Bar, select Calibration > Create Calibration Orders
If the selected test has multiple calibrator materials defined for it, the calibrator materials will appear in the Calibrator Materials area of the screen
• Select one or more materials to include in the order • Once selected, the calibrator test orders will appear in the Orders area of the screen
If the selected test only has one calibrator material defined for it, the calibrator test order will appear in the Orders area of the screen as soon as the test is selected

Calibration
Atellica Solution General Operator Onsite 7-9
Options for reviewing Calibration Results 1. To view the status of test orders and results for calibration, QC, and patient orders, access the Worklist
Overview screen
2. To export or print a detailed calibration report, and to troubleshoot calibration results, access the Calibration Results screen
Review Calibration Results: Worklist Overview Screen
On the Command Bar, select Worklist > Worklist Overview
To view more details on results, navigate to the Calibration Results screen To view Calibration Results Details, select either the SID or Test Name for that order, OR select the order and then select the Edit/View button

Calibration
7-10 Atellica Solution General Operator Onsite
Review Calibration Orders and Results: Calibration Results Screen
On the Command bar, select Calibration > Calibration Results
To be able to select to view the other attributes, you must first select an analyzer
“Awaiting Acceptance” indicates the results do not meet the acceptance criteria for 1 or more expected calibration values and the following conditions apply:
1. Automatic Acceptance is disabled in the CH assay test definition
2. Accept Cal is enabled in the IM assay test definition
The operator must select to accept or reject the calibration
NOTE: The “Awaiting Acceptance” status will also occur for the CH analyzer if Perform QC with Calibration is being used and the calibration passes but the QC is out of range.

Calibration
Atellica Solution General Operator Onsite 7-11
Calibration Results Screen- Details
QC Performed with Calibration – Provides a summary of QC results, when the system automatically performed QC with calibration
Acceptance Criteria – Displays the criteria used by the system to evaluate the calibration, and indicates whether each criteria failed or passed for the selected calibration
Comments – To enter a new comment, select the Edit button
Graph– Only displayed for CH. Graph of the results as Expected Concentration/System Response
Calibration
7-12 Atellica Solution General Operator Onsite
IMT Calibrations The CH Analyzer uses a 2-point calibration to automatically calibrate the IMT subsystem in the following situations:
• System startup • System a reset from a paused or stopped state • 4-hour intervals • After 250 tests have been completed since the last calibration • A-LYTE® sensor temperature changes outside of specifications • IMT successful error recovery • IMT cleaning procedure • A-LYTE multisensor, Standard A, or Standard B replacement
The operator can also manually calibrate the IMT subsystem if needed during troubleshooting
The material used for IMT calibration are the IMT fluids (Standard A and Standard B)
During IMT calibrations, the system does not process IMT tests
C0 Adjust Pack Calibrations
The CH Analyzer supports 2 types of pack calibrations:
Full- multiple calibrator levels are used
C0 Adjust- only a low-level calibrator is used
o For Siemens assays that use C0 Adjust pack calibrations, CH Diluent (CH # 4) is used as the calibrator
The CH assay test definition specifies the type of pack calibration as assay requires.
Only certain assays use C0 Adjust pack calibrations: Acetaminophen, Cholesterol 2, Glucose Oxidase, Inorganic Phosphorus, Triglycerides, Uric Acid, Urea Nitrogen, and ETOH.
* For Amylase and PAmylase, CH Diluent is used for all calibrations and is a CO adjust.
NOTE: When the system alerts that a pack calibration is needed because the previous lot calibration has expired, and the operator orders a pack calibration, the system will perform a full pack calibration.
Calibration
Atellica Solution General Operator Onsite 7-13
Calibration
1. What Command tab and subtab would you select to determine the calibrator material that is required by the system to process your system calibrations?
________________________________________________________________________________
2. What Command tab and subtab do you use to print calibrator barcodes? ________________________________________________________________________________
3. What is the acceptable tube type that can store calibrator material in the Cal/QC Storage? ________________________________________________________________________________
4. What 2 options are available to manually create a calibration order?
_______________________________________________________________________________ _______________________________________________________________________________
On the Command Bar, select Calibration > IMT Calibration
1. Which 2 IMT fluids are used to calibrate the IMT?
_______________________________________________________________________________
_______________________________________________________________________________

Calibration
7-14 Atellica Solution General Operator Onsite
Notes
Maintenance
Atellica Solution General Operator Onsite 8-1
8 Maintenance
Maintenance
8-2 Atellica Solution General Operator Onsite
Maintenance
Resources • Online Help
• PEPconnect
• Atellica Solution PEP to Go Key Tasks for Basic Operation
Objectives Upon completion of this exercise, you will be able to:
• Utilize Procedure Details to access maintenance procedures
• Perform daily maintenance
• Perform weekly maintenance

Maintenance
Atellica Solution General Operator Onsite 8-3
Maintenance Overview At the Command Bar, select Maintenance > Schedule
Sample Handler (SH)
SH and Atellica Magline Transport Daily Maintenance
SH Autocheck The system automatically performs autocheck on the SH.
Atellica Magline Transport Autocheck
The system automatically performs autocheck on the Atellica Magline Transport.

Maintenance
8-4 Atellica Solution General Operator Onsite
Chemistry Module (CH)
CH Daily Maintenance
IMT Daily Cleaning The analyzer automatically performs IMT system cleaning daily.
CH Daily Maintenance The analyzer automatically performs cuvette, probe, mixer, and drain cleaning autocheck, and reaction ring bath refresh daily.
Inspecting the Washer Probes The operator manually inspects the washer probes.
CH Weekly Maintenance
CH Weekly Maintenance The analyzer automatically performs cuvette, probe, and mixer cleaning, autocheck, and reaction ring bath drain and refill weekly.
Checking the Lamp Coolant The operator manually inspects the lamp coolant level.
Maintenance
Atellica Solution General Operator Onsite 8-5
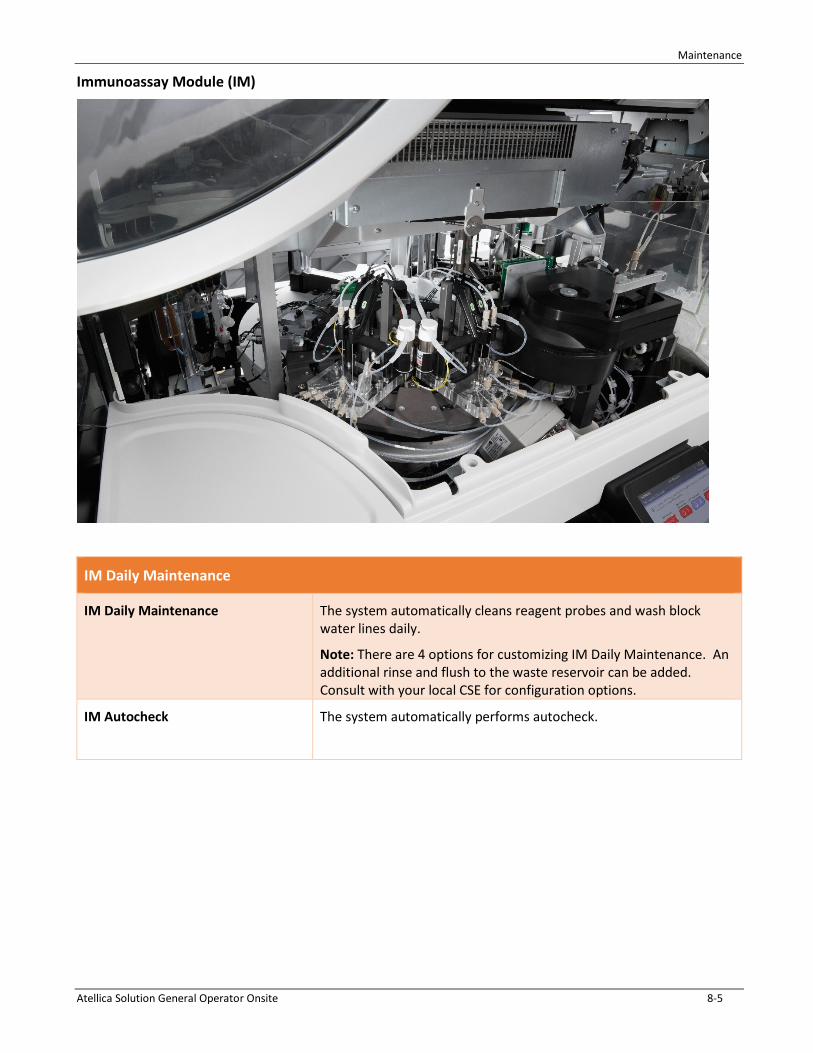
Immunoassay Module (IM)
IM Daily Maintenance
IM Daily Maintenance The system automatically cleans reagent probes and wash block water lines daily.
Note: There are 4 options for customizing IM Daily Maintenance. An additional rinse and flush to the waste reservoir can be added. Consult with your local CSE for configuration options.
IM Autocheck The system automatically performs autocheck.
Maintenance
8-6 Atellica Solution General Operator Onsite
IM Weekly Maintenance
IM Weekly Maintenance The system automatically cleans reagent probes and wash block water and wash lines weekly.
Cleaning the Exterior of the Reagent Probes
The operator manually cleans the exterior of the reagent probe.
Inspecting and Emptying the IM Water Trap
The operator manually inspects the IM water trap and removes condensation.
Inspecting and Emptying the IM Dryer
The operator manually inspects the IM dryer and removes condensation.
Cleaning the IM Sample Tip Drip Tray
The operator must inspect the sample tip drip tray weekly and clean as needed.

Maintenance
Atellica Solution General Operator Onsite 8-7
Daily and Weekly Maintenance
At the Command Bar, select Maintenance > Schedule
1. Which button on the Maintenance > Schedule can we select to access the online help information to perform any maintenance task on the Atellica?
_____________________________________________________________________________________
Daily Chemistry Maintenance
1. If residue is observed during inspection of CH Washer Probes, what must be used to clean them?
__________________________________________________________________________________
Weekly Chemistry Maintenance
1. What reagents must be on board the analyzer to perform automated weekly maintenance?
_________________________________________________________________________________
2. To what level must the lamp coolant be filled if required? ________________________________________________________________________________
Daily IM Maintenance
1. What supplies are required for the IM Daily Maintenance to complete? ________________________________________________________________________________
2. If the IM Daily Maintenance stops before completing and logs an error, can samples be processed?
________________________________________________________________________________
Weekly IM Maintenance
1. Does the weekly automated IM maintenance satisfy the daily automated IM maintenance requirement?
________________________________________________________________________________
2. What diagnostic procedure must be performed after cleaning the IM Sample Tip Drip Tray?
________________________________________________________________________________

Maintenance
8-8 Atellica Solution General Operator Onsite
Notes

Troubleshooting
Atellica Solution General Operator Onsite 9-1
9 Troubleshooting
Troubleshooting
9-2 Atellica Solution General Operator Onsite
Troubleshooting
Resources • Online Help
• PEPconnect
• Atellica Solution PEP to Go Key Tasks for Basic Operation
Objectives Upon completion of this exercise, you will be able to:
• Utilize the Operator Event Log and Event Help button
• Create a Service Support Request ticket

Troubleshooting
Atellica Solution General Operator Onsite 9-3
Troubleshooting At the Command Bar, select System > Logs > Operator Event Log
Operator Event Log
• Displays system events as the events occur • Can be filtered based on time, module, error/warning • An event can be selected, the detailed information will display at the bottom of the workspace • Event Help enables you to review the event, possible causes, corrective actions, and corrective action
procedures • Comments can be added to an event
Corrective Actions
Events marked with the corrective action symbol must be resolved by the operator. After resolving, the event can be marked completed Unacknowledged Events
Events marked with the unacknowledged symbol can be acknowledged by the operator. To acknowledge an event: a. Select the event b. Either select the unacknowledged symbol for an event, or select Acknowledge All to acknowledge all
events

Troubleshooting
9-4 Atellica Solution General Operator Onsite
Siemens Remote Assistance
The Remote Assistance feature can be utilized by selecting in the Status bar.
• Allows the operator to contact the local technical support provider through an encrypted connection to
ensure patient data privacy
• Can be used to ask a question, request information, or troubleshoot issues
• The local technical support provider will call the operator by phone or text chat

Troubleshooting
Atellica Solution General Operator Onsite 9-5
Troubleshooting Review the Operator Event Log
1. How can you differentiate between an error and a warning?
________________________________________________________________________________________
2. What button would the operator select to review the event, possible causes, corrective actions and
corrective action procedures?
___________________________________________________________________________________
Creating a Service Support Request
1. Where can you locate the software version? ____________________________________________________________________________________
2. What icon in the Status Bar allows the operator to create a Service Support Request Ticket?
____________________________________________________________________________________

Troubleshooting
9-6 Atellica Solution General Operator Onsite
Notes

Asa
Atellica Solution General Operator Onsite 10-1
10 Atellica Asa™ Application

Asa
10-2 Atellica Solution General Operator Onsite
Atellica Asa™ Application
Resources • Online Help
• PEPconnect
Objectives Upon completion of this exercise, you will be able to:
• Discuss the Atellica Asa software
Asa
Atellica Solution General Operator Onsite 10-3
Use Asa to complete daily system operation The Asa application helps to improve workflow. It allows the operator to walk away from the system with confidence that it is processing as expected through the monitoring of possible issues. It provides the operator a way to troubleshoot, utilizing all the tools provided from a single easy to access place. It enables the operator to easily perform the following:
• Check system health
• Check and perform maintenance
• Create a list of materials to collect using the Cart List
• Check sample status

Asa
10-4 Atellica Solution General Operator Onsite
Asa Dashboard
The Atellica Asa Application Dashboard provides a touchscreen interface to display a feature. The tile-based interface allows the operator to perform the following tasks without being physically present at the system display:
A. Title Bar: Screen title, remote services, cart list, connection status, system name and hamburger menu
B. System Status Map: allows the operator the ability to view the status of the connected Atellica system at a glance
C. Tile Area: allows monitoring of all systems supplies, consumables, and reagents with the ability to create a supplies list for use when gathering supplies
A
B
C
Asa
Atellica Solution General Operator Onsite 10-5
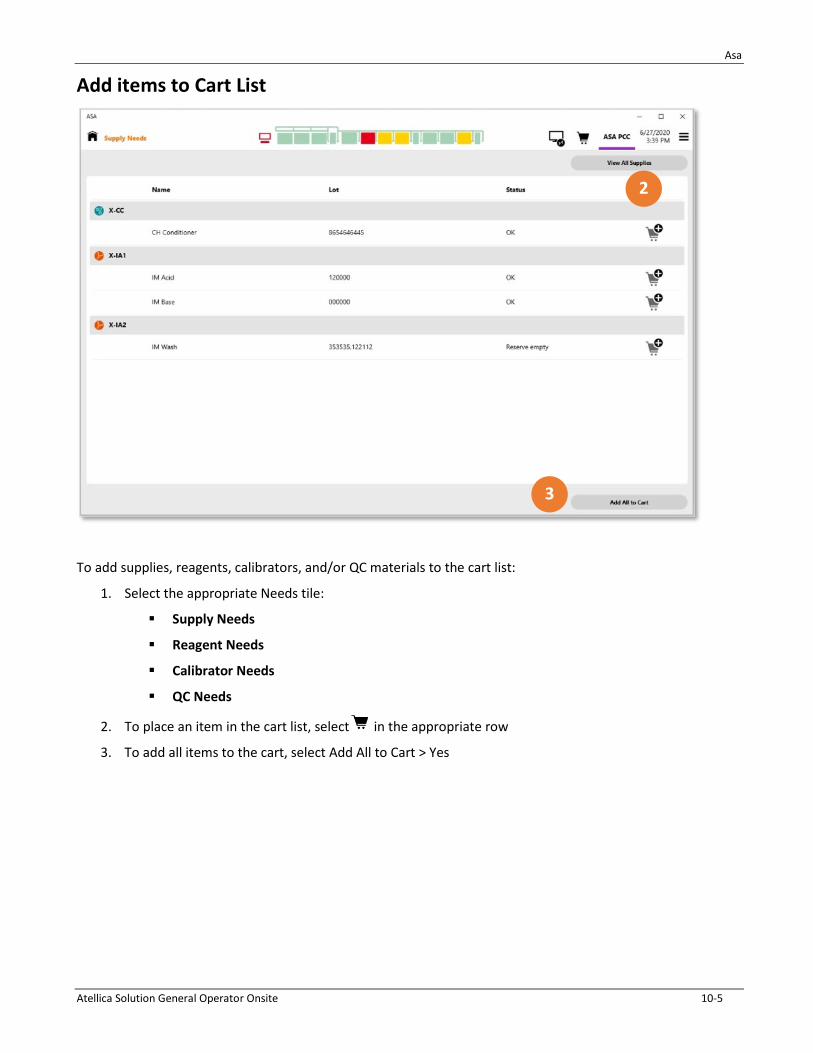
Add items to Cart List
To add supplies, reagents, calibrators, and/or QC materials to the cart list:
1. Select the appropriate Needs tile:
Supply Needs
Reagent Needs
Calibrator Needs
QC Needs
2. To place an item in the cart list, select in the appropriate row
3. To add all items to the cart, select Add All to Cart > Yes
2
3
Asa
10-6 Atellica Solution General Operator Onsite
Use the Asa Troubleshooting Features
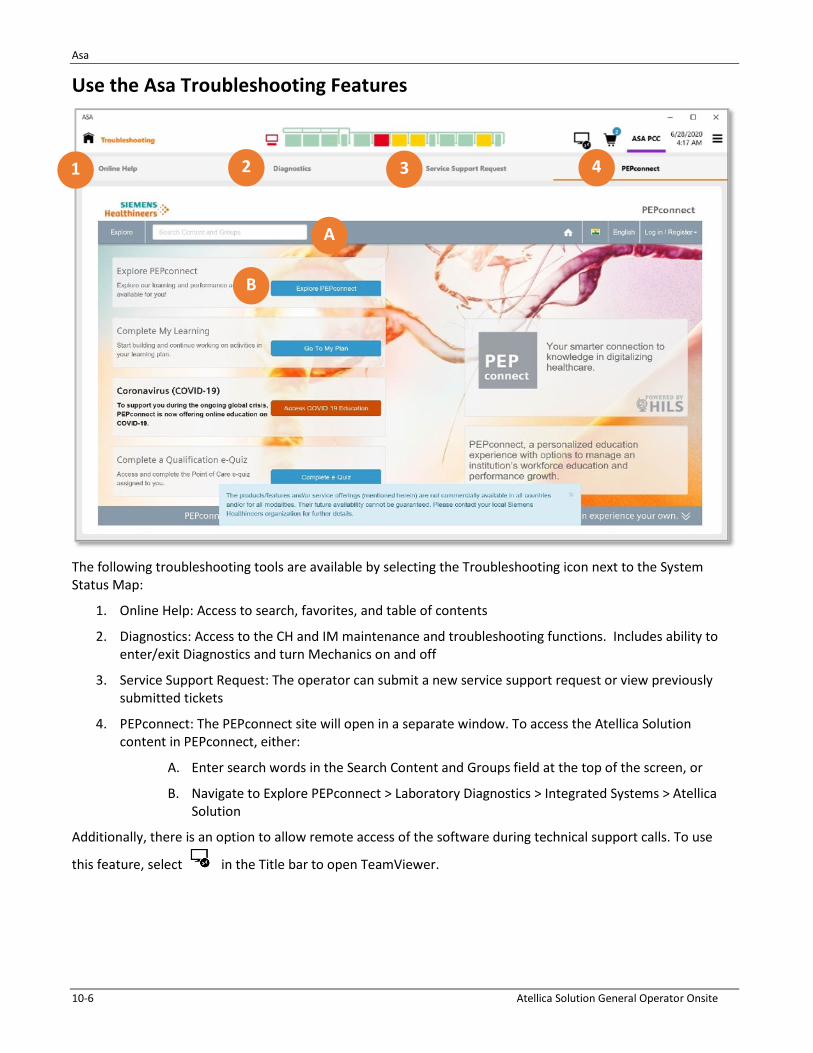
The following troubleshooting tools are available by selecting the Troubleshooting icon next to the System Status Map:
1. Online Help: Access to search, favorites, and table of contents
2. Diagnostics: Access to the CH and IM maintenance and troubleshooting functions. Includes ability to enter/exit Diagnostics and turn Mechanics on and off
3. Service Support Request: The operator can submit a new service support request or view previously submitted tickets
4. PEPconnect: The PEPconnect site will open in a separate window. To access the Atellica Solution content in PEPconnect, either:
A. Enter search words in the Search Content and Groups field at the top of the screen, or
B. Navigate to Explore PEPconnect > Laboratory Diagnostics > Integrated Systems > Atellica Solution
Additionally, there is an option to allow remote access of the software during technical support calls. To use
this feature, select in the Title bar to open TeamViewer.
1 2 3 4
A
B

Asa
Atellica Solution General Operator Onsite 10-7
Notes

Atellica® Decapper
Atellica Solution General Operator Onsite 11-1
11 Atellica® Decapper

Atellica® Decapper
11-2 Atellica Solution General Operator Onsite
Atellica®Decapper
Resources • Online Help
• PEPconnect
Objectives Upon completion of this exercise, you will be able to:
• Discuss the Atellica Decapper

Atellica® Decapper
Atellica Solution General Operator Onsite 11-3
Atellica® Decapper The Atellica Decapper is part of an integrated suite of revolutionary sample management for the Atellica Solution. This chapter introduces the Atellica Decapper.
The Atellica Decapper drives simplicity and ease of workflow for your lab as an integrated part of lab automation. The decapper is directly connected to the Atellica Magline transport, routing capped samples, removing their caps and routing them back to the Magline track to continue their sample processing journey.
Three Throughput and placement options with little or no additional footprint.
1 1 1
Atellica® Decapper
11-4 Atellica Solution General Operator Onsite
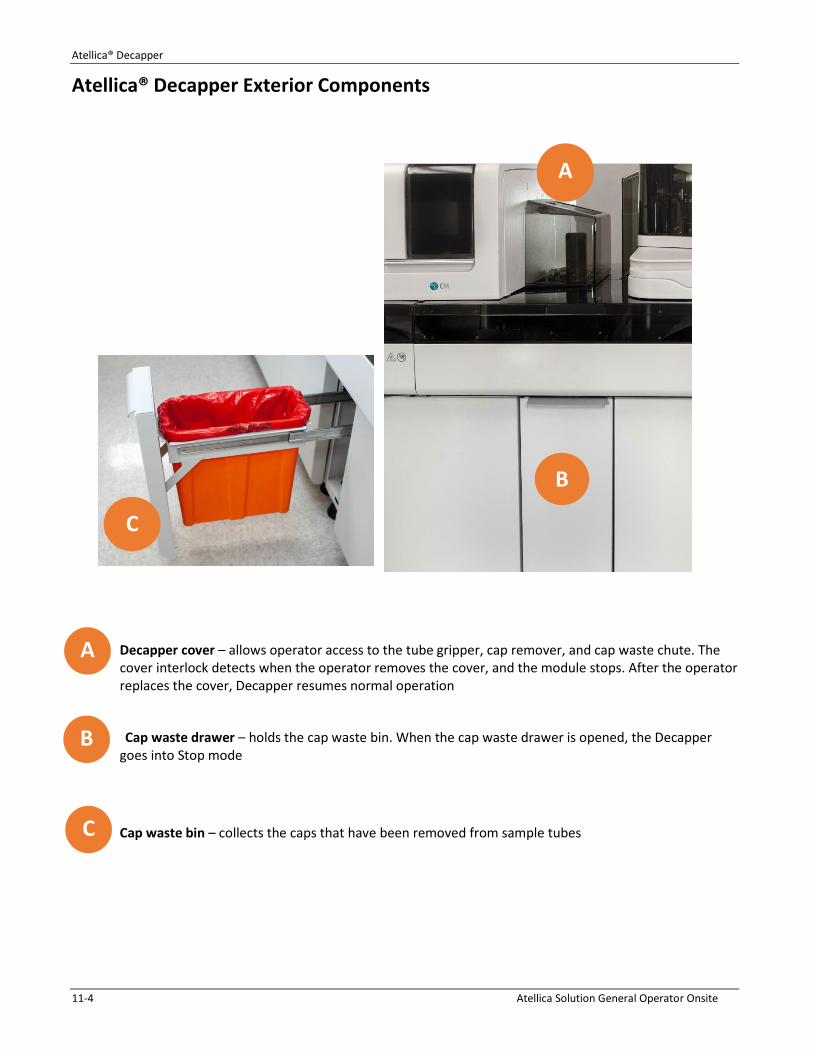
Atellica® Decapper Exterior Components
A. Decapper cover – allows operator access to the tube gripper, cap remover, and cap waste chute. The cover interlock detects when the operator removes the cover, and the module stops. After the operator replaces the cover, Decapper resumes normal operation
B. Cap waste drawer – holds the cap waste bin. When the cap waste drawer is opened, the Decapper goes into Stop mode
C. Cap waste bin – collects the caps that have been removed from sample tubes
A
B
C
A
B
C
Atellica® Decapper
Atellica Solution General Operator Onsite 11-5
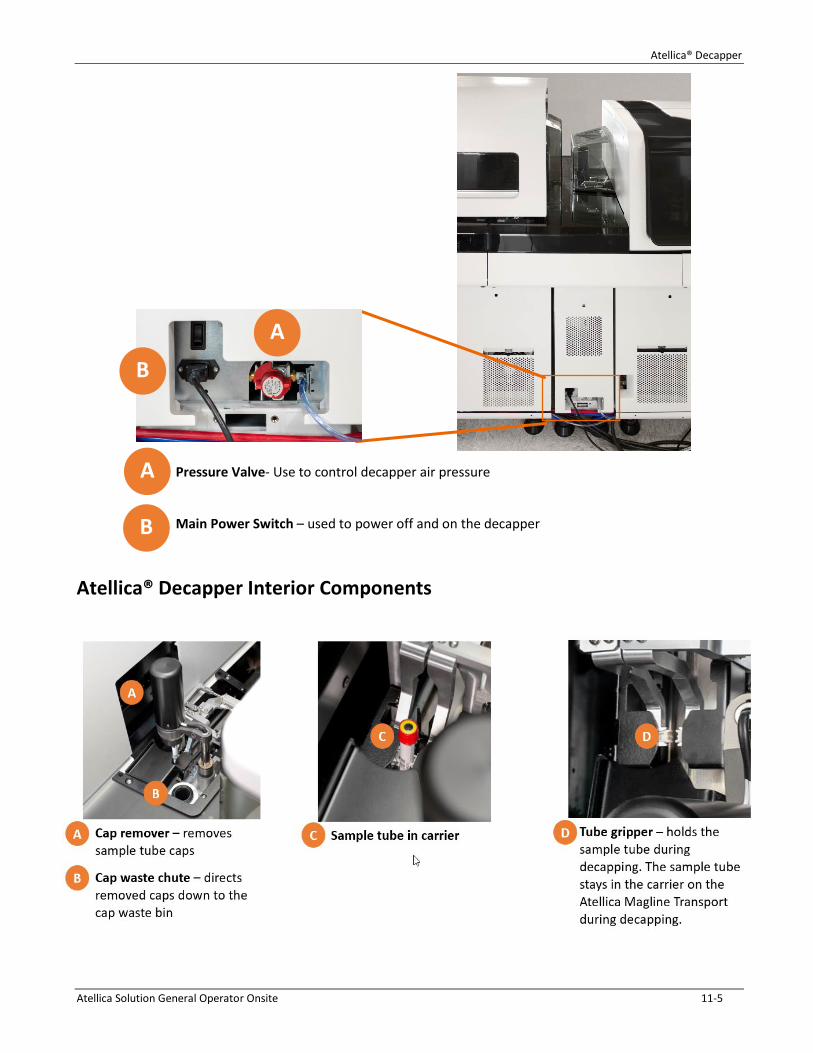
Pressure Valve- Use to control decapper air pressure
Main Power Switch – used to power off and on the decapper
Atellica® Decapper Interior Components
A
B
A
B

Atellica® Decapper
11-6 Atellica Solution General Operator Onsite
Atellica Decapper Acceptable Sample Containers
The Atellica® Decapper supports most types of sample containers, but there are some exceptions.
The following types of sample containers are NOT supported by the Decapper:
• Glass tubes
• Caps with diameter bigger than 18 mm
• Rubber stoppers
• Pediatric tubes
• Capillary Collection containers
• Certain cap colors
NOTE: Refer to the Atellica Solution Online help for a complete list of the supported sample containers.

Atellica® Decapper
Atellica Solution General Operator Onsite 11-7
Notes