lg simple wired remote controller - klimalux.huangol)/multi_v_ii/... · • for all the problems...
TRANSCRIPT

LGSimple Wired Remote Controller
LG
IMPORTANT
• Please read this installation manual completely before installing the product.
• Installation work must be performed in accordance with the national wiring standards by authorized personnel only.
• Please retain this installation manual for future reference after reading it thoroughly.
Owner's & Installation Manual
Visit us at : http://www.lgservice.com
Models: PQRCUCA0

2 Simple Wired Remote Controller
Simple Wired Remote Controller Owner’s & Installation Manual
TABLE OF CONTENTS
� Safety Precautions..............................................................3~4
� Part Description ..................................................................5~6
� Wired remote controller switch information.........................7
� Installation Method .................................................................8
� Necessary functions before using .................................9~11
• Trial Operation..........................................................................................9
• Setting the Central Control Address ....................................................10
• ESP Function ..........................................................................................11
� How to use the Mode Selection Button.........................12~18
• Cooling Operation ..................................................................................12
• Heating Operation ..................................................................................13
• Auto-Operation .......................................................................................14
• Dry(Dehumidification) Operation..........................................................15
• Fan Operation .........................................................................................15
• Fan Speed Selection ..............................................................................16
• Indoor Temperature Display..................................................................17
• Auto Swing..............................................................................................17
• Child Lock ...............................................................................................18
• Different Mode Operation .....................................................................19
Note) Please, refer to indoor's manual for product's detail information of subfunction
Safety Precautions
Owner’s & Installation Manual 3
� Installation
Service Center
Original Parts
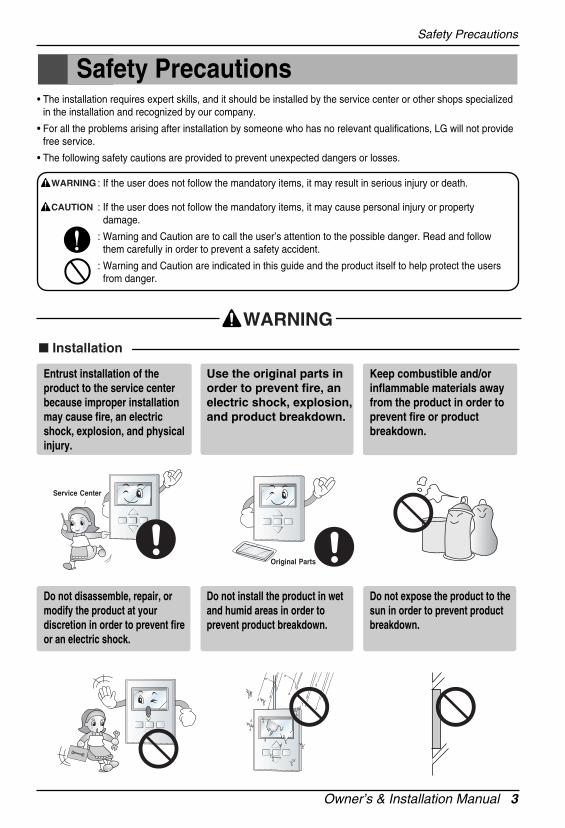
Safety Precautions• The installation requires expert skills, and it should be installed by the service center or other shops specialized
in the installation and recognized by our company.
• For all the problems arising after installation by someone who has no relevant qualifications, LG will not providefree service.
• The following safety cautions are provided to prevent unexpected dangers or losses.
: If the user does not follow the mandatory items, it may result in serious injury or death.
: If the user does not follow the mandatory items, it may cause personal injury or propertydamage.
: Warning and Caution are to call the user’s attention to the possible danger. Read and followthem carefully in order to prevent a safety accident.
: Warning and Caution are indicated in this guide and the product itself to help protect the usersfrom danger.
WARNING
CAUTION
WARNING
Entrust installation of theproduct to the service centerbecause improper installationmay cause fire, an electricshock, explosion, and physicalinjury.
Use the original parts inorder to prevent fire, anelectric shock, explosion,and product breakdown.
Keep combustible and/orinflammable materials awayfrom the product in order toprevent fire or productbreakdown.
Do not disassemble, repair, ormodify the product at yourdiscretion in order to prevent fireor an electric shock.
Do not install the product in wetand humid areas in order toprevent product breakdown.
Do not expose the product to thesun in order to prevent productbreakdown.

Safety Precautions
4 Simple Wired Remote Controller
Do not modify or lengthen thepower cable at your discretion.It may cause fire or an electricshock.
Do not place a heating devicenear the product. It may causefire.
Do not drop water on to theproduct. It may cause an electricshock or product breakdown.
Do not place something heavy onthe power cable. It may cause fireor an electric shock.
Do not place a heavy thing on theproduct. It may cause productbreakdown.
If the product was submergedunder water, ask the servicecenter for instruction. It maycause fire or an electric shockunless you do that.
� In-use
� In-use
Service Center
Make sure children or senorcitizens use the product underproper observation in order toprevent safety accident.
Do not subject the product toshock. It will cause productbreakdown.
Do not pick the product with asharp tool. It may causeproduct breakdown with thedamage to its parts.
Do not clean the product with strong cleanser suchas solvent. Use soft clothes in order to prevent fireor product deformation.
Do not touch the product with a wet hand. Do notpull the lead cable. It may cause product breakdownor an electric shock.
CAUTION
Part Description
Owner’s & Installation Manual 5
PQRCUCA0
FANSPEED
MODE
Cooling Heating Auto Dry Fan
Defrost Preheat Out door
SloLo
Med
Hi
Po
Room Temp
Total on
Central Run
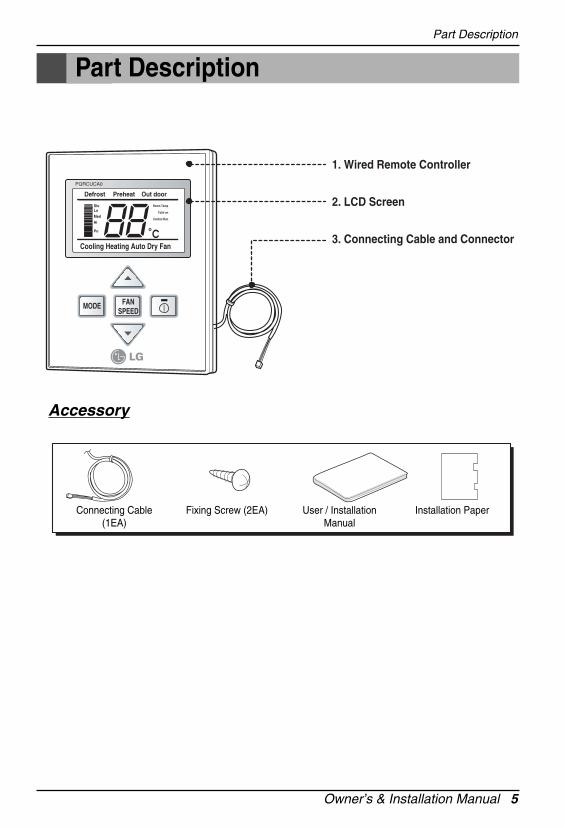
1. Wired Remote Controller
2. LCD Screen
3. Connecting Cable and Connector
Part Description
Accessory
Connecting Cable(1EA)
Fixing Screw (2EA) User / InstallationManual
Installation Paper
Part Description
6 Simple Wired Remote Controller
Simple Wired Remote Controller
PQRCUCA0
FANSPEED
MODE
Cooling Heating Auto Dry Fan
Defrost Preheat Out door
SloLo
Med
Hi
Po
Room Temp
Total on
Central Run
1
2
34
5
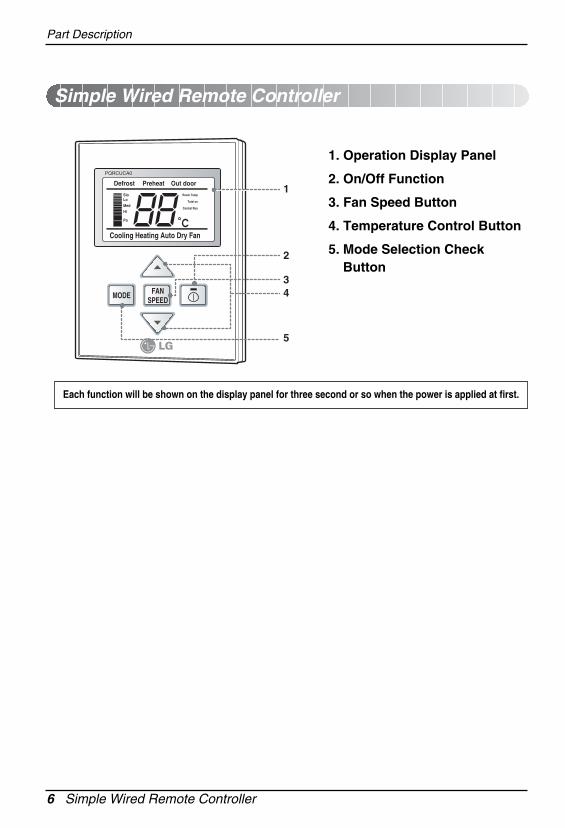
Each function will be shown on the display panel for three second or so when the power is applied at first.
1. Operation Display Panel
2. On/Off Function
3. Fan Speed Button
4. Temperature Control Button
5. Mode Selection CheckButton
Wired remote controller switch information
Owner’s & Installation Manual 7
12
S/W GR
Group Control
Ceiling Height/Default E.S.P
Room Temp. Sensing
Select Product
12
S/W
123
S/W 2
1 2 3
S/W 1
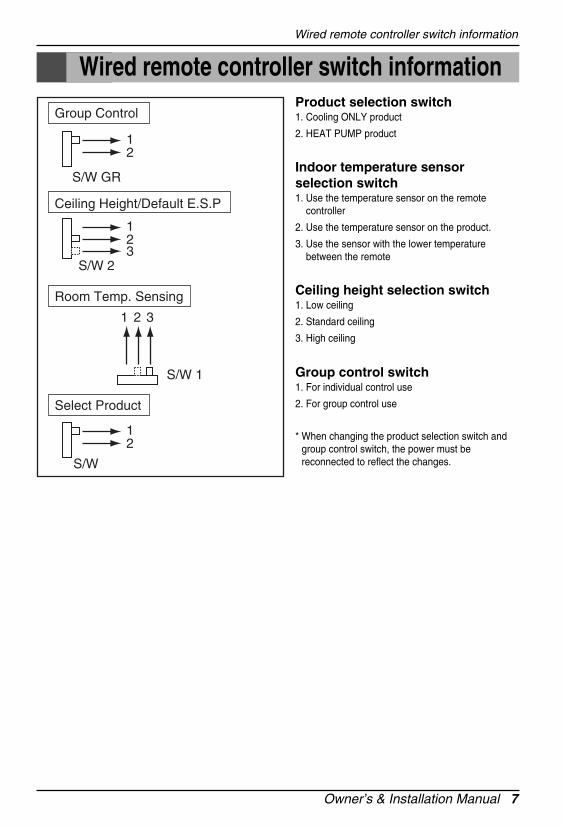
Product selection switch1. Cooling ONLY product
2. HEAT PUMP product
Indoor temperature sensorselection switch1. Use the temperature sensor on the remote
controller
2. Use the temperature sensor on the product.
3. Use the sensor with the lower temperaturebetween the remote
Ceiling height selection switch1. Low ceiling
2. Standard ceiling
3. High ceiling
Group control switch1. For individual control use
2. For group control use
* When changing the product selection switch andgroup control switch, the power must bereconnected to reflect the changes.
Wired remote controller switch information
8 Simple Wired Remote Controller
Installation Method
CN-REMO LO2K
J15 LO1K
LO1D
C07D
C01K
J14
CN-D
ISP
CN-M
CN-Z
ONE
C
IC01
A
The position of the fixing screws
Side of remote Controller
Side of Indoor Unit
Main indoor unit
Red Yellow Brown
Main frame
Fixing the remote controller
2cm
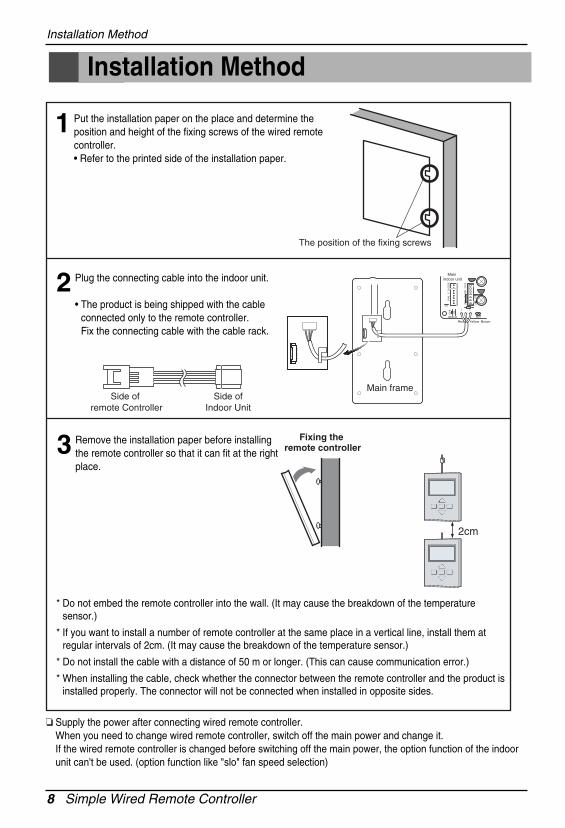
1 Put the installation paper on the place and determine theposition and height of the fixing screws of the wired remotecontroller.• Refer to the printed side of the installation paper.
2 Plug the connecting cable into the indoor unit.
• The product is being shipped with the cableconnected only to the remote controller.Fix the connecting cable with the cable rack.
3 Remove the installation paper before installingthe remote controller so that it can fit at the rightplace.
* Do not embed the remote controller into the wall. (It may cause the breakdown of the temperaturesensor.)
* If you want to install a number of remote controller at the same place in a vertical line, install them atregular intervals of 2cm. (It may cause the breakdown of the temperature sensor.)
* Do not install the cable with a distance of 50 m or longer. (This can cause communication error.)
* When installing the cable, check whether the connector between the remote controller and the product isinstalled properly. The connector will not be connected when installed in opposite sides.
❏ Supply the power after connecting wired remote controller.When you need to change wired remote controller, switch off the main power and change it.If the wired remote controller is changed before switching off the main power, the option function of the indoorunit can't be used. (option function like "slo" fan speed selection)
Installation Method

Owner’s & Installation Manual 9
Necessary function before using
Necessary functions before using
Out door
Room Temp
Total on
Central Run
Defrost Preheat
PQRCUCA0
FANSPEEDMODE
The trial operation is to check the installation status of the product. The temperature will not be controlled duringtrial operation. Instead the product will operate in several modes such as cooling, strong wind, comp-on.
* This function might not be available for Multi Product like Multi V system.
1 If you want to set the trial operation mode, press themode button and the Fan speed button same time forthree seconds.
2 Then the product will begin the trial operation and thedisplay will be like as shown on left side picture.
3 If you want to cancel the trial operation mode, justpress the On/Off button.
4 The trail operation will be shut down automaticallyafter 18 minutes and system will go to the standbymode.
Trial Operation
10 Simple Wired Remote Controller
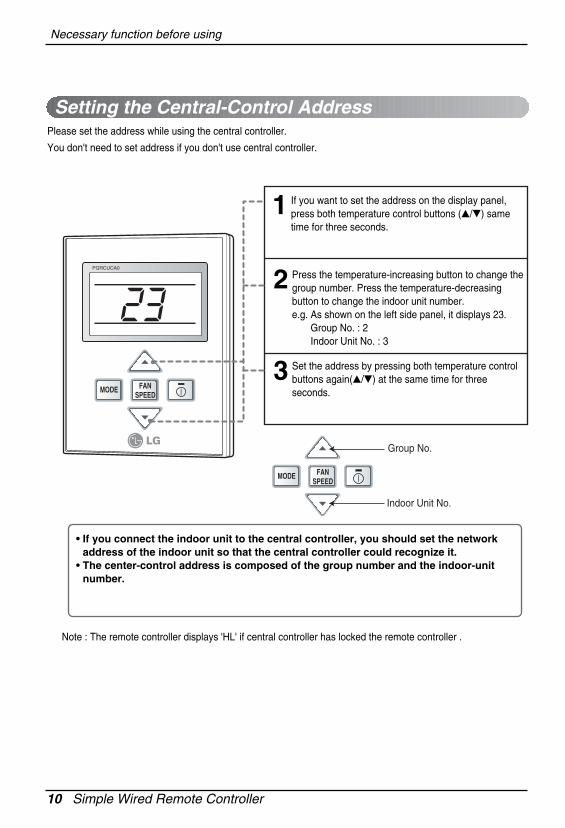
Note : The remote controller displays 'HL' if central controller has locked the remote controller .
Necessary function before using
Out door
Room Temp
Total on
Central Run
Defrost Preheat
PQRCUCA0
FANSPEED
MODE
FANSPEED
MODE
Group No.
Indoor Unit No.
1 If you want to set the address on the display panel,press both temperature control buttons (�/�) sametime for three seconds.
2 Press the temperature-increasing button to change thegroup number. Press the temperature-decreasingbutton to change the indoor unit number.e.g. As shown on the left side panel, it displays 23.
Group No. : 2Indoor Unit No. : 3
3 Set the address by pressing both temperature controlbuttons again(�/�) at the same time for threeseconds.
• If you connect the indoor unit to the central controller, you should set the networkaddress of the indoor unit so that the central controller could recognize it.
• The center-control address is composed of the group number and the indoor-unitnumber.
Setting the Central-Control AddressPlease set the address while using the central controller.
You don't need to set address if you don't use central controller.
Owner’s & Installation Manual 11
Necessary function before using
Out door
Room Temp
Total on
Central Run
Defrost Preheat
PQRCUCA0
FANSPEED
MODE
Lo
Med
200 100
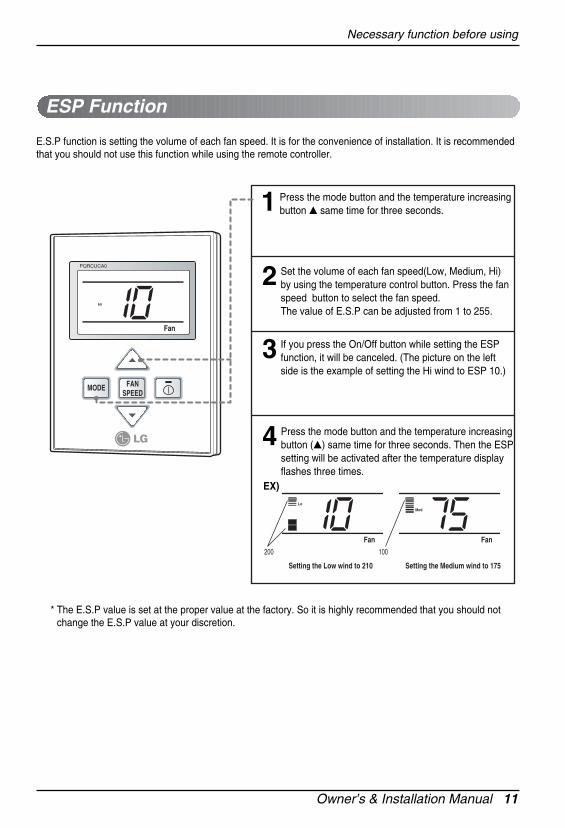
Setting the Low wind to 210 Setting the Medium wind to 175
1 Press the mode button and the temperature increasingbutton � same time for three seconds.
2 Set the volume of each fan speed(Low, Medium, Hi)by using the temperature control button. Press the fanspeed button to select the fan speed.The value of E.S.P can be adjusted from 1 to 255.
3 If you press the On/Off button while setting the ESPfunction, it will be canceled. (The picture on the leftside is the example of setting the Hi wind to ESP 10.)
4 Press the mode button and the temperature increasingbutton (�) same time for three seconds. Then the ESPsetting will be activated after the temperature displayflashes three times.
E.S.P function is setting the volume of each fan speed. It is for the convenience of installation. It is recommendedthat you should not use this function while using the remote controller.
EX)
* The E.S.P value is set at the proper value at the factory. So it is highly recommended that you should notchange the E.S.P value at your discretion.
ESP Function
12 Simple Wired Remote Controller
How to use the Mode Selection Button
Defrost Preheat
PQRCUCA0
FANSPEED
MODE
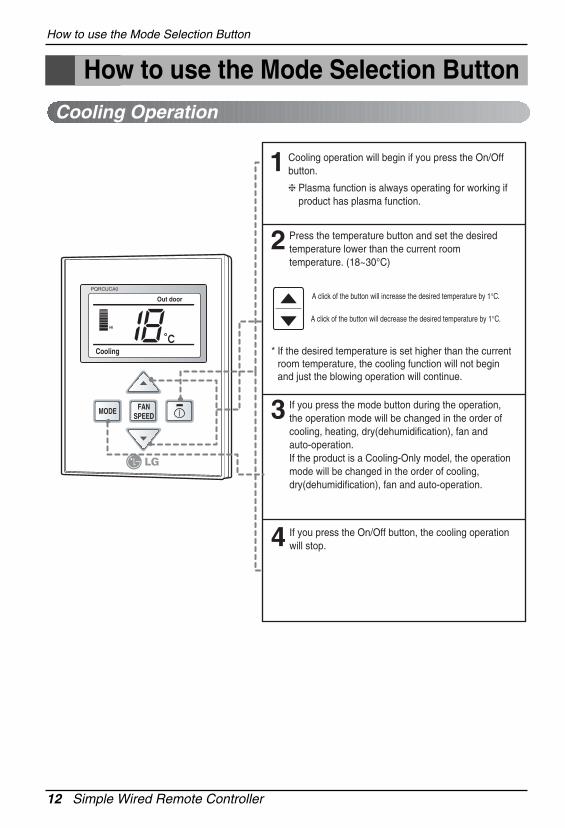
Out door A click of the button will increase the desired temperature by 1°C.
A click of the button will decrease the desired temperature by 1°C.
1 Cooling operation will begin if you press the On/Offbutton.
❈ Plasma function is always operating for working ifproduct has plasma function.
2 Press the temperature button and set the desiredtemperature lower than the current roomtemperature. (18~30°C)
* If the desired temperature is set higher than the currentroom temperature, the cooling function will not beginand just the blowing operation will continue.
3 If you press the mode button during the operation,the operation mode will be changed in the order ofcooling, heating, dry(dehumidification), fan andauto-operation.If the product is a Cooling-Only model, the operationmode will be changed in the order of cooling,dry(dehumidification), fan and auto-operation.
4 If you press the On/Off button, the cooling operationwill stop.
Cooling Operation
How to use the Mode Selection Button

Owner’s & Installation Manual 13
How to use the Mode Selection Button
Room Temp
Total on
Central Run
Defrost Preheat
PQRCUCA0
FANSPEED
MODE
Out door A click of the button will increase the desired temperature by 1°C.
A click of the button will decrease the desired temperature by 1°C.
1 If you want to set the heating operation, press theOn/Off button. And press the mode button.
❈ Plasma function is always operating for working ifproduct has plasma function.
2 Set the desired room temperature higher than thecurrent room temperature. (16~30°C)
* If the desired temperature is set lower than the currentroom temperature, the heating function will not begin.
3 If you press the mode button during the operation, theoperation mode will be changed in the order of cooling,heating, dry(dehumidification), fan and auto-operation.
4 If you press On/Off button again, the heating operationwill stop.
What is the three-minute delay function?
It will take time for the product to blow warm air. The delay is to protect the compressor. Theroom will be heated with warm air after three minutes when the compressor begins operation.
� The cooling-only model will not do heating function.
Heating Operation
14 Simple Wired Remote Controller
How to use the Mode Selection Button
Room Temp
Total on
Central Run
Defrost Preheat
PQRCUCA0
FANSPEED
MODE
Out door
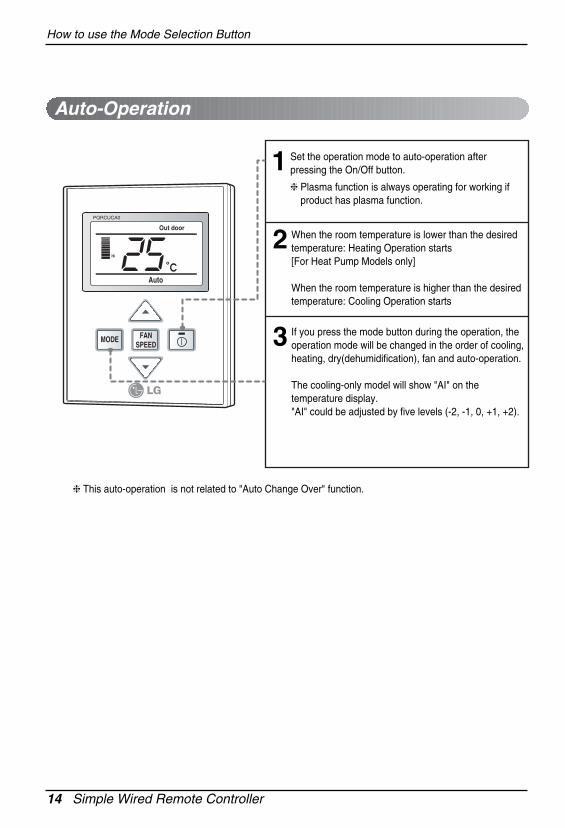
1 Set the operation mode to auto-operation afterpressing the On/Off button.
❈ Plasma function is always operating for working ifproduct has plasma function.
2 When the room temperature is lower than the desiredtemperature: Heating Operation starts[For Heat Pump Models only]
When the room temperature is higher than the desiredtemperature: Cooling Operation starts
3 If you press the mode button during the operation, theoperation mode will be changed in the order of cooling,heating, dry(dehumidification), fan and auto-operation.
The cooling-only model will show "AI" on thetemperature display."AI" could be adjusted by five levels (-2, -1, 0, +1, +2).
Auto-Operation
❈ This auto-operation is not related to "Auto Change Over" function.

Owner’s & Installation Manual 15
How to use the Mode Selection Button
Out door
Room Temp
Total on
Central Run
Defrost Preheat
PQRCUCA0
FANSPEEDMODE
Out door
Room Temp
Total on
Central Run
Defrost Preheat
PQRCUCA0
FANSPEED
MODE
1 Press the On/Off button on the remote controller.❈ Plasma function is always operating for working if
product has plasma function.
2 Set the mode to dry operation by pressing the modebutton.When the dry operation is selected, “dh” will be shownon the display panel as shown on the left side.
3 If it is used during rainy season or high humidity, youcan have both effective dehumidifying and airconditioning effect.
* Temperature control is not available during the dryoperation.
1 Press the On/Off button on the remote controller.❈ Plasma function is always operating for working if
product has plasma function.
2 Set the unit to fan operation by pressing the modebutton.
3 When the fan is selected, "Fn" will be displayed on thedisplay panel.
4 • Fan operation does not give cold air, but just the fanair.
• By giving out air that has no difference oftemperature with the indoors, it allows circulation ofthe room.
* Temperature control is not available in the fan operation.
Dry(Dehumidification) by lowering temperature slightly
Dry(Dehumidification) Operation
Fan Operation
16 Simple Wired Remote Controller
How to use the Mode Selection Button
Room Temp
Total on
Central Run
Defrost Preheat
PQRCUCA0
FANSPEED
MODE
Out door
Po
Hi
Med
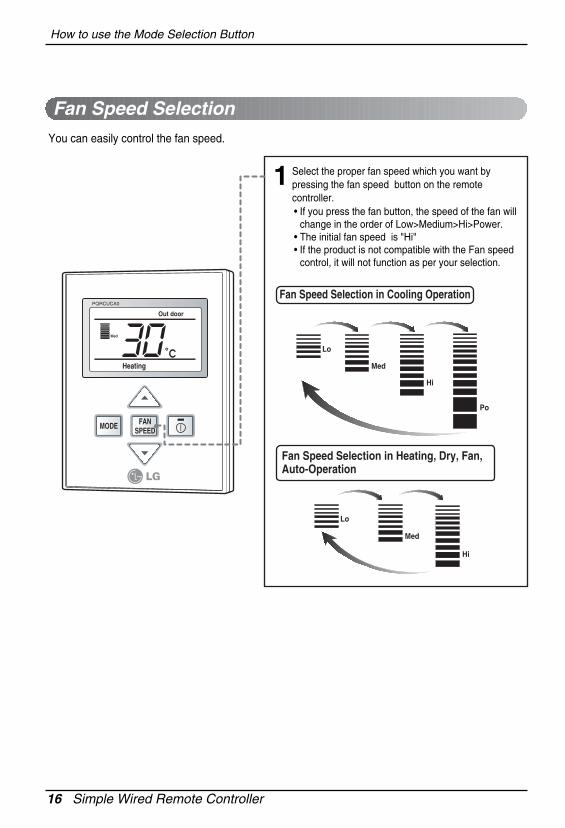
Fan Speed Selection in Cooling Operation
Lo
Fan Speed Selection in Heating, Dry, Fan, Auto-Operation
Hi
Med
Lo
1 Select the proper fan speed which you want bypressing the fan speed button on the remotecontroller.• If you press the fan button, the speed of the fan will
change in the order of Low>Medium>Hi>Power.• The initial fan speed is "Hi"• If the product is not compatible with the Fan speed
control, it will not function as per your selection.
You can easily control the fan speed.
Fan Speed Selection
Owner’s & Installation Manual 17
How to use the Mode Selection Button
Out doorDefrost Preheat
PQRCUCA0
FANSPEEDMODE
Room Temp
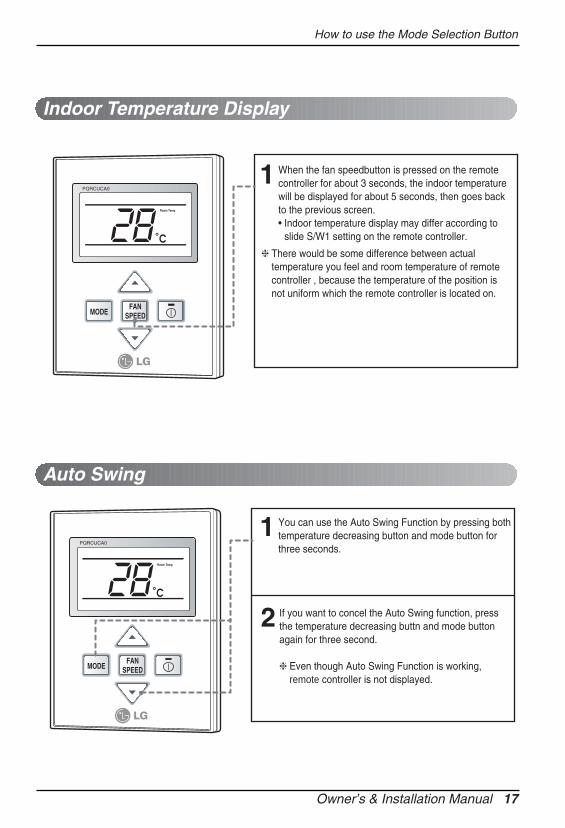
1 When the fan speedbutton is pressed on the remotecontroller for about 3 seconds, the indoor temperaturewill be displayed for about 5 seconds, then goes backto the previous screen.• Indoor temperature display may differ according to
slide S/W1 setting on the remote controller.
❈ There would be some difference between actualtemperature you feel and room temperature of remotecontroller , because the temperature of the position isnot uniform which the remote controller is located on.
Out doorDefrost Preheat
PQRCUCA0
FANSPEEDMODE
Room Temp
1 You can use the Auto Swing Function by pressing bothtemperature decreasing button and mode button forthree seconds.
2 If you want to concel the Auto Swing function, pressthe temperature decreasing buttn and mode buttonagain for three second.
❈ Even though Auto Swing Function is working, remote controller is not displayed.
Indoor Temperature Display
Auto Swing
18 Simple Wired Remote Controller
How to use the Mode Selection Button
Out door
Room Temp
Total on
Central Run
Defrost Preheat
PQRCUCA0
FANSPEED
MODE
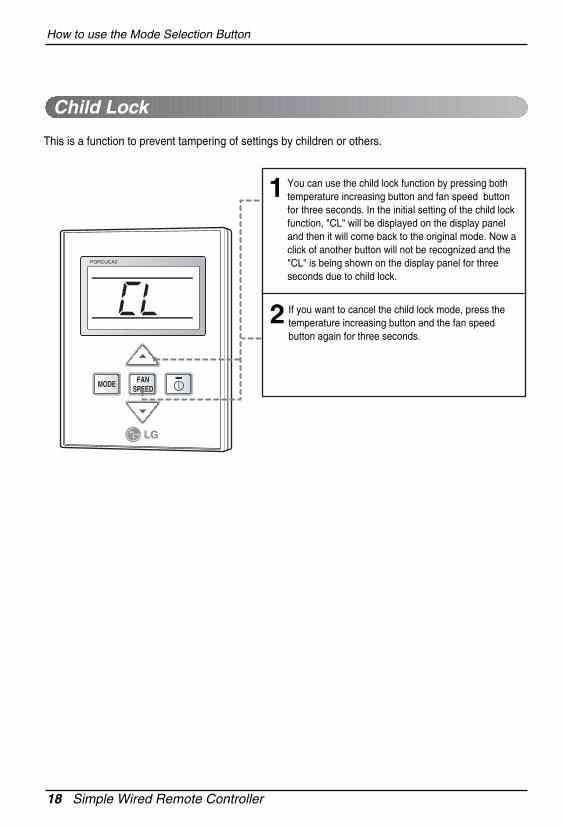
1 You can use the child lock function by pressing bothtemperature increasing button and fan speed buttonfor three seconds. In the initial setting of the child lockfunction, "CL" will be displayed on the display paneland then it will come back to the original mode. Now aclick of another button will not be recognized and the"CL" is being shown on the display panel for threeseconds due to child lock.
2 If you want to cancel the child lock mode, press thetemperature increasing button and the fan speedbutton again for three seconds.
This is a function to prevent tampering of settings by children or others.
Child Lock
How to use the Mode Selection Button
Owner’s & Installation Manual 19
Room Temp
Total on
Central Run
Defrost Preheat
PQRCUCA0
FANSPEED
MODE
Out door
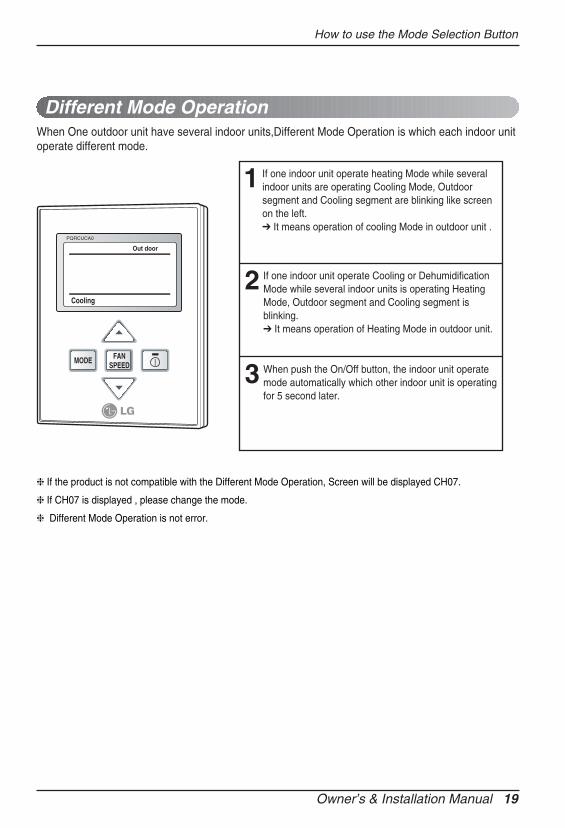
1 If one indoor unit operate heating Mode while severalindoor units are operating Cooling Mode, Outdoorsegment and Cooling segment are blinking like screenon the left.➔ It means operation of cooling Mode in outdoor unit .
2 If one indoor unit operate Cooling or DehumidificationMode while several indoor units is operating HeatingMode, Outdoor segment and Cooling segment isblinking.➔ It means operation of Heating Mode in outdoor unit.
3 When push the On/Off button, the indoor unit operatemode automatically which other indoor unit is operatingfor 5 second later.
When One outdoor unit have several indoor units,Different Mode Operation is which each indoor unitoperate different mode.
Different Mode Operation
❈ If the product is not compatible with the Different Mode Operation, Screen will be displayed CH07.
❈ If CH07 is displayed , please change the mode.
❈ Different Mode Operation is not error.

P/No.: 3828A20561D Printed in KoreaAfter reading this manual, keep it in a place easily accessible to the user for future reference.