lesson assignment lesson 3 initiate rescue … · lesson objectives after ... 3-1. identify the...
TRANSCRIPT

MD0532 3-1
LESSON ASSIGNMENT
LESSON 3 Initiate Rescue Breathing on an Adult.
TEXT ASSIGNMENT Paragraphs 3-1 through 3-12.
TASK TAUGHT 081-831-0018, Open the Airway.
081-831-0048, Perform Rescue Breathing.
LESSON OBJECTIVES After completing this lesson, you should be able to:
3-1. Identify the steps (in sequence) for evaluating acasualty and initiating rescue breathing.
3-2. Identify the proper procedures (in sequence) foropening a casualty's airway using the jaw-thrustmethod and the head-tilt/chin-lift method.
3-3. Identify the proper procedures (in sequence) foradministering mouth-to-mouth, mouth-to-nose,and mouth-to-stoma rescue breathing.
3-4. Identify the proper procedures for taking acarotid pulse.
SUGGESTION After you have completed the text assignment, work theexercises at the end of this lesson before beginning thenext lesson. These exercises will help you to achievethe lesson objectives.

MD0532 3-2
LESSON 3
INITIATE RESCUE BREATHING ON AN ADULT
3-1. REMOVE CASUALTY FROM ANY IMMEDIATE DANGER
If you see a possible casualty, you must evaluate the person to determine ifrescue breathing should be initiated. Before you begin the evaluation procedure,however, quickly evaluate your surroundings for the presence of an immediate danger,such as a burning vehicle which might explode. If a hazard endangers the safety of thecasualty and yourself, move the casualty to a nearby location; then begin yourevaluation of the casualty. (Note: The steps for evaluating a casualty and initiatingrescue breathing are the same as for initiating cardiopulmonary resuscitation. Theseare also the same steps normally used to evaluate any casualty.)
3-2. CHECK FOR RESPONSIVENESS
Quickly check to see if the casualty is unconscious. This can be done by gentlyshaking or tapping the casualty's shoulder (the one nearest to you) and shouting, "Areyou O.K.?" Establishing unconsciousness will usually take between 4 to 10 seconds.
CAUTION: If the casualty was injured in a motor vehicle accident, in a parachutingaccident, in a diving accident, by a fall, by a blow to the back, or by some other violentincident which could result in injury to the back, do not shake the casualty--just shout.The casualty may have a fractured spine (backbone). Even if you do not suspect spinaldamage, do not shake the casualty in a violent manner since such action couldaggravate other injuries which the casualty may have suffered.
a. If the casualty answers, he is conscious and breathing, continue yourexamination of the casualty and render whatever aid is needed. (Evaluation andtreatment procedures for injuries are presented in other 91 CMF subcourses.)
b. If the casualty does not respond, he is unconscious. Perform the evaluationand treatment procedures given in the following paragraphs.
3-3. CALL FOR HELP
If the casualty does not respond (unconscious), attempt to obtain additionalmedical help. Do not leave the casualty to obtain help.
a. If you are alone with the casualty in the field, shout, "Help." Repeat ifnecessary. (In a combat situation, do not shout if the action will endanger your life orthe lives of others.)

MD0532 3-3
b. If another person is available and if a radio or telephone is available, have theperson use the radio or telephone to summon medical help. If you are alone, use theradio or telephone to call for help and return to the casualty and begin medical help.
c. If someone who is not medically trained is available, send him to getadditional medical help.
d. If you are in a hospital and find an unconscious patient, summon help usingavailable systems. These systems may include bells, lights, verbal calls for assistance,codes to alert medical personnel, and intercoms.
3-4. CHECK FOR SPINAL INJURY
Check the casualty for a spinal injury. If the casualty has a spinal injury,minimize any additional movement of the casualty (using the jaw-thrust method ofopening the airway rather than the head-tilt/chin-lift method, for example). Moving acasualty with a fractured spine may cause additional damage to the spinal cord whichcould result in paralysis or even death. If you suspect a spinal injury, perform yourefforts as though you knew that a fracture of the spine were present. Do not try tostraighten a fractured spine. Signs of spinal injury include:
a. Bruises and/or swelling over the spinal area.
b. Casualty lying in an abnormal (deformed) position.
c. Fluid draining from one or both ears.
3-5. POSITION THE CASUALTY
Position the casualty flat on his back and on a hard surface. Rescue breathing ismost effective when the casualty is lying on his back. Chest compressions (part ofCPR) are not effective unless the casualty is lying on his back and lying on a hardsurface.
a. If the casualty is lying on a bed or cot, remove the casualty from the bed orcot and place him on the floor or ground. An alternative is to place a bed board or longback board between the casualty's back and the bed or cot.
b. If the casualty is lying on the ground in a supine (on his back) position, placehis arms at his side and proceed to establish an open airway.
c. If the casualty is lying on solid ground in a prone (on his chest) position, turnhim onto his back using the procedures given below. These procedures allow thecasualty to be turned as a unit. Turning the casualty as a unit minimizes the likelihoodthat existing injuries will be aggravated and also minimizes the chances that the head or

MD0532 3-4
neck will be injured during the turning. It is especially important to use theseprocedures if you suspect that the casualty has a spinal injury.
(1) Straighten the casualty's legs.
(2) Kneel beside the casualty. Your knees should be near his chest area, butthere should be enough space between you and the casualty for you to roll him onto hisback.
(3) Take one of the casualty's arms and move it so that the arm is straightandabove his head. Then move his other arm so that it is also straight and above his head.
(4) Support the casualty's head and neck by placing your hand that isnearest his head on the back of his head (figure 3-1A).
(5) With your other hand, reach across the casualty's back and grasp thecasualty's uniform under his far arm.
(6) Pull on the casualty's uniform and roll the casualty toward you (figure3-1B). Use a steady and even pull so that the casualty's head and neck stay in line withhis back. (If you have a person to assist you, have the person to help roll the casualty'ships and legs.)
(7) Once the casualty is lying flat on his back, return the casualty's arms tohis side (figure 3-1C). If his legs are crossed, uncross them.
3-6. OPEN THE AIRWAY
Once the casualty is in position for rescue breathing, open the casualty's airwayusing either the head-tilt/chin-lift method or the jaw thrust method. (The head-tilt/neck-lift method is no longer recommended.) Sometimes an unconscious casualty who is notbreathing or breathing in a weak manner will resume normal respiration when his headis positioned correctly and his airway is opened. This is especially true if the casualty'stongue is blocking the airway. The tongue is the most common cause of airwayobstruction in unconscious casualties. Repositioning (lifting) the lower jaw forward liftsthe tongue away from the back of the throat and unblocks the airway. (Note: Anunconscious casualty does not "swallow his tongue." The muscles of the tongue simplyrelax and slide to a lower position which results in the pharynx being blocked.)Establishing an airway should take between 3 and 5 seconds.

MD0532 3-5
Figure 3-1. Rolling a casualty onto his back.
a. Head-Tilt/Chin-Lift Method. The head-tilt/chin-lift (figure 3-2) is thepreferred method of opening the casualty's airway if a neck fracture is not suspected. Inaddition, loose dentures can be handled easier using the head-tilt/chin-lift method.
Figure 3-2. Opening the airway: Head-tilt/chin-lift method.
MD0532 3-6
(1) Kneel at the side of the casualty's head or shoulders.
(2) Place your hand (the hand closest to the casualty's head) on hisforehead.
(3) Apply firm, backward pressure with the palm of your hand. This pressurewill cause the casualty's head to tilt back.
(4) Place the fingertips of your other hand under the bony part of his chin, noton the soft flesh under his chin. Pressing on the soft flesh under the chin could result inblocking his airway.
(5) Lift his chin with your fingertips. Continue to lift the lower jaw until hisupper and lower teeth are almost brought together. The mouth should not be closed asthis could prevent air from entering the casualty's airway.
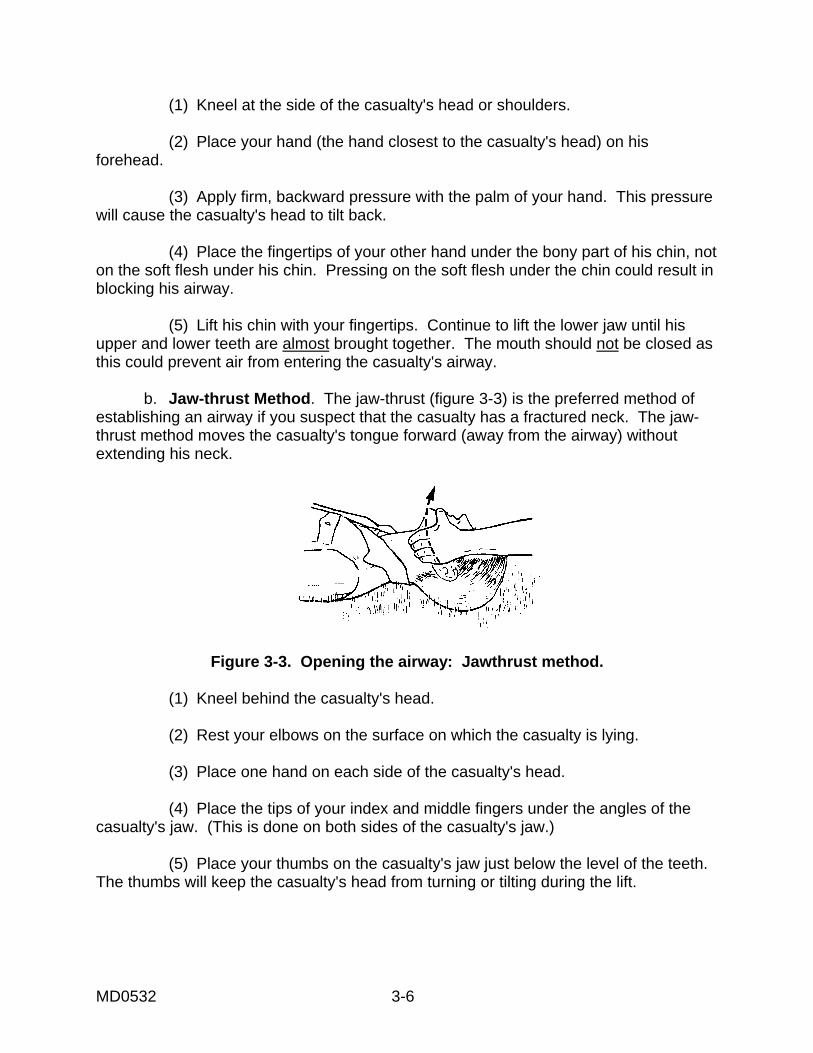
b. Jaw-thrust Method. The jaw-thrust (figure 3-3) is the preferred method ofestablishing an airway if you suspect that the casualty has a fractured neck. The jaw-thrust method moves the casualty's tongue forward (away from the airway) withoutextending his neck.
Figure 3-3. Opening the airway: Jawthrust method.
(1) Kneel behind the casualty's head.
(2) Rest your elbows on the surface on which the casualty is lying.
(3) Place one hand on each side of the casualty's head.
(4) Place the tips of your index and middle fingers under the angles of thecasualty's jaw. (This is done on both sides of the casualty's jaw.)
(5) Place your thumbs on the casualty's jaw just below the level of the teeth.The thumbs will keep the casualty's head from turning or tilting during the lift.
MD0532 3-7
(6) Lift the jaw upward with your fingertips. The mouth should not be closedas this could prevent air from entering the casualty's airway. Use your thumb to retractthe casualty's lower lip if needed.
(7) If the lift does not open his airway (tongue is still blocking the airway), liftthe jaw up a little further. If this is unsuccessful, tilt the casualty's head backward veryslightly.
3-7. CHECK FOR BREATHING
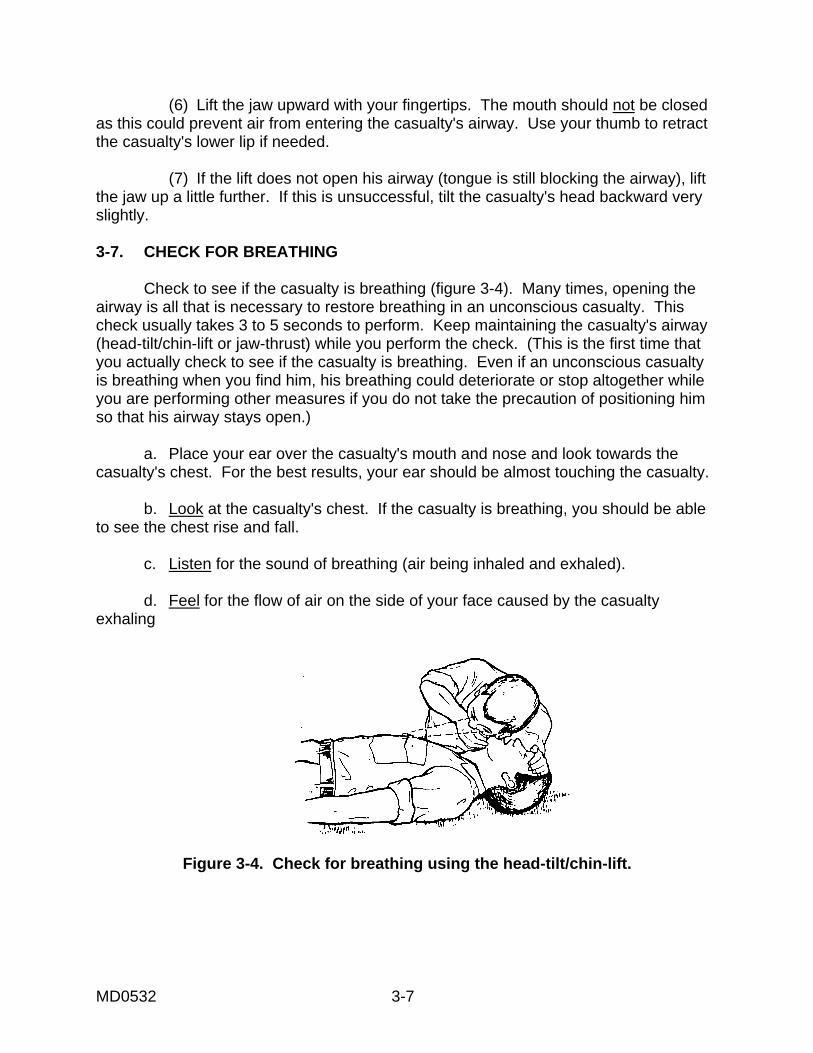
Check to see if the casualty is breathing (figure 3-4). Many times, opening theairway is all that is necessary to restore breathing in an unconscious casualty. Thischeck usually takes 3 to 5 seconds to perform. Keep maintaining the casualty's airway(head-tilt/chin-lift or jaw-thrust) while you perform the check. (This is the first time thatyou actually check to see if the casualty is breathing. Even if an unconscious casualtyis breathing when you find him, his breathing could deteriorate or stop altogether whileyou are performing other measures if you do not take the precaution of positioning himso that his airway stays open.)
a. Place your ear over the casualty's mouth and nose and look towards thecasualty's chest. For the best results, your ear should be almost touching the casualty.
b. Look at the casualty's chest. If the casualty is breathing, you should be ableto see the chest rise and fall.
c. Listen for the sound of breathing (air being inhaled and exhaled).
d. Feel for the flow of air on the side of your face caused by the casualtyexhaling
Figure 3-4. Check for breathing using the head-tilt/chin-lift.

MD0532 3-8
3-8. EVALUATE YOUR FINDINGS
a. If your check shows that the casualty is not breathing, try to open his airwayagain and check for breathing a second time. If he is still not breathing, beginadministering ventilations immediately (paragraph 3-9).
b. If your check shows that the casualty is breathing, continue to examine thecasualty for injuries while maintaining his airway. Check on his breathing periodically.Reopen the airway and perform rescue breathing should the casualty stop breathing.
(1) If the casualty regains consciousness, place him in a semilateral position(figure 3-5) if no other injuries are present.
Figure 3-5. Unconscious casualty in a semilateral position.
(2) If the casualty is unconscious and have an oropharyngeal airway (J-tube)available, you can insert the airway to prevent the casualty's airway from being blockedby his tongue. Remove the airway when the casualty begins to regain consciousness.
(a) Make sure that you insert the correct size of airway. Place theoropharyngeal airway along the outside of the casualty's jaw. The airway should reachfrom the bottom tip of his ear to the corner of his mouth.
(b) Open the casualty's mouth. If you have difficulty in opening hismouth, place your crossed thumb and index finger on the casualty's upper and lowerteeth near a corner of his mouth and push until his teeth separate and his mouth opens.
(c) Place the tip end (not the flanged end) of the oropharyngeal airwayinto the casualty's mouth so that the tip points toward the roof of the casualty's mouth.
(d) Slide the airway along the natural curvature of the tongue.
(e) When the tip of the airway reaches the back of the tongue past thesoft palate, rotate the airway 180° so the tip of the airway points down toward his throat.
(f) Advance the airway until the flange rests on the casualty's lips.
MD0532 3-9
3-9. ADMINISTER TWO BREATHS
If the unconscious casualty is not breathing, you will need to perform rescuebreathing. Rescue breathing procedures are also called "ventilating the casualty."Ventilation simply means that you are supplying the casualty's lungs with fresh air.Even though the air comes from your lungs, it still contains plenty of oxygen. Themouth-to-mouth technique of rescue breathing is normally used. An alternatetechnique, the mouth-to-nose method, is used when the casualty has a serious mouthor jaw injury, when the casualty's mouth cannot be opened, or when you are unable toachieve a tight seal around the casualty's mouth. If you must perform rescue breathingin a hospital setting, check for the presence of a stoma (an artifically created opening inthe neck and trachea). A stoma allows air exchange when the casualty's upper airwayis blocked due to surgery or a medical condition such as cancer. If a stoma is present,perform mouth-to-stoma rescue breathing. As you administer the two ventilations,observe the casualty's chest out of the corner of your eye to see if the chest rises andfalls. It should take about 1 1/2 seconds to blow a breath into the casualty's lungs. Bothbreaths should be delivered within 5 seconds.
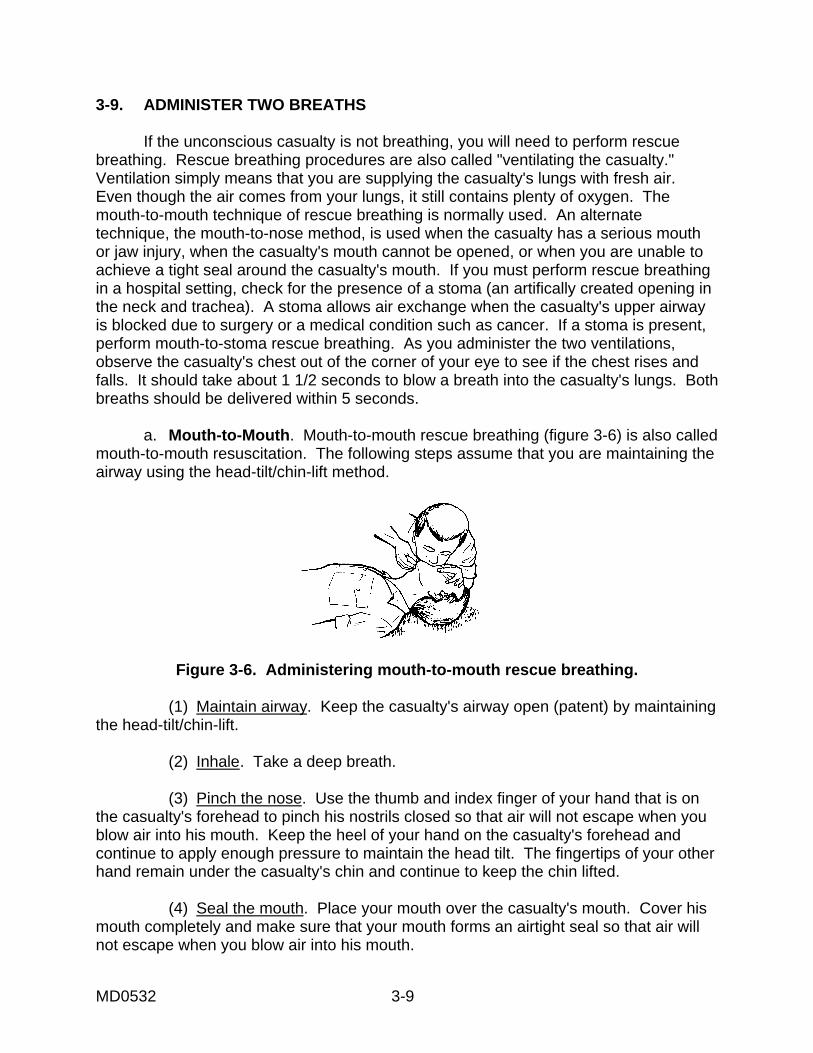
a. Mouth-to-Mouth. Mouth-to-mouth rescue breathing (figure 3-6) is also calledmouth-to-mouth resuscitation. The following steps assume that you are maintaining theairway using the head-tilt/chin-lift method.
Figure 3-6. Administering mouth-to-mouth rescue breathing.
(1) Maintain airway. Keep the casualty's airway open (patent) by maintainingthe head-tilt/chin-lift.
(2) Inhale. Take a deep breath.
(3) Pinch the nose. Use the thumb and index finger of your hand that is onthe casualty's forehead to pinch his nostrils closed so that air will not escape when youblow air into his mouth. Keep the heel of your hand on the casualty's forehead andcontinue to apply enough pressure to maintain the head tilt. The fingertips of your otherhand remain under the casualty's chin and continue to keep the chin lifted.
(4) Seal the mouth. Place your mouth over the casualty's mouth. Cover hismouth completely and make sure that your mouth forms an airtight seal so that air willnot escape when you blow air into his mouth.

MD0532 3-10
(5) Deliver the first breath. Blow a breath at a slow rate into the casualty'smouth. (Maintaining the open airway will keep the casualty's mouth slightly open.) Ifthe airway is truly open, the chest should rise as his lungs fill with air.
(6) Take another deep breath. After blowing into the casualty's mouth,quickly break the seal over his mouth, take a breath of air, exhale, and then takeanother deep breath. The casualty's chest should fall as air escapes from his mouthafter you break the seal. You may be able to hear or feel the exhaled breath also.
(7) Seal the mouth. Seal your mouth over the casualty's mouth again so thatair will not escape.
(8) Deliver the second breath. Blow another breath into the casualty's mouthat a slow rate. Observe the casualty's chest.
(9) Break the seal and release nose. After delivering the second breath,break the seal over the casualty's mouth and release the nose. The casualty's body willexhale without further effort on your part.
b. Mouth-to-Nose. The mouth-to-nose rescue breathing (figure 3-7) is alsocalled mouth-to-nose resuscitation.
Figure 3-7. Administering mouth-to-nose breathing.
(1) Maintain airway. Keep the casualty's airway open by keeping the chinlifted.
(2) Inhale. Take a deep breath.
(3) Close the mouth. Use the hand that is lifting the casualty's jaw to closethe casualty's mouth. No air should escape through the casualty's mouth when youperform your ventilations. Continue to keep the jaw in a "lifted" position. (If the head-tilt/chin-lift is being used, maintain the pressure on the forehead with your other hand tokeep the casualty's airway open.)
(4) Seal the nose. Place your mouth over the casualty's nose. Make surethat your mouth forms a seal so that air will not escape when you blow air into his nose.

MD0532 3-11
(5) Deliver the first breath. Blow a breath into the casualty's nose at a slowrate. If the airway is open, the chest will rise as his lungs fill with air.
(6) Take another breath. After blowing into the casualty's nose, quickly breakthe seal over his nose, take a breath of air, exhale, and take another deep breath. Hischest should fall somewhat as air escapes from the casualty's nose after you break theseal. You may be able to hear or feel the exhaled breath also.
(7) Seal the nose. Seal your mouth over the casualty's nose again so that airwill not escape.
(8) Deliver the second breath. Blow another breath into the casualty's noseat a slow rate and observe the casualty's chest.
(9) Break the seal and open mouth. After delivering the second breath,break the seal over the casualty's nose and allow his mouth to open slightly whilecontinuing to maintain the open airway. (The mouth is opened in case there is anobstruction in the casualty's nasal passages.) The casualty's body will exhale naturallywithout effort on your part. If the mouth does not open readily, use your thumb todepress the lower lips slightly to separate the lips.
c. Mouth-to-Stoma. The mouth to stoma rescue breathing is used if apermanent or temporary opening has been made at the front base of the neck in orderto open the airway to the atmosphere.
(1) Inhale. Take a breath.
(2) Close the mouth and nose, if needed. Use a hand to close the casualty'smouth and nostrils in order to prevent air escaping.
(a) This step is not needed if the casualty's upper airway has beenclosed surgically, as shown in figure 3-8.
Figure 3-8. Administering mouth-to-stoma rescue breathing.
MD0532 3-12
(b) If the casualty has a temporary tracheostomy tube in the trachea, thetube may have a cuff that can be inflated to seal off the airway above the stoma andthus prevent air from escaping through the mouth or nose.
(3) Seal the stoma. Place your mouth over the casualty's stoma. Make surethat your mouth forms an airtight seal so that air will not escape when you blow air intothe stoma.
(4) Deliver the first breath. Blow a breath into the stoma. His chest shouldrise as his lungs fill with air.
(5) Take another breath. After delivering the first breath, quickly break theseal over the stoma, take a breath of air, exhale, and then take another breath. Hischest should fall somewhat as air escapes from the stoma after you break the seal.You may be able to hear or feel the exhaled air also.
(6) Seal the stoma. Seal your mouth over the stoma again so that air will notescape.
(7) Deliver the second breath. Blow another breath at a slow rate into thestoma and observe the casualty's chest.
(8) Break seal. After delivering the second breath, break the seal over thestoma. If you are holding the casualty's mouth and nose closed, you can release them.The casualty's body will exhale naturally.
3-10. EVALUATE THE EFFECTIVENESS OF THE TWO VENTILATIONS
a. Spontaneous Breathing Resumes. If the casualty begins breathing againon his own, look for injuries. Do not leave the casualty since his breathing may stopagain. The casualty may still require help to keep his airway open.
b. Airway Blocked. If the casualty's chest did not rise and fall, then fresh air isnot getting into his lungs. Reposition the casualty's airway. Then administer twobreaths again using the same procedures. If the casualty's chest still does not rise, heprobably has an object blocking his airway. Remove the obstruction using fingersweeps and manual thrusts as described in paragraph 5-6. Once the obstruction hasbeen removed, administer two full breaths and proceed to check the casualty's pulse(paragraph 3-11).
c. Airway Open With No Spontaneous Breathing. If air goes in and out of thecasualty's lungs (airway open) but he does not start breathing on his own, check hispulse (paragraph 3-11) and determine if chest compressions are required.

MD0532 3-13
3-11. CHECK CAROTID PULSE
Check the casualty's pulse after you have successfully administered the twoinitial ventilations. Getting fresh air into the casualty's lungs will not help if his heart isnot beating and the blood is not circulating. There are two major arteries called thecarotid arteries in the neck. One artery lies in a grove on the left side of the trachea(windpipe); the other lies in a groove on the right side of the trachea. Either artery maybe used to check the casualty's carotid pulse, but you will normally use the artery on theside of the neck closest to you. The carotid pulse is used because you are already nearthe neck, it is easily accessible, and a pulse can sometimes be felt at the carotid arterywhen the pulse may be too weak to be detected at arteries farther from the heart.
a. Locate Pulse Site. Place the index and middle fingers of your hand on thecasualty's trachea or larynx. Then slide your fingers toward you while gently pressingon the neck until you find the groove running parallel to the airway (figure 3-9).
Figure 3-9. Locating the carotid pulse.
(1) If you are using the chin-lift/head-tilt, remove your hand from thecasualty's chin and use that hand to locate the pulse site. Keep your other hand on hisforehead and maintain the head-tilt.
(2) If you are using the jaw-thrust, use your dominant hand to check for apulse while maintaining the casualty's airway with the other hand.
(3) Three fingers (index, middle, and ring fingers) can be used instead of onlytwo fingers. Do not, however, use your thumb. The thumb has a detectable pulse andyou may mistake the pulse in your thumb for the casualty's pulse.
b. Feel for Pulse. Press gently on the carotid artery with your fingertips. Allowenough time to detect a pulse that is weak, slow, and/or irregular. The check shouldtake between 5 and 10 seconds.

MD0532 3-14
c. Evaluate the Pulse Check.
(1) If no pulse can be felt, cardiopulmonary resuscitation is requiredimmediately. The procedures for administering cardiopulmonary resuscitation are givenin Lesson 4.
(2) If a pulse can be felt, then the casualty's heart is beating. Administer therescue breathing procedures given in paragraph 3-12.
3-12. CONTINUE RESCUE BREATHING
If the casualty's heart is beating and he is not breathing on his own, continue toadminister rescue breathing. Administer ventilations (breaths) at a rate of oneventilation about every 5 seconds (10-12 ventilations per minute). Keep the casualty'sairway open while performing the ventilations and continue to monitor the casualty'spulse.
a. Perform Ventilations. Administer ventilations using the mouth-to-mouth, themouth-to-nose, or the mouth-to-stoma method, as appropriate. The steps given belowassume that the mouth-to-mouth method is being used with the head-tilt/chin-lift. Adjustthe procedures as needed if another combination is being used.
(1) Take a breath.
(2) Pinch the casualty's nostrils closed using the thumb and index finger ofthe hand on his forehead.
(3) Place your mouth over the casualty's mouth, making sure that a tight sealis formed.
(4) Blow into the casualty's mouth at a slow rate. As you blow, observe hischest. If his chest does not rise, a sufficient amount of air is not getting into his lungs.This may be caused by an inadequate positioning of his airway, by air leaking from thecasualty's nose, by air leaking from around your mouth, or by the breath not beingdelivered with sufficient force. If a problem exists, correct the problem and continueadministering ventilations.
(5) Remove your mouth from around the casualty's mouth and release hisnose. This allows him to exhale. Remember, the casualty's airway must be kept openso he can exhale.
(6) Inhale and exhale a small breath for yourself if you need to do so.
(7) Repeat the above procedures at a rate of one ventilation about every 5seconds until you have completed 10-12 ventilations.

MD0532 3-15
b. Recheck Pulse. Recheck the casualty's carotid pulse after every 10-12breaths (once per minute). As you check his pulse, also look, listen, and feel for signsthat the casualty has begun to breathe on his own.
(1) If the pulse is absent, begin administring chest compressions (lesson 4).
(2) If the casualty begins breathing on his own, maintain his airway andcheck for other injuries. If the casualty remains unconscious, an oropharyngeal airwaymay be inserted. Monitor the casualty's respirations in case he stops breathing again.The casualty will need to be evacuated for further evaluation and treatment by aphysician.
(3) If the casualty still has a pulse but is not breathing on his own, continue toadminister rescue breathing and recheck the pulse after every 12 ventilations. Continueuntil the casualty begins breathing on his own, you are relieved by another qualifiedperson, you are ordered to stop, or until you are too exhausted to continue. (In ahospital, only a physician can order that resuscitation efforts be stopped.)
Continue with Exercises
Return to Table of Contents
MD0532 3-16
EXERCISES, LESSON 3
INSTRUCTIONS: Circle the letter of the response that BEST completes the statementor BEST answers the question. After you have completed all of the exercises, turn to"Solutions to Exercises" at the end of the lesson exercises and check your answers.For each exercise answered incorrectly, reread the material referenced after thesolution.
1. You are near a car wreck. A car is on fire and a person is still in the car. As arescuer, which of the following should be your first action?
a. Gently shake the person and shout, "Are you O.K.?"
b. Remove the casualty from the burning vehicle.
c. Open the casualty's airway.
d. Check for a pulse.
2. Before beginning rescue breathing on a casualty, you should check thecasualty for the presence of a fractured:
a. Arm.
b. Leg.
c. Rib.
d. Spine.
3. You find a person in a park lying on the ground and not moving. As a rescuer,which of the following should you perform first?
a. Administer five chest compressions.
b. Administer two breaths.
c. Gently shake the person and shout, "Are you O.K.?"
d. Open the person's airway.
MD0532 3-17
4. You are treating a casualty who requires CPR. There is no one to assist you.Should you delay starting CPR in order to telephone for help?
a. Yes
b. No.
5. You are preparing to administer rescue breathing to a soldier lying on hisstomach. What should you do to the casualty before administering ventilations?
a. Kneel beside the casualty, grasp the casualty's uniform under his arm,push on the uniform, and roll the casualty away from you.
b. Kneel beside the casualty, reach across the casualty's back and graspthe casualty's uniform under his arm, pull on the uniform, and roll the casualty towardyou.
c. Stand over the casualty so that you straddle the casualty's hips, bendover and grasp the casualty's uniform under each armpit, lift the casualty's upper body,twist the casualty so that his chest is down, and lower the casualty.
d. Nothing.
6. How is the head-tilt portion of the head-tilt/chin-lift method of opening an adultcasualty's airway accomplished?
a. Place the palm of your hand on his forehead and press his head back.
b. Place your fist on his forehead and press his forehead back.
c. Place the palm of your hand under the back of his head and lift his headforward.
d. Place your fist under the back of his head and lift his head forward.
MD0532 3-18
7. In the jaw-thrust method of opening an adult casualty's airway, the jaw is liftedby:
a. Placing the fingertips under the angles of the jaw and lifting while usingyour thumbs to keep the chin steady.
b. Hooking the thumb under the casualty's jaw, then lifting the chin.
c. Placing the fingertips under the bony part of the chin, hooking the thumbover the casualty's bottom teeth, then lifting the chin.
d. Pressing the thumbs tightly on each side of the chin and pushing down.
8. After you have performed the head-tilt/chin-lift, the casualty's mouth should be:
a. Closed.
b. Almost closed.
c. As wide open as possible.
9. You have found an unconscious casualty and are initiating rescue breathing.When is the first time that you really take time to see if the casualty is breathing.
a. Just before you check the casualty for responsiveness.
b. Immediately after you check the casualty for responsiveness.
c. Just before you open the casualty's airway.
d. Immediately after you open the casualty's airway.
10. After using the head-tilt/chin-lift method to open a casualty's airway, thecasualty began to breathe normally and soon regained consciousness. The casualtyhas no injuries. How should you position the casualty?
a. On his side.
b. On his back.
c. On his chest.

MD0532 3-19
11. You are checking a casualty for spontaneous breathing. Which of thefollowing statements is/are true concerning the look, listen, and feel procedures?
a. You are looking at the casualty's face.
b. You are listening for the casualty's heartbeat.
c. You are feeling for the casualty's carotid pulse.
d. None of the above are correct.
12. You have found an unconscious casualty who is not breathing. After openinghis airway, you should:
a. Administer two full ventilations within 5 seconds.
b. Administer two full ventilations within 15 seconds.
c. Administer four full ventilations within 5 seconds.
d. Administer four full ventilations within 15 seconds.
13. You have found an unconscious casualty who is not breathing. You have justperform the head-tilt/chin-lift procedure and tried to initiate rescue breathing. Thecasualty's airway, however, appears to be blocked. You should:
a. Administer finger sweeps and manual thrusts.
b. Begin chest compressions.
c. Check for a pulse.
d. Try to open his airway again and repeat the two ventilations.
MD0532 3-20
14. You are administering rescue breathing using the mouth-to-mouth method.What, if anything, is done to the casualty's nose?
a. The rescuer uses the thumb and finger of his hand on the casualty's chinto pinch the nostrils closed before he blows into the casualty's mouth.
b. The rescuer uses the thumb and finger of his hand on the casualty's chinto pinch the nostrils closed when he breaks the seal over the casualty's mouth.
c. The rescuer uses the thumb and finger of his hand on the casualty'sforehead to pinch the nostrils closed before he blows into the casualty's mouth.
d. The rescuer uses the thumb and finger of his hand on the casualty'sforehead to pinch the nostrils closed when he breaks the seal over the casualty's mouth.
15. Which of the following locations is/correct for checking the casualty's pulsewhile performing rescue breathing.
a. Over the casualty's "Adam's apple."
b. The groove to the right of the casualty's "Adam's apple."
c. The groove to the left of the casualty's "Adam's apple."
d. Either b or c above.
16. You are administering rescue breathing to a casualty. You have checked thecasualty's pulse and found that his heart is still beating. When do you check thecasualty's pulse again?
a. After each breath.
b. After every 6 breaths.
c. After every 12 breaths.
d. Only after his heart stops beating.

MD0532 3-21
17. When you are administering rescue breathing (no external chestcompressions) using the mouth-to-nose method, you should administer ventilations at arate of about:
a. One ventilation every second.
b. One ventilation every 2 seconds.
c. One ventilation every 5 seconds.
d. One ventilation every 12 seconds.
Check Your Answers on Next Page

MD0532 3-22
SOLUTIONS TO EXERCISES, LESSON 3
1. b (para 3-1)
2. d (paras 3-2, 3-4)
3. c (paras 3-2)
4. a (para 3-3b)
5. b (para 3-5c)
6. a (para 3-6a(2), (3))
7. a (para 3-6b(4), (5), (6))
8. b (para 3-6a(5))
9. d (paras 3-6, 3-7)
10. a (para 3-8b(1))
11. d (para 3-7b, c, d)
12. a (para 3-9)
13. d (para 3-10b)
14. c (para 3-9a(3))
15. d (paras 3-11, 1-5d)
16. c (para 3-12b)
17. c (para 3-12a(7))
Return to Table of Contents