lectric e racer b asic uild · lectric racer – basic uild ... be craft supplies, from a recycling...
TRANSCRIPT
ELECTRIC RACER – BASIC BUILD
© TeacherGeek Inc. Permission is granted for editing, printing and republishing to non-for-profit organizations.
Page 1
Name: ___________________________________________ Set: _________ Date: _________
This guide will take you through the process of creating a basic electric racer. After you finish this
build, you should be able to experiment, design and engineer your own racer.
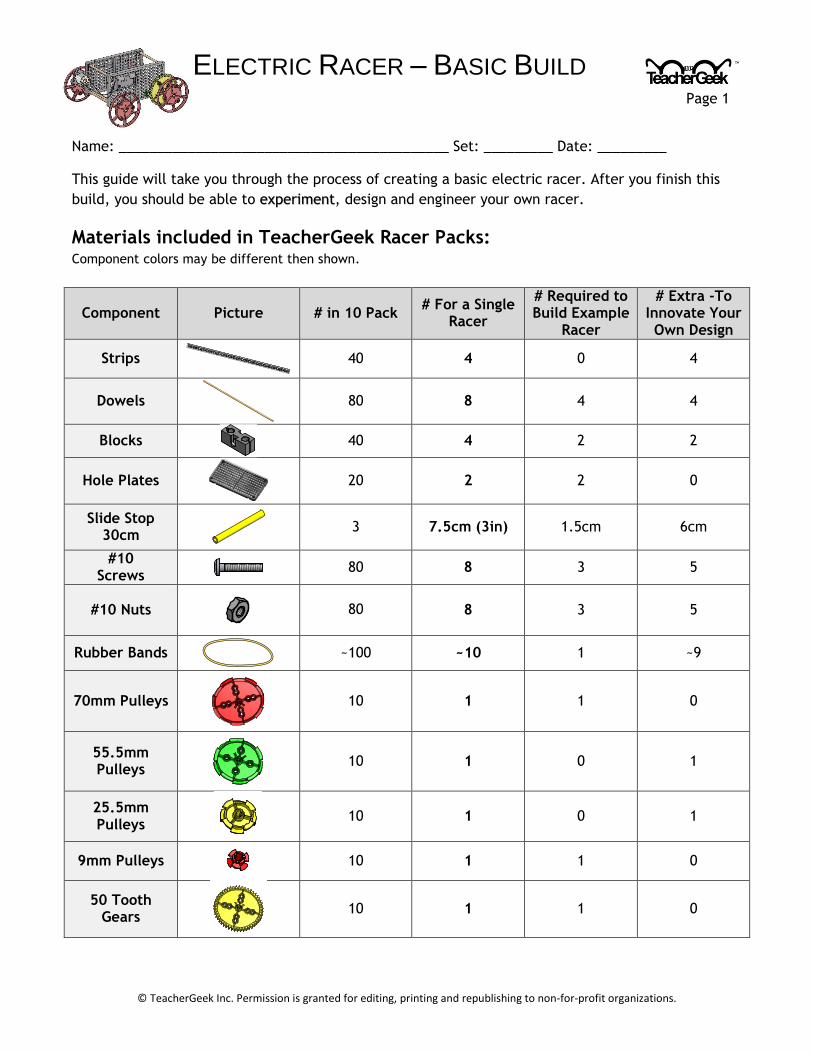
Materials included in TeacherGeek Racer Packs: Component colors may be different then shown.
Component Picture # in 10 Pack # For a Single
Racer
# Required to Build Example
Racer
# Extra -To Innovate Your Own Design
Strips
40 4 0 4
Dowels
80 8 4 4
Blocks
40 4 2 2
Hole Plates
20 2 2 0
Slide Stop 30cm
3 7.5cm (3in) 1.5cm 6cm
#10 Screws
80 8 3 5
#10 Nuts
80 8 3 5
Rubber Bands
~100 ~10 1 ~9
70mm Pulleys
10 1 1 0
55.5mm Pulleys
10 1 0 1
25.5mm Pulleys
10 1 0 1
9mm Pulleys
10 1 1 0
50 Tooth Gears
10 1 1 0

ELECTRIC RACER – BASIC BUILD
© TeacherGeek Inc. Permission is granted for editing, printing and republishing to non-for-profit organizations.
Page 2
Component Picture # in 10 Pack # For a Single
Racer
# Required to Build Example
Racer
# Extra -To Innovate Your Own Design
40 Tooth Gears
10 1 0 1
20 Tooth Gears
10 1 0 1
10 Tooth Gears
10 1 1 0
Wheels
40 40 0 0
Rubber Band Tires
40 4 2 2
Battery Holders
10 1 1 0
Project Motors
10 1 1 0
Angle Brackets
20 2 0 0
Motor Mounts
10 1 1 0
Stop Clips
40 4 1 3
Motor Adaptor Pins
15 1 1 0
Other Materials:
Two AA batteries are required per racer, but not included in the kit.
The TeacherGeek system is designed to be used with other materials you can
find (materials not supplied in the TeacherGeek pack). Other materials could
be craft supplies, from a recycling bin, wood, metal, cardboard, or anything
else you may have. These materials can be used to help you create your own
unique designs.
ELECTRIC RACER – BASIC BUILD
© TeacherGeek Inc. Permission is granted for editing, printing and republishing to non-for-profit organizations.
Page 3
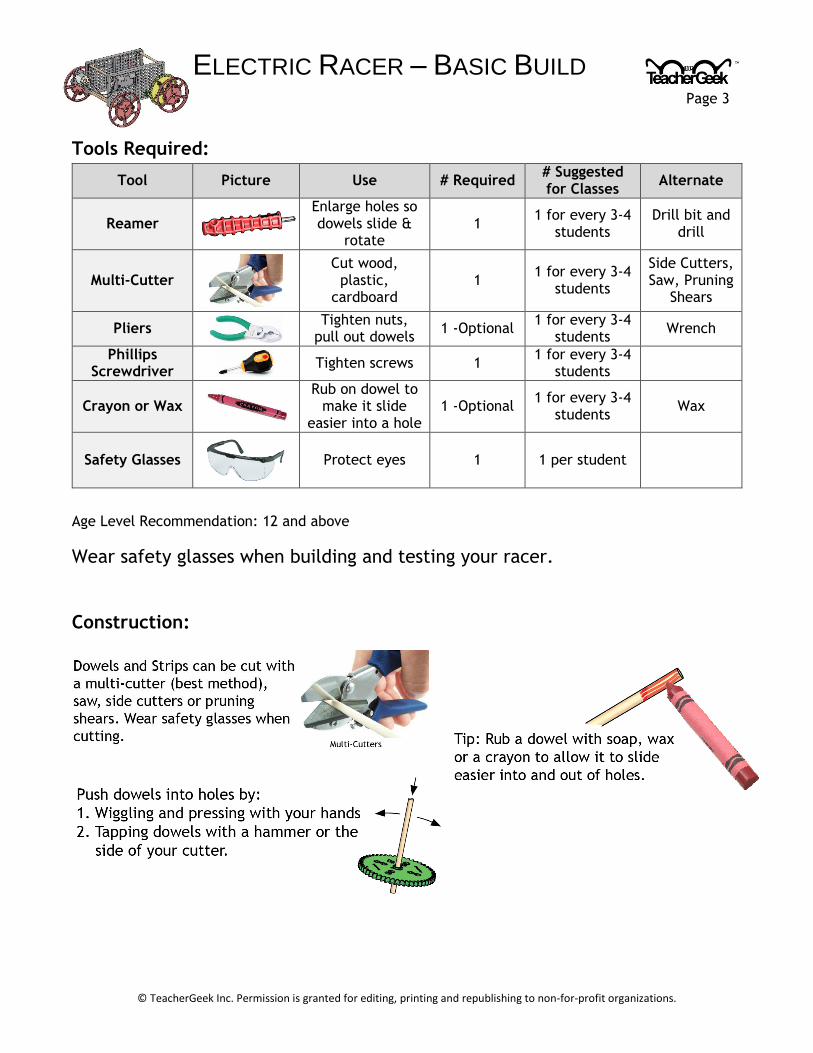
Tools Required:
Tool Picture Use # Required # Suggested for Classes
Alternate
Reamer
Enlarge holes so dowels slide &
rotate 1
1 for every 3-4 students
Drill bit and drill
Multi-Cutter
Cut wood, plastic,
cardboard 1
1 for every 3-4 students
Side Cutters, Saw, Pruning
Shears
Pliers
Tighten nuts, pull out dowels
1 -Optional 1 for every 3-4
students Wrench
Phillips Screwdriver
Tighten screws 1 1 for every 3-4
students
Crayon or Wax
Rub on dowel to make it slide
easier into a hole 1 -Optional
1 for every 3-4 students
Wax
Safety Glasses
Protect eyes 1 1 per student
Age Level Recommendation: 12 and above
Wear safety glasses when building and testing your racer.
Construction:

ELECTRIC RACER – BASIC BUILD
© TeacherGeek Inc. Permission is granted for editing, printing and republishing to non-for-profit organizations.
Page 4
Step #1 Cut four 12cm (4 in) dowels.
Step #2 Press/tap the 12cm (4in) dowels into a hole plate.
Step #3 Push/tap a second hole plate onto the dowels. This
creates the frame for your racer.

ELECTRIC RACER – BASIC BUILD
© TeacherGeek Inc. Permission is granted for editing, printing and republishing to non-for-profit organizations.
Page 5
Step #4 Cut off an adaptor pin.
Step #5 Tap or push the motor shaft into the adaptor pin. Warning: Only
push/tap on the back of the motor shaft. Pushing from the sides of
the motor could cause the motor to fall apart.
Tip: Place the adaptor pin into a perpendicular block
to hold it while tapping the motor shaft in.
Step #6 Place the motor into a mount.
Step #7 Use a screw and nut to fasten the motor mount to the frame.

ELECTRIC RACER – BASIC BUILD
© TeacherGeek Inc. Permission is granted for editing, printing and republishing to non-for-profit organizations.
Page 6
Step #8 Cut V shaped notches on the battery holder tabs.
Step #9 Use two screws and nuts to attach the battery holder to the frame.
Step #10 Connect the wires from the battery
holder to the motor terminals.
Twist the stripped wires around
the motor terminals to help them
stay on.
Tip: Strip more insulation off the
wire ends. Use the additional
exposed wire to twist around after
feeding through the motor
terminal.

ELECTRIC RACER – BASIC BUILD
© TeacherGeek Inc. Permission is granted for editing, printing and republishing to non-for-profit organizations.
Page 7
Run the motor Place two AA batteries into the battery holder. Use the
lever switch on the battery holder to turn the motor on
and off. If the motor does not run, check the wires
connected to the motor terminals. Make sure that the
metal wires are touching the metal terminals. Reversing Polarity: What happens if you switch the wires
on the motor terminals?
Step #11
Cut a 140mm (5 1/2in) dowel and tap it
into the largest pulley. The colors of your
pulleys may be different than pictured.
Step #12 Cut a 15mm (5/8in) section of slide stop.
Slide it down the dowel, next to the
pulley.
Step #13 Place the assembly from Step #12 into the frame
holes shown.

ELECTRIC RACER – BASIC BUILD
© TeacherGeek Inc. Permission is granted for editing, printing and republishing to non-for-profit organizations.
Page 8
Step #14
Place a small pulley onto the motor pin. Your small pulley may be a different color.
Step #15 Wrap a small rubber band around the pulleys.
Pulleys & Mechanical Advantage Place a mark (with a pencil or pen) on the face of your pulleys. Rotate one of the pulleys all the way
around. How far did the other pulley turn? Switch the pulleys around. Exchange them for a different
size. Rotate them again. What happens? Pulleys can trade force for distance, or distance for force:

ELECTRIC RACER – BASIC BUILD
© TeacherGeek Inc. Permission is granted for editing, printing and republishing to non-for-profit organizations.
Page 9
Step #16
Place the smallest gear onto the pulley
dowel.
Step #17 Cut a 200mm (7 7/8in) dowel. Tap the dowel through a large, 50 tooth gear, so it sticks out 40mm (1
9/16in)
Step #18 Place the assembly from Step #17 into the frame, so the small and large gears mesh.
ELECTRIC RACER – BASIC BUILD
© TeacherGeek Inc. Permission is granted for editing, printing and republishing to non-for-profit organizations.
Page 10
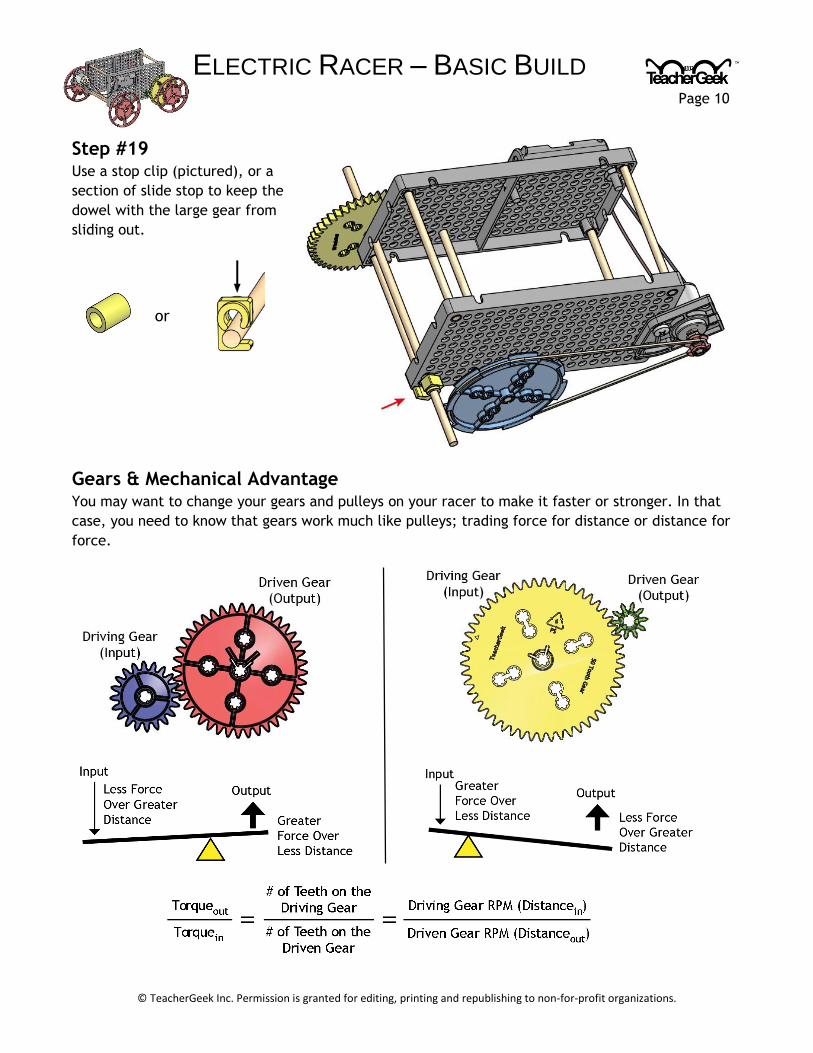
Step #19 Use a stop clip (pictured), or a
section of slide stop to keep the
dowel with the large gear from
sliding out.
Gears & Mechanical Advantage You may want to change your gears and pulleys on your racer to make it faster or stronger. In that
case, you need to know that gears work much like pulleys; trading force for distance or distance for
force.
or

ELECTRIC RACER – BASIC BUILD
© TeacherGeek Inc. Permission is granted for editing, printing and republishing to non-for-profit organizations.
Page 11
Step #20 Push/tap two wheels onto the ends of the dowel.
Step #21 Cut a new 200mm (7 7/8in) dowel. Then cut two sections of slide stop. Use the slide stop, 200mm
dowel and two wheels to make your racer roll.
ELECTRIC RACER – BASIC BUILD
© TeacherGeek Inc. Permission is granted for editing, printing and republishing to non-for-profit organizations.
Page 12
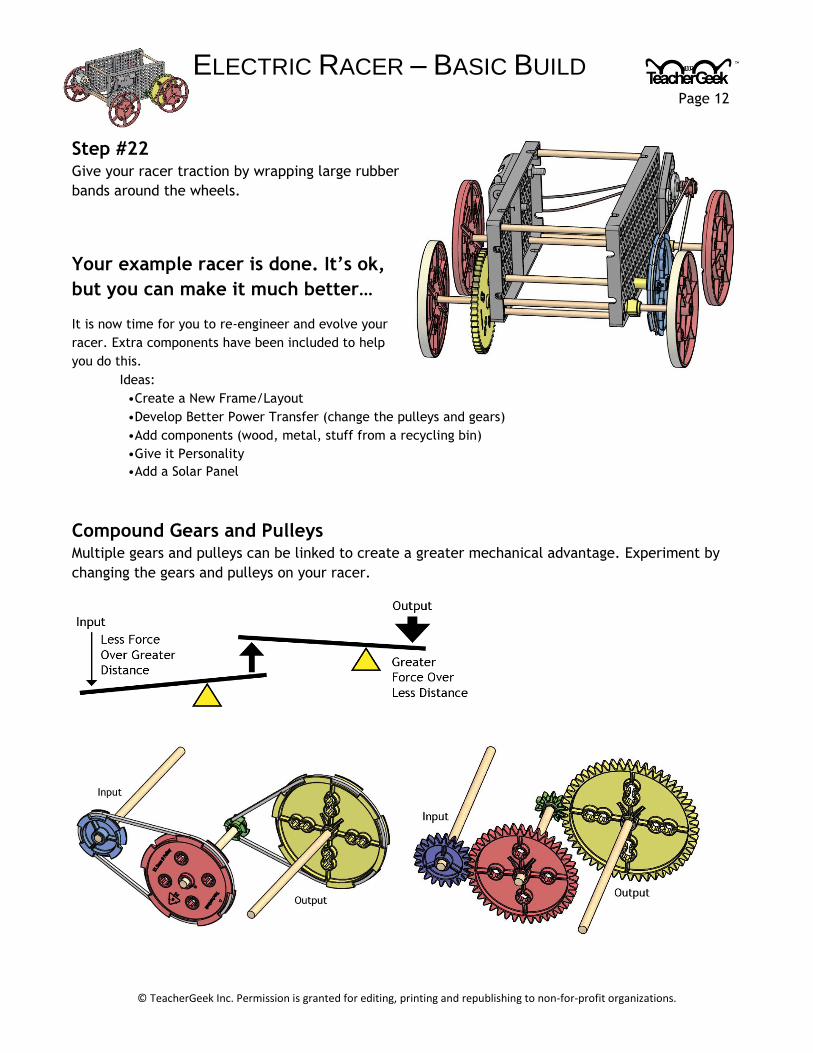
Step #22 Give your racer traction by wrapping large rubber
bands around the wheels.
Your example racer is done. It’s ok,
but you can make it much better…
It is now time for you to re-engineer and evolve your
racer. Extra components have been included to help
you do this.
Ideas:
•Create a New Frame/Layout
•Develop Better Power Transfer (change the pulleys and gears)
•Add components (wood, metal, stuff from a recycling bin)
•Give it Personality
•Add a Solar Panel
Compound Gears and Pulleys Multiple gears and pulleys can be linked to create a greater mechanical advantage. Experiment by
changing the gears and pulleys on your racer.

ELECTRIC RACER – BASIC BUILD
© TeacherGeek Inc. Permission is granted for editing, printing and republishing to non-for-profit organizations.
Page 13
Extreme Challenges
Re-engineer your electric racer to compete in extreme challenges. Build it for one competition, then re-
engineer it for another.