labor compliance program - amazon s3 | p a g e contractor introduction & quick start guide labor...
TRANSCRIPT

1 | P a g e
CONTRACTOR INTRODUCTION
& QUICK START GUIDE
Labor Compliance Program
Engineering Applications
Phone: (303) 757-9980
July 2016

2 | P a g e
Table of Contents I. OVERVIEW ............................................................................................................................................. 3
II. QUICK-START GUIDE FOR CONTRACTORS ............................................................................................. 5
1. Logging In ......................................................................................................................................... 5
2. Add/Edit Employee .......................................................................................................................... 6
3. Default Hourly Paid Fringes (as paid to fund on behalf of employee) ............................................. 7
4. Default Other Deductions Notes ...................................................................................................... 8
5. Payroll Records ................................................................................................................................. 9
III. SUCCESSFUL SAVE ................................................................................................................................ 16
IV. CHECK FOR NOTICES ............................................................................................................................ 17
V. CERTIFICATION – STEP 1 OF 2 .............................................................................................................. 18
VI. CERTIFICATION – STEP 2 OF 2 .............................................................................................................. 19
VII. eDocuments ........................................................................................................................................ 20
VIII. SUMMARY ........................................................................................................................................... 21

3 | P a g e
WELCOME TO LCPTRACKER
LCPtracker is an easy-to-learn, easy-to-use Labor Compliance software program for CDOT and its
Contractors.
This new program ensures that Contractors are meeting Prevailing Wage guidelines such as Davis-
Bacon laws set by the Department of Labor or any other labor laws set by state or local governmental
agencies.
I. OVERVIEW
LCPtracker is a paperless online system for entering Certified Payroll Reports. Payroll data can be
entered directly into the system or uploaded from many major construction accounting and payroll
programs. This serves two key functions: it eliminates the need to submit paper documents and forms
and stores all Certified Payroll Reports in an online database.
Benefits of LCPtracker
The program contains all contract-specific wage rates and worker classifications.
Contractors simply select classifications from a drop-down menu.
Rates and classifications are verified prior to submission of payroll or payroll related
documents.
Reports are instantly available in both hardcopy and electronic formats.
Payrolls are submitted electronically.
The service and online training is free to Contractors.

4 | P a g e
Login Information
Every contractor who will be submitting and approving certified payroll will receive a user ID and
temporary password.
Every contractor account is created by the Administrator or their Prime Contractor.
An email with login instructions is sent to Contractors once they’re assigned an account.
Contractors may access training support after receiving a User ID and password.
Support
Got technical questions or need help? The following will help you get started:
Contact LCPtracker Support by phone at 714-669-0052 option 4 or email
To contact LCPtracker Support by email please include your name and phone number,
company name and User ID, and the nature of your question. Responses are generated
within 24 hours or less.
Live Chat is available after logging in to LCPtracker. Support Hours are:
Monday – Friday 6:00 a.m. – 7:30 p.m. Mountain Time

5 | P a g e
II. QUICK-START GUIDE FOR CONTRACTORS
1. Logging In
To log in to LCPtracker, go to: https://prod.lcptracker.net/
Enter your User ID and password. When you log in the first time, you will be directed to
change your password.
6 | P a g e
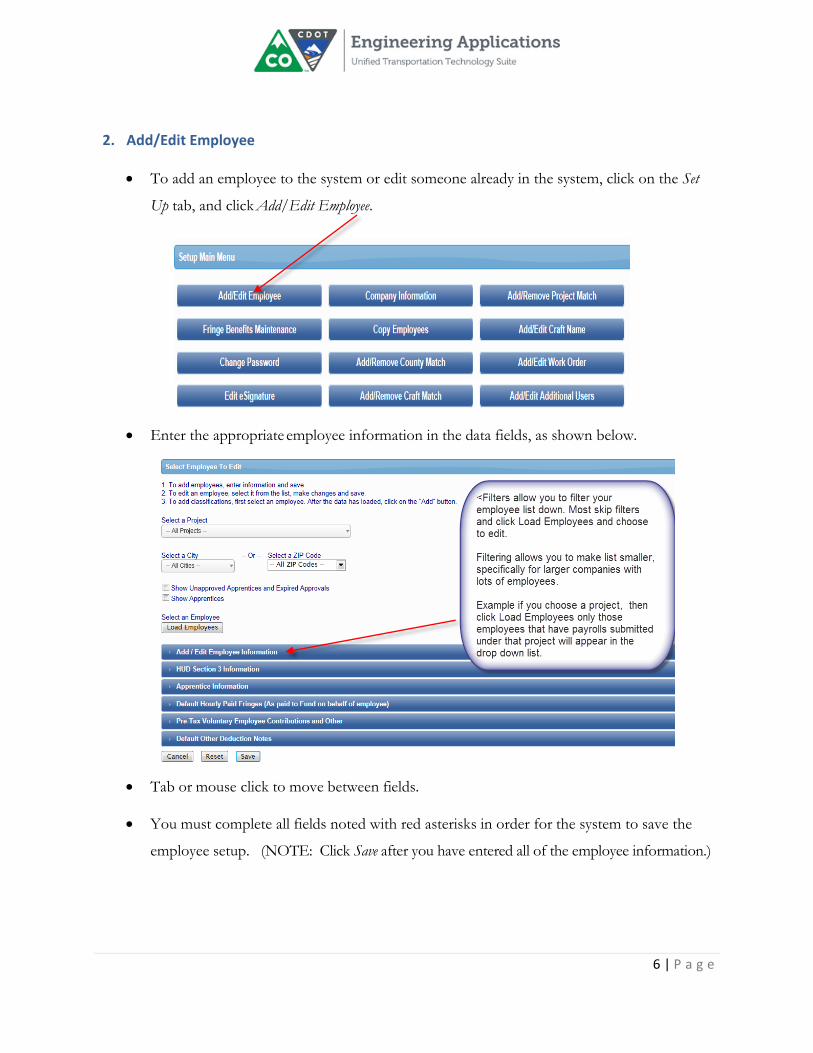
2. Add/Edit Employee
To add an employee to the system or edit someone already in the system, click on the Set
Up tab, and click Add/Edit Employee.
Enter the appropriate employee information in the data fields, as shown below.
Tab or mouse click to move between fields.
You must complete all fields noted with red asterisks in order for the system to save the
employee setup. (NOTE: Click Save after you have entered all of the employee information.)

7 | P a g e
3. Default Hourly Paid Fringes (as paid to fund on behalf of employee)
Start the process by clicking on Default Hourly Paid Fringes section (Found in the Add/Edit
Employee section in the Set-up Tab) :
If entering payroll records manually, you may want to fill in the hourly fringe rates in this
section.
If you have multiple projects with different fringe rates, built in increases, or if everyone
has the same fringes and you only want to enter those dollar values once, you may wish to
skip this section.

8 | P a g e
4. Default Other Deductions Notes
Anything that falls under the Other heading of the taxes section such as garnishments is
entered in the Default Other Deductions Notes. (To access the Default Other Deductions Notes
section, select the Set Up tab and then select Fringe Benefit Maintenance.)
NOTE: This area is considered a validation setting and may be required when entering
payroll records.
You can always return and add or edit the information in this section.

9 | P a g e
5. Payroll Records
There are multiple ways to enter payroll records in LCPtracker:
Option 1: Upload via a LCPtracker provided Excel spreadsheet template
Option 2: Manual entry
Option 3: Custom Accounting Interfaces with a variety of major accounting systems
is available
Option 4: Direct Processing Subscription where (for a fee) LCPtracker will map your
accounting software to the LCPtracker fields.
a. Option 1: Upload Payroll Records
To upload, go to Payroll Records
Select Upload Records.

10 | P a g e
Before you attempt to upload any records, please make sure you are using the
LCPtracker downloadable spreadsheet template as shown here.
The spreadsheet contains four (4) tabs: Required columns/field names (Sheet 1),
Instructions, Legend, and a Misc. tab that will assist with the upload process.
b. Option 2: Custom Accounting Interfaces
Currently, LCPtracker has interfaces with the following:
Paychex
Foundation Software
Viewpoint
Pay-Net
Construction Partner
California Payroll
Computer Ease

11 | P a g e
c. Option 3: Direct Payroll Subscription (DPI)
For a fee ($595), LCPtracker’s DPI Department can map your existing payroll software
to LCPtracker so you can upload your payroll with ease each week. Please email
[email protected] for more details.
d. Option 4: Manual Payroll Entry (1 of 2)
If you are entering payroll manually, you will need to enter records each week for all
employees that work on a prevailing wage project and have reported to work.
From the Payroll Records tab, select Enter Records.
Choose the project, location, employee name, and classification.
NOTE: For those with no default classification in the Add/Edit Employee screen,
you will have to Add Classification to proceed.
Week End Date is based on your own payroll.
Choose the correct CDOT project from the list.
Choose the location (if applicable)
Check the box for the classification you need to report on

12 | P a g e
Select Add Classification. In the new window, choose the craft from the drop down
and select the appropriate classification. Click Add Selected.
Check the “Select” box and then click Next.
Select Craft
Select
Classification

13 | P a g e
e. Manual Payroll Entry (2 of 2)
The information below is a brief overview of each section of the payroll record entry
form (You may not necessarily enter information into all fields.):
Amounts Paid
Enter the appropriate amounts. See the Legend below for information on each field.
Legend
Gross Employee Pay This Project – the amount of basic wages paid for this project only.
This is typically the hourly rate of pay times hours worked.
Wages Paid-in-Lieu of Fringes – the amount paid to the employee instead of fringes. This
amount is sometimes included in the Gross Employee Pay field.
Gross Pay All Projects – the gross amount on the paycheck for the week, for all projects
worked.
Hourly rate of pay – the hourly rate of pay without fringes. Some accounting systems
include taxable fringes and Paid-in-Lieu in this amount. Some agencies report taxable fringes
and Paid-in-Lieu amounts separately.
Hourly overtime rate of pay – the 1.5 overtime hourly rate without fringes. Typically this is
1.5 times the hourly rate of pay. Only required when 1.5 overtime worked.
Hourly double time rate – the 2.0 overtime hourly rate without fringes. Typically this is 2.0
times the hourly rate of pay. Only required when 2.0 overtime worked.
Rate in lieu of fringes – the hourly rate paid-in-lieu of fringes. Only required when reported
separately.
14 | P a g e
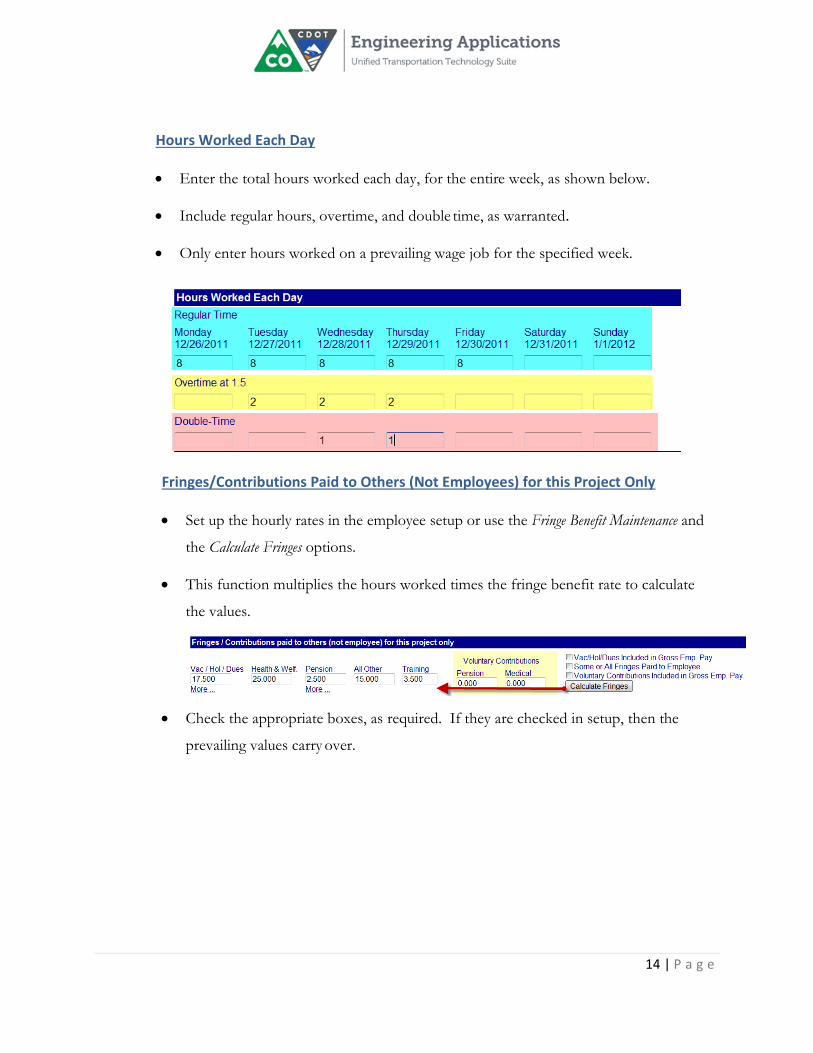
Hours Worked Each Day
Enter the total hours worked each day, for the entire week, as shown below.
Include regular hours, overtime, and double time, as warranted.
Only enter hours worked on a prevailing wage job for the specified week.
Fringes/Contributions Paid to Others (Not Employees) for this Project Only
Set up the hourly rates in the employee setup or use the Fringe Benefit Maintenance and
the Calculate Fringes options.
This function multiplies the hours worked times the fringe benefit rate to calculate
the values.
Check the appropriate boxes, as required. If they are checked in setup, then the
prevailing values carry over.
15 | P a g e
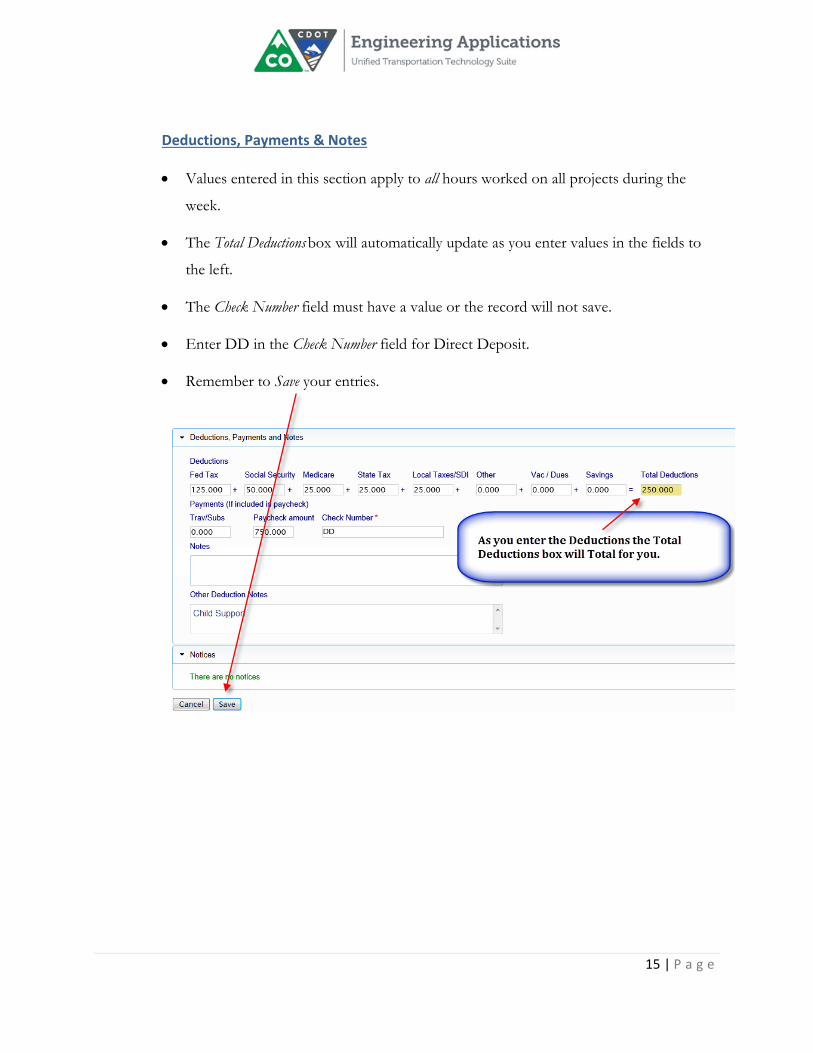
Deductions, Payments & Notes
Values entered in this section apply to all hours worked on all projects during the
week.
The Total Deductions box will automatically update as you enter values in the fields to
the left.
The Check Number field must have a value or the record will not save.
Enter DD in the Check Number field for Direct Deposit.
Remember to Save your entries.

16 | P a g e
III. SUCCESSFUL SAVE
A successful save means there are no notices, per the illustration in the upper left below.
In the event of notices, simply click ‘yes’ and continue to enter all your records for the week,
then fix issues after all entries are completed.

17 | P a g e
IV. CHECK FOR NOTICES
Once you have entered all payroll records for the week, it is considered best practices to double
check for any payroll notices.
To view notices, select Notices on the navigation tab.
A notice could simply be the result of a typo, incorrect math entry, or other discrepancy. See
illustration below.
18 | P a g e
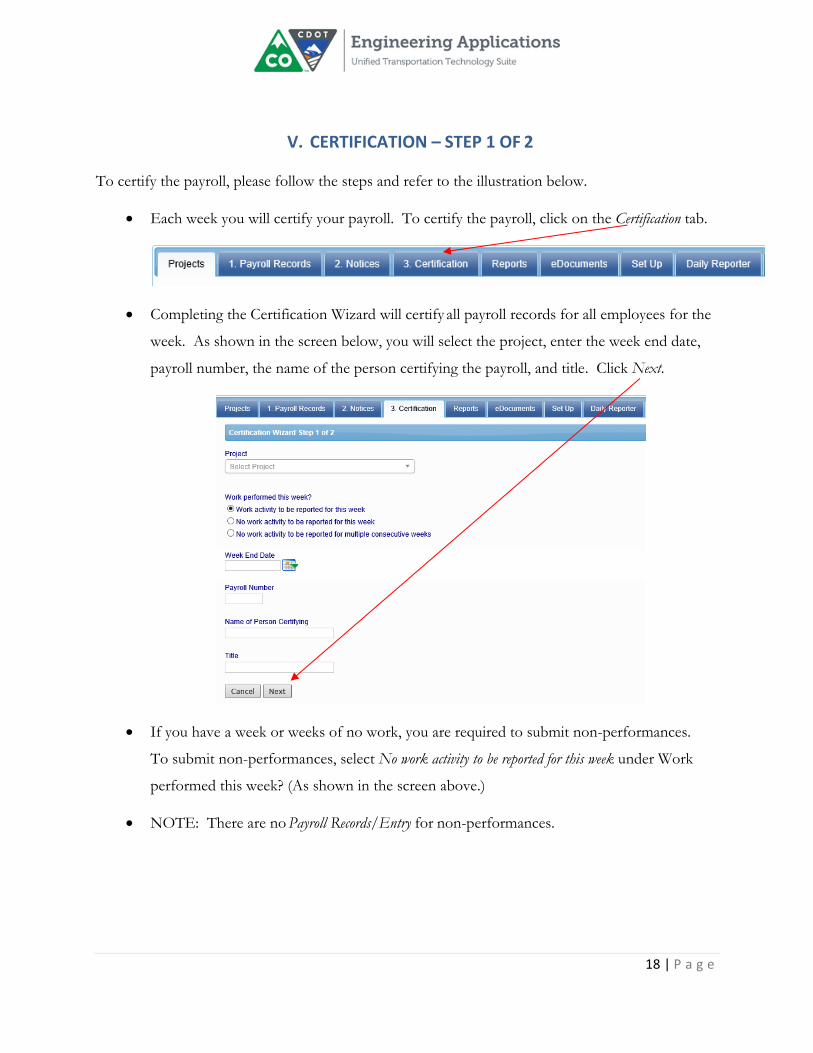
V. CERTIFICATION – STEP 1 OF 2
To certify the payroll, please follow the steps and refer to the illustration below.
Each week you will certify your payroll. To certify the payroll, click on the Certification tab.
Completing the Certification Wizard will certify all payroll records for all employees for the
week. As shown in the screen below, you will select the project, enter the week end date,
payroll number, the name of the person certifying the payroll, and title. Click Next.
If you have a week or weeks of no work, you are required to submit non-performances.
To submit non-performances, select No work activity to be reported for this week under Work
performed this week? (As shown in the screen above.)
NOTE: There are no Payroll Records/Entry for non-performances.

19 | P a g e
VI. CERTIFICATION – STEP 2 OF 2
The last step to certification is to sign the report. If you omitted your eSignature, go back to Setup
and edit your eSignature as shown, then back to certification and start again.
20 | P a g e
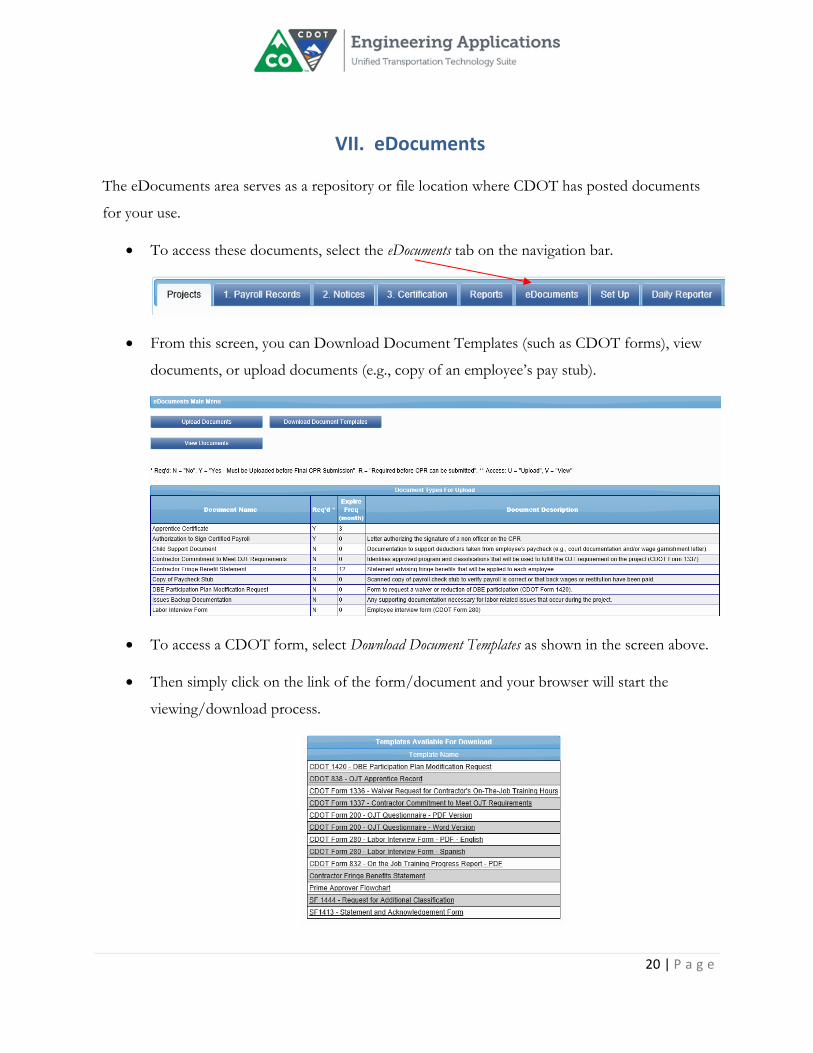
VII. eDocuments
The eDocuments area serves as a repository or file location where CDOT has posted documents
for your use.
To access these documents, select the eDocuments tab on the navigation bar.
From this screen, you can Download Document Templates (such as CDOT forms), view
documents, or upload documents (e.g., copy of an employee’s pay stub).
To access a CDOT form, select Download Document Templates as shown in the screen above.
Then simply click on the link of the form/document and your browser will start the
viewing/download process.

21 | P a g e
VIII. SUMMARY
Congratulations! You have now completed the requisite training to certify your payrolls.
A final reminder of the following:
Certified Payroll Reports (CPRs) are electronically sent to your Administrator through
the following process:
Unless otherwise specified, there is no need to send or print out a hardcopy unless you
would like to do so for your own records.