lab 2: vulnerability analysis and pen testing lab 2: vulnerability analysis and pen testing a...
TRANSCRIPT
1
Lab 2: Vulnerability Analysis and Pen Testing
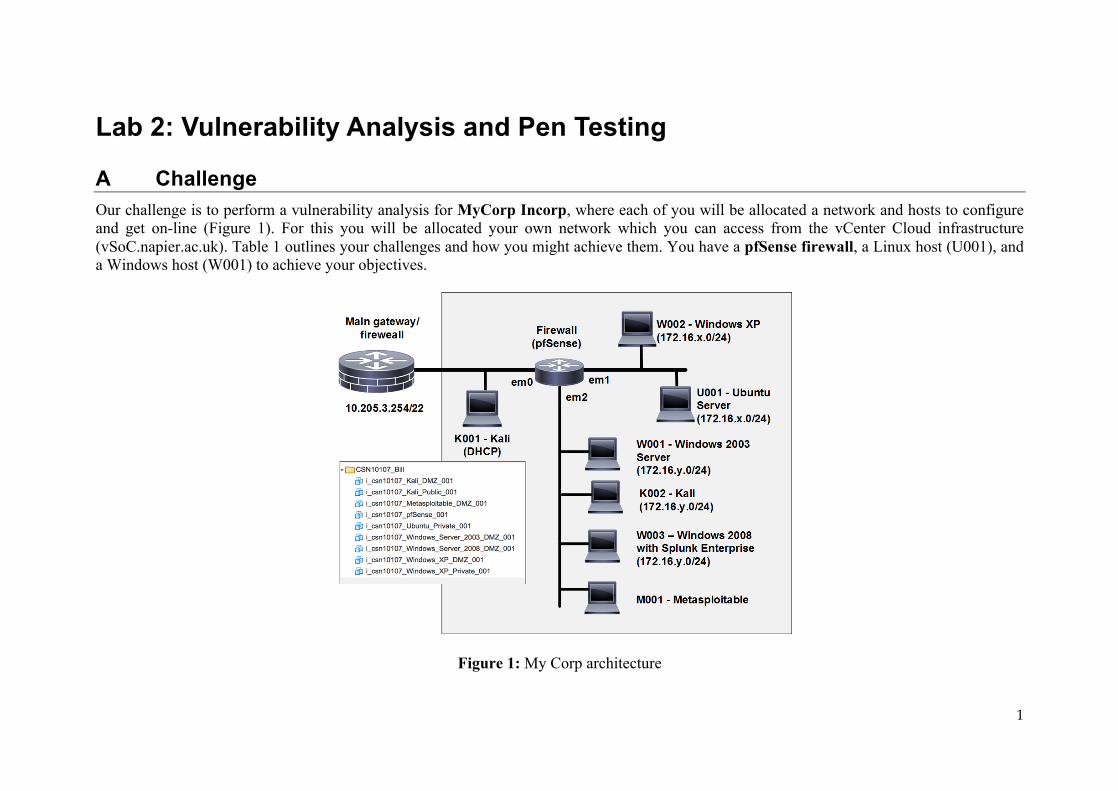
A Challenge Our challenge is to perform a vulnerability analysis for MyCorp Incorp, where each of you will be allocated a network and hosts to configure and get on-line (Figure 1). For this you will be allocated your own network which you can access from the vCenter Cloud infrastructure (vSoC.napier.ac.uk). Table 1 outlines your challenges and how you might achieve them. You have a pfSense firewall, a Linux host (U001), and a Windows host (W001) to achieve your objectives.
Figure 1: My Corp architecture

2
Table 1: Your challenges
Challenge Description How will I do this? Completed 1 Setup Pfsense and the hosts so that you can connect all the
required hosts. Successful pings.
2 You should be able to discover the hosts on all your networks, and the services on hosts in your own network (DMZ and LAN) Test: List the hosts
Run NMAP with a range of options, including –sP (to perform a host scan), and -sS (to perform a service scan on a host).
3 You should be able to discover the operating system of the hosts on your network (DMZ and LAN) Test: List the operating systems.
Run NMAP with the –O flag.
4 You should be able to discover the Web services that are running and their version. Test: List the Web services.
Run NMAP with the –sV flag.
5 You should be able to craft network packets which can exercise servers and the firewall. Test: Use hping to assess response.
Run hping with various flags.
6
You should be able to setup basic IDS rules. Test: Use Snort to detect simple network events.
Run Snort for detection.
B Setting up the network In this lab we will connect multiple firewalls to the main gateway, and be able to complete the challenges in Table 1. You will be given two things: Network Allocation: A

3
https://asecuritysite.com/csn10107/prep Demo: https://youtu.be/1wn2io8EWvs Draw your network diagram here, and identify the IP addresses of your network: User logins: Ubuntu (User: napier, Password: napier123), Windows: (User: Administrator, Password: napier), Vyatta (User: vyatta, Password: vyatta), pfsense (User: admin, Password: pfsense), Metasploitable (User: user, Password: user), Kali (User: root, Password: toor).
C Opening the firewall We will be testing from the LAN network to the DMZ, and vice-versa. First setup your network, and open up TCP, UDP and ICMP from the DMZ to the LAN network.
From → To
Command Observation
LAN to DMZ
ping 192.168.y.7
ping 192.168.y.254
Do you have connectivity from LAN to DMZ: [Yes] [No]

4
Try to connect to the Web server at 192.168.y.7
DMZ to LAN
ping 192.168.x.7
ping 192.168.x.254
Try to connect to the Web server at 192.168.x.7
Do you have connectivity from DMZ to LAN: [Yes] [No]
D Identifying Services Within a network infrastructure we have services which run on hosts. These services provide a given functionality, such as for sending/receiving email, file storage, and so on. From → To
Command Observation
DMZ On your Windows host, run the command:
netstat –a
and outline some of the services which are running on your host (define the port number and the name of the service and only pick off the LISTENING status on the port).
Outline some of the services which are running on your host (define the port number and the name of the service):
LAN For the Ubuntu Virtual Machine, and run the command:
netstat –l.
Outline some of the services which are running on your host (define the port number and the name of the service):
5
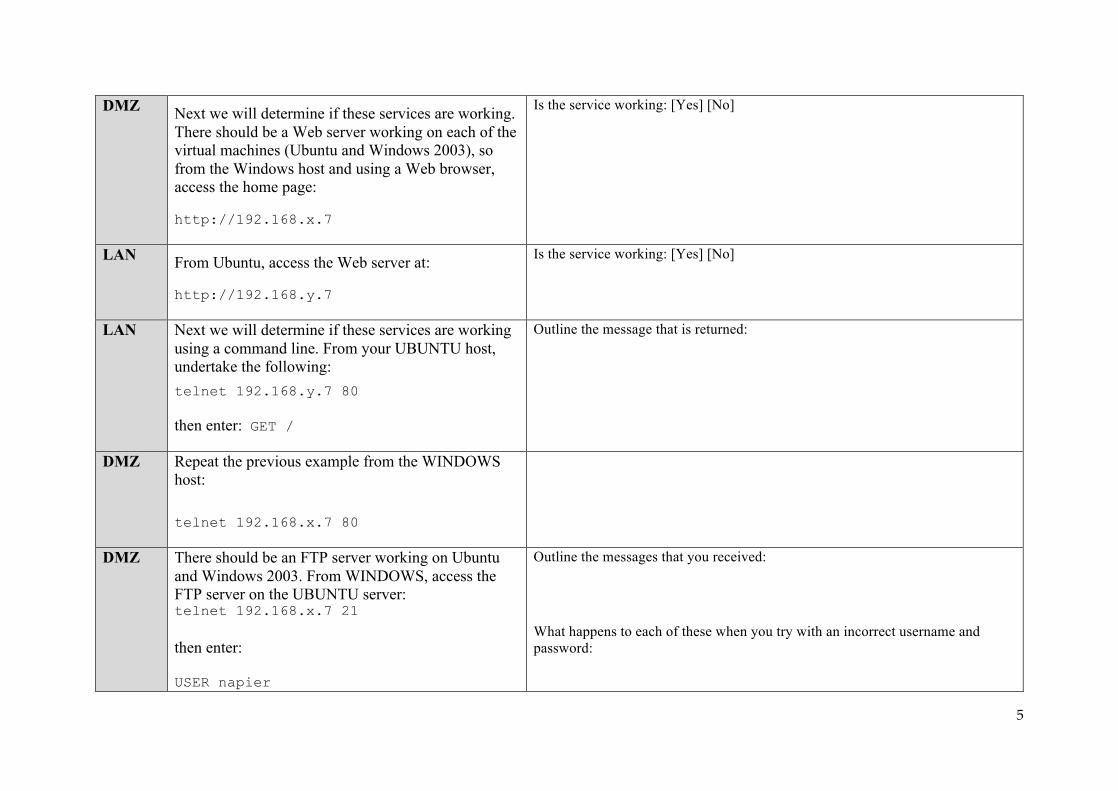
DMZ Next we will determine if these services are working. There should be a Web server working on each of the virtual machines (Ubuntu and Windows 2003), so from the Windows host and using a Web browser, access the home page:
http://192.168.x.7
Is the service working: [Yes] [No]
LAN From Ubuntu, access the Web server at:
http://192.168.y.7
Is the service working: [Yes] [No]
LAN Next we will determine if these services are working using a command line. From your UBUNTU host, undertake the following: telnet 192.168.y.7 80
then enter: GET /
Outline the message that is returned:
DMZ Repeat the previous example from the WINDOWS host: telnet 192.168.x.7 80
DMZ There should be an FTP server working on Ubuntu and Windows 2003. From WINDOWS, access the FTP server on the UBUNTU server: telnet 192.168.x.7 21 then enter: USER napier
Outline the messages that you received:
What happens to each of these when you try with an incorrect username and password:

6
PASS napier123 QUIT
LAN From UBUNTU access the WINDOWS host with telnet 192.168.x.7 21 then enter: USER Administrator PASS napier QUIT
Outline the messages that you received:
What happens to each of these when you try with an incorrect username and password:
DMZ On the UBUNTU instance you will see that the VNC (port: 5900) service is running, which is the remote access service. From your WINDOWS host, access the VNC service using a VNC client, and see what happens.
What does this service do:
DMZ Next we will assess the SMTP service running on the WINDOWS virtual machine. From your UBUNTU machine console run a service to access SMTP: telnet 192.168.y.7 25 Table 1 outlines the commands to use.
On the WINDOWS virtual machine, go into the C:\inetpub\mailroot\queue folder, and view the queued email message.
Was the mail successfully queued? If not, which mail folder has the file in?
Outline the format of the EML file?
Table 1: SMTP commands 220 napier Microsoft ESMTP MAIL Service, Version: 6.0.3790.3959 ready at Sun, 2 Dec 2009 21:56:01 +0000 help 214-This server supports the following commands: 214 HELO EHLO STARTTLS RCPT DATA RSET MAIL QUIT HELP AUTH TURN ETRN BDAT VRFY helo me
7
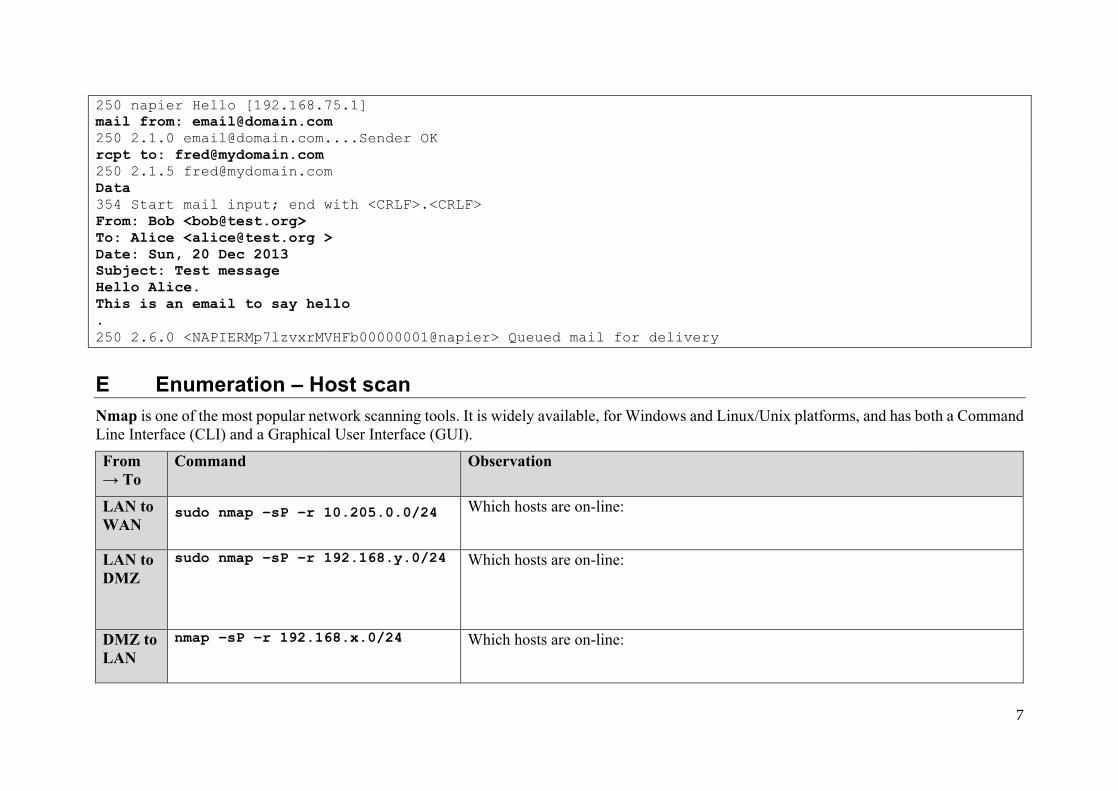
250 napier Hello [192.168.75.1] mail from: [email protected] 250 2.1.0 [email protected] OK rcpt to: [email protected] 250 2.1.5 [email protected] Data 354 Start mail input; end with <CRLF>.<CRLF> From: Bob <[email protected]> To: Alice <[email protected] > Date: Sun, 20 Dec 2013 Subject: Test message Hello Alice. This is an email to say hello . 250 2.6.0 <NAPIERMp7lzvxrMVHFb00000001@napier> Queued mail for delivery
E Enumeration – Host scan Nmap is one of the most popular network scanning tools. It is widely available, for Windows and Linux/Unix platforms, and has both a Command Line Interface (CLI) and a Graphical User Interface (GUI).
From → To
Command Observation
LAN to WAN
sudo nmap –sP –r 10.205.0.0/24 Which hosts are on-line:
LAN to DMZ
sudo nmap –sP –r 192.168.y.0/24 Which hosts are on-line:
DMZ to LAN
nmap –sP –r 192.168.x.0/24 Which hosts are on-line:

8
LAN to DMZ
Run Wireshark on host in LAN, and run: sudo nmap –sP –r 192.168.y.0/24
Which transport layer protocol does NMAP use to discover the host: [ICMP] or [ARP]
DMZ to LAN
Run Wireshark on host in DMZ, and run: sudo nmap –sP –r 192.168.x.0/24
Which transport layer protocol does NMAP use to discover the host: [ICMP] or [ARP]
F Enumeration - Operating System Fingerprinting Enumeration is the gathering of information about target hosts. After discovering live target systems, we want to identify which machines are running which OSs. A useful feature of nmap, is determining the operating system of hosts on the network. It performs active OS fingerprinting by sending packets to the target system. From → To
Command Observation
LAN to DMZ
Perform an OS Fingerprint Scan on some of the hosts discovered on the network, using a command such as: sudo nmap –O 192.168.y.0/24
Which operating systems does it return:
DMZ to LAN
Perform an OS Fingerprint Scan on some of the hosts discovered on the network, using a command such as: nmap –O 192.168.x.0/24
Which operating systems does it return:
G Enumeration – Application Fingerprinting
9
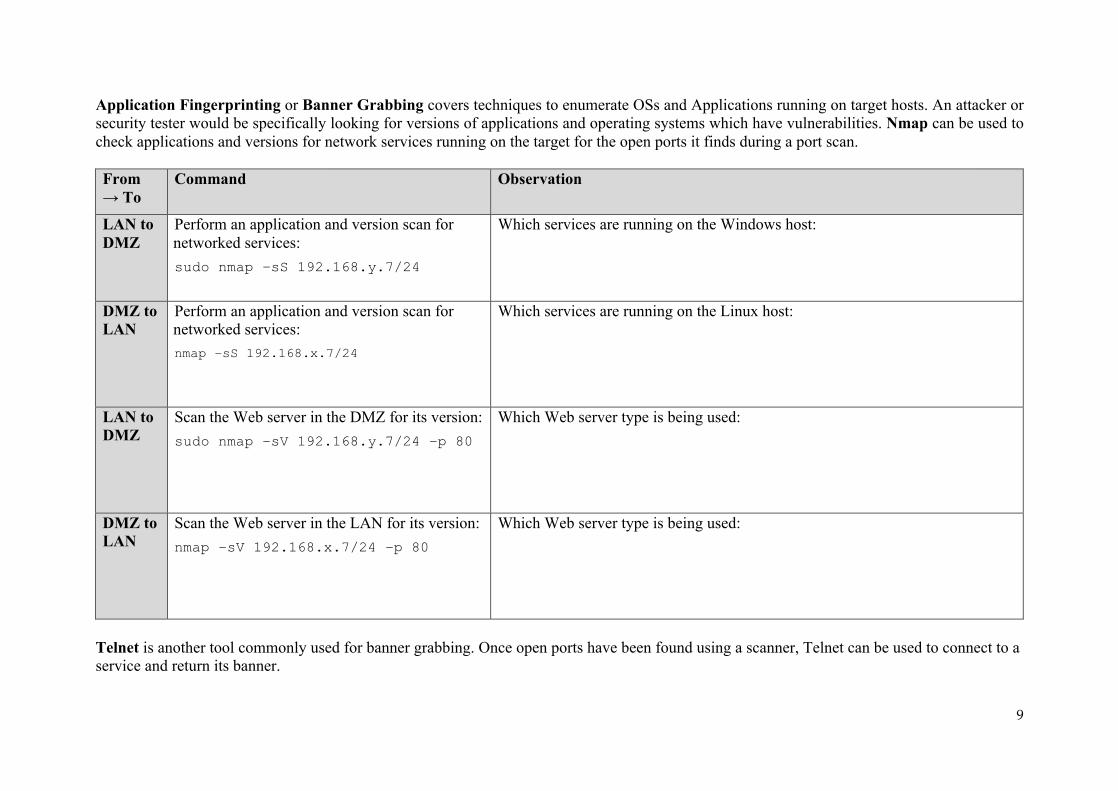
Application Fingerprinting or Banner Grabbing covers techniques to enumerate OSs and Applications running on target hosts. An attacker or security tester would be specifically looking for versions of applications and operating systems which have vulnerabilities. Nmap can be used to check applications and versions for network services running on the target for the open ports it finds during a port scan.
From → To
Command Observation
LAN to DMZ
Perform an application and version scan for networked services: sudo nmap –sS 192.168.y.7/24
Which services are running on the Windows host:
DMZ to LAN
Perform an application and version scan for networked services: nmap –sS 192.168.x.7/24
Which services are running on the Linux host:
LAN to DMZ
Scan the Web server in the DMZ for its version: sudo nmap –sV 192.168.y.7/24 –p 80
Which Web server type is being used:
DMZ to LAN
Scan the Web server in the LAN for its version: nmap –sV 192.168.x.7/24 –p 80
Which Web server type is being used:
Telnet is another tool commonly used for banner grabbing. Once open ports have been found using a scanner, Telnet can be used to connect to a service and return its banner.

10
From → To
Command Observation
DMZ to LAN
Connect to port 80, with: telnet 192.168.x.7 80
and then send the HTTP OPTIONS command to the web server: OPTIONS / HTTP/1.0
What is returned and how can this be used to fingerprint the WebServer?
Which WebServer is running and which version?
DMZ to LAN
Similarly, other HTTP commands such as HEAD (get a HTML page header) and GET (get the whole HTML page) can be used to footprint a web server. Try the following and observe: HEAD / HTTP/1.0 GET / HTTP/1.0
What do you observe from using these HTTP requests:
H Network Packet Crafting and DoS - Hping Hping is used by an intruder to craft network packets which can look to exploit a system. For example an intruder might send in a network packet which has all the TCP flags set in order to exploit a weakness in the system. For all of the following, within the UBUNTU virtual instance, open two Terminal windows and in one capture your data packets with.

11
From → To
Command Observation
LAN to DMZ
On UBUNTU capture packets with: sudo tcpdump -i eth11 Start Wireshark on the WINDOWS. If you can’t see your network adapter on Windows, type: net stop npf net start npf Next go to your UBUNTU virtual machine, and run the command of:
sudo hping 192.168.y.7
Let it run for a few seconds, and the stop it with the Ctrl-C keystroke. Next go back to your WINDOWS instance and stop the trace. What can you observe from the trace?
Which TCP ports have been used?
Why is there no reply?
LAN to DMZ
Investigate the following: sudo hping 192.168.x.7 –p 80 sudo hping –S 192.168.x.7 –p 80 sudo hping –A 192.168.x.7 –p 80 sudo hping –R 192.168.x.7 –p 80
How might an intruder use this command:
LAN to DMZ
Investigate the following: sudo hping 192.168.x.7 --icmp
How might an intruder use this command:

12
LAN to DMZ
View the options for hping with hping –help, and create ping with SYN flag checked on port 80 with a spoof address of 10.0.0.1. sudo hping targetIP --spoof spoofIP -p 80 -S
What can you identify on the scanned host?
I Network Scanning Detection, using an IDS Snort is one of the most popular intrusion detection systems, where an agent is used to detect network threats. From → To
Command Observation
LAN From UBUNTU, run the Wireshark packet sniffer with the command: sudo wireshark &
DMZ Basic Host Discovery can be performed using ICMP or ARP traffic, typically with tools such as ping and arping. This type of active network scanning is easy to detect using an Intrusion Detection System (IDS), such as Snort.
From WINDOWS2003, create a folder named MYSNORT and create a snort detection rules file in this folder named icmp.rules, and add the following snort variables, and detection rule: alert icmp any any -> any any (msg:"ICMP ping"; sid:999)

13
DMZ Run Snort on WINDOWS with: Find your interface index by typing: c:\Snort\bin>snort -W snort -c c:\MYSNORT\icmp.rules -i 1 -p -l c:\MYSNORT -K ascii
1 is the interface index here
LAN to DMZ
From UBUNTU, ping the WINDOWS2003 VM.
Did Snort detect the pings from UBUNTU?
DMZ Create a rule on WINDOWS2003 which will detect an initial Telnet connection and the end of it?
Did it detect the start and end of the connection?
LAN to DMZ
Then from UBUNTU, perform an ICMP Host Scan against the WINDOWS2003 VM, using nmap with nmap –PE 192.168.y.7
Did Snort detect the Host Scan from UBUNTU?
DMZ Scanning specific hosts to find the services they are running is another common technique. This can be detected network auditing systems, by collecting traffic streams together and analysing them for scanning packets. From WINDOWS2003, create a new IDS detection rules file call portscan.rules which will detect network scanning traffic, and add: preprocessor sfportscan: proto { all } scan_type { all } sense_level { high } logfile { portscan.log }
LAN to DMZ
Run Snort with the detection portscan rules on WINDOWS with: snort -c c:\mysnort\portscan.rules -i 1 -p -l c:\mysnort -K ascii
Did Snort detect the port scan:

14
and from UBUNTU, perform a Port Scan on WINDOWS using: nmap 192.168.y.7.
What type of port scan has been performed (which protocol is being used):
J Enumeration – Password Cracking with Hydra NOTE: Hydra should only be used on private networks. Do not use on any systems on the Internet. From → To
Command Observation
LAN Create a new user fred on the FTP server in UBUNTU, using (check by viewing the /etc/passwd file):
sudo useradd fred -p fredpass -d /home/fred -s /bin/false –m Now change the password: sudo passwd fred View the password file: sudo cat /etc/shadow
Can you locate the user “fred” in the shadow file?
DMZ to LAN
Open user file (user.txt) and pass file (pass.txt) in C:\hydra> using command prompt on DMZ. Add fred to “userfile.txt” and fredpass to “pass.txt” and save both. Now we want to find all the usernames and passwords on LAN by trying all the combination of the user names and passwords from user.txt and pass.txt.
15
For this, we use Hydra (from DMZ to LAN): C:\hydra> hydra -L user.txt -P pass.txt 192.168.x.7 telnet Next from DMZ log into the TELNET server on LAN with the username and password that hydra found. Use: telnet 192.168.x.7 USER fred PASSWORD fredpass
Can hydra find fred’s username and pass?
Did you successfully login?
DMZ to LAN
Go UBUNTU, and run Wireshark, and rescan with Hydra, and capture the trace. Now find the successful login from the trace.
Can you find the network packet at which Hydra cracked the TELNET password?