kettmaps user guide ios (english)
TRANSCRIPT

1
version 2.2
Iphone / Ipad Guide
S-Line compatibleE-Premium compatible

2
With KETTMaps / S-FIT app, you can run, ride or rowing over more than 100,000km of motion videos all over the world and daily updated by the users themselves. Try to follow their rhythm under the same conditions at the pace they were recorded. Use the KINOMAP portal and choose you own real life video. Increase your fitness by using your own interval or heart rate training (*).
Connect directly your compatible KETTLER equipment. Alternatively, use the front facing camera giving you an optical cadence, stride or stroke sensor.
(*) appears with the next update

3
1. Account

4
If you want to use KETTMaps, you have first to connect using your Kinomap account. Once your login is successful, you can start your training session. If you do not log-off, you will remain logged next time you launch the App.
If you do not have a KETTMaps / Kinomap account, please Sign In to get a free account.
Sign In

5
The default version is free, giving you access to a set of free videos as well as interval workouts.
A subscription is required later on to get access to all eligible content including thousands of real life videos, a multiplayer mode, a heart rate control workout and many more.
After the first login, the app can prompt you for an activation code. If you have one, enter it in the appropriate field settings to activate your subscription for the app.
You can call the option >>add an activation code<< whenever you need later on.
Activation code

6
You can also subscribe for the service, based on a monthly or yearly subscription, giving you access to enhanced features.
Go to Settings >> subscribe to KETTMaps >> KETTMapsAfter activation, see your subscription on my subscription.
Activation code
7
2. Connection

8
3. IPhone / IPad connection
During two minutes, you can connect S- Line device with your smartphone. Ensure Bluetooth is ON. Then go to the Bluetooth
settings inside your IPhone and press on showing fitness device.
Preparation of BluetoothKETTLER S-Line Device
1. Make the fitness computer visible:
2. Press the OK Button for more than 5 seconds
When the Bluetooth name is displayed and the outer ring changes the color, the device is ready for Bluetooth connection to a smartphone /tablet for 2 minutes. Figure similar
Example: Racer S A73F69

9
Equipment connectionKETTLER S-Line device
4. successful connection if seeing the blue ring
Starting App5. Go to Settings / Equipment to add a new equipment for
wireless communication.6. Add a new equipment with the button +.7. Effect step 1 – 4 until your device was listed successful.
Outer Ring will light up constantly blue
You can add a new equipment. Once done, you can also add an
additional sensor (cadence, Heart Rate….)

10
Preparation of bluetooth KETTLER E-Premium Display
1. Premium display visibleTurn on Bluetooth at the display of the device. device settings > Bluetooth ON
2. Change the mode to APP/PCdevice name and device number available below. Go back to the main menu.
Figure similarexample: ERGO C12 Display
3. Iphone /Ipad connectionIt is possible, to find your device on smartphone / tablet which support BLE 4.0.
You can pair the display and the app directly from inside the app.
You can see the device, as soon as bluetooth is turned ON inside the device

11
Equipment connectionKETTLER E-Premium Display
Start the App4. Go to the settings / device to add new equipment.5. Add new equipment with the + button6. Effect step 1 – 4 until your device is listed successful. 7. At the 1st connection you need to confirm with a security
PIN. This number you have to type into the IPhone or IPad.
No connection to the app at that time
PIN is generated and shown at the screen
You can add a new equipment. Once done, you can also add an
additional sensor (cadence, Heart Rate….)
12
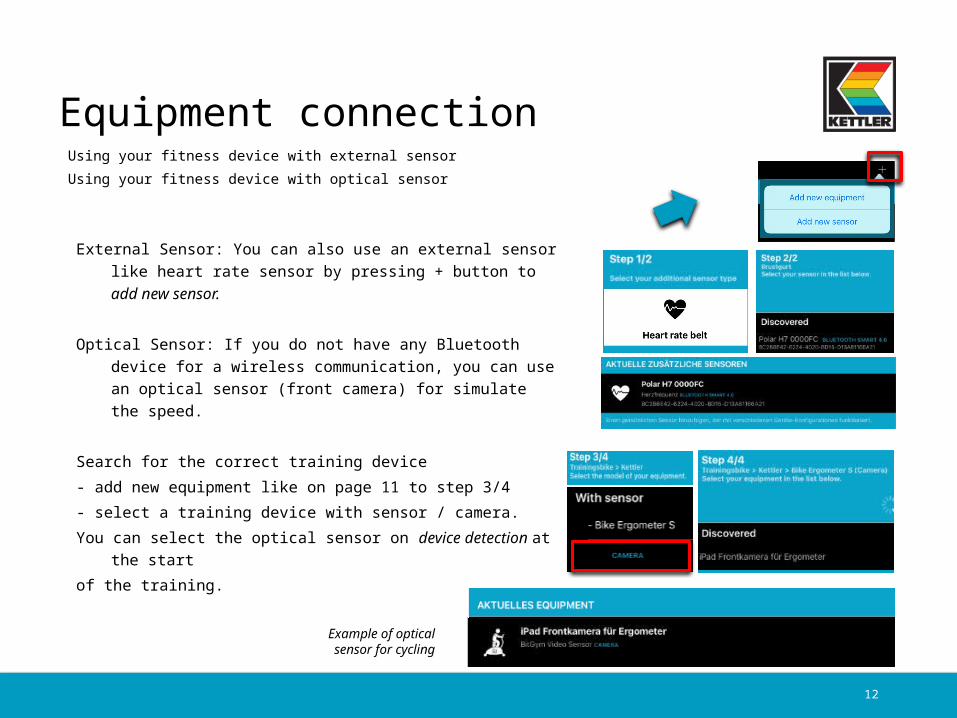
Equipment connectionUsing your fitness device with external sensorUsing your fitness device with optical sensor
External Sensor: You can also use an external sensor like heart rate sensor by pressing + button to add new sensor.
Optical Sensor: If you do not have any Bluetooth device for a wireless communication, you can use an optical sensor (front camera) for simulate the speed.
Search for the correct training device - add new equipment like on page 11 to step 3/4 - select a training device with sensor / camera.You can select the optical sensor on device detection at the
start of the training.
Example of optical sensor for cycling
13
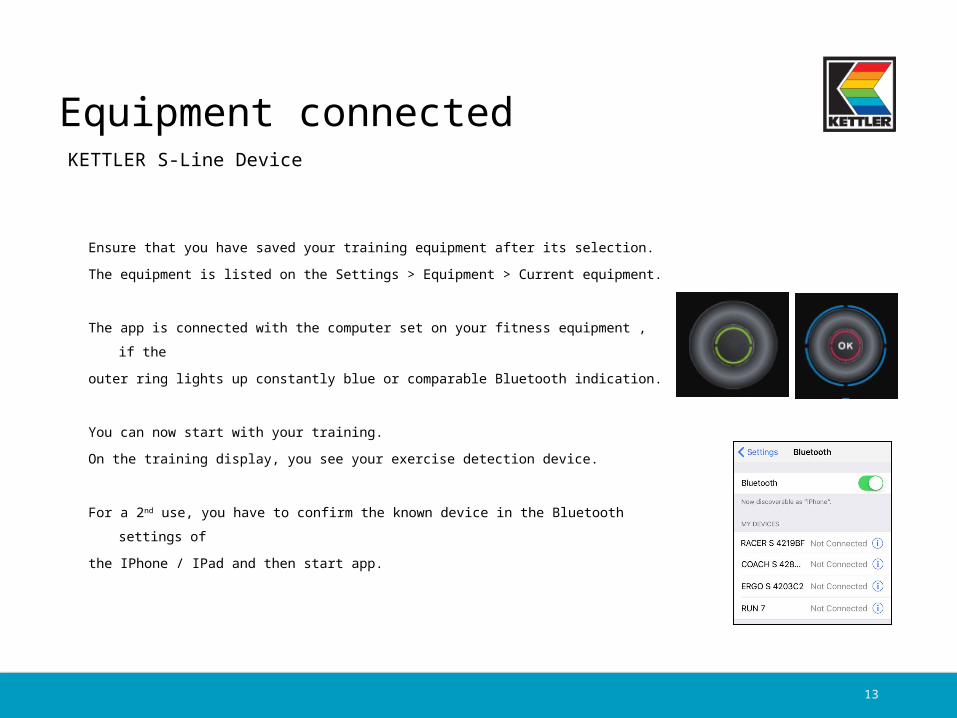
Equipment connectedKETTLER S-Line Device
Ensure that you have saved your training equipment after its selection.The equipment is listed on the Settings > Equipment > Current equipment.
The app is connected with the computer set on your fitness equipment , if the outer ring lights up constantly blue or comparable Bluetooth indication.
You can now start with your training.On the training display, you see your exercise detection device.
For a 2nd use, you have to confirm the known device in the Bluetooth settings of
the IPhone / IPad and then start app.
14
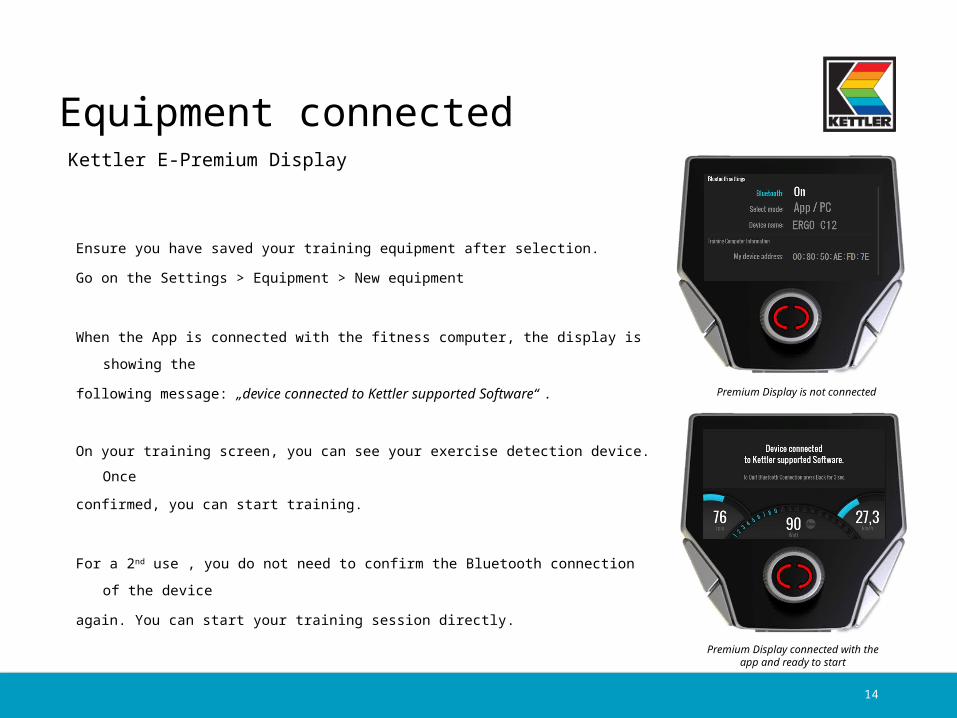
Equipment connectedKettler E-Premium Display
Ensure you have saved your training equipment after selection.
Go on the Settings > Equipment > New equipment
When the App is connected with the fitness computer, the display is showing the
following message: „device connected to Kettler supported Software“ .
On your training screen, you can see your exercise detection device. Once confirmed, you can start training.
For a 2nd use , you do not need to confirm the Bluetooth connection of the device
again. You can start your training session directly.
Premium Display is not connected
Premium Display connected with the app and ready to start

15
3. Training

16
There are several lists of videos made available, on which you can choose the video you want to train on it during your workout session. There is a filter function to ensure you get access to the videos you are looking for (Featured, popular, most viewed, most recent, duration, distance, incline…)
Videos selection
For each video, you can see relevant information: its name,
the contributor (who published the video), country, duration,
distance, average of positive slope, average speed.
17
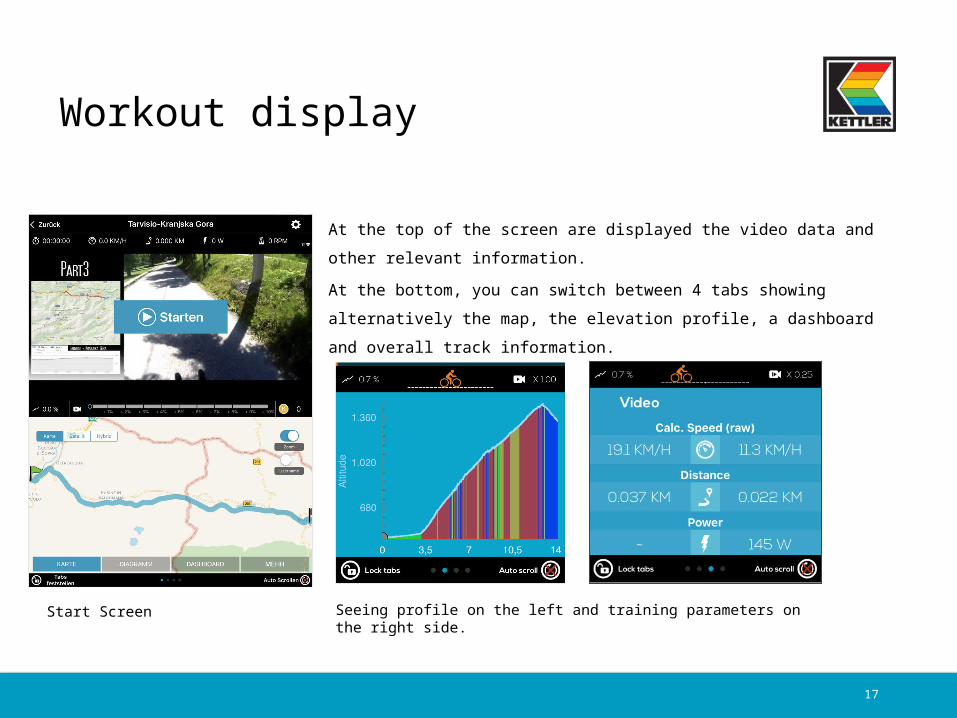
At the top of the screen are displayed the video data and other relevant information.At the bottom, you can switch between 4 tabs showing alternatively the map, the elevation profile, a dashboard and overall track information.
Workout display
Start Screen Seeing profile on the left and training parameters on the right side.

18
On the screen, you get instructions when having to adjust the resistance according to the elevation profile (altitude) when using a cadence or an optical sensor.
When being connected to the KETTLER device wireless, you can still change the resistance with „+“ and „-“
Set resistance / gears
19
Start your workout
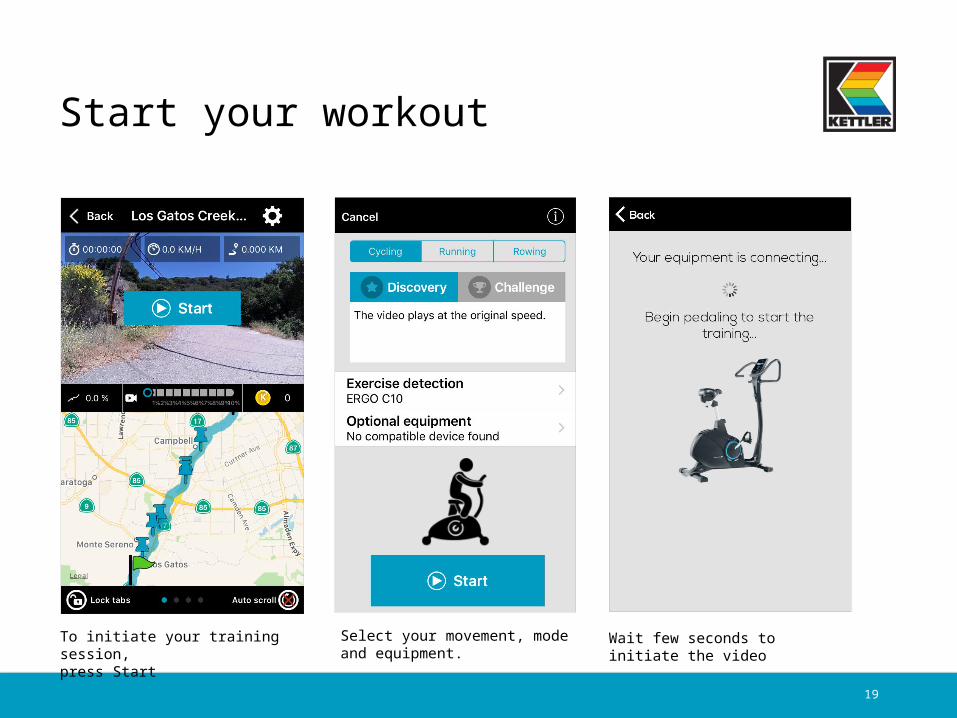
To initiate your training session,press Start
Select your movement, mode and equipment.
Wait few seconds to initiate the video

20
If you want to pause or stop the workout, just stop pedaling or use the Pause button in the corner of the workout. Click on „resume“ text or icon to resume an unachieved workout.
Stop workout
Click here to resume the training session.

21
Join the profile training for your individual workout plan and use appropriate profiles. If the interactive device is connected with the app, you only have to choose the time (< >) for count down and start training. With the Button + and - you can change the selected parameter.
Profile training
Easy and clearly presented profile training with your Kettler device. Change the difficulty in %.

22
Do you use a cross trainer for your training and add it as the same? In that case, we suggest running tracks for an elliptical movement, these running videos being more accurate than cycling ones.
Please search for running videos even if cycling videos are possible as well. Don’t forget to set your training device as running before start.
Specials

23
Do you want to train in portrait or in landscape mode? Please select the suitable position of the tablet before you select a video. A change of the mode during training is not possible when using an iPhone or iPad.
Specials

24
4. Reporting
25
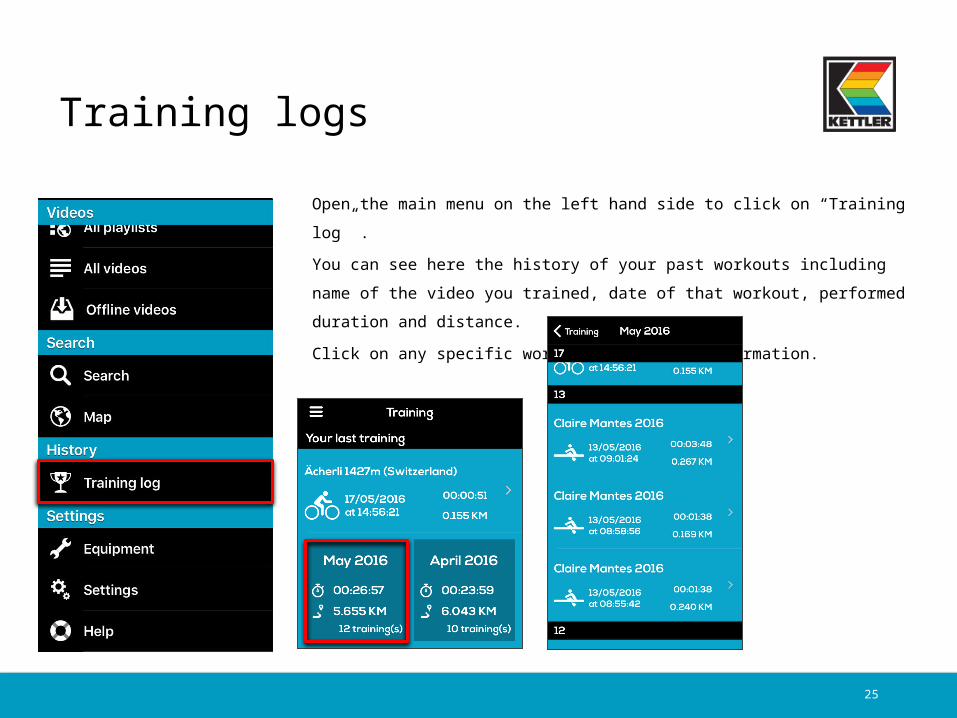
Open the main menu on the left hand side to click on “Training log” .You can see here the history of your past workouts including name of the video you trained, date of that workout, performed duration and distance.Click on any specific workout to get all information.
Training logs

26
Your training log includes a map, a summary and a set of detailed charts reporting your past speed, power, cadence, heart rate.Note that the workout log can be automatically exported to various platforms including RunKeeper, Strava or Selfloops.
Training logs

27
5. Search

28
There are several ways to find the appropriate video. You can search by clicking on the search bar. Once you typed at least 3 characters, an auto completion search is made.
You can also have a geographical search. Go to the main menu to select “Map”.
Search

29
6. Settings

30
Go to the main menu to the Settings and set your user details including units, height, weight, birthday, gender, frontal area. There are also some advanced settings to complete.
User Settings

31
Playlists
Search for more public playlists within the app.
Create and use your individual playlists of your favorite videos directly from your account. You can share it for everybody (public) or only for your own.

32
7. Other
33
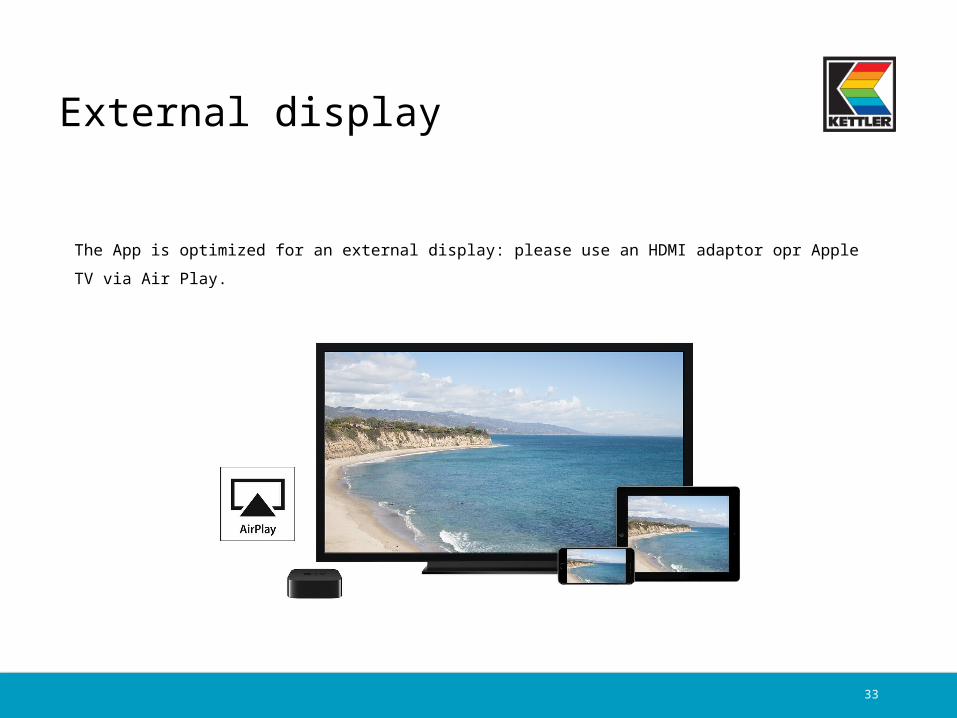
The App is optimized for an external display: please use an HDMI adaptor opr Apple TV via Air Play.
External display

34
The Help menu gives you access to the online support including FAQ / trouble ticketing.
Help & FAQ