kendriya vidyalaya sangathan jaipur … have now developed yet useful software for the fresh...
TRANSCRIPT

KENDRIYA VIDYALAYA SANGATHAN
JAIPUR REGION
Designed and Developed by
Harjeet Raj & Vijeta
PGT(Computer Science)
K V 5,Mansarovar, Jaipur

lans'k & Jherh pUnz izHkk pkS/kjh] izkpk;kZ
mBks] tkxks vkSj y{; izkfIr rd :dks er
It gives me immense pleasure to say that by this “GOLDEN JUBILEE
YEAR “, the KVS has proved its vision of a Pace Setting Organisation in the
field of education. During these 50 glorious years, KVS has proven its
identity and has established a high position in the society. KVS has very
smoothly transacted from the traditional practices in the field of education
to the Integrated Computer Teaching. KVS teachers have shown their
strength and excellence in developing the e- content, e- diary, CCE
Automation software, Library automation of the KV Libraries etc.
In the pursuit of the using the Information Technology and to ease the
administrative work load of the teachers , I appreciate the efforts of
Sh. Harjeet Raj and Smt. Vijeta PGT(Comp. Sc.) , KV No. 5 Jaipur has taken
the initiative of developing the software for Library automation of the KV
Libraries , has now developed software for The Fresh Admissions in KVS
meticulously and in a very friendly and easy way. This software will
substantively reduce the workload of the vibrant teachers of KVS, will save
their precious time for the more creative works in the interest of the
students. I am confident that the KV teachers will continue their endeavor of
using their technical skills for the welfare of the students, teachers and KVS
as a whole.
I convey my sincere thanks to Sh. J M Rawat, Deputy Commissioner, KVS
Jaipur Region for providing us this opportunity, guidance and motivation in
developing this software.
I also extend my thanks to Sh. Harjeet Raj , Smt. Vijita PGT(Comp. Sc.) of
this vidyalaya for their sincere and dedicated efforts in developing this
software..
With all good wishes.
Smt. C P Chaudhri Principal
Kendriya Vidyalaya No. 5, Jaipur

PREFACE
It is a matter of great pleasure for us that after the successful launch of the
software for Library automation for the KVS Libraries developed by us last year,
we have now developed yet useful software for the Fresh Admissions -2015 in
KVs.
This software incorporates all the features and provisions of the KVS Admission
Guidelines 2015 .Right from the registration of the student, checking its eligibility,
reservations under RTE, reservations for the SC/ST/ Sponsoring Agency,
generation of lots, priority wise lists, master lists, waiting lists it can generate the
admission lists. This software will also act as a database of the registered students
and will provide all the information to its users at a mouse click. We are sure that
this software will make the admission procedure more transparent and will not
only make the admissions easier but they will also be error less.
No doubt this software will reduce the workload of the teachers and hence will
save their valuable time which they can utilize for the teaching -learning activities
more efficiently and effectively. We are sure that at the very outset all the KVs of
Jaipur region will get benefit from this software.
We extend our sincere gratitude to Sh. J M Rawat, Deputy Commissioner, and
KVS Jaipur Region for his blessings, motivation and kind approval for this software.
We would like to extend our sincere thanks to Smt. C P Chaudhri, Principal
Kendriya Vidyalaya No. 5, Jaipur, who herself is well versed in ICT, for her
inspiration and guidance.
We would fail in our duty, if we do not pay our thanks to Mr. K K Kochhar,
PGT(Maths) of this Vidyalaya who was always with us in the planning, designing,
testing and execution of this software.
At the end we would like to say that it is the Beta Version(Trial Version) ,though
all efforts have been made to make this software errorless , secured and easily
accessible, however we would feel happy to welcome the queries or suggestions
of our intellectual users.
12/02/2015 Sh. Harjeet Raj & Smt. Vijeta PGT(Comp. Sc.)
KV No. 5(First Shift) Jaipur Mobile NO . 8107454956

USER MAUNAL
e-Admission
An automation system to automate the admission process of
Kendriya Vidylayas from I to XI class
Note: This is the beta version of the Software for trial purpose
please check all the lists manually that will preapaed by the
software
System Requirements:
1. Windows 7 and above
2. Microsoft Office 2010
USER INTERFACE:-
The software has vary easy userface that is very easy to understand for the users.
Main Screen of the software

The software has three main menus that will perform different kind of task.
Admin Menu bar
The admin menu bar contains five sub menus that are very important and useful in admission
process
Let explore them one by one
Program Setting:
This form has six tabs to perform different task i.e.
General: This tab contains general information of your Vidyalaya here you can change your
Vidyalaya information.
Admission Committee: to set the Admission Committee of your Vidyalaya.
Age Setting: to set the Minimum and maximum age limit for each class.

Vacancy Position:
Here you can set total vacancy for all classes.
1. To set the vacancy position fill all the particulars like SC quota ST quota EWS Quota
Horizontal Reservation and Total Seats that are reserved for sponsoring agency, then
click Ok
2. Then the cursor will automatically move to the total vacancy textfield for class I enter
Total Vacancy and Software will automatically calculate the seats according to the
criteria given by you.
3. Select Class which you want to save the vacancy (this option is use for save vacancy
position for separate classes. Suppose if you select class I from the drop down then it will
save only the vacancies that are related to class I
Note: please set the Vacancy for each class (this is the one time process) before proceeding to
the admission, once you created any admission list of any class, you will not able to change the
vacancy position of any class.
Lottery Setting: This option provides the facility to conduct the lottery. Arrange the lottery
options according to the sequence you will follow to conduct the lottery.
Report Header: This option provides the facility to create the header according to your choice,
theses headers can be used to print the Reports with your Headers.
Reset Password: This option can be used to reset the password for your software.
Database Backup: This option can be used to take the backup of your database
Note: please take the backup regularly to avoid future problems.

Undo Admission List: This is very important option for you, if you have done any mistake in the
admission list simply click on the option this will undo the whole admission lists of the particular
class that has been selected.
Note: once you undo the admission list it will delete all the option like lottery
setting , vacancy position and all the admission lists and waiting list of a class
and you will not able to get them back. So be careful from unauthorized persons
to try this option.
Main Menu bar
Add New Record: This is simply Data Entry Screen where you can enter the details of candidates.
Some tips to enter data:
1. Enter Date of birth and date of deposit in MM/dd/yyyy format.
2. To enter data with fast speed press tab key to move to the next Field.
3. You need not to pick date from the calendar just enter date in the same provided by the
calendar control.
Date Entry form to register the candidate
Update Record: here you can update information of a particular candidate
Simply enter the application no. and it will show the whole details of the candidate change the
data you want and click on update.

Delete Record: to delete the record of particular Candidate.
Generation of First Admission List:
Note: Before generation of Admission lists please verify that all the records of candidates
should be up to date, after generation of admission lists you will not able to edit the records of
the candidates.
This option is use to create First Admission list:
Step 1: Select Class for Admission
Step 2: choose category for admission, once you select category it shows list of all the
candidates that are belongs to selected category.it also show total vacancy that are available for
that particular category. If number of records are greater than the Vacancy position it means
there is not provision to admit them directly you have to go for the lottery if number of records
are less then or equals to the simply click on Save to Admission List button to admit the
students.
For example you choose “RTE-EWS” Category from the Drop down and this category has total 30
vacancies but list showing 140 records of this category. So you have to conduct the lottery for
this category.
Note: Suppose you have selected category I from the drop down and it display the list of
candidates that belongs to category I now if total vacancy for priority wise is 10 and the
software displaying the list of 20 candidates and you want to add only those candidates in the
admission list directly(Without lot) who are having number of transfers greater than 0 then
select that records that you do not want to include in the list and press delete key from the
keyboard it will delete all unwanted records from the current list, now you are having only
those records that you want to admit in the admission list, now simply click on save to
Admission List.
To conduct the lottery go to ADMIN-> Prigram Setting -> Lottery Setting

Select Class for Lottery
Two listbox will be appear, select lot type from first List and move it to second list then click on
save button.
Now close this form with click on exit.
Step 4: go to main menu and click on “Generation of Admission/waiting using lot”
Then form given below will appear
Step: 1 Select Class
Step 2: Select List type to Create Admission List Select Adm. List and to create waiting list Select
Wait list from the drop down.
Step 3: Select Lot Category from the Select Category Drop down.
Step 4: Enter Application No. for the selected candidate.
Step 5: Click on Search.
After click on search button the record of candidate will be displayed
Step 6: Enter Lot no. for the candidate.
Step 7: Click on add to list.
Repeat step 4 to 7 till the list is not completed against the vacancy position.
After complete the list click on “Save Record(s) to admission list” button.
To create waiting list for this category click on “Reset button” then select class and the select
“wait list” from List type and select same category again.
Repeat step 4 to 7 till the waiting list is not completed.
Click on “save Record(s) to waiting list” to save the records.
You can use same technique for all categories.
Note: Before proceeding to the next option please check whether you admission list has been
completed. If it has been completed then go to Admin->Finalization of Admission list then
select class and admission list no. from the dropdown and click on finalize. Once you finalized a
list then you cannot make changes in that particular list.
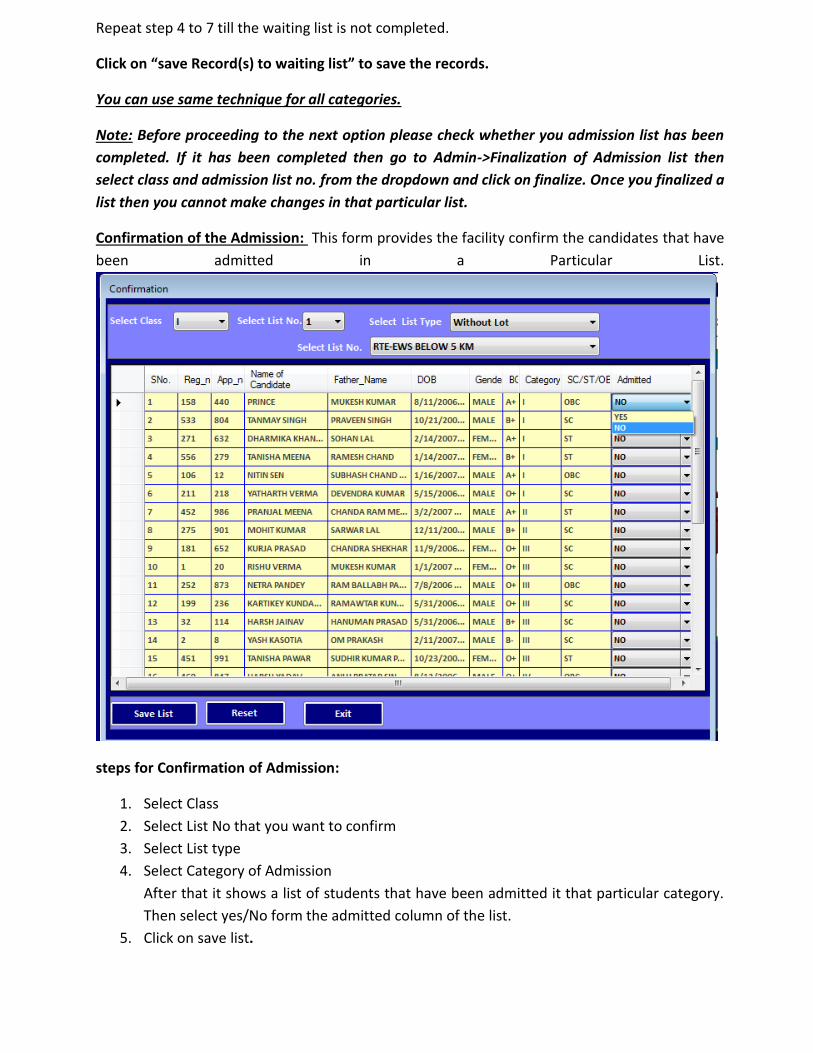
Confirmation of the Admission: This form provides the facility confirm the candidates that have
been admitted in a Particular List.
steps for Confirmation of Admission:
1. Select Class
2. Select List No that you want to confirm
3. Select List type
4. Select Category of Admission
After that it shows a list of students that have been admitted it that particular category.
Then select yes/No form the admitted column of the list.
5. Click on save list.

Admission from waiting list:
Steps for Admission form waiting list:
1. Select Class
2. Select Waiting list from which you want to take records
3. Select no. of records that you want to get from that particular list
After that it shows a list of students that have been belongs to that particular waiting list.
4. Click on save to Admission List.
Report menu bar

Report menu bar provides the facilities to prepare and print the lists like master list, admission
list, waiting list etc.
For example we want to print the admission list then click on Admission List and then the
following Form will appear:
Steps to print Admission List:
1. Select Class
2. Select List no. which you want to print
3. Select List type
4. Select option or category of admission
A list will display
5. Click on print preview
6. Enter date when you want to display the list( this date will be print on the report)
7. Select header for report( this header will be print as a header on the report)
8. Click on preview
As you click on preview a report will be display as give below

Page Setup
Export Data
Print View
Note: Use legal size papers to take print outs.
Similarly you can prepare reports for each category.
Printing of Lot Slips:
You can print lot slips using this option (use A4 size paper to take the print)
Role of Reset Button: Reset button is used to set the form at initial stage
Role of Exit Button: Exit button is used to exit from the current form.
(It is for the circulation in KVs of Jaipur Region)
For any suggestion you can e-mail us on:

For Class XI Add New Record
Setting for Class XI
Admin->Setting for class XI
This menu will allow you to perform setting before start the admission
process for class XI
in the
above screen there are two tabs Subject Offered and Admission Criteria
Subject offered:
This tab will allow you to shortlist the subjects that are opted by your
school in different streams from the list of subject offered by CBSE.
Admission Criteria:
This option will allow to set the Criteria i.e. eligibility for different
streams. You can also add the New Education BOARD and School name
that will display in Board name and School name dropdowns in the “Add
New student” Form for class XI as the image given below

Main->Add New Record->XI
Class XI Admission-> Prepare Admission List
The above form will allow you to prepare admission list for class XI.
Steps to prepare the list
1. Choose stream from stream Drop-Down box

2. Select subject combination from six drop down boxes(Sixth is for optional
subject if any). For example if you want students with subject combination
like English, Hindi, Physi cs , Chemistry, Maths,
IP will go to the section B of Class XI simply select this combination and click
on filter students this will display the list of students with same subject
combination.
3. Now to admit the student select yes in the Admit column and select section
like A, B,C from the section column for the particular student. You can apply
the setting of first Admit column to all the students by checking the check
box “Apply Admit Status to All” and you can also apply the setting of first
section column to all by checking the check box “Apply section to all”
You can also filter the students by board name or school name
Printing of Admission Lists/Master List: you can print the admission
lists/Master List from the report menu bar