just kisses at dusk - robert kaufman
TRANSCRIPT

Just KissesDesigned by Erica Jackmanwww.kitchentablequilting.com
Finished quilt measures: 60” x 75”
Featuring
AT DUSK

page 2
Fabric and Supplies Needed
Color Fabric Name/SKU Yardage
K001- 1089CORN YELLOW
K001- 481SANGRIA
K001- 32SURF
K001- 1294PLUM
K001- 84PERSIMMON
K001- 419AZALEA
K001- 26CANARY
K001- 1084COPEN
K001- 261BUBBLE GUM
K001- 1482SCHOOL BUS
K001- 323FLAME
K001- 476GRELLOW
K001-1016BERRY
K001- 140NIGHTFALL
K001- 1218MARINE
K001- 1066CERISE
K001- 1295POMEGRANATE
K001- 400CARROT
1/6 yard
1/6 yard
1/6 yard
1/6 yard
1/6 yard
1/6 yard
1/6 yard
1/6 yard
1/6 yard
Color Fabric Name/SKU Yardage
Fabric amounts based on yardage that is 40” wide.
A
B
C
D
E
F
G
H
I
J
K
L
M
N
O
P
Q
R
1/6 yard
1/6 yard
1/6 yard
1/6 yard
1/6 yard
1/6 yard
1/6 yard
1/6 yard
1/6 yard
Fabric and Supplies Needed
page 3
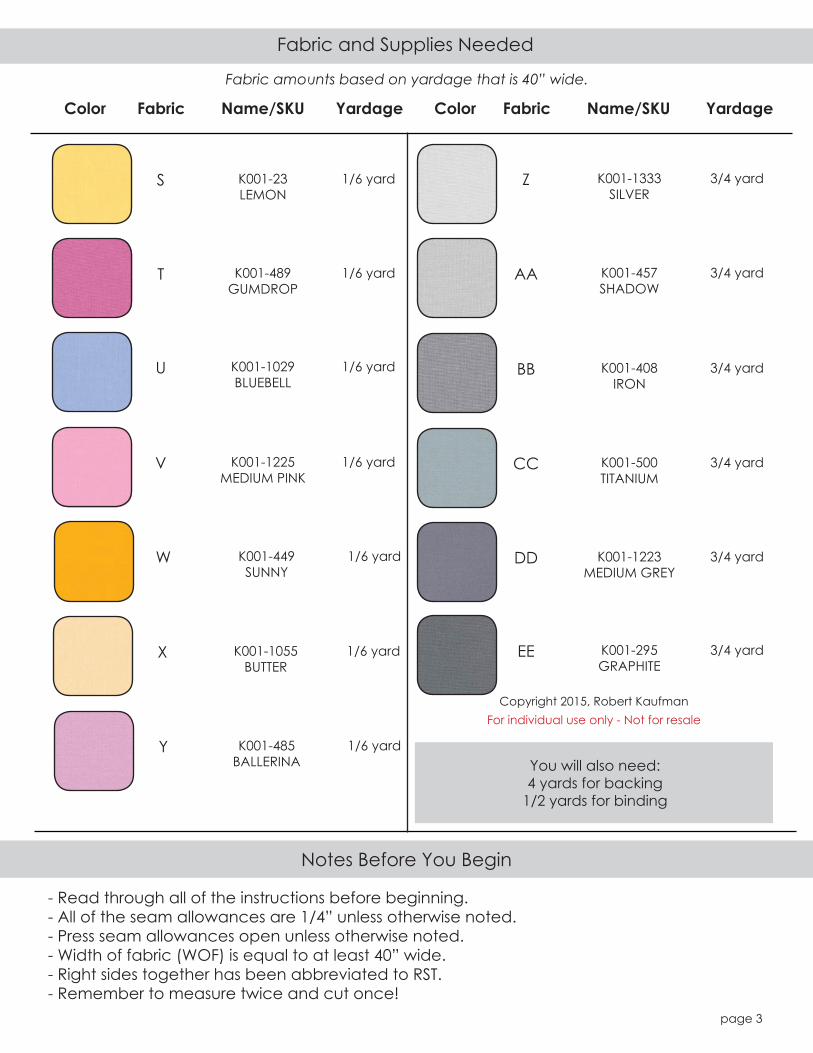
Fabric and Supplies Needed
Color Fabric Name/SKU Yardage
K001- 449SUNNY
K001- 23LEMON
K001- 1055BUTTER
K001- 485BALLERINA
K001- 1333SILVER
K001- 457SHADOW
K001- 408IRON
K001- 500TITANIUM
K001- 1223MEDIUM GREY
K001-295GRAPHITE
K001- 489GUMDROP
K001- 1029BLUEBELL
K001- 1225MEDIUM PINK
1/6 yard
1/6 yard
1/6 yard
3/4 yard
3/4 yard
3/4 yard
3/4 yard
3/4 yard
3/4 yard
Color Fabric Name/SKU Yardage
Fabric amounts based on yardage that is 40” wide.
S
T
U
V
W
X
Y
Z
AA
BB
CC
DD
EE
1/6 yard
1/6 yard
1/6 yard
1/6 yard
Fabric and Supplies Needed
Copyright 2015, Robert KaufmanFor individual use only - Not for resale
You will also need:4 yards for backing
1/2 yards for binding
- Read through all of the instructions before beginning.- All of the seam allowances are 1/4” unless otherwise noted.- Press seam allowances open unless otherwise noted.- Width of fabric (WOF) is equal to at least 40” wide.- Right sides together has been abbreviated to RST.- Remember to measure twice and cut once!
Notes Before You Begin

page 4
Note: Quantities are per fabric.
From Fabrics A-E, cut:ten 3-7/8” squares
From Fabrics F-J, cut:eight 3-7/8” squares
From Fabrics K-O, cut:six 3-7/8” squares
1. Cut all of the squares, both the 3- 7/8” and 15- 7/8”, along the diagonal to make right triangles.
2. Arrange the triangles from each color into the following layout with the darkest colored triangles on the hypotenuse down to the lightest triangle in the bottom right corner.
Cutting Instructions
Assembling the Blocks
From Fabrics P-T, cut:four 3-7/8” squares
From Fabrics U-Y, cut:two 3-7/8” squares
From Fabrics Z- EE, cut:twenty 3-7/8” squarestwo 15-7/8” squares
Match Fabric EE triangles with the blues in order from darkest to lightest: Nightfall (Fabric E), Marine (F), Surf (K), Copen (P), and Blue Bell (U).
Match the Fabric CC triangles with the purples in order from darkest to lightest: Berry (Fabric D), Cerise (G), Plum (L), Gumdrop (T), Ballerina (Y).
Match the Fabric BB triangles with the pinks in order from darkest to lightest: Sangria (Fabric A), Pomegranate (H), Azalea (N), Bubble Gum (Q), and Medium Pink (V).
Match the Fabric AA triangles with the oranges in order from darkest to lightest: Flame (Fabric B), Carrot (I), Persimmon (M), School Bus (R), and Sunny (W).
Match the Fabric Z triangles with the yellows in order from darkest to lightest: Grellow (Fabric C), Corn Yellow (J), Canary (O), Lemon (S), and Butter (X).
3. Piece together each of the smaller colored triangles with the corresponding gray triangles along the diagonal edge to make squares. Press toward the gray fabrics.
4. Using half of the triangles and squares, join together the squares with the darkest colored triangles on the edge of each row as shown in Diagram A, then piece the rows together.
Diagram A

page 5
5. Join your smaller triangles with the larger triangle as shown in Diagram B.
6. You should now have four 15- 1/2” blocks for each color. Arrange the blocks as shown in the fi nished quilt diagram.
7. Piece together blocks into fi ve rows of four blocks each. Press block seams to the left in odd numbered rows and to the right in even numbered rows. Press row seams open.
8. Your quilt is complete. Baste, bind, quilt and enjoy!
Diagram B