just-in-time supply to customer (2em us) - sap
TRANSCRIPT

7/23/2020
https://help.sap.com/http.svc/dynamicpdfcontentpreview?deliverable_id=22279113&topics=24286d6e71b94c2e80e36f5458d… 1/32
Just-In-Time Supply to Customer(2EM_US)Generated on: 2020-07-23
SAP_S4HANA_BEST_PRACTICES | 2005_DEV
CONFIDENTIAL
Original content: https://help.sap.com/viewer/DRAFT/f9939bb9fbfb8d62761e4515c0bb79d8/2005_DEV/en-US
Warning
This document has been generated from the SAP Help Portal and is an incomplete version of the official SAP productdocumentation. The information included in custom documentation may not re�ect the arrangement of topics in the SAP HelpPortal, and may be missing important aspects and/or correlations to other topics. For this reason, it is not for productive use.
For more information, please visit the https://help.sap.com/viewer/disclaimer.

7/23/2020
https://help.sap.com/http.svc/dynamicpdfcontentpreview?deliverable_id=22279113&topics=24286d6e71b94c2e80e36f5458d… 2/32
PurposeThe process starts with receiving of Just-In-Time (JIT) calls from customers. JIT calls are sent via an Electronic Data Interchange(EDI) integration and contain the component details with the requirements date and time.
The Material Planner - Just-In-Time Supply monitors and manages the JIT calls from customers.
The Shipping Specialist - Just-In-Time Supply creates deliveries on open JIT calls, with status re�ected accordingly. Advancedshipping noti�cations are sent via EDI to the OEM.
After picking and posting of goods issue, the JIT call status is updated accordingly.
After the billing is created, the JIT call is updated to Completed status.
This document provides a detailed procedure for testing this scope item after solution activation, re�ecting the prede�ned scopeof the solution. Each process step, report, or item is covered in its own section, providing the system interactions (test steps) in atable view. Steps that are not in scope of the process but are needed for testing are marked accordingly. Project-speci�c stepsmust be added.
PrerequisitesThis section summarizes all prerequisites to conducting the test in terms of systems, users, master data, organizational data,other test data and business conditions.
Additional Manual Con�gurationBefore proceeding with testing this scope item, you need to have completed the additional and mandatory con�guration stepsthat are described in the Set-Up Instructions for this scope item 2EM - Just-In-Time Supply to Customer. These con�gurationsteps are speci�c for your implementation. These include mandatory settings that are not delivered by SAP and must be createdby you. For more information, refer to the document in the SAP Best Practices Explorer.
RolesOnly relevant for Cloud:
Create business roles using the following business role templates delivered by SAP and assign them to your individual test users.
Only relevant for On-Premise:
Assign the following business roles to your individual test users.
Name ID
Internal Sales Representative SAP_BR_INTERNAL_SALES_REP
Master Data Specialist - Business Partner Data SAP_BR_BUPA_MASTER_SPECIALIST
NoteThese roles are example roles provided by SAP. You can use them as templates to create your own roles.
7/23/2020
https://help.sap.com/http.svc/dynamicpdfcontentpreview?deliverable_id=22279113&topics=24286d6e71b94c2e80e36f5458d… 3/32
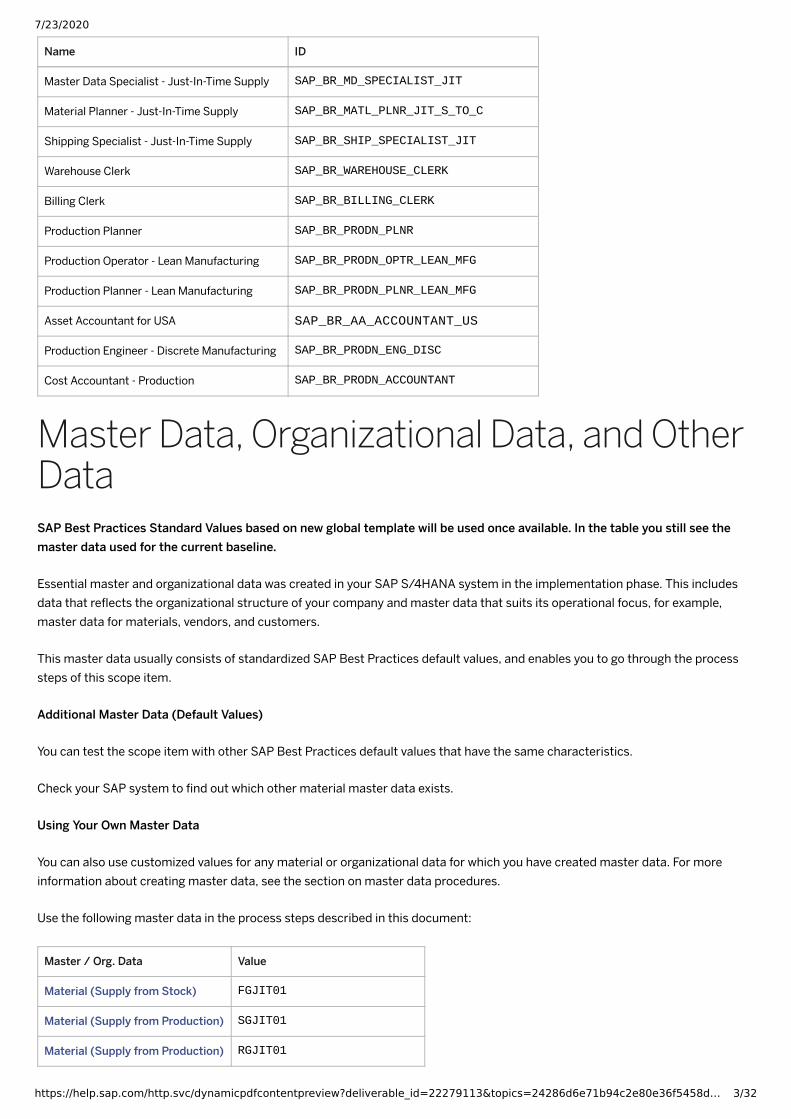
Name ID
Master Data Specialist - Just-In-Time Supply SAP_BR_MD_SPECIALIST_JIT
Material Planner - Just-In-Time Supply SAP_BR_MATL_PLNR_JIT_S_TO_C
Shipping Specialist - Just-In-Time Supply SAP_BR_SHIP_SPECIALIST_JIT
Warehouse Clerk SAP_BR_WAREHOUSE_CLERK
Billing Clerk SAP_BR_BILLING_CLERK
Production Planner SAP_BR_PRODN_PLNR
Production Operator - Lean Manufacturing SAP_BR_PRODN_OPTR_LEAN_MFG
Production Planner - Lean Manufacturing SAP_BR_PRODN_PLNR_LEAN_MFG
Asset Accountant for USA SAP_BR_AA_ACCOUNTANT_US
Production Engineer - Discrete Manufacturing SAP_BR_PRODN_ENG_DISC
Cost Accountant - Production SAP_BR_PRODN_ACCOUNTANT
Master Data, Organizational Data, and OtherDataSAP Best Practices Standard Values based on new global template will be used once available. In the table you still see themaster data used for the current baseline.
Essential master and organizational data was created in your SAP S/4HANA system in the implementation phase. This includesdata that re�ects the organizational structure of your company and master data that suits its operational focus, for example,master data for materials, vendors, and customers.
This master data usually consists of standardized SAP Best Practices default values, and enables you to go through the processsteps of this scope item.
Additional Master Data (Default Values)
You can test the scope item with other SAP Best Practices default values that have the same characteristics.
Check your SAP system to �nd out which other material master data exists.
Using Your Own Master Data
You can also use customized values for any material or organizational data for which you have created master data. For moreinformation about creating master data, see the section on master data procedures.
Use the following master data in the process steps described in this document:
Master / Org. Data Value
Material (Supply from Stock) FGJIT01
Material (Supply from Production) SGJIT01
Material (Supply from Production) RGJIT01

7/23/2020
https://help.sap.com/http.svc/dynamicpdfcontentpreview?deliverable_id=22279113&topics=24286d6e71b94c2e80e36f5458d… 4/32
Master / Org. Data Value
Sold-To Party 17154801
Ship-To Party 17154801
Plant 1710
Storage Location 171Afor material FGJIT01
171B
for material SGJIT01
Shipping Point 1710
Sales Organization 1710
Distribution Channel 10
Division 00
System AccessSystem Details
System Accessible via SAP Fiori launchpad. Your system administrator provides you with the URL to access the various apps assigned toyour role.
Master Data Creation in SAP On-PremiseSystemExamples to create master data in SAP On-Premise system.
Create MaterialMaterial can be created with the following entries, for example:
Material Name: RP001JIT01
Maintain the following views:
Basic Data 1
Plant: P001
Sales Organization: 0001
Distribution Channel: 01
Description: <Material Description>
Base Unit of Measure: EA
Material Group: <L004>
GenItemCatGroup: NORM
7/23/2020
https://help.sap.com/http.svc/dynamicpdfcontentpreview?deliverable_id=22279113&topics=24286d6e71b94c2e80e36f5458d… 5/32
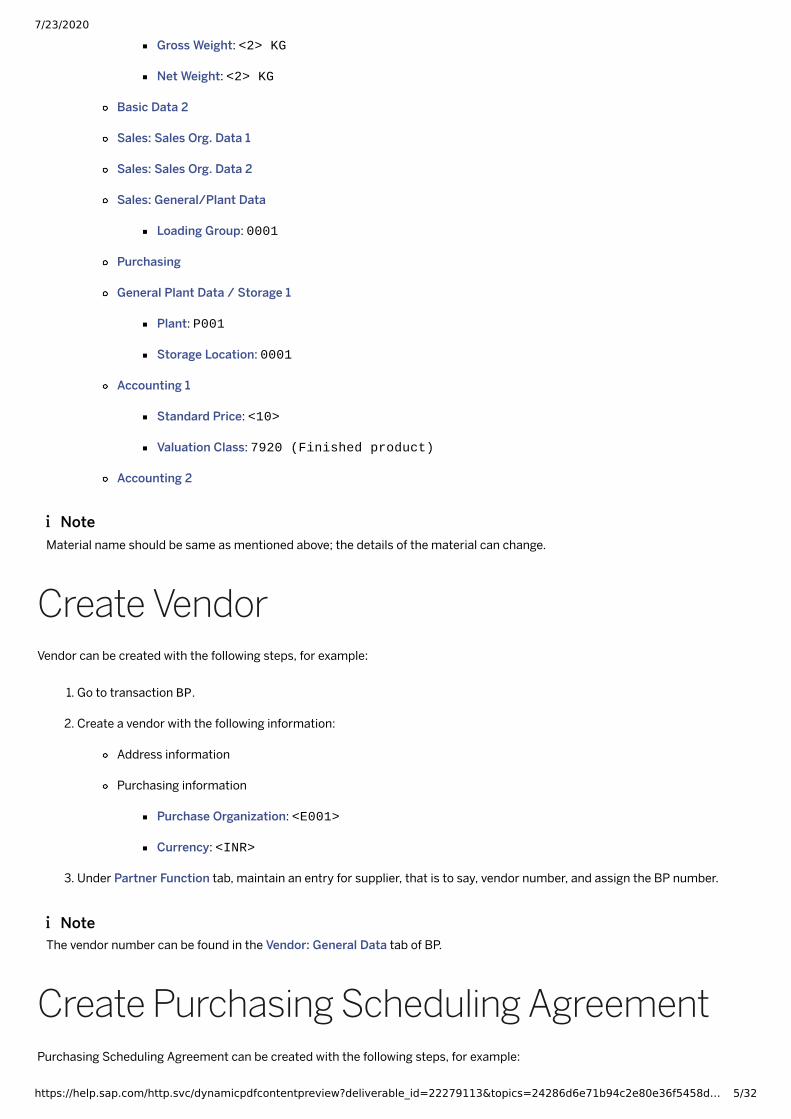
Gross Weight: <2> KG
Net Weight: <2> KG
Basic Data 2
Sales: Sales Org. Data 1
Sales: Sales Org. Data 2
Sales: General/Plant Data
Loading Group: 0001
Purchasing
General Plant Data / Storage 1
Plant: P001
Storage Location: 0001
Accounting 1
Standard Price: <10>
Valuation Class: 7920 (Finished product)
Accounting 2
Create VendorVendor can be created with the following steps, for example:
1. Go to transaction BP.
2. Create a vendor with the following information:
Address information
Purchasing information
Purchase Organization: <E001>
Currency: <INR>
3. Under Partner Function tab, maintain an entry for supplier, that is to say, vendor number, and assign the BP number.
Create Purchasing Scheduling AgreementPurchasing Scheduling Agreement can be created with the following steps, for example:
NoteMaterial name should be same as mentioned above; the details of the material can change.
NoteThe vendor number can be found in the Vendor: General Data tab of BP.

7/23/2020
https://help.sap.com/http.svc/dynamicpdfcontentpreview?deliverable_id=22279113&topics=24286d6e71b94c2e80e36f5458d… 6/32
1. Go to transaction ME31L.
2. Create a Purchasing Scheduling Agreement with the following information:
Vendor: <Specify the vendor number created in the above step>
Agreement Type: LPA
Purchasing Organization and Group: <for example, E001 / 000>
Validity Date: <>
Incoterm: CFR
Material: RP001JIT01
Target Quantity: <for example, 10 >
Net Price: <for example, 10>
Plant: P001
Con�rmation Control Key: 0001
3. Save the entries; the scheduling agreement is created.
Create Supply AreaA new supply area can be created with the following steps, for example: (An existing entry can also be used)
1. Go to transaction PK05S.
2. Maintain the following information and choose Save:
Plant: P001
Supply Area: <RA_P001_01>
Description: <Description>
Supply Area Responsible
Create Control CycleA new control cycle can be created with the following steps, for example:
1. Go to transaction PKMC.
2. Maintain the plant and execute.
3. In change mode, choose Create Action.
4. Select Manual SUMJC
5. Maintain the following and choose OK:
NoteMake sure the Kanban indicator Z is maintained for scheduling agreement.
7/23/2020
https://help.sap.com/http.svc/dynamicpdfcontentpreview?deliverable_id=22279113&topics=24286d6e71b94c2e80e36f5458d… 7/32
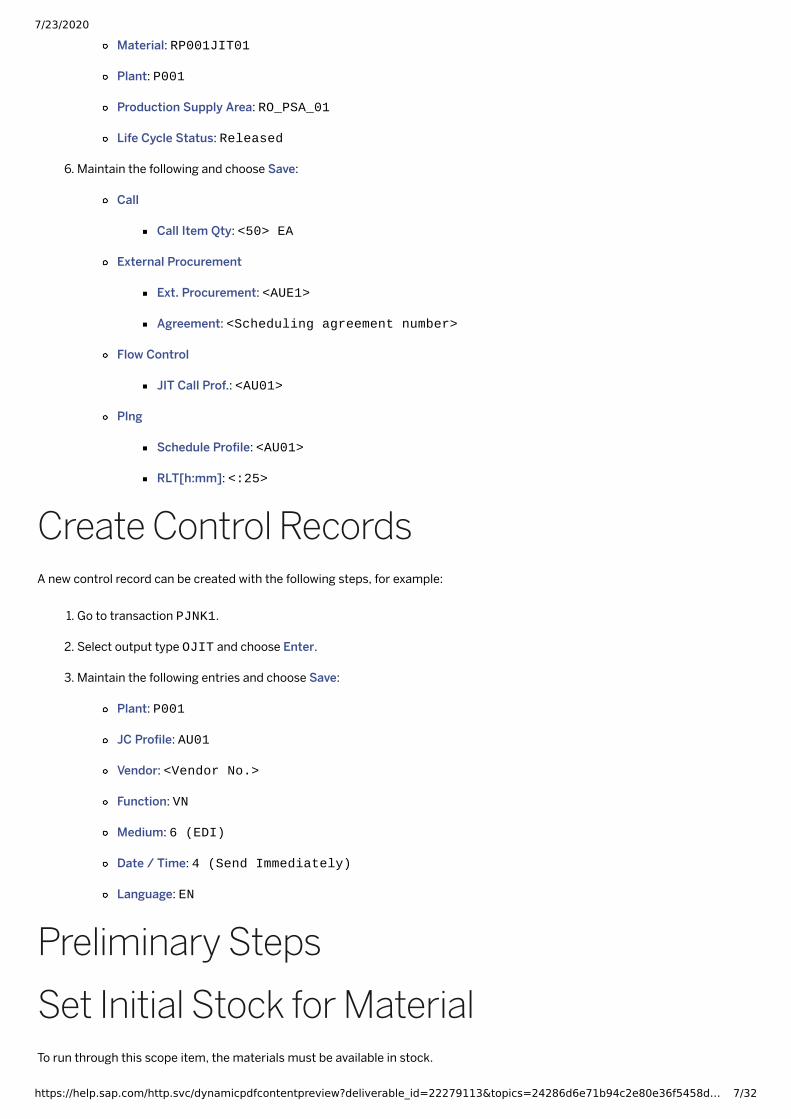
Material: RP001JIT01
Plant: P001
Production Supply Area: RO_PSA_01
Life Cycle Status: Released
6. Maintain the following and choose Save:
Call
Call Item Qty: <50> EA
External Procurement
Ext. Procurement: <AUE1>
Agreement: <Scheduling agreement number>
Flow Control
JIT Call Prof.: <AU01>
Plng
Schedule Pro�le: <AU01>
RLT[h:mm]: <:25>
Create Control RecordsA new control record can be created with the following steps, for example:
1. Go to transaction PJNK1.
2. Select output type OJIT and choose Enter.
3. Maintain the following entries and choose Save:
Plant: P001
JC Pro�le: AU01
Vendor: <Vendor No.>
Function: VN
Medium: 6 (EDI)
Date / Time: 4 (Send Immediately)
Language: EN
Preliminary StepsSet Initial Stock for MaterialTo run through this scope item, the materials must be available in stock.
7/23/2020
https://help.sap.com/http.svc/dynamicpdfcontentpreview?deliverable_id=22279113&topics=24286d6e71b94c2e80e36f5458d… 8/32
TestStep#
Test Step Name Instruction ExpectedResult
Pass / Fail / Comment
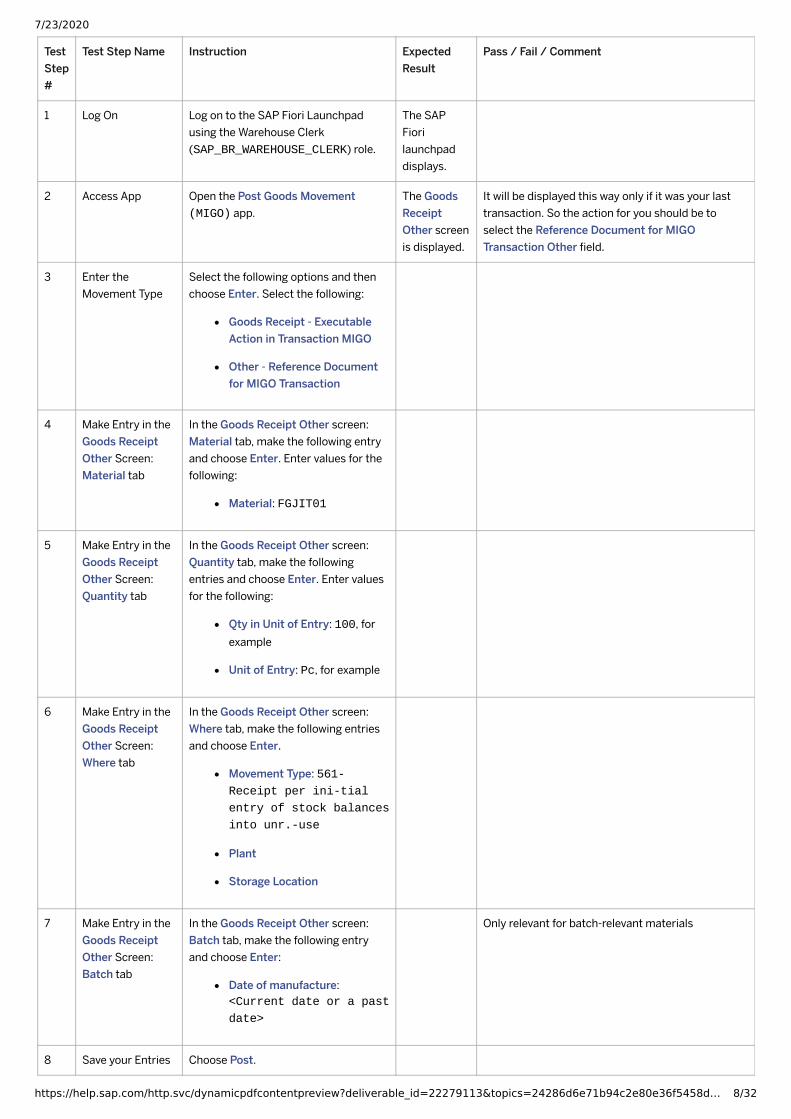
1 Log On Log on to the SAP Fiori Launchpadusing the Warehouse Clerk(SAP_BR_WAREHOUSE_CLERK) role.
The SAPFiorilaunchpaddisplays.
2 Access App Open the Post Goods Movement(MIGO) app.
The GoodsReceiptOther screenis displayed.
It will be displayed this way only if it was your lasttransaction. So the action for you should be toselect the Reference Document for MIGOTransaction Other �eld.
3 Enter theMovement Type
Select the following options and thenchoose Enter. Select the following:
Goods Receipt - ExecutableAction in Transaction MIGO
Other - Reference Documentfor MIGO Transaction
4 Make Entry in theGoods ReceiptOther Screen:Material tab
In the Goods Receipt Other screen:Material tab, make the following entryand choose Enter. Enter values for thefollowing:
Material: FGJIT01
5 Make Entry in theGoods ReceiptOther Screen:Quantity tab
In the Goods Receipt Other screen:Quantity tab, make the followingentries and choose Enter. Enter valuesfor the following:
Qty in Unit of Entry: 100, forexample
Unit of Entry: Pc, for example
6 Make Entry in theGoods ReceiptOther Screen:Where tab
In the Goods Receipt Other screen:Where tab, make the following entriesand choose Enter.
Movement Type: 561-Receipt per ini-tial
entry of stock balances
into unr.-use
Plant
Storage Location
7 Make Entry in theGoods ReceiptOther Screen:Batch tab
In the Goods Receipt Other screen:Batch tab, make the following entryand choose Enter:
Date of manufacture:<Current date or a past
date>
Only relevant for batch-relevant materials
8 Save your Entries Choose Post.

7/23/2020
https://help.sap.com/http.svc/dynamicpdfcontentpreview?deliverable_id=22279113&topics=24286d6e71b94c2e80e36f5458d… 9/32
Create Customer Master DataCreate Just-In-Time Customer Master DataPurpose
To maintain JIT-speci�c information for a JIT customer.
Procedure
TestStep#
Test Step Name Instruction ExpectedResult
Pass / Fail / Comment
1 Log On Log on to the SAP Fiori Launchpad usingthe role Master Data Specialist - Just-In-Time Supply(SAP_BR_MD_SPECIALIST_JIT).
The SAPFioriLaunchpadis displayed.
2 Access the App Open Manage Just-In-Time CustomerData app
Customerinformationis displayed.
By default, all the customers for whom the JIT-relevant information is maintained are displayed.You can �lter to narrow down the customers list.
3 Create JIT-RelevantCustomer
Choose Add to create a JIT-relevantcustomer.
Objectscreen isdisplayed.
4 MaintainCustomer ID
Choose Enter Customer and enter17154801
By default, the following information is displayedon the screen:
Sales Area, Country, City, Status

7/23/2020
https://help.sap.com/http.svc/dynamicpdfcontentpreview?deliverable_id=22279113&topics=24286d6e71b94c2e80e36f5458… 10/32
TestStep#
Test Step Name Instruction ExpectedResult
Pass / Fail / Comment
5 MaintainAdditional JIT-speci�cInformation for aCustomer
On the Customer Detail screen, make thefollowing entries and choose Save andActivate:
Destination
Customer Supply Area:RO_PSA_01
Unloading Point: UL01
Customer AssemblyLocation: <Body Shop>
External Status Mapping
Transmitted Status:<Blank>
External Status: 0200
External Status Mapping
Transmitted Status: 0010
External Status: 0200
Call Processing
Ext. JIT Call No. Uniquefor (Days): 9999
[Optional] Delivery Split Criteria:No split
For Delivery Split Criteria, there is no defaultoption selected. Either of the following optionscan be selected from the menu:
External Component Group
Number: Selecting this option splits thedelivery document based on externalcomponent group number.
External JIT Call Number:Selecting this option splits the deliverydocument based on external JIT callnumber.
6 Save the Entries Choose Save and Activate The statusof thecustomer isset toActive.
Create Customer Supply Control RecordsPurpose
To create a customer supply control.
Procedure
TestStep#
Test Step Name Instruction Expected Result Pass / Fail / Comment
1 Log On Log on to the SAP Fiori Launchpad using the roleMaster Data Specialist - Just-In-Time Supply(SAP_BR_MD_SPECIALIST_JIT).
The SAP Fiori Launchpadis displayed.

7/23/2020
https://help.sap.com/http.svc/dynamicpdfcontentpreview?deliverable_id=22279113&topics=24286d6e71b94c2e80e36f5458… 11/32
TestStep#
Test Step Name Instruction Expected Result Pass / Fail / Comment
2 Access the App Open Manage Just-In-Time Customer SupplyControls app.
3 Create CustomerSupply Control
Choose Add to create a new customer supply control Object screen is displayedto create a new customersupply control
4 MaintainCustomer SupplyControl
On the Supply Control Detail screen, make thefollowing entries and choose Save and Activate:
Supply Control
Supply Control Description
Unloading Point: UL01
Customer: 17154801
Plant
Plant: 1710
Supply Area
Customer Supply Area: RO_PSA_01
Call Processing
Action Control: S1_ACTRL
Call Type: Summarized JIT Call
Repetitive Manufacturing isAllowed: No
Delivery Control
Partial Delivery Allowed: Yes
By default, the followinginformation is displayedon the screen:
Sales Area, Country,City, Status
5 Save the Entries Choose Save and Activate The status of the supplycontrol is set to Active.
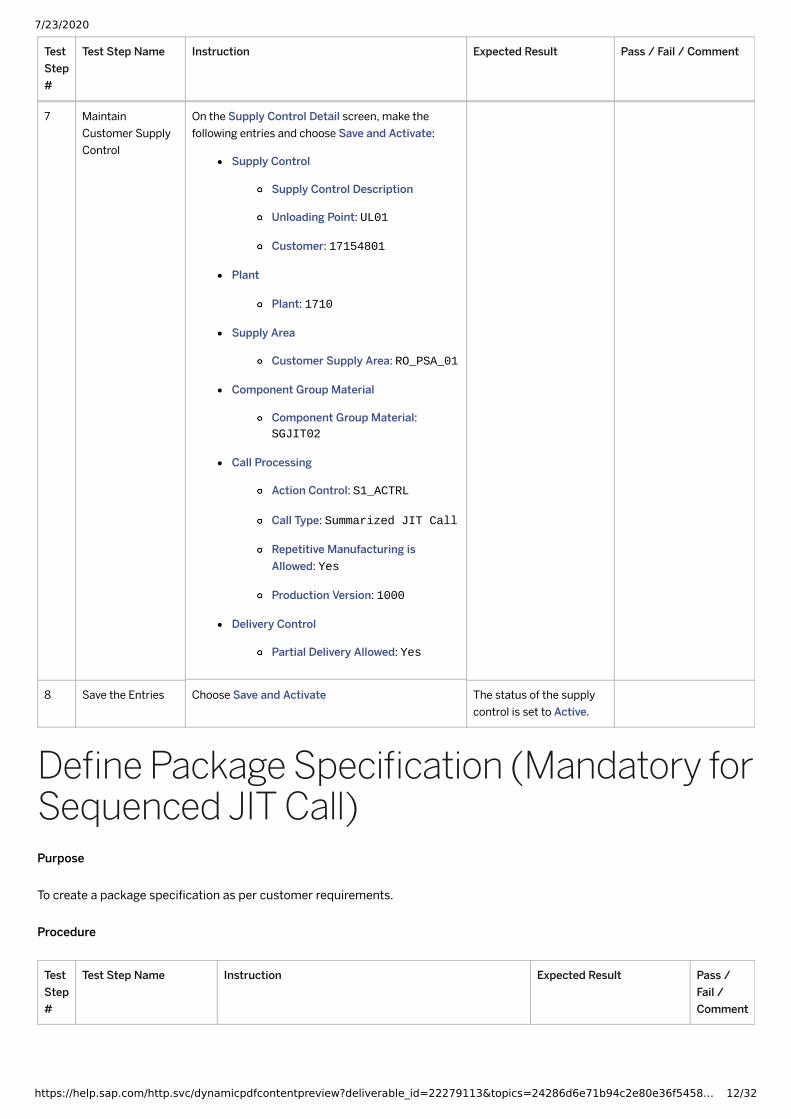
6 Create NewSupply Control forMaterial SGJIT02
Choose Add to create a new customer supplycontrol.
Object screen is displayedto create a new customersupply control
7/23/2020
https://help.sap.com/http.svc/dynamicpdfcontentpreview?deliverable_id=22279113&topics=24286d6e71b94c2e80e36f5458… 12/32
TestStep#
Test Step Name Instruction Expected Result Pass / Fail / Comment
7 MaintainCustomer SupplyControl
On the Supply Control Detail screen, make thefollowing entries and choose Save and Activate:
Supply Control
Supply Control Description
Unloading Point: UL01
Customer: 17154801
Plant
Plant: 1710
Supply Area
Customer Supply Area: RO_PSA_01
Component Group Material
Component Group Material:SGJIT02
Call Processing
Action Control: S1_ACTRL
Call Type: Summarized JIT Call
Repetitive Manufacturing isAllowed: Yes
Production Version: 1000
Delivery Control
Partial Delivery Allowed: Yes
8 Save the Entries Choose Save and Activate The status of the supplycontrol is set to Active.
De�ne Package Speci�cation (Mandatory forSequenced JIT Call)Purpose
To create a package speci�cation as per customer requirements.
Procedure
TestStep#
Test Step Name Instruction Expected Result Pass /Fail /Comment

7/23/2020
https://help.sap.com/http.svc/dynamicpdfcontentpreview?deliverable_id=22279113&topics=24286d6e71b94c2e80e36f5458… 13/32
TestStep#
Test Step Name Instruction Expected Result Pass /Fail /Comment
1 Log On Log on to the SAP Fiori Launchpad using the role MasterData Specialist - Just-In-Time Supply(SAP_BR_MD_SPECIALIST_JIT).
The SAP Fiori Launchpad isdisplayed.
2 Access the App Open Manage Package Speci�cation for Sequenced JITCalls (F3896) app.
3 Create a New PackageSpeci�cation
Choose Add to create a new package speci�cation Object screen is displayed tocreate a new packagespeci�cation.
4 Maintain PackageSpeci�cation
On the Package Speci�cation Detail screen, make thefollowing entries and choose Save and Activate:
Package Speci�cation Description: <PackageSpecification for <Customer Name>
Packaging Material: <Choose a PackagingMaterial from Value Help>
Total Number of Slots: 2
5 Maintain Slot GroupInformation
On the Package Speci�cation Detail screen, choose Add inthe Slot Group section.
Make the following entries and choose Save and Activate:
Slot Group
First Slot ID: 1
Last Slot ID: 2
Increment: 1
Content Type: Component GroupMaterial
Component Group Material: FGJIT01
Withdrawal Sort Sequence: Ascending
6 Save the Entries Choose Save and Activate The status of the packagespeci�cation is set to Active.
7 Create a New PackageSpeci�cation for materialSGJIT02
Choose Add to create a new package speci�cation Object screen is displayed tocreate a new packagespeci�cation.
8 Maintain PackageSpeci�cation
On the Package Speci�cation Detail screen, make thefollowing entries and choose Save and Activate:
Package Speci�cation Description: <PackageSpecification for <Customer Name>
Packaging Material: <Choose a PackagingMaterial from Value Help>
Total Number of Slots: 2

7/23/2020
https://help.sap.com/http.svc/dynamicpdfcontentpreview?deliverable_id=22279113&topics=24286d6e71b94c2e80e36f5458… 14/32
TestStep#
Test Step Name Instruction Expected Result Pass /Fail /Comment
9 Maintain Slot GroupInformation
On the Package Speci�cation Detail screen, choose Add inthe Slot Group section.
Make the following entries and choose Save and Activate:
Slot Group
First Slot ID: 1
Last Slot ID: 2
Increment: 1
Content Type: Component GroupMaterial
Component Group Material: SGJIT02
Withdrawal Sort Sequence: Ascending
10 Save the Entries Choose Save and Activate The status of the packagespeci�cation is set to Active.
Create Product Cost CollectorsThis step can only be executed if product cost planning is activated.
Procedure
TestStep#
Test StepName
Instruction Expected Result Pass / Fail/Comment
1 Log On Log on to the SAP Fiori Launchpad using the role CostAccountant - ProductionSAP_BR_PRODN_ACCOUNTANT).
The SAP Fiori Launchpad is displayed.
2 Access theSAP FioriApp
Choose Create Product Cost Collectors - ProductionVersions - Collective (KKF6M).
The Create Multiple Product CostCollector for Production Versions screenopens.
5 EnterRelevantValues
Make the following entries and choose Execute:
Plant: 1710
Material: SGJIT01
Order Type: YBMR
Only Repetitive Mfg Mat: select
6 Exit Choose Exit.
7/23/2020
https://help.sap.com/http.svc/dynamicpdfcontentpreview?deliverable_id=22279113&topics=24286d6e71b94c2e80e36f5458… 15/32
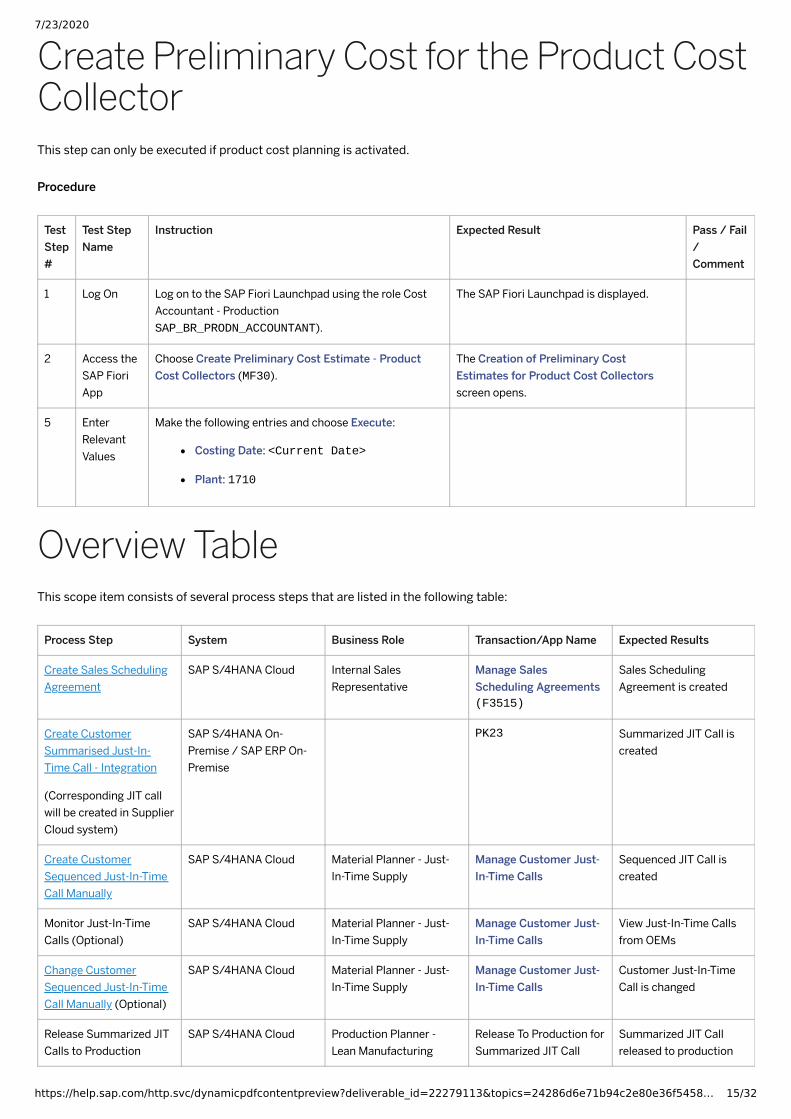
Create Preliminary Cost for the Product CostCollectorThis step can only be executed if product cost planning is activated.
Procedure
TestStep#
Test StepName
Instruction Expected Result Pass / Fail/Comment
1 Log On Log on to the SAP Fiori Launchpad using the role CostAccountant - ProductionSAP_BR_PRODN_ACCOUNTANT).
The SAP Fiori Launchpad is displayed.
2 Access theSAP FioriApp
Choose Create Preliminary Cost Estimate - ProductCost Collectors (MF30).
The Creation of Preliminary CostEstimates for Product Cost Collectorsscreen opens.
5 EnterRelevantValues
Make the following entries and choose Execute:
Costing Date: <Current Date>
Plant: 1710
Overview TableThis scope item consists of several process steps that are listed in the following table:
Process Step System Business Role Transaction/App Name Expected Results
Create Sales SchedulingAgreement
SAP S/4HANA Cloud Internal SalesRepresentative
Manage SalesScheduling Agreements(F3515)
Sales SchedulingAgreement is created
Create CustomerSummarised Just-In-Time Call - Integration
(Corresponding JIT callwill be created in SupplierCloud system)
SAP S/4HANA On-Premise / SAP ERP On-Premise
PK23 Summarized JIT Call iscreated
Create CustomerSequenced Just-In-TimeCall Manually
SAP S/4HANA Cloud Material Planner - Just-In-Time Supply
Manage Customer Just-In-Time Calls
Sequenced JIT Call iscreated
Monitor Just-In-TimeCalls (Optional)
SAP S/4HANA Cloud Material Planner - Just-In-Time Supply
Manage Customer Just-In-Time Calls
View Just-In-Time Callsfrom OEMs
Change CustomerSequenced Just-In-TimeCall Manually (Optional)
SAP S/4HANA Cloud Material Planner - Just-In-Time Supply
Manage Customer Just-In-Time Calls
Customer Just-In-TimeCall is changed
Release Summarized JITCalls to Production
SAP S/4HANA Cloud Production Planner -Lean Manufacturing
Release To Production forSummarized JIT Call
Summarized JIT Callreleased to production

7/23/2020
https://help.sap.com/http.svc/dynamicpdfcontentpreview?deliverable_id=22279113&topics=24286d6e71b94c2e80e36f5458… 16/32
Process Step System Business Role Transaction/App Name Expected Results
Release Sequenced JITCalls to Production
SAP S/4HANA Cloud Production Planner -Lean Manufacturing
Release To Production forSequenced JIT Call
Sequenced JIT Callreleased to production
Con�rm JIT Calls forProduction
SAP S/4HANA Cloud Production Operator -Lean Manufacturing
Con�rm Production ofJIT Calls
Con�rm JIT Call forproduction
Create OutboundDelivery fromSummarized JIT Calls
SAP S/4HANA Cloud Shipping Specialist -Just-In-Time Supply
Create OutboundDeliveries - FromSummarized JIT Calls(F3012)
Outbound delivery iscreated
Create OutboundDelivery from SequencedJIT Calls
SAP S/4HANA Cloud Shipping Specialist -Just-In-Time Supply
Create OutboundDelivery for SequencedJIT Calls (F3897)
Outbound delivery iscreated
Execute Picking and PostGoods Issue
SAP S/4HANA Cloud Shipping Specialist -Just-In-Time Supply
My Outbound DeliveryMonitor (VL06O)
Picking for the delivery isexecuted.
The goods issue isposted.
Create Billing Document SAP S/4HANA Cloud Billing Clerk Create BillingDocuments (F0798)
Billing document iscreated
Test ProceduresThis section describes procedures for each process step that belongs to scope item 2EM - Just-In-Time Supply to Customer.
The Enterprise search function provides a central entry point for �nding business objects in your company from different sourcesusing a single search request, You can search for objects such as apps or factsheets for business objects. From the data found,you can go directly to the respective apps and factsheets to display, edit the data, or �nd related objects.
How to access and check a factsheet:
1. Log on to the SAP Fiori Launchpad using the respective user, for example, Internal Sales Representative.
2. Access the Enterprise Search bar and choose the Search icon in the upper right corner.
3. The Enterprise Search bar is displayed, and two �lter �elds appear to the left of the Search icon. Enter your search criteriaand choose the business object type in the menu, for example, Sales Orders. Enter sales order number and choose Search.
The sales order is listed.
4. Choose the billing document number link. The system navigates to the factsheet screen and the billing document-relatedinformation is integrated and summarized on one SAP Fiori screen. You can get detailed data by choosing thecorresponding links.
There are factsheets available for the following objects: (Visible depending on the assigned role)
Billing document
Customer 360 factsheet
Create Sales Scheduling Agreement

7/23/2020
https://help.sap.com/http.svc/dynamicpdfcontentpreview?deliverable_id=22279113&topics=24286d6e71b94c2e80e36f5458… 17/32
Test Administration
Customer project: Fill in the project-speci�c parts.
Test Case ID <X.XX> Tester Name Testing Date Enter a
test date.
Business Role(s)
Responsibility <State the Service Provider, Customer or
Joint Service Provider and Customer>Duration Enter a
duration.
Procedure
Test Step#
Test Step Name Instruction Expected Result Comments
1 Log On Log on to the SAP Fiori launchpad as an Internal SalesRepresentative.
The SAP Fiorilaunchpad displays.
2 Access the App Open Manage Sales Scheduling Agreements(F3515).
3 Navigate toCreateSchedulingAgreementScreen
On the Manage Scheduling Agreements screen,choose Create Scheduling Agreement.
4 Enter Data On the Create Scheduling Agreement screen, makethe following entries:
Sched. Agreemt Type: LZJ
Sales Organization: 1710
Distribution Channel: 10
Division: 00
5 Enter SchedulingAgreementDetails
On the Create Sched. Agr. w/Rel: Overview screen,make the following entries:
Sold-to Party: 17154801
Ship-to Party: 17154801
Customer Reference: Purchasescheduling agreement number from
customer
Material Number:
FGJIT01
Customer Material: RP001JIT03
6 Maintain Pricing On the Condition tab, maintain the following entries:
Condition Type: PPRO
Amount: 2 USD (For US) / 2 EUR (For DE)

7/23/2020
https://help.sap.com/http.svc/dynamicpdfcontentpreview?deliverable_id=22279113&topics=24286d6e71b94c2e80e36f5458… 18/32
Test Step#
Test Step Name Instruction Expected Result Comments
7 Save Document Choose Save.
Make a note of the scheduling agreement number.
If you have created a scheduling agreement with thesame data in your system and you use material TG11and customer 17154801, the following warning mayappear:
There is already a scheduling agreement with this samedata.
To skip this warning, choose Enter.
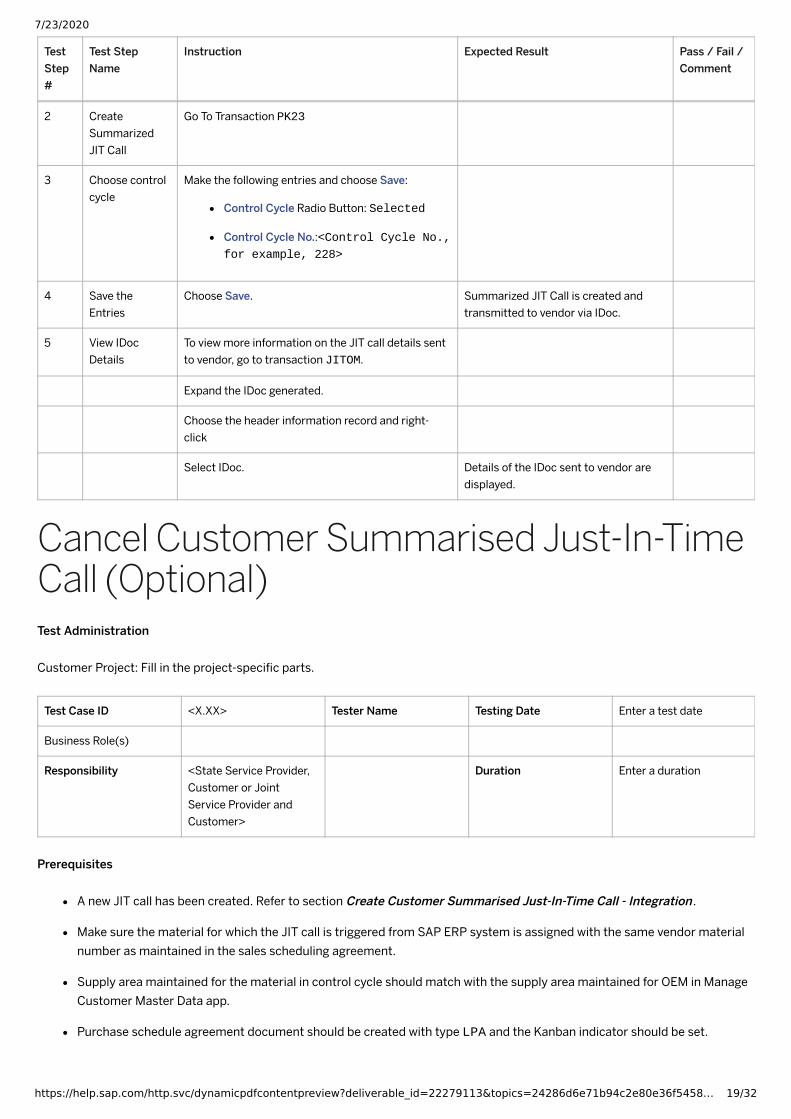
Create Customer Summarised Just-In-TimeCall - IntegrationTest Administration
Customer Project: Fill in the project-speci�c parts.
Test Case ID <X.XX> Tester Name Testing Date Enter a test date
Business Role(s)
Responsibility <State Service Provider,Customer or JointService Provider andCustomer>
Duration Enter a duration
Prerequisites
Make sure the material for which the JIT call is triggered from SAP ERP system is assigned with the same vendor materialnumber as maintained in the sales scheduling agreement.
Supply area maintained for the material in control cycle should match with the supply area maintained for OEM in ManageCustomer Master Data app.
Purchase schedule agreement document should be created with type LPA and the Kanban indicator should be set.
Example to setup a master data in SAP On-Premise system is mentioned in Master Data Creation in SAP On-Premise Systemsection.
Procedure
TestStep#
Test StepName
Instruction Expected Result Pass / Fail /Comment
1 Log On Log on to the SAP S/4HANA On-Premise or SAP ERPOn-Premise System
The SAP Fiori launchpad displays.
7/23/2020
https://help.sap.com/http.svc/dynamicpdfcontentpreview?deliverable_id=22279113&topics=24286d6e71b94c2e80e36f5458… 19/32
TestStep#
Test StepName
Instruction Expected Result Pass / Fail /Comment
2 CreateSummarizedJIT Call
Go To Transaction PK23
3 Choose controlcycle
Make the following entries and choose Save:
Control Cycle Radio Button: Selected
Control Cycle No.:<Control Cycle No.,for example, 228>
4 Save theEntries
Choose Save. Summarized JIT Call is created andtransmitted to vendor via IDoc.
5 View IDocDetails
To view more information on the JIT call details sentto vendor, go to transaction JITOM.
Expand the IDoc generated.
Choose the header information record and right-click
Select IDoc. Details of the IDoc sent to vendor aredisplayed.
Cancel Customer Summarised Just-In-TimeCall (Optional)Test Administration
Customer Project: Fill in the project-speci�c parts.
Test Case ID <X.XX> Tester Name Testing Date Enter a test date
Business Role(s)
Responsibility <State Service Provider,Customer or JointService Provider andCustomer>
Duration Enter a duration
Prerequisites
A new JIT call has been created. Refer to section Create Customer Summarised Just-In-Time Call - Integration .
Make sure the material for which the JIT call is triggered from SAP ERP system is assigned with the same vendor materialnumber as maintained in the sales scheduling agreement.
Supply area maintained for the material in control cycle should match with the supply area maintained for OEM in ManageCustomer Master Data app.
Purchase schedule agreement document should be created with type LPA and the Kanban indicator should be set.

7/23/2020
https://help.sap.com/http.svc/dynamicpdfcontentpreview?deliverable_id=22279113&topics=24286d6e71b94c2e80e36f5458… 20/32
Example to setup a master data in SAP On-Premise system is mentioned in Master Data Creation in SAP On-Premise Systemsection.
Procedure
TestStep#
Test StepName
Instruction Expected Result Pass / Fail/Comment
1 Log On Log on to the SAP S/4HANA On-Premise or SAP ERP On-PremiseSystem.
The SAP Fiori launchpaddisplays.
2 CreateSummarizedJIT Call
Go to Transaction JITOM
3 Cancel JITCall
Select the JIT call to be cancelled and choose Execute Action.
4 Choose the cancel action ZCAN IDOC is triggered withcancellation status
5 Logon Log on to the SAP Fiori Launchpad using the role Material Planner -Just-In-Time Supply (SAP_BR_MATL_PLNR_JIT_S_TO_C)
Access theApp
Open Manage Just-In-Time Customer Data app. The selected JIT call shouldhave a status Cancelled.
Create Customer Sequenced Just-In-TimeCall ManuallyTest Administration
Customer project: Fill in the project-speci�c parts.
Test Case ID <X.XX> Tester Name Testing Date Enter a
test date.
Business Role(s)
Responsibility <State the Service Provider, Customer or
Joint Service Provider and Customer>Duration Enter a
duration.
Procedure
TestStep#
Test Step Name Instruction Expected Result Pass /Fail /Comment
1 Log On Log on to the SAP Fiori Launchpad using the roleMaterial Planner - Just-In-Time Supply.
The SAP Fiori launchpad displays.
2 Access the App Open Manage Customer Just-In-Time Calls
3 Create JIT Call Choose Add (+ Icon) Create New Just-In-TimeCall

7/23/2020
https://help.sap.com/http.svc/dynamicpdfcontentpreview?deliverable_id=22279113&topics=24286d6e71b94c2e80e36f5458… 21/32
TestStep#
Test Step Name Instruction Expected Result Pass /Fail /Comment
4 On Manage Customer JIT Calls screen, make thefollowing entry and choose Save:
Header Details
External Call Number: <Number toidentify the JIT call uniqely
from customer prespective>
Call Type: Sequenced JIT Call
Material Usage Indicator: S Series
Vehicle Information
Vehicle Number: <Vehicle No.>
Vehicle Model: <Vehicle Model>
Partner Data
Partner Description of Ship-To Party :<P001>
Description of Supplier:<Description>
Ship-To Party ID : 17154801
Summarized JIT Call is creat-ed andtransmitted to vendor via IDOC.
5 Add Components To add components into a JIT call, chooseManage Components.
Dialog box to maintain componentsappears.
6 Make the following entries in the dialog box bychoosing Add. Choose Enter after maintaining thebelow components:
First Component
Supplier Material Number: FGJIT01
Customer Supply Area: RO_PSA_01
External Call Status: 0200
Requirement Data and Time: <01-10-2018:T10:00:00>
Requests Quantity: 2
Unit of Measure: EA
The following are derived and auto-�lled:
Internal Material Number
Internal Material Desc.
Sales Scheduling Agreement No.
Sales Scheduling Agreement Item
Unloading Point
Shipping Point
Plant
Storage Location
Customer Supply Area Desc.
Assembly Location

7/23/2020
https://help.sap.com/http.svc/dynamicpdfcontentpreview?deliverable_id=22279113&topics=24286d6e71b94c2e80e36f5458… 22/32
TestStep#
Test Step Name Instruction Expected Result Pass /Fail /Comment
7 Choose OK on the Manage Components dialogbox.
Dialog box is closed and the componentgroups are derived automatically based onthe BAdI implementation.
The following entries appear for componentgroup.
Component Group Number
External Call Status
Internal Processing Status
Component Group Material
Requirement Date
Plant
Customer Supply Control
Customer Supply Area
8 View Componentsof a ComponentGroup
On Manage Customer JIT Calls screen, undersection Component Group, choose Chevron forthe component group
A panel with component details is openedwith list of components for a selectedcomponent group.
9 Create SequencedJIT Call forMaterial SGJIT02
Follow the above steps from 2 to 8 and create anew sequenced JIT call for material SGJIT02.
Call Type: Sequenced JIT Call
Supplier Material Number: SGJIT01
Sequenced JIT call is created with Activestatus.
10 CreateSummarized JITCall for MaterialSGJIT02
Follow the above steps from 2 to 8 and create anew summarized JIT call for material SGJIT02.
Call Type: Summarized JIT Call
Supplier Material Number: SGJIT01
Summarized JIT call is created with Activestatus.
Change Customer Sequenced Just-In-TimeCall ManuallyTest Administration
Customer project: Fill in the project-speci�c parts.
Test Case ID <X.XX> Tester Name Testing Date Enter a
test date.
Business Role(s)
Responsibility <State the Service Provider, Customer or
Joint Service Provider and Customer>Duration Enter a
duration.

7/23/2020
https://help.sap.com/http.svc/dynamicpdfcontentpreview?deliverable_id=22279113&topics=24286d6e71b94c2e80e36f5458… 23/32
Procedure
TestStep#
Test Step Name Instruction Expected Result Pass /Fail /Comment
1 Log On Log on to the SAP Fiori Launchpad using therole Material Planner - Just-In-Time Supply
The SAP Fiori launchpad displays.
2 Access the App Open Manage Customer Just-In-Time Calls .
3 Filter JIT Call to beEdited
Make the following entry in �lters and chooseEnter:
Ship-To Party : 17154801
4 View Details of a JITCall
Choose Chevron to navigate to the detailsscreen for Ship-To Party 17154801
Summarized JIT Call is created andtransmitted to vendor via IDoc.
5 Edit Components To edit components in a JIT call, choose Edit. Dialog box to maintain components appears.
6 Edit(Add/Delete/Modify)Components
Choose Manage Components to edit thecomponents
Make the following change to the componentand choose Enter.
First Component:
Requests Quantity: 4
Choose OK on the Manage Componentsdialog box.
Dialog box is closed and the componentgroups are derived automatically based onthe BAdI implementation.
The following entries appear for componentgroup:
Component Group Number
External Call Status
Internal Processing Status
Component Group Material
Requirement Date
Plant
Customer Supply Control
Customer Supply Area
View Components ofa Compo-nent Group
On Manage Customer JIT Calls screen, undersection Component Group, choose Chevronfor a component group.
A panel with component details is openedwith list of components for the selectedcomponent group.
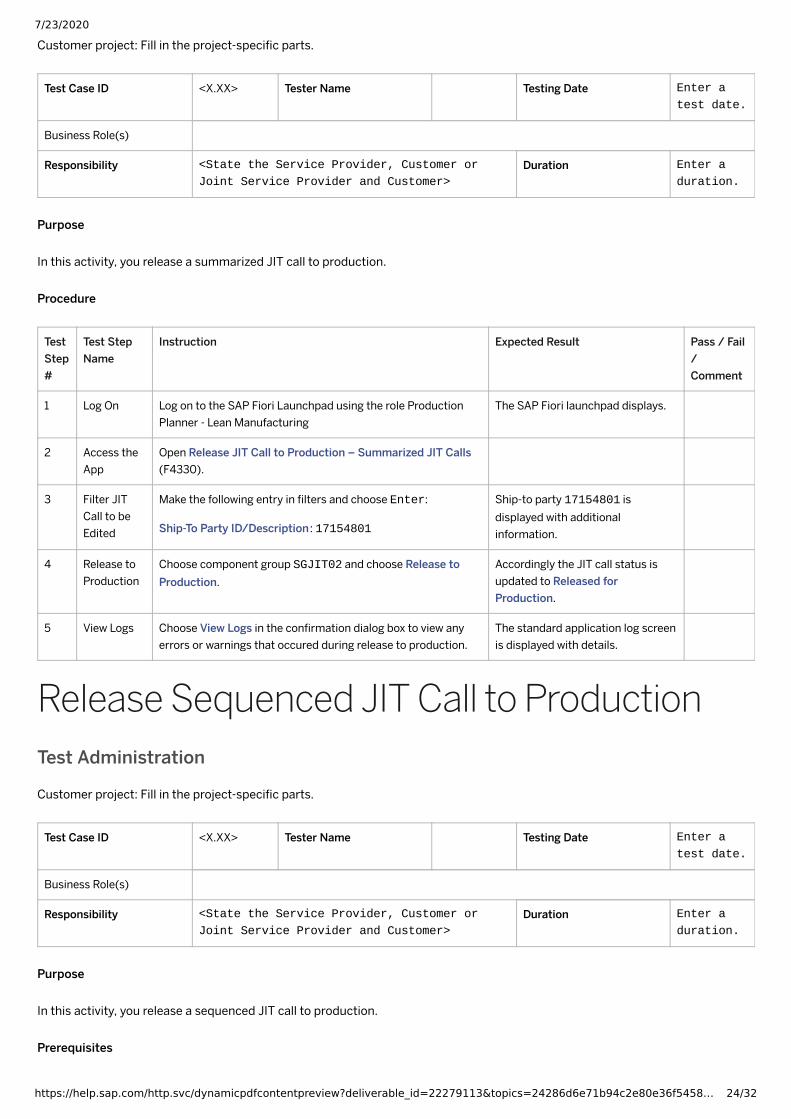
Release Summarized JIT Call to ProductionTest Administration
7/23/2020
https://help.sap.com/http.svc/dynamicpdfcontentpreview?deliverable_id=22279113&topics=24286d6e71b94c2e80e36f5458… 24/32
Customer project: Fill in the project-speci�c parts.
Test Case ID <X.XX> Tester Name Testing Date Enter a
test date.
Business Role(s)
Responsibility <State the Service Provider, Customer or
Joint Service Provider and Customer>Duration Enter a
duration.
Purpose
In this activity, you release a summarized JIT call to production.
Procedure
TestStep#
Test StepName
Instruction Expected Result Pass / Fail/Comment
1 Log On Log on to the SAP Fiori Launchpad using the role ProductionPlanner - Lean Manufacturing
The SAP Fiori launchpad displays.
2 Access theApp
Open Release JIT Call to Production – Summarized JIT Calls(F4330).
3 Filter JITCall to beEdited
Make the following entry in �lters and choose Enter:
Ship-To Party ID/Description : 17154801
Ship-to party 17154801 isdisplayed with additionalinformation.
4 Release toProduction
Choose component group SGJIT02 and choose Release toProduction.
Accordingly the JIT call status isupdated to Released forProduction.
5 View Logs Choose View Logs in the con�rmation dialog box to view anyerrors or warnings that occured during release to production.
The standard application log screenis displayed with details.
Release Sequenced JIT Call to ProductionTest Administration
Customer project: Fill in the project-speci�c parts.
Test Case ID <X.XX> Tester Name Testing Date Enter a
test date.
Business Role(s)
Responsibility <State the Service Provider, Customer or
Joint Service Provider and Customer>Duration Enter a
duration.
Purpose
In this activity, you release a sequenced JIT call to production.
Prerequisites
7/23/2020
https://help.sap.com/http.svc/dynamicpdfcontentpreview?deliverable_id=22279113&topics=24286d6e71b94c2e80e36f5458… 25/32
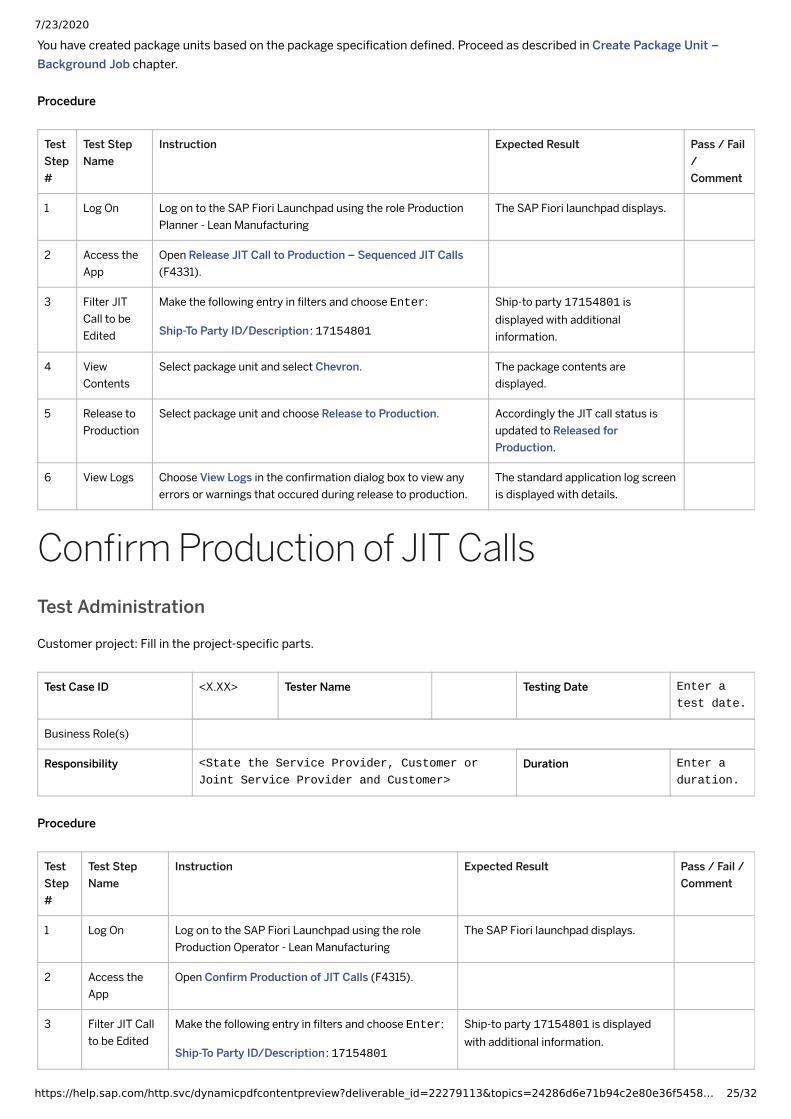
You have created package units based on the package speci�cation de�ned. Proceed as described in Create Package Unit –Background Job chapter.
Procedure
TestStep#
Test StepName
Instruction Expected Result Pass / Fail/Comment
1 Log On Log on to the SAP Fiori Launchpad using the role ProductionPlanner - Lean Manufacturing
The SAP Fiori launchpad displays.
2 Access theApp
Open Release JIT Call to Production – Sequenced JIT Calls(F4331).
3 Filter JITCall to beEdited
Make the following entry in �lters and choose Enter:
Ship-To Party ID/Description : 17154801
Ship-to party 17154801 isdisplayed with additionalinformation.
4 ViewContents
Select package unit and select Chevron. The package contents aredisplayed.
5 Release toProduction
Select package unit and choose Release to Production. Accordingly the JIT call status isupdated to Released forProduction.
6 View Logs Choose View Logs in the con�rmation dialog box to view anyerrors or warnings that occured during release to production.
The standard application log screenis displayed with details.
Con�rm Production of JIT CallsTest Administration
Customer project: Fill in the project-speci�c parts.
Test Case ID <X.XX> Tester Name Testing Date Enter a
test date.
Business Role(s)
Responsibility <State the Service Provider, Customer or
Joint Service Provider and Customer>Duration Enter a
duration.
Procedure
TestStep#
Test StepName
Instruction Expected Result Pass / Fail /Comment
1 Log On Log on to the SAP Fiori Launchpad using the roleProduction Operator - Lean Manufacturing
The SAP Fiori launchpad displays.
2 Access theApp
Open Con�rm Production of JIT Calls (F4315).
3 Filter JIT Callto be Edited
Make the following entry in �lters and choose Enter:
Ship-To Party ID/Description : 17154801
Ship-to party 17154801 is displayedwith additional information.

7/23/2020
https://help.sap.com/http.svc/dynamicpdfcontentpreview?deliverable_id=22279113&topics=24286d6e71b94c2e80e36f5458… 26/32
TestStep#
Test StepName
Instruction Expected Result Pass / Fail /Comment
4 Release toProduction
Select material group FGJIT02 and choose Con�rmProduction.
Accordingly the JIT call status isupdated to Production Con�rmed.
5 View Logs Choose View Logs in the con�rmation dialog box toview any errors or warnings.
The standard application log screen isdisplayed with details.
Create Outbound Delivery from SummarizedJIT CallsTest Administration
Customer project: Fill in the project-speci�c parts.
Test Case ID <X.XX> Tester Name Testing Date Enter a
test date.
Business Role(s)
Responsibility <State the Service Provider, Customer or
Joint Service Provider and Customer>Duration Enter a
duration.
Procedure
TestStep#
Test StepName
Instruction Expected Result Pass / Fail / Comment
1 Log On Log on to the SAP Fiori Launchpadusing the role Shipping Specialist -Just-In-Time Supply.
2 Accessthe App
Open Create Outbound Deliveries -From Summarized JIT Calls(F3012).
3 Filter JITCall to beEdited
Make the following entry in �ltersand choose Enter:
Ship-To Party ID/Description :17154801
Ship-to party 17154801is displayed withadditional information.
4 CreateOutboundDelivery
Choose Component GroupFGJIT01 and choose CreateOutbound Delivery
Accordingly the JIT callstatus is updated toDelivery Created.
5 View Logs Choose View Logs to view anyerrors/warnings that occuredduring delivery creation
The delivery view logsapplication screen isdisplayed with details.
Printing Form
NoteOutbound delivery is created based on theselected split criteria; refer to section CreateJust-In-Time Customer Master Data .

7/23/2020
https://help.sap.com/http.svc/dynamicpdfcontentpreview?deliverable_id=22279113&topics=24286d6e71b94c2e80e36f5458… 27/32
TestStep#
Test StepName
Instruction Expected Result Pass /Fail /Comment
1 Log On toSAP FioriLaunchpad
Log on to the SAP Fiori Launchpad using the Shipping Specialist role. The SAP FioriLaunchpad isdisplayed.
2 Access theApp
Open Change Outbound Delivery (VL02N) app. The ChangeOutbound Deliveryscreen is displayed
3 IssueDeliveryOutput
On the Change Outbound Delivery screen, enter the delivery number and chooseContinue. From the Delivery xxxxxxxx Change: Overview screen, chooseMore Extras Delivery Output Output Control .
The Delivery:Output screen isdisplayed.
4 PrintPreview
On the Delivery: Output screen, select the line with the Output TypeDELIVERY_PICK_LIST and choose Display PDF Document.
A preview of theprint document isdisplayed.
5 PrintDeliveryPick List
From the preview of the document, choose Print. The delivery picklist is printed.
Create Package Unit – Background JobTest Administration
Customer project: Fill in the project-speci�c parts.
Test Case ID <X.XX> Tester Name Testing Date Enter a
test date.
Business Role(s)
Responsibility <State the Service Provider, Customer or
Joint Service Provider and Customer>Duration Enter a
duration.
Purpose
In this activity, you schedule a background job to create package units based on the package speci�cation de�ned.
Procedure
TestStep#
Test Step Name Instruction Expected Result Pass / Fail /Comment
1 Log On Log on to the SAP Fiori Launchpad using the role ShippingSpecialist - Just-In-Time Supply
The SAP Fiori launchpaddisplays.
2 Access the App Open Schedule Package Unit Creation app.
3 Create a new job Choose Create to create a new job. The SchedulingInformation screen isdisplayed.
7/23/2020
https://help.sap.com/http.svc/dynamicpdfcontentpreview?deliverable_id=22279113&topics=24286d6e71b94c2e80e36f5458… 28/32
TestStep#
Test Step Name Instruction Expected Result Pass / Fail /Comment
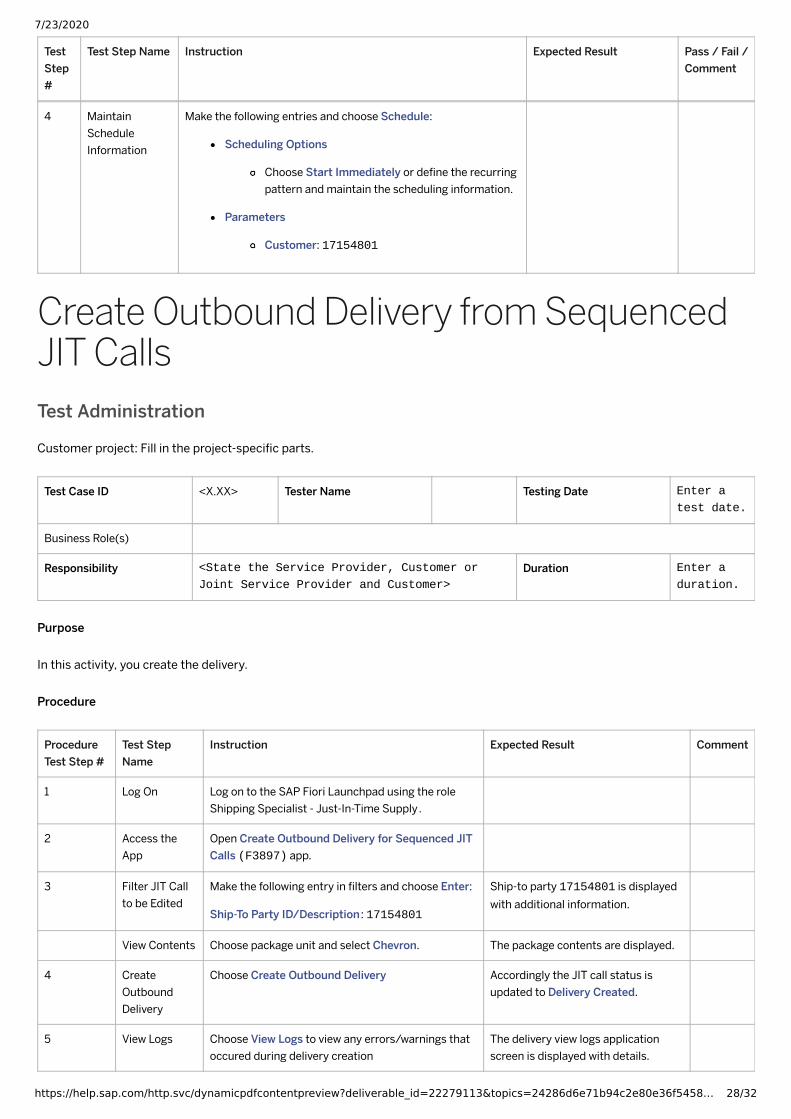
4 MaintainScheduleInformation
Make the following entries and choose Schedule:
Scheduling Options
Choose Start Immediately or de�ne the recurringpattern and maintain the scheduling information.
Parameters
Customer: 17154801
Create Outbound Delivery from SequencedJIT CallsTest Administration
Customer project: Fill in the project-speci�c parts.
Test Case ID <X.XX> Tester Name Testing Date Enter a
test date.
Business Role(s)
Responsibility <State the Service Provider, Customer or
Joint Service Provider and Customer>Duration Enter a
duration.
Purpose
In this activity, you create the delivery.
Procedure
ProcedureTest Step #
Test StepName
Instruction Expected Result Comment
1 Log On Log on to the SAP Fiori Launchpad using the roleShipping Specialist - Just-In-Time Supply.
2 Access theApp
Open Create Outbound Delivery for Sequenced JITCalls (F3897) app.
3 Filter JIT Callto be Edited
Make the following entry in �lters and choose Enter:
Ship-To Party ID/Description : 17154801
Ship-to party 17154801 is displayedwith additional information.
View Contents Choose package unit and select Chevron. The package contents are displayed.
4 CreateOutboundDelivery
Choose Create Outbound Delivery Accordingly the JIT call status isupdated to Delivery Created.
5 View Logs Choose View Logs to view any errors/warnings thatoccured during delivery creation
The delivery view logs applicationscreen is displayed with details.
7/23/2020
https://help.sap.com/http.svc/dynamicpdfcontentpreview?deliverable_id=22279113&topics=24286d6e71b94c2e80e36f5458… 29/32
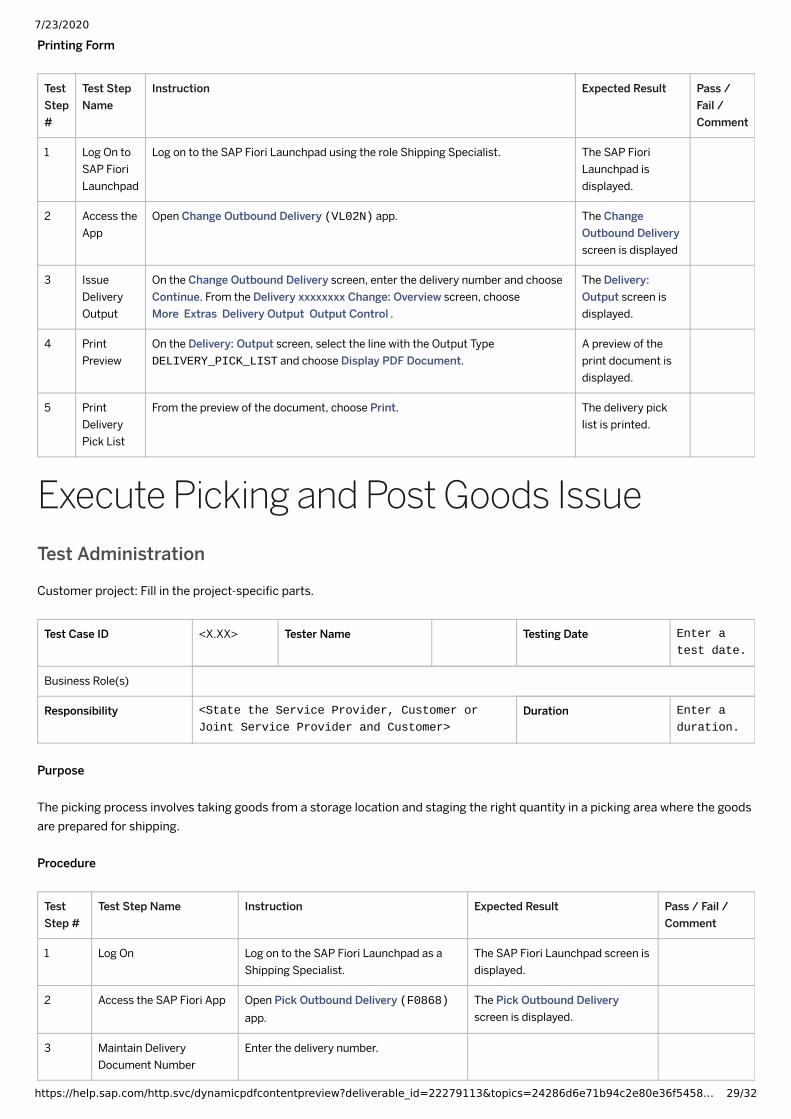
Printing Form
TestStep#
Test StepName
Instruction Expected Result Pass /Fail /Comment
1 Log On toSAP FioriLaunchpad
Log on to the SAP Fiori Launchpad using the role Shipping Specialist. The SAP FioriLaunchpad isdisplayed.
2 Access theApp
Open Change Outbound Delivery (VL02N) app. The ChangeOutbound Deliveryscreen is displayed
3 IssueDeliveryOutput
On the Change Outbound Delivery screen, enter the delivery number and chooseContinue. From the Delivery xxxxxxxx Change: Overview screen, chooseMore Extras Delivery Output Output Control .
The Delivery:Output screen isdisplayed.
4 PrintPreview
On the Delivery: Output screen, select the line with the Output TypeDELIVERY_PICK_LIST and choose Display PDF Document.
A preview of theprint document isdisplayed.
5 PrintDeliveryPick List
From the preview of the document, choose Print. The delivery picklist is printed.
Execute Picking and Post Goods IssueTest Administration
Customer project: Fill in the project-speci�c parts.
Test Case ID <X.XX> Tester Name Testing Date Enter a
test date.
Business Role(s)
Responsibility <State the Service Provider, Customer or
Joint Service Provider and Customer>Duration Enter a
duration.
Purpose
The picking process involves taking goods from a storage location and staging the right quantity in a picking area where the goodsare prepared for shipping.
Procedure
TestStep #
Test Step Name Instruction Expected Result Pass / Fail /Comment
1 Log On Log on to the SAP Fiori Launchpad as aShipping Specialist.
The SAP Fiori Launchpad screen isdisplayed.
2 Access the SAP Fiori App Open Pick Outbound Delivery (F0868)app.
The Pick Outbound Deliveryscreen is displayed.
3 Maintain DeliveryDocument Number
Enter the delivery number.

7/23/2020
https://help.sap.com/http.svc/dynamicpdfcontentpreview?deliverable_id=22279113&topics=24286d6e71b94c2e80e36f5458… 30/32
TestStep #
Test Step Name Instruction Expected Result Pass / Fail /Comment
4 Enter Picking Quantity Enter the picking quantity, for example, 1.
5 Choose Enter Choose Enter.
6 Save Choose Save. The delivery is picked.
7 Post Goods Issue Choose Post GI to post the goods issue. The goods issue is posted.
Printing Form
TestStep#
Test StepName
Instruction Expected Result Pass /Fail /Comment
1 Log On toSAP FioriLaunchpad
Log on to the SAP Fiori Launchpad using the role Shipping Specialist. The SAP FioriLaunchpad isdisplayed.
2 Access theApp
Open Change Outbound Delivery (VL02N) app. The ChangeOutbound Deliveryscreen is displayed
3 IssueDeliveryOutput
On the Change Outbound Delivery screen, enter the delivery number and chooseContinue. From the Delivery xxxxxxxx Change: Overview screen, chooseMore Extras Delivery Output Output Control .
The Delivery:Output screen isdisplayed.
4 PrintPreviewDeliveryNote
On the Delivery: Output screen, select the line with the Output TypeDELIVERY_NOTE and choose Display PDF Document.
A preview of theprint document isdisplayed.
5 PrintDeliveryNote
From the preview of the document, choose Print. The delivery note isprinted.
Create Billing DocumentTest Administration
Customer project: Fill in the project-speci�c parts.
Test Case ID <X.XX> Tester Name Testing Date Enter a
test date.
Business Role(s)
Responsibility <State the Service Provider, Customer or
Joint Service Provider and Customer>Duration Enter a
duration.
Purpose
In this activity you handle the billing.
Procedure

7/23/2020
https://help.sap.com/http.svc/dynamicpdfcontentpreview?deliverable_id=22279113&topics=24286d6e71b94c2e80e36f5458… 31/32
TestStep#
Test StepName
Instruction Expected Result Pass /Fail /Comment
1 Log On toSAP FioriLaunchpad
Log on to the SAP Fiori Launchpad using the role Billing Clerk . The SAP FioriLaunchpaddisplays.
2 Access theApp
Open Create Billing Documents (F0798) app. The Create BillingDocuments screendisplays.
3 De�neBillingSetting
Choose Billing Settings in the footer bar, then make the following settings:
1. Set billing date and type before billing: ON
2. Create separate billing document for each item of billing due list: OFF
3. Automatically post billing documents: ON
4. Display billing documents after creation: ON
4 Search forBilling DueList
In the search condition, use criteria if necessary. Sales document(s)are displayed.
5 SelectItems forBilling
Select rows of sales documents created previously and choose Create. Create BillingDocumentswindow isdisplayed.
6 MaintainBilling Date
Choose billing type Invoice (F2) and maintain billing date, for example, currentdate. Then choose OK.
The draft billingdocument with IDis displayed.
7 Save BillingDocument
In the Billing Document screen, choose Save. The draft version billing documentwith ID Sxxxxxxxx turns into a saved billing document with ID xxxxxxxx. Make anote of the billing document number.
The systemgenerates aninvoice for billing.
The JIT call statusis set toCompleted.
Manage Billing Documents (Optional)
TestStep#
Test Step Name Instruction Expected Result Pass /Fail /Comment
1 Access App Open Manage Billing Documents (F0797) app andgo to Sales Billing Document .
The Manage Billing Documentscreen is displayed.
2 Search the BillingDocument Created inPrevious Step
Input the billing document number recorded inprevious step. Choose Enter.
The billing document created inprevious step is displayed.
3 Display the BillingDocument
Select the billing document item, and choose Display. The billing document is displayed.
4 Check Output Condition On the Billing Document screen, choose the lastassignment block – Output Items.
There is one entry in the item andthe output type isBILLING_DOCUMENT

7/23/2020
https://help.sap.com/http.svc/dynamicpdfcontentpreview?deliverable_id=22279113&topics=24286d6e71b94c2e80e36f5458… 32/32
TestStep#
Test Step Name Instruction Expected Result Pass /Fail /Comment
5 Display Print Preview On the Billing Document screen, choose Preview. Preview for PDF document isdisplayed.
6 Cancel Billing Document(Optional)
Select an appropriate billing document and chooseCancel Billing Docs
You see a log display – BillingDocu-ment Canceled.
7 Update New Attachment(Optional)
In the edit mode, add, delete or update theattachments. Save your changes by choosing Save inthe footer bar.
8 Update New Text(optional)
In the edit mode, you can add, delete or update thesetexts. Save your changes by choosing Save in thefooter bar.
If you have both the preliminary billing document and billing document, then please skip the next step Create Billing Document.
AppendixProcess IntegrationThe process to be tested in this test script is part of a chain of integrated processes.
Succeeding ProcessesAfter completing the activities in this test script, you can continue testing the following business processes:
Scope Item Business Condition
3NR – Sales SchedulingAgreements
Create a Sales Scheduling Agreement of type LZJ , etc.
Using the master data from this document, complete the following activities described in the testscript:
Creation of Sales Scheduling Agreement
Succeeding ProcessesAfter completing the activities in this test script, you can continue testing the following business processes:
Scope Item Business Condition
J59 - AccountsReceivable
Posting a Customer Invoice in Accounting, etc.
Using the master data from this document, complete the following activities described in the test script:
Accounts Receivable (Sections: Posting a Customer Invoice in Accounting, Overdue Receivables, DisplayCustomer Balances, Manage Customer Line Items)