just cause 2 prima official guide
TRANSCRIPT

8/18/2019 Just Cause 2 Prima Official Guide
http://slidepdf.com/reader/full/just-cause-2-prima-official-guide 1/208
TM
PRIMA OFFICIAL STRATEGY GUIDE
Prima Games
An Imprint of Random House, Inc.
3000 Lava Ridge Court, Suite 100Roseville, CA 95661
www.primagames.com
Written by Catherine Browne
The Prima Games logo is a registered trademark of
Random House, Inc., registered in the United States and
other countries. Primagames.com is a registered trademark
of Random House, Inc., registered in the United States.
© 2010 by Prima Games. All rights reserved. No part of this book may be reproduced or transmitted
in any form or by any means, electronic or mechanical, including photocopying, recording, or by any
information storage or retrieval system without written permission from Prima Games. Prima Games is an
imprint of Random House, Inc.
Product Manager: Todd Manning
Associate Product Manager: Sean Scheuble
Copyeditor: Carrie Andrews
Design & Layout: Kari Keating
Manufacturing: Suzanne Goodwin
eProduction: Suzanne Goodwin
Just Cause 2 © 2010 Square Enix Ltd. Published by Square Enix, Inc. Developed by Avalanche Studios.
SQUARE ENIX and the SQUARE ENIX logo are registered trademarks or trademarks of Square Enix
Holdings Co., Ltd. JUST CAUSE, the JUST CAUSE 2 logo, EIDOS and the EIDOS logo are registered
trademarks or trademarks of Square Enix Ltd. AVALANCHE STUDIOS is a trademark of Fatalist Enter-
tainment AB. All rights reserved.
All products and characters mentioned in this book are trademarks of their respective companies.
Please be advised that the ESRB Ratings icons, “EC,” “E,” “E10+,” “T,” “M,” “AO,” and “RP” are trademarks
owned by the Entertainment Software Association, and may only be used with their permission and
authority. For information regarding whether a product has been rated by the ESRB, please visit www.
esrb.org. For permission to use the Rating icons, please contact marketing at esrb.org.
Important:
Prima Games has made every effort to determine that the information contained in this book is accurate.
However, the publisher makes no warranty, either expressed or implied, as to the accuracy, effectiveness,
or completeness of the material in this book; nor does the publisher assume liability for damages, either
incidental or consequential, that may result from using the information in this book. The publisher cannot
provide any additional information or support regarding gameplay, hints and strategies, or problems with
hardware or software. Such questions should be directed to the support numbers provided by the gameand/or device manufacturers as set forth in their documentation. Some game tricks require precise t iming
and may require repeated attempts before the desired result is achieved.
ISBN: 978-0-3074-6599-3
Catherine BrowneCatherine grew up in a small town, loving
the proverbial “great outdoors.” While
she still enjoys hiking, camping, and just
getting out under the big sky, Catherine
also appreciates the fine art of blasting
the Covenant in Halo as well as arranging
a perfect little village in Animal Crossing.
(Seriously, you cannot just plant apple
trees all willy-nilly. Neat rows, people!)
We want to hear from you! E-mail
comments and feedback to
Protected by copyright. Unauthorized or unlawful copying or downloading expressly prohibited.

8/18/2019 Just Cause 2 Prima Official Guide
http://slidepdf.com/reader/full/just-cause-2-prima-official-guide 2/208
PRIMA OFFICIAL STRATEGY GUIDETM
2
CONTENTS
CAST OF
CHARACTERS . . . . . . 6
THE PLAYERS OF PANAU. . . . . . 6 The Factions ................................6
The Actors...................................6
FIELD GUIDE TO
PANAU . . . . . . . . . . . 9
RICO’S WAY . . . . . . . . . . . . . 9 The Essentials .............................9
Combat ...................................... 10 Driving ...................................... 12
Swimming.................................. 12 Flying ........................................ 13
Stunt Jumping/Hijacking ............ 13 Grappling Hook .......................... 14
Black Market ............................. 15 Black Market Prices ............... 15 Black Market Unlocks............ 15 Black Market Costs ................ 16
Heat .......................................... 16
Chaos........................................ 18 Mission Management ................. 19
WEAPONS . . . . . . . . 20
PARTY FAVORS . . . . . . . . . . .20 Firearms ...................................20
Explosives .................................23
VEHICLES . . . . . . . . 24
BY LAND, SEA, OR AIR . . . . . .24 Cars and Trucks ........................24 Military Vehicles .......................28
Motorcycles and ATVs ......... .......29
Boats ........................................30 Helicopters ...............................32
Airplanes ..................................33
EXPLORING PANAU 34
PARADISE LOST . . . . . . . . . . .34 Settlements ...............................34 SETTLEMENTS MAP ......................34
Parts and Cash Stashes ......... ....38 Armor Parts ..............................38
Weapon Parts ........................... 42 Vehicle Parts ............................ 50 Cash Stashes ........................... 58
CHAOS. . . . . . . . . . . . . . . . .62 Colonels ....................................62 East Tanah Raya ....................... 63 West Tanah Raya ..................... 63 Ramai Rakyat Islands ............. 63 Pelault Archipelago ............... 63 Selatan Archipelago ............... 63 Senjakala Islands .................... 63 Lautan Lama Desert ............... 63 Berawan Besar Mountains .... 63 Panau Tengah Bay ................... 63
Chaos Objects ...........................64 Baby Panay Statue .................. 64 Bio-fuel Shaft ........................... 65 Broadcast Tower ...................... 65 Communication Station ......... 66 Crane.......................................... 67 Fuel Depot ................................. 67 Gas Holder ................................ 72 Gas Pump .................................. 72 Generator ...................................74 industrial Chimney .................. 76 Mobile Radar............................ 77 Offshore Rig .............................. 77 Pipeline ...................................... 77 Propaganda Trailer .................. 77 Radar.......................................... 78 Radio Mast ............................... 78 SAM Site ................................... 78 Satellite Dish ............................ 79 Silo.............................................. 79 Transformer...............................80 Water Tower ..............................80 Wind Turbine............................. 81
AGENCY MISSIONS 82
WORKING FOR THE MAN . . . . .82 Welcome to Panau .....................82 WELCOME TO PANAU MAP .........83
Casino Bust ...............................86 CASINO BUST MAP .......................86
White Tiger ...............................89 WHITE TIGER MAP .........................89
Mountain Rescue .......................92 MOUNTAIN RESCUE......................92
Three Kings ...............................96 THREE KINGS MAP ........................96
Into the Den ..............................99 INTO THE DEN MAP .....................100
A Just Cause ........................... 103 A JUST CAUSE MAP ....................104
STRONGHOLD
TAKEOVERS. . . . . . .107
STRONGHOLD TAKEOVERMISSIONS MAP............................107
HOW THEY WORK . . . . . . . . . 108 REAPERS . . . . . . . . . . . . . . 109 Rocket Science ........................ 109 ROCKET SCIENCE MAP ..............110
A Second Amendment ................112 A SECOND AMENDMENT MAP 112
Chemical Compound ..................114 CHEMICAL COMPOUND MAP .114
ROACHES . . . . . . . . . . . . . . 116 Free Trade ................................116 FREE TRADE MAP ........................116
Oil for Blood.............................118 OIL FOR BLOOD MAP .................118
Paradise Valley ........................ 120 PARADISE VALLEY MAP .............120
ULAR BOYS. . . . . . . . . . . . . 122 Power Surge ........................... 122 POWER SURGE MAP ...................122
Pilgrimage .............................. 124 PILGRIMAGE MAP .......................124
Boys with Toys ......................... 126 BOYS WITH TOYS MAP ...............126
FACTION MISSIONS 128
FACTION MISSION MAP ............128
Reaper .................................... 129
Roaches .................................. 129
Ular Boys ............................... 129
REAPERS . . . . . . . . . . . . . . 130 Ups and Downs ........................ 130 UPS AND DOWNS MAP ............. 130
Political Debate ........................ 131 POLITICAL DEBATE MAP ............132
Taming the Beast ..................... 133 TAMING THE BEAST MAP ..........133
Pirate Broadcast ..................... 134 PIRATE BROADCAST MAP .........135
Can I Get a Witness? ............... 136 CAN I GET A WITNESS? MAP ... 136
Driving Miss Stacey ................. 138 DRIVING MISS STACEY MAP ... 138
The Broader Scope .................. 139 THE BROADER SCOPE MAP ..... 139
Black Gold ............................... 140 BLACK GOLD MAP ......................140
AST OFRACTER
FIELD GUIDETO PANAU
WEAPONS VEHICLE EXPLORINGPANAU
AGENCYMISSIONS
STRONGHOLDTAKEOVERS
FACTIONMISSIONS
CHALLENGES COLLECTIBLES ACHIEVEMENTSAND TROPHIES
Protected by copyright. Unauthorized or unlawful copying or downloading expressly prohibited.

8/18/2019 Just Cause 2 Prima Official Guide
http://slidepdf.com/reader/full/just-cause-2-prima-official-guide 3/208
C H A R A C T E R S
F I E L D G U I D E T O P A N A U
W E A P O N S
V E H I C L E S
E X P L O R I N G P A N A U
A G E N C Y M I S S I O N S
S T R O N G H O L D T A K E O V E R S
F A C T I O N M I S S I O N S
C H A L L E N G E S
C O L L E C T I B L E S
A C H I E V E M E N T S
primagames.com 3
Hell on Wheels ......................... 141HELL ON WHEELS MAP ..............142
Death from Above .................... 142DEATH FROM ABOVE MAP ........143
Helicopter Hangaround............. 144HELICOPTER HANGAROUNDMAP .................................................144
I Want to Break Free................ 145I WANT TO BREAK FREE MAP ...145
Clear Skies ............................. 146CLEAR SKIES MAP .......................147
Jumping Parole ........................147JUMPING PAROLE MAP .............148
Slippin’ and Slidin’ ................... 149SLIPPIN’ AND SLIDIN’ MAP ......149
Chemical Heist ........................ 150CHEMICAL HEIST MAP ..............151
Checking the Menu .................. 152CHECKING THE MENU MAP .....153
The Setup ................................ 153 THE SETUP MAP .......................... 154
ROACHES . . . . . . . . . . . . . . 155Nothing to Declare ................... 155
NOTHING TO DECLARE MAP ....155
Airport Troubles ...................... 156 AIRPORT TROUBLES MAP ........ 156
Paparazzi Pursuit .....................157PAPARAZZI PURSUIT MAP ...... 158
The Red One or the Blue One? .. 158 THE RED ONE OR THE BLUEONE? MAP .................................... 159
Breaking and Entering .............. 160BREAKING AND ENTERINGMAP .................................................161
Mile High Club ..........................161MILE HIGH CLUB MAP ...............162
Smugglers Do Run ................... 163SMUGGLERS DO RUN MAP ......164
Keeping the Flow ..................... 164KEEPING THE FLOW MAP ..........165
Head of State .......................... 166HEAD OF STATE MAP ...................166
River Runs Red .........................167RIVER RUNS RED MAP ..............168
An Officer and a Hitman ........... 169 AN OFFICER AND A HITMANMAP .................................................169
Information Highway .................170INFORMATION HIGHWAYMAP .................................................171
Offensive Action .......................172OFFENSIVE ACTION MAP...........172
O Panay Redentor .....................173O PANAY REDENTOR MAP .........173
Stop the Press .........................174 STOP THE PRESS MAP ................175
ULAR BOYS. . . . . . . . . . . . . 176 Bridging New Contacts ......... .....176 BRIDGING NEW CONTACTS
MAP .................................................176
Siphoning Gas...........................177 SIPHONING GAS MAP ................177
Fry Me to the Moon ...................179 FRY ME TO THE MOON MAP .....179
Stranded .................................. 181 STRANDED MAP ..........................181
Mercenaries Must Die ............. 183 MERCENARIES MUST DIE MAP ..184
One Deadly Sin ........................ 185 ONE DEADLY SIN MAP ...............185
Rico’s Day in Court .................. 185 RICO’S DAY IN COURT MAP .....186
Above the Law...........................187 ABOVE THE LAW MAP ................187
Pulling a Jeremy ..................... 188 PULLING A JEREMY MAP ..........188
Holy Smoke ............................. 189 HOLY SMOKE MAP ......................189
Taking Candy from a Millionaire 190 TAKING CANDY FROM A
MILLIONAIRE MAP ......................191
Shakedown .............................. 192 SHAKEDOWN MAP ......................192
Taking Care of the Dishes ........ 193 TAKING CARE OF THE
DISHES MAP .................................193
Save the Forest ....................... 195 SAVE THE FOREST MAP ..............195
Fender Bender ..........................197 FENDER BENDER MAP ...............197
Be Quick or Be Dead ................ 198 BE QUICK OR BE DEAD MAP ....198
CHALLENGES . . . . . 199
RACE FOR YOUR LIFE. . . . . . . 199 Racing Challenges ................... 199 CHALLENGES MAP ......................200
Challenges ..............................201
COLLECTIBLES. . . . 203
FACTION PICK-UPS. . . . . . . .203 Collectibles Checklists..... ........ 203 Drug Drops .............................203 Skulls .......................................204 Black Boxes ............................204
ACHIEVEMENTS
AND TROPHIES . . . 205 EYES ON THE PRIZE . . . . . . .205 Achievements and Trophies
Collection ................................205
ST OFRACTER
FIELD GUIDETO PANAU
WEAPONS VEHICLE EXPLORINGPANAU
AGENCYMISSIONS
STRONGHOLDTAKEOVERS
FACTIONMISSIONS
CHALLENGES COLLECTIBLES ACHIEVEMENTSAND TROPHIES
Protected by copyright. Unauthorized or unlawful copying or downloading expressly prohibited.

8/18/2019 Just Cause 2 Prima Official Guide
http://slidepdf.com/reader/full/just-cause-2-prima-official-guide 4/208
PRIMA OFFICIAL STRATEGY GUIDETM
4
Chapter 3: Weapons
Get the full rundown on all weapons you can use in Panau,
including how to find them and which are best for specific
situations.
Chapter 4: Vehicles
There are a lot of wheels in Panau—and no shortage of wings,
either. This chapter details all of the vehicles you can use in your
adventure.
Chapter 5: Exploring Panau
Panau may be an island nation, but the series of islands that
DESTROY PANAU
TO SAVE ITYou have two jobs to do in Panau: create enough chaos to shatter
the current government and then survive the power grab that will
surely explode in its vacuum. Our guide is essential for agents
who not only want to see every sight in the beautiful island
nation, but who also want to complete every mission and locate
all collectibles, such as vehicle parts.
Chapter 1: Cast of Characters
As you attempt to solve the situation on the island nation, use the
intel on all major players in Panau to decide your loyalties. You
will create enough chaos to destabilize the current regime.
Chapter 2: Field Guide to Panau
Learn the essentials of playing Just Cause 2. Everything from
how to work up enough chaos to meet goals to details on how
to find and accept missions are found in this chapter. Plus, check
out tips and tricks for using Rico’s full playbook—that grappling
hook/parachute combo is both fun and versatile.
HOW TO USE THIS GUIDE
AST OFRACTER
FIELD GUIDETO PANAU
WEAPONS VEHICLE EXPLORINGPANAU
AGENCYMISSIONS
STRONGHOLDTAKEOVERS
FACTIONMISSIONS
CHALLENGES COLLECTIBLES ACHIEVEMENTSAND TROPHIES
Protected by copyright. Unauthorized or unlawful copying or downloading expressly prohibited.

8/18/2019 Just Cause 2 Prima Official Guide
http://slidepdf.com/reader/full/just-cause-2-prima-official-guide 5/208
C H A R A C T E R S
F I E L D G U I D E T O P A N A U
W E A P O N S
V E H I C L E S
E X P L O R I N G P A N A U
A G E N C Y M I S S I O N S
S T R O N G H O L D T A K E O V E R S
F A C T I O N M I S S I O N S
C H A L L E N G E S
C O L L E C T I B L E S
A C H I E V E M E N T S
primagames.com 5
make up the country amount to a lot of real estate. Use these
maps to see who controls what territory, the location of missions,
and tips for destabilizing Panau.
Chapter 6: Agency Missions
Though you must work for the different factions in Panau to bring
down the regime, your first loyalty is to the agency. All agency-
directed missions are explained in this chapter, complete with
locations and strategies.
Chapter 7: Stronghold Takeovers
To help the three factions expand their influence, you must take
over key government facilities such as military bases and ports.
When you assist factions in these nine takeover missions, you
unlock more faction missions. Use the strategies in this chapter
to effectively conquer the strongholds.
Chapter 8: Faction Missions
There are dozens of faction missions, including escorting assets
and sniping dangerous thugs. The missions in this chapter
are split into the three factions. Each mission entry is
complete with strategies, location, and rewards.
Chapter 9: Challenges
In addition to taking missions for the agency and factions,
you can earn cash by participating in a series of racing
challenges all over Panau.
Chapter 10: Collectibles
Each of the factions has an asset spread around Panau that
they want you to locate on their behalf. This chapter discloses
the locations of all 300 collectibles.
Chapter 11: Achievements and Trophies
Bragging rights are now a major part of gaming! Use our
award charts and strategies to bank all of the achievementsand trophies in Just Cause 2.
ST OFRACTER
FIELD GUIDETO PANAU
WEAPONS VEHICLE EXPLORINGPANAU
AGENCYMISSIONS
STRONGHOLDTAKEOVERS
FACTIONMISSIONS
CHALLENGES COLLECTIBLES ACHIEVEMENTSAND TROPHIES
Protected by copyright. Unauthorized or unlawful copying or downloading expressly prohibited.

8/18/2019 Just Cause 2 Prima Official Guide
http://slidepdf.com/reader/full/just-cause-2-prima-official-guide 6/208
6
PRIMA OFFICIAL STRATEGY GUIDETM
groups have in recent years come
together to form one terrifying and
volatile, even bloodthirsty, force.
There also have been reports of
sectlike brainwashing and the distri-
bution of powerful hallucinogenics
among the young Ulars. All to build
a dangerously tight community of
bloodthirsty and blindly loyal gangsters. But the accusations
of power abuse and gangsterism thrown at the Ular Boys are
always jostled by the cold, distant, and highly educated Irawan.The accusers then usually find themselves mysteriously killed,
dismembered with their heads impaled on spikes at the roadside
in the true ancient Ular tradition.
The ActorsAs the situation in Panau deteriorates, the personalities at the
center of the unstable regime and its possible replacement heat
up. At the center of the thrilling developments is agent Rico
Rodriguez, an effective asset who is as deadly as he is stylish.
But Rico shares the spotlight with such strong characters as
Karl Blaine, an aging spy who really needs to dry out, and Bolo
Santosi, the passionate leader of the revolutionary Reapers who
seems to want to restore ownership of government to the people
of Panau but who may have her own agenda.
Rico RodriguezBirthdate: January 25, 1968
Allegiance: Agency
Rico Rodriguez is a longtime
Agency field operative, renowned
for his expertise in high-risk
deployments of “regime-change”
missions. The Agency first
approached Rodriguez during theinvasion of Panama in 1986 and
has since been in the Agency’s employ. Rodriguez made quite
a name for himself during the San Esperito debacle a few years
back and has proven himself in difficult situations more than
once over the years.
He is an expert marksman, demolition technician, pilot,
and driver and has done fieldwork that includes paramilitary
training and political subversion. Rodriguez is also known for his
expertise in the use of the grappling hook/parachute combi-
nation, a somewhat flamboyant but extremely effective means of
transportation.
The Agency considers Rodriguez to be a “high maintenance”
operative, and he has more than a few loose-cannon tendencies.He works best with his old commanding officer Tom Sheldon but
has difficulties taking orders from other operatives.
THE PLAYERS
OF PANAUAs the situation in Panau reaches a boiling point, numerous
players jostle for the power grab coming should the national
leadership topple. At the heart of the bubbling drama are three
factions and a cast of exciting characters. Use this intel to
familiarize yourself with all the relevant factors at play in Panau.
Knowing exactly who stands to gain by the failure of the current
regime will help you sort out loyalties. Although, Panau is thekind of place where you look out for number one—so you don’t
step in number two.
The FactionsThere are three factions with Panau positioning to take over
should the new regime of Panau fall. Rico must align himself with
all three of these factions, helping them destabilize the country
so that when Baby Panay, the new leader of Panau, falls, a
power vacuum is created. Hopefully, that vacuum will be filled by
somebody with a benevolent streak.
ReapersThe Reapers are a Panauan revolu-
tionary group believed to have been in
contact with many of the Socialist and
Communist regimes of Asia over the
years. The Reapers organization today is
less of a militia and more of a gangster
outfit. The Reapers are driven by their
anger at the Panay government’s historic capacity to squander
wealth while leaving the real workers of the island in squalor.
Their leader, Bolo Santosi, is determined one day to rule the
island, or at least plunder its riches.
RoachesThe Roaches, led by Razak Razman, are
a criminal organization of the same ilk
as the Mafia or the Yakuza. They are a
mainly urban outfit that deals in tradi-
tional organized crime ventures such as
drugs, prostitution, and smuggling. In
the last few years, their operations have
expanded notably, mostly in and around Panau City.
Ular BoysThe Ular Boys stem from the indigenous Ular jungle tribes of
Panau and claim to be the rightful rulers of the island. Underthe charismatic leadership of Sri Irawan, the disparate tribal
CAST OF CHARACTERS
AST OFRACTER
FIELD GUIDETO PANAU
WEAPONS VEHICLE EXPLORINGPANAU
AGENCYMISSIONS
STRONGHOLDTAKEOVERS
FACTIONMISSIONS
CHALLENGES COLLECTIBLES ACHIEVEMENTSAND TROPHIES
THE PLAYERS OF PANAUThe Factions • The Actors
Protected by copyright. Unauthorized or unlawful copying or downloading expressly prohibited.

8/18/2019 Just Cause 2 Prima Official Guide
http://slidepdf.com/reader/full/just-cause-2-prima-official-guide 7/208
C H A R A C T E R S
F I E L D G U I D E T O P A N A U
W E A P O N S
V E H I C L E S
E X P L O R I N G P A N A U
A G E N C Y M I S S I O N S
S T R O N G H O L D T A K E O V E R S
F A C T I O N M I S S I O N S
C H A L L E N G E S
C O L L E C T I B L E S
A C H I E V E M E N T S
primagames.com 7
Tom SheldonBirthdate: July 4, 1949
Allegiance: Agency
Tom Sheldon is a longtime Agency
operative who first came into
Agency employ in the late sixties.
Sheldon was active during the
various Agency black ops of the
Vietnam War (including ops in Laos
and Cambodia).
Sheldon was active in the South American theater during the
eighties, and he played an important role in the operations that
led to the election of the famed “Papa Panay” of Panau.
A few years back, Sheldon and his protégé, Rico Rodriguez,
played a vital role in overthrowing President Salvador Mendoza of San
Esperito. Sheldon has since been working the South Pacific theater.
Recently, Sheldon was on assignment in Panau when he wasreported missing. Some sources within the Agency claim that he
has gone rogue. If this is true, he constitutes a major threat to the
Agency that must be dealt with.
Maria KaneBirthdate: June 15, 1970
Allegiance: Agency
Maria Kane has been with the
Agency since the mid-nineties. Prior
to the Agency approaching her,
she had a promising career in the
military. She served in the Gulf War
in 1991 in a Rangers special unit in
which she proved herself in several
covert ops behind enemy lines.
After the Gulf War, the Agency approached her several times
before she finally accepted their offer. Maria Kane, together with
Tom Sheldon and Rico Rodriguez, helped overthrow the regime
of President Salvador Mendoza in San Esperito a few years back.
Kane has proven herself to be both a steadfast and loyal
Agency operative, but many see her as cold and distant. During
the course of Kane’s career, it has become obvious that she finds
friendship superfluous; her only loyalties are with the Agency. Kane
is a born soldier: extremely professional, disciplined, and loyal.
Karl BlaineBirthdate:
December 16, 1960
Allegiance: Mothers forFruit for Life
An Agency sleeper asset, Karl
Blaine has been on the island of
Panau longer than most. He is
undercover as a field worker for a
Swedish agricultural development
organization known as Mothers for Fruit for Life.
While posted on Panau, Blaine has only rarely been activated
and has taken to gambling and drinking heavily.
Jade TanBirthdate:
October 31, 1981
Allegiance: Unknown
Jade Tan of Panau is a trusted
agency operative, used to
working under deep cover.
Using different honey-trap
techniques, she has been
invaluable in collecting infor-
mation about the state of affairs on Panau.
Tan remains one of the most loyal and trusted infor-
mation gatherers in Panau. Due to the nature of her work, her
connections to the Agency must be kept strictly confidential.
Sri Irawan
Birthdate: April 22, 1974
Allegiance: Ular Boys
Sri Irawan is the leader of the
notorious Ular Boys, a criminal
organization of some power.
Irawan’s education at Princeton
and his fine manners clash
somewhat with the brutish
methods of the Ular, but the organization has reached new
heights under his leadership.
Irawan’s agenda is simple enough: power. And many
believe he only uses his ethnicity to build false loyalty amongthe bloodthirsty warriors of the Ular Boys.
Bolo SantosiBirthdate:
August 18, 1979
Allegiance: Reapers
Bolo Santosi is the leader of the
Panauan revolutionary clique
known as the Reapers.
Santosi stems from a long
family of revolutionaries, and
she is obsessed with the Communist history of the Chinese
people, even though most would argue that her true ideology
revolves around money and power. Bolo Santosi is widely
known for her corruption and arbitrary attitude toward the
Socialist cause. Her leadership of the Reapers remains
undisputed, however, and her passionate talk of revolution
draws new recruits each day.
Razak RazmanBirthdate: September 21, 1946
Allegiance: Roaches
Razak Razman is the leader of the Roaches. He was a goodfriend and benefactor of Papa Panay. But there seems to
ST OFRACTER
FIELD GUIDETO PANAU
WEAPONS VEHICLE EXPLORINGPANAU
AGENCYMISSIONS
STRONGHOLDTAKEOVERS
FACTIONMISSIONS
CHALLENGES COLLECTIBLES ACHIEVEMENTSAND TROPHIES
THE PLAYERS OF PANAUThe Factions • The Actors
Protected by copyright. Unauthorized or unlawful copying or downloading expressly prohibited.

8/18/2019 Just Cause 2 Prima Official Guide
http://slidepdf.com/reader/full/just-cause-2-prima-official-guide 8/208
8
PRIMA OFFICIAL STRATEGY GUIDETM
be no love lost between him and
the current leader, Baby Panay.
The criminal activities of the
Roaches are well known, but the
right amount of money in the right
pockets allows Razman to remain aprominent public figure.
His businesses are rarely
lawful ones, but even so, Razman
remains one of the most influential
businessmen on Panau. Some even
say that he might one day rule the island himself.
Alexander MirkovBirthdate: July 21, 1964
Allegiance: RussianFederation
Mirkov’s “diplomatic career” began
with the KGB. When the Soviet
collapsed, he transformed himself
effortlessly into a Moscow Mafia
boss, making a fortune selling off
military hardware, from suitcase
nukes to secondhand warships.
Ice-cold and ruthless, Mirkov’s heavy-set features give away
his roots in Ukrainian blacksmith stock. Always a loyal friend
to his ex-KGB friends, when the offer came for an “interesting”
posting as second trade secretary to the Russian Embassy in
Panau, Mirkov couldn’t resist. He conveniently arrived six months
before Papa Panay was blown up. Mirkov’s real task: to assess all antigovernment groups on
the island, select the best candidate, then fund and train said
group until the candidate of their choice can be placed in the
palace. He views Razak Razman as a convenient ally and admires
the organized brutality of the Roaches.
Zhang SunBirthdate: February 3, 1947
Allegiance: People’sRepublic of China
Zhang Sun is the Chinese repre-
sentative on Panau. He is an elderlymilitary intelligence chief with an
extensive background inside the
Chinese military’s inner circles.
A thirty-year survivor of the
Chinese transition from repressive Communism to repressive
Capitalist free-market Communism, Zhang has pretty much seen
it all when it comes to violence, torture, and fear tactics.
In his time, Zhang earned himself a reputation for his cold-
blooded savagery in several of the northern Chinese provinces.
Capable of shrewd strategic thinking, he sees the popular Bolo
Santosi of the Reapers as an expendable medium-term leader:
As soon as the Chinese-backed revolutionaries take the island,he intends to seek its return to the beneficent rule of the Chinese
government back in Beijing.
General Masaio
WashioBirthdate: December 8,
1942
Allegiance: Japan
Since childhood, Masaio Washio
has lived in the shadow of his great
warrior father, Etsuo Washio. Like
his father, Washio joined the army
at age 15. But so far for him, there have been no battles, no
glory. Japan’s peacetime army has acted only to save earthquake
survivors. But the tune is changing. China will soon be on the
march, and the Japanese government is sharp enough to know
that if they don’t make a stand now, they will be washed away
with Taiwan, Hong Kong, Singapore, and the rest before the
United States and Russia dare call a halt to the expansion. So
Japan’s army is being secretly reawakened. Panau is going to bethe line in the sand.
But it must appear at first to be a popular rebellion. Which
is why Washio has forged an alliance with Sri Irawan and his
tribesmen. By promising them independence on the New Panau,
the Japanese will use their might to take the reins of government.
And once in power, the large indigenous Japanese population
can be directed to vote for secession to Japan.
Baby PanayBirthdate: March 13, 1978
Allegiance: Panau
Pandak “Baby” Panay is the currentruler of the nation of Panau. An
unremarkable man, he was long
ignored by the Agency and other
intelligence organizations, as
nothing was expected to come
of him. However, he is suspected
of assassinating his father, Papa Panay, in order to usurp his
presidency.
As regent, he does little in the way of leading his country,
choosing instead to indulge in various eccentricities and impose
his cult of personality upon the citizens of Panau.
Papa PanayBirthdate: October 2, 1951
Allegiance: Panau
The father of Baby Panay and longtime ruler of Panau before
his death, Papa Panay was as close to a benevolent dictator as
Panau had ever had. More importantly, Papa was in the Agency’s
pocket and a close “personal” friend of Tom Sheldon.
Several more or less reliable sources report Baby Panay’s
involvement in the car bomb that killed Papa Panay. Regardless
of the truth of the matter, the new ruler of the nation is far, far
worse than the old.
AST OFRACTER
FIELD GUIDETO PANAU
WEAPONS VEHICLE EXPLORINGPANAU
AGENCYMISSIONS
STRONGHOLDTAKEOVERS
FACTIONMISSIONS
CHALLENGES COLLECTIBLES ACHIEVEMENTSAND TROPHIES
THE PLAYERS OF PANAUThe Factions • The Actors
Protected by copyright. Unauthorized or unlawful copying or downloading expressly prohibited.

8/18/2019 Just Cause 2 Prima Official Guide
http://slidepdf.com/reader/full/just-cause-2-prima-official-guide 9/208
C H A R A C T E R S
F I E L D G U I D E T O P A N A U
W E A P O N S
V E H I C L E S
E X P L O R I N G P A N A U
A G E N C Y M I S S I O N S
S T R O N G H O L D T A K E O V E R S
F A C T I O N M I S S I O N S
C H A L L E N G E S
C O L L E C T I B L E S
A C H I E V E M E N T S
primagames.com 9
Target Cursor: These crosshairs indicate where you areaiming. When the crosshairs include a rectangle, thesurface is close enough for your grappling hook to findpurchase. When you are aiming at something that canbe shot, the cursor turns red. When you are aiming at afriendly, the cursor appears green.
Context-Sensitive Commands: Occasionally, specificactions in the context of the current situation appearhere, such as the ability to stunt-jump onto a speedingvehicle or hijack it.
Weapon: The currently selected weapon appears here.The stars beneath the weapon icon indicate its cur-rent level. The number is the amount of reserve ammo.The circle around the reserve ammo number indicatesthe number of rounds in the current magazine. See the“Black Market” section of this chapter for more informa-tion about upgrading gear.
Explosives: You may carry two different kinds of explo-sives into the field. The current selection appears here. Thestars beneath the explosive indicate the current upgradelevel. The number is the amount of explosives in reserve.
Objective: If you are in a mission, the current objectiveappears up here. Use this info to keep on task.
Minimap: This map details your immediate surround-ings and shares icons with your PDA, such as the loca-tion of an objective or an identified settlement.
Health: Your current health is noted here. You can re-generate approximately half of your health when injured,but you must avoid incoming fire for a short period oftime to do so. To fully restore health, access a medicalkit, which you find all over Panau while on missions orwhile just exploring. You can upgrade your maximumhealth by locating five armor parts.
Heat: When you start stirring up trouble, you draw atten-tion from the Panauan military. This attention translates
into heat. The more heat you bring upon yourself foracting against government agents or interests, the moreresponse you draw. If you disappear from the view ofsoldiers, heat starts to subside.
Signal Strength: Throughout Panau, you will locateweapon, vehicle, and armor parts that you can use toupgrade gear, vehicles, and maximum health, respectively.The more bars you see in this indicator, the closer you areto a part or a cash stash. When you are especially closeto a part or cash stash, the indicator flashes and a smallwhite arrow appears onscreen, pointing to the actual item.
Settlement Info: There are hundreds of settlements
all across Panau, from giant cities to small villages tomilitary bases. When you enter the borders of an estab-
Welcome to Panau, Agent. Before you are inserted into active duty
on the island, it is imperative that you be intimately familiar with
the latest combat techniques, the use of your gear, and exactly
how to cause the chaos necessary to destabilize the current
regime. Without this mastery, you are likely to survive in the field
as long as a hot dog survives at a Fourth of July barbecue. So,
enjoy the flight into Panau and read up on these essentials before
entering Panauan airspace. Because once you set foot on the
island, there isn’t much the Agency can do to help you. After all, as
far the Agency is concerned, you don’t even exist. And even if you
did, you certainly wouldn’t be existing in Panau.
RICO’S WAY As Rico Rodriguez, you have access to some great training and
tools. The suave, flamboyant agent is capable of amazing feats
of acrobatics and deeds of derring-do, from fearlessly jumping
between speeding vehicles to hopping out of a helicopter in
midflight and not pulling the rip cord on his parachute until the
ground is mere meters away.
However, even though Rico is an excellent agent, he is not
superhuman. He bleeds just like everybody else. Therefore, to keep
him alive, you need to know all of the basics of being an agent in
the field, such as how to read your heads-up display (HUD) and
the best way to utilize the gear you buy from the Black Market.
The EssentialsWhen you first arrive in Panau, you are weaponless, save for the
revolutionary grappling hook gauntlet attached to your forearm.
You must start collecting gear and weapons immediately. You
must also learn how to best use your PDA, which offers constant
updates on your position (and condition) in Panau. The HUD and
PDA are synced, so you are always on top of the situation.
Main Game Screen
FIELD GUIDE TO PANAU
5
1
3
2
4
108
9 6
7
1
2
3
4
5
6
7
8
9
10
ST OFRACTER
FIELD GUIDETO PANAU
WEAPONS VEHICLE EXPLORINGPANAU
AGENCYMISSIONS
STRONGHOLDTAKEOVERS
FACTIONMISSIONS
CHALLENGES COLLECTIBLES ACHIEVEMENTSAND TROPHIES
RICO’S WAYThe Essentials • Combat • Driving • Swimming • Flying • Stunt Jumping/Hijacking • Grappling Hook • Black Market • Heat • Chaos • Mission Management
Protected by copyright. Unauthorized or unlawful copying or downloading expressly prohibited.

8/18/2019 Just Cause 2 Prima Official Guide
http://slidepdf.com/reader/full/just-cause-2-prima-official-guide 10/208
10
PRIMA OFFICIAL STRATEGY GUIDETM
lishment, its name temporarily appears here. The percentageindicates how much of a settlement you have “completed,”which means how much of it you have taken back fromgovernment control. See the “Chaos” section of this chapterfor more information about completing settlements and howthat fits in with your overall goals on Panau.
A common place to find medical kits is on the side of
gas stations, which are all over Panau.
The PDA ScreenChecking in on your PDA reveals a map of Panau, complete with
a list of all relevant info, such as current Chaos levels and known
locations. Use your PDA to remain abreast of the latest information.
Setting waypoints on your PDA is extremely useful.
When you are back on the game screen, a yellow box
shows you the direction and distance from your marked
waypoint. This is helpful for finding collectibles andother pick-ups, using our lists of coordinates.
ICON LEGEND
This is the icon legend for the PDA map:
Objective
Agency mission
Stronghold Takeover
Faction mission
Racing challenge
Military base
Military airport
Military harbor
Civilian village
Civilian City
Communication outpost
Offshore oil rig
Roaches stronghold
Reapers stronghold
Ular Boys stronghold
Military stronghold
CombatNothing in Panau
is just given—you
must take it. The
currency most
recognized (and
respected) in Panau
is violence. Your
primary attack is
shooting, although
you may use
explosives to neutralize foes. In addition, you can also use the
grappling hook as a melee weapon. You are able to carry up to
three weapons at a time in Panau: two single-handed weapons
5
1
32
4
6
The PDA screen. You can zoom in to see locations in greater detail or zoom out to see which
groups in Panau control specific areas of the island.
Map Cursor: When you look at the map, you change yourcurrent view by moving the map cursor. When you moveover an identified settlement, you see pertinent informationabout the settlement. Moving over an offered mission revealsobjective information and rewards for completing it.
Icon Legend: The icon legend allows you to customizewhich icons appear on the map when looking at your PDA.
Database: The database keeps tabs on important informa-tion, such as known players in Panau, combat actions, and
the use of items.
Chaos Meters: To shake the government in Panau, youmust cause chaos. The overall amount of Chaos is the num-ber above these meters. The meters measure the amount ofChaos you must achieve to unlock new missions (Agency,Stronghold Takeover, and Faction) and to earn new items inthe Black Market.
Resources: This area of the PDA keeps track of how manyweapon, vehicle, and armor parts you have located as wellas how much cash you currently possess.
Coordinates: These X,Y coordinates are useful for locat-ing everything from upgrade parts to objects that you can
destroy to cause chaos. Many lists in this guide use coordi-nates to help you locate useful items and objects.
1
2
3
4
5
6
#
AST OFRACTER
FIELD GUIDETO PANAU
WEAPONS VEHICLE EXPLORINGPANAU
AGENCYMISSIONS
STRONGHOLDTAKEOVERS
FACTIONMISSIONS
CHALLENGES COLLECTIBLES ACHIEVEMENTSAND TROPHIES
RICO’S WAYThe Essentials • Combat • Driving • Swimming • Flying • Stunt Jumping/Hijacking • Grappling Hook • Black Market • Heat • Chaos • Mission Management
Protected by copyright. Unauthorized or unlawful copying or downloading expressly prohibited.

8/18/2019 Just Cause 2 Prima Official Guide
http://slidepdf.com/reader/full/just-cause-2-prima-official-guide 11/208
C H A R A C T E R S
F I E L D G U I D E T O P A N A U
W E A P O N S
V E H I C L E S
E X P L O R I N G P A N A U
A G E N C Y M I S S I O N S
S T R O N G H O L D T A K E O V E R S
F A C T I O N M I S S I O N S
C H A L L E N G E S
C O L L E C T I B L E S
A C H I E V E M E N T S
primagames.com 11
and one double-handed weapon. You may dual-wield single-
handed weapons to increase your firepower, but you are going to
burn through ammo much faster while doing this.
While dual-wielding, you cannot throw explosives.
As a general rule, two-handed weapons are more
powerful than single-handed weapons. For a complete
list of all weapons and relevant stats, please see the
Weapons chapter.
While shooting, you can use the size of your target cursor to
judge your accuracy. The larger the cursor, the wilder your
shot. Shooting while running reduces accuracy. As soon as youstand still, your accuracy improves. However, for the greatest
accuracy while shooting, switch to Aiming mode. This allows
you to really pinpoint your target cursor on your enemies and is
critical for scoring headshots, which are one-shot kills on most
thugs and brutes.
Aiming mode decreases
your movement speed and
field of vision but greatly
improves your accuracy.
Though we cover this in greater detail in the Weapons chapter,
you should always consider range when engaging an enemy.
Some weapons are better at close range than others, such as
the two shotguns. An assault rifle, on the other hand, is effective
at medium range. Range dovetails into accuracy, because when
you use a weapon properly, your accuracy improves. Expect
poor results if you have a shotgun and are attempting to shoot
an enemy who is on top of a guard tower while you are halfway
across a courtyard. Thanks to the decreased accuracy, you will
burn through more ammunition in order to eliminate the target.
Rate of fire is
also an important
factor to keep
in mind while
choosing weapons.
A weapon with a
high rate of fire,
like a submachine
gun, has decreased
accuracy. However,
if the submachine gun is used properly at close to medium range,
the accuracy is much greater than over great distances. The
weapon may go through ammo fast, but because you are closeenough to the target to make more shots count, you eliminate
the enemy quicker.
Reload often with the Reload button. It takes a
second or two to reload a weapon, during which
time you are defenseless. Therefore, reload behind
cover or after immediately finishing a firefight, and you’ll go into the next encounter ready to play.
There are mounted
weapons around
Panau that you can
slip behind and use,
such as miniguns
and flak cannons.
These weapons have
unlimited ammo.
You may detach themounted guns from
their harness and
carry them into battle.
These miniguns have
incredible firepower,
but they slow your
movement and prevent
you from using
explosives or your
grappling hook.
Using explosives is another great way to eliminate threats.
Thanks to an explosive’s powerful blast, you can usuallykill any enemy caught within the blast radius with a single
charge or grenade. However, in the case of fragmentation
grenades, you must consider the countdown time between
throwing the grenade and it arriving at its target. A grenade
usually takes five seconds to blow. This is sometimes more
than enough time for an enemy to spot the incoming grenade
and run beyond the reach of the blast radius. However, if
you hold down the Grenade button for a few seconds before
letting go, you can effectively “cook” the grenade. When you
throw it, the countdown is much shorter.
You can overcook a grenade and have it blow up in
your face, so don’t hold on to it for more than three orfour seconds.
ST OFRACTER
FIELD GUIDETO PANAU
WEAPONS VEHICLE EXPLORINGPANAU
AGENCYMISSIONS
STRONGHOLDTAKEOVERS
FACTIONMISSIONS
CHALLENGES COLLECTIBLES ACHIEVEMENTSAND TROPHIES
RICO’S WAYThe Essentials • Combat • Driving • Swimming • Flying • Stunt Jumping/Hijacking • Grappling Hook • Black Market • Heat • Chaos • Mission Management
Protected by copyright. Unauthorized or unlawful copying or downloading expressly prohibited.

8/18/2019 Just Cause 2 Prima Official Guide
http://slidepdf.com/reader/full/just-cause-2-prima-official-guide 12/208
12
PRIMA OFFICIAL STRATEGY GUIDETM
You are not the only person on Panau with a weapon, you know.
Every soldier in the Panauan military is armed—sometimes to the
teeth. Often, the best offensive is a good defense. If you get into
trouble, use the Dodge button to evade an incoming attack by
rolling away.
DrivingPanau may be an
island, but it’s a
pretty big island.
Traveling strictly
on foot will get
you from one side
to the other, but
it will take a long,
long time. You arebetter off driving.
There are dozens of land- and sea-based vehicles to take control
of in Panau, from sedans to motorcycles to speedboats. Most
automobiles and boats handle similarly, with acceleration and
braking controls in the same place.
However, while the controls may be similar, handling most
certainly is not. Though vehicles in similar classes may handle
the same (e.g., there is not much difference between sedans),
the difference between a transport truck and a dirt bike is
substantial. Heavier vehicles require more time to reach top
speed and require greater distances for stopping. Small vehicles,
such as motorcycles, are more nimble than cars and can easily
weave through traffic.
If you need to make a quick turn, use the handbrake on
an automobile to drift.
Some vehicles are equipped
with weapons, such as
mounted guns you can use
while driving.
Whenever possible, you should dive in and out of cars
and trucks to cut travel time and to zero in on the
Trying Everything Once achievement/trophy, which
requires you drive 104 unique vehicles.
Off-roading
should be
limited to
off-road-
capable
vehicles, such
ATVs and jeeps
that are built
specifically to
handle rough
terrain. A regular car will get banged up quickly and even
stranded on uneven terrain.
Swimming
In addition to running, you can also swim through the water
and under it (which is a great way to escape enemy detection).
To swim, simply control Rico the same way you would while on
the ground. However, while underwater, you must keep tabs
on his current air supply, which appears onscreen. To control
depth, move the camera up and down. For example, if you are
swimming underwater and need to surface, position the cameraso you are looking up and then swim forward.
AST OFRACTER
FIELD GUIDETO PANAU
WEAPONS VEHICLE EXPLORINGPANAU
AGENCYMISSIONS
STRONGHOLDTAKEOVERS
FACTIONMISSIONS
CHALLENGES COLLECTIBLES ACHIEVEMENTSAND TROPHIES
RICO’S WAYThe Essentials • Combat • Driving • Swimming • Flying • Stunt Jumping/Hijacking • Grappling Hook • Black Market • Heat • Chaos • Mission Management
Protected by copyright. Unauthorized or unlawful copying or downloading expressly prohibited.

8/18/2019 Just Cause 2 Prima Official Guide
http://slidepdf.com/reader/full/just-cause-2-prima-official-guide 13/208
C H A R A C T E R S
F I E L D G U I D E T O P A N A U
W E A P O N S
V E H I C L E S
E X P L O R I N G P A N A U
A G E N C Y M I S S I O N S
S T R O N G H O L D T A K E O V E R S
F A C T I O N M I S S I O N S
C H A L L E N G E S
C O L L E C T I B L E S
A C H I E V E M E N T S
primagames.com 13
Flying
Driving a car may cut down on travel time, but if you really want
to get somewhere on Panau in hurry, you take to the skies. There
are multiple airplanes and helicopters for use in Panau. Most
airplanes are located at airports and range in size from personalcraft to jumbo jets. Helicopters, on the other hand, are more
common, and you can locate occupied helipads on both military
sites and civilian centers.
Some locations are impossible to reach by car, too,
such as mountaintops. Use aircraft to reach great
heights in Panau.
Helicopters are much easier to control than airplanes, because
you can easily change altitude and can nimbly pitch and bankusing the same controls as if your were running. This increased
mobility allows you to get in and out of tight spots. Contrast
that to an airplane, which requires a runway to both take off
and safely land. Banking in an airplane also requires extra
room, since you turn much wider, although there really are few
obstacles to avoid in the sky....
While flying through unfriendly airspace, watch out for
surface-to-air missiles (SAMs). To dodge an incoming
SAM, quickly change altitude while banking. You can
destroy SAM batteries with your vehicle’s weapons, or
you can blow it up while still on the ground.
Stunt Jumping/Hijacking
While on any vehicle, you may perform a stunt jump. This
command moves you out of the driver’s seat (which is very
dangerous) and on top of the vehicle. From this position, you
can shoot, use explosives, and deploy the grappling hook.
If you are close enough to another vehicle, you can quickly jump to it. You do not need to aim specifically for the second
vehicle; Rico’s instincts take over and he makes the jump
successfully. From the stunt-jump position, you may enter
a vehicle. However, if a hostile occupies the driver’s seat,
you must do something about that person before you seize
control of the vehicle.
To hijack a vehicle,
follow the onscreen
prompts to beat the
driver senseless and
eject him. If you miss
a prompt, the driverhits back and you take
damage. Miss too many
prompts and you’ll be
the one who’s ejected.
When you move into the stunt-jump position in an
aircraft, the vehicle immediately starts losing altitude.
If you don’t jump away from the aircraft, you will perish
when it hits the ground.
While stunt-
jumping, you
may also move
around the
outside of the
vehicle. Use
this technique
to avoid
getting shot by
enemies (not
the current driver who remains behind the wheel) leaning out
of open doors. Some enemies manage to use doors as cover,
so you must sometimes move around the car to get a clean
shot at a target. While hanging off the grille or trunk of avehicle, you may not use explosives.
ST OFRACTER
FIELD GUIDETO PANAU
WEAPONS VEHICLE EXPLORINGPANAU
AGENCYMISSIONS
STRONGHOLDTAKEOVERS
FACTIONMISSIONS
CHALLENGES COLLECTIBLES ACHIEVEMENTSAND TROPHIES
RICO’S WAYThe Essentials • Combat • Driving • Swimming • Flying • Stunt Jumping/Hijacking • Grappling Hook • Black Market • Heat • Chaos • Mission Management
Protected by copyright. Unauthorized or unlawful copying or downloading expressly prohibited.

8/18/2019 Just Cause 2 Prima Official Guide
http://slidepdf.com/reader/full/just-cause-2-prima-official-guide 14/208
14
PRIMA OFFICIAL STRATEGY GUIDETM
Grappling HookAny secret agent can shoot a gun. Big deal. Only a super agent
like Rico can use a personal grappling hook attached to his
forearm to get him out of sticky situations in a blink of an eye.
That grappling hook is an incredibly versatile tool, too. It can be
used for multiple things, such as ripping an enemy out of a tower
perch or beating an enemy senseless with the sharp, hard hook.
General Use
The most common use of the grappling hook is to attach it to a
distant surface and pull yourself to it. This works at almost any
angle, from pulling you straight up to pulling you across a gap
in the ground. However, the grappling hook does not stretch
forever. It only goes so far. To judge if you are able to attach to a
surface (or a vehicle or an enemy) you are aiming at, look at the
target cursor. If the rectangle appears around the crosshairs, you
can successfully grapple.
One of the basic uses of
the grappling hook is to
grapple to a vehicle, which
places you in the stunt
position, unless you grapple
to a motorcycle. Then you
immediately eject the driver
and slide right behind the
handlebars.
Slingshot
The slingshot is auseful trick that
combines the
grappling hook
and the parachute.
To slingshot into
the air, grapple
toward a surface
and then release
the parachute.
You release the grappling hook and then drift up into the sky.
The slingshot technique is great for crossing distances if you are
suddenly without a vehicle or need to get somewhere close by
quickly and don’t have time to steal a car.
You can tether together slingshot moves to stay airborne for
quite some time. Just drift through the air, looking for an object
to grapple toward, such as trees or the sides of buildings. The
grappling hook acts like a bungee cord, pulling you in and then
releasing you with a little “spring action” that gives you extra
momentum.
In Combat
As mentioned in the “Combat” section, you can use the grappling
hook as a melee weapon. While close to an enemy, hit the Melee
button to swing the grappling hook. Low-level enemies, such as
grunts, require just one or two hits, depending on whether you
have already softened them up with bullets. Elite enemies can
withstand more hits before they go down.
Melee should never be your primary attack, since it
requires you get close to an enemy to land the blow.
However, in a dire situation, it can be an effective fight-
ender.
You can also use the grappling hook to pull an enemy off his
feet. Now, depending on where the enemy is standing, this has
different effects. If you pull an enemy off a tower, they fall to their
death. Grappling an enemy on flat ground just sweeps them off
their feet; they will scramble back up right away. However, you do
stop them from firing for a few seconds as they pull themselves
off the ground. You can also use the grappling hook to pull an
enemy out of cover, which proves useful early in your adventureand is one of your most reliable maneuvers.
AST OFRACTER
FIELD GUIDETO PANAU
WEAPONS VEHICLE EXPLORINGPANAU
AGENCYMISSIONS
STRONGHOLDTAKEOVERS
FACTIONMISSIONS
CHALLENGES COLLECTIBLES ACHIEVEMENTSAND TROPHIES
RICO’S WAYThe Essentials • Combat • Driving • Swimming • Flying • Stunt Jumping/Hijacking • Grappling Hook • Black Market • Heat • Chaos • Mission Management
Protected by copyright. Unauthorized or unlawful copying or downloading expressly prohibited.
8/18/2019 Just Cause 2 Prima Official Guide
http://slidepdf.com/reader/full/just-cause-2-prima-official-guide 15/208
C H A R A C T E R S
F I E L D G U I D E T O P A N A U
W E A P O N S
V E H I C L E S
E X P L O R I N G P A N A U
A G E N C Y M I S S I O N S
S T R O N G H O L D T A K E O V E R S
F A C T I O N M I S S I O N S
C H A L L E N G E S
C O L L E C T I B L E S
A C H I E V E M E N T S
primagames.com 15
Dual-HookThe grappling
hook can not only
connect you to
another object
or surface, butyou can also use
it to hook two
things together
independently of
you. This is called
a dual-hook. To dual-hook, fire the grappling hook at a surface,
object, or enemy and then hold down the button. While holding the
button, drag the target cursor to another object or surface. When
you release, the grappling hook binds the two objects together.
There are many uses for dual-hooking, such as tethering an enemy
to the ceiling. This puts them out of commission, since they just
dangle there like a pinata. (In fact, if you beat them with a melee
attack while they hang there, you bank a Pinata Kill. If you shootthem as they hang, that counts as a Suspension Kill.)
Dual-hooking is a fun way to
bring down statues of Baby
Panay spread around the
island. Dual-hook the statue
to a large vehicle and then
drive off, pulling the statue
to the ground.
Experiment with dual-hooking. The uses are seemingly
limitless, such as attaching a pursuing vehicle to a
bridge support. When it reaches the end of the hook,
the vehicle flips into the air.
You can even dual hook two enemies together! Connect
two incoming thugs with your grappling hook to watch
them smash into each other. If they are far enough apart
or weakened by bullets, the slapstick violence may even
result in a kill.
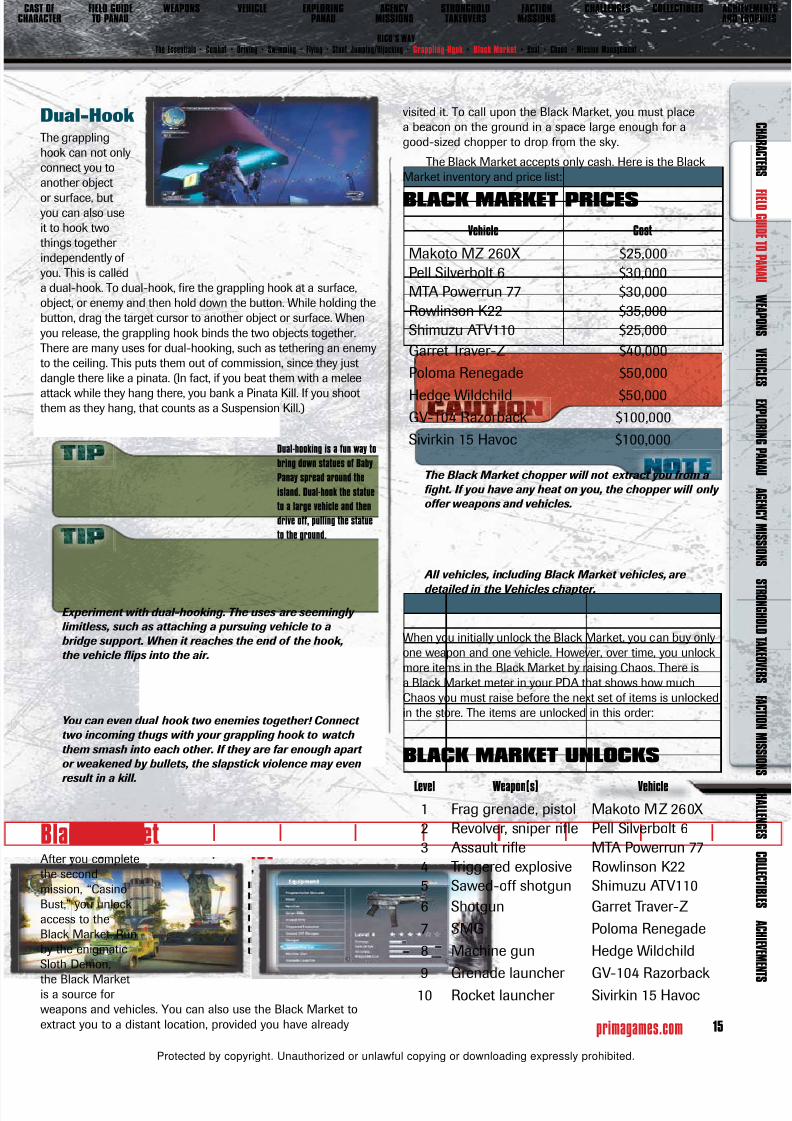
Black MarketAfter you complete
the second
mission, “Casino
Bust,” you unlock
access to the
Black Market. Run
by the enigmatic
Sloth Demon,
the Black Marketis a source for
weapons and vehicles. You can also use the Black Market to
extract you to a distant location, provided you have already
visited it. To call upon the Black Market, you must place
a beacon on the ground in a space large enough for a
good-sized chopper to drop from the sky.
The Black Market accepts only cash. Here is the Black
Market inventory and price list:
BLACK MARKET PRICES
Vehicle Cost
Makoto MZ 260X $25,000
Pell Silverbolt 6 $30,000
MTA Powerrun 77 $30,000
Rowlinson K22 $35,000
Shimuzu ATV110 $25,000
Garret Traver-Z $40,000
Poloma Renegade $50,000
Hedge Wildchild $50,000
GV-104 Razorback $100,000
Sivirkin 15 Havoc $100,000
The Black Market chopper will not extract you from a
fight. If you have any heat on you, the chopper will only
offer weapons and vehicles.
All vehicles, including Black Market vehicles, are
detailed in the Vehicles chapter.
When you initially unlock the Black Market, you can buy only
one weapon and one vehicle. However, over time, you unlock
more items in the Black Market by raising Chaos. There is
a Black Market meter in your PDA that shows how much
Chaos you must raise before the next set of items is unlocked
in the store. The items are unlocked in this order:
BLACK MARKET UNLOCKS
Level Weapon(s) Vehicle
1 Frag grenade, pistol Makoto MZ 260X
2 Revolver, sniper rifle Pell Silverbolt 6
3 Assault rifle MTA Powerrun 77
4 Triggered explosive Rowlinson K22
5 Sawed-off shotgun Shimuzu ATV110
6 Shotgun Garret Traver-Z
7 SMG Poloma Renegade
8 Machine gun Hedge Wildchild
9 Grenade launcher GV-104 Razorback
10 Rocket launcher Sivirkin 15 Havoc
ST OFRACTER
FIELD GUIDETO PANAU
WEAPONS VEHICLE EXPLORINGPANAU
AGENCYMISSIONS
STRONGHOLDTAKEOVERS
FACTIONMISSIONS
CHALLENGES COLLECTIBLES ACHIEVEMENTSAND TROPHIES
RICO’S WAYThe Essentials • Combat • Driving • Swimming • Flying • Stunt Jumping/Hijacking • Grappling Hook • Black Market • Heat • Chaos • Mission Management
Protected by copyright. Unauthorized or unlawful copying or downloading expressly prohibited.

8/18/2019 Just Cause 2 Prima Official Guide
http://slidepdf.com/reader/full/just-cause-2-prima-official-guide 16/208
16
PRIMA OFFICIAL STRATEGY GUIDETM
UpgradesWithin the Black Market, you can upgrade weapons and vehicles
to improve their power and effectiveness. To upgrade items in the
Black Market, you must locate weapon and vehicle parts in the
field. The signal next to your minimap aids you in finding parts.
It flashes when you are close to one. Each weapon and vehiclemay be upgraded five times. Each upgrade costs more than the
previous. Here is the cost structure of the Black Market:
BLACK MARKET COSTS
Upgrade Level # of Parts
2 5
3 10
4 15
5 206 25
Weapon and vehicle parts
are found inside these
crates.
There are 400 armor parts, 862 weapon parts, and 812
vehicle parts.
When you upgrade a weapon, you improve its damage, rate
of fire, accuracy, magazine size, and overall maximum ammo.
Upgrading a vehicle increases its top speed, acceleration,
handling, and armor. However, some vehicles receive weapons
when upgraded to Level 6, the highest upgrade level. The
MTA Powerrun, Rowlinson K22, and Garret Traver-Z all receive
machine-gun weapon upgrades at Level 6. The MTA Powerrun
also receives rockets at Level 6.
Don’t hoard your upgrade parts. Spend them on your
favorite weapons and vehicles to make them more
powerful. This will make exploring the island easier and
a lot more fun.
HeatNaturally, trying to overthrow the government gets the attention
of the military in Panau. The measurement of attention you bring
down on yourself is called heat. When you are just walking
around, nobody gives you a second look—including enemies.
But if you act aggressively toward a soldier or trespass on
government-controlled property, such as a military base, you
gain heat. The more heat you have on your head, the more
reinforcements are called in to deal with you.
Boiling Point
There are four levels of heat. When you first arrive, you can generate
only the first level of heat, which prompts a basic military response
of low-level soldiers and perhaps a pursuit vehicle if you are mobile.
However, the longer you spend on Panau taking missions and causing
Chaos, the more heat you can bring upon yourself. Eventually, you
will be such a thorn in Panay’s side that you are worthy of four levels
of military engagement. Each successive level of heat increases
the number of soldiers and support vehicles, increases the level of
aggression, and even generates tougher enemies.
EnemiesThere are multiple enemy types in Panau. At first you encounter
only grunts, which are low-level soldiers who are not partic-
ularly well trained and who wear less armor. However, you will
encounter tougher enemies as you dig deeper into the missions.
Soon you will face down heavily armored colonels, crafty ninjas,
and aggressive elites.
Colonels are special targets. There are 50 of them in
Panau, and you get a cash bounty for eliminating each
one. For a full list of colonels, including their locations,
please see Chapter 5, Exploring Panau.
Grunt Weapons:
Pistol, SMG,sawed-offshotgun,shotgun,revolver
Armor: Low
Behavior: Yourstandard
soldier, grunts tend to travel in packs wheneverpossible, finding safety in numbers. However, you willencounter some grunts in towers with sniper rifles orrocket launchers.
AST OFRACTER
FIELD GUIDETO PANAU
WEAPONS VEHICLE EXPLORINGPANAU
AGENCYMISSIONS
STRONGHOLDTAKEOVERS
FACTIONMISSIONS
CHALLENGES COLLECTIBLES ACHIEVEMENTSAND TROPHIES
RICO’S WAYThe Essentials • Combat • Driving • Swimming • Flying • Stunt Jumping/Hijacking • Grappling Hook • Black Market • Heat • Chaos • Mission Management
Protected by copyright. Unauthorized or unlawful copying or downloading expressly prohibited.

8/18/2019 Just Cause 2 Prima Official Guide
http://slidepdf.com/reader/full/just-cause-2-prima-official-guide 17/208
C H A R A C T E R S
F I E L D G U I D E T O P A N A U
W E A P O N S
V E H I C L E S
E X P L O R I N G P A N A U
A G E N C Y M I S S I O N S
S T R O N G H O L D T A K E O V E R S
F A C T I O N M I S S I O N S
C H A L L E N G E S
C O L L E C T I B L E S
A C H I E V E M E N T S
primagames.com 17
Colonel Weapons:
Shotgun,assaultrifle,
machinegun, fraggrenade
Armor:High
Behavior: Colonels are equipped with armor thatprotects them from most weapons unless youscore a headshot, which does damage but doesnot induce a one-hit kill like it would on a grunt oran elite. You cannot grapple colonels.
The best way to bring down a colonel is with an
explosive or a mounted weapon.
When you bring down enough heat, or you have attracted
heat while you are airborne, you often encounter an enemy
attack chopper. Whenever you spot one, make it your top
priority, because the mounted weapons on an attack chopper
can cut you down within seconds. The best way to handle a
chopper is to grapple to it, shoot any guard who hangs out
the side, and then smash the pilot’s face until he releases
the controls and can be thrown to the ground. Now you have
your very own chopper to use against your enemies.
Cooling DownHeat is
unavoidable,
especially
when you are
on a mission
that requires
you to attack
an enemy
installation.
You just have
to manage your enemies during the course of the mission.However, if time is not of the essence during a mission or
Elite Weapons:
Shotgun,assault rifle,machine gun,
frag grenade
Armor:Medium
Behavior:Elitesare both larger and more aggressive than grunts.Thankfully, they are not nearly as common. Theirincreased armor allows them to withstand moreattacks, although there’s no stopping a one-shot-killheadshot.
Demolition Officer Weapons:
SMG,triggeredexplosives
Armor:Medium
Behavior:Demolitionofficers aresimilar to elites in that they can withstand more hits
than a grunt. However, this enemy primarily relies onexplosives to attack unless you get so close they mustswitch to an SMG.
When killed, a demolition officer drops multiple timed
charges on the ground. Get back before they blow!
Ninja Weapon: SMG
Armor: Low
Behavior:Ninjas arefast-movingtargets whouse smokebombs toseeminglyvanish and reappear elsewhere—usually just outside ofyour field of vision. You cannot grapple ninjas.
ST OFRACTER
FIELD GUIDETO PANAU
WEAPONS VEHICLE EXPLORINGPANAU
AGENCYMISSIONS
STRONGHOLDTAKEOVERS
FACTIONMISSIONS
CHALLENGES COLLECTIBLES ACHIEVEMENTSAND TROPHIES
RICO’S WAYThe Essentials • Combat • Driving • Swimming • Flying • Stunt Jumping/Hijacking • Grappling Hook • Black Market • Heat • Chaos • Mission Management
Protected by copyright. Unauthorized or unlawful copying or downloading expressly prohibited.
8/18/2019 Just Cause 2 Prima Official Guide
http://slidepdf.com/reader/full/just-cause-2-prima-official-guide 18/208
18
PRIMA OFFICIAL STRATEGY GUIDETM
if you are between missions (causing trouble), you can hide to
reduce heat. Just move away from the current engagement and
seek solitude on a rooftop or in the forest, watching the Heat
meter around your minimap drop until it is empty.
However, while things cool off, you are not in the clear. When
the heat starts to subside and enemies give up looking for you,the Heat meter turns orange and a small orange exclamation
point appears below the minimap. During this period, if you are
spotted, all heat returns—and it returns to the current level.
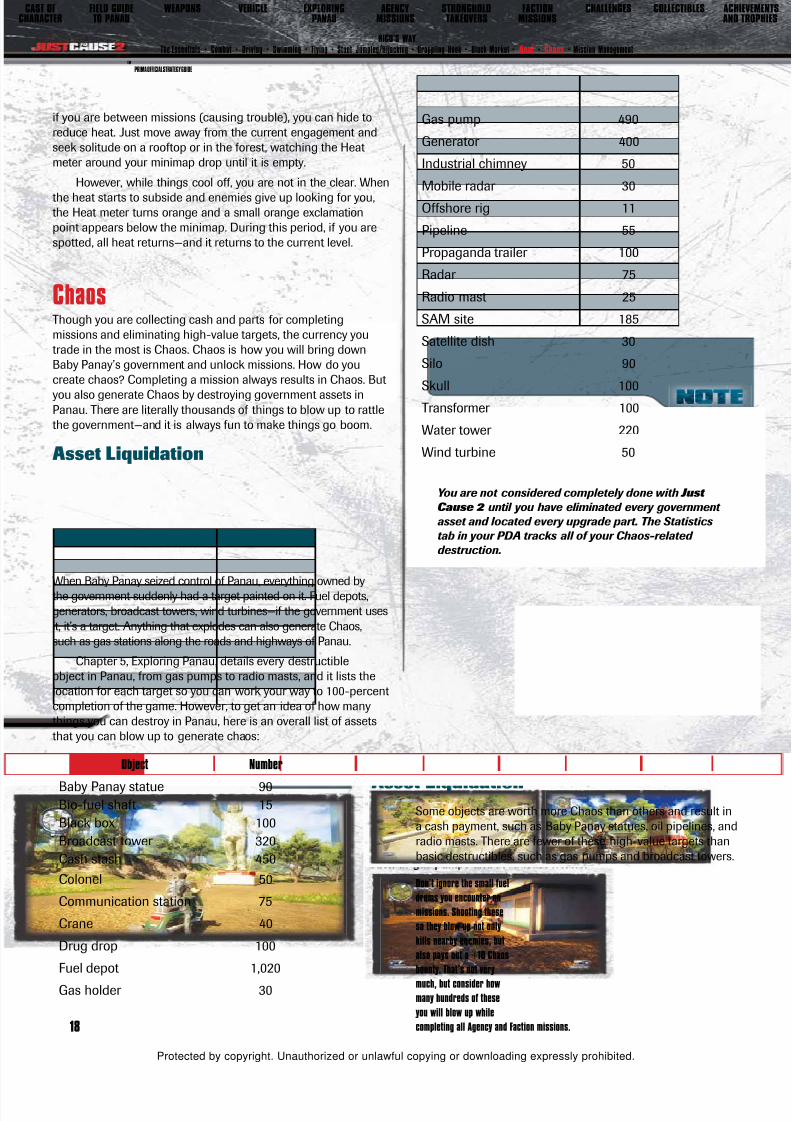
ChaosThough you are collecting cash and parts for completing
missions and eliminating high-value targets, the currency you
trade in the most is Chaos. Chaos is how you will bring down
Baby Panay’s government and unlock missions. How do you
create chaos? Completing a mission always results in Chaos. But
you also generate Chaos by destroying government assets inPanau. There are literally thousands of things to blow up to rattle
the government—and it is always fun to make things go boom.
Asset Liquidation
When Baby Panay seized control of Panau, everything owned by
the government suddenly had a target painted on it. Fuel depots,
generators, broadcast towers, wind turbines—if the government uses
it, it’s a target. Anything that explodes can also generate Chaos,
such as gas stations along the roads and highways of Panau.
Chapter 5, Exploring Panau, details every destructible
object in Panau, from gas pumps to radio masts, and it lists the
location for each target so you can work your way to 100-percent
completion of the game. However, to get an idea of how many
things you can destroy in Panau, here is an overall list of assets
that you can blow up to generate chaos:
Object Number
Baby Panay statue 90Bio-fuel shaft 15
Black box 100
Broadcast tower 320
Cash stash 450
Colonel 50
Communication station 75
Crane 40
Drug drop 100
Fuel depot 1,020
Gas holder 30
Gas pump 490
Generator 400
Industrial chimney 50
Mobile radar 30
Offshore rig 11
Pipeline 55
Propaganda trailer 100
Radar 75
Radio mast 25
SAM site 185
Satellite dish 30
Silo 90
Skull 100Transformer 100
Water tower 220
Wind turbine 50
You are not considered completely done with Just
Cause 2 until you have eliminated every government
asset and located every upgrade part. The Statistics
tab in your PDA tracks all of your Chaos-related
destruction.
Some objects are worth more Chaos than others and result in
a cash payment, such as Baby Panay statues, oil pipelines, and
radio masts. There are fewer of these high-value targets than
basic destructibles, such as gas pumps and broadcast towers.
Don’t ignore the small fuel
drums you encounter on
missions. Shooting these
so they blow up not only
kills nearby enemies, but
also pays out a +10 Chaos
bounty. That’s not very
much, but consider howmany hundreds of these
you will blow up while
completing all Agency and Faction missions.
AST OFRACTER
FIELD GUIDETO PANAU
WEAPONS VEHICLE EXPLORINGPANAU
AGENCYMISSIONS
STRONGHOLDTAKEOVERS
FACTIONMISSIONS
CHALLENGES COLLECTIBLES ACHIEVEMENTSAND TROPHIES
RICO’S WAYThe Essentials • Combat • Driving • Swimming • Flying • Stunt Jumping/Hijacking • Grappling Hook • Black Market • Heat • Chaos • Mission Management
Protected by copyright. Unauthorized or unlawful copying or downloading expressly prohibited.

8/18/2019 Just Cause 2 Prima Official Guide
http://slidepdf.com/reader/full/just-cause-2-prima-official-guide 19/208
C H A R A C T E R S
F I E L D G U I D E T O P A N A U
W E A P O N S
V E H I C L E S
E X P L O R I N G P A N A U
A G E N C Y M I S S I O N S
S T R O N G H O L D T A K E O V E R S
F A C T I O N M I S S I O N S
C H A L L E N G E S
C O L L E C T I B L E S
A C H I E V E M E N T S
primagames.com 19
You also bank chaos by locating collectibles for
each faction. All collectibles are listed in Chapter 10,
Collectibles.
Playing the PercentagesYou also generate
Chaos by liberating
settlements,
cities, and bases.
Every location in
Panau starts out
under complete
government control.
However, as you
destroy assets
within the borders of that location, you see the percentage of thatsettlement or site tick upward. To earn 100 percent and completely
free a site (which pays out in cash and Chaos), you must destroy
all government-owned assets and pick up all upgrades. So, use
your signal to locate part crates in every village.
Use our complete part location table in Chapter
5, Exploring Panau, to score 100 percent in every
settlement, base, or city.
Mission ManagementThere are three types of missions that you must undertake
to eventually topple Baby Panay’s regime: Agency missions,
Stronghold Takeovers, and Faction missions. When you first arrive
in Panau, you automatically begin the first Agency mission, which
then funnels into the second Agency mission. Following the
completion of the second Agency mission, “Casino Bust,” you are
then able to spread out and begin taking missions from the three
factions within Panau that are also seeking to control the island.
All three of these mission types are related, as you cannot open
up the main Agency missions without generating Chaos through
general mayhem and by completing Faction missions.
Agency MissionsAgency missions
are those you
undertake on
behalf of the
Central Intelligence
Agency, your
employer. There
are seven Agency
missions that make
up the backbone
of the story line and lead from your first arrival in Panau to the
final battle with Baby Panay. To unlock these missions, you need
to generate Chaos. Monitor the Chaos meters in your PDA to seehow much trouble you must stir up to unlock the next Agency
mission.
Stronghold Takeovers and Faction
MissionsAfter
completing the
second Agencymission, you
are introduced
to the three
factions:
Reapers,
Roaches,
and Ular
Boys. The first thing you must do to establish trust with
the faction leaders is help them roll a government outpost.
These missions are called Stronghold Takeovers, and there
are nine total. Once you help a faction seize a stronghold,
that becomes a base of operations for the faction. You can
then begin taking missions for that faction within the area of
influence around the stronghold, which you can view on your
PDA map. At first, the amount of real estate a faction controls
around a stronghold is small. But as you generate Chaos
and complete missions for that faction, that area of influence
widens, which in turn unlocks more Faction and Stronghold
Takeover missions.
By the time you finish the game, the three factions
will control all of Panau.
In addition to running missions for the factions,
you can also curry their favor by seeking out their
errant collectibles. The Reapers are looking for
black boxes. The Roaches are after drug drops.The Ular Boys seek sacred skulls. The locations
of all 300 collectibles are detailed in Chapter 10,
Collectibles.
Challenges
Running low on cash? Then enlist in a racing challenge.
Racing challenges are unlocked around the island as you
expand each faction’s area of influence. There are 75 total
racing challenges that span land, air, and sea. Each challenge
pays out $20,000 if you win the racing event. For a full list of
racing challenges, please see Chapter 9, Challenges.
ST OFRACTER
FIELD GUIDETO PANAU
WEAPONS VEHICLE EXPLORINGPANAU
AGENCYMISSIONS
STRONGHOLDTAKEOVERS
FACTIONMISSIONS
CHALLENGES COLLECTIBLES ACHIEVEMENTSAND TROPHIES
RICO’S WAYThe Essentials • Combat • Driving • Swimming • Flying • Stunt Jumping/Hijacking • Grappling Hook • Black Market • Heat • Chaos • Mission Management
Protected by copyright. Unauthorized or unlawful copying or downloading expressly prohibited.

8/18/2019 Just Cause 2 Prima Official Guide
http://slidepdf.com/reader/full/just-cause-2-prima-official-guide 20/208
PRIMA OFFICIAL STRATEGY GUIDETM
20
The first weapon you
find in Panau is the
pistol. This is your
basic point-and-shoot
sidearm. As a single-
handed weapon, the
pistol may be dual-
wielded to double the
firing power. Without
upgrading, the pistol is not terribly effective unless you score
headshots with it on a regular basis. While you shouldn’t overlook the
pistol when you are in a jam, almost every other weapon is preferable.
Level Magazine Size Max AmmoMin. # of Shots
to Kill EliteMin. # of Shots
to Kill Grunt
1 12 120 14 6
2 14 140 13 5
3 16 160 11 5
4 18 180 10 4
5 20 200 8 4
6 22 220 7 3
RevolverBlack Market Price: $40,000
The revolver is similar
in shape to the pistol,
but it has much more
stopping power. The
revolver can eliminate
an enemy with a single
shot, regardless of
whether it hits the head
or torso. The drawback
of the revolver, though, is that its magazine size is so small.
Even when fully upgraded, the revolver still has fewer
rounds in a magazine than the starting-level pistol.
Level Magazine Size Max AmmoMin. # of Shots
to Kill EliteMin. # of Shots
to Kill Grunt
1 5 50 2 1
2 6 60 2 1
3 7 70 2 1
4 8 80 2 1
5 9 90 2 1
6 10 100 1 1
PARTY FAVORSRico’s primary tool is his grappling hook, which he can also use
to grab enemies, string them up, or use as a melee weapon. But
he’ll need more than the grappling hook to get the job done in
Panau. Rico must collect, purchase, and use a series of firearms
and explosives against his enemies. These same weapons are
also used to ruin government assets, which in turn fosters Chaos.
Study the weapons detailed in this chapter before heading out
into the field. The weapon listings here detail critical information
about each piece of deadly gear, including the improvements thateach upgrade makes when you spend weapon parts in the Black
Market.
FirearmsThere are two types of firearms: single-handed and double-
handed. You can carry two single-handed weapons into battle
and strap one double-handed weapon to your back. The key
difference is that you are able to dual-wield single-handed
weapons, which greatly increases their effectiveness, although
you will burn through ammo at a much faster rate.
Firearms range in size from a small pistol to anenormous rocket launcher. However, the size of the
weapon does affect your speed.
As mentioned in the Field Guide to Panau chapter, all weapons
may be upgraded in the Black Market, which affects their power,
rate of fire, and ammo supplies. As you consider which weapons
to upgrade and to carry into battle, consider these factors:
Magazine size: Number of bullets per magazine
Max ammo: Maximum number of bullets you cancarry
Minimum number of shots: Minimum number ofshots required to kill either a grunt or an elite
Headshots score instant kills, regardless of the number
of shots needed to drop a target.
PistolBlack Market Price: $20,000
WEAPONS
AST OFRACTER
FIELD GUIDETO PANAU
WEAPONS VEHICLE EXPLORINGPANAU
AGENCYMISSIONS
STRONGHOLDTAKEOVERS
FACTIONMISSIONS
CHALLENGES COLLECTIBLES ACHIEVEMENTSAND TROPHIES
PARTY FAVORSFirearms • Explosives
Protected by copyright. Unauthorized or unlawful copying or downloading expressly prohibited.

8/18/2019 Just Cause 2 Prima Official Guide
http://slidepdf.com/reader/full/just-cause-2-prima-official-guide 21/208
C H A R A C T E R S
F I E L D G U I D E T O P A N A U
W E A P O N S
V E H I C L E S
E X P L O R I N G P A N A U
A G E N C Y M I S S I O N S
S T R O N G H O L D T A K E O V E R S
F A C T I O N M I S S I O N S
C H A L L E N G E S
C O L L E C T I B L E S
A C H I E V E M E N T S
primagames.com 21
Sawed-off ShotgunBlack Market Price: $35,000
The sawed-off shotgun
is a deadly instrument
at close range, capable
of doing enormous
damage. Note how it
takes a single blast
from the sawed-off
to kill a basic enemy.
This incredible power
comes at two prices, though: This weapon has very limited range,
and it holds few cartridges in a single load.
Level Magazine Size Max AmmoMin. # of Shots
to Kill EliteMin. # of Shots
to Kill Grunt
1 3 30 2 1
2 4 40 2 1
3 5 50 2 1
4 6 60 2 1
5 7 70 2 1
6 8 80 1 1
Submachine GunBlack Market Price: $35,000
The submachine gun
is one of the mostuseful weapons in the
game, thanks in large
part to its versatility.
At its lowest levels, the
SMG may not have
tremendous stopping
power, but the rate of
fire is enough to deliver the increased number of bullets needed
for the kill in a short period of time. The trade-off? You’ll go
through half a magazine just to kill an elite, provided you are
close enough to make every shot count.
Upgrading the SMG turns it into a superweapon that
not only holds a lot of bullets, but also delivers them at
such a fast rate your enemies barely have time to react
before they’ve been gunned down.
Level Magazine Size Max AmmoMin. # of Shots
to Kill EliteMin. # of Shots
to Kill Grunt
1 30 300 14 6
2 34 340 13 5
3 38 380 11 5
4 42 420 10 45 46 460 8 4
6 50 500 7 3
ShotgunBlack Market Price: $45,000
The shotgun has
greater range than
the sawed-off but
does just as much
damage. And it
is more common
to find while
exploring Panau.
So, what’s the
drawback? The shotgun is slow to fire, slow to reload, and is
a two-handed weapon. It is also not effective at long-range
skirmishes. Upgrade the shotgun to increase the number of
bullets it holds and to increase its accuracy.
While the shotgun is always useful, once you reach
Level 4 with it, it is one of the best weapons to use
in close-quarters combat.
LevelMagazine
Size Max AmmoMin. # of Shots
to Kill EliteMin. # of Shots
to Kill Grunt
1 10 200 2 1
2 12 240 2 1
3 14 280 2 1
4 16 320 2 1
5 18 360 2 16 20 400 1 1
Grenade LauncherBlack Market Price: $75,000
The grenade
launcher is a tricky
beast, but one that
does outrageous
damage once you
have its nuances
down. For one
thing, the grenade
launcher fires a
shell directly at the target cursor. The shell travels along an
arc and will drop to the ground, sometimes closer to you than
the actual target. You must compensate by aiming higher.
The grenade launcher is perfect for laying waste to
assets like fuel depots and broadcast towers during
a mission. A single shell does great damage, so you
do not need to stop and linger to finish off a target.
AST OFRACTER
FIELD GUIDETO PANAU
WEAPONS VEHICLE EXPLORINGPANAU
AGENCYMISSIONS
STRONGHOLDTAKEOVERS
FACTIONMISSIONS
CHALLENGES COLLECTIBLES ACHIEVEMENTSAND TROPHIES
PARTY FAVORSFirearms • Explosives
Protected by copyright. Unauthorized or unlawful copying or downloading expressly prohibited.

8/18/2019 Just Cause 2 Prima Official Guide
http://slidepdf.com/reader/full/just-cause-2-prima-official-guide 22/208
PRIMA OFFICIAL STRATEGY GUIDETM
22
Level Magazine Size Max AmmoMin. # of Shots
to Kill EliteMin. # of Shots
to Kill Grunt
1 6 30 1 1
2 8 40 1 1
3 10 50 1 14 12 60 1 1
5 14 70 1 1
6 16 80 1 1
Assault RifleBlack Market Price: $55,000
The assault rifle is a
powerful medium- to
long-range weapon
that is useful for
gutting enemies
without having to get
too close to them. It is
a two-handed weapon,
so you may not dual
wield with it. The assault rifle is one of the best all-purpose
weapons to have on the island. Upgrade it regularly.
Many soldiers use assault rifles, so you are rarely
without ammo unless you burn through it with abandon.
Level Magazine Size Max AmmoMin. # of Shots
to Kill EliteMin. # of Shots
to Kill Grunt
1 32 320 9 4
2 36 360 8 3
3 40 400 7 3
4 44 440 6 3
5 48 480 5 2
6 52 520 5 2
Sniper RifleBlack Market Price: $45,000
The sniper rifle is a
lethal tool, capable of
delivering a single-
shot kill with pinpoint
accuracy, even at its
lowest levels. If there
is no heat on you and
you have the freedom to
settle into a perch with
a great view of an enemy-held location, you can do serious damage
before being detected. However, the trade-off with the sniper rifle is
that it carries few rounds per magazine, and until it has been signifi-cantly upgraded, you cannot hold much reserve ammo.
The sniper rifle is almost useless at close range. Do not
carry it unless you have at least one single-handed
weapon with a solid ammo stock.
Level Magazine Size Max AmmoMin. # of Shots
to Kill EliteMin. # of Shots
to Kill Grunt
1 4 20 2 1
2 6 30 2 1
3 8 40 2 1
4 10 50 2 1
5 12 60 2 1
6 14 70 1 1
Machine GunBlack Market Price: $70,000
Even at its lowest
levels, the machine
gun is quite deadly
thanks to its stopping
power and solid
magazine size.
However, the machine
gun is not a common
weapon on Panau,
making it easy to run out of ammo while on a mission. Because
of this, it is essential to upgrade it on a regular basis.
Level Magazine Size Max AmmoMin. # of Shots
to Kill EliteMin. # of Shots
to Kill Grunt
1 50 250 5 2
2 60 300 5 2
3 70 350 4 2
4 80 400 4 2
5 90 450 3 2
6 100 500 3 2
Rocket LauncherBlack Market Price: $80,000
The rocket launcher
is death in a cylinder.
It is positively deadly
against human targets,
and it is effective at
destroying government
assets large and small.
Such power, though,
comes at a price. The
rocket launcher is not commonly found on Panau, so it is easy to
run out of ammo, even with an upgraded model. Its reload rate isalso long, so between shells, you leave yourself open to counter-
attack by a survivor...provided you left any, of course.
AST OFRACTER
FIELD GUIDETO PANAU
WEAPONS VEHICLE EXPLORINGPANAU
AGENCYMISSIONS
STRONGHOLDTAKEOVERS
FACTIONMISSIONS
CHALLENGES COLLECTIBLES ACHIEVEMENTSAND TROPHIES
PARTY FAVORSFirearms • Explosives
Protected by copyright. Unauthorized or unlawful copying or downloading expressly prohibited.

8/18/2019 Just Cause 2 Prima Official Guide
http://slidepdf.com/reader/full/just-cause-2-prima-official-guide 23/208
C H A R A C T E R S
F I E L D G U I D E T O P A N A U
W E A P O N S
V E H I C L E S
E X P L O R I N G P A N A U
A G E N C Y M I S S I O N S
S T R O N G H O L D T A K E O V E R S
F A C T I O N M I S S I O N S
C H A L L E N G E S
C O L L E C T I B L E S
A C H I E V E M E N T S
primagames.com 23
Level Magazine Size Max AmmoMin. # of Shots
to Kill EliteMin. # of Shots
to Kill Grunt
1 3 6 1 1
2 4 8 1 1
3 5 10 1 14 6 12 1 1
5 7 14 1 1
6 8 16 1 1
ExplosivesExplosives are secondary weapons, thrown to produce damage
with an area effect. There are two types of explosives: fragmen-
tation grenades and triggered explosives. Even at their lowest
levels, these weapons are capable of shattering enemies, but
you better be careful. The blast radius of an explosive does not
discriminate. If you are too close to an explosive when it goes off,
you will take significant damage or possibly be killed.
Max carried: Maximum number of explosives youcan carry
Range: Blast radius of the explosive; enemieswithin the radius who are killed
Frag GrenadeBlack Market Price: $25,000
Fragmentation
grenades are hand-
thrown explosives
that have a modest
blast radius at its
lowest levels, although
the power of the
detonation is still
enough to instantly kill
anybody caught in it, yourself included. Frags can be bounced
off walls for bank shots or rolled along the ground to slip
beneath targets.
Frags are useful against assets, especially after you
have upgraded them a few times.
Be very, very careful when using frags in close-quarter
combat. In fact, avoid doing so unless you are out of
ammo for your three other weapons.
Level Max Carried Range (in meters)
1 15 7.5
2 20 8
3 25 8.54 30 9
5 35 9.5
6 40 10
Triggered ExplosivesBlack Market Price: $30,000
Unlike frag
grenades,
triggered
explosives stickto surfaces. This
allows you to plant
them as bombs,
move away, and
then detonate
them from safe distances. To detonate a triggered explosive,
you just need to hold down the grenade button. Rico will
then lift the detonator and press the button, initiating the
explosion. Since these are detonated remotely, you can plant
multiple triggered explosives around a site and then set them
off later. However, you may not set off planted explosives in a
particular order. They all go up when you hit the detonator.
Triggered explosives are great for destroying assets
at government-held sites like bases and harbors, as
well as Baby Panay statues.
Level Max Carried Range (in meters)
1 15 7.5
2 20 8
3 25 8.5
4 30 95 35 9.5
6 40 10
AST OFARACTER
FIELD GUIDETO PANAU
WEAPONS VEHICLE EXPLORINGPANAU
AGENCYMISSIONS
STRONGHOLDTAKEOVERS
FACTIONMISSIONS
CHALLENGES COLLECTIBLES ACHIEVEMENTSAND TROPHIES
PARTY FAVORSFirearms • Explosives
Protected by copyright. Unauthorized or unlawful copying or downloading expressly prohibited.

8/18/2019 Just Cause 2 Prima Official Guide
http://slidepdf.com/reader/full/just-cause-2-prima-official-guide 24/208
PRIMA OFFICIAL STRATEGY GUIDETM
24
VEHICLES
BY LAND, SEA, OR AIRPanau may be an island nation, but it is hardly a postage stamp.
The country is composed of several islands of varying sizes.
Some are connected by bridges, while others require airplanes
or boats to visit. As you explore Panau and take on missions for
the Agency or the factions, you will often rely on vehicles to get
you from point A to point B (and typically to point C) as fast as
possible. You have the freedom to take any vehicle you want,
giving you full access to land, sea, and air in Panau. You can putt
along in a little scooter one minute and then roar to the edge ofthe atmosphere in a fighter jet the next. The only catch is that
occasionally you need to forcefully eject the driver of the vehicle.
But dealing with a stubborn driver or pilot isn’t too much trouble
for the world’s smoothest superagent. Just apply those fists to
the driver’s face a few times and then enjoy your new ride.
Remember, if your vehicle starts to catch fire, bail as soon
as possible. You have only a few seconds before it goes up
in a fireball. If you are still behind the wheel when it blows,
you die instantly no matter how much health you have.
We have collected every vehicle available to you in Panau. Each
vehicle is pictured, and all relevant stats are included, such as the
top speed (useful for racing challenges or escape missions), the
rate of acceleration, and the amount of armor. If a vehicle has any
weapons on board, we note that as well.
Black Market vehicles listed in Chapter 2, Field Guide
to Panau, are integrated in this chapter. The weapons
added via upgrades are detailed in their entries.
Cars and TrucksThe primary method of travel in Panau is via car or truck.
Thousands of sedans, buggies, pickups, and other four-wheelers
race the country’s extensive road and highway system. Expect to
find higher-end cars in the big cities, while medium-class sedans
rule the rural roads. The cars and trucks you order up from the
Black Market are among the best of the class, so when you are
caught in a jam, use any of these automobiles. Even the most
basic civilian sedan has some armor, which will give you at least
a few seconds of getaway time.
When you get out into the sticks, definitely expect to
see fewer cars.
Boyd Fireflame 544 Top Speed: 70
Acceleration: 60
Armor: 30
Handling: 45
Chepachet PVD
Top Speed: 68
Acceleration: 52
Armor: 65
Handling: 60
Chevalier Express HT Top Speed: 55
Acceleration: 30
Armor: 41
Handling: 51
Chevalier Liner SB Top Speed: 50
Acceleration: 39
Armor: 30
Handling: 48
Chevalier Piazza IX Top Speed: 40
Acceleration: 35
Armor: 20
Handling: 45
Chevalier Traveller SC Top Speed: 52
Acceleration: 40
Armor: 30Handling: 49
AST OFRACTER
FIELD GUIDETO PANAU
WEAPONS VEHICLE EXPLORINGPANAU
AGENCYMISSIONS
STRONGHOLDTAKEOVERS
FACTIONMISSIONS
CHALLENGES COLLECTIBLES ACHIEVEMENTSAND TROPHIES
BY LAND, SEA, OR AIRCars and Trucks • Military Vehicles • Motorcycles and ATVs • Boats • Helicopters • Airplanes
Protected by copyright. Unauthorized or unlawful copying or downloading expressly prohibited.

8/18/2019 Just Cause 2 Prima Official Guide
http://slidepdf.com/reader/full/just-cause-2-prima-official-guide 25/208
C H A R A C T E R S
F I E L D G U I D E T O P A N A U
W E A P O N S
V E H I C L E S
E X P L O R I N G P A N A U
A G E N C Y M I S S I O N S
S T R O N G H O L D T A K E O V E R S
F A C T I O N M I S S I O N S
C H A L L E N G E S
C O L L E C T I B L E S
A C H I E V E M E N T S
primagames.com 25
Chevalier Traveller SD Top Speed: 50
Acceleration: 39
Armor: 30
Handling: 48
Chevalier Traveller SX Top Speed: 50
Acceleration: 39
Armor: 30
Handling: 48
Civadier 999 Top Speed: 82
Acceleration: 92
Armor: 31
Handling: 68
Civadier 999 Cabrioluxe Top Speed: 82
Acceleration: 94
Armor: 32
Handling: 68
Columbi Excelsior Top Speed: 50
Acceleration: 45
Armor: 30
Handling: 40
Dalton N90 Top Speed: 62
Acceleration: 58
Armor: 58
Handling: 57
Dinggong 134D Top Speed: 30
Acceleration: 20
Armor: 30
Handling: 30
Dinggong 268D Top Speed: 30
Acceleration: 20
Armor: 30
Handling: 30
Dongtai A-B Century Top Speed: 15
Acceleration: 15
Armor: 35
Handling: 15
Dongtai A-B DecaLux Top Speed: 15
Acceleration: 15
Armor: 35
Handling: 15
Dongtai Agriboss 35 Top Speed: 15
Acceleration: 15
Armor: 35
Handling: 15
Dongtai Agriboss 9000 Top Speed: 15
Acceleration: 15
Armor: 35
Handling: 15
AST OFARACTER
FIELD GUIDETO PANAU
WEAPONS VEHICLE EXPLORINGPANAU
AGENCYMISSIONS
STRONGHOLDTAKEOVERS
FACTIONMISSIONS
CHALLENGES COLLECTIBLES ACHIEVEMENTSAND TROPHIES
BY LAND, SEA, OR AIRCars and Trucks • Military Vehicles • Motorcycles and ATVs • Boats • Helicopters • Airplanes
Protected by copyright. Unauthorized or unlawful copying or downloading expressly prohibited.

8/18/2019 Just Cause 2 Prima Official Guide
http://slidepdf.com/reader/full/just-cause-2-prima-official-guide 26/208
PRIMA OFFICIAL STRATEGY GUIDETM
26
Fengding EC14FD2 Top Speed: 40
Acceleration: 35
Armor: 55
Handling: 40
Fengding EC2 Lift Top Speed: 40
Acceleration: 35
Armor: 55
Handling: 40
Garret Traver-Z Top Speed: 89
Acceleration: 95
Armor: 40
Handling: 76
Weapons: Mounted
gun (w/ Black Market
upgrade)
Hamaya Oldman Top Speed: 55
Acceleration: 50
Armor: 30
Handling: 55
Hamaya Oldman Cab Top Speed: 55
Acceleration: 50
Armor: 30
Handling: 55
Hedge Wildchild Top Speed: 70
Acceleration: 60
Armor: 65
Handling: 70
Weapons: Mounted gun,
rockets (w/ Black Market upgrade)
Kenwall Heavy Rescue Top Speed: 45
Acceleration: 40
Armor: 45
Handling: 40
Maddox FVA 45 Top Speed: 60
Acceleration: 42
Armor: 50
Handling: 60
Mancini Cavallo 1001 Top Speed: 85
Acceleration: 90
Armor: 27
Handling: 75
Marten Storm III Top Speed: 60
Acceleration: 50
Armor: 60
Handling: 55
Marten Storm III-2 Top Speed: 60
Acceleration: 50
Armor: 60
Handling: 50
Niseco Coastal D22 Top Speed: 35
Acceleration: 20
Armor: 30
Handling: 20
AST OFRACTER
FIELD GUIDETO PANAU
WEAPONS VEHICLE EXPLORINGPANAU
AGENCYMISSIONS
STRONGHOLDTAKEOVERS
FACTIONMISSIONS
CHALLENGES COLLECTIBLES ACHIEVEMENTSAND TROPHIES
BY LAND, SEA, OR AIRCars and Trucks • Military Vehicles • Motorcycles and ATVs • Boats • Helicopters • Airplanes
Protected by copyright. Unauthorized or unlawful copying or downloading expressly prohibited.

8/18/2019 Just Cause 2 Prima Official Guide
http://slidepdf.com/reader/full/just-cause-2-prima-official-guide 27/208
C H A R A C T E R S
F I E L D G U I D E T O P A N A U
W E A P O N S
V E H I C L E S
E X P L O R I N G P A N A U
A G E N C Y M I S S I O N S
S T R O N G H O L D T A K E O V E R S
F A C T I O N M I S S I O N S
C H A L L E N G E S
C O L L E C T I B L E S
A C H I E V E M E N T S
primagames.com 27
Niseco Tusker D18 Top Speed: 40
Acceleration: 20
Armor: 30
Handling: 35
Niseco Tusker G216 Top Speed: 30
Acceleration: 20
Armor: 30
Handling: 30
Niseco Tusker P246 Top Speed: 35
Acceleration: 20
Armor: 30
Handling: 30
Pocumtuck Nomad Top Speed: 30
Acceleration: 25
Armor: 30
Handling: 30
Poloma Renegade Top Speed: 65
Acceleration: 60
Armor: 31
Handling: 50
Weapons: Rockets,
mounted gun (w/ Black
Market upgrade)
Saas PP12 Hogg Top Speed: 70
Acceleration: 55
Armor: 60
Handling: 63
Karl Blaine’s favorite car may not be much to look
at, but it’s a versatile rig with decent speed.
Saas PP30 Ox Top Speed: 50
Acceleration: 35
Armor: 75
Handling: 50
Sakura Aquila City Top Speed: 60
Acceleration: 50
Armor: 30
Handling: 55
Sakura Aguila Forte Top Speed: 60
Acceleration: 50
Armor: 33
Handling: 55
Sakura Aquila Metro ST Top Speed: 73
Acceleration: 65
Armor: 29
Handling: 68
Sakura Aquila Space Top Speed: 55
Acceleration: 49
Armor: 32
Handling: 48
Stinger Dunebug 84 Top Speed: 60
Acceleration: 52
Armor: 30
Handling: 60
AST OFARACTER
FIELD GUIDETO PANAU
WEAPONS VEHICLE EXPLORINGPANAU
AGENCYMISSIONS
STRONGHOLDTAKEOVERS
FACTIONMISSIONS
CHALLENGES COLLECTIBLES ACHIEVEMENTSAND TROPHIES
BY LAND, SEA, OR AIRCars and Trucks • Military Vehicles • Motorcycles and ATVs • Boats • Helicopters • Airplanes
Protected by copyright. Unauthorized or unlawful copying or downloading expressly prohibited.

8/18/2019 Just Cause 2 Prima Official Guide
http://slidepdf.com/reader/full/just-cause-2-prima-official-guide 28/208
PRIMA OFFICIAL STRATEGY GUIDETM
28
Titus ZJ Top Speed: 85
Acceleration: 83
Armor: 30
Handling: 70
The Titus ZJ is greased lightning. It’s low on armor,
though, but considering the power under the hood, you
can practically outrun bullets in this thing.
Titus ZJ Cabriolet Top Speed: 85
Acceleration: 83
Armor: 30
Handling: 70
Titus ZJ Soft Top Top Speed: 85
Acceleration: 85
Armor: 28
Handling: 70
Tuk-Tuk Laa Top Speed: 20
Acceleration: 25
Armor: 20
Handling: 35
Tuk-Tuk Rickshaw Top Speed: 20
Acceleration: 25
Armor: 20
Handling: 35
URGA-9380 Top Speed: 40
Acceleration: 30
Armor: 65
Handling: 40
Vanderbildt Leisure Liner Top Speed: 30
Acceleration: 20
Armor: 30
Handling: 30
Vaultier Patrolman Top Speed: 60
Acceleration: 55
Armor: 36
Handling: 50
Military VehiclesBaby Panay’s forces can use any vehicle in Panau, but they
primarily stick to these trucks, jeeps, and tanks when not using
attack choppers. The trucks and tanks are heavily armored,
making them tough to knock out with explosives or a rocket
launcher. Jeeps, on the other hand, trade armor for speed and
versatility. Almost all military vehicles, though, can transport
multiple soldiers, so when encountering one, don’t stop shooting
until you are absolutely sure nobody else is going to pour out of
a hatch.
GV-104 Razorback Top Speed: 20
Acceleration: 20
Armor: 90
Handling: 20
Weapons: Auto-cannon,
mounted guns (w/ Black Market upgrade)
The Razorback rattles into battle like a deadly
armadillo. Encased in significant armor, you can dish
out incredible damage while absorbing a fair amount
of it before you must abandon ship. The big drawback?
Steering. The Razorback is not necessarily adept at
getting through tight spaces.
MV Quartermaster Top Speed: 66
Acceleration: 45
Armor: 65Handling: 65
AST OFRACTER
FIELD GUIDETO PANAU
WEAPONS VEHICLE EXPLORINGPANAU
AGENCYMISSIONS
STRONGHOLDTAKEOVERS
FACTIONMISSIONS
CHALLENGES COLLECTIBLES ACHIEVEMENTSAND TROPHIES
BY LAND, SEA, OR AIRCars and Trucks • Military Vehicles • Motorcycles and ATVs • Boats • Helicopters • Airplanes
Protected by copyright. Unauthorized or unlawful copying or downloading expressly prohibited.

8/18/2019 Just Cause 2 Prima Official Guide
http://slidepdf.com/reader/full/just-cause-2-prima-official-guide 29/208
C H A R A C T E R S
F I E L D G U I D E T O P A N A U
W E A P O N S
V E H I C L E S
E X P L O R I N G P A N A U
A G E N C Y M I S S I O N S
S T R O N G H O L D T A K E O V E R S
F A C T I O N M I S S I O N S
C H A L L E N G E S
C O L L E C T I B L E S
A C H I E V E M E N T S
primagames.com 29
MV V880 Top Speed: 66
Acceleration: 45
Armor: 65
Handling: 65
SV-1003 Raider Top Speed: 18
Acceleration: 21
Armor: 83
Handling: 17
Weapons: Mounted gun
SV-1007 Stonewall Top Speed: 16
Acceleration: 19
Armor: 81
Handling: 14
Weapons: Auto-cannon
Wilforce Range X
Top Speed: 65 Acceleration: 70
Armor: 50
Handling: 70
Wilforce Trek II Top Speed: 65
Acceleration: 70
Armor: 50
Handling: 70
Wilforce Trekstar Top Speed: 65
Acceleration: 70
Armor: 50
Handling: 70
Weapons: Mounted gun
Motorcycles and ATVsMotorcycles are speedy vehicles perfect for slipping through
heavy-traffic situations. If you are in pursuit, the motorcycle
can thread tight spots and keep you on target. And if you are
trying to escape, the motorcycle’s narrow width is critical for
slipping around parked cars and trucks.
If you are going full speed on a motorcycle, you
earn Stunt Points for steering a hairsbreadth next to
incoming cars and trucks.
Few vehicles are better than ATVs for off-roading. Trying to
steer a car or a truck through the trees is tricky. You can get
tripped up on hard-to-see rocks and roots or can wedge the
vehicle in a ditch, unable to get it out. ATVs, though, were
built for rough, uneven terrain. If you need to escape theheat, stealing into the trees on an ATV is great way to put
some distance between you and pursuing soldiers.
Hamaya 1300 Elite Cruiser Top Speed: 65
Acceleration: 75
Armor: 35
Handling: 55
Hamaya Cougar 600 Top Speed: 70
Acceleration: 80
Armor: 30
Handling: 60
Hamaya GSY650 Top Speed: 60
Acceleration: 55 Armor: 45
Handling: 55
Hamaya Y250S Top Speed: 55
Acceleration: 50
Armor: 35
Handling: 60
AST OFARACTER
FIELD GUIDETO PANAU
WEAPONS VEHICLE EXPLORINGPANAU
AGENCYMISSIONS
STRONGHOLDTAKEOVERS
FACTIONMISSIONS
CHALLENGES COLLECTIBLES ACHIEVEMENTSAND TROPHIES
BY LAND, SEA, OR AIR
Cars and Trucks • Military Vehicles • Motorcycles and ATVs • Boats • Helicopters • Airplanes
Protected by copyright. Unauthorized or unlawful copying or downloading expressly prohibited.

8/18/2019 Just Cause 2 Prima Official Guide
http://slidepdf.com/reader/full/just-cause-2-prima-official-guide 30/208
PRIMA OFFICIAL STRATEGY GUIDETM
30
Makoto MZ 250 Top Speed: 55
Acceleration: 55
Armor: 35
Handling: 55
Makoto MZ 260X Top Speed: 60
Acceleration: 60
Armor: 40
Handling: 60
Mosca 125 Performance Top Speed: 20
Acceleration: 35
Armor: 25
Handling: 45
Mosca 2000 Top Speed: 20
Acceleration: 30
Armor: 20
Handling: 45
Schulz Virginia Top Speed: 20
Acceleration: 25
Armor: 15
Handling: 45
Shimuzu ATV55T Top Speed: 35
Acceleration: 32
Armor: 27
Handling: 30
Shimuzu Freerunner Top Speed: 45
Acceleration: 40
Armor: 30
Handling: 35
Shimuzu PI Service Top Speed: 45
Acceleration: 40
Armor: 30
Handling: 35
Shimuzu Tracline Top Speed: 45
Acceleration: 40
Armor: 30
Handling: 35
BoatsPanau is an island nation, surrounded by water and sliced into
regions by rivers and lakes. Skimming across the waves in a boat
is a fun way to explore Panau and see the sights. Some of the
boats roll through the seas at a leisurely pace, but they are still
faster than swimming to shore. (If you are shot out of the sky
over the ocean, look for a boat to grapple to and steer it to solid
ground.) Few boats are equipped with weapons, but those that
are work well for circling around government-controlled harbors
and taking out assets like cranes.
Frisco Catshark S-38 Top Speed: 75
Acceleration: 60
Armor: 45
Handling: 65
Kuang Adventure Top Speed: 10
Acceleration: 13
Armor: 75
Handling: 10
AST OFRACTER
FIELD GUIDETO PANAU
WEAPONS VEHICLE EXPLORINGPANAU
AGENCYMISSIONS
STRONGHOLDTAKEOVERS
FACTIONMISSIONS
CHALLENGES COLLECTIBLES ACHIEVEMENTSAND TROPHIES
BY LAND, SEA, OR AIR
Cars and Trucks • Military Vehicles • Motorcycles and ATVs • Boats • Helicopters • Airplanes
Protected by copyright. Unauthorized or unlawful copying or downloading expressly prohibited.

8/18/2019 Just Cause 2 Prima Official Guide
http://slidepdf.com/reader/full/just-cause-2-prima-official-guide 31/208
C H A R A C T E R S
F I E L D G U I D E T O P A N A U
W E A P O N S
V E H I C L E S
E X P L O R I N G P A N A U
A G E N C Y M I S S I O N S
S T R O N G H O L D T A K E O V E R S
F A C T I O N M I S S I O N S
C H A L L E N G E S
C O L L E C T I B L E S
A C H I E V E M E N T S
primagames.com 31
Kuang Homestead Top Speed: 30
Acceleration: 33
Armor: 35Handling: 25
Kuang Sunrise Top Speed: 12
Acceleration: 11
Armor: 75
Handling: 10
Kuang Sunset Top Speed: 10
Acceleration: 14
Armor: 75
Handling: 10
MTA Powerrun 77 Top Speed: 85
Acceleration: 80
Armor: 25
Handling: 75
Weapons: Rockets (w/
Black Market upgrade)
Orca Bon Ton 71FT Top Speed: 40
Acceleration: 35
Armor: 35
Handling: 30
Orca Grandois 21TT Top Speed: 20
Acceleration: 30
Armor: 35
Handling: 20
Orca Living 42T Top Speed: 30
Acceleration: 33
Armor: 35
Handling: 25
Pattani Gluay Touring Top Speed: 25
Acceleration: 17
Armor: 30
Handling: 30
SnakeHead T20 Top Speed: 80
Acceleration: 65
Armor: 30
Handling: 60
Trat Tang-mo Top Speed: 10
Acceleration: 12
Armor: 75
Handling: 10
Winstons Amen 69 Top Speed: 35
Acceleration: 10
Armor: 75
Handling: 45
YP-107 Phoenix Top Speed: 70
Acceleration: 70
Armor: 55
Handling: 60
AST OFARACTER
FIELD GUIDETO PANAU
WEAPONS VEHICLE EXPLORINGPANAU
AGENCYMISSIONS
STRONGHOLDTAKEOVERS
FACTIONMISSIONS
CHALLENGES COLLECTIBLES ACHIEVEMENTSAND TROPHIES
BY LAND, SEA, OR AIR
Cars and Trucks • Military Vehicles • Motorcycles and ATVs • Boats • Helicopters • Airplanes
Protected by copyright. Unauthorized or unlawful copying or downloading expressly prohibited.

8/18/2019 Just Cause 2 Prima Official Guide
http://slidepdf.com/reader/full/just-cause-2-prima-official-guide 32/208
PRIMA OFFICIAL STRATEGY GUIDETM
32
Zhejiang 6903 Top Speed: 15
Acceleration: 12
Armor: 80
Handling: 15
HelicoptersHelicopters are the most versatile vehicles in Panau. They allow you
to quickly take to the air and cover great distances in relatively little
time (although they are not as fast as airplanes), and they have
easy maneuverability. Changing altitude is effortless, which gives
you a fair chance at avoiding incoming missiles. Plus, helicopters
do not require landing strips. As long as the ground beneath thechopper is relatively flat, you can land on it.
A handful of choppers are equipped with weapons, making
them devastating against government installations. Circling a base
from the air and unloading gunfire and rockets into assets like fuel
depots and radio masts is the easiest way to generate Chaos.
An attack chopper like the AH-33 Topachula is a perfect
tool for taking out the 50 colonels spread across Panau.
Colonels are special assassination targets worth big
cash and Chaos, and therefore are heavily defended.
Rockets or minigun fire from an attack chopper cutsthrough a colonel’s minions and increased armor.
AH-33 Topachula Top Speed: 55
Acceleration: 55
Armor: 65
Handling: 60
Weapons: Mounted guns,
rockets
H-62 Quapaw Top Speed: 35
Acceleration: 35
Armor: 75
Handling: 35
The H-62 Quapaw is a heavily armored chopper that
is great for covering dangerous skies, but it has no
weapons to defend itself with.
Mullen Skeeter Eagle Top Speed: 35
Acceleration: 45
Armor: 35
Handling: 40
Mullen Skeeter Hawk
Top Speed: 40
Acceleration: 45
Armor: 30
Handling: 45
Rowlinson K22 Top Speed:
Acceleration: 65
Armor: 60
Handling: 20
Weapons: 70 Mounted
guns (w/ Black Market upgrade)
Sivirkin 15 Havoc Top Speed: 60
Acceleration: 55
Armor: 70
Handling: 60
Weapons: Mounted guns,rockets (w/ Black Market upgrade)
The Sivirkin is one of the best attack choppers in this
category. Once upgraded with rockets, you can tear
apart facilities with near impunity...as long as you take
out any nearby SAM sites.
AST OFRACTER
FIELD GUIDETO PANAU
WEAPONS VEHICLE EXPLORINGPANAU
AGENCYMISSIONS
STRONGHOLDTAKEOVERS
FACTIONMISSIONS
CHALLENGES COLLECTIBLES ACHIEVEMENTSAND TROPHIES
BY LAND, SEA, OR AIR
Cars and Trucks • Military Vehicles • Motorcycles and ATVs • Boats • Helicopters • Airplanes
Protected by copyright. Unauthorized or unlawful copying or downloading expressly prohibited.

8/18/2019 Just Cause 2 Prima Official Guide
http://slidepdf.com/reader/full/just-cause-2-prima-official-guide 33/208
C H A R A C T E R S
F I E L D G U I D E T O P A N A U
W E A P O N S
V E H I C L E S
E X P L O R I N G P A N A U
A G E N C Y M I S S I O N S
S T R O N G H O L D T A K E O V E R S
F A C T I O N M I S S I O N S
C H A L L E N G E S
C O L L E C T I B L E S
A C H I E V E M E N T S
primagames.com 33
UH-10 Chippewa Top Speed: 50
Acceleration: 50
Armor: 60
Handling: 55
Weapons: Mounted guns
AirplanesWhen you must tame the sheer size of Panau, nothing beats
taking to the skies in an airplane. Usually you obtain an airplane
at one of Panau’s airports. Civilian craft like the Cassius are
found at smaller, nonmilitary airports, while weaponized jet
fighters such as Si-47 Leopard are found at military installations.
Most airplanes require an airstrip to take off and land, but if you
are in a pinch, a straight stretch of highway will do the trick.
Aeroliner 474 Top Speed: 55
Acceleration: 55
Armor: 70
Handling: 50
Bering I-86DP Top Speed: 60
Acceleration: 45
Armor: 85
Handling: 45
Cassius 192 Top Speed: 55
Acceleration: 30
Armor: 30
Handling: 65
G9 Eclipse Top Speed: 75
Acceleration: 70
Armor: 65
Handling: 65
Weapons: Rockets
Peek Airhawk 225 Top Speed: 65
Acceleration: 60
Armor: 25
Handling: 80
Pell Silverbolt 6 Top Speed: 95
Acceleration: 80
Armor: 30
Handling: 90
The Pell Silverbolt is
The Pell Silverbolt is one of the fastest planes in
Panau. It requires little room to take off, but if you
clip a tree or building as it roars into the air, the
results are disastrous.
Si-47 Leopard Top Speed: 70
Acceleration: 75
Armor: 60
Handling: 70
Weapons: Mounted
guns, rockets
AST OFARACTER
FIELD GUIDETO PANAU
WEAPONS VEHICLE EXPLORINGPANAU
AGENCYMISSIONS
STRONGHOLDTAKEOVERS
FACTIONMISSIONS
CHALLENGES COLLECTIBLES ACHIEVEMENTSAND TROPHIES
BY LAND, SEA, OR AIR
Cars and Trucks • Military Vehicles • Motorcycles and ATVs • Boats • Helicopters • Airplanes
Protected by copyright. Unauthorized or unlawful copying or downloading expressly prohibited.

8/18/2019 Just Cause 2 Prima Official Guide
http://slidepdf.com/reader/full/just-cause-2-prima-official-guide 34/208
PRIMA OFFICIAL STRATEGY GUIDETM
34
The location of all parts, cash stashes, and destructible
objects are detailed in the tables of this chapter.
Use this table of settlements to guide you in your
exploration of Panau:
Name: This is the name of the settlement.
Type: This describes the nature of the settlement, from
village to military bases. Use type to determine what
types of vehicles you may find. For example, you are
likely to find airplanes and helicopters at an airport,
boats at a harbor, and strong military presences onbases.
PDA Coordinates: These are the x, y coordinates on
your PDA. Set checkpoints at these coordinates to
locate the settlement.
SETTLEMENTS
Name TypePDA Coordinates
(X, Y)
Kepulauan Senjakala Alpha Communication outpost 14987, 26844
Negeri Gunung Berawn Military base 24210, 24850
Pekan Belalang Civilian village 14608, 28455
Kampung Tiga Kelapa Civilian village 9908, 7021
Kampung Jelantur Civilian village 10079, 10232
Bandar Kayu Buaya Civilian village 17820, 17336
Tanah Raya Timur Beta Communication outpost 28018, 14259
Gunung Lapik Military airport 20285, 22573
Lengkok Sungai Gambler'sDen
Civilian village 8646, 23133
Koji Kuasa Panau Utara Civilian village 21896, 6464
Pelantar Minyak Gerudi Besar Offshore Rig 797, 22490
Kastelo Singa Military Base Military base 21112, 9529
Bandar Baru Indah Civilian village 13829, 29499
Port Rodrigo Civilian village 15398, 22457
Negeri Selatan Civilian village 24178, 20165
Tanah Raya Timur Epsilon Communication outpost 30690, 17390
Pulau Tiga Gunung Military base 14522, 26354
Kampung Sawah Pantai Civilian village 21695, 21892
Tanah Raya Timur Eta Communication outpost 22385, 18780
Kampung Langit Berasap Civilian village 26770, 6694
Banjaran Berawan Besar Iota Communication outpost 17927, 9438
Tanah Raya Timur Kappa Communication outpost 28430, 16532
Bandar Lubuk Paya Civilian village 12634, 25978
Pekan Lengkong Civilian village 24708, 20586
Pekan Keris Perak Military base 10369, 22764
Pekan Pondok Getah Civilian village 17464, 17498
Kuala Rajang Civilian village 14751, 25692
PARADISE LOSTNow that you are familiar with the tools of the trade, it’s time to
learn exactly what you need to do around Panau to undermine
Baby Panay’s government: create chaos. You spend a great deal
of your time on Panau in missions for the Agency or for each
faction, but you can spend so much more just exploring the
island nation and taking in the breathtaking sights. Panau is truly
a paradise. But to save this paradise, you must do some serious
damage to it.
Settlements
There are 360 settlements in Panau, ranging from small civilian
villages to the massive Panau City. When you first arrive in Panau,
none of the settlements are registered on your PDA. You must
discover them for yourself. The only way to log a settlement
on your PDA is to visit. And that doesn’t mean fly over it in a
jet at 25,000 feet. You must enter the physical borders of the
settlement so its name pops up under your minimap; then it will
be registered in your PDA.
There are multiple reasons to log settlements on your
PDA map. Establishing the location of a settlement means youcan travel to it via Black Market extraction; you can then start
working on achieving 100-percent completion of that settlement
by destroying assets and picking up parts or cash stashes within
its borders.
EXPLORING PANAU
AST OFRACTER
FIELD GUIDETO PANAU
WEAPONS VEHICLE EXPLORINGPANAU
AGENCYMISSIONS
STRONGHOLDTAKEOVERS
FACTIONMISSIONS
CHALLENGES COLLECTIBLES ACHIEVEMENTSAND TROPHIES
PARADISE LOST • CHAOSSettlements • Parts and Cash Stashes
Protected by copyright. Unauthorized or unlawful copying or downloading expressly prohibited.

8/18/2019 Just Cause 2 Prima Official Guide
http://slidepdf.com/reader/full/just-cause-2-prima-official-guide 35/208
C H A R A C T E R S
F I E L D G U I D E T O P A N A U
W E A P O N S
V E H I C L E S
E X P L O R I N G P A N A U
A G E N C Y M I S S I O N S
S T R O N G H O L D T A K E O V E R S
F A C T I O N M I S S I O N S
C H A L L E N G E S
C O L L E C T I B L E S
A C H I E V E M E N T S
primagames.com 35
Name TypePDA Coordinates
(X, Y)
Teluk Panau Tengah Beta Communication outpost 11824, 20800
Pekan Ular Sawa Military base 3899, 20160
Kem Serigala Kelabu Military base 19145, 15716
Paya Keras Civilian village 18532, 7046
Pekan Badak Bermandi Civilian village 18207, 21543
Bandar Tokong Kecil Civilian village 25603, 5467
Pekan Pakis Civilian village 29149, 14577
Tanah Raya Timur Gamma Communication outpost 27022, 19701
Rumah Hartawan Civilian village 16522, 3314
Seabreeze Sawmill Civilian village 15366, 25865
Kampung Orkid Riak Civilian village 17683, 25328
Kampung Rencong Berkarat Military base 20570, 13437
Kem General Yahya Military base 28411, 31323
Teluk Panau Tengah Delta Communication outpost 13168, 23920
Kem Udara Wau Pantas Military airport 22163, 23265
Pekan Batu Karang Civilian village 2281, 31478
Kota Kuala Delima Civilian village 27674, 13571
Pekan Kemilau Civilian village 27662, 8124
Kampung Tanah Besar Civilian village 28366, 8573
Tanah Luas Military base 8926, 7887
Kampung Sekam Padi Civilian village 24319, 26012
Loji Kuasa Pantai Tokong Civilian village 18518, 20186
Kem Jalan Kilang Lama Military base 19298, 14277
Kampung Kilang Papan Civilian village 5213, 31666
Sungai Jernih Military airport 12286, 25201
Bandar Baru Cina Civilian village 17262, 18190
Kepulauan Selatan Gamma Communication outpost 20218, 25797
Kuala Cherah Civilian village 23947, 28103
Kampung Tasik Lembah Civilian village 2500, 31192
Kampung Kolam Gelap Civilian village 13238, 31213
Gunung Jarandua Civilian village 28184, 9557
Kampung Datuk Tua Civilian village 23595, 26235
Kem Jalan Padang Luas Military base 25465, 31294
Bandar Besar Civilian village 15964, 11878
Bandar Selekeh Civilian village 9170, 11413
Kampung Dataran Nipah Civilian village 6493, 19897
Pekan Jambatan Batu Civilian village 3593, 24704
Kepulauan Selatan Eta Communication outpost 25943, 28892
Kampung Lembah Danau Civilian village 24515, 30449
Gurun Lautan Lama Gamma Communication outpost 4545, 25160Kampung Kosa Besar Civilian village 26156, 20072
Kampung Kerang Hitam Civilian village 12300, 9264
Panau International Airport Military airport 9748, 12798
Kampung Sawah Basah Civilian village 4340, 31397
Fasility Gunung Timur Military base 30585, 28826
Port Kepulauan Pelaut Military harbor 26139, 4786
Tanjung Putih Civilian village 2903, 21057
Kepulauan Senjakala Beta Communication outpost 2422, 28540
Kem Pekan Selamat Military base 7105, 26022
Sungai Cerah Civilian village 10909, 28569
Pekan Hutan Buluh Civilian village 27506, 6529
Bandar Kayu Manis Civilian village 22922, 13772Pelantar Gas Panau Utara Offshore rig 11593, 1026
Bandar Pertama Civilian village 16598, 16492
Name TypePDA Coordinates
(X, Y)
Bandar Jernih Civilian village 21752, 29722
Kem Gunung Dataran Tinggi Military base 15331, 9373
Kepulauan Selatan Kappa Communication outpost 23639, 28960
Kem Komodor Da Silva Military harbor 8554, 9310
Negeri Tenggara Military base 25597, 20439
Kampung Tokong Tua Civilian village 10467, 6034
Kampung Ketam Laut Civilian village 8509, 14037
Sungai Geneng Military base 14146, 27781
Panau City, Docks District Harbor 1068, 13565
Kampung Nelayan, Nelayan Civilian village 17342, 4196
Sungai Madu Leleh Civilian village 6543, 21370
Pulau Naga Civilian village 15794, 27920
Kampung Sawah Luas Civilian village 19293, 22056
Kem Rajang Floodgates Military base 8421, 21070
Kampung Curah Dalam Military base 13703, 7826
Pekan Buaya Tidur Civilian village 14556, 11558
Sungai Curah Military base 11494, 24067
Tanjung Rumah Api Civilian village 13653, 21006
Pulau Delima Civilian village 19847, 27335
Kampung Cicak Hitam Civilian village 4447, 30319
Tasik Permata Civilian village 4689, 22073
Kampung Monyet Lena Civilian village 21187, 21991
Tanah Raya Timur Theta Communication outpost 21152, 19509
Bandar Bukit Rata Civilian village 24105, 10909
Bukit Matahari Civilian village 12992, 7268
Kampung Anjing Gila Civilian village 10566, 17076
Negeri Cabang Military base 20745, 20676
Three Kings Hotel Civilian village 3709, 31482
Kampung Tokong Purba Civilian village 7014, 23892
Kampung Desa Lena Civilian village 4691, 30798
Bukit Tinggi Military base 20024, 10908
Kem Jurang Gurun Military base 10933, 21231
Bandar Gereja Gurun Civilian village 6065, 26016
Bandar Sungai Rajang Civilian village 8626, 20564
Paya Luas Military airport 28412, 5704
Kampung Sri Puteri Civilian village 11217, 9062
Wajah Ramah Fortress Military base 30187, 30387
Gunung Rata Military base 17244, 28110
Kem Harimau Putih Military base 27596, 17232
Pulau Dayang Terlena Military airport 4472, 21183Sungai Remaja Military base 9774, 21621
Pekan Jati Besar Civilian village 18122, 15877
Pekan Desa Civilian village 10983, 7705
Pekan Buah Melambak Civilian village 17429, 14762
Kepulauan Selatan Beta Communication outpost 21790, 29328
Kampung Penggali Civilian village 21829, 11028
Hutan Dalam Military base 23072, 27038
Tasik Cerah Civilian village 11527, 19574
Kepulauan Selatan Lambda Communication outpost 15722, 24355
Kampung Danau Lengkong Civilian village 10429, 26149
Kampung Perigi Lumpur Civilian village 6008, 26990
Kampung Tiang Emas Civilian village 17589, 15951Kampung Batang Reput Civilian village 17241, 16884
AST OFRACTER
FIELD GUIDETO PANAU
WEAPONS VEHICLE EXPLORINGPANAU
AGENCYMISSIONS
STRONGHOLDTAKEOVERS
FACTIONMISSIONS
CHALLENGES COLLECTIBLES ACHIEVEMENTSAND TROPHIES
PARADISE LOST • CHAOSSettlements • Parts and Cash Stashes
Protected by copyright. Unauthorized or unlawful copying or downloading expressly prohibited.

8/18/2019 Just Cause 2 Prima Official Guide
http://slidepdf.com/reader/full/just-cause-2-prima-official-guide 36/208
PRIMA OFFICIAL STRATEGY GUIDETM
36
Name TypePDA Coordinates
(X, Y)
Pekan Teluk Tengah Civilian village 17070, 13788
Bukit Dengkang Military base 11629, 10007
Gunung Hotel Ski Resort Civilian village 24574, 14786
Pekan Tupai Merah Civilian village 27179, 15538Kem General Abidin Military base 2255, 29869
Kuala Gandin Military base 21798, 19781
Kuala Geneng Civilian village 23184, 21069
Bandar Gunung BelakangPatah
Civilian village 22287, 16730
Kampung Bunga Raya Civilian village 11084, 24705
Pantai Kelapa Resort Civilian village 24625, 26569
Pekan Merdeka Silam Civilian village 17166, 17225
Teluk Panau Tengah Gamma Communication outpost 12590, 26401
Kem Harimau Bintang Military base 28602, 30472
Bukit Rendah Military base 16466, 7371
Loji Bahan Bakar Fossil Military base 25900, 6206Pulau Ketam Besar Military base 20209, 26644
Kem Lembah Hutan Military base 27599, 30002
Bandar Pekan Lama Civilian village 28739, 17583
Pekan Ayer Gilang Civilian village 17624, 15328
Pulau Ombak Ribut Military base 24582, 18619
Kampung Padi Hilang Civilian village 28710, 15622
Banjaran Berawan BesarTheta
Communication outpost 25570, 11081
Kem Sungai Sejuk Military base 17141, 12369
Pasir Putih Military harbor 12994, 19246
Bandar Koperasi Civilian village 12570, 4028
Pekan Hujung Military base 5351, 23777
Kampung Lembah Gurun Civilian village 7970, 25638
Kem General Hong Military base 13115, 6785
Kampung Kayu Keras Civilian village 24460, 28028
Pulau Berendam Military harbor 25878, 3460
Telok Ayer Batang Military base 16870, 21534
Kem Port Pelangi Military harbor 5831, 29630
Pasir Hitam Military base 18177, 18603
Gunung Merah RadarFacility
Military base 7370, 27732
Banjaran Berawan BesarDelta
Communication outpost 20232, 9839
Kampung Ayer Lama Military harbor 8562, 18956
Pekan Pinggir Jalan Civilian village 18457, 19074Banjaran Berawan BesarAlpha
Communication outpost 23866, 8806
Banjaran Gundin Military airport 11699, 5106
Tanah Raya Timur Iota Communication outpost 25788, 12358
Banjaran Berawan Besar Eta Communication outpost 17145, 11218
Bandar Dataran Sawah Civilian village 27074, 16675
Negeri Gandin Military base 10217, 4400
Kampung Cahaya Bulan Civilian village 20620, 16434
Mile High Club Civilian village 29584, 11435
Pulau Kait Military harbor 23476, 5031
Kem Kucing Belang Hitam Military base 21068, 13887
Bandar Padang Besar Civilian village 29963, 17120
Pekan Selamat Civilian village 7448, 25817
Name TypePDA Coordinates
(X, Y)
Gurun Lautan Lama Alpha Communication outpost 5360, 25637
Kampung Nahkoda Civilian village 28324, 8909
Kepulauan Selatan Theta Communication outpost 22802, 31028
Bandar Gunung Raya Civilian village 21124, 12146
Tanah Raya Timur Mu Communication outpost 22078, 23818
Bandar Baru Bukit Kuprum Civilian village 21727, 12258
Kampung Perigi Hitam Civilian village 28721, 8846
Kampung Pohon Reput Civilian village 9524, 18276
Sungai Cengkih Besar Military airport 20904, 5569
Sungai Tapai Civilian village 20401, 24964
Kampung Gunung Merah Civilian village 8839, 26151
Bandar Pantai Sunyi Civilian village 24715, 19733
Pulau Dongeng Military base 22283, 26726
Pelantar Gas Tiang Geneng Offshore rig 31417, 7313
Panau City, Park District City 3716, 11529
Kem Kuala Rajang Military base 8497, 21789Kem Jalan Merpati Military airport 9434, 28188
Kem Singa Menerkam Military base 19399, 6258
Kem Jalan Padang Tembak Military base 25782, 30153
Bandar Serigala Kelabu Civilian village 30359, 18672
Teluk Panau Tengah Alpha Communication outpost 16763, 22401
Bandar Batu Besar Civilian village 4059, 30370
Panau City, Financial District City 6076, 13335
Kem Lubang Dalam Military base 21806, 17375
Tasik Kasuari Civilian village 17973, 23110
Kem Tentera Timur Military base 11048, 8293
Kampung Tok Dalang Civilian village 7513, 24979
Banjaran Berawan BesarEpsilon
Communication outpost 25510, 9540
Kampung Ekor Bengkok Civilian village 7510, 28706
Kota Kersik Civilian village 10725, 19866
Pelantar Gas Panau Barat Offshore rig 1149, 23299
Kepulauan Pelaut Alpha Communication outpost 23720, 3975
Pelantar Gas Panau Selatan Offshore rig 29850, 24753
Tanjung Intan Civilian village 10546, 3570
Pelantar Gas Telok Panau Offshore rig 11480, 14983
Pekan Sempit Civilian village 5587, 30998
Pekan Juku-Juku Civilian village 14971, 2976
Kepulauan Selatan Iota Communication outpost 24298, 27523
Tanah Raya Timur Alpha Communication outpost 23015, 16777Kampung Lima Batu Military base 5887, 24928
Tanah Raya Timur Delta Communication outpost 25568, 16141
Kem Kapitan Mohideen Military base 17241, 21138
Bandar Arang Batu Besar Civilian village 24753, 27199
Jalan Lompat Civilian village 19520, 15881
Tanah Raya Barat Alpha Communication outpost 11335, 9682
Kem Gereja Merah Military base 30229, 27745
Kem Helang Merah Military harbor 13015, 11476
Bukit Ketot Military base 24557, 10486
Kampung Bunga Kertas Civilian village 13203, 3403
Pekan Rusa Pantas Civilian village 12712, 10390
Lembah Genting Tinggi Military base 15932, 7523Port Rajang Selatan Civilian village 8432, 24104
Kepulauan Pelaut Beta Communication outpost 23659, 5562
AST OFRACTER
FIELD GUIDETO PANAU
WEAPONS VEHICLE EXPLORINGPANAU
AGENCYMISSIONS
STRONGHOLDTAKEOVERS
FACTIONMISSIONS
CHALLENGES COLLECTIBLES ACHIEVEMENTSAND TROPHIES
PARADISE LOST • CHAOSSettlements • Parts and Cash Stashes
Protected by copyright. Unauthorized or unlawful copying or downloading expressly prohibited.

8/18/2019 Just Cause 2 Prima Official Guide
http://slidepdf.com/reader/full/just-cause-2-prima-official-guide 37/208
C H A R A C T E R S
F I E L D G U I D E T O P A N A U
W E A P O N S
V E H I C L E S
E X P L O R I N G P A N A U
A G E N C Y M I S S I O N S
S T R O N G H O L D T A K E O V E R S
F A C T I O N M I S S I O N S
C H A L L E N G E S
C O L L E C T I B L E S
A C H I E V E M E N T S
primagames.com 37
Name TypePDA Coordinates
(X, Y)
Rajang Temple Civilian village 12058, 23256
Bandar Lengkok Sungai Civilian village 8166, 22885
Kem Jalan Gurun Military base 7449, 23857
Pulau Ombak Merah Military base 13402, 30241
Bukit Bura Military base 19137, 9061
Kampung Jalan Gunung Civilian village 19774, 18293
Kem Kuala Utara Military harbor 30253, 26990
Pekan Dusun Rambutan Civilian village 17415, 26511
Panau Falls Casino Civilian village 18565, 17755
Kampung Tokong Dalam Civilian village 19887, 15925
Kem Port Rodrigo Military harbor 11719, 28146
Kota Pantai Kuala Civilian village 16573, 3857
Kepulauan Pelaut Gamma Communication outpost 28916, 9511
Tasik Jernih Civilian village 16197, 22037
Kampung Pokok Ru Civilian village 26406, 5427
Desa Kuda Lari Civilian village 27204, 20053Kampung Batu Tiga Military base 10516, 18857
Pulau Panau Kecil Military base 27609, 8855
Port Kuala Besar Military harbor 16115, 12779
Kampung Sawah Hijau Civilian village 25952, 19655
Gunung Hutan Merah Military base 7880, 18555
Kampung Bunga Mawar Military harbor 29952, 19636
Kampung Sawah Hutan Civilian village 13553, 26303
Bandar Baru Nipah Civilian village 15884, 4287
Kampung Tukang Besi Civilian village 28738, 14733
Kampung KepulauanSelatan
Civilian village 18568, 23386
Banjaran Berawan BesarBeta Communication outpost 14813, 4672
Gunung Condong Military base 25734, 25698
Kampung Papan Tanda Civilian village 19021, 21251
Bandar Jeti Batu Civilian village 23670, 19686
Pekan Kesuma Civilian village 21758, 30338
Gunung Tasik Facility Military base 19548, 12606
Gurun Lautan Lama Beta Communication outpost 6023, 21573
Kampung Negeri Sawah Civilian village 29076, 14001
Kampung Kala Merah Military base 11082, 22158
Pekan Lalang Liar Civilian village 15978, 3375
Pekan Putra Gunung Civilian village 18570, 26250
Pelantar Gas KepulauanPelaut Offshore rig 26381, 2196
Pekan Gua Cina Civilian village 27192, 6786
Lembah Delima Military airport 25920, 20229
Pekan Labah Hitam Civilian village 23609, 15196
Kem Pulau Kerbau Military harbor 26614, 27208
Kota Tinggi Civilian village 21118, 14968
Kem Kapitan Luk Ya Sian Military base 16458, 10092
Kuala Cengkih Military harbor 23594, 4379
Pelantar Gas Panau Timur Offshore rig 29480, 21255
Kampung Nur Cahaya Civilian village 9352, 21774
Pekan Cahaya Matahari Civilian village 27777, 9445
Kepulauan Selatan Zeta Communication outpost 31003, 28960
Gunung Pawang Tua Military base 27337, 18466
Kampung Tujuh Telaga Military airport 17008, 16403
Lembah Cerah Civilian village 6774, 25519
Name TypePDA Coordinates
(X, Y)
Pelantar Gas Pandak Panay Offshore rig 8888, 1323
Pekan Buah Melimpah Civilian village 14736, 10958
Kampung Relau Merah Civilian village 5485, 19808
Kem Komander Williamson Military base 28857, 28076
Kuala Merah Civilian village 9209, 8915
Banjaran Berawan BesarGamma
Communication outpost 14201, 9575
Kota Istana Purba Civilian village 19326, 11418
Pekan Jalan Pokok Civilian village 9531, 25908
Bandar Bukit Kuprum Lama Civilian village 13327, 24895
Tanah Lebar Military airport 16064, 23457
Bandar Bukit Tahan Civilian village 25252, 5491
Kem Komander Sutherland Military base 7364, 19214
Teluk Putih Civilian village 21743, 26141
Negeri Cengkih Military base 13607, 22857
Kem Gunung Kudus Military base 23268, 12875Bandar Lembah Raja Civilian village 23713, 27181
Teluk Permata Military airport 9454, 5760
Kampung Redup Civilian village 194,958,270
Pelantar Gas Ledakan Besar Offshore rig 29794, 2898
Kuala Jernih Military base 9957, 20478
Hutan Nenas Military base 24160, 31182
Pekan Kuil Civilian village 23424, 28377
Kepulauan Selatan Mu Communication outpost 18693, 25398
Bandar Kolam Dalam Civilian village 26367, 6704
Pelantar Gas Telok BetingTimur
Offshore rig 31909, 12078
PAN MILSAT Military base 23440, 17420
Cape Carnival Military base 30172, 14068
Port Gurun Lautan Lama Military harbor 2804, 22837
Kampung Padang Luas Military harbor 27235, 7715
Kampung Nipah Civilian village 29354, 16990
Pekan Air Hangar Civilian village 11195, 11096
Pekan Sri Vijaya Civilian village 3968, 29844
Kampung Pantai Berangin Civilian village 27889, 12248
Kampung Tanah Runtuh Civilian village 27829, 18675
Pekan Hutan Lama Civilian village 9480, 14266
Hutan Besar Military base 23971, 30046
Pekan Kuala Kering Civilian village 18125, 23878
Kampung Tanah Bernilai Civilian village 27646, 19487
Kem Sungai Floodgates Military base 8330, 19605
Kampung Sirip Tajam Civilian village 9446, 5064
Pulau Berapi Military harbor 14834, 17323
Fasility Gunung HutanTinggi
Military base 29248, 29289
Kampung Pasir Panjang Civilian village 4824, 19490
Kampung Tanjung Luas Civilian village 18798, 20862
Kem Hang Johan Military base 26321, 30604
Bandar Lombong Besi Military base 28910, 7850
Tanah Raya Timur Zeta Communication outpost 19092, 19465
Pekan Batang Kelepek Civilian village 21763, 13019
Panau City, Residential
DistrictCity 3697, 15499
Bandar Suralaya Civilian village 14568, 7027
AST OFRACTER
FIELD GUIDETO PANAU
WEAPONS VEHICLE EXPLORINGPANAU
AGENCYMISSIONS
STRONGHOLDTAKEOVERS
FACTIONMISSIONS
CHALLENGES COLLECTIBLES ACHIEVEMENTSAND TROPHIES
PARADISE LOST • CHAOSSettlements • Parts and Cash Stashes
Protected by copyright. Unauthorized or unlawful copying or downloading expressly prohibited.

8/18/2019 Just Cause 2 Prima Official Guide
http://slidepdf.com/reader/full/just-cause-2-prima-official-guide 38/208
PRIMA OFFICIAL STRATEGY GUIDETM
38
Name TypePDA Coordinates
(X, Y)
Tanah Raya Timur Lambda Communication outpost 28419, 15167
Kem Gunung BelakangPatah
Military base 22140, 16277
Kem Sungai Cerah Military base 6890, 21966Pulau Penjala Civilian village 11496, 12464
Kampung Hutan Hijau Civilian village 18246, 19147
Kepulauan Selatan Alpha Communication outpost 18238, 26702
Bukit Marmar Pecah Military base 12049, 8464
Kepulauan Selatan Epsilon Communication outpost 27777, 29373
Banjaran Berawan BesarZeta
Communication outpost 21796, 14284
Kepulauan Selatan Delta Communication outpost 18635, 28425
Kem Gunung Raya Military base 21087, 11645
Gurun Lautan Lama Delta Communication outpost 7290, 23310
Pekan Tanjung Civilian village 17788, 23128
Kem General Vikneshwaran Military base 17669, 16788Pulau Ketam Kecil Military harbor 28066, 11260
Kampung Pantai Kelabu Civilian village 24199, 19362
Tanjung Besar Military base 25122, 7256
Pekan Bukit Nenas Civilian village 11921, 10485
Paya Dalam Military base 20078, 18741
Telok Berlian Civilian village 23970, 28825
Kampung Teratai Putih Civilian village 9208, 10053
Kota Buluh Civilian village 24816, 3539
Parts and Cash Stashes
There are thousands of weapon parts, vehicle parts, armor
parts, and cash stashes hidden around Panau. Parts are critical
for upgrading the weapons and vehicles you buy from the
Black Market. If you aren’t spending parts to upgrade your
favorite guns, for example, you will have serious trouble in the
second half of the adventure. Armor parts are just as important,
because every five you locate raises your maximum health a
little bit. And finally, you need cash to buy those upgraded Black
Market items, so you definitely want to track down as many of
the 445 cash stashes tucked around Panau as possible.
Four hundred and forty-five cash stashes? That’s
$1,112,500! Think of how many Rowlinson choppers and
sawed-off shotguns you can buy with that kind of scratch.
These charts provide the location of all parts and
cash stashes in Panau. Use it to bank enough partsto upgrade your Black Market gear, and to earn 100
percent game completion.
Mission: If the part is easily found during a mission,
the mission is named here. However, parts noted during
missions can be collected at any time.
Region: Region of the map, split into the different terri-
tories noted on your PDA.
PDA Coordinates: The x, y coordinates on your PDA. Set
checkpoints at these coordinates to locate the item.
Use the checkboxes in this table and others to keep
track of what you’ve collected or destroyed so you
know what’s left to earn that coveted 100-percent
completion!
ARMOR PARTS
Mission RegionPDA Coordinates
(X, Y)
Airport Troubles Ramal Rakyat Islands 9695, 12867
Mile High Club Pelaut Archipelago 29600, 11349
Mile High Club Pelaut Archipelago 29592, 11403
River Runs Red Ramal Rakyat Islands 8484, 21105
Save the Forest Senjakala Islands 15468, 25962
Save the Forest Senjakala Islands 15458, 25729
Stranded West Tanah Raya 2812, 2435
Chemical Heist East Tanah Raya 19703, 12605
Chemical Heist East Tanah Raya 19508, 12701
Taking Care of theDishes
East Tanah Raya 23239, 17656
Can I Get a Witness? Lautan Lama Deser t 7483, 27724
Fry Me to the Moon East Tanah Raya 30335, 14070
Fry Me to the Moon East Tanah Raya 29920, 14196
Slippin' and SlidingBerawan BesarMountains
23644, 13644
Slippin' and Sliding East Tanah Raya 24410, 14854
Black Gold Lautan Lama Desert 770, 22505
Welcome to PanauBerawan BesarMountains
14798, 9582
Welcome to PanauBerawan BesarMountains
15102, 9205
Welcome to PanauBerawan BesarMountains
15252, 9304
Welcome to PanauBerawan BesarMountains
15365, 9249
Casino Bust East Tanah Raya 18571, 17841
Casino Bust East Tanah Raya 18575, 17749
The White Tiger Ramal Rakyat Islands 8696, 23151
The White Tiger Panau Tengah Bay 12060, 23262
Mountain Rescue Berawan BesarMountains 20647, 9971
Mountain RescueBerawan BesarMountains
21121, 9771
AST OFRACTER
FIELD GUIDETO PANAU
WEAPONS VEHICLE EXPLORINGPANAU
AGENCYMISSIONS
STRONGHOLDTAKEOVERS
FACTIONMISSIONS
CHALLENGES COLLECTIBLES ACHIEVEMENTSAND TROPHIES
PARADISE LOST • CHAOSSettlements • Parts and Cash Stashes
Protected by copyright. Unauthorized or unlawful copying or downloading expressly prohibited.

8/18/2019 Just Cause 2 Prima Official Guide
http://slidepdf.com/reader/full/just-cause-2-prima-official-guide 39/208
C H A R A C T E R S
F I E L D G U I D E T O P A N A U
W E A P O N S
V E H I C L E S
E X P L O R I N G P A N A U
A G E N C Y M I S S I O N S
S T R O N G H O L D T A K E O V E R S
F A C T I O N M I S S I O N S
C H A L L E N G E S
C O L L E C T I B L E S
A C H I E V E M E N T S
primagames.com 39
Mission RegionPDA Coordinates
(X, Y)
Mountain RescueBerawan BesarMountains
21031, 9171
Three Kings Senjakala Islands 3833, 31443
Three Kings Senjakala Islands 3604, 31433Three Kings Senjakala Islands 3751, 31409
Into the Den Selatan Archipelago 30009, 30242
Into the Den Selatan Archipelago 30279, 30319
Panau City Ramal Rakyat Islands 4782, 15692
Panau City Ramal Rakyat Islands 2992, 14810
Panau City West Tanah Raya 3993, 11330
Panau City West Tanah Raya 3662, 12122
Oil for Blood Pelaut Archipelago 28095, 6977
Paradise Valley Selatan Archipelago 19060, 26011
Free Trade Ramal Rakyat Islands 1443, 13470
Free Trade Ramal Rakyat Islands 1400, 13346
Free Trade Ramal Rakyat Islands 1588, 13372Pilgrimage West Tanah Raya 9289, 6588
Power Surge East Tanah Raya 25440, 17879
Boys with Toys Senjakala Islands 13434, 29183
Rocket ScienceBerawan BesarMountains
17045, 8979
A Second Amendment Lautan Lama Deser t 5774, 27493
Chemical Compound Panau Tengah Bay 13013, 25337
Collectible any time Selatan Archipelago 29604, 31339
Collectible any time Lautan Lama Deser t 1122, 23313
Collectible any time Senjakala Islands 2126, 29830
Collectible any time Senjakala Islands 2296, 31195
Collectible any time Lautan Lama Deser t 2903, 22742
Collectib le any t ime Ramal Rakyat Islands 3483, 14594
Collectible any time Ramal Rakyat Islands 3600, 16079
Collectible any time Lautan Lama Desert 3871, 20200
Collectible any time Senjakala Islands 3888, 29797
Collectible any time Senjakala Islands 4187, 30352
Collectible any time Lautan Lama Deser t 4502, 21382
Collectible any time Senjakala Islands 4386, 30324
Collectible any time Lautan Lama Deser t 4843, 19480
Collectible any time Senjakala Islands 4756, 30739
Collectible any time Lautan Lama Deser t 5351, 23777
Collectible any time Senjakala Islands 5296, 31664
Collectible any time Lautan Lama Desert 5477, 19898
Collectible any time Lautan Lama Desert 5461, 19748
Collectible any time Lautan Lama Deser t 5973, 24963
Collectible any time Lautan Lama Desert 6057, 25906
Collectible any time Lautan Lama Desert 5961, 26881
Collectible any time Senjakala Islands 5776, 29757
Collectible any time Lautan Lama Deser t 6515, 19832
Collectible any time Lautan Lama Deser t 6394, 21389
Collectible any time Lautan Lama Deser t 6520, 27620
Collectible any time Lautan Lama Deser t 6860, 22053
Collectible any time Lautan Lama Deser t 7013, 23933
Collectible any time Lautan Lama Desert 7442, 19207
Collectible any time Lautan Lama Deser t 7503, 23924
Collectible any time Lautan Lama Deser t 7488, 24951
Collectible any time Lautan Lama Deser t 7446, 26094
Mission RegionPDA Coordinates
(X, Y)
Collectible any time Lautan Lama Deser t 7569, 28638
Collectible any time Lautan Lama Deser t 7900, 18621
Collectible any time Lautan Lama Deser t 7995, 25560
Collectib le any t ime Ramal Rakyat Islands 8736, 18853
Collectible any time Ramal Rakyat Islands 8580, 21889
Collectible any time Lautan Lama Desert 8205, 22842
Collectible any time West Tanah Raya 8861, 1337
Collectible any time West Tanah Raya 8865, 7920
Collectible any time West Tanah Raya 8709, 9564
Collectible any time West Tanah Raya 9561, 4959
Collectible any time West Tanah Raya 9428, 5715
Collectible any time West Tanah Raya 9341, 7625
Collectible any time West Tanah Raya 9309, 8861
Collectib le any time Ramal Rakyat Islands 9468, 14332
Collectib le any time Ramal Rakyat Islands 9977, 19487
Collectib le any time Ramal Rakyat Islands 9431, 21863
Collectible any time Senjakala Islands 9721, 28491
Collectible any time West Tanah Raya 9853, 7018
Collectible any time Ramal Rakyat Is lands 10015, 20421
Collectible any time Ramal Rakyat Is lands 9758, 21680
Collectible any time West Tanah Raya 10445, 3605
Collectible any time West Tanah Raya 10488, 5986
Collect ible any t ime Ramal Rakyat Islands 10482, 18785
Collect ible any t ime Ramal Rakyat Islands 10473, 21407
Collect ible any t ime Ramal Rakyat Islands 10234, 22766
Collectible any time Lautan Lama Desert 10426, 26144
Collectible any time West Tanah Raya 11218, 3748
Collectible any time West Tanah Raya 10833, 7795
Collectible any time West Tanah Raya 10969, 8178
Collectible any time West Tanah Raya 11038, 9235
Collectib le any time Ramal Rakyat Islands 11224, 11222
Collectib le any time Ramal Rakyat Islands 10767, 19800
Collectib le any time Ramal Rakyat Islands 10955, 21196
Collectib le any time Ramal Rakyat Islands 11097, 22080
Collectible any time West Tanah Raya 11566, 1040
Collectible any time West Tanah Raya 11215, 5294
Collectib le any time Ramal Rakyat Islands 11613, 10044
Collectib le any time Ramal Rakyat Islands 11620, 10984
Collectible any time Ramal Rakyat Is lands 11425, 12412
Collectible any time Ramal Rakyat Is lands 11459, 15005Collectible any time Ramal Rakyat Is lands 11451, 19567
Collectible any time Senjakala Islands 11594, 28280
Collectible any time West Tanah Raya 12040, 8539
Collectible any time Panau Tengah Bay 12285, 25135
Collectible any time West Tanah Raya 12697, 3945
Collectible any timeBerawan BesarMountains
13139, 6759
Collect ible any time Ramal Rakyat Is lands 12215, 9227
Collectible any time West Tanah Raya 13335, 3413
Collectible any timeBerawan BesarMountains
12992, 7338
Collectib le any time Ramal Rakyat Islands 12991, 11436
Collectible any time Panau Tengah Bay 12912, 19195
AST OFRACTER
FIELD GUIDETO PANAU
WEAPONS VEHICLE EXPLORINGPANAU
AGENCYMISSIONS
STRONGHOLDTAKEOVERS
FACTIONMISSIONS
CHALLENGES COLLECTIBLES ACHIEVEMENTSAND TROPHIES
PARADISE LOST • CHAOSSettlements • Parts and Cash Stashes
Protected by copyright. Unauthorized or unlawful copying or downloading expressly prohibited.

8/18/2019 Just Cause 2 Prima Official Guide
http://slidepdf.com/reader/full/just-cause-2-prima-official-guide 40/208
PRIMA OFFICIAL STRATEGY GUIDETM
40
Mission RegionPDA Coordinates
(X, Y)
Collectible any time Panau Tengah Bay 13722, 22940
Collectible any time Panau Tengah Bay 13674, 25232
Collectible any time Senjakala Islands 13358, 30313
Collectible any time Senjakala Islands 13416, 30637
Collectible any timeBerawan BesarMountains
14065, 3747
Collectible any timeBerawan BesarMountains
13738, 7916
Collectib le any time Ramal Rakyat Is lands 13848, 10935
Collectible any time Panau Tengah Bay 14181, 23431
Collectible any time Senjakala Islands 14057, 27692
Collectible any time Senjakala Islands 14278, 29067
Collectible any time Senjakala Islands 13834, 29403
Collectible any time Senjakala Islands 14066, 29705
Collectible any timeBerawan BesarMountains
14786, 7075
Collectible any time Panau Tengah Bay 14651, 16882
Collectible any time Senjakala Islands 14461, 26395
Collectible any time Senjakala Islands 14640, 28622
Collectible any time West Tanah Raya 14828, 2871
Collectible any timeBerawan BesarMountains
15055, 8327
Collectible any time Panau Tengah Bay 15222, 22836
Collectible any time Pelaut Archipelago 16034, 3380
Collectible any timeBerawan BesarMountains
15960, 4562
Collectible any timeBerawan BesarMountains
15967, 7455
Collectible any time Panau Tengah Bay 16307, 12704Collectible any time Panau Tengah Bay 16253, 22045
Collectible any time Panau Tengah Bay 15848, 22237
Collectible any time Selatan Archipelago 15906, 23452
Collectible any time Pelaut Archipelago 16568, 3237
Collectible any time Pelaut Archipelago 16674, 3825
Collectible any time Pelaut Archipelago 16574, 3755
Collectible any timeBerawan BesarMountains
16503, 7347
Collectible any time Panau Tengah Bay 16620, 16483
Collectible any time Panau Tengah Bay 16917, 21518
Collectible any time Selatan Archipelago 16806, 26676
Collectible any time Pelaut Archipelago 17290, 4158
Collectible any timeBerawan BesarMountains
17150, 6364
Collectible any time Panau Tengah Bay 17218, 12139
Collectible any time Panau Tengah Bay 17037, 14120
Collectible any time Panau Tengah Bay 17364, 14742
Collectible any time Panau Tengah Bay 17169, 16448
Collectible any time Panau Tengah Bay 17182, 21112
Collectible any time Selatan Archipelago 17296, 26563
Collectible any time Selatan Archipelago 17562, 26334
Collectible any time Selatan Archipelago 17246, 28143
Collectible any time Panau Tengah Bay 17727, 13933
Collectible any time Panau Tengah Bay 17652, 14950
Collectible any time Panau Tengah Bay 17634, 14905Collectible any time Panau Tengah Bay 17660, 17166
Mission RegionPDA Coordinates
(X, Y)
Collectible any time Panau Tengah Bay 17457, 21654
Collectible any time Panau Tengah Bay 17579, 22721
Collectible any time Panau Tengah Bay 17672, 22638
Collectible any time Panau Tengah Bay 17763, 23128
Collectible any time Selatan Archipelago 17556, 25951
Collectible any time Selatan Archipelago 17661, 26012
Collectible any time Pelaut Archipelago 18009, 5289
Collectible any time East Tanah Raya 19359, 14317
Collectible any time Panau Tengah Bay 17989, 16391
Collectible any time East Tanah Raya 18031, 19120
Collectible any time East Tanah Raya 18035, 19146
Collectible any time East Tanah Raya 18107, 19064
Collectible any time Panau Tengah Bay 17947, 21381
Collectible any time East Tanah Raya 18581, 20236
Collectible any time Selatan Archipelago 18465, 26167
Collectible any time Pelaut Archipelago 19042, 5296
Collectible any timeBerawan BesarMountains
19318, 8970
Collectible any time Panau Tengah Bay 19075, 15585
Collectible any time East Tanah Raya 19030, 21383
Collectible any time East Tanah Raya 19232, 22147
Collectible any time Pelaut Archipelago 19479, 6358
Collectible any timeBerawan BesarMountains
19582, 8597
Collectible any timeBerawan BesarMountains
19328, 11813
Collectible any timeBerawan BesarMountains
19386, 11788
Collectible any time East Tanah Raya 19521, 15894
Collectible any timeBerawan BesarMountains
20117, 10943
Collectible any time East Tanah Raya 19802, 15984
Collectible any time East Tanah Raya 20155, 15972
Collectible any time East Tanah Raya 20180, 18734
Collectible any time East Tanah Raya 20322, 22572
Collectible any time Selatan Archipelago 20585, 25120
Collectible any time Selatan Archipelago 20222, 26689
Collectible any time Pelaut Archipelago 20752, 5744
Collectible any time East Tanah Raya 20578, 13481
Collectible any time East Tanah Raya 20743, 20724
Collectible any time Berawan BesarMountains
21152, 11583
Collectible any timeBerawan BesarMountains
21009, 12031
Collectible any timeBerawan BesarMountains
21100, 13859
Collectible any time East Tanah Raya 21088, 15000
Collectible any time East Tanah Raya 21338, 21925
Collectible any time Pelaut Archipelago 21946, 6526
Collectible any timeBerawan BesarMountains
21918, 11146
Collectible any timeBerawan BesarMountains
21727, 13072
Collectible any time Berawan BesarMountains 21913, 13114
Collectible any timeBerawan BesarMountains
21819, 12811
AST OFRACTER
FIELD GUIDETO PANAU
WEAPONS VEHICLE EXPLORINGPANAU
AGENCYMISSIONS
STRONGHOLDTAKEOVERS
FACTIONMISSIONS
CHALLENGES COLLECTIBLES ACHIEVEMENTSAND TROPHIES
PARADISE LOST • CHAOSSettlements • Parts and Cash Stashes
Protected by copyright. Unauthorized or unlawful copying or downloading expressly prohibited.

8/18/2019 Just Cause 2 Prima Official Guide
http://slidepdf.com/reader/full/just-cause-2-prima-official-guide 41/208
C H A R A C T E R S
F I E L D G U I D E T O P A N A U
W E A P O N S
V E H I C L E S
E X P L O R I N G P A N A U
A G E N C Y M I S S I O N S
S T R O N G H O L D T A K E O V E R S
F A C T I O N M I S S I O N S
C H A L L E N G E S
C O L L E C T I B L E S
A C H I E V E M E N T S
primagames.com 41
Mission RegionPDA Coordinates
(X, Y)
Collectible any time East Tanah Raya 22178, 16344
Collectible any time East Tanah Raya 21739, 19816
Collectible any time East Tanah Raya 22232, 16682
Collectible any time East Tanah Raya 21998, 23365
Collectible any time Selatan Archipelago 22204, 26862
Collectible any time Selatan Archipelago 22178, 26676
Collectible any time Selatan Archipelago 21906, 30294
Collectible any time Selatan Archipelago 21496, 30404
Collectible any time Pelaut Archipelago 23497, 4518
Collectible any time Pelaut Archipelago 23685, 4875
Collectible any timeBerawan BesarMountains
23329, 12897
Collectible any timeBerawan BesarMountains
23024, 13699
Collectible any time East Tanah Raya 23163, 19039
Collectible any time East Tanah Raya 23404, 19617Collectible any time Selatan Archipelago 23084, 27059
Collectible any timeBerawan BesarMountains
24088, 10956
Collectible any time East Tanah Raya 23565, 15233
Collectible any time Selatan Archipelago 23836, 27199
Collectible any time Selatan Archipelago 24052, 28065
Collectible any time Selatan Archipelago 23899, 28790
Collectible any time Selatan Archipelago 23984, 28901
Collectible any timeBerawan BesarMountains
24551, 10519
Collectible any time East Tanah Raya 24179, 19387
Collectible any time Selatan Archipelago 24206, 24813
Collectible any time Selatan Archipelago 24191, 24776
Collectible any time Selatan Archipelago 24235, 24813
Collectible any time Selatan Archipelago 24231, 24769
Collectible any time Selatan Archipelago 24274, 24767
Collectible any time Selatan Archipelago 24206, 24913
Collectible any time Selatan Archipelago 24171, 24776
Collect ible any time Selatan Archipelago 24277, 26011
Collectible any time Selatan Archipelago 24458, 25989
Collectible any time Selatan Archipelago 24402, 28067
Collectible any time Selatan Archipelago 24429, 28128
Collectible any time Selatan Archipelago 24176, 31199
Collectible any time Selatan Archipelago 24086, 31117
Collectible any time East Tanah Raya 24739, 17883
Collectible any time East Tanah Raya 24541, 18601
Collectible any time East Tanah Raya 24869, 20606
Collectible any time Selatan Archipelago 24501, 26661
Collectible any time Selatan Archipelago 24621, 26603
Collectible any time Selatan Archipelago 24840, 27205
Collectible any time Pelaut Archipelago 25277, 5536
Collectible any time Pelaut Archipelago 25142, 7318
Collectible any time East Tanah Raya 25323, 19413
Collectible any time East Tanah Raya 25624, 20408
Collectible any time Selatan Archipelago 25449, 31455
Collectible any time Pelaut Archipelago 25829, 3253
Collectible any time Pelaut Archipelago 26164, 4845
Collectible any time Pelaut Archipelago 25797, 5913
Collectible any time Pelaut Archipelago 25859, 6274
Mission RegionPDA Coordinates
(X, Y)
Collectible any time East Tanah Raya 25835, 19604
Collectible any time East Tanah Raya 25939, 20285
Collectible any time Selatan Archipelago 25853, 25547Collectible any time Selatan Archipelago 25723, 30127
Collectible any time Pelaut Archipelago 26354, 2210
Collectible any time Pelaut Archipelago 26186, 6544
Collectible any time Selatan Archipelago 26339, 30492
Collectible any time Pelaut Archipelago 26795, 6589
Collectible any time Pelaut Archipelago 26820, 11352
Collectib le any time Selatan Archipelago 26752, 27259
Collectible any time Pelaut Archipelago 27495, 6562
Collectible any time Pelaut Archipelago 27503, 7985
Collectible any time Pelaut Archipelago 27624, 8877
Collectible any time Pelaut Archipelago 27766, 9466
Collectible any time East Tanah Raya 27557, 13538
Collectible any time East Tanah Raya 27303, 15392
Collectible any time East Tanah Raya 27795, 17304
Collectible any time East Tanah Raya 27392, 18518
Collectible any time East Tanah Raya 27699, 19500
Collectible any time Selatan Archipelago 27686, 29990
Collectible any time Pelaut Archipelago 28077, 5816
Collectible any time East Tanah Raya 27873, 12289
Collectible any time East Tanah Raya 27881, 18598
Collectible any time Pelaut Archipelago 28381, 8642
Collectible any time Pelaut Archipelago 28329, 8870
Collectible any time Pelaut Archipelago 28218, 9561
Collectible any time Pelaut Archipelago 28119, 11342
Collectible any time East Tanah Raya 28693, 17390
Collectible any time Selatan Archipelago 28258, 31285
Collectible any time Pelaut Archipelago 28603, 7869
Collectible any time Pelaut Archipelago 28732, 8889
Collectible any time East Tanah Raya 29122, 14436
Collectible any time East Tanah Raya 28863, 14785
Collectible any time East Tanah Raya 29109, 19052
Collectible any time Selatan Archipelago 28882, 28055
Collectible any time Selatan Archipelago 28544, 30491
Collectible any time East Tanah Raya 29470, 16867
Collectible any time East Tanah Raya 29453, 21269
Collectible any time Selatan Archipelago 29216, 29325
Collectible any time Selatan Archipelago 29303, 29309
Collectible any time Pelaut Archipelago 29767, 2912
Collectible any time East Tanah Raya 30056, 19544
Collectib le any time Selatan Archipelago 29824, 24767
Collectible any time Selatan Archipelago 30211, 27047
Collectible any time Selatan Archipelago 30624, 28901
Collectible any time Pelaut Archipelago 31391, 7327
Collectible any time Pelaut Archipelago 31882, 12093
Pekan Sri Vijaya Civilian village 3968, 29844
Kampung PantaiBerangin
Civilian village 27889, 12248
Kampung Tanah Runtuh Civilian village 27829, 18675
Pekan Hutan Lama Civilian village 9480, 14266
AST OFRACTER
FIELD GUIDETO PANAU
WEAPONS VEHICLE EXPLORINGPANAU
AGENCYMISSIONS
STRONGHOLDTAKEOVERS
FACTIONMISSIONS
CHALLENGES COLLECTIBLES ACHIEVEMENTSAND TROPHIES
PARADISE LOST • CHAOSSettlements • Parts and Cash Stashes
Protected by copyright. Unauthorized or unlawful copying or downloading expressly prohibited.

8/18/2019 Just Cause 2 Prima Official Guide
http://slidepdf.com/reader/full/just-cause-2-prima-official-guide 42/208
PRIMA OFFICIAL STRATEGY GUIDETM
42
Mission RegionPDA Coordinates
(X, Y)
Hutan Besar Military base 23971, 30046
Pekan Kuala Kering Civilian village 18125, 23878
Kampung Tanah Bernilai Civilian village 27646, 19487
Kem Sungai Floodgates Military base 8330, 19605
Kampung Sirip Tajam Civilian village 9446, 5064
Pulau Berapi Military harbor 14834, 17323
Fasility Gunung HutanTinggi
Military base 29248, 29289
Kampung Pasir Panjang Civilian village 4824, 19490
Kampung Tanjung Luas Civilian village 18798, 20862
Kem Hang Johan Military base 26321, 30604
Bandar Lombong Besi Military base 28910, 7850
Tanah Raya Timur ZetaCommunicationoutpost
19092, 19465
Pekan Batang Kelepek Civilian village 21763, 13019
Panau City, ResidentialDistrict City 3697, 15499
Bandar Suralaya Civilian village 14568, 7027
Tanah Raya TimurLambda
Communicationoutpost
28419, 15167
Kem Gunung BelakangPatah
Military base 22140, 16277
Kem Sungai Cerah Military base 6890, 21966
Pulau Penjala Civilian village 11496, 12464
Kampung Hutan Hijau Civilian village 18246, 19147
Kepulauan SelatanAlpha
Communicationoutpost
18238, 26702
Bukit Marmar Pecah Military base 12049, 8464
Kepulauan SelatanEpsilon
Communicationoutpost 27777, 29373
Banjaran Berawan BesarZeta
Communicationoutpost
21796, 14284
Kepulauan Selatan DeltaCommunicationoutpost
18635, 28425
Kem Gunung Raya Military base 21087, 11645
Gurun Lautan LamaDelta
Communicationoutpost
7290, 23310
Pekan Tanjung Civilian village 17788, 23128
Kem GeneralVikneshwaran
Military base 17669, 16788
Pulau Ketam Kecil Military harbor 28066, 11260
Kampung Pantai Kelabu Civilian village 24199, 19362
Tanjung Besar Military base 25122, 7256
Pekan Bukit Nenas Civilian village 11921, 10485
Paya Dalam Military base 20078, 18741
Telok Berlian Civilian village 23970, 28825
Kampung Teratai Putih Civilian village 9208, 10053
Kota Buluh Civilian village 24816, 3539
WEAPON PARTS
Mission RegionPDA Coordinates
(X, Y)
Airport Troubles Ramal Rakyat Islands 9856, 12914Airport Troubles Ramal Rakyat Islands 9645, 12699
Mission RegionPDA Coordinates
(X, Y)
Airport Troubles Ramal Rakyat Islands 9652, 12788
Airport Troubles Ramal Rakyat Islands 9747, 12437
Airport Troubles Ramal Rakyat Islands 9894, 13233
Mile High Club Pelaut Archipelago 29588, 11462
River Runs Red Lautan Lama Desert 8391, 19554
River Runs Red Ramal Rakyat Islands 8473, 21135
Save the Forest Senjakala Islands 15294, 25943
Save the Forest Senjakala Islands 15422, 25965
Save the Forest Senjakala Islands 15233, 25941
Save the Forest Senjakala Islands 15424, 25797
Save the Forest Senjakala Islands 15365, 25708
Stranded West Tanah Raya 2284, 2258
Stranded West Tanah Raya 2516, 2178
Stranded West Tanah Raya 2264, 1958
Chemical Heist East Tanah Raya 19668, 12531
Chemical Heist East Tanah Raya 19603, 12538
Taking Care of theDishes
East Tanah Raya 23386, 17201
Taking Care of theDishes
East Tanah Raya 23122, 17348
Taking Care of theDishes
East Tanah Raya 23442, 17316
Taking Care of theDishes
East Tanah Raya 23256, 17580
Can I Get a Witness? Lautan Lama Deser t 7447, 27735
Fry Me to the Moon East Tanah Raya 30256, 14219
Fry Me to the Moon East Tanah Raya 30259, 14208
Fry Me to the Moon East Tanah Raya 30251, 14201
Fry Me to the Moon East Tanah Raya 30631, 13766
Fry Me to the Moon East Tanah Raya 30196, 13938
Fry Me to the Moon East Tanah Raya 30143, 14112
Slippin' and Sliding East Tanah Raya 24419, 14740
Slippin' and Sliding East Tanah Raya 24416, 14616
Black Gold Lautan Lama Desert 793, 22511
Welcome to Panau Berawan Besar Mountains 14781, 9612
Welcome to Panau Berawan Besar Mountains 15343, 9132
Welcome to Panau Berawan Besar Mountains 15253, 9184
Welcome to Panau Berawan Besar Mountains 15150, 9360
Welcome to Panau Berawan Besar Mountains 15406, 9320
Welcome to Panau Berawan Besar Mountains 15366, 9256
Welcome to Panau Berawan Besar Mountains 15185, 9365
Welcome to Panau Berawan Besar Mountains 15179, 9239
Casino Bust East Tanah Raya 18503, 17708
Casino Bust East Tanah Raya 18593, 17712
Casino Bust East Tanah Raya 18503, 17776
Casino Bust East Tanah Raya 18608, 17826
Casino Bust East Tanah Raya 18593, 17818
The White Tiger Ramal Rakyat Islands 8693, 23156
The White Tiger Ramal Rakyat Islands 10473, 23528
The White Tiger Ramal Rakyat Islands 10396, 23535
The White Tiger Panau Tengah Bay 12003, 23231
The White Tiger Panau Tengah Bay 12109, 23274
The White Tiger Panau Tengah Bay 11985, 23207
The White Tiger Panau Tengah Bay 11983, 23240
Mountain Rescue Berawan Besar Mountains 21076, 9230
AST OFRACTER
FIELD GUIDETO PANAU
WEAPONS VEHICLE EXPLORINGPANAU
AGENCYMISSIONS
STRONGHOLDTAKEOVERS
FACTIONMISSIONS
CHALLENGES COLLECTIBLES ACHIEVEMENTSAND TROPHIES
PARADISE LOST • CHAOSSettlements • Parts and Cash Stashes
Protected by copyright. Unauthorized or unlawful copying or downloading expressly prohibited.

8/18/2019 Just Cause 2 Prima Official Guide
http://slidepdf.com/reader/full/just-cause-2-prima-official-guide 43/208
C H A R A C T E R S
F I E L D G U I D E T O P A N A U
W E A P O N S
V E H I C L E S
E X P L O R I N G P A N A U
A G E N C Y M I S S I O N S
S T R O N G H O L D T A K E O V E R S
F A C T I O N M I S S I O N S
C H A L L E N G E S
C O L L E C T I B L E S
A C H I E V E M E N T S
primagames.com 43
Mission RegionPDA Coordinates
(X, Y)
Mountain Rescue Berawan Besar Mountains 21048, 9710
Mountain Rescue Berawan Besar Mountains 21286, 9199
Mountain Rescue Berawan Besar Mountains 20975, 9215
Mountain Rescue Berawan BesarMountains
20738, 9933
Mountain Rescue Berawan Besar Mountains 21426, 9455
Mountain RescueBerawan BesarMountains
21091, 9372
Three Kings Senjakala Islands 3752, 31560
Three Kings Senjakala Islands 3719, 31385
Three Kings Senjakala Islands 3824, 31499
Three Kings Senjakala Islands 3744, 31421
Into the Den Selatan Archipelago 30021, 30285
Into the Den Selatan Archipelago 29731, 29908
Into the Den Selatan Archipelago 29825, 30146
Into the Den Selatan Archipelago 30064, 30375Into the Den Selatan Archipelago 30207, 30566
Into the Den Selatan Archipelago 30356, 30626
Panau City Ramal Rakyat Islands 4335, 15579
Panau City Ramal Rakyat Islands 4521, 15545
Panau City Ramal Rakyat Islands 4302, 15417
Panau City Ramal Rakyat Islands 4402, 15459
Panau City Ramal Rakyat Islands 3970, 15204
Panau City Ramal Rakyat Islands 3932, 15085
Panau City Ramal Rakyat Islands 3733, 15417
Panau City Ramal Rakyat Islands 3547, 15147
Panau City West Tanah Raya 3917, 11389
Panau City West Tanah Raya 3940, 11088
Panau City West Tanah Raya 3901, 11476
Panau City West Tanah Raya 3793, 11139
Panau City West Tanah Raya 3544, 12198
Panau City West Tanah Raya 3447, 12295
Panau City West Tanah Raya 3582, 12377
Panau City West Tanah Raya 3316, 12061
Oil for Blood Pelaut Archipelago 28009, 7112
Oil for Blood Pelaut Archipelago 27900, 7052
Oil for Blood Pelaut Archipelago 27900, 6903
Oil for Blood Pelaut Archipelago 27828, 7102
Paradise Valley Selatan Archipelago 19079, 25937
Paradise Valley Selatan Archipelago 19067, 25835
Paradise Valley Selatan Archipelago 19114, 26067
Paradise Valley Selatan Archipelago 19107, 25730
Free Trade Ramal Rakyat Islands 1471, 13424
Free Trade Ramal Rakyat Islands 1638, 13353
Pilgrimage West Tanah Raya 9251, 6611
Pilgrimage West Tanah Raya 9168, 6607
Pilgrimage West Tanah Raya 9410, 6624
Pilgrimage West Tanah Raya 9479, 6625
Power Surge East Tanah Raya 25624, 17932
Power Surge East Tanah Raya 25462, 18075
Power Surge East Tanah Raya 25528, 18100
Power Surge East Tanah Raya 25500, 17922
Boys with Toys Senjakala Islands 13420, 29202
Boys with Toys Senjakala Islands 13485, 29072
Boys with Toys Senjakala Islands 13345, 29219
Mission RegionPDA Coordinates
(X, Y)
Boys with Toys Senjakala Islands 13380, 29227
Rocket Science Berawan Besar Mountains 16917, 9306
Rocket ScienceBerawan Besar
Mountains16953, 9110
Rocket Science Berawan Besar Mountains 16878, 9027
A SecondAmendment
Lautan Lama Desert 5599, 27541
A SecondAmendment
Lautan Lama Desert 5774, 27441
A SecondAmendment
Lautan Lama Desert 5662, 27474
A SecondAmendment
Lautan Lama Desert 5683, 27389
ChemicalCompound
Panau Tengah Bay 13079, 25273
ChemicalCompound
Panau Tengah Bay 12950, 25324
ChemicalCompound
Panau Tengah Bay 13025, 25252
ChemicalCompound
Panau Tengah Bay 13065, 25243
Collectible any time Lautan Lama Desert 1145, 23320
Collectible any time Senjakala Islands 2411, 29988
Collectible any time Senjakala Islands 2280, 29607
Collectible any time Senjakala Islands 2450, 29935
Collectible any time Senjakala Islands 2327, 29638
Collectible any time Senjakala Islands 2466, 31154
Collectible any time West Tanah Raya 2665, 10950
Collectible any time Lautan Lama Desert 2828, 20996
Collectible any time Lautan Lama Desert 2665, 21385Collectible any time Lautan Lama Desert 2873, 21114
Collectible any time Lautan Lama Desert 2829, 22689
Collectible any time Lautan Lama Desert 2783, 22779
Collectible any time Lautan Lama Desert 2703, 22839
Collectible any time Lautan Lama Desert 2686, 22782
Collectible any time Lautan Lama Desert 3157, 22486
Collectible any time Lautan Lama Desert 3661, 24722
Collectible any time Lautan Lama Desert 3829, 20063
Collectible any time Lautan Lama Desert 3983, 20233
Collectible any time Lautan Lama Desert 3870, 20167
Collectible any time Lautan Lama Desert 3969, 21786
Collectible any time Lautan Lama Desert 3809, 25042Collectible any time Senjakala Islands 4000, 29805
Collectible any time Senjakala Islands 4118, 30434
Collectible any time Lautan Lama Desert 4247, 21335
Collectible any time Lautan Lama Desert 4470, 21326
Collectible any time Lautan Lama Desert 4028, 21093
Collectible any time Lautan Lama Desert 4381, 21289
Collectible any time Lautan Lama Desert 4510, 22538
Collectible any time Lautan Lama Desert 4605, 22340
Collectible any time Senjakala Islands 4424, 30257
Collectible any time Senjakala Islands 4523, 30397
Collectible any time Lautan Lama Desert 4952, 19517
Collectible any time Lautan Lama Desert 4793, 19510Collectible any time Senjakala Islands 4827, 31551
AST OFRACTER
FIELD GUIDETO PANAU
WEAPONS VEHICLE EXPLORINGPANAU
AGENCYMISSIONS
STRONGHOLDTAKEOVERS
FACTIONMISSIONS
CHALLENGES COLLECTIBLES ACHIEVEMENTSAND TROPHIES
PARADISE LOST • CHAOSSettlements • Parts and Cash Stashes
Protected by copyright. Unauthorized or unlawful copying or downloading expressly prohibited.

8/18/2019 Just Cause 2 Prima Official Guide
http://slidepdf.com/reader/full/just-cause-2-prima-official-guide 44/208
PRIMA OFFICIAL STRATEGY GUIDETM
44
Mission RegionPDA Coordinates
(X, Y)
Collectible any time Lautan Lama Deser t 5334, 23655
Collectible any time Lautan Lama Deser t 5438, 23803
Collectible any time Lautan Lama Deser t 5403, 23899
Collectible any time Lautan Lama Deser t 5362, 23783
Collectible any time Lautan Lama Desert 5112, 24900
Collectible any time Senjakala Islands 5616, 31173
Collectible any time Senjakala Islands 5434, 30851
Collectible any time Senjakala Islands 5149, 31651
Collectible any time Lautan Lama Desert 5448, 19847
Collectible any time Lautan Lama Deser t 5529, 19904
Collectible any time Lautan Lama Desert 5842, 24913
Collectible any time Lautan Lama Deser t 5942, 24885
Collectible any time Lautan Lama Deser t 5945, 24880
Collectible any time Lautan Lama Deser t 6001, 25958
Collectible any time Lautan Lama Deser t 5641, 25916
Collectible any time Lautan Lama Deser t 6034, 27025
Collectible any time Senjakala Islands 5782, 29686
Collectible any time Senjakala Islands 5766, 29680
Collectible any time Senjakala Islands 5793, 29653
Collectible any time Senjakala Islands 5772, 29785
Collectible any time Senjakala Islands 5699, 31319
Collectible any time Lautan Lama Desert 6597, 19880
Collectible any time Lautan Lama Desert 6511, 20026
Collectible any time Lautan Lama Desert 6362, 21483
Collectible any time Lautan Lama Desert 6271, 21501
Collectible any time Lautan Lama Desert 6216, 27380
Collectible any time Lautan Lama Desert 6851, 21902
Collectible any time Lautan Lama Desert 6816, 21959
Collectible any time Lautan Lama Desert 6807, 21994
Collectible any time Lautan Lama Desert 6905, 21951
Collectible any time Lautan Lama Desert 7036, 23859
Collectible any time Lautan Lama Desert 7039, 24561
Collectible any time Lautan Lama Desert 7181, 25503
Collectible any time Lautan Lama Desert 6749, 25453
Collectible any time Lautan Lama Desert 7293, 19290
Collectible any time Lautan Lama Desert 7301, 19224
Collectible any time Lautan Lama Desert 7395, 19183
Collectible any time Lautan Lama Desert 7373, 19339
Collectible any time Lautan Lama Desert 7480, 22683
Collectible any time Lautan Lama Desert 7406, 23779Collectible any time Lautan Lama Desert 7486, 25042
Collectible any time Lautan Lama Desert 7546, 25137
Collectible any time Lautan Lama Desert 7412, 25865
Collectible any time Lautan Lama Desert 7491, 25951
Collectible any time Lautan Lama Desert 7037, 25881
Collectible any time Senjakala Islands 7667, 28771
Collectible any time Lautan Lama Desert 7492, 28663
Collectible any time Lautan Lama Desert 7917, 18585
Collectible any time Lautan Lama Desert 7819, 18538
Collectible any time Lautan Lama Desert 7951, 18629
Collectible any time Lautan Lama Deser t 7843, 18594
Collectible any time Lautan Lama Deser t 7956, 25469Collectible any time Lautan Lama Deser t 8015, 25589
Mission RegionPDA Coordinates
(X, Y)
Collectible any time West Tanah Raya 8084, 6744
Collectible any t ime Ramal Rakyat Islands 8431, 13875
Collectible any time Lautan Lama Deser t 8406, 19062
Collectible any time Lautan Lama Deser t 8564, 18855
Collectible any t ime Ramal Rakyat Islands 8634, 20472
Collectib le any t ime Ramal Rakyat Islands 8636, 20620
Collectib le any t ime Ramal Rakyat Islands 8611, 21730
Collectib le any t ime Ramal Rakyat Islands 8603, 21655
Collectib le any t ime Ramal Rakyat Islands 8612, 21835
Collectib le any t ime Ramal Rakyat Islands 8623, 21763
Collectible any time Lautan Lama Deser t 8226, 22924
Collectible any time Lautan Lama Deser t 8113, 22977
Collectible any time Lautan Lama Deser t 8406, 24090
Collectible any time West Tanah Raya 8884, 1344
Collectible any time West Tanah Raya 8835, 7921
Collectible any time West Tanah Raya 8860, 7837
Collectible any time West Tanah Raya 8910, 7809
Collectible any time West Tanah Raya 8909, 7951
Collectible any time West Tanah Raya 8790, 9528
Collectible any time West Tanah Raya 8798, 9486
Collectible any time West Tanah Raya 8558, 9524
Collectible any time West Tanah Raya 9284, 10055
Collectib le any t ime Ramal Rakyat Islands 8874, 21350
Collectible any time Lautan Lama Desert 8794, 26148
Collectible any time Lautan Lama Desert 9111, 26947
Collectible any time West Tanah Raya 9452, 4949
Collectible any time West Tanah Raya 9414, 5211
Collectible any time West Tanah Raya 9495, 5823
Collectible any time West Tanah Raya 9366, 7633
Collectible any time West Tanah Raya 9260, 8980
Collectible any time West Tanah Raya 9594, 10512
Collectible any time West Tanah Raya 9324, 11745
Collectib le any t ime Ramal Rakyat Islands 9704, 18335
Collectib le any t ime Ramal Rakyat Islands 9430, 18033
Collectib le any t ime Ramal Rakyat Islands 9322, 18259
Collectib le any t ime Ramal Rakyat Islands 9799, 18377
Collectib le any t ime Ramal Rakyat Islands 9255 , 21791
Collectib le any t ime Ramal Rakyat Islands 9217, 21972
Collectible any time Senjakala Islands 9948, 28468
Collectible any time Senjakala Islands 9878, 28488Collectible any time Senjakala Islands 9130, 28002
Collectible any time Senjakala Islands 9931, 28544
Collectible any time West Tanah Raya 10148, 4329
Collectible any time West Tanah Raya 10259, 4464
Collectible any time West Tanah Raya 10125, 4402
Collectible any time West Tanah Raya 10216, 4329
Collectible any time West Tanah Raya 10010, 6860
Collectible any time West Tanah Raya 9923, 9866
Collectible any time West Tanah Raya 10020, 10218
Collectib le any time Ramal Rakyat Islands 10221, 18542
Collectib le any time Ramal Rakyat Islands 10003, 20408
Collectib le any time Ramal Rakyat Islands 9981, 20411Collectib le any time Ramal Rakyat Islands 9895, 20447
Collectib le any time Ramal Rakyat Islands 9936, 20397
AST OFRACTER
FIELD GUIDETO PANAU
WEAPONS VEHICLE EXPLORINGPANAU
AGENCYMISSIONS
STRONGHOLDTAKEOVERS
FACTIONMISSIONS
CHALLENGES COLLECTIBLES ACHIEVEMENTSAND TROPHIES
PARADISE LOST • CHAOSSettlements • Parts and Cash Stashes
Protected by copyright. Unauthorized or unlawful copying or downloading expressly prohibited.

8/18/2019 Just Cause 2 Prima Official Guide
http://slidepdf.com/reader/full/just-cause-2-prima-official-guide 45/208
C H A R A C T E R S
F I E L D G U I D E T O P A N A U
W E A P O N S
V E H I C L E S
E X P L O R I N G P A N A U
A G E N C Y M I S S I O N S
S T R O N G H O L D T A K E O V E R S
F A C T I O N M I S S I O N S
C H A L L E N G E S
C O L L E C T I B L E S
A C H I E V E M E N T S
primagames.com 45
Mission RegionPDA Coordinates
(X, Y)
Collectib le any t ime Ramal Rakyat Islands 9881, 21686
Collectib le any t ime Ramal Rakyat Islands 9848, 21612
Collectib le any t ime Ramal Rakyat Islands 9815, 21570
Collectib le any t ime Ramal Rakyat Islands 9838, 21699
Collectible any time Lautan Lama Desert 9555, 25969
Collectible any time Lautan Lama Desert 9549, 25888
Collectible any time West Tanah Raya 10652, 3581
Collectible any time West Tanah Raya 10514, 3564
Collectible any time West Tanah Raya 10562, 6122
Collectible any time West Tanah Raya 10511, 10404
Collectib le any time Ramal Rakyat Islands 10554, 17117
Collectib le any time Ramal Rakyat Islands 10561, 18846
Collectib le any time Ramal Rakyat Islands 10560, 18896
Collectib le any time Ramal Rakyat Islands 10371, 20903
Collectib le any time Ramal Rakyat Islands 10279, 21371
Collectib le any time Ramal Rakyat Islands 10334, 22842
Collectib le any time Ramal Rakyat Islands 10455, 22712
Collectib le any time Ramal Rakyat Islands 10416, 22820
Collectib le any time Ramal Rakyat Islands 10595, 25048
Collectible any time Lautan Lama Desert 10490, 26025
Collectible any time Lautan Lama Desert 10381, 26150
Collectible any time West Tanah Raya 11291, 3732
Collectible any time West Tanah Raya 11090, 7734
Collectible any time West Tanah Raya 11119, 7680
Collectible any time West Tanah Raya 10884, 8291
Collectible any time West Tanah Raya 11016, 8319
Collectible any time West Tanah Raya 10919, 8343
Collectible any time West Tanah Raya 10918, 8195
Collectible any time West Tanah Raya 11188, 9151
Collectible any time West Tanah Raya 11312, 9175
Collectible any time West Tanah Raya 11152, 10127
Collectible any time Ramal Rakyat Is lands 11071, 10627
Collect ible any time Ramal Rakyat Is lands 11170, 11068
Collect ible any time Ramal Rakyat Islands 11240, 10972
Collect ible any t ime Ramal Rakyat Islands 10794, 19928
Collect ible any t ime Ramal Rakyat Islands 10936, 21163
Collect ible any t ime Ramal Rakyat Islands 10982, 21316
Collect ible any t ime Ramal Rakyat Islands 10997, 21278
Collect ible any t ime Ramal Rakyat Islands 10881, 21167
Collect ible any t ime Ramal Rakyat Islands 11151, 22098Collect ible any t ime Ramal Rakyat Islands 11137, 22194
Collect ible any t ime Ramal Rakyat Islands 11025, 22124
Collectible any time Senjakala Islands 11032, 28515
Collectible any time Senjakala Islands 11163, 28585
Collectible any time West Tanah Raya 11589, 1047
Collectible any time West Tanah Raya 11384, 2782
Collectible any time West Tanah Raya 11862, 5121
Collectible any time West Tanah Raya 11789, 5055
Collectible any time West Tanah Raya 11535, 5135
Collectible any time West Tanah Raya 11795, 5176
Collectible any time West Tanah Raya 11893, 4894
Collectible any t ime Ramal Rakyat Islands 11637, 9977Collectible any t ime Ramal Rakyat Islands 11686, 10013
Collectible any t ime Ramal Rakyat Islands 11495, 12450
Mission RegionPDA Coordinates
(X, Y)
Collectib le any t ime Ramal Rakyat Islands 11482, 15005
Collectib le any t ime Ramal Rakyat Islands 11538, 19249
Collectib le any t ime Ramal Rakyat Islands 11596, 21809
Collectible any time Senjakala Islands 12019, 28049
Collectible any time Senjakala Islands 11911, 28170
Collectible any time Senjakala Islands 11826, 27988
Collectible any time Senjakala Islands 11919, 27925
Collectible any time West Tanah Raya 12016, 8428
Collectible any time West Tanah Raya 12098, 8420
Collectib le any t ime Ramal Rakyat Islands 12062, 9071
Collectible any time Panau Tengah Bay 12234, 25149
Collectible any time Panau Tengah Bay 12210, 25235
Collectible any time Panau Tengah Bay 12333, 25263
Collectible any time Panau Tengah Bay 12278, 25305
Collectible any time West Tanah Raya 12604, 3877
Collectible any time West Tanah Raya 12664, 3877
Collectible any time Berawan Besar Mountains 13087, 6873
Collectible any time Berawan Besar Mountains 13146, 6820
Collectible any time Berawan Besar Mountains 13131, 6732
Collectib le any time Ramal Rakyat Islands 12131, 9451
Collectible any time Berawan Besar Mountains 12435, 9109
Collectib le any time Ramal Rakyat Islands 12765, 10377
Collectib le any time Ramal Rakyat Islands 12401, 11224
Collectible any time Panau Tengah Bay 12682, 25856
Collectible any time West Tanah Raya 13130, 3206
Collectible any time West Tanah Raya 13170, 3546
Collectible any time Berawan Besar Mountains 12987, 7216
Collectible any time Berawan Besar Mountains 13086, 7214
Collectible any time Berawan Besar Mountains 13082, 7301
Collectible any time Berawan Besar Mountains 13029, 7180
Collectible any time Berawan Besar Mountains 13023, 9364
Collectib le any time Ramal Rakyat Islands 13155, 11477
Collectib le any time Ramal Rakyat Islands 13159, 11477
Collectib le any time Ramal Rakyat Islands 13145, 11463
Collectib le any time Ramal Rakyat Islands 13091, 11476
Collectible any time Panau Tengah Bay 13051, 19364
Collectible any time Panau Tengah Bay 13127, 19370
Collectible any time Panau Tengah Bay 13091, 19372
Collectible any time Panau Tengah Bay 13033, 19328
Collectible any time Panau Tengah Bay 13324, 24904Collectible any time Panau Tengah Bay 13293, 24847
Collectible any time Panau Tengah Bay 13081, 26915
Collectible any time Senjakala Islands 13204, 31244
Collectible any time Panau Tengah Bay 13648, 21021
Collectible any time Panau Tengah Bay 13783, 20884
Collectible any time Panau Tengah Bay 13722, 22871
Collectible any time Panau Tengah Bay 13718, 22789
Collectible any time Panau Tengah Bay 13693, 22820
Collectible any time Panau Tengah Bay 13636, 22807
Collectible any time Panau Tengah Bay 13454, 26246
Collectible any time Senjakala Islands 13413, 29925
Collectible any time Senjakala Islands 13354, 30214Collectible any time Senjakala Islands 13334, 30237
AST OFRACTER
FIELD GUIDETO PANAU
WEAPONS VEHICLE EXPLORINGPANAU
AGENCYMISSIONS
STRONGHOLDTAKEOVERS
FACTIONMISSIONS
CHALLENGES COLLECTIBLES ACHIEVEMENTSAND TROPHIES
PARADISE LOST • CHAOSSettlements • Parts and Cash Stashes
Protected by copyright. Unauthorized or unlawful copying or downloading expressly prohibited.

8/18/2019 Just Cause 2 Prima Official Guide
http://slidepdf.com/reader/full/just-cause-2-prima-official-guide 46/208
PRIMA OFFICIAL STRATEGY GUIDETM
46
Mission RegionPDA Coordinates
(X, Y)
Collectible any time Berawan Besar Mountains 14061, 3765
Collectible any time Berawan Besar Mountains 13768, 7923
Collectible any time Berawan Besar Mountains 13672, 7888
Collectible any time Berawan Besar Mountains 13683, 7901
Collectible any time Berawan Besar Mountains 14192, 8665
Collect ible any t ime Ramal Rakyat Islands 14253 , 11491
Collectible any time Senjakala Islands 14246, 27849
Collectible any time Senjakala Islands 14112, 27846
Collectible any time Senjakala Islands 14254, 27813
Collectible any time Senjakala Islands 14056, 27828
Collectible any time Senjakala Islands 14261, 29020
Collectible any time Senjakala Islands 14137, 29751
Collectible any time Senjakala Islands 13909, 29687
Collectible any time Berawan Besar Mountains 14659, 7048
Collectible any time Berawan Besar Mountains 14521, 7019
Collectible any time Berawan Besar Mountains 14655, 7131
Collectible any time Berawan Besar Mountains 14700, 7126
Collectib le any t ime Ramal Rakyat Islands 14676, 10982
Collectib le any t ime Ramal Rakyat Islands 14427, 11528
Collectible any time Panau Tengah Bay 15312, 17195
Collectible any time Panau Tengah Bay 15322, 17584
Collectible any time Panau Tengah Bay 15210, 17693
Collectible any time Panau Tengah Bay 15104, 17727
Collectible any time Panau Tengah Bay 14597, 23566
Collectible any time Senjakala Islands 14812, 25661
Collectible any time Senjakala Islands 14552, 26353
Collectible any time Senjakala Islands 14586, 26410
Collectible any time Senjakala Islands 14544, 26406
Collectible any time Senjakala Islands 14589, 26333
Collectible any time Senjakala Islands 14414, 27813
Collectible any time Senjakala Islands 14541, 28561
Collectible any time Senjakala Islands 14480, 28327
Collectible any time West Tanah Raya 15060, 2978
Collectible any time West Tanah Raya 15106, 2933
Collectible any time West Tanah Raya 15119, 2959
Collectible any time West Tanah Raya 15093, 2990
Collectible any time Berawan Besar Mountains 14947, 6792
Collectib le any time Ramal Rakyat Islands 14859, 11497
Collectible any time Panau Tengah Bay 15246, 23056
Collectible any time Panau Tengah Bay 15382, 22887
Collectible any time Pelaut Archipelago 16049, 3404
Collectible any time Pelaut Archipelago 15952, 3363
Collectible any time Pelaut Archipelago 16002, 3342
Collectible any time Pelaut Archipelago 16027, 3359
Collectible any time Pelaut Archipelago 15770, 4303
Collectible any time Pelaut Archipelago 15900, 4322
Collectible any time Pelaut Archipelago 15964, 4193
Collectible any time Berawan Besar Mountains 15975, 7467
Collectible any time Berawan Besar Mountains 15877, 7551
Collectible any time Berawan Besar Mountains 16006, 7516
Collectible any time Ramal Rakyat Is lands 15985, 11986
Collectible any time Ramal Rakyat Is lands 15879, 11945
Mission RegionPDA Coordinates
(X, Y)
Collectible any time Panau Tengah Bay 16197, 12808
Collectible any time Panau Tengah Bay 16080, 12804
Collectible any time Panau Tengah Bay 15801, 12748
Collectible any time Panau Tengah Bay 15983, 12831
Collectible any time Panau Tengah Bay 15751, 22320
Collectible any time Panau Tengah Bay 16128, 22047
Collectible any time Selatan Archipelago 15943, 23510
Collectible any time Selatan Archipelago 15938, 23399
Collectib le any t ime Selatan Archipelago 15957, 23430
Collectible any time Selatan Archipelago 16104, 23388
Collectible any time Senjakala Islands 15672, 28149
Collectible any time Senjakala Islands 15558, 27860
Collectible any time Pelaut Archipelago 16926, 3789
Collectible any time Pelaut Archipelago 16549, 4000
Collectible any time Pelaut Archipelago 16569, 3871
Collectible any time Berawan Besar Mountains 16569, 7358
Collectible any time Berawan Besar Mountains 16574, 7452
Collectible any time Berawan Besar Mountains 16477, 7437
Collectible any time Berawan Besar Mountains 16627, 7397
Collectible any time Panau Tengah Bay 16511, 16491
Collectible any time Panau Tengah Bay 16474, 16490
Collectible any time Panau Tengah Bay 16867, 21609
Collectible any time Panau Tengah Bay 16915, 21557
Collectible any time Panau Tengah Bay 16829, 21604
Collectible any time Panau Tengah Bay 16894, 21487
Collectible any time Pelaut Archipelago 17352, 4121
Collectible any time Panau Tengah Bay 17157, 12343
Collectible any time Panau Tengah Bay 17222, 12281
Collectible any time Panau Tengah Bay 17308, 12134
Collectible any time Panau Tengah Bay 17302, 12104
Collectible any time Panau Tengah Bay 17126, 13690
Collectible any time Panau Tengah Bay 17087, 13834
Collectible any time Panau Tengah Bay 17025, 13782
Collectible any time Panau Tengah Bay 17127, 13820
Collectible any time Panau Tengah Bay 17354, 14625
Collectible any time Panau Tengah Bay 17309, 14622
Collectible any time Panau Tengah Bay 17435, 14569
Collectible any time Panau Tengah Bay 17079, 16429
Collectible any time Panau Tengah Bay 16994, 16336
Collectible any time Panau Tengah Bay 17170, 16419
Collectible any time Panau Tengah Bay 17312, 16826
Collectible any time Panau Tengah Bay 17210, 16994
Collectible any time Panau Tengah Bay 17249, 16828
Collectible any time Panau Tengah Bay 17232, 16999
Collectible any time Panau Tengah Bay 17157, 17194
Collectible any time East Tanah Raya 17132, 17259
Collectible any time East Tanah Raya 17174, 17263
Collectible any time East Tanah Raya 17197, 18219
Collectible any time East Tanah Raya 17307, 18081
Collectible any time Panau Tengah Bay 17259, 21069
Collectible any time Panau Tengah Bay 17261, 21163
Collectible any time Selatan Archipelago 17021, 23193
Collectible any time Selatan Archipelago 17333, 26601
Collectible any t ime Selatan Archipelago 17597, 26499
AST OFRACTER
FIELD GUIDETO PANAU
WEAPONS VEHICLE EXPLORINGPANAU
AGENCYMISSIONS
STRONGHOLDTAKEOVERS
FACTIONMISSIONS
CHALLENGES COLLECTIBLES ACHIEVEMENTSAND TROPHIES
PARADISE LOST • CHAOSSettlements • Parts and Cash Stashes
Protected by copyright. Unauthorized or unlawful copying or downloading expressly prohibited.

8/18/2019 Just Cause 2 Prima Official Guide
http://slidepdf.com/reader/full/just-cause-2-prima-official-guide 47/208
C H A R A C T E R S
F I E L D G U I D E T O P A N A U
W E A P O N S
V E H I C L E S
E X P L O R I N G P A N A U
A G E N C Y M I S S I O N S
S T R O N G H O L D T A K E O V E R S
F A C T I O N M I S S I O N S
C H A L L E N G E S
C O L L E C T I B L E S
A C H I E V E M E N T S
primagames.com 47
Mission RegionPDA Coordinates
(X, Y)
Collectible any time Selatan Archipelago 17262, 28188
Collectible any time Selatan Archipelago 17314, 28142
Collectib le any t ime Selatan Archipelago 17297, 28177
Collectible any time Selatan Archipelago 17223, 28195
Collectible any time Panau Tengah Bay 17744, 13964
Collectible any time Panau Tengah Bay 17617, 15291
Collectible any time Panau Tengah Bay 17520, 15956
Collectible any time Panau Tengah Bay 17733, 16835
Collectible any time Panau Tengah Bay 17635, 16771
Collectible any time Panau Tengah Bay 17618, 16765
Collectible any time Panau Tengah Bay 17587, 17056
Collectible any time Panau Tengah Bay 17499, 17473
Collectible any time Panau Tengah Bay 17838, 22406
Collectible any time Panau Tengah Bay 17810, 23141
Collectible any time Selatan Archipelago 17574, 25266
Collectible any time East Tanah Raya 19349, 14354
Collectible any time East Tanah Raya 19263, 14260
Collectible any time East Tanah Raya 19232, 14341
Collectible any time East Tanah Raya 19337, 14209
Collectible any time Panau Tengah Bay 18239, 16385
Collectible any time East Tanah Raya 18029, 18101
Collectible any time East Tanah Raya 18117, 18633
Collectible any time East Tanah Raya 18089, 18637
Collectible any time East Tanah Raya 18133, 19142
Collectible any time East Tanah Raya 18186, 19185
Collectible any time East Tanah Raya 18286, 19434
Collectible any time Panau Tengah Bay 18079, 21609
Collectible any time Panau Tengah Bay 18194, 21517
Collectible any time Selatan Archipelago 17996, 23897
Collectib le any time Selatan Archipelago 18178, 23795
Collectible any time Selatan Archipelago 18163, 24153
Collectible any time Berawan Besar Mountains 18495, 8717
Collectible any time Panau Tengah Bay 18569, 15703
Collectible any time Panau Tengah Bay 18542, 15955
Collectible any time East Tanah Raya 18825, 20883
Collectible any time Selatan Archipelago 18545, 23410
Collectible any time Selatan Archipelago 18651, 26376
Collectible any time Pelaut Archipelago 19063, 5276
Collectible any time Berawan Besar Mountains 19351, 8955
Collectible any time Berawan Besar Mountains 19343, 8859
Collectible any time Berawan Besar Mountains 19339, 9026
Collectible any time Berawan Besar Mountains 19122, 8942
Collectible any time Panau Tengah Bay 19130, 15683
Collectible any time Panau Tengah Bay 19103, 15558
Collectible any time East Tanah Raya 19195, 15625
Collectible any time Panau Tengah Bay 19040, 15689
Collectible any time East Tanah Raya 18977, 21321
Collectible any time East Tanah Raya 19104, 21230
Collectible any time East Tanah Raya 19279, 21850
Collectible any time East Tanah Raya 19184, 22067
Collectible any time East Tanah Raya 19471, 21988
Collectible any time Selatan Archipelago 19482, 26396
Collectible any time Pelaut Archipelago 19385, 6396
Collectible any time Pelaut Archipelago 19440, 6245
Mission RegionPDA Coordinates
(X, Y)
Collectible any time Pelaut Archipelago 19427, 6387
Collectible any time Pelaut Archipelago 19357, 6314
Collectible any time Berawan Besar Mountains 19504, 8228
Collectible any time Berawan Besar Mountains 19556, 8593
Collectible any time Berawan Besar Mountains 19255, 8032
Collectible any time Berawan Besar Mountains 19559, 8285
Collectible any time Berawan Besar Mountains 19637, 11604
Collectible any time Berawan Besar Mountains 19205, 11380
Collectible any time Berawan Besar Mountains 19247, 11122
Collectible any time Berawan Besar Mountains 19079, 11184
Collectible any time East Tanah Raya 19800, 18181
Collectible any time East Tanah Raya 19806, 18423
Collectible any time Selatan Archipelago 19706, 27383
Collectible any time Berawan Besar Mountains 20156, 10947
Collectible any time Berawan Besar Mountains 20113, 11014
Collectible any time Berawan Besar Mountains 20055, 10936
Collectible any time Berawan Besar Mountains 20146, 11012
Collectible any time East Tanah Raya 20182, 15903
Collectible any time East Tanah Raya 19847, 15911
Collectible any time East Tanah Raya 20092, 16039
Collectible any time East Tanah Raya 19928, 15872
Collectible any time East Tanah Raya 20108, 18664
Collectible any time East Tanah Raya 19894, 18649
Collectible any time East Tanah Raya 20136, 18837
Collectible any time East Tanah Raya 20120, 18960
Collectible any time East Tanah Raya 20219, 22525
Collectible any time East Tanah Raya 20195, 22604
Collectible any time East Tanah Raya 20266, 22492
Collectible any time East Tanah Raya 20230, 22553
Collectible any time Selatan Archipelago 20383, 24961
Collectible any time Selatan Archipelago 20321, 26715
Collectible any time Selatan Archipelago 20313, 26602
Collectible any time Selatan Archipelago 20368, 26607
Collectible any time Selatan Archipelago 20326, 26743
Collectible any time Selatan Archipelago 20178, 27779
Collectible any time Selatan Archipelago 20209, 27697
Collectible any time Pelaut Archipelago 20740, 5871
Collectible any time Pelaut Archipelago 20830, 5898
Collectible any time Pelaut Archipelago 20820, 5869
Collectible any time Pelaut Archipelago 20711, 5816
Collectible any timeBerawan BesarMountains
20618, 13360
Collectible any time East Tanah Raya 20551, 13453
Collectible any timeBerawan BesarMountains
20676, 13425
Collectible any time Berawan Besar Mountains 20683, 13516
Collectible any time East Tanah Raya 20721, 16388
Collectible any time East Tanah Raya 20635, 16411
Collectible any time East Tanah Raya 20696, 16369
Collectible any time East Tanah Raya 20762, 16365
Collectible any time East Tanah Raya 20769, 20554
Collectible any time East Tanah Raya 20709, 20576Collectible any time East Tanah Raya 20848, 20662
AST OFRACTER
FIELD GUIDETO PANAU
WEAPONS VEHICLE EXPLORINGPANAU
AGENCYMISSIONS
STRONGHOLDTAKEOVERS
FACTIONMISSIONS
CHALLENGES COLLECTIBLES ACHIEVEMENTSAND TROPHIES
PARADISE LOST • CHAOSSettlements • Parts and Cash Stashes
Protected by copyright. Unauthorized or unlawful copying or downloading expressly prohibited.

8/18/2019 Just Cause 2 Prima Official Guide
http://slidepdf.com/reader/full/just-cause-2-prima-official-guide 48/208
PRIMA OFFICIAL STRATEGY GUIDETM
48
Mission RegionPDA Coordinates
(X, Y)
Collectible any time East Tanah Raya 20834, 20631
Collectible any time Berawan Besar Mountains 21200, 11690
Collectible any time Berawan Besar Mountains 21061, 11622
Collectible any time Berawan Besar Mountains 21094, 11660
Collectible any time Berawan Besar Mountains 21021, 11562
Collectible any time Berawan Besar Mountains 21047, 12047
Collectible any time Berawan Besar Mountains 21246, 12262
Collectible any time Berawan Besar Mountains 21093, 13886
Collectible any time East Tanah Raya 21148, 21926
Collectible any time East Tanah Raya 21244, 22010
Collectible any time East Tanah Raya 20887, 22123
Collectible any time Pelaut Archipelago 21841, 6469
Collectible any time Berawan Besar Mountains 21877, 11206
Collectible any time Berawan Besar Mountains 21891, 10970
Collectible any time Berawan Besar Mountains 21783, 10982
Collectible any time Berawan Besar Mountains 21893, 11215
Collectible any time Berawan Besar Mountains 21743, 12282
Collectible any time Berawan Besar Mountains 21711, 12276
Collectible any time Berawan Besar Mountains 21735, 12263
Collectible any time Berawan Besar Mountains 21813, 12766
Collectible any time Berawan Besar Mountains 21811, 12796
Collectible any time Berawan Besar Mountains 21844, 12939
Collectible any time Berawan Besar Mountains 21791, 13005
Collectible any time East Tanah Raya 22207, 16243
Collectible any time East Tanah Raya 22114, 16242
Collectible any time East Tanah Raya 22136, 16390
Collectible any time East Tanah Raya 22055, 16306
Collectible any time East Tanah Raya 21766, 17427
Collectible any time East Tanah Raya 21792, 19675
Collectible any time East Tanah Raya 21818, 19774
Collectible any time East Tanah Raya 21835, 19718
Collectible any time East Tanah Raya 21772, 19677
Collectible any time Selatan Archipelago 21765, 26216
Collectib le any time Selatan Archipelago 21770, 29790
Collectible any time East Tanah Raya 22312, 16703
Collectible any time East Tanah Raya 22285, 16727
Collectible any time East Tanah Raya 22256, 16730
Collectible any time East Tanah Raya 22247, 16745
Collectible any time East Tanah Raya 22083, 23323
Collectible any time East Tanah Raya 22176, 23324
Collectible any time East Tanah Raya 22373, 23198
Collectible any time East Tanah Raya 22261, 23396
Collectible any time East Tanah Raya 22314, 23345
Collectible any time Selatan Archipelago 22394, 26823
Collectible any time Selatan Archipelago 22381, 26742
Collectible any time Selatan Archipelago 22220, 26626
Collectible any time Selatan Archipelago 22284, 26635
Collectible any time Selatan Archipelago 22239, 26686
Collectible any time Selatan Archipelago 22472, 26610
Collectible any time Selatan Archipelago 21684, 30385
Collectible any time Selatan Archipelago 21623, 30252
Collectible any time Selatan Archipelago 21617, 30311
Collectible any time Selatan Archipelago 21884, 30245
Mission RegionPDA Coordinates
(X, Y)
Collectible any time East Tanah Raya 23332, 19100
Collectible any time Pelaut Archipelago 23744, 4454
Collectible any time Pelaut Archipelago 23817, 4454
Collectible any time Pelaut Archipelago 23496, 4562
Collectible any time Pelaut Archipelago 23503, 4287
Collectible any time Pelaut Archipelago 23752, 4471
Collectible any time Pelaut Archipelago 23354, 4245
Collectible any time Pelaut Archipelago 23469, 4934
Collectible any time Pelaut Archipelago 23727, 5120
Collectible any time Pelaut Archipelago 23726, 5026
Collectible any time Pelaut Archipelago 23571, 4991
Collectible any time Berawan Besar Mountains 23353, 12972
Collectible any time Berawan Besar Mountains 23294, 12936
Collectible any time Berawan Besar Mountains 23192, 12973
Collectible any time Berawan Besar Mountains 23374, 12896
Collectible any time Berawan Besar Mountains 22992, 13767
Collectible any time Berawan Besar Mountains 23022, 13743
Collectible any time Berawan Besar Mountains 23042, 13742
Collectible any time Berawan Besar Mountains 23039, 13761
Collectible any time East Tanah Raya 23332, 19100
Collectible any time East Tanah Raya 23431, 19606
Collectible any time East Tanah Raya 23229, 20977
Collectible any time Selatan Archipelago 23124, 27141
Collectible any time Selatan Archipelago 23139, 27160
Collectible any time Selatan Archipelago 23120, 27126
Collectible any time Selatan Archipelago 23135, 27182
Collectible any time Selatan Archipelago 23339, 28664
Collectible any time Selatan Archipelago 23591, 28072
Collectible any time Berawan Besar Mountains 24127, 10875
Collectible any time Berawan Besar Mountains 24172, 10908
Collectible any time Berawan Besar Mountains 24211, 10988
Collectible any time Berawan Besar Mountains 24199, 10897
Collectible any time East Tanah Raya 23678, 15125
Collectible any time East Tanah Raya 23592, 15112
Collectible any time East Tanah Raya 23664, 19657
Collectible any time Selatan Archipelago 23455, 26278
Collectible any time Selatan Archipelago 23554, 26111
Collectible any time Selatan Archipelago 23622, 27236
Collectible any time Selatan Archipelago 23979, 28305
Collectible any time Selatan Archipelago 23957, 28794
Collectible any time Selatan Archipelago 24006, 30104
Collectible any time Berawan Besar Mountains 24554, 10455
Collectible any time Berawan Besar Mountains 24518, 10534
Collectible any time Berawan Besar Mountains 24538, 10553
Collectible any time Berawan Besar Mountains 24453, 10507
Collectible any time East Tanah Raya 24498, 18119
Collectible any time East Tanah Raya 24108, 19452
Collectible any time East Tanah Raya 24048, 20216
Collectible any time Selatan Archipelago 24274, 24806
Collectible any time Selatan Archipelago 24228, 26083
Collectible any time Selatan Archipelago 24341, 26060
Collectible any time Selatan Archipelago 24416, 28114
Collectible any time Selatan Archipelago 24440, 28014
Collectible any time Selatan Archipelago 24399, 30411
AST OFRACTER
FIELD GUIDETO PANAU
WEAPONS VEHICLE EXPLORINGPANAU
AGENCYMISSIONS
STRONGHOLDTAKEOVERS
FACTIONMISSIONS
CHALLENGES COLLECTIBLES ACHIEVEMENTSAND TROPHIES
PARADISE LOST • CHAOSSettlements • Parts and Cash Stashes
Protected by copyright. Unauthorized or unlawful copying or downloading expressly prohibited.

8/18/2019 Just Cause 2 Prima Official Guide
http://slidepdf.com/reader/full/just-cause-2-prima-official-guide 49/208
C H A R A C T E R S
F I E L D G U I D E T O P A N A U
W E A P O N S
V E H I C L E S
E X P L O R I N G P A N A U
A G E N C Y M I S S I O N S
S T R O N G H O L D T A K E O V E R S
F A C T I O N M I S S I O N S
C H A L L E N G E S
C O L L E C T I B L E S
A C H I E V E M E N T S
primagames.com 49
Mission RegionPDA Coordinates
(X, Y)
Collectib le any t ime Selatan Archipelago 24217, 31160
Collectible any time Selatan Archipelago 24139, 31117
Collectible any time Pelaut Archipelago 24833, 3547
Collectible any time Pelaut Archipelago 24879, 3252
Collectible any time Pelaut Archipelago 24743, 3559
Collectible any time East Tanah Raya 24508, 18642
Collectible any time East Tanah Raya 24521, 18667
Collectible any time East Tanah Raya 24607, 18708
Collectible any time East Tanah Raya 24565, 18695
Collectible any time East Tanah Raya 24766, 19711
Collectible any time East Tanah Raya 24719, 20530
Collectible any time East Tanah Raya 24643, 20594
Collectible any time Selatan Archipelago 24710, 26568
Collectible any time Selatan Archipelago 24848, 27130
Collectible any time Selatan Archipelago 24738, 27080
Collectible any time Pelaut Archipelago 25223, 5492
Collectible any time Pelaut Archipelago 25271, 5594
Collectible any time Pelaut Archipelago 25156, 7220
Collectible any time Pelaut Archipelago 25093, 7264
Collectible any time Pelaut Archipelago 25055, 7229
Collectible any time East Tanah Raya 25166, 18578
Collectible any time East Tanah Raya 25288, 19205
Collectible any time East Tanah Raya 25581, 20504
Collectible any time East Tanah Raya 25613, 20440
Collectible any time Selatan Archipelago 25260, 31336
Collectible any time Selatan Archipelago 25479, 31150
Collectible any time Selatan Archipelago 25463, 31088
Collectible any time Pelaut Archipelago 25840, 3427
Collectible any time Pelaut Archipelago 25907, 3157
Collectible any time Pelaut Archipelago 25806, 3438
Collectible any time Pelaut Archipelago 25862, 3323
Collectible any time Pelaut Archipelago 26212, 4780
Collectible any time Pelaut Archipelago 26031, 4877
Collectible any time Pelaut Archipelago 26183, 4854
Collectible any time Pelaut Archipelago 26203, 4814
Collectible any time Pelaut Archipelago 25806, 5947
Collectible any time Pelaut Archipelago 26012, 6173
Collectible any time Pelaut Archipelago 25887, 6287
Collectible any time Pelaut Archipelago 25999, 6265
Collectible any time Pelaut Archipelago 25969, 6156
Collectible any time East Tanah Raya 25917, 19572
Collectible any time East Tanah Raya 25870, 20119
Collectible any time East Tanah Raya 25800, 20143
Collectible any time Selatan Archipelago 25846, 25794
Collectible any time Selatan Archipelago 25871, 25606
Collect ible any time Selatan Archipelago 25717, 25856
Collectible any time Selatan Archipelago 25840, 25759
Collectible any time Selatan Archipelago 25814, 30129
Collectible any time Selatan Archipelago 25849, 30172
Collectible any time Selatan Archipelago 25723, 30192
Collectible any time Selatan Archipelago 25802, 30208
Collectible any time Pelaut Archipelago 26377, 2217
Collectible any time Pelaut Archipelago 26438, 5421
Mission RegionPDA Coordinates
(X, Y)
Collectible any time Pelaut Archipelago 26320, 5395
Collectible any time Pelaut Archipelago 26343, 5418
Collectible any time Pelaut Archipelago 26463, 5501
Collectible any time Pelaut Archipelago 26109, 6439
Collectible any time Pelaut Archipelago 26038, 6528
Collectible any time Pelaut Archipelago 26275, 6620
Collectible any time Pelaut Archipelago 26175, 6532
Collectible any time East Tanah Raya 26226, 20090
Collectib le any t ime Selatan Archipelago 26527, 27043
Collectible any time Selatan Archipelago 26465, 26995
Collectible any time Selatan Archipelago 26525, 26962
Collectible any time Selatan Archipelago 26330, 30558
Collectible any time Selatan Archipelago 26236, 30476
Collectible any time Selatan Archipelago 26451, 30669
Collectible any time Pelaut Archipelago 26768, 6882
Collectible any time Pelaut Archipelago 26807, 11337
Collectible any time East Tanah Raya 27133, 16723
Collectible any time East Tanah Raya 27161, 16700
Collectible any time Selatan Archipelago 26840, 27344
Collectible any time Pelaut Archipelago 27462, 6663
Collectible any time Pelaut Archipelago 27462, 6708
Collectible any time Pelaut Archipelago 27509, 6661
Collectible any time Pelaut Archipelago 27508, 6621
Collectible any time Pelaut Archipelago 27462, 6621
Collectible any time Pelaut Archipelago 27509, 6708
Collectible any time Pelaut Archipelago 27296, 7718
Collectible any time Pelaut Archipelago 27253, 7718
Collectible any time Pelaut Archipelago 27484, 8054
Collectible any time Pelaut Archipelago 27741, 8087
Collectible any time Pelaut Archipelago 27585, 8157
Collectible any time Pelaut Archipelago 27512, 8051
Collectible any time Pelaut Archipelago 27496, 8062
Collectible any time Pelaut Archipelago 27639, 8149
Collectible any time Pelaut Archipelago 27489, 8763
Collectible any time Pelaut Archipelago 27547, 8820
Collectible any time Pelaut Archipelago 27660, 8809
Collectible any time Pelaut Archipelago 27562, 8864
Collectible any time Pelaut Archipelago 27780, 9462
Collectible any time Pelaut Archipelago 27793, 9406
Collectible any time Pelaut Archipelago 27818, 9419
Collectible any time Pelaut Archipelago 27765, 9439
Collectible any time Pelaut Archipelago 27704, 9429
Collectible any time East Tanah Raya 27629, 13567
Collectible any time East Tanah Raya 27723, 13579
Collectible any time East Tanah Raya 27571, 13510
Collectible any time East Tanah Raya 27227, 15534
Collectible any time East Tanah Raya 27182, 15702
Collectible any time East Tanah Raya 27556, 17286
Collectible any time East Tanah Raya 27531, 17296
Collectible any time East Tanah Raya 27595, 17223
Collectible any time East Tanah Raya 27546, 17239
Collectible any time East Tanah Raya 27415, 18518
Collectible any time East Tanah Raya 27334, 18448
AST OFRACTER
FIELD GUIDETO PANAU
WEAPONS VEHICLE EXPLORINGPANAU
AGENCYMISSIONS
STRONGHOLDTAKEOVERS
FACTIONMISSIONS
CHALLENGES COLLECTIBLES ACHIEVEMENTSAND TROPHIES
PARADISE LOST • CHAOSSettlements • Parts and Cash Stashes
Protected by copyright. Unauthorized or unlawful copying or downloading expressly prohibited.

8/18/2019 Just Cause 2 Prima Official Guide
http://slidepdf.com/reader/full/just-cause-2-prima-official-guide 50/208
PRIMA OFFICIAL STRATEGY GUIDETM
50
Mission RegionPDA Coordinates
(X, Y)
Collectible any time East Tanah Raya 27524, 19621
Collectible any time East Tanah Raya 27612, 19283
Collectible any time East Tanah Raya 27676, 19623
Collectible any time East Tanah Raya 27233, 20034
Collectible any time Selatan Archipelago 27626, 30017
Collectible any time Selatan Archipelago 27539, 29922
Collectible any time Selatan Archipelago 27556, 29980
Collectible any time Pelaut Archipelago 28141, 5765
Collectible any time Pelaut Archipelago 28013, 5830
Collectible any time Pelaut Archipelago 27962, 5748
Collectible any time Pelaut Archipelago 28240, 5713
Collectible any time East Tanah Raya 27870, 12212
Collectible any time East Tanah Raya 27798, 18778
Collectible any time East Tanah Raya 27895, 18677
Collectible any time Pelaut Archipelago 28308, 8560
Collectible any time Pelaut Archipelago 28348, 8552
Collectible any time Pelaut Archipelago 28241, 9536
Collectible any time Pelaut Archipelago 28219, 11145
Collectible any time Pelaut Archipelago 28036, 11447
Collectible any time Pelaut Archipelago 28211, 11093
Collectible any time Pelaut Archipelago 27951, 11304
Collectible any time East Tanah Raya 28602, 14398
Collectible any time East Tanah Raya 28692, 17464
Collectible any time East Tanah Raya 28854, 17517
Collectible any time East Tanah Raya 28782, 17570
Collectible any time East Tanah Raya 28851, 17407
Collectible any time Selatan Archipelago 28099, 31245
Collectible any time Selatan Archipelago 28150, 31312
Collectible any time Selatan Archipelago 28235, 31331
Collectible any time Pelaut Archipelago 28626, 7895
Collectible any time Pelaut Archipelago 28749, 7894
Collectible any time Pelaut Archipelago 28582, 7925
Collectible any time Pelaut Archipelago 28690, 7893
Collectible any time Pelaut Archipelago 28710, 8919
Collectible any time Pelaut Archipelago 28624, 8866
Collectible any time East Tanah Raya 28993, 14065
Collectible any time East Tanah Raya 28996, 14039
Collectible any time East Tanah Raya 29165, 14701
Collectible any time East Tanah Raya 29153, 14454
Collectible any time East Tanah Raya 28752, 14580
Collectible any time East Tanah Raya 28814, 14824
Collectible any time East Tanah Raya 28844, 14673
Collectible any time East Tanah Raya 28671, 14778
Collectible any time East Tanah Raya 28761, 14468
Collectible any time East Tanah Raya 28794, 15651
Collectible any time East Tanah Raya 29019, 19056
Collectible any time Selatan Archipelago 28840, 28029
Collectible any time Selatan Archipelago 28927, 28094
Collectible any time Selatan Archipelago 28855, 28065
Collectible any time Selatan Archipelago 28654, 30558
Collectible any time Selatan Archipelago 28593, 30439
Collectible any time Selatan Archipelago 28605, 30379
Mission RegionPDA Coordinates
(X, Y)
Collectible any time East Tanah Raya 29441, 16923
Collectible any time East Tanah Raya 29216, 17026
Collectible any time East Tanah Raya 29476, 21276
Collectible any time Selatan Archipelago 29281, 29328
Collectible any time Selatan Archipelago 29164, 29291
Collectible any time Selatan Archipelago 29275, 29352
Collectible any time Pelaut Archipelago 29790, 2919
Collectible any time East Tanah Raya 29765, 17176
Collectible any time East Tanah Raya 29778, 17073
Collectible any time East Tanah Raya 30017, 19628
Collectible any time East Tanah Raya 29783, 19702
Collectible any time East Tanah Raya 30102, 19691
Collectible any time East Tanah Raya 29853, 19476
Collectible any time Selatan Archipelago 29846, 24774
Collectib le any t ime Selatan Archipelago 30167, 27001
Collectib le any t ime Selatan Archipelago 30387, 27033
Collectible any time Selatan Archipelago 30113, 26953
Collectible any time Selatan Archipelago 30172, 27782
Collectible any time East Tanah Raya 30336, 18525
Collectible any time Selatan Archipelago 30631, 28740
Collectible any time Selatan Archipelago 30631, 28762
Collectible any time Pelaut Archipelago 31413, 7334
Collectible any time Pelaut Archipelago 31905, 12100
VEHICLE PARTS
Mission Region PDA Coordinates(X, Y)
Airport Troubles Ramal Rakyat Islands 9472, 13326
Airport Troubles Ramal Rakyat Islands 9939, 12521
Airport Troubles Ramal Rakyat Islands 9624, 12669
Airport Troubles Ramal Rakyat Islands 9642, 12514
Airport Troubles Ramal Rakyat Islands 9290, 12686
Mile High Club Pelaut Archipelago 29579, 11485
River Runs Red Lautan Lama Desert 8390, 19663
River Runs Red Lautan Lama Desert 8348, 21171
Save the Forest Senjakala Islands 15348, 25860
Save the Forest Senjakala Islands 15470, 25975
Save the Forest Senjakala Islands 15316, 25715Save the Forest Senjakala Islands 15411, 25849
Save the Forest Senjakala Islands 15417, 26030
Save the Forest Senjakala Islands 15341, 25773
Stranded West Tanah Raya 3263, 3062
Stranded West Tanah Raya 2282, 2237
Stranded West Tanah Raya 2158, 2081
Chemical Heist East Tanah Raya 19415, 12465
Taking Care of theDishes
East Tanah Raya 23361, 17187
Taking Care of theDishes
East Tanah Raya 23087, 17370
Taking Care of the
Dishes East Tanah Raya 23516, 17480
Taking Care of theDishes
East Tanah Raya 23236, 17633
AST OFRACTER
FIELD GUIDETO PANAU
WEAPONS VEHICLE EXPLORINGPANAU
AGENCYMISSIONS
STRONGHOLDTAKEOVERS
FACTIONMISSIONS
CHALLENGES COLLECTIBLES ACHIEVEMENTSAND TROPHIES
PARADISE LOST • CHAOSSettlements • Parts and Cash Stashes
Protected by copyright. Unauthorized or unlawful copying or downloading expressly prohibited.

8/18/2019 Just Cause 2 Prima Official Guide
http://slidepdf.com/reader/full/just-cause-2-prima-official-guide 51/208
C H A R A C T E R S
F I E L D G U I D E T O P A N A U
W E A P O N S
V E H I C L E S
E X P L O R I N G P A N A U
A G E N C Y M I S S I O N S
S T R O N G H O L D T A K E O V E R S
F A C T I O N M I S S I O N S
C H A L L E N G E S
C O L L E C T I B L E S
A C H I E V E M E N T S
primagames.com 51
Mission RegionPDA Coordinates
(X, Y)
Can I Get a Witness? Lautan Lama Desert 7547, 27756
Fry Me to the Moon East Tanah Raya 30218, 14227
Fry Me to the Moon East Tanah Raya 29843, 13594
Fry Me to the Moon East Tanah Raya 30188, 14197Fry Me to the Moon East Tanah Raya 29732, 14395
Slippin' and Sliding Berawan Besar Mountains 23725, 13664
Slippin' and Sliding Berawan Besar Mountains 23761, 13595
Slippin' and Sliding East Tanah Raya 24323, 14754
Slippin' and Sliding East Tanah Raya 24679, 14763
Slippin' and Sliding East Tanah Raya 24331, 14847
Black Gold Lautan Lama Desert 823, 22504
Black Gold Lautan Lama Desert 823, 22476
Welcome to Panau Berawan Besar Mountains 14788, 9587
Welcome to Panau Berawan Besar Mountains 15200, 9202
Welcome to Panau Berawan Besar Mountains 15395, 9239
Welcome to Panau Berawan Besar Mountains 15281, 9152Casino Bust East Tanah Raya 18574, 17822
Casino Bust East Tanah Raya 18499, 17731
Casino Bust East Tanah Raya 18555, 17842
Casino Bust East Tanah Raya 18480, 17751
The White Tiger Ramal Rakyat Islands 8674, 23122
The White Tiger Ramal Rakyat Islands 10413, 23493
The White Tiger Panau Tengah Bay 12017, 23242
The White Tiger Panau Tengah Bay 11985, 23240
The White Tiger Panau Tengah Bay 12057, 23253
Mountain Rescue Berawan Besar Mountains 21191, 9201
Mountain Rescue Berawan Besar Mountains 21131, 9756
Mountain Rescue Berawan Besar Mountains 21339, 9505Mountain Rescue Berawan Besar Mountains 21059, 9190
Mountain Rescue Berawan Besar Mountains 20979, 9229
Mountain Rescue Berawan Besar Mountains 21166, 8890
Three Kings Senjakala Islands 3664, 31639
Three Kings Senjakala Islands 3589, 31492
Into the Den Selatan Archipelago 29815, 30008
Into the Den Selatan Archipelago 29946, 30232
Into the Den Selatan Archipelago 30243, 30348
Into the Den Selatan Archipelago 30214, 30498
Collect ible any t ime Ramal Rakyat Is lands 4884, 15453
Collectible any time Ramal Rakyat Islands 4490, 15146
Collect ible any t ime Ramal Rakyat Is lands 4532, 15719Collect ible any t ime Ramal Rakyat Is lands 4538, 15252
Collect ible any t ime Ramal Rakyat Is lands 2689, 15116
Collectible any time Ramal Rakyat Islands 2871, 14867
Collect ible any t ime Ramal Rakyat Is lands 2767, 15223
Collect ible any t ime Ramal Rakyat Is lands 3131, 14706
Collectible any time West Tanah Raya 4578, 11006
Collectible any time West Tanah Raya 4425, 11003
Collectible any time West Tanah Raya 4536, 11237
Collectible any time West Tanah Raya 4229, 11186
Collectible any time West Tanah Raya 3710, 11868
Collectible any time West Tanah Raya 3296, 11929
Collectible any time West Tanah Raya 3041, 11682Collectible any time West Tanah Raya 3153, 12074
Oil for Blood Pelaut Archipelago 28010, 6863
Mission RegionPDA Coordinates
(X, Y)
Oil for Blood Pelaut Archipelago 27884, 7108
Oil for Blood Pelaut Archipelago 27989, 7008
Paradise Valley Selatan Archipelago 19125, 25826
Paradise Valley Selatan Archipelago 19232, 25731Paradise Valley Selatan Archipelago 19223, 25761
Free Trade Ramal Rakyat Islands 1439, 13432
Free Trade Ramal Rakyat Islands 1411, 13412
Free Trade Ramal Rakyat Islands 1413, 13344
Pilgrimage West Tanah Raya 9154, 6594
Pilgrimage West Tanah Raya 9283, 6646
Pilgrimage West Tanah Raya 9345, 6581
Power Surge East Tanah Raya 25562, 17933
Power Surge East Tanah Raya 25478, 17997
Power Surge East Tanah Raya 25467, 18056
Boys with Toys Senjakala Islands 13397, 29047
Boys with Toys Senjakala Islands 13335, 29037Boys with Toys Senjakala Islands 13409, 29076
Rocket Science Berawan Besar Mountains 17042, 9335
A SecondAmendment
Lautan Lama Desert 5607, 27417
A SecondAmendment
Lautan Lama Desert 5834, 27467
A SecondAmendment
Lautan Lama Desert 5619, 27501
Chemical Compound Panau Tengah Bay 12931, 25255
Chemical Compound Panau Tengah Bay 13041, 25350
Chemical Compound Panau Tengah Bay 12902, 25269
Collectible any time Lautan Lama Deser t 1175, 23312
Collectible any time Lautan Lama Deser t 1175, 23284
Collectible any time Senjakala Islands 2140, 29879
Collectible any time Senjakala Islands 2108, 29920
Collectible any time Senjakala Islands 2348, 29992
Collectible any time Senjakala Islands 2350, 29898
Collectible any time Senjakala Islands 2698, 31324
Collectible any time West Tanah Raya 2903, 11124
Collectible any time Lautan Lama Deser t 2752, 21090
Collectible any time Lautan Lama Deser t 2747, 21183
Collectible any time Lautan Lama Deser t 2697, 21269
Collectible any time Lautan Lama Deser t 2648, 22788
Collectible any time Lautan Lama Deser t 2855, 22834
Collectible any time Lautan Lama Deser t 2645, 22739
Collectible any time Lautan Lama Deser t 2782, 22750
Collectible any time Lautan Lama Deser t 3251, 22461
Collectible any time Lautan Lama Deser t 3542, 24685
Collectible any time Lautan Lama Deser t 3611, 24798
Collectible any time Lautan Lama Deser t 3841, 20204
Collectible any time Lautan Lama Deser t 3868, 20051
Collectible any time Lautan Lama Deser t 4018, 20122
Collectible any time Senjakala Islands 3920, 29899
Collectible any time Senjakala Islands 4032, 30421
Collectible any time Lautan Lama Deser t 4376, 21075
Collectible any time Lautan Lama Deser t 4395, 21256
Collectible any time Lautan Lama Deser t 4134, 21001
AST OFRACTER
FIELD GUIDETO PANAU
WEAPONS VEHICLE EXPLORINGPANAU
AGENCYMISSIONS
STRONGHOLDTAKEOVERS
FACTIONMISSIONS
CHALLENGES COLLECTIBLES ACHIEVEMENTSAND TROPHIES
PARADISE LOST • CHAOSSettlements • Parts and Cash Stashes
Protected by copyright. Unauthorized or unlawful copying or downloading expressly prohibited.

8/18/2019 Just Cause 2 Prima Official Guide
http://slidepdf.com/reader/full/just-cause-2-prima-official-guide 52/208
PRIMA OFFICIAL STRATEGY GUIDETM
52
Mission RegionPDA Coordinates
(X, Y)
Collectible any time Lautan Lama Desert 4325, 21251
Collectible any time Lautan Lama Desert 4585, 22380
Collectible any time Lautan Lama Desert 4469, 22626
Collectible any time Lautan Lama Desert 4441, 22281Collectible any time Senjakala Islands 4405, 29698
Collectible any time Senjakala Islands 4505, 30343
Collectible any time Senjakala Islands 4274, 31410
Collectible any time Senjakala Islands 4353, 31413
Collectible any time Lautan Lama Desert 4822, 19393
Collectible any time Lautan Lama Desert 4749, 19396
Collectible any time Senjakala Islands 4868, 31641
Collectible any time Lautan Lama Desert 5597, 18877
Collectible any time Lautan Lama Desert 5255, 23886
Collectible any time Lautan Lama Desert 5337, 23878
Collectible any time Lautan Lama Desert 5434, 23853
Collectible any time Senjakala Islands 5563, 31035Collectible any time Senjakala Islands 5255, 31650
Collectible any time Lautan Lama Desert 5420, 19708
Collectible any time Lautan Lama Desert 5966, 24973
Collectible any time Lautan Lama Desert 5788, 24933
Collectible any time Lautan Lama Desert 6016, 24903
Collectible any time Lautan Lama Desert 6204, 26001
Collectible any time Lautan Lama Desert 5976, 27023
Collectible any time Senjakala Islands 5806, 29532
Collectible any time Senjakala Islands 5881, 29535
Collectible any time Senjakala Islands 5843, 29541
Collectible any time Senjakala Islands 5784, 29520
Collectible any time Lautan Lama Desert 6478, 19989Collectible any time Lautan Lama Desert 6620, 19937
Collectible any time Lautan Lama Desert 6466, 21394
Collectible any time Lautan Lama Desert 6397, 24318
Collectible any time Lautan Lama Desert 6768, 27263
Collectible any time Lautan Lama Desert 6978, 21934
Collectible any time Lautan Lama Desert 6992, 22069
Collectible any time Lautan Lama Desert 6910, 22082
Collectible any time Lautan Lama Desert 7044, 22055
Collectible any time Lautan Lama Desert 6968, 23827
Collectible any time Lautan Lama Desert 6743, 25528
Collectible any time Lautan Lama Desert 6846, 25526
Collectible any time Lautan Lama Desert 6842, 25478Collectible any time West Tanah Raya 7448, 8171
Collectible any time Lautan Lama Desert 7434, 19214
Collectible any time Lautan Lama Desert 7346, 19261
Collectible any time Lautan Lama Desert 7332, 19178
Collectible any time Lautan Lama Desert 7318, 19189
Collectible any time Lautan Lama Desert 7509, 22666
Collectible any time Lautan Lama Desert 7497, 23802
Collectible any time Lautan Lama Desert 7591, 24324
Collectible any time Lautan Lama Desert 7534, 24953
Collectible any time Lautan Lama Desert 7140, 26044
Collectible any time Lautan Lama Desert 7474, 25793
Collectible any time Lautan Lama Desert 7514, 28589Collectible any time Lautan Lama Desert 7451, 28694
Mission RegionPDA Coordinates
(X, Y)
Collectible any time Lautan Lama Desert 7808, 18618
Collectible any time Lautan Lama Desert 7806, 18568
Collectible any time Lautan Lama Desert 7805, 18599
Collectible any time Lautan Lama Desert 7953, 18507Collectible any time Lautan Lama Desert 7998, 25611
Collectible any time Lautan Lama Desert 7958, 25708
Collect ible any t ime Ramal Rakyat Is lands 8692, 19004
Collectible any time Lautan Lama Desert 8535, 18961
Collect ible any t ime Ramal Rakyat Is lands 8664, 20482
Collect ible any t ime Ramal Rakyat Is lands 8585, 20524
Collect ible any t ime Ramal Rakyat Is lands 8408, 21620
Collect ible any t ime Ramal Rakyat Is lands 8466, 22013
Collect ible any t ime Ramal Rakyat Is lands 8479, 21634
Collect ible any t ime Ramal Rakyat Is lands 8403, 22000
Collectible any time Lautan Lama Desert 8111, 22921
Collectible any time Lautan Lama Desert 8193, 22915Collectible any time Lautan Lama Desert 8471, 24124
Collectible any time West Tanah Raya 8914, 1308
Collectible any time West Tanah Raya 8914, 1336
Collectible any time West Tanah Raya 8996, 7864
Collectible any time West Tanah Raya 8992, 7842
Collectible any time West Tanah Raya 8996, 7884
Collectible any time West Tanah Raya 8984, 7904
Collectible any time West Tanah Raya 8705, 9617
Collectible any time West Tanah Raya 8725, 9333
Collectible any time West Tanah Raya 8607, 9347
Collectible any time West Tanah Raya 9096, 10034
Collectible any time West Tanah Raya 9183, 10325Collectible any time Lautan Lama Desert 8851, 26193
Collectible any time Lautan Lama Desert 8843, 26122
Collectible any time Lautan Lama Desert 9092, 27019
Collectible any time West Tanah Raya 9397, 4909
Collectible any time West Tanah Raya 9329, 4968
Collectible any time West Tanah Raya 9452, 5856
Collectible any time West Tanah Raya 9336, 7624
Collectible any time West Tanah Raya 9137, 8886
Collectible any time West Tanah Raya 9601, 10556
Collectible any time West Tanah Raya 9349, 11764
Collectible any time West Tanah Raya 9275, 11679
Collect ible any t ime Ramal Rakyat Is lands 9422, 14251Collect ible any t ime Ramal Rakyat Is lands 9498, 18239
Collect ible any t ime Ramal Rakyat Is lands 9211, 18357
Collect ible any t ime Ramal Rakyat Is lands 9932, 18499
Collect ible any t ime Ramal Rakyat Is lands 9153, 18509
Collect ible any t ime Ramal Rakyat Is lands 9318, 21969
Collect ible any t ime Ramal Rakyat Is lands 9210, 21878
Collectible any time Senjakala Islands 9045, 28034
Collectible any time Senjakala Islands 9856, 28409
Collectible any time Senjakala Islands 9208, 28079
Collectible any time Lautan Lama Desert 8954, 27783
Collectible any time West Tanah Raya 10203, 4450
Collectible any time West Tanah Raya 10150, 4456Collectible any time West Tanah Raya 9759, 6501
Collectible any time West Tanah Raya 9905, 7084
AST OFRACTER
FIELD GUIDETO PANAU
WEAPONS VEHICLE EXPLORINGPANAU
AGENCYMISSIONS
STRONGHOLDTAKEOVERS
FACTIONMISSIONS
CHALLENGES COLLECTIBLES ACHIEVEMENTSAND TROPHIES
PARADISE LOST • CHAOSSettlements • Parts and Cash Stashes
Protected by copyright. Unauthorized or unlawful copying or downloading expressly prohibited.

8/18/2019 Just Cause 2 Prima Official Guide
http://slidepdf.com/reader/full/just-cause-2-prima-official-guide 53/208
C H A R A C T E R S
F I E L D G U I D E T O P A N A U
W E A P O N S
V E H I C L E S
E X P L O R I N G P A N A U
A G E N C Y M I S S I O N S
S T R O N G H O L D T A K E O V E R S
F A C T I O N M I S S I O N S
C H A L L E N G E S
C O L L E C T I B L E S
A C H I E V E M E N T S
primagames.com 53
Mission RegionPDA Coordinates
(X, Y)
Collectible any time West Tanah Raya 10135, 9272
Collectible any time West Tanah Raya 9880, 9924
Collectible any time West Tanah Raya 10074, 10202
Collect ible any t ime Ramal Rakyat Is lands 10208, 18554Collect ible any t ime Ramal Rakyat Is lands 9955, 20549
Collect ible any t ime Ramal Rakyat Is lands 9932, 20522
Collect ible any t ime Ramal Rakyat Is lands 9896, 20506
Collect ible any t ime Ramal Rakyat Is lands 9992, 20536
Collect ible any t ime Ramal Rakyat Is lands 9762, 21579
Collect ible any t ime Ramal Rakyat Is lands 9754, 21604
Collect ible any t ime Ramal Rakyat Is lands 9787, 21591
Collect ible any t ime Ramal Rakyat Is lands 9774, 21621
Collectible any time Lautan Lama Desert 9573, 25863
Collectible any time Lautan Lama Desert 9489, 25916
Collectible any time West Tanah Raya 10645, 3659
Collectible any time West Tanah Raya 10574, 3718Collectible any time West Tanah Raya 10409, 5954
Collectible any time West Tanah Raya 10456, 10399
Collect ible any t ime Ramal Rakyat Is lands 10591 , 17028
Collect ible any t ime Ramal Rakyat Is lands 10480, 18925
Collect ible any t ime Ramal Rakyat Is lands 10481, 18877
Collect ible any t ime Ramal Rakyat Is lands 10391, 20953
Collect ible any t ime Ramal Rakyat Is lands 10282, 22717
Collect ible any t ime Ramal Rakyat Is lands 10306, 22810
Collect ible any t ime Ramal Rakyat Is lands 10417, 22700
Collect ible any t ime Ramal Rakyat Is lands 10577, 25030
Collectible any time Lautan Lama Desert 10446, 26027
Collectible any time Lautan Lama Desert 10346, 26185Collectible any time West Tanah Raya 11252, 3745
Collectible any time West Tanah Raya 11056, 7680
Collectible any time West Tanah Raya 11073, 7734
Collectible any time West Tanah Raya 10941, 8285
Collectible any time West Tanah Raya 10871, 8237
Collectible any time West Tanah Raya 10870, 8255
Collectible any time West Tanah Raya 10969, 8189
Collectible any time West Tanah Raya 11384, 8977
Collectible any time West Tanah Raya 11249, 9325
Collectible any time West Tanah Raya 11172, 10068
Collect ible any t ime Ramal Rakyat Is lands 11053, 10615
Collect ible any t ime Ramal Rakyat Is lands 11202, 11157Collect ible any t ime Ramal Rakyat Is lands 11250, 11128
Collect ible any t ime Ramal Rakyat Is lands 10731, 19980
Collect ible any t ime Ramal Rakyat Is lands 11022, 21297
Collect ible any t ime Ramal Rakyat Is lands 10931, 21255
Collect ible any t ime Ramal Rakyat Is lands 10993, 21326
Collect ible any t ime Ramal Rakyat Is lands 11067, 22067
Collect ible any t ime Ramal Rakyat Is lands 11106, 22137
Collect ible any t ime Ramal Rakyat Is lands 11165, 22223
Collectible any time Senjakala Islands 10948, 28601
Collectible any time Senjakala Islands 11068, 28485
Collectible any time West Tanah Raya 11619, 1039
Collectible any time West Tanah Raya 11619, 1011Collectible any time West Tanah Raya 11918, 4768
Collectible any time West Tanah Raya 11806, 4867
Mission RegionPDA Coordinates
(X, Y)
Collectible any time West Tanah Raya 11744, 4805
Collectible any time West Tanah Raya 11864, 4677
Collectib le any t ime Ramal Rakyat Islands 11560, 9939
Collectib le any t ime Ramal Rakyat Islands 11536, 10009Collectib le any t ime Ramal Rakyat Islands 11627, 9937
Collectib le any t ime Ramal Rakyat Islands 11547, 12472
Collectib le any t ime Ramal Rakyat Islands 11509, 14989
Collectib le any t ime Ramal Rakyat Islands 11500, 14962
Collectib le any t ime Ramal Rakyat Islands 11639, 21819
Collectible any time Senjakala Islands 11618, 28141
Collectible any time Senjakala Islands 11578, 28253
Collectible any time Senjakala Islands 11597, 28094
Collectible any time Senjakala Islands 11550, 28069
Collectible any time West Tanah Raya 11857, 3148
Collectible any time West Tanah Raya 11948, 4273
Collectible any time West Tanah Raya 11963, 8492Collectible any time West Tanah Raya 12019, 8503
Collectib le any t ime Ramal Rakyat Islands 12033, 9029
Collectib le any t ime Ramal Rakyat Islands 12073, 10892
Collectible any time Panau Tengah Bay 12260, 25236
Collectible any time Panau Tengah Bay 12249, 25125
Collectible any time Panau Tengah Bay 12195, 25190
Collectible any time Panau Tengah Bay 12184, 25206
Collectible any time Panau Tengah Bay 12300, 27437
Collectible any time Panau Tengah Bay 12268, 27468
Collectible any time West Tanah Raya 12458, 3901
Collectible any time West Tanah Raya 12560, 4179
Collectible any time Berawan Besar Mountains 13083, 6771Collectible any time Berawan Besar Mountains 13040, 6851
Collectible any time Berawan Besar Mountains 12336, 7421
Collectible any time Berawan Besar Mountains 12316, 9302
Collectib le any t ime Ramal Rakyat Islands 12133, 9385
Collectible any time Berawan Besar Mountains 12610, 9307
Collectib le any t ime Ramal Rakyat Islands 12680, 10392
Collectib le any t ime Ramal Rakyat Islands 12694, 10345
Collectib le any t ime Ramal Rakyat Islands 12286, 11362
Collectible any time Panau Tengah Bay 12514, 25949
Collectible any time Panau Tengah Bay 12553, 26086
Collectible any time Panau Tengah Bay 12649, 26104
Collectible any time West Tanah Raya 13259, 3212Collectible any time West Tanah Raya 13258, 3435
Collectible any time Berawan Besar Mountains 13031, 7114
Collectible any time Berawan Besar Mountains 12943, 7272
Collectible any time Berawan Besar Mountains 12970, 7451
Collectible any time Berawan Besar Mountains 13115, 7256
Collectible any timeBerawan BesarMountains
12886, 9263
Collectib le any t ime Ramal Rakyat Islands 13130, 10773
Collectib le any t ime Ramal Rakyat Islands 13042, 11561
Collectib le any t ime Ramal Rakyat Islands 13015, 11565
Collectib le any t ime Ramal Rakyat Islands 13147, 11524
Collectib le any t ime Ramal Rakyat Islands 12952, 11564Collectible any time Panau Tengah Bay 12838, 19118
AST OFRACTER
FIELD GUIDETO PANAU
WEAPONS VEHICLE EXPLORINGPANAU
AGENCYMISSIONS
STRONGHOLDTAKEOVERS
FACTIONMISSIONS
CHALLENGES COLLECTIBLES ACHIEVEMENTSAND TROPHIES
PARADISE LOST • CHAOSSettlements • Parts and Cash Stashes
Protected by copyright. Unauthorized or unlawful copying or downloading expressly prohibited.

8/18/2019 Just Cause 2 Prima Official Guide
http://slidepdf.com/reader/full/just-cause-2-prima-official-guide 54/208
PRIMA OFFICIAL STRATEGY GUIDETM
54
Mission RegionPDA Coordinates
(X, Y)
Collectible any time Panau Tengah Bay 12905, 19076
Collectible any time Panau Tengah Bay 12905, 19211
Collectible any time Panau Tengah Bay 12926, 19066
Collectible any time Panau Tengah Bay 13387, 24805Collectible any time Panau Tengah Bay 13253, 24956
Collectible any time Senjakala Islands 13197, 31201
Collectible any time Senjakala Islands 13256, 31146
Collectible any time Panau Tengah Bay 13552, 20841
Collectible any time Panau Tengah Bay 13620, 21083
Collectible any time Panau Tengah Bay 13454, 22841
Collectible any time Panau Tengah Bay 13510, 22809
Collectible any time Panau Tengah Bay 13463, 22909
Collectible any time Panau Tengah Bay 13500, 22894
Collectible any time Panau Tengah Bay 13683, 25119
Collectible any time Panau Tengah Bay 13514, 26277
Collectible any time Senjakala Islands 13460, 29881Collectible any time Senjakala Islands 13438, 30269
Collectible any time Berawan Besar Mountains 14034, 3738
Collectible any time Berawan Besar Mountains 13692, 7679
Collectible any time Berawan Besar Mountains 13634, 7734
Collectible any time Berawan Besar Mountains 13605, 7840
Collectible any time Berawan Besar Mountains 14204, 8741
Collect ible any time Ramal Rakyat Islands 14253, 11482
Collectible any time Senjakala Islands 14208, 27719
Collectible any time Senjakala Islands 14236, 27725
Collectible any time Senjakala Islands 14191, 27776
Collectible any time Senjakala Islands 14243, 27761
Collectible any time Senjakala Islands 13930, 29518Collectible any time Senjakala Islands 14149, 29605
Collectible any time Berawan Besar Mountains 14413, 6994
Collectible any time Berawan Besar Mountains 14660, 6949
Collectible any time Berawan Besar Mountains 14428, 7013
Collectible any time Berawan Besar Mountains 14735, 6997
Collectible any time Berawan Besar Mountains 14301, 7978
Collect ible any time Ramal Rakyat Islands 14777, 10922
Collect ible any time Ramal Rakyat Islands 14531, 11459
Collectible any time Panau Tengah Bay 14421, 17444
Collectible any time Panau Tengah Bay 14497, 17154
Collectible any time Panau Tengah Bay 14419, 17389
Collectible any time Panau Tengah Bay 14281, 17406Collectible any time Senjakala Islands 14780, 25762
Collectible any time Senjakala Islands 14731, 25752
Collectible any time Senjakala Islands 14503, 26286
Collectible any time Senjakala Islands 14526, 26336
Collectible any time Senjakala Islands 14531, 26275
Collectible any time Senjakala Islands 14593, 26331
Collectible any time Senjakala Islands 14544, 28300
Collectible any time Senjakala Islands 14722, 28508
Collectible any time West Tanah Raya 15013, 3116
Collectible any time West Tanah Raya 15021, 3113
Collectible any time Berawan Besar Mountains 14973, 6795
Collect ible any time Ramal Rakyat Islands 14816, 11503Collectible any time Panau Tengah Bay 15226, 23050
Mission RegionPDA Coordinates
(X, Y)
Collectible any time Panau Tengah Bay 15392, 22486
Collectible any time Pelaut Archipelago 15962, 3345
Collectible any time Pelaut Archipelago 15967, 3416
Collectible any time Pelaut Archipelago 16019, 3285
Collectible any time Pelaut Archipelago 15901, 3390
Collectible any time Pelaut Archipelago 15849, 4382
Collectible any time Pelaut Archipelago 15899, 4331
Collectible any time Berawan Besar Mountains 15863, 7455
Collectible any time Berawan Besar Mountains 15862, 7484
Collectible any time Panau Tengah Bay 15931, 12837
Collectible any time Panau Tengah Bay 15979, 12747
Collectible any time Panau Tengah Bay 16098, 12727
Collectible any time Panau Tengah Bay 15982, 12825
Collectible any time Panau Tengah Bay 15959, 22233
Collectible any time Panau Tengah Bay 16059, 22179
Collect ible any t ime Selatan Archipelago 16131, 23321
Collectible any time Panau Tengah Bay 15909, 23179
Collect ible any t ime Selatan Archipelago 16134, 23568
Collect ible any t ime Selatan Archipelago 16081, 23378
Collectible any time Senjakala Islands 15793, 27666
Collectible any time Pelaut Archipelago 16502, 3218
Collectible any time Pelaut Archipelago 16293, 4256
Collectible any time Berawan Besar Mountains 16473, 7349
Collectible any time Berawan Besar Mountains 16543, 7389
Collectible any time Berawan Besar Mountains 16582, 7441
Collectible any time Berawan Besar Mountains 16529, 7319
Collectible any time Panau Tengah Bay 16581, 16451
Collectible any time Panau Tengah Bay 16630, 16478Collectible any time Panau Tengah Bay 16829, 21604
Collectible any time Panau Tengah Bay 16795, 21499
Collectible any time Panau Tengah Bay 16830, 21571
Collectible any time Panau Tengah Bay 16843, 21516
Collectible any time Panau Tengah Bay 17143, 12232
Collectible any time Panau Tengah Bay 17180, 12398
Collectible any time Panau Tengah Bay 17279, 12370
Collectible any time Panau Tengah Bay 17228, 12363
Collectible any time Panau Tengah Bay 17232, 14037
Collectible any time Panau Tengah Bay 17035, 13531
Collectible any time Panau Tengah Bay 17511, 14766
Collectible any time Panau Tengah Bay 17531, 14970Collectible any time Panau Tengah Bay 17484, 15001
Collectible any time Panau Tengah Bay 17263, 16812
Collectible any time Panau Tengah Bay 17264, 16783
Collectible any time Panau Tengah Bay 17270, 16833
Collectible any time East Tanah Raya 17182, 17240
Collectible any time Panau Tengah Bay 17187, 17226
Collectible any time East Tanah Raya 17271, 18048
Collectible any time East Tanah Raya 17158, 18208
Collectible any time Panau Tengah Bay 17257, 21201
Collectible any time Panau Tengah Bay 17314, 21070
Collect ible any t ime Selatan Archipelago 17111, 23178
Collect ible any t ime Selatan Archipelago 17310, 25602Collect ible any t ime Selatan Archipelago 17362, 26587
Collect ible any t ime Selatan Archipelago 17217, 26581
AST OFRACTER
FIELD GUIDETO PANAU
WEAPONS VEHICLE EXPLORINGPANAU
AGENCYMISSIONS
STRONGHOLDTAKEOVERS
FACTIONMISSIONS
CHALLENGES COLLECTIBLES ACHIEVEMENTSAND TROPHIES
PARADISE LOST • CHAOSSettlements • Parts and Cash Stashes
Protected by copyright. Unauthorized or unlawful copying or downloading expressly prohibited.

8/18/2019 Just Cause 2 Prima Official Guide
http://slidepdf.com/reader/full/just-cause-2-prima-official-guide 55/208
C H A R A C T E R S
F I E L D G U I D E T O P A N A U
W E A P O N S
V E H I C L E S
E X P L O R I N G P A N A U
A G E N C Y M I S S I O N S
S T R O N G H O L D T A K E O V E R S
F A C T I O N M I S S I O N S
C H A L L E N G E S
C O L L E C T I B L E S
A C H I E V E M E N T S
primagames.com 55
Mission RegionPDA Coordinates
(X, Y)
Collectib le any time Selatan Archipelago 17536, 26465
Collectib le any time Selatan Archipelago 17167, 28051
Collectib le any time Selatan Archipelago 17276, 28038
Collectib le any time Selatan Archipelago 17213, 28067Collectib le any time Selatan Archipelago 17235, 28056
Collectible any time Panau Tengah Bay 17585, 14031
Collectible any time Panau Tengah Bay 17658, 15374
Collectible any time Panau Tengah Bay 17669, 15911
Collectible any time Panau Tengah Bay 17670, 16718
Collectible any time Panau Tengah Bay 17605, 17315
Collectible any time Panau Tengah Bay 17477, 21644
Collectible any time Panau Tengah Bay 17810, 22306
Collectible any time Panau Tengah Bay 17798, 22595
Collectib le any time Selatan Archipelago 17838, 25222
Collectib le any time Selatan Archipelago 17543, 25353
Collectible any time East Tanah Raya 19295, 14195Collectible any time East Tanah Raya 19330, 14262
Collectible any time East Tanah Raya 19328, 14367
Collectible any time East Tanah Raya 19377, 14302
Collectible any time Panau Tengah Bay 18189, 15867
Collectible any time Panau Tengah Bay 18209, 16323
Collectible any time East Tanah Raya 18161, 18703
Collectible any time East Tanah Raya 18108, 19395
Collectible any time East Tanah Raya 18072, 19516
Collectible any time Panau Tengah Bay 18185, 21706
Collectible any time Panau Tengah Bay 18292, 21661
Collectib le any time Selatan Archipelago 18190, 23827
Collectib le any time Selatan Archipelago 18147, 23971Collectib le any time Selatan Archipelago 18058, 24139
Collectible any time Berawan Besar Mountains 18561, 8370
Collectible any time Panau Tengah Bay 18596, 15713
Collectible any time Panau Tengah Bay 18691, 16348
Collectible any time East Tanah Raya 18317, 20211
Collectible any time Panau Tengah Bay 18420, 22829
Collectib le any time Selatan Archipelago 18457, 23383
Collectib le any time Selatan Archipelago 18682, 26291
Collectible any time Pelaut Archipelago 18973, 5227
Collectible any time Berawan Besar Mountains 19268, 8847
Collectible any time Berawan Besar Mountains 19191, 8863
Collectible any time Berawan Besar Mountains 19257, 8900Collectible any time Berawan Besar Mountains 19289, 8901
Collectible any time Panau Tengah Bay 19048, 15595
Collectible any time Panau Tengah Bay 19073, 15645
Collectible any time Panau Tengah Bay 19071, 15721
Collectible any time Panau Tengah Bay 19128, 15559
Collectible any time East Tanah Raya 18973, 21230
Collectible any time East Tanah Raya 19041, 21320
Collectible any time East Tanah Raya 19463, 22040
Collectible any time East Tanah Raya 19347, 22085
Collectible any time Pelaut Archipelago 19500, 6316
Collectible any time Pelaut Archipelago 19352, 6242
Collectible any time Pelaut Archipelago 19495, 6288Collectible any time Pelaut Archipelago 19459, 6335
Collectible any time Berawan Besar Mountains 19664, 8350
Mission RegionPDA Coordinates
(X, Y)
Collectible any time Berawan Besar Mountains 19556, 8186
Collectible any time Berawan Besar Mountains 19574, 8547
Collectible any time Berawan Besar Mountains 19530, 8545
Collectible any time Berawan Besar Mountains 19300, 11508Collectible any time Berawan Besar Mountains 19616, 11626
Collectible any time Berawan Besar Mountains 19224, 11477
Collectible any time Berawan Besar Mountains 19279, 11467
Collectible any time East Tanah Raya 19661, 18179
Collectible any time East Tanah Raya 19835, 18467
Collectib le any t ime Selatan Archipelago 19854, 27222
Collectible any time Berawan Besar Mountains 20119, 10915
Collectible any time Berawan Besar Mountains 20019, 11027
Collectible any time Berawan Besar Mountains 20043, 10944
Collectible any time Berawan Besar Mountains 20091, 10891
Collectible any time East Tanah Raya 19970, 15957
Collectible any time East Tanah Raya 20166, 18712Collectible any time East Tanah Raya 20161, 18852
Collectible any time East Tanah Raya 20068, 18619
Collectible any time East Tanah Raya 20020, 18627
Collectible any time East Tanah Raya 20249, 22545
Collectible any time East Tanah Raya 20256, 22585
Collectible any time East Tanah Raya 20289, 22537
Collectible any time East Tanah Raya 20307, 22555
Collectib le any t ime Selatan Archipelago 20285, 24948
Collectib le any t ime Selatan Archipelago 20290, 26606
Collectib le any t ime Selatan Archipelago 20272, 26642
Collectib le any t ime Selatan Archipelago 20216, 26647
Collectib le any t ime Selatan Archipelago 20233, 26597Collectible any time Pelaut Archipelago 20834, 5701
Collectible any time Pelaut Archipelago 20716, 5772
Collectible any time Pelaut Archipelago 20682, 5966
Collectible any time Pelaut Archipelago 20683, 5861
Collectible any time East Tanah Raya 20588, 13508
Collectible any time Berawan Besar Mountains 20715, 13485
Collectible any time East Tanah Raya 20639, 13483
Collectible any time Berawan Besar Mountains 20552, 13428
Collectible any time East Tanah Raya 20527, 16517
Collectible any time East Tanah Raya 20815, 16424
Collectible any time East Tanah Raya 20673, 16518
Collectible any time East Tanah Raya 20502, 16459Collectible any time East Tanah Raya 20751, 20645
Collectible any time East Tanah Raya 20650, 20782
Collectible any time East Tanah Raya 20681, 20641
Collectible any time East Tanah Raya 20640, 20683
Collectib le any t ime Selatan Archipelago 20445, 26318
Collectible any time Berawan Besar Mountains 21085, 11633
Collectible any time Berawan Besar Mountains 21121, 11616
Collectible any time Berawan Besar Mountains 21103, 11520
Collectible any time Berawan Besar Mountains 21033, 11664
Collectible any time Berawan Besar Mountains 21258, 12278
Collectible any time Berawan Besar Mountains 21249, 12266
Collectible any time East Tanah Raya 21180, 15011Collectible any time East Tanah Raya 21233, 15007
AST OFRACTER
FIELD GUIDETO PANAU
WEAPONS VEHICLE EXPLORINGPANAU
AGENCYMISSIONS
STRONGHOLDTAKEOVERS
FACTIONMISSIONS
CHALLENGES COLLECTIBLES ACHIEVEMENTSAND TROPHIES
PARADISE LOST • CHAOSSettlements • Parts and Cash Stashes
Protected by copyright. Unauthorized or unlawful copying or downloading expressly prohibited.

8/18/2019 Just Cause 2 Prima Official Guide
http://slidepdf.com/reader/full/just-cause-2-prima-official-guide 56/208
PRIMA OFFICIAL STRATEGY GUIDETM
56
Mission RegionPDA Coordinates
(X, Y)
Collectible any time Berawan Besar Mountains 21283, 14923
Collectible any time Berawan Besar Mountains 21231, 14906
Collectible any time East Tanah Raya 21319, 22096
Collectible any time East Tanah Raya 21155, 21932
Collectible any time East Tanah Raya 21256, 22180
Collectible any time Berawan Besar Mountains 22034, 11003
Collectible any time Berawan Besar Mountains 22017, 11032
Collectible any time Berawan Besar Mountains 21958, 11011
Collectible any time Berawan Besar Mountains 22043, 11031
Collectible any time Berawan Besar Mountains 21906, 13151
Collectible any time East Tanah Raya 22110, 16356
Collectible any time East Tanah Raya 22081, 16333
Collectible any time East Tanah Raya 22176, 16274
Collectible any time East Tanah Raya 22203, 16336
Collectible any time East Tanah Raya 21922, 17255
Collectible any time East Tanah Raya 21773, 19818
Collectible any time East Tanah Raya 21876, 19717
Collectible any time East Tanah Raya 21848, 19807
Collectible any time East Tanah Raya 21881, 19685
Collectib le any t ime Selatan Archipelago 21730, 26165
Collectib le any t ime Selatan Archipelago 21704, 26095
Collectib le any t ime Selatan Archipelago 21787, 29728
Collectib le any t ime Selatan Archipelago 21707, 29700
Collectible any time East Tanah Raya 22276, 23506
Collectible any time East Tanah Raya 22167, 23457
Collectible any time East Tanah Raya 22171, 23188
Collectible any time East Tanah Raya 21962, 23453
Collectible any time East Tanah Raya 22176, 23324
Collectib le any t ime Selatan Archipelago 22181, 26977
Collectib le any t ime Selatan Archipelago 22237, 26812
Collectib le any t ime Selatan Archipelago 22233, 26927
Collectib le any t ime Selatan Archipelago 22043, 26726
Collectib le any t ime Selatan Archipelago 22302, 26797
Collectib le any t ime Selatan Archipelago 22323, 26776
Collectib le any t ime Selatan Archipelago 21880, 30371
Collectib le any t ime Selatan Archipelago 21686, 30290
Collectib le any t ime Selatan Archipelago 21528, 30312
Collectib le any t ime Selatan Archipelago 21729, 30356
Collectible any time East Tanah Raya 23295, 19151
Collectible any time Pelaut Archipelago 23270, 4567Collectible any time Pelaut Archipelago 23315, 4579
Collectible any time Pelaut Archipelago 23329, 4246
Collectible any time Pelaut Archipelago 23807, 4472
Collectible any time Pelaut Archipelago 23573, 4791
Collectible any time Pelaut Archipelago 23407, 5112
Collectible any time Pelaut Archipelago 23410, 5057
Collectible any time Pelaut Archipelago 23292, 4817
Collectible any time Berawan Besar Mountains 23257, 12912
Collectible any time Berawan Besar Mountains 23291, 12867
Collectible any time Berawan Besar Mountains 23307, 13010
Collectible any time Berawan Besar Mountains 23354, 12944
Collectible any time Berawan Besar Mountains 23019, 13791Collectible any time Berawan Besar Mountains 23159, 13711
Mission RegionPDA Coordinates
(X, Y)
Collectible any time Berawan Besar Mountains 23181, 13748
Collectible any time Berawan Besar Mountains 23163, 13801
Collectible any time East Tanah Raya 23295, 19151
Collectible any time East Tanah Raya 23475, 19591
Collectible any time East Tanah Raya 23186, 21150
Collect ible any t ime Selatan Archipelago 23069, 27131
Collect ible any t ime Selatan Archipelago 23046, 27108
Collect ible any t ime Selatan Archipelago 23129, 27067
Collect ible any t ime Selatan Archipelago 23071, 27075
Collect ible any t ime Selatan Archipelago 23417, 28374
Collect ible any t ime Selatan Archipelago 23515, 28391
Collect ible any t ime Selatan Archipelago 23302, 28329
Collect ible any t ime Selatan Archipelago 23617, 28215
Collectible any time Berawan Besar Mountains 24088, 10975
Collectible any time Berawan Besar Mountains 24052, 11014
Collectible any time Berawan Besar Mountains 24030, 10807
Collectible any time Berawan Besar Mountains 24067, 10810
Collectible any time East Tanah Raya 23632, 15150
Collectible any time East Tanah Raya 23710, 15175
Collectible any time East Tanah Raya 23922, 18584
Collectible any time East Tanah Raya 23721, 19579
Collectible any time East Tanah Raya 23768, 19631
Collect ible any t ime Selatan Archipelago 23557, 26313
Collect ible any t ime Selatan Archipelago 23624, 27114
Collect ible any t ime Selatan Archipelago 23975, 28250
Collect ible any t ime Selatan Archipelago 24005, 28825
Collect ible any t ime Selatan Archipelago 24125, 28887
Collectible any time Berawan Besar Mountains 24553, 10466
Collectible any time Berawan Besar Mountains 24531, 10411
Collectible any time Berawan Besar Mountains 24592, 10456
Collectible any time Berawan Besar Mountains 24530, 10441
Collectible any time East Tanah Raya 24141, 19313
Collectible any time East Tanah Raya 24079, 20108
Collect ible any t ime Selatan Archipelago 24172, 24913
Collect ible any t ime Selatan Archipelago 24325, 28144
Collect ible any t ime Selatan Archipelago 24542, 30354
Collect ible any t ime Selatan Archipelago 24086, 31231
Collect ible any t ime Selatan Archipelago 24160, 31232
Collectible any time Pelaut Archipelago 24736, 3597
Collectible any time Pelaut Archipelago 24838, 3612Collectible any time East Tanah Raya 24650, 18679
Collectible any time East Tanah Raya 24601, 18564
Collectible any time East Tanah Raya 24661, 18548
Collectible any time East Tanah Raya 24574, 18551
Collectible any time East Tanah Raya 24735, 19634
Collectible any time East Tanah Raya 24724, 20638
Collectible any time East Tanah Raya 24535, 20689
Collect ible any t ime Selatan Archipelago 24761, 26535
Collect ible any t ime Selatan Archipelago 24696, 26445
Collect ible any t ime Selatan Archipelago 24713 , 27178
Collectible any time Pelaut Archipelago 25332, 5418
Collectible any time Pelaut Archipelago 25285, 5532Collectible any time Pelaut Archipelago 25253, 5459
Collectible any time Pelaut Archipelago 25200, 7213
AST OFRACTER
FIELD GUIDETO PANAU
WEAPONS VEHICLE EXPLORINGPANAU
AGENCYMISSIONS
STRONGHOLDTAKEOVERS
FACTIONMISSIONS
CHALLENGES COLLECTIBLES ACHIEVEMENTSAND TROPHIES
PARADISE LOST • CHAOSSettlements • Parts and Cash Stashes
Protected by copyright. Unauthorized or unlawful copying or downloading expressly prohibited.

8/18/2019 Just Cause 2 Prima Official Guide
http://slidepdf.com/reader/full/just-cause-2-prima-official-guide 57/208
C H A R A C T E R S
F I E L D G U I D E T O P A N A U
W E A P O N S
V E H I C L E S
E X P L O R I N G P A N A U
A G E N C Y M I S S I O N S
S T R O N G H O L D T A K E O V E R S
F A C T I O N M I S S I O N S
C H A L L E N G E S
C O L L E C T I B L E S
A C H I E V E M E N T S
primagames.com 57
Mission RegionPDA Coordinates
(X, Y)
Collectible any time Pelaut Archipelago 25190, 7329
Collectible any time East Tanah Raya 25607, 20496
Collectible any time East Tanah Raya 25560, 20462
Collectible any time Selatan Archipelago 25528, 31413
Collectible any time Selatan Archipelago 25532, 31412
Collectible any time Pelaut Archipelago 25792, 3421
Collectible any time Pelaut Archipelago 25677, 3460
Collectible any time Pelaut Archipelago 25762, 3515
Collectible any time Pelaut Archipelago 25775, 3427
Collectible any time Pelaut Archipelago 26021, 4748
Collectible any time Pelaut Archipelago 26041, 4795
Collectible any time Pelaut Archipelago 25987, 4826
Collectible any time Pelaut Archipelago 26073, 4720
Collectible any time Pelaut Archipelago 25793, 5889
Collectible any time Pelaut Archipelago 25930, 6148
Collectible any time Pelaut Archipelago 25866, 6232
Collectible any time Pelaut Archipelago 25903, 6206
Collectible any time Pelaut Archipelago 25949, 6211
Collectible any time East Tanah Raya 25648, 18409
Collectible any time East Tanah Raya 25616, 19010
Collectible any time East Tanah Raya 25984, 19434
Collectible any time East Tanah Raya 26042, 20298
Collectible any time East Tanah Raya 26091, 20366
Collectible any time Selatan Archipelago 25819, 25527
Collectible any time Selatan Archipelago 25873, 25659
Collectible any time Selatan Archipelago 25819, 25611
Collectible any time Selatan Archipelago 25851, 25762
Collectible any time Selatan Archipelago 25794, 30083
Collectible any time Selatan Archipelago 25812, 30090
Collectible any time Selatan Archipelago 25780, 30072
Collectible any time Selatan Archipelago 25782, 30153
Collectible any time Selatan Archipelago 25779, 30117
Collectible any time Pelaut Archipelago 26407, 2209
Collectible any time Pelaut Archipelago 26407, 2181
Collectible any time Pelaut Archipelago 26316, 5473
Collectible any time Pelaut Archipelago 26376, 5343
Collectible any time Pelaut Archipelago 26316, 5424
Collectible any time Pelaut Archipelago 26275, 6763
Collectible any time Pelaut Archipelago 26179, 6825
Collectible any time Pelaut Archipelago 26194, 6720Collectible any time Pelaut Archipelago 26218, 6843
Collectible any time East Tanah Raya 26417, 19234
Collectible any time East Tanah Raya 26146, 20036
Collectible any time Selatan Archipelago 26568, 27053
Collectible any time Selatan Archipelago 26507, 27031
Collectible any time Selatan Archipelago 26364, 30665
Collectible any time Selatan Archipelago 26333, 30631
Collectible any time Pelaut Archipelago 26780, 6794
Collectible any time Pelaut Archipelago 27170, 6745
Collectible any time Pelaut Archipelago 26777, 11345
Collectible any time East Tanah Raya 27120, 15378
Collectible any time East Tanah Raya 27119, 15477Collectible any time East Tanah Raya 27130, 16625
Collectible any time East Tanah Raya 27287, 16585
Mission RegionPDA Coordinates
(X, Y)
Collectib le any t ime Selatan Archipelago 26674, 27075
Collectible any time Pelaut Archipelago 27589, 6610
Collectible any time Pelaut Archipelago 27589, 6520
Collectible any time Pelaut Archipelago 27317, 7676
Collectible any time Pelaut Archipelago 27216, 7660
Collectible any time Pelaut Archipelago 27542, 8106
Collectible any time Pelaut Archipelago 27665, 8155
Collectible any time Pelaut Archipelago 27540, 8711
Collectible any time Pelaut Archipelago 27442, 8707
Collectible any time Pelaut Archipelago 27562, 8714
Collectible any time Pelaut Archipelago 27480, 8878
Collectible any time East Tanah Raya 27651, 13605
Collectible any time East Tanah Raya 27664, 13576
Collectible any time East Tanah Raya 27674, 13443
Collectible any time East Tanah Raya 27440, 17200
Collectible any time East Tanah Raya 27507, 17214
Collectible any time East Tanah Raya 27488, 17231
Collectible any time East Tanah Raya 27437, 17279
Collectible any time East Tanah Raya 27272, 18531
Collectible any time East Tanah Raya 27389, 18456
Collectible any time East Tanah Raya 27589, 19301
Collectible any time East Tanah Raya 27665, 19639
Collectible any time East Tanah Raya 27566, 19457
Collectible any time East Tanah Raya 27172, 20078
Collectib le any t ime Selatan Archipelago 27542, 30099
Collectib le any t ime Selatan Archipelago 27546, 30004
Collectible any time Pelaut Archipelago 28459, 5901
Collectible any time Pelaut Archipelago 28341, 5766
Collectible any time Pelaut Archipelago 28452, 5767
Collectible any time Pelaut Archipelago 28432, 5807
Collectible any time East Tanah Raya 27748, 18794
Collectible any time East Tanah Raya 27848, 18684
Collectible any time Pelaut Archipelago 28358, 8511
Collectible any time Pelaut Archipelago 28354, 8979
Collectible any time Pelaut Archipelago 28308, 8905
Collectible any time Pelaut Archipelago 28360, 8948
Collectible any time Pelaut Archipelago 28213, 9582
Collectible any time Pelaut Archipelago 28119, 9602
Collectible any time Pelaut Archipelago 28241, 9519
Collectible any time Pelaut Archipelago 28263, 9556Collectible any time Pelaut Archipelago 28166, 11269
Collectible any time Pelaut Archipelago 27951, 11294
Collectible any time Pelaut Archipelago 28094, 11227
Collectible any time Pelaut Archipelago 28212, 11197
Collectible any time East Tanah Raya 28762, 17497
Collectible any time East Tanah Raya 28708, 17663
Collectible any time East Tanah Raya 28740, 17656
Collectible any time East Tanah Raya 28703, 17519
Collectib le any t ime Selatan Archipelago 28136, 31261
Collectib le any t ime Selatan Archipelago 28519, 31435
Collectib le any t ime Selatan Archipelago 28680, 31215
Collectible any time Pelaut Archipelago 29165, 7885Collectible any time Pelaut Archipelago 29209, 7885
AST OFRACTER
FIELD GUIDETO PANAU
WEAPONS VEHICLE EXPLORINGPANAU
AGENCYMISSIONS
STRONGHOLDTAKEOVERS
FACTIONMISSIONS
CHALLENGES COLLECTIBLES ACHIEVEMENTSAND TROPHIES
PARADISE LOST • CHAOSSettlements • Parts and Cash Stashes
Protected by copyright. Unauthorized or unlawful copying or downloading expressly prohibited.

8/18/2019 Just Cause 2 Prima Official Guide
http://slidepdf.com/reader/full/just-cause-2-prima-official-guide 58/208
PRIMA OFFICIAL STRATEGY GUIDETM
58
Mission RegionPDA Coordinates
(X, Y)
Collectible any time Pelaut Archipelago 29165, 7848
Collectible any time Pelaut Archipelago 28719, 8871
Collectible any time Pelaut Archipelago 28645, 8772
Collectible any time East Tanah Raya 28687, 13741
Collectible any time East Tanah Raya 29080, 13886
Collectible any time East Tanah Raya 29117, 14083
Collectible any time East Tanah Raya 29157, 14666
Collectible any time East Tanah Raya 29194, 14706
Collectible any time East Tanah Raya 28910, 14856
Collectible any time East Tanah Raya 28750, 14553
Collectible any time East Tanah Raya 28746, 14815
Collectible any time East Tanah Raya 28956, 14864
Collectible any time East Tanah Raya 28904, 14851
Collectible any time East Tanah Raya 28749, 15658
Collectible any time East Tanah Raya 29081, 19084
Collectib le any t ime Selatan Archipelago 28898, 28149
Collectib le any t ime Selatan Archipelago 28656, 30438
Collectib le any t ime Selatan Archipelago 28603, 30450
Collectible any time East Tanah Raya 29504, 16833
Collectible any time East Tanah Raya 29354, 16902
Collectible any time East Tanah Raya 29506, 21241
Collectible any time East Tanah Raya 29506, 21268
Collectib le any t ime Selatan Archipelago 29213, 29360
Collectib le any t ime Selatan Archipelago 29320, 29308
Collectib le any t ime Selatan Archipelago 29336, 29275
Collectible any time Pelaut Archipelago 29820, 2883
Collectible any time Pelaut Archipelago 29820, 2911
Collectible any time East Tanah Raya 30051, 17081
Collectible any time East Tanah Raya 29671, 17168
Collectible any time East Tanah Raya 29954, 19609
Collectible any time East Tanah Raya 29807, 19529
Collectible any time East Tanah Raya 29821, 19563
Collectible any time East Tanah Raya 30039, 19792
Collectib le any t ime Selatan Archipelago 29876, 24738
Collectib le any t ime Selatan Archipelago 29876, 24766
Collectib le any t ime Selatan Archipelago 30117, 26948
Collectib le any t ime Selatan Archipelago 30173, 26965
Collectib le any t ime Selatan Archipelago 30451, 26953
Collectib le any t ime Selatan Archipelago 30186, 27690
Collectib le any t ime Selatan Archipelago 30207, 27594
Collectible any time East Tanah Raya 30323, 18786
Collectible any time East Tanah Raya 30357, 18857
Collectib le any t ime Selatan Archipelago 30669, 28769
Collectible any time Selatan Archipelago 30569, 28866
Collectible any time Pelaut Archipelago 31444, 7326
Collectible any time Pelaut Archipelago 31443, 7298
Collectible any time Pelaut Archipelago 31935, 12092
Collectible any time Pelaut Archipelago 31935, 12064
CASH STASHES
Mission RegionPDA Coordinates
(X, Y)
Welcome to Panau Berawan Besar Mountains 15368, 9311
Welcome to Panau Berawan Besar Mountains 15202, 9354Welcome to Panau Berawan Besar Mountains 15172, 9337
Welcome to Panau Berawan Besar Mountains 15262, 9231
Casino Bust East Tanah Raya 18495, 17697
Casino Bust East Tanah Raya 18558, 17801
The White Tiger Ramal Rakyat Islands 8607, 23128
The White Tiger Ramal Rakyat Islands 8636, 23106
The White Tiger Ramal Rakyat Islands 10417, 23474
The White Tiger Panau Tengah Bay 12099, 23265
Mountain Rescue Berawan Besar Mountains 21081, 9695
Mountain Rescue Berawan Besar Mountains 21081, 9449
Mountain Rescue Berawan Besar Mountains 20784, 9797
Mountain Rescue Berawan Besar Mountains 21244, 9319Mountain Rescue Berawan Besar Mountains 21051, 9240
Mountain Rescue Berawan Besar Mountains 21421, 9423
Mountain Rescue Berawan Besar Mountains 21378, 9475
Three Kings Senjakala Islands 3656, 31461
Three Kings Senjakala Islands 3671, 31608
Three Kings Senjakala Islands 3787, 31535
Three Kings Senjakala Islands 3720, 31398
Into the Den Selatan Archipelago 30179, 30531
Into the Den Selatan Archipelago 30052, 30409
Into the Den Selatan Archipelago 29976, 30349
Into the Den Selatan Archipelago 30276, 30284
Panau City Ramal Rakyat Islands 4470, 15699Panau City Ramal Rakyat Islands 2998, 14931
Panau City West Tanah Raya 3972, 11447
Panau City West Tanah Raya 3677, 12226
Oil for Blood Pelaut Archipelago 27977, 7167
Oil for Blood Pelaut Archipelago 27793, 7011
Paradise Valley Selatan Archipelago 19078, 25879
Paradise Valley Selatan Archipelago 19095, 26010
Free Trade Ramal Rakyat Islands 1606, 13356
Free Trade Ramal Rakyat Islands 1577, 13345
Pilgrimage West Tanah Raya 9517, 6623
Pilgrimage West Tanah Raya 9328, 6641
Power Surge East Tanah Raya 25425, 18039Power Surge East Tanah Raya 25509, 18004
Boys with Toys Senjakala Islands 13353, 29143
Boys with Toys Senjakala Islands 13362, 29161
Rocket Science Berawan Besar Mountains 17055, 9286
Rocket Science Berawan Besar Mountains 17041, 9236
Rocket Science Berawan Besar Mountains 16979, 9321
Rocket Science Berawan Besar Mountains 17034, 8919
Rocket Science Berawan Besar Mountains 17008, 9239
A SecondAmendment
Lautan Lama Desert 5757, 27487
A SecondAmendment
Lautan Lama Desert 5666, 27403
ChemicalCompound
Panau Tengah Bay 13044, 25281
ChemicalCompound
Panau Tengah Bay 12988, 25304
AST OFRACTER
FIELD GUIDETO PANAU
WEAPONS VEHICLE EXPLORINGPANAU
AGENCYMISSIONS
STRONGHOLDTAKEOVERS
FACTIONMISSIONS
CHALLENGES COLLECTIBLES ACHIEVEMENTSAND TROPHIES
PARADISE LOST • CHAOSSettlements • Parts and Cash Stashes
Protected by copyright. Unauthorized or unlawful copying or downloading expressly prohibited.

8/18/2019 Just Cause 2 Prima Official Guide
http://slidepdf.com/reader/full/just-cause-2-prima-official-guide 59/208
C H A R A C T E R S
F I E L D G U I D E T O P A N A U
W E A P O N S
V E H I C L E S
E X P L O R I N G P A N A U
A G E N C Y M I S S I O N S
S T R O N G H O L D T A K E O V E R S
F A C T I O N M I S S I O N S
C H A L L E N G E S
C O L L E C T I B L E S
A C H I E V E M E N T S
primagames.com 59
Mission RegionPDA Coordinates
(X, Y)
Airport Troubles Ramal Rakyat Islands 9744, 12875
Airport Troubles Ramal Rakyat Islands 9664, 12675
Airport Troubles Ramal Rakyat Islands 9631, 12654
Mile High Club Pelaut Archipelago 29569, 11449
River Runs Red Lautan Lama Desert 8267, 19654
River Runs Red Lautan Lama Desert 8269, 19546
River Runs Red Lautan Lama Desert 8368, 20996
River Runs Red Lautan Lama Desert 8385, 21117
Save the Forest Senjakala Islands 15366, 25977
Stranded West Tanah Raya 2265, 2238
Chemical Heist East Tanah Raya 19633, 12588
Chemical Heist East Tanah Raya 19600, 12584
Chemical Heist East Tanah Raya 19690, 12535
Chemical Heist East Tanah Raya 19419, 12476
Taking Care of the
DishesEast Tanah Raya 23357, 17259
Taking Care of theDishes
East Tanah Raya 23135, 17296
Can I Get a Witness? Lautan Lama Desert 7538, 27719
Can I Get a Witness? Lautan Lama Desert 7455, 27697
Can I Get a Witness? Lautan Lama Desert 7459, 27775
Fry Me to the Moon East Tanah Raya 30405, 13918
Fry Me to the Moon East Tanah Raya 29819, 13608
Fry Me to the Moon East Tanah Raya 30657, 13738
Fry Me to the Moon East Tanah Raya 28738, 12988
Black Gold Lautan Lama Desert 812, 22494
Black Gold Lautan Lama Desert 770, 22469
Black Gold Lautan Lama Desert 789, 22494
Collectible any time Berawan Besar Mountains 23830, 8783
Collectible any time Berawan Besar Mountains 14820, 4670
Collectible any time West Tanah Raya 11352, 9704
Collectible any time East Tanah Raya 23031, 16807
Collectible any time East Tanah Raya 28038, 14249
Collectible any time East Tanah Raya 27014, 19706
Collectible any time East Tanah Raya 25594, 16152
Collectible any time Pelaut Archipelago 23699, 3987
Collectible any time Lautan Lama Desert 5392, 25628
Collectible any time Selatan Archipelago 18219, 26723
Collectible any time Selatan Archipelago 21835, 29346
Collectible any time East Tanah Raya 22112, 23818
Collectible any time Berawan Besar Mountains 14182, 9568
Collectible any time Berawan Besar Mountains 20247, 9813
Collectible any time Senjakala Islands 14971, 26869
Collectible any time Lautan Lama Desert 6020, 21551
Collectible any time Selatan Archipelago 20221, 25764
Collectible any time Selatan Archipelago 18626, 28458
Collectible any time Pelaut Archipelago 23660, 5583
Collectible any time East Tanah Raya 30703, 17420
Collectible any time Berawan Besar Mountains 25517, 9572
Collectible any time Berawan Besar Mountains 21822, 14290
Collectible any time Lautan Lama Desert 7259, 23302
Collectible any time Ramal Rakyat Islands 17177, 11214
Collectible any time East Tanah Raya 19124, 19458
Collectible any time East Tanah Raya 22390, 18747
Mission RegionPDA Coordinates
(X, Y)
Collectible any time Berawan Besar Mountains 25566, 11110
Collectible any time Selatan Archipelago 27782, 29526
Collectible any time Selatan Archipelago 31022, 28986
Collectible any time Selatan Archipelago 25976, 28889
Collectible any time Selatan Archipelago 22811, 31059
Collectible any time Selatan Archipelago 24298, 27502
Collectible any time Selatan Archipelago 23661, 28970
Collectible any time Panau Tengah Bay 16800, 22411
Collectib le any t ime Ramal Rakyat Is lands 11848, 20807
Collectible any time Panau Tengah Bay 12578, 26434
Collectible any time Senjakala Islands 15753, 24354
Collectible any time Panau Tengah Bay 13175, 23945
Collectible any time Selatan Archipelago 18705, 25419
Collectible any time East Tanah Raya 21165, 19529
Collectible any time East Tanah Raya 25804, 12355
Collectible any time Senjakala Islands 2444, 28562
Collectible any time Lautan Lama Desert 4559, 25181
Collectible any time Berawan Besar Mountains 17956, 9421
Collectible any time Pelaut Archipelago 28925, 9542
Collectible any time East Tanah Raya 28401, 15193
Collectible any time East Tanah Raya 28451, 16556
Collectible any time Lautan Lama Desert 1141, 23302
Collectible any time Lautan Lama Desert 1122, 23277
Collectible any time Lautan Lama Desert 1164, 23302
Collectible any time Senjakala Islands 2036, 29832
Collectible any time Senjakala Islands 2365, 31087
Collectible any time Senjakala Islands 2261, 31492
Collectible any time West Tanah Raya 2809, 10972Collectible any time Lautan Lama Desert 2893, 22713
Collectib le any t ime Ramal Rakyat Is lands 3521, 14641
Collectib le any t ime Ramal Rakyat Is lands 3702 , 16089
Collectib le any t ime Ramal Rakyat Is lands 4354, 16394
Collectible any time Lautan Lama Desert 3924, 20088
Collectible any time Lautan Lama Desert 3901, 20191
Collectible any time Lautan Lama Desert 4036, 25031
Collectible any time Senjakala Islands 4047, 29916
Collectible any time Senjakala Islands 4071, 30302
Collectible any time Lautan Lama Desert 4464, 21193
Collectible any time Lautan Lama Desert 4328, 21136
Collectible any time Lautan Lama Desert 4707, 19558Collectible any time Senjakala Islands 4969, 30578
Collectible any time Senjakala Islands 4672, 30785
Collectible any time Lautan Lama Desert 5382, 23841
Collectible any time Lautan Lama Desert 5351, 23777
Collectible any time Lautan Lama Desert 5205, 24877
Collectib le any t ime Ramal Rakyat Is lands 5483, 15660
Collectib le any t ime Ramal Rakyat Is lands 5768, 15876
Collectible any time Lautan Lama Desert 5883, 24949
Collectible any time Lautan Lama Desert 5766, 24831
Collectible any time Lautan Lama Desert 5891, 26720
Collectible any time Senjakala Islands 5754, 29759
Collectible any time Lautan Lama Desert 6469, 19880Collectible any time Lautan Lama Desert 6453, 21414
AST OFRACTER
FIELD GUIDETO PANAU
WEAPONS VEHICLE EXPLORINGPANAU
AGENCYMISSIONS
STRONGHOLDTAKEOVERS
FACTIONMISSIONS
CHALLENGES COLLECTIBLES ACHIEVEMENTSAND TROPHIES
PARADISE LOST • CHAOSSettlements • Parts and Cash Stashes
Protected by copyright. Unauthorized or unlawful copying or downloading expressly prohibited.

8/18/2019 Just Cause 2 Prima Official Guide
http://slidepdf.com/reader/full/just-cause-2-prima-official-guide 60/208
PRIMA OFFICIAL STRATEGY GUIDETM
60
Mission RegionPDA Coordinates
(X, Y)
Collectible any time Lautan Lama Desert 6929, 22042
Collectible any time Lautan Lama Desert 7082, 23924
Collectible any time Lautan Lama Desert 6618, 25890
Collectible any time Lautan Lama Desert 6590, 25668
Collectible any time Lautan Lama Desert 7283, 19215
Collectible any time Lautan Lama Desert 7430, 23870
Collectible any time Lautan Lama Desert 7538, 23855
Collectible any time Lautan Lama Desert 7454, 24939
Collectible any time Lautan Lama Desert 6986, 26027
Collectible any time Senjakala Islands 7531, 28824
Collectible any time Lautan Lama Desert 7852, 18622
Collectib le any time Ramal Rakyat Islands 8499, 14049
Collectib le any time Ramal Rakyat Islands 8258, 15517
Collectib le any time Ramal Rakyat Islands 8218, 15574
Collectible any time Lautan Lama Desert 8551, 18796
Collectib le any time Ramal Rakyat Islands 8580, 21878
Collectible any time Lautan Lama Desert 8122, 22840
Collectible any time West Tanah Raya 8903, 1327
Collectible any time West Tanah Raya 8861, 1301
Collectible any time West Tanah Raya 8880, 1326
Collectible any time West Tanah Raya 8952, 7915
Collectible any time West Tanah Raya 8450, 8992
Collectible any time West Tanah Raya 9213, 10081
Collectible any time West Tanah Raya 9511, 5021
Collectible any time West Tanah Raya 9482, 5854
Collectible any time West Tanah Raya 9651, 7123
Collectible any time West Tanah Raya 9366, 7635
Collectible any time West Tanah Raya 9169, 8916
Collectib le any time Ramal Rakyat Islands 9282, 21825
Collectible any time Senjakala Islands 9679, 28470
Collectible any time West Tanah Raya 10221, 4436
Collectible any time West Tanah Raya 10237, 4428
Collectible any time West Tanah Raya 9987, 7000
Collectible any time West Tanah Raya 9919, 9803
Collectible any time West Tanah Raya 10145, 10306
Collectib le any time Ramal Rakyat Islands 9980, 20447
Collectib le any time Ramal Rakyat Islands 9773, 21693
Collectib le any time Ramal Rakyat Islands 10314 , 22015
Collectible any time West Tanah Raya 10581, 3430
Collectible any time West Tanah Raya 10378, 6162Collectib le any time Ramal Rakyat Islands 10540, 18785
Collectib le any time Ramal Rakyat Islands 10412, 22734
Collectib le any time Ramal Rakyat Islands 10352, 22704
Collectible any time Lautan Lama Desert 10402, 26101
Collectible any time West Tanah Raya 11267, 3727
Collectible any time West Tanah Raya 10779, 7632
Collectible any time West Tanah Raya 10864, 8298
Collectible any time West Tanah Raya 11112, 8926
Collectib le any time Ramal Rakyat Islands 11075, 11133
Collectib le any time Ramal Rakyat Islands 10821 , 19825
Collectib le any time Ramal Rakyat Islands 10940, 21233
Collectib le any time Ramal Rakyat Islands 10889, 21202Collectib le any time Ramal Rakyat Islands 11049, 22239
Mission RegionPDA Coordinates
(X, Y)
Collect ible any t ime Ramal Rakyat Islands 11093, 22129
Collectible any time West Tanah Raya 11566, 1004
Collectible any time West Tanah Raya 11585, 1029
Collectible any time West Tanah Raya 11608, 1030
Collectible any time West Tanah Raya 11376, 2179
Collectible any time West Tanah Raya 11415, 2734
Collectible any time West Tanah Raya 11631, 5021
Collectible any time West Tanah Raya 12016, 4948
Collect ible any t ime Ramal Rakyat Islands 11671, 10062
Collect ible any t ime Ramal Rakyat Islands 11416, 10771
Collect ible any t ime Ramal Rakyat Islands 11612, 12515
Collect ible any t ime Ramal Rakyat Islands 11473, 14989
Collect ible any t ime Ramal Rakyat Islands 11495, 14983
Collect ible any t ime Ramal Rakyat Islands 11448, 14971
Collectible any time Senjakala Islands 12005, 28017
Collectible any time West Tanah Raya 12094, 8470
Collectible any time Panau Tengah Bay 12186, 25251
Collectible any time West Tanah Raya 12609, 4150
Collectible any time Berawan Besar Mountains 13139, 6833
Collectible any time Berawan Besar Mountains 12509, 9170
Collectible any time West Tanah Raya 13205, 3383
Collectible any time Berawan Besar Mountains 13023, 7257
Collect ible any t ime Ramal Rakyat Islands 12898, 11443
Collectible any time Panau Tengah Bay 12866, 19140
Collectible any time Panau Tengah Bay 13690, 21175
Collectible any time Panau Tengah Bay 13646, 22913
Collectible any time Panau Tengah Bay 13574, 26312
Collectible any time Senjakala Islands 13469, 30284
Collectible any time Senjakala Islands 13479, 30185
Collectible any time Berawan Besar Mountains 14084, 3792
Collectible any time Berawan Besar Mountains 13718, 7729
Collectible any time Berawan Besar Mountains 13788, 7839
Collectible any time Senjakala Islands 14057, 27788
Collectible any time Senjakala Islands 13884, 29438
Collectible any time Senjakala Islands 14031, 29677
Collectible any time Berawan Besar Mountains 14632, 7027
Collect ible any t ime Ramal Rakyat Islands 14568, 11651
Collectible any time Panau Tengah Bay 14940, 16906
Collectible any time Senjakala Islands 14509, 26422
Collectible any time Senjakala Islands 14510, 27990
Collectible any time Senjakala Islands 14529, 28539
Collectible any time West Tanah Raya 14995, 2959
Collectible any time Pelaut Archipelago 16062, 3361
Collectible any time Berawan Besar Mountains 15834, 4577
Collectible any time Pelaut Archipelago 15907, 4295
Collectible any time Pelaut Archipelago 15891, 4341
Collectible any time Berawan Besar Mountains 15859, 7500
Collectible any time Berawan Besar Mountains 15986, 7540
Collect ible any t ime Ramal Rakyat Islands 15952, 11926
Collectible any time Panau Tengah Bay 16173, 12839
Collectible any time Panau Tengah Bay 16037, 22086
Collectible any time Panau Tengah Bay 16206, 22045
Collect ible any t ime Selatan Archipelago 15987, 23424
Collectible any time Senjakala Islands 15774, 27914
AST OFRACTER
FIELD GUIDETO PANAU
WEAPONS VEHICLE EXPLORINGPANAU
AGENCYMISSIONS
STRONGHOLDTAKEOVERS
FACTIONMISSIONS
CHALLENGES COLLECTIBLES ACHIEVEMENTSAND TROPHIES
PARADISE LOST • CHAOSSettlements • Parts and Cash Stashes
Protected by copyright. Unauthorized or unlawful copying or downloading expressly prohibited.

8/18/2019 Just Cause 2 Prima Official Guide
http://slidepdf.com/reader/full/just-cause-2-prima-official-guide 61/208
C H A R A C T E R S
F I E L D G U I D E T O P A N A U
W E A P O N S
V E H I C L E S
E X P L O R I N G P A N A U
A G E N C Y M I S S I O N S
S T R O N G H O L D T A K E O V E R S
F A C T I O N M I S S I O N S
C H A L L E N G E S
C O L L E C T I B L E S
A C H I E V E M E N T S
primagames.com 61
Mission RegionPDA Coordinates
(X, Y)
Collectible any time Pelaut Archipelago 16584, 3433
Collectible any time Berawan Besar Mountains 16497, 7484
Collectible any time Panau Tengah Bay 16588, 16519
Collectible any time Panau Tengah Bay 16928, 21580
Collectible any time Panau Tengah Bay 16854, 12589
Collectible any time Panau Tengah Bay 16977, 13767
Collectible any time Panau Tengah Bay 17390, 14705
Collectible any time Panau Tengah Bay 17139, 16410
Collectible any time East Tanah Raya 17166, 18252
Collectible any time Panau Tengah Bay 17309, 21119
Collectible any time Selatan Archipelago 17498, 25809
Collectible any time Selatan Archipelago 17486, 26501
Collectible any time Selatan Archipelago 17222, 28157
Collectible any time Panau Tengah Bay 17732, 13963
Collectible any time Panau Tengah Bay 17590, 16127
Collectible any time Panau Tengah Bay 17706, 16760
Collectible any time Panau Tengah Bay 17714, 17140
Collectible any time Selatan Archipelago 17779, 23148
Collectible any time East Tanah Raya 19246, 14201
Collectible any time East Tanah Raya 18130, 18635
Collectible any time East Tanah Raya 17850, 18204
Collectible any time Panau Tengah Bay 18055, 21724
Collectible any time Panau Tengah Bay 17985, 23097
Collectible any time Pelaut Archipelago 18533, 7094
Collectible any time Pelaut Archipelago 18525, 7013
Collectible any time Pelaut Archipelago 18542, 7051
Collectible any time Pelaut Archipelago 18505, 7017
Collectible any time Pelaut Archipelago 18455, 7019
Collectible any time East Tanah Raya 18610, 19958
Collectible any time East Tanah Raya 18324, 20175
Collectible any time Pelaut Archipelago 19409, 4422
Collectible any time Pelaut Archipelago 19069, 5276
Collectible any time Berawan Besar Mountains 19161, 8923
Collectible any time Panau Tengah Bay 19127, 15731
Collectible any time East Tanah Raya 19128, 21141
Collectible any time Selatan Archipelago 19422, 26393
Collectible any time Pelaut Archipelago 19361, 6262
Collectible any time Berawan Besar Mountains 19410, 7974
Collectible any time Berawan Besar Mountains 19575, 11666
Collectible any time Berawan Besar Mountains 19546, 11584
Collectible any time Selatan Archipelago 19972, 27370
Collectible any time Berawan Besar Mountains 20047, 11014
Collectible any time East Tanah Raya 20127, 15917
Collectible any time East Tanah Raya 20136, 18890
Collectible any time East Tanah Raya 20260, 22623
Collectible any time Selatan Archipelago 20250, 25077
Collectible any time Selatan Archipelago 20275, 26694
Collectible any time Pelaut Archipelago 20794, 5777
Collectible any time Berawan Besar Mountains 20725, 13429
Collectible any time East Tanah Raya 20685, 20690
Collectible any time Berawan Besar Mountains 21056, 11562
Collectible any time Berawan Besar Mountains 20983, 11996
Collectible any time Berawan Besar Mountains 20985, 13925
Collectible any time East Tanah Raya 21030, 21843
Mission RegionPDA Coordinates
(X, Y)
Collectible any time Berawan Besar Mountains 21857, 11140
Collectible any time Berawan Besar Mountains 21856, 12782
Collectible any time East Tanah Raya 22174, 16264
Collectible any time East Tanah Raya 21682, 17512
Collectible any time East Tanah Raya 21748, 19774
Collectible any time East Tanah Raya 21729, 21915
Collectible any time East Tanah Raya 21713, 21954
Collectible any time East Tanah Raya 21740, 21910
Collectible any time East Tanah Raya 22394, 23337
Collectible any time East Tanah Raya 22223, 23261
Collectible any time Selatan Archipelago 22241, 26777
Collectible any time Selatan Archipelago 22131, 26803
Collectib le any t ime Selatan Archipelago 21857, 30298
Collectible any time Selatan Archipelago 21640, 30382
Collectible any time Pelaut Archipelago 23657, 4390
Collectible any time Pelaut Archipelago 23714, 4835
Collectible any time Berawan Besar Mountains 23222, 12914
Collectible any time Berawan Besar Mountains 23007, 13638
Collectible any time East Tanah Raya 23146, 19070
Collectible any time East Tanah Raya 23465, 19613
Collectible any time East Tanah Raya 23333, 21027
Collectible any time Selatan Archipelago 23110, 27036
Collectible any time Berawan Besar Mountains 24160, 10991
Collectible any time East Tanah Raya 23577, 15193
Collectible any time East Tanah Raya 23902, 18626
Collectible any time East Tanah Raya 23755, 19741
Collectib le any t ime Selatan Archipelago 23787, 27151
Collectible any time Selatan Archipelago 23973, 28039
Collectible any time Selatan Archipelago 23860, 28169
Collectible any time Selatan Archipelago 23943, 30067
Collectible any time Berawan Besar Mountains 24470, 10460
Collectible any time East Tanah Raya 24167, 19408
Collectible any time East Tanah Raya 24042, 20202
Collectible any time Selatan Archipelago 24156, 24890
Collectible any time Selatan Archipelago 24326, 25860
Collectible any time Selatan Archipelago 24394, 28089
Collectible any time Selatan Archipelago 24413, 30679
Collectible any time Selatan Archipelago 24224, 31117
Collectible any time East Tanah Raya 24604, 18646
Collectible any time East Tanah Raya 24709, 19757Collectible any time East Tanah Raya 24822, 20577
Collectib le any t ime Selatan Archipelago 24647, 26726
Collectible any time Pelaut Archipelago 25059, 7287
Collectible any time East Tanah Raya 25152, 18609
Collectible any time East Tanah Raya 25617, 20381
Collectible any time Selatan Archipelago 25560, 31393
Collectible any time Selatan Archipelago 25412, 31456
Collectible any time Pelaut Archipelago 25851, 3215
Collectible any time Pelaut Archipelago 26163, 4778
Collectible any time Pelaut Archipelago 25562, 5502
Collectible any time Pelaut Archipelago 25598, 5529
Collectible any time Pelaut Archipelago 25593, 5394Collectible any time Pelaut Archipelago 25622, 5459
AST OFRACTER
FIELD GUIDETO PANAU
WEAPONS VEHICLE EXPLORINGPANAU
AGENCYMISSIONS
STRONGHOLDTAKEOVERS
FACTIONMISSIONS
CHALLENGES COLLECTIBLES ACHIEVEMENTSAND TROPHIES
PARADISE LOST • CHAOSSettlements • Parts and Cash Stashes
Protected by copyright. Unauthorized or unlawful copying or downloading expressly prohibited.

8/18/2019 Just Cause 2 Prima Official Guide
http://slidepdf.com/reader/full/just-cause-2-prima-official-guide 62/208

8/18/2019 Just Cause 2 Prima Official Guide
http://slidepdf.com/reader/full/just-cause-2-prima-official-guide 63/208
C H A R A C T E R S
F I E L D G U I D E T O P A N A U
W E A P O N S
V E H I C L E S
E X P L O R I N G P A N A U
A G E N C Y M I S S I O N S
S T R O N G H O L D T A K E O V E R S
F A C T I O N M I S S I O N S
C H A L L E N G E S
C O L L E C T I B L E S
A C H I E V E M E N T S
primagames.com 63
So, go into these fights heavily armed. Flying over a colonel in an
attack chopper is always a sound strategy, because the armored
colonels may be able to withstand a lot of SMG fire, but they
stand no chance against rockets and miniguns.
We’ve compiled the location of all 50 colonels. Use the
coordinates to zero in on each one and then go for him. Just beready for some serious heat, because the military does not take
an assassination attempt lying down.
Use this table to keep track of your kills so you can nail
all 50 and reap the rewards:
Name: Name of the targeted colonel
PDA Coordinates: The x, y coordinates on your PDA. Set
checkpoints at these coordinates to locate the colonel.
PELAULT ARCHIPELAGO
Colonel PDA Coordinates (X, Y)
Colonel Ranjan 19399, 6258
Colonel Gupta 20830, 5870
Colonel Adiputera 28040, 5716
Colonel Baratham 26406, 5427
Colonel Tunko Isnin 28066, 11260
Colonel Sivanathan 25878, 3460
SELATAN ARCHIPELAGO
Colonel PDA Coordinates (X, Y)
Colonel Lee Yu When 16064, 23457
Colonel Ismail Omar 26614, 27208
Colonel Rakyat 21758, 30338
SENJAKALA ISLANDS
Colonel PDA Coordinates (X, Y)
Colonel Ruofan 5831, 29630
Colonel Malaka 14522, 26354
Colonel Dollah 9914, 28510
Colonel Boon 15794, 27920
Colonel Awang Deris 2255, 29869
LAUTAN LAMA DESERT
Colonel PDA Coordinates (X, Y)
Colonel Tunko Bin Hitam 4472, 21183
Colonel Lee Seng Sen 6774, 25519
Colonel Mo Zuo Itik - 7880, 18555
Colonel Romel Naivalurua 6330, 21675
Colonel Virgillo - 2909, 21057
Colonel Jejomar Isko 5351, 23777
BERAWAN BESAR MOUNTAINS
Colonel PDA Coordinates (X, Y)
Colonel Abdul Rahman 19137, 9061
Colonel Ismaryanto 211087, 11645
Colonel Azman Sherman 22922, 13772
PANAU TENGAH BAY
Colonel PDA Coordinates (X, Y)
Colonel John Yeo 13607, 22857
Colonel Yoong 16115, 12779
Colonel Siu 12286, 25201Colonel Che Soon 12994, 19246
EAST TANAH RAYA
Colonel PDA Coordinates (X, Y)
Colonel Danyal Mail 17241, 21138
Colonel Sulung 28739, 17583
Colonel Usop Yeop 20745, 20676
Colonel Jegathesan 21798, 19781
Colonel Bamert 19145, 15716
Colonel Wright 27337, 18466
Colonel Bertrand 22140, 16277
Colonel Zulkrnain 22140, 16277
Colonel Perang Lee 26156, 20072Colonel Relutzu 24582, 18619
WEST TANAH RAYA
Colonel PDA Coordinates (X, Y)
Colonel Abdul Ishak 4214, 11279
Colonel Rany Kiandee 9454, 5760
Colonel Loo Won Fui 3531, 12185
Chaerul Tunko 3716, 11529
Colonel Saravanan 3122, 12189
Colonel Hamid Hitam 8554, 9310
RAMAI RAKYAT ISLANDS
Colonel PDA Coordinates (X, Y)
Colonel Muhammad Yatim 4385, 15334
Colonel Tengku Baba 1292, 14269
Colonel Yuan 1068, 13565
Colonel Ibrahim Ahmad 8509, 14037
Colonel Bachtiar Saleh 4786, 15452
Colonel Rajah Idis 3132, 14706
Colonel Sutan 3232, 15396
AST OFRACTER
FIELD GUIDETO PANAU
WEAPONS VEHICLE EXPLORINGPANAU
AGENCYMISSIONS
STRONGHOLDTAKEOVERS
FACTIONMISSIONS
CHALLENGES COLLECTIBLES ACHIEVEMENTSAND TROPHIES
PARADISE LOST • CHAOSColonels • Chaos Objects
Protected by copyright. Unauthorized or unlawful copying or downloading expressly prohibited.

8/18/2019 Just Cause 2 Prima Official Guide
http://slidepdf.com/reader/full/just-cause-2-prima-official-guide 64/208
PRIMA OFFICIAL STRATEGY GUIDETM
64
Chaos ObjectsThere are thousands of objects you can destroy in Panau to
generate Chaos. Unload on generators, radio masts, wind
turbines, propaganda vans, and more to stir up unrest. There are
more than enough objects to blow up in order to unlock all ofthe missions and Black Market objects, but unless you obliterate
every Chaos-related object, you cannot score 100-percent
completion in Mercenary mode.
Grab a fighter jet and race offshore to the oil rigs to
cause massive amounts of chaos.
There are fuel depots
everywhere in Panau,
practically on every base.
Overload oil pipelines to
rattle the government, but
get back before the pipeline
blows. You can be injured in
the explosion.
Attack choppers are the
best tools for wiping out
government assets—those
miniguns cause wide swaths
of destruction.
Blow up gas stations to
generate some quick chaos,
but be ready for soldiers
to fall all over themselves
getting to you.
Most gas stations have a medical kit, so if you’re ever in
trouble with health, drop in for a quick fix.
Broadcast towers have little
armor, making them easy to
destroy even with low-level
weapons.
Don’t ignore
the thousands
of unmarked
fuel drums and
gas canisters
all over Panau.
These do not
count toward your overall
100-percent
goal, but each drum or canister you blow is worth 10
Chaos. This adds up over time.
Destroying any government asset raises heat, so don’t do
so lightly.
Use these tables to chart your reign of destruction
in Panau, checking off everything you blow up sothat when the time comes to go for that 100-percent
completion, you’ll know exactly what’s left to reduce to
rubble and ashes. Use the checkboxes to keep track of
what you’ve destroyed:
PDA Coordinates: The x, y coordinates on your PDA.
Set checkpoints at these coordinates to locate the
object.
BABY PANAY STATUE
PDA Coordinates (X, Y)
9774, 8612
15799, 27921
13212, 3413
9558, 12757
3710, 31489
20123, 5709
9366, 7569
10055, 5858
9175, 18364
27605, 14502
6354, 13423
6511, 133246292, 13523
6359, 13085
6358, 12717
PDA Coordinates (X, Y)
3005, 14627
3275, 14884
4055, 14800
3757, 15569
19894, 27215
26368, 16370
19400, 7950
2775, 10965
11406, 19490
3940, 11840
2879, 11433
3031, 121843426, 11713
3690, 12172
3757, 12705
AST OFRACTER
FIELD GUIDETO PANAU
WEAPONS VEHICLE EXPLORINGPANAU
AGENCYMISSIONS
STRONGHOLDTAKEOVERS
FACTIONMISSIONS
CHALLENGES COLLECTIBLES ACHIEVEMENTSAND TROPHIES
PARADISE LOST • CHAOSColonels • Chaos Objects
Protected by copyright. Unauthorized or unlawful copying or downloading expressly prohibited.
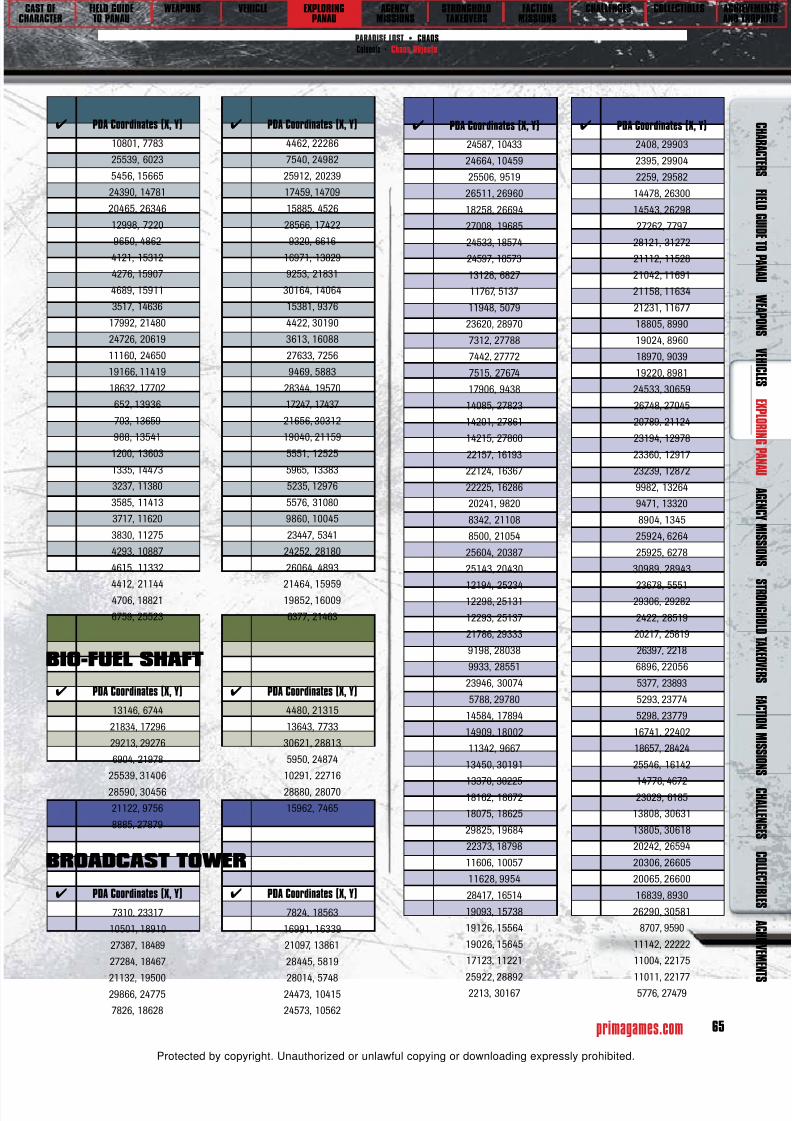
8/18/2019 Just Cause 2 Prima Official Guide
http://slidepdf.com/reader/full/just-cause-2-prima-official-guide 65/208
C H A R A C T E R S
F I E L D G U I D E T O P A N A U
W E A P O N S
V E H I C L E S
E X P L O R I N G P A N A U
A G E N C Y M I S S I O N S
S T R O N G H O L D T A K E O V E R S
F A C T I O N M I S S I O N S
C H A L L E N G E S
C O L L E C T I B L E S
A C H I E V E M E N T S
primagames.com 65
PDA Coordinates (X, Y)
10801, 7783
25539, 6023
5456, 15665
24390, 1478120465, 26346
12998, 7220
9650, 4862
4121, 15312
4276, 15907
4689, 15911
3517, 14636
17992, 21480
24726, 20619
11160, 24650
19166, 11419
18632, 17702652, 13936
703, 13659
988, 13541
1200, 13603
1335, 14473
3237, 11380
3585, 11413
3717, 11620
3830, 11275
4293, 10887
4615, 11332
4412, 211444706, 18821
6759, 25523
PDA Coordinates (X, Y)
4462, 22286
7540, 24982
25912, 20239
17459, 1470915885, 4526
28566, 17422
9320, 6616
16971, 13829
9253, 21831
30164, 14064
15381, 9376
4422, 30190
3613, 16088
27633, 7256
9469, 5883
28344, 1957017247, 17437
21656, 30312
19040, 21159
5551, 12525
5965, 13383
5235, 12976
5576, 31080
9860, 10045
23447, 5341
24252, 28180
26064, 4893
21464, 1595919852, 16009
6377, 21463
BIO-FUEL SHAFT
PDA Coordinates (X, Y)
13146, 6744
21834, 17296
29213, 29276
6904, 21978
25539, 31406
28590, 30456
21122, 9756
8885, 27879
PDA Coordinates (X, Y)
4480, 21315
13643, 7733
30621, 28813
5950, 24874
10291, 22716
28880, 28070
15962, 7465
BROADCAST TOWER
PDA Coordinates (X, Y)
7310, 23317
10501, 18910
27387, 18489
27284, 18467
21132, 1950029866, 24775
7826, 18628
PDA Coordinates (X, Y)
7824, 18563
16991, 16339
21097, 13861
28445, 5819
28014, 574824473, 10415
24573, 10562
PDA Coordinates (X, Y)
24587, 10433
24664, 10459
25506, 9519
26511, 2696018258, 26694
27008, 19685
24533, 18574
24597, 18573
13128, 6827
11767, 5137
11948, 5079
23620, 28970
7312, 27788
7442, 27772
7515, 27674
17906, 943814085, 27823
14201, 27861
14215, 27860
22157, 16193
22124, 16367
22225, 16286
20241, 9820
8342, 21108
8500, 21054
25604, 20387
25143, 20430
12194, 2523412298, 25131
12293, 25137
21786, 29333
9198, 28038
9933, 28551
23946, 30074
5788, 29780
14584, 17894
14909, 18002
11342, 9667
13450, 30191
13370, 3022518162, 18672
18075, 18625
29825, 19684
22373, 18798
11606, 10057
11628, 9954
28417, 16514
19093, 15738
19126, 15564
19026, 15645
17123, 11221
25922, 288922213, 30167
PDA Coordinates (X, Y)
2408, 29903
2395, 29904
2259, 29582
14478, 2630014543, 26298
27262, 7797
28121, 31272
21112, 11528
21042, 11691
21158, 11634
21231, 11677
18805, 8990
19024, 8960
18970, 9039
19220, 8981
24533, 3065926748, 27045
20789, 21124
23194, 12978
23360, 12917
23239, 12872
9982, 13264
9471, 13320
8904, 1345
25924, 6264
25925, 6278
30989, 28943
23678, 555129306, 29282
2422, 28519
20217, 25819
26397, 2218
6896, 22056
5377, 23893
5293, 23774
5298, 23779
16741, 22402
18657, 28424
25546, 16142
14778, 467223029, 6185
13808, 30631
13805, 30618
20242, 26594
20306, 26605
20065, 26600
16839, 8930
26290, 30581
8707, 9590
11142, 22222
11004, 22175
11011, 221775776, 27479
AST OFRACTER
FIELD GUIDETO PANAU
WEAPONS VEHICLE EXPLORINGPANAU
AGENCYMISSIONS
STRONGHOLDTAKEOVERS
FACTIONMISSIONS
CHALLENGES COLLECTIBLES ACHIEVEMENTSAND TROPHIES
PARADISE LOST • CHAOSColonels • Chaos Objects
Protected by copyright. Unauthorized or unlawful copying or downloading expressly prohibited.

8/18/2019 Just Cause 2 Prima Official Guide
http://slidepdf.com/reader/full/just-cause-2-prima-official-guide 66/208
PRIMA OFFICIAL STRATEGY GUIDETM
66
PDA Coordinates (X, Y)
5646, 27394
5710, 27466
16475, 10141
16440, 998316415, 10051
16562, 10100
22368, 26693
22152, 26977
22175, 26672
22095, 26786
22083, 26780
28932, 9497
24868, 3264
6001, 21573
31925, 12100
17238, 2806417247, 28168
6745, 27574
10194, 4450
10216, 4347
27730, 29509
25172, 7279
25069, 7257
24110, 31159
24213, 31181
15893, 7447
15985, 7561
20833, 5730
1165, 23321
15007, 27020
15006, 26833
16507, 7492
16540, 7317
16440, 7399
25811, 30097
25741, 30176
12053, 8518
11963, 8485
7302, 19213
7448, 19216
7441, 19217
7582, 19201
4379, 21114
4402, 21304
16880, 21484
16858, 21587
3748, 20147
4017, 20199
3902, 20068
3904, 20075
10999, 21280
15951, 23514
16072, 23351
PDA Coordinates (X, Y)
22057, 23819
24278, 27517
27585, 29986
22401, 2734418693, 25376
13706, 22814
13480, 22852
13660, 22936
16187, 12841
15967, 12815
11831, 20820
13349, 29135
13401, 29059
24146, 24796
24211, 24793
24615, 2523120022, 11024
20169, 10925
20040, 10911
22244, 23237
22231, 23238
22111, 23427
10876, 8283
10980, 8180
10976, 8186
20731, 13462
20557, 13429
20638, 13530
12612, 26403
23022, 16759
13728, 7728
13686, 7896
27522, 8880
27481, 8825
27487, 8829
27504, 8827
27498, 8822
27644, 8872
27643, 8859
27983, 14262
22805, 31007
25548, 11082
14195, 9596
5338, 25632
20154, 18876
30638, 28875
23783, 17320
23550, 17321
23544, 17316
28760, 12976
21817, 14286
23097, 27117
23173, 27044
PDA Coordinates (X, Y)
23312, 27295
25420, 17862
25549, 17983
25463, 1806512938, 19056
12929, 19066
9645, 6609
19267, 14194
19325, 14361
19372, 14240
13167, 23898
30303, 14065
30138, 14163
15357, 9400
15278, 9413
15359, 934815282, 9329
15144, 9374
15177, 9352
21788, 19795
21810, 19692
22015, 19784
29496, 21277
25682, 25826
25884, 25646
25780, 25535
4558, 25143
29689, 19106
20240, 22641
20209, 22584
20358, 22742
5864, 24888
5894, 24962
31434, 7335
23147, 17224
9351, 5669
9344, 5681
20648, 20656
20868, 20692
30684, 17370
23339, 4129
26844, 27362
25586, 31443
11609, 1048
19137, 12772
813, 22512
8987, 7837
PDA Coordinates (X, Y)
8976, 7901
23814, 8837
7475, 23809
7444, 2391019371, 6250
19490, 6370
19486, 6259
19312, 6120
11502, 15000
8183, 19525
8300, 19252
8298, 19245
15704, 24368
25776, 12376
18603, 6991
29810, 292030349, 27824
23718, 3953
9915, 20499
10006, 20445
12025, 28041
19071, 19465
29975, 30418
29968, 30422
10336, 22698
10364, 22776
28857, 28005
27967, 6895
17264, 21088
17242, 21191
23695, 5143
2895, 22958
2634, 22728
26181, 4847
26169, 4843
10550, 17183
20146, 5798
19044, 25839
9813, 21696
9826, 21591
28432, 15190
11424, 24098
11536, 24005
11531, 24010
8361, 22000
8413, 21630
8583, 21624
COMMUNICATION STATION
PDA Coordinates (X, Y)
7290, 23310
21152, 19509
28466, 5862
PDA Coordinates (X, Y)
24580, 10669
25510, 9540
18238, 26702
AST OFRACTER
FIELD GUIDETO PANAU
WEAPONS VEHICLE EXPLORINGPANAU
AGENCYMISSIONS
STRONGHOLDTAKEOVERS
FACTIONMISSIONS
CHALLENGES COLLECTIBLES ACHIEVEMENTSAND TROPHIES
PARADISE LOST • CHAOSColonels • Chaos Objects
Protected by copyright. Unauthorized or unlawful copying or downloading expressly prohibited.

8/18/2019 Just Cause 2 Prima Official Guide
http://slidepdf.com/reader/full/just-cause-2-prima-official-guide 67/208
C H A R A C T E R S
F I E L D G U I D E T O P A N A U
W E A P O N S
V E H I C L E S
E X P L O R I N G P A N A U
A G E N C Y M I S S I O N S
S T R O N G H O L D T A K E O V E R S
F A C T I O N M I S S I O N S
C H A L L E N G E S
C O L L E C T I B L E S
A C H I E V E M E N T S
primagames.com 67
PDA Coordinates (X, Y)
27022, 19701
11550, 5120
23639, 28960
17927, 943825766, 3501
20232, 9839
21805, 29344
9956, 28364
11325, 9693
22385, 18780
28430, 16532
19111, 15821
17145, 11218
25943, 28892
2235, 30166
21224, 1169718794, 8972
26805, 27052
23400, 12777
31003, 28960
23659, 5562
13376, 30267
2422, 28540
20218, 25797
22399, 16215
5425, 23567
11387, 24000
16763, 22401
18635, 28425
25568, 16141
14800, 4671
11025, 22091
16513, 10239
28916, 9511
6023, 21573
PDA Coordinates (X, Y)
27750, 29517
20881, 5758
14987, 26844
16329, 73287579, 19222
16850, 21557
3770, 20147
22078, 23818
24298, 27523
18693, 25398
11824, 20800
19822, 10723
20369, 13464
12590, 26401
23020, 16781
28005, 1426122802, 31028
25570, 11081
14201, 9575
5360, 25632
20128, 18985
21796, 14284
13164, 23920
25692, 25845
4545, 25160
20749, 20570
30690, 17390
23821, 8812
19332, 6126
15722, 24355
25788, 12358
23716, 3974
19092, 19465
28419, 15167
CRANE
PDA Coordinates (X, Y)
29829, 24732
25900, 3154
15981, 4109
15838, 4006
15975, 3877
6973, 25975
7291, 26168
7150, 26012
15222, 25868
15490, 25742
8867, 1302
26360, 2175
1528, 13390
1623, 13294
8757, 9461
PDA Coordinates (X, Y)
31888, 12058
1128, 23278
13055, 19121
29459, 21234
31397, 7292
23659, 4333
23392, 4677
26750, 27260
11572, 1005
1393, 12844
1730, 13771
1543, 13647
1656, 13389
1640, 13612
11454, 14970
PDA Coordinates (X, Y)
29773, 2877
27987, 11241
23358, 4781
23443, 478023232, 5116
PDA Coordinates (X, Y)
23269, 5056
2708, 22831
26096, 4692
26145, 4748776, 22470
FUEL DEPOT
PDA Coordinates (X, Y)
10702, 23918
10575, 18929
10575, 18945
10575, 18959
27394, 18430
27314, 18402
27405, 18430
27304, 18402
29858, 24741
29836, 24765
29875, 24747
29836, 24747
29829, 24765
29871, 24776
29873, 24765
29873, 24747
29875, 24765
29867, 24776
29850, 24770
29829, 24765
7912, 18511
7807, 18493
7912, 18501
7807, 18503
7807, 18512
17066, 16410
17072, 16414
14729, 25708
14734, 25713
28523, 5598
28523, 5579
28523, 5588
9977, 12595
9975, 12604
9980, 12587
10097, 12712
10105, 12709
10088, 12714
9652, 12562
9658, 12555
9646, 12568
27890, 12262
27887, 12270
PDA Coordinates (X, Y)
28605, 7809
24650, 18661
24667, 18556
24659, 18661
24658, 18556
24649, 18556
13083, 6815
13077, 6810
13071, 6805
11945, 4867
11745, 5161
11734, 5172
11739, 5166
11934, 4878
11939, 4872
28382, 8537
14076, 27731
14085, 27731
14067, 27731
8454, 21114
8387, 21033
12231, 25194
12357, 25198
12239, 25194
12357, 25189
12248, 25194
10001, 28502
9996, 28507
10006, 28497
9676, 28500
8972, 27775
9088, 27988
9683, 28504
9083, 27997
9093, 27980
8988, 27777
5764, 29552
13081, 25237
12971, 25322
12842, 25275
12915, 25334
13060, 25333
12846, 25315
AST OFRACTER
FIELD GUIDETO PANAU
WEAPONS VEHICLE EXPLORINGPANAU
AGENCYMISSIONS
STRONGHOLDTAKEOVERS
FACTIONMISSIONS
CHALLENGES COLLECTIBLES ACHIEVEMENTSAND TROPHIES
PARADISE LOST • CHAOSColonels • Chaos Objects
Protected by copyright. Unauthorized or unlawful copying or downloading expressly prohibited.

8/18/2019 Just Cause 2 Prima Official Guide
http://slidepdf.com/reader/full/just-cause-2-prima-official-guide 68/208
PRIMA OFFICIAL STRATEGY GUIDETM
68
PDA Coordinates (X, Y)
12989, 25320
13464, 30222
21824, 17363
27489, 1731327498, 17313
27480, 17313
29921, 19671
29991, 19576
11665, 10065
11695, 9984
11665, 10075
11693, 9974
2386, 30024
2368, 30024
2377, 30024
14595, 26386
14612, 26281
14605, 26386
14603, 26281
14594, 26281
27157, 7746
27156, 7737
28567, 31462
28123, 31314
28172, 31384
28695, 31230
24427, 30638
24434, 30639
26653, 27106
6922, 25961
7178, 26011
7013, 26064
7013, 26073
6922, 25953
7185, 26011
9996, 19428
9996, 19438
9949, 13178
9938, 13175
9478, 13336
9486, 13333
8896, 1311
8873, 1335
8913, 1317
8873, 1317
8867, 1335
8909, 1346
8911, 1335
8911, 1317
8913, 1335
8905, 1346
8888, 1340
8867, 1335
PDA Coordinates (X, Y)
25888, 6187
25924, 6247
26007, 6205
25934, 624725967, 6187
25931, 6187
25915, 6247
26007, 6187
29335, 29326
29335, 29309
29335, 29318
27119, 15495
27117, 15504
27121, 15486
18840, 20838
18831, 20836
26389, 2185
26366, 2208
26406, 2190
26366, 2190
26360, 2208
26402, 2219
26404, 2208
26404, 2190
26406, 2208
26398, 2219
26381, 2214
26360, 2208
6926, 21941
6926, 22015
6862, 21978
6908, 22055
5348, 23847
5369, 23727
5350, 23838
5360, 23725
5352, 23828
1384, 13526
1384, 13518
1384, 13510
28672, 30485
28666, 30471
9193, 11667
9142, 11662
20340, 26701
20378, 26601
20349, 26703
20368, 26600
20359, 26598
16968, 9168
16982, 8921
16968, 9138
16968, 9154
PDA Coordinates (X, Y)
16982, 8936
17011, 9347
17011, 9335
26280, 3055626308, 30546
26252, 30567
26224, 30578
8529, 9560
8525, 9550
8665, 9607
8671, 9613
8659, 9600
11092, 22202
11088, 22193
11083, 22184
5666, 274725674, 27472
16557, 10110
22202, 26782
22195, 26778
22210, 26787
22200, 26713
22208, 26718
22217, 26791
27775, 9395
27782, 9388
27834, 9386
27755, 9421
27749, 9429
31917, 12067
31894, 12091
31934, 12073
31894, 12073
31888, 12091
31930, 12102
31932, 12091
31932, 12073
31934, 12091
31926, 12102
31909, 12096
31888, 12091
17180, 28073
17175, 28159
17177, 28063
17178, 28168
21007, 9242
21015, 9256
21003, 9252
21019, 9246
30430, 26934
30416, 26934
10253, 4458
10282, 4379
10253, 4467
PDA Coordinates (X, Y)
10282, 4364
25180, 7221
25099, 7192
25190, 722125089, 7192
24102, 31218
24183, 31246
24092, 31218
24193, 31246
1157, 23287
1134, 23311
1174, 23293
1134, 23293
1128, 23311
1170, 23322
1172, 233111172, 23293
1174, 23311
1166, 23322
1149, 23316
1128, 23311
25788, 30212
25853, 30156
25783, 30221
25858, 30147
12108, 8496
12093, 8412
12113, 8505
12088, 8403
7356, 19217
7441, 19305
7363, 19224
7447, 19299
7370, 19232
16821, 21477
16792, 21557
16821, 21466
16792, 21567
3855, 20089
3963, 20199
3861, 20083
3956, 20192
3868, 20076
3948, 20185
10910, 21151
10970, 21327
15996, 23415
16005, 23416
15897, 23484
15895, 23493
27558, 30083
27643, 29997
27618, 29994
27560, 30068
AST OFRACTER
FIELD GUIDETO PANAU
WEAPONS VEHICLE EXPLORINGPANAU
AGENCYMISSIONS
STRONGHOLDTAKEOVERS
FACTIONMISSIONS
CHALLENGES COLLECTIBLES ACHIEVEMENTSAND TROPHIES
PARADISE LOST • CHAOSColonels • Chaos Objects
Protected by copyright. Unauthorized or unlawful copying or downloading expressly prohibited.

8/18/2019 Just Cause 2 Prima Official Guide
http://slidepdf.com/reader/full/just-cause-2-prima-official-guide 69/208
C H A R A C T E R S
F I E L D G U I D E T O P A N A U
W E A P O N S
V E H I C L E S
E X P L O R I N G P A N A U
A G E N C Y M I S S I O N S
S T R O N G H O L D T A K E O V E R S
F A C T I O N M I S S I O N S
C H A L L E N G E S
C O L L E C T I B L E S
A C H I E V E M E N T S
primagames.com 69
PDA Coordinates (X, Y)
27574, 29985
13663, 22740
13645, 22740
13654, 2274026817, 6585
26812, 6593
26821, 6577
26783, 6787
26774, 6805
27637, 6545
27628, 6545
27618, 6545
27440, 6695
13345, 29149
13452, 29059
13399, 2913013444, 29112
13327, 29040
13415, 29146
13273, 29144
26047, 20318
26054, 20311
26060, 20304
24265, 24879
24280, 24774
24275, 24879
24271, 24774
24262, 24774
28708, 8834
28699, 8834
16012, 11839
22275, 23293
22274, 23302
22275, 23284
10917, 8247
11039, 8247
10927, 8247
11039, 8238
10936, 8247
13747, 7791
13754, 7796
13760, 7801
27662, 8866
27662, 8875
27586, 8845
10468, 26125
10465, 26117
11260, 4186
11269, 4186
28249, 9589
28249, 9583
20169, 18832
20168, 18841
20169, 18823
PDA Coordinates (X, Y)
30587, 28765
30582, 28773
30577, 28780
23211, 2710523142, 27156
23136, 27165
23216, 27097
25459, 17907
25545, 18009
25446, 17955
25443, 17961
25456, 17915
25555, 17988
12984, 19038
13091, 19257
13112, 1927717056, 14078
17062, 14085
30339, 14176
30193, 14210
30331, 14162
30323, 14149
15317, 9135
15239, 9168
21847, 19803
21876, 19722
21847, 19814
21876, 19712
29488, 21244
29465, 21267
29505, 21249
29465, 21249
29459, 21267
29501, 21278
29503, 21267
29503, 21249
29505, 21267
29497, 21278
29480, 21273
29459, 21267
25866, 25580
25847, 25580
25856, 25580
10784, 19756
10778, 19759
20264, 22498
20162, 22529
20260, 22489
20167, 22538
20171, 22546
5749, 24947
5748, 24930
5748, 24938
31426, 7301
PDA Coordinates (X, Y)
31403, 7325
31443, 7307
31403, 7307
31397, 732531439, 7336
31440, 7325
31440, 7307
31443, 7325
31435, 7336
31418, 7330
31397, 7325
4329, 16408
23235, 17158
23166, 17192
9498, 5768
9491, 57649484, 5759
6088, 26032
6082, 26037
20650, 20714
20804, 20659
20650, 20707
20803, 20667
20804, 20651
24004, 4402
24004, 4388
23817, 4496
23714, 449323909, 4399
26601, 27365
26604, 27374
26599, 27356
6407, 19759
6407, 19766
6407, 19773
25458, 31161
25520, 31163
25505, 31162
25405, 31428
25392, 3143825442, 31160
21308, 9396
21313, 9391
21298, 9405
21167, 9294
21170, 9287
21162, 9307
20989, 9445
20986, 9439
20995, 9458
11601, 1014
11578, 103811618, 1020
PDA Coordinates (X, Y)
11578, 1020
11572, 1038
11614, 1049
11616, 103811616, 1020
11618, 1038
11610, 1049
11593, 1044
11572, 1038
25758, 17439
19146, 12715
19560, 12823
19146, 12709
19560, 12830
19659, 12535
19653, 1260019650, 12535
19653, 12617
19665, 12600
19665, 12617
8880, 7935
8980, 7973
8878, 7945
8981, 7964
8983, 7955
7399, 23818
7373, 23921
7389, 238177382, 23922
7391, 23923
11484, 14970
11469, 14999
11502, 14971
11464, 14982
11463, 15001
11507, 14999
11505, 14988
11500, 14971
11507, 14988
11503, 1500111485, 15000
11463, 15001
5215, 31718
5215, 31731
29802, 2887
29779, 2910
29819, 2892
29779, 2892
29773, 2910
29815, 2921
29817, 2910
29817, 289229819, 2910
AST OFRACTER
FIELD GUIDETO PANAU
WEAPONS VEHICLE EXPLORINGPANAU
AGENCYMISSIONS
STRONGHOLDTAKEOVERS
FACTIONMISSIONS
CHALLENGES COLLECTIBLES ACHIEVEMENTSAND TROPHIES
PARADISE LOST • CHAOSColonels • Chaos Objects
Protected by copyright. Unauthorized or unlawful copying or downloading expressly prohibited.

8/18/2019 Just Cause 2 Prima Official Guide
http://slidepdf.com/reader/full/just-cause-2-prima-official-guide 70/208
PRIMA OFFICIAL STRATEGY GUIDETM
70
PDA Coordinates (X, Y)
29811, 2921
29794, 2916
29773, 2910
30184, 2781030229, 27616
30203, 27691
9978, 20543
10067, 20483
9985, 20550
10060, 20476
10054, 20470
11671, 28149
11678, 28288
11974, 28095
11781, 28005
11951, 28039
28121, 11166
28117, 11174
28126, 11159
29565, 11360
10238, 22769
10239, 22778
10238, 22760
28828, 28100
28815, 28094
28041, 7072
28047, 7078
27878, 7128
27871, 7122
17205, 21080
17176, 21161
17205, 21070
17176, 21171
23731, 4775
23227, 4878
23578, 4772
23256, 4776
23227, 4868
23740, 4775
23248, 4776
23585, 4772
23688, 5135
2759, 22676
2753, 22661
25988, 4797
26156, 4828
26165, 4801
26033, 4866
26151, 4841
26169, 4789
26014, 4805
26001, 4801
19456, 26392
PDA Coordinates (X, Y)
19450, 26389
9899, 21603
9886, 21673
9894, 215679896, 21672
9884, 21568
9875, 21569
11467, 24066
11477, 24067
11487, 24068
8582, 21873
8583, 21865
805, 22479
782, 22503
822, 22485
782, 22485
776, 22502
818, 22514
820, 22503
820, 22485
822, 22503
814, 22514
797, 22508
776, 22502
10683, 23907
10683, 23917
10477, 18818
10477, 18842
10477, 18808
10477, 18832
27314, 18444
27314, 18464
27314, 18436
27314, 18455
12857, 11520
12859, 11503
12859, 11493
12858, 11511
13091, 11469
13089, 11489
13091, 11461
13090, 11480
7950, 18530
7950, 18550
7950, 18522
7950, 18541
8646, 14129
8630, 14123
8621, 14145
8638, 14151
27955, 5744
27955, 5728
27955, 5717
PDA Coordinates (X, Y)
27955, 5735
28418, 5635
28438, 5635
28409, 563528429, 5635
28489, 5905
28469, 5905
28498, 5905
28478, 5905
26438, 26995
26438, 26979
26438, 26969
26438, 26987
24602, 18671
24601, 18651
24602, 1867924602, 18660
8457, 19529
8454, 19547
8477, 19551
8480, 19533
9336, 18357
9320, 18365
9330, 18386
9346, 18378
30513, 14696
30495, 14694
30493, 14717
30511, 14719
7356, 27780
7337, 27779
7346, 27780
14106, 27849
14126, 27849
14098, 27849
14117, 27849
25829, 3235
25826, 3216
25831, 3243
25827, 3225
19817, 18428
19834, 18421
19826, 18400
19809, 18407
25587, 20445
25607, 20444
25579, 20445
25598, 20444
25542, 20475
25542, 20455
25542, 20483
25542, 20464
12267, 25287
12243, 25287
PDA Coordinates (X, Y)
12277, 25287
12253, 25287
9072, 28096
9089, 281079065, 28092
9081, 28102
5781, 29652
5761, 29652
5790, 29652
5770, 29652
12955, 25042
12935, 25044
12964, 25041
12944, 25043
12929, 25354
13165, 2522513153, 25227
13167, 25255
13156, 25256
13142, 25228
13145, 25257
12921, 25354
23231, 5932
23216, 5919
23237, 5937
23223, 5925
13436, 30289
13445, 30289
27558, 17260
27558, 17280
27558, 17252
27558, 17271
27492, 17217
27512, 17217
27484, 17217
27503, 17217
18070, 18662
18070, 18646
18070, 18635
18070, 18654
29863, 19758
29849, 19749
29841, 19743
29856, 19753
29997, 19549
29988, 19562
29982, 19571
29992, 19556
29834, 19476
29845, 19459
29829, 19482
29840, 19467
11583, 10074
11559, 10074
AST OFRACTER
FIELD GUIDETO PANAU
WEAPONS VEHICLE EXPLORINGPANAU
AGENCYMISSIONS
STRONGHOLDTAKEOVERS
FACTIONMISSIONS
CHALLENGES COLLECTIBLES ACHIEVEMENTSAND TROPHIES
PARADISE LOST • CHAOSColonels • Chaos Objects
Protected by copyright. Unauthorized or unlawful copying or downloading expressly prohibited.

8/18/2019 Just Cause 2 Prima Official Guide
http://slidepdf.com/reader/full/just-cause-2-prima-official-guide 71/208
C H A R A C T E R S
F I E L D G U I D E T O P A N A U
W E A P O N S
V E H I C L E S
E X P L O R I N G P A N A U
A G E N C Y M I S S I O N S
S T R O N G H O L D T A K E O V E R S
F A C T I O N M I S S I O N S
C H A L L E N G E S
C O L L E C T I B L E S
A C H I E V E M E N T S
primagames.com 71
PDA Coordinates (X, Y)
11593, 10074
11569, 10074
19219, 15731
19205, 1574619224, 15725
19211, 15739
2080, 29851
2094, 29865
2074, 29845
2087, 29858
14550, 26327
14550, 26347
14550, 26319
14550, 26338
23566, 4295
23584, 429523584, 4272
23566, 4272
5307, 23736
5283, 23731
5317, 23737
5293, 23733
28679, 30466
28688, 30488
28675, 30457
28684, 30479
20303, 26648
20307, 26629
20302, 26656
20305, 26637
8579, 9372
8592, 9387
8574, 9365
8586, 9380
16540, 3825
16525, 3815
16512, 3834
16527, 3844
5586, 27473
5787, 27515
5586, 27482
5797, 27515
5586, 27465
22179, 26635
22187, 26621
22193, 26612
22183, 26628
22142, 26816
22121, 26804
22151, 26821
22130, 26809
17309, 28043
17315, 28062
17307, 28035
PDA Coordinates (X, Y)
17313, 28053
30152, 27024
30151, 27035
10238, 444810238, 4424
10238, 4458
10238, 4434
25055, 7293
25055, 7273
25055, 7301
25055, 7282
24071, 31131
24071, 31151
24071, 31123
24071, 31142
20981, 579620974, 5813
20996, 5821
21002, 5805
20787, 5825
20769, 5817
20795, 5828
20777, 5821
12022, 8417
12018, 8410
12015, 8403
4369, 21312
4390, 21324
4360, 21307
4381, 21319
4117, 21275
4106, 21296
4122, 21266
4110, 21287
8109, 22757
8109, 22775
8132, 22775
8132, 22757
10942, 21306
10930, 21289
10946, 21312
10935, 21297
16165, 23548
16185, 23551
16157, 23548
16176, 23550
16180, 23441
16170, 23440
16160, 23438
16151, 23437
27513, 30088
27633, 30094
27640, 30095
13498, 22887
PDA Coordinates (X, Y)
13498, 22907
13498, 22879
13498, 22898
15896, 1273015900, 12746
15902, 12756
15898, 12738
13284, 29164
13272, 29177
13288, 29193
13300, 29181
13357, 29191
13323, 29193
13343, 29177
13317, 29200
24247, 2488224247, 24862
24247, 24890
24247, 24871
22194, 23381
22194, 23361
22194, 23389
22194, 23370
22370, 23215
22370, 23235
22370, 23207
22370, 23226
22323, 2348322303, 23483
22332, 23483
22312, 23483
11049, 8194
11049, 8174
11049, 8202
11049, 8183
27505, 8743
27485, 8743
27513, 8743
27494, 8743
8393, 267428401, 26713
8398, 26722
8396, 26732
26371, 16423
26372, 16441
26395, 16441
26394, 16423
20135, 18647
20113, 18638
20144, 18651
20122, 18642
23782, 1736423765, 17364
PDA Coordinates (X, Y)
23755, 17364
23773, 17364
23129, 27130
23143, 2711123123, 27138
23137, 27119
28524, 17682
28521, 17699
28543, 17704
28546, 17686
12882, 19183
12896, 19197
12876, 19178
12890, 19191
15209, 9339
15173, 932021817, 19800
21817, 19780
21817, 19808
21817, 19789
25780, 25609
25780, 25589
25780, 25618
25780, 25598
20274, 22709
20289, 22701
20278, 22680
20263, 2268920295, 22534
20278, 22543
20303, 22530
20286, 22539
17609, 16810
17597, 16794
17613, 16817
17602, 16801
20683, 20664
20683, 20684
20683, 20655
20683, 2067526716, 27320
26731, 27316
26741, 27313
26724, 27318
25478, 31386
25456, 31395
25488, 31382
25465, 31391
28910, 14609
28915, 14626
28937, 14620
28932, 146038891, 7922
AST OFRACTER
FIELD GUIDETO PANAU
WEAPONS VEHICLE EXPLORINGPANAU
AGENCYMISSIONS
STRONGHOLDTAKEOVERS
FACTIONMISSIONS
CHALLENGES COLLECTIBLES ACHIEVEMENTSAND TROPHIES
PARADISE LOST • CHAOSColonels • Chaos Objects
Protected by copyright. Unauthorized or unlawful copying or downloading expressly prohibited.

8/18/2019 Just Cause 2 Prima Official Guide
http://slidepdf.com/reader/full/just-cause-2-prima-official-guide 72/208
PRIMA OFFICIAL STRATEGY GUIDETM
72
PDA Coordinates (X, Y)
8871, 7918
8899, 7923
8880, 7920
19453, 638819473, 6386
19445, 6389
19464, 6387
19338, 6310
19336, 6291
19339, 6319
19337, 6300
8321, 19218
8312, 19229
10031, 20540
10046, 20527
10025, 20546
10039, 20533
11657, 28337
11673, 28335
11684, 28334
11666, 28336
11591, 28140
11610, 28138
11582, 28141
11602, 28139
17292, 12266
17277, 12253
17298, 12272
17283, 12259
16941, 12578
16927, 12592
16946, 12572
16933, 12586
28051, 11334
28044, 11349
28039, 11358
28047, 11342
18429, 19001
18434, 19018
PDA Coordinates (X, Y)
18456, 19012
18452, 18995
10446, 22769
10446, 2279310446, 22758
10446, 22783
28046, 7008
28051, 7013
28056, 7018
28062, 7023
17247, 21159
17227, 21159
17256, 21159
17236, 21159
23632, 5053
23616, 5053
23606, 5053
23624, 5053
23399, 5161
23399, 5181
23399, 5153
23399, 5172
2740, 22763
2734, 22748
2730, 22738
2737, 22755
2882, 22680
2863, 22688
2889, 22677
2872, 22685
9840, 21687
9840, 21667
9840, 21695
9840, 21676
8339, 21985
8384, 21635
8338, 21993
8386, 21621
8385, 21628
PDA Coordinates (X, Y)
23296, 4114
19441, 6362
19375, 6331
23489, 522923257, 4894
PDA Coordinates (X, Y)
23489, 5249
23257, 4854
23489, 5209
23257, 487426150, 4840
GAS HOLDER
PDA Coordinates (X, Y)
13125, 25217
13119, 25267
12917, 25260
13081, 25220
12876, 25231
19222, 8927
19242, 8927
19262, 8927
16887, 911216907, 9112
PDA Coordinates (X, Y)
16927, 9112
21091, 9429
21109, 9421
21127, 9412
13636, 7882
13648, 7867
13661, 7852
8193, 26788
8193, 2675523316, 4114
GAS PUMP
PDA Coordinates (X, Y)
15753, 27614
15755, 27621
8508, 19057
8500, 19057
14685, 25642
14691, 25647
2676, 210812683, 21083
8409, 14165
8416, 14163
9286, 12776
9286, 12784
9279, 12784
9279, 12776
9279, 12710
9279, 12702
9286, 12702
9286, 12710
27942, 1226127935, 12259
11952, 4300
11950, 4292
11957, 4291
11959, 4298
18702, 23356
18700, 23363
13679, 25099
13686, 25097
9311, 18296
9307, 18289
9314, 182869317, 18293
26381, 5343
26381, 5350
27415, 14810
27423, 14810
6468, 14136
6475, 14139
6472, 14146
6465, 14143
6239, 13821
6232, 13825
6228, 138186235, 13815
6650, 13500
6657, 13504
PDA Coordinates (X, Y)
6653, 13510
6646, 13506
6869, 13867
6864, 13873
6858, 13870
6863, 13863
6905, 134386913, 13438
6913, 13445
6905, 13445
6830, 12978
6833, 12971
6840, 12974
6837, 12981
6644, 13242
6652, 13243
6651, 13250
6643, 13249
6585, 129496577, 12949
6577, 12942
6585, 12942
3101, 15378
3095, 15373
3099, 15367
3105, 15373
3308, 15691
3301, 15695
3297, 15689
3304, 15685
3864, 153373870, 15341
3867, 15347
3860, 15343
2950, 14721
2942, 14719
2944, 14712
2951, 14714
3886, 14845
3882, 14852
3876, 14848
3880, 14841
3527, 150303535, 15030
3535, 15037
3527, 15037
AST OFRACTER
FIELD GUIDETO PANAU
WEAPONS VEHICLE EXPLORINGPANAU
AGENCYMISSIONS
STRONGHOLDTAKEOVERS
FACTIONMISSIONS
CHALLENGES COLLECTIBLES ACHIEVEMENTSAND TROPHIES
PARADISE LOST • CHAOSColonels • Chaos Objects
Protected by copyright. Unauthorized or unlawful copying or downloading expressly prohibited.

8/18/2019 Just Cause 2 Prima Official Guide
http://slidepdf.com/reader/full/just-cause-2-prima-official-guide 73/208
C H A R A C T E R S
F I E L D G U I D E T O P A N A U
W E A P O N S
V E H I C L E S
E X P L O R I N G P A N A U
A G E N C Y M I S S I O N S
S T R O N G H O L D T A K E O V E R S
F A C T I O N M I S S I O N S
C H A L L E N G E S
C O L L E C T I B L E S
A C H I E V E M E N T S
primagames.com 73
PDA Coordinates (X, Y)
3422, 15248
3429, 15252
3425, 15258
3419, 1525317964, 16342
17971, 16338
17975, 16344
17968, 16348
21256, 12233
21251, 12239
21246, 12235
21251, 12229
19717, 27438
19720, 27431
11545, 19259
11540, 1926511642, 19702
11650, 19703
21650, 21672
21649, 21664
21656, 21663
21657, 21671
15369, 22864
15374, 22870
15368, 22874
15363, 22868
3126, 11742
3119, 117383122, 11732
3129, 11736
4027, 12107
4033, 12101
4037, 12106
4031, 12112
2899, 11637
2892, 11641
2889, 11635
2896, 11631
3703, 11769
3703, 117613710, 11761
3710, 11769
3463, 11633
3467, 11626
3473, 11629
3470, 11636
5172, 24871
5172, 24879
5165, 24879
5165, 24871
17611, 15324
17618, 15322
17620, 15329
17613, 15331
5800, 15850
PDA Coordinates (X, Y)
5800, 15858
5793, 15858
5793, 15850
27192, 679927185, 6802
27182, 6796
27189, 6792
13466, 26254
13461, 26260
10004, 19518
9996, 19518
9996, 19511
10004, 19511
8496, 24054
8491, 24059
11055, 1064211050, 10636
7533, 12917
7528, 12924
7522, 12919
7527, 12913
17046, 23180
17038, 23180
17038, 23173
17046, 23173
14583, 23596
14583, 23588
14590, 2358814590, 23596
18579, 8382
18574, 8388
18729, 20847
18736, 20848
11398, 2663
11398, 2670
11617, 11094
11615, 11087
17680, 26028
17672, 26027
17673, 2602017681, 26022
4876, 15429
4876, 15437
4869, 15437
4869, 15429
4194, 15592
4187, 15588
4190, 15581
4197, 15585
4165, 15080
4157, 15082
4156, 15075
4164, 15074
4447, 15097
4454, 15093
PDA Coordinates (X, Y)
4458, 15098
4451, 15103
4539, 15756
4532, 157524535, 15746
4542, 15750
8257, 15560
8251, 15554
8256, 15549
8262, 15555
30399, 18773
30392, 18772
13862, 10961
13856, 10956
13861, 10950
13867, 1095613405, 29897
13409, 29903
13403, 29907
13399, 29901
16662, 4012
16656, 4008
16576, 3851
16571, 3857
16566, 3853
16570, 3847
24845, 20615
24849, 2062224843, 20625
24839, 20619
10984, 24866
10984, 24874
10977, 24874
10977, 24866
19079, 11192
19071, 11194
19070, 11187
19077, 11185
18306, 19451
18300, 1944618304, 19440
18310, 19445
10406, 20904
10400, 20909
10395, 20904
10401, 20898
21734, 12214
21741, 12212
21743, 12219
21735, 12221
27771, 18777
27778, 18774
17807, 22210
PDA Coordinates (X, Y)
17800, 22209
1109, 13856
1115, 13860
1112, 138661105, 13861
1029, 13402
1033, 13395
1039, 13399
1035, 13406
946, 13251
953, 13255
949, 13261
942, 13257
1358, 13723
1365, 13727
1362, 137331355, 13729
1119, 14253
1112, 14257
1108, 14251
1115, 14247
1474, 14289
1481, 14284
1485, 14289
1479, 14294
4039, 11428
4047, 11429
4046, 114364038, 11435
3207, 11262
3199, 11262
3199, 11255
3207, 11255
4738, 11130
4746, 11130
4746, 11137
4738, 11137
4039, 11019
4039, 11011
4046, 110114046, 11019
4087, 11641
4080, 11645
4077, 11639
4084, 11635
3797, 11438
3790, 11442
3786, 11436
3793, 11432
10922, 28510
10921, 28518
11269, 28584
11262, 28587
AST OFRACTER
FIELD GUIDETO PANAU
WEAPONS VEHICLE EXPLORINGPANAU
AGENCYMISSIONS
STRONGHOLDTAKEOVERS
FACTIONMISSIONS
CHALLENGES COLLECTIBLES ACHIEVEMENTSAND TROPHIES
PARADISE LOST • CHAOSColonels • Chaos Objects
Protected by copyright. Unauthorized or unlawful copying or downloading expressly prohibited.

8/18/2019 Just Cause 2 Prima Official Guide
http://slidepdf.com/reader/full/just-cause-2-prima-official-guide 74/208
PRIMA OFFICIAL STRATEGY GUIDETM
74
PDA Coordinates (X, Y)
8192, 22756
8200, 22757
8199, 22764
8191, 2276312389, 11251
12391, 11243
12397, 11245
12396, 11253
7182, 25517
7171, 25515
16056, 22010
16058, 22017
7565, 24316
7573, 24316
7573, 24323
7565, 243233904, 21791
3904, 21783
3911, 21783
3911, 21791
13447, 29059
13449, 29112
4476, 22712
4468, 22712
4468, 22705
4476, 22705
17394, 14591
17394, 1458317401, 14583
17401, 14591
14216, 8711
14209, 8714
14206, 8708
14213, 8704
3192, 22481
3188, 22488
3182, 22485
3186, 22478
10524, 26129
10517, 261319743, 6513
9739, 6507
10027, 6882
10021, 6877
10026, 6872
10032, 6877
12068, 10917
12069, 10909
12076, 10909
12075, 10917
21814, 26154
21806, 2615424228, 3811
PDA Coordinates (X, Y)
24232, 3805
17037, 14116
17042, 14111
13726, 2104913719, 21049
23035, 21247
23030, 21242
9171, 21948
9175, 21955
9169, 21958
9165, 21951
17452, 21633
17459, 21632
10746, 19767
10753, 19764
10756, 1977010749, 19774
9106, 10023
9114, 10025
22500, 21525
22496, 21518
22503, 21515
22506, 21522
27703, 7326
27710, 7328
26645, 28841
26638, 28843
6055, 260316061, 26025
6066, 26030
6060, 26036
18226, 16373
18231, 16368
15026, 2913
15020, 2916
6429, 19795
6421, 19795
6421, 19788
6429, 19788
17134, 1828717137, 18281
25719, 17493
25720, 17485
25727, 17486
25726, 17494
18901, 21277
18898, 21270
18904, 21267
18907, 21274
5184, 31707
5184, 31715
5177, 317155177, 31707
PDA Coordinates (X, Y)
23456, 26181
23458, 26188
18590, 7085
18590, 707727316, 10347
27320, 10340
27326, 10343
27322, 10350
5343, 12655
5336, 12651
5340, 12645
5347, 12648
5721, 12675
5719, 12667
5726, 12665
5728, 126735657, 13652
5657, 13660
5650, 13660
5650, 13652
6101, 13052
6101, 13060
6094, 13060
6094, 13052
5605, 12881
5613, 12881
5613, 12888
5605, 128885286, 13381
5278, 13381
5278, 13374
5286, 13374
4927, 19533
4934, 19529
4938, 19535
4930, 19539
18426, 8723
18434, 8724
PDA Coordinates (X, Y)
6386, 24338
6391, 24332
6396, 24336
6391, 243429369, 5219
9376, 5217
11842, 3162
11836, 3157
3473, 24722
3477, 24715
3634, 24637
3636, 24630
3643, 24632
3640, 24639
17278, 26609
17278, 2661717271, 26617
17271, 26609
8259, 28362
8252, 28362
14240, 11498
14235, 11493
19376, 26471
19379, 26465
25757, 5731
25764, 5729
25766, 5736
25758, 573814082, 29478
14075, 29481
19860, 18459
19853, 18462
19850, 18455
19858, 18452
6529, 21360
6533, 21367
6526, 21370
6522, 21363
GENERATOR
PDA Coordinates (X, Y)
7308, 23322
10500, 18917
27387, 18483
27284, 18461
21135, 19495
29832, 24769
29825, 24768
29867, 24769
7826, 18622
7818, 18563
30758, 15321
16987, 16343
PDA Coordinates (X, Y)
21082, 13878
28444, 5825
28015, 5741
19281, 28498
24479, 10416
24567, 10561
24586, 10439
24664, 10465
25513, 9519
26511, 26966
9768, 12394
18260, 26700
AST OFRACTER
FIELD GUIDETO PANAU
WEAPONS VEHICLE EXPLORINGPANAU
AGENCYMISSIONS
STRONGHOLDTAKEOVERS
FACTIONMISSIONS
CHALLENGES COLLECTIBLES ACHIEVEMENTSAND TROPHIES
PARADISE LOST • CHAOSColonels • Chaos Objects
Protected by copyright. Unauthorized or unlawful copying or downloading expressly prohibited.

8/18/2019 Just Cause 2 Prima Official Guide
http://slidepdf.com/reader/full/just-cause-2-prima-official-guide 75/208
C H A R A C T E R S
F I E L D G U I D E T O P A N A U
W E A P O N S
V E H I C L E S
E X P L O R I N G P A N A U
A G E N C Y M I S S I O N S
S T R O N G H O L D T A K E O V E R S
F A C T I O N M I S S I O N S
C H A L L E N G E S
C O L L E C T I B L E S
A C H I E V E M E N T S
primagames.com 75
PDA Coordinates (X, Y)
27013, 19681
24539, 18575
24598, 18567
8630, 825713124, 6832
11771, 5142
11947, 5085
23618, 28964
7312, 27794
7442, 27778
7522, 27675
7376, 27674
7376, 27687
7376, 27710
7376, 27701
7376, 2767917906, 9432
14084, 27829
14207, 27862
22161, 16198
22120, 16363
22220, 16290
20247, 9823
8336, 21107
8494, 21053
25610, 20388
25139, 20425
12201, 2523512304, 25131
12287, 25136
21790, 29328
9194, 28043
9939, 28552
23945, 30080
5789, 29774
14584, 17900
14909, 18008
11336, 9666
13450, 30197
13370, 3023118169, 18673
18069, 18625
29828, 19679
22369, 18794
11612, 10058
11634, 9955
28422, 16511
19089, 15733
19130, 15568
19031, 15641
17124, 11215
29437, 1373631216, 17896
10202, 4007
PDA Coordinates (X, Y)
25922, 28886
2214, 30160
2402, 29903
2265, 2958328295, 8924
14484, 26300
14543, 26292
27262, 7791
28122, 31266
21115, 11534
21039, 11686
21152, 11637
21237, 11679
18800, 8993
19024, 8954
18970, 903319214, 8980
24539, 30660
26748, 27051
12059, 2581
2855, 31894
20795, 21127
23195, 12972
23358, 12923
23244, 12874
15402, 25831
9977, 13268
9477, 133218870, 1339
8862, 1339
8905, 1339
25924, 6271
30995, 28940
23680, 5556
24462, 21045
1743, 28966
29300, 29281
21005, 20012
21001, 20008
21007, 2000321011, 20007
21046, 19996
21030, 20013
21031, 19978
2425, 28514
9048, 6171
30837, 16515
20211, 25818
28271, 20611
26362, 2212
26355, 2212
26397, 22126897, 22050
5378, 23887
PDA Coordinates (X, Y)
5295, 23768
5296, 23785
16742, 22396
18656, 2843025547, 16136
14779, 4666
23030, 6179
21898, 6479
21903, 6502
21873, 6484
21936, 6506
21877, 6507
21928, 6508
13808, 30625
20248, 26595
20307, 2659920063, 26594
16838, 8936
26292, 30587
8710, 9595
11140, 22216
11002, 22170
11013, 22182
5769, 27479
5640, 27394
5710, 27477
16470, 10137
16437, 998916410, 10047
16567, 10103
9215, 9896
22373, 26692
22151, 26983
22090, 26783
28935, 9502
16958, 27036
24874, 3267
6002, 21567
31890, 12094
31883, 1209431925, 12094
17232, 28065
17241, 28170
23162, 5995
23158, 5991
23163, 5985
23167, 5989
23202, 5978
23187, 5995
23188, 5961
11379, 10295
6743, 2757910766, 2405
PDA Coordinates (X, Y)
10201, 4450
10223, 4347
27733, 29504
25172, 727325069, 7251
24109, 31165
24212, 31187
15888, 7443
15990, 7565
20830, 5735
1130, 23315
1123, 23314
1165, 23315
15009, 27026
15008, 26838
16503, 748716544, 7322
16444, 7395
25816, 30101
25746, 30180
12059, 8516
11961, 8480
8102, 8477
7306, 19218
7452, 19221
7437, 19212
7588, 19203
4382, 211094399, 21309
16873, 21484
16851, 21587
3749, 20141
4013, 20195
3907, 20064
3899, 20079
11005, 21278
15957, 23516
16070, 23357
22057, 23813
24282, 2751227584, 29992
22397, 27348
18699, 25377
13705, 22820
13479, 22858
13660, 22930
26842, 6590
16193, 12841
15968, 12821
27373, 6690
27373, 6713
11825, 2082229190, 20249
AST OFRACTER
FIELD GUIDETO PANAU
WEAPONS VEHICLE EXPLORINGPANAU
AGENCYMISSIONS
STRONGHOLDTAKEOVERS
FACTIONMISSIONS
CHALLENGES COLLECTIBLES ACHIEVEMENTSAND TROPHIES
PARADISE LOST • CHAOSColonels • Chaos Objects
Protected by copyright. Unauthorized or unlawful copying or downloading expressly prohibited.

8/18/2019 Just Cause 2 Prima Official Guide
http://slidepdf.com/reader/full/just-cause-2-prima-official-guide 76/208
PRIMA OFFICIAL STRATEGY GUIDETM
76
PDA Coordinates (X, Y)
10172, 10834
11305, 3501
13345, 29139
13405, 2906427376, 20857
18620, 20127
18620, 20150
18594, 20127
18594, 20150
24152, 24796
24211, 24787
24618, 25236
20023, 11018
20168, 10931
20047, 10911
28799, 888228813, 8870
22312, 23249
22324, 23263
22238, 23237
22111, 23420
10883, 8284
10986, 8181
10969, 8185
20727, 13466
20562, 13425
20634, 13525
12610, 26409
23028, 16761
13734, 7728
27515, 8880
27482, 8819
27486, 8835
27503, 8833
27499, 8816
27645, 8866
27984, 14255
22811, 31008
25549, 11076
14189, 9593
5339, 25626
30538, 18251
20160, 18876
30644, 28873
16650, 28210
23789, 17320
23550, 17327
23544, 17310
28760, 12983
21816, 14292
23102, 27121
23178, 27048
23312, 27301
PDA Coordinates (X, Y)
25425, 17865
25544, 17981
25465, 18060
12933, 190609651, 6608
19273, 14196
19319, 14359
19370, 14246
13173, 23900
15284, 9414
15288, 9330
21795, 19796
21817, 19693
22017, 19789
29461, 21271
29454, 2127129496, 21271
25687, 25823
25883, 25652
25786, 25536
4563, 25147
29686, 19101
20237, 22635
20204, 22586
20359, 22748
5858, 24888
5888, 24961
31399, 7328
31392, 7328
31434, 7329
23144, 17219
9347, 5674
20654, 20656
20867, 20699
30690, 17369
23338, 4135
26850, 27361
25588, 31449
11574, 1042
11567, 1042
11609, 1042
4531, 31842
14004, 30858
19143, 12773
779, 22506
771, 22506
814, 22506
14492, 28837
25887, 20884
8985, 7843
8982, 7903
23815, 8831
7469, 23808
PDA Coordinates (X, Y)
7443, 23916
19377, 6250
19484, 6370
19485, 626619314, 6114
11467, 15004
11460, 15006
11500, 14994
8183, 19531
8296, 19256
8302, 19240
12837, 31275
15701, 24362
25771, 12372
18602, 6997
29775, 291429768, 2914
29810, 2914
30347, 27830
23724, 3954
9919, 20504
10011, 20441
12031, 28039
19071, 19459
29980, 30420
29962, 30419
14749, 27463
29601, 11366
PDA Coordinates (X, Y)
10336, 22704
28855, 28000
27972, 6891
17258, 2108817236, 21191
23334, 4913
23334, 4890
23334, 4899
23334, 4922
23362, 4913
23362, 4890
23362, 4899
23362, 4922
23702, 5141
2898, 22963
2628, 2273026176, 4844
10544, 17183
19038, 25839
9820, 21696
9826, 21585
28426, 15191
11430, 24099
11542, 24006
11525, 24009
8367, 22001
8412, 21636
8582, 21630
INDUSTRIAL CHIMNEY
PDA Coordinates (X, Y)
28602, 7880
28602, 7861
27250, 7760
25884, 6273
25904, 6273
25944, 6273
25964, 6273
26794, 657226777, 6563
26784, 6766
26801, 6857
26784, 6847
28680, 8834
28661, 8834
28766, 8834
28747, 8834
28165, 9557
28184, 9557
23305, 4193
23305, 421223818, 4388
23819, 4369
PDA Coordinates (X, Y)
1418, 12889
1418, 12908
1546, 13743
1565, 13743
1417, 12802
1417, 12822
1466, 13130
1447, 131301236, 12803
1236, 12823
27901, 7095
27888, 7109
27939, 7053
27926, 7067
28082, 7001
28068, 6988
27976, 6949
27989, 6962
28012, 6984
28026, 699727929, 6903
27943, 6916
AST OFRACTER
FIELD GUIDETO PANAU
WEAPONS VEHICLE EXPLORINGPANAU
AGENCYMISSIONS
STRONGHOLDTAKEOVERS
FACTIONMISSIONS
CHALLENGES COLLECTIBLES ACHIEVEMENTSAND TROPHIES
PARADISE LOST • CHAOSColonels • Chaos Objects
Protected by copyright. Unauthorized or unlawful copying or downloading expressly prohibited.

8/18/2019 Just Cause 2 Prima Official Guide
http://slidepdf.com/reader/full/just-cause-2-prima-official-guide 77/208
C H A R A C T E R S
F I E L D G U I D E T O P A N A U
W E A P O N S
V E H I C L E S
E X P L O R I N G P A N A U
A G E N C Y M I S S I O N S
S T R O N G H O L D T A K E O V E R S
F A C T I O N M I S S I O N S
C H A L L E N G E S
C O L L E C T I B L E S
A C H I E V E M E N T S
primagames.com 77
PDA Coordinates (X, Y)
23630, 5072
23611, 5072
23486, 5180
PDA Coordinates (X, Y)
23506, 5180
23491, 4881
23491, 4900
MOBILE RADAR
PDA Coordinates (X, Y)
30781, 15322
19297, 28481
8609, 8248
29438, 13728
31238, 17905
10197, 4000
12042, 2579
2835, 31901
24462, 210541734, 28966
9039, 6150
30846, 16516
28279, 20614
9207, 9898
16959, 27045
PDA Coordinates (X, Y)
11377, 10304
10763, 2381
8096, 8470
29198, 20271
10150, 10839
11309, 3478
27384, 20861
30546, 18247
16652, 282184537, 31864
14019, 30876
14500, 28838
25879, 20906
12839, 31283
14754, 27470
OFFSHORE RIG
PDA Coordinates (X, Y)
29854, 24756
8892, 1326
26385, 2199
31913, 12082
1153, 23302
29484, 21258
PDA Coordinates (X, Y)
31422, 7316
11597, 1029
801, 22494
11485, 14985
29798, 2901
PIPELINE
PDA Coordinates (X, Y)
10671, 23751
12928, 11485
26091, 2006228178, 5807
28835, 7833
13466, 6120
11789, 4663
14170, 27763
25783, 3262
2075, 29776
19284, 9047
3454, 30516
7123, 26071
6949, 25920
20801, 2652514663, 5003
25906, 6120
PDA Coordinates (X, Y)
18846, 24098
17126, 5988
4834, 2136219467, 22791
6881, 21902
23514, 30992
30641, 15665
21815, 6224
8463, 9032
20712, 21287
12705, 7573
21051, 5707
14801, 16856
24303, 6716
13769, 2282916327, 12700
8452, 22036
PDA Coordinates (X, Y)
11239, 8454
30540, 14749
13713, 7829
24525, 1125529586, 19016
21995, 21313
9536, 5683
18016, 16626
26849, 27279
25344, 31164
6589, 24953
PDA Coordinates (X, Y)
11424, 28368
20095, 25848
17155, 12216
28097, 1142610730, 22841
14605, 26869
23314, 4953
2984, 22968
19035, 9694
26239, 4785
PROPAGANDA TRAILER
PDA Coordinates (X, Y)
8487, 14147
12265, 9230
13183, 3511
23055, 13666
24195, 19390
9438, 12756
12228, 4278
9716, 18362
9174, 18468
21292, 22024
26394, 5445
13351, 24912
24026, 20223
23275, 21090
29849, 17193
6205, 12941
6556, 14086
6836, 13713
6863, 13002
2873, 15221
3606, 15389
3314, 14883
21809, 11001
14420, 7061
14681, 7024
19594, 8297
29415, 16869
20297, 24959
3875, 29906
10584, 3680
15954, 3310
11440, 19428
21712, 21925
3373, 11912
3733, 12496
3116, 11931
11114, 7741
27226, 6877
PDA Coordinates (X, Y)
26626, 18982
12955, 7286
11198, 11089
23738, 19635
4428, 15460
4861, 15567
9397, 11751
30349, 18487
14788, 10957
27663, 19476
22901, 6514
24685, 20650
19334, 11543
15560, 5985
27850, 18626
20622, 16456
17728, 22240
917, 13711
869, 13494
1139, 13386
1213, 13830
1381, 13861
1176, 14102
4426, 11082
4147, 11629
4249, 11299
8103, 22899
4528, 22472
10066, 10255
25290, 5523
21221, 14948
7985, 25540
9968, 7012
28728, 17400
24266, 3795
9297, 21947
4448, 30330
24077, 10939
AST OFRACTER
FIELD GUIDETO PANAU
WEAPONS VEHICLE EXPLORINGPANAU
AGENCYMISSIONS
STRONGHOLDTAKEOVERS
FACTIONMISSIONS
CHALLENGES COLLECTIBLES ACHIEVEMENTSAND TROPHIES
PARADISE LOST • CHAOSColonels • Chaos Objects
Protected by copyright. Unauthorized or unlawful copying or downloading expressly prohibited.

8/18/2019 Just Cause 2 Prima Official Guide
http://slidepdf.com/reader/full/just-cause-2-prima-official-guide 78/208
PRIMA OFFICIAL STRATEGY GUIDETM
78
PDA Coordinates (X, Y)
10797, 19836
9162, 10093
9204, 8927
3608, 16113
6090, 25964
14499, 28367
14996, 3002
21773, 13111
6513, 20014
11181, 9207
28887, 14843
18944, 21243
PDA Coordinates (X, Y)
5358, 13409
5442, 13047
16452, 3296
9541, 4982
9502, 14279
23621, 15223
17292, 26614
10477, 6039
12754, 10398
10568, 17080
19857, 15995
20200, 15984
RADAR
PDA Coordinates (X, Y)
24455, 10414
24591, 10564
24588, 10414
7466, 27730
7488, 27708
7467, 27708
7488, 27730
7257, 27783
7251, 27801
7477, 27719
7477, 27691
7477, 27747
7450, 27719
7505, 27719
22145, 16179
22135, 16382
22240, 16273
19105, 15752
19116, 15549
19011, 15658
21104, 11512
21049, 11708
21175, 11625
23188, 12995
23367, 12900
23220, 12866
5455, 23808
5444, 23835
5439, 23805
5441, 23852
17052, 9230
11154, 22107
11162, 22135
11140, 22114
11170, 22150
21339, 9433
21413, 9424
21354, 9527
PDA Coordinates (X, Y)
16519, 7505
16529, 7303
16425, 7412
7325, 19327
7309, 19302
7336, 19315
7297, 19290
3880, 20214
4004, 20110
3867, 20203
4016, 20122
13594, 22745
13569, 22774
13569, 22745
13594, 22774
13619, 22745
13619, 22774
20021, 11042
20172, 10907
20021, 10909
20745, 13450
20542, 13440
20651, 13545
19250, 14188
19342, 14368
19378, 14222
14786, 9609
14805, 9584
15110, 9204
14921, 9284
15176, 9233
15196, 9362
19583, 12831
19101, 12737
19353, 6250
19499, 6390
19486, 6240
RADIO MAST
PDA Coordinates (X, Y)
24566, 10462
22189, 16292
19061, 1563921122, 11632
23262, 12899
5402, 23753
11080, 22093
16390, 10083
22460, 26563
21345, 9463
21412, 9533
27667, 29335
16475, 7393
PDA Coordinates (X, Y)
7356, 19270
3970, 20211
20149, 1109020632, 13495
8211, 26110
5352, 25555
19344, 14263
30358, 13933
29961, 14170
15228, 9231
19415, 6301
11484, 24156
SAM SITE PDA Coordinates (X, Y)
13162, 11518
29827, 24761
7807, 18646
24599, 10484
24739, 10481
24662, 18701
13150, 6812
13092, 6768
11724, 5054
11835, 492111209, 5297
12000, 4811
14161, 27712
14178, 27861
25899, 3349
25646, 3502
22197, 16331
12313, 25153
12324, 25294
8940, 27963
9748, 28425
9012, 2779810031, 28474
5857, 29590
5772, 29628
12898, 25342
12998, 25072
13120, 25294
21812, 17238
21820, 17403
21745, 17365
27612, 17379
27509, 17236
19053, 156002010, 29855
2104, 29950
PDA Coordinates (X, Y)
14463, 26282
28044, 31271
28219, 31500
28636, 31449
21034, 11578
21121, 11671
21144, 11642
21121, 11545
19038, 9076
19335, 903523291, 12872
8865, 1331
25994, 6239
29216, 29347
29160, 29313
29276, 29293
26358, 2205
6821, 22010
6990, 22053
6767, 21977
5318, 23762
5459, 237765528, 23806
14501, 17637
14415, 17356
14521, 17134
1392, 13386
1467, 13216
1525, 13337
28540, 30432
28671, 30510
17055, 9278
16887, 9066
16928, 937416967, 8872
26343, 30520
AST OFRACTER
FIELD GUIDETO PANAU
WEAPONS VEHICLE EXPLORINGPANAU
AGENCYMISSIONS
STRONGHOLDTAKEOVERS
FACTIONMISSIONS
CHALLENGES COLLECTIBLES ACHIEVEMENTSAND TROPHIES
PARADISE LOST • CHAOSColonels • Chaos Objects
Protected by copyright. Unauthorized or unlawful copying or downloading expressly prohibited.

8/18/2019 Just Cause 2 Prima Official Guide
http://slidepdf.com/reader/full/just-cause-2-prima-official-guide 79/208
C H A R A C T E R S
F I E L D G U I D E T O P A N A U
W E A P O N S
V E H I C L E S
E X P L O R I N G P A N A U
A G E N C Y M I S S I O N S
S T R O N G H O L D T A K E O V E R S
F A C T I O N M I S S I O N S
C H A L L E N G E S
C O L L E C T I B L E S
A C H I E V E M E N T S
primagames.com 79
PDA Coordinates (X, Y)
26209, 30596
8762, 9406
8629, 9302
11017, 2215211138, 22079
5859, 27631
5696, 27426
5582, 27446
16400, 10018
16606, 10099
22072, 26713
22033, 26765
22188, 26585
22143, 26663
31886, 12087
17147, 2807121123, 9446
21241, 9309
21451, 9482
30177, 27083
30147, 27050
30134, 26924
27861, 29638
15858, 7458
16003, 7542
20669, 5631
21189, 5819
21168, 5217
1126, 23307
16467, 7353
7443, 19243
7348, 19348
3875, 20179
3961, 20067
15901, 23449
16254, 23502
15057, 17135
15074, 17639
15162, 17358
27594, 29996
27549, 30099
27700, 29990
13455, 22868
13687, 22748
16002, 12740
15836, 12697
13385, 29081
13302, 29214
13333, 29121
24127, 24770
20092, 10898
21780, 23582
22470, 23500
11003, 8340
PDA Coordinates (X, Y)
10994, 8205
20593, 13503
27482, 8755
8368, 267878224, 26816
30565, 28925
30665, 28773
25643, 17923
25440, 18047
25430, 17876
25555, 18080
13022, 19308
9304, 6554
9182, 6680
19371, 14293
30164, 1416530275, 14173
30290, 14199
29457, 21264
20294, 22466
6061, 24932
5843, 24822
31395, 7321
23179, 17513
23434, 17328
20717, 20605
25477, 31177
25492, 31503
25557, 31096
25619, 31466
25325, 31462
11570, 1035
19233, 12857
19037, 12651
19629, 12564
774, 22499
19502, 6310
11460, 14998
29771, 2907
11661, 28089
11619, 28363
11943, 28241
11953, 27940
17267, 12099
28779, 28134
28926, 28088
28849, 27985
27785, 7047
27974, 7173
27962, 6976
28031, 7047
2860, 22753
26257, 4724
25976, 4741
PDA Coordinates (X, Y)
19097, 26010
19149, 25925
19085, 25742
PDA Coordinates (X, Y)
11549, 24029
11547, 24170
SATELLITE DISH
PDA Coordinates (X, Y)
7304, 27815
7304, 27815
7426, 27751
7426, 27751
7455, 27687
7455, 27687
7417, 27751
7417, 27751
7500, 277487500, 27748
7446, 27710
7446, 27710
7510, 27728
7510, 27728
7510, 27710
PDA Coordinates (X, Y)
7510, 27710
7468, 27748
7468, 27748
7300, 27819
7300, 27819
21079, 9247
21051, 9181
21097, 9197
21108, 922921022, 9200
15350, 9322
15345, 9425
30016, 30366
30236, 30297
30204, 30496
SILO
PDA Coordinates (X, Y)
28583, 7835
28583, 781028361, 8944
28361, 8951
27171, 7760
27196, 7760
27283, 7758
27283, 7733
27219, 7739
27219, 7764
14405, 17770
14311, 17562
14468, 17715
14281, 1751014398, 17744
14360, 17523
14482, 17744
14529, 17680
14386, 17722
14543, 17704
14514, 17655
14265, 17423
14288, 17196
14347, 17407
14288, 17136
14272, 1739714349, 17182
PDA Coordinates (X, Y)
14345, 17439
14417, 1740614272, 17372
14417, 17435
14417, 17378
14388, 17038
14596, 16944
14443, 17101
14648, 16914
14414, 17031
14630, 16984
14414, 17116
14478, 17162
14436, 1701914453, 17177
14504, 17147
14832, 16837
14794, 16837
15124, 17175
15133, 17102
15101, 17162
14929, 16914
15162, 17116
15163, 17031
15079, 17149
15191, 1704015138, 17018
AST OFRACTER
FIELD GUIDETO PANAU
WEAPONS VEHICLE EXPLORINGPANAU
AGENCYMISSIONS
STRONGHOLDTAKEOVERS
FACTIONMISSIONS
CHALLENGES COLLECTIBLES ACHIEVEMENTSAND TROPHIES
PARADISE LOST • CHAOSColonels • Chaos Objects
Protected by copyright. Unauthorized or unlawful copying or downloading expressly prohibited.

8/18/2019 Just Cause 2 Prima Official Guide
http://slidepdf.com/reader/full/just-cause-2-prima-official-guide 80/208
PRIMA OFFICIAL STRATEGY GUIDETM
80
PDA Coordinates (X, Y)
14985, 16934
15035, 17705
15229, 17522
15108, 1771515048, 17683
15296, 17510
15094, 17744
15179, 17744
15061, 17661
15170, 17773
15191, 17719
15274, 17566
15159, 17435
15238, 17181
15230, 17407
15159, 17409
15289, 17136
15231, 17439
PDA Coordinates (X, Y)
15305, 17397
15159, 17384
15312, 17426
15303, 1736915300, 17198
23372, 4151
23372, 4158
23373, 4225
23373, 4232
23343, 4818
23266, 4818
23343, 4804
23266, 4804
15321, 9346
15337, 9399
15189, 9362
15294, 9333
15291, 9391
TRANSFORMER
PDA Coordinates (X, Y)
14742, 25688
2814, 21097
9575, 12579
9575, 12579
26425, 5432
24209, 2016227730, 13602
14694, 6975
19565, 8322
19512, 8560
6959, 26043
6959, 26043
6959, 26022
6959, 26022
7230, 26144
7230, 26144
27206, 6751
12723, 2607012723, 26070
13035, 7241
23740, 19654
23677, 19596
21061, 20011
21061, 20011
21045, 20027
21045, 20027
27570, 7986
21919, 6469
21919, 6469
21923, 649121923, 6491
PDA Coordinates (X, Y)
21932, 6521
21935, 6488
21935, 6488
21931, 6467
21931, 6467
16689, 370116689, 3701
16517, 4047
16567, 3924
16581, 3759
16678, 3764
24732, 20559
24822, 3528
23220, 5990
23223, 5994
23223, 5994
21717, 12269
20682, 1647311117, 28550
11117, 28550
26845, 6578
26845, 6578
27394, 6691
27394, 6691
27394, 6713
27394, 6713
13355, 31175
13355, 31175
13285, 31172
18643, 2012118643, 20121
PDA Coordinates (X, Y)
18643, 20143
18643, 20143
18647, 20174
18655, 2014318655, 20143
18655, 20121
18655, 20121
28817, 8888
28817, 8888
22306, 23267
22306, 23267
21175, 15026
27447, 8780
27447, 8780
7993, 25623
25597, 1806425597, 18064
17124, 13658
17124, 13658
PDA Coordinates (X, Y)
9182, 10065
9475, 5789
9475, 5789
17629, 1672817629, 16728
21781, 12977
18931, 21311
17361, 4202
30022, 30233
30022, 30233
29938, 30345
29938, 30345
30033, 30307
17402, 26583
17402, 26583
10441, 624010441, 6240
13887, 29368
19921, 15873
WATER TOWER
PDA Coordinates (X, Y)
27270, 18537
7952, 18499
26777, 11345
2903, 21058
4322, 156054252, 15600
4339, 15554
4327, 15519
4194, 15408
12166, 9407
12529, 4090
815, 13488
1390, 13791
1085, 13622
858, 13656
984, 13797
1298, 13829972, 14023
1335, 13601
1062, 14168
944, 13567
1176, 13437
905, 13736
825, 13778
830, 13775
838, 13966
1148, 14191
1137, 14100
24600, 1870321198, 22067
26319, 5422
PDA Coordinates (X, Y)
7551, 27756
27665, 14544
21755, 29688
18457, 22748
12264, 2512027675, 13636
917, 13081
1187, 13368
1198, 13116
21791, 11055
19942, 27324
14770, 7088
19582, 8594
9494, 25912
18187, 18709
11559, 9941
21334, 950824276, 26017
14545, 26417
6707, 13044
6737, 13795
6726, 13789
6657, 13604
6881, 13261
6678, 13665
6806, 13689
6775, 13625
6293, 13905
6657, 138766563, 13383
6821, 13666
AST OFRACTER
FIELD GUIDETO PANAU
WEAPONS VEHICLE EXPLORINGPANAU
AGENCYMISSIONS
STRONGHOLDTAKEOVERS
FACTIONMISSIONS
CHALLENGES COLLECTIBLES ACHIEVEMENTSAND TROPHIES
PARADISE LOST • CHAOSColonels • Chaos Objects
Protected by copyright. Unauthorized or unlawful copying or downloading expressly prohibited.

8/18/2019 Just Cause 2 Prima Official Guide
http://slidepdf.com/reader/full/just-cause-2-prima-official-guide 81/208
C H A R A C T E R S
F I E L D G U I D E T O P A N A U
W E A P O N S
V E H I C L E S
E X P L O R I N G P A N A U
A G E N C Y M I S S I O N S
S T R O N G H O L D T A K E O V E R S
F A C T I O N M I S S I O N S
C H A L L E N G E S
C O L L E C T I B L E S
A C H I E V E M E N T S
primagames.com 81
PDA Coordinates (X, Y)
6145, 13002
7486, 25950
12516, 25954
13120, 726013603, 26325
15365, 25841
23688, 19768
3847, 12348
3902, 12380
3710, 11833
3239, 12280
3556, 12283
3632, 12140
3287, 12060
3187, 11841
3219, 119053353, 12318
3216, 11923
3187, 12043
3784, 12316
3570, 12214
3693, 12482
3640, 12468
3202, 12189
3393, 11986
3849, 12440
3548, 12513
3407, 118693646, 12046
3236, 12386
24414, 28053
5406, 23905
27630, 7956
9342, 11783
20285, 26722
27623, 19447
11173, 22214
17659, 16017
2350, 31095
17317, 28161
5389, 12839
5266, 13202
5556, 12673
5389, 13469
5699, 13561
10147, 4334
17652, 25208
25056, 7327
24226, 31111
15970, 7575
8655, 20620
25757, 30052
11955, 8441
7276, 19230
4243, 21340
PDA Coordinates (X, Y)
11031, 28521
16927, 21600
4042, 20180
6673, 2548913506, 22801
3311, 15136
3816, 15430
3463, 15008
3762, 15375
3531, 15155
3191, 14997
2712, 15086
3602, 15496
3633, 15477
3073, 14689
3115, 147743464, 15625
3526, 14873
3519, 15390
3187, 15256
3059, 14825
3199, 15599
3046, 14979
3278, 15661
3280, 14733
3406, 14993
3561, 15592
3732, 154393426, 15658
3540, 14996
3356, 15593
3023, 11700
2992, 11252
4605, 22291
7455, 24933
25774, 20255
24217, 24911
15874, 11941
10870, 8314
25252, 5480
25993, 19539
14054, 3794
4380, 11235
4026, 11237
4502, 10989
4225, 11134
4336, 11559
3947, 11079
3986, 11098
4391, 11450
4534, 11260
4586, 11229
4386, 11172
4081, 11100
4297, 11315
PDA Coordinates (X, Y)
4129, 11468
4579, 10984
4453, 11188
4186, 116294155, 11556
4426, 11299
4356, 10949
3949, 11462
8017, 25616
23732, 17299
23122, 26995
28687, 17462
13592, 21033
16698, 16535
8886, 26116
9370, 2180121741, 19679
26182, 6548
10684, 19908
9236, 9990
22556, 21581
20311, 22508
6055, 25901
17684, 13958
PDA Coordinates (X, Y)
15006, 3065
6495, 19843
6622, 19943
8859, 78817508, 23921
19003, 21127
17355, 4230
5253, 31644
11948, 10527
4762, 19529
6913, 23895
9965, 20394
6040, 27026
14508, 27621
7591, 28662
18505, 1906617311, 21204
10495, 6212
21039, 9705
9761, 21592
11415, 24128
8618, 21725
25806, 5941
19950, 15819
WIND TURBINE
PDA Coordinates (X, Y)28050, 11962
27933, 12077
27989, 12017
25941, 3282
26091, 3442
25998, 3274
26017, 3383
26054, 3414
16859, 3196
16910, 3382
16710, 3024
16451, 29878684, 11393
8859, 11325
8742, 11371
8802, 11347
8914, 11305
21559, 6430
21901, 6422
21442, 6401
13032, 31491
12870, 31453
13212, 31498
13333, 3144826353, 8017
PDA Coordinates (X, Y)26378, 8118
26403, 8234
18595, 20230
18722, 20256
18444, 20218
27582, 14683
27637, 14831
27671, 14943
27799, 15214
27714, 15047
27757, 15134
30482, 1647230466, 16597
30466, 16538
8393, 26461
8060, 26519
8240, 26512
11534, 16000
11381, 16134
11317, 15955
2483, 20718
2385, 20489
2440, 20612
2548, 208142553, 20946
AST OFRACTER
FIELD GUIDETO PANAU
WEAPONS VEHICLE EXPLORINGPANAU
AGENCYMISSIONS
STRONGHOLDTAKEOVERS
FACTIONMISSIONS
CHALLENGES COLLECTIBLES ACHIEVEMENTSAND TROPHIES
PARADISE LOST • CHAOSColonels • Chaos Objects
Protected by copyright. Unauthorized or unlawful copying or downloading expressly prohibited.

8/18/2019 Just Cause 2 Prima Official Guide
http://slidepdf.com/reader/full/just-cause-2-prima-official-guide 82/208
PRIMA OFFICIAL STRATEGY GUIDETM
82
Welcome to Panau
Under the cover of twilight, you slip into the airspace over Panau
in a helicopter with fellow Agency asset Kane. As you slice
through the darkening sky, Kane fills you in on the situation in
Panau. The previous president was recently assassinated—by
his own son, Pandak “Baby” Panay. Baby Panay has no plans to
continue Panau’s relationship with the United States, so you have
been sent in to help destabilize the regime.
But youare not the first
person the Agency
has dropped
into Panau. Your
mentor, Tom
Sheldon, arrived
before you.
However, he has
gone off the radar.
The Agency assumes the worst: Sheldon is now rogue. So, you
have twin goals now. First, locate Sheldon and find out if he has
abandoned the Agency. Second, burrow into Panau and disrupt it
from within. To help, Kane gives you a handful of memory cardswith intel on Panau.
Just as she
extends her
hand, though, the
chopper is struck
by antiair cannons.
The pilot keeps the
chopper steady,
but one of your
comrades, Marshal,
is dumped from the
helicopter, along with your PDA and the memory cards. If those
cards fall into the wrong hands, everything will be lost before thestruggle even gets started. You must bail out of the chopper and
parachute down to the surface to fetch the memory cards.
When you initially arrive in Panau, Kane is your only contact. You
must make contacts on the island, such as the Agency asset Karl
Blaine, in order to ingrain yourself with the local factions and
begin your campaign of wanton chaos. However, even though
you are pledging your actions to the factions, your loyalty resides
with only one group: the Agency. And during your time on Panau,
you must participate in a series of missions for the Agency. In
these missions, you will unravel secrets about the heavy players
in Panau and ultimately overthrow Baby Panay’s horrible regime.
WORKING FOR
THE MANYou begin your adventure on Panau with a pair of back-to-back
Agency missions. The remaining five missions (there are seven
total) become available as you cause chaos on Panau. Use the
Chaos meters in your PDA to see how close you are to unlocking
the next Agency mission.
When you unlock Agency missions, they appear on your
map. Travel to the marked spot and speak to your contact to
initiate the mission. A dialogue scene will unspool, explaining
the gist of the mission. This, in turn, moves the story ahead.Sometimes a vehicle is made available to you at the start of a
mission. Other times, you are immediately escorted to the site of
the actual missions.
After you complete an Agency mission, you enjoy great
rewards in Chaos, cash, and parts. Use these spoils to upgrade
your available weapons and vehicles and then head back out into
the cities and countryside to accept new faction missions and
continue your campaign of terror.
As soon as you are able to use the Black Market, make
sure you call upon it to fill your ammo stocks and
grenades before taking on Agency missions. These aretypically the toughest challenges in the game; having
multiple frags and triggered explosives on hand, as
well as upgraded weapons, increases your chances for
success.
AGENCY MISSIONS
AST OFRACTER
FIELD GUIDETO PANAU
WEAPONS VEHICLE EXPLORINGPANAU
AGENCYMISSIONS
STRONGHOLDTAKEOVERS
FACTIONMISSIONS
CHALLENGES COLLECTIBLES ACHIEVEMENTSAND TROPHIES
WORKING FOR THE MANWelcome to Panau • Casino Bust • White Tiger • Mountain Rescue • Three Kings • Into the Den • A Just Cause
Protected by copyright. Unauthorized or unlawful copying or downloading expressly prohibited.

8/18/2019 Just Cause 2 Prima Official Guide
http://slidepdf.com/reader/full/just-cause-2-prima-official-guide 83/208
C H A R A C T E R S
F I E L D G U I D E T O P A N A U
W E A P O N S
V E H I C L E S
E X P L O R I N G P A N A U
A G E N C Y M I S S I O N S
S T R O N G H O L D T A K E O V E R S
F A C T I O N M I S S I O N S
C H A L L E N G E S
C O L L E C T I B L E S
A C H I E V E M E N T S
primagames.com 83
LEGEND
The mission
begins with you
speeding toward
the surface, having jumped from
the helicopter.
You need to
zoom straight for
Marshal’s falling
body to retrieve
your PDA. Press forward to straighten out and pick up speed,
aiming directly for Marshal while avoiding flak bursts in the
evening sky.
After retrieving your PDA, you must release Marshal. Now,
continue streaking toward the site of the memory cards, whichnow appears on your HUD. The distance to the landing zone
appears next to the marker, helpfully informing you of how soon
you will pancake on the side of the mountain unless you pull
the cord and release your parachute. When you reach the
700-meter range, hit the chute and drift in for a soft landing
outside the marked zone. This initial
run up the
mountain acts
as a tutorial
for some basic
functions, such
as using your
grappling hook
to scale vertical
surfaces. Use
the hook to vault over the first wall, but then slow your pace
as you approach the next. There is an enemy soldier on
the rooftop ahead. Without a gun, you must use the toolsyou have to neutralize him and continue moving into the
mountaintop site.
Aim for the soldier and
grab him with your
grappling hook. This
yanks the soldier off
the rooftop. He does
not survive the fall.
WELCOME TO PANAU
StrategyLocation: Kem Gunung Dataran Tinggi
Rewards: 10,000 Chaos, $20,000, threeweapon parts, three vehicle parts
1
Kem Gunung DataranTinggi base
1
START
AST OFRACTER
FIELD GUIDETO PANAU
WEAPONS VEHICLE EXPLORINGPANAU
AGENCYMISSIONS
STRONGHOLDTAKEOVERS
FACTIONMISSIONS
CHALLENGES COLLECTIBLES ACHIEVEMENTSAND TROPHIES
WORKING FOR THE MANWelcome to Panau • Casino Bust • White Tiger • Mountain Rescue • Three Kings • Into the Den • A Just Cause
Protected by copyright. Unauthorized or unlawful copying or downloading expressly prohibited.

8/18/2019 Just Cause 2 Prima Official Guide
http://slidepdf.com/reader/full/just-cause-2-prima-official-guide 84/208
PRIMA OFFICIAL STRATEGY GUIDETM
84
Grapple up to the soldier’s
post and then cross the
rooftops to find the first
memory card. There are
no other guards in theimmediate area.
At the edge of the rooftop, you are prompted to use your
grappling hook to pull fuel barrels down on soldiers below. Thisis more than just a clever combat technique. Destroying fuel
barrels whenever you spot them is a good way to add small bits
of Chaos to your overall total. You get +10 Chaos per barrel. That
doesn’t seem like very much, but there are literally thousands of
barrels out there. That adds up over time. After finishing with the
barrels, zip to the next rooftop and snag the pistol in the marked
weapons stash. Now you have the means to shoot guards and
pop assets like the fuel depot to your right.
With bullets at a premium right now, you may wish to
hold off on the fuel depot. You will soon have the meansto create a lot of noise, and thusly, a lot of chaos.
Use the pistol to take out
the next set of guards.
Zoom in and pick them off
via headshots to get that
stat counter going. Use your
grappling hook to pull the
next batch of guards out of
cover, and then finish them
off with the pistol.
The next memory card is on the ground by one of the giant antiair
cannons that jostled your chopper at the start of the mission. Pick
up the memory card, but then jump behind the cannon. You can
now cause massive destruction at the base. Shoot everything that
turns the target cursor red, such as the radar dishes and radar
domes next to the cannon. However, the cannon also has serious
range. Turn it on the buildings above you and unload on silos,radio masts, and broadcast towers.
Turn your fire on the attack
chopper that zooms down
to pepper your cannon with
minigun fire. Two or three
direct hits from the cannon
will take the chopper down.
After blasting everything in sight, leave the cannon and pick
up the weapon part next to the tram car. Notice how this
increases the completion percentage of the site; you must pick
up all bonuses to finish off sites and wrest them wholly from
government control. Now, start the tram and begin the journey
across the gap between the radar dishes and the main base site.
Look out—more soldiers wait for you on the opposite side of
the tram ride. If they move near the ledges, yank them off their
feet with your grappling hook, notching a Fall Kill on your stats.
Otherwise, plug them with the pistol. If you take damage greater
than that which you recover naturally, instantly recharge at the
medical kit on the wall, marked with the large green cross.
Never be too quick to use the medical kits in a mission.
They do not respawn and will remain empty unless you
restart the mission.
AST OFRACTER
FIELD GUIDETO PANAU
WEAPONS VEHICLE EXPLORINGPANAU
AGENCYMISSIONS
STRONGHOLDTAKEOVERS
FACTIONMISSIONS
CHALLENGES COLLECTIBLES ACHIEVEMENTSAND TROPHIES
WORKING FOR THE MANWelcome to Panau • Casino Bust • White Tiger • Mountain Rescue • Three Kings • Into the Den • A Just Cause
Protected by copyright. Unauthorized or unlawful copying or downloading expressly prohibited.

8/18/2019 Just Cause 2 Prima Official Guide
http://slidepdf.com/reader/full/just-cause-2-prima-official-guide 85/208
C H A R A C T E R S
F I E L D G U I D E T O P A N A U
W E A P O N S
V E H I C L E S
E X P L O R I N G P A N A U
A G E N C Y M I S S I O N S
S T R O N G H O L D T A K E O V E R S
F A C T I O N M I S S I O N S
C H A L L E N G E S
C O L L E C T I B L E S
A C H I E V E M E N T S
primagames.com 85
The third memory card is on
the ledge overlooking Panau.
A cash stash is next to it.
To capture the fourth memory card, you must pursue a fleeing
soldier who is carrying it. To quickly get on top of the soldier,
grapple to the tram parked halfway across the gap to the
right. Then, as you are about to reach the tram car, deploy the
parachute. This slingshot technique is critical for getting in
and out of hot spots. You can actually chain together multiple
slingshots to cross large areas, but in this situation, you need
only one.
At the site of the soldier,
drop his comrades and then
zero in on the one with the
memory card.
There are two critical pick-ups at this site beyond
the memory card. Grab the submachine gun fromthe helipad (place it in your alternate holster) and
the armor part from the radar dome. This begins your
armor part collection, which is paramount for survival.
For every five armor parts you bank, your maximum
health increases. You cannot pass these up.
After capturing the card,
grapple up to Kane’s
chopper and hold on as she
flies you back to the main
site. While flying, target the
soldiers on the rooftops.
Aim for the fuel barrels toearn a little Chaos and blast
the soldiers to their doom.
It is tempting to empty a few clips into the silo, but
unless you have full stocks, preserve your bullets. You
can always return to clean out the rest of the site.
Drop down when Kane lowers you to the main site. Now you
must take out two mounted gunners who guard the bridge
leading to the fifth memory card. There are two ways to stop
these gunners. Either step out from behind the concrete
barriers and take shots (relying on autotargeting to make
sure you get your target), or use the grappling hook to pull
the soldiers out from behind their guns. Once the gunners
are down, cross the bridge and pick up the nearby vehicle
part and the memory card.
As you rush up theramp, target smaller
assets like broadcast
towers to keep banking
Chaos.
Kane cannot pick you up until you have disabled the two
SAM batteries on the base. There is a crate of triggered
explosives near the SAMs. But to reach that, you must first
blast through a small wave of soldiers. If one surprises you up
close, whip him with the grappling hook. Run over droppedweapons to keep your stocks full.
AST OFRACTER
FIELD GUIDETO PANAU
WEAPONS VEHICLE EXPLORINGPANAU
AGENCYMISSIONS
STRONGHOLDTAKEOVERS
FACTIONMISSIONS
CHALLENGES COLLECTIBLES ACHIEVEMENTSAND TROPHIES
WORKING FOR THE MANWelcome to Panau • Casino Bust • White Tiger • Mountain Rescue • Three Kings • Into the Den • A Just Cause
Protected by copyright. Unauthorized or unlawful copying or downloading expressly prohibited.

8/18/2019 Just Cause 2 Prima Official Guide
http://slidepdf.com/reader/full/just-cause-2-prima-official-guide 86/208
PRIMA OFFICIAL STRATEGY GUIDETM
86
Don’t ignore shooters on the
ledges above you. Grapple
up and take them down.
With the guns you pick up,
you can shoot out the silos
without worry of running
out of ammo.
After picking up the triggered explosives, toss one on each SAM.
To detonate the explosives, hold the Throw button, but make sure
you are far enough back. The blast radius is substantial—and
deadly. Use the rest of your triggered explosives on the Baby
Panay statue above the SAMs. Place two explosives on the statue
base and then detonate it to bank 1,000 Chaos and $5,000. Now
that the SAMs are smoldering wrecks, Kane can come get you.
The explosions on the mountain base pretty much blew your
cover. Baby Panay knows somebody is on the island and gunning for
him. Now you must seek out the Agency’s other Panauan asset: Karl
Blaine. The degenerate gambler isn’t going to be the most helpful
person in Panau, but he’s the only friend you have on the ground
right now, so he’ll have to do. Kane flies you down to his villa,
leading your directly into the next Agency mission: Casino Bust.
Casino BustKnock, knock—
nobody’s home at
Karl’s place. The
gambler is at the
Panau Falls Casino.
That wouldn’t be
a problem except
that as you touch
down outside Karl’svilla, word goes
out over Panauan television that Baby Panay is about to level the
place as a statement that foreign greed and decadence is no
longer welcome in the island nation.
After dis-
covering Karl is
not home, you are
greeted by Jade
Tan, a woman who
claims to be Karl’s
girlfriend. She
offers to give you
a lift to the casino
in hopes that if you
save Karl, she will also avoid government scrutiny. You
accept the ride and roar off to the casino, leaving Kane
behind.
StrategyLocation: Panau Falls Casino
Rewards: 10,000 Chaos, $20,000, threeweapon parts, three vehicle parts
LEGEND
CASINO BUST
START
1
2
3
4
Panau Casino
Karl’s car
Soldier engagement
Karl’s villa
1
2
3
4
AST OFRACTER
FIELD GUIDETO PANAU
WEAPONS VEHICLE EXPLORINGPANAU
AGENCYMISSIONS
STRONGHOLDTAKEOVERS
FACTIONMISSIONS
CHALLENGES COLLECTIBLES ACHIEVEMENTSAND TROPHIES
WORKING FOR THE MANWelcome to Panau • Casino Bust • White Tiger • Mountain Rescue • Three Kings • Into the Den • A Just Cause
Protected by copyright. Unauthorized or unlawful copying or downloading expressly prohibited.

8/18/2019 Just Cause 2 Prima Official Guide
http://slidepdf.com/reader/full/just-cause-2-prima-official-guide 87/208
C H A R A C T E R S
F I E L D G U I D E T O P A N A U
W E A P O N S
V E H I C L E S
E X P L O R I N G P A N A U
A G E N C Y M I S S I O N S
S T R O N G H O L D T A K E O V E R S
F A C T I O N M I S S I O N S
C H A L L E N G E S
C O L L E C T I B L E S
A C H I E V E M E N T S
primagames.com 87
As you approach the casino, note the convergence of soldiers
around the Baby Panay statue out front. Expect a skirmish
there; prepare yourself by collecting a submachine gun and frag
grenades from the small boxes on the road’s right side. Once you
have the gear, rush the soldiers and gun them down before theycan react to your presence. You may catch two or three in the
surprise attack, but expect heavy resistance soon.
About the
Baby Panay
statue...if you
have triggered
explosives
left, you can
blow the
statue base
and bring itdown. Far
more fun, though, is to attach your grappling hook to the
statue’s torso and then double-hook it to the nearby MV
V880 military truck. Now jump behind the wheel and
drag the statue down for Chaos and cash.
Press through the next wave of soldiers as you close in on the
casino towers. Far more dangerous in the demolitions officer
on the landing in front of the casino. He throws grenades at
you from afar. If he rolls one next to a parked car or truck, the
resulting explosion can instantly kill you. Grapple up to the
landing and then shoot the officer down. Just make sure you
back up as soon as he is dead, because he drops a series of
timed explosives that go off three seconds after his death. If you
are caught in the blast, you risk getting killed.
Pick up the triggered explosives dropped by thedeceased demolitions Officer and snag the nearby
armor part.
You must
now scale the
casino towers
to disarm
charges Baby
Panay’s thugshave placed on
the upper floors
of the casino.
Without a
chopper, you must use your grappling hook to scale the face
of the casino. To move up the building, just shoot your hook
and pull yourself up. When you stop and hang, aim farther up
the casino and then fire the hook again. You release from the
building but fire the hook so fast you do not fall. Repeat this
over and over to move up to the casino balconies with the
bombs.
To actually grapple
inside the balcony, you
may need to zip out
to the sky bridge and
then grapple back to
the building.
Try dual-hooking enemies to ledges to fling them
out into empty space, or dangle them from the
ceiling.
Blast the soldiers
around the bombs.
If you are short on
ammo, pick up the
assault rifle from the
boxes near the bombs.
Once the soldiers are
down, walk up to the
bomb. Disable it by
following the onscreen
button prompts.
AST OFRACTER
FIELD GUIDETO PANAU
WEAPONS VEHICLE EXPLORINGPANAU
AGENCYMISSIONS
STRONGHOLDTAKEOVERS
FACTIONMISSIONS
CHALLENGES COLLECTIBLES ACHIEVEMENTSAND TROPHIES
WORKING FOR THE MANWelcome to Panau • Casino Bust • White Tiger • Mountain Rescue • Three Kings • Into the Den • A Just Cause
Protected by copyright. Unauthorized or unlawful copying or downloading expressly prohibited.

8/18/2019 Just Cause 2 Prima Official Guide
http://slidepdf.com/reader/full/just-cause-2-prima-official-guide 88/208
PRIMA OFFICIAL STRATEGY GUIDETM
88
Now, cross the sky bridge
and disable the bomb on the
other tower in the exact
same way.
While you’re
on top of the
casino, why
not grapple all
the way to the
roof and pick
up the armor
part?
After you disable the second bomb, an attack chopper races
up to the balconies to see who is meddling in government
affairs. Before the chopper turns its miniguns on you, grapple
onto it. Pull yourself up to the nose and lean to the left to shoot
the copilot as he leans out. Once the copilot is down, enter the
cockpit and follow the onscreen prompts to bash the pilot three
times and throw him out of the chopper. Now you have control of
the chopper. And that’s a good thing, because a second chopper
is inbound.
Stay above the second
chopper and rain minigun
fire on it. If you stay above
it, the other pilot will
struggle to target you.
Facing the chopper head-on
makes it too easy to shoot
you down at the same time.
After you destroy the second chopper, Karl runs across the sky
bridge to make his escape. He’s stopped by an opposing force.
Karl aims his gun at the soldiers, but you must help him get out
of there. Zoom alongside the sky bridge and blast the soldiers
with your miniguns. Then, land on top of the sky bridge and exit
the chopper. Jump through the hole in the rooftop to grab Karl
and get him out of there—by jumping out of the building.
When you
and Karl land, he
agrees to help you
find Tom Sheldon,
but you must first
get him back to
his villa. He knows
soldiers are on the
way. So, use the
dual hook to attach
Karl’s ditched car to the nearby tractor and pull it out. Once it ison the road, Karl can drive you back to his villa.
Before pulling out the car, pick up the nearby assault
rifle and weapon part.
Once Karl’s car is
on the road, stunt
jump on top of
the roof. From up
here, you can aim
at Panay’s thugsas they give chase.
It takes a moment
for the government
trucks to catch up,
but when they do, they come hard and fast. You must blast these
trucks off the road to make your escape.
Zoom in and aim for the
tires! If you shoot out a
front tire, the truck flips or
veers into a ditch.
AST OFRACTER
FIELD GUIDETO PANAU
WEAPONS VEHICLE EXPLORINGPANAU
AGENCYMISSIONS
STRONGHOLDTAKEOVERS
FACTIONMISSIONS
CHALLENGES COLLECTIBLES ACHIEVEMENTSAND TROPHIES
WORKING FOR THE MANWelcome to Panau • Casino Bust • White Tiger • Mountain Rescue • Three Kings • Into the Den • A Just Cause
Protected by copyright. Unauthorized or unlawful copying or downloading expressly prohibited.

8/18/2019 Just Cause 2 Prima Official Guide
http://slidepdf.com/reader/full/just-cause-2-prima-official-guide 89/208
C H A R A C T E R S
F I E L D G U I D E T O P A N A U
W E A P O N S
V E H I C L E S
E X P L O R I N G P A N A U
A G E N C Y M I S S I O N S
S T R O N G H O L D T A K E O V E R S
F A C T I O N M I S S I O N S
C H A L L E N G E S
C O L L E C T I B L E S
A C H I E V E M E N T S
primagames.com 89
Dual-hook trucks to the
bridge and watch them flip
and fly.
Keep on the
trucks, blasting
them before they
get close to Karl’s
car. If they move
alongside Karl’s
car, target the
soldiers hanging
out of the doorsfirst. Beware of
jumping to a truck, because if you get too far from Karl, the
mission ends in failure.
Once you
finally reach Karl’s
villa, the agent
jumps out and
promises to help
you find Sheldon.
He also says he
can help you
burrow into the
three rival factionsvying for control of the island in the event of Baby Panay’s
downfall: the Reapers, the Roaches, and the Ular Boys. He will
slip word that a criminal named Scorpio is in Panau and looking
for work.
To get you started, Karl takes your PDA and gives you intel.
He also marks each faction’s HQ on your map. This unlocks the
first three Stronghold Takeover missions for each faction. You
must complete at least one of these next to keep the adventure
rolling along.
Completing
this mission
also unlocks
the ability to
call in orders
to the Black
Market. The
Black Market
is run by a
shady operator
nicknamed Sloth Demon. Just use the beacon Karl gives you
to call down the Black Market chopper, order up weapons
and vehicles, and get extracted and relocated to discovered
locations on the island.
White Tiger
You finally have a lead on Tom Sheldon, also known as the
White Tiger by locals. You must report to a contact in the
desert village of Bandar Lengkok Sungai. After you loosen his
lips with some cash, he tells you where you can find Ken Pang,
who can actually take you to Sheldon. Pang, however, is about
to be executed for not paying gambling debts. You must rush
to his rescue and then follow his lead to locate Sheldon and
discover if the agency asset has indeed gone rogue.
Strategy
Location: Bandar LengkokSungai
Rewards: 10,000 Chaos,$20,000, three weaponparts, three vehicle parts
LEGEND
WHITE TIGER
Gambler’s Den
Shipwreck
White Tiger base
1
2
3
START 1
23
AST OFRACTER
FIELD GUIDETO PANAU
WEAPONS VEHICLE EXPLORINGPANAU
AGENCYMISSIONS
STRONGHOLDTAKEOVERS
FACTIONMISSIONS
CHALLENGES COLLECTIBLES ACHIEVEMENTSAND TROPHIES
WORKING FOR THE MANWelcome to Panau • Casino Bust • White Tiger • Mountain Rescue • Three Kings • Into the Den • A Just Cause
Protected by copyright. Unauthorized or unlawful copying or downloading expressly prohibited.

8/18/2019 Just Cause 2 Prima Official Guide
http://slidepdf.com/reader/full/just-cause-2-prima-official-guide 90/208
PRIMA OFFICIAL STRATEGY GUIDETM
90
After you leave your contact, the gambling den where Ken Pang
is being held appears on your map. It’s just upriver. There is a
boat on the pier below the village. Steal the boat and steer it
along the river until you reach the docks outside the gambling
den. Get out of the boat and approach the den. The Sloth Demonwill tell you what to do next.
There are cash stashes under the gambling den.
Enter the den and kill all of
the guards in the courtyard.
The excitement should lead
the people holding Pang out
of hiding.
Stepping into
the open reveals
snipers at every
tower in the den.
The red lasers
dance across the
ground as the
snipers seek their
shots. Quickly
target the snipersin their perches and pull them down with your grappling hook.
When the third (and final) sniper is down, you must locate a
walkie-talkie and lead Pang’s guards into the open.
Grapple up to the walkie-
talkie in the tower and
report that the intruder has
been taken care of. Then,
pick up the nearby sniper
rifle.
Through the rifle
scope, watch
the executioner
march Pang into
the courtyard.
Follow the execu-tioner until he
is completely
exposed, and then
go for that deadly
headshot. If you miss, he will kill Pang. So, zoom in and make
sure his skull is in the center of your sights before pulling the
trigger.
Dropping the executioner
triggers more thugs to
enter the courtyard. Snipe
them from your tower
before parachuting down toescort Pang out of the den.
Pang runs ahead but stops
whenever he is confronted
by criminals. He hangs
back until you gun down
the gang.
Drop frags into the middle of criminal packs to send
bodies flying.
After you kill the
remainder of the
thugs, Pang leads
you out to a pair of
motorbikes he has
stashed. Jump on
the extra bike and
follow Pang across
the desert. Keep up
with him. If he gets
too far ahead, the mission ends in failure, especially when he
stops at the site of the ambush.
Rush ahead of Pang and kill
the thugs at the ambush in
the narrow canyon. Then
turn to the bikes and head
back out until you reach the
site of a shipwreck.
AST OFRACTER
FIELD GUIDETO PANAU
WEAPONS VEHICLE EXPLORINGPANAU
AGENCYMISSIONS
STRONGHOLDTAKEOVERS
FACTIONMISSIONS
CHALLENGES COLLECTIBLES ACHIEVEMENTSAND TROPHIES
WORKING FOR THE MANWelcome to Panau • Casino Bust • White Tiger • Mountain Rescue • Three Kings • Into the Den • A Just Cause
Protected by copyright. Unauthorized or unlawful copying or downloading expressly prohibited.
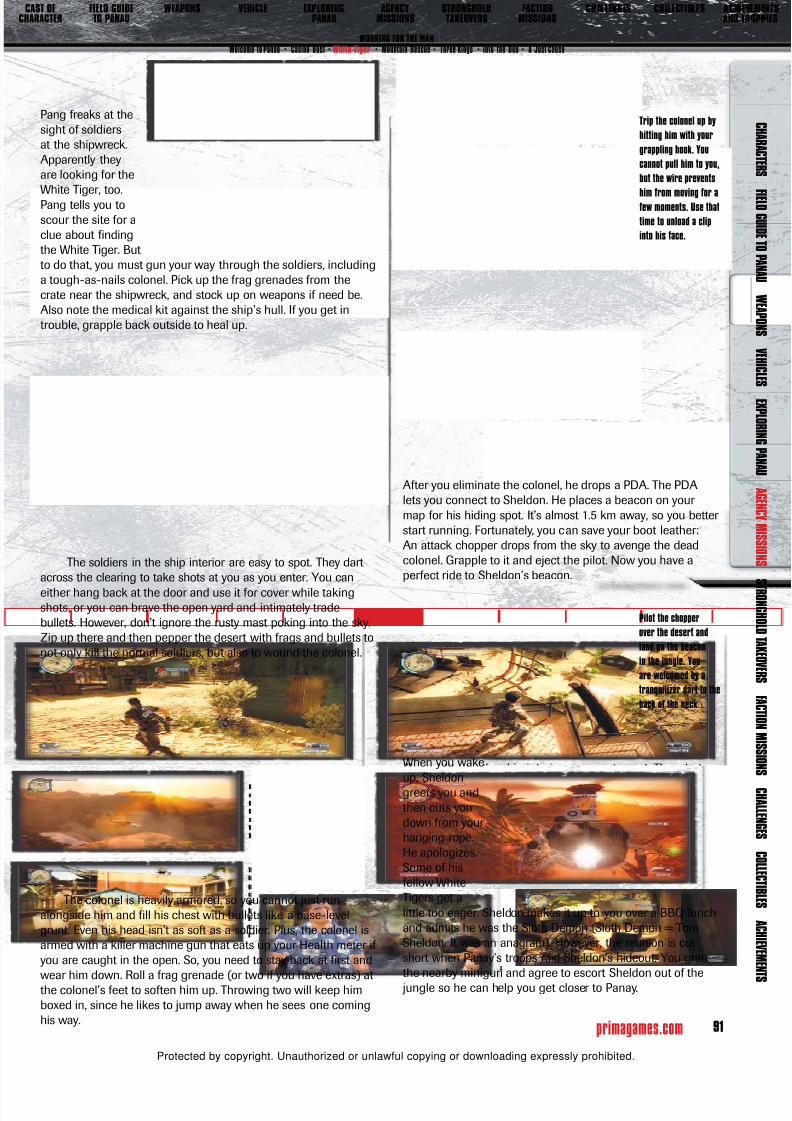
8/18/2019 Just Cause 2 Prima Official Guide
http://slidepdf.com/reader/full/just-cause-2-prima-official-guide 91/208
C H A R A C T E R S
F I E L D G U I D E T O P A N A U
W E A P O N S
V E H I C L E S
E X P L O R I N G P A N A U
A G E N C Y M I S S I O N S
S T R O N G H O L D T A K E O V E R S
F A C T I O N M I S S I O N S
C H A L L E N G E S
C O L L E C T I B L E S
A C H I E V E M E N T S
primagames.com 91
The soldiers in the ship interior are easy to spot. They dart
across the clearing to take shots at you as you enter. You can
either hang back at the door and use it for cover while takingshots, or you can brave the open yard and intimately trade
bullets. However, don’t ignore the rusty mast poking into the sky.
Zip up there and then pepper the desert with frags and bullets to
not only kill the normal soldiers, but also to wound the colonel.
The colonel is heavily armored, so you cannot just run
alongside him and fill his chest with bullets like a base-level
grunt. Even his head isn’t as soft as a soldier. Plus, the colonel is
armed with a killer machine gun that eats up your Health meter if
you are caught in the open. So, you need to stay back at first and
wear him down. Roll a frag grenade (or two if you have extras) at
the colonel’s feet to soften him up. Throwing two will keep him
boxed in, since he likes to jump away when he sees one coming
his way.
Pang freaks at the
sight of soldiers
at the shipwreck.
Apparently they
are looking for the
White Tiger, too.
Pang tells you to
scour the site for a
clue about finding
the White Tiger. But
to do that, you must gun your way through the soldiers, including
a tough-as-nails colonel. Pick up the frag grenades from the
crate near the shipwreck, and stock up on weapons if need be.
Also note the medical kit against the ship’s hull. If you get in
trouble, grapple back outside to heal up.
Trip the colonel up by
hitting him with your
grappling hook. You
cannot pull him to you,
but the wire prevents
him from moving for afew moments. Use that
time to unload a clip
into his face.
After you eliminate the colonel, he drops a PDA. The PDA
lets you connect to Sheldon. He places a beacon on your
map for his hiding spot. It’s almost 1.5 km away, so you better
start running. Fortunately, you can save your boot leather:
An attack chopper drops from the sky to avenge the dead
colonel. Grapple to it and eject the pilot. Now you have a
perfect ride to Sheldon’s beacon.
Pilot the chopper
over the desert and
land on the beacon
in the jungle. You
are welcomed by a
tranquilizer dart to the
back of the neck.
When you wake
up, Sheldon
greets you and
then cuts you
down from your
hanging rope.
He apologizes.
Some of his
fellow White
Tigers get a
little too eager. Sheldon makes it up to you over a BBQ lunch
and admits he was the Sloth Demon (Sloth Demon = Tom
Sheldon. It was an anagram). However, the reunion is cut
short when Panay’s troops raid Sheldon’s hideout. You grab
the nearby minigun and agree to escort Sheldon out of the
jungle so he can help you get closer to Panay.
AST OFRACTER
FIELD GUIDETO PANAU
WEAPONS VEHICLE EXPLORINGPANAU
AGENCYMISSIONS
STRONGHOLDTAKEOVERS
FACTIONMISSIONS
CHALLENGES COLLECTIBLES ACHIEVEMENTSAND TROPHIES
WORKING FOR THE MANWelcome to Panau • Casino Bust • White Tiger • Mountain Rescue • Three Kings • Into the Den • A Just Cause
Protected by copyright. Unauthorized or unlawful copying or downloading expressly prohibited.

8/18/2019 Just Cause 2 Prima Official Guide
http://slidepdf.com/reader/full/just-cause-2-prima-official-guide 92/208
PRIMA OFFICIAL STRATEGY GUIDETM
92
You must keep Sheldon alive as you work your way through the
ruins. Stay a few steps ahead of Sheldon when he stops, because
that means he has spotted soldiers. Inch ahead to draw fire—you
regenerate health; Sheldon does not. Next, cut through the pack
of government soldiers with that minigun, spraying fuel drums to
make them explode and topple stone totems so the rocks crush
soldiers. There are several encounters on this rampage, so always
listen to Sheldon, as he will stop talking about Panay whenever
trouble is about to flare up. With unlimited ammo, you can easily
keep the soldiers at bay.
At the end of the
firefight, a truckpulls up to pick up
Sheldon. Sheldon
suspects that Karl
betrayed you by
slipping a bug into
your PDA when he
downloaded all of
that faction intel. Sure enough, he was right. Karl is no longer to
be trusted. Sheldon also reveals that Jade Tan is working for the
Agency. Before leaving, Sheldon tells you to keep working with
the factions. He believes they have information on heavy clients
at work behind the scenes in Panau. You need to flush them out
before you make a run on Baby Panay.
Mountain RescueTo start this
mission, hook up
with Sheldon and
Kane on the beach
marked on your
PDA map. Sheldon
tells you that Jade
Tan has been
captured by Baby
Panay—Karl ratted
her out. And if Sheldon knows Panay, there’s a good chance
Jade will be tortured and killed. Sheldon hands over the keys to
a Sivirkin 15 Havoc attack chopper, and marks the location of the
Kastelo Singa military base on your PDA. You must fly to the base
and free Jade before she falls victim to Panay’s blade.
StrategyLocation: Kastelo Singa
Rewards: 10,000 Chaos, $20,000,three weapon parts, three vehicleparts
LEGEND
MOUNTAIN RESCUE
START
1 Kastelo Singa base
Vent
1
AST OFRACTER
FIELD GUIDETO PANAU
WEAPONS VEHICLE EXPLORINGPANAU
AGENCYMISSIONS
STRONGHOLDTAKEOVERS
FACTIONMISSIONS
CHALLENGES COLLECTIBLES ACHIEVEMENTSAND TROPHIES
WORKING FOR THE MANWelcome to Panau • Casino Bust • White Tiger • Mountain Rescue • Three Kings • Into the Den • A Just Cause
Protected by copyright. Unauthorized or unlawful copying or downloading expressly prohibited.

8/18/2019 Just Cause 2 Prima Official Guide
http://slidepdf.com/reader/full/just-cause-2-prima-official-guide 93/208
C H A R A C T E R S
F I E L D G U I D E T O P A N A U
W E A P O N S
V E H I C L E S
E X P L O R I N G P A N A U
A G E N C Y M I S S I O N S
S T R O N G H O L D T A K E O V E R S
F A C T I O N M I S S I O N S
C H A L L E N G E S
C O L L E C T I B L E S
A C H I E V E M E N T S
primagames.com 93
much time, in fact. You risk reinforcements shooting you in
the back as you try pumping enough lead into the generator
to blow it. The better approach is to plant two triggered
explosives on the generator and then detonate them as you
are leaving the station.
Rushing inside the
vent station is a good
way to get shot in the
back. This mission
is not timed, so
methodically clear out
the soldiers before
attempting to enter a
station.
There is typically two or three soldiers inside each
station.
Place two explosives
on the generator
and then bail. Do
not detonate the
explosives until
you are outside the
station.
Once you blast the first vent station, steal the nearby MV
V880 and drive it up the hill to the next station. While driving,
you cannot be shot (unless you just sit there and take a
pounding), which gives you a chance to heal up a little before
making a play for the second station.
Yank the sniper off
the tower outside the
second vent station,
and then clear out the
surrounding guards
before rushing inside.
After picking up the offered gear, including triggered explosives,
jump into the chopper and take to the skies. The military base is
in the mountains, to the south of the beach rendezvous you had
with Sheldon and Kane. As you approach the base, slow up. Your
chopper has the guns to lay waste to a lot of assets on-site, suchas radar dishes and fuel depots. But if you get too close, a SAM
will take you out. So, target the SAM battery on the tower to the
base’s left first and then circle the base, racking up Chaos points
by dismantling government assets.
To complete this mission,
you must actually land and
attack ground targets. But
for now, enjoy the use of the
attack chopper, and blast
the radar dishes and other
assets to bank Chaos.
There are two radio masts at this base. Don’t leave
without bringing them to the ground.
To free Jade, you must start by tearing apart the military facility.
There are four vent stations at the base. You must destroy all
four of them so that air no longer circulates below the surface.
The four vent stations stretch up the mountainside—they are
not all placed together. To destroy a vent station, you must cut
through the patrol guarding it—be warned, the soldiers are veryaggressive—and then destroy the generator within. You can shoot
the generator, but that will take a lot of bullets and time. Too
AST OFRACTER
FIELD GUIDETO PANAU
WEAPONS VEHICLE EXPLORINGPANAU
AGENCYMISSIONS
STRONGHOLDTAKEOVERS
FACTIONMISSIONS
CHALLENGES COLLECTIBLES ACHIEVEMENTSAND TROPHIES
WORKING FOR THE MANWelcome to Panau • Casino Bust • White Tiger • Mountain Rescue • Three Kings • Into the Den • A Just Cause
Protected by copyright. Unauthorized or unlawful copying or downloading expressly prohibited.

8/18/2019 Just Cause 2 Prima Official Guide
http://slidepdf.com/reader/full/just-cause-2-prima-official-guide 94/208
PRIMA OFFICIAL STRATEGY GUIDETM
94
Try to avoid crashing your MV V880. You’ll want to use
it to drive farther up the mountain to the next station.
Resistance grows more significant with each station. You should
expect three or more guards in a station. If you run low on
bullets, help yourself to an SMG in a box to the left of the station
entrance. With full clips, you can rip apart the guards inside the
station and quickly slap two bombs on the generator. Leave the
way you came in and then blast the second vent station.
Collect the weapon part atop the station after blowing
the explosives and killing any nearby guards.
There is a GV-104 Razorback tank next to the
guard tower you pass on the way up the mountain.While you cannot drive that tank into a vent station and
blow up the generator, you sure can wipe the guards
off the station exterior with ease.
Use one of the MV V880s to
race up the mountainside to
the next station. However,
the cement blocks in the
road mean you must hop out
at the guard post—which
is currently manned by a
single shooter. Repeat the
same procedure at this
station and then continue up
the mountain.
Claim the MV V880
at the wreck of the
third station and
then roar farther
up the mountain
road. The fourth
station is also
heavily guarded,
both inside andoutside. Expect
gunners on the roof, so either stand back and open fire or quickly
duck inside and fend off the thugs guarding the generator. Throw
two bombs on the generator and then back out of the station.
Blast the station off the mountainside.
There’s an armor part on
the roof of the cement
structure next to the fourth
vent station.
Now that all four vent stations are down, the military have no
choice but to open some doors to get fresh air inside the under-
ground facility. Follow Sheldon’s orders to race back down the
mountain and enter the base via an entrance below the first vent
station. Use the mark on your map to close in on the target. Once
you’re on the concrete slab in front of the base entrance, blast any
guards and heal up at the medical kit.
When you attempt to enter the base, you are attacked by
three ninjas. Each ninja has a sword, an SMG, and a bag of
smoke bombs that help them disappear. So stay back. If you
get too close to one of the ninjas, they drop a smoke bomb and
vanish, usually several feet away and with the SMG outstretched.
You cannot use the grappling hook on the ninjas, either. They
disappear if you attempt to hook them.
AST OFRACTER
FIELD GUIDETO PANAU
WEAPONS VEHICLE EXPLORINGPANAU
AGENCYMISSIONS
STRONGHOLDTAKEOVERS
FACTIONMISSIONS
CHALLENGES COLLECTIBLES ACHIEVEMENTSAND TROPHIES
WORKING FOR THE MANWelcome to Panau • Casino Bust • White Tiger • Mountain Rescue • Three Kings • Into the Den • A Just Cause
Protected by copyright. Unauthorized or unlawful copying or downloading expressly prohibited.

8/18/2019 Just Cause 2 Prima Official Guide
http://slidepdf.com/reader/full/just-cause-2-prima-official-guide 95/208
C H A R A C T E R S
F I E L D G U I D E T O P A N A U
W E A P O N S
V E H I C L E S
E X P L O R I N G P A N A U
A G E N C Y M I S S I O N S
S T R O N G H O L D T A K E O V E R S
F A C T I O N M I S S I O N S
C H A L L E N G E S
C O L L E C T I B L E S
A C H I E V E M E N T S
primagames.com 95
You will not kill a ninja
with a single attack. You
must play along with their
cat-and-mouse game, filling
them with half of a clip and
then finding them again
after they disappear.
While you should always
shoot for the nearest target,
try to zero in on one ninja at
a time. It’s better to whittle
their numbers down one by
one than have three ninjas
with partial health still
running around. After all, it
doesn’t matter if a ninja has
full health or just a sliver.
They can still shoot all the same.
There is a medical kit on the wall just inside the base.
After you eliminate the three ninjas, Panay’s thugs throw Jade
into a truck and try to escape. Running interference is a nuclear
submarine, so don’t even try to chase her down with a chopper.
Jump off the cliffside and parachute after the truck as it speeds
across the frozen lake. You must hijack that truck before it
escapes the frozen lake and into the pass below.
If you cannot get a good shot at the truck, land ahead of the convoy and then turn back to
target them as they roar by.
The armored truck provides lots of cover for the ninjas who
pop out to shoot you off the roof. Move around the vehicle to
circumvent the armored doors and to dodge incoming fire.
It’s very difficult to shoot you while you’re hanging on to the
front grille. After shooting all of the ninjas off the truck, return
to the roof and then press the Enter button to start the hijack.Follow the onscreen prompts to hammer the driver with three
sharp blows, and then throw them onto the ice. Once you
take control of the truck, the rescue ends in success.
Saving Jade from Baby Panay does more than add a
pretty face to the group. Jade has some valuable intel on
the heavy players pulling the strings in Panau. She reveals
that former Soviet Secret Service agent Alexander Mirkov is
aiding the Roaches. The Reapers are backed by Zhang Sun,
a Chinese general with a sadist streak. The Ular Boys are in
league with a disgraced Japanese general named Masayo
Washio.
Why are these three involved in Panau’s politics? That is the
thrust of the next Agency mission: “Three Kings.” Once you
have achieved enough Chaos to unlock it (use the Chaos
meter on your PDA to see how much more damage is
required to open it), head off to solve the questions posed by
Jade’s intel.
AST OFRACTER
FIELD GUIDETO PANAU
WEAPONS VEHICLE EXPLORINGPANAU
AGENCYMISSIONS
STRONGHOLDTAKEOVERS
FACTIONMISSIONS
CHALLENGES COLLECTIBLES ACHIEVEMENTSAND TROPHIES
WORKING FOR THE MANWelcome to Panau • Casino Bust • White Tiger • Mountain Rescue • Three Kings • Into the Den • A Just Cause
Protected by copyright. Unauthorized or unlawful copying or downloading expressly prohibited.

8/18/2019 Just Cause 2 Prima Official Guide
http://slidepdf.com/reader/full/just-cause-2-prima-official-guide 96/208
PRIMA OFFICIAL STRATEGY GUIDETM
96
Three KingsYou have amassed
the needed intel
on the three heavy
players to mount
an attack. All three
targets are staying
at the Three Kings
Hotel, a luxury
high-rise. The best
part? None of
the three knows the other is involved in Panauan affairs, much
less staying at the same hotel. You have all of your eggs in one
basket. Time to blow up the basket. Sheldon agrees to come
along for the ride. While you deal with the thugs on the hotel
rooftops, he will provide air support in the chopper.
Though there are weapons placed around this mission, you should hit up the Black Market for top gear
first. Spend weapon parts to upgrade weapons and
explosives, because you need good guns, such as
upgraded SMGs and assault rifles, to tackle the rooftop
threats in this mission.
StrategyLocation: Three Kings Hotel
Rewards: 10,000 Chaos, $20,000, three weaponparts, three vehicle parts
LEGEND
THREE KINGS
When the mission
begins, Sheldon
is shuttling you
toward the Three
Kings. He tells
you to jump as henears the hotel.
One of the three
towers is now
marked onscreen.
Parachute toward the marked tower, where you must engage
one of the three shadow clients in combat. As you close in on the
rooftop, the game switches to a cutscene of your safe landing.
Chinese general Zhang Sun
and his minions wait for you
on the roof. They break out
the explosives as you come
in for a landing.
Zhang Sun attacks
from the stage
above the hotel
bar. He is flanked
by four guards.
Three of them
typically spread out
across the rooftop
to seek you outwhile Sun throws
bombs. There is a lot of cover
on the roof, such as the bar and
several concrete planters. If you
get in trouble, use the medical
kit to the stage’s right to heal up,
and pick up an SMG.
You cannot use your
grapple hook to pull Sun
toward you, nor can you
slingshot him off the
rooftop.
START1 Three Kings Hotel1
AST OFRACTER
FIELD GUIDETO PANAU
WEAPONS VEHICLE EXPLORINGPANAU
AGENCYMISSIONS
STRONGHOLDTAKEOVERS
FACTIONMISSIONS
CHALLENGES COLLECTIBLES ACHIEVEMENTSAND TROPHIES
WORKING FOR THE MANWelcome to Panau • Casino Bust • White Tiger • Mountain Rescue • Three Kings • Into the Den • A Just Cause
Protected by copyright. Unauthorized or unlawful copying or downloading expressly prohibited.

8/18/2019 Just Cause 2 Prima Official Guide
http://slidepdf.com/reader/full/just-cause-2-prima-official-guide 97/208
C H A R A C T E R S
F I E L D G U I D E T O P A N A U
W E A P O N S
V E H I C L E S
E X P L O R I N G P A N A U
A G E N C Y M I S S I O N S
S T R O N G H O L D T A K E O V E R S
F A C T I O N M I S S I O N S
C H A L L E N G E S
C O L L E C T I B L E S
A C H I E V E M E N T S
primagames.com 97
Shooting Sun works to a degree. Peppering the stage with
explosives is far more effective. Sun rolls away from frag
grenades, but triggered explosives are little trickier for the guy.
If you drop one or two on the stage, he does not drastically
avoid them; therefore, wait until you see him run near one of the
explosives and then detonate it to injure him and send him flyingoff the stage.
There is an armor part at
the bottom of the stairs to
the stage’s left, which is
another good place to hide
and regenerate health.
Clean out Sun’s minions early so you can concentrate on themastermind. Watch him throw the bombs across the rooftop
and then roll away from them. As you pop up, empty a clip into
Sun. He does not react very fast right after a throw, giving you a
chance to really do some damage.
Use the stage itself as
cover, darting out to throw
grenades at Sun or empty
half a clip before rushing
back into cover.
When you do finally
kill Sun, keep back. He
drops several bombs,
just like a demolition
officer. If caught in
the blast, you may belaunched clear off the
rooftop.
After Sun perishes, Sheldon swoops down to take you to the
next marked rooftop. The Russian gangster Alexander Mirkov
is ready for you—he’s even had a tank ferried to the rooftop
to take you out. Before grappling to Sheldon so he can escort
you to the next tower, refill SMG ammo (if that is your desired
weapon) and nab the cash stash above the stage. When you
are all set, hook to Sheldon’s chopper and accept the ride.
Drop down
on the next
rooftop when
Sheldon slows
down. Sheldon
tells you he has
your back. He
better, because
Mirkov’s tank
turret is devas-
tating. You can take cover from it at the stairwell (where you
find a weapon part) and at the bar, but out in the open, you
are in serious trouble. When Mirkov stops to let his guns cool,
Sheldon swoops low and opens fire from his chopper. Use
these precious seconds of reprieve to pop out and zero in on
Mirkov’s head.
Just like your fight with Sun, you cannot use your
grappling hook to rip Mirkov out from behind the gun.
Do not get close to the stage. Mirkov has
mined it! If you walk too close to the flashing red
lights, they explode. If you have been injured, the
explosion may be enough to kill you.
AST OFRACTER
FIELD GUIDETO PANAU
WEAPONS VEHICLE EXPLORINGPANAU
AGENCYMISSIONS
STRONGHOLDTAKEOVERS
FACTIONMISSIONS
CHALLENGES COLLECTIBLES ACHIEVEMENTSAND TROPHIES
WORKING FOR THE MANWelcome to Panau • Casino Bust • White Tiger • Mountain Rescue • Three Kings • Into the Den • A Just Cause
Protected by copyright. Unauthorized or unlawful copying or downloading expressly prohibited.

8/18/2019 Just Cause 2 Prima Official Guide
http://slidepdf.com/reader/full/just-cause-2-prima-official-guide 98/208
PRIMA OFFICIAL STRATEGY GUIDETM
98
Watch out for Mirkov’s
men. When you pop out of
cover, they swarm. Take
them out early so you can
concentrate on Mirkov’s
head when Sheldon providescover.
Use frag grenades and
triggered explosives to
damage the tank and hurt
Mirkov.
Your best chance against Mirkov is to slip to either side of his
tank and hide until Sheldon provides cover fire. When Mirkov’s
turret swings toward Sheldon, Mirkov’s head is completely
exposed. Use Zoom mode to get a good look at the side of his
dome and then empty a clip. As soon as you hear Sheldon stop
firing, though, you better run. Mirkov will turn right back to you
when Sheldon moves away from the rooftop.
While not exactly a solid strategy, you can create a “safe
zone” to one side of the stage by triggering a mine andtaking the damage. Heal up with the medical kit near the
bar, and then use that “unmined” wall to the side of the
tank as cover when Sheldon cannot offer fire.
When you finally break Mirkov down, Sheldon ditches his
damaged chopper—and crashes it right into the Russian’s tank.
Now you must head to the third tower to take out Washio.
Before leaving the current rooftop, scavenge any spare ammo
from the small boxes. Then, jump off the side of the building
and parachute over to Washio’s tower. Grapple onto it and pull
yourself in.
Though there are weaponsto use on the roof, your
target is the two doors
to Washio’s suite on the
hotel’s penthouse level.
Parachute in and open fire
on the Japanese general’s
guards.
You must blow up the two
doors to the suite. If you
are out of grenades, pick
up some frags from the box
in the red-carpeted hallway.
After destroying the
two doors, Washio
has no choice
but to flee to the
rooftop. You chase
after him. However,
as you arrive, you
realize that it might
be you walking into
a trap, not Washio.
The general has a battery of satellite-controlled missiles that
will call down from the heavens and blast you off the side of the
hotel, your broken body falling to the street below.
Washio is armed with an SMG that he uses to defend himself
during this battle, but you should be far more concerned with the
missiles. The missiles are heralded by a collection of laser beams
that meet at a single point. If that single point is on top of your
head, you’re a goner. So keep moving around the rooftop. If you
ever stand still, the lasers will find you.
AST OFRACTER
FIELD GUIDETO PANAU
WEAPONS VEHICLE EXPLORINGPANAU
AGENCYMISSIONS
STRONGHOLDTAKEOVERS
FACTIONMISSIONS
CHALLENGES COLLECTIBLES ACHIEVEMENTSAND TROPHIES
WORKING FOR THE MANWelcome to Panau • Casino Bust • White Tiger • Mountain Rescue • Three Kings • Into the Den • A Just Cause
Protected by copyright. Unauthorized or unlawful copying or downloading expressly prohibited.

8/18/2019 Just Cause 2 Prima Official Guide
http://slidepdf.com/reader/full/just-cause-2-prima-official-guide 99/208
C H A R A C T E R S
F I E L D G U I D E T O P A N A U
W E A P O N S
V E H I C L E S
E X P L O R I N G P A N A U
A G E N C Y M I S S I O N S
S T R O N G H O L D T A K E O V E R S
F A C T I O N M I S S I O N S
C H A L L E N G E S
C O L L E C T I B L E S
A C H I E V E M E N T S
primagames.com 99
Washio is flanked by three
or so minions with SMGs.
Ventilate them as you move
one step ahead of the
lasers.
Get up on that stage or run
by it, emptying a clip into
Washio as you move.
Now, this is tricky but ultraeffective against Washio. You know
how the lasers collect on your position? Lure the lasers to
Washio. Back him up to a corner of the stage by whipping him
with your grappling hook. (You will take some fire, but if you save
the medical kit, you can use it to restore your health after this
daredevil move.) Let the lasers converge on your location and
then roll away. Washio doesn’t move as fast as you. He will be
caught in the missile blast, which severely shears his health.
Keep moving
around the
rooftop, trying todrag Washio into
his own weapon
systems. He likes to
stick to the stage
since it is the high
ground, so if you
can pass him on
the steps, you can
lead him directly
under a missile
attack. Once
Washio is dead,
the mission ends insuccess.
At the rooftop
bar, Sheldon fixes
you a drink. Together, you go over the intel gathered from
this mission. All three superpowers are interested in Panau
for a reason, but all died before telling you exactly what that
reason is. What could Panau possibly possess that would
have Russia, China, Japan, and the United States butting
heads? This is just a small island nation, after all....
Sheldon tells you to get back to work with the factions and
keep destabilizing Panau. You’ve almost sent the entire island
into pandemonium. As soon as you have the entire island
under the control of the factions, Baby Panay will have no
choice but to show his hand.
The final two missions of the main campaign follow.
Do not read them unless you want to spoil the
surprise ending of Just Cause 2. Come back here
after you have caused enough chaos to unlock the
mission “Into the Den.”
Into the Den
This is it, the beginning of the endgame for Baby Panay and
his regime of terror. You have successfully delivered the
island to the rival factions. Everything is in complete disarray.
Chaos reigns. Mission accomplished?
Not yet.
It’s now time for regime change. You must chase Panay
to his hidden lair and kill him. When the vacuum of poweropens up, the Agency can install a new leader. Sheldon
places the location of Panay’s lair on your PDA map. It is
situated in a heavily fortified canyon. You cannot fly straight
to the lair; you must go in on the ground and disable air
defenses. He then tells you that you may take one of the
factions into battle with you to help during this penultimate
mission. Once you choose a faction, there is no backing out.
They are with you to the end.
It does not matter which faction you choose to take with
you; the selection does not affect the course of events or
strategy for finding Panay. For the sake of this chapter,
we’re going with the Reapers. What? Bolo’s cute.
AST OFRACTER
FIELD GUIDETO PANAU
WEAPONS VEHICLE EXPLORINGPANAU
AGENCYMISSIONS
STRONGHOLDTAKEOVERS
FACTIONMISSIONS
CHALLENGES COLLECTIBLES ACHIEVEMENTSAND TROPHIES
WORKING FOR THE MANWelcome to Panau • Casino Bust • White Tiger • Mountain Rescue • Three Kings • Into the Den • A Just Cause
Protected by copyright. Unauthorized or unlawful copying or downloading expressly prohibited.

8/18/2019 Just Cause 2 Prima Official Guide
http://slidepdf.com/reader/full/just-cause-2-prima-official-guide 100/208
PRIMA OFFICIAL STRATEGY GUIDETM
100
air-drop technicians to help you hack the security system that
keeps Panay’s lair locked up tighter than a kick drum.
Before you can start disabling the air defenses, you must push
through the canyon floor. There is a system of rally points you
must capture with your comrades. Soldiers are present at each
rally point, and the closer you get to the lair, the stronger they
become. Start running toward the first rally point and then unload
when you see the first soldier raise his weapon. While you can
regenerate health, your comrades cannot. If they fall, they do not
get back up. The longer you can keep these guys with you, the
easier you’ll have it while sweeping out the canyon.
LEGEND
INTO THE DEN
When you leave Sheldon, you must report to the HQ of your
chosen faction. All three HQs are on your PDA map. Fly or drive to
the faction HQ and engage the leader, requesting their assistance.
Naturally, the faction leader agrees to help you hunt and destroy
Panay. They want that little creep gone, too. Although, they have no
idea that once you’ve taken their help, you have other ideas about
who to install at the top of the pyramid.
Weapon up before heading out. There is gear at each
faction HQ. And since this is the start of the endgame,
blow your cash and parts on your favorite tools of
destruction.
The faction leader
pledges support to
you. A small patrol
of the faction’s best
men will flank you
as you take the
canyon. However,
the faction leader
cannot join you.
Not while the
air defenses are in place. You need to work your way through
the canyon and disable air defenses so the faction leader can
StrategyLocation: Wajah Ramah Fortress
Rewards: 10,000 Chaos, $20,000,three weapon parts, three vehicleparts
Reaper HQ
Ular Boys HQ
Roaches HQ
Rally Point
Baby Panay’s Lair
Anti-Air Guns
1
2
3
4
3
1
START
2
4
5
5
AST OFRACTER
FIELD GUIDETO PANAU
WEAPONS VEHICLE EXPLORINGPANAU
AGENCYMISSIONS
STRONGHOLDTAKEOVERS
FACTIONMISSIONS
CHALLENGES COLLECTIBLES ACHIEVEMENTSAND TROPHIES
WORKING FOR THE MANWelcome to Panau • Casino Bust • White Tiger • Mountain Rescue • Three Kings • Into the Den • A Just Cause
Protected by copyright. Unauthorized or unlawful copying or downloading expressly prohibited.

8/18/2019 Just Cause 2 Prima Official Guide
http://slidepdf.com/reader/full/just-cause-2-prima-official-guide 101/208
C H A R A C T E R S
F I E L D G U I D E T O P A N A U
W E A P O N S
V E H I C L E S
E X P L O R I N G P A N A U
A G E N C Y M I S S I O N S
S T R O N G H O L D T A K E O V E R S
F A C T I O N M I S S I O N S
C H A L L E N G E S
C O L L E C T I B L E S
A C H I E V E M E N T S
primagames.com 101
Stay with the pack. Weapon
and vehicle parts tempt, but
your comrades need your
support to survive.
As you approach rally
points, throw explosives
over your comrades’ heads
to soften up the soldiers.
Look for medical kits
at the rally points, and
always scoop up your fallen
enemy’s dropped weapons.
When you reach the cement wall, you must stop. Just as the
team collects around you, a Razorback bursts through the wall
and opens fire. Your comrades do not stand a chance against
firepower like that. If you do not act fast, they will be killed within
seconds. As soon as possible, grapple the gunner atop the tank
and rip him out from behind the trigger. Then, slap a pair of
triggered explosives on the tank and blow it sky-high.
Once the tank is down, you can start moving on the air defenses.
Inside the first clearing, blast the nearby generators to generate a
little Chaos and pick up the armor part. Climb the stairs and
cut down the small soldier patrol hiding behind some boxes.
Grapple up to the
cash stash above theclearing, and take a
shortcut up the side
of the mountain.
Blast every asset in
sight. Not only does
this cause chaos
(always fun), but it
also adds to your
stats. And in about 30
minutes, you’ll see just how those factor
into the overall game.
When you reach the top of the stairs, you’re finally at the
first antiair gun. But before you can sabotage it, you must
deal with a mounted gun and several soldiers. Start with the
mounted gun. Rip that shooter out of his perch with your
grappling hook, and then train your fire on the other soldiers.
Take to the mounted gun yourself to attack the remaining
soldiers. And if you really want to take some firepower with
you up the mountain, detach the mounted gun and carry itwith you. It requires you use both hands, so you cannot use
your grappling hook, but nobody can withstand a full blast
shot from that cannon.
Destroy the antiair
gun with whatever
you have handy. The
mounted gun works
well, as does triggered
explosives. Now your
faction boss can send
in a technician to start
hacking the controls
for Panay’s palace.
AST OFRACTER
FIELD GUIDETO PANAU
WEAPONS VEHICLE EXPLORINGPANAU
AGENCYMISSIONS
STRONGHOLDTAKEOVERS
FACTIONMISSIONS
CHALLENGES COLLECTIBLES ACHIEVEMENTSAND TROPHIES
WORKING FOR THE MANWelcome to Panau • Casino Bust • White Tiger • Mountain Rescue • Three Kings • Into the Den • A Just Cause
Protected by copyright. Unauthorized or unlawful copying or downloading expressly prohibited.

8/18/2019 Just Cause 2 Prima Official Guide
http://slidepdf.com/reader/full/just-cause-2-prima-official-guide 102/208
PRIMA OFFICIAL STRATEGY GUIDETM
102
Once the first gun is down, hop on the nearby tram car and ride
it to the next gun. You are dropped off right next to it, but several
soldiers are determined to stop you. Unload on them as soon as
you exit the tram. There is an elite in the group with extra ammo,
so go for the head if possible. You must also watch out for a
mounted gun on the antiair gun platform. Take out the gunner so
you have free access to the air defenses. Destroy the gun so the
faction can parachute in another technician.
Pick up the armor part on the building to the right of
the antiair gun.
Keep ripping apart the
facilities in the canyon
whenever possible. Using
a detached mountedgun works because it is
powerful and has unlimited
ammo.
The final antiair gun is just a tram ride away. When you reach
solid ground, you can pick up a medical kit and a shotgun,
but that’s only if you survive the initial defenses. There are two
autoturrets in front of the antiair gun and a small ninja patrol that
dances around. This is why the detached mounted gun remains
a good pick-up. It slows you down, but the minigun makes short
work of the ninjas and knocks over the autoturrets before they
can even draw a bead on your position.
Once you
have destroyed
the ninjas and the
turrets, ruin the
final antiair gun.
Your faction leadercomes over the
radio. All three
technicians are in
place. You should
now use the tram to cross to the carved faces of the Panay family
on the mountainside. The entrance to Panay’s lair is through the
mouth of the central face. You must hack it with the other three
technicians at the same time, so ride the tram to the mouth and
start the hack.
The mouth slowly opens,
revealing a stunning
courtyard carved inside
the mountain. All is still.Too still for your taste. You
must cross the courtyard
and access the personal
quarters marked on your
map. You will find Panay
there.
You confront Baby
Panay. The creep
asks if you are
also on Panau to
steal the country’soil supplies. Oil.
This was all over
oil. Before you
can handle Panay
yourself, though,
Karl comes out of hiding to attack Panay. Brandishing a grenade
and with a freaky glint in his eye, Karl grabs Baby and pulls him
close. Karl thinks Panay killed Jade, and now he is willing to give
up his own life for revenge. Who are you to stop him?
The explosion kills them both. But when Panay dies, a self-
destruct mechanism is started. You must escape the lair beforeit explodes. However, it’s locked up. You must parachute to a
control panel at the bottom of the courtyard and hack it to open
AST OFRACTER
FIELD GUIDETO PANAU
WEAPONS VEHICLE EXPLORINGPANAU
AGENCYMISSIONS
STRONGHOLDTAKEOVERS
FACTIONMISSIONS
CHALLENGES COLLECTIBLES ACHIEVEMENTSAND TROPHIES
WORKING FOR THE MANWelcome to Panau • Casino Bust • White Tiger • Mountain Rescue • Three Kings • Into the Den • A Just Cause
Protected by copyright. Unauthorized or unlawful copying or downloading expressly prohibited.

8/18/2019 Just Cause 2 Prima Official Guide
http://slidepdf.com/reader/full/just-cause-2-prima-official-guide 103/208
C H A R A C T E R S
F I E L D G U I D E T O P A N A U
W E A P O N S
V E H I C L E S
E X P L O R I N G P A N A U
A G E N C Y M I S S I O N S
S T R O N G H O L D T A K E O V E R S
F A C T I O N M I S S I O N S
C H A L L E N G E S
C O L L E C T I B L E S
A C H I E V E M E N T S
primagames.com 103
the exit. But the scene is now full of elite soldiers and an attack
chopper. With little cover at the panel, you must do something
about the chopper. However, while you’re shooting the chopper’s
guards, the soldiers on the ground will chew you to pieces.
So, you must
first eliminateat least half of
the soldiers in
the courtyard.
Drop down and
plow through the
soldiers around the
hack panel. Don’t
even try to access
it. Just hunt the soldiers. When the chopper circles overhead, roll
away from its minigun spray. Once you have killed about five or
six soldiers, you have the cover to take the chopper down.
Grab the medical kit from
the wall near the panel
before grappling to the
chopper—you will take
damage while attempting to
hijack it.
Blast the two guards who
hang out of each side of the
chopper, and then hammer
away at the pilot’s face.Once you have control of
the chopper, use its guns to
kill more soldiers around
the courtyard.
Other soldiers will attempt to steal the chopper if you
land near the panel, so trash the chopper by jumping out
and parachuting to the ground. Let the chopper crash.
Once you hack the panel and open the exit, you have 30
seconds to get out of there. Look for the marked exit and then
zip up to it with your grappling hook. You have little time
to engage the surviving soldiers. Just get out of that base
ASAP before it blows.
Outside, you get in Sheldon’s face for not telling you
about the real reason you were inserted in Panau: oil.
But before the two of you can get down to a geopoliticaldiscussion, Kane arrives via chopper. Supertankers from rival
powers are headed toward Panau. You must do something
to stop this island from turning into a field of death and
destruction over the black gold. This automatically segues
into the final mission: “A Just Cause.”
A Just Cause
Panau is sitting on the world’s largest oil supply. That’s why
players from all over the world were just circling like buzzards
in the event Baby Panay ended up on a slab. And now thatBaby is yesterday’s news, the superpowers are converging on
Panau to harvest that sweet crude. You need to make sure
that only Uncle Sam gets to drink deep. You must fly out to
the Panau oil field in the ocean and repel the supertankers on
their way to take the oil, which will in turn lead to a war that
threatens to ravage the island in ways that Panay couldn’t
ever have imagined.
StrategyLocation: Trader Sierra Outpost
Rewards: 10,000 Chaos, $20,000, three weaponparts, three vehicle parts
Kane
drops you off
at a Sivirkin 15
Havoc attack
chopper. Load
up on supplies
and then take
the chopper
out to the spot
marked on
your PDA map. That’s the location of the oil field. All of the
supertankers will converge on that spot, which is likely where
the shooting will begin.
AST OFRACTER
FIELD GUIDETO PANAU
WEAPONS VEHICLE EXPLORINGPANAU
AGENCYMISSIONS
STRONGHOLDTAKEOVERS
FACTIONMISSIONS
CHALLENGES COLLECTIBLES ACHIEVEMENTSAND TROPHIES
WORKING FOR THE MANWelcome to Panau • Casino Bust • White Tiger • Mountain Rescue • Three Kings • Into the Den • A Just Cause
Protected by copyright. Unauthorized or unlawful copying or downloading expressly prohibited.

8/18/2019 Just Cause 2 Prima Official Guide
http://slidepdf.com/reader/full/just-cause-2-prima-official-guide 104/208
PRIMA OFFICIAL STRATEGY GUIDETM
104
However, as you flyout to the oil field,
Sheldon tells you
he is getting some
nuclear readings
from under the
water. Something’s
up. As you close in
on the oil field, a
nuclear sub rises
from the blue. Where did that thing come from? But the more
immediate question is whether you can survive the incoming
barrage of SAMs launched from the sub’s deck. You need to get
down to that submarine and check out who is driving it. Chances
are good that the sub has a frightening payload.
You have two options: You can either bail out of the chopper and
just parachute down to the submarine, or you can attempt to
blast the SAMs from a distance and then use the chopper’s guns
to target the soldiers scurrying around the deck. If you opt to usethe chopper, get low to the water and creep up to the sub. Start
firing at about 320 meters and then inch
forward until you see your shots landing on
the SAM batteries. Stay out that far. If you
get any closer, the SAMs will find you.
There is an attack chopper circling the submarine. If you do not
deal with it in your own chopper, you must confront it when you
land on the submarine.
Elite soldiers attack as
soon as you land. Circle
the submarine deck and
shoot the soldiers. There
are weapons against the far
wall, near the doors to the
sub’s interior.
If you are facing away from
the sub doors, you find amedical kit on the left side
of the deck. Watch out for
soldiers!
Use the flak cannon on the
submarine’s deck to shoot
down the chopper. You
better hurry because you
are exposed on the cannon,
and if you miss the chopper,
it will cut you to ribbons
with a minigun attack.
LEGEND
A JUST CAUSE
START
1
Nuclear Submarine1
AST OFRACTER
FIELD GUIDETO PANAU
WEAPONS VEHICLE EXPLORINGPANAU
AGENCYMISSIONS
STRONGHOLDTAKEOVERS
FACTIONMISSIONS
CHALLENGES COLLECTIBLES ACHIEVEMENTSAND TROPHIES
WORKING FOR THE MANWelcome to Panau • Casino Bust • White Tiger • Mountain Rescue • Three Kings • Into the Den • A Just Cause
Protected by copyright. Unauthorized or unlawful copying or downloading expressly prohibited.

8/18/2019 Just Cause 2 Prima Official Guide
http://slidepdf.com/reader/full/just-cause-2-prima-official-guide 105/208
C H A R A C T E R S
F I E L D G U I D E T O P A N A U
W E A P O N S
V E H I C L E S
E X P L O R I N G P A N A U
A G E N C Y M I S S I O N S
S T R O N G H O L D T A K E O V E R S
F A C T I O N M I S S I O N S
C H A L L E N G E S
C O L L E C T I B L E S
A C H I E V E M E N T S
primagames.com 105
Once the deck is clear of
soldiers, hack the control
panel and open the doors to
see who is behind the wheel
of this boat.
Panay survived the grenade blast? Well, it looks like he won’t
be winning any beauty contests now, but that rocket launcher
he’s pointing at you certainly makes him a front-runner for Miss
Congeniality. Baby is flanked by a trio of ninjas who he sends out
to attack you. You must thwart the ninjas and kill Baby. Again.
Don’t get close to Panay’s platform unless you run right
up to the edge of it. He has two guns on the wall above
the platform that cannot be destroyed.
When the battle
begins, take
immediate cover
behind one of the
huge stacks of
gold ingots inside
the submarine. The
gold blocks Panay’s
rocket volleys and
hides you from the
ninjas. Use this moment to take stock of your surroundings. You
have Panay on the far side of the area with a rocket launcher.
Three ninjas are making their way toward you. There are boxes
with assault rifles against the left and right walls and a medical
kit on the right
wall. Ready? Break!
You need to work your way
closer to Panay, so take out
those ninjas. Use the gold
for cover and close in onthe ninjas, catching them in
streams of bullets.
There may only be
three ninjas in the
submarine when the
battle starts, but
there are plenty more
where they camefrom. However, there
are only ever three
ninjas at a time in
the hull. If you kill all
three, Panay just orders the next ninja squad into action.
This looks
like a good
idea, but
it is not.
Grappling
up to Panay
just puts you right in
front of his
wall-mounted guns, which shred you within seconds.
This is a favorite
trick of the
ninjas. You
have them dead
to rights across
the hull, but
after you landa few shots,
they vanish in
a smoke cloud.
Don’t relax for
a second. Start
looking around
your immediate
area. Chances
are good the
ninja zoomed
just out of your
peripheral
vision. You cannot
get close to
Panay, but you
can unload on
him when he
is reloading
his launcher.
He launches
in volleys, so
when you hear
four rockets smash into a gold pile or a pillar, you have a few
“safe” seconds to stand out of cover and empty a clip. The
assault rifle is great if you can get a clean shot in zoomedmode. The SMG is good for looser aiming, especially while
running around the sub.
AST OFRACTER
FIELD GUIDETO PANAU
WEAPONS VEHICLE EXPLORINGPANAU
AGENCYMISSIONS
STRONGHOLDTAKEOVERS
FACTIONMISSIONS
CHALLENGES COLLECTIBLES ACHIEVEMENTSAND TROPHIES
WORKING FOR THE MANWelcome to Panau • Casino Bust • White Tiger • Mountain Rescue • Three Kings • Into the Den • A Just Cause
Protected by copyright. Unauthorized or unlawful copying or downloading expressly prohibited.

8/18/2019 Just Cause 2 Prima Official Guide
http://slidepdf.com/reader/full/just-cause-2-prima-official-guide 106/208
PRIMA OFFICIAL STRATEGY GUIDETM
106
The wall guns are
dangerous, but if you
grapple under the front
ledge of Panay’s platform,
you put him in a tough spot.Launch a series of grenades
up to his level and then back
off. If you surround him with
frags, he has nowhere to go
but down.
If you are caught out in the
open when Panay launches,
start rolling. Get to cover!
Once you defeat
Panay, you discover
his trump card: The
diminutive dictator
has four nukes
onboard. Each of
the nukes is aimed
at a superpower
that tried to claim
the oil for itself.
The madman launches the missiles right in front of you, too. But
Panay wasn’t looking when he tried running across the deckof the sub, because he got his clothes caught on one of the
missiles. He may be about to nuke America, but he’s going to get
a front-row seat to the show—unless you can stop those missiles.
You have no choice. You grapple up to one of the missiles.
You must disarm
the four missiles
by hacking their
control panels, but
Panay will shoot
at you when you
try to perform the
hack. So, take aim
and shoot Panayoff-balance. When
he slips, quickly hack the control panel and input the onscreen
sequence.
Use a stunt jump to bound
between the four missiles
as they streak across the
water.
Repeat this process
for the three
missiles. When only
Panay’s missile
is left, jump to it.
You slam Panayinto the exposed
missile core. He’s
stuck and has no
chance of freeing
himself. Then you turn to the control panel. Instead of disabling
the nuke, though, you just change the target coordinates. Baby
is not going to America, after all. His flight is making its final stop
much closer.
Much to
Sheldon’s chagrin,
you programmed
the missile to crash
into the oil field,thus destroying
the impetus for the
superpowers to
descend on Panau.
No oil, no interest.
This denies the agency access to the oil, but after hearing
your reasoning, Sheldon understands you did it to protect the
innocents of Panau. War was coming. And when that oil was
finally sold, none of the people would have seen a dime anyway.
So, as you drift through the waters of Panau and enjoy the last of
the fireworks, you raise a toast to good deeds, good friends, and
doing your duty for a just cause.
MERCENARY MODEOnce youcompletethe Agencymissions andthe story ofoverthrowingBaby Panayends, yourtime in Panauis hardlyover. Welcome to Mercenary mode. All of Panau remains
your playground, and you still have Black Market access,so complete any outstanding faction mission you mayhave skipped, or work on some more racing challenges.But now instead of causing chaos and looking for troublefor the sake of cash and moving the story along, you areworking toward 100-percent completion.
In your PDA, the Chaos meters are replaced by apercentage counter that shows how much of the game youhave finished. If you only did all of the Faction, Stronghold Takeover, and Agency missions, you should be right around32 percent. Without scouring the island for parts and cashstashes, cleaning all evidence of Panay off the island byblowing up assets, and finishing challenges, you cannotachieve 100-percent completion. So get back out there andkeep making noise. The revolution may be over, but thedemolition is just getting started.
AST OFRACTER
FIELD GUIDETO PANAU
WEAPONS VEHICLE EXPLORINGPANAU
AGENCYMISSIONS
STRONGHOLDTAKEOVERS
FACTIONMISSIONS
CHALLENGES COLLECTIBLES ACHIEVEMENTSAND TROPHIES
WORKING FOR THE MANWelcome to Panau • Casino Bust • White Tiger • Mountain Rescue • Three Kings • Into the Den • A Just Cause
Protected by copyright. Unauthorized or unlawful copying or downloading expressly prohibited.

8/18/2019 Just Cause 2 Prima Official Guide
http://slidepdf.com/reader/full/just-cause-2-prima-official-guide 107/208
C H A R A C T E R S
F I E L D G U I D E T O P A N A U
W E A P O N S
V E H I C L E S
E X P L O R I N G P A N A U
A G E N C Y M I S S I O N S
S T R O N G H O L D T A K E O V E R S
F A C T I O N M I S S I O N S
C H A L L E N G E S
C O L L E C T I B L E S
A C H I E V E M E N T S
primagames.com 107
STRONGHOLD TAKEOVERS
STRONGHOLD TAKEOVER MISSIONS MAP
LEGEND
2
12
1
33
3
2
1
Reapers HQ
Roaches HQ
Ular Boys HQ
Rocket Science
A Second Amendment
Chemical Compound
Free Trade
Oil for Blood
Paradise Valley
Power Surge
Pilgrimage
Boys with Toys
2
3
1
1
3
1
2
2 3
AST OFRACTER
FIELD GUIDETO PANAU
WEAPONS VEHICLE EXPLORINGPANAU
AGENCYMISSIONS
STRONGHOLDTAKEOVERS
FACTIONMISSIONS
CHALLENGES COLLECTIBLES ACHIEVEMENTSAND TROPHIES
HOW THEY WORK • REAPERS • ROACHES • ULAR BOYS
Protected by copyright. Unauthorized or unlawful copying or downloading expressly prohibited.

8/18/2019 Just Cause 2 Prima Official Guide
http://slidepdf.com/reader/full/just-cause-2-prima-official-guide 108/208
PRIMA OFFICIAL STRATEGY GUIDETM
108
When you initially set foot in Panau, the government controls
the entire island. To aid in the destabilization of Baby Panay’s
regime, you must expand the influence of the three rival factions
at play: the Reapers, the Roaches, and the Ular Boys. However,
you must first establish some form of trust with the faction
leaders, no matter how tenuous. After you complete the secondAgency mission, Karl Blaine sends out word that the criminal
Scorpio (you) has landed on Panau and is willing to work for
the highest bidder. Your first mission with each faction, then, is
to help it claim ownership of a corner of the island. From there,
the factions’ spheres of influence grow as you raise the level of
Chaos on the island.
These essential missions are called Stronghold Takeover
missions. Each faction has three Stronghold Takeover missions
you must complete, so you have nine of them total to finish. Once
you finish the initial Stronghold Takeover mission for a faction,
missions for that faction appear within the area of influence you
gain by wresting the stronghold away from the government.
Initially, there may be only three or so faction missions afterunlocking a new stronghold. As you further destabilize the island
by causing chaos, more faction missions appear.
If you are killed outside of a mission, you respawn at
the nearest faction-controlled stronghold.
After some time, factions will offer new Stronghold Takeover
missions, typically in a different section of the island. Theultimate goal is to establish all nine faction strongholds so that
they control 99 percent of the island before you make your final
charge on Baby Panay and ruin his corrupt regime.
All Stronghold Takeover missions after the initial run
are assigned at the faction headquarters, located
around the center of Panau. These HQs are placed on
your map after completing the second Agency mission:
“Casino Bust.”
HOW THEY WORK
After accepting a Stronghold Takeover mission, the faction leaderescorts you to the site of the stronghold. You join a technician
loyal to the faction, as well as a handful of the technician’s
comrades. Your job is to keep that technician alive until you reach
the interior of the stronghold. Once the technician identifies the
stronghold’s communications center, he will tell you to protect
him while he hacks the communications terminal. As soon as the
hack is complete, the stronghold belongs to the faction.
Strongholds
are useful for
receiving new
missions, and
they serveas depots
for vehicles.
However, do
not expect to
always find a
chopper or a tank at every stronghold each time
you visit.
Of course, nothing is that easy. You must fight your way through
several layers of defenses to reach the communications center.
Typically, you must break through a main gate by killing the first
wave of guards and hacking a gate switch. Then, you must stayalongside the technician as you drop government thugs. The
technician and his allies will fight, and the technician is relying on
the great Scorpio to keep him alive. If the technician finds himself
in danger, he will hang back and let you move ahead, carving a
path through the guards and soldiers.
AST OFRACTER
FIELD GUIDETO PANAU
WEAPONS VEHICLE EXPLORINGPANAU
AGENCYMISSIONS
STRONGHOLDTAKEOVERS
FACTIONMISSIONS
CHALLENGES COLLECTIBLES ACHIEVEMENTSAND TROPHIES
HOW THEY WORK • REAPERS • ROACHES • ULAR BOYS
Protected by copyright. Unauthorized or unlawful copying or downloading expressly prohibited.

8/18/2019 Just Cause 2 Prima Official Guide
http://slidepdf.com/reader/full/just-cause-2-prima-official-guide 109/208
C H A R A C T E R S
F I E L D G U I D E T O P A N A U
W E A P O N S
V E H I C L E S
E X P L O R I N G P A N A U
A G E N C Y M I S S I O N S
S T R O N G H O L D T A K E O V E R S
F A C T I O N M I S S I O N S
C H A L L E N G E S
C O L L E C T I B L E S
A C H I E V E M E N T S
primagames.com 109
Even though
you are trying
to take these
strongholdsfor the
factions, you
should still
tear apart
government-
owned assets
like broadcast towers and fuel depots to raise Chaos.
In fact, after a faction owns a stronghold, you can blast
apart assets to continue causing chaos.
No two strongholds are the same. You will storm different
facilities, such as military bases and docks. Defenses will be
different, especially as the level of government aggression rises.During the first few Stronghold Takeover missions, it may take a
while to rattle the hornets’ nest enough to make Panay’s forces
radio in air support, but by the time you bring down the final trio
of strongholds, the soldiers will throw everything they have at you
within just a minute or two.
In some strongholds, you must take out the
commanders to secure the facility. These commanders
are often piloting attack choppers that attempt to stop
the communications center hack, and they will be noted
onscreen.
When you reach
the communi-
cations center, you
are expected to
hold off one last
push by Panay’s
troops. Fortunately,
there is often a
mounted weapon
next to the terminal.
Jump behind it and riddle advancing troops and vehicles with
a stream of hot lead. There are exceptions, of course, and you
may find it much easier to hold off Panay’s last-ditch efforts
by hijacking an attack chopper instead of using the mounter
weapon.
Struggling with a takeover? Call up the Black Market
and drop in new weapons or a vehicle.
Use the strategies in this chapter to overtake all nine
strongholds and extend the influence of the factions. Not
only are Stronghold Takeover missions the only conduit to
continue receiving faction missions (no area of influence, no
new missions), but also knocking over one of Panay’s bases
greatly raises the island’s Chaos level, which will help youmeet your end goals.
REAPERS
Rocket Science
When you accept this mission, you meet Bolo Santosi for
the first time at the Reaper HQ. She is interested to find out
why you want to join the Reapers, but instead of making up
some story, you say that you are contracted to find and killan American—which is only a half-truth. On the helicopter
ride into the mountains, the site of the Gunung Gila Pangkat
Facility, you discuss the terms of your arrangement. If you
help Bolo take the mountain research facility, she will help
you find the American.
You have the element of surprise at the beginning of the
mission, so don’t waste it. Rush toward the facility and do not
open fire until you can take down a guard for sure. There are
several guards at the facility’s entrance. With your comrades
at your side, push into their midst and take them out.
AST OFRACTER
FIELD GUIDETO PANAU
WEAPONS VEHICLE EXPLORINGPANAU
AGENCYMISSIONS
STRONGHOLDTAKEOVERS
FACTIONMISSIONS
CHALLENGES COLLECTIBLES ACHIEVEMENTSAND TROPHIES
HOW THEY WORK • REAPERS • ROACHES • ULAR BOYSRocket Science • A Second Amendment • Chemical Compound
Protected by copyright. Unauthorized or unlawful copying or downloading expressly prohibited.

8/18/2019 Just Cause 2 Prima Official Guide
http://slidepdf.com/reader/full/just-cause-2-prima-official-guide 110/208
PRIMA OFFICIAL STRATEGY GUIDETM
110
There are no guards in the first set of towers.
No better time than thepresent to start causing
chaos. Blast the fuel depots
inside the facility as you
approach the locked gate.
When you reach the locked gate, the Reapers hang back. You
must dispatch the guards at the gate (look out for the shooter in
the tower to the right) and then breach the wall to unlock it from
within. After killing the guards, launch over the gate by zipping
up to the tower and hopping down the other side.
LEGEND
ROCKET SCIENCE
Before breaching the gate,
snake the vehicle part on
the nearby rooftop.
Keep a constant eye on your Upgrade radar. Don’t risk
your life for parts, but that radar will make sure you
never miss a grab.
Look out for the guard
inside the small gatehouse
with the control panel. Kill
him and then follow the
onscreen code to open thegate and let the Reapers
inside the facility.
Just inside the
gate, you find
a flak cannon.
Jump behind the
controls and use
the massive gun to
rip apart the fuel
tanks and radardish that are within
range. This causes
Strategy
Location: Gunung Gila Pangkat Facility
Rewards: 7,500 Chaos, $17,500, two
weapon parts, two vehicle parts
Reaper Stronghold
AST OFRACTER
FIELD GUIDETO PANAU
WEAPONS VEHICLE EXPLORINGPANAU
AGENCYMISSIONS
STRONGHOLDTAKEOVERS
FACTIONMISSIONS
CHALLENGES COLLECTIBLES ACHIEVEMENTSAND TROPHIES
HOW THEY WORK • REAPERS • ROACHES • ULAR BOYSRocket Science • A Second Amendment • Chemical Compound
Protected by copyright. Unauthorized or unlawful copying or downloading expressly prohibited.

8/18/2019 Just Cause 2 Prima Official Guide
http://slidepdf.com/reader/full/just-cause-2-prima-official-guide 111/208
C H A R A C T E R S
F I E L D G U I D E T O P A N A U
W E A P O N S
V E H I C L E S
E X P L O R I N G P A N A U
A G E N C Y M I S S I O N S
S T R O N G H O L D T A K E O V E R S
F A C T I O N M I S S I O N S
C H A L L E N G E S
C O L L E C T I B L E S
A C H I E V E M E N T S
primagames.com 111
chaos and increases heat. You may see your first attack chopper
at this point. Either blast it down with the cannon or hijack it to
use for the remainder of the mission, blasting Panay’s thugs as
the Reapers make their way through the facility.
The Reapers are stopped by a mounted gun at the bottom of a
ramp. The gunner is flanked by several guards. (Has Panay not
trained his men to not stand next to fuel drums in a firefight?
Blast those barrels to kill the guards.) Use frags to displace the
gunner or rip him out from behind the gun with your grappling
hook. After you kill everybody at the base of the ramp, the
Reapers can advance.
Got extra bullets? There are spherical fuel holders
at the bottom of the ramp that increase Chaos when
destroyed. If you are low on ammo, save your bullets
and come back after the takeover.
Keep up with the Reapers as they rush toward the communi-
cations center. The clearing in which the communications center
is situated has a mounted gun, making the technician stop short.
You must take out that gunner before the Reapers will move an
inch, so stick your head out and blast the gunner with frags or go
for a tricky headshot. Prioritize the gunner, because once he is
out of commission, the Reapers rejoin the fight and help clean up
the remaining soldiers.
There are extra frags, a submachine gun, and a medicalkit in small boxes next to the communications console.
While the technician
hacks the console, use
the mounted gun to
hold off the advancing
guards. Ammo is
unlimited, so let loosewith a fat spray until
the hack is complete.
If you cannot quite see the advancing troopers
through the muzzle flash, that’s good—you have
pushed them back. However, to make sure you are
targeting the right areas, watch for the cursor to
turn red. That means you’re aiming right at a hostile.
Before thetechnician can
finish the hack,
the stronghold
commander
arrives via
attack chopper.
Try to target the
chopper with
the mounted
gun, but if
you cannot
nail it before
it screamsoverhead
(the mounted
gun’s range
is limited to
approximately
a 35-degree
angle from the ground), abandon the gun and go for a
straight hijack. Rush under the chopper and grapple to it with
your hook. Rip the commander out of his seat to steal the
chopper. He will not survive the fall to the ground unless the
chopper is brought low during the hijacking.
Use the chopper to
destroy all government
targets at the facility.
If you take the chopper before the hack is complete,
watch out for SAMs.
AST OFRACTER
FIELD GUIDETO PANAU
WEAPONS VEHICLE EXPLORINGPANAU
AGENCYMISSIONS
STRONGHOLDTAKEOVERS
FACTIONMISSIONS
CHALLENGES COLLECTIBLES ACHIEVEMENTSAND TROPHIES
HOW THEY WORK • REAPERS • ROACHES • ULAR BOYSRocket Science • A Second Amendment • Chemical Compound
Protected by copyright. Unauthorized or unlawful copying or downloading expressly prohibited.

8/18/2019 Just Cause 2 Prima Official Guide
http://slidepdf.com/reader/full/just-cause-2-prima-official-guide 112/208
PRIMA OFFICIAL STRATEGY GUIDETM
112
As soon as the technician completes the hack, the Reapers
establish their foothold in Panau. This successful Stronghold
Takeover mission results in a new spawn point, and it unlocks
at least one new Reaper faction mission: “Ups and Downs.” If
you have not started helping the other factions yet, engage the
Roaches or the Ular Boys to initiate another Stronghold Takeover
mission and start shaking the foundation of Baby Panay’s regime.
If you lose the commander’s UH-10 Chippewa, there is
often a Mullen Skeeter Eagle on the helipad near the
hack point. No guns, but it’s a lot faster than walking.
A Second AmendmentSantosi’s second Stronghold Takeover mission is at a military
supply depot in the mountains of the Lautan Lama desert. This
southwestern stronghold is heavily guarded, so make sure you
enter the fight with good weapons—and full clips. By now, expect
slightly more aggressive guards, as you have surely rattled
Panay’s cage a little by this point.
Strategy
Location: Kem Gunung Gurun Supply Depot
Rewards: 7,500 Chaos, $17,500, two weapon parts,
two vehicle parts
Follow the Reapers through the rocks to the entrance of the
supply depot. Before rounding the corner to look directly at the
gate, the Reapers stop. Who can blame them? There are two
guards on the towers flanking the gate, each armed
with a rocket launcher. When you step out in the open
to attack, immediately look to the towers and yank
the guards off their feet with your grappling hook. As
soon as both rocket-launching guards are dead, the
Reapers rejoin the fight.
A SECOND AMENDMENT
LEGEND
Reaper Stronghold
Resist the temptation to rush in and take the
dropped launchers until you have cleared outthe guards below the towers.
There is a third guard with a launcher on the tower just beyond
the gate. Grab him with your hook before attempting to scale the
gate and unlock it from within.
The interior of
the supply depot
is crawling with
guards. Expect
immediate
resistance when
you scale the gate.
Don’t try to open
the doors right away, because the troops will shoot you in the
back while you attempt to hack the gate controls.
AST OFRACTER
FIELD GUIDETO PANAU
WEAPONS VEHICLE EXPLORINGPANAU
AGENCYMISSIONS
STRONGHOLDTAKEOVERS
FACTIONMISSIONS
CHALLENGES COLLECTIBLES ACHIEVEMENTSAND TROPHIES
HOW THEY WORK • REAPERS • ROACHES • ULAR BOYSRocket Science • A Second Amendment • Chemical Compound
Protected by copyright. Unauthorized or unlawful copying or downloading expressly prohibited.

8/18/2019 Just Cause 2 Prima Official Guide
http://slidepdf.com/reader/full/just-cause-2-prima-official-guide 113/208
C H A R A C T E R S
F I E L D G U I D E T O P A N A U
W E A P O N S
V E H I C L E S
E X P L O R I N G P A N A U
A G E N C Y M I S S I O N S
S T R O N G H O L D T A K E O V E R S
F A C T I O N M I S S I O N S
C H A L L E N G E S
C O L L E C T I B L E S
A C H I E V E M E N T S
primagames.com 113
There are lots of assets to sabotage inside the facility,
such as fuel tanks and mobile broadcast towers. Just do
not empty your clips into them, because you need your
bullets to survive the coming gauntlet.
The guards have set up a real meat grinder around the corner
from the entrance. There is a mounted gun atop the building on
the right side of the street (just above two sandbag barricades
with at least three more troops), and a sniper occupies the tower
to the west. Start by taking out the mounted gunner. Slip to the
corner of the building across from the mounted gun and zoom in
to score a headshot. Next, target the soldiers at the sandbags.
The technician will not
budge until you kill the
sniper. Peek out and
grapple the sniper, pulling
him to his death.
Use the red laser to tell exactly where the sniper is
looking. If you ever see a red laser, do not stop moving,
even for half a second. These crackshots will put one
right in your chest, and it is tough to survive a follow-up
shot.
Destroy convenient assets
as you push through the
depot. You can clean up
the rest after securing the
stronghold.
There is a mounted
gun on a buggy just to
the right of the sniper
tower. The Reaper
helps engage this
vehicle but will not lastlong unless you kill the
gunner, and any troop
who tries to retake
the weapon, before the
technician moves across the road to safety.
Except another mounted
gun just inside the gate
at the bottom of the
next ramp. Everybody
opens fire on it, but
you better take the
lead since you are thebest shot.
Look out for several guards moving through the
pillars to the north as you make a run toward the
communications center. Thankfully, there is a
medical kit on one of the pillars.
As the
technician does
his job, jumpbehind the
mounted gun
to hold off the
final wave of
soldiers. Expect
not only foot
soldiers, but
also vehicles.
The mounted
gun chews
through them,
but if you give
them a secondto open fire at
the Reapers,
you risk
injury to the
technician. The stronghold commander roars into the clearing
inside a tank. Stand your ground and unload into the tank’s
mounted weapon to kill the commander and liberate the
supply depot for the Reapers.
Depending on your current Chaos level, unlocking
this stronghold opens up missions such as “Can I
Get a Witness?” and “Driving Miss Stacey.”
AST OFRACTER
FIELD GUIDETO PANAU
WEAPONS VEHICLE EXPLORINGPANAU
AGENCYMISSIONS
STRONGHOLDTAKEOVERS
FACTIONMISSIONS
CHALLENGES COLLECTIBLES ACHIEVEMENTSAND TROPHIES
HOW THEY WORK • REAPERS • ROACHES • ULAR BOYSRocket Science • A Second Amendment • Chemical Compound
Protected by copyright. Unauthorized or unlawful copying or downloading expressly prohibited.

8/18/2019 Just Cause 2 Prima Official Guide
http://slidepdf.com/reader/full/just-cause-2-prima-official-guide 114/208
PRIMA OFFICIAL STRATEGY GUIDETM
114
LEGEND
Reaper Stronghold
The chemical plant is loaded with government assets that run up
the Chaos score. However, you want to keep your powder dry for
now and just concentrate on the takeover right now. Make sure
you have full clips before attempting to breach the entrance to
the facility; after all, those fuel tanks aren’t going anywhere.
The front gateof the facility is
locked tight. The
Reapers freeze
when they see the
two soldiers with
rocket launchers
on the towers that
flank the gate. Until
you kill them, your
comrades will not join you in the assault. So, start by rolling out
of the way of any incoming rockets and then rip the thugs from
their perches with your grappling hook. When the second hits
the pavement, the Reapers return to your side and unload theirweapons on the soldiers at the gate.
Chemical CompoundThe final Stronghold Takeover mission for the Reapers
is a chemical research facility in the Rajang River
delta. Panay is dumping the by-products of his
chemical weapons research into the water. Santosi
is still skeptical of your allegiances at this point, but
successfully rolling this stronghold for her should
certainly win her trust once and for all.
Strategy
Location: Pemainan Racun Facility
Rewards: 7,500 Chaos, $17,500, two weapon
parts, two vehicle parts
The cement barricades look like great places to hide,
but the soldiers are thinking the same thing. You have to
get dangerously close to flush them out of hiding.
Use weapons dropped by the
soldiers to blast apart the
gas holders near the gate.
Before attempting to open
the facility gates, take down
the three guards just inside.
These elites are armed with
shotguns, so do not get
close. Instead, use building
corners and concrete
barriers as cover while
targeting the thugs.
The Reapers stay
close until you
reach the walkway
stretching over
the road that runs
through the centerof the facility.
It’s not the three
soldiers on the
CHEMICAL COMPOUND
AST OFRACTER
FIELD GUIDETO PANAU
WEAPONS VEHICLE EXPLORINGPANAU
AGENCYMISSIONS
STRONGHOLDTAKEOVERS
FACTIONMISSIONS
CHALLENGES COLLECTIBLES ACHIEVEMENTSAND TROPHIES
HOW THEY WORK • REAPERS • ROACHES • ULAR BOYSRocket Science • A Second Amendment • Chemical Compound
Protected by copyright. Unauthorized or unlawful copying or downloading expressly prohibited.

8/18/2019 Just Cause 2 Prima Official Guide
http://slidepdf.com/reader/full/just-cause-2-prima-official-guide 115/208
C H A R A C T E R S
F I E L D G U I D E T O P A N A U
W E A P O N S
V E H I C L E S
E X P L O R I N G P A N A U
A G E N C Y M I S S I O N S
S T R O N G H O L D T A K E O V E R S
F A C T I O N M I S S I O N S
C H A L L E N G E S
C O L L E C T I B L E S
A C H I E V E M E N T S
primagames.com 115
bridge who have the Reapers spooked—it’s the mounted gun on
the street. Advance and use the concrete barriers as cover to
shoot the troops off the walkway, and then rip the gunner out
from behind the mounted gun’s shielding with your grappling
hook. As soon as the gun falls silent, the Reapers rejoin you.
Use the mounted gun to destroy the SAM atop the
building directly opposite the walkway.
Continue moving through
the base with the Reapers,
blasting the incoming
troops. Don’t miss the
armor upgrade near the
green trailers just beyond
the mounted gun.
Blast the fuel depot at the
end of the road. The giant
explosion kills all of the
Panay thugs standing next
to it.
Sniper! As you round thecorner from the fuel depot
you used as a bomb, look to
the tower for a sniper. Yank
him down so the Reapers
can continue toward the
communications center.
The communications center is not only protected by a sniper, but
also a mounted gun. Grapple up to the sniper tower to fly over
the mounted gun and then shoot the gunner from above. He has
no defense from you on the tower. Use the tower to rain death
down on the remaining guards at the communications center
while the technician and his comrades cross the clearing. As
soon as the technician reaches the console and starts the
hack, jump down and man the mounted gun to repel the final
assault.
Unload on the trucks
the troops use to
race toward the
site. This kills the
soldiers caught in
the substantial blast
radius of the trucks.
Before long, the stronghold commander arrives via attack
chopper. Release the mounted gun and grapple up to the
helicopter. Pull the commander out of the pilot’s seat and
throw him to his doom so you can command the chopper
while the technician finishes the hack. Listen close for anymissile launches (you often hear things like “missile away!”
when a rocket enters the air), and take evasive action to
avoid a midair death.
Use the chopper to
sweep the facility and
blast the remaining
assets like tanks to
rake up some extra
Chaos.
This completes the final Stronghold Takeover mission for the
Reapers, thus unlocking new missions like “I Want to Break
Free” and “Helicopter Hangaround.” However, to expand the
Reapers’ influence and find more missions, take the offered
faction missions and move across Panau, leaving nothing but
smoke and shrapnel in your wake.
AST OFRACTER
FIELD GUIDETO PANAU
WEAPONS VEHICLE EXPLORINGPANAU
AGENCYMISSIONS
STRONGHOLDTAKEOVERS
FACTIONMISSIONS
CHALLENGES COLLECTIBLES ACHIEVEMENTSAND TROPHIES
HOW THEY WORK • REAPERS • ROACHES • ULAR BOYSRocket Science • A Second Amendment • Chemical Compound
Protected by copyright. Unauthorized or unlawful copying or downloading expressly prohibited.

8/18/2019 Just Cause 2 Prima Official Guide
http://slidepdf.com/reader/full/just-cause-2-prima-official-guide 116/208
PRIMA OFFICIAL STRATEGY GUIDETM
116
LEGEND
Roaches Stronghold
When the Roaches rejoin you inside the harbor, you must all race
for the giant warehouse and cut down the soldiers attempting to
push back against you. The Roaches will assist, but the onus is
on you to lead the charge. Use your grappling hook to yank the
soldiers out of the warehouse, and then finish them off before
they can get to their feet.
If you kill a soldier pulled off his feet before he hits the
ground, you bank a Juggle Kill.
Use the fuel barrels inside the warehouse as
bombs to kill the troops.
Strategy
Location: Pelabuhan Saudagar
Rewards: 7,500 Chaos, $17,500, two weapon parts,two vehicle parts
The Roaches gladly
join you as you
rush the harbor
from the chopper,
but slow down
when you actually
reach the heavily
guarded entrance.
They hang back
and fire into the
guards, but they cannot move much farther into the harbor until
the soldiers are dead and you scale the gate to hack the control
panel. Grapple up to one of the empty towers and then drop
down on the other side to locate the control panel.
Look for the fuel depots next
to the gate; they’re easy
pickings once you reach the
harbor interior.
ROACHES
Free Trade
When you first pick up the phone to call the Roaches,
a speedboat roars up to the nearby pier to take youto the faction leader: Razak “Razor” Razman. The
ganglord lives in a posh estate in Panau and makes a
good living with his criminal empire, but like any thug,
he wants more. You tell Razor that you will help his
“cause,” and in return he will assist you in finding the
American who bedevils you. His first assignment is
to run point on a Stronghold Takeover mission at the
Pelabuhan Saudagar harbor in Panau City.
FREE TRADE
AST OFRACTER
FIELD GUIDETO PANAU
WEAPONS VEHICLE EXPLORINGPANAU
AGENCYMISSIONS
STRONGHOLDTAKEOVERS
FACTIONMISSIONS
CHALLENGES COLLECTIBLES ACHIEVEMENTSAND TROPHIES
HOW THEY WORK • REAPERS • ROACHES • ULAR BOYSFree Trade • Oil for Blood • Paradise Valley
Protected by copyright. Unauthorized or unlawful copying or downloading expressly prohibited.

8/18/2019 Just Cause 2 Prima Official Guide
http://slidepdf.com/reader/full/just-cause-2-prima-official-guide 117/208
C H A R A C T E R S
F I E L D G U I D E T O P A N A U
W E A P O N S
V E H I C L E S
E X P L O R I N G P A N A U
A G E N C Y M I S S I O N S
S T R O N G H O L D T A K E O V E R S
F A C T I O N M I S S I O N S
C H A L L E N G E S
C O L L E C T I B L E S
A C H I E V E M E N T S
primagames.com 117
More soldiers await
inside the warehouse. Lob
grenades at them to soften
up the pack, and then finish
them off alongside the restof the Roaches.
There is a medical kit against the back wall of the
warehouse. A submachine gun sits in a small box to its left.
When the Roaches exit the warehouse, they come to an
immediate stop. There is a sniper on the huge crane against the
water. The technician will not budge until the sniper is dead, sotarget the shooter and pull him to his death with your grappling
hook. As soon as the sniper pancakes on the pavement, the
technician comes out of hiding and resumes moving through the
harbor.
Crane cockpits like the one that hosted the sniper are
prime targets for causing chaos, but they take a lot of
firepower to destroy. Don’t waste SMG bullets on it.
More soldiers wait behind
some sandbags to the left
of the sniper’s crane. Blast
the fuel drums behind them
to blow up their defenses
(and score (10 Chaos per
barrel) and then clean up
any survivors.
When you enter the
next warehouse, zip up
to the cash stash on
the cargo containers.
Another batch of guards stands strong on a catwalk inside
the warehouse. You can pull them off the catwalk, but the fall
is not high enough to kill them. Instead, either shoot them off
the catwalk or target the fuel drums next to them for quick
kills. Mop up any remaining troops inside the warehouse and
then take the nearby medical kit before venturing outside.
The
Roaches will
not leave thewarehouse until
you take out
the mounted
gun next to
the communi-
cations center.
Step out and
immediately
target the
gunner. Either
go for a zoomed
headshot or pull
the shooter outof the gun with
your grappling
hook. As soon
as the mounted
gun is down, the Roaches make a break for the communi-
cations center. As the technician hacks the console, grab
the mounted gun (you can even detach it for mobility) and
chew up the incoming Panay thugs.
AST OFRACTER
FIELD GUIDETO PANAU
WEAPONS VEHICLE EXPLORINGPANAU
AGENCYMISSIONS
STRONGHOLDTAKEOVERS
FACTIONMISSIONS
CHALLENGES COLLECTIBLES ACHIEVEMENTSAND TROPHIES
HOW THEY WORK • REAPERS • ROACHES • ULAR BOYSFree Trade • Oil for Blood • Paradise Valley
Protected by copyright. Unauthorized or unlawful copying or downloading expressly prohibited.

8/18/2019 Just Cause 2 Prima Official Guide
http://slidepdf.com/reader/full/just-cause-2-prima-official-guide 118/208
PRIMA OFFICIAL STRATEGY GUIDETM
118
Just before the technician
finishes the hack, the
stronghold commander
arrives in an attack chopper.
Release the gun and grappleup to the chopper ASAP.
Throw the commander to his
death to commandeer the
chopper and use it to defend
the technician while he
finishes his work.
After securing the harbor,
sweep through it with the
chopper and blast the fuel
tanks, industrial chimneys,
and crane cockpits for
Chaos points.
Taking over the harbor results in Razor gaining a foothold in
Panau City. His sphere of influence encompasses the major metro
center and unlocks both new faction missions and several racing
challenges.
OIL FOR BLOOD The oil refinery has many assets to destroy, such as
industrial chimneys and fuel tanks, but your top priority
during this visit is to get the technician to the commu-
nications center inside the refinery. You must first take
out the group of guards at the front entrance. After
the kills, scale the gate and use the control panel to
lower the doors. Now the Roaches can rejoin you and
continue to move through the refinery.
There is a submachine gun refill next to the
control panel.
As soon as the Roaches breach the gate, two trucks
roar down the road and several soldiers jump out. The
concrete barriers are excellent cover. Stick with the Roaches,
though, because they are an aggressive bunch and will fight hard
against basic patrols like this. It’s only locked doors, snipers, and
mounted guns that make them hesitate.
Oil for BloodRazor knows you are not what you seem, but as long as you
keep helping the Roaches, he will overlook your hidden agenda.
His next task for you is to knock over an oil refinery. Oil is the
lifeblood of the new Panau economy. With this new foothold
in eastern Panau, Razor’s influence will spread and open newmarkets for his illicit trade.
Strategy
Location: Emas Hitam Oil Refinery
Rewards: 7,500 Chaos, $17,500, two weapon parts,
two vehicle parts
LEGEND
Roaches Stronghold
AST OFRACTER
FIELD GUIDETO PANAU
WEAPONS VEHICLE EXPLORINGPANAU
AGENCYMISSIONS
STRONGHOLDTAKEOVERS
FACTIONMISSIONS
CHALLENGES COLLECTIBLES ACHIEVEMENTSAND TROPHIES
HOW THEY WORK • REAPERS • ROACHES • ULAR BOYSFree Trade • Oil for Blood • Paradise Valley
Protected by copyright. Unauthorized or unlawful copying or downloading expressly prohibited.

8/18/2019 Just Cause 2 Prima Official Guide
http://slidepdf.com/reader/full/just-cause-2-prima-official-guide 119/208
C H A R A C T E R S
F I E L D G U I D E T O P A N A U
W E A P O N S
V E H I C L E S
E X P L O R I N G P A N A U
A G E N C Y M I S S I O N S
S T R O N G H O L D T A K E O V E R S
F A C T I O N M I S S I O N S
C H A L L E N G E S
C O L L E C T I B L E S
A C H I E V E M E N T S
primagames.com 119
Several guards rush down a ramp as you wind deeper into the
refinery. Throw frags to soften up the troopers as they stream
toward you. Use your grappling hook to pull them down the ramp.
As they struggle to their feet, the Roaches unload into them.
The concrete barriers are good places to rest if you
need to recover lost health.
At the top of the ramp,
turn left to chase fleeing
soldiers into the refinery
core.
Stay with the Roaches.
There’s safety in numbers!
Need a heavier weapon? Look for an assault rifle in
a crate next to the line of industrial chimneys at the
ramp’s top.
Several guards
confront you as
you close in on the
communications
center. There is
a soldier in a low
bunker on the
street’s left side,
and a sniper in the
tower to the right. The Roaches provide cover fire so you can
rush out and kill the embedded soldiers. Once you’ve pulled
both soldiers from cover, you can easily mop up the rest of
the pack.
Watch for soldiers ona narrow catwalk over
the ramp leading up
to the communications
center.
The communications center is not protected by a mounted
gun. Instead, the main defense is a demolition officer. Keep
your distance from this thug. He will throw frags at you,
which are easy enough to avoid. But when he performs his
suicide act of peppering the ground around him with timedcharges, you better be on the other side of the clearing.
Those explosives are powerful enough to kill, even if you are
close to full health.
Without
a mounted
gun, you must
seek the high
ground to
defend the
technician
as he hacks
the commu-
nications
console. Climb
up to the
helipad over
the clearing
so you have
clean shots at
the incoming
soldiers. The
troops don’t
just come from
the clearing. A batch erupts from behind the buildings to
the right. They take cover around the rooftop units, but you
can lob a grenade in there and let the blast damage shattertheir skulls.
AST OFRACTER
FIELD GUIDETO PANAU
WEAPONS VEHICLE EXPLORINGPANAU
AGENCYMISSIONS
STRONGHOLDTAKEOVERS
FACTIONMISSIONS
CHALLENGES COLLECTIBLES ACHIEVEMENTSAND TROPHIES
HOW THEY WORK • REAPERS • ROACHES • ULAR BOYSFree Trade • Oil for Blood • Paradise Valley
Protected by copyright. Unauthorized or unlawful copying or downloading expressly prohibited.

8/18/2019 Just Cause 2 Prima Official Guide
http://slidepdf.com/reader/full/just-cause-2-prima-official-guide 120/208
PRIMA OFFICIAL STRATEGY GUIDETM
120
LEGEND
Roaches Stronghold
Why not use the attack chopper on the helipad? It isn’t
easy to hit small targets with the chopper, and if an
enemy slips by you, they can kill the technician while
you try to maneuver for a good shot, which is not always
easy. Plus, there are SAMs on-site that will open fire
as soon as you start the engines. You cannot get up tospeed in time to avoid incoming missiles.
When the stronghold
commander arrives via
attack chopper, grapple
up to him and toss him
to the ground to finish
the Stronghold Takeover
mission.
Use the stolen Chippewa to
blast the industrial chimneys
and other assets after
seizing the stronghold. Keep
that chaos going.
Unlocking the second Roaches stronghold gives you a new base
of operations in northeast Panau—the Pelaut Archipelago. Thisopens new faction missions in this area of influence, such as
“Breaking and Entering” and “Smugglers Do Run.”
Paradise ValleyThe third Roaches Stronghold Takeover mission unfolds at a
drug-manufacturing facility in southern Panau, located in the
fertile Lembah Firaus valley. As soon as you escort the technician
to the hack site and bring the area under Razor’s control, the wily
ganglord offers additional faction missions out of one side of hismouth while threatening to kill you out the other.
Strategy
Location: Lembah Firaus Compound
Rewards: 7,500 Chaos, $17,500, two weapon parts,
two vehicle parts
PARADISE VALLEY
The drug factory is located on a site with ancient ruins. As such,
it is not protected as well as a harbor or a military base. But that
doesn’t mean the compound is without defenses. In fact, expectheavy resistance from violent soldiers who give it their all for
Baby Panay. Start your assault by blasting barrels and causing as
much noise as possible.
While the compound is ablaze, rush toward the mounted gun on
the main road through the area. Rip the trooper out from behind
the mounted gun to clear safe passage for the technician.
AST OFRACTER
FIELD GUIDETO PANAU
WEAPONS VEHICLE EXPLORINGPANAU
AGENCYMISSIONS
STRONGHOLDTAKEOVERS
FACTIONMISSIONS
CHALLENGES COLLECTIBLES ACHIEVEMENTSAND TROPHIES
HOW THEY WORK • REAPERS • ROACHES • ULAR BOYSFree Trade • Oil for Blood • Paradise Valley
Protected by copyright. Unauthorized or unlawful copying or downloading expressly prohibited.

8/18/2019 Just Cause 2 Prima Official Guide
http://slidepdf.com/reader/full/just-cause-2-prima-official-guide 121/208
C H A R A C T E R S
F I E L D G U I D E T O P A N A U
W E A P O N S
V E H I C L E S
E X P L O R I N G P A N A U
A G E N C Y M I S S I O N S
S T R O N G H O L D T A K E O V E R S
F A C T I O N M I S S I O N S
C H A L L E N G E S
C O L L E C T I B L E S
A C H I E V E M E N T S
primagames.com 121
Several soldiers guard
the temple, including
a trooper with a
rocket launcher. Grab
that guy with your
grappling hook firstwhile the Roaches
concentrate on the
rest of the pack.
The technician dives for the communications console to
the temple’s west. You must protect him while he hacks the
distress signal. Easier said than done because two armored
vehicles are coming through the fields, each with a mounted
cannon. There is a rocket launcher in the temple you must
pick up. Be mindful about using the medical kit right away,
though, because you will need it later if you are clipped by
one of those mounted cannons.
It takes four direct
rocket hits to destroy
one of the armored
vehicles, so don’t use
shells on the foot
soldiers. You need
every one of them for
the trucks.
All of the soldiers are heavily armed with assault
rifles and machine guns. If they reach the technician,
they will kill him within seconds. Salt the earth with grenades or triggered explosives so the soldiers
cannot advance up the road.
Don’t step over the box of frag grenades on the road’s
left side. They are extremely useful in clearing out
soldier patrols.
Next, two snipers in towers above the fields threaten the
technician. It can be difficult to see the snipers, so follow the red
lasers back to the towers and place the target cursor over the
shooter. Yank the snipers to their deaths before either of them
gets off a shot on the technician. When the snipers are down, the
Roaches start through the fields, too, and will assist in mopping
up the nearby soldiers.
Nab the cash stash in the
raised houses above the
fields, next to the sniper
towers. You can always finda use for $2,500.
Keep up with the Roaches as they rush under the raised houses
and continue their push through the compound. A jeep with
a mounted weapon barrels down the road between the fields
ahead, opening fire as it rolls. Blast the gunner before he gets a
bead on the technician, and then make a break for the temple
site to the east.
AST OFRACTER
FIELD GUIDETO PANAU
WEAPONS VEHICLE EXPLORINGPANAU
AGENCYMISSIONS
STRONGHOLDTAKEOVERS
FACTIONMISSIONS
CHALLENGES COLLECTIBLES ACHIEVEMENTSAND TROPHIES
HOW THEY WORK • REAPERS • ROACHES • ULAR BOYSFree Trade • Oil for Blood • Paradise Valley
Protected by copyright. Unauthorized or unlawful copying or downloading expressly prohibited.

8/18/2019 Just Cause 2 Prima Official Guide
http://slidepdf.com/reader/full/just-cause-2-prima-official-guide 122/208
PRIMA OFFICIAL STRATEGY GUIDETM
122
As soon as the second truck
is down, the stronghold
commander swoops down
from the sky in his attack
chopper. Grapple up to him
so he cannot gun down
the exposed technician.Throw him out to complete
the Stronghold Takeover
mission.
The Roaches now have a base of operations in southern
Panau’s Selatan Archipelago. This unlocks new faction missions
as well as challenges. Use this compound to regroup and then
head out to continue taking missions and causing major chaos
around the island.
ULAR BOYSPower SurgeWhen you first
answer the call
of the Ular Boys,
you are picked
up by boat and
escorted to the
nationalist gang’s
headquarters on
a small island. Sri
Irawan greets you
warmly, but behind that smile is a killer’s instinct. He knows you
are not what you seem, but you are a means to an end. He charges
you with protecting his technician in the faction’s first Stronghold
Takeover mission: the Awan Cendawan nuclear power plant.
Strategy
Location: Awan Cendawan
Rewards: 7,500 Chaos, $17,500, two weapon parts,
two vehicle parts
Sri’s desire to
possess the
nuclear power
plant puts you
and his men
immediately in
harm’s way. The
power plant islocked down and
heavily guarded.
There is a small bunker just outside the main entrance, and
there are shooters in the two towers that flank the gate. The Ular
Boys will not help out until you take down the soldiers in the
towers, so use your grappling hook to pull them down and then
concentrate your fire on the grunts who guard the door from the
ground.
Scale the door with your
grappling hook to drop
down on the other side and
access the control panel.
POWER SURGE
LEGEND
Ular Boys Stronghold
Inside the gate, target the nearby soldiers to clear a path for
the Ular Boys, and be sure to grab the vehicle part next to the
SAM launcher. After emptying the area, unlock the door for the
Ular Boys.
AST OFRACTER
FIELD GUIDETO PANAU
WEAPONS VEHICLE EXPLORINGPANAU
AGENCYMISSIONS
STRONGHOLDTAKEOVERS
FACTIONMISSIONS
CHALLENGES COLLECTIBLES ACHIEVEMENTSAND TROPHIES
HOW THEY WORK • REAPERS • ROACHES • ULAR BOYSPower Surge • Pilgrimage • Boys with Toys
Protected by copyright. Unauthorized or unlawful copying or downloading expressly prohibited.

8/18/2019 Just Cause 2 Prima Official Guide
http://slidepdf.com/reader/full/just-cause-2-prima-official-guide 123/208
C H A R A C T E R S
F I E L D G U I D E T O P A N A U
W E A P O N S
V E H I C L E S
E X P L O R I N G P A N A U
A G E N C Y M I S S I O N S
S T R O N G H O L D T A K E O V E R S
F A C T I O N M I S S I O N S
C H A L L E N G E S
C O L L E C T I B L E S
A C H I E V E M E N T S
primagames.com 123
With the Ular Boys, continue up the road that runs alongside the
reactor. Additional soldiers will pop out as soon as the technician
enters the facility, but the entire Ular pack helps you drop the
grunts who block the street.
The Ular Boys slow again
when you approach a tower
that hosts a soldier with a
rocket launcher. Either shoot
the trooper or yank him
out of the tower with your
grappling hook.
through the power plant. There is a mounted gunner on the
trench’s far side. The Ular Boys are no match for the mounted
weapon, so the technician and his comrades dart into cover
until you stop the gunner. There are multiple ways to do this.
You can grapple the gunner and yank him into the trench, go
for a headshot, or zip over the trench (via the grappling hook)
and target the mounted gunner from behind.
As soon as
the mounted
gunner is down,
the technician
comes out of
hiding and
crosses the
trench on the
bridge. Cross
with him and
the other Ulars. Now, take up position behind the mounted
weapon. Use it to hold off the incoming soldiers and to blow
up the fuel depots across the trench.
To complete
the Stronghold
Takeover
mission, you
must take out
the stronghold
commander. He
arrives behind
the mounted
weapon on top
of a tank. Your mounted gun is powerful enough to cut him
down, so target him between the crates and destroy the tankbefore it reaches the bridge that spans the trench.
Completing “Power Surge” establishes a stronghold in East
Tanah Raya. The Ular Boys now have a foothold in Panau
and will start offering faction missions, such as “Bridging
New Contacts.” By completing these missions and causing
additional chaos, you increase the Ular Boys’ sphere of
influence in Panau. Before heading out to take on additional
missions and challenges, scour the power plant for pick-ups,
such as vehicle and weapon parts and drug drops (the Ular
Boys’ collectible).
After killing the rocket-launcher soldier, the Ular Boys continue
into the refinery. They stop short of a “canyon” between tall
buildings that turns out to be a perfect ambush site. Pull down thegunners on the rooftops with your grappling hook. The real threat
is a sniper behind sandbags on one of the roofs. Be mindful of his
shots: They are deadly this early in the adventure. Use the concrete
barriers as cover and then launch your hook at the sniper to pull
him to the road below. He will not survive the fall.
When the
sniper is down, the
technician resumes
moving through
the power plant.
However, the Ular
Boys stop again as
soon as you reacha trench that runs
AST OFRACTER
FIELD GUIDETO PANAU
WEAPONS VEHICLE EXPLORINGPANAU
AGENCYMISSIONS
STRONGHOLDTAKEOVERS
FACTIONMISSIONS
CHALLENGES COLLECTIBLES ACHIEVEMENTSAND TROPHIES
HOW THEY WORK • REAPERS • ROACHES • ULAR BOYSPower Surge • Pilgrimage • Boys with Toys
Protected by copyright. Unauthorized or unlawful copying or downloading expressly prohibited.

8/18/2019 Just Cause 2 Prima Official Guide
http://slidepdf.com/reader/full/just-cause-2-prima-official-guide 124/208
PRIMA OFFICIAL STRATEGY GUIDETM
124
LEGEND
Ular Boys Stronghold
Cause chaos right here on
the site by blasting down
broadcast towers and
shooting up generators.
Grapple to the top of the reactor to snatch an armor
part. Every time you collect five of these upgrades, you
increase your maximum health.
PilgrimageSri has received word that Baby Panay has scheduled to pave oneof the sacred sites of the Ular Boys. This outrage must be stopped.
The Ular Boys’ leader asks you to retake the village of Kampung
Bahari from government forces so that it remains in Ular hands
and is never desecrated again. Oh, and Sri will also use the site as
a stronghold for running some of his drug operations....
Strategy
Location: Kampung Bahari
Rewards: 7,500 Chaos, $17,500, two weapon parts,
two vehicle parts
When you arrive at the village exterior, follow the Ular Boys into
the site, keeping close tabs on the technician so that no harm
becomes him. The Ulars hold up when they reach the ramped
road leading into the village. The soldiers have a mounted gun on
top of a parked truck; this weapon is just too strong for them to
overtake. You must forge ahead and destroy the mounted gun (or
at least kill every trooper in the area so nobody is left to retake
the gun’s controls).
PILGRIMAGE
If you leave the vehicle in one piece, you can
hijack it and drive it deeper into the village.
Stunt-jump on top of the vehicle and then pull
back to jump behind the weapon. Use it to slice
through incoming soldiers.
After you stop the mounted gun, the Ular Boys fall
alongside you again as you brave the next wave of
guards. There are several troops stationed in front ofthe giant temple in the middle of the village. Rush with
the Ulars to overtake them, blasting as you run.
Shoot the fuel drums along the road to earn
bonus Chaos.
AST OFRACTER
FIELD GUIDETO PANAU
WEAPONS VEHICLE EXPLORINGPANAU
AGENCYMISSIONS
STRONGHOLDTAKEOVERS
FACTIONMISSIONS
CHALLENGES COLLECTIBLES ACHIEVEMENTSAND TROPHIES
HOW THEY WORK • REAPERS • ROACHES • ULAR BOYSPower Surge • Pilgrimage • Boys with Toys
Protected by copyright. Unauthorized or unlawful copying or downloading expressly prohibited.

8/18/2019 Just Cause 2 Prima Official Guide
http://slidepdf.com/reader/full/just-cause-2-prima-official-guide 125/208
C H A R A C T E R S
F I E L D G U I D E T O P A N A U
W E A P O N S
V E H I C L E S
E X P L O R I N G P A N A U
A G E N C Y M I S S I O N S
S T R O N G H O L D T A K E O V E R S
F A C T I O N M I S S I O N S
C H A L L E N G E S
C O L L E C T I B L E S
A C H I E V E M E N T S
primagames.com 125
Don’t pass
up the drug
drop on
the steps infront of the
ancient site
behind the
temple.
The communi-
cations center
is at the top
of the ancient
site. There is
a mounted
gunner atop
the trail leading
through the site.
The Ular Boys
will not go up the hill until you remove the mounted gunner.
Use your grappling hook to quickly ascend the trail and get at
the gunner. There are several other soldiers on the hill, so flank
them as they target the Ulars at the base of the trail.
When the
technician
reaches the top
of the trail and
starts the hack,you must take
the mounted
gun for yourself
and use it to
push back
against the reinforcements that parachute into the ancient
village. Blast the troops as they drop from the sky. If any
reach the ground, they still have to climb the hill to reach you,
so you have plenty of room to destroy them.
The
stronghold
commander
arrives viaattack chopper
and wastes no
time opening
fire. He streams
a trail of bullets
as he moves
toward the ancient site. Duck behind stones for cover and
then grapple to the copter as soon as it is within range.
Punch the commander until he’s delirious, and then toss him
out of the chopper. He perishes when he hits the ground,
thus ending the Stronghold Takeover mission.
The Ular Boys now have a grip on West Tanah Raya, which
includes the beautiful island in the northwest of Panau. This
There are several guards inside the temple, using the pillars as
cover. Move into the temple, picking up any superior weapons
the soldiers drop (like assault rifles). Dive side to side to surprise
the troops in their hiding spots. Make good use of the medical kit
at the back of the temple.
For the Ular Boys to
continue moving through
the village, you must yank
the snipers off the rooftop
opposite the temple.
There is a colossal Baby
Panay statue inside the
temple courtyard. If you
have triggered explosives,
pop two of them on the
statue base and then blow
the statue as you run to
keep up with the Ular Boys.
Otherwise, come back after
the takeover to destroy the
statue and earn the extra
Chaos.
There is another soldier patrol on the temple’s far side. They
have one mounted gun on the back of a truck. That is your main
target. Pull the gunner out from behind the gun or shoot him.
If you still have triggered explosives (you should always try to
carry some with you), throw them on the trucks to turn them into
bombs.
AST OFRACTER
FIELD GUIDETO PANAU
WEAPONS VEHICLE EXPLORINGPANAU
AGENCYMISSIONS
STRONGHOLDTAKEOVERS
FACTIONMISSIONS
CHALLENGES COLLECTIBLES ACHIEVEMENTSAND TROPHIES
HOW THEY WORK • REAPERS • ROACHES • ULAR BOYSPower Surge • Pilgrimage • Boys with Toys
Protected by copyright. Unauthorized or unlawful copying or downloading expressly prohibited.

8/18/2019 Just Cause 2 Prima Official Guide
http://slidepdf.com/reader/full/just-cause-2-prima-official-guide 126/208
PRIMA OFFICIAL STRATEGY GUIDETM
126
success unlocks faction missions and racing challenges.
If you want to earn all of the missions in this area of
influence, though, you must cause additional chaos.
Boys with ToysThough the Ulars believe in the ancient ways, Sri
knows that modern enemies can only be brought low
with modern weapons. That’s why Sri’s last Stronghold
Takeover mission is a military supply depot. With the
weapons you help the Ular Boys secure at the depot, they
can further establish influence in Panau and hopefully fill
the vacuum left by Baby Panay’s fall.
Location: ulau Kejantanan
Rewards: 7,500 Chaos, $17,500, two weapon
parts, two vehicle parts
The Ular
Boys
charge the
depot with
you, but the
defenses
at the
front gate
immediately
give them
pause. They will not enter the facility until you soften
up the defenses and open the gate. Waste no time. Use yourgrappling hook to pull the soldiers off the towers, out from
behind the mounted guns, and out from the trucks parked
outside the depot.
There is a weapon part in the left tower. Scale the gate
via that tower to easily snag it.
When you finish off
the tower guards,
the Ular Boys can
enter the depot.
Rejoin them. They
are strong, and
you have better
chances for
success when you
stick together. As
you cross the bridge leading to the depot interior, a gate drops
to reveal another mounted weapon on a truck. There is no place
for the Ulars to hide. Immediately grapple the gunner to save the
technician. Then finish off the other soldiers with the Ular Boys.
There is a submachine gun in a crate, an armor part justbeyond the gate, and a medical kit on the wall.
BOYS WITH TOYS
Snuff out the next soldier
patrol. Use the fuel depot
behind them as a bomb.
Empty a clip into it or
throw a few frags over
the soldiers’ heads to land
next to the fuel depot. The
explosion is devastating.
The Ular Boys stop again as they encounter a locked gate. You
must pull the two guards off the towers that flank the gate and
then scale it to access the control panel. Follow the onscreen
commands to lower the gate, allowing the Ulars inside the next
ring of defenses around the depot.
From the towers, quickly
target a generator and a
broadcast tower to generate
a little Chaos.
LEGEND
Ular Boys Stronghold
AST OFRACTER
FIELD GUIDETO PANAU
WEAPONS VEHICLE EXPLORINGPANAU
AGENCYMISSIONS
STRONGHOLDTAKEOVERS
FACTIONMISSIONS
CHALLENGES COLLECTIBLES ACHIEVEMENTSAND TROPHIES
HOW THEY WORK • REAPERS • ROACHES • ULAR BOYSPower Surge • Pilgrimage • Boys with Toys
Protected by copyright. Unauthorized or unlawful copying or downloading expressly prohibited.

8/18/2019 Just Cause 2 Prima Official Guide
http://slidepdf.com/reader/full/just-cause-2-prima-official-guide 127/208
C H A R A C T E R S
F I E L D G U I D E T O P A N A U
W E A P O N S
V E H I C L E S
E X P L O R I N G P A N A U
A G E N C Y M I S S I O N S
S T R O N G H O L D T A K E O V E R S
F A C T I O N M I S S I O N S
C H A L L E N G E S
C O L L E C T I B L E S
A C H I E V E M E N T S
primagames.com 127
Though the Ulars have been allowed deeper into the complex,
they are not yet safe. There is a sniper on the wall just around the
corner from the gate. Track his position by following the red laser
from his rifle and then pull him to his death.
The commu-nications center
is just beyond the
snipers. There is a
mounted gun on a
walkway above the
communications
center that you
must take out so
the technician can
get in there and do his thing. There are multiple fuel depots on
the site. Use them as bombs to kill the guards, but be sure to
utilize your grappling hook to yank the trooper out from behind
the mounted weapon.
Take the mounted weapon for yourself and use it to repel the
next two waves of reinforcements while the technician works.
The gun is great for taking out fuel depots and other Panay
assets, but you really must prioritize the soldiers. You can worry
about the extra targets after finishing off the mission.
After you take down
the second wave of
soldiers, it doesn’t
take long for the
stronghold commander
to arrive via his
chopper. Grapple up to
the chopper and eject
the commander to end
the mission.
After completing the takeover, remain in the chopper and
circle the supply depot, blasting all government assets in
sight. If it has a white star on it, blow it up. The resulting
Chaos will help you unlock even more faction missions than
those opened up just for establishing the Ular Boys’ third
stronghold. Now that Sri has a fingerhold in the Senjakala
Islands in south Panau, he is extremely grateful to you.Accept his rewards and then continue on your quest to
topple Baby Panay.
AST OFRACTER
FIELD GUIDETO PANAU
WEAPONS VEHICLE EXPLORINGPANAU
AGENCYMISSIONS
STRONGHOLDTAKEOVERS
FACTIONMISSIONS
CHALLENGES COLLECTIBLES ACHIEVEMENTSAND TROPHIES
HOW THEY WORK • REAPERS • ROACHES • ULAR BOYSPower Surge • Pilgrimage • Boys with Toys
Protected by copyright. Unauthorized or unlawful copying or downloading expressly prohibited.

8/18/2019 Just Cause 2 Prima Official Guide
http://slidepdf.com/reader/full/just-cause-2-prima-official-guide 128/208
PRIMA OFFICIAL STRATEGY GUIDETM
128
FACTION MISSIONS
FACTION MISSION MAP
3
1
2
4
5
7
86
11
12
13
15
16
10
9
14
15
12
3
4
5
6
78
9
10
11
12
13
14
15
16
12
3
4
5
6
7
8
9
1011
12
1314
17
18
AST OFRACTER
FIELD GUIDETO PANAU
WEAPONS VEHICLE EXPLORINGPANAU
AGENCYMISSIONS
STRONGHOLDTAKEOVERS
FACTIONMISSIONS
CHALLENGES COLLECTIBLES ACHIEVEMENTSAND TROPHIES
REAPERS • ROACHES • ULAR BOYS
Protected by copyright. Unauthorized or unlawful copying or downloading expressly prohibited.

8/18/2019 Just Cause 2 Prima Official Guide
http://slidepdf.com/reader/full/just-cause-2-prima-official-guide 129/208
C H A R A C T E R S
F I E L D G U I D E T O P A N A U
W E A P O N S
V E H I C L E S
E X P L O R I N G P A N A U
A G E N C Y M I S S I O N S
S T R O N G H O L D T A K E O V E R S
F A C T I O N M I S S I O N S
C H A L L E N G E S
C O L L E C T I B L E S
A C H I E V E M E N T S
primagames.com 129
As part of your campaign to shake the government of Panau
until it collapses, you must embed yourself with the three
factions vying for control of the island nation: the Reapers,
the Roaches, and the Ular Boys. The missions will send you
all over the island, performing feats of mischief and mayhem
such as kidnapping, blowing up government assets, escorting
faction associates, and sabotaging trials.
Use this chapter to plan your faction missions. Now, not
all of them are available from the start of the game. You must
first perform at least one Stronghold Takeover mission for
each faction. This unlocks the first faction mission. As you
foster chaos on the island and grow the areas of influence
for each faction, more and more faction missions become
available.
Each faction mission
is initiated by picking
up the telephone at the
mission site marked
on the map.
Each faction mission pays out in Chaos, cash, and
parts. Use these winnings on the Black Market to
upgrade your favorite weapons and vehicles as you
unlock them.
Map icon Mission Mission Name
1 Ups and Downs
2 Political Debate
3 Taming the Beast
4 Pirate Broadcast
5 Can I Get a Witness?
6 Driving Miss Stacey
7 The Broader Scope
8 Black Gold
9 Hell on Wheels
10 Death from Above
11 Helicopter Hangaround
12 I Want to Break Free
13 Clear Skies
14 Jumping Parole
15 Slippin' and Slidin'
16 Chemical Heist
17 Checking the Menu
18 The Setup
Reaper
Map icon Mission Mission Name
1 Nothing to Declare
2 Airport Troubles
3 Paparazzi Pursuit
4 The Red One or the Blue One?
5 Breaking and Entering
6 Mile High Club
7 Smugglers Do Run
8 Keeping the Flow
9 Head of State
10 River Runs Red
11 An Officer and a Hitman
12 Information Highway
13 Offensive Action
14 O Panay Redentor
15 Stop the Press
Roaches
Map icon Mission Mission Name
1 Bridging New Contacts
2 Siphoning Gas
3 Fry Me to the Moon
4 Stranded
5 Mercenaries Must Die
6 One Deadly Sin
7 Rico's Day in Court
8 Above the Law
9 Pulling a Jeremy
10 Holy Smoke
11 Taking Candy from a Millionaire
12 Shakedown
13 Taking Care of the Dishes
14 Save the Forest
15 Fender Bender
16 Be Quick or Be Dead
Ular Boys
15
16
1
23
4
5
6
7
8
9
10
1112
13
14
15
16
1
23
4
5
6
7
8
9
10
1112
13
14
17
18
15
1
2
3
4
5
6
7
8
9
10
11
12
13
14
AST OFRACTER
FIELD GUIDETO PANAU
WEAPONS VEHICLE EXPLORINGPANAU
AGENCYMISSIONS
STRONGHOLDTAKEOVERS
FACTIONMISSIONS
CHALLENGES COLLECTIBLES ACHIEVEMENTSAND TROPHIES
REAPERS • ROACHES • ULAR BOYS
Protected by copyright. Unauthorized or unlawful copying or downloading expressly prohibited.

8/18/2019 Just Cause 2 Prima Official Guide
http://slidepdf.com/reader/full/just-cause-2-prima-official-guide 130/208
PRIMA OFFICIAL STRATEGY GUIDETM
130
REAPERSThe self-righteous Reapers operate under the leadership of Bolo
Santosi. As you work inside the faction, Santosi will offer jobs that
involve murder and mayhem to the highest degree,
which may not seem like the most aboveboard way
to engineer a revolution, but as a means to an end,
you do your duty. The Reaper missions are presented
in the order in which they appear, provided you
perform the Stronghold Takeover missions in the order in
which they are offered: “Rocket Science,” “A Second
Amendment,” and “Chemical Compound.”
Ups and Downs
LEGEND
UPS AND DOWNS
When you
enter the base, look
for the SV-1003
Raider parked near
the giant biofuel
shaft. Jump behind
the armored
vehicle’s mounted
gun and use it to
drill through the
soldiers rushing to stop you from accessing the biofuel shaft.
Soldiers stand their ground
if you drive the Raider
around the base. Run them
down!
The Reapers are striking at government facilities
around Gunung Dataran Tinggi and need your help in
toppling the Lembah Genting Tinggi military base. The
main thrust of the mission is to destroy a giant biofuel
shaft in the center of the base. You must fight your way
to the bottom of the biofuel shaft to start the sabotage process.
Strategy
Location: Lembah Genting Tinggi
Rewards: 5,000 Chaos, $10,000, one weapon part,
one vehicle part
After answering the
call from Santosi,you are given
an SMG and a
Hamaya GSY650
motorbike to use
to enter the base.
Roar through the
base’s front gate.
There are at least
two guards you can breeze past, but if you stop to challenge the
soldiers, consider switching to the parked jeep or parked truck
next to the gate for extra body protection as you move into the
core of the base, especially since there are shooters at the towers
flanking the base entrance.
Lembah Genting Tinggi Base
START
1
1
AST OFRACTER
FIELD GUIDETO PANAU
WEAPONS VEHICLE EXPLORINGPANAU
AGENCYMISSIONS
STRONGHOLDTAKEOVERS
FACTIONMISSIONS
CHALLENGES COLLECTIBLES ACHIEVEMENTSAND TROPHIES
REAPERS • ROACHES • ULAR BOYSUps and Downs • Political Debate • Taming the Beast • Pirate Broadcast • Can I Get a Witness? • Driving Miss Stacey • The Broader Scope • Black Gold • Hell on Wheels • Death from Above • Helicopter Hangaround • I Want to Break Free
• Clear Skies • Jumping Parole • Slippin’ and Slidin’ • Chemical Heist • Checking the Menu • The Setup
Protected by copyright. Unauthorized or unlawful copying or downloading expressly prohibited.

8/18/2019 Just Cause 2 Prima Official Guide
http://slidepdf.com/reader/full/just-cause-2-prima-official-guide 131/208
C H A R A C T E R S
F I E L D G U I D E T O P A N A U
W E A P O N S
V E H I C L E S
E X P L O R I N G P A N A U
A G E N C Y M I S S I O N S
S T R O N G H O L D T A K E O V E R S
F A C T I O N M I S S I O N S
C H A L L E N G E S
C O L L E C T I B L E S
A C H I E V E M E N T S
primagames.com 131
Though the goal of the mission is to destroy the biofuel shaft,
you should also cause as much chaos as possible on the base by
destroying assets such as the water tower and broadcast towers.
The AH-33 Topachula attack chopper on the base helipad is an
excellent tool of destruction. And if you don’t seize it, you risk
having a soldier jump into the cockpit and taking it into the air to
rain bullets down upon you.
If you use the chopper, be sure to take evasive
maneuvers right away and then pivot to the east to shoot
the SAM battery. It targets you the moment you are 10
feet off the ground. You can also opt to blast the SAM
battery first, on foot, with grenades.
Before
heading down
into the hole
that surrounds
the biofuel
tower, grapple
to the center
structure and
pick up the
armor part.
When you’re ready to
destroy the tower, grapple
down to the bottom of the
pit. Either hook the girders
crisscrossing the hole or
parachute down.
There are several
soldiers at the
bottom of the pit
and more on the
way down. You
must kill everybody
on the lower floor
before accessing
the marked control
console on your
screen. Circle the panel, shooting immediate targets, and then
quickly dart to the panel. Because this is early in your adventure,
the code input is short (they get much longer as you go).
After hacking the panel, grapple up to the cargo
container behind you and grab the weapon part.
Making your
escape after
hacking the
panel isn’t easy.
Watch for a
bull rush of
soldiers comingdown the stairs.
Grenades
keep them at
bay while you
access the
medical kit on
the wall next
to the stairs.
Once you are all
healed up, look
skyward and
grapple up the
side of the pit.Don’t attempt the stairs. The grapple hook gets you out faster,
which is much safer—especially since the biofuel shaft is about
to blow.
Once you escape the hole and the biofuel tower
explodes, the mission ends in success. You are rewarded with
the promised spoils, including cash and parts.
There’s a strong chance the attack chopper was
taken by an enemy soldier while you were in the
hole. So, run as soon as you hit the ground outside
and then look up for the chopper. If you spot it
moving into an attack position, grapple up to it andeject the pilot. Now you have a capable ride for
moving on to the next mission. And with those guns,
you can cause some real chaos along the way.
Political DebateThe Reapers need your help convincing a local politician
named Quinrung Theng to see things Santori’s way. He will
not accept bribes, so that only leaves the threat of violence.
Santosi’s intel says the politician is heading to a scheduledmeeting at a military base on Dataran Tinggi mountain.
Kidnap him from his ride before he reaches the base.
Strategy
Location: Lembah Genting Tinggi
Rewards: 5,000 Chaos, $10,000, one weapon
part, one vehicle part
AST OFRACTER
FIELD GUIDETO PANAU
WEAPONS VEHICLE EXPLORINGPANAU
AGENCYMISSIONS
STRONGHOLDTAKEOVERS
FACTIONMISSIONS
CHALLENGES COLLECTIBLES ACHIEVEMENTSAND TROPHIES
REAPERS • ROACHES • ULAR BOYSUps and Downs • Political Debate • Taming the Beast • Pirate Broadcast • Can I Get a Witness? • Driving Miss Stacey • The Broader Scope • Black Gold • Hell on Wheels • Death from Above • Helicopter Hangaround • I Want to Break Free
• Clear Skies • Jumping Parole • Slippin’ and Slidin’ • Chemical Heist • Checking the Menu • The Setup
Protected by copyright. Unauthorized or unlawful copying or downloading expressly prohibited.

8/18/2019 Just Cause 2 Prima Official Guide
http://slidepdf.com/reader/full/just-cause-2-prima-official-guide 132/208
PRIMA OFFICIAL STRATEGY GUIDETM
132
You are gifted an SMG and a Makoto MZ250 motorbike at the start of the mission. If you
have no other vehicle handy, jump on the bike and
immediately tear off for the cliffside to the north.
There is a metal ramp extending over the cliff’s edge.
Hit that ramp at full speed and launch yourself into
the great beyond; then jump off the bike to make a
stunt fall. Do not engage your chute just yet.
As you fall through the air,
you spy Theng’s limo driving
through the canyon below.
When you get close to it, hit your chute and then track
the limo.
Aim for the limo and then
grapple to it.
As you stand
on the limo in a
stunt-jump stance,
target the guards
hanging out of
the speeding
vehicle. If another
government vehicle
moves alongside
the limo and opens
fire, swing around the car to protect yourself from incomingbullets. Once you have killed the guards, the Enter command
appears. Bash the driver senseless to take over the limo.
LEGENDPOLITICAL DEBATE
Theng’s Limo
Now that you’ve commandeered the limo, you must get it to
the drop-off point in one piece. Panay’s thugs will flank you for
most of the trip, so you need to take evasive action to shake
them, such as barreling down the mountainside between the
switchbacks. However, do not get too aggressive with shortcuts
through the trees. You may shake the soldiers, but you risk
getting the limo wedged between rocks, bounced off a tree, or
turned upside down like a sad turtle.
Look out for a roadblock
when you are just over one
kilometer from the drop-off.
Swerve around the parked
jeeps without letting off
the gas.
1
START
1
AST OFRACTER
FIELD GUIDETO PANAU
WEAPONS VEHICLE EXPLORINGPANAU
AGENCYMISSIONS
STRONGHOLDTAKEOVERS
FACTIONMISSIONS
CHALLENGES COLLECTIBLES ACHIEVEMENTSAND TROPHIES
REAPERS • ROACHES • ULAR BOYSUps and Downs • Political Debate • Taming the Beast • Pirate Broadcast • Can I Get a Witness? • Driving Miss Stacey • The Broader Scope • Black Gold • Hell on Wheels • Death from Above • Helicopter Hangaround • I Want to Break Free
• Clear Skies • Jumping Parole • Slippin’ and Slidin’ • Chemical Heist • Checking the Menu • The Setup
Protected by copyright. Unauthorized or unlawful copying or downloading expressly prohibited.

8/18/2019 Just Cause 2 Prima Official Guide
http://slidepdf.com/reader/full/just-cause-2-prima-official-guide 133/208
C H A R A C T E R S
F I E L D G U I D E T O P A N A U
W E A P O N S
V E H I C L E S
E X P L O R I N G P A N A U
A G E N C Y M I S S I O N S
S T R O N G H O L D T A K E O V E R S
F A C T I O N M I S S I O N S
C H A L L E N G E S
C O L L E C T I B L E S
A C H I E V E M E N T S
primagames.com 133
LEGEND
Bukit Dengkang Base
Drop-Off Site
The drop-off site is a temple
just outside the village of
Kampung Sri Puteri.
Pulling the limo
into the drop-off
area may end the
mission in success,
but that does not
mean the soldiers
just give up. They
chase you into
the drop-off site.
You must fight
back to get on your way to the next mission (or the next chaos
run, perhaps in the little village of Kampung Sri Puteri). Use the
mounted gun on the Reaper’s truck to cut down the incoming
soldiers and clear an escape route.
Taming the BeastThe Reapers want to launch a major attack on a government post
but lack the heavy vehicle needed to make such a strong move.
Santosi asks you to help secure an armored truck for the cause.
You must locate the armored truck at the nearby Bukit Dengkang
military base, seize it, and then escort it to the drop-off site.
Before answering the phone to take the mission,
shoot up the assets in the village of Kampung
Kerang Hitam to generate some Chaos. The water
tower is a good start.
Strategy
Location: Lembah Genting Tinggi
Rewards: 5,000 Chaos, $10,000, one weapon
part, one vehicle part
Santosi leaves
you an SMG
and a Mokoto
motorbike to
start things off.
The armored
truck you must
steal is over
one kilometer
away from your
starting point, so you need to hurry. Grab the bike and follow the
truck. The bike is great because it is fast and nimble. You can
weave through traffic with ease and stand a better chance of
surviving a shortcut through the jungle.
TAMING THE BEAST
1
START
2
The armored truck is in a garage at the base. If you parachute
in rather than going through the front door, you can snag the
armored car before the alarm is raised.
1
2
AST OFRACTER
FIELD GUIDETO PANAU
WEAPONS VEHICLE EXPLORINGPANAU
AGENCYMISSIONS
STRONGHOLDTAKEOVERS
FACTIONMISSIONS
CHALLENGES COLLECTIBLES ACHIEVEMENTSAND TROPHIES
REAPERS • ROACHES • ULAR BOYSUps and Downs • Political Debate • Taming the Beast • Pirate Broadcast • Can I Get a Witness? • Driving Miss Stace y • The Broader Scope • Black Gold • Hell on Wheels • Death from Above • Helicopter Hangaround • I Want to Break Free
• Clear Skies • Jumping Parole • Slippin’ and Slidin’ • Chemical Heist • Checking the Menu • The Setup
Protected by copyright. Unauthorized or unlawful copying or downloading expressly prohibited.

8/18/2019 Just Cause 2 Prima Official Guide
http://slidepdf.com/reader/full/just-cause-2-prima-official-guide 134/208
PRIMA OFFICIAL STRATEGY GUIDETM
134
The Bukit Dengkang base is loaded with things to blow up
for Chaos, such as broadcast towers, fuel depots, and a water
tower. However, lighting up the base for Chaos brings every
soldier in the area crashing down upon you. You must be ready
to fight back as you cause mischief, such as grappling snipersout of towers and sneaking through the narrow spaces between
barracks to surprise soldiers.
There are parts in the base to pick up, such as a vehicle
part under the water tower and one in a guard tower.
Want some extra firepower? Grab one of the
mounted guns at the base entrance and then detach
it. You can cut through any soldier you aim at, but it
does limit your movement speed and prevents you from
using the grappling hook.
If you cause enough mayhem
at the base to raise your
Heat, an attack chopper
swoops low. Grapple to it
and use it to tear up the
base’s assets.
If you have stolen the truck and the chopper arrives, get
out of the truck and deal with the chopper. Its guns can
ruin the armored truck before you reach the drop-off
point.
Once you steal
the armored truck,
drive it through
the base, blasting
anything in your
way. Really, that
cannon is just as
good for destroying
base assets as
anything, but you need to get it to the drop-off site in one piece;
therefore, make for the base entrance as soon as possible, and
start along the east highway to the designated drop-off point. Try
to avoid smashing into civilian cars and trucks, as that will slow
you down and raise Heat if you’re spotted by a soldier.
The drop-off is at a gas station along the highway. Blast through
the soldiers who surround the station, blow up a few gas pumps,
and then park the armored truck at the drop-off point to end the
mission.
There is one armor part inside the small booth next to
the gas station sign and another directly behind the
station itself.
Pirate BroadcastThe Reapers want to show the people of Panau just how filthy
the politicians are. They have recorded a special message
that reveals just how depraved the system is, and they plan to
broadcast it to all television and radio stations on the island.
To help facilitate the broadcast, you must travel to the Panau
Broadcast Center tower and hack the receivers to accept the
pirate signal. Once the transmission has been sent out, you
must then destroy the transmitting tower so Panay’s pigs cannot
broadcast an immediate refute.
Before accepting the
mission, pick up the armor
part at the small village.
There is a weapon part on
the village dock, too.
Strategy
Location: Kampung Nelayan-Nelayan
Rewards: 7,500 Chaos, $17,500, one weapon part,
one vehicle part
AST OFRACTER
FIELD GUIDETO PANAU
WEAPONS VEHICLE EXPLORINGPANAU
AGENCYMISSIONS
STRONGHOLDTAKEOVERS
FACTIONMISSIONS
CHALLENGES COLLECTIBLES ACHIEVEMENTSAND TROPHIES
REAPERS • ROACHES • ULAR BOYSUps and Downs • Political Debate • Taming the Beast • Pirate Broadcast • Can I Get a Witness? • Driving Miss Stace y • The Broader Scope • Black Gold • Hell on Wheels • Death from Above • Helicopter Hangaround • I Want to Break Free
• Clear Skies • Jumping Parole • Slippin’ and Slidin’ • Chemical Heist • Checking the Menu • The Setup
Protected by copyright. Unauthorized or unlawful copying or downloading expressly prohibited.

8/18/2019 Just Cause 2 Prima Official Guide
http://slidepdf.com/reader/full/just-cause-2-prima-official-guide 135/208
C H A R A C T E R S
F I E L D G U I D E T O P A N A U
W E A P O N S
V E H I C L E S
E X P L O R I N G P A N A U
A G E N C Y M I S S I O N S
S T R O N G H O L D T A K E O V E R S
F A C T I O N M I S S I O N S
C H A L L E N G E S
C O L L E C T I B L E S
A C H I E V E M E N T S
primagames.com 135
LEGEND
Panau Broadcast Center
While you can travel by car to Bandar Baru Nipah, home of the
Panau Broadcast Center, it is much easier to get started on this
mission with a chopper. If you do not have immediate access to
a chopper, you can steal one from a helipad to the south of the
broadcast towers. It is on top of a four-story building directly
across the street. Alternately, you can grapple on top of the
exterior elevators and ride them to the rooftops.
There are four dishes on
the tower rooftops. You
must hack each dish to
accept the signal. Land near
one of the dishes.
There are
multiple threats
on the rooftops,
such as normal
soldiers,demolition
officers, and
autoturrets. Be
careful with
the demolition
officers, since
the bombs they
drop when they
die can blast
you clean off
the roof. The
autoturrets are
deadly, too, soroll a grenade
at the turret from a distance. As soon as you knock it over, it
is safe to walk near it.
The demolitions officer is on the southeast tower.
The autoturrets are on the northwest tower.
Pick up the goodies on the towers when it is
convenient or safe. There is a vehicle part on the
southwest tower, under the dish.
PIRATE BROADCAST
START
1
1
AST OFRACTER
FIELD GUIDETO PANAU
WEAPONS VEHICLE EXPLORINGPANAU
AGENCYMISSIONS
STRONGHOLDTAKEOVERS
FACTIONMISSIONS
CHALLENGES COLLECTIBLES ACHIEVEMENTSAND TROPHIES
REAPERS • ROACHES • ULAR BOYSUps and Downs • Political Debate • Taming the Beast • Pirate Broadcast • Can I Get a Witness? • Driving Miss Stacey • The Broader Scope • Black Gold • Hell on Wheels • Death from Above • Helicopter Hangaround • I Want to Break Free
• Clear Skies • Jumping Parole • Slippin’ and Slidin’ • Chemical Heist • Checking the Menu • The Setup
Protected by copyright. Unauthorized or unlawful copying or downloading expressly prohibited.

8/18/2019 Just Cause 2 Prima Official Guide
http://slidepdf.com/reader/full/just-cause-2-prima-official-guide 136/208
PRIMA OFFICIAL STRATEGY GUIDETM
136
LEGEND
Each rooftop has a medical kit.
Soldiers attempt to cut you
off from reaching the otherrooftops by patrolling the
walkways between them.
Either gun them down
or jump off the towers
when you finish and just
parachute to the next one.
Grapple back up the side,
just like you did at the
casino tower.
After hacking all four dishes, Santosi begins her broadcast. As
she transmits the video of a man being tortured to death, ride
one of the elevators to the top of the building, which is still
several stories up. When you reach the antenna at the top of the
broadcast building, you must fight your way through a handful of
soldiers guarding the facility. Tear through them and then grapple
up to the antenna itself to place two bombs. Stand on the marked
sites on the antenna and press the onscreen button to plant the
bombs.
CAN I GET A WITNESS?
After placing the second bomb, leap off the
building. As you soar through the sky, the
antenna is engulfed in a fireball. Don’t pull therip cord yet, though, as this is a good place to
rack up base-jumping stats. You can get an
easy 500 meters off this tower if you hold off
on the chute until you brush the treetops.
Radar Facility
Convoy
Can I Get a Witness?The Reapers are not friendly with the Roaches. Santosi has a plot
to blackmail the leader of the Roaches by interfering with the
trial of Razor’s nephew, who is up for assault and battery. The
Roaches are planning to kill the only witness for the prosecution.
You must find this witness near Kampung Perigi Lumpur and
then kidnap him. The Reapers can later use this witness as a
bargaining chip.
Premission chaos: blast
the water tower before
taking the mission, and then
grapple up to the wreckage
to score a weapon part.
Strategy
Location: Kampung Nelayan-Nelayan
Rewards: 7,500 Chaos, $17,500, one weapon part,
one vehicle part
At the start of
the mission,
Santosi leaves you
an SMG and a
Hamaya GSY650
motorcycle. You
must first locate a
radar facility and
then hack into it
1
2
START
1
2
AST OFRACTER
FIELD GUIDETO PANAU
WEAPONS VEHICLE EXPLORINGPANAU
AGENCYMISSIONS
STRONGHOLDTAKEOVERS
FACTIONMISSIONS
CHALLENGES COLLECTIBLES ACHIEVEMENTSAND TROPHIES
REAPERS • ROACHES • ULAR BOYSUps and Downs • Political Debate • Taming the Beast • Pirate Broadcast • Can I Get a Witness? • Driving Miss Stace y • The Broader Scope • Black Gold • Hell on Wheels • Death from Above • Helicopter Hangaround • I Want to Break Free
• Clear Skies • Jumping Parole • Slippin’ and Slidin’ • Chemical Heist • Checking the Menu • The Setup
Protected by copyright. Unauthorized or unlawful copying or downloading expressly prohibited.

8/18/2019 Just Cause 2 Prima Official Guide
http://slidepdf.com/reader/full/just-cause-2-prima-official-guide 137/208
C H A R A C T E R S
F I E L D G U I D E T O P A N A U
W E A P O N S
V E H I C L E S
E X P L O R I N G P A N A U
A G E N C Y M I S S I O N S
S T R O N G H O L D T A K E O V E R S
F A C T I O N M I S S I O N S
C H A L L E N G E S
C O L L E C T I B L E S
A C H I E V E M E N T S
primagames.com 137
to learn the exact coordinates of the witness. The radar facility is
not too far from the village, so jump on the motorcycle and race
up the dusty road toward the facility, which is now marked on
your map.
As tempting as it is to bypass the guard post at the facility
entrance (after all, they left a perfectly good jump for you), you
should stop. Open fire on the soldiers as you race through the
guard post, and then hijack the parked GV-104 Razorback on the
right side of the road. This tank will make you near unstoppable
as you approach the radar facility.
Before leaving the guard post, blast the broadcast
tower and generator for a little Chaos.
This is precisely why you
stole that Razorback.
Those guard towers cannot
withstand a single shell
from the Razorback’s turret.
Have fun with the
Razorback! Smash the fuel
depots, satellite dishes,towers, and everything
bearing a white star as
you push toward the radar
facility.
Circle the radar facility in the Razorback, carefully steering
through the narrow streets as you pound every soldier dumb
enough to poke his head out. Keep hammering assets as you
drive around the facility; then park beneath the door panel to
the radar room on the rooftop of the central building.
Grapple up to the
rooftop and open fire
on the soldiers coming
from the left.
Stand back after opening the door on the rooftop. There is
a sentry gun inside that lets loose with a stream of bullets if
you attempt to step inside. Lob a frag through the open door
to blast the sentry off its tripod. Then enter the room and
hack the computer to download the location of the witness.
(If you are low on ammo, there is a pistol and an SMG inside
the room, too.) Once the hack is complete, Santosi sends a
chopper to pick you up. Grapple to the chopper and hang on
as it swoops
down on the
moving witness.
The witness is in a
convoy of government
trucks. Grapple to the
trucks as the choppermoves low.
AST OFRACTER
FIELD GUIDETO PANAU
WEAPONS VEHICLE EXPLORINGPANAU
AGENCYMISSIONS
STRONGHOLDTAKEOVERS
FACTIONMISSIONS
CHALLENGES COLLECTIBLES ACHIEVEMENTSAND TROPHIES
REAPERS • ROACHES • ULAR BOYSUps and Downs • Political Debate • Taming the Beast • Pirate Broadcast • Can I Get a Witness? • Driving Miss Stacey • The Broader Scope • Black Gold • Hell on Wheels • Death from Above • Helicopter Hangaround • I Want to Break Free
• Clear Skies • Jumping Parole • Slippin’ and Slidin’ • Chemical Heist • Checking the Menu • The Setup
Protected by copyright. Unauthorized or unlawful copying or downloading expressly prohibited.

8/18/2019 Just Cause 2 Prima Official Guide
http://slidepdf.com/reader/full/just-cause-2-prima-official-guide 138/208
PRIMA OFFICIAL STRATEGY GUIDETM
138
If you miss the witness’s
truck, hijack one of the
other convoy vehicles and
race it next to the witness.
Stunt-jump to the witness’struck and hijack it.
Now that you have
the witness, you
must escort him to
Santosi’s drop-off
site. Soldiers give
chase as soon as
you gain control of
the truck, so you
need to put thepedal down and
race through the desert roads to reach the drop-off site before
you take too much damage and explode. Soldiers flank you on
bikes and in trucks. Steer close to oncoming traffic to shake the
soldiers. They are concentrating so hard on you that they do not
see the traffic and run right into it.
Place a waypoint on the drop-off site so arrows appear
on the road, guiding you through the twists and turns of
the dusty highways.
LEGEND
DRIVING MISS STACEY
Driving Miss StaceySantosi has a new job for you: professional driver. A high-ranking
Reaper’s wife has gone undercover as a prostitute to seduce
government officials. She has gathered a lot of intel for the
Reapers, but one of her marks has discovered her true identity
and is planning to kill her. You must pick her up and drive her to
a safe house...in a pink limo stored at Pekan Selamat.
There is an armor part on the rooftop above the pink limo.
Strategy
Location: Pekan Selamat
Rewards: 5,000 Chaos, $10,000, one weapon part,
one vehicle part
Run through the
village to locate the
Columbi Excelsior—
the pink limo. It’s
the only car Stacey
will take. Once you
have the Columbi
Excelsior, drive it to
Stacey’s location,
approximately one
and a half kilometers away. Take the roads to avoid damaging the
limo. You need it in great shape in case you come under heavy
fire. This vehicle will not withstand much damage.
Slow down at Miss Stacey’s “date” site.
She automatically hops into the limo.
Miss Stacey
Boom-Boom
Drop-Off Site
START
12
3
1
2
3
AST OFRACTER
FIELD GUIDETO PANAU
WEAPONS VEHICLE EXPLORINGPANAU
AGENCYMISSIONS
STRONGHOLDTAKEOVERS
FACTIONMISSIONS
CHALLENGES COLLECTIBLES ACHIEVEMENTSAND TROPHIES
REAPERS • ROACHES • ULAR BOYSUps and Downs • Political Debate • Taming the Beast • Pirate Broadcast • Can I Get a Witness? • Driving Miss Stacey • The Broader Scope • Black Gold • Hell on Wheels • Death from Above • Helicopter Hangaround • I Want to Break Free
• Clear Skies • Jumping Parole • Slippin’ and Slidin’ • Chemical Heist • Checking the Menu • The Setup
Protected by copyright. Unauthorized or unlawful copying or downloading expressly prohibited.

8/18/2019 Just Cause 2 Prima Official Guide
http://slidepdf.com/reader/full/just-cause-2-prima-official-guide 139/208
C H A R A C T E R S
F I E L D G U I D E T O P A N A U
W E A P O N S
V E H I C L E S
E X P L O R I N G P A N A U
A G E N C Y M I S S I O N S
S T R O N G H O L D T A K E O V E R S
F A C T I O N M I S S I O N S
C H A L L E N G E S
C O L L E C T I B L E S
A C H I E V E M E N T S
primagames.com 139
LEGEND
Sniper perch
There is no timer
on this mission,
so take your time
driving to the safe
house. Driving with
the flow of traffickeeps a low profile.
If you stay clam
and careful in your
driving, you will not
attract soldier attention right away.
When you are about 600 meters from the drop-off site, you
encounter a roadblock. General “Boom Boom,” Stacey’s
paramour, is sitting in the middle of the street holding a rocket
launcher. Swerve to avoid the incoming rockets and drive around
the roadblock. Then, punch the gas and do not let up until you
reach the safe house; you now have a lot of heat on you.
Soldiers flank the limo on bikes. Nudge them into oncoming traffic.
The Broader ScopeA Panauan army colonel known as Chen has started a
personal campaign against the Reapers. You must assas-
sinate the colonel at the Port Gurun Lautan Lama harbor.
Santosi gives you a sniper rifle for getting the job done withminimal attention.
Strategy
Location: Port Gurun Lautan Lama
Rewards: 5,000 Chaos, $10,000, one weapon
part, one vehicle part
After picking
up the sniper
rifle Santosi left
you, take the
nearby Stinger
Dunebug 84
and drive to
the sniper’s
perch marked
on your map.
You are not the
only person
planning to use
this position,
though. There
are several
soldiers on
the ridge
THE BROADER SCOPE
When you reach the safe house, Stacey gets out
and the mission ends in success. Before moving
on, be sure to collect the vehicle part and
weapon part at the safe house. 1
1
START
AST OFRACTER
FIELD GUIDETO PANAU
WEAPONS VEHICLE EXPLORINGPANAU
AGENCYMISSIONS
STRONGHOLDTAKEOVERS
FACTIONMISSIONS
CHALLENGES COLLECTIBLES ACHIEVEMENTSAND TROPHIES
REAPERS • ROACHES • ULAR BOYSUps and Downs • Political Debate • Taming the Beast • Pirate Broadcast • Can I Get a Witness? • Driving Miss Stacey • The Broader Scope • Black Gold • Hell on Wheels • Death from Above • Helicopter Hangaround • I Want to Break Free
• Clear Skies • Jumping Parole • Slippin’ and Slidin’ • Chemical Heist • Checking the Menu • The Setup
Protected by copyright. Unauthorized or unlawful copying or downloading expressly prohibited.

8/18/2019 Just Cause 2 Prima Official Guide
http://slidepdf.com/reader/full/just-cause-2-prima-official-guide 140/208
PRIMA OFFICIAL STRATEGY GUIDETM
140
Santosi leaves behind an SMG for you to use in
this mission, but the bigger gift is one given bythe Panauan military: a fighter jet. Steal one of
the fighter jets on the base. The Si-47 Leopard
is equipped with a cannon and missiles—perfect
for taking out an oil rig, or at least doing some
serious damage with a few passes.
Jump in the cockpit and roar down the runway, taking off into the blue
yonder. Steer out over the ocean, punching it to close the distance
between you and the oil rig.
LEGEND
overlooking the harbor. You must eliminate them before you can
make an attempt on Chen’s life.
There is some chaos to cause up here after the mission
ends. Blast the broadcast tower and sabotage the
pipeline behind you.
When all of the
soldiers are done,
take to the perch.
Bring up your
sniper rifle scope
and look down on
the harbor to locate
Chen. He is marked.
A headshot will kill
him instantly. If youwing him, though, you need to make two shots. Chen runs as soon
as the first shot rings out. You must lead him by a hair to take him
out with the second shot, if necessary.
The harbor below is ripe with chaos possibilities.
Shatter the crane and light up the fuel depots to add to
your growing Chaos score.
Black GoldThe Panauan government controls many offshore oil rigs. The
Reapers want to destroy one of the rigs as a message to the
government that nothing is safe from Santosi’s grip. The rig
you must destroy is the Pelantar Minyak Gerudi Besar, which is
located in the waters west of Port Gurun Lautan Lama.
The base is the home of Colonel Tunko Bin Hitam, one
of your targets.
Strategy
Location: Pulau Dayand Terlena
Rewards: 5,000 Chaos, $10,000, one weapon part,
one vehicle part
BLACK GOLD
Pelantar Minyak Gerudi Besar oil rig
1
1
START
AST OFRACTER
FIELD GUIDETO PANAU
WEAPONS VEHICLE EXPLORINGPANAU
AGENCYMISSIONS
STRONGHOLDTAKEOVERS
FACTIONMISSIONS
CHALLENGES COLLECTIBLES ACHIEVEMENTSAND TROPHIES
REAPERS • ROACHES • ULAR BOYSUps and Downs • Political Debate • Taming the Beast • Pirate Broadcast • Can I Get a Witness? • Driving Miss Stacey • The Broader Scope • Black Gold • Hell on Wheels • Death from Above • Helicopter Hangaround • I Want to Break Free
• Clear Skies • Jumping Parole • Slippin’ and Slidin’ • Chemical Heist • Checking the Menu • The Setup
Protected by copyright. Unauthorized or unlawful copying or downloading expressly prohibited.

8/18/2019 Just Cause 2 Prima Official Guide
http://slidepdf.com/reader/full/just-cause-2-prima-official-guide 141/208
C H A R A C T E R S
F I E L D G U I D E T O P A N A U
W E A P O N S
V E H I C L E S
E X P L O R I N G P A N A U
A G E N C Y M I S S I O N S
S T R O N G H O L D T A K E O V E R S
F A C T I O N M I S S I O N S
C H A L L E N G E S
C O L L E C T I B L E S
A C H I E V E M E N T S
primagames.com 141
Circle the rig in the
chopper and slam it
with missile after
missile to damage the
platform to Santosi’s
satisfaction.
Once you spoil the platform, you can still land on it. There are
vehicle and weapon parts on the rig you should lift for use in
the Black Market between missions. Plus, gathering the parts
is the only way to reach 100-percent completion on the oil rig.
Hell on WheelsThe Reapers have agreed to a sit-down with one of their
rivals; however, she has just learned that a saboteur has
planted bombs on three of the vehicles in her convoy headed
to the confab. You must quickly catch up to the convoy and
disarm the three bombs (while the trucks are still moving) to
complete the mission.
Strategy
Location: Kampung Pasir Panjang
Rewards: 5,000 Chaos, $10,000, one weaponpart, one vehicle part
Santosi leaves
you an SMG
and access to
a Saas PP12
Hogg. If you
have no better
vehicle (such
as a chopper)
handy, jump
behind thewheel of the Hogg and set out after the convoy, which is
approximately one kilometer away at the start of the mission.
Race across the flat
desert to intersect
the convoy as it pulls
onto a dirt highway.
Drive alongside one
of the trucks and then
get into a stunt-jump
position.
To ruin the rig, you must fill the Damage meter under your radar
map. The oil rig is loaded with targets, such as fuel depots
beneath the main platform, a crane, and the central mast. Slam
the rig with missiles on multiple passes, slowing down only a
little as you close in on the rig so you can get off an extra shot or
two before speeding away to make a wide turn and come back.
There is an SAM on the platform, so if you slow down
too much while flying over the rig, you risk being shot
down.
If you are struggling with
the jet, you can also take
apart the oil rig on foot.
Parachute down to the rig,
but be ready for resistance.
Snipers are everywhere.
Admittedly, the jet isn’t for everybody. A chopper might suit your
style better. There is an attack chopper on the rig you can steal,
but you better destroy the SAM battery before snaking it. You
can also steal an AH-33 Topachula attack helicopter from the
military base instead of the fighter jet. It will take much longer
to reach the oil rig, but the chopper’s extra maneuverability does
make it a touch easier to target all of the destructible features,
like the depots and cranes. Just take out that SAM battery first.
AST OFRACTER
FIELD GUIDETO PANAU
WEAPONS VEHICLE EXPLORINGPANAU
AGENCYMISSIONS
STRONGHOLDTAKEOVERS
FACTIONMISSIONS
CHALLENGES COLLECTIBLES ACHIEVEMENTSAND TROPHIES
REAPERS • ROACHES • ULAR BOYSUps and Downs • Political Debate • Taming the Beast • Pirate Broadcast • Can I Get a Witness? • Driving Miss Stacey • The Broader Scope • Black Gold • Hell on Wheels • Death from Above • Helicopter Hangaround • I Want to Break Free
• Clear Skies • Jumping Parole • Slippin’ and Slidin’ • Chemical Heist • Checking the Menu • The Setup
Protected by copyright. Unauthorized or unlawful copying or downloading expressly prohibited.

8/18/2019 Just Cause 2 Prima Official Guide
http://slidepdf.com/reader/full/just-cause-2-prima-official-guide 142/208
PRIMA OFFICIAL STRATEGY GUIDETM
142
LEGEND
Jump to one of the trucks
and drop to the rear of thevehicle. Disarm the bomb
by following the onscreen
commands.
If you are close
enough to another
truck, stunt-jump
to it. Otherwise,
hit your parachute
and fly above theconvoy. Circle
around the convoy
and grapple to the
closest rig. Repeat
the disarming process. Soldiers have likely caught up with you
by this point. If your Reaper comrades do not fight them off, lean
out from behind the truck and shoot out the soldiers’ tires to slow
them down while you finish off the rest of the bombs.
HELL ON WHEELS
Strategy
Location: Tanah Lebar AirbaseRewards: 5,000 Chaos, $10,000, one weapon part,
one vehicle part
When the mission begins, the Reapers drop out of the sky in a
transport chopper to escort you to the site of the fighter jets. Grapple
up to the chopper and then hold on as you are flown over the base
entrance and directly next to the airstrip where the jets are parked.
Do not attempt to hang from the chopper and circle
over the jets. You are totally exposed up there and will
be shot down within seconds by the soldiers scramblingacross the airstrip.
Convoy1
START
1
Death from AboveThe Reaper outposts in the Panau Tengah Bay
area have been getting hit pretty hard by aerial
patrols originating from the Tanah Lebar Airbase.
Santosi needs you to fly to the base via one of
her choppers, and then destroy the fighter jets
stationed on the runway so Panay’s thugs can nolonger use them to attack Reaper assets.
If you have access to them in the Black
Market, the grenade launcher or rocket
launcher are exceedingly useful for this
mission.
AST OFRACTER
FIELD GUIDETO PANAU
WEAPONS VEHICLE EXPLORINGPANAU
AGENCYMISSIONS
STRONGHOLDTAKEOVERS
FACTIONMISSIONS
CHALLENGES COLLECTIBLES ACHIEVEMENTSAND TROPHIES
REAPERS • ROACHES • ULAR BOYSUps and Downs • Political Debate • Taming the Beast • Pirate Broadcast • Can I Get a Witness? • Driving Miss Stacey • The Broader Scope • Black Gold • Hell on Wheels • Death from Above • Helicopter Hangaround • I Want to Break Free
• Clear Skies • Jumping Parole • Slippin’ and Slidin’ • Chemical Heist • Checking the Menu • The Setup
Protected by copyright. Unauthorized or unlawful copying or downloading expressly prohibited.
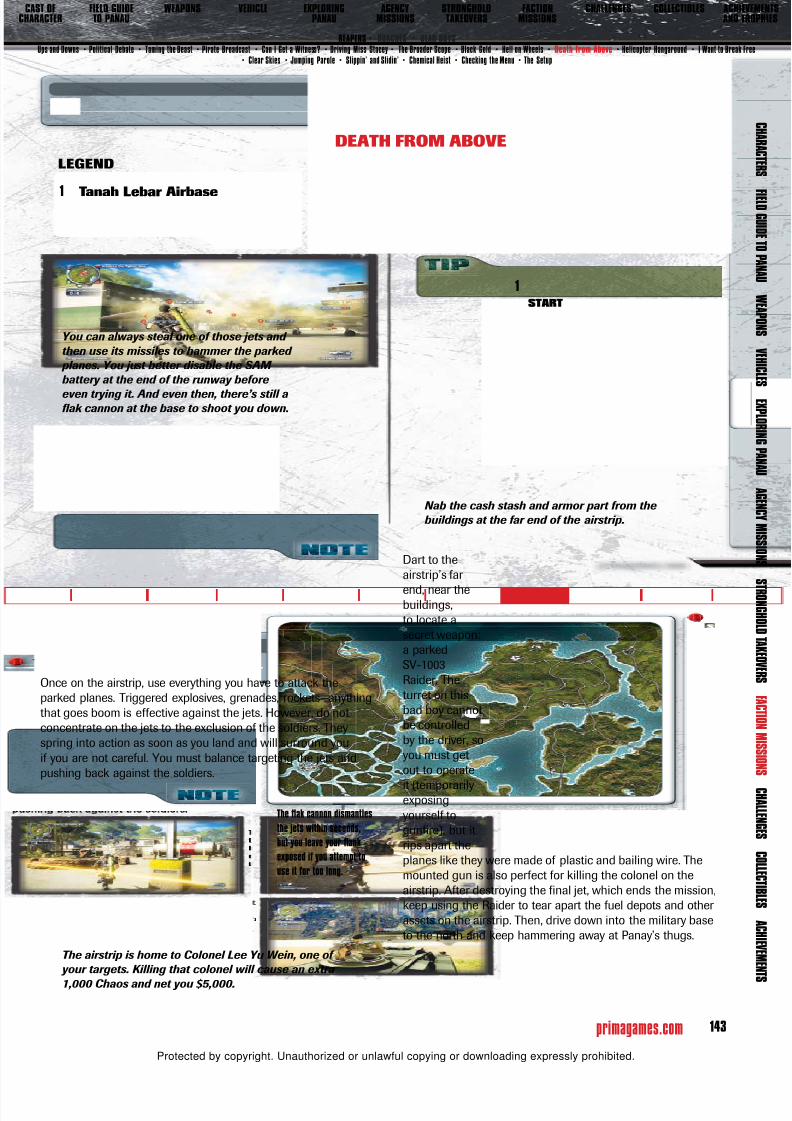
8/18/2019 Just Cause 2 Prima Official Guide
http://slidepdf.com/reader/full/just-cause-2-prima-official-guide 143/208
C H A R A C T E R S
F I E L D G U I D E T O P A N A U
W E A P O N S
V E H I C L E S
E X P L O R I N G P A N A U
A G E N C Y M I S S I O N S
S T R O N G H O L D T A K E O V E R S
F A C T I O N M I S S I O N S
C H A L L E N G E S
C O L L E C T I B L E S
A C H I E V E M E N T S
primagames.com 143
LEGEND
Nab the cash stash and armor part from the
buildings at the far end of the airstrip.
Dart to the
airstrip’s far
end, near thebuildings,
to locate a
secret weapon:
a parked
SV-1003
Raider. The
turret on this
bad boy cannot
be controlled
by the driver, so
you must get
out to operate
it (temporarilyexposing
yourself to
gunfire), but it
rips apart the
planes like they were made of plastic and bailing wire. The
mounted gun is also perfect for killing the colonel on the
airstrip. After destroying the final jet, which ends the mission,
keep using the Raider to tear apart the fuel depots and other
assets on the airstrip. Then, drive down into the military base
to the north and keep hammering away at Panay’s thugs.
Once on the airstrip, use everything you have to attack the
parked planes. Triggered explosives, grenades, rockets—anything
that goes boom is effective against the jets. However, do not
concentrate on the jets to the exclusion of the soldiers. They
spring into action as soon as you land and will surround you
if you are not careful. You must balance targeting the jets and
pushing back against the soldiers.
The flak cannon dismantles
the jets within seconds,
but you leave your flank
exposed if you attempt to
use it for too long.
The airstrip is home to Colonel Lee Yu Wein, one of
your targets. Killing that colonel will cause an extra
1,000 Chaos and net you $5,000.
Tanah Lebar Airbase
DEATH FROM ABOVE
You can always steal one of those jets and
then use its missiles to hammer the parked
planes. You just better disable the SAM
battery at the end of the runway before
even trying it. And even then, there’s still aflak cannon at the base to shoot you down.
1
START
1
AST OFRACTER
FIELD GUIDETO PANAU
WEAPONS VEHICLE EXPLORINGPANAU
AGENCYMISSIONS
STRONGHOLDTAKEOVERS
FACTIONMISSIONS
CHALLENGES COLLECTIBLES ACHIEVEMENTSAND TROPHIES
REAPERS • ROACHES • ULAR BOYSUps and Downs • Political Debate • Taming the Beast • Pirate Broadcast • Can I Get a Witness? • Driving Miss Stacey • The Broader Scope • Black Gold • Hell on Wheels • Death from Above • Helicopter Hangaround • I Want to Break Free
• Clear Skies • Jumping Parole • Slippin’ and Slidin’ • Chemical Heist • Checking the Menu • The Setup
Protected by copyright. Unauthorized or unlawful copying or downloading expressly prohibited.

8/18/2019 Just Cause 2 Prima Official Guide
http://slidepdf.com/reader/full/just-cause-2-prima-official-guide 144/208
PRIMA OFFICIAL STRATEGY GUIDETM
144
When you fly toward the military base in the provided chopper,
you discover that you are too late. Panay’s forces are in the air.
You must now chase down these three choppers and shoot them
out of the sky before they can pound the contraband silo. When going
up against another
attack chopper,
you always want
the high ground.
It is much easier
to pound another
chopper from
above. The chopper
below cannot get
a good bead on you with its guns or its rockets. So maintain a
slight altitude advantage on the rival choppers and unleash the
fury of your guns to push them into the jungle below.
LEGEND
Tanah Lebar Airbase
Helicopter HangaroundThe Reapers are stockpiling illegal contraband in a silo
outside the Tasik Jernih village. Word of this silo has
reached the government. Panay’s forces have a plan
now to launch several choppers to descend on the silosite and destroy it. You must take the attack chopper
Santosi gives you and fly to the Tanah Lebar military
base. Once there, destroy the choppers before the
government can use them to destroy the silo.
Strategy
Location: Tanah Lebar Base
Rewards: 5,000 Chaos, $10,000, one weap-
on part, one vehicle part
When the attack
choppers finally
reach the silo,
you need to act
fast. Those enemychoppers circle
the silo and just
unload on the
Reaper asset. Stay
above the silo site
and circle along with the enemy choppers, slamming them with
rockets and gunfire.
Allowing two of the
choppers to attack the silo
is a sound strategy, because
once in position, they no
longer target you. You can
rain lead upon them without
fear of retribution or
engagement.
Once the mission is
over, use the attack
chopper to destroy
assets at Tasik
Jernih, such as the
gas pumps on the
dock. The nearby
Pasir Putih harborbase is another
good site to attack
HELICOPTER HANGAROUND
1
START
1
AST OFRACTER
FIELD GUIDETO PANAU
WEAPONS VEHICLE EXPLORINGPANAU
AGENCYMISSIONS
STRONGHOLDTAKEOVERS
FACTIONMISSIONS
CHALLENGES COLLECTIBLES ACHIEVEMENTSAND TROPHIES
REAPERS • ROACHES • ULAR BOYSUps and Downs • Political Debate • Taming the Beast • Pirate Broadcast • Can I Get a Witness? • Driving Miss Stacey • The Broader Scope • Black Gold • Hell on Wheels • Death from Above • Helicopter Hangaround • I Want to Break Free
• Clear Skies • Jumping Parole • Slippin’ and Slidin’ • Chemical Heist • Checking the Menu • The Setup
Protected by copyright. Unauthorized or unlawful copying or downloading expressly prohibited.

8/18/2019 Just Cause 2 Prima Official Guide
http://slidepdf.com/reader/full/just-cause-2-prima-official-guide 145/208
C H A R A C T E R S
F I E L D G U I D E T O P A N A U
W E A P O N S
V E H I C L E S
E X P L O R I N G P A N A U
A G E N C Y M I S S I O N S
S T R O N G H O L D T A K E O V E R S
F A C T I O N M I S S I O N S
C H A L L E N G E S
C O L L E C T I B L E S
A C H I E V E M E N T S
primagames.com 145
along the shoreline to the east and race up to the harbor. Park
the boat near one of the docks and then jump out.
The captive is in the
marked container
right on the harbor’sedge. However, several
soldiers are guarding
the container. Circle
the container and blast
them with your guns.
To free the comrade, you must blow open the doors of the
container. Lob a frag grenade (there are extras in a nearby
crate) at the door and stand back. The explosion rocks the
doors off their hinges. The Reaper associate steps into the
sunlight, happy to see you. Now it’s time to get him out of
there. He will follow you and enter any vehicle you claim.
while in possession of the gifted attack chopper. Circle the dock
and blast fuel depots, broadcast towers, and cranes. Just be
mindful that after about 15 seconds of your wanton destruction,
the soldiers will put a bird in the air to engage you.
Try to hold on to the chopper. It is useful at thebeginning of the “I Want to Break Free” mission for the
Reapers, should you choose to take that job next.
I Want to Break FreeThe Reapers have long been searching for a kidnapped comrade.
Recently, Santosi received confirmation that her associate was
being held in a cargo container at the Pasir Putih harbor near
the village of Tasik Jernih. You must infiltrate the harbor, free the
captive, and then bring him to a safe house.
Strategy
Location: Pasir Putih Harbor
Rewards: 5,000 Chaos, $10,000, one weapon part,
one vehicle part
If you do not have
another vehicle to
use for this mission,
take the Frisco
Catshark S-38
powerboat Santosileaves for you at
the docks (she also
gifts you an SMG).
Steer the boat
LEGEND
I WANT TO BREAK FREE
START
1
Pasir Putih Harbor
Drop-Off Site
1
22
AST OFRACTER
FIELD GUIDETO PANAU
WEAPONS VEHICLE EXPLORINGPANAU
AGENCYMISSIONS
STRONGHOLDTAKEOVERS
FACTIONMISSIONS
CHALLENGES COLLECTIBLES ACHIEVEMENTSAND TROPHIES
REAPERS • ROACHES • ULAR BOYSUps and Downs • Political Debate • Taming the Beast • Pirate Broadcast • Can I Get a Witness? • Driving Miss Stacey • The Broader Scope • Black Gold • Hell on Wheels • Death from Above • Helicopter Hangaround • I Want to Break Free
• Clear Skies • Jumping Parole • Slippin’ and Slidin’ • Chemical Heist • Checking the Menu • The Setup
Protected by copyright. Unauthorized or unlawful copying or downloading expressly prohibited.

8/18/2019 Just Cause 2 Prima Official Guide
http://slidepdf.com/reader/full/just-cause-2-prima-official-guide 146/208
PRIMA OFFICIAL STRATEGY GUIDETM
146
You have multiple options right now. If you did not totally beach
the Frisco, you can lead the Reaper back to the water and then
speed off in the boat. There is a Maddox FVA 45 near the cargo
container, too. This off-roader will get you out of the base quickly
and on the road to the drop-off point, which is 1.85 kilometers tothe south.
If you take the roads, watch
out for Panay thugs to give
chase. Run them off the road
by steering them into traffic
or the rocks.
Another escape option is the H-62 Quapaw transport chopper on
the helipad to the southeast of the cargo container. This chopper
is not armed, so you need to fly high to avoid ground fire and
buzz straight to the drop-off to minimize the chance of an aerial
engagement. Extra bonus: you now have a chopper to fly to your
next mission.
The AH-33 Topachula on the helipad next to the
Quapaw is an attack chopper, but you cannot use it
for the second half of this mission, because it is not a
two-seater.
Clear SkiesThe Reaper’s aerial smuggling routes are in danger of being
overrun by the defense systems at the Bukit Rendah military base
up in the Gunung Dataran Tinggi mountains. You must infiltrate
the base for Santosi and deprogram the defense systems so the
smuggling routes may continue to be used without any fear ofdisruption.
Strategy
Location: Bandar Gunung Raya
Rewards: 5,000 Chaos, $10,000, one weapon part,
one vehicle part
Santosi leaves you
an SMG but does
not offer a vehicle.
You are on your
own to reach the
military base. There
are several cars in
the village, but you
may wish to either
call in an order
from the Black Market or steal the Maddox parked just outside
the village along the highway.
The base hosts Colonel Ismaryanto. Kill him during this
mission to bank some Chaos and cash.
Once you enter the
base, the computer
that lets you
program the aerial
defense pops on
your radar. But
you need to deal
with the soldiersswarming the base
before attempting
to hack the laptop. Start out by blasting the soldiers near the
base entrance. There is a mounted gun you can detach from a
guard post and use to cut through the soldiers, but it will signifi-
cantly slow you down.
The laptop is located near
the SAM battery. But if you
make a break for it, you
must first kill two guards.
Plus, this places you in the
sights of the base’s colonel,who is a tough customer
armed with a machine gun.
Look to the
northeast of the
laptop for the
solution to all your
problems: a Raider.
Jump into the
armored vehicle
and regenerate any
lost health. Then,
stunt-jump back
behind the mounted gun on the vehicle roof. Use the gun to take
down the colonel and any soldier around the laptop.
AST OFRACTER
FIELD GUIDETO PANAU
WEAPONS VEHICLE EXPLORINGPANAU
AGENCYMISSIONS
STRONGHOLDTAKEOVERS
FACTIONMISSIONS
CHALLENGES COLLECTIBLES ACHIEVEMENTSAND TROPHIES
REAPERS • ROACHES • ULAR BOYSUps and Downs • Political Debate • Taming the Beast • Pirate Broadcast • Can I Get a Witness? • Driving Miss Stacey • The Broader Scope • Black Gold • Hell on Wheels • Death from Above • Helicopter Hangaround • I Want to Break Free
• Clear Skies • Jumping Parole • Slippin’ and Slidin’ • Chemical Heist • Checking the Menu • The Setup
Protected by copyright. Unauthorized or unlawful copying or downloading expressly prohibited.

8/18/2019 Just Cause 2 Prima Official Guide
http://slidepdf.com/reader/full/just-cause-2-prima-official-guide 147/208
C H A R A C T E R S
F I E L D G U I D E T O P A N A U
W E A P O N S
V E H I C L E S
E X P L O R I N G P A N A U
A G E N C Y M I S S I O N S
S T R O N G H O L D T A K E O V E R S
F A C T I O N M I S S I O N S
C H A L L E N G E S
C O L L E C T I B L E S
A C H I E V E M E N T S
primagames.com 147
LEGEND
CLEAR SKIES
There is an armor part wedged between the barracks
and base wall to the north of the Raider.
After killing the soldiers,
turn the gun on government
assets, like the massive
radio mast in the middle of
the base. That mast is worth
$5,000 and 1,000 Chaos,
just like the colonel.
When you start hacking the laptop, the military attacks with
another Raider and an attack chopper. You must stick close to
the laptop to complete the hack. Target the gunner on the Raider
and either shoot him or pull him out with your grappling hook.
If you can just hold on until the hack is complete, you take over
the missile systems. They automatically target the enemy chopper
and bring it down without you lifting a finger.
After finishing the
laptop hack and
completing the mission, stay and search the base for parts. Between the Raider’s guns
on the assets and the parts search, you can score 100 percent on this base in no time.
Jumping ParoleSaul Sukano is one of the Reaper’s best hitmen. Unfor-
tunately, he was recently captured and is scheduled to
be executed. Santosi requests that you free him as he is
transported through the Gunung Raya valley in an armored
car convoy. The valley is a perfect place for the ambush, but
expect resistance from his captors.
Strategy
Location: Gunung Raya Valley
Rewards: 5,000 Chaos, $10,000, one weapon
part, one vehicle part
Santosi
leaves you a
submachine gun
but no vehicle?
What gives?
Well, in about
90 seconds, the
armored car
containing Saul
is actually going
to pass under the bridge on which you’re standing; therefore, face
south and watch the pass. When you see the car appear on yourradar, jump off the bridge and sail down to the government truck
accompanying Saul’s vehicle.
START
1
Bukit Rendah Base1
AST OFRACTER
FIELD GUIDETO PANAU
WEAPONS VEHICLE EXPLORINGPANAU
AGENCYMISSIONS
STRONGHOLDTAKEOVERS
FACTIONMISSIONS
CHALLENGES COLLECTIBLES ACHIEVEMENTSAND TROPHIES
REAPERS • ROACHES • ULAR BOYSUps and Downs • Political Debate • Taming the Beast • Pirate Broadcast • Can I Get a Witness? • Driving Miss Stacey • The Broader Scope • Black Gold • Hell on Wheels • Death from Above • Helicopter Hangaround • I Want to Break Free
• Clear Skies • Jumping Parole • Slippin’ and Slidin’ • Chemical Heist • Checking the Menu • The Setup
Protected by copyright. Unauthorized or unlawful copying or downloading expressly prohibited.

8/18/2019 Just Cause 2 Prima Official Guide
http://slidepdf.com/reader/full/just-cause-2-prima-official-guide 148/208
PRIMA OFFICIAL STRATEGY GUIDETM
148
Grapple and drop down onto
the truck’s roof and shoot
the guards who pop out.Eliminating these threats
now will make your escape
much easier.
Zip over to Saul’s car and
beat the driver senseless.
Once you eject the driver,
you must race to the
drop-off site and deliver the
hitman.
Once you have
Saul, you must drive
down the winding,
snowy road to the
drop-off site at the
village of Kampung
Penggali. This is
not going to be
easy, because the
car drives like a
greased pig on the icy pavement. Don’t get going too fast or youmay lose control, sending it flying off the side of the mountain.
Stay in the center of the road and weave through traffic—do not
make any sudden movements that could make you lose control or
overcorrect.
If the soldiers do overwhelm you, there is a trick for getting
away without killing Saul. Going forward down the face of the
mountain is deadly. However, if you swing your back end to the
road’s edge and then drive down in reverse, you will actually
have greater control, since you don’t get going as fast as if you
drive straight down.
After pulling into the
drop-off area, get out and
gun down the soldiers who
followed you.
LEGEND
JUMPING PAROLE
START
1
Gunung Raya Valley/Armored Car1
AST OFRACTER
FIELD GUIDETO PANAU
WEAPONS VEHICLE EXPLORINGPANAU
AGENCYMISSIONS
STRONGHOLDTAKEOVERS
FACTIONMISSIONS
CHALLENGES COLLECTIBLES ACHIEVEMENTSAND TROPHIES
REAPERS • ROACHES • ULAR BOYSUps and Downs • Political Debate • Taming the Beast • Pirate Broadcast • Can I Get a Witness? • Driving Miss Stacey • The Broader Scope • Black Gold • Hell on Wheels • Death from Above • Helicopter Hangaround • I Want to Break Free
• Clear Skies • Jumping Parole • Slippin’ and Slidin’ • Chemical Heist • Checking the Menu • The Setup
Protected by copyright. Unauthorized or unlawful copying or downloading expressly prohibited.

8/18/2019 Just Cause 2 Prima Official Guide
http://slidepdf.com/reader/full/just-cause-2-prima-official-guide 149/208
C H A R A C T E R S
F I E L D G U I D E T O P A N A U
W E A P O N S
V E H I C L E S
E X P L O R I N G P A N A U
A G E N C Y M I S S I O N S
S T R O N G H O L D T A K E O V E R S
F A C T I O N M I S S I O N S
C H A L L E N G E S
C O L L E C T I B L E S
A C H I E V E M E N T S
primagames.com 149
LEGEND
Slippin’ and Slidin’Following a firefight at the Tanah Raya
ski resort, some Reaper associates need
immediate medical attention. However, the
lodge is surrounded by Panay’s thugs. You must
transport a Reaper doctor down the ski slopes
of the resort and to the lodge. Once there, cover
the doctor as he tends to his patients.
Strategy
Location: Tanah Raya ski resort
Rewards: 7,500 Chaos, $17,500, one
weapon part, one vehicle part
the hill. But
the Maddox
is an open-air
vehicle, which
exposes you
and the doctorto gunfire. It’s
your choice,
but time is of
the essence. As
soon as you free the doctor from the soldiers, you have 2:40
to get down the hill and save the patient. The Maddox will get
you there faster.
Carefully steer around
the soldiers who
pursue you in their
own Maddox. They
have a mounted gun,
but if you just stay
calm and steer around
them you, you can
escape unscathed. The
soldiers almost always
overcorrect and crash.
Pull up to the hotel
gates to stop the timer.
The doctor refuses to
get out, though, until
you kill the soldiers
around the lodge.
Before
leaving the
SLIPPIN’ AND SLIDIN’
There is a
Chevalier Express
HT parked near
the telephone.
Hop in the
truck and startdriving down
the ski slopes.
Maintaining
control over the
truck is tough, since you can get little traction on the snow. Just
power ahead and take wide, gentle turns to avoid flying through
the fences that line the slopes.
If you stole a transport chopper, you could bypass the
slippery slopes, pick up the doctor, and then set down
near the patients.
The Reaper doctor is waiting for you halfway down the slopes.
Steer to the left and pull into the lodge where he is located. There
are several soldiers at the site. Hop out of your car and open fire
on Panay’s troops before they kill the doctor.
Once you have the doctor, you can either jump back in yourtruck or steal the soldiers’ Maddox. The Maddox’s tires get much
better purchase on the snow, so it will be easier to get down
Doctor
Ski Lodge
1
2
START
1
2
AST OFRACTER
FIELD GUIDETO PANAU
WEAPONS VEHICLE EXPLORINGPANAU
AGENCYMISSIONS
STRONGHOLDTAKEOVERS
FACTIONMISSIONS
CHALLENGES COLLECTIBLES ACHIEVEMENTSAND TROPHIES
REAPERS • ROACHES • ULAR BOYSUps and Downs • Political Debate • Taming the Beast • Pirate Broadcast • Can I Get a Witness? • Driving Miss Stacey • The Broader Scope • Black Gold • Hell on Wheels • Death from Above • Helicopter Hangaround • I Want to Break Free
• Clear Skies • Jumping Parole • Slippin’ and Slidin’ • Chemical Heist • Checking the Menu • The Setup
Protected by copyright. Unauthorized or unlawful copying or downloading expressly prohibited.

8/18/2019 Just Cause 2 Prima Official Guide
http://slidepdf.com/reader/full/just-cause-2-prima-official-guide 150/208
PRIMA OFFICIAL STRATEGY GUIDETM
150
When the mission begins, Santosi leaves behind a Rowlinson K22—a
personal helicopter—on the wooden helipad next to the telephone.
Unless you have an attack chopper on hand, use the small copter
to ascend the tall mountain range and close in on the chemical
research facility. It is over two kilometers, so expect a decent-sized
ride before seeing the facility appear in the snow below.
The facility is protected
by an SAM battery, so
land soon. If you are in
the Rowlinson, you haveno guns, anyway, to attack
the base. Just get on the
ground.
Once at the base,
you must breach
two laboratories
to get the samples
Santosi requires.
The first is located
just at the southern
tip of the site.Land the chopper
near the lab. The
lab is guarded by a handful of soldiers, including at least one
shooter on the roof. Pull him down or zip up there yourself and
kill him. After eliminating the soldiers on the lab roof, pick up the
triggered explosives from the small crate.
Place a triggered explosive
on the lab roof (or roll a
frag grenade across it) to
force your way inside.
Strategy
Location: Pekan Teluk Tengah
Rewards: 7,500 Chaos, $17,500, one weapon part,
one vehicle part
lodge following the mission, be sure to blast the Baby
Panay statue for Chaos and cash.
The lodge iscrawling with
soldiers. Stick
to cover and
systematically
push through the
courtyard leading
up to the lodge on
the far side of the
Baby Panay statue.
There is a demolition officer near the statue. Keep back and
target him from a distance since he drops explosives when you
kill him.
As you close
in on the lodge,
rockets streak
through the air.
There are two
guards on the
lodge steps, each
with a rocket
launcher. That’s
what is giving the
doctor serious pause. You must eliminate both soldiers with the
launchers before the doc will move. Pick one of the two soldiers
and then run close enough to use your grappling hook. Pull them
off the stairs and then finish them with gunfire before they can
get back up.
After neutralizing
one of the soldiers,
cross behind the
other against
the lodge. You
collect an armor
part as you move.
Sneaking up from
behind gives you
an unbeatable
advantage. Plug the soldier before he lets fly with a rocket. Nowthat the doctor can reach the lodge without fear of taking a
rocket to the face, you complete the mission.
Chemical HeistSantosi knows that she has seriously rattled the government and
wants to keep delivering hard hits to establish the Reapers as a
force to be reckoned with within Panau. Santosi orders you to fly
up to a chemical research facility in the mountains and retrieve
three samples of a chemical weapon. You must then get the
samples back down to Santosi before the elements thaw.
AST OFRACTER
FIELD GUIDETO PANAU
WEAPONS VEHICLE EXPLORINGPANAU
AGENCYMISSIONS
STRONGHOLDTAKEOVERS
FACTIONMISSIONS
CHALLENGES COLLECTIBLES ACHIEVEMENTSAND TROPHIES
REAPERS • ROACHES • ULAR BOYSUps and Downs • Political Debate • Taming the Beast • Pirate Broadcast • Can I Get a Witness? • Driving Miss Stacey • The Broader Scope • Black Gold • Hell on Wheels • Death from Above • Helicopter Hangaround • I Want to Break Free
• Clear Skies • Jumping Parole • Slippin’ and Slidin’ • Chemical Heist • Checking the Menu • The Setup
Protected by copyright. Unauthorized or unlawful copying or downloading expressly prohibited.

8/18/2019 Just Cause 2 Prima Official Guide
http://slidepdf.com/reader/full/just-cause-2-prima-official-guide 151/208
C H A R A C T E R S
F I E L D G U I D E T O P A N A U
W E A P O N S
V E H I C L E S
E X P L O R I N G P A N A U
A G E N C Y M I S S I O N S
S T R O N G H O L D T A K E O V E R S
F A C T I O N M I S S I O N S
C H A L L E N G E S
C O L L E C T I B L E S
A C H I E V E M E N T S
primagames.com 151
There is a sentry gun inside
each lab. If you have spare
grenades, dropping one
inside will overturn it.
Once inside the lab, pick up
the sample and then open
the door. Expect two or
three soldiers to be waitingfor you just outside. Shoot
them from the safety of the
lab and then rush back out
into the snow.
The next lab is
to the east. With
several soldiers
still in play, grapple
over to the parked
Fengding EC14
truck and race upthe dirt road that
winds around the
Before dropping into the second lab, target thesniper on the low building to the south. If he lives, he
can possibly pick you off as you exit the lab.
LEGENDCHEMICAL HEIST
Sample Labs
Scientist
Drop-Off Site
1
2
3
START
12
3
frozen lake. When you reach the second lab,
take a moment to park the truck facing the
giant platform to the left. You need to get
there in a hurry once you finish grabbing the
sample at this lab, so having the truck ready
to speed straight to the platform will shave
precious seconds off your time.
As soon as you grab the second sample, a scientist holding
the third attempts to make a quick getaway from the
platform. Get back in the truck and drive directly to the
platform. As you drive, the scientist races up several flights of
stairs to reach a helipad on the roof. You need to reach the
scientist before he gets in his chopper and flies away. You
can always target him as he takes off, but if he gets out over
the frozen lake, the mission ends.
AST OFRACTER
FIELD GUIDETO PANAU
WEAPONS VEHICLE EXPLORINGPANAU
AGENCYMISSIONS
STRONGHOLDTAKEOVERS
FACTIONMISSIONS
CHALLENGES COLLECTIBLES ACHIEVEMENTSAND TROPHIES
REAPERS • ROACHES • ULAR BOYSUps and Downs • Political Debate • Taming the Beast • Pirate Broadcast • Can I Get a Witness? • Driving Miss Stacey • The Broader Scope • Black Gold • Hell on Wheels • Death from Above • Helicopter Hangaround • I Want to Break Free
• Clear Skies • Jumping Parole • Slippin’ and Slidin’ • Chemical Heist • Checking the Menu • The Setup
Protected by copyright. Unauthorized or unlawful copying or downloading expressly prohibited.

8/18/2019 Just Cause 2 Prima Official Guide
http://slidepdf.com/reader/full/just-cause-2-prima-official-guide 152/208
PRIMA OFFICIAL STRATEGY GUIDETM
152
Leap out of the truck (or
parachute out to fly up the
face of the platform) and
grapple up the side.
The scientist runs as fast as he can to the chopper, but you are
faster than he is. However, there are a handful of soldiers on the
platform, too. If the scientist gets too far ahead, pull him back
with your grappling hook. As he tumbles, empty a clip into him.
The scientist has no armor, so you can chew through pretty
quickly if you have decent aim. When the scientist perishes, he
drops the third sample.
If the scientist makes it to
his chopper, you need to
grapple up to him as soon
as possible and bash him
out of the pilot’s seat. He
drops the sample, which
you can then fly down and
pick up.
Once you have retrieved the third sample for Santosi, you must
take all three of them down to her drop-off site, which is over
three kilometers away. You do not have enough time to reach
the bottom of the mountain by parachute or truck. You need to
use the scientist’s chopper. Climb inside and then take it high to
avoid the SAM battery at the facility’s southern end. Fly straight
for the site, keeping an eye on the sample temperature gauge
just under your radar. The drop-off site is inside the small town
of Pekan Teluk Tengah. Just land the bird next to the site to
complete the mission.
And now that you have an attack chopper, why not use
it to blow up the statue of Baby Panay in the town?
Checking the MenuThe Reapers are ready to expand their operations but require
additional supplies for the increased size of their forces. Santosi
has located a food shipment meant for the Panauan military, but
she wants you to hijack it and bring it back to one of her drop-off
points. You must escort the food crates to the drop-off without
losing too many to traffic or attacks.
Strategy
Location: Tanah Raya Highway
Rewards: 5,000 Chaos, $10,000, one weapon part,one vehicle part
Santosi did not
give you a vehicle
for this mission,
but fortunately
this area is heavily
trafficked by
motorcycles and
scooters. Relieve
one of the civilians
of their wheels and
then race after the food shipment, which is now marked on yourmap. It is parked at a gas station to the north.
Grab the armor part behind the cargo containers at the
gas station.
Don’t get in a firefight with
the soldiers at the gas
station. You can come back
and tear the place apart for
Chaos. Concentrate instead
on hijacking the truck.
Do not go
off-roading right
away with the
shipment. Bumps
will throw crates
out of the truck,
and if you lose
half of them, the
mission ends infailure. So, stick to
the highway, but keep the hammer down. You cannot afford to
AST OFRACTER
FIELD GUIDETO PANAU
WEAPONS VEHICLE EXPLORINGPANAU
AGENCYMISSIONS
STRONGHOLDTAKEOVERS
FACTIONMISSIONS
CHALLENGES COLLECTIBLES ACHIEVEMENTSAND TROPHIES
REAPERS • ROACHES • ULAR BOYSUps and Downs • Political Debate • Taming the Beast • Pirate Broadcast • Can I Get a Witness? • Driving Miss Stacey • The Broader Scope • Black Gold • Hell on Wheels • Death from Above • Helicopter Hangaround • I Want to Break Free
• Clear Skies • Jumping Parole • Slippin’ and Slidin’ • Chemical Heist • Checking the Menu • The Setup
Protected by copyright. Unauthorized or unlawful copying or downloading expressly prohibited.

8/18/2019 Just Cause 2 Prima Official Guide
http://slidepdf.com/reader/full/just-cause-2-prima-official-guide 153/208
C H A R A C T E R S
F I E L D G U I D E T O P A N A U
W E A P O N S
V E H I C L E S
E X P L O R I N G P A N A U
A G E N C Y M I S S I O N S
S T R O N G H O L D T A K E O V E R S
F A C T I O N M I S S I O N S
C H A L L E N G E S
C O L L E C T I B L E S
A C H I E V E M E N T S
primagames.com 153
slow down and give the soldiers you left back
at the gas station an easy time catching up with
you. Your truck is already at a speed disad-
vantage as it is.
LEGEND
CHECKING THE MENU
When you approach the temple on the road’s left side, you need
to look for a shortcut through the trees. Slow down and carefully
steer the truck over the slight hump. If you take it smooth, you
will not lose a crate. Steer through the wide gaps between the
trees and take care to avoid rocks. Some are covered with moss,
which makes them blend with the ground.
As you close in on 200
kilometers from the drop-off
site, you reach a roadblock.
Do not slow down. Just
power through any gap you
see in the fortifications.
The drop-off site is the
docks on the waterfront to
the roadblock’s east. Just
pull into the parking lot and
the Reaper will take care of
the rest.
The SetupSantosi has a personal beef with the military’s ace pilot
Hamzah, stationed at the Kem Sungai Sejuk airbase. She has
orchestrated a complex revenge plot, one that requires you to
sneak onto the base and steal one of Hamzah’s fighter jets.
Once you have the jet, use it to attack the nearby Kem Singa
Menerkam base and make Hamzah look like a traitor.
Strategy
Location: Kem Sungai Sejuk Base
Rewards: 5,000 Chaos, $10,000, one weapon
part, one vehicle part
After answering Santosi’s call, you must rush to the nearby
airbase. The plane you need to steal is right on the runway,but so are several soldiers and an attack chopper. There is
START1
2 Food Truck
Drop-Off Site
1
2
AST OFRACTER
FIELD GUIDETO PANAU
WEAPONS VEHICLE EXPLORINGPANAU
AGENCYMISSIONS
STRONGHOLDTAKEOVERS
FACTIONMISSIONS
CHALLENGES COLLECTIBLES ACHIEVEMENTSAND TROPHIES
REAPERS • ROACHES • ULAR BOYSUps and Downs • Political Debate • Taming the Beast • Pirate Broadcast • Can I Get a Witness? • Driving Miss Stacey • The Broader Scope • Black Gold • Hell on Wheels • Death from Above • Helicopter Hangaround • I Want to Break Free
• Clear Skies • Jumping Parole • Slippin’ and Slidin’ • Chemical Heist • Checking the Menu • The Setup
Protected by copyright. Unauthorized or unlawful copying or downloading expressly prohibited.

8/18/2019 Just Cause 2 Prima Official Guide
http://slidepdf.com/reader/full/just-cause-2-prima-official-guide 154/208
PRIMA OFFICIAL STRATEGY GUIDETM
154
Overload the
oil pipeline
that runs
alongside
the airstrip
to bank even
more cash
and Chaos.
As soon as the runway
is clear, steal the jet and
take off from the base. The
military target now appears
on your map.
LEGEND
no getting by them. You must eliminate soldiers running
straight at you while dodging the chopper’s fire. After
killing a couple soldiers, grapple up to the chopper and
seize control of it.
As soon as you have the chopper, target the SAM battery above the parked jet
fighter. Now, use the chopper to circle the base and rip up assets to cause chaos.
THE SETUP
The military base is rich with targets. The most obvious is the
colossal radio mast poking into the skies. But there are radar
dishes, fuel depots, and more just waiting to be torn to pieces
by your rockets and guns. Pass over the base low and slow,
hammering it with several rockets before zooming off to make
another run. There are SAMs on-site, so don’t get too slow or
else you make yourself a prime target. You only need to blast a
few assets to complete the mission.
Colonel Ranjan is the boss of the base. If you cannot
slam him with missiles, come back later with a chopperto target the colonel to earn cash and Chaos.
2
1 START
Kem Sungai Sejuk Base
Kem Singa Menerkam Base
1
2
AST OFRACTER
FIELD GUIDETO PANAU
WEAPONS VEHICLE EXPLORINGPANAU
AGENCYMISSIONS
STRONGHOLDTAKEOVERS
FACTIONMISSIONS
CHALLENGES COLLECTIBLES ACHIEVEMENTSAND TROPHIES
REAPERS • ROACHES • ULAR BOYSUps and Downs • Political Debate • Taming the Beast • Pirate Broadcast • Can I Get a Witness? • Driving Miss Stacey • The Broader Scope • Black Gold • Hell on Wheels • Death from Above • Helicopter Hangaround • I Want to Break Free
• Clear Skies • Jumping Parole • Slippin’ and Slidin’ • Chemical Heist • Checking the Menu • The Setup
Protected by copyright. Unauthorized or unlawful copying or downloading expressly prohibited.

8/18/2019 Just Cause 2 Prima Official Guide
http://slidepdf.com/reader/full/just-cause-2-prima-official-guide 155/208
C H A R A C T E R S
F I E L D G U I D E T O P A N A U
W E A P O N S
V E H I C L E S
E X P L O R I N G P A N A U
A G E N C Y M I S S I O N S
S T R O N G H O L D T A K E O V E R S
F A C T I O N M I S S I O N S
C H A L L E N G E S
C O L L E C T I B L E S
A C H I E V E M E N T S
primagames.com 155
Location: Lembah Genting Tinggi
Rewards: 5,000 Chaos, $10,000, one weapon part,
one vehicle part
Razman leaves an
assault rifle next
to the telephone
for you to useduring this short
mission. Take the
rifle if it is superior
to your current
two-handed
weapon, and then
seek out a nearby vehicle to chase down the pilot. The Roaches’
Dalton N90 is a speedy little truck that will get you across the
airport in no time.
As you approach the pilot,
he takes off in a helicopter.You must pursue him. Find
a way to take to the skies
yourself.
There are multiple Aeroliner
474s at the airport. Jump
in the cockpit and take off
after the pilot, or use the
second attack chopper at
the helipad.
LEGEND
ROACHESThe Roaches are a criminal gang that operates
under the leadership of Razak “Razor” Razman. The
cutthroat crime boss runs a tight ship, and with your
help, he will expand his empire across Panau. The
Roaches missions are presented in the order in which
they appear, provided you perform the Stronghold
Takeover missions in the order in which they are
offered: “Free Trade,” “Oil for Blood,” and “Paradise
Valley.”
Nothing to DeclareThe Roaches place a premium on loyalty. Razman
has just discovered that his personal pilot has turned
traitor and is agreeing to work with the government.
Razman wants you to intercept the pilot at the Panau
International Airport and snuff him out.
Strategy
The Panau International Airport is the only place
you can find the Aeroliner 474.
It’s a gas to chase the pilot in the Aeroliner, but this
mission is definitely easier if you use the chopper.
If you take the
Aeroliner, fly above
the pilot’s chopper and
then bail out. Fall near
the chopper and then
deploy your chute.Grapple to the chopper
to seize the pilot.
Should you
choose the
chopper, fly
after the pilot
as he makes
his way to the
downtown
area. Stay
above the
pilot so youcan spray his helicopter with bullets while giving chase. Do
NOTHING TO DECLARE
Pilot1
START
1
2
AST OFRACTER
FIELD GUIDETO PANAU
WEAPONS VEHICLE EXPLORINGPANAU
AGENCYMISSIONS
STRONGHOLDTAKEOVERS
FACTIONMISSIONS
CHALLENGES COLLECTIBLES ACHIEVEMENTSAND TROPHIES
REAPERS • ROACHES • ULAR BOYSNothing to Declare • Airport Troubles • Paparazzi Pursuit • The Red One or the Blue One? • Breaking and Entering • Mile High Club • Smugglers Do Run • Keeping the Flow • Head of State • River Runs Red • An Officer and a Hitman
• Information Highway • Offensive Action • O Panay Redentor • Stop the Press
Protected by copyright. Unauthorized or unlawful copying or downloading expressly prohibited.

8/18/2019 Just Cause 2 Prima Official Guide
http://slidepdf.com/reader/full/just-cause-2-prima-official-guide 156/208
PRIMA OFFICIAL STRATEGY GUIDETM
156
StrategyLocation: Panau International Airport
Rewards: 5,000 Chaos, $10,000, one weapon part,
one vehicle part
If you are low on health, use the medical kit at the fuel
station near the telephone.
Razman leaves you
only a submachine
gun. Because youare so close to
the airport, he has
no need to gift
you a vehicle. The
location of the pilot
is marked on your
map. He is inside a
hangar on the fringes of the airport. Run (or slingshot-parachute)
to the hangar to close in on the pilot.
not engage the him. Just maintain your height advantage while
keeping within range of your guns, which is about 200 meters.
After several blasts, the chopper—and the pilot inside—crash
to earth. With the pilot down, the Razman thanks you for your
service and rewards you with cash and parts.
LEGEND
AIRPORT TROUBLES
The pilot has no intention of
going quietly. You must kill
him. When the pilot dies, he
drops his PDA, which has
the location of the hacker
on it.
There are many fuel depots at the airport that are easy
to blow up with the attack chopper you take from the
dead pilot.
The PDA reveals
that the hacker,
nicknamed Little
Guy, is still at the
airport. He is in a
small plane getting
ready to take off
from the airstrip
to the south of
the hangar. Fly
the pilot’s attack chopper to the site of the small plane. There
are multiple soldiers around, but the chopper makes short workof them from above. If you really want to cause a splash and
neutralize several soldiers, hammer the parked airliner at the end
of the runway with your chopper’s guns.
Airport TroublesA hacker who once worked for the Roaches has
turned against Razman and has struck a deal with
the government. That hacker has entirely too much
information on the Roaches to be walking right into
Panay’s hands. You must seek out the hacker, but few
people know where he is hiding. To find out, you must
start at the airport and interrogate the pilot of the
plane that is scheduled to fly the hacker to safety.
The Titus ZJ is one of the best cars on the island, and the only
place to find it is on display in front of the airport.
Pilot
Little Guy
1
2
START
1
2
AST OFRACTER
FIELD GUIDETO PANAU
WEAPONS VEHICLE EXPLORINGPANAU
AGENCYMISSIONS
STRONGHOLDTAKEOVERS
FACTIONMISSIONS
CHALLENGES COLLECTIBLES ACHIEVEMENTSAND TROPHIES
REAPERS • ROACHES • ULAR BOYSNothing to Declare • Airport Troubles • Paparazzi Pursuit • The Red One or the Blue One? • Breaking and Entering • Mile High Club • Smugglers Do Run • Keeping the Flow • Head of State • River Runs Red • An Officer and a Hitman
• Information Highway • Offensive Action • O Panay Redentor • Stop the Press
Protected by copyright. Unauthorized or unlawful copying or downloading expressly prohibited.

8/18/2019 Just Cause 2 Prima Official Guide
http://slidepdf.com/reader/full/just-cause-2-prima-official-guide 157/208
C H A R A C T E R S
F I E L D G U I D E T O P A N A U
W E A P O N S
V E H I C L E S
E X P L O R I N G P A N A U
A G E N C Y M I S S I O N S
S T R O N G H O L D T A K E O V E R S
F A C T I O N M I S S I O N S
C H A L L E N G E S
C O L L E C T I B L E S
A C H I E V E M E N T S
primagames.com 157
You must steal the small
plane with Little Guy inside
of it, which requires you to
land. On the ground, take
out any remaining soldiers
between you and Little Guy’s
plane.
Trash the pilot’s chopper so the soldiers near the plane
cannot steal it back and use it against you.
Once behind the Cassius
192’s controls, take off
to avoid too much damage
to the plane from ground
troops or from an incoming
attack chopper.
As you fly away from the airport, you start downloading all of the
information Little Guy has on him. The download takes several
seconds. As the information is downloading, continue gaining
altitude to leave behind the attack chopper that gave chase from
the airport. If you stay too low, you risk being shot down before
the download is complete.
Once the
download is
complete, Razman
is satisfied. He tells
you to do with Little
Guy as you please.
You can crash the
plane to get rid of
Little Guy or land
it somewhere and
just let the friendless hacker melt back into the Panauan people.
However, you should definitely use the plane to speed to yournext mission, whenever it appears on the map.
Jets and planes are great for discovering
settlements. Just fly low over the settlement to
mark it on your PDA. Marking settlements gives
you greater freedom with landing zones when using
Black Market extraction.
Paparazzi PursuitRazman is in need of a killer. It seems a paparazzi in Panau
City has managed to snap some incriminating photos of one
of Razman’s associates. You need to report to Panau City
and close in on the photographer’s apartment. Should the
photographer flee, chase him down and recover the photo-
graphs. They must never be seen!
Strategy
Location: Panau City
Rewards: 5,000 Chaos, $10,000, one weapon
part, one vehicle part
Razman leaves
you an SMG
and a Makoto
MZ 250
motorcycle. The
motorcycle is
great becauseis it fast, and
it has great
maneuver-
ability. You can fire one of your single-handed weapons (like
the SMG) while driving it. Once you’re on the bike, weave
through traffic to close in on the photographer’s apartment.
When
you reach the
apartment, the
photographer
spots you as
a potential
assassin and
takes off on his
motorcycle. The
photographer’s
bike is just as
fast as yours;
since he has a
head start, you
must keep the
throttle up to
catch him. The
photographer
makes sharp
turns to loseyou, such as an immediate hard right after you spot him.
AST OFRACTER
FIELD GUIDETO PANAU
WEAPONS VEHICLE EXPLORINGPANAU
AGENCYMISSIONS
STRONGHOLDTAKEOVERS
FACTIONMISSIONS
CHALLENGES COLLECTIBLES ACHIEVEMENTSAND TROPHIES
REAPERS • ROACHES • ULAR BOYSNothing to Declare • Airport Troubles • Paparazzi Pursuit • The Red One or the Blue One? • Breaking and Entering • Mile High Club • Smugglers Do Run • Keeping the Flow • Head of State • River Runs Red • An Officer and a Hitman
• Information Highway • Offensive Action • O Panay Redentor • Stop the Press
Protected by copyright. Unauthorized or unlawful copying or downloading expressly prohibited.

8/18/2019 Just Cause 2 Prima Official Guide
http://slidepdf.com/reader/full/just-cause-2-prima-official-guide 158/208
C H A R A C T E R S
F I E L D G U I D E T O P A N A U
W E A P O N S
V E H I C L E S
E X P L O R I N G P A N A U
A G E N C Y M I S S I O N S
S T R O N G H O L D T A K E O V E R S
F A C T I O N M I S S I O N S
C H A L L E N G E S
C O L L E C T I B L E S
A C H I E V E M E N T S
primagames.com 159
LEGEND
The first drug
refinery is to
the south of
the telephone.
Hijack any car or
motorbike thatpasses by, and
drive straight to the
first refinery. The
site is on a roof,
so you must grapple up to the rooftop to mount your attack and
secure the bomb.
A small helicopter is useful for getting to each site, but
by the time you reach the fourth refinery, heat is so
strong that your craft may not be able to withstand all
of the incoming bullets. An attack chopper, on the other
hand, is devastating.
As soon as you
reach the first
rooftop, the timers
for all four bombs
start ticking. You
have just over four
minutes to diffuse
all of the bombs or
the mission ends
in failure. So, to
get things started, target the soldiers around the bomb on the
first rooftop refinery in order to clear the site. If you leave anysoldier alive, you risk being shot in the back while hacking the
bomb’s controls. This restarts the hack sequence, thus eating up
precious seconds.
The second refinery is farther south. Cross the rooftops to reach
the refinery as quickly as possible. Grapple to the next roof from the first
refinery and then engage the parachute to fly straight at the bomb site.
As you fly toward the site, you pass a cash stash on
a billboard. Unless you can be quick about grabbing
it, come back to it later.
When you
reach the
second refinery,
several guns
train on you.
Act fast to
bring these
thugs down,
whipping any
that get too
close. They are armed with shotguns, and you can ill afford
a close-range blast. Your grapple hook can rip soldiers off
the roof, so pull them to their deaths if they get too close tothe edge. Shoot the rest of the group and then zero in on the
bomb. Diffuse it as fast as you can and then begin traveling
to the third refinery.
The refinery is to
the southeast, on top
of a high-rise. It is
much farther away, so
this is why having a
chopper is so useful.
But if you are without
rotors, grapple from
building to building,using your chute to
slingshot to the third
refinery.
THE RED ONE OR THE BLUE ONE?
Drug Refinery
Drug Refinery
Drug Refinery
Drug Refinery
1
2
3
4
START
1
23 4
AST OFRACTER
FIELD GUIDETO PANAU
WEAPONS VEHICLE EXPLORINGPANAU
AGENCYMISSIONS
STRONGHOLDTAKEOVERS
FACTIONMISSIONS
CHALLENGES COLLECTIBLES ACHIEVEMENTSAND TROPHIES
REAPERS • ROACHES • ULAR BOYSNothing to Declare • Airport Troubles • Paparazzi Pursuit • The Red One or the Blue One? • Breaking and Entering • Mile High Club • Smugglers Do Run • Keeping the Flow • Head of State • River Runs Red • An Officer and a Hitman
• Information Highway • Offensive Action • O Panay Redentor • Stop the Press
Protected by copyright. Unauthorized or unlawful copying or downloading expressly prohibited.

8/18/2019 Just Cause 2 Prima Official Guide
http://slidepdf.com/reader/full/just-cause-2-prima-official-guide 159/208
PRIMA OFFICIAL STRATEGY GUIDETM
158
The photographer’s best chance to lose you is where he turns onto
the freeway. The on-ramp is narrow and easy to miss if you do not
either slow down or swing wide into it.
Use the SMG or revolver to gun down the paparazzo.
The pistol, unless significantly upgraded, just doesn’tdo the damage needed to end this chase.
Slide behind the
photog on the
freeway. There is
a little traffic, but
most of it clears
out when they
see you coming.
The freeway is a
straight shot, giving
the photog fewoptions for avoiding your gunfire. If you get close enough to the
photographer, you can also jump off your bike and immediately
grapple to his. When you grapple to his bike, he falls off. Jump off
the photog’s bike and then gun him down right in the middle of
the road.
You can also kill the
photographer by targeting
his bike. Shoot it up until it
is on fire and then wait for
the flames to reach the gas
tank. The explosion kills the
photog.
LEGENDPAPARAZZI PURSUIT
After killing the photographer, stop at his corpse and retrieve thepictures. Now you must drive them to a drop-off point, where
they will be disposed of. By this point, though, you have a little
heat on you. Soldiers will give pursuit and open fire as you speed
through the city en route to the drop-off site, which is a trash
can. Deposit the photos to end the mission.
The Red One or the Blue One?The Roaches control several drug refineries around Panau City.
Razman has learned that government troops are launching
an operation to destroy four of his facilities. The soldiers willsurround each site and then plant a bomb to blow it up. Razman
needs you to quickly travel to the four refineries and disarm the
bombs. Resistance will be strong, though, so make sure you’re
operating with full clips before taking this assignment.
Strategy
Location: Panau City
Rewards: 5,000 Chaos, $10,000, one weapon part,
one vehicle part
START1
Paparazzi1
AST OFRACTER
FIELD GUIDETO PANAU
WEAPONS VEHICLE EXPLORINGPANAU
AGENCYMISSIONS
STRONGHOLDTAKEOVERS
FACTIONMISSIONS
CHALLENGES COLLECTIBLES ACHIEVEMENTSAND TROPHIES
REAPERS • ROACHES • ULAR BOYSNothing to Declare • Airport Troubles • Paparazzi Pursuit • The Red One or the Blue One? • Breaking and Entering • Mile High Club • Smugglers Do Run • Keeping the Flow • Head of State • River Runs Red • An Officer and a Hitman
• Information Highway • Offensive Action • O Panay Redentor • Stop the Press
Protected by copyright. Unauthorized or unlawful copying or downloading expressly prohibited.

8/18/2019 Just Cause 2 Prima Official Guide
http://slidepdf.com/reader/full/just-cause-2-prima-official-guide 160/208
PRIMA OFFICIAL STRATEGY GUIDETM
160
The third refinery is being attacked by normal soldiers, and
there is a sniper on the stairs above the bomb. Start yanking the
soldiers off the rooftop refinery with your grappling hook before
wading in to finish the rest (if any survived being pulled by your
hook or you opted to just rush in and start shooting) and disarm
the bomb. The bomb is completely exposed, so you must clear
the roof before attempting to disarm it. Otherwise, you will be
repeatedly shot every time you turn to the bomb.
The fourth
and final refinery is
southeast, on top
of an even taller
building. You must
get around a giant
skyscraper to reach
it. If you are relying
only on your hook
and chute, pullyourself to the skyscraper and then slingshot around it. To get
enough momentum to propel you to the refinery building, you will
need to grapple to the skyscraper again (latch on to a ledge) as
you make the arc around the right side.
The fourth
rooftop is a minor
war zone. Beware of
a demolition officer
tossing explosives
at you. One false
move and you’ll
be blasted off the
roof. By this point,you have attracted
significant heat. An attack chopper is likely to swirl overhead.
Grapple up to it and steal it away in order to blast everybody off the
rooftop. Once the scene is clear, land on the rooftop and diffuse
the final bomb.
If you hold on to the attack
chopper, use it to drop down
to the nearby rooftop with
Colonel Tengku Baba. Shred
him with the chopper’s guns
to bank 1,000 Chaos and
$5,000.
Breaking and EnteringThe Roaches want to expand their operations in the Pelaut
Archipelago and cannot do so without sensitive information
that the government possesses. The data is at the Pulau Panau
Kecil military base, but the computer you must access is heavilyguarded. Do not go into this mission lightly. Before moving
out, take the assault rifle Razman leaves behind for you at the
telephone.
Strategy
Location: Pulau Panau Kecil Base
Rewards: 5,000 Chaos, $10,000, one weapon
part, one vehicle part
Razman leaves
behind no vehicle,
but with the baseso close to the
telephone site,
you only need
to “borrow” a
civilian’s ride
temporarily to
reach the base
entrance. The entrance is guarded by a single soldier on a tower.
He is easy to pull down. There is a mounted weapon at the
entrance, too. If you want serious firepower, detaching it from the
mounting gives you a minigun capable of perforating an enemy
soldier from great distances.
The minigun makes short
work of soldiers, trucks,
fuel tanks, you name it. But
the trade-off is speed and
use of the grappling hook.
As soon as you reach the base, a timer starts. You must access
the data within 1:40 or else the download is wiped and you lose
access to the information. The laptop is in a small garage to the
west of the second base gate. By this point, your heat is high and
several soldiers are en route to your position. An attack chopper
is likely being called in, too.
AST OFRACTER
FIELD GUIDETO PANAU
WEAPONS VEHICLE EXPLORINGPANAU
AGENCYMISSIONS
STRONGHOLDTAKEOVERS
FACTIONMISSIONS
CHALLENGES COLLECTIBLES ACHIEVEMENTSAND TROPHIES
REAPERS • ROACHES • ULAR BOYSNothing to Declare • Airport Troubles • Paparazzi Pursuit • The Red One or the Blue One? • Breaking and Entering • Mile High Club • Smugglers Do Run • Keeping the Flow • Head of State • River Runs Red • An Officer and a Hitman
• Information Highway • Offensive Action • O Panay Redentor • Stop the Press
Protected by copyright. Unauthorized or unlawful copying or downloading expressly prohibited.

8/18/2019 Just Cause 2 Prima Official Guide
http://slidepdf.com/reader/full/just-cause-2-prima-official-guide 161/208
C H A R A C T E R S
F I E L D G U I D E T O P A N A U
W E A P O N S
V E H I C L E S
E X P L O R I N G P A N A U
A G E N C Y M I S S I O N S
S T R O N G H O L D T A K E O V E R S
F A C T I O N M I S S I O N S
C H A L L E N G E S
C O L L E C T I B L E S
A C H I E V E M E N T S
primagames.com 161
Strategy
Location: Mile High Club
Rewards: 7,500 Chaos, $17,500, one weapon part,
one vehicle part
You accept the call for the mission at the Mile High Club’s
earthbound base. Razman leaves behind a shotgun,
which is a good weapon for the close-quarter combat you
will encounter at the brothel. But you need to hijack the
Rowlinson personal copter on the helipad to fly up to the
Mile High Club, which is over three kilometers away. The
Rowlinson has no guns, but the flight is peaceful.
LEGEND
The GV-104 Razorback
parked on the main road of
the base has a cannon that
eliminates any soldier who
attempts to challenge you as
you close in on the laptop.
And after you complete the
mission, you can use it to
target all of the assets on
the base.
Once inside the garage, open fire on the two soldiers in the
back. A frag is usually enough to kill them, so if you have spares,
launch one or two into the rear of the garage. Or, just use you
grappling hook to pull them out of cover and finish them off
with your guns. After killing the guards, start the hack. You must
then protect the laptop from the next wave of soldiers while the
information is downloaded on Razman’s end. As soon as the last
byte is transferred, the mission ends in success. But that doesn’t
mean the soldiers on the base stop attacking. You still have
plenty of heat and must fight your way back out.
Mile High ClubMadam Lee, the proprietor of the Mile High Club
brothel (the world’s only blimp-powered house
of ill repute), has dirt on pretty much everybody
in Panau. Madam Lee often uses the information
gathered at the Mile High Club for extortion and
bribery plots. Razman wants you to fly up to the
Mile High Club and steal Madam Lee’s secret
information on Baby Panay so he can use it for his
own nefarious means.
BREAKING AND ENTERING
START
1
Pulau Panau Kecil Base1
AST OFRACTER
FIELD GUIDETO PANAU
WEAPONS VEHICLE EXPLORINGPANAU
AGENCYMISSIONS
STRONGHOLDTAKEOVERS
FACTIONMISSIONS
CHALLENGES COLLECTIBLES ACHIEVEMENTSAND TROPHIES
REAPERS • ROACHES • ULAR BOYSNothing to Declare • Airport Troubles • Paparazzi Pursuit • The Red One or the Blue One? • Breaking and Entering • Mile High Club • Smugglers Do Run • Keeping the Flow • Head of State • River Runs Red • An Officer and a Hitman
• Information Highway • Offensive Action • O Panay Redentor • Stop the Press
Protected by copyright. Unauthorized or unlawful copying or downloading expressly prohibited.

8/18/2019 Just Cause 2 Prima Official Guide
http://slidepdf.com/reader/full/just-cause-2-prima-official-guide 162/208
PRIMA OFFICIAL STRATEGY GUIDETM
162
LEGENDMILE HIGH CLUB
The second
laptop is on the far
side of the brothel.
Race past the
giant dance club
(you’ll be back here
soon enough) tolocate the laptop
near the DJ. The
hack is easy
enough, but as soon as you finish grabbing the data, several
brothel employees race to cut you off from reaching the dance
club, site of the final laptop. The strippers and guards are armed
with pistols and shotguns. Stand your ground while the data is
downloaded and eliminate the threats. In addition to shooting
them, you can yank the off the airship or string them up with
your hook for pinata kills.
Now, return to the dance club—located between the first andsecond laptops—and open fire on the first bartender you see.
Chances are good he has a shotgun pointed right at your head.
Patrons dive for cover as the firefight boils over.
When you approach the Mile High Club, land on the helipad.
Do not touch down on the small runway. You may need that
cleared for your escape.
There is an
armor part on
the runway
behind the
parked
plane. Pickit up to keep
increasing
your
maximum
health, and then grapple up to the control tower at the
runway’s edge to grab a second armor part.
To achieve 100-percent completion of the Mile High
Club, you must destroy several assets like the fuel
depot and generator on the runway. But save those for
later. Concentrate on the mission right now.
The first laptop with
data is at the bar
halfway through
the Mile High Club.
The bartender
brandishes a
shotgun as you
approach the bar.
Within seconds, a
firefight breaks out. You cannot hack the laptop until you clean
out the bar. Eliminate the bartender and any guards who cross
the nearby dance floor to intercept you. Once you’ve thinned outthe crowd, turn back to the laptop and perform the hack.
START
1
Mile High Club1
AST OFRACTER
FIELD GUIDETO PANAU
WEAPONS VEHICLE EXPLORINGPANAU
AGENCYMISSIONS
STRONGHOLDTAKEOVERS
FACTIONMISSIONS
CHALLENGES COLLECTIBLES ACHIEVEMENTSAND TROPHIES
REAPERS • ROACHES • ULAR BOYSNothing to Declare • Airport Troubles • Paparazzi Pursuit • The Red One or the Blue One? • Breaking and Entering • Mile High Club • Smugglers Do Run • Keeping the Flow • Head of State • River Runs Red • An Officer and a Hitman
• Information Highway • Offensive Action • O Panay Redentor • Stop the Press
Protected by copyright. Unauthorized or unlawful copying or downloading expressly prohibited.

8/18/2019 Just Cause 2 Prima Official Guide
http://slidepdf.com/reader/full/just-cause-2-prima-official-guide 163/208
C H A R A C T E R S
F I E L D G U I D E T O P A N A U
W E A P O N S
V E H I C L E S
E X P L O R I N G P A N A U
A G E N C Y M I S S I O N S
S T R O N G H O L D T A K E O V E R S
F A C T I O N M I S S I O N S
C H A L L E N G E S
C O L L E C T I B L E S
A C H I E V E M E N T S
primagames.com 163
Rush to the laptop and start the hack. As you hold your ground,
the bullets start to fly. Guards line up around the perimeter of the
dance floor to take their shots. Use your grappling hook to pull
them off their perches. They are much easier to deal with on the
dance floor below. You have a little freedom to step away from
the laptop and target the guards without disrupting the hack.
As soon as the download is done, Razman congratulates you on
your success.
However, the celebration is cut short when Razman discovers
that Panay’s thugs have sabotaged the Mile High Club. They haverigged the brothel to blow with a large bomb in the engine room
belowdecks. You must return to the runway where you initially
landed (watch out for the sniper at the control tower) and slip
through a door on the ship’s side to locate the bomb.
There is a weapon part in the engine room, but don’t go
for it until you’ve dealt with the bomb.
When you step
below the deck, the
timer on the bombstarts. You have
just one minute to
get the bomb off
the brothel. Pull the
two guards to their
deaths with your
grappling hook
(they are easily dropped through the hole between the catwalks
in the engine room) and then hack the bomb’s controls. Your
hack fails no matter what you do, leaving only one last option:
shoot the mountings holding it under the brothel.
Close in on the
mountings and deliver
point-blank blasts that
free the bomb.
As soon as the bomb falls away from the brothel, the mission
ends in success. Now you have time to scour the base and
grab the rest of the vehicle, armor, and weapon parts. When
you are finished with the Mile High Club, either leave via the
small copter or steal away in the Cassius personal plane. The
plane will get you to your next mission in no time.
Smugglers Do RunThe Roaches worked hard and shed a lot of blood to establish
their smuggling routes around Panau. And now some band of
small-time crooks thinks they can just use them for their own
purposes without paying up? Razman wants you to intercept
and eliminate the smugglers as they attempt to use the
smuggling route along the Pelaut Archipelago.
Before the mission,
there are two armor
parts to grab. One is
by the nearby dock;
the other is behind the
cargo containers.
StrategyLocation: Pelaut Archipelago beach
Rewards: 5,000 Chaos, $10,000, one weapon
part, one vehicle part
AST OFRACTER
FIELD GUIDETO PANAU
WEAPONS VEHICLE EXPLORINGPANAU
AGENCYMISSIONS
STRONGHOLDTAKEOVERS
FACTIONMISSIONS
CHALLENGES COLLECTIBLES ACHIEVEMENTSAND TROPHIES
REAPERS • ROACHES • ULAR BOYSNothing to Declare • Airport Troubles • Paparazzi Pursuit • The Red One or the Blue One? • Breaking and Entering • Mile High Club • Smugglers Do Run • Keeping the Flow • Head of State • River Runs Red • An Officer and a Hitman
• Information Highway • Offensive Action • O Panay Redentor • Stop the Press
Protected by copyright. Unauthorized or unlawful copying or downloading expressly prohibited.
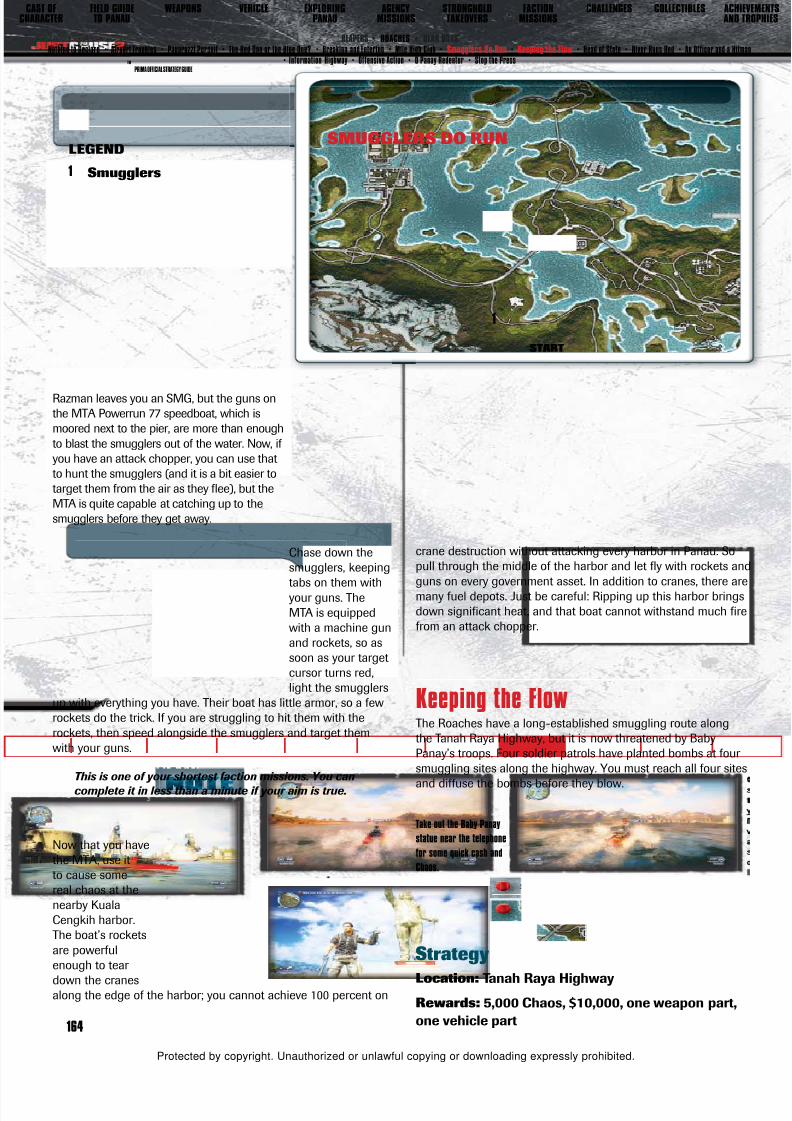
8/18/2019 Just Cause 2 Prima Official Guide
http://slidepdf.com/reader/full/just-cause-2-prima-official-guide 164/208
PRIMA OFFICIAL STRATEGY GUIDETM
164
LEGENDSMUGGLERS DO RUN
crane destruction without attacking every harbor in Panau. So
pull through the middle of the harbor and let fly with rockets and
guns on every government asset. In addition to cranes, there are
many fuel depots. Just be careful: Ripping up this harbor brings
down significant heat, and that boat cannot withstand much fire
from an attack chopper.
Keeping the FlowThe Roaches have a long-established smuggling route along
the Tanah Raya Highway, but it is now threatened by Baby
Panay’s troops. Four soldier patrols have planted bombs at four
smuggling sites along the highway. You must reach all four sites
and diffuse the bombs before they blow.
Take out the Baby Panay
statue near the telephone
for some quick cash and
Chaos.
Strategy
Location: Tanah Raya HighwayRewards: 5,000 Chaos, $10,000, one weapon part,
one vehicle part
Chase down the
smugglers, keeping
tabs on them with
your guns. The
MTA is equipped
with a machine gun
and rockets, so as
soon as your target
cursor turns red,
light the smugglers
up with everything you have. Their boat has little armor, so a few
rockets do the trick. If you are struggling to hit them with the
rockets, then speed alongside the smugglers and target them
with your guns.
This is one of your shortest faction missions. You can
complete it in less than a minute if your aim is true.
Now that you have
the MTA, use it
to cause some
real chaos at the
nearby Kuala
Cengkih harbor.
The boat’s rockets
are powerful
enough to tear
down the cranesalong the edge of the harbor; you cannot achieve 100 percent on
Smugglers1
START
1
Razman leaves you an SMG, but the guns on
the MTA Powerrun 77 speedboat, which is
moored next to the pier, are more than enough
to blast the smugglers out of the water. Now, if
you have an attack chopper, you can use that
to hunt the smugglers (and it is a bit easier to
target them from the air as they flee), but the
MTA is quite capable at catching up to the
smugglers before they get away.
AST OFRACTER
FIELD GUIDETO PANAU
WEAPONS VEHICLE EXPLORINGPANAU
AGENCYMISSIONS
STRONGHOLDTAKEOVERS
FACTIONMISSIONS
CHALLENGES COLLECTIBLES ACHIEVEMENTSAND TROPHIES
REAPERS • ROACHES • ULAR BOYSNothing to Declare • Airport Troubles • Paparazzi Pursuit • The Red One or the Blue One? • Breaking and Entering • Mile High Club • Smugglers Do Run • Keeping the Flow • Head of State • River Runs Red • An Officer and a Hitman
• Information Highway • Offensive Action • O Panay Redentor • Stop the Press
Protected by copyright. Unauthorized or unlawful copying or downloading expressly prohibited.

8/18/2019 Just Cause 2 Prima Official Guide
http://slidepdf.com/reader/full/just-cause-2-prima-official-guide 165/208
C H A R A C T E R S
F I E L D G U I D E T O P A N A U
W E A P O N S
V E H I C L E S
E X P L O R I N G P A N A U
A G E N C Y M I S S I O N S
S T R O N G H O L D T A K E O V E R S
F A C T I O N M I S S I O N S
C H A L L E N G E S
C O L L E C T I B L E S
A C H I E V E M E N T S
primagames.com 165
Once the thugs are down, rush the bomb and hack it.
As soon as you disable the bomb, get back on your bike or in
your car and zoom to the next site farther up the freeway.
There are two dirt bikes at the first depot. You can
use these if you lost your first vehicle.
The second bomb site
is in the middle of
the freeway at some
ancient ruins.
LEGEND
Razman gifts you
a shotgun and a
Makoto MZ 250
motorcycle at
the start of this
mission. Now, themotorcycle has
no armor, leaving
you completely
exposed. So, while
it is speedy, this vehicle is dangerous because as you pull up to
smuggling sites, multiple soldiers will turn their guns on you. You
will take damage. Consider calling in a different vehicle via the Black
Market (the Poloma Renegade is good if you can access it right
now) or start the mission with something both fast and armored.
KEEPING THE FLOW
several of the soldiers, too, which goes a long way
to cleaning out the site.
START1
23
4
Bomb
Bomb
Bomb
Bomb
1
2
3
4
You have just shy of five minutes to disarm those four bombs, so
get going as soon as possible. As you pull up to the first site on the
freeway’s right side, a handful of soldiers step out to attack. Repel
them with gunfire or grenades. Shooting the fuel drums shatters
Bail out of your vehicle and rush the site. There are five or
more soldiers surrounding the bomb. Duck behind the cargo
containers and use them as cover to target the soldiers as
you close in on the bomb. Shoot the barrels around the
AST OFRACTER
FIELD GUIDETO PANAU
WEAPONS VEHICLE EXPLORINGPANAU
AGENCYMISSIONS
STRONGHOLDTAKEOVERS
FACTIONMISSIONS
CHALLENGES COLLECTIBLES ACHIEVEMENTSAND TROPHIES
REAPERS • ROACHES • ULAR BOYSNothing to Declare • Airport Troubles • Paparazzi Pursuit • The Red One or the Blue One? • Breaking and Entering • Mile High Club • Smugglers Do Run • Keeping the Flow • Head of State • River Runs Red • An Officer and a Hitman
• Information Highway • Offensive Action • O Panay Redentor • Stop the Press
Protected by copyright. Unauthorized or unlawful copying or downloading expressly prohibited.

8/18/2019 Just Cause 2 Prima Official Guide
http://slidepdf.com/reader/full/just-cause-2-prima-official-guide 166/208
PRIMA OFFICIAL STRATEGY GUIDETM
166
LEGEND
shacks to kill the soldiers quickly. When the coast is clear, hack
the bomb and then roar off to the next site farther up the road. If
you need new wheels, there is a Makoto next to the bomb.
Be careful while
racing through
traffic on a
motorcycle. If
you accidentally
clip a truck at
full speed, you’ll
be ejected from
the bike and
likely killed
when you smack the pavement.
The third bomb
is in a small
temple to the left
of the freeway.
Blast through the
soldiers as you
close in on the
temple, where
you also find an
armor part. Circle
the temple with a close-quarter killing machine like the shotgun,
and sweep the soldiers off their feet. When you have cleared out
enough to safely make a run for the bomb, roll to it and quickly
input the disarm commands. Jump back on your wheels (or use
the dirt bikes helpfully left at the temple) and then take off across
the bridge to close in on the fourth bomb site.
The bomb site is on the bridge’s other side, off to the right. Jump
out of your vehicle and immediately start blasting. The explosions
from popped fuel drums kill a few of the guards, but you need to
smartly circle the site to clean out those who backed away when
you aimed for the barrels. After eliminating the soldiers, diffuse
the bomb to complete the mission and please Razman.
Head of StateTom Yee, one of Razman’s business partners, was just forced off
some of his prized land to make room for one of those gaudy
Baby Panay statues. Razman wants to send a little gift to Yee to
cheer him up: the head of the Baby Panay statue.
Strategy
Location: Kota Pantai Kuala
Rewards: 5,000 Chaos, $10,000, one weapon part,
one vehicle part
HEAD OF STATE
START
1
2
Kota Pantai Kuala
Drop-Off Site
1
2
The Baby Panay statue is located in the town squareto the northwest of the telephone, in the center
of Kota Pantai Kuala. Pick up the rocket launcher
Razman left behind for you, and then grapple up
to the buildings overlooking the town square. Try to
maintain a low profile at first, because this mission is
easier if you start without any heat.
AST OFRACTER
FIELD GUIDETO PANAU
WEAPONS VEHICLE EXPLORINGPANAU
AGENCYMISSIONS
STRONGHOLDTAKEOVERS
FACTIONMISSIONS
CHALLENGES COLLECTIBLES ACHIEVEMENTSAND TROPHIES
REAPERS • ROACHES • ULAR BOYSNothing to Declare • Airport Troubles • Paparazzi Pursuit • The Red One or the Blue One? • Breaking and Entering • Mile High Club • Smugglers Do Run • Keeping the Flow • Head of State • River Runs Red • An Officer and a Hitman
• Information Highway • Offensive Action • O Panay Redentor • Stop the Press
Protected by copyright. Unauthorized or unlawful copying or downloading expressly prohibited.

8/18/2019 Just Cause 2 Prima Official Guide
http://slidepdf.com/reader/full/just-cause-2-prima-official-guide 167/208
C H A R A C T E R S
F I E L D G U I D E T O P A N A U
W E A P O N S
V E H I C L E S
E X P L O R I N G P A N A U
A G E N C Y M I S S I O N S
S T R O N G H O L D T A K E O V E R S
F A C T I O N M I S S I O N S
C H A L L E N G E S
C O L L E C T I B L E S
A C H I E V E M E N T S
primagames.com 167
Since you have the Razorback, you might as well go for
100-percent completion at the mansion. Drive close to the
water and target the wind turbines along the beach to drive
up the percentage. Then circle the mansion again to blast
other assets and seek out additional parts and cash stashes.
River Runs RedRazman calls upon the services of Captain Singh and his
boat the Minerva to carry contraband along the Rajang River.
Singh is about to start another run to the Roaches’ safe
house along the river, but military patrols on the Rajang are
at an all-time high. Escort Singh upriver to the safe house by
manning the Minerva ’s guns.
Prior to accepting
Razman’s call, destroy
the gas station and
fuel depots across the
street to raise Chaos
and increase your
percentage at the site.
Strategy
Location: Bandar Lengkok Sungai
Rewards: 7,500 Chaos, $17,500, one weapon part,
one vehicle part
To meet up with
Captain Singh,
you must cross
the Rajang
River behind
the village.
Singh’s Minerva
is parked at the
docks on the
river’s opposite
side. You can easily cross by slingshotting off a rock or tree
and parachuting over the waters. When you reach the boat,
climb aboard and then stunt-jump behind the guns while
listening to Singh describe the upcoming gauntlet.
The rooftop directly looking down on the statue has an
armor part.
Once you are in position,
blast the Baby Panay statue
with the rocket launcher. It
crumbles. The head rolls to
the ground.
Use the remaining rockets to
eliminate the soldiers who
spring into action aroundthe shattered statue. Just
be careful not to shoot the
parked Razorback. That’s
your ticket out of here.
Drop to the ground and fire
your grappling hook at the
statue head. Then dual-hook
it to the Razorback. Once
connected, you can drag
the statue head behind theRazorback.
You need to drag the statue head to the Rumah Hartawan
mansion on the waterfront to the north. Using the Razorback’s
cannon, blast the roadblock at the intersection that leads down
to the beach. Steer through the wreckage and then cut to the
right to power down to the waterfront. There are additional
soldiers waiting for you at the mansion’s front gate. Hammer the
patrol with the Razorback and then drive around the back of the
mansion.
To deliver the statue head,
just pull into the courtyard.
This ends the mission.
Before leaving the mansion,
be sure to grab the armor
part next to the shackacross from the courtyard.
AST OFRACTER
FIELD GUIDETO PANAU
WEAPONS VEHICLE EXPLORINGPANAU
AGENCYMISSIONS
STRONGHOLDTAKEOVERS
FACTIONMISSIONS
CHALLENGES COLLECTIBLES ACHIEVEMENTSAND TROPHIES
REAPERS • ROACHES • ULAR BOYSNothing to Declare • Airport Troubles • Paparazzi Pursuit • The Red One or the Blue One? • Breaking and Entering • Mile High Club • Smugglers Do Run • Keeping the Flow • Head of State • River Runs Red • An Officer and a Hitman
• Information Highway • Offensive Action • O Panay Redentor • Stop the Press
Protected by copyright. Unauthorized or unlawful copying or downloading expressly prohibited.

8/18/2019 Just Cause 2 Prima Official Guide
http://slidepdf.com/reader/full/just-cause-2-prima-official-guide 168/208
PRIMA OFFICIAL STRATEGY GUIDETM
168
LEGEND
Right away, you are
assaulted by an attack
chopper. Use the mountedgun to blast the chopper out
of the sky. It’s tough to hold
your aim on the chopper,
since it is moving and the
water is choppy.
The onslaught continues as you speed upriver. Two government
gunboats slip behind you, and another attack chopper drops out
of the skies. Target the boats when you see them, but as soon
as the chopper is in play, move to the skies and take that thing
down. It is a far greater threat than the boats, since it can shootover the gun’s shielding.
RIVER RUNS RED
After you destroy the boats and the second chopper, Singh
pulls up to the river’s floodgates. They are closed. You must
grapple to the top of the floodgates and locate the control panel.
Slingshot
through the
air over the
floodgates to
sail right to
the control
panel with
minimal
resistance.
Land on the
cash stash near the panel to bank $2,500.
Captain Singh
Floodagtes
Floodgates
1
2
3
START1
2
3
There is at least one soldier guarding the floodgate controls. Gun
him down and then hack the controls to open the gates. Next,
you must cross back to the front of the gates (slingshotting works
again) to access a second floodgate control panel. There areseveral fuel depots along the edges of the gates, but you need
to help Singh right now. You can always come back and target
those depots after getting Singh to safety.
AST OFRACTER
FIELD GUIDETO PANAU
WEAPONS VEHICLE EXPLORINGPANAU
AGENCYMISSIONS
STRONGHOLDTAKEOVERS
FACTIONMISSIONS
CHALLENGES COLLECTIBLES ACHIEVEMENTSAND TROPHIES
REAPERS • ROACHES • ULAR BOYSNothing to Declare • Airport Troubles • Paparazzi Pursuit • The Red One or the Blue One? • Breaking and Entering • Mile High Club • Smugglers Do Run • Keeping the Flow • Head of State • River Runs Red • An Officer and a Hitman
• Information Highway • Offensive Action • O Panay Redentor • Stop the Press
Protected by copyright. Unauthorized or unlawful copying or downloading expressly prohibited.

8/18/2019 Just Cause 2 Prima Official Guide
http://slidepdf.com/reader/full/just-cause-2-prima-official-guide 169/208
C H A R A C T E R S
F I E L D G U I D E T O P A N A U
W E A P O N S
V E H I C L E S
E X P L O R I N G P A N A U
A G E N C Y M I S S I O N S
S T R O N G H O L D T A K E O V E R S
F A C T I O N M I S S I O N S
C H A L L E N G E S
C O L L E C T I B L E S
A C H I E V E M E N T S
primagames.com 169
Steal the MV V880 military truck on the left side of the floodgates
and carefully drive it along the narrow road.
LEGEND
Steer the truck up to
the mines and then
drive right off the
edge. Jump out as
soon as the truck
loses purchase on
the road.
Destroying the sea mines blasts open the back floodgate.
The Minerva may now continue her journey upriver to the
Roaches’ safe house. There are no more obstructions to
worry about, so Singh thanks you for your service and sends
you on your way.
An Officer and a HitmanA Panauan army colonel has killed one of Razman’s
associates. Naturally, this leads Razman to demand retri-
bution: in blood. Razman charges you with locating the
colonel at his mansion outside the village of Kampung Bunga
Raya. You must first coax the colonel out of his mansion by
tearing up the joint. Once the colonel shows his face, go to
work proving yourself the best killer in Razman’s employ.
Strategy
Location: Kampung Bunga Raya
Rewards: 5,000 Chaos, $10,000, one weaponpart, one vehicle part
Once you open the second
floodgate, parachute down
to Singh and get back
behind the guns.
It doesn’t take long for another attack chopper to swingoverhead and unload with its miniguns. A gunboat also pulls
behind you. Open fire on the boat as you swing the gun up to
the sky to bring down the bird. As the Minerva plows her way to
the next floodgate, continue blasting gunboats out of the water.
Singh will tell you when it is time to get out again.
It seems the
floodgates are open,
but the military has
positioned several
sea mines in the
water. You must
set off these mines
to clear a path forthe Minerva . Singh
suggests grappling
to the top of the gates and stealing a vehicle. Drive
the stolen vehicle off the edge of the gates and into
the sea mines. Naturally, he’d prefer you jumped
out of the vehicle first....
AN OFFICER AND A HITMAN
START
1
Colonel’s Mansion1
AST OFRACTER
FIELD GUIDETO PANAU
WEAPONS VEHICLE EXPLORINGPANAU
AGENCYMISSIONS
STRONGHOLDTAKEOVERS
FACTIONMISSIONS
CHALLENGES COLLECTIBLES ACHIEVEMENTSAND TROPHIES
REAPERS • ROACHES • ULAR BOYSNothing to Declare • Airport Troubles • Paparazzi Pursuit • The Red One or the Blue One? • Breaking and Entering • Mile High Club • Smugglers Do Run • Keeping the Flow • Head of State • River Runs Red • An Officer and a Hitman
• Information Highway • Offensive Action • O Panay Redentor • Stop the Press
Protected by copyright. Unauthorized or unlawful copying or downloading expressly prohibited.

8/18/2019 Just Cause 2 Prima Official Guide
http://slidepdf.com/reader/full/just-cause-2-prima-official-guide 170/208
PRIMA OFFICIAL STRATEGY GUIDETM
170
Razman leaves behind a Makoto MZ 250 and a machine gun for
the assault on the mansion. These tools work, but if you order
up an attack chopper from the Black Market or steal one from a
military base and bring it here, you can finish this mission in half
the time it would take you on the motorbike.
If you don’t have any triggered explosives, order some
up from the Black Market. They make this mission run
much smoother than relying on frags to destroy assets
at the mansion.
Drive to the
colonel’s mansion
and then grapple
to the rooftop,
avoiding the guards
out front. You can
also slink around
the back of the
mansion and scale
the smaller walls to
access the garden behind the house. To draw the colonel out, you
must destroy the four SAM batteries in the back garden.
Circle the SAMs in the backyard, planting a single triggered explosive on each unit. The
resulting explosions are powerful enough to kill any guards unfortunate enough to be standing
next to the SAM battery.
Grapple around the garden,
clamoring up to the
structures above the SAMs.
Throw explosives on the
batteries and blast them
while dodging incoming fire.
There is a medical kit in the garden, but you have to
brave a bunch of soldiers to reach it.
When you blastthe fourth SAM,
the colonel steps
out of his back
door and raises a
rocket launcher to
his shoulder. Duck
behind the domes
on the garden
structures to avoid
the rockets. Between rockets, lean out and shoot at the colonel.
If you have triggered explosives left, grapple to the house above
the colonel and drop them around the back porch. Set them off
to catch the colonel inside the blast radius and do significantdamage. The mission ends when you eliminate the colonel.
Now, remember we said that an attack chopper makes this
mission a breeze? You must be a good pilot to blast the SAMs
without being shot out of the sky. You cannot hold still while
circling the back garden. Use the guns to hammer the SAMs, but
always be moving. Whenever you see a missile leave a battery,
swerve hard and either gain or lose altitude. Those actions
together will prevent you from getting smashed by a missile.
When the colonel stepsonto his porch, you can lay
him out before he gets his
second rocket off.
Information HighwayThe government’s antigang task force is targeting the Roaches
again. Razman knows the task force is about to launch a majoroperation, but he doesn’t know where. One of the task force
officers is around the village of Kampung Orkid Riak. You must
hijack the officer’s vehicle and download the attack plans.
AST OFRACTER
FIELD GUIDETO PANAU
WEAPONS VEHICLE EXPLORINGPANAU
AGENCYMISSIONS
STRONGHOLDTAKEOVERS
FACTIONMISSIONS
CHALLENGES COLLECTIBLES ACHIEVEMENTSAND TROPHIES
REAPERS • ROACHES • ULAR BOYSNothing to Declare • Airport Troubles • Paparazzi Pursuit • The Red One or the Blue One? • Breaking and Entering • Mile High Club • Smugglers Do Run • Keeping the Flow • Head of State • River Runs Red • An Officer and a Hitman
• Information Highway • Offensive Action • O Panay Redentor • Stop the Press
Protected by copyright. Unauthorized or unlawful copying or downloading expressly prohibited.

8/18/2019 Just Cause 2 Prima Official Guide
http://slidepdf.com/reader/full/just-cause-2-prima-official-guide 171/208
C H A R A C T E R S
F I E L D G U I D E T O P A N A U
W E A P O N S
V E H I C L E S
E X P L O R I N G P A N A U
A G E N C Y M I S S I O N S
S T R O N G H O L D T A K E O V E R S
F A C T I O N M I S S I O N S
C H A L L E N G E S
C O L L E C T I B L E S
A C H I E V E M E N T S
primagames.com 171
LEGEND
INFORMATION HIGHWAY
Dance around
the truck,
shooting all of
the guards who
pop out of the
doors. From the
roof, you needto drop to the
front grille to
target a thug
and then retreat to the rear to blast another. When no more
guards remain, the Enter command pops onscreen. Roll down
to the driver’s side door and smash his face until he releases
the wheel. You throw him out and take control of the truck.
If the other
vehicles are
giving youtoo much
trouble,
grapple to
them and
shoot the
guards hanging out of the doors. Remember, while
dealing with the driver of the officer’s car, you are a
sitting duck.
Razman leaves behind a Hamaya motorcycle at the telephone
site. That’s a perfect vehicle to hunt the task force officer, since it
is fast and has excellent maneuverability. Jump onto the bike and
roar after the officer, who is speeding northbound on the road
leading away from the village. You cannot waste any time!
If you don’t shoot up the gas pumps before accepting
the mission, don’t worry about the gas station at the
telephone site after making the call. You can come
back later to finish off your chaos.
The officer is in the middle
vehicle in the convoy. Race
past the rear vehicle and
stunt-jump to the truck.
This is a short mission: The officer drives
fast, and if you do not catch him right
away, the mission ends in failure.
Strategy
Location: Kampung Orkid Riak
Rewards: 5,000 Chaos, $10,000, one
weapon part, one vehicle part
START
1
Kampung Orkid Riak1
AST OFRACTER
FIELD GUIDETO PANAU
WEAPONS VEHICLE EXPLORINGPANAU
AGENCYMISSIONS
STRONGHOLDTAKEOVERS
FACTIONMISSIONS
CHALLENGES COLLECTIBLES ACHIEVEMENTSAND TROPHIES
REAPERS • ROACHES • ULAR BOYSNothing to Declare • Airport Troubles • Paparazzi Pursuit • The Red One or the Blue One? • Breaking and Entering • Mile High Club • Smugglers Do Run • Keeping the Flow • Head of State • River Runs Red • An Officer and a Hitman
• Information Highway • Offensive Action • O Panay Redentor • Stop the Press
Protected by copyright. Unauthorized or unlawful copying or downloading expressly prohibited.

8/18/2019 Just Cause 2 Prima Official Guide
http://slidepdf.com/reader/full/just-cause-2-prima-official-guide 172/208
PRIMA OFFICIAL STRATEGY GUIDETM
172
STRATEGY
OFFENSIVE ACTION
As soon as you
have control of
the vehicle, the
download begins.
Now, peel away
from the convoyand put as much
distance between
you and them as
possible. Make
a hasty U-turn and drive away from the convoy. They will give
chase, but if you steer through the trees or a roadside attraction,
you can lose the convoy long enough to complete the download
and finish the mission.
Offensive ActionFor years, Razman has been bribing the officers at the Pulau Dongeng
military base to make them turn a blind eye to his smuggling
operations on the Selatan Archipelago. Too bad one of the officers
decided to double-cross Razman. The Roaches’ boss tasks you with
infiltrating the base and destroying several valuable silos to punish the
traitor and send a clear warning to the others he has bribed.
Strategy
Location: Pulau Dongeng Base
Rewards: 5,000 Chaos, $10,000, one weapon part,
one vehicle part
Razman leaves
you a Hamaya
motorcycle to race
up to the base. If
you don’t have an
attack chopper, this
will at least get you
through the front
gate; however, a
chopper will let
you bypass all ground defenses and circle the site, hammering
the silos from the safety of the air. All you need to do is dodge
SAMs until you can target the batteries and knock them out of
commission.
When you enter the base,
consider trading the Hamaya
for a truck or a jeep—
something with armor.
When you reach the base’s main gate, kill the soldier manning
the mounted weapon. For some impressive firepower, rip the minigun
off the mount and carry it into the base. It makes short work of the silos.
There are multiple assets on the base to
destroy for chaos, including a huge radio mast.
Pulau Dongeng Base1
START
1
AST OFRACTER
FIELD GUIDETO PANAU
WEAPONS VEHICLE EXPLORINGPANAU
AGENCYMISSIONS
STRONGHOLDTAKEOVERS
FACTIONMISSIONS
CHALLENGES COLLECTIBLES ACHIEVEMENTSAND TROPHIES
REAPERS • ROACHES • ULAR BOYSNothing to Declare • Airport Troubles • Paparazzi Pursuit • The Red One or the Blue One? • Breaking and Entering • Mile High Club • Smugglers Do Run • Keeping the Flow • Head of State • River Runs Red • An Officer and a Hitman
• Information Highway • Offensive Action • O Panay Redentor • Stop the Press
Protected by copyright. Unauthorized or unlawful copying or downloading expressly prohibited.

8/18/2019 Just Cause 2 Prima Official Guide
http://slidepdf.com/reader/full/just-cause-2-prima-official-guide 173/208
C H A R A C T E R S
F I E L D G U I D E T O P A N A U
W E A P O N S
V E H I C L E S
E X P L O R I N G P A N A U
A G E N C Y M I S S I O N S
S T R O N G H O L D T A K E O V E R S
F A C T I O N M I S S I O N S
C H A L L E N G E S
C O L L E C T I B L E S
A C H I E V E M E N T S
primagames.com 173
STRATEGY
O PANAY REDENTOR
Triggered explosives are
also good for blowing the
silos. Just make sure you
are far enough back from
the silo that you aren’t
caught in the blast—20
meters should do the trick.
You must destroy five silos. Keep moving to the north through the
base. You reach a ledge looking down on two silos. A machinegun or assault rifle tears through the silos, as does a triggered
explosive. Work fast to destroy the silos, but always be mindful
of your surroundings. Soldiers are continually coming out of the
shadows to cut off your efforts. When you spy several soldiers
moving around a silo, though, use the silo explosion to eliminate
all of the ground forces in a single blast.
The fifth silo is
to the east, at the
end of a long row of
fuel depots. There
is a cash stash
and a small box of
triggered explosivesnear the fuel depots.
Grab the goodies
and then make a
run on the fifth silo to complete the assignment.
Alternately, there is a
Razorback to the south
of the first silos. It
limits your maneuver-
ability, but the armor
will keep you safefrom incoming soldiers
while you drive up to
each silo.
O Panay RedentorBaby Panay cannot stop erecting statues of himself around
Panau. The newly installed statue at the top of Carcavoda
Mountain in the Selatan Archipelago is so garish that it
has depressed local businesses—businesses owned by theRoaches. Razman wants you to fly up to the mountain and
destroy that offensive statue.
Strategy
Location: Carcavoda Mountain
Rewards: 5,000 Chaos, $10,000, one weapon
part, one vehicle part
Carcavoda Mountain
Drop-Off Site
1
2
An attack chopper is a great tool of destruction here, but watch out
for two SAM batteries. They are against the west edge of the base,
near the water. They are tough to spot at first, so circle around the
base while changing altitude to avoid the missiles and zero in on
them. Once those SAMs are down, the silos are ripe targets.
START1
2
AST OFRACTER
FIELD GUIDETO PANAU
WEAPONS VEHICLE EXPLORINGPANAU
AGENCYMISSIONS
STRONGHOLDTAKEOVERS
FACTIONMISSIONS
CHALLENGES COLLECTIBLES ACHIEVEMENTSAND TROPHIES
REAPERS • ROACHES • ULAR BOYSNothing to Declare • Airport Troubles • Paparazzi Pursuit • The Red One or the Blue One? • Breaking and Entering • Mile High Club • Smugglers Do Run • Keeping the Flow • Head of State • River Runs Red • An Officer and a Hitman
• Information Highway • Offensive Action • O Panay Redentor • Stop the Press
Protected by copyright. Unauthorized or unlawful copying or downloading expressly prohibited.

8/18/2019 Just Cause 2 Prima Official Guide
http://slidepdf.com/reader/full/just-cause-2-prima-official-guide 174/208
PRIMA OFFICIAL STRATEGY GUIDETM
174
Razman gives you an SMG at the start of the mission. That’s a
nice gesture, but far more appreciated is the H-62 Quapaw on
the wooden helipad next to the telephone booth. Jump in the
cockpit of the chopper and take to the skies, flying straight to the
eastern peak, where the Panay statue casts an ill shadow.
Now, the
Quapaw is a
transport chopper;
it is not an attack
chopper. So, when
you reach the
mountain, you must
land and attack the
statue with your
other tools, such as
triggered explosives or frags. There are triggered explosives near
the medical kit behind the statue.
The statue site is crawling
with soldiers. Blast through
the soldiers surrounding
the statue, using the cargo
containers as cover.
Next, destroy the statue with explosives or rocket fire. You need to shatter it.
Razman has a
quirky sense of
humor. He thinks
the head of the
statue will make a
great present for
one of his captains.
You need to deliver
the head to the
captain’s house. To
get the head off the mountain, dual-hook it to the Quapaw on the
helipad next to the statue. (There is a second chopper up here,
just in case your first is lost.) Once dual-hooked, take off. The
Quapaw is powerful enough to lift the stone head into the air.
Now, get some altitude to avoid any ground fire and then fly
east. The drop-off point is just under two kilometers away from
Carcavoda Mountain. If you get some good height, nobody willbother you once you escape the mountain. Just fly the head
down to the drop-off site, and lower it into the marked area to
complete this small mission.
Stop the PressA Singaporean journalist is writing an article about corruption
in Panau. You cannot have an article about corruption without
mentioning the Roaches and Razman. Razman has attempted
to bribe the journalist, but he rebuffs the ganglord’s efforts. So
it’s time to play hardball. Razman wants you to seek out the journalist and convince him to give up the story—by killing him,
of course.
Strategy
Location: Pekan Kesuma
Rewards: 5,000 Chaos, $10,000, one weapon part,
one vehicle part
AST OFRACTER
FIELD GUIDETO PANAU
WEAPONS VEHICLE EXPLORINGPANAU
AGENCYMISSIONS
STRONGHOLDTAKEOVERS
FACTIONMISSIONS
CHALLENGES COLLECTIBLES ACHIEVEMENTSAND TROPHIES
REAPERS • ROACHES • ULAR BOYSNothing to Declare • Airport Troubles • Paparazzi Pursuit • The Red One or the Blue One? • Breaking and Entering • Mile High Club • Smugglers Do Run • Keeping the Flow • Head of State • River Runs Red • An Officer and a Hitman
• Information Highway • Offensive Action • O Panay Redentor • Stop the Press
Protected by copyright. Unauthorized or unlawful copying or downloading expressly prohibited.

8/18/2019 Just Cause 2 Prima Official Guide
http://slidepdf.com/reader/full/just-cause-2-prima-official-guide 175/208
C H A R A C T E R S
F I E L D G U I D E T O P A N A U
W E A P O N S
V E H I C L E S
E X P L O R I N G P A N A U
A G E N C Y M I S S I O N S
S T R O N G H O L D T A K E O V E R S
F A C T I O N M I S S I O N S
C H A L L E N G E S
C O L L E C T I B L E S
A C H I E V E M E N T S
primagames.com 175
LEGEND
The journalist
flees as soon as
he spots you.You must chase
him around the
waters of the
archipelago,
letting loose
with a torrent
of gunfire. It
is difficult to get a clean shot off with all of the chop, so fire
any time you move the crosshairs within 200 meters of the
journalist’s boat.
Of course, there’s always the attack chopper solution. The journalist cannot hide from
you if you are raining death from above.
STOP THE PRESS
Before taking the mission, destroy the Baby Panay statue in the
village and eliminate the local colonel: Colonel Rakyat. Both actions
bank significant Chaos and cash.
Razman hands over the keys to a brand-new MTA Powerrun 77
speedboat at the docks of Pekan Kesuma. The boat is armed
to the teeth, perfect for showing the journalist that while the
pen is mightier than the sword, neither stand up to a machine
gun. Jump behind the wheel of the boat and speed off for the
journalist, who is now marked on your map.
Journalist1
START
1
AST OFRACTER
FIELD GUIDETO PANAU
WEAPONS VEHICLE EXPLORINGPANAU
AGENCYMISSIONS
STRONGHOLDTAKEOVERS
FACTIONMISSIONS
CHALLENGES COLLECTIBLES ACHIEVEMENTSAND TROPHIES
REAPERS • ROACHES • ULAR BOYSNothing to Declare • Airport Troubles • Paparazzi Pursuit • The Red One or the Blue One? • Breaking and Entering • Mile High Club • Smugglers Do Run • Keeping the Flow • Head of State • River Runs Red • An Officer and a Hitman
• Information Highway • Offensive Action • O Panay Redentor • Stop the Press
Protected by copyright. Unauthorized or unlawful copying or downloading expressly prohibited.

8/18/2019 Just Cause 2 Prima Official Guide
http://slidepdf.com/reader/full/just-cause-2-prima-official-guide 176/208
PRIMA OFFICIAL STRATEGY GUIDETM
176
Strategy
Location: Bandar Jeti Batu
Rewards: 5,000 Chaos, $10,000, one weapon part,
one vehicle part
Sri leaves you an
SMG and Makoto
MZ 250 motorcycle
at the start of the
mission. You must
use the bike or any
other vehicle that
passes through
the village to
chase down the
operative, who is approximately 500 meters east of the telephone.
The operative is in the
middle of the bridge,
surrounded by soldiers.
Circle the firing squad and
lay into them.
ULAR BOYSThe Ular Boys are a ragtag group of nationalists determined to
restore Panau to its glory before the rise of modern government
and all of its corruption. Led by the charismatic Sri Irawan,
the Ular Boys seek to wage a campaign of terror against the
government to show the people that they are more than capable
LEGEND
BRIDGING NEW CONTACTS
of leading their own lives without the interference of pencil
pushers and an expensive military.
Bridging New ContactsOne of the Ular Boys’ undercover operatives has been
compromised. The operative is currently hiding around the
Swawh River delta to avoid the military. Sri needs you to locate
the operative and get him to the nearby Lembah Delima Airportso he may be safely extracted from Panau.
Prior to accepting the
mission, scour the longhouse
for armor, vehicle, and
weapon parts.
Grapple the first soldier you spot to pull him
away from the operative. The operative has some
armor but cannot withstand too much damage.
Once you save the operative, jump behind the wheel of
his Dalton N90 pickup truck. The operative leaps into
the passenger seat. Drop the gas pedal and continue
Operative
Lembah Delima Airport
1
2
START 1
2
AST OFRACTER
FIELD GUIDETO PANAU
WEAPONS VEHICLE EXPLORINGPANAU
AGENCYMISSIONS
STRONGHOLDTAKEOVERS
FACTIONMISSIONS
CHALLENGES COLLECTIBLES ACHIEVEMENTSAND TROPHIES
REAPERS • ROACHES • ULAR BOYSBridging New Contacts • Siphoning Gas • Fry Me to the Moon • Stranded • Mercenaries Must Die • One Deadly Sin • Rico’s Day in Court • Above the Law • Pulling a Jeremy • Holy Smoke • Taking Candy from a Millionaire • Shakedown
• Taking Care of the Dishes • Save the Forest • Fender Bender • Be Quick or Be Dead
Protected by copyright. Unauthorized or unlawful copying or downloading expressly prohibited.

8/18/2019 Just Cause 2 Prima Official Guide
http://slidepdf.com/reader/full/just-cause-2-prima-official-guide 177/208
C H A R A C T E R S
F I E L D G U I D E T O P A N A U
W E A P O N S
V E H I C L E S
E X P L O R I N G P A N A U
A G E N C Y M I S S I O N S
S T R O N G H O L D T A K E O V E R S
F A C T I O N M I S S I O N S
C H A L L E N G E S
C O L L E C T I B L E S
A C H I E V E M E N T S
primagames.com 177
LEGEND
SIPHONING GAS
To end the mission, pull up to the drop-off site next to the
personal planes. Remember this airport—you can always find
great aircraft here for crisscrossing Panau.
In fact, why not take a Cassius right now and fly off to your next
mission in style?
across the bridge, outrunning the pursuing soldiers. If a soldier
pulls alongside you, run them into the bridge’s guardrail to send
them flying into the void.
When you are 1.35kilometers from the
checkpoint, you encounter
a roadblock. Steer around
the roadblock, grazing
the guardrail to avoid the
barricades.
If the pickup starts
to smolder, you
need to bail as
soon as possible. If
the truck explodes,both you and the
operative perish.
There are plenty of
cars on the roads
to steal. If you are
feeling particularly brazen, nab one of the trucks used by the
soldiers pursuing you and continue your dash for the airport.
The airport is home to Colonel Perang Lee, one of your
50 military targets. Don’t engage him, though, until
dropping off the operative.
Siphoning GasThe Ular Boys have been siphoning away government-owned
diesel for years. Panay’s thugs only recently realized what
Sri’s gang has been up to. You must locate the nearby series
of laptops and download data to determine exactly what the
government has on the Ular Boys and transmit it back to Sri.
Strategy
Location: East Tanah Raya
Rewards: 5,000 Chaos, $10,000, one weapon
part, one vehicle part
Sri leaves you
an SMG and a
Boyd Fireflame
544 (a classy
ride) at thestart of the
mission. The
car has plenty
of pep, which
will get you to
the first laptop site in no time. The laptop is 400 meters away
from the telephone, so get behind the wheel and hit the gas.
As you pull alongside the pipeline where the first laptop is
located, veer to the left and drop down the embankment.
Laptop
Laptop
Laptop
1
2
3
START
1
2
3
AST OFRACTER
FIELD GUIDETO PANAU
WEAPONS VEHICLE EXPLORINGPANAU
AGENCYMISSIONS
STRONGHOLDTAKEOVERS
FACTIONMISSIONS
CHALLENGES COLLECTIBLES ACHIEVEMENTSAND TROPHIES
REAPERS • ROACHES • ULAR BOYSBridging New Contacts • Siphoning Gas • Fry Me to the Moon • Stranded • Mercenaries Must Die • One Deadly Sin • Rico’s Day in Court • Above the Law • Pulling a Jeremy • Holy Smoke • Taking Candy from a Millionaire • Shakedown
• Taking Care of the Dishes • Save the Forest • Fender Bender • Be Quick or Be Dead
Protected by copyright. Unauthorized or unlawful copying or downloading expressly prohibited.

8/18/2019 Just Cause 2 Prima Official Guide
http://slidepdf.com/reader/full/just-cause-2-prima-official-guide 178/208
PRIMA OFFICIAL STRATEGY GUIDETM
178
There is an armor part to the west of the laptop, behind
the skinny building.
You must eliminate the
government stooges
attending to the pipeline
so they cannot interrupt
your hack.
Once you complete the hack, you must race off to the second
laptop, which is to the southeast. If you cannot recover the Boyd
Fireflame, use the workers’ Shimuzu ATVS5T. Take off across the
prairie and continue moving in the shadow of the pipeline to
locate the next laptop. You will cross a freeway to get there, so be
mindful of traffic so you’re not banged up in the process.
There is another armor part
at the site of the second
laptop, located on the
balcony of the house.
Repeat the process from the
first laptop, cleaning out the
workers so you have free
access to the laptop. Follow
the hacking commands and
stick around while the data
is transmitted.
It is likely that
reinforcements will
arrive while the data is
downloading, so stand
your ground and pick offthe intruders before they
can even get out of their
vehicle.
The final laptop is farther southeast. Cut through the trees to
make a beeline for the site. While driving through the trees, you
will shed some of your heat. If you linger a little and lose the heat
while in the trees, you decrease the chances for reinforcements
at the third laptop site. There is no timer on this mission, so take
your time while driving and lose the heat.
The final laptop
is located at the
Kampung Bunga
Mawar harbor
along the coastline.
There are lots of
assets to destroy
at the harbor, such
as fuel depots, but
you must prioritize
the laptop for now. Those fuel depots aren’t going anywhere,
and you can bash them for extra chaos as soon as you finish the
mission. Move through the harbor, gunning down Panay’s thugs
as they appear out of the shadows. The laptop is directly under
the pipeline, surrounded by three or four soldiers.
After you
complete the hack
on the third laptop,
the mission ends.
You are now free to
tear up the harbor
and generate
some Chaos. The
flak cannon on
the water’s edge
is perfect for ripping apart fuel depots. Don’t forget to scour the
harbor for cash stashes and parts, too.
AST OFRACTER
FIELD GUIDETO PANAU
WEAPONS VEHICLE EXPLORINGPANAU
AGENCYMISSIONS
STRONGHOLDTAKEOVERS
FACTIONMISSIONS
CHALLENGES COLLECTIBLES ACHIEVEMENTSAND TROPHIES
REAPERS • ROACHES • ULAR BOYSBridging New Contacts • Siphoning Gas • Fry Me to the Moon • Stranded • Mercenaries Must Die • One Deadly Sin • Rico’s Day in Court • Above the Law • Pulling a Jeremy • Holy Smoke • Taking Candy from a Millionaire • Shakedown
• Taking Care of the Dishes • Save the Forest • Fender Bender • Be Quick or Be Dead
Protected by copyright. Unauthorized or unlawful copying or downloading expressly prohibited.

8/18/2019 Just Cause 2 Prima Official Guide
http://slidepdf.com/reader/full/just-cause-2-prima-official-guide 179/208
C H A R A C T E R S
F I E L D G U I D E T O P A N A U
W E A P O N S
V E H I C L E S
E X P L O R I N G P A N A U
A G E N C Y M I S S I O N S
S T R O N G H O L D T A K E O V E R S
F A C T I O N M I S S I O N S
C H A L L E N G E S
C O L L E C T I B L E S
A C H I E V E M E N T S
primagames.com 179
At the beginning of the mission, Sri leaves you a crate of
triggered explosives and a Maddox FVA 45 buggy. Grab the
explosives and then jump into the buggy. The space center is
to the north of the telephone. As you roar into the base, smash
through the security gates and bypass the troops who open fire.
They cannot keep up with you in the speedy jeep.
Your goal is
the three rockets
currently on the
launch pads
around the space
center. You must
ascend each
launch tower
and plant an
explosive on the
satellite housed in the rocket’s nose cone. (Alternately, you can
shoot the satellite, but the triggered explosive is much faster.)
Parachute over the space center’s main buildings and close in
on the launch pads.
LEGEND
Fry Me to the MoonBaby Panay takes great pride in the Panauan space
program, particularly its ability to launch satellites into
lower orbit that allow the dictator to control all media
transmissions and to run a complicated surveillance
program that monitors the entire island. Running a
space program isn’t cheap. The cost of keeping it
running for a single day would feed all hungry mouths
in Panau. The Ular Boys want this program dismantled.
Strategy
Location: Panau Space Center
Rewards: 7,500 Chaos, $17,500, one weapon
part, one vehicle part
There is a Baby Panay statue at the space center.
Following the mission, destroy it to bank cash and
Chaos.
There are two ways to
climb the towers. You
can use the stairs and
grapple up the side of
the tower—or even
the rocket itself.
Each tower is guarded by several soldiers. You must eliminate
everybody who stands between you and the rocket. Grapple
the soldiers to yank them off the buildings or dual-hook them
to the ceilings for pinata kills. You will also find a medical kit
on each tower, located on the same floor as the satellite.
FRY ME TO THE MOON
Panau Space Center
Satellite
1START
1
AST OFRACTER
FIELD GUIDETO PANAU
WEAPONS VEHICLE EXPLORINGPANAU
AGENCYMISSIONS
STRONGHOLDTAKEOVERS
FACTIONMISSIONS
CHALLENGES COLLECTIBLES ACHIEVEMENTSAND TROPHIES
REAPERS • ROACHES • ULAR BOYSBridging New Contacts • Siphoning Gas • Fry Me to the Moon • Stranded • Mercenaries Must Die • One Deadly Sin • Rico’s Day in Court • Above the Law • Pulling a Jeremy • Holy Smoke • Taking Candy from a Millionaire • Shakedown
• Taking Care of the Dishes • Save the Forest • Fender Bender • Be Quick or Be Dead
Protected by copyright. Unauthorized or unlawful copying or downloading expressly prohibited.

8/18/2019 Just Cause 2 Prima Official Guide
http://slidepdf.com/reader/full/just-cause-2-prima-official-guide 180/208
PRIMA OFFICIAL STRATEGY GUIDETM
180
When you reach the
satellite, either open fire
or lob a pair of triggered
explosives on it from the
tower. (You can also drop
a frag right in the “cup”
around the satellite.
It requires two triggered
explosives to destroy each
satellite. You will find extras
on the launch towers.
After destroying the first satellite, Panay initiates the
launch sequence for the other rockets. You have ten
minutes to finish the mission.
Use your parachute to
cross between the towers.
Keep an eye open for attack
choppers circling the site.
If you see one, grapple to it.
As soon as you hijack a chopper, gain altitude and bank
left or right. There are SAM batteries around the space
center that fill the air with missiles if you are spotted
stealing a government helicopter.
An attack chopper’s guns
ruin a satellite in seconds
without exposing you to the
dangers of soldiers on the
rocket towers.
Sri begins to congratulate you after you destroy the third satellite,
but he stops short when noticing a fourth rocket gearing up for
takeoff. Panay had a hidden satellite. And the rocket that will
propel it into the heavens is minutes away from launching. You
must steal a Si-47 Leopard fighter jet from the space center anduse it to target the rocket before it leaves the atmosphere. The
plane is now marked on your radar, located inside a hangar at
the end of one of the twin runways that cross the site.
Enter the hangar and
neutralize the soldiers
guarding the plane. Then,
hop in the cockpit and punch
the engines. You need to be
airborne.
As soon as you can line up your guns, open fire on the rocket.
Keep firing as you fly after the rocket. You do not have much time
before it reaches the edge of the atmosphere. Track the rocket as
it thrusts into the sky. Steadily bank up with it so you don’t swing
your guns too far away. The rocket is moving fast, and if you losethe target, reacquiring it may eat up too much time. Stay on the
rocket, firing until it explodes. This ends the mission.
Since you have the jet, take
it for a spin around the
island. Fly under bridges,
soar low over villages, or
perform a skydive from the
edge of the atmosphere.
AST OFRACTER
FIELD GUIDETO PANAU
WEAPONS VEHICLE EXPLORINGPANAU
AGENCYMISSIONS
STRONGHOLDTAKEOVERS
FACTIONMISSIONS
CHALLENGES COLLECTIBLES ACHIEVEMENTSAND TROPHIES
REAPERS • ROACHES • ULAR BOYSBridging New Contacts • Siphoning Gas • Fry Me to the Moon • Stranded • Mercenaries Must Die • One Deadly Sin • Rico’s Day in Court • Above the Law • Pulling a Jeremy • Holy Smoke • Taking Candy from a Millionaire • Shakedown
• Taking Care of the Dishes • Save the Forest • Fender Bender • Be Quick or Be Dead
Protected by copyright. Unauthorized or unlawful copying or downloading expressly prohibited.

8/18/2019 Just Cause 2 Prima Official Guide
http://slidepdf.com/reader/full/just-cause-2-prima-official-guide 181/208
C H A R A C T E R S
F I E L D G U I D E T O P A N A U
W E A P O N S
V E H I C L E S
E X P L O R I N G P A N A U
A G E N C Y M I S S I O N S
S T R O N G H O L D T A K E O V E R S
F A C T I O N M I S S I O N S
C H A L L E N G E S
C O L L E C T I B L E S
A C H I E V E M E N T S
primagames.com 181
The base where you start this mission is home to
Colonel Rany Kiandee. There is also an oil pipeline
on-site you can overload for additional cash and Chaos.
Strategy
Locations: Teluk Permata and Hantu Island
Rewards: 7,500 Chaos, $17,500, one weapon part,
one vehicle part
As soon as the
mission begins,
rush to the small
Peek Airhawk 225
personal plane
on the runway of
the air base. The
island is almost
seven kilometersaway, so waste
no time getting the plane off the ground and over the ocean. As
you fly toward the island, Sri fills in on the details of the mission.
The shipment is drugs, which is worth a lot of money. You must
recover the contraband and then drive it to the small island’s
beach, where Sri will pick it up.
As you close in
on the island, you
see smoke signals.
Those must be
from the downed
pilot. But that’s
not the only odd
phenomenon on
the island. A giant
StrandedOne of the Ular Boys’ delivery planes has been shot
down over a supposedly uninhabited island off Panau’s
northwest coast. That plane contained important
cargo. Sri would like you to pilot a plane to the island,which has been shrouded in mystery since the end of
World War II. Legends say the island is home to ghosts
and demons, which is why nobody from the faction or
even the government will go there. You must brave the
island and discover what happened to the plane.
tower sticking out of the jungle begins to spark and crackle. A
bright flash lights up the sky, killing your plane’s engine. Jump
out of the plane before it plummets into the side of the island.
Parachute to the
ground and investigate
the smoke signals.
The downed
pilot was
indeed the
source of the
smoke signals.
He is happy for
a rescue. The
pilot tells you
that the island
is actually
home to a fantastical machine created by ancient Japanese
soldiers who still believe the war in the Pacific rages. The tower
releases an electromagnetic pulse that knocks out the engine
power of any plane or helicopter that attempts to land on the
island. That was the crackle that killed your Peek Airhawk’s
engine. The pilot asks that you escort him to the site of the lost
cargo. Jump in one of the parked Fengding trucks. The pilot
crawls into the passenger seat.
LEGEND
STRANDED
Smoke Signals
EMP Device
Pick-Up Site
1
2
3
START
1
2
3
AST OFRACTER
FIELD GUIDETO PANAU
WEAPONS VEHICLE EXPLORINGPANAU
AGENCYMISSIONS
STRONGHOLDTAKEOVERS
FACTIONMISSIONS
CHALLENGES COLLECTIBLES ACHIEVEMENTSAND TROPHIES
REAPERS • ROACHES • ULAR BOYSBridging New Contacts • Siphoning Gas • Fry Me to the Moon • Stranded • Mercenaries Must Die • One Deadly Sin • Rico’s Day in Court • Above the Law • Pulling a Jeremy • Holy Smoke • Taking Candy from a Millionaire • Shakedown
• Taking Care of the Dishes • Save the Forest • Fender Bender • Be Quick or Be Dead
Protected by copyright. Unauthorized or unlawful copying or downloading expressly prohibited.

8/18/2019 Just Cause 2 Prima Official Guide
http://slidepdf.com/reader/full/just-cause-2-prima-official-guide 182/208
PRIMA OFFICIAL STRATEGY GUIDETM
182
Drive along the old dirt road
to the northern end of the
island to locate the cargo.
When you reach the cargo, the pilot hops out of the truck and
starts loading the crates. While he attends to the cargo, you
must disable the tower. The first task is to destroy the power
generators that juice up the EMP device. Before heading out to
the closest tower, pick up the armor part near the cargo. Then,
jump off the edge of the rock and open your parachute to sail
toward the towers.
Grapple to the side of the
towers and reel yourself in.
There are several ancient Japanese soldiers on each tower. They
are armed with rifles. Systematically clear out the soldiers from
the towers. Use your grappling hook to yank the old soldiers
over the railing or fling them into the night. If you run out of
ammunition, seek out the SMG in the crate near the top of
the tower. To disable the generator towers, hack the control
consoles on the top floor. You must neutralize all nearby soldiers
to complete the hack; otherwise, you’ll be shot in the back while
trying to input the onscreen commands.
Jump off the generator and
slingshot via the central
tower to reach the other
generator.
Wind around the catwalks
that circle the generator,
blasting the old soldiers.
As soon as you disable the
second generator, you must
ascend the central tower
to destroy the EMP device
that will prevent Sri from
picking up his missing
shipment.
Use your grappling hook to
climb up the sides of the
tower, latching on to the
platforms that stick out of
the device.
Halfway up the tower, you must work through three floors
of Japanese soldiers. The soldiers are armed with rifles and
shotguns. They circle the tower, opening fire whenever they spot
you. There is a medical kit on the lowest floor, so if you get toolow on health, hit that box to restore lost stamina and stay in the
fight. In addition to a medical kit, you will also find parts, such as
a weapon part, on the middle floor.
AST OFRACTER
FIELD GUIDETO PANAU
WEAPONS VEHICLE EXPLORINGPANAU
AGENCYMISSIONS
STRONGHOLDTAKEOVERS
FACTIONMISSIONS
CHALLENGES COLLECTIBLES ACHIEVEMENTSAND TROPHIES
REAPERS • ROACHES • ULAR BOYSBridging New Contacts • Siphoning Gas • Fry Me to the Moon • Stranded • Mercenaries Must Die • One Deadly Sin • Rico’s Day in Court • Above the Law • Pulling a Jeremy • Holy Smoke • Taking Candy from a Millionaire • Shakedown
• Taking Care of the Dishes • Save the Forest • Fender Bender • Be Quick or Be Dead
Protected by copyright. Unauthorized or unlawful copying or downloading expressly prohibited.

8/18/2019 Just Cause 2 Prima Official Guide
http://slidepdf.com/reader/full/just-cause-2-prima-official-guide 183/208
C H A R A C T E R S
F I E L D G U I D E T O P A N A U
W E A P O N S
V E H I C L E S
E X P L O R I N G P A N A U
A G E N C Y M I S S I O N S
S T R O N G H O L D T A K E O V E R S
F A C T I O N M I S S I O N S
C H A L L E N G E S
C O L L E C T I B L E S
A C H I E V E M E N T S
primagames.com 183
From the third floor of the
midpoint, you can grapple
up to the actual pulse
generator atop the tower.
Cut through the pack of soldiers surrounding the pulse
generator, and then open fire on the device itself. It crackles andpops with each bullet. If you have frags or triggered explosives,
use those on the generator. Once you’ve destroyed the generator,
leap off the tower and parachute back to the pilot, who has
finished loading the cargo.
There are parts on the tower, such as weapon and
vehicle parts. You can either collect those now or come
back after finishing the mission.
The pilot has loaded eight crates of contraband into the truck.
You must reach the island’s northern beach with at least three
crates. Follow the road to the north as it stretches across a
canyon via a bridge. Don’t slow down for soldiers who attempt to
ambush the truck. The pilot will hang out of the passenger door
and return fire, but if you park and get out, you risk losing the
shipment.
When the stormy weather
clears up, expect increased
resistance, such as soldiers
on motorbikes that flank
the truck. Steer them into
rocks, trees, and concrete
blocks along the road.
As you close in on
the beach, look up
to spot an attack
chopper you can steal
to escape the islandafter completing the
mission.
Drive the truck
through a
roadblock and
down to the
beach where
a transport
chopper is
waiting. As
soon as youdrive beneath
the Ular Boys’ chopper, the mission ends. You can now either
escape the island with the attack chopper located back
up the road or explore the island to seek out hidden cash
stashes and parts (use the chart in Chapter 5, Exploring
Panau, to get the exact coordinates.
Mercenaries Must DieThe government has contracted a skilled mercenary to lead
a new antigang unit and hunt down the Ular Boys. Sri wants
you to assassinate this mercenary before he can eliminate
any Ular Boys or their associates. The antigang training camp
is located at the Banjaran Gundin military base not too far
from the telephone you used to accept the mission.
Strategy
Location: Banjaran Gundin Base
Rewards: 5,000 Chaos, $10,000, one weapon
part, one vehicle part
After you
accept the
mission, Sri
leaves behind
an SMG but
not vehicle. No
matter, this is
a busy area,
and you can
hijack any car
or rig to drive to the military base and locate the mercenary.
The Niseco Tusker dump truck parked near the gas station
is heavily armored, making it as good as anything to break
through security at the base and zero in on the mercenary.
AST OFRACTER
FIELD GUIDETO PANAU
WEAPONS VEHICLE EXPLORINGPANAU
AGENCYMISSIONS
STRONGHOLDTAKEOVERS
FACTIONMISSIONS
CHALLENGES COLLECTIBLES ACHIEVEMENTSAND TROPHIES
REAPERS • ROACHES • ULAR BOYSBridging New Contacts • Siphoning Gas • Fry Me to the Moon • Stranded • Mercenaries Must Die • One Deadly Sin • Rico’s Day in Court • Above the Law • Pulling a Jeremy • Holy Smoke • Taking Candy from a Millionaire • Shakedown
• Taking Care of the Dishes • Save the Forest • Fender Bender • Be Quick or Be Dead
Protected by copyright. Unauthorized or unlawful copying or downloading expressly prohibited.

8/18/2019 Just Cause 2 Prima Official Guide
http://slidepdf.com/reader/full/just-cause-2-prima-official-guide 184/208
PRIMA OFFICIAL STRATEGY GUIDETM
184
AST OFRACTER
FIELD GUIDETO PANAU
WEAPONS VEHICLE EXPLORINGPANAU
AGENCYMISSIONS
STRONGHOLDTAKEOVERS
FACTIONMISSIONS
CHALLENGES COLLECTIBLES ACHIEVEMENTSAND TROPHIES
REAPERS • ROACHES • ULAR BOYSBridging New Contacts • Siphoning Gas • Fry Me to the Moon • Stranded • Mercenaries Must Die • One Deadly Sin • Rico’s Day in Court • Above the Law • Pulling a Jeremy • Holy Smoke • Taking Candy from a Millionaire • Shakedown
• Taking Care of the Dishes • Save the Forest • Fender Bender • Be Quick or Be Dead
The military base is
enormous and features
many assets to destroy
after completing themission. Drive to the
training camp, which is to
the south.
The training camp is located among the trees. The mercenary is
in the middle of the camp. There are several concrete walls in
the courtyard between the small buildings that flank the camp. A
sniper in a guard tower stands over the site. As you approach the
camp, expect several soldiers to spring into action to defend the
mercenary, including the shooter in the tower. While your main
target is indeed the merc, you cannot ignore the other soldiers.
They will surround you in an attempt to cut you down before youget too close to the mercenary.
There are several guns around the camp, including anassault rifle in a crate by the camp’s northern entrance.
Circle the camp, plugging
the soldiers to get close to
the merc, and open fire. If
you have frags or triggered
explosives, throw them
at the mercenary while
targeting the soldiers.
Though it requires you to
get dangerously close, the
shotgun is very effective at
eliminating the mercenary.
There is a Maddox with a mounted gun near the base
entrance, too. If you drive it to the training camp and
park near the mercenary, the mounted gun will slicethrough him in no time.
The mounted weapon at the front gate
can be detached and carried into the
base. This will really slow your progress,but that minigun ventilates the mercenary
within seconds if you survive the slog to
the training camp.
LEGENDMERCENARIES MUST DIE
Banjaran Gundin Base1
START
1
Protected by copyright. Unauthorized or unlawful copying or downloading expressly prohibited.

8/18/2019 Just Cause 2 Prima Official Guide
http://slidepdf.com/reader/full/just-cause-2-prima-official-guide 185/208
C H A R A C T E R S
F I E L D G U I D E T O P A N A U
W E A P O N S
V E H I C L E S
E X P L O R I N G P A N A U
A G E N C Y M I S S I O N S
S T R O N G H O L D T A K E O V E R S
F A C T I O N M I S S I O N S
C H A L L E N G E S
C O L L E C T I B L E S
A C H I E V E M E N T S
primagames.com 185
AST OFRACTER
FIELD GUIDETO PANAU
WEAPONS VEHICLE EXPLORINGPANAU
AGENCYMISSIONS
STRONGHOLDTAKEOVERS
FACTIONMISSIONS
CHALLENGES COLLECTIBLES ACHIEVEMENTSAND TROPHIES
REAPERS • ROACHES • ULAR BOYSBridging New Contacts • Siphoning Gas • Fry Me to the Moon • Stranded • Mercenaries Must Die • One Deadly Sin • Rico’s Day in Court • Above the Law • Pulling a Jeremy • Holy Smoke • Taking Candy from a Millionaire • Shakedown
• Taking Care of the Dishes • Save the Forest • Fender Bender • Be Quick or Be Dead
Sri gifts you an SMG and a small Rowlinson personal chopper at
the start of the mission. Use the copter to ride above Panau City
and track Palut as he weaves his way through traffic en route towork. The councilman is tough to miss: He’s being shuttled in a
candy-apple-red limo.
This Rowlinson
has been upgraded
with machine
guns. As soon
as you spot the
limo, swing low
and unload into
the car. Within
seconds, the limo
explodes, killing
the councilman and ending the mission.
Don’t take too long to follow the limo, or you risk an
interception by a government attack chopper.
Rico’s Day in CourtThe Ular Boys are fearful of an upcoming trial in Panau City
that could have serious repercussions on their affairs. Sri
hatches a plan to stop the trial: All of the witnesses for the
prosecution must be convinced to not show up for the trial. A
bullet in the brain should do the trick.
Strategy
Location: Panau City
Rewards: 5,000 Chaos, $10,000, one weapon
part, one vehicle part
When the
mission begins,
take the
sniper rifle Sri
left behind.
You need
it to assas-
sinate the two
witnesses forthe trial. Once
LEGEND
One Deadly SinCouncilman Panut is a well-respected politician—
one of the few left in Panau. Panut refuses the
accept a bribe from the Ular Boys. In return for this
rebuff, Sri wants him dead. Every morning, Panut
takes the same route to work, along the Panau City
Highway. Use this intel to target the councilman
and bring him down for Sri.
ONE DEADLY SIN
Politician’s Limo1START
1
Strategy
Location: Panau City
Rewards: 5,000 Chaos, $10,000, one
weapon part, one vehicle part
Protected by copyright. Unauthorized or unlawful copying or downloading expressly prohibited.

8/18/2019 Just Cause 2 Prima Official Guide
http://slidepdf.com/reader/full/just-cause-2-prima-official-guide 186/208
PRIMA OFFICIAL STRATEGY GUIDETM
186
LEGEND
you have the sniper rifle, you must situate yourself in a perch
above the witnesses in a plaza. Use your grappling hook to pullyourself across the rooftops of the buildings between you and the
witnesses.
The rooftop you want is
approximately 100 meters
from the witnesses. Note
that there are soldiers on
the other rooftops in the
plaza. They will act as soon
as the first shot rings out.
Zoom in on one of thewitnesses and take the
shot. This causes the other
to scatter. He immediately
starts running for the
courthouse. You must stop
him before he reaches the
courthouse or the mission
ends in failure.
Before dropping down to street level to cut off the witness, fire
the sniper rifle one last time. Lead the witness as he runs through
the street. If you pull the trigger just as the witness runs through
the center of your crosshairs, you can cut him down right away.
However, you must hurry, since the snipers on the other rooftops
are now looking for you, and you weren’t exactly that sneaky.
Should you miss the witness with your second shot,
immediately jump down the side of the building and take off
after him. The witness runs through the park on his way to the
courthouse. Run alongside him and open fire, ignoring the
shots from the soldiers. You can deal with them as soon as you
neutralize this witness. Because the witness lacks armor, it takesonly a few shots to put him down.
RICO’S DAY IN COURT
Witnesses1
START
1
AST OFRACTER
FIELD GUIDETO PANAU
WEAPONS VEHICLE EXPLORINGPANAU
AGENCYMISSIONS
STRONGHOLDTAKEOVERS
FACTIONMISSIONS
CHALLENGES COLLECTIBLES ACHIEVEMENTSAND TROPHIES
REAPERS • ROACHES • ULAR BOYSBridging New Contacts • Siphoning Gas • Fry Me to the Moon • Stranded • Mercenaries Must Die • One Deadly Sin • Rico’s Day in Court • Above the Law • Pulling a Jeremy • Holy Smoke • Taking Candy from a Millionaire • Shakedown
• Taking Care of the Dishes • Save the Forest • Fender Bender • Be Quick or Be Dead
Protected by copyright. Unauthorized or unlawful copying or downloading expressly prohibited.

8/18/2019 Just Cause 2 Prima Official Guide
http://slidepdf.com/reader/full/just-cause-2-prima-official-guide 187/208
C H A R A C T E R S
F I E L D G U I D E T O P A N A U
W E A P O N S
V E H I C L E S
E X P L O R I N G P A N A U
A G E N C Y M I S S I O N S
S T R O N G H O L D T A K E O V E R S
F A C T I O N M I S S I O N S
C H A L L E N G E S
C O L L E C T I B L E S
A C H I E V E M E N T S
primagames.com 187
Sri is quite the
gift-giver at
the start of this
mission. He leaves
behind a rocket
launcher and aRowlinson personal
copter. Take the
launcher and then
pilot the copter
to the top of the building. The hacker is already in position and
ready to initiate the download as soon as you land on the roof to
offer protection.
On the roof of the building is a UH-10 Chippewa attack
chopper equipped with twin guns. You may wish to use
that to ward off military attacks instead of using therocket launcher.
The hacker will
not begin his
download until you
land, so place the
Rowlinson down
near him and get
out. As soon as
you land, though,
several soldiers
rush the rooftop.
Use the rocket launcher to blast them off the building. Or, to save
rockets (however, there is another launcher on the rooftop), use
your single-handed guns or grappling hook.
When the last of the
soldiers is dead, the
hacker starts his
work. Climb on the
catwalk overlooking
the city and wait forthe first chopper to
move into position.
Open fire. A direct hit
from your launcher
is enough to send the
chopper on a death spiral to the ground.
Standing on the ledge and using the launcher to hold back
the choppers is dangerous, though, since you are exposed.
This mission is much easier if you instead land on the roof
next to the attack chopper you saw on the way in. To start the
hack, look down and blast the soldiers on the roof with your
rocket launcher. Then, jump in the Chippewa and fly abovethe hacker’s ledge.
Above the LawThe Ular Boys are in the final planning stages
of an attack on one of Panau’s biggest corpo-
rations. Sri needs you to put the plot into motion
by ascending to the top of the corporation’sskyscraper in downtown Panau City and running
interference while a hacker breaks into the
network and downloads company secrets.
LEGEND
ABOVE THE LAW
Hacker1
START
1
StrategyLocation: Panau City
Rewards: 5,000 Chaos, $10,000, one
weapon part, one vehicle part
AST OFRACTER
FIELD GUIDETO PANAU
WEAPONS VEHICLE EXPLORINGPANAU
AGENCYMISSIONS
STRONGHOLDTAKEOVERS
FACTIONMISSIONS
CHALLENGES COLLECTIBLES ACHIEVEMENTSAND TROPHIES
REAPERS • ROACHES • ULAR BOYSBridging New Contacts • Siphoning Gas • Fry Me to the Moon • Stranded • Mercenaries Must Die • One Deadly Sin • Rico’s Day in Court • Above the Law • Pulling a Jeremy • Holy Smoke • Taking Candy from a Millionaire • Shakedown
• Taking Care of the Dishes • Save the Forest • Fender Bender • Be Quick or Be Dead
Protected by copyright. Unauthorized or unlawful copying or downloading expressly prohibited.

8/18/2019 Just Cause 2 Prima Official Guide
http://slidepdf.com/reader/full/just-cause-2-prima-official-guide 188/208
PRIMA OFFICIAL STRATEGY GUIDETM
188
Strategy
Location: Bandar Naru Indah
Rewards: 5,000 Chaos, $10,000, one weapon part,
one vehicle part
Bandar Naru
Indah is to the
northwest of the
telephone where
you accepted
the mission. The
informant is hiding
behind some
shacks, ready for
an incoming attack.
As soon as you
reach the informant, he acknowledges you and will follow you.
If you have the chopper from “Above the Law,” this
mission is a snap. Just land near the informant, pick
him up, and fly over the attacking soldiers to reach the
safe house.
If you maintain a height advantage on the scene, you can
dominate the other choppers. Use your radar to track incoming
military choppers and circle the building to target them with your
mounted guns. From above, it doesn’t take long to dismantle the
rotors and send the enemies crashing to the streets below. Assoon as the download finishes (the completion bar is beneath
your radar), the mission ends. Use the chopper to either reach
your next mission or fly over government sites and blow up
assets like fuel depots and broadcast towers.
Pulling a JeremyA local government official has developed a serious drug
addiction, and the Ular Boys are using it to ply the officer for
information about Panay’s affairs. Sri needs you to report to
Bandar Naru Indah and pick up the official. Then, escort him to asafe house where Sri can debrief him.
LEGEND
PULLING A JEREMY
Official
Drop-Off Site
1
2
START
1
2
The village is under attack from several
soldiers that have grown wise to the
official’s betrayal. Move ahead of the official
and target the soldiers as they rush through
the village. The official cannot take as much
damage as you, so you must draw fire away
from him. After pushing back against the
initial wave of soldiers, take one of the
vehicles around the village for a getawaycar. The Maddox jeep is a great choice,
because it has a mounted weapon that the
official will use.
AST OFRACTER
FIELD GUIDETO PANAU
WEAPONS VEHICLE EXPLORINGPANAU
AGENCYMISSIONS
STRONGHOLDTAKEOVERS
FACTIONMISSIONS
CHALLENGES COLLECTIBLES ACHIEVEMENTSAND TROPHIES
REAPERS • ROACHES • ULAR BOYSBridging New Contacts • Siphoning Gas • Fry Me to the Moon • Stranded • Mercenaries Must Die • One Deadly Sin • Rico’s Day in Court • Above the Law • Pulling a Jeremy • Holy Smoke • Taking Candy from a Millionaire • Shakedown
• Taking Care of the Dishes • Save the Forest • Fender Bender • Be Quick or Be Dead
Protected by copyright. Unauthorized or unlawful copying or downloading expressly prohibited.

8/18/2019 Just Cause 2 Prima Official Guide
http://slidepdf.com/reader/full/just-cause-2-prima-official-guide 189/208
PRIMA OFFICIAL STRATEGY GUIDETM
190
The soldiers attack in waves. Sri calls out the direction the groups
of troops are coming from. The first group moves in from the
east. They run together, so roll frags at the troops or use triggered
explosives to blow them to pieces as they attempt to rush the
temple hill. The next wave
attacks from the
south. In addition
to soldiers, you
must fight off two
trucks. Each truck
is armed with a
mounted weapon.
Use your grappling
hook to yank the
gunners out of their perches. Lob frags down the hill to blow up
the approaching soldiers and the vehicles.
The third wave approaches from the north. The soldiers
are backed up by two armored vehicles with mounted guns.
You must thin the herd with grenades or triggered explosives;
otherwise you risk being overrun by their superior numbers.
Duck behind the rocks and
lob frags down the hill at
the trucks. If you blow
up one of the trucks, the
resulting explosion kills
every soldier standing near
the vehicle.
After repelling the third wave of soldiers, the mission ends and
Sri pays out the promised reward. This mission is easier if you
have an attack chopper, stolen from an airbase, since none of the
vehicles have rockets. You can just circle the temple and hammer
them from above. However, if you do employ an attack chopper
to clear the temple site, be ready for the government to answer
with one of their own at some point in the battle, since they
typically like to fight fire with fire.
Taking Candy from a MillionaireSri admits a passion for fast cars and covets the collection of
millionaire Tom Gunawan. The Ular Boys’ leader wants you to
infiltrate the millionaire’s garage and steal one of his race cars.
Once you steal a car, you must bring it to a gas station outside
the Jalan Gunung village in one piece.
There is an oil pipeline near
the telephone site for this
mission. Sabotage it to bank
cash and Chaos.
Strategy
Location: Jalan Gunung
Rewards: 5,000 Chaos, $10,000, one weapon part,
one vehicle part
Sri leaves behind an SMG and a Makoto motorcycle. The
motorcycle is fast and capable of weaving through traffic, but
since you are likely to draw government attention during this
mission, you may wish to trade up to one of the civilian cars
speeding down the highway.
If a military jeep or
motorcycle attempts to
intercept, run them off the
road or nudge them into a
telephone pole.
AST OFRACTER
FIELD GUIDETO PANAU
WEAPONS VEHICLE EXPLORINGPANAU
AGENCYMISSIONS
STRONGHOLDTAKEOVERS
FACTIONMISSIONS
CHALLENGES COLLECTIBLES ACHIEVEMENTSAND TROPHIES
REAPERS • ROACHES • ULAR BOYSBridging New Contacts • Siphoning Gas • Fry Me to the Moon • Stranded • Mercenaries Must Die • One Deadly Sin • Rico’s Day in Court • Above the Law • Pulling a Jeremy • Holy Smoke • Taking Candy from a Millionaire • Shakedown
• Taking Care of the Dishes • Save the Forest • Fender Bender • Be Quick or Be Dead
Protected by copyright. Unauthorized or unlawful copying or downloading expressly prohibited.

8/18/2019 Just Cause 2 Prima Official Guide
http://slidepdf.com/reader/full/just-cause-2-prima-official-guide 190/208
C H A R A C T E R S
F I E L D G U I D E T O P A N A U
W E A P O N S
V E H I C L E S
E X P L O R I N G P A N A U
A G E N C Y M I S S I O N S
S T R O N G H O L D T A K E O V E R S
F A C T I O N M I S S I O N S
C H A L L E N G E S
C O L L E C T I B L E S
A C H I E V E M E N T S
primagames.com 189
LEGEND
Sri leaves behind an SMG and a Shimuzu Tracline ATV for
reaching the temple. The ATV is useful, because you must go
off-road to access the temple, which is west of the telephone.
Hop on the ATV and zip through the trees, outrunning the
soldiers who are on your trail the moment the mission begins.
Steer close to rocks and trees to lure soldiers into
accidentally wrecking their rigs when they attempt
to drive alongside you.
When you reach the
temple, you have a few
moments to gear up.
There is an assault
rifle near the opium
silo as well as fraggrenades.
The drop-off site is almost
two kilometers to the
northeast of the village.
As you cross the bridge
close to 1.3 kilometers away
from the drop-off, steer to
the left or slip through a
roadblock.
The drop-off site is a long,
skinny building on the
highway’s right side. Just
slide in next to the parked
Maddox to deliver the
official.
Holy SmokeThe Ular Boys are using the Lelaki Temple on Pulau Kejantanan
to stockpile opium. However, the military has learned of this
illegal activity and is sending a patrol to destroy
the opium silo. Sri needs you to report to the
temple and repel the attack. HOLY SMOKE
Strategy
Location: Lelaki Temple
Rewards: 5,000 Chaos, $10,000, one
weapon part, one vehicle part
Silo1
START1
AST OFRACTER
FIELD GUIDETO PANAU
WEAPONS VEHICLE EXPLORINGPANAU
AGENCYMISSIONS
STRONGHOLDTAKEOVERS
FACTIONMISSIONS
CHALLENGES COLLECTIBLES ACHIEVEMENTSAND TROPHIES
REAPERS • ROACHES • ULAR BOYSBridging New Contacts • Siphoning Gas • Fry Me to the Moon • Stranded • Mercenaries Must Die • One Deadly Sin • Rico’s Day in Court • Above the Law • Pulling a Jeremy • Holy Smoke • Taking Candy from a Millionaire • Shakedown
• Taking Care of the Dishes • Save the Forest • Fender Bender • Be Quick or Be Dead
Protected by copyright. Unauthorized or unlawful copying or downloading expressly prohibited.

8/18/2019 Just Cause 2 Prima Official Guide
http://slidepdf.com/reader/full/just-cause-2-prima-official-guide 191/208
C H A R A C T E R S
F I E L D G U I D E T O P A N A U
W E A P O N S
V E H I C L E S
E X P L O R I N G P A N A U
A G E N C Y M I S S I O N S
S T R O N G H O L D T A K E O V E R S
F A C T I O N M I S S I O N S
C H A L L E N G E S
C O L L E C T I B L E S
A C H I E V E M E N T S
primagames.com 191
LEGEND
TAKING CANDY FROM A MILLIONAIRE
Make a right turn at
Pekan Pinggir Jalan,
directly in front of the
line of fuel depots.
Use the hand brake to swing around the gas station at the
village and deliver the car to the drop-off site. The gas station
is under attack by government forces, so hop out and join
the Ular Boys in repelling the troops. After eliminating the
attackers, turn your fire on the gas pumps and nearby fuel
depots to rack up some Chaos.
When you close in on the race car, get ready to make a stunt
jump. Get right up next to the race car and jump up to the roof of
your car; then, either grapple to the new ride or stunt-jump right
into the driver’s seat if you are just a few feet away.
As soon as you seal the car,
punch it. The drop-off site is
actually quite far away, andthe car has little armor. You
cannot lollygag and trade
paint with military vehicles.
Pull off the freeway when
you reach the overpass,
and turn north to access a
winding road that leads up
to the village.
Car
Drop-Off Site12
START
1
2
AST OFRACTER
FIELD GUIDETO PANAU
WEAPONS VEHICLE EXPLORINGPANAU
AGENCYMISSIONS
STRONGHOLDTAKEOVERS
FACTIONMISSIONS
CHALLENGES COLLECTIBLES ACHIEVEMENTSAND TROPHIES
REAPERS • ROACHES • ULAR BOYSBridging New Contacts • Siphoning Gas • Fry Me to the Moon • Stranded • Mercenaries Must Die • One Deadly Sin • Rico’s Day in Court • Above the Law • Pulling a Jeremy • Holy Smoke • Taking Candy from a Millionaire • Shakedown
• Taking Care of the Dishes • Save the Forest • Fender Bender • Be Quick or Be Dead
Protected by copyright. Unauthorized or unlawful copying or downloading expressly prohibited.

8/18/2019 Just Cause 2 Prima Official Guide
http://slidepdf.com/reader/full/just-cause-2-prima-official-guide 192/208
PRIMA OFFICIAL STRATEGY GUIDETM
192
LEGEND
SHAKEDOWN
ShakedownA Panauan businessman named Fooi Sheh owes the
Ular Boys a great deal of money but has defaulted on
his payments. This cannot stand, lest other debtors
get the impression the Ular Boys can be rolled. Sri
wants you to intercept a shipment of Sheh’s goods
near Canabg and destroy them. Perhaps this will teach
Sheh (and anybody else, for that mater) not to let
debts to the Ular Boys go unpaid.
Strategy
Location: Kuala Geneng
Rewards: 5,000 Chaos, $10,000, one weap-
on part, one vehicle part
There are multiple
ways to destroy
the shipments.
You can either
throw triggered
explosives on the
vans as they slow
to move through
traffic, or you can
hijack the vans
and then pull off to the side of the road and use any number of
means to blow it up. If you hijack the van, be warned that each
vehicle has a single guard in the passenger seat who will lean
out and open fire.
Only one triggered explosive
is needed to destroy each
van.
As you ruin the vans, heat increases. Expect soldiers on
motorcycles and in jeeps to flank the vans in an attempt
to take you down.
The weapons crate Sri leaves behind contains triggered
explosives. Grab them and then hop on the Hamaya Y2505
motorbike also left for you to use in this mission. There are three
vans you must chase down, each approximately 230 meters from
the telephone at the beginning of the mission. However, as soon
as the mission starts, these vans pull to the north to travel along
the shipping route.
The vans move in a convoy.
You have ample chance to
drive alongside them and
then either stunt-jump to
them or grapple to the
rooftops.
Convoy1 START
1
AST OFRACTER
FIELD GUIDETO PANAU
WEAPONS VEHICLE EXPLORINGPANAU
AGENCYMISSIONS
STRONGHOLDTAKEOVERS
FACTIONMISSIONS
CHALLENGES COLLECTIBLES ACHIEVEMENTSAND TROPHIES
REAPERS • ROACHES • ULAR BOYSBridging New Contacts • Siphoning Gas • Fry Me to the Moon • Stranded • Mercenaries Must Die • One Deadly Sin • Rico’s Day in Court • Above the Law • Pulling a Jeremy • Holy Smoke • Taking Candy from a Millionaire • Shakedown
• Taking Care of the Dishes • Save the Forest • Fender Bender • Be Quick or Be Dead
Protected by copyright. Unauthorized or unlawful copying or downloading expressly prohibited.

8/18/2019 Just Cause 2 Prima Official Guide
http://slidepdf.com/reader/full/just-cause-2-prima-official-guide 193/208
C H A R A C T E R S
F I E L D G U I D E T O P A N A U
W E A P O N S
V E H I C L E S
E X P L O R I N G P A N A U
A G E N C Y M I S S I O N S
S T R O N G H O L D T A K E O V E R S
F A C T I O N M I S S I O N S
C H A L L E N G E S
C O L L E C T I B L E S
A C H I E V E M E N T S
primagames.com 193
LEGEND
TAKING CARE OF THE DISHES
Alternatively, you can handle this mission by air. If you have
access to a chopper in the Black Market (either the Sivirkin
attack chopper or the upgraded Rowlinson), take to the skies
right after accepting the mission and track the van convoy. With
not much armor on the vans, you can blast them off the roadwithin seconds.
Using an attack chopper in
this mission often prompts
the military to send in one
of their own. By the time
it intercepts you, though,
the three vans are already
wrecks on the highway.
Taking Care of the DishesThe government is having good luck tracking and disrupting the
Ular Boys’ smuggling operations—too good. Sri has discovered
that the government is using a powerful satellite dish in the
mountains to coordinate with eyes in the sky to monitor the
shipments. In addition to destroying the dish for the Ular Boys,
Sri wants you to locate Lee Ho Fook, a businessman stationed
at the dish site. Fook stole a shipment of Ular Boys’ contraband
and sold it for personal gain, giving some of the proceeds to
Macau gangsters. Eliminate him for Sri.
Strategy
Location: PAN MILSAT
Rewards: 7,500 Chaos, $17,500, one weapon part,
one vehicle part
At thebeginning of
this operation,
Sri left behind
an SMG and
a Hamaya
motorcycle.
If you do not
have another
vehicle (such
as a chopper), jump on the motorcycle and race up the
winding mountain roads to the MILSAT site.
PAN MILSAT1
START
1
The PAN MILSAT site is enormous. Once
you reach the dish, you must travel to two
control panels that flank the dish. Hack each
panel to open the dish. Unless the dish isexposed, you cannot destroy it. The control
panels are in towers marked on your radar
as soon as you access that dish site.
AST OFRACTER
FIELD GUIDETO PANAU
WEAPONS VEHICLE EXPLORINGPANAU
AGENCYMISSIONS
STRONGHOLDTAKEOVERS
FACTIONMISSIONS
CHALLENGES COLLECTIBLES ACHIEVEMENTSAND TROPHIES
REAPERS • ROACHES • ULAR BOYSBridging New Contacts • Siphoning Gas • Fry Me to the Moon • Stranded • Mercenaries Must Die • One Deadly Sin • Rico’s Day in Court • Above the Law • Pulling a Jeremy • Holy Smoke • Taking Candy from a Millionaire • Shakedown
• Taking Care of the Dishes • Save the Forest • Fender Bender • Be Quick or Be Dead
Protected by copyright. Unauthorized or unlawful copying or downloading expressly prohibited.

8/18/2019 Just Cause 2 Prima Official Guide
http://slidepdf.com/reader/full/just-cause-2-prima-official-guide 194/208
PRIMA OFFICIAL STRATEGY GUIDETM
194
The dish is guarded by
dozens of soldiers. If
you steer clear of the
soldiers at first, you will
not generate any heat andcan access the first tower
without much difficulty.
The entrance to each tower is facing away from the
dish, on the street-level floor.
There are medical kits on each tower, located next to
the entrance door.
Inside the tower, run
downstairs and hack the
control panel. This starts
the dish-activation process.
But now you must cross the
dish to access the second
tower, and your hack job
just alerted the soldiers.
Hacking the first panel also flushes Fook out into the open. The
businessman is waiting for you outside the first tower, flanked
by several soldiers. Fook is carrying an SMG and unloads as
soon as he spots you. Use the door to the tower as cover while
targeting Fook.
Fook bails when you attack, running for a nearby truck. He
dives behind the wheel if you do not nab him with your grappling
hook. If Fook gets in the truck, you must hijack the vehicle to
throw him to the pavement and continue your assault.
You must eliminate Fook in
order to continue the main
objective of this mission:
ruining the satellite dish.
Use your parachute to
slingshot across the center
of the dish and avoid a great
number of soldiers moving
along the outer road.
There is a cash stash at the bottom of the stairs leading
away from the second control panel.
Slip inside the second tower to access the control panel. By this
point, the soldiers have called in an attack chopper. The choppercircles the dish. The pilot can see inside the tower via the window
above the panel. If you attempt to access the panel, the pilot
opens fire. So, wait until the chopper is facing away from the
window as it makes one of its wide turns to circle the dish, and
quickly input the hack commands. If you do not hurry, the pilot
will spot you and start shooting.
Hacking the
second panel
reveals the dish
receiver. You must
blow it to pieces.
The attack chopper
the soldiers calledin is an obvious
tool. However,
there is sometimes
an attack chopper parked on the helipad to the north of the
second control panel. Grapple to either chopper and then take to
the skies over the dish.
If you grapple to the bird already in the air, watch out:
soldiers may use the parked chopper to follow you into
the sky.
AST OFRACTER
FIELD GUIDETO PANAU
WEAPONS VEHICLE EXPLORINGPANAU
AGENCYMISSIONS
STRONGHOLDTAKEOVERS
FACTIONMISSIONS
CHALLENGES COLLECTIBLES ACHIEVEMENTSAND TROPHIES
REAPERS • ROACHES • ULAR BOYSBridging New Contacts • Siphoning Gas • Fry Me to the Moon • Stranded • Mercenaries Must Die • One Deadly Sin • Rico’s Day in Court • Above the Law • Pulling a Jeremy • Holy Smoke • Taking Candy from a Millionaire • Shakedown
• Taking Care of the Dishes • Save the Forest • Fender Bender • Be Quick or Be Dead
Protected by copyright. Unauthorized or unlawful copying or downloading expressly prohibited.

8/18/2019 Just Cause 2 Prima Official Guide
http://slidepdf.com/reader/full/just-cause-2-prima-official-guide 195/208
C H A R A C T E R S
F I E L D G U I D E T O P A N A U
W E A P O N S
V E H I C L E S
E X P L O R I N G P A N A U
A G E N C Y M I S S I O N S
S T R O N G H O L D T A K E O V E R S
F A C T I O N M I S S I O N S
C H A L L E N G E S
C O L L E C T I B L E S
A C H I E V E M E N T S
primagames.com 195
Strategy
Location: Seabreeze Sawmill
Rewards: 5,000 Chaos, $10,000, one weapon
part, one vehicle part
Sri leaves
behind an SMG
and a Shimuzu
Tracline ATV.
The Seabreeze
site is to the
immediate
north of the
telephone, but
you must first
drive east to rendezvous with a cadre of Ular Boys ready to
help you on this dangerous mission. When you see the Ular
Boys, they start speeding toward the logging site. Follow
them.
If you do not have any triggered explosives, buy
them from the Black Market at the start of this
mission.
Unload into the receiver
sphere at the center of the
dish. As soon as the sphere
explodes, the mission ends.
There are two
SAM batteries
around the
dish. When
you take to
the air, change
altitude often
and swerve
left and rightto avoid
incoming missile attacks.
Save the ForestBaby Panay has invited an international logging company,
Seabreeze, into Panau to cut down the trees at the Pelamat
Forest. This is a sacred site to the Ular Boys, so the logging
operation must be stopped. The plan is to infiltrate the site and
wreck the industrial sawmills. Expect the foreman not to take thisattack lightly; should the foreman respond, neutralize him.
LEGEND
SAVE THE FOREST
Ular Boys Convoy
Seabreeze Logging
1
2
START1
2
There are three sawmill silos at the logging
site. The Ular Boys will attack them one
by one, starting with the silo closest to the
logging site entrance. The Ular Boys will also
assist in repelling the logging crew, which
turns out to be heavily armed. While the Ular
Boys engage the workers, zero in on the silo
and destroy it. Your guns take a long time
to chip away at the silo, but if you brought
triggered explosives, you can wreck the silos
in no time.
AST OFRACTER
FIELD GUIDETO PANAU
WEAPONS VEHICLE EXPLORINGPANAU
AGENCYMISSIONS
STRONGHOLDTAKEOVERS
FACTIONMISSIONS
CHALLENGES COLLECTIBLES ACHIEVEMENTSAND TROPHIES
REAPERS • ROACHES • ULAR BOYSBridging New Contacts • Siphoning Gas • Fry Me to the Moon • Stranded • Mercenaries Must Die • One Deadly Sin • Rico’s Day in Court • Above the Law • Pulling a Jeremy • Holy Smoke • Taking Candy from a Millionaire • Shakedown
• Taking Care of the Dishes • Save the Forest • Fender Bender • Be Quick or Be Dead
Protected by copyright. Unauthorized or unlawful copying or downloading expressly prohibited.

8/18/2019 Just Cause 2 Prima Official Guide
http://slidepdf.com/reader/full/just-cause-2-prima-official-guide 196/208
PRIMA OFFICIAL STRATEGY GUIDETM
196
You can bring down each
silo with two triggered
explosives (unless you have
poured a lot of upgrades
into them, and then you may
need only one).
Beware of snipers at the
site. When you spot a red
laser moving through the
scene, follow it to the
source and then pull the
shooter to his death with the
grappling hook.
Stay with the Ular Boys as you weave through the logging site
and destroy the silos. The Ular Boys provide cover for you as you
plant explosives. And with each wrecked silo, resistance grows
stronger. So, stay with the pack so your combined firepower
keeps the armed workers in check.
There is a medical kit next to each silo, hanging on a
support pillar.
Sadly, by the time
you reach the third
silo, you may be
flying solo. Use the
pillars and fences
as cover as you
move toward the
final silo, blasting
through the
workers. Get close
to the silo and throw your explosives, then shoot your way to a
safe distance before setting off the bombs. The explosion from
the silo blast will eliminate a lot of the workers guarding the silo.
Sri was right—the foreman is not going to take your attack
lightly. The foreman breaks through a garage in the rear of the
site in a tank! The foreman commands the mounted gun atop
the tank. The tank circles the logging site, with the foreman
looking everywhere for you. You must flank the tank and take theforeman out. Be warned: You cannot grapple the foreman out of
the tank. You must target him while he is behind the guns, which
means putting yourself in harm’s way.
Use your parachute to
slingshot above the site and
follow the tank. The foreman
is exposed from the air,
making him an easy target.
If you still have triggered explosives, throw them at the
tank and detonate them when the foreman rolls past.
Each explosion seriously wounds him.
There is a way to breeze through this mission, but you need a
Razorback tank, either stolen from a military base or bought
through the Black Market. The Razorback’s autocannon ruins
each silo with just two shots. Inside the tank, you do not have to
worry about the workers too much, but you should shell them
when you spot them gathering in groups. The Razorback also
cuts through the foreman’s tank with just a few shots.
AST OFRACTER
FIELD GUIDETO PANAU
WEAPONS VEHICLE EXPLORINGPANAU
AGENCYMISSIONS
STRONGHOLDTAKEOVERS
FACTIONMISSIONS
CHALLENGES COLLECTIBLES ACHIEVEMENTSAND TROPHIES
REAPERS • ROACHES • ULAR BOYSBridging New Contacts • Siphoning Gas • Fry Me to the Moon • Stranded • Mercenaries Must Die • One Deadly Sin • Rico’s Day in Court • Above the Law • Pulling a Jeremy • Holy Smoke • Taking Candy from a Millionaire • Shakedown
• Taking Care of the Dishes • Save the Forest • Fender Bender • Be Quick or Be Dead
Protected by copyright. Unauthorized or unlawful copying or downloading expressly prohibited.

8/18/2019 Just Cause 2 Prima Official Guide
http://slidepdf.com/reader/full/just-cause-2-prima-official-guide 197/208
C H A R A C T E R S
F I E L D G U I D E T O P A N A U
W E A P O N S
V E H I C L E S
E X P L O R I N G P A N A U
A G E N C Y M I S S I O N S
S T R O N G H O L D T A K E O V E R S
F A C T I O N M I S S I O N S
C H A L L E N G E S
C O L L E C T I B L E S
A C H I E V E M E N T S
primagames.com 197
Fender BenderA military lieutenant named Gusti has been
hammering Ular Boys’ assets in the Senjakala
Islands in southwest Panau. Sri wants you to
strike back against Gusti where it hurts: his prized
collection of classic luxury cars. Gusti stores his cars
at the Kem General Abidin military base, so expect
serious resistance while targeting the collection.
The base is home to
Colonel Awang Deris.
The colonel is an easy
kill if you attack the
base with a tank or a
chopper.
Steal one of the
soldier’s trucks
and drive south
to the next
batch of classic
cars. The cars
are guarded by
several soldiers.
If you are in a
vehicle, drive
right through the soldiers protecting the cars. Hop out and
plant your bomb, then back off and detonate. You can also
nick a chopper from a helipad next to the cars, but beware
of several SAM batteries at the base. There are so many that
you may wish to just leave the chopper grounded for this
mission and then use it as a getaway vehicle.
Slingshot through the
air above the base to
zero in on the third
car, which is to the
west.
LEGEND
FENDER BENDER
Strategy
Location: Kem General Abidin
Rewards: 7,500 Chaos, $17,500, one weapon part,
one vehicle part
Sri leaves you a crate of triggered explosives at the start of this
mission to use on the general’s car collection. None of the cars
are armored, so a single bomb is enough to ruin each piece of
the collection.
If you can purchase a
Razorback from the Black
Market, use it in this
mission to blow up the cars
with ease.
There is a mounted gun at the base entrance you can
rip from its mount and use to clear out the site.
The first car is just
inside the base
entrance, off to
the left. The car is
parked behind a
warehouse, next
to some cargo
containers. There
is a medical kit on
the wall next to the
cars as well as a weapon part in a small alcove.
Car
Car
Car
1
2
3
START
1
23
AST OFRACTER
FIELD GUIDETO PANAU
WEAPONS VEHICLE EXPLORINGPANAU
AGENCYMISSIONS
STRONGHOLDTAKEOVERS
FACTIONMISSIONS
CHALLENGES COLLECTIBLES ACHIEVEMENTSAND TROPHIES
REAPERS • ROACHES • ULAR BOYSBridging New Contacts • Siphoning Gas • Fry Me to the Moon • Stranded • Mercenaries Must Die • One Deadly Sin • Rico’s Day in Court • Above the Law • Pulling a Jeremy • Holy Smoke • Taking Candy from a Millionaire • Shakedown
• Taking Care of the Dishes • Save the Forest • Fender Bender • Be Quick or Be Dead
Protected by copyright. Unauthorized or unlawful copying or downloading expressly prohibited.

8/18/2019 Just Cause 2 Prima Official Guide
http://slidepdf.com/reader/full/just-cause-2-prima-official-guide 198/208
PRIMA OFFICIAL STRATEGY GUIDETM
198
The third car is
under an awning,
making it tough to
blast from the air.
So, once you land,
zigzag through thesoldiers protecting
the cars and either
fill it with lead or
launch a triggered
explosive at the prize. Also be sure to pick up the armor part next to
the cars. Once you’ve destroyed the final car, you can either escape
from the base or stick around to obliterate fuel depots, an oil pipeline,
and other assets in pursuit of 100 percent completion of the base.
Be Quick or Be DeadOne of the Ular Boys’ associates, Portuguese Pete, has been
captured by government thugs. Normally, Sri would wash his
hands of the situation at this point, but Pete was in possession of
sensitive Ular Boys data. You must track Pete down at a harbor
base in the southern Rajang River delta and retrieve the data
before he is executed.
Strategy
Location: Sungai Cerah
Rewards: 5,000 Chaos, $10,000, one weapon part,
one vehicle part
LEGEND
BE QUICK OR BE DEAD
Before going to the door to
download the data, eliminate
the shooter in the nearby
guard tower.
Neutralize any soldier near
the door so you can start
the download uninterrupted.
After hacking the
data connection,
you must stand yourground until the
transfer is complete.
Stay near the door
and watch the
staircases leading
to the rooftop.
There is a staircase
directly across from
the door and two
more to the left
and right. Look for
soldiers to attack in this order: forward, left, forward, left, right. If
you run low on ammo, step out to pick up any dropped weapons,and use those against the incoming soldiers. Once the download is
complete, leave Pete to his fate and explore the harbor for parts.
Kem Port Rodrigo Harbor1
START
1In addition to an SMG, Sri gifts you a Frisco Catshark
S-38 speedboat. Jump in the boat to race to the Kem Port
Rodrigo harbor base, where Pete is being held. As you drive
to the base, Sri explains that Pete did what anybody would do
when caught with contraband—he hid it. Up his...you know.
You must download the data through the door of where Pete
is held.
When you reach the
harbor, grapple to
a cargo container
and slingshot toward
Pete’s holding cell.
AST OFRACTER
FIELD GUIDETO PANAU
WEAPONS VEHICLE EXPLORINGPANAU
AGENCYMISSIONS
STRONGHOLDTAKEOVERS
FACTIONMISSIONS
CHALLENGES COLLECTIBLES ACHIEVEMENTSAND TROPHIES
REAPERS • ROACHES • ULAR BOYSBridging New Contacts • Siphoning Gas • Fry Me to the Moon • Stranded • Mercenaries Must Die • One Deadly Sin • Rico’s Day in Court • Above the Law • Pulling a Jeremy • Holy Smoke • Taking Candy from a Millionaire • Shakedown
• Taking Care of the Dishes • Save the Forest • Fender Bender • Be Quick or Be Dead
Protected by copyright. Unauthorized or unlawful copying or downloading expressly prohibited.

8/18/2019 Just Cause 2 Prima Official Guide
http://slidepdf.com/reader/full/just-cause-2-prima-official-guide 199/208
C H A R A C T E R S
F I E L D G U I D E T O P A N A U
W E A P O N S
V E H I C L E S
E X P L O R I N G P A N A U
A G E N C Y M I S S I O N S
S T R O N G H O L D T A K E O V E R S
F A C T I O N M I S S I O N S
C H A L L E N G E S
C O L L E C T I B L E S
A C H I E V E M E N T S
primagames.com 199
RACE FOR YOUR LIFEGot your eye on that hot Sivirkin attack chopper in the Black
Market, but you’re short on funds? Well, you’re in luck because
although Panau is in the midst of a violent revolution, there is still
plenty of time to enjoy a good race. Racing challenges crisscross
the island, offering ample opportunity to collect cash purses that
will help you keep the Black Market rolling in dough—and will
keep you outfitted with the latest and greatest gear.
Racing Challenges
Race challenges are contests in which you zoom from point A to
point B. You don’t race against a field of competitors but rather
against the clock. To complete a race, you must pass through
a series of checkpoints before time runs out. However, every
checkpoint you pass through adds ten seconds to the clock, so
as long as you regularly slide through the checkpoints, you are
always in the game.
You must pass through
every checkpoint to
complete a challenge. There
is an arrow inside each
circle that points to the
next checkpoint.
Every race challenge pays out $20,000 if you complete it within
the time limit. (There are now Chaos or parts awards for racing
challenges.) There are a total of 75 race challenges. You
unlock them as you expand factions’ areas of influence around
their established strongholds. There are four types of racingchallenges: driving, flying, boating, and stunt. Each race is graded
on a three-level difficulty scale, ranging from easy to hard.
To accept a race, you report to a checkered flag and interact with
it just like the telephone you use to accept a Faction mission.
With the exception of stunt challenges, where you base-jump
through checkpoints, you are given a vehicle at the start of every
race. However, you are not required to use the gifted vehicle. You
may use any vehicle you like to complete the challenge. So, let’s
say you enter the Pulau Berapi Refinery Run. You are given a
Stinger Dunebug 84 when you enter the race, but if you have a
souped-up Titus ZJ, you are free to use that instead.
Accepting a race may
gift you a vehicle, but you cannot just drive
off with it and ignore
the challenge. If you
fail out of a race and
choose not to retry it,
you lose the vehicle
and are transported
to the nearest faction
stronghold.
You can start a race challenge while dealing with
heat, but be prepared to dodge bullets while racing.
Most races are
short and can
be completed
in just a few
minutes.
We have
assembled
a map that
details all 75
challenges,
including the difficulty of the race and what vehicle you
are given at the start of the event. If the event is a stunt
challenge, then no vehicle is listed.
CHALLENGES
AST OFRACTER
FIELD GUIDETO PANAU
WEAPONS VEHICLE EXPLORINGPANAU
AGENCYMISSIONS
STRONGHOLDTAKEOVERS
FACTIONMISSIONS
CHALLENGES COLLECTIBLES ACHIEVEMENTSAND TROPHIES
RACE FOR YOUR LIFERacing Challenges
Protected by copyright. Unauthorized or unlawful copying or downloading expressly prohibited.
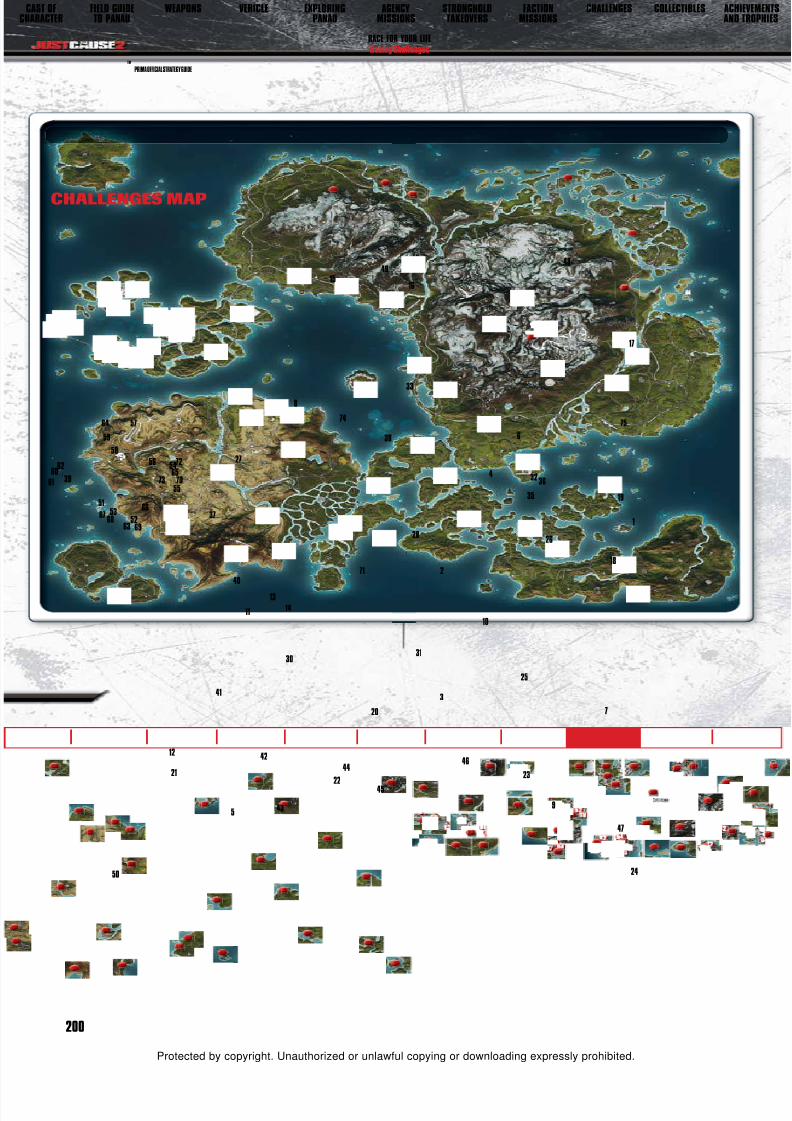
8/18/2019 Just Cause 2 Prima Official Guide
http://slidepdf.com/reader/full/just-cause-2-prima-official-guide 200/208
PRIMA OFFICIAL STRATEGY GUIDETM
200
CHALLENGES MAP
4915
16
48
17
75
35
32 36
19
6
33
4
38
74
8
2772
55
5465
7073
56
5764
59
58
66
6260
61 39
51
526963
5367 68 37
28
40
13
11 14
30
41
71
31
3
2
25
10
26
7
1
18
47
24
9
23
46
45
44
22
20
42
435
21
12
50
AST OFRACTER
FIELD GUIDETO PANAU
WEAPONS VEHICLE EXPLORINGPANAU
AGENCYMISSIONS
STRONGHOLDTAKEOVERS
FACTIONMISSIONS
CHALLENGES COLLECTIBLES ACHIEVEMENTSAND TROPHIES
RACE FOR YOUR LIFERacing Challenges
Protected by copyright. Unauthorized or unlawful copying or downloading expressly prohibited.

8/18/2019 Just Cause 2 Prima Official Guide
http://slidepdf.com/reader/full/just-cause-2-prima-official-guide 201/208
C H A R A C T E R S
F I E L D G U I D E T O P A N A U
W E A P O N S
V E H I C L E S
E X P L O R I N G P A N A U
A G E N C Y M I S S I O N S
S T R O N G H O L D T A K E O V E R S
F A C T I O N M I S S I O N S
C H A L L E N G E S
C O L L E C T I B L E S
A C H I E V E M E N T S
primagames.com 201
CHALLENGES
MapLocation Challenge Name Race Type Vehicle Difficulty
1 Sawah River Sightseeing Air Peek Airhawk 225 Hard
2 The Cleavage Air N/A Easy3 Kepulauan Valley Run Air Peek Airhawk 225 Medium
4 Gunung Berbahaya Drop Air N/A Easy
5 Gunung Merah Beach Race Land Stinger Dunebug 84 Medium
6 Gunung Raya Downhill Land Dalton N90 Medium
7 Island Hopping Air Pell Silverbolt 6 Medium
8 Highway to Heaven Air Pell Silverbolt 6 Hard
9 Selatan Bikini Run Air Peek Airhawk 225 Medium
10 Left for Death Land Stinger Dunebug 84 Medium
11 Gurun Canyon Run Air Peek Airhawk 225 Easy
12 Desert Dash Air Peek Airhawk 225 Easy
13 Jurang Rajang Crossing Air Peek Airhawk 225 Medium
14 Kampung Nur Cahaya Road Land Garret Traver-Z Medium
15 Nipah Valley Roundabout Air Peek Airhawk 225 Hard
16 Dataran Tinggi Tour Air Cassius 192 Easy
17 Pelaut Highway Run Land Titus ZJ Easy
18 Sawah County Crossing Air Peek Airhawk 225 Easy
19 Pan Milsat Run Air Peek Airhawk 225 Easy
20 Pulau Tasik Offroad Land Shimuzu Freerunner Easy
21 Red Canyon Race Land Stinger Dunebug 84 Easy
22 Test of Kejantanan Land Stinger Dunebug 84 Medium
23 Baby's Cradle Land Shimuzu Freerunner Medium
24 The Forbidden Coast Land SV-1007 Stonewall Medium
25 Crossing Lanes Land Stinger Dunebug 84 Medium
26 The Centrifuge Land SV-1007 Stonewall Hard
27 Panau International Land Titus ZJ Medium
28 Berapi Island Air Peek Airhawk 225 Hard
29 Rajang Delta Flyby Air Pell Silverbolt 6 Medium
30 Rajang Highway Land Makoto MZ 250 Medium
31 Casino Finale Air Peek Airhawk 225 Hard
32 Slopes of Gunung Kudus Land SV-1007 Stonewall Hard
33 Gunung Gila Pangkat Crossing Air Peek Airhawk 225 Easy34 Gunung Kudus Slackcountry Land SV-1007 Stonewall Medium
35 Frozen Hell Land SV-1007 Stonewall Hard
36 Holy Diver Air N/A Medium
37 Wet City Sea SnakeHead T20 Medium
38 Gila Pangkat Route Land Stinger Dunebug 84 Hard
39 Harbormaster Air Peek Airhawk 225 Easy
40 Ramai Rakyat Island Run Sea Kuang Adventure Easy
41 Rajang River Run Sea SnakeHead T20 Easy
42 Rajang Delta Daredevil Sea SnakeHead T20 Hard
43 Port Rodrigo Return Ticket Sea SnakeHead T20 Medium
Driving Challenges
There are more driving challenges in the list
of 75 contests than any other event. Driving
challenges are road races that take place
all over Panau, from the streets of Panau
City to the arid desert. When you accept a
driving challenge, you are typically given an
automobile appropriate for the challenge,
such as a buggy with off-roading capabilitiesfor a race that takes you across sand.
You just have to get through a checkpoint for it to count. The
vehicle doesn’t necessarily have to be right-side up.
To shave seconds off race times, don’t
aim for the center of each checkpoint.
If you get just under half of the vehicle
through the checkpoint, it still counts.
Flying Challenges
Flying challenges are air-based races
through the skies above Panau. To complete
flying challenges, you must successfully
take off in the plane (not too difficult) andnavigate through a series of checkpoints
AST OFRACTER
FIELD GUIDETO PANAU
WEAPONS VEHICLE EXPLORINGPANAU
AGENCYMISSIONS
STRONGHOLDTAKEOVERS
FACTIONMISSIONS
CHALLENGES COLLECTIBLES ACHIEVEMENTSAND TROPHIES
RACE FOR YOUR LIFERacing Challenges
Protected by copyright. Unauthorized or unlawful copying or downloading expressly prohibited.

8/18/2019 Just Cause 2 Prima Official Guide
http://slidepdf.com/reader/full/just-cause-2-prima-official-guide 202/208
PRIMA OFFICIAL STRATEGY GUIDE
TM
202
hanging in the air. As opposed to a road race,
the checkpoints are at different altitudes, and
as a race gets tougher, the checkpoints typically
require precision flight paths to avoid missing
a checkpoint—or slamming into the side of a
building while attempting to reach it.
Don’t use a helicopter for flying
challenges, as you may struggle to reach
each checkpoint within the time frame,
especially on hard races. Planes may
be harder to maneuver, but they are
universally faster.
Boating Challenges
Boating challenges are the easiest of the four
races, thanks to the fact that you are largelydealing with little traffic while skimming across
the water at top speed. However, you are not
always blasting through the open sea. Many
boating challenges take place on rivers, and
sometimes the waterway becomes quite narrow.
Take shortcuts during boating
challenges by “jumping” over narrow
sandbars at full speed.
MapLocation Challenge Name Race Type Vehicle Difficulty
44 Kejantanan Island Run Sea SnakeHead T20 Medium
45Pulau Naga Powerboat
Challenge
Sea Kuang Adventure Medium
46 Ketam Besar Trespass Land MV V880 Hard
47 Selatan Route Land Garret Traver-Z Medium
48 Pulau Kait Speedrun Land Titus ZJ Easy
49 PBC Plunge Air N/A Medium
50 King of Kings Air N/A Hard
51 Right up Your Alley Land Tuk-Tuk Laa Medium
52 South City Speeding Land Titus ZJ Medium
53 Downtown Highway Land Mancini Cavallo 1001 Easy
54 Financial District Frenzy Land Titus ZJ Easy
55 Emergency Call Land
Kenwall Heavy
Rescue Medium
56 Utara Bridge Insanity Land Mancini Cavallo 1001 Hard
57 Park District Bugrun Land Stinger Dunebug 84 Medium
58 Backstage Pass Land Tuk-Tuk Laa Medium
59 Barat Bridge Insanity Land Titus ZJ Hard
60 Backdoor Breaking Land Tuk-Tuk Laa Medium
61 Kicked to the Curb Land SV-1003 Raider Medium
62 Panau City Speed Freak Land Garret Traver-Z Easy
63 Panau City Bridge Ballet Air Peek Airhawk 225 Hard
64 Panau City Park Challenge Air Peek Airhawk 225 Hard
65 Ace's High Air Peek Airhawk 225 Medium66 Bridge of Death Air Peek Airhawk 225 Hard
67 Tangga ke Syurga Basejump Air N/A Medium
68 Twin Dive Air N/A Easy
69 Slingshot Galore Air N/A Easy
70 Demam Tinggi Tower Jump Air N/A Medium
71 Pulau Berapi Refinery Run Land Stinger Dunebug 84 Medium
72 Panau City Slingalong Air N/A Easy
73 Burj Panau Air N/A Hard
74 West Tanah Raya Highway Run Land Mancini Cavallo 1001 Medium
75 The Raya Race Land Mancini Cavallo 1001 Hard
Stunt Challenges
Without question, stunt challenges are the most difficult of
the contests. To complete these events, you leap from a great
height and then must dive through a series of checkpoints in
the air without aid of a vehicle. You can deploy your parachute,
but doing so will throw you wildly off course. You just need to
balance straightening out for daredevil speed and pulling back to
slow your descent (and add a little horizontal to your trajectory).
Getting to most stunt
challenges requires
flying, such as reaching
the checkered flag of the
Gunung Berbahaya Drop in
the mountains high above
central Panau.
AST OFRACTER
FIELD GUIDETO PANAU
WEAPONS VEHICLE EXPLORINGPANAU
AGENCYMISSIONS
STRONGHOLDTAKEOVERS
FACTIONMISSIONS
CHALLENGES COLLECTIBLES ACHIEVEMENTSAND TROPHIES
RACE FOR YOUR LIFERacing Challenges
Protected by copyright. Unauthorized or unlawful copying or downloading expressly prohibited.

8/18/2019 Just Cause 2 Prima Official Guide
http://slidepdf.com/reader/full/just-cause-2-prima-official-guide 203/208
C H A R A C T E R S
F I E L D G U I D E T O P A N A U
W E A P O N S
V E H I C L E S
E X P L O R I N G P A N A U
A G E N C Y M I S S I O N S
S T R O N G H O L D T A K E O V E R S
F A C T I O N M I S S I O N S
C H A L L E N G E S
C O L L E C T I B L E S
A C H I E V E M E N T S
primagames.com 203
FACTION PICK-UPSWhile in the employ of each faction, you have the opportunity to
curry additional favor by seeking out errant items on behalf of the
leader. Each faction has 100 collectibles spread across Panau for
a grand total of 300. The Reapers are seeking out Black Boxes,
the Roaches are searching for Drug Drops, and the Ular Boys
want you to find Skulls. To recover these items, just step over
them—you do not need to transport them back to the faction
headquarters.
Picking up acollectible rewards
you with $2,000 and
500 Chaos.
Collectibles appear with the
Scorpio symbol above them,
helping you pick the item out
of a busy scene.
Collectibles ChecklistsCollectibles appear on your PDA map, but we have assembled
the coordinates for all 300 collectibles and placed them in a
checklist for you. If you are aiming for 100-percent completion of
Just Cause 2, you must find all 300 collectibles, just as you must
eliminate all government assets to generate insane amounts of
Chaos and close in on that coveted 100-percent completion rate.
You may still search for faction collections after
completing the main missions. Mercenary mode allows
you to still enjoy the Panau playground, just without any
of the story-based missions.
COLLECTIBLES
DRUG DROPS
PDA Coordinates (x, y)
21165, 8839
27624, 13670
29518, 17902
27576, 19296
24563, 18563
26577, 28800
24134, 31190
21791, 29778
PDA Coordinates (x, y)
17529, 26542
16721, 26471
13409, 29929
12037, 28204
8323, 22186
25373, 6285
27546, 9879
27922, 11204
PDA Coordinates (x, y)
28058, 11445
24274, 25882
21380, 22970
19298, 26534
18626, 26462
17939, 25337
18230, 23277
18941, 21354
19648, 8276
3787, 315342758, 31747
4062, 31436
21847, 19767
19398, 7979
23244, 17642
23369, 17198
9250, 6634
30640, 13748
29744, 14438
29921, 13597
30245, 14197
15319, 2586615919, 4354
20780, 9795
21017, 9200
21057, 9747
24464, 14879
24346, 14783
25606, 17900
21578, 19617
21000, 6222
20782, 5701
18083, 14874
9894, 1291614579, 11685
14808, 10995
11063, 10629
9145, 8850
8784, 9525
9162, 10097
10000, 10287
9631, 12672
PDA Coordinates (x, y)
9181, 11061
8262, 19662
3984, 20326
8871, 13268
5724, 13269
6664, 13268
5745, 13438
5826, 12682
4536, 15205
6374, 140544870, 15476
4156, 15817
3031, 15320
3104, 12182
3518, 12499
3939, 12192
4064, 11660
3643, 12040
3585, 12098
3769, 11775
3578, 12281
3887, 124733720, 11880
3588, 12005
3520, 11165
3684, 12247
4359, 15834
4749, 15748
4894, 15721
4846, 15639
4494, 15812
4195, 15835
3193, 15387
3123, 149932789, 14972
3581, 15505
4283, 15679
3399, 15481
3950, 14809
3801, 15469
4370, 15733
4325, 15096
AST OFRACTER
FIELD GUIDETO PANAU
WEAPONS VEHICLE EXPLORINGPANAU
AGENCYMISSIONS
STRONGHOLDTAKEOVERS
FACTIONMISSIONS
CHALLENGES COLLECTIBLES ACHIEVEMENTSAND TROPHIES
FACTION PICK-UPSCollectibles Checklists
Protected by copyright. Unauthorized or unlawful copying or downloading expressly prohibited.

8/18/2019 Just Cause 2 Prima Official Guide
http://slidepdf.com/reader/full/just-cause-2-prima-official-guide 204/208
PRIMA OFFICIAL STRATEGY GUIDETM
204
PDA Coordinates (x, y)
22465, 11595
20632, 1427520064, 24417
20471, 26026
22133, 29326
15178, 22672
14595, 22653
12767, 19197
10666, 23048
8247, 23357
14096, 7920
11595, 8135
9922, 7591
14674, 959318353, 11009
21585, 16660
22555, 17691
29532, 13060
28920, 14955
27907, 15896
21144, 21342
12057, 23386
7862, 24194
6847, 19943
6175, 21596
27234, 1255224504, 16206
26754, 13446
28286, 13818
25625, 15580
27074, 18683
11391, 5578
26305, 19021
18498, 22698
18238, 23784
18215, 25413
13369, 29533
10444, 28355
5047, 31723
21541, 20267
10518, 20564
2241, 30018
10511, 21675
1680, 28513
4883, 25985
18067, 7629
26695, 10543
28289, 8302
3866, 23418
2004, 22452
PDA Coordinates (x, y)
23953, 30976
25492, 2766923523, 25841
20635, 23156
22010, 23120
16079, 23870
11543, 24787
4412, 26991
9180, 10318
3981, 19370
5685, 19136
4987, 25227
11504, 24372
8748, 2585116814, 16494
21080, 11025
19034, 8724
23609, 8823
18953, 7095
19871, 7611
26416, 6454
24270, 10976
16491, 10344
17181, 7109
12690, 7757
25991, 2940726235, 24871
17588, 28367
14007, 30601
14366, 27352
14137, 26980
9131, 22705
4817, 21549
3287, 20901
10539, 17155
25636, 13495
21404, 18261
20282, 18019
20536, 16709
16313, 10242
20544, 11835
21933, 13664
21813, 7006
18275, 2282
15174, 5881
14218, 5594
9459, 5625
10366, 6682
23605, 3139
11278, 2145
BLACK BOXES
PDA Coordinates (x, y)
27968, 11114
22280, 475014556, 11786
9522, 15478
2608, 28076
899, 30088
3374, 31230
20491, 26850
18108, 25322
20694, 25203
23984, 29410
24716, 26099
25751, 24121
28008, 1239929221, 8886
24960, 5231
21947, 847
21085, 2346
16376, 21303
11603, 16096
11923, 19843
15708, 20885
12887, 11549
7706, 8233
9077, 10587
3182, 198293573, 19492
6106, 18717
8654, 18746
8415, 22079
5299, 27112
5502, 28048
11722, 28254
14185, 26302
16239, 26663
16009, 28151
17566, 29480
18559, 2930221186, 28724
30788, 17244
30738, 17563
30393, 18682
30107, 19756
29446, 20234
27495, 20841
25804, 20869
25036, 20246
23144, 21851
22434, 22509
1558, 30232
PDA Coordinates (x, y)
5643, 31646
13023, 2971215381, 24734
17652, 23264
22804, 31852
24523, 31551
26586, 31601
26130, 26037
30733, 16707
31015, 13659
1518, 15793
2592, 12730
6184, 17034
10163, 1687111227, 16180
10731, 17054
9078, 6767
5610, 9989
10684, 1970
2555, 20670
25386, 7400
27252, 8700
18399, 2147
18495, 3653
7262, 8965
25328, 2752026863, 29355
24454, 24760
19830, 22789
18974, 26607
3865, 30594
8989, 29354
3659, 24850
2384, 21996
29619, 11771
17063, 20349
18256, 20943
12779, 30926
9240, 22741
14124, 19144
7797, 13848
10470, 12543
4265, 8851
27337, 10799
30088, 5610
23043, 4553
15055, 3060
11335, 2152
9271, 6314
12630, 2333
SKULLS
AST OFRACTER
FIELD GUIDETO PANAU
WEAPONS VEHICLE EXPLORINGPANAU
AGENCYMISSIONS
STRONGHOLDTAKEOVERS
FACTIONMISSIONS
CHALLENGES COLLECTIBLES ACHIEVEMENTSAND TROPHIES
FACTION PICK-UPSCollectibles Checklists
Protected by copyright. Unauthorized or unlawful copying or downloading expressly prohibited.

8/18/2019 Just Cause 2 Prima Official Guide
http://slidepdf.com/reader/full/just-cause-2-prima-official-guide 205/208
C H A R A C T E R S
F I E L D G U I D E T O P A N A U
W E A P O N S
V E H I C L E S
E X P L O R I N G P A N A U
A G E N C Y M I S S I O N S
S T R O N G H O L D T A K E O V E R S
F A C T I O N M I S S I O N S
C H A L L E N G E S
C O L L E C T I B L E S
A C H I E V E M E N T S
primagames.com 205
EYES ON THE PRIZEAs you play Just Cause 2 , you rack up dozens of in-game statistics, such as the number of generators destroyed, the
number of enemies killed, and the number of kilometers driven. These statistics and more—such as how many (and
which) missions you have completed—count toward the collection of achievements or trophies, depending on your
respective console. This chapter details all of the achievements for earning a perfect score, and we provide tips and
tricks for getting some of the harder awards.
ACHIEVEMENTS
AND TROPHIES
Name DescriptionXbox 360
GamerscorePLAYSTATION 3
Trophies
Welcome to Panau Complete Welcome to Panau Agency mission on any difficulty. 10 Bronze
Casino Bust Complete Casino Bust Agency mission on any difficulty. 20 Bronze
The White Tiger Complete White Tiger Agency mission on any difficulty. 30 Bronze
Mountain Rescue Complete Mountain Rescue Agency mission on any difficulty. 40 Bronze
Three Kings Complete Three Kings Agency mission on any difficulty. 50 Silver
Into the Den Complete Into the Den Agency mission on any difficulty. 60 Silver A Just Cause Complete A Just Cause Agency mission on any difficulty. 70 Gold
Top Agent Complete the game on Normal difficulty. 20 Bronze
Heroic AgentComplete the game on Hard difficulty. Also gives you the bonus for Normaldifficulty.
30 Silver
Legendary AgentComplete the game on Extreme difficulty. Also gives you the bonus for Hardand Normal difficulties.
40 Gold
Gaining a Foothold Complete 3 Stronghold Takeover missions. 10 Bronze
Conqueror of Panau Complete all 9 Stronghold Takeover missions. 20 Silver
A Trusted Ally Complete all 49 faction missions. 20 Gold
First Taste of Chaos Cause chaos for the first time. 10 Bronze
Saboteur Complete 100 sabotages by destroying government assets such as fuel depotsand broadcast towers.
10 Bronze
Destroyer Complete 500 sabotages by destroying government assets such as fuel depotsand broadcast towers.
20 Bronze
Professional Hitman Assassinate 25 colonels. 20 Bronze
Up to the Challenge 1 Complete 10 racing challenges. 10 Bronze
Up to the Challenge 2 Complete 50 racing challenges. 20 Bronze
Finders Keepers Collect 50 resource items, such as weapons parts. 25 Bronze
Leaving No Rock Unturned Collect 500 resource items, such as weapons parts. 15 Bronze
Faction Benefactor Collect 100 faction items, such as skulls or drug drops. 20 Bronze
Globetrotter Discover 100 locations on the island, such as settlements or bases. 20 Bronze
Achievements and Trophies Collection
AST OFRACTER
FIELD GUIDETO PANAU
WEAPONS VEHICLE EXPLORINGPANAU
AGENCYMISSIONS
STRONGHOLDTAKEOVERS
FACTIONMISSIONS
CHALLENGES COLLECTIBLES ACHIEVEMENTSAND TROPHIES
EYES ON THE PRIZEAchievements and Trophies Collection
Protected by copyright. Unauthorized or unlawful copying or downloading expressly prohibited.

8/18/2019 Just Cause 2 Prima Official Guide
http://slidepdf.com/reader/full/just-cause-2-prima-official-guide 206/208
PRIMA OFFICIAL STRATEGY GUIDETM
206
Name DescriptionXbox 360
GamerscorePLAYSTATION 3
Trophies
Freeroamer 1 Reach 100% complete in 15 locations. 10 Bronze
Freeroamer 2 Reach 100% complete in 75 locations. 20 Silver
Body Count Kill 500 enemies. 15 BronzeUnarmed and Dangerous Kill 50 enemies using melee attacks. 15 Bronze
Gravity Is a Bitch! Kill 15 enemies by making them fall to their deaths. 15 Bronze
Follow Me! Kill 15 enemies by dragging them behind a vehicle with the grappling hook. 15 Bronze
Hang 'em High!Kill 15 enemies while they're suspended in the air (Hang Kill) with the grapplinghook.
15 Bronze
Wrecking BallKill 5 enemies by smashing them with an object tethered to your vehicle(Wrecking Ball Kill) with the grappling hook.
15 Bronze
Pinata PartyKill 5 enemies with the melee attack while they're suspended with the grapplinghook (Pinata Kill).
15 Bronze
Juggler Kill 15 enemies while they're falling through the air (Juggle Kill). 15 Bronze
Road Rage Kill 50 enemies by mowing them down with vehicles (Road Kills). 10 Bronze
Marksman Kill 50 enemies with headshots. 15 Bronze
Killing Frenzy Kill 20 enemies in 60 seconds. 20 Bronze
Invincible Warrior Kill 40 enemies in a row with personal weapons (guns, explosives) withoutlosing health.
20 Bronze
Destruction Frenzy Destroy 25 objects in 60 seconds. 20 Bronze
Test Driver Drive 30 different vehicles. 10 Bronze
Trying Everything Once Drive 104 different vehicles—land, sea, or air. 25 Bronze
Road Trip Travel 75 kilometers in a car. 25 Bronze
Please Step out of the Vehicle Hijack 50 enemy vehicles. 10 Bronze
Stunt Driver Get 100 Stunt Driver points. 10 Bronze
Halfway There Complete 50% of the game in Normal or Mercenary mode. 25 Bronze
Parachute Climber Bronze 10 Bronze
I Believe I Can Fly Base jump 1,000 meters. 10 Bronze
Bridge Limbo Pass under 30 different bridges in Panau. 20 Bronze
Stunt Flyer Fly an airplane close to the ground for 30 seconds. 10 Bronze
Perfectionist Complete 75% of the game in Normal or Mercenary mode. 25 Bronze
Bronze Stand on foot at the highest point of Panau. 10 Bronze
Going for Gold Get all the gold trophies. N/A Platinum
Professional HitmanThere are 50
colonels in Panau
who you can
eliminate for cash
bounties and
Chaos increases.
To earn this award,
you must eliminate
half of them.
Use the chart of
colonel locations in Chapter 5, Exploring Panau, to track down
your targets. Now, neutralizing colonels is tough because they
are typically surrounded by grunts (and even elites in some
cases), and they wear strong armor that absorbs a lot of damage.
The key to eliminating colonels without hassle is to go in with
overwhelming firepower, such as a rocket launcher or fully
upgraded triggered explosives. You can also simplify the assassi-
nation by using a heavy-duty attack vehicle, such as a Razorback
tank or a Sivirkin 15 Havoc chopper, complete with miniguns and
rockets.
AST OFRACTER
FIELD GUIDETO PANAU
WEAPONS VEHICLE EXPLORINGPANAU
AGENCYMISSIONS
STRONGHOLDTAKEOVERS
FACTIONMISSIONS
CHALLENGES COLLECTIBLES ACHIEVEMENTSAND TROPHIES
EYES ON THE PRIZEAchievements and Trophies Collection
Protected by copyright. Unauthorized or unlawful copying or downloading expressly prohibited.

8/18/2019 Just Cause 2 Prima Official Guide
http://slidepdf.com/reader/full/just-cause-2-prima-official-guide 207/208
C H A R A C T E R S
F I E L D G U I D E T O P A N A U
W E A P O N S
V E H I C L E S
E X P L O R I N G P A N A U
A G E N C Y M I S S I O N S
S T R O N G H O L D T A K E O V E R S
F A C T I O N M I S S I O N S
C H A L L E N G E S
C O L L E C T I B L E S
A C H I E V E M E N T S
primagames.com 207
Finders Keepers/Leaving No Rock
UnturnedFinders Keepers
and Leaving No
Rock Unturnedrequire a keen eye
for weapons and
vehicle parts. Your
radar flashes when
you are near these
pick-ups, but if you
flip to Chapter 5,
Exploring Panau, you can use our chart of all part locations to
bank these awards in no time. Plus, as you earn these awards,
you can rapidly upgrade your weapons and vehicles, which
makes completing missions much easier.
Hang ’em High/Pinata Party
To earn this award, you must grapple an enemy to a ceiling.
While your foe is helplessly suspended in the air, you can either
shoot them to earn Hang Kills or beat them with your grappling
hook to bank Pinata Kills. You need to rack up 15 of each kill to
earn these awards.
Wrecking Ball
This is a fun award to pursue, and you can even notch a few kills
toward it while on faction missions, where you must transport
the head of a Baby Panay statue (i.e., “O Panay Redentor” or
“Head of State,” both Roaches missions). To earn the kills needed
for this award, called Wrecking Ball Kills, you need to swing a
dragged object into enemies. Dual-hook an object like a
statue head to your vehicle and then make wide turns near
soldiers to bowl them over.
Juggler/Gravity Is a Bitch
Juggle Kills are kills where you eliminate an enemy whilethey are in midair, which is different from a Fall Kill (for the
Gravity Is a Bitch award). Fall Kills are about pulling enemies
out of high places like a guard tower so they slam into the
pavement. Juggle Kills are where you yank an enemy off his
feet from a lower height and then blast him as he’s in the air.
Usually you need a powerful one-shot kill weapon like the
sawed-off shotgun to complete these kills.
Trying Everything OnceTo earn this
award, you
must drive
104 uniquevehicles. The
game keeps
constant tabs
on this statistic
as you play,
displaying the
current number
near your radar.
The best way to
earn this award
is to work your
way through
the factionmissions, where
you will be
around a lot
of different rides, and to explore the large cities (Panau City,
for example) and bases to try out everything with wheels or
wings. And when you are near water, grapple out to boats of
all shapes and sizes to notch those vehicles on your overall
count.
AST OFRACTER
FIELD GUIDETO PANAU
WEAPONS VEHICLE EXPLORINGPANAU
AGENCYMISSIONS
STRONGHOLDTAKEOVERS
FACTIONMISSIONS
CHALLENGES COLLECTIBLES ACHIEVEMENTSAND TROPHIES
EYES ON THE PRIZEAchievements and Trophies Collection
Protected by copyright. Unauthorized or unlawful copying or downloading expressly prohibited.

8/18/2019 Just Cause 2 Prima Official Guide
http://slidepdf.com/reader/full/just-cause-2-prima-official-guide 208/208
PRIMA OFFICIAL STRATEGY GUIDETM
as weaving through traffic on a motorcycle at top speed while
leaning within a hairsbreadth from another car or driving off a
ramp at a high speed.
Stunt Flyer
I Believe I Can Fly
This is a fun one. To accomplish this reward, you must jump off
a tall building and not pull your parachute until you have fallen
over 1 000 meters As you fall a counter near your radar displays
AST OFRACTER
FIELD GUIDETO PANAU
WEAPONS VEHICLE EXPLORINGPANAU
AGENCYMISSIONS
STRONGHOLDTAKEOVERS
FACTIONMISSIONS
CHALLENGES COLLECTIBLES ACHIEVEMENTSAND TROPHIES
EYES ON THE PRIZEAchievements and Trophies Collection