javatest harness - graphical user interface user's guide - oracle
TRANSCRIPT

JavaTest™ Harness 4.4.1
Graphical User Interface User’s Guide
November 2011

PleaseRecycle
Copyright © 2002, 2011, Oracle and/or its affiliates. All rights reserved.
This software and related documentation are provided under a license agreement containing restrictions on use and disclosure and areprotected by intellectual property laws. Except as expressly permitted in your license agreement or allowed by law, you may not use, copy,reproduce, translate, broadcast, modify, license, transmit, distribute, exhibit, perform, publish, or display any part, in any form, or by anymeans. Reverse engineering, disassembly, or decompilation of this software, unless required by law for interoperability, is prohibited.
The information contained herein is subject to change without notice and is not warranted to be error-free. If you find any errors, please reportthem to us in writing.
If this is software or related documentation that is delivered to the U.S. Government or anyone licensing it on behalf of the U.S. Government, thefollowing notice is applicable:
U.S. GOVERNMENT RIGHTS Programs, software, databases, and related documentation and technical data delivered to U.S. Governmentcustomers are "commercial computer software" or "commercial technical data" pursuant to the applicable Federal Acquisition Regulation andagency-specific supplemental regulations. As such, the use, duplication, disclosure, modification, and adaptation shall be subject to therestrictions and license terms set forth in the applicable Government contract, and, to the extent applicable by the terms of the Governmentcontract, the additional rights set forth in FAR 52.227-19, Commercial Computer Software License (December 2007). Oracle America, Inc., 500Oracle Parkway, Redwood City, CA 94065.
This software or hardware is developed for general use in a variety of information management applications. It is not developed or intended foruse in any inherently dangerous applications, including applications that may create a risk of personal injury. If you use this software orhardware in dangerous applications, then you shall be responsible to take all appropriate fail-safe, backup, redundancy, and other measures toensure its safe use. Oracle Corporation and its affiliates disclaim any liability for any damages caused by use of this software or hardware indangerous applications.
Oracle and Java are registered trademarks of Oracle and/or its affiliates. Other names may be trademarks of their respective owners.
Intel and Intel Xeon are trademarks or registered trademarks of Intel Corporation. All SPARC trademarks are used under license and aretrademarks or registered trademarks of SPARC International, Inc. AMD, Opteron, the AMD logo, and the AMD Opteron logo are trademarks orregistered trademarks of Advanced Micro Devices. UNIX is a registered trademark licensed through X/Open Company, Ltd.
This software or hardware and documentation may provide access to or information on content, products, and services from third parties.Oracle Corporation and its affiliates are not responsible for and expressly disclaim all warranties of any kind with respect to third-party content,products, and services. Oracle Corporation and its affiliates will not be responsible for any loss, costs, or damages incurred due to your access toor use of third-party content, products, or services.
This document in any form, software or printed matter, contains proprietary information that is the exclusive property of Oracle. Your access toand use of this confidential material is subject to the terms and conditions of your Oracle Software License and Service Agreement, which hasbeen executed and with which you agree to comply. This document and information contained herein may not be disclosed, copied,reproduced, or distributed to anyone outside Oracle without prior written consent of Oracle. This document is not part of your licenseagreement nor can it be incorporated into any contractual agreement with Oracle or its subsidiaries or affiliates.

Contents
Preface 11
1. Introduction 1
GUI Features 1
Configuration Information 2
Before Starting the Harness 2
Installation and Runtime Security Guidelines 3
Starting the Harness 4
Online User’s Guide 4
Accessing Online Documentation 5
2. Quick Start 7
Starting a New Test Run 7
Resuming Work on a Test Run 8
Browsing the Contents of a Test Suite 9
Opening a Test Suite 9
▼ Open a Test Suite 9
Opening a Work Directory 10
▼ Open a Work Directory with the Quick Start Wizard 10
▼ Open a Work Directory with the Test Manager 11
1

Creating a Work Directory 11
▼ Create a Work Directory with the Quick Start Wizard 12
▼ Create a Work Directory with the Test Manager 12
3. Graphical User Interface 15
Menus 16
File 17
Tools 18
Windows 19
Help 20
Setting Preferences 20
Appearance Preferences 21
Test Manager Preferences 23
Displaying Online Information 25
Help Menu 26
Help Buttons 26
F1 Key 26
Keyboard access 26
Keyboard Focus 27
Keyboard Shortcuts 27
Hot Key Shortcuts 27
Keyboard Navigation 28
Navigation in Hyperlinked Text 29
Navigation in Folder Pane Status Tabs 29
Navigation in the Test Tree 29
Keyboard Activation 30
Tools 30
Agent Monitor Tool 31
Report Converter Tool 31
2 JavaTest Harness Graphical User Interface User’s Guide • November 2011

Report Converter Window 33
Report Converter Menu Bar 33
Navigation Bar 34
Report Viewer 34
Report Converter Wizard 34
Test Manager Tool 36
Tasks Performed from the Test Manager 37
Configure Menu 38
Run Tests Menu 39
Report Menu 40
View Menu 40
Tool Bar 41
Progress Monitor 42
Progress Indicator 45
Information Area 45
Test Tree 47
▼ Quick Pick Test Execution of Specific Folders or Tests 52
▼ Refresh Tests and Folders 53
▼ Clear a Test Result 54
▼ Clear Test Results in Folders 54
View Filters 55
▼ Creating a Custom View Filter 59
Work Directory Status Line 63
Test Manager Status Line 63
Configuration Editor 63
Template Editor 71
Log Viewer 79
Test Results Auditor Tool 81
Contents 3
Audit Tool Menu Bar 83
Audit Settings 83
Audit Results 83
Audit Test Results Options 85
4. Configuring a Test Run 89
Creating a Configuration 90
▼ Create a New Configuration 90
▼ Loading a Configuration 91
▼ Editing a Configuration 92
Editing Quick Set Values 93
▼ Specifying Tests to Run 94
Run Tree 95
Load Test List 95
▼ Creating a Test List File 96
▼ Using Exclude Lists 97
Exclude List Selection Options 98
Latest Exclude List 99
Other Exclude List 99
▼ Specifying Keywords 100
List of Expressions 101
List of Logical Operators 102
▼ Specifying Prior Status 103
Prior Status Filter Selections 105
▼ Setting Concurrency and Timeout Factor 106
Concurrency 107
Time Factor 107
▼ Saving a Configuration 108
Using Bookmarks in Configurations 108
4 JavaTest Harness Graphical User Interface User’s Guide • November 2011
▼ Set Bookmarks for Specific Questions 108
▼ Display Questions With Bookmarks 109
▼ Open Groups of Questions 109
▼ Close Groups of Questions 109
▼ Clear the Value of a Specific Question 110
▼ Remove All Bookmarks 110
▼ Remove a Bookmark From a Question 110
Searching a Configuration 110
▼ Search for Characters in Configurations 111
Search Criteria 112
Working with Multiple Configurations 112
5. Creating and Editing Templates 115
▼ Creating a Template 116
Editing a Template 116
▼ Editing in Question Mode 117
▼ Editing in Quick Set Mode 117
▼ Changing Tests to Run 119
Specifying Tests in the Test Tree 120
▼ Loading a Test List 120
▼ Creating a Test List File 121
▼ Adding or Removing Exclude Lists 122
Exclude List Pane 123
Latest Exclude List 124
Other Exclude List 124
▼ Editing Keywords and Expressions 125
Keyword Expressions 126
List of Logical Operators 126
▼ Editing Prior Status Settings 127
Contents 5
Prior Status Pane 129
▼ Editing Concurrency and Timeout Factor 129
Concurrency 131
Time Factor 131
Resolving Configuration-Template Conflicts 133
Setting Bookmarks 134
▼ Set Bookmarks for Specific Questions 134
▼ Display Questions With Bookmarks 134
▼ Open Groups of Questions 135
▼ Close Groups of Questions 135
▼ Clear the Values of All Questions With Bookmarks 135
▼ Clear the Value of a Specific Question 136
▼ Remove All Bookmarks 136
▼ Remove a Bookmark From a Question 136
Using Template Search 137
▼ Loading a Template 138
6. Running Tests 141
Starting a Test Run 142
Monitoring a Test Run 144
Monitoring With a Test Tree 145
Using View Filters 146
Monitoring Output Logs 146
Agent Monitor Tool 148
Stopping a Test Run 149
Troubleshooting a Test Run 149
Test Tree 150
Folder View 150
Test View 150
6 JavaTest Harness Graphical User Interface User’s Guide • November 2011
Log Viewer 151
Service Monitor 151
7. Browsing Test Information 153
Displaying Folder Information 154
Summary Information 155
Status Information 156
Passed 157
Failed 157
Error 157
Not Run 158
Filtered Out 158
Multi-Selection Panel 158
Displaying Test Information 159
Test Description Pane 161
Name 161
Value 161
Files Pane 162
Configuration Pane 162
Name 162
Value 163
Test Run Details Pane 163
Name 163
Value 164
Test Run Messages Pane 164
Message List 165
Message Area 167
Test Result Status Bar 167
Displaying Configuration Information 167
Contents 7
Displaying the Configuration Checklist 168
Viewing Configuration Values 169
Viewing Exclude List Contents 171
Exclude List Contents 171
Test Details 171
Displaying the Question Log 172
Viewing Test Manager Properties 173
Test Suite 173
Work Directory 174
Configuration 174
Plug-Ins 174
Viewing Test Suite Errors 175
8. Creating and Displaying Reports 177
Creating Reports 177
▼ Creating a Test Report 179
HTML Options 181
HTML Files 182
KFL Options in HTML Reports 182
Using a Known Failures List 182
Creating a Known Failures List 183
Specifying a Known Failures List 184
Known Failures List Reports 184
Known Failure Analysis 185
Report Files 187
Displaying Reports 188
▼ Display Reports in the Report Browser 189
Report Browser Contents 192
HTML Report Files 192
8 JavaTest Harness Graphical User Interface User’s Guide • November 2011
Viewing Reports Offline 193
9. Merging and Converting XML Test Reports 195
▼ Merge XML Reports 195
10. Auditing Test Results 199
▼ Audit a Test Run 199
11. Troubleshooting With the GUI 203
Harness Fails During Use 203
Problems Running Tests 204
Tests with Errors 204
Tests that Fail 205
Problems Viewing Test Results 205
Output Overflow Message Displayed in Test Run Messages 206
Problems Viewing Reports 207
Problems Writing Reports 207
Problems Moving Reports 207
12. Glossary 209
Contents 9

10 JavaTest Harness Graphical User Interface User’s Guide • November 2011
Preface
This manual describes how to use the Graphical User Interface (GUI) provided by theJavaTest™ harness (the harness) to run tests of the test suite, browse results, writereports, and audit test results.
The harness provides two User’s Guides, the Graphical User Interface User’s Guide andthe Command-Line Interface User’s Guide . If your test suite uses the JavaTest agent torun tests, the JavaTest Agent Users’ Guide might also be included.
This User’s Guide is also provided by the harness in an online version. The onlineversion of the User’s Guide differs from the PDF in the following areas:
■ In the online version, all of the harness User’s Guides are merged into a singledocument.
■ In the online version, the search function provides a list and ranking of allmatching text strings found in the complete harness documentation set.
■ The online version can be opened either from the command line in a viewer(without opening the harness GUI) or from within the harness GUI.
■ In the online version, hypertext links and navigation bars are used instead of pageand section references.
Note – Displaying the online version of the User’s Guide does not require theinstallation of any additional software (such as a web browser). The viewer isprovided by the harness.
Security NoteThis section discusses potential security vulnerabilities in the harness deliverables.
11
The harness is a self-contained package and only requires the Java archive(/lib/javatest.jar) to execute.
You can reduce risk by restricting access to optional files or removing themcompletely. “Optional Components” on page 12 lists portions of the distribution thatare not required. Please refer to all the product release notes for the most recent notesabout security.
Architects creating test suites should carefully select the set of files to include, andshould ensure that file permissions are restricted to essential access.
Optional ComponentsThe harness includes the following optional components:
■ Launch scripts are located in each platform’s /bin directory (for example,javatest.ksh or javatest.bat.
Launch scripts are provided for convenience. If you keep the launch scripts, checkto ensure that they do not have administrative privileges.
■ Documentation is located in the /doc directory.
■ Examples or sample code (varies across distributions).
■ A test suite might include additional files. Refer to your test suite’s documentationto see which files are optional.
Remote Agent RisksThe harness includes the JavaTest agent, a remote execution framework. Using theagent opens communication ports on your machine and on the agent machine,therefore care is required to ensure that the machine is protected against maliciousattack.
For secure operation, both the host and the remote machine should be used in aprotected intranet on a physically isolated network.
Before You Read This BookTo fully use the information in this document, you must have a thorough knowledgeof the topics discussed in the documentation delivered with your test suite.
12 JavaTest Harness Graphical User Interface User’s Guide • November 2011
How This Book Is OrganizedChapter 1 introduces the harness, describes the basic topics that users should befamiliar with before starting the harness on a test system, describes how to start theharness.
Chapter 2 describes the Quick Start process.
Chapter 3 describes the GUI menus, the tools, and operations that can be performedfrom the harness desktop.
Chapter 4 describes how to create and manage configurations used by the harness torun tests.
Chapter 5 describes how to create and edit templates used .
Chapter 6 describes how to use templates to create configurations.
Chapter 7 describes how to use the Test Manager tool to run tests and monitor results
Chapter 8 describes how to use the Test Manager tool to browse test information.
Chapter 9 describes how to use the Test Manager tool to generate test reports.
Chapter 10 describes how to use the Report Converter tool to merge test reports.
Chapter 11 describes how to use the Test Results Auditor tool to audit test results.
Chapter 12 describes how to use the GUI tools and components to troubleshoot a testrun.
Using SystemCommandsThis document does not contain information on basic system commands andprocedures such as shutting down the system, booting the system, and configuringdevices.
See one or more of the following for this information:
■ Solaris Handbook for Sun Peripherals
■ AnswerBook2™ software online documentation for the Solaris™ operatingenvironment
■ Other software documentation that you received with your system
Preface 13

Typographic ConventionsThis User’s Guide uses the following typographic conventions:
Shell PromptsExamples in this User’s Guide contain the following shell prompts:
Typeface Meaning Examples
AaBbCc123 The names of commands, files,and directories; on-screencomputer output
Edit your .login file.Use ls -a to list all files.% You have mail.
AaBbCc123 What you type, whencontrasted with on-screencomputer output
% suPassword:
AaBbCc123 Book titles, new words or terms,words to be emphasized
Command-line variable; replacewith a real name or value
Read Chapter 6 in the User’s Guide.These are called class options.You must be superuser to do this.
To delete a file, type rm filename.
Shell Prompt
C shell machine_name%
C shell superuser machine_name#
Bourne shell and Korn shell $
Bourne shell and Korn shell superuser #
14 JavaTest Harness Graphical User Interface User’s Guide • November 2011
Related DocumentationThe following documentation provides additional detailed information about theharness:
Accessing Documentation OnlineThe Oracle Technology Network enables you to access Java ME technicaldocumentation on the Web:
http://download.oracle.com/javame/index.html
We Welcome Your CommentsWe are interested in improving our documentation and we welcome your commentsand suggestions. Provide feedback at [email protected].
Application Title
JavaTest harnesscommand-line interface
Command-Line Interface User’s Guide
JavaTest agent (optional) JavaTest Agent User’s Guide
Preface 15

16 JavaTest Harness Graphical User Interface User’s Guide • November 2011
1
Introduction
The harness provides two interfaces, a Graphical User Interface (GUI) and acommand-line interface. The GUI provides a desktop that contains a set of menusand interactive tools that you use to configure and execute tests, control and monitoragents, audit test results, and create reports.
The harness also provides a command-line interface that enables users to accomplishmany of the tasks performed in the GUI.
The command-line interface also enables the user to display the online version of theUser’s Guide without opening the GUI. One means of displaying the online User’sGuide (test suites might provide other means) is to type the following command:
java -jar testsuite/lib/javatest.jar -onlinehelp
In the command line, testsuite/lib/ represents the location of the directory wherethe test suite installed the javatest.jar file.
See the Command-Line Interface User’s Guide for a description of the command-lineinterface.
GUI FeaturesThe features of the GUI include a set of interactive tools and utilities that enable theuser to perform the following tasks:
■ Configure, run, and monitor tests on a variety of test platforms (such as servers,workstations, browsers, and small devices) with a variety of test executionmodels (such as API compatibility tests, language tests, compiler tests, andregression tests).
■ Evaluate and analyze test results.
■ Create template configuration files.
Chapter 1 Introduction 1
■ Generate and view test reports that summarize test runs.
■ View the contents of log files.
■ Monitor agents (only enabled when the test suite provides an agent). The JavaTestharness supports the use of an agent to run tests on systems that can’t run theJavaTest harness.
■ Display online user documentation in a viewer that provides context sensitivehelp, full-text search, and keyword search information.
Configuration InformationThe harness uses the Configuration Editor to collect configuration information abouthow tests are run on a specific test platform. The Configuration Editor saves theinformation in a configuration file (.jti file) that the harness uses to run tests. Byusing configuration files, the harness can run programs on a variety of Javaplatforms. The harness writes the test results in the work directory associated withthat configuration and test suite. See the Glossary for detailed descriptions of theterms .jti file, work directory, and configuration file.
Before Starting the HarnessBefore you start the harness on a test system, you must have a valid test suite andJava Development Kit 6.0 or higher installed on your test system. See your test suitedocumentation for information about installing the test suite on your test system.Refer to http://www.oracle.com/products for information about installing thecurrent Java Development Kit on your test system.
You must also understand how your test group uses or intends to use the harness inits test system. For example, consider the following questions:
Does your test group use the harness and one or more agents to run distributedtests?
If you use an agent to run tests, you must also install the agent on the platformbeing tested. If you intend to use the JavaTest agent, see JavaTest Agent User’sGuide for detailed information about installing the harness agent on a testplatform. If you use a custom agent, refer to your test suite documentation fordetailed information about installing the agent.
Does your test group use configuration files and templates from a centrallocation, or does it use individual configuration files customized for each testrun?
2 Graphical User Interface User’s Guide • November 2011

If your group intends to use configuration files and templates from a centrallocation, the location must be configured for the harness to access the templatefiles.
Does your test group run the harness from a central location or from localinstallations in the test system?
If your group uses a central location for the test system, you must be able to accessthe test system at that location.
Installation and Runtime Security GuidelinesIt is extremely important to note that the JavaTest installation and runtime system isfundamentally a developer system that is not specifically designed to guard againstany malicious attacks from outside intruders. If sample code or tests you authormake a network call, you can expose the JavaTest operating environment duringexecution. For this reason, it is critically important to observe the precautionsoutlined in the following security guidelines when installing and running JavaTest.
The harness itself is self-contained in javatest.jar. The only external dependencyis jh.jar, which should be placed either on the classpath or in the same directoryas javatest.jar. If desired, the following optional parts of the binary distributioncan be deleted:
■ The directories linux, solaris, and win32 each contain a subdirectory namedbin, which contains a script named javatest. All of these directories and filesare provided for convenience and can be deleted without harm. (If the javatestlaunch script is deleted you can start the harness by pointing a JVM at thejavatest.jar file.)
■ Examples in the examples/ directory.
■ Documentation in the doc/ directory.
■ lib/jt-junit.jar which is an optional binary component.
To maintain optimum network security, JavaTest can be installed and run in a"closed" network operating environment, meaning JavaTest is not connected directlyto the Internet, or to a company Intranet environment that could introduceunwanted exposure to malicious intrusion. This is the ideal secure operatingenvironment when it is possible.
JavaTest does not require an "Intranet" connection that supports networkconnections to systems outside the JavaTest architecture to intra-company resources,but, for example, some Java ME applications in a test suite might use an HTTPconnection. If JavaTest or applications launched from JavaTest are open to anynetwork access you must observe the following precautions to protect valuableresources from malicious intrusion:
Chapter 1 Introduction 3
Install JavaTest behind a secure firewall that strictly limits unauthorized networkaccess to the Java ME SDK file system and services. Limit access privileges tothose that are required for JavaTest usage while allowing all the I-directional localnetwork communications that are necessary for JavaTest functionality. Thefirewall configuration must support these requirements to run JavaTest while alsoaddressing them from a security standpoint.
Follow the principle of "least privilege" by assigning the minimum set of systemaccess permissions required for installation and execution of JavaTest.
Do not store any data sensitive information on the same file system that is hostingJavaTest.
To maintain the maximum level of security, make sure the operating systempatches are up-to-date on the JavaTest host machine.
Starting the HarnessThe harness provides a set of command-line options that you can use to specify theconfiguration and properties of the GUI when starting the harness. See theCommand-Line Interface User’s Guide for detailed information about command-lineoptions used to specify how the harness starts.
See your test suite documentation for specific information required to start theharness on your test system.
Online User’s GuideThe harness also provides an online version of the User’s Guide. The online versioncan either be displayed without starting the harness or from inside the GUI. Theonline User’s Guide merges all of the following PDF User’s Guides into onedocument:
■ Graphical User Interface User’s Guide contains information about using the GUI.
■ Command-Line Interface User’s Guide contains command-line and utilityinformation.
■ JavaTest Agent User’s Guide (available only if supplied by the test suite) containsinformation about the optional agent.
4 Graphical User Interface User’s Guide • November 2011
Throughout the online version, the icon is used to identify additionalinformation that might be required to fully understand a topic. In the PDF format,this information is presented in the form of notes.
The following sections describe the different actions used to display the onlineversion of the User’s Guide and other online documentation.
Accessing Online DocumentationThe harness enables you to display the User’s Guide and other forms on onlinedocumentation without starting the GUI. The viewer is provided by the harness andrequires no additional software. To display the online User’s Guide, type thefollowing command from the directory containing the javatest.jar file:
java -jar javatest.jar -onlinehelp
You can also display the User’s Guide and other forms on online documentationinside the GUI. The following table describes user actions in the GUI that display theUser’s Guide and other information about the harness.
TABLE 1 Accessing the Online Guide
Action Description
F1 key Press the F1 key to display information about the window that haskeyboard focus.You must establish keyboard focus in a window before pressing theF1 key. To establish focus, you might have to highlight something inthe window.
Help menu The Help menu lists the following types of online documentation:• Information for the window that has focus. To display information
for the window that has focus (such as the Test Manager window),choose window_name from the menu.
• Information for the harness. To display the User’s Guide for theharness, choose JavaTest Harness Online Help from the menu.
• Optional information (such as, users’ guide and release notes)provided by the test suite.
• Information consists of information about the harness and thevirtual machine. This information is collected and provided by theharness.
Help buttons Click the Help button in a dialog box for information about how touse that dialog box.
Chapter 1 Introduction 5

6 Graphical User Interface User’s Guide • November 2011

2
Quick Start
The harness includes a Quick Start wizard that enables users to quickly createcombinations of test suite, work directory, and configuration files and open them inproperly configured Test Manager windows. The harness opens the wizard whenone of the following conditions occur:
■ The harness cannot restore an existing desktop.
■ A user includes a command-line option in the command to start the GUI.
■ A user opens a new Test Manager window.
In each case, the wizard enables the user to specify one of the following tasks:
■ Start a New Test Run.
■ Resume Work on a Test Run.
■ Browse the Contents of a Test Suite.
Because each of these tasks has a different set of test suite, work directory, andconfiguration file requirements, the wizard presents the user with a set of questionsthat collect the information required for that specified task. When the wizard hascollected the required information, it opens a new Test Manager window that isproperly set up to perform the specified task.
Starting a New Test RunThe harness requires that you have a test suite, a work directory, and a validconfiguration loaded in the Test Manager before running tests. To properly set upthe Test Manager, when you choose Start a New Test Run, the wizard displays aseries of questions that prompt you to choose the type of configuration used (load atemplate or create a new configuration), specify a test suite, and choose a workdirectory. See the following topics for additional information about templates, testsuites and work directories:
Chapter 2 Quick Start 7
■ Working With Templates
■ Opening a Test Suite
■ Opening a Work Directory
■ Creating a Work Directory
In the last panel, the wizard displays two options: automatically open theConfiguration Editor and automatically begin the test run.
If you choose not to automatically open the Configuration Editor when the wizardcloses, the harness displays the Test Manager. In either case, before the harnessbegins to run tests, it verifies that the configuration is complete. If configurationvalues are missing or invalid, the harness displays a dialog box describing theproblem before opening the Configuration Editor.
See the following topics for additional information about working withconfigurations:
■ Creating a Configuration
■ Editing a Configuration
Resuming Work on a Test RunIf you choose to resume work on a test run, the wizard only prompts you for thework directory. Because each work directory is mapped to a test suite and aconfiguration file, you do not provide any additional information to the harness. SeeOpening a Work Directory for additional information about using an existing workdirectory.
In the last panel, the wizard displays two options: automatically open theConfiguration Editor and automatically begin the test run.
If you choose not to automatically open the Configuration Editor when the wizardcloses, the harness displays the Test Manager. In either case, before the harnessbegins to run tests, it verifies that the configuration is complete. If configurationvalues are missing or invalid, the harness displays a dialog box describing theproblem before opening the Configuration Editor.
8 Graphical User Interface User’s Guide • November 2011
Browsing the Contents of a Test SuiteIf you want to view the tests in a test suite without running them, the wizard onlyrequires that you specify the test suite. While the wizard provides you with theoption of creating a configuration file for the test suite, this is not required. If youchoose not to create a configuration file for the test suite, the harness closes thewizard and opens a Test Manager window containing the test suite.
See Opening a Test Suite for a additional information about loading a test suite.
Note – Until you provide both a work directory and a valid configuration file, youcannot run tests.
Opening a Test SuiteYou can open a test suite from either the Test Manager or the Quick Start wizard (ifit is enabled and you are starting a new test run).
Note: Some test suites do not implement the optional Quick Start wizard. It won’t beavailable if the test suite architect disabled it.
▼ Open a Test Suite1. Click the Browse button in the Quick Start wizard Test Suite panel or choose File
> Open Test Suite from the Test Manager menu bar.
2. Use the dialog box to navigate to the test suite.
3. Click the test suite icon or enter its name in the text field.
4. Click the Open button.
The harness loads the test suite in a new Test Manager.
Before you can run tests, you must open or create a work directory and load orcreate a configuration. If you did not use the Quick Start wizard to open the TestManager, you must perform these operations separately. See the following topics fordetailed information about using work directories and configurations:
Chapter 2 Quick Start 9
■ Opening a Work Directory provides information about using an existing workdirectory for the test run.
■ Creating a Work Directory provides information about creating a new workdirectory for the test run.
■ Working With Templates provides information about using a template in the testrun.
■ Creating a New Configuration provides information about creating a newconfiguration for the test run.
■ Editing a Configuration provides information about changing configurationvalues used for the test run.
Opening a Work DirectoryEach work directory is associated with a specific test suite, a configuration, andpossibly a template. Each time the harness runs tests, it creates test result files thatstore the information collected during the test run. The harness stores these files inthe work directory for all test runs of the test suite with that configuration.
You can open a work directory from either the Quick Start wizard (when resumingwork on a test run) or the Test Manager.
Use File > Recent Work Directory to quickly open a directory you have used before.
▼ Open a Work Directory with the Quick Start Wizard1. Click the Browse button in the Quick Start wizard Work Directory panel.
The harness displays a Work Directory chooser.
2. Use the chooser to navigate to the location of the work directory.
3. Click on the work directory icon or enter the name of the work directory in thetext field.
4. Click the Open button.
5. Complete the Quick Start wizard.
When you complete the Quick Start wizard, the harness opens a Test Managerwindow containing the test results for all test runs of the associated test suite andconfiguration.
10 Graphical User Interface User’s Guide • November 2011

▼ Open a Work Directory with the Test Manager1. Choose File > Open Work Directory from the Test Manager menu bar.
The harness displays the Open Work Directory dialog box.
2. Use dialog box to navigate to the location of the work directory.
3. Enter the name of the work directory in the Path field or click its name in the tree.
4. Click the Open button.
The harness performs one of the following actions:
■ Displays the test results from the work directory for all test runs of the currenttest suite in the Test Manager if both of the following conditions are true:
■ The current test suite and configuration are associated with the work directory.
■ The current test suite is not associated with any other open work directory.
■ Opens a new Test Manager window for the work directory, test suite, andconfiguration if the work directory is not associated with the current test suite inthe Test Manager.
Creating a Work DirectoryEvery work directory is associated with a specific test suite and a configuration fileafter one is created or opened. Each time the harness runs tests, it creates test resultfiles that store the information collected during the test run. The harness stores thesefiles in the work directory for all test runs of the test suite with that configuration.
You must create a new work directory for each new test suite. You might also chooseto create a new work directory to perform multiple test runs of the same test suitebut with different configuration files. If you try to use an archive work directory thatis no longer considered valid by the harness you must also create a new workdirectory.
You can create a work directory from either the Test Manager or the Quick Startwizard (if it is enabled and you are starting a new test run). The harness alsoprompts you to specify a work directory if you begin a task requiring a workdirectory without having specified one.
Chapter 2 Quick Start 11

▼ Create a Work Directory with the Quick Start WizardNote: Some test suites do not implement the optional Quick Start wizard. It won’t beavailable if the test suite architect disabled it.
1. Click the Browse button in the Quick Start wizard Work Directory panel.
The harness displays a Work Directory chooser.
2. Use the chooser to navigate to the location of the new work directory.
3. Enter the name of the work directory in the text field.
4. Click the Create button.
5. Complete the Quick Start wizard.
When you complete the Quick Start wizard, the harness opens a new Test Managerwindow and creates a work directory for the test suite, template, and configurationfile combination.
▼ Create a Work Directory with the Test Manager1. Choose File > Create Work Directory from the Test Manager menu bar.
The harness displays the Create Work Directory dialog box.
2. Enter the name of the new work directory in the Work Directory Name text field.
12 Graphical User Interface User’s Guide • November 2011

3. Click the Browse button and use the File Chooser to select a location for the workdirectory.
Note – Do not enter the directory name in the file chooser. The harness uses thename from the Work Directory Name text field to create it for you.
Depending on the test suite, the template option might not be allowed (templatesnot enabled), might be required (cannot select "No Template"), or might be optional(operates as described) in the following step. If you select a template, it will beassociated with that work directory for all configurations that are created for thatwork directory.
4. Use the No Template or Choose a Template buttons to set the template options forthe work directory.
5. Check the Launch Configuration Editor box to open the Configuration Editorafter the dialog box closes.
6. Click the Create button.
When you create the work directory, the harness opens a new Test Manager windowand creates a work directory for the test suite, template, and configuration filecombination.
Chapter 2 Quick Start 13

14 Graphical User Interface User’s Guide • November 2011
3
Graphical User Interface
The GUI consists of a desktop containing a set of tools that enable the user toconfigure and run tests, monitor test status, evaluate and analyze test results,generate reports, view log file contents, and audit test results.
The harness attempts to restore the previous desktop when it displays the GUI. Ifyou used a command-line option (such as, -newdesktop) to start the harness or if aprevious desktop does not exist, the harness displays the Quick Start wizard. See theCommand-Line Interface User’s Guide for detailed information about using specificvalues and setup commands in the command line to start the GUI.
The Quick Start wizard guides you through the process of setting up the GUI for atest run. See Quick Start for information about using the Quick Start wizard.
For detailed information about desktop functions and features, see the followingtopics:
■ Layout Styles
■ Menus
■ Setting Preferences
■ Displaying Online Information
■ Keyboard access
■ Tools
For information about using desktop tools to perform tasks, see the following topics:
■ Configuring a Test Run
■ Creating and Editing Templates
■ Working with Templates
■ Running Tests
■ Browsing Test Run Information
■ Creating and Displaying Reports
■ Merging and Converting XML Test Reports
Chapter 3 Graphical User Interface 15
■ Auditing Test Results
■ Troubleshooting with the GUI
MenusThe GUI provides two types of menus: desktop and tool. The layout styledetermines how the menus are displayed in the GUI. The following table describesthe two menu types and how the desktop style determines how they are displayed.
TABLE 2 GUI Menus
Menu Type Description
Desktop Desktop menus are always available to the user in the desktop menu bar. See GUILayout for a detailed description of the GUI layout options available to the user. Theyinclude the following menus:
• File• Tool• Windows• Help
Tool These menus are unique to specific tools and are only available to the user when that toolwindow is open. The appropriate tool menus are merged with the desktop menus in asingle menu bar.
See Agent Monitor Tool for a description of the Agent Monitor tool menus. If your testsuite uses the harness agent, see the JavaTest Harness Agent User’s Guide for a descriptionof the Agent Monitor.
See Report Converter Tool for a description of the Report Converter tool menus.
See Test Manager Tool for a description of the Test Manager tool menus.
See Test Results Auditor Tool for a description of the Audit Test Results tool menus.
16 Graphical User Interface User’s Guide • November 2011
FileUse the File menu to open files, set user preferences, and exit from the harness. Thecontents of the File menu change dynamically, based on the context of the desktop.The harness only enables menus when they can be used. The following tabledescribes the contents of the File menu.
TABLE 3 File Menu Contents
Menu Item Description
Open the Quick Start Wizard Note: Some test suites do not implement the optional Quick Startwizard. It won’t be available if the test suite architect disabled it.
Opens the optional Quick Start wizard for you to use for thefollowing tasks:• Start a new test run by selecting a test suite, work directory, and
a configuration file. If the configuration file is new orincomplete, the harness opens the Configuration Editor after thewizard closes.
• Resume work on a previous test run or browse a test suitewithout running tests.
• Browse the contents of a test suite.
Create Work Directory Opens a dialog box that you can use to create a work directory.When you choose to create a new work directory, the harnessassociates it with the test suite opened in the Test Manager toolwindow. The harness creates test result files in the work directorythat contain all of the information gathered by the harness duringtest runs of the test suite.
See Creating a Work Directory for detailed information aboutcreating a work directory.
Open > Work Directory Opens a dialog box that you can use to open an existing workdirectory. Each work directory is associated with a specific testsuite and contains information from previous test runs. The testresult files in the work directory contain all of the informationgathered by the harness during test runs.When you choose to open an existing work directory, the harnessperforms the following actions:• It associates that work directory with the test suite opened in
the Test Manager tool window only if the test suite is both amatch and has no other work directory already open.
• If it cannot associate the work directory with the open test suite,the harness opens a new Test Manager and loads both the workdirectory and its associated test suite.
See Opening a Work Directory for detailed information aboutopening a work directory.
Chapter 3 Graphical User Interface 17
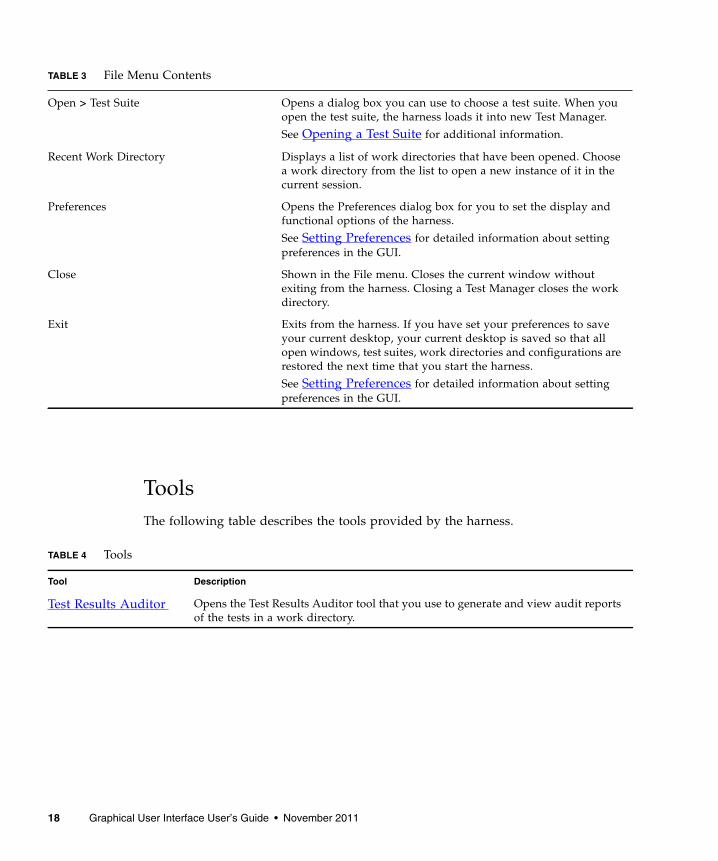
ToolsThe following table describes the tools provided by the harness.
Open > Test Suite Opens a dialog box you can use to choose a test suite. When youopen the test suite, the harness loads it into new Test Manager.
See Opening a Test Suite for additional information.
Recent Work Directory Displays a list of work directories that have been opened. Choosea work directory from the list to open a new instance of it in thecurrent session.
Preferences Opens the Preferences dialog box for you to set the display andfunctional options of the harness.
See Setting Preferences for detailed information about settingpreferences in the GUI.
Close Shown in the File menu. Closes the current window withoutexiting from the harness. Closing a Test Manager closes the workdirectory.
Exit Exits from the harness. If you have set your preferences to saveyour current desktop, your current desktop is saved so that allopen windows, test suites, work directories and configurations arerestored the next time that you start the harness.
See Setting Preferences for detailed information about settingpreferences in the GUI.
TABLE 4 Tools
Tool Description
Test Results Auditor Opens the Test Results Auditor tool that you use to generate and view audit reportsof the tests in a work directory.
TABLE 3 File Menu Contents
18 Graphical User Interface User’s Guide • November 2011
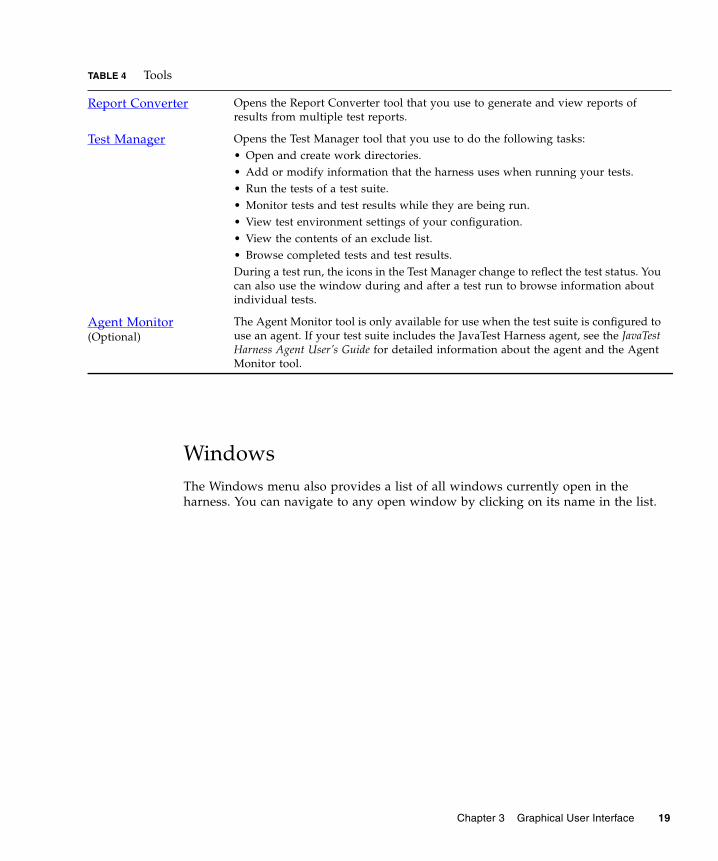
WindowsThe Windows menu also provides a list of all windows currently open in theharness. You can navigate to any open window by clicking on its name in the list.
Report Converter Opens the Report Converter tool that you use to generate and view reports ofresults from multiple test reports.
Test Manager Opens the Test Manager tool that you use to do the following tasks:• Open and create work directories.• Add or modify information that the harness uses when running your tests.• Run the tests of a test suite.• Monitor tests and test results while they are being run.• View test environment settings of your configuration.• View the contents of an exclude list.• Browse completed tests and test results.During a test run, the icons in the Test Manager change to reflect the test status. Youcan also use the window during and after a test run to browse information aboutindividual tests.
Agent Monitor(Optional)
The Agent Monitor tool is only available for use when the test suite is configured touse an agent. If your test suite includes the JavaTest Harness agent, see the JavaTestHarness Agent User’s Guide for detailed information about the agent and the AgentMonitor tool.
TABLE 4 Tools
Chapter 3 Graphical User Interface 19

HelpUse the Help menu to display user information about the tool window and theharness, the available test suite documentation, version information about theharness, and information about the current Java runtime environment.
Setting PreferencesChoose File > Preferences from the menu bar to open the harness preferences dialog.Use this dialog to set the display and functional options of the harness.
TABLE 5 Contents of the Help Menu
Menu Item Description
Active Window Name Displays user information about the active window.This menu item is only available in an open toolwindow.
Online Help Displays the online version of the harness User’sGuide. This version combines the GUI, command-lineinterface, and the agent User’s Guides (whenapplicable) into one document.
Test Suite Documentation (Optional) If the test suite provides online documentation, theharness lists it here. Click the document name todisplay it in the viewer.
About the JavaTest Harness Displays information about this release of the harness.
About the Java Virtual Machine Displays information about the runtime used to run theharness.
20 Graphical User Interface User’s Guide • November 2011
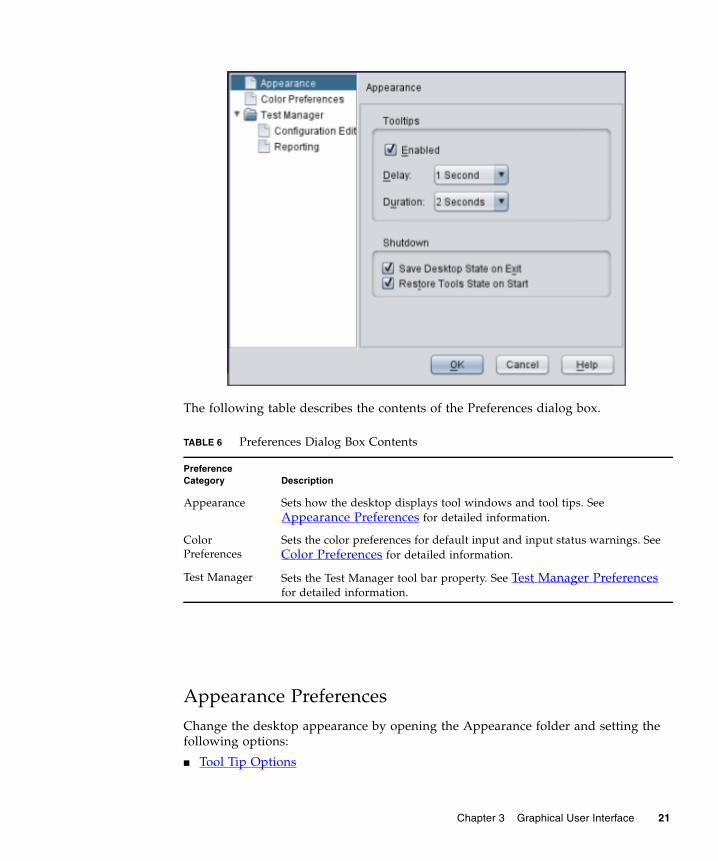
The following table describes the contents of the Preferences dialog box.
Appearance PreferencesChange the desktop appearance by opening the Appearance folder and setting thefollowing options:
■ Tool Tip Options
TABLE 6 Preferences Dialog Box Contents
PreferenceCategory Description
Appearance Sets how the desktop displays tool windows and tool tips. SeeAppearance Preferences for detailed information.
ColorPreferences
Sets the color preferences for default input and input status warnings. SeeColor Preferences for detailed information.
Test Manager Sets the Test Manager tool bar property. See Test Manager Preferencesfor detailed information.
Chapter 3 Graphical User Interface 21

■ Shutdown Options
See GUI Layout for a detailed description of the tabbed interface.
Tool Tip Options
You can set the tool tip options from the Appearance category of the Preferencesdialog box.
The Tool Tips area contains combo boxes and a check box that you can use to specifyhow tool tips function in the desktop. The following table describes the availabletool tip options.
TABLE 7 Setting Tool Tip Options
Option Description
Enabled Use the check-box to enable or disable tool tips for the GUI.
Delay Use the combo box to select the delay interval beforedisplaying tool tips.
Persistence Use the combo box to select the duration that the GUIdisplays a tool tip.
22 Graphical User Interface User’s Guide • November 2011
Shutdown Options
Check the Save Desktop State on Exit option to save your current desktop for use ina future test session. This default is on.
When you exit this option saves the current view filter information, recent workdirectories, and recent configuration information. If a desktop file exists, it willremain.
If you uncheck Save Desktop State on Exit and close the harness, the current viewfilter information is not saved. The next time you open a test session the harnessopens the Quick Start Wizard (if the test suite author has enabled it) or an emptyharness tool.
Check Restore Tools State on Start to restore saved desktop settings. The default ison. If this option is not checked, the recent work directories and configurationinformation are restored but the tools are not.
If Restore Tools is set on and Save Desktop State on Exit is set off, the harness willalways start with one tools set (although -newdesktop can be used to remove alldata).
Test Manager PreferencesTo change the Test Manager preferences, select File > Preferences > Test Manager.
■ Test Manager Preferences
■ Configuration Editor
■ Reporting
The following preferences are set when the Test Manager folder is selected asfollows:
Chapter 3 Graphical User Interface 23
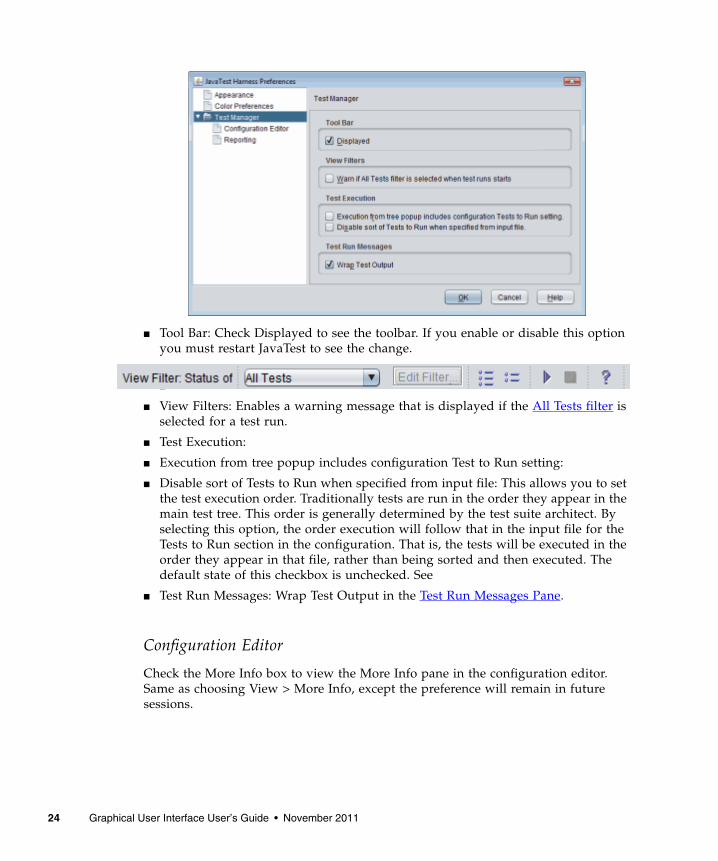
■ Tool Bar: Check Displayed to see the toolbar. If you enable or disable this optionyou must restart JavaTest to see the change.
■
■ View Filters: Enables a warning message that is displayed if the All Tests filter isselected for a test run.
■ Test Execution:
■ Execution from tree popup includes configuration Test to Run setting:
■ Disable sort of Tests to Run when specified from input file: This allows you to setthe test execution order. Traditionally tests are run in the order they appear in themain test tree. This order is generally determined by the test suite architect. Byselecting this option, the order execution will follow that in the input file for theTests to Run section in the configuration. That is, the tests will be executed in theorder they appear in that file, rather than being sorted and then executed. Thedefault state of this checkbox is unchecked. See
■ Test Run Messages: Wrap Test Output in the Test Run Messages Pane.
Configuration Editor
Check the More Info box to view the More Info pane in the configuration editor.Same as choosing View > More Info, except the preference will remain in futuresessions.
24 Graphical User Interface User’s Guide • November 2011
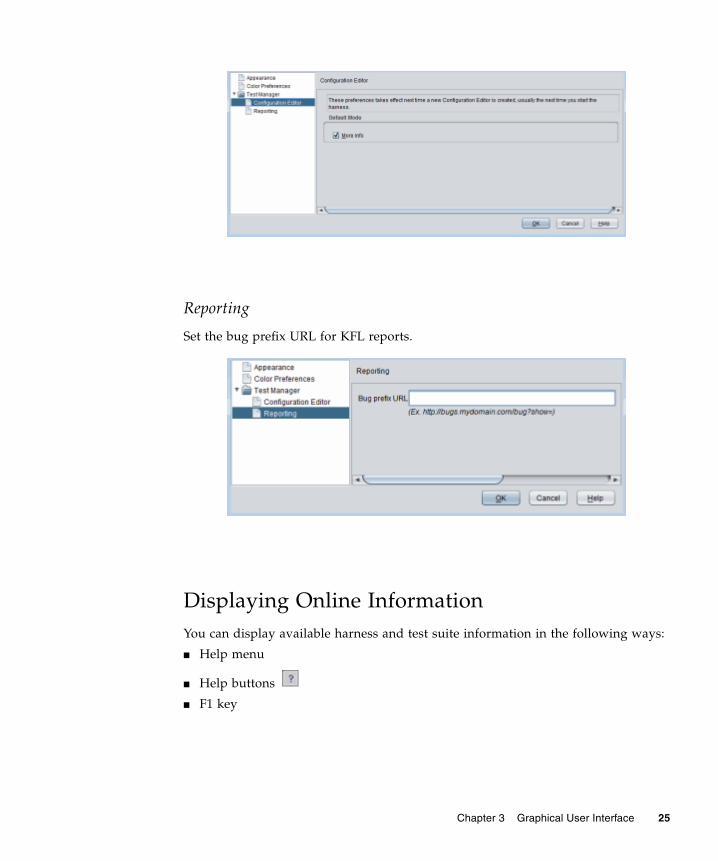
Reporting
Set the bug prefix URL for KFL reports.
Displaying Online InformationYou can display available harness and test suite information in the following ways:
■ Help menu
■ Help buttons
■ F1 key
Chapter 3 Graphical User Interface 25
Help MenuThe Help menu lists the available harness, test suite, and current runtimeinformation.When multiple test suites are opened, the menu displays a menu itemfor each document provided by the test suite. Choosing an item from the menuopens it in a separate viewer.
Help ButtonsThe desktop provides a help button on all window tool bars and in all dialog boxes.
In the tool bar, clicking the help button displays the documentation for that window.
In dialog boxes, clicking the help button displays documentation for that dialog box.
F1 KeyPress the F1 key to see detailed information for the window that has keyboard focus.Establish keyboard focus in a window before pressing the F1 key. In some cases, youmight have to highlight a component in the window to establish focus.
Keyboard accessThe harness uses standard Java programming language key bindings for keyboardtraversal and access of the GUI. See the Java Look and Feel Design Guidelines athttp://java.sun.com/products/jlf/ for a detailed description of thestandard key bindings for keyboard traversal and access of the GUI.
The window or component must have keyboard focus before you can use keyboardnavigation, activation, or shortcuts. Keyboard navigation, activation, and shortcutoperations are described in the following topics.
26 Graphical User Interface User’s Guide • November 2011
Keyboard FocusWhen a component has focus, it is generally displayed with a colored border orchanges color. However, some components in the GUI cannot be displayed with afocus indicator. In this case, you must continue to use the keyboard to traverse theGUI until focus is displayed.
Keyboard ShortcutsKeyboard shortcuts perform both navigation and activation in the same action. Thefollowing table lists the keys that are used to access menus and online help.
Hot Key ShortcutsThe harness provides shortcuts throughout the application for accessing menu titles,menu items, text fields, checkboxes, radio buttons, and command buttons.
Shortcut keys are identified in the following ways:
■ Text at the end of tool tips - For example, Start Running Tests Alt-S
■ Underlined letters in menus and text buttons - For example, File
■ Underlined letters in labeled fields - For example, Response:
TABLE 8 Keyboard Shortcuts for Navigation and Activation
Activation Keys GUI Action
F1 Activates the online help.
F10 Activates the File menu.
Shift F10 Activates the pop-up menu if focus is on a folder or test in the test tree.
Chapter 3 Graphical User Interface 27

Keyboard NavigationKeyboard navigation enables you to move keyboard focus from one GUI componentto another by using the keyboard without activating the component. The followingtable lists the keys used for keyboard navigation.
TABLE 9 Keyboard Navigation Keys
Navigation Key GUI Action
Tab Navigates to the next focusable component in the GUI. The tab traversal order is generally leftto right and top to bottom.
Shift-Tab Navigates back to the next focusable component.
Control-Tab Navigates to the next focusable component even if the current component accepts the Tab keyas input (such as a text area).
Control-ShiftTab
Navigates back to the next focusable component even if the current component accepts the Tabkey as input (such as a text area).
Left arrow Moves keyboard focus left one character or component.If focus is in the test tree, focus moves up the tree and closes the node.If focus is on the splitter bar (F8 moves focus to the splitter bar), it moves the splitter bar left.
Right arrow Moves keyboard focus right one character or component.If focus is in the test tree, focus moves sequentially down the tree, opening the node andtraversing all tests in a folder.If focus is on the splitter bar (F8 moves focus to the splitter bar), it moves the splitter bar right.
Up arrow Moves keyboard focus up one line or component.If focus is in the test tree, focus moves sequentially up the tree but does not open any closedfolders.If focus is on the splitter bar (F8 moves focus to the splitter bar), it moves the splitter bar left.
Down arrow Moves keyboard focus down one line or component.If focus is in the test tree, focus moves sequentially down the tree but does not open any closedfolders.If focus is on the splitter bar (F8 moves focus to the splitter bar), it moves the splitter bar right.
Page Up Navigates up one pane of information within a scroll pane.
Page Down Navigates down one pane of information within a scroll pane.
Home Moves to the beginning of the data. In a table, moves to the beginning of a row. If focus is inthe test tree, moves to the top of the tree.
End Moves to the end of the data. In a table, moves to the last cell in a row. If focus is in the testtree, moves to the bottom of the tree.
Control-F1 Displays the tool tip information for the GUI object that has focus. Can be used to determinewhich GUI object has focus.
F6 Shifts focus between left and right panes.
28 Graphical User Interface User’s Guide • November 2011
Navigation in Hyperlinked TextNavigating hyperlinks in text areas such as the More Info pane and report viewerrequires that you establish focus in the pane itself. After you have established focusinside the pane, use the keyboard navigation keys listed in Keyboard Navigation tonavigate in the pane. Because some components in the GUI cannot display focus,you have to use the keyboard to traverse the GUI until you can determine that focusis established inside the pane.
After focus is established in the pane, use Control-T and Shift-Control-T to navigateto the next and previous link in the document. Use Control and Space bar to select(follow) the hyperlink. See Keyboard Activation for a list of keys used for keyboardactivation.
Navigation in Folder Pane Status TabsNavigating in the folder pane test status tabs requires that you establish focus in thepane itself.
After focus is established in the pane, use the Arrow Up and Arrow Down keyslisted in Keyboard Navigation to navigate in the pane. When only a single entry ispresent in the folder pane, you must use the Home or End key to select the item.
Because some components in the GUI cannot be displayed with focus indicators, youmay have to use the keyboard to traverse the GUI until you can determine that focusis established inside the folder pane.
Use the Return or Enter key to navigate to the selected item. See KeyboardActivation for a list of keys used for keyboard activation.
Navigation in the Test TreeNavigating in a test tree requires that you establish focus in the test tree itself.
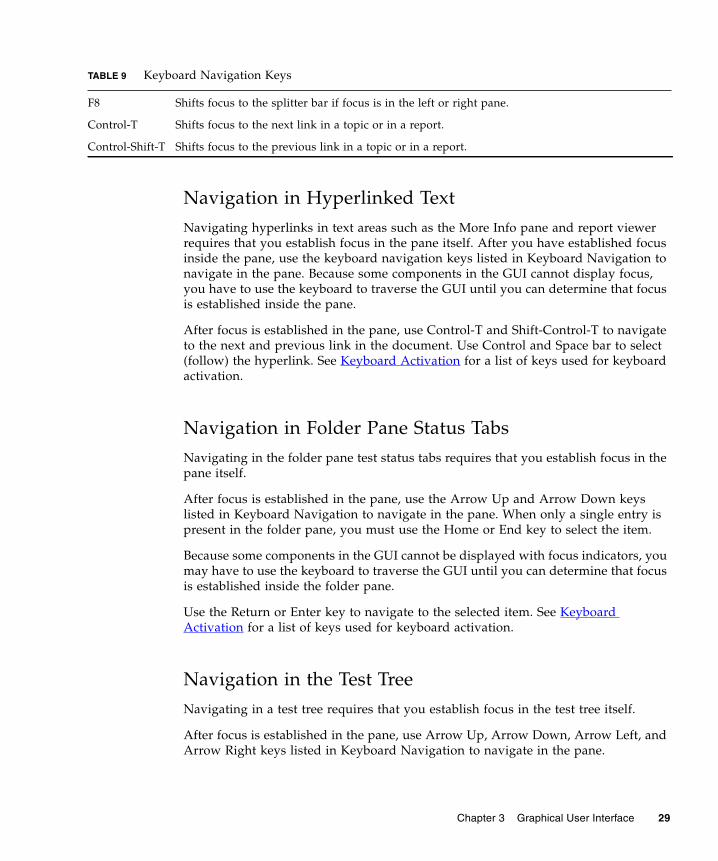
After focus is established in the pane, use Arrow Up, Arrow Down, Arrow Left, andArrow Right keys listed in Keyboard Navigation to navigate in the pane.
F8 Shifts focus to the splitter bar if focus is in the left or right pane.
Control-T Shifts focus to the next link in a topic or in a report.
Control-Shift-T Shifts focus to the previous link in a topic or in a report.
TABLE 9 Keyboard Navigation Keys
Chapter 3 Graphical User Interface 29
Keyboard ActivationAfter navigating to a component, you can then use the keyboard to activate thecomponent. The following table lists the key that are used to activate GUIcomponents.
ToolsThe harness provides a set of tools that enable you to perform specific tasks relatedto running tests, troubleshooting, and reporting test results. The tools provided bythe harness include the following:
■ Agent Monitor tool - Enables you to monitor the activity of agents connected tothe harness.
■ Report Converter tool - Enables you to merge XML reports from multiple workdirectories into a single XML report.
■ Test Manager tool - Enables you to perform the following tasks:
■ Load, edit, or create a configuration.
■ Run and monitor tests.
■ Browse test results.
■ Create and view reports.
■ Test Results Auditor tool - Enables you to audit test results from test runs.
TABLE 10 Keyboard Activation
ActivationKeys GUI Action
Enter orReturn
Activates the default command button.
Escape Dismisses a menu or dialog box without changes.
Space Bar Activates the tool bar button that has keyboard focus.
Shift-SpaceBar
Extends the selection of items in a list.
Control-Space Bar
If the item with focus is in a list, it toggles the selection state of the itemwithout affecting any other list selections.If the item is a link, it follows the link.
30 Graphical User Interface User’s Guide • November 2011
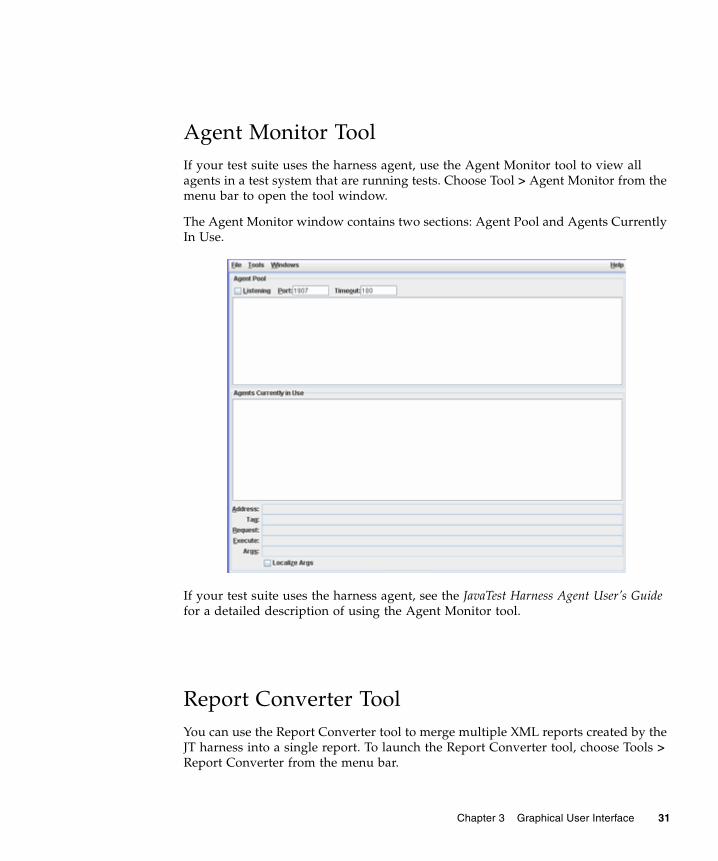
Agent Monitor ToolIf your test suite uses the harness agent, use the Agent Monitor tool to view allagents in a test system that are running tests. Choose Tool > Agent Monitor from themenu bar to open the tool window.
The Agent Monitor window contains two sections: Agent Pool and Agents CurrentlyIn Use.
If your test suite uses the harness agent, see the JavaTest Harness Agent User’s Guidefor a detailed description of using the Agent Monitor tool.
Report Converter ToolYou can use the Report Converter tool to merge multiple XML reports created by theJT harness into a single report. To launch the Report Converter tool, choose Tools >Report Converter from the menu bar.
Chapter 3 Graphical User Interface 31

1. Report Converter window
2. Report Converter wizard
See Merging and Converting XML Test Reports for a detailed description of usingthe Report Converter tool .
32 Graphical User Interface User’s Guide • November 2011

Report Converter WindowYou can use the Report Converter window to view reports.
1. Report Converter Menu Bar
2. Navigation Bar
3. Report Viewer
Report Converter Menu BarThe Report Converter menu bar contains a Settings menu. The menu bar alsocontains harness standard menus. See Menus for a description of the harnessstandard menus that are displayed on the menu bar.
The Settings menu contains the following menu items:
■ New - Launches the Report Converter wizard.
See Report Converter Wizard for a detailed description.
■ Open - Launches a file chooser for users to navigate to and open existing reportsin the report viewer.
Chapter 3 Graphical User Interface 33
Navigation BarThe navigation bar contains a report field and navigation buttons. The report fieldidentifies the location and name of the report file displayed in the report viewer.When a report contains hyperlinks to other reports, users can use the links in thereport and the navigation buttons to move from page to page.
Report ViewerThe harness displays the report in the viewer. The viewer is a noneditable text area.
Report Converter WizardThe harness displays the Report Converter wizard when you launch the ReportConverter Tool or when you choose Settings > New from the Report Converter Toolmenu bar. The Report Converter wizard consists of two panels, an XML Input Filespanel and a Report Options panel. See Merging and Converting XML Test Reportsfor instructions on the use of the Report Converter wizard.
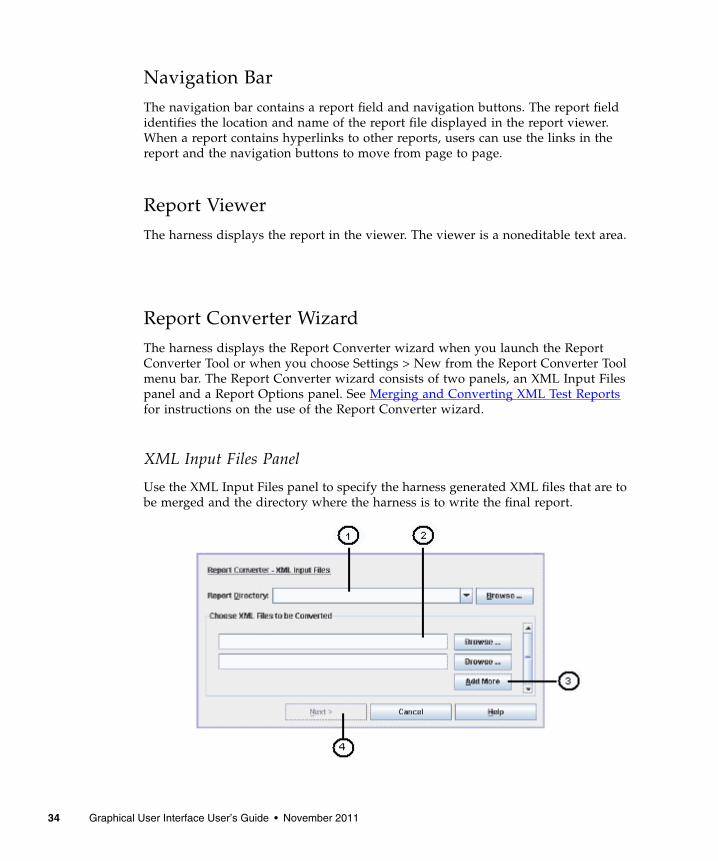
XML Input Files Panel
Use the XML Input Files panel to specify the harness generated XML files that are tobe merged and the directory where the harness is to write the final report.
34 Graphical User Interface User’s Guide • November 2011
1. Report Directory field and Browse button - Set the directory where the report issaved
2. Source file fields and Browse buttons - Specify the source XML report files
3. Add More button - Creates additional source file fields
4. Next button - Opens the Report Options panel
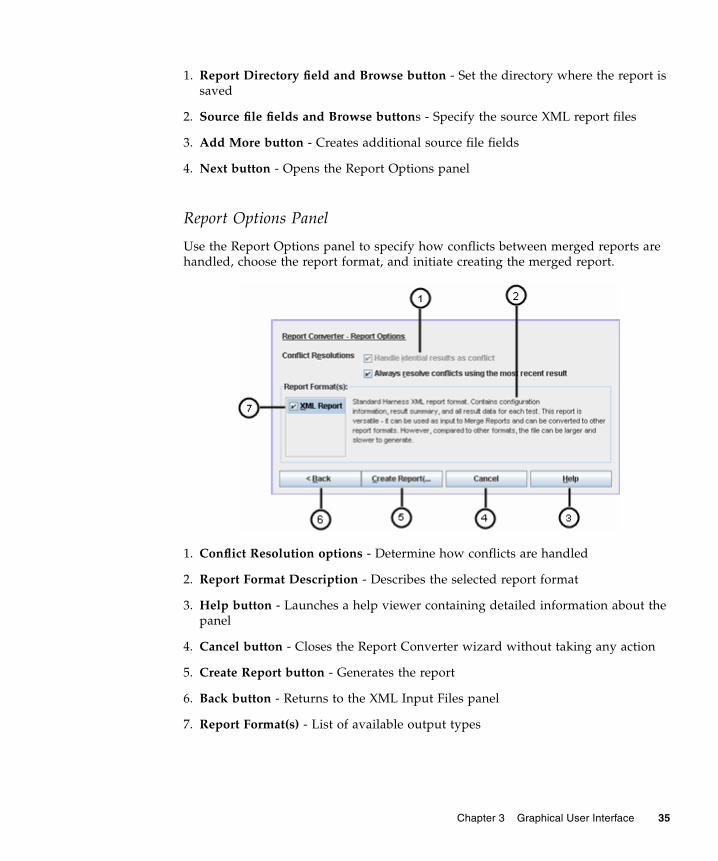
Report Options Panel
Use the Report Options panel to specify how conflicts between merged reports arehandled, choose the report format, and initiate creating the merged report.
1. Conflict Resolution options - Determine how conflicts are handled
2. Report Format Description - Describes the selected report format
3. Help button - Launches a help viewer containing detailed information about thepanel
4. Cancel button - Closes the Report Converter wizard without taking any action
5. Create Report button - Generates the report
6. Back button - Returns to the XML Input Files panel
7. Report Format(s) - List of available output types
Chapter 3 Graphical User Interface 35

Test Manager ToolUse the Test Manager tool to load, edit, or create a configuration, to run and monitortests, to browse test information, and to troubleshoot a test run.
You can launch the Test Manager at any time by choosing Tools > Test Manager orby choosing File > Open Quick Start from the menu bar.
The harness also automatically opens a new Test Manager when you perform one ofthe following actions:
■ Open an existing work directory
■ Create a work directory
■ Open a test suite
Depending on the layout style that you use, the desktop menus (File, Tools, andWindows) might also be displayed in the menu bar. See Menus for a description ofthe desktop menus. See Appearance Preferences for a description of how to changethe layout style.
1. Configure Menu
2. Run Tests Menu
3. Report Menu
4. View Menu
5. Tool Bar
36 Graphical User Interface User’s Guide • November 2011
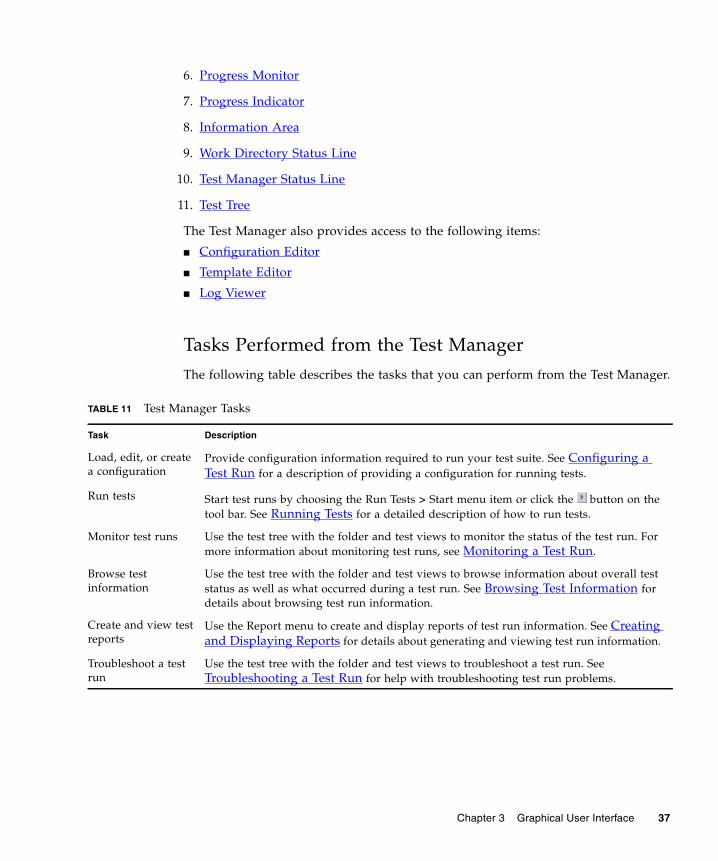
6. Progress Monitor
7. Progress Indicator
8. Information Area
9. Work Directory Status Line
10. Test Manager Status Line
11. Test Tree
The Test Manager also provides access to the following items:
■ Configuration Editor
■ Template Editor
■ Log Viewer
Tasks Performed from the Test ManagerThe following table describes the tasks that you can perform from the Test Manager.
TABLE 11 Test Manager Tasks
Task Description
Load, edit, or createa configuration
Provide configuration information required to run your test suite. See Configuring aTest Run for a description of providing a configuration for running tests.
Run tests Start test runs by choosing the Run Tests > Start menu item or click the button on thetool bar. See Running Tests for a detailed description of how to run tests.
Monitor test runs Use the test tree with the folder and test views to monitor the status of the test run. Formore information about monitoring test runs, see Monitoring a Test Run.
Browse testinformation
Use the test tree with the folder and test views to browse information about overall teststatus as well as what occurred during a test run. See Browsing Test Information fordetails about browsing test run information.
Create and view testreports
Use the Report menu to create and display reports of test run information. See Creatingand Displaying Reports for details about generating and viewing test run information.
Troubleshoot a testrun
Use the test tree with the folder and test views to troubleshoot a test run. SeeTroubleshooting a Test Run for help with troubleshooting test run problems.
Chapter 3 Graphical User Interface 37
Configure MenuUse the Configure menu to load, create, modify, and view configuration data usedfor a test run. The following table describes the default menu items in the Configuremenu. Because this menu can be customized you might see additional optionsdefined in the current test suite.
The template menu options listed in the following table are only available whentemplate usage is enabled.
TABLE 12 Configure Menu
Menu Item Description
Edit Configuration Opens the Configuration Editor and loads the current configuration. The harness uses theConfiguration Editor to change configuration values required to run a test suite.
See Editing a Configuration for detailed information.
Edit Template Opens the Template Editor and loads the template on which the current configuration isbased. If the test suite disables the template feature, this and all other template menuitems are not displayed. This menu item is also disabled when the test suite only enablesusers to load but not edit templates. Use the Template Editor to change configurationvalues in the template and to propagate the changes to the current configuration.
See Editing a Template for detailed information.
Edit Quick Set Opens an additional menu containing Tests to Run, Exclude List (optional), Keywords(optional), Environment (optional), Prior Status, Concurrency, and Timeout Factor menuitems that you can use to change specific configuration values.
See Editing Quick Set Values for detailed information.
New Configuration Opens the Configuration Editor and loads an empty configuration. The harness uses theConfiguration Editor to create configuration data containing the test environment andstandard values required to run a test suite.
See Creating a Configuration for detailed information.
Load Configuration Opens a Load Configuration File dialog box that you use to load an existingconfiguration into the Test Manager.The harness does not open the Configuration Editor when you load an existing, completeconfiguration interview.
See Loading a Configuration for detailed information.
Load RecentConfiguration
Displays a list of recently opened configuration. You can choose a configuration from thelist to use as the current configuration.
New Template Opens the Template Editor and loads an empty template. The harness uses the TemplateEditor to create a template containing known test environment and standard valuesrequired to run a test suite.
See Creating a Template for detailed information about templates.
38 Graphical User Interface User’s Guide • November 2011
Run Tests MenuThe Run Tests menu is used to start, stop, and monitor a test run. This menu can becustomized to include additional actions, so you may see additional options. Acustom menu is developed as part of a test suite, so it is visible only when the testsuite is in use.
The following table describes the default items in the Run Tests menu.
Load Template Opens a Load Template dialog box that you use to load an existing template into the TestManager.
See Loading a Template for detailed information.
Load RecentTemplate
Displays a list of templates that have been opened. You can choose a template from thelist to use as the template for creating a configuration.
Update Template Enabled only when template propagation is enabled and the template on which currentconfiguration is based has changed. Displays a dialog box that enables you to importchanges from the template into your configuration.
TABLE 13 Run Tests Menu
Menu Item Description
Start The harness enables the Start menu item when it is not running tests. Choosethe Start menu item to start a test run.
Only one test run at a time can be active in the Test Manager. See Starting aTest Run for detailed information about starting a test run.
Stop The harness enables the Stop menu item when it is running tests. Choose theStop menu item to end a test run after the current test is completed.
See Stopping a Test Run for detailed information about stopping a test run.
MonitorProgress
When the harness is running tests, you can use the Progress Monitor to displaythe progress of the test run and current resource information about the testsystem. Choose the Monitor Progress menu item to open the Progress Monitor.
See Using the Progress Monitor for detailed information about using theProgress Monitor.
TABLE 12 Configure Menu
Chapter 3 Graphical User Interface 39
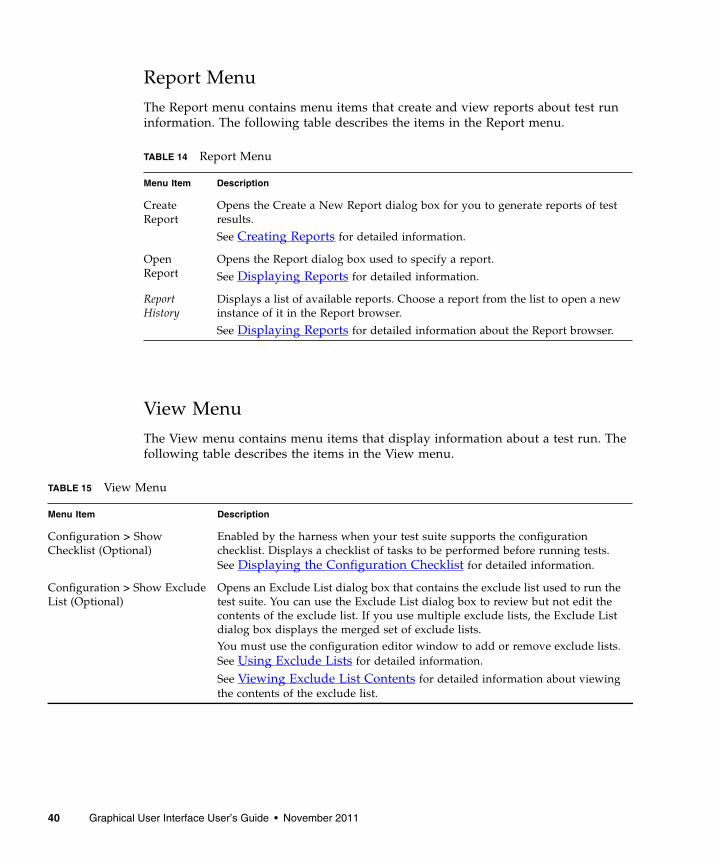
Report MenuThe Report menu contains menu items that create and view reports about test runinformation. The following table describes the items in the Report menu.
View MenuThe View menu contains menu items that display information about a test run. Thefollowing table describes the items in the View menu.
TABLE 14 Report Menu
Menu Item Description
CreateReport
Opens the Create a New Report dialog box for you to generate reports of testresults.
See Creating Reports for detailed information.
OpenReport
Opens the Report dialog box used to specify a report.
See Displaying Reports for detailed information.
ReportHistory
Displays a list of available reports. Choose a report from the list to open a newinstance of it in the Report browser.
See Displaying Reports for detailed information about the Report browser.
TABLE 15 View Menu
Menu Item Description
Configuration > ShowChecklist (Optional)
Enabled by the harness when your test suite supports the configurationchecklist. Displays a checklist of tasks to be performed before running tests.See Displaying the Configuration Checklist for detailed information.
Configuration > Show ExcludeList (Optional)
Opens an Exclude List dialog box that contains the exclude list used to run thetest suite. You can use the Exclude List dialog box to review but not edit thecontents of the exclude list. If you use multiple exclude lists, the Exclude Listdialog box displays the merged set of exclude lists.You must use the configuration editor window to add or remove exclude lists.See Using Exclude Lists for detailed information.
See Viewing Exclude List Contents for detailed information about viewingthe contents of the exclude list.
40 Graphical User Interface User’s Guide • November 2011
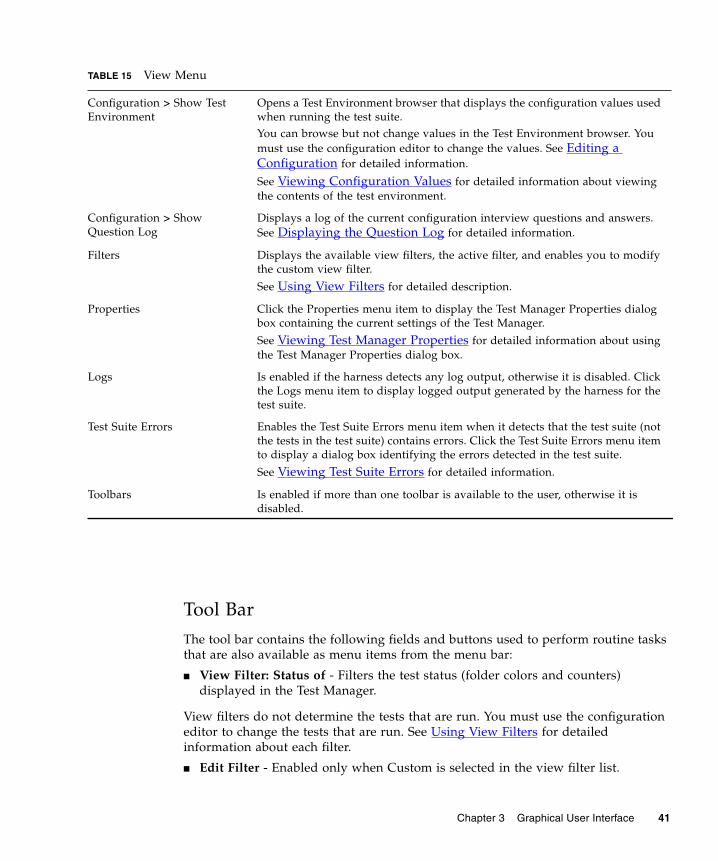
Tool BarThe tool bar contains the following fields and buttons used to perform routine tasksthat are also available as menu items from the menu bar:
■ View Filter: Status of - Filters the test status (folder colors and counters)displayed in the Test Manager.
View filters do not determine the tests that are run. You must use the configurationeditor to change the tests that are run. See Using View Filters for detailedinformation about each filter.
■ Edit Filter - Enabled only when Custom is selected in the view filter list.
Configuration > Show TestEnvironment
Opens a Test Environment browser that displays the configuration values usedwhen running the test suite.You can browse but not change values in the Test Environment browser. Youmust use the configuration editor to change the values. See Editing aConfiguration for detailed information.
See Viewing Configuration Values for detailed information about viewingthe contents of the test environment.
Configuration > ShowQuestion Log
Displays a log of the current configuration interview questions and answers.See Displaying the Question Log for detailed information.
Filters Displays the available view filters, the active filter, and enables you to modifythe custom view filter.
See Using View Filters for detailed description.
Properties Click the Properties menu item to display the Test Manager Properties dialogbox containing the current settings of the Test Manager.
See Viewing Test Manager Properties for detailed information about usingthe Test Manager Properties dialog box.
Logs Is enabled if the harness detects any log output, otherwise it is disabled. Clickthe Logs menu item to display logged output generated by the harness for thetest suite.
Test Suite Errors Enables the Test Suite Errors menu item when it detects that the test suite (notthe tests in the test suite) contains errors. Click the Test Suite Errors menu itemto display a dialog box identifying the errors detected in the test suite.
See Viewing Test Suite Errors for detailed information.
Toolbars Is enabled if more than one toolbar is available to the user, otherwise it isdisabled.
TABLE 15 View Menu
Chapter 3 Graphical User Interface 41

See Using View Filters for detailed information about creating a custom view filter.
■ - Opens the Configuration Editor in Question Mode.
See Question Mode for a detailed description of this mode.
■ - Opens the Configuration Editor in Quick Set Mode.
See Quick Set Mode for a detailed description of the mode.
■ - Starts a test run.
See Starting a Test Run for a detailed description.
■ - Stops a test run.
See Stopping a Test Run for a detailed description.
■ - Displays User Guide information about the Test Manager.
Progress MonitorThe Progress Monitor is a dialog box that only displays information about thecurrent configuration when the harness is running tests. The information displayedis equivalent to the Last Test Run view filter set in the Test Manager. Changing viewfilters in the Test Manager does not change the information displayed by theProgress Monitor.
Choose Run Tests > Monitor Progress from the Test Manager menu bar or click the
icon at the bottom of the Test Manager to open the Progress Monitor.
The following areas in the Progress Monitor display information about the test run:
■ Progress
■ Tests in Progress
■ Memory
42 Graphical User Interface User’s Guide • November 2011

■ Time
Progress
The following table describes the information displayed in the Progress area.
The following table describes the colors used in the progress bar. The colors aredisplayed from left to right in the order in which they are presented in the table.
TABLE 16 Progress Area Contents
Name Description
Passed Displays the number of tests in the test suite that were run and hadpassing results.
Failed Displays the number of tests in the test suite that were run and hadfailing results.
Errors Displays the number of tests in the test suite that could not be run.
Not Run Displays the number of tests in the test suite have not yet been run.
Test Results A colored progress bar representing the results of the tests in the testsuite.As the harness runs tests, the test results are displayed as coloredsegments in the progress bar. The colors used in the progress barrepresent the current status of the test results.The colors below are the harness default settings. The harnesssupports using colors other than the default settings. See SpecifyingStatus Colors in the JavaTest Harness User’s Guide: Command-LineInterface.The progress bar is the same as that displayed in the test progressdisplay at the bottom of the Test Manager.
TABLE 17 Order of Colors Displayed in the Progress Bar
Color Status Description
Green Passed Tests in the test run having passing results when they wereexecuted.
Red Failed Tests in the test run having failed results when they wereexecuted.
Blue Error Tests in the test run that the harness could not execute.Errors usually occur because the test environment is notproperly configured.
White Not yet run Tests in the test run that the harness has not yet executed.Tests excluded from the test run are not included.
Chapter 3 Graphical User Interface 43
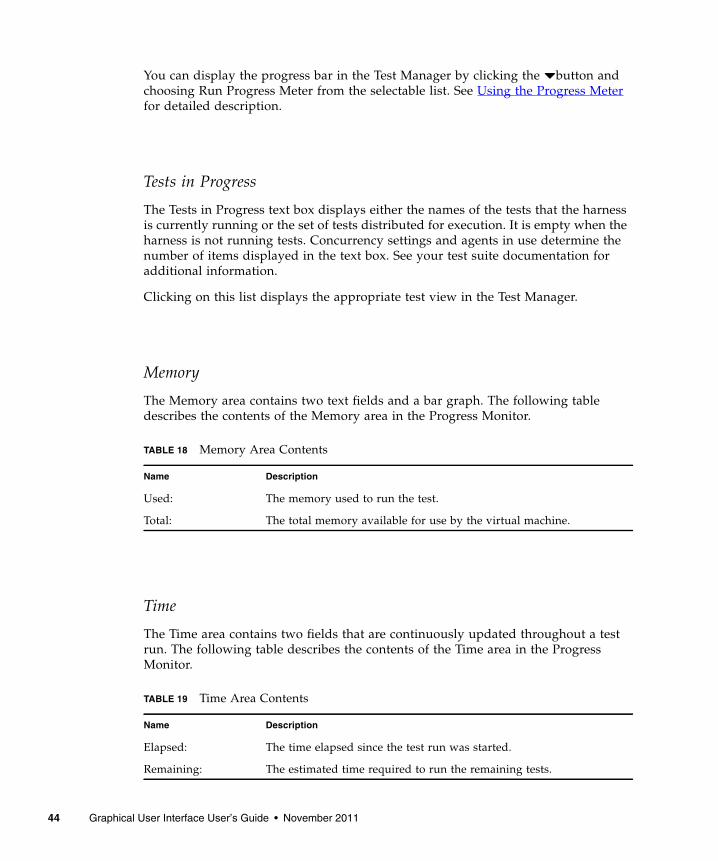
You can display the progress bar in the Test Manager by clicking the button andchoosing Run Progress Meter from the selectable list. See Using the Progress Meterfor detailed description.
Tests in Progress
The Tests in Progress text box displays either the names of the tests that the harnessis currently running or the set of tests distributed for execution. It is empty when theharness is not running tests. Concurrency settings and agents in use determine thenumber of items displayed in the text box. See your test suite documentation foradditional information.
Clicking on this list displays the appropriate test view in the Test Manager.
Memory
The Memory area contains two text fields and a bar graph. The following tabledescribes the contents of the Memory area in the Progress Monitor.
Time
The Time area contains two fields that are continuously updated throughout a testrun. The following table describes the contents of the Time area in the ProgressMonitor.
TABLE 18 Memory Area Contents
Name Description
Used: The memory used to run the test.
Total: The total memory available for use by the virtual machine.
TABLE 19 Time Area Contents
Name Description
Elapsed: The time elapsed since the test run was started.
Remaining: The estimated time required to run the remaining tests.
44 Graphical User Interface User’s Guide • November 2011
Tests that timeout or have execution times significantly longer than the other testsbeing run can cause the harness to display inaccurate times.
Progress IndicatorThe progress indicator located at the bottom of the Information Area displays theelapsed time of the previous test run when tests are not running. When tests arerunning, it automatically changes to the progress bar of the current test run. At thecompletion of the test run, the indicator changes to display the elapsed time.
You can use the button at any time to select and display either the elapsed time orthe progress bar.
Elapsed Time
When a test run starts, the elapsed time display resets to 00.00.00. At the end of thetest run, the total elapsed time for the test run is displayed.
Progress Bar
The harness displays a progress bar and a percentage complete value. As the harnesscompletes a test, it updates the progress bar and the percentage complete value.
Information AreaThe Test Manager uses the information area to display information about the itemselected in the test tree. The Test Manager uses two views, folder view and test view,to display the information.
Folder View
When you click a folder icon in the test tree, the Test Manager displays a Summarytab, a Documentation tab, five status tabs, and a status field containing informationfrom the work directory about a folder and its descendants.
Chapter 3 Graphical User Interface 45
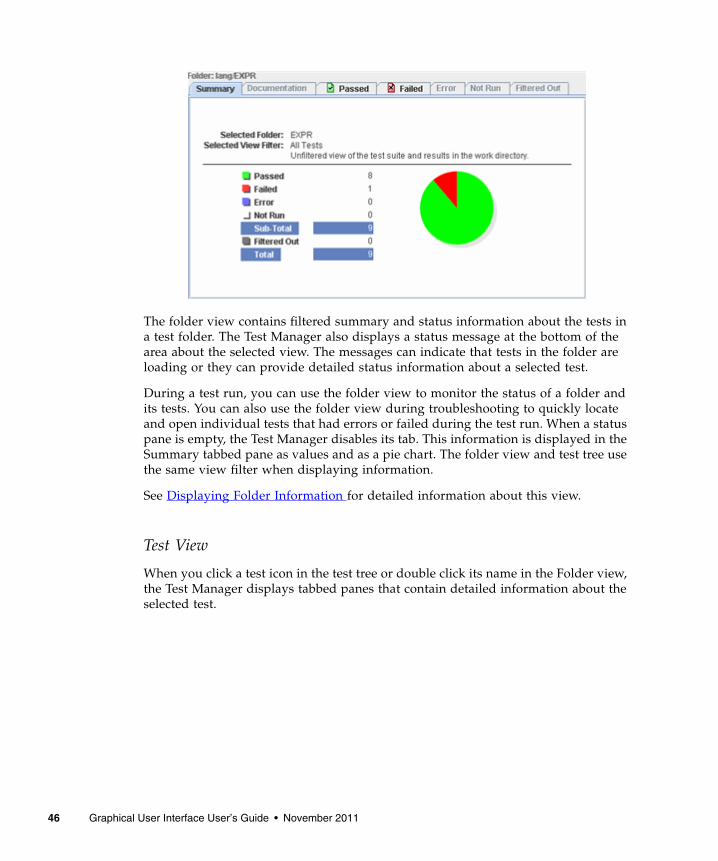
The folder view contains filtered summary and status information about the tests ina test folder. The Test Manager also displays a status message at the bottom of thearea about the selected view. The messages can indicate that tests in the folder areloading or they can provide detailed status information about a selected test.
During a test run, you can use the folder view to monitor the status of a folder andits tests. You can also use the folder view during troubleshooting to quickly locateand open individual tests that had errors or failed during the test run. When a statuspane is empty, the Test Manager disables its tab. This information is displayed in theSummary tabbed pane as values and as a pie chart. The folder view and test tree usethe same view filter when displaying information.
See Displaying Folder Information for detailed information about this view.
Test View
When you click a test icon in the test tree or double click its name in the Folder view,the Test Manager displays tabbed panes that contain detailed information about theselected test.
46 Graphical User Interface User’s Guide • November 2011
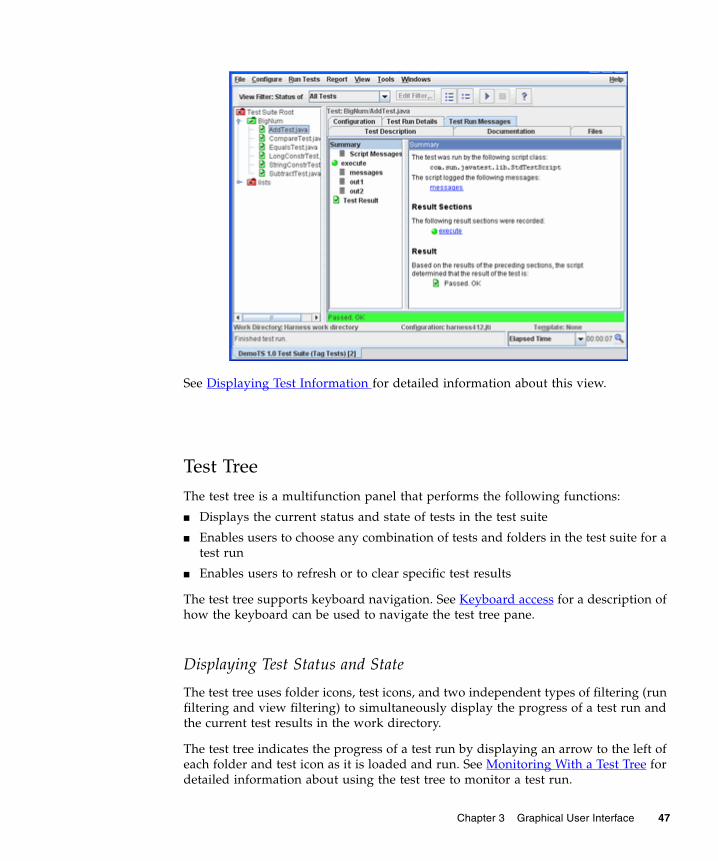
See Displaying Test Information for detailed information about this view.
Test TreeThe test tree is a multifunction panel that performs the following functions:
■ Displays the current status and state of tests in the test suite
■ Enables users to choose any combination of tests and folders in the test suite for atest run
■ Enables users to refresh or to clear specific test results
The test tree supports keyboard navigation. See Keyboard access for a description ofhow the keyboard can be used to navigate the test tree pane.
Displaying Test Status and State
The test tree uses folder icons, test icons, and two independent types of filtering (runfiltering and view filtering) to simultaneously display the progress of a test run andthe current test results in the work directory.
The test tree indicates the progress of a test run by displaying an arrow to the left ofeach folder and test icon as it is loaded and run. See Monitoring With a Test Tree fordetailed information about using the test tree to monitor a test run.
Chapter 3 Graphical User Interface 47

Based on the Test Manager view filter, the test tree updates the folder and test resulticons to indicate the current test results in the work directory.
Example:
When you choose the Current Configuration view filter, the test tree only displaysthe results for the tests specified in your current configuration. If you choose the AllTests view filter, the test tree immediately redisplays all test results from the workdirectory regardless of the settings in your current configuration. To display filteredsummary information about the test results in the work directory, click the test suiteicon in the test tree.
See View Filters for a detailed description of how to specify which test results fromthe work directory are displayed in the test tree.
When you click a folder icon in the test tree, the harness displays its folder view inthe Test Manager information area. The Test Manager uses the view filter to filterresults displayed in the folder view. See Displaying Folder Information foradditional information.
When you click a test icon in the test tree, the harness displays its test view in theTest Manager information area. Unlike the folder view, the Test Manager does notfilter results in the test view. See Test View for additional information.
Run, Refresh, or Clear Results
You can select any combination of tests and test folders and right click in the test treeto open a pop-up menu for performing the following actions:
■ Execute highlighted folders and tests by performing a quick pick execution.
■ Refresh the list of folders and tests without restarting the harness by performingan on-demand refresh scan for new folders, new tests and updated testdescriptions.
■ Clear Results by performing an on-demand clearing of the contents of thehighlighted folder, test, or entire work directory.
If a single test or folder is highlighted in the test tree, the Test Manager displays theappropriate Test View or Folder View. However, when multiple tests and folders arehighlighted in the test tree, the harness displays a Multiple Tree Nodes Selected panethat lists the highlighted tests and folders. Highlight multiple tests and folders in thetest tree by using standard keystrokes (such as Shift and Control) and clicking thetest and folder icons in the test tree.
The selection list in the Multiple Tree Nodes Selected pane displays the full path ofeach node highlighted in the test tree. Click a test or folder in the test tree a secondtime to remove the highlighting and to remove it from the selection list. The GUIdisplays the updated Multiple Tree Nodes Selected pane.
48 Graphical User Interface User’s Guide • November 2011
Folders and tests do not have to be highlighted in the test tree for you to use thepop-up menu. See Test Tree Pop-up Menu for detailed information about using thepop-up menu.
Folder Icons
The test tree uses colored icons to indicate both run status and result status. Thecolors of the icons shown below are the default settings. The harness enables you touse colors other than the default settings. See Specifying Status Colors in theCommand-Line Interface User’s Guide.
Folder Run Status
When activity occurs in a folder, such as loading or running tests, the Test Managerdisplays an arrow to the left of the folder icon. The standard values of the currentconfiguration, not the view filter, determine the run status displayed by the test tree.
Folder Result Status
The folder icon indicates the current test results in the work directory and does notchange until its tests are completed. After the harness completes running the tests ina folder, it displays the appropriate result status icon.
The folder icon displayed in the test tree is determined by the result of all its tests(see Test Icons) and the current view filter (see View Filters). The folder iconsdisplayed in the test tree indicate the highest priority result of any test hierarchicallybeneath it. The following table describes the folder icons in order of priority.
Note –
Test Icons
The test tree uses colored icons to indicate both run status and result status. Thecolors of the icons shown below are the default settings. The harness enables you touse colors other than the default settings. See Specifying Status Colors in theCommand-Line Interface User’s Guide.
Chapter 3 Graphical User Interface 49

Test Run Status
The Test Manager displays an arrow to the left of the test icon when running a test.The standard values of the current configuration, not the view filter, determine therun status displayed by the test tree.
Test Result Status
The test icon indicates the last known test result and does not change until the test iscompleted. After the harness completes the test, it displays the appropriate resultstatus icon.
The test result icons displayed in the test tree are determined by the results in thework directory and by the view filter set in the Test Manager. See View Filters for adescription of how to specify the test results displayed in the test tree. The followingtable describes the test icons used to indicate the result of each test.
Note – Users can change the color of the test icons displayed in the following table.However, the symbols displayed in the icons do not change.
TABLE 20 Test Icons
Icon Result Description
Error A blue test containing an exclamation symbol ( !) indicatesthat the test is not filtered out and that harness could notexecute it. These errors usually occur because the testenvironment is not properly configured.
Failed A red test containing a x symbol indicates that the test is notfiltered out and had a Failed result the last time it wasexecuted.
Not Run A white test containing a - symbol indicates that the test isnot filtered out but has not yet been executed.
Passed A green test containing a symbol indicates that the test isnot filtered out and had a Passed result the last time it wasexecuted.
Filtered Out A gray test containing no symbols indicates that the test iscurrently not selected to be run.
50 Graphical User Interface User’s Guide • November 2011
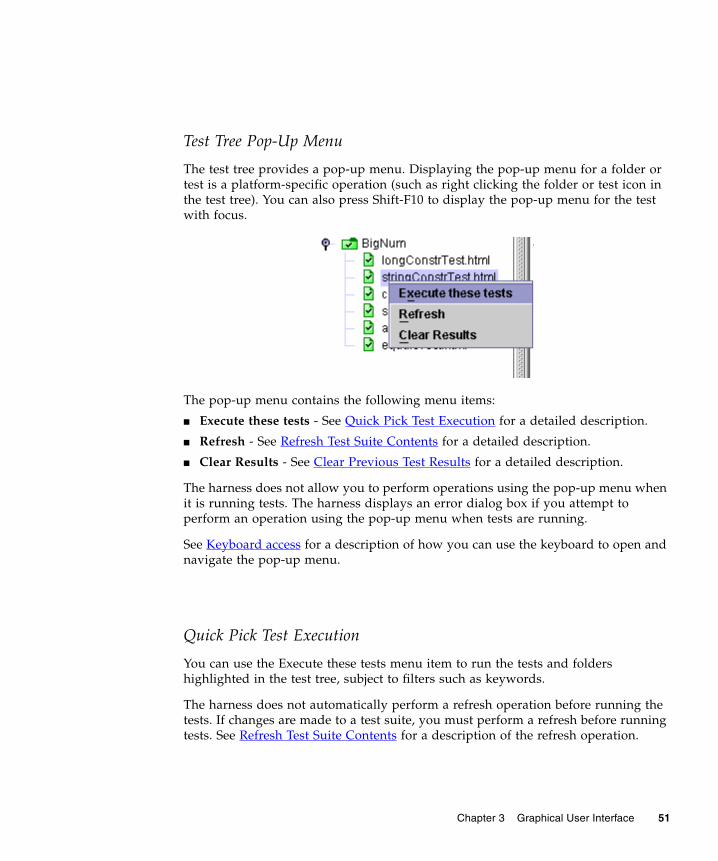
Test Tree Pop-Up Menu
The test tree provides a pop-up menu. Displaying the pop-up menu for a folder ortest is a platform-specific operation (such as right clicking the folder or test icon inthe test tree). You can also press Shift-F10 to display the pop-up menu for the testwith focus.
The pop-up menu contains the following menu items:
■ Execute these tests - See Quick Pick Test Execution for a detailed description.
■ Refresh - See Refresh Test Suite Contents for a detailed description.
■ Clear Results - See Clear Previous Test Results for a detailed description.
The harness does not allow you to perform operations using the pop-up menu whenit is running tests. The harness displays an error dialog box if you attempt toperform an operation using the pop-up menu when tests are running.
See Keyboard access for a description of how you can use the keyboard to open andnavigate the pop-up menu.
Quick Pick Test Execution
You can use the Execute these tests menu item to run the tests and foldershighlighted in the test tree, subject to filters such as keywords.
The harness does not automatically perform a refresh operation before running thetests. If changes are made to a test suite, you must perform a refresh before runningtests. See Refresh Test Suite Contents for a description of the refresh operation.
Chapter 3 Graphical User Interface 51
▼ Quick Pick Test Execution of Specific Folders or Tests1. Select one or more folders and tests in the test tree.
■ You must left click to select nodes. When more than one folder or test ishighlighted in the test tree, the Test Manager displays a list of the selected testsand folders in the information area.
■ Selecting a test executes only that test.
■ Selecting a folder executes all tests currently known to the Test Manager in andbelow that folder.
2. Right click in the test tree pane to open the pop-up menu.
Opening the pop-up menu is a platform-specific operation (such as right clicking inthe test tree pane). A modifier key or operation which doesn’t utilize the clicking atall may be necessary depending on your platform details.
3. Choose Execute these tests from the test tree pop-up menu.
■ If the Test Manager contains a completed configuration, the harness displays amessage to confirm the execute operation.
■ If the Test Manager does not contain a completed configuration, the harnessdisplays a message asking you to complete the configuration or cancel the testrun.
Note – The harness combines the current configuration and the nodes selected inthe test tree to determine which tests will be executed. In the Test ManagerPreferences, the option Execution from tree popup includes configuration Tests toRun how the harness uses the Tests to Run value in the configuration, as describedbelow:
Box is unchecked (default). The harness ignores the tests specified in the currentconfiguration’s Tests to Run question. It runs the tests selected in the test tree,subject to configuration Test Selection filters, such as keywords. This option iscompatible with the behavior of test harnesses older than version 4.2.1.
Box is checked. The harness compares the tests you selected in the test tree and thetests specified in the configuration’s Tests to Run question to find a set of commontests. The harness then applies the configuration’s Test Selection filters (such askeywords) to the common test set, producing the set of eligible tests.
4. Tests will be executed. The above test selection process and exclusions from thecriteria defined by the test suite or interview may eliminate all the eligible tests. Ifthis happens you will see a message, and the test run is aborted.
52 Graphical User Interface User’s Guide • November 2011
Refresh Test Suite Contents
When developing tests, changes in a test suite are not automatically detected by theharness. The first time tests are run, the harness uses the test finder to read testdescriptions. If the harness loads tests from an existing work directory, the testdescriptions contained in those results are used by default.
The refresh operation enables test developers to load changes they might have madein a test suite without restarting the harness or reloading the test suite.
The harness does not require a work directory to perform a refresh of the test suite.
If you are viewing the test panel after refreshing a test or folder, update the test treeby choosing a different test or folder icon and repeating your test tree choice.
▼ Refresh Tests and Folders1. Select one or more folders and tests in the test tree.
■ You must left click to select a node. When more than one folder or test ishighlighted in the test tree, the Test Manager displays a list of the selected testsand folders in the information area.
■ Selecting a test chooses only that test.
■ Selecting a folder chooses all tests currently known to the Test Manager in andbelow that folder.
2. Right click in the test tree to open the pop-up menu.
Opening the pop-up menu is a platform-specific operation (such as right clicking inthe test tree).
3. Choose Refresh from the pop-up menu.
4. For files, the harness checks the time stamp of the file containing the testdescription.
5. If the time stamp has changed, the harness compares the test descriptions.
6. If the properties of the test descriptions are different, the harness removes the testresult from the work directory and the Test Manager and loads a test containingthe new test description into the Test Manager and displays it in the Not Runstate.
7. For folders, the harness checks the time stamps of the files in a folder and scansfor new folders and tests. This operation may take place on any folder includingthe root folder.
8. If a time stamp has changed, the harness compares the test descriptions.
Chapter 3 Graphical User Interface 53
9. If the properties of the test descriptions are different, the harness removes the testresult from the work directory and the Test Manager and loads the test containingthe new test description into the Test Manager and displays it in the Not Runstate.
Clear Previous Test Results
You can use the Clear Results menu item to remove existing test results for anycombination of tests and folders.
To clear test results, you must have an open work directory.
▼ Clear a Test Result1. Select one or more tests in the test tree.
You must left click to select a node. When more than one test is highlighted in thetest tree, the Test Manager displays a list of the selected tests and folders in theinformation area.
2. Right click in the test tree to open the pop-up menu.
Opening the pop-up menu is a platform-specific operation (such as right clicking inthe test tree).
3. Choose Clear Results from the test tree pop-up menu.
The harness opens a confirmation dialog box that displays a list of the selected itemsand performs the following actions when the user clicks the Yes button:
■ Removes the .jtr file from the work directory for that test.
■ Refreshes the test description for that test.
■ Displays the test in the Not Run state.
▼ Clear Test Results in Folders1. Select one or more folders in the test tree.
You must left click to select a node. When more than one folder is highlighted in thetest tree, the Test Manager displays a list of the selected tests and folders in theinformation area.
2. Right click in the test tree pane to open the pop-up menu.
Opening the pop-up menu is a platform-specific operation (such as right clicking inthe test tree).
54 Graphical User Interface User’s Guide • November 2011
3. Choose Clear Results from the test tree pop-up menu.
The harness displays a confirmation dialog box that displays a list of selected itemsand performs the following actions when the user clicks the Yes button:
■ Removes all .jtr files from the work directory for all tests in and below thatfolder.
■ Deletes all other files in and below the folder in the work directory.
■ Deletes all other directories corresponding to the folders in and below the folderin the work directory.
■ Displays the folder and its tests as Not Run.
The harness does not display an error message if it is unable to delete a folder or filefrom the work directory.
View FiltersThe harness provides a special view filtering facility that enables you to filter thestatus (the colors and counters) of the folders and tests displayed in the TestManager. View filters function independently from the run filtering set in theconfiguration editor window.
See Editing a Configuration for detailed information about specifying the tests thatare run.
Note – You also use view filters when generating reports. See Creating Reports for adescription of using view filters when generating reports.
The harness provides four Test Manager view filters:
■ Last Test Run
■ Current Configuration
■ Current Template
■ All Tests (default)
■ Custom
An additional view filter, such as a Certification filter, can be added by the test suite.Refer to your test suite documentation for detailed descriptions of any additionalfilters displayed in the list of view filters.
Chapter 3 Graphical User Interface 55
To use a view filter, either choose View > Filters from the menu bar or choose a viewfilter from the tool bar. See Custom View Filter for a description of how to create acustom view filter.
If you checked the Save Desktop State on Exit option in the Preferences dialog box,the current view filter information is saved when you exit.
Current view filter information is not saved if you:
■ unchecked the Save Desktop State on Exit option in the Preferences dialog box
■ provided test suite or work directory information on the command line whenstarting the harness
■ used the -newDesktop on the command line when starting the harness
See Shutdown Options.
Last Test Run View Filter
When you select the Last Test Run view filter, the Test Manager displays the currenttotals in the Summary pane and status icons in the test tree for all folders and testsincluded in the last test run (even if you have exited the harness since the last testrun) or the states from the test run in progress if the harness is running tests. Theinformation displayed in the Test Manager is associated with the work directory.
The following examples provide descriptions of the use of the Last Test Run viewfilter:
■ Example 1 - A test run had failed tests and you want to rerun only the failedtests. See Specifying Prior Status for a detailed description of setting the priorstatus value. The Test Tree and the Summary pane continue to show all tests inthe last test run regardless of their status.
When you repeat the test run, the Test Manager clears the previous test results andonly displays current status icons in the test tree and totals in the Summary pane forthe tests and folders in the current test run.
■ Example 2 - A test run had failed tests and you want to use an Exclude List in thenext run that excludes the failed tests from the test run. See Using Exclude Listsfor a detailed description of specifying an exclude list. The Test Tree and theSummary pane do not change when the exclude list is added to the configuration.
When you repeat the test run, the Test Manager clears the previous test results andonly displays current status icons in the test tree and totals in the Summary pane forthe tests and folders in the current test run.
56 Graphical User Interface User’s Guide • November 2011
Current Configuration View Filter
When you select the Current Configuration view filter, the Test Manager onlydisplays the status of the folders and tests currently selected by the currentconfiguration.
To select the Current Configuration view filter, choose View > Filter > CurrentConfiguration from the menu bar or choose the Current Configuration view filterfrom the tool bar.
The following examples provide descriptions of the use of the Current Configurationview filter:
■ Example 1 - You only want to run and view the results for tests in the api folder.See Specifying Tests to Run for detailed description of specifying the tests that arerun.
Either choose View > Filter > Current Configuration from the menu bar or choosethe Current Configuration view filter from the tool bar.
The Test Manager displays gray folder and test icons for all folders and testsexcept those under api. The Test Manager changes the Summary totals to indicatethat these tests are filtered out.
The current result icons are only displayed in the test tree for those folder and testicons under api and the Summary pane is updated to display their totals. When yourun the tests, the test tree and folder view only display the results for those foldersand tests under api.
■ Example 2 - You only want to run and view results for failed tests. See SpecifyingPrior Status for a detailed description of setting the prior status value.
Either choose View > Filters > Current Configuration from the menu bar or choosethe Current Configuration view filter from the tool bar.
Immediately the Test Manager displays gray folder and test icons for allfolders and tests except those with Failed test results. The Test Manager updates theSummary totals to indicate that these tests are filtered out and changes the Passed,Error, and Not Run totals to indicate 0.
The Test Manager displays those folders and tests in the test tree with Failed test
results as red folder and test icons. The Test Manager updates the Summaryinformation to indicate the number of tests that have Failed test results.
When you repeat the test run, as failed tests pass, the Test Manager updates their
icons from red folder and test icons to gray folder and test icons (they nolonger match the configuration criteria of the view filter). The Test Manager updatesthe totals in the Summary pane to match the results displayed in the test tree.
Chapter 3 Graphical User Interface 57

Current Template View Filter
When you select the Current Template view filter, the Test Manager only displaysthe status of the folders and tests selected by the template on which the currentconfiguration is based.
Select the Current Template view filter by either choosing View > Filter > CurrentTemplate from the menu bar or choosing the Current Template view filter from thetool bar.
All Tests View Filter
When you select the All Tests view filter, the Test Manager immediately displayscurrent totals in the Summary pane and status icons in the test tree for all foldersand tests, regardless of the values set in the configuration. This is an unfiltered viewof the complete work directory contents.
The harness only overwrites the previous results for tests when they are rerun. TheAll Tests filter displays the last run status for all tests in the work directory,including the tests that were excluded from the current test run.
If you are using the All Tests view filter and begin a test run, the harness displays anadvisory dialog box. Using the All Test view filter will display the results of all testsin a test suite regardless of whether or not they are included in the test run.
You can choose to disable the dialog box by setting preferences, by choosing adifferent view filter, or by using the check box in the dialog to stop the dialog frombeing displayed in the future.
The following examples provide descriptions of the use of the All Tests view filter.
■ Example 1 - A test run had failed tests and you want to rerun only the failed tests.See Specifying Prior Status for a detailed description of setting the prior statusvalue. The Test Tree and the Summary pane do not change.
When you use the All Tests view filter, the Test Manager displays all totals in theSummary pane and status icons in the test tree regardless of the values set in thecurrent configuration.
■ Example 2 - A test run had failed tests and you want to use an Exclude List in thenext run that excludes the failed tests from the test run. See Using Exclude Listsfor a detailed description of specifying an exclude list. The Test Tree and theSummary pane do not change.
58 Graphical User Interface User’s Guide • November 2011

When you repeat the test run, the Test Manager displays current status icons in thetest tree and totals in the Summary pane for every test in the work directory,including results for any tests excluded from the current test run.
Custom View Filter
If you want to monitor a specific set of test results in the Test Manager, you cancreate a custom view filter.
The custom view filter is unique to the test suite. When the harness opens the testsuite in the Test Manager, it restores the custom filter, including any name that youassign it.
You can also use the custom filter to generate reports. See Creating Reports for adescription of using the Custom filter when generating reports.
▼ Creating a Custom View Filter1. Choose View > Filter > Configure Filters from the menu bar to open the Filter
Editor. You can also choose Custom and then Edit Filter in the tool bar.
Chapter 3 Graphical User Interface 59

2. Choose Custom in the Available Filters panel. You can provide a name for thefilter in the Custom Label field. The name is applied to the filter and restored eachtime the test suite is opened.
3. Use the tabbed panes to set the following view filter properties:
■ Specify Tests to View
■ Use the Exclude List as a View Filter
■ Use Keywords as a View Filter
■ Use Prior Status as a View Filter
■ Use Special Settings as a View Filter
4. Click one of the following buttons:
■ Apply - Saves but does not dismiss the dialog box. Updates the GUI if the filteris selected.
■ Reset - Discards all changes and restores the last saved Custom filter.
■ Cancel - Closes the dialog box without saving any changes.
■ OK - Saves the current changes, updates the Custom filter, and closes thedialog box.
■ Help - Displays online help for the Filter Editor.
Using Test Suite Areas, Keywords, Prior Status, Exclude Lists, and Special settings inthe view filter does not stop the harness from running these tests. To filter the teststhat are run, you must change the values in the configuration. See Editing aConfiguration for a detailed description.
Specify Tests to View
Click the Test Suite Areas tab and use the tree to choose the results of test folders orindividual tests that you want displayed in the Test Tree. The harness walks the testtree starting with the sub-branches and tests you specify and displays the results ofall tests that it finds.
Use Keywords as a View Filter
If your test suite provides keywords, you can use the Keywords pane to restrict theset of test results displayed in the test tree and in the Summary pane.
To specify the keywords:
60 Graphical User Interface User’s Guide • November 2011

1. Click Match.
The harness enables the Expression button.
2. Click Expression to display a list of expressions that can be constructed.
3. From the list, choose the type of expression that you are building.
4. In the text field, enter the keywords and operators used in the expression.
The following table provides descriptions and examples of keyword expressions thatcan be constructed.
TABLE 21 Keyword Expressions
Expression Description
Any Of Displays all tests in the test suite having any of the keywords enteredin the text field.Example:A test suite uses the keyword interactive to identify tests thatrequire human interaction, and color to identify tests that require acolor display.To display only the results for tests containing the interactivekeyword, choose Any Of and then use the interactive keyword.
All Of Displays results for all tests in the test suite having all of thekeywords entered in the text field.Example:To display results for only the tests containing both theinteractive and color keywords, choose All Of and then usethe interactive and color keywords.
Expression Displays results for all tests in the test suite having the expressionentered in the text field.Construct a Boolean expression in the text field. Keywords stand asBoolean predicates that are true if, and only if, the keyword is presentin the test being considered. A test is accepted if the overall value ofthe expression is true. All other tests are rejected by the restriction.Example:A test suite uses the keyword interactive to identify tests thatrequire human interaction, and color to identify tests that require acolor display.To display results for only the tests with the color keyword that donot also contain the interactive keyword, choose Expressionand then use the color keyword, the ! operator, and theinteractive keyword.
Chapter 3 Graphical User Interface 61
Use Prior Status as a View Filter
Click the Prior Status tab and choose the test results from the previous test run thatyou want displayed in the Test Tree.
Prior status is evaluated on a test-by-test basis using information stored in the resultfiles (.jtr) that are written in the work directory. Unless overridden by a test suite,a result file is written in the work directory for every test that is executed. When youchange work directories between test runs, the result files in the previous workdirectory are no longer used and, if the new work directory is empty, the harnessbehaves as though the test suite was not run.
Use the Exclude List as a View Filter
To use the exclude list specified in the configuration interview as a filter, click theExclude Lists tab and the Use settings in interview check box. The Exclude Listspane displays the name of the exclude list file used by the current configuration.
Any test in the exclude list is filtered out and displayed as a icon in the test tree.
Use Special Settings as a Filter
If the test suite architect provides a default filter for the test suite, click the Specialtab and the Enable test suite filter check box to select this filter.
You must select this setting to correctly simulate the Current Configuration settings.
TABLE 22 Using Prior Status as a Filter
Prior Status Filter Action
Passed Displays tests with passed results the last time the test was executed.
Failed Displays tests with failed results the last time the test was executed.
Error Displays tests that the harness could not execute the last time it wasincluded in a test run.
Not Run Displays tests without results in the current work directory.
62 Graphical User Interface User’s Guide • November 2011
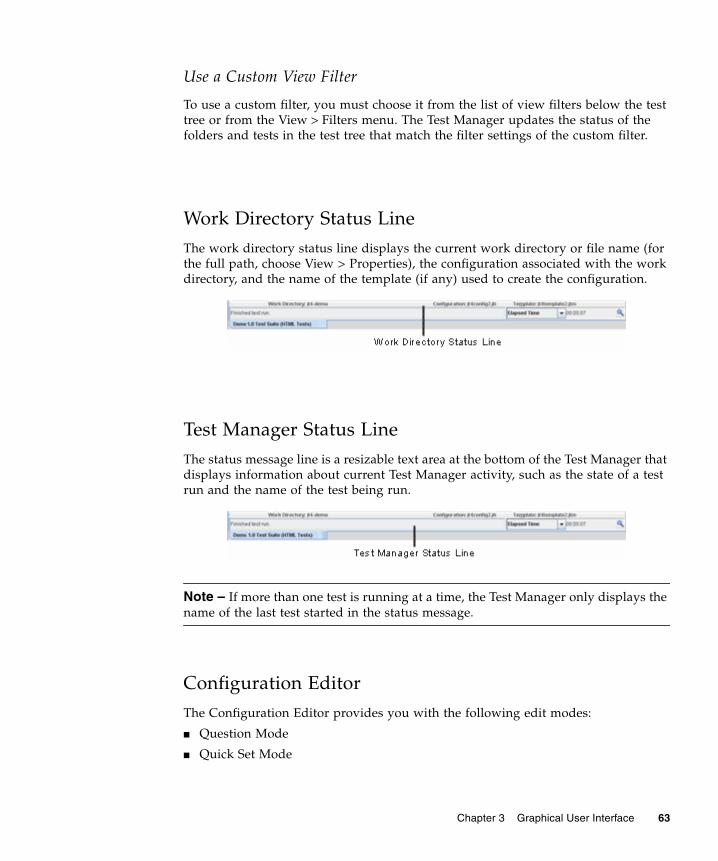
Use a Custom View Filter
To use a custom filter, you must choose it from the list of view filters below the testtree or from the View > Filters menu. The Test Manager updates the status of thefolders and tests in the test tree that match the filter settings of the custom filter.
Work Directory Status LineThe work directory status line displays the current work directory or file name (forthe full path, choose View > Properties), the configuration associated with the workdirectory, and the name of the template (if any) used to create the configuration.
Test Manager Status LineThe status message line is a resizable text area at the bottom of the Test Manager thatdisplays information about current Test Manager activity, such as the state of a testrun and the name of the test being run.
Note – If more than one test is running at a time, the Test Manager only displays thename of the last test started in the status message.
Configuration EditorThe Configuration Editor provides you with the following edit modes:
■ Question Mode
■ Quick Set Mode
Chapter 3 Graphical User Interface 63
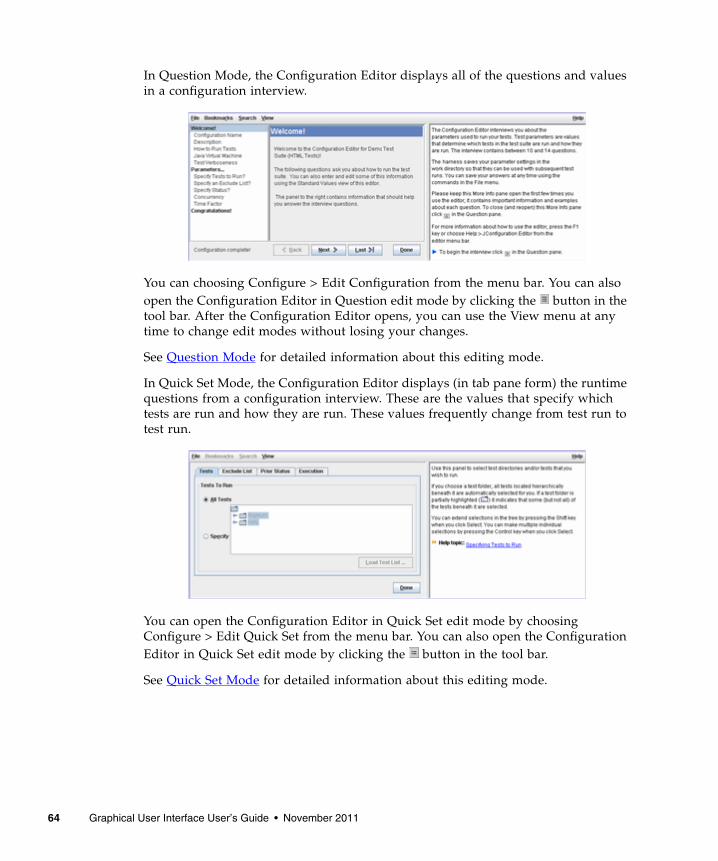
In Question Mode, the Configuration Editor displays all of the questions and valuesin a configuration interview.
You can choosing Configure > Edit Configuration from the menu bar. You can alsoopen the Configuration Editor in Question edit mode by clicking the button in thetool bar. After the Configuration Editor opens, you can use the View menu at anytime to change edit modes without losing your changes.
See Question Mode for detailed information about this editing mode.
In Quick Set Mode, the Configuration Editor displays (in tab pane form) the runtimequestions from a configuration interview. These are the values that specify whichtests are run and how they are run. These values frequently change from test run totest run.
You can open the Configuration Editor in Quick Set edit mode by choosingConfigure > Edit Quick Set from the menu bar. You can also open the ConfigurationEditor in Quick Set edit mode by clicking the button in the tool bar.
See Quick Set Mode for detailed information about this editing mode.
64 Graphical User Interface User’s Guide • November 2011
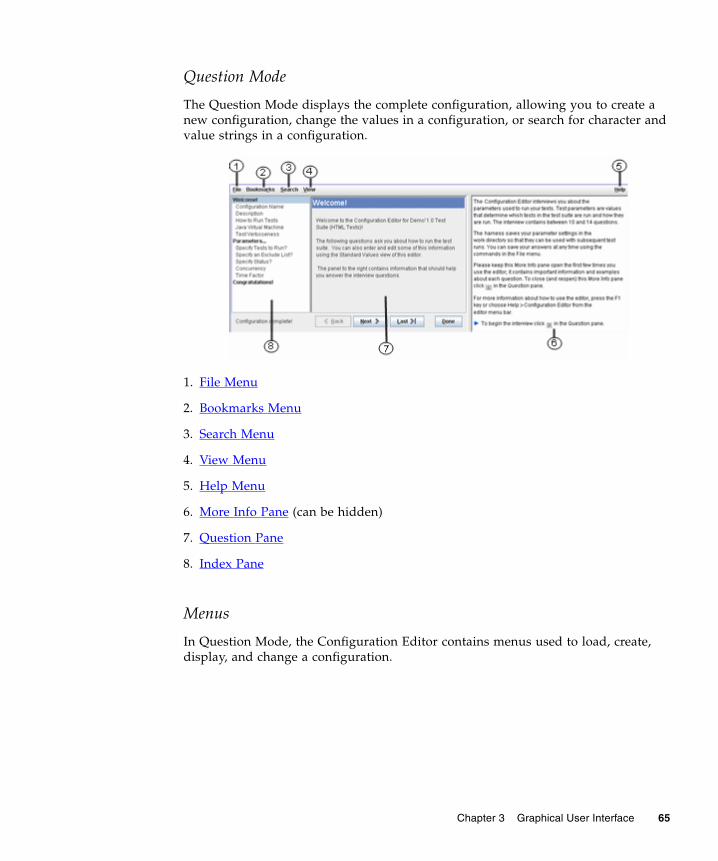
Question Mode
The Question Mode displays the complete configuration, allowing you to create anew configuration, change the values in a configuration, or search for character andvalue strings in a configuration.
1. File Menu
2. Bookmarks Menu
3. Search Menu
4. View Menu
5. Help Menu
6. More Info Pane (can be hidden)
7. Question Pane
8. Index Pane
Menus
In Question Mode, the Configuration Editor contains menus used to load, create,display, and change a configuration.
Chapter 3 Graphical User Interface 65
File Menu
The File menu contains items to open, save, and restore configuration files. Thefollowing table describes the items in the Configuration Editor File menu.
TABLE 23 Configuration Editor File Menu
Menu Item Description
Save Saves the current configuration.Choose File > Save at any time to save your answers and position in the configuration file. Ifthe configuration is new, the editor opens the file chooser for you to use in naming and savingthe current configuration. If you do not provide the .jti extension when you name the file,the editor adds the extension when it saves the file.
Save As Opens a dialog box that you can use to save a configuration with a new name. TheConfiguration Editor makes the saved configuration the current configuration. If you do notprovide the .jti extension when you name the configuration file, the editor adds theextension when it saves the file.
Revert Discards any changes to the current configuration and restores the last saved version ofconfiguration file.
NewConfiguration
Clears the current configuration and starts a new configuration. See Creating aConfiguration> for a detailed description.
LoadConfiguration
Opens an existing configuration file and makes it the current configuration. See Loading aConfiguration for a detailed description.
Load RecentConfiguration
Displays a list of configuration files that have been opened in the Configuration Editorwindow. Choose a configuration file from the list to open it in the Configuration Editorwindow.
New Template Provides the option to save or clear the current template before starting a new template. SeeCreating a Template for a detailed description.
Load Template Opens an existing template. See Loading a Template for a detailed description.
Load RecentTemplate
Displays a list of templates that have been opened in the Template Editor. Choose a templatefrom the list to open it in the Template Editor.
Close Closes the Configuration Editor window.
66 Graphical User Interface User’s Guide • November 2011

Bookmarks Menu
The Bookmarks menu contains items to use bookmarks in the configuration. Thefollowing table describes the items in the Bookmarks menu.
Using bookmarked questions enables the user to display only those configurationquestions that must be answered. See Using Bookmarks in Configurations for adescription of how the Bookmarks menu can be used to specify the questions thatthe Configuration Editor window displays.
TABLE 24 Configuration Editor Bookmarks Menu
Menu Item Description
Enable Bookmarks Enables and disables bookmarking in the configuration.
Show Only BookmarkedQuestions
Display only the marked questions or all questions.
Mark Current Question Clears the bookmark from a selected question in theConfiguration Editor window.
Unmark Current Question Bookmarks the selected question in the Configuration Editorwindow. Enabled only if the selected question is notbookmarked.
Clear Answer For CurrentQuestion
Clears the answer for a selected question in the ConfigurationEditor window. Enabled only if the selected question isbookmarked.
Open Group Expands a selected set of questions in the Configuration Editorwindow.
Clear Answers toBookmarked Questions
Clear the values in all marked questions.
Remove Bookmarks Remove all bookmarks from the configuration.
Chapter 3 Graphical User Interface 67
Search Menu
Use the Search menu items to find the occurrence in a configuration of a specificcharacter or value string. When troubleshooting a test run, you can use the Searchmenu to quickly locate an answer that needs to be changed. The following tabledescribes the items in the Search menu.
See Searching a Configuration for a detailed description of how to search forcharacter and value strings in a configuration.
View Menu
Use the View menu to display the Configuration Editor window in Question Modeor in Quick Set Mode, to hide or display the More Info pane, and to display questiontag field at the bottom of each question panel. The following table describes theitems in the View menu.
TABLE 25 Configuration Editor Search Menu
Menu Item Description
Find Opens a dialog box used to search the configuration for a specificcharacter or value string.
Find Next Searches the configuration for the next occurrence of a specific characteror value string.
TABLE 26 Contents of the View Menu
Menu Item Description
Question Mode Displays the Configuration Editor window in Question Mode.
Quick Set Mode Displays the Configuration Editor window in Quick Set Mode.
More Info Displays and hides the More Info pane in the Configuration Editorwindow.
Question Tag Displays and hides the Question Tag field in the Configuration EditorQuestion Pane.
Refresh Updates the values and questions displayed in the Configuration Editorwindow.
68 Graphical User Interface User’s Guide • November 2011
Help Menu
Use the Help menu to display the online help for the Configuration Editor windowand both editor modes. The following table describes the items in the Help menu.
Index Pane
When completing a configuration, the index pane lists the titles of the questions youhave answered, are currently answering, or that the editor determines might need tobe answered. The current question is highlighted.
In completed configurations, the questions that are displayed in the index can becontrolled by setting bookmarks in the configuration. See Bookmarks Menu.
Note – The title is also displayed at the top of the question pane when you areanswering a question.
Click on any question in the index list to make it the current question. Clicking on aquestion does not cause the list to change. If you change an answer that alters theconfiguration options, the Configuration Editor window updates the questions inthe list to reflect the change in options. If a previously answered question is nolonger displayed in the index list, the Configuration Editor saves its answer untilyou either save the configuration or change its value.
You can also use the buttons at the bottom of the Question pane to navigate throughthe configuration file. See Question Pane for a description of the navigation buttons.
TABLE 27 Configuration Editor Help Menu
Menu Item Description
ConfigurationEditor
Displays online help for the Configuration Editor window.
Template Editor Displays online help for the Template Editor window.
Question Mode Displays online help for the Question Mode.
Quick Set Mode Displays online help for the Quick Set Mode.
Chapter 3 Graphical User Interface 69
Question Pane
The Configuration Editor window displays configuration questions in the main textarea of the editor. You answer the questions using controls such as text boxes, radiobuttons, or combo boxes located beneath the question. After you answer each
question, click at the bottom of the panel to proceed to the next question.
The buttons at the bottom of the Question pane control the following functions:
■ Back - Returns to the previous question.
■ Last - Advances as far as possible through the configuration.
■ Next - Proceeds to the next question.
■ Done - Saves your answers as a configuration and closes the Configuration Editorwindow.
See Creating a Configuration for information about using the Question pane tocreate a configuration.
See Editing a Configuration for information about using the Question pane to editthe current configuration.
More Info Pane
To open and close the More Info pane, choose View > More Info from the menu bar.
The More Info pane provides additional information about each question, includingthe following:
■ Background information about the question
■ Information about choosing an answer
■ Examples of answers
See Keyboard access for a description of how the keyboard can be used to navigatethe More Info pane.
Quick Set Mode
Quick Set Mode uses tabbed panes to display the values of a configuration that theharness uses to determine which tests are run and how they are run. Because theymight change from test run to test run, the Quick Set Mode enables the user toquickly locate and edit these values.
70 Graphical User Interface User’s Guide • November 2011
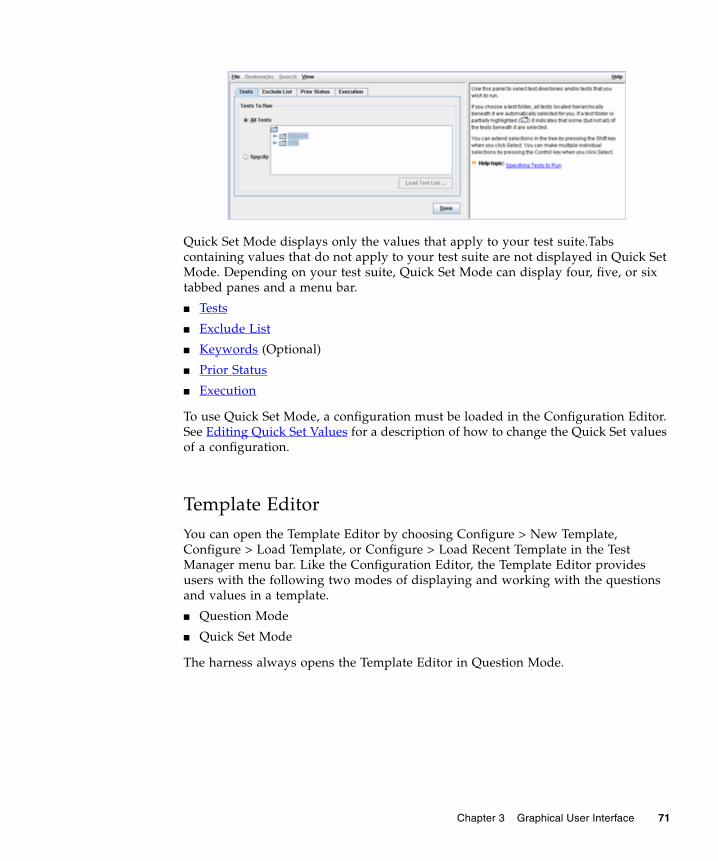
Quick Set Mode displays only the values that apply to your test suite.Tabscontaining values that do not apply to your test suite are not displayed in Quick SetMode. Depending on your test suite, Quick Set Mode can display four, five, or sixtabbed panes and a menu bar.
■ Tests
■ Exclude List
■ Keywords (Optional)
■ Prior Status
■ Execution
To use Quick Set Mode, a configuration must be loaded in the Configuration Editor.See Editing Quick Set Values for a description of how to change the Quick Set valuesof a configuration.
Template EditorYou can open the Template Editor by choosing Configure > New Template,Configure > Load Template, or Configure > Load Recent Template in the TestManager menu bar. Like the Configuration Editor, the Template Editor providesusers with the following two modes of displaying and working with the questionsand values in a template.
■ Question Mode
■ Quick Set Mode
The harness always opens the Template Editor in Question Mode.
Chapter 3 Graphical User Interface 71
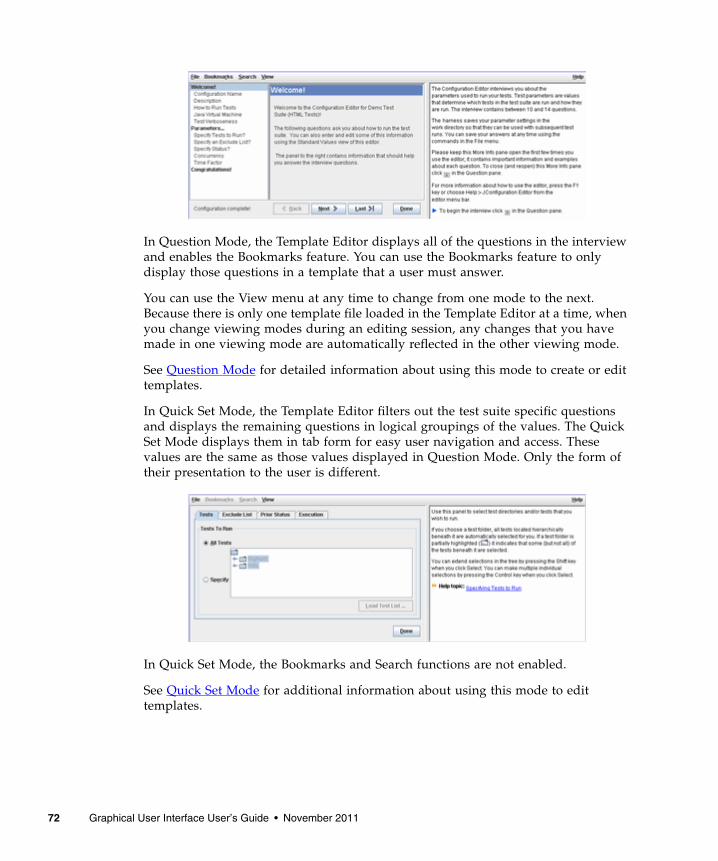
In Question Mode, the Template Editor displays all of the questions in the interviewand enables the Bookmarks feature. You can use the Bookmarks feature to onlydisplay those questions in a template that a user must answer.
You can use the View menu at any time to change from one mode to the next.Because there is only one template file loaded in the Template Editor at a time, whenyou change viewing modes during an editing session, any changes that you havemade in one viewing mode are automatically reflected in the other viewing mode.
See Question Mode for detailed information about using this mode to create or edittemplates.
In Quick Set Mode, the Template Editor filters out the test suite specific questionsand displays the remaining questions in logical groupings of the values. The QuickSet Mode displays them in tab form for easy user navigation and access. Thesevalues are the same as those values displayed in Question Mode. Only the form oftheir presentation to the user is different.
In Quick Set Mode, the Bookmarks and Search functions are not enabled.
See Quick Set Mode for additional information about using this mode to edittemplates.
72 Graphical User Interface User’s Guide • November 2011
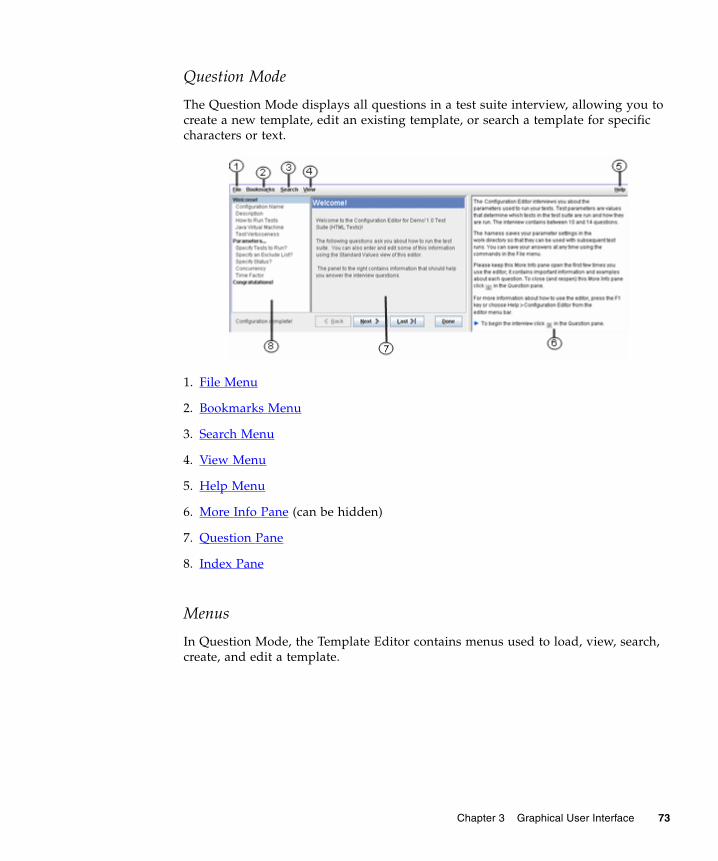
Question Mode
The Question Mode displays all questions in a test suite interview, allowing you tocreate a new template, edit an existing template, or search a template for specificcharacters or text.
1. File Menu
2. Bookmarks Menu
3. Search Menu
4. View Menu
5. Help Menu
6. More Info Pane (can be hidden)
7. Question Pane
8. Index Pane
Menus
In Question Mode, the Template Editor contains menus used to load, view, search,create, and edit a template.
Chapter 3 Graphical User Interface 73
File Menu
The File menu contains items to open, save, and restore template files. The followingtable describes the items in the File menu.
Bookmarks Menu
The Bookmarks menu contains items used to manage bookmarks in the template.Using bookmarked questions enables the user to display only those templatequestions that must be answered. See Setting Markers for a description of how theBookmarks menu can be used to specify the questions that the Template Editordisplays.
TABLE 28 Template Editor File Menu
Menu Item Description
Save Saves the current template.Choose File > Save at any time to save your answers and position in the template. If thetemplate is new, the editor opens the file chooser for you to name and save the currentvalues. If you do not provide the .jtm extension when you name the file, the editor addsthe extension when it saves the template.
Save As Opens a dialog box that you can use to save a template with a new name or change thelocation of the template. If you do not provide the .jtm extension when you name thetemplate, the editor adds the extension when it saves the file.
Revert Discards any changes to the current template and restores the last saved version of thetemplate.
New Configuration Clears the current configuration and starts a new configuration. See Creating aConfiguration for a detailed description.
Load Configuration Opens an existing configuration file and makes it the current configuration. See Loadinga Configuration for a detailed description.
Load RecentConfiguration
Displays a list of configuration files that have been opened in the Configuration Editorwindow. Choose a configuration file from the list to open it in the Configuration Editorwindow.
New Template Provides the option to save or clear the current template before starting a new template.See Creating a Template for a detailed description.
Load Template Opens an existing template. See Loading a Template for a detailed description.
Load RecentTemplate
Displays a list of templates that have been opened in the Template Editor. Choose atemplate from the list to open it in the Template Editor.
Close Closes the Template Editor.
74 Graphical User Interface User’s Guide • November 2011
The following table describes the items in the Bookmarks menu.
Search Menu
Use the Search menu items to find the occurrence in a Template of a specificcharacter or value string. When troubleshooting a test run, you can use the Searchmenu to quickly locate an answer that needs to be changed. See Searching theTemplate for a detailed description of how to search for character and value stringsin a Template.
The following table describes the items in the Search menu.
TABLE 29 Template Editor Bookmarks Menu
Menu Item Description
Enable Bookmarks Enables or disables bookmarking in the template. Whenbookmarking is disabled, the remaining bookmark menuitems are grayed out.
Show Only BookmarkedQuestions
Displays only the bookmarked questions.
Mark Current Question Sets the bookmark for a question selected in the index pane.
Unmark Current Question Clears the bookmark from a question selected in the indexpane. Enabled only if the selected question is bookmarked.
Clear Answer For CurrentQuestion
Clears the answer for a selected question in the indexpane.Enabled only if the selected question is bookmarked.
Open Group Expands a selected set of questions in the index pane.
Clear Answers to BookmarkedQuestions
Clears the values in all bookmarked questions.
Remove Bookmarks Removes all bookmarks from the Template.
TABLE 30 Template Editor Search Menu
Menu Item Description
Find Opens a dialog box used to search the template for a specific character or valuestring.
Find Next Searches the template for the next occurrence of a specific character or valuestring.
Chapter 3 Graphical User Interface 75
View Menu
Use the View menu to display the Template Editor in Question Mode or in Quick SetMode, to hide or display the More Info pane, and to display question tag field at thebottom of each question panel. The following table describes the items in the Viewmenu.
Help Menu
Use the Help menu to display the online help for the Template Editor and botheditor modes. The following table describes the items in the Help menu.
TABLE 31 Contents of the Search Menu
Menu Item Description
QuestionMode
Displays the Template Editor in Question Mode.
Quick SetMode
Displays the Template Editor in Quick Set Mode.
More Info Displays and hides the More Info pane in the Template Editor.
QuestionTag
Displays and hides the Question Tag field in the Template Editor Questionpane.
Refresh Updates the values and questions displayed in the Template Editor.
TABLE 32 Template Editor Help Menu
Menu Item Description
Configuration Editor
Displays online help for the Configuration Editor.
TemplateEditor
Displays online help for the Template Editor.
QuestionMode
Displays online documentation for the Question Mode.
Quick SetMode
Displays online documentation for the Quick Set Mode.
76 Graphical User Interface User’s Guide • November 2011

Index Pane
When completing a template, the index pane lists the titles of the questions you haveanswered, are currently answering, and any questions that the editor can determinemight need to be answered. The current question is highlighted and its title isdisplayed at the top of the question pane.
The number of questions displayed in the configuration interview is controlled bysetting bookmarks in the template. See Bookmarks Menu for procedures used toreduce the number of questions displayed in the configuration interview.
Click on any question in the index list to make it the current question. Clicking on aquestion does not cause the list to change. If you change an answer that alters theTemplate options, the Template Editor updates the questions in the list to reflect thechange in options. If a previously answered question is no longer displayed in theindex list, the Template Editor saves its answer until you either save the Template orchange its value.
You can also use the buttons at the bottom of the Question pane to navigate throughthe Template file. See Question Pane for a description of the navigation buttons.
Question Pane
The Template Editor displays template questions in the main text area of the editor.You answer the questions using controls such as text boxes, radio buttons, or combo
boxes located beneath the question. After you answer each question, click atthe bottom of the panel to proceed to the next question.
The buttons at the bottom of the Question pane control the following functions:
■ Back - Returns to the previous question.
■ Last - Advances as far as possible through the template.
■ Next - Proceeds to the next question.
■ Done - Saves your answers as a template and closes the Template Editor.
See Creating a Template for information about using the Question pane to create atemplate.
See Editing a Template for information about using the Question pane to edit thecurrent template.
Chapter 3 Graphical User Interface 77
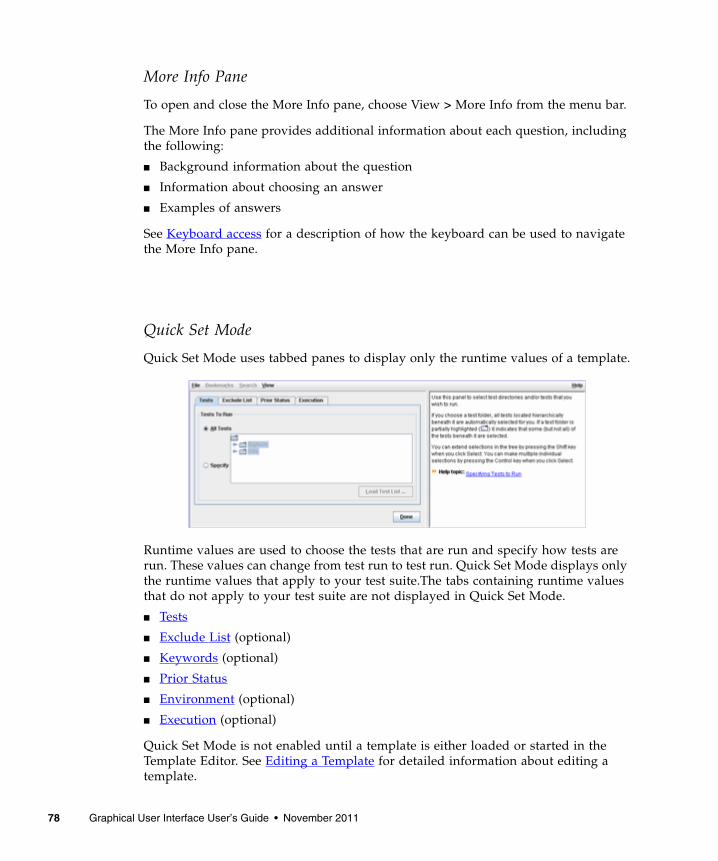
More Info Pane
To open and close the More Info pane, choose View > More Info from the menu bar.
The More Info pane provides additional information about each question, includingthe following:
■ Background information about the question
■ Information about choosing an answer
■ Examples of answers
See Keyboard access for a description of how the keyboard can be used to navigatethe More Info pane.
Quick Set Mode
Quick Set Mode uses tabbed panes to display only the runtime values of a template.
Runtime values are used to choose the tests that are run and specify how tests arerun. These values can change from test run to test run. Quick Set Mode displays onlythe runtime values that apply to your test suite.The tabs containing runtime valuesthat do not apply to your test suite are not displayed in Quick Set Mode.
■ Tests
■ Exclude List (optional)
■ Keywords (optional)
■ Prior Status
■ Environment (optional)
■ Execution (optional)
Quick Set Mode is not enabled until a template is either loaded or started in theTemplate Editor. See Editing a Template for detailed information about editing atemplate.
78 Graphical User Interface User’s Guide • November 2011

Log ViewerUse the Log Viewer to view the log contents during or after a test run. The test suitegenerates the logs that are displayed in the viewer. The following illustration is anexample of the content that a test suite might generate. See your test suitedocumentation for detailed information about the log files that it generates.
1. Selection Action list
2. Logs and levels pane
3. Log Message pane
4. Close button
5. Open New Log Viewer button
6. Save button
7. Clear Log button
8. Find text field.
9. Live Scrolling check box
Chapter 3 Graphical User Interface 79
10. Word Wrap check box
Selection Action List
The Selection Action list consists of three sections of message selection actions (loglevels) that a user might choose for displaying the message of a log. A log is a seriesof notifications concerning a component of the system. Log levels are descriptivecriteria applied to each message within a log.
The first section of the list enables the user to either Select All log levels for displayin the log viewer or to Unselect All. The second section of the list enables the user toselect one or more general message log levels for display. In the example illustration,these messages are represented by the General Logger messages. The third section ofthe list enables the user to select one or more test suite log levels for display. In theexample illustration, these message types are represented by the TSM Loggermessage types.
The choices in this list only change the current state of selections. These selectionswould not apply to the new log which is displayed after the user chooses Select All.
Logs and Levels Pane
The log viewer displays a list of log levels available from the test suite that has beenselected for display. You can select one or more of the log levels in any combination.These log levels are also listed in the Selection Action list. As in the Selection Actionlist, the log levels are grouped into general types. See Selection Action List for adescription of logs and log levels. See your test suite documentation for detailedinformation about the log messages that it generates.
Log Message Pane
The contents of the output log specified by the selections in the logs and levels paneare displayed as text. The test suite specifies the output log contents displayed in theviewer. See your test suite documentation for detailed information about the log filecontents that it generates.
Close Button
The Close button closes the log viewer. If multiple log viewers are open during a testrun to monitor specific sets of log messages, the Close button only closes the logviewer to which it is bound.
80 Graphical User Interface User’s Guide • November 2011
Open New Log Viewer Button
Use the Open New Log Viewer button to open an empty log viewer. During a testrun, multiple log viewers can be opened and used to monitor specific sets of logmessages.
Save Button
Click the Save button to save the contents of the Log Viewer as an XML file.
Clear Log Button
Click the Clear Log button to erase the contents displayed in the log viewer andusually stored on a disk. These contents are automatically loaded the next time thatthe work directory is opened.
Find Text Field
Use the Find Text field to search the contents of the log message pane for specifictext strings.
Live Scrolling Check Box
Check to monitor for log output while the harness runs. Log entries can begenerated at any time, not just while tests are running.
Word Wrap Check Box
Check the Work Wrap check box to cause the log viewer to wrap long line of contentin the log message pane.
Test Results Auditor ToolUse the Test Results Auditor tool (Audit tool) to generate and view an audit reportof the test results in a work directory. The Audit tool verifies that all tests in a testsuite ran correctly and identifies any audit categories in a test run with errors. To
Chapter 3 Graphical User Interface 81
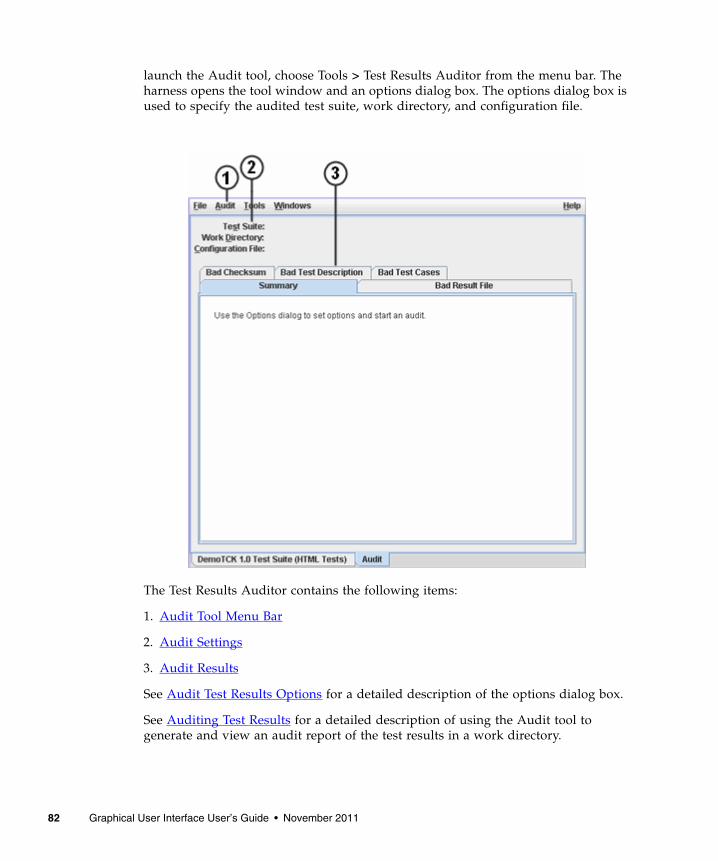
launch the Audit tool, choose Tools > Test Results Auditor from the menu bar. Theharness opens the tool window and an options dialog box. The options dialog box isused to specify the audited test suite, work directory, and configuration file.
The Test Results Auditor contains the following items:
1. Audit Tool Menu Bar
2. Audit Settings
3. Audit Results
See Audit Test Results Options for a detailed description of the options dialog box.
See Auditing Test Results for a detailed description of using the Audit tool togenerate and view an audit report of the test results in a work directory.
82 Graphical User Interface User’s Guide • November 2011

Audit Tool Menu BarThe Audit tool menu bar contains an Audit and a Help menu.
Use the Audit menu to set options used to generate an audit report. See Audit TestResults Options for a description of the Options dialog box.
Use the Help menu to display online help for the Test Results Auditor window.
See Menus for a description of the harness standard menus that are displayed on themenu bar.
Audit SettingsThe following audit settings are displayed at the top of the window:
■ Test Suite - Displays the name and location of the reference test suite.
■ Work Directory - Displays the name and location of the audited work directory.
■ Configuration File - Displays the name and location of the referenceconfiguration interview.
Use the options dialog box to specify the values in these fields. See Audit TestResults Options for a detailed description of the options dialog box.
Audit ResultsThe harness displays the audit report in the following five tabbed panels:
■ Summary
■ Bad Result File
■ Bad Checksum
■ Bad Test Description
■ Bad Test Cases
Chapter 3 Graphical User Interface 83
Summary
The following table describes the audit category state and details displayed in theSummary panel.
Bad Result File
The Bad Result File panel lists any corrupted or missing test result files.
A corrupted or missing test result file is an indication that the result file was edited.
Bad Checksum
The Bad Checksum panel lists all test result files with invalid checksums.
The result file checksums must match the reference checksums in the reference testsuite. An invalid checksum is an indication that a result file was edited.
TABLE 33 Summary Panel Contents
Category Description
Result Files Displays a summary of the audit forcorrupted and missing test result files. SeeBad Result File for a description of thedetailed tab.
Checksums Displays a summary of the audit of the testresult files checksums. See Bad Checksumfor a description of the detailed tab.
Test Descriptions Displays a summary of the audit of the testdescriptions. See Bad Test Description for adescription of the detailed tab.
Test Cases Displays a summary of the audit of theexclude list. See Bad Test Cases for adescription of the detailed tab.
Test Results Displays a summary of the test results audit.To pass the audit, all tests must have passingresults.
Time Stamps Displays the date and time when the first andthe last tests were run.
84 Graphical User Interface User’s Guide • November 2011
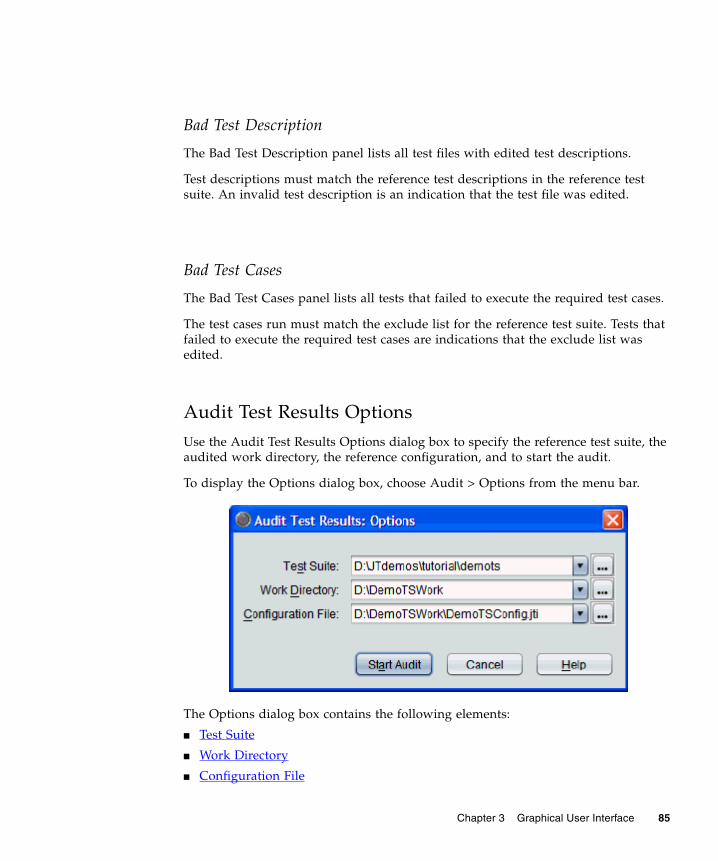
Bad Test Description
The Bad Test Description panel lists all test files with edited test descriptions.
Test descriptions must match the reference test descriptions in the reference testsuite. An invalid test description is an indication that the test file was edited.
Bad Test Cases
The Bad Test Cases panel lists all tests that failed to execute the required test cases.
The test cases run must match the exclude list for the reference test suite. Tests thatfailed to execute the required test cases are indications that the exclude list wasedited.
Audit Test Results OptionsUse the Audit Test Results Options dialog box to specify the reference test suite, theaudited work directory, the reference configuration, and to start the audit.
To display the Options dialog box, choose Audit > Options from the menu bar.
The Options dialog box contains the following elements:
■ Test Suite
■ Work Directory
■ Configuration File
Chapter 3 Graphical User Interface 85

■ Start Audit button
■ Cancel button
■ Help button
Test Suite
You can use the drop-down list or the chooser to specify a test suite. You can alsoclear a previous entry in the Test Suite field by choosing the empty line from thedrop-down list. A blank field indicates a test suite is not set.
Click the button to open the list of test suites currently loaded in the harness. Youare not limited to using these tests suites. You can either choose a test suite from the
list or click the button to open the dialog box used to choose another test suite.
If you choose a reference test suite, the harness sets the entries in the work directorydrop-down list to the work directories that are currently loaded and matches thespecified test suite. If you have multiple test suites and work directories, specifyinga test suite can simplify choosing the options.
The harness always uses the test suite associated with the work directory that youchoose to audit. See Work Directory below for a description of how to choose a workdirectory to audit.
Work Directory
The harness audits the work directory named in the Work Directory field. A blankfield indicates the work directory is not set.
You can use the drop-down list or the chooser to specify the work directory to audit.You can also clear a previous entry in the work directory field by choosing theempty line in the drop-down list.
Click the button to open the list of work directories identified by the harness. Ifyou choose a reference test suite, the harness only lists the work directoriesassociated with it in the drop-down list.
You are not limited to using these work directories. You can either choose a work
directory from the list or click the button to open the dialog box used to chooseanother work directory.
If you choose a work directory, the harness uses the test suite associated with thework directory and sets the entries in the Configuration File drop-down list to thosemost recently used with the work directory.
86 Graphical User Interface User’s Guide • November 2011
If you do not choose a work directory, the harness uses the work directory associatedwith the configuration file that you specify. See Configuration File below for adescription of how to choose a reference configuration file.
Configuration File
You can use the drop-down list or the chooser to specify a reference configurationfile. You can also clear a previous file from the Configuration File field by choosingthe empty line in the drop-down list.
A blank field indicates that the default configuration file for the chosen workdirectory is used. If a work directory is not chosen, you can choose a referenceconfiguration, and the harness opens its work directory.
Click the button to open the list of configuration files identified by the harness.The harness lists the configuration files associated with the work directory.
Choose a file from the list or click the button to open the dialog box used inchoosing a configuration file.
If you specify a configuration file, it must be associated with the work directory. Ifthe configuration file is not associated with the work directory, the harness displaysan error message without performing the audit.
Start Audit Button
After you set the audit options, click the Start Audit button to audit the workdirectory. The harness closes the Option dialog box and displays a message in theAudit Test Results window that it is performing the audit.
Cancel Button
Closes the Options dialog box without accepting any changes to the option fields.
Help Button
Displays online help for the Options dialog box.
Chapter 3 Graphical User Interface 87

88 Graphical User Interface User’s Guide • November 2011
4
Configuring a Test Run
Before the harness can execute the tests in a test suite, it requires information abouthow your computing environment is configured. You provide the harness with thisinformation by loading a template (.jtm), loading an existing configuration file(.jti), creating a new configuration, or changing the values in a configuration.
Note – You can also specify configuration values from the command line whenstarting the harness GUI.
The quantity and scope of information required to run tests depends on the testsuite. Some test suites run in diverse environments (different platforms andnetworks), while others run in very specific, well-defined environments. The testsuite may provide a configuration interview or a template for you to use in creatinga configuration for your test run. If your test suite does not provide any of these,consult the test suite documentation for directions about how you can supply therequired configuration information.
This chapter contains the following topics:
■ Editing a Configuration- Describes how to use the Question Mode edit aconfiguration.
■ Editing Quick Set Values- Describes how to use the Quick Set Mode to edit theruntime values in a configuration file.
■ Creating a Configuration- Describes how to create a configuration for use inrunning tests.
■ Saving a Configuration - Describes how to save the current configuration.
■ Loading a Configuration - Describes how to load an existing configuration or atemplate for use in running tests.
■ Using Bookmarks in Configurations - Describes how to use bookmarks tosimplify a configuration interview.
■ Searching a Configuration - Describes how to search a configuration forcharacters or values.
Chapter 4 Configuring a Test Run 89

■ Working with Multiple Configurations - Describes how to use multipleconfiguration files to switch configurations between test runs.
Creating a ConfigurationYou must create a configuration for the test run if an existing configuration is notprovided by the test suite or your test group.
Note – If you have an existing configuration, load it in the Test Manager (seeLoading a Configuration) and then edit it (see Editing a Configuration) as requiredfor your test run.
Before creating a configuration, if you have a template provided by your test groupor by the test suite, you can load it in the Test Manager (see Loading a Template) anduse it as the basis for creating a configuration. You can also create a template (seeCreating a Template), if an existing template is not available, and use it as the basisfor creating a configuration.
▼ Create a New ConfigurationTo create a configuration for the test run, perform the following steps:
1. If you have an appropriate template provided by your test group or by the testsuite, load it in the Test Manager (see Loading a Template).
You can create a template (see Creating a Template), if an appropriate, existingtemplate is not available.
If you choose not to use a template, go to Step 2.
2. Choose Configure > New Configuration from the Test Manager menu bar or File> New Configuration from the Configuration Editor menu bar.
3. Answer the questions displayed in the Configuration Editor window.
If you are creating a configuration from a template, the values set in the templateare applied to the questions.
90 Graphical User Interface User’s Guide • November 2011
Note – The Configuration Editor window displays questions in the center pane (seethe Question Pane). Use the text box, radio button, or combo box controls locatedbeneath the question to provide the required configuration information. After youanswer each question, click the Next button to proceed to the next question. Somequestions provide information and do not require an answer. In these cases, click theNext button to proceed to the next question.
You can go backward and forward to any question to review or change youranswer by doing one of the following:
■ Choosing a question directly from the Index pane
■ Clicking the Back button, the Next button, or the Last buttonAs you move backward and forward, the Configuration Editor window saves
all answers until you either save the configuration or change the answers.Choose File > Save at any time to save your answers and position in a
configuration file. See Saving a Configuration.
4. After you complete the configuration, click the Done button to save theconfiguration and close the Configuration Editor window.
▼ Loading a ConfigurationTo load an existing configuration, perform the following steps:
1. Choose Configure > Load Configuration from the Test Manager menu bar, or, ifyou have an open Configuration Editor window, choose File > LoadConfiguration from the menu bar.
The harness opens the Load Configuration dialog box.
Chapter 4 Configuring a Test Run 91
If your test group provides an existing configuration, you can use it to run tests.
2. Locate and select the configuration file (.jti).
3. Click the Load button.
The harness loads the file and closes the Load Configuration File chooser.
If you loaded a configuration file that you must edit before running tests, use theConfiguration Editor to set appropriate values for your test environment. SeeEditing a Configuration.
▼ Editing a ConfigurationTo edit a configuration, perform the following steps:
1. Choose Configure > Edit Configuration in the Test Manager menu bar.
The harness opens the Configuration Editor in Question Mode and loads the currentconfiguration.
In Question Mode, the Configuration Editor enables the Bookmarks feature. Use theBookmarks feature to simplify an interview by displaying only questions whoseanswers might change. See Using Bookmarks in Configurations for the stepsrequired to set, clear, and manage Bookmarks in a configuration. See Question Modefor detailed information about using the features of this mode to edit aconfiguration.
92 Graphical User Interface User’s Guide • November 2011
Quick Set Mode enables rapid editing of frequently changed values. If you areediting only these values, you can change to the Quick Set Mode. You can use theView menu at any time to change from one mode to the other. Because only oneconfiguration file is loaded in the Configuration Editor at a time, any changes thatyou made in one mode are automatically reflected in the other mode. See EditingQuick Set Values for detailed information about using the features of this mode toedit a configuration.
2. In Question Mode, navigate to the question by one of the following means:
■ Use the Search menu to locate specific characters or character strings in the titles,questions, and answers. See Searching a Configuration.
■ Choose the question directly from the Index pane.
■ Click the Back button or Next button as required to locate the question.
3. Review and change configuration values as necessary.
When you move backward and forward through the list of questions, theConfiguration Editor preserves your previous answers until you change them.
4. After making all required changes to the configuration, save the changedconfiguration by one of the following means:
■ If you are using a configuration template or an existing configuration file to createa new configuration file, choose File > Save As from the Configuration Editormenu bar. The Configuration Editor opens a dialog box for you to use in settingthe location and name of the new configuration file.
■ If you are modifying an existing configuration file used to run tests, click theDone button. The Configuration Editor saves the changes to the configuration fileand closes. When the Done button is enabled, you can click it regardless of yourlocation in the configuration.
Editing Quick Set ValuesThe following topics describe how values displayed in the Quick Set Mode can bechanged for a test run.
■ Specifying Tests to Run - Describes how to specify the individual tests or groupsof tests in a test run.
■ Using Exclude Lists - Describes how to specify the exclude list used for a test run.
■ Specifying Keywords (Only enabled if used by the test suite) - Describes how tospecify keywords to filter the tests that are run.
Chapter 4 Configuring a Test Run 93
■ Specifying Prior Status - Describes how to filter the tests that are run based ontheir prior results.
■ Setting Concurrency and Timeout Factor - Describes how to set the concurrencyand timeout values of a test run.
▼ Specifying Tests to RunTo directly specify the tests that are run, perform the following steps:
1. Click the Quick Set Mode button on the Test Manager tool bar or chooseConfigure > Edit Quick Set > Tests To Run in the menu bar.
The Configuration Editor opens in Quick Set Mode.
Note – In Question Mode, use the How to Specify Tests question to specify tests thatare run.
2. Click the Tests tab if it does not have focus.
3. Choose the Specify radio button.
The Configuration Editor enables the tree and the Load Test List button.
4. Use the run tree or the Load Test List button to specify the tests that are run.
94 Graphical User Interface User’s Guide • November 2011
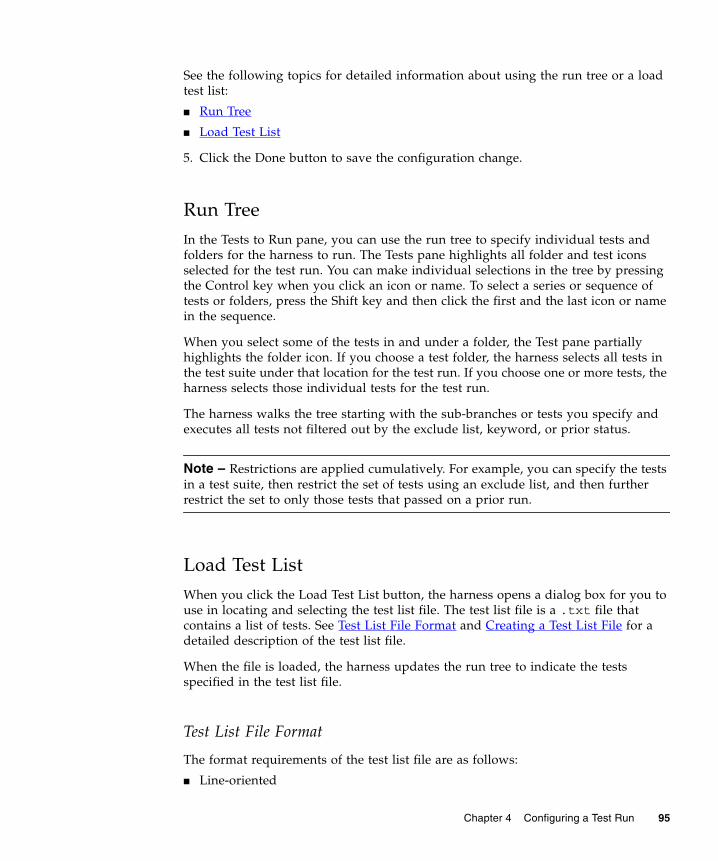
See the following topics for detailed information about using the run tree or a loadtest list:
■ Run Tree
■ Load Test List
5. Click the Done button to save the configuration change.
Run TreeIn the Tests to Run pane, you can use the run tree to specify individual tests andfolders for the harness to run. The Tests pane highlights all folder and test iconsselected for the test run. You can make individual selections in the tree by pressingthe Control key when you click an icon or name. To select a series or sequence oftests or folders, press the Shift key and then click the first and the last icon or namein the sequence.
When you select some of the tests in and under a folder, the Test pane partiallyhighlights the folder icon. If you choose a test folder, the harness selects all tests inthe test suite under that location for the test run. If you choose one or more tests, theharness selects those individual tests for the test run.
The harness walks the tree starting with the sub-branches or tests you specify andexecutes all tests not filtered out by the exclude list, keyword, or prior status.
Note – Restrictions are applied cumulatively. For example, you can specify the testsin a test suite, then restrict the set of tests using an exclude list, and then furtherrestrict the set to only those tests that passed on a prior run.
Load Test ListWhen you click the Load Test List button, the harness opens a dialog box for you touse in locating and selecting the test list file. The test list file is a .txt file thatcontains a list of tests. See Test List File Format and Creating a Test List File for adetailed description of the test list file.
When the file is loaded, the harness updates the run tree to indicate the testsspecified in the test list file.
Test List File Format
The format requirements of the test list file are as follows:
■ Line-oriented
Chapter 4 Configuring a Test Run 95

■ Relative test paths
■ Blank lines and lines beginning with the pound symbol (#) are ignored
■ On all other lines, the first item (up to the first whitespace) is taken as a test nameand the remainder of the line is ignored
The format of the load list file is compatible with the format of the summary.txtgenerated as part of a report.
▼ Creating a Test List FileTo create a test list file, perform the following steps:
1. Select the lines from summary.txt that define the tests you want to run.
Note – You can use other sources for obtaining the path names of the tests that youwant to include in the test list file. On a Solaris platform, you might use awk, grep,or similar utilities to identify lines that specify the tests with failed or error results.
Example lines from summary.txt:BigNum/compareTest.html Failed. exit code 1BigNum/equalsTest.html Failed. exit code 1BigNum/longConstrTest.html Failed. exit code 1BigNum/subtractTest.html Failed. exit code 1lists/DoublyLinkedList/appendTest.html Failed. exit code 1lists/DoublyLinkedList/equalsTest.html Failed. exit code 1lists/DoublyLinkedList/insertTest.html Failed. exit code 1lists/DoublyLinkedList/removeTest.html Failed. exit code 1lists/LinkedList/appendTest.html Failed. exit code 1lists/LinkedList/equalsTest.html Failed. exit code 1lists/LinkedList/insertTest.html Failed. exit code 1lists/LinkedList/removeTest.html Failed. exit code 1lists/SortedList/equalsTest.html Failed. exit code 1lists/SortedList/insertTest.html Failed. exit code 1lists/SortedList/removeTest.html Failed. exit code 1
2. Copy and paste the relative paths into a .txt file.
3. Remove all text that is not part of the test path.
Example lines in the .txt file:BigNum/compareTest.htmlBigNum/equalsTest.htmlBigNum/longConstrTest.htmlBigNum/subtractTest.htmllists/DoublyLinkedList/appendTest.html
96 Graphical User Interface User’s Guide • November 2011
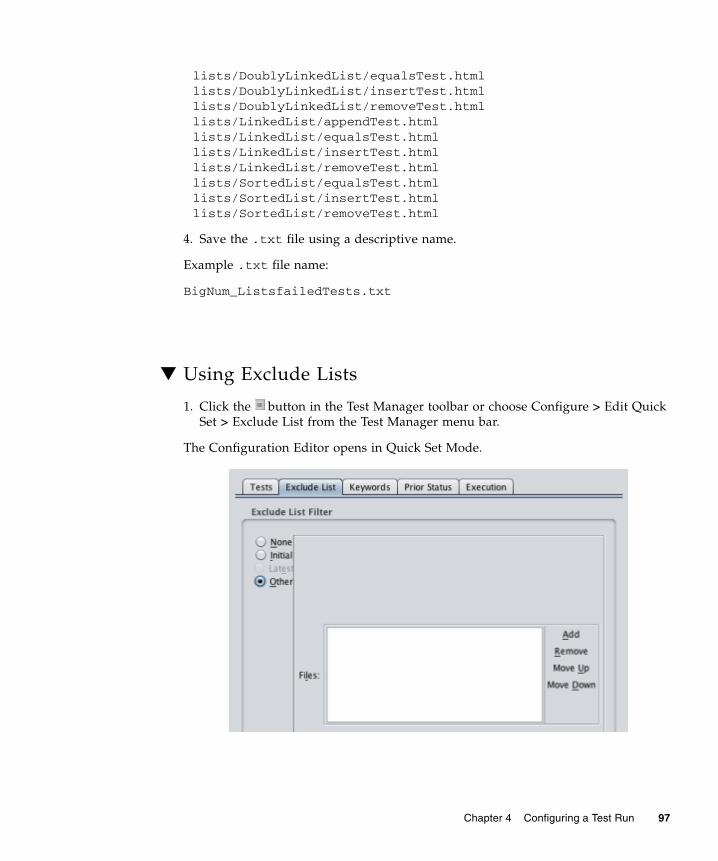
lists/DoublyLinkedList/equalsTest.htmllists/DoublyLinkedList/insertTest.htmllists/DoublyLinkedList/removeTest.htmllists/LinkedList/appendTest.htmllists/LinkedList/equalsTest.htmllists/LinkedList/insertTest.htmllists/LinkedList/removeTest.htmllists/SortedList/equalsTest.htmllists/SortedList/insertTest.htmllists/SortedList/removeTest.html
4. Save the .txt file using a descriptive name.
Example .txt file name:
BigNum_ListsfailedTests.txt
▼ Using Exclude Lists
1. Click the button in the Test Manager toolbar or choose Configure > Edit QuickSet > Exclude List from the Test Manager menu bar.
The Configuration Editor opens in Quick Set Mode.
Chapter 4 Configuring a Test Run 97

Note – Exclude list files contain a list of tests in a test suite that are not run bythe harness. You can also use Question Mode view to specify exclude lists.
2. Click the Exclude List tab if it does not have focus.
3. Use the buttons in the tabbed pane to set exclude list selection options and to addor remove exclude lists used to run tests in your computing environment.
See Exclude List Selection Options, Latest Exclude List, and Other Exclude List for adetailed description of these values and how they are used by the harness whenrunning tests.
4. Click the Done button to save the configuration change.
Exclude List Selection OptionsUse the following selections to specify the exclude list option used to run tests:
■ None - An Exclude List is not used.
■ Initial - Only enabled if the test suite provides an exclude list. If you chooseInitial, the tests are run using the exclude list provided by the test suite.
■ Latest - Only enabled if the test suite provides a location for updated excludelists. If you choose Latest, additional options are displayed. See Latest ExcludeList below for detailed information.
■ Other - A custom exclude list can be used. See Other Exclude List below fordetailed information.
If a complete test is added to the exclude list, the harness updates the test resultstatus without requiring the test be rerun. However, if only a test case from a test isadded to the exclude list, the harness requires that you rerun the test using theupdated exclude list before updating the test result status.
98 Graphical User Interface User’s Guide • November 2011
Latest Exclude ListIf your test suite provides a URL for the latest test suite, the harness enables theLatest exclude list option. The following table describes the text and controlsdisplayed when you choose the Latest exclude list option.
Other Exclude ListThe following table describes the buttons displayed when you choose the Otherexclude list option.
TABLE 34 Latest Exclude List Dialog Box Contents
Text and Controls Description
Location: Displays the location of the exclude list specified by the testsuite. This is a non-editable field.
Last updated: Displays the date that the exclude list was last updated. This is anon-editable field.
Check For UpdatesAutomatically
Causes the harness to automatically check the location of theexclude list and compare the date-time stamps of the remote andlocal exclude lists. The harness then displays a dialog boxadvising you of the results. If a new exclude list is available, youcan choose to download it.
Every _ Days Sets an interval for the harness to automatically check the remotelocation of the exclude list for updates.
Every Test Run Causes the harness to check the remote location of the excludelist for updates before each test run.
Check Now Causes the harness to check the remote location of the excludelist for an update.
TABLE 35 Other Exclude List Dialog Box Contents
Button Description
Add Selects an exclude list file for your test suite. As you makeselections with the file chooser dialog box, they are added to thelist. After you add an exclude list, you can modify the list.
Chapter 4 Configuring a Test Run 99
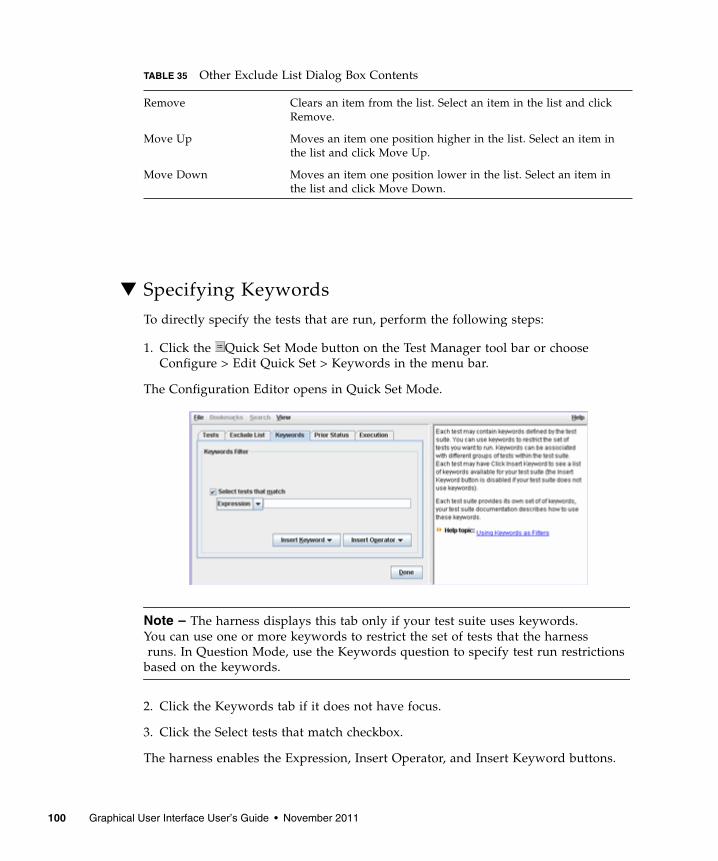
▼ Specifying KeywordsTo directly specify the tests that are run, perform the following steps:
1. Click the Quick Set Mode button on the Test Manager tool bar or chooseConfigure > Edit Quick Set > Keywords in the menu bar.
The Configuration Editor opens in Quick Set Mode.
Note – The harness displays this tab only if your test suite uses keywords.You can use one or more keywords to restrict the set of tests that the harnessruns. In Question Mode, use the Keywords question to specify test run restrictions
based on the keywords.
2. Click the Keywords tab if it does not have focus.
3. Click the Select tests that match checkbox.
The harness enables the Expression, Insert Operator, and Insert Keyword buttons.
Remove Clears an item from the list. Select an item in the list and clickRemove.
Move Up Moves an item one position higher in the list. Select an item inthe list and click Move Up.
Move Down Moves an item one position lower in the list. Select an item inthe list and click Move Down.
TABLE 35 Other Exclude List Dialog Box Contents
100 Graphical User Interface User’s Guide • November 2011
4. Build an expression in the text field by using any logical combination of thefollowing actions:
■ Click the Expression button to display a list of expressions that can beconstructed. From the list, choose the type of expression that you are building.See List of Expressions for a description of the available types of expressions.
■ Click the Insert Keyword button to display the list of keywords provided by thetest suite for use in filtering tests (this is only available if the test suite hasinformation). From the list, choose one or more keywords used in the expression.
■ Click the Insert Operator button to display a list of logical operators that you caninclude to construct boolean expressions in the text field. From the list, choose anoperator to include it in the expression. See List of Logical Operators for adescription of the available operators.
5. Click the Done button to save the configuration change.
List of ExpressionsThe following table provides descriptions and examples of keyword expressions thatcan be constructed.
TABLE 36 Keyword Expressions
Expression Description
Chapter 4 Configuring a Test Run 101
List of Logical OperatorsLogical operators are only available when Expression is selected in the list ofexpressions. The following table provides descriptions and examples of logicaloperators that can be used to build keyword expressions. The precedence column
Any Of Runs all tests in the test suite having any of the keywords entered inthe text field.Example:A test suite uses the keyword interactive to identify tests that
require human interaction, and color to identify tests that require acolor display.To execute only the tests containing the interactive keyword,choose Any Of and then use the Insert Keyword button to choose theinteractive keyword.
All Of Runs all tests in the test suite having all of the keywords entered inthe text field.Example:To execute only the tests containing both the interactive andcolor keywords, choose All Of and then use the Insert Keywordbutton to choose the interactive and color keyword.
Expression Runs all tests in the test suite having the expression entered in thetext field.Use the Insert Keyword and the Insert Operator buttons to constructa Boolean expression in the text field. Keywords stand as Booleanpredicates that are true if, and only if, the keyword is present in thetest being considered. A test is accepted if the overall value of theexpression is true. All other tests are rejected by the restriction.Example:A test suite uses the keyword interactive to identify tests that
require human interaction, and color to identify tests that require acolor display.To execute only the tests with the color keyword that do not alsocontain the interactive keyword, choose Expression and then usethe Insert Keyword button to choose the color keyword, the InsertOperator button to choose the ! operator, and the Insert Keywordbutton to choose the interactive keyword.
TABLE 36 Keyword Expressions
102 Graphical User Interface User’s Guide • November 2011
indicates the order in which the expression is resolved. Expressions in parenthesesare evaluated first, with nested parentheses being evaluated from the innermostparentheses outward.
▼ Specifying Prior StatusTo specify prior status used to restrict the set of tests that are run, perform thefollowing steps:
TABLE 37 Keyword Operators
LogicalOperator
Precedence Description
( ) group 1 Used to create groups of expressions.Example:A test suite uses the keyword interactive to identify tests that
require human interaction and color to identify tests that require acolor display.!(interactive&color)
The harness will exclude tests that include both keywords.
! not 2 Logical not. Used to exclude tests containing the expression.Example:A test suite uses the keyword interactive to identify tests that
require human interaction and color to identify tests that require acolor display.!interactive&!color
The harness will exclude tests that include either keyword.
& and 3 Logical and. Used to combine expressions.Example:A test suite uses the keyword interactive to identify tests that
require human interaction and color to identify tests that require acolor display.interactive&colorThe harness will only choose tests that include both keywords.
| or 4 Logical or. Used to specify either of two expressions.Example:A test suite uses the keyword interactive to identify tests that
require human interaction and color to identify tests that require acolor display.interactive|colorThe harness will only choose tests that include either keyword.
Chapter 4 Configuring a Test Run 103
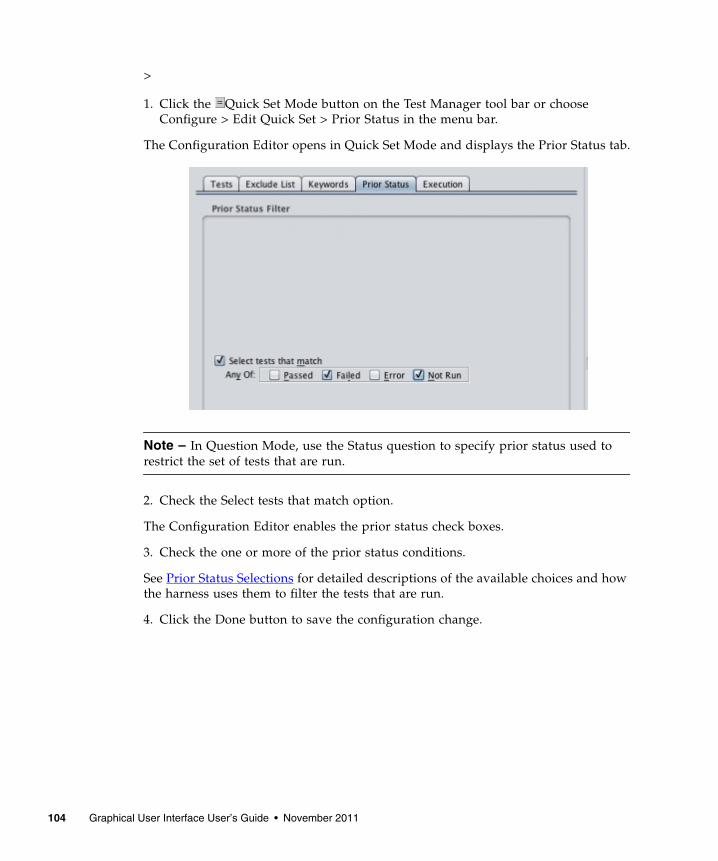
>
1. Click the Quick Set Mode button on the Test Manager tool bar or chooseConfigure > Edit Quick Set > Prior Status in the menu bar.
The Configuration Editor opens in Quick Set Mode and displays the Prior Status tab.
Note – In Question Mode, use the Status question to specify prior status used torestrict the set of tests that are run.
2. Check the Select tests that match option.
The Configuration Editor enables the prior status check boxes.
3. Check the one or more of the prior status conditions.
See Prior Status Selections for detailed descriptions of the available choices and howthe harness uses them to filter the tests that are run.
4. Click the Done button to save the configuration change.
104 Graphical User Interface User’s Guide • November 2011
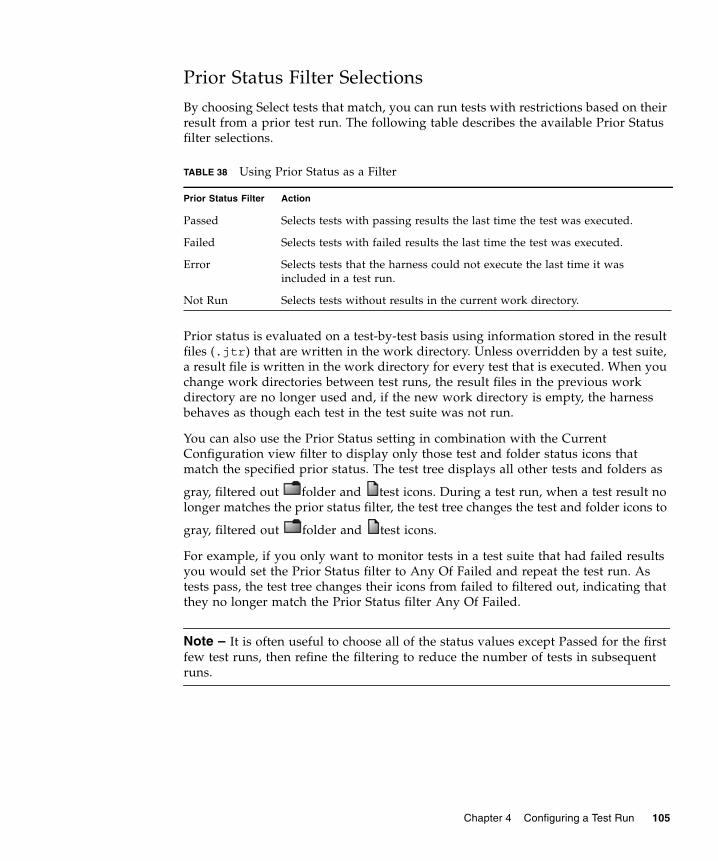
Prior Status Filter SelectionsBy choosing Select tests that match, you can run tests with restrictions based on theirresult from a prior test run. The following table describes the available Prior Statusfilter selections.
Prior status is evaluated on a test-by-test basis using information stored in the resultfiles (.jtr) that are written in the work directory. Unless overridden by a test suite,a result file is written in the work directory for every test that is executed. When youchange work directories between test runs, the result files in the previous workdirectory are no longer used and, if the new work directory is empty, the harnessbehaves as though each test in the test suite was not run.
You can also use the Prior Status setting in combination with the CurrentConfiguration view filter to display only those test and folder status icons thatmatch the specified prior status. The test tree displays all other tests and folders as
gray, filtered out folder and test icons. During a test run, when a test result nolonger matches the prior status filter, the test tree changes the test and folder icons to
gray, filtered out folder and test icons.
For example, if you only want to monitor tests in a test suite that had failed resultsyou would set the Prior Status filter to Any Of Failed and repeat the test run. Astests pass, the test tree changes their icons from failed to filtered out, indicating thatthey no longer match the Prior Status filter Any Of Failed.
Note – It is often useful to choose all of the status values except Passed for the firstfew test runs, then refine the filtering to reduce the number of tests in subsequentruns.
TABLE 38 Using Prior Status as a Filter
Prior Status Filter Action
Passed Selects tests with passing results the last time the test was executed.
Failed Selects tests with failed results the last time the test was executed.
Error Selects tests that the harness could not execute the last time it wasincluded in a test run.
Not Run Selects tests without results in the current work directory.
Chapter 4 Configuring a Test Run 105

▼ Setting Concurrency and Timeout FactorTo set the concurrency and the timeout factor, perform the following steps:
1. Click the Quick Set Mode button on the Test Manager tool bar, choose Configure> Edit Quick Set > Concurrency, or choose Configure > Edit Quick Set > TimeoutFactor in the menu bar.
The Configuration Editor opens in Quick Set Mode.
Note – You can also use the Configuration Editor window in Question Mode tospecify the concurrency and the timeout factor.
2. Click the Execution tab if it does not have focus.
3. Use the text fields in the tabbed pane to set the concurrency and the timeoutfactor values used to run tests in your computing environment.
See Concurrency and Time Factor for a detailed description of these values and howthey are used by the harness when running tests.
4. Click the Done button to save the configuration change.
106 Graphical User Interface User’s Guide • November 2011

ConcurrencyThe harness can run tests concurrently. If you are running the tests on amultiprocessor computer or are using multiple agents on a test system, concurrencycan reduce the time required to run tests. For detailed information about usingagents to run tests, refer to your test suite documentation and to the JavaTest HarnessAgent User’s Guide if it is provided by the test suite.
When using multiple agents to run tests, the concurrency value must not exceed thenumber of agents. If the concurrency value exceeds the total number of availableagents, an error will occur in the test run.
If you have unexpected test failures, run the tests again, one at a time. Some testsuites may not work correctly if you run tests concurrently. The default range ofvalues used by the harness is from 1 to 50.
For your first test run, leave this field set to 1. After the tests run properly, you canincrease this value. Unless your test suite restricts concurrency, the maximumnumber of threads specified by the concurrency command is 50. See your test suitedocumentation for additional information about using concurrency values greaterthan 1.
This field is disabled for some test suites.
Time FactorTo prevent a stalled test from stopping a test run, most test suites set a timeout limitfor each test. The timeout limit is the amount of time that the harness waits for a testto complete before moving on to the next test.
If you are running the tests on a particularly slow CPU or slow network, you canchange the time limit by specifying a floating point value in the time factor field.Each test’s timeout limit is multiplied by the time factor value. The default range ofvalues used by the harness is from 0.1 to 100.0.
Note – In the Time Factor field, the harness uses the form of floating point valuesthat is specific to the locale in which it is run. For example, if your locale usesfloating point values in the form of x,x, harness uses that form of floating pointvalue in the Time Factor field. In setting the timeout factor in the following example,specify values of 2,0 and 0,5 if your locale uses floating point values in the form ofx,x.
Example:
Chapter 4 Configuring a Test Run 107
If you specify a value of 2.0, the timeout limit for tests with a basic 10-minute timelimit becomes 20 minutes. Specifying a value of 0.5 for tests with a 10-minute limitproduces a 5-minute timeout limit.
At first, use the default value of 1.0 to run tests and then, if necessary, increase thevalue. The actual timeout calculation for any particular test suite might vary.
▼ Saving a ConfigurationTo save your current answers and position while editing or creating a configuration,choose either File > Save or File > Save As from the Configuration Editor menu bar.
If you are creating a new configuration, the harness opens a dialog box for you touse in setting the location and name of the new configuration file.
If you use different configurations to run a test suite, seeWorking with MultipleConfigurations.
Using Bookmarks in ConfigurationsIn Question Mode, you can use Bookmarks to restrict the set of questions displayedin the Configuration Editor (Bookmarks are not used in Quick Set Mode).Bookmarks are persistent and are saved in the .jti file, and reloaded when theconfiguration is used again. When bookmarks are disabled, they are preserved inprogram memory but cannot be manipulated.
▼ Set Bookmarks for Specific QuestionsTo set bookmarks for specific questions in the configuration, perform the followingsteps:
1. Click the Bookmarks > Enable Bookmarks check box in the menu bar.
2. Click a question in the Configuration Editor.
3. Set a bookmark for the highlighted question by performing one of the followingactions:
■ Click to the left of the highlighted question text.
■ Choose Bookmarks > Mark Current Question in the menu bar.
108 Graphical User Interface User’s Guide • November 2011
■ Right click the highlighted question and choose the Mark Current Question menuitem in the pop-up menu.
▼ Display Questions With BookmarksTo only display the questions with bookmarks, perform the following step:
■ Click the Bookmarks > Show Only Bookmarked Questions checkbox in the menubar.
The Configuration Editor displays bookmarked questions in the following manner:
■ The first question in the interview is displayed.
■ Questions with bookmarks are displayed.
■ If the interview is complete (all questions have valid answers) the final question isdisplayed.
■ If the interview is incomplete (one or more questions have invalid or incompleteanswers), the questions from the last marked question to the first question withan invalid or incomplete answer are displayed.
■ Sequences of questions not described by a previous category are grouped andrepresented by three dashes (---) in the list. These groups can be opened todisplay the complete sequence of questions.
▼ Open Groups of QuestionsTo open a group of hidden questions, perform the following steps :
1. Click the --- section in the list of questions.
Groups of hidden questions without bookmarks are represented by three dashes (---) in the list of questions.
2. Click the Bookmarks > Open --- Group menu item from the menu bar or rightclick the highlighted --- section and choose Open --- Group menu item from thepop-up menu.
▼ Close Groups of QuestionsTo clear the values of all questions with bookmarks, perform the following steps:
1. Click a question in the list of questions.
Chapter 4 Configuring a Test Run 109
2. Click the Bookmarks > Clear Answers to Bookmarked Questions menu item fromthe menu bar.
▼ Clear the Value of a Specific QuestionTo clear the value of a specific question, perform the following steps:
1. Click the question in the list of questions.
2. Click the Bookmarks > Clear Answer For Current Question menu item or rightclick the highlighted question and choose Clear Answer For Current Questionfrom the pop-up menu.
▼ Remove All BookmarksTo remove the bookmarks from the configuration, perform the following step:
■ Choose the Bookmarks > Remove Bookmarks menu item.
The configuration list reverts to the full configuration list.
▼ Remove a Bookmark From a QuestionTo remove the bookmarks from a question in the configuration, perform thefollowing steps:
1. Click the question in the list of questions.
2. Click the Bookmarks > Unmark Current Question menu item or right click thehighlighted question and choose Unmark Current Question menu item from thepop-up menu.
Searching a ConfigurationWhen using the Configuration Editor in Question Mode, you can locate and displaythe panes containing a specific character string. The harness can search titles,questions, and answers for matching characters. It does not search the More Info.
110 Graphical User Interface User’s Guide • November 2011
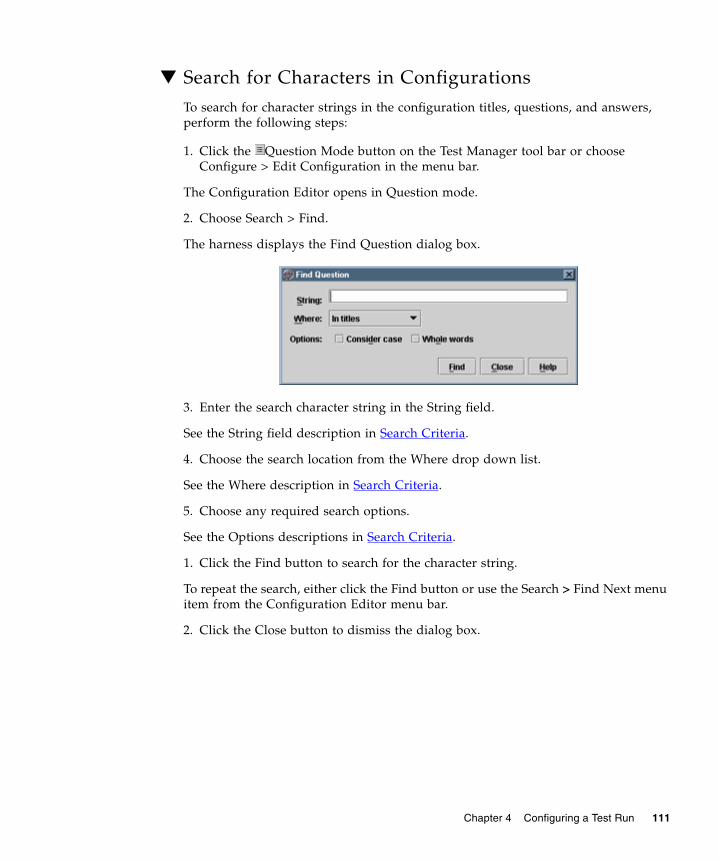
▼ Search for Characters in ConfigurationsTo search for character strings in the configuration titles, questions, and answers,perform the following steps:
1. Click the Question Mode button on the Test Manager tool bar or chooseConfigure > Edit Configuration in the menu bar.
The Configuration Editor opens in Question mode.
2. Choose Search > Find.
The harness displays the Find Question dialog box.
3. Enter the search character string in the String field.
See the String field description in Search Criteria.
4. Choose the search location from the Where drop down list.
See the Where description in Search Criteria.
5. Choose any required search options.
See the Options descriptions in Search Criteria.
1. Click the Find button to search for the character string.
To repeat the search, either click the Find button or use the Search > Find Next menuitem from the Configuration Editor menu bar.
2. Click the Close button to dismiss the dialog box.
Chapter 4 Configuring a Test Run 111
Search CriteriaThe following table describes the search criteria used in the Find Question dialogbox.
Working with Multiple ConfigurationsIn some testing situations it is useful to use separate configuration files to switchbetween different configurations for different test runs. For example, oneconfiguration could select automated tests and another could select interactive tests.
Prior to running tests, use the Configure menu to load the required configurationfile. See Loading a Configuration for detailed information. These configuration filescan be loaded from a central resource provided by your test group. See your testgroup for the name and location of the configuration files.
If your group does not provide an existing set of configuration files, you can createthem by using the Configuration Editor to edit an existing configuration and thensave each variation to a file name of your choosing. See Editing a Configuration fordetailed information.
You can save these configuration files anywhere in your file system. Generally,however, the work directory should not be used to save configuration files. Clearingthe work directory would delete the configuration file.
TABLE 39 Find Question Dialog Box Search Criteria
Item Description
String Enter the character string that you are trying to find.
Where Choose where you want to search:• In titles• In text of questions• In answers• Anywhere
Options: Considercase
Specifies that the search pattern match the case of the characters inthe Find text field.
Options: Wholewords
Specifies that the search pattern only match whole words from theFind text field.
112 Graphical User Interface User’s Guide • November 2011

After these configuration files are created, they can be used by your test group to runtests.
Chapter 4 Configuring a Test Run 113

114 Graphical User Interface User’s Guide • November 2011

5
Creating and Editing Templates
The harness provides users with the optional ability to create and edit templates thatcan be used to run tests on multiple test systems or test platform.
Note – Your test suite might not enable creating or editing templates. The menuitems and features described here will not appear in your user interface if your testsuite does not support templates.
For example, if your test suite enables creating and editing templates and your testgroup uses a central location to provide and manage the resources required to runtests (the test suite, report directories, configuration files, or the harness), you cancreate a template that contains all known configuration values required by the testgroup to run tests. Each user can load the template from the central site, provideonly those values unique to their test environment or test run, and run their testsusing their completed configuration.
See Creating a Template for a detailed description of the process used to create atemplate.
See Editing a Template for a detailed description of the process used to change thecontents of a template.
In addition to providing users with partially completed configurations, templatescan further simplify the process of creating and maintaining configurations throughthe use of the following features:
■ Bookmarks
■ Propagation
An optional feature of templates is the ability to propagate (inherit) templateupdates to all configurations based on that template. When the test suite developerenables template propagation, the harness checks for template updates when a userdoes any of the following:
■ Starts a test run.
Chapter 5 Creating and Editing Templates 115

■ Opens a work directory.
■ Loads a configuration.
For a configuration to receive template updates, the test suite developer must enablepropagation in both the configuration and its template.
▼ Creating a TemplateTo create a template, perform the following steps:
1. Choose Configure > New Template from the Test Manager menu bar.
2. Answer the questions displayed in the Template Editor.
The Template Editor displays questions in the center pane (the Question Pane).After answering a question, click the Next button to proceed to the next question.
3. Choose File > Save As from the menu bar and save the template with a relevantname.
Template file names are automatically appended with a .jtm extension.
Note – Changes to a template propagate to configurations based on the templateonly if propagation is enabled in both the template and the derived configurations.
Editing a TemplateThe Template Editor provides the following two modes of displaying and editing thequestions and values in a template.
See Question Mode for detailed information about using the features of this editingmode.
■ Question Mode - Enables editing of all template questions.
■ Quick Set Mode - Enables rapid editing of a limited set of template questions.
Quick Set Mode filters out all test suite specific questions and displays a limited
116 Graphical User Interface User’s Guide • November 2011
set of general questions whose values are often changed from test run to test run.In this editing mode, the Template Editor creates logical groupings of the valuesand displays them in tab form for easy user navigation and access.
▼ Editing in Question ModeTo edit all template questions and bookmarks in a template, perform the followingsteps:
1. If you are editing the current template (named at the bottom of the Test Manager)choose Configure > Edit Template in the Test Manager menu bar, otherwisechoose either Configure > Load Template or Configure > Load Recent Template.
If you are editing the current template (named at the bottom of the Test Manager),the harness opens the Template Editor and loads the template. Go to step 3.
If you are editing a different template, the harness displays the Load Templatedialog box.
2. Use the dialog box to locate and load the template.
The harness opens the Template Editor and displays the template in QuestionMode.
3. Use Question Mode to change the values of questions in the template.
4. Click Done to save the changes and close the Template Editor.
You can use the View menu at any time to change from one mode to the next.Because there is only one template file loaded in the Template Editor at a time, whenyou change modes during an editing session, any changes made in one mode areautomatically reflected in the other.
If a configuration is attached to the edited template, the harness opens a Templateupdated dialog box that enables you to review the changes and to accept, reject, orpostpone having the changes propagated to the attached configuration. SeeResolving Configuration-Template Conflicts for a description of the dialog box andthe choices available to the user.
▼ Editing in Quick Set ModeTo edit one or more of the quick set values in a template, perform the followingsteps:
Chapter 5 Creating and Editing Templates 117

1. If you are editing the current template (named at the bottom of the Test Manager)choose Configure > Edit Template in the Test Manager menu bar, otherwisechoose either Configure > Load Template or Configure > Load Recent Template.
If you are editing the current template (named at the bottom of the Test Manager),the harness opens the Template Editor and loads the template. Go to step 3.
If you are editing a different template, the harness displays the Load Templatedialog box.
2. Use the dialog box to locate and load the template.
The harness opens the Template Editor and displays the template in QuestionMode.
3. Choose View > Quick Set Mode in the Template Editor menu bar.
The harness displays the Template Editor in Quick Set Mode.
4. Set the quick set values by using the following tabs:
■ Tests - Use this tab to edit the default set of tests that a user can run in thisconfiguration.
■ Exclude List - (Optional) Use this tab to edit the default list of tests that areexcluded from a test run using this configuration.
■ Keywords - (Optional) Use this tab to edit the default keywords and expressionsused in this configuration to run tests.
■ Prior Status - Use this tab to edit the default restrictions on tests that are run byusing their status from the previous test run.
■ Execution - (Optional) Use this tab to edit the default concurrency and timeoutfactor values used in the configuration for running tests.
5. Click Done to save the changes and close the Template Editor.
You can use the View menu at any time to change from one mode to the next.Because there is only one template file loaded in the Template Editor at a time, whenyou change modes during an editing session, any changes made in one mode areautomatically reflected in the other.
If a configuration is attached to the edited template, the harness opens a Templateupdated dialog box that enables you to review the changes and to accept, reject, orpostpone having the changes propagated to the attached configuration. SeeResolving Configuration-Template Conflicts for a description of the dialog box andthe choices available to the user.
118 Graphical User Interface User’s Guide • November 2011
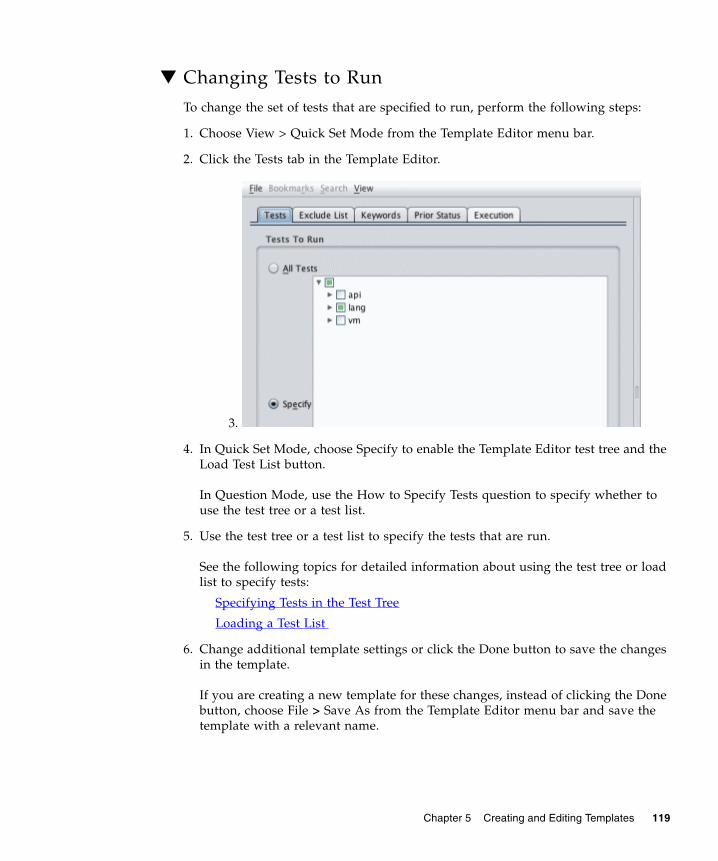
▼ Changing Tests to RunTo change the set of tests that are specified to run, perform the following steps:
1. Choose View > Quick Set Mode from the Template Editor menu bar.
2. Click the Tests tab in the Template Editor.
3.
4. In Quick Set Mode, choose Specify to enable the Template Editor test tree and theLoad Test List button.
In Question Mode, use the How to Specify Tests question to specify whether touse the test tree or a test list.
5. Use the test tree or a test list to specify the tests that are run.
See the following topics for detailed information about using the test tree or loadlist to specify tests:
Specifying Tests in the Test Tree
Loading a Test List
6. Change additional template settings or click the Done button to save the changesin the template.
If you are creating a new template for these changes, instead of clicking the Donebutton, choose File > Save As from the Template Editor menu bar and save thetemplate with a relevant name.
Chapter 5 Creating and Editing Templates 119

Specifying Tests in the Test TreeIn the Template Editor test tree (not the Test Manager test tree) you can chooseindividual tests and folders of tests for the harness to run. The harness walks the testtree starting with the sub-branches or tests you specify and executes all tests notfiltered out by the exclude list, keyword, or prior status.
Restrictions are applied cumulatively. For example, you can specify the tests in a testsuite, then restrict the set of tests using an exclude list, and then further restrict theset to only those tests that passed on a prior run.
If you choose a test folder, the harness selects all tests in the test suite under thatlocation for the test run.
If you choose one or more tests, the harness selects those individual tests for the testrun.
The Tests pane highlights all folder and test icons selected for the test run. You canmake individual selections in the test tree by pressing the Control key when youclick an icon or name in the test tree.
To select a series or sequence of tests or folders, press the Shift key and then click thefirst and the last icon or name in the sequence.
When you select some (but not all) of the tests in and under a folder, the Test panepartially highlights the folder icon.
▼ Loading a Test ListTo load a test list file in the template, perform the following steps:
1. Click the Load Test List button.
2. Use the dialog box to locate and select a test list file.
See Test List File Format for a detailed description of a test list file.
3. When the file is loaded, the test tree is updated to indicate the tests that have beenspecified.
Test List File Format
A test list is a .txt file containing a list of tests to run. See Creating a Test List Filefor a detailed description of the test list file. The format requirements of the test listfile are as follows:
■ Line-oriented
120 Graphical User Interface User’s Guide • November 2011
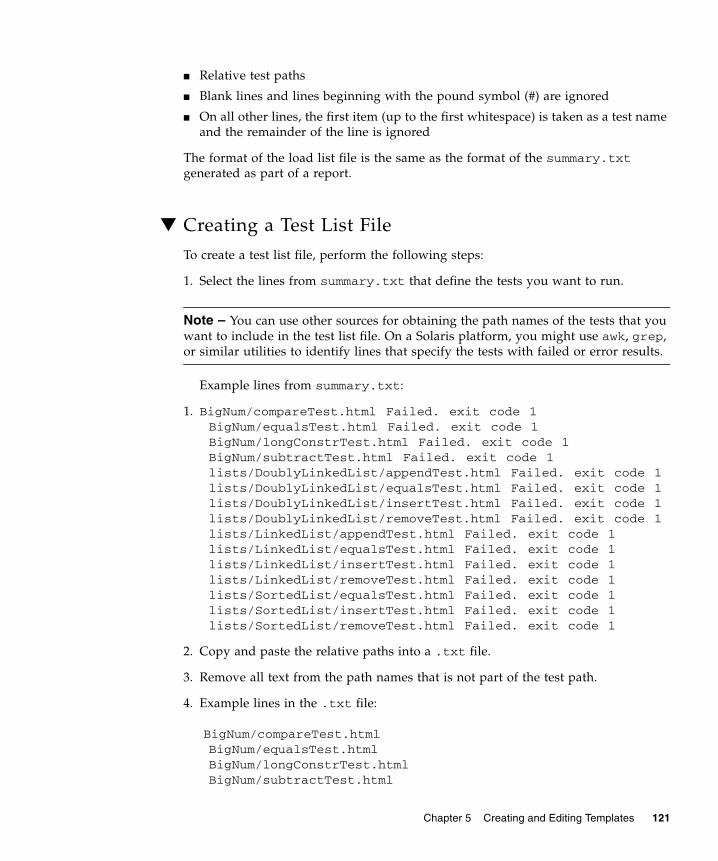
■ Relative test paths
■ Blank lines and lines beginning with the pound symbol (#) are ignored
■ On all other lines, the first item (up to the first whitespace) is taken as a test nameand the remainder of the line is ignored
The format of the load list file is the same as the format of the summary.txtgenerated as part of a report.
▼ Creating a Test List FileTo create a test list file, perform the following steps:
1. Select the lines from summary.txt that define the tests you want to run.
Note – You can use other sources for obtaining the path names of the tests that youwant to include in the test list file. On a Solaris platform, you might use awk, grep,or similar utilities to identify lines that specify the tests with failed or error results.
Example lines from summary.txt:
1. BigNum/compareTest.html Failed. exit code 1BigNum/equalsTest.html Failed. exit code 1BigNum/longConstrTest.html Failed. exit code 1BigNum/subtractTest.html Failed. exit code 1lists/DoublyLinkedList/appendTest.html Failed. exit code 1lists/DoublyLinkedList/equalsTest.html Failed. exit code 1lists/DoublyLinkedList/insertTest.html Failed. exit code 1lists/DoublyLinkedList/removeTest.html Failed. exit code 1lists/LinkedList/appendTest.html Failed. exit code 1lists/LinkedList/equalsTest.html Failed. exit code 1lists/LinkedList/insertTest.html Failed. exit code 1lists/LinkedList/removeTest.html Failed. exit code 1lists/SortedList/equalsTest.html Failed. exit code 1lists/SortedList/insertTest.html Failed. exit code 1lists/SortedList/removeTest.html Failed. exit code 1
2. Copy and paste the relative paths into a .txt file.
3. Remove all text from the path names that is not part of the test path.
4. Example lines in the .txt file:
BigNum/compareTest.htmlBigNum/equalsTest.htmlBigNum/longConstrTest.htmlBigNum/subtractTest.html
Chapter 5 Creating and Editing Templates 121
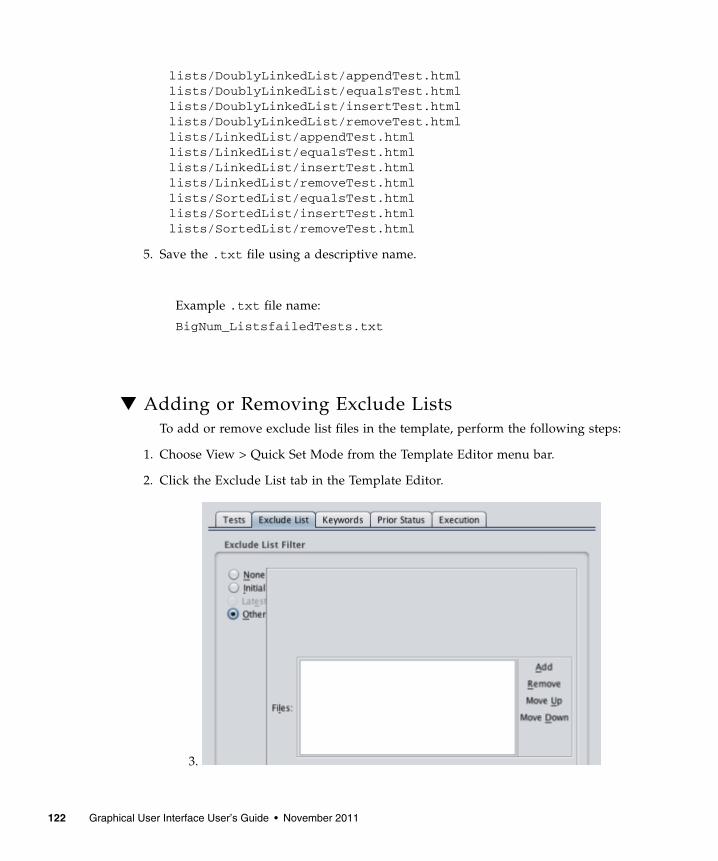
lists/DoublyLinkedList/appendTest.htmllists/DoublyLinkedList/equalsTest.htmllists/DoublyLinkedList/insertTest.htmllists/DoublyLinkedList/removeTest.htmllists/LinkedList/appendTest.htmllists/LinkedList/equalsTest.htmllists/LinkedList/insertTest.htmllists/LinkedList/removeTest.htmllists/SortedList/equalsTest.htmllists/SortedList/insertTest.htmllists/SortedList/removeTest.html
5. Save the .txt file using a descriptive name.
Example .txt file name:
BigNum_ListsfailedTests.txt
▼ Adding or Removing Exclude ListsTo add or remove exclude list files in the template, perform the following steps:
1. Choose View > Quick Set Mode from the Template Editor menu bar.
2. Click the Exclude List tab in the Template Editor.
3.
122 Graphical User Interface User’s Guide • November 2011
4. Add or remove exclude lists in the template as required.
Note – Exclude list files contain a list of tests in a test suite that are not run by theharness. See Exclude List Pane for a description of this pane.
5. Change additional template settings or click the Done button to save the changesin the template.
If you are creating a new template for these changes, instead of clicking the Donebutton, choose File > Save As from the Template Editor menu bar and save thetemplate with a relevant name.
Exclude List PaneUse the following to change the exclude list used to run tests:
■ None - An Exclude List is not used.
■ Initial - Only enabled if the test suite provides an exclude list. If you chooseInitial, the tests are run using the exclude list provided by the test suite.
■ Latest - Only enabled if the test suite provides a location for updated excludelists. If you choose Latest, additional options are displayed. See Latest ExcludeList below for detailed information.
■ Other - A custom exclude list can be used. See Other Exclude List below fordetailed information.
If a complete test is added to the exclude list, the harness updates the test resultstatus without requiring the test be rerun. However, if only a test case from a testis added to the exclude list, the harness requires that you rerun the test using theupdated exclude list before updating the test result status.
Chapter 5 Creating and Editing Templates 123

Latest Exclude ListIf your test suite provides a URL for the latest test suite, the harness enables theLatest exclude list option. The following table describes the text and controlsdisplayed when you choose the Latest exclude list option.
Other Exclude ListThe following table describes the buttons displayed when you choose the Otherexclude list option.
TABLE 40 Latest Exclude List Dialog Box Contents
Text and Controls Description
Location Displays the location of the exclude list specified by the test suite. This isa non-editable field.
Last updated Displays the date that the exclude list was last updated. This is a non-editable field.
Check ForUpdatesAutomatically
Causes the harness to automatically check the location of the exclude listand compare the date-time stamps of the remote and local exclude lists.The harness then displays a dialog box advising you of the results. If anew exclude list is available, you can choose to download it.
Every _ Days Sets an interval for the harness to automatically check the remote locationof the exclude list for updates.
Every Test Run Causes the harness to check the remote location of the exclude list forupdates before each test run.
Check Now Causes the harness to check the remote location of the exclude list for anupdate.
TABLE 41 Other Exclude List Dialog Box Contents
Button Description
Add Selects an exclude list file for your test suite. As you make selections with thefile chooser dialog box, they are added to the list. After you add an exclude list,you can modify the list.
Remove Clears an item from the list. Select an item in the list and click Remove.
Move Up Moves an item one position higher in the list. Select an item in the list and clickMove Up.
Move Down Moves an item one position lower in the list. Select an item in the list and clickMove Down.
124 Graphical User Interface User’s Guide • November 2011
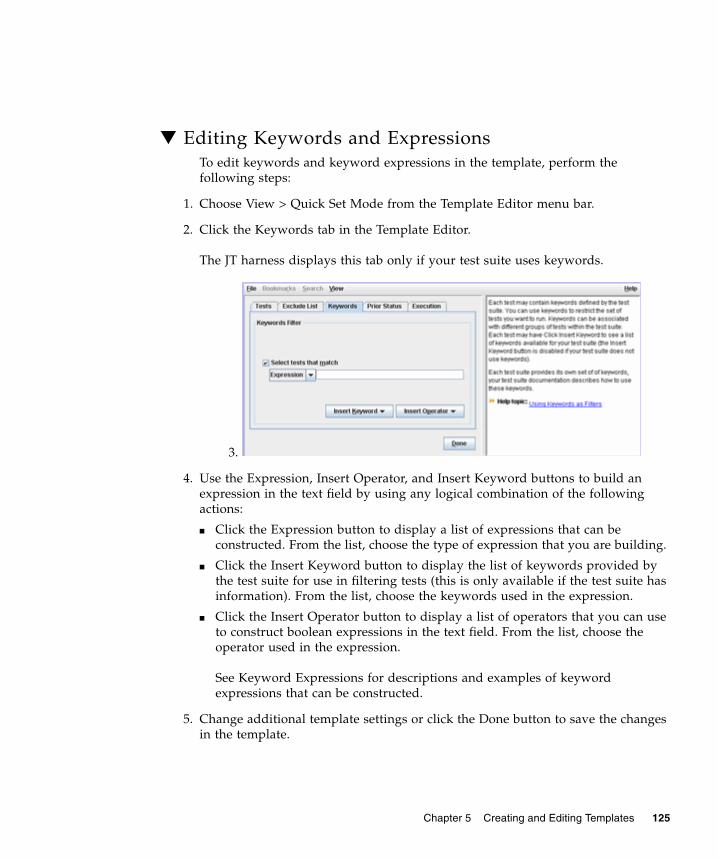
▼ Editing Keywords and ExpressionsTo edit keywords and keyword expressions in the template, perform thefollowing steps:
1. Choose View > Quick Set Mode from the Template Editor menu bar.
2. Click the Keywords tab in the Template Editor.
The JT harness displays this tab only if your test suite uses keywords.
3.
4. Use the Expression, Insert Operator, and Insert Keyword buttons to build anexpression in the text field by using any logical combination of the followingactions:
■ Click the Expression button to display a list of expressions that can beconstructed. From the list, choose the type of expression that you are building.
■ Click the Insert Keyword button to display the list of keywords provided bythe test suite for use in filtering tests (this is only available if the test suite hasinformation). From the list, choose the keywords used in the expression.
■ Click the Insert Operator button to display a list of operators that you can useto construct boolean expressions in the text field. From the list, choose theoperator used in the expression.
See Keyword Expressions for descriptions and examples of keywordexpressions that can be constructed.
5. Change additional template settings or click the Done button to save the changesin the template.
Chapter 5 Creating and Editing Templates 125
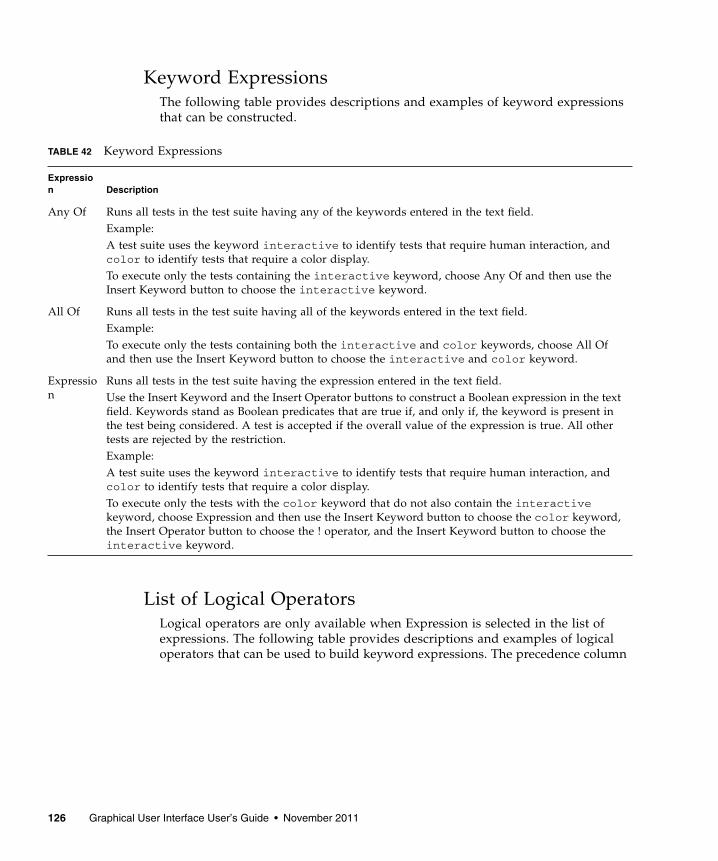
Keyword ExpressionsThe following table provides descriptions and examples of keyword expressionsthat can be constructed.
List of Logical OperatorsLogical operators are only available when Expression is selected in the list ofexpressions. The following table provides descriptions and examples of logicaloperators that can be used to build keyword expressions. The precedence column
TABLE 42 Keyword Expressions
Expression Description
Any Of Runs all tests in the test suite having any of the keywords entered in the text field.Example:A test suite uses the keyword interactive to identify tests that require human interaction, andcolor to identify tests that require a color display.To execute only the tests containing the interactive keyword, choose Any Of and then use theInsert Keyword button to choose the interactive keyword.
All Of Runs all tests in the test suite having all of the keywords entered in the text field.Example:To execute only the tests containing both the interactive and color keywords, choose All Ofand then use the Insert Keyword button to choose the interactive and color keyword.
Expression
Runs all tests in the test suite having the expression entered in the text field.Use the Insert Keyword and the Insert Operator buttons to construct a Boolean expression in the textfield. Keywords stand as Boolean predicates that are true if, and only if, the keyword is present inthe test being considered. A test is accepted if the overall value of the expression is true. All othertests are rejected by the restriction.Example:A test suite uses the keyword interactive to identify tests that require human interaction, andcolor to identify tests that require a color display.To execute only the tests with the color keyword that do not also contain the interactivekeyword, choose Expression and then use the Insert Keyword button to choose the color keyword,the Insert Operator button to choose the ! operator, and the Insert Keyword button to choose theinteractive keyword.
126 Graphical User Interface User’s Guide • November 2011
indicates the order in which the expression is resolved. Expressions inparentheses are evaluated first, with nested parentheses being evaluated from theinnermost parentheses outward.
▼ Editing Prior Status SettingsTo change the prior status settings in the template, perform the following steps:
1. Choose View > Quick Set Mode from the Template Editor menu bar.
2. Click the Prior Status tab in the Template Editor.
TABLE 43 Keyword Operators
Logical OperatorPrecedence Description
( ) group 1 Used to create groups of expressions.Example:A test suite uses the keyword interactive to identify tests that require human
interaction and color to identify tests that require a color display.!(interactive&color)
The harness will exclude tests that include both keywords.
! not 2 Logical not. Used to exclude tests containing the expression.Example:A test suite uses the keyword interactive to identify tests that require human
interaction and color to identify tests that require a color display.!interactive&!color
The harness will exclude tests that include either keyword.
& and 3 Logical and. Used to combine expressions.Example:A test suite uses the keyword interactive to identify tests that require human
interaction and color to identify tests that require a color display.interactive&colorThe harness will only choose tests that include both keywords.
| or 4 Logical or. Used to specify either of two expressions.Example:A test suite uses the keyword interactive to identify tests that require human
interaction and color to identify tests that require a color display.interactive|colorThe harness will only choose tests that include either keyword.
Chapter 5 Creating and Editing Templates 127
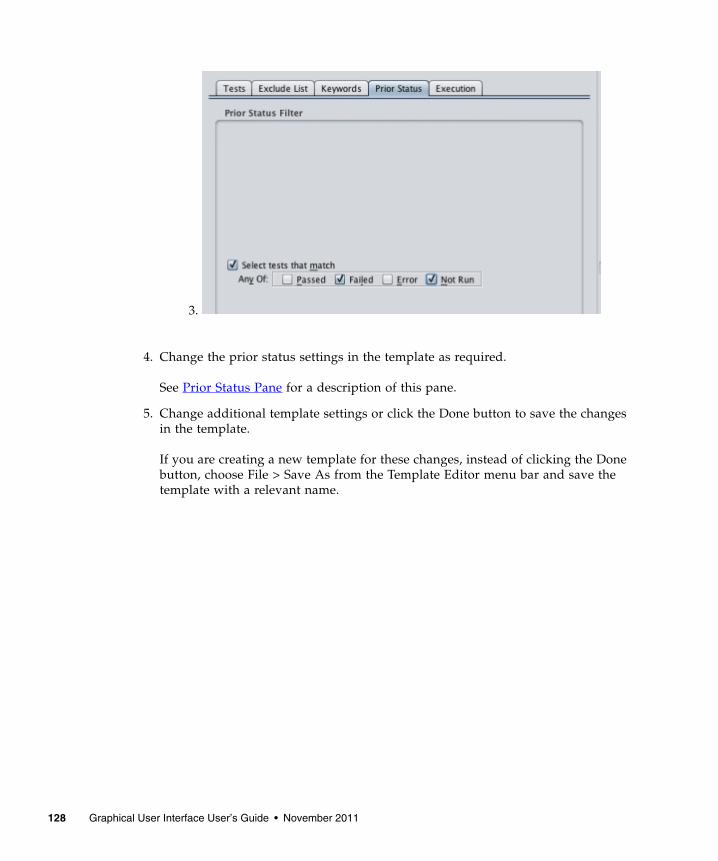
3.
4. Change the prior status settings in the template as required.
See Prior Status Pane for a description of this pane.
5. Change additional template settings or click the Done button to save the changesin the template.
If you are creating a new template for these changes, instead of clicking the Donebutton, choose File > Save As from the Template Editor menu bar and save thetemplate with a relevant name.
128 Graphical User Interface User’s Guide • November 2011

Prior Status PaneBy choosing Select tests that match, you can run tests with restrictions based ontheir result from a prior test run. The following table describes the available PriorStatus filter selections.
Prior status is evaluated on a test-by-test basis using information stored in theresult files (.jtr) that are written in the work directory. Unless overridden by atest suite, a result file is written in the work directory for every test that isexecuted. When users change work directories between test runs, the result filesin the previous work directory are no longer used and, if the new work directoryis empty, the harness behaves as though each test in the test suite was not run.
▼ Editing Concurrency and Timeout FactorTo change the concurrency and the timeout factor in the template, perform thefollowing steps:
1. Choose View > Quick Set Mode from the Template Editor menu bar.
2. Click the Execution tab in the Template Editor.
TABLE 44 Using Prior Status as a Filter
Prior Status Action
Passed Selects tests that passed the last time the test was executed.
Failed Selects tests that failed the last time the test was executed.
Error Selects tests that the harness could not execute the last time it was included ina test run.
Not Run Selects tests without results in the current work directory.
Chapter 5 Creating and Editing Templates 129
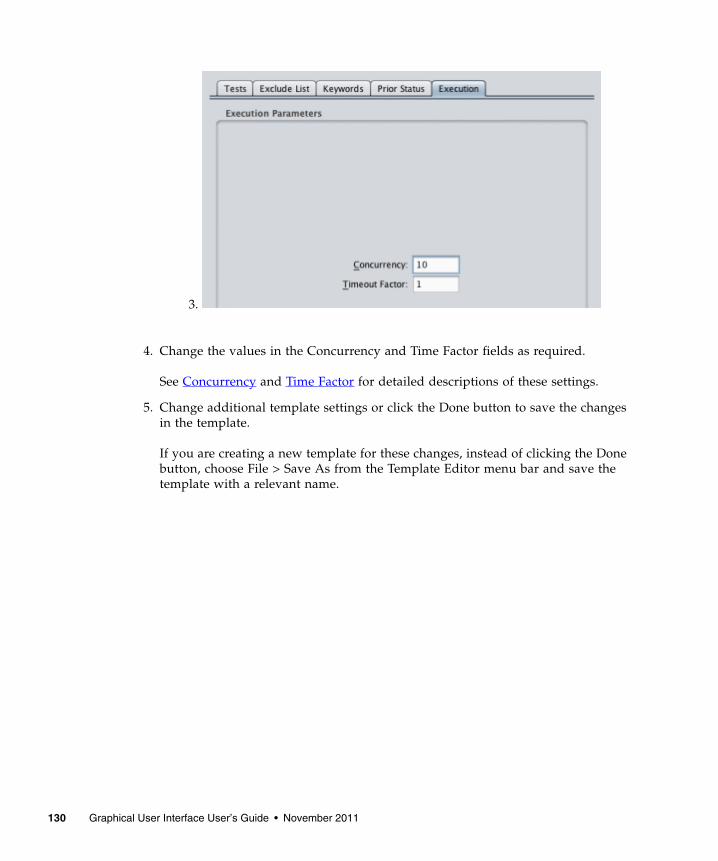
3.
4. Change the values in the Concurrency and Time Factor fields as required.
See Concurrency and Time Factor for detailed descriptions of these settings.
5. Change additional template settings or click the Done button to save the changesin the template.
If you are creating a new template for these changes, instead of clicking the Donebutton, choose File > Save As from the Template Editor menu bar and save thetemplate with a relevant name.
130 Graphical User Interface User’s Guide • November 2011
ConcurrencyThe harness can run tests concurrently. If users run tests on a multiprocessorcomputer or are using multiple agents on a test system, concurrency can reducethe time required to run tests. For detailed information about using agents to runtests, refer to the test suite documentation and to the JavaTest Harness Agent User’sGuide if it is provided by the test suite.
When using multiple agents to run tests, the concurrency value must not exceedthe number of agents. If the concurrency value exceeds the total number ofavailable agents, an error will occur in the test run.
The default range of values used by the harness is from 1 to 50. If unexpected testfailures occur, run the tests again, one at a time. Some test suites may not workcorrectly if tests run concurrently.
For the first test run, set the value in this field to 1. After the tests run properly,incrementally increase this value. Unless the test suite restricts concurrency, themaximum number of threads specified by the concurrency command is 50. Seethe test suite documentation for additional information about using concurrencyvalues greater than 1.
This field is disabled for some test suites.
Time FactorTo prevent a stalled test from stopping a test run, most test suites set a timeoutlimit for each test. The timeout limit is the amount of time that the harness waitsfor a test to complete before moving on to the next test.
If users run tests on a slow CPU or slow network, change the time limit byspecifying a floating point value in the time factor field. Each test’s timeout limitis multiplied by the time factor value. The default range of values used by theharness is from 0.1 to 100.0.
Chapter 5 Creating and Editing Templates 131

Note – In the Time Factor field, the harness uses the form of floating point valuesthat is specific to the locale in which it is run. For example, if your locale usesfloating point values in the form of x,x, harness uses that form of floating pointvalue in the Time Factor field. In setting the timeout factor in the following example,specify values of 2,0 and 0,5 if your locale uses floating point values in the form ofx,x.
Example:
If you specify a value of 2.0, the timeout limit for tests with a basic 10-minutetime limit becomes 20 minutes. Specifying a value of 0.5 for tests with a 10-minute limit produces a 5-minute timeout limit.
At first, use the default value of 1.0 to run tests and then, if necessary, increasethe value. The actual timeout calculation for any particular test suite might vary.
132 Graphical User Interface User’s Guide • November 2011
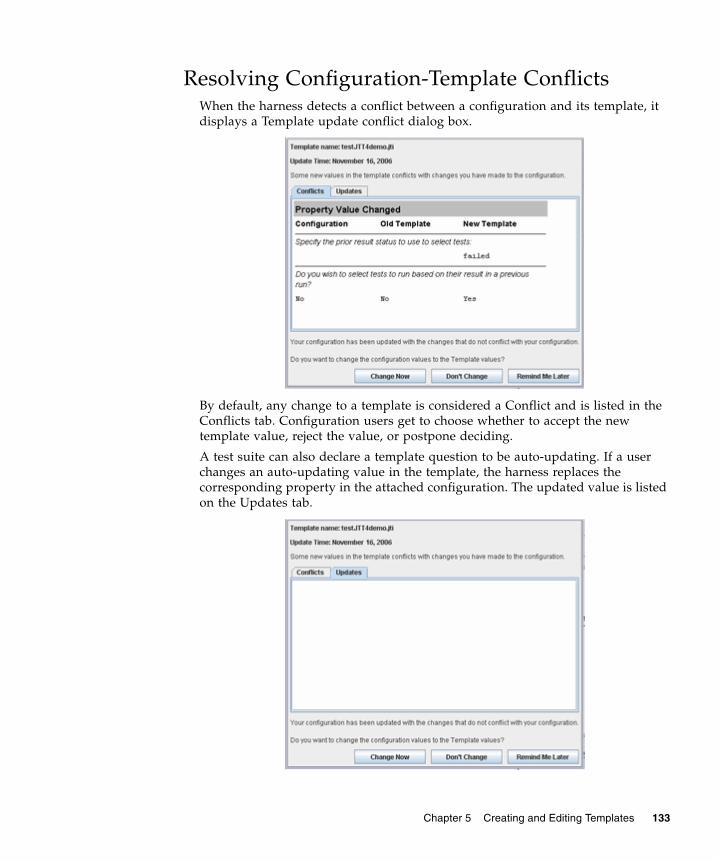
Resolving Configuration-Template ConflictsWhen the harness detects a conflict between a configuration and its template, itdisplays a Template update conflict dialog box.
By default, any change to a template is considered a Conflict and is listed in theConflicts tab. Configuration users get to choose whether to accept the newtemplate value, reject the value, or postpone deciding.
A test suite can also declare a template question to be auto-updating. If a userchanges an auto-updating value in the template, the harness replaces thecorresponding property in the attached configuration. The updated value is listedon the Updates tab.
Chapter 5 Creating and Editing Templates 133

A user cannot refuse to accept an auto-updating value.
Choose a dialog button based on the following guidelines:
■ Change Now - Click this button if you want the new template values tooverwrite the corresponding configuration values.
■ Don’t Change - Click this button if you want the new template values to beignored.
■ Remind Me Later - Click this button if you want to defer the conflict resolutionuntil the next time the harness checks for updates.
Setting BookmarksYou can use Bookmarks to restrict the set of questions displayed when a userloads the template in a Configuration Editor. This feature enables you to reducethe visible length and complexity of a configuration interview by only displayingthe questions that a user must answer before running tests.
Bookmarks are persistent and are saved in the .jtm file. If bookmarks aredisabled by a user, they remain in program memory but cannot be manipulated.
▼ Set Bookmarks for Specific QuestionsTo set bookmarks for specific questions in the template, perform the followingsteps:
1. Click the Bookmarks > Enable Bookmarks check box in the menu bar.
2. Click a question in the Template Editor.
3. Set a bookmark for the highlighted question by performing one of the followingactions:
■ Click to the left of the highlighted question text.
■ Choose Bookmarks > Mark Current Question in the menu bar.
■ Right click the highlighted question and choose the Mark Current Questionmenu item in the pop-up menu.
▼ Display Questions With BookmarksTo only display the questions with bookmarks, perform the following step:
134 Graphical User Interface User’s Guide • November 2011
■ Click the Bookmarks > Show Only Bookmarked Questions checkbox in themenu bar.
The Template Editor displays bookmarked questions in the following manner:
■ The first question in the interview is displayed.■ Questions with bookmarks are displayed.■ If the interview is complete (all questions have valid answers) the final question is
displayed.■ If the interview is incomplete (one or more questions have invalid or incomplete
answers), the questions from the last marked question to the first question withan invalid or incomplete answer are displayed.
■ Sequences of questions not described by a previous category are grouped andrepresented by three dashes (---) in the list of questions. These groups can beopened to display the complete sequence of questions.
▼ Open Groups of QuestionsGroups of hidden questions without bookmarks are represented by three dashes(---) in the list of questions.
To open a group of hidden questions, perform the following steps:
1. Click the --- section in the list.
2. Click the Bookmarks > Open --- Group menu item from the menu bar or rightclick the highlighted --- section and choose Open --- Group menu item from thepop-up menu.
▼ Close Groups of QuestionsTo close groups of questions without bookmarks, perform the following steps:
1. Click the question in the list.
2. Click the Bookmarks > Close --- Group menu item from the menu bar or rightclick the highlighted --- section and choose Close --- Group menu item from thepop-up menu.
▼ Clear the Values of All Questions With BookmarksTo clear the values of all questions with bookmarks, perform the following steps:
1. Click a question in the question list.
2. Click the Bookmarks > Clear Answers to Bookmarked Questions menu item fromthe menu bar.
Chapter 5 Creating and Editing Templates 135

▼ Clear the Value of a Specific QuestionTo clear the value of a specific question, perform the following steps:
1. Click the question in the list.
2. Click the Bookmarks > Clear Answer For Current Question menu item or rightclick the highlighted question and choose Clear Answer For Current Questionfrom the pop-up menu.
▼ Remove All BookmarksTo remove the bookmarks from the template, perform the following step:
■ Choose Bookmarks > Remove Bookmarks.
The list of questions reverts to the full list.
▼ Remove a Bookmark From a QuestionTo remove the bookmarks from a question in the template, perform the followingsteps:
1. Click the question in the question list.
2. Click the Bookmarks > Unmark Current Question menu item or right click thehighlighted question and choose Unmark Current Question menu item from thepop-up menu.
136 Graphical User Interface User’s Guide • November 2011

Using Template SearchWhen using the Template Editor in Question Mode, you can locate and displaythe panes containing a specific character string by choosing Search > Find. TheFind Question dialog box is used in locating and displaying a specified characterstring.
The editor can search titles, questions, and answers for matching characters. Itdoes not search the More Info.
The following table describes the search criteria used in the Find Question dialogbox.
Click the Find button to search for the character string.
To repeat the search, either click the Find button again or use the Search > FindNext menu item from the Template Editor menu bar.
Click the Help button to display context-sensitive help.
TABLE 45 Find Question Dialog Box Search Criteria
Item Description
String Enter the character string that you are trying to find.
Where Choose where you want to search:
In titles
In text of questions
In answers
Anywhere
Options: Consider caseSpecifies that the search pattern match the case of the charactersin the Find text field.
Options: Whole wordsSpecifies that the search pattern only match whole words fromthe Find text field.
Chapter 5 Creating and Editing Templates 137
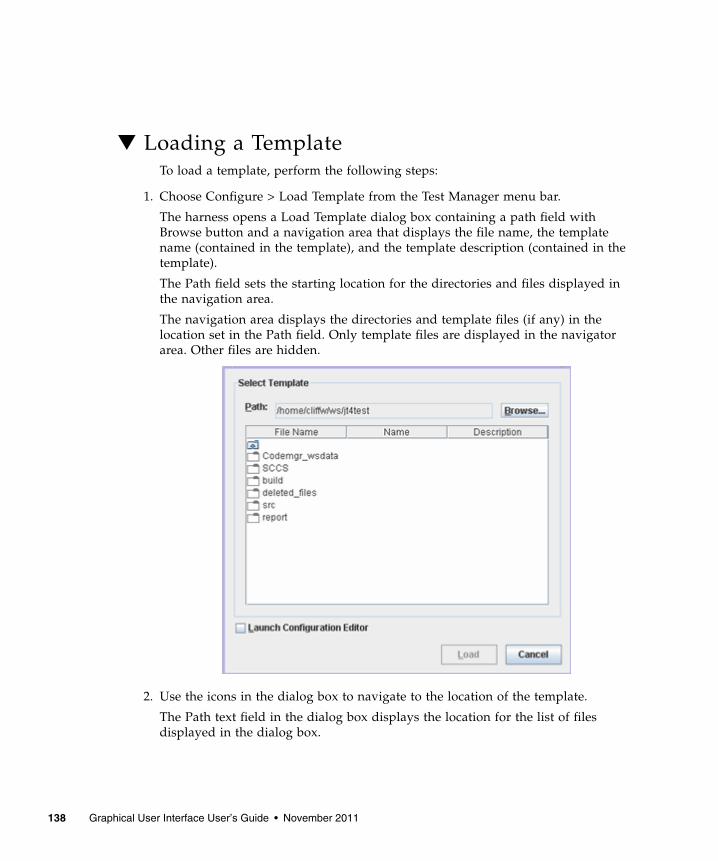
▼ Loading a TemplateTo load a template, perform the following steps:
1. Choose Configure > Load Template from the Test Manager menu bar.
The harness opens a Load Template dialog box containing a path field withBrowse button and a navigation area that displays the file name, the templatename (contained in the template), and the template description (contained in thetemplate).
The Path field sets the starting location for the directories and files displayed inthe navigation area.
The navigation area displays the directories and template files (if any) in thelocation set in the Path field. Only template files are displayed in the navigatorarea. Other files are hidden.
2. Use the icons in the dialog box to navigate to the location of the template.
The Path text field in the dialog box displays the location for the list of filesdisplayed in the dialog box.
138 Graphical User Interface User’s Guide • November 2011
3. Click the template icon and the Load button.
The harness loads the template. If the template is not correct for the test suite, theharness displays an error dialog box and closes without loading the template.
Chapter 5 Creating and Editing Templates 139

140 Graphical User Interface User’s Guide • November 2011
6
Running Tests
In the Test Manager, you can use the Run Tests menu or the toolbar button to starta test run of the tests specified in your current configuration. See Test ManagerTool for a description of the Run Tests menu and the tool bar buttons. SeeConfiguring a Test Run for a description of how to use the Configuration Editorto specify configuration information used to run tests.
You can also use the test tree pop-up menu to start a test run of one or more testsselected from the test tree. See Test Tree Pop-up Menu for a description of how touse the test tree pop-up menu to run individual tests in a test tree.
Note – If you do not want to use the Test Manager to run tests, you can use thecommand line. See Command-Line Summary in the Command-Line Interface User’sGuide for information about running tests from the command line.
The harness saves all test results after running tests but does not automaticallygenerate reports of test results. You must generate test reports from the TestManager or from the command line. See Generating and Viewing Reports fordetailed information about reports.
If you use the All Tests view filter and begin a test run, the harness displays anadvisory dialog box. Using the All Test view filter displays the results of all testsin a test suite regardless of whether or not they are included in the test run.
You can choose to disable the dialog box by setting harness Preferences, bychoosing a different view filter, or by using the check box in the dialog to stop thedialog from being displayed in the future.
This chapter contains the following topics, presented in a sequence that you canuse when running tests:
■ Starting a Test Run - Describes how to use the Test Manager to start a test runusing the current configuration.
■ Monitoring a Test Run - Describes how to use the Test Manager (including theuse of the Log Viewer) to monitor a test run.
Chapter 6 Running Tests 141
■ Monitoring Agents - Describes how to use the Agent Monitor tool to monitoragent activity during a test run.
■ Stopping a Test Run - Describes how to use the Test Manager to stop a testrun.
■ Troubleshooting a Test Run - Describes how to use the Test Manager totroubleshoot a test run.
Starting a Test RunWhen the harness is not running tests, it enables both the button on the tool barand the Run Tests > Start menu item.
Note – Only one test run at a time can be active in each Test Manager.
To start a test run using the current configuration, either click the button orchoose Run Tests > Start. You can also use the test tree pop-up menu to run aspecific test or group of tests in a folder. See Test Tree Pop-Up Menu.
Before the harness attempts to run the test suite, it verifies that the requiredconfiguration information is complete. You can view the configuration state in theTest Manager Properties browser. See Viewing Test Manager Properties for adescription of the browser.
If the configuration information is not provided or is incomplete, the harnessopens a dialog box advising you that the configuration must be completed beforeit can begin running tests. You can choose to open the configuration editorwindow or cancel the test run. If you choose to open the configuration, theharness opens the configuration at the incomplete section.
To change the test suite or work directory before running tests, refer to thefollowing topics:
■ Opening a Test Suite
■ Opening a Work Directory
142 Graphical User Interface User’s Guide • November 2011
■ Creating a Work Directory
If a JavaTest Harness agent is used to run the tests for your product, you muststart the agent before you begin the test run. See JavaTest Harness Agent User’sGuide for detailed information about the JavaTest Harness agent.
If the harness starts the test run and issues a request before the active agent startsrunning, the harness waits for an available agent until the timeout period ends. Ifthe timeout period ends before an agent is available, the harness reports an errorfor the test.
Chapter 6 Running Tests 143
Monitoring a Test RunAfter the test run begins, the Test Manager displays information about the testrun in the areas described in the following table.
While monitoring the test run in the Test manager, you can also display thecontents of output logs being generated during the test run. See Monitoring
TABLE 46 Monitor a Test Run
Area Description
Test Tree The test tree uses colored icons to display the current run and test results status of the foldersand tests in the work directory. As the harness completes running individual tests, it updateseach test tree icon to indicate the test result status.
See Monitoring With a Test Tree for detailed information about using the test tree tomonitor the progress of the test run.
StatusMessages
Below the test tree area is a resizable text area that displays information about current TestManager activity. In this area the harness displays status messages about the state of the testrun and the name of the test being run.
ProgressIndicator
The Test Manager Status Line contains a progress indicator. The indicator displays the elapsedtime of the previous test run when tests are not running. When tests are running, itautomatically changes to the progress bar of the current test run. At the completion of the testrun, the indicator changes to display the elapsed time.
See Progress Indicator for information about using the test progress meter to monitor theprogress of the test run.
ProgressMonitor
A separate Progress Monitor is available that displays current, detailed information about theprogress of the test run.
See Progress Monitor for information about using the Progress Monitor.
InformationArea
As tests run, the harness displays information about the run in the information area to the rightof the test tree. The information area provides two views:
Folder view - When you click a folder icon in the test tree,the harness displays a Summary tab, a Documentation tab,five status tabs, and a status field containing informationfrom the work directory about a folder and its descendants.See Displaying Folder Information for detailed informationabout browsing folder information.
Test view - When you click a test icon in the test tree ordouble click its name in the Folder view, the harnessdisplays six tabbed panes that contain detailed informationabout the test. See Displaying Test Information for detailedinformation about browsing test information.
144 Graphical User Interface User’s Guide • November 2011

Output Logs and Monitoring Services for detailed information.
The harness also provides a web server that you can use to remotely monitor andcontrol batch mode test runs. The HTTP Server provides two types of output:
■ HTML Formatted Output allowing users to remotely monitor batch mode testruns in a web browser
■ Plain Text Output intended for use by automated testing frameworks
See the Command-Line Interface User’s Guide for details about running tests fromthe command line and using the web server.
Monitoring With a Test TreeThe test tree uses folder icons, test icons, and two independent types of filtering(run filtering and view filtering) to simultaneously display the followingconditions:
■ Progress of a test run
■ Current test results in the work directory
When a test run begins, you can track its progress in the test tree by observing thefolder and test icons. The test tree displays an arrow at the left of each folder andtest icon as it is loaded and run.
After the harness completes running a test, it writes the test results to the workdirectory and updates the folder and test icons in the test tree. The test treedisplays folder and test icons based on the view filter specified in the TestManager window.
The harness supports using status colors specified by the user instead of thedefault color settings. See Specifying Status Colors in the Command-Line InterfaceUser’s Guide.
Regardless of whether or not a test was run, the test tree displays filtered out
folder and test icons for those tests and folders filtered out by the view filter.All other icons are updated to reflect their current result status from the workdirectory.
Changing either the run or the view filter settings causes the harness toimmediately update the folder and test icons displayed in the test tree.
See View Filters for a description of how to specify which test results from thework directory are displayed in the test tree.
See Test Tree for a detailed description of the icons, filters, and other features usedin the test tree.
The goal of a test run, when using the appropriate view filter, is for the root test
suite folder to display the passed folder icon. The passed root test suite foldericon signifies that all tests in the test suite not filtered out of the test run (by
Chapter 6 Running Tests 145
specifying tests that are run, exclude lists, keywords, and prior status) withpassed test results. See Changing QuickSet Values for a description how toquickly set run filters that include or remove tests from a test run.
Click the test suite icon in the test tree to display status information for the testsuite in the Test Manager information area. The view filter used in the test tree isalso used to display folder status information. See
Using View FiltersIn the toolbar at the top of the test tree is a list of view filters that you can use toselect the status of the folders and tests displayed by the test tree. The harnessincludes a Current Configuration filter and an All Tests filter. Additional filters,such as certification filters, can also be added by the test suite. Refer to your testsuite documentation for detailed descriptions of any additional filters in the list ofview filters.
Selecting a view filter only filters the status (folder colors and counters) displayedin the Test Manager window, not the tests that are run. You must use theconfiguration editor to filter the tests that are run. See Specifying Tests to Run.
SeeView Filters for detailed information about the view filters available in the TestManager.
Monitoring Output LogsYou can use the Log Viewer to monitor logs produced during a test run. To usethe Log Viewer, your test suite must generate the logs that the viewer can display.See your test suite documentation for detailed information about the log files thatit generates. See Log Viewer for a detailed description of the Log Viewer.
The Log Viewer enables you to perform the following actions when monitoringoutput logs:
■ Display specific types of information from a log by selecting one or morenotification levels.
For example, you can choose to display only the Critical and Warningmessages.
■ Monitor real-time content of output logs.
You can track log data in real time by selecting the Live Scrolling check box.
■ Search log messages for text strings.
You can use the Find text field to search for literal strings within the currentlyviewed log data.
146 Graphical User Interface User’s Guide • November 2011
■ Display multiple views of real-time content.
You can display data side-by-side by clicking the Open New Log Viewerbutton and using different criteria for displaying the output data in eachviewer. Only the first instance of the Log Viewer is used to restore log viewingpreferences next time the work directory is opened.
■ Selection of log levels across all available logs in a single action.
Use the Selection Actions list to turn on a log level in all available logs. Forexample, you can turn on Error reporting for all logs. Because the operationonly affects the current logs, logs created after you make the selection are notaffected. To include logs created after the initial selection, reselect the action.
■ Save log contents displayed in the log viewer. To save the log contents, clickthe Save button at the bottom of the viewer.
■ Clear the contents displayed in the log viewer. To clear the log contents, clickthe Clear log button at the bottom of the viewer.
Chapter 6 Running Tests 147

Agent Monitor ToolIf your test suite uses the harness agent, use the Agent Monitor tool to view allagents in a test system that are running tests. Choose Tool > Agent Monitor fromthe menu bar to open the tool window.
The Agent Monitor window contains two sections: Agent Pool and AgentsCurrently In Use.
If your test suite uses the harness agent, see the JavaTest Harness Agent User’sGuide for a detailed description of using the Agent Monitor tool.
148 Graphical User Interface User’s Guide • November 2011

Stopping a Test RunWhen the harness is running tests, it enables both the button on the toolbar andthe Stop menu item.
Either click the button or choose Run Tests > Stop to stop a test run.
As it completes each test, the harness writes the test results (.jtr files) in thework directory. Stopping a test run causes the tests in progress to indicate anerror.
When you stop a test run, the harness does not generate reports of test results.You must generate the reports from the Test Manager window or from thecommand line. See Creating and Displaying Reports for detailed informationabout test reports.
Troubleshooting a Test RunNormally, the goal of a test run is for all tests in the test suite that are not filteredout by the current configuration to have passing results. See ChangingConfiguration Values for a description of how the current configuration filterstests in a test run.
If the root test suite folder contains tests with errors or failing results, you musttroubleshoot and correct the cause to satisfactorily complete the test run.
Tests with errors are tests that could not be executed by the JT harness. Theseerrors usually occur because the test environment is not properly configured orthe software under test is defective. See Tests with Errors for a detaileddescription of troubleshooting tests with errors.
Tests that failed are tests that were executed but had failing results. See Teststhat Fail for a detailed description of troubleshooting tests that failed.
The Test Manager window provides you with the following facilities to effectivelytroubleshoot a test run:
■ Test Tree
■ Folder View
■ Test View
■ Log Viewer
■ Service Monitor
Chapter 6 Running Tests 149
Test TreeUse the test tree and view filters to identify specific folders and tests with errors
or failing results. Open the red and blue folders until the specific tests that
failed or had errors are displayed.
Folder ViewWhen you click a folder icon in the test tree pane, the JT harness displays afiltered summary of its test status in the Test Manager information area thatmatches the test tree.
Note –The View filter chosen in the Test Manager window might change the summaryvalues displayed in the folder view, but does not change the test results written inthe work directory.
Click the Error and the Failed tabs to display the lists of all tests in and under afolder that were not successfully run. You can double-click a test in the lists toview its detailed test information. Refer to Test View below for a description ofthe test information that the JT harness displays.
Test ViewWhen you click a test icon in the test tree or double-click its name in the folderview, the JT harness displays unfiltered, detailed information about the test in theinformation area. The Test Manager displays the current information for that testfrom the work directory.
Note – Because the Test Manager does not use a view filter when displaying testinformation, the test status displayed in the information area may not match thefiltered view in the test tree or the folder Summary view.
The test view contains detailed test information panes and a brief status messageat the bottom identifying the type of result. This message may be sufficient foryou to identify the cause of an error or failure.
If you need additional information to identify the cause of the error or failure, usethe following panes listed in order of their importance:
■ Test Run Messages contains a Message list and a Message pane that display themessages produced during the test run
150 Graphical User Interface User’s Guide • November 2011

■ Test Run Details contains a two-column table of name-value pairs recordedwhen the test was run.
■ Configuration contains a two-column table of the name-value pairs derivedfrom the configuration data that were actually used to run the test.
Log ViewerUse the Log Viewer (select View > Logs) to monitor log files generated during atest run or to inspect log files after a test run is completed. See Monitoring OutputLogs for a detailed description.
Service MonitorIf a test suite uses services, use the Service Monitor (select View > Services) to seethe status of services. See Monitoring Services for a detailed description.
Chapter 6 Running Tests 151

152 Graphical User Interface User’s Guide • November 2011
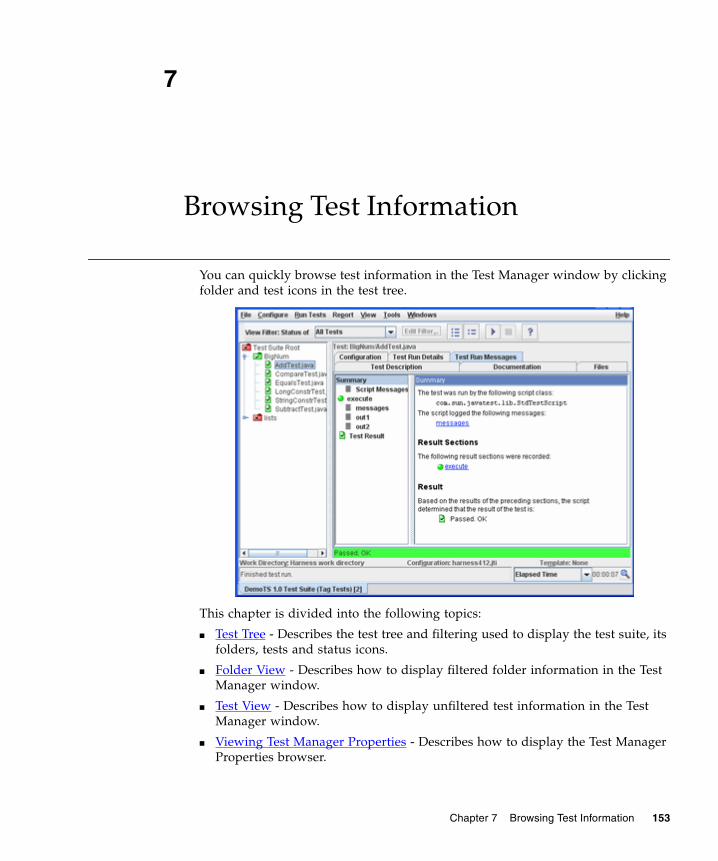
7
Browsing Test Information
You can quickly browse test information in the Test Manager window by clickingfolder and test icons in the test tree.
This chapter is divided into the following topics:
■ Test Tree - Describes the test tree and filtering used to display the test suite, itsfolders, tests and status icons.
■ Folder View - Describes how to display filtered folder information in the TestManager window.
■ Test View - Describes how to display unfiltered test information in the TestManager window.
■ Viewing Test Manager Properties - Describes how to display the Test ManagerProperties browser.
Chapter 7 Browsing Test Information 153
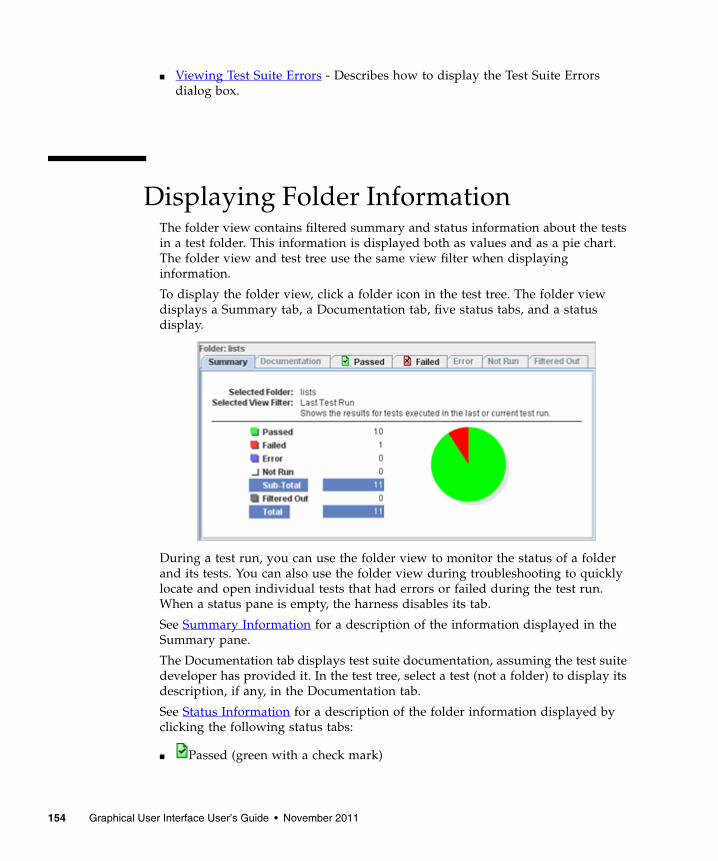
■ Viewing Test Suite Errors - Describes how to display the Test Suite Errorsdialog box.
Displaying Folder InformationThe folder view contains filtered summary and status information about the testsin a test folder. This information is displayed both as values and as a pie chart.The folder view and test tree use the same view filter when displayinginformation.
To display the folder view, click a folder icon in the test tree. The folder viewdisplays a Summary tab, a Documentation tab, five status tabs, and a statusdisplay.
During a test run, you can use the folder view to monitor the status of a folderand its tests. You can also use the folder view during troubleshooting to quicklylocate and open individual tests that had errors or failed during the test run.When a status pane is empty, the harness disables its tab.
See Summary Information for a description of the information displayed in theSummary pane.
The Documentation tab displays test suite documentation, assuming the test suitedeveloper has provided it. In the test tree, select a test (not a folder) to display itsdescription, if any, in the Documentation tab.
See Status Information for a description of the folder information displayed byclicking the following status tabs:
■ Passed (green with a check mark)
154 Graphical User Interface User’s Guide • November 2011
■ Failed (red with an x)
■ Error (blue with an exclamation point)
■ Not Run (white with a dash)
■ Filtered Out (gray or shaded)
The status message displayed at the bottom of the pane provides informationabout the selected tab. The messages indicate that tests in the folder are loadingor provide detailed status information about a selected test.
Summary InformationWhen you click a folder icon in the test tree, the harness uses the current viewfilter to display Summary information about the folder’s test results.
The Summary pane contains header information that identifies the folder and theview filter presented in the Summary table and its associated pie chart. The piechart displayed in the Summary pane is a graphical representation of the tabulardata.
The following table describes the filtered work directory information that theSummary table and pie chart can display.
TABLE 47 Summary Pane Contents
Field Description
Passed The number of tests in a folder (including all of its subordinate folders)displayed in the test tree that were run and have passed test results.
Failed The number of tests in a folder (including all of its subordinate folders)displayed in the test tree that were run and have failed test results.
Error The number of tests in a folder (including all of its subordinate folders)displayed in the test tree that were run but had errors.
Not Run The number of tests in a folder (including all of its subordinate folders) in thetest tree that have not yet been run and were not filtered out.
Sub-Total The total number of tests that were selected to run.
Filtered Out The total number of tests in a folder (including all of its subordinate folders)displayed in the test tree that were filtered out. Tests that were filtered outinclude tests that you omitted from the test run by using keywords, priorstatus, or exclude lists.
Total Total number of tests in a folder and its subordinate folders.
Chapter 7 Browsing Test Information 155
Note – The GUI only displays results of those tests in the work directory that matchyour view filter setting. Changing the view filter used in the Test Manager changesthe values displayed in the Summary pane.
When using the All Tests view filter, new settings in the current configuration donot change the values displayed in the Summary pane.
When using the Current Configuration view filter, each time you make a changein the configuration, the values displayed in the Summary pane are recalculatedand displayed based on the new settings in the current configuration. See thefollowing example for a description of the use of the Current Configuration viewfilter and the All Tests view filter.
Example:If you rerun a set of tests and use the Current Configuration view filter with
Prior Status: Failed set in the configuration (see Specifying Prior Status), asactual test status in the work directory changes from Failed to either Passed orError, the test status displayed in the Summary pane changes from Failed toFiltered Out.
If you change the view filter to All Tests, the test tree and Summary paneimmediately display the actual results of all tests in the work directory,regardless of the Prior Status settings in the configuration.
See Problems Viewing Test Results for additional information about viewing teststatus in the test tree and Summary pane.
Click the appropriate status information tab to identify the individual tests in acategory.
Status InformationIn addition to Summary and Documentation information, the folder viewcontains five status tabs that use the view filter to group and list a folder’s testsby their results in the work directory. See Displaying Folder Information foradditional information.
■ In the tabbed panes, click a test in the list to display the summary message atthe bottom of the pane.
■ By default the list has two columns, Name and Title. Click a heading to sort thelist.
■ To display alternate information in the second column, right-click on thecolumn heading and make a selection from the Description or Runtime contextmenus.
156 Graphical User Interface User’s Guide • November 2011
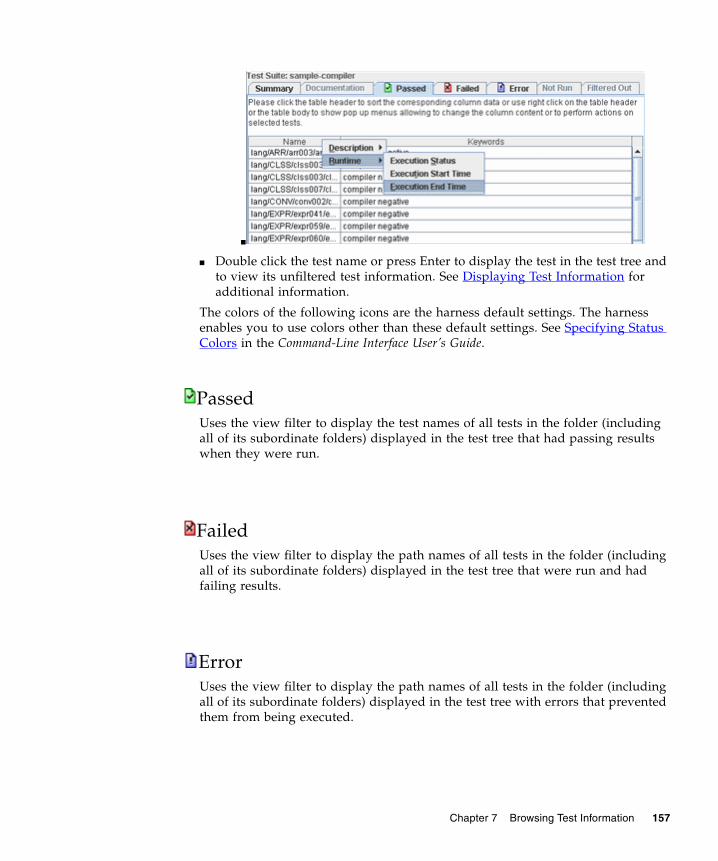
■
■ Double click the test name or press Enter to display the test in the test tree andto view its unfiltered test information. See Displaying Test Information foradditional information.
The colors of the following icons are the harness default settings. The harnessenables you to use colors other than these default settings. See Specifying StatusColors in the Command-Line Interface User’s Guide.
PassedUses the view filter to display the test names of all tests in the folder (includingall of its subordinate folders) displayed in the test tree that had passing resultswhen they were run.
FailedUses the view filter to display the path names of all tests in the folder (includingall of its subordinate folders) displayed in the test tree that were run and hadfailing results.
ErrorUses the view filter to display the path names of all tests in the folder (includingall of its subordinate folders) displayed in the test tree with errors that preventedthem from being executed.
Chapter 7 Browsing Test Information 157

Not RunUses the view filter to display the path names of all tests in the folder (includingall of its subordinate folders) displayed in the test tree that are selected by theview filter but have not been run.
Filtered OutUses the view filter to display a two-column list. The first column contains thenames of tests in the selected folder whose results are filtered out by the selectedview filter.
The second column contains a specific reason why the test result is filtered out bythe view filter. The specific reason depends on the view filter criteria. See ViewFilters for a detailed description of filtering criteria.
Multi-Selection PanelWhen multiple tests are selected in the test tree, the harness displays a Multi-Selection panel in the Information Area.
1. Test Tree Selection
2. Multi-Selection Panel
This panel contains a text description area at the top of the panel that describesthe operations that can be performed using tests and folders selected in the testtree and listed below.
In the section below the text description area, the harness displays a list of thetests and folders selected in the test tree.
158 Graphical User Interface User’s Guide • November 2011
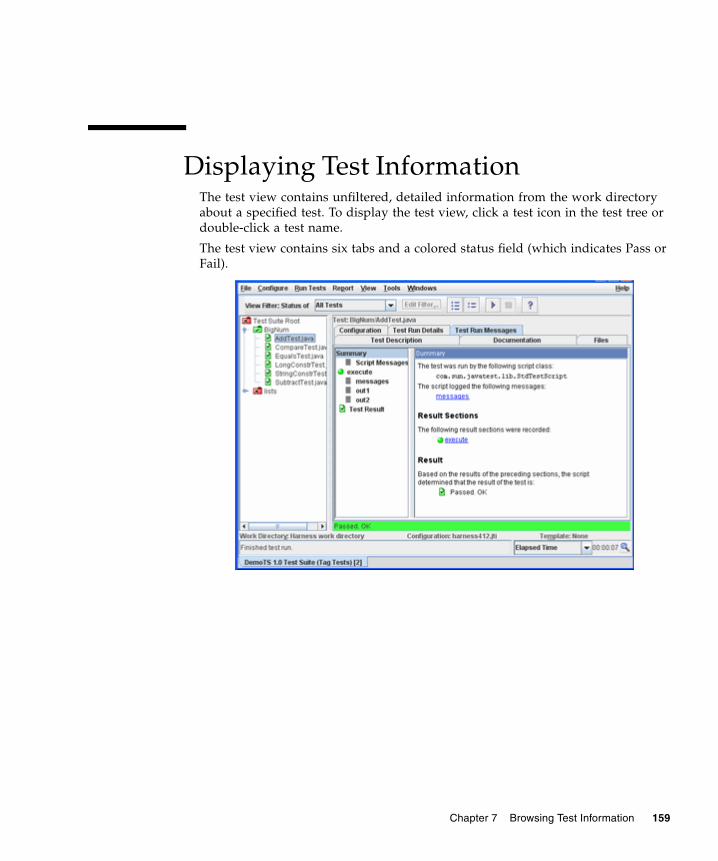
Displaying Test InformationThe test view contains unfiltered, detailed information from the work directoryabout a specified test. To display the test view, click a test icon in the test tree ordouble-click a test name.
The test view contains six tabs and a colored status field (which indicates Pass orFail).
Chapter 7 Browsing Test Information 159
Note –The test view does not use view filtering to display information. If you are using aview filter other than All Tests, the status color displayed in this view might notmatch the test icon or the folder view tab.
The following table describes the contents of the test view panes. The status fieldat the bottom of the pane contains a description of the test result and is visible inall of the test view panes.
When an information pane is empty, the harness disables it.
TABLE 48 Information Pane Contents
Tab Description
Test Description Pane Displays the name-value pairs contained in the test description.The contents are input data and always available.
Documentation Pane Displays test documentation, if it exists.
Files Pane Contains a drop-down list of source files from the testdescription. Click a file name from the drop-down list to displayits contents. The contents are input data and always available.
Configuration Pane Displays a table of configuration name-value pairs used to run aspecific test. The contents are output data and only enabled if thetest was run.
Test Run Details Pane Displays the name-value pairs that were recorded when the testwas run. The contents are output data and only enabled if thetest was run.
Test Run MessagesPane
Contains a tree and message panel of output from sections of thetest. Click a name to display its contents. The contents are outputdata and only enabled if the test was run.
160 Graphical User Interface User’s Guide • November 2011
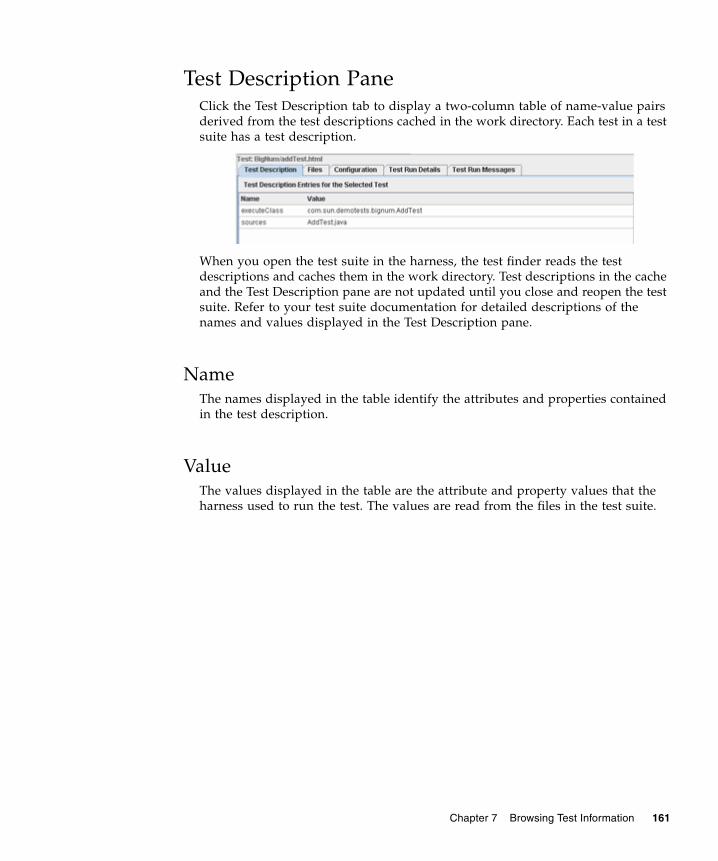
Test Description PaneClick the Test Description tab to display a two-column table of name-value pairsderived from the test descriptions cached in the work directory. Each test in a testsuite has a test description.
When you open the test suite in the harness, the test finder reads the testdescriptions and caches them in the work directory. Test descriptions in the cacheand the Test Description pane are not updated until you close and reopen the testsuite. Refer to your test suite documentation for detailed descriptions of thenames and values displayed in the Test Description pane.
NameThe names displayed in the table identify the attributes and properties containedin the test description.
ValueThe values displayed in the table are the attribute and property values that theharness used to run the test. The values are read from the files in the test suite.
Chapter 7 Browsing Test Information 161

Files PaneThe Files tab displays those files nominated by a test suite on a per-test basis. TheFiles tab can render .html, .rtf, and .txt files as well as most .au, .wav,.mid, .gif, .jpg, and .png files.You can browse but not edit source files in thispanel.
Choose a file from the drop-down list to display its contents.
Configuration PaneThe Configuration tab displays a two-column table of the name-value pairs thatwere derived from the configuration file and actually used to run the test.
The contents of this pane vary for each test suite. Because the table containsvalues that were used when the test was run, it may provide valuable informationwhen troubleshooting a test run. Refer to your test suite documentation fordetailed descriptions of the name-value pairs for your test.
NameThe names in the table identify test environment properties used by the harnessto run the test.
162 Graphical User Interface User’s Guide • November 2011

ValueThe values displayed in the table were used to run the test.
Test Run Details PaneClick the Test Run Details tab to display a two-column table of name-value pairsthat were recorded when the test was run and may provide valuable informationwhen troubleshooting a test run. Refer to your test suite documentation fordetailed descriptions of the result property name-value pairs for your test.
NameThe harness derives property names from the test results file and displays them inthe table with the following defaults:
■ Information about the version of the harness used to run the test
■ Information about the operating system used to run the test
■ Date and time the test started
■ Date and time the test ended
Chapter 7 Browsing Test Information 163
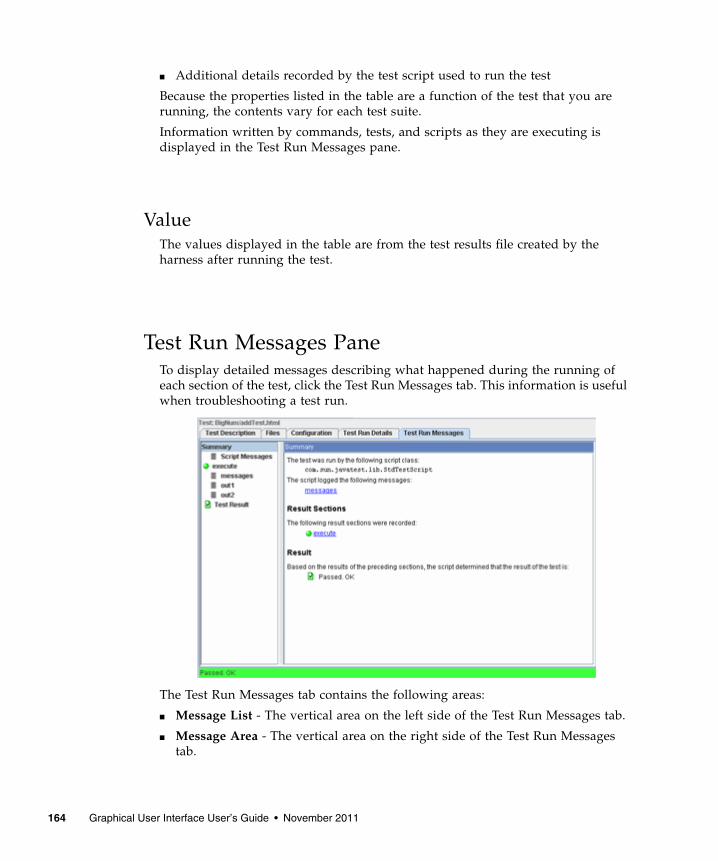
■ Additional details recorded by the test script used to run the test
Because the properties listed in the table are a function of the test that you arerunning, the contents vary for each test suite.
Information written by commands, tests, and scripts as they are executing isdisplayed in the Test Run Messages pane.
ValueThe values displayed in the table are from the test results file created by theharness after running the test.
Test Run Messages PaneTo display detailed messages describing what happened during the running ofeach section of the test, click the Test Run Messages tab. This information is usefulwhen troubleshooting a test run.
The Test Run Messages tab contains the following areas:
■ Message List - The vertical area on the left side of the Test Run Messages tab.
■ Message Area - The vertical area on the right side of the Test Run Messagestab.
164 Graphical User Interface User’s Guide • November 2011

■ Test Result Status Bar - The horizontal area at the bottom of the Test RunMessages tab.
Message ListThe message list provides a detailed list of messages issued during a test run.Click an item in the list to display its contents in the message area. The messagelist contains links to the following types of messages:
■ Summary Message
■ Output Summary and Result Messages
■ Test Result Message
Summary MessageOnly one per test, this message summarizes all of the messages generated duringa test run and provides hypertext links to their detailed contents. The SummaryMessage contains the following information in the message area:
■ Test script used to run the test
■ Messages logged by the test script
■ Individual test result sections
■ Test result and its result icon
Script MessagesThis message is passed up from the script that executed the test. There is only onescript message per test. Script messages vary for each test script. Refer to your testsuite documentation for detailed descriptions of its script messages whentroubleshooting a test run.
Chapter 7 Browsing Test Information 165
Output Summary and Result MessagesEach test result section has an Output Summary and Result message thatprovides summary messages and hypertext links to its detailed messages. Thename of the Output Summary message is a function of the test suite and variesfor each test suite.
Some tests have only one result section, while others have multiple sections. Referto your test suite documentation for detailed descriptions of the tests whentroubleshooting a test run.
The following table lists and describes the message types.
TABLE 49 Output Summary and Result Messages
Message Type Description
Output Summary A two-column table listing the name and size of each output section. Each of thefollowing output sections contains text generated while executing the test section:
messages - Provides the command string used by thetest script to run the test section. Unlike ref and log,the messages field always exists in a section.
ref - The name of this message field is determined bythe test and might be a name other than ref. A test canuse this output stream to provide standard outputinformation from the test section.
log - The name of this message field is determined bythe test and might be a name other than log. A test canuse this output stream to provide standard errorinformation from the test section. Many tests only usethe log stream and include tracing as well as standarderror information when writing to the log output.
The contents of each output section varies from test suite to test suite. Refer to your testsuite documentation for detailed descriptions of the test section messages whentroubleshooting a test run.If no details exist in an output section, the harness does not create its hypertext link andindicates in the Size (chars) column that it is empty.
Result Contains a colored status icon and a brief description of the results of the specific testsection. The color of the circle indicates the result of the test section.
166 Graphical User Interface User’s Guide • November 2011
Test Result MessageThe Test Result Message indicates the cumulative result of the test. There is onlyone Test Result Message per test.
Note – For negative tests, the Test Result correctly indicates Passed when all of itstest sections have failed.
Message AreaThe area displays the messages issued during a test run. The number, names, andcontent vary for each test suite and may also vary for different tests in the sametest suite.
Test Result Status BarThe area displays an abbreviated form of the Test Result Message. See Test ResultMessage for detailed information.
Displaying Configuration InformationThe harness provides special browsers for displaying configuration checklists, testenvironment values, exclude list contents, and configuration log informationderived from the current configuration.This section contains the following topics:
■ Displaying the Configuration Checklist - Describes how to display the checklistthat a test suite’s interview may produce.
The checklist is optional and may not be produced by all test suites.
■ Viewing Configuration Values - Describes how to view the configurationvalues used to run a test suite.
When troubleshooting you can use the Test Environment browser to view theconfiguration values and their sources that were derived from the configurationfile and used by test suite specific plugin code to execute and run tests.
■ Viewing Exclude List Contents - Describes how to view the list of testsexcluded from a test run.
You can use the Exclude List browser to display the list of tests that wereexcluded from a test run. The browser also displays details about individual testsselected in the list.
Chapter 7 Browsing Test Information 167

■ Displaying the Question Log - Describes how to browse (in HTML format) thetext of all completed questions asked in the configuration interview and theiranswers.
Displaying the Configuration ChecklistYour test suite might produce a checklist of steps that must be performed beforerunning tests. The checklist is dynamically generated by the harness from thecurrent configuration. Changes to the values in the current configuration canproduce different checklist items.
If the tests suite produces a checklist, the harness enables the Show Checklistmenu item. To view the Configuration Checklist of the current configurationinterview choose View > Configuration > Show Checklist.
To close both the Configuration Checklist and the viewer, click the Close button atthe bottom of the window.
168 Graphical User Interface User’s Guide • November 2011
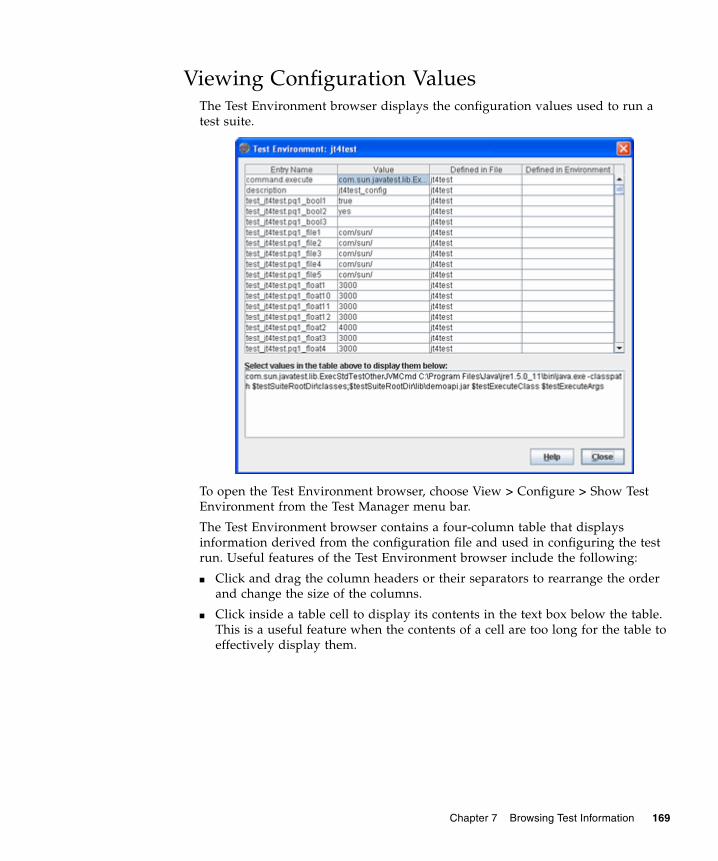
Viewing Configuration ValuesThe Test Environment browser displays the configuration values used to run atest suite.
To open the Test Environment browser, choose View > Configure > Show TestEnvironment from the Test Manager menu bar.
The Test Environment browser contains a four-column table that displaysinformation derived from the configuration file and used in configuring the testrun. Useful features of the Test Environment browser include the following:
■ Click and drag the column headers or their separators to rearrange the orderand change the size of the columns.
■ Click inside a table cell to display its contents in the text box below the table.This is a useful feature when the contents of a cell are too long for the table toeffectively display them.
Chapter 7 Browsing Test Information 169

■ Click a column header to alpha-numerically sort the contents of the table. Thisis a useful feature when searching for a specific name or value in a lengthytable.
The following table describes the contents of the Test Environment browser.
TABLE 50 Test Environment Dialog Box Contents
Name Description
Entry Name Identifies a name-value pair derived from the configuration file andused by test suite specific plug-in code to execute and run tests.
Value A value specified by the user in the configuration file used toconfigure a test run.
Defined in file Identifies the source of the configuration information used to run thetests. If your test suite uses a configuration (.jti) file to run tests,the source of the values is displayed.
Defined inenvironment
When appropriate, this field displays the environment name from theconfiguration.
170 Graphical User Interface User’s Guide • November 2011
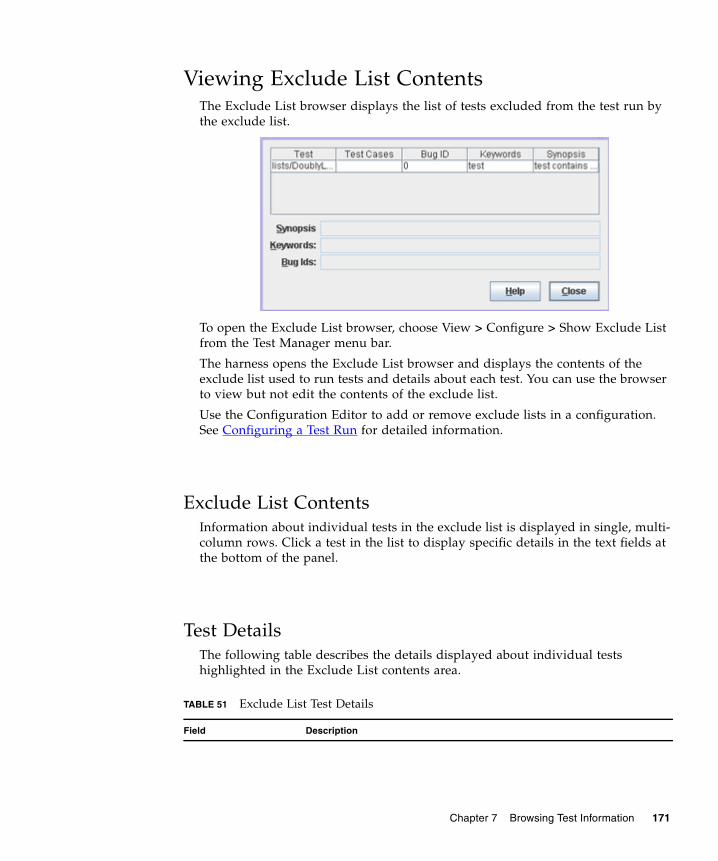
Viewing Exclude List ContentsThe Exclude List browser displays the list of tests excluded from the test run bythe exclude list.
To open the Exclude List browser, choose View > Configure > Show Exclude Listfrom the Test Manager menu bar.
The harness opens the Exclude List browser and displays the contents of theexclude list used to run tests and details about each test. You can use the browserto view but not edit the contents of the exclude list.
Use the Configuration Editor to add or remove exclude lists in a configuration.See Configuring a Test Run for detailed information.
Exclude List ContentsInformation about individual tests in the exclude list is displayed in single, multi-column rows. Click a test in the list to display specific details in the text fields atthe bottom of the panel.
Test DetailsThe following table describes the details displayed about individual testshighlighted in the Exclude List contents area.
TABLE 51 Exclude List Test Details
Field Description
Chapter 7 Browsing Test Information 171
Displaying the Question LogThe harness creates a log file of all the completed questions in the current, savedconfiguration file and their answers. The harness does not update the questionlog until you save the configuration file or click the Done button in theConfiguration Editor.
Open the Question Log of the current, saved configuration file by choosing View> Configure > Show Question Log from the Test Manager menu bar.
The log provides a list of all questions in the saved configuration with links to thefollowing details about each question:
■ Question
■ Question tag
■ Question description
■ Response (if appropriate)
Synopsis Provides annotated information about the excluded test
Keywords Provides a list of keywords that describe why the test was excluded
Bug Ids Lists the bug tracking IDs for the excluded test
TABLE 51 Exclude List Test Details
172 Graphical User Interface User’s Guide • November 2011
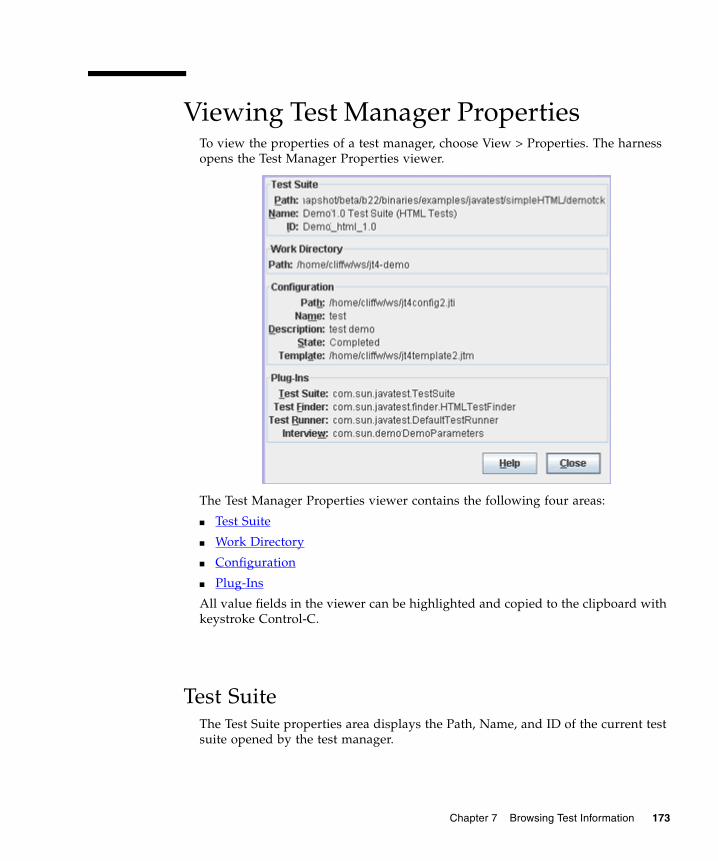
Viewing Test Manager PropertiesTo view the properties of a test manager, choose View > Properties. The harnessopens the Test Manager Properties viewer.
The Test Manager Properties viewer contains the following four areas:
■ Test Suite
■ Work Directory
■ Configuration
■ Plug-Ins
All value fields in the viewer can be highlighted and copied to the clipboard withkeystroke Control-C.
Test SuiteThe Test Suite properties area displays the Path, Name, and ID of the current testsuite opened by the test manager.
Chapter 7 Browsing Test Information 173
Work DirectoryThe Work Directory properties area displays the path of the current workdirectory opened by the test manager.
ConfigurationThe Configuration properties area displays the Path, Name, Description, State,and Template of the current configuration interview opened by the test manager.The State field indicates whether the configuration is complete and tests can berun. It also identifies the availability of special filters.
Plug-InsThe Plug-Ins properties area displays the name of the plug-ins used by the TestManager. The plug-ins are provided by the test suite architect. The following tabledescribes the properties that might be identified in the Plug-Ins properties area.
TABLE 52 Plug-Ins Area
Property Description
Test Suite The fully qualified name of the test suite class used by the test manager.
TestFinder
The fully qualified name of the test finder class used by the test manager.
TestRunner
The fully qualified name of the test runner class used by the test manager.
Interview The fully qualified name of the interview class used by the test manager.
174 Graphical User Interface User’s Guide • November 2011
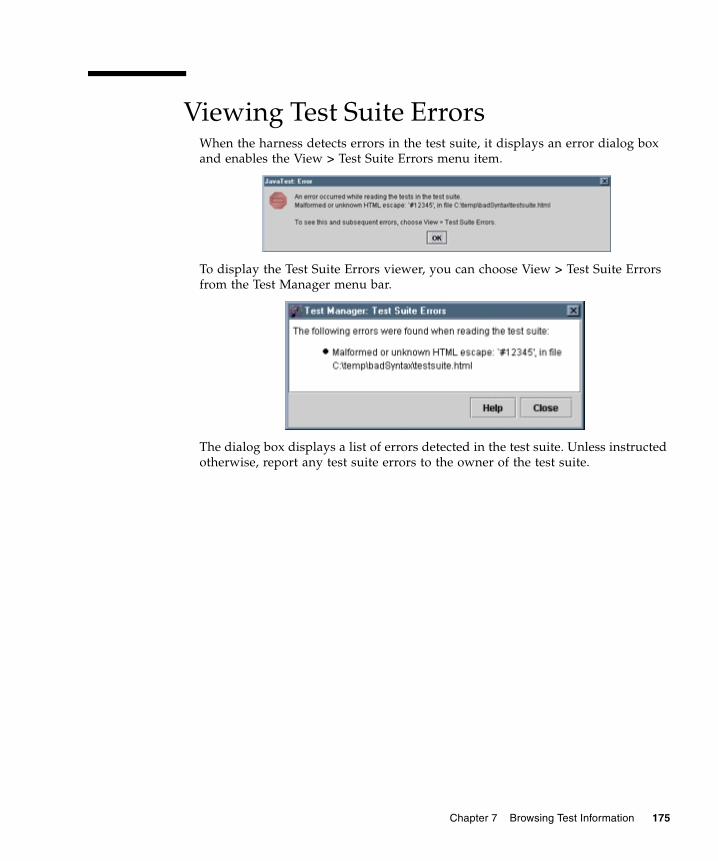
Viewing Test Suite ErrorsWhen the harness detects errors in the test suite, it displays an error dialog boxand enables the View > Test Suite Errors menu item.
To display the Test Suite Errors viewer, you can choose View > Test Suite Errorsfrom the Test Manager menu bar.
The dialog box displays a list of errors detected in the test suite. Unless instructedotherwise, report any test suite errors to the owner of the test suite.
Chapter 7 Browsing Test Information 175

176 Graphical User Interface User’s Guide • November 2011
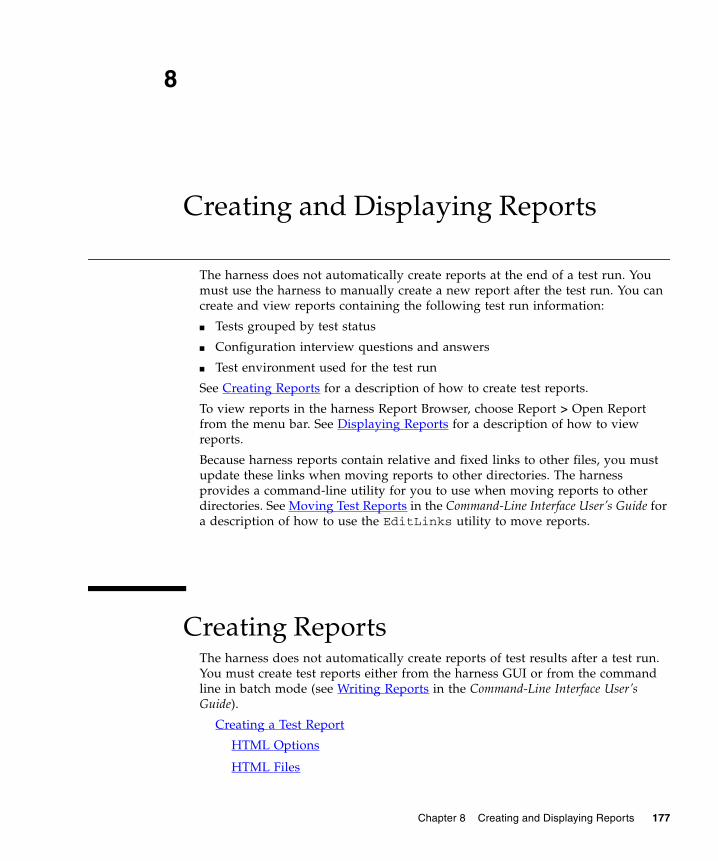
8
Creating and Displaying Reports
The harness does not automatically create reports at the end of a test run. Youmust use the harness to manually create a new report after the test run. You cancreate and view reports containing the following test run information:
■ Tests grouped by test status
■ Configuration interview questions and answers
■ Test environment used for the test run
See Creating Reports for a description of how to create test reports.
To view reports in the harness Report Browser, choose Report > Open Reportfrom the menu bar. See Displaying Reports for a description of how to viewreports.
Because harness reports contain relative and fixed links to other files, you mustupdate these links when moving reports to other directories. The harnessprovides a command-line utility for you to use when moving reports to otherdirectories. See Moving Test Reports in the Command-Line Interface User’s Guide fora description of how to use the EditLinks utility to move reports.
Creating ReportsThe harness does not automatically create reports of test results after a test run.You must create test reports either from the harness GUI or from the commandline in batch mode (see Writing Reports in the Command-Line Interface User’sGuide).
Creating a Test Report
HTML Options
HTML Files
Chapter 8 Creating and Displaying Reports 177
KFL Options
Report Files
Reports might contain configuration values as well as test results. To ensurethat any configuration values printed in reports are those that were used to runthe tests, observe the following precautions after running tests for which youintend to generate one or more reports:
Do not change any values in the current configuration.
Do not load a different configuration into the work directory.
Note – To minimize the chance of creating reports with configuration values that areinconsistent with the test results, either create reports after running the tests or usedifferent work directories for different configurations.
Displaying Reports
178 Graphical User Interface User’s Guide • November 2011
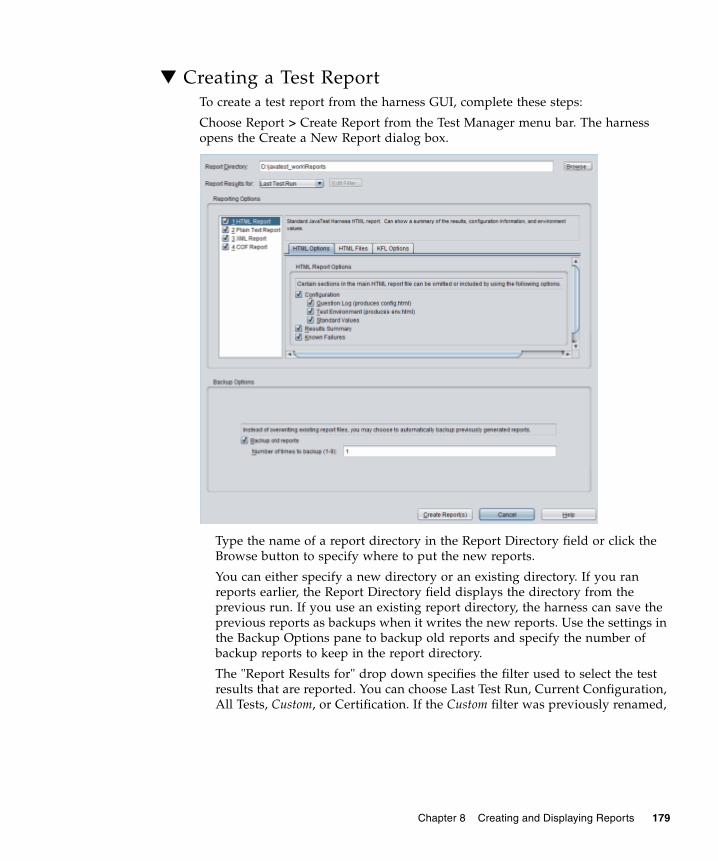
▼ Creating a Test ReportTo create a test report from the harness GUI, complete these steps:
Choose Report > Create Report from the Test Manager menu bar. The harnessopens the Create a New Report dialog box.
Type the name of a report directory in the Report Directory field or click theBrowse button to specify where to put the new reports.
You can either specify a new directory or an existing directory. If you ranreports earlier, the Report Directory field displays the directory from theprevious run. If you use an existing report directory, the harness can save theprevious reports as backups when it writes the new reports. Use the settings inthe Backup Options pane to backup old reports and specify the number ofbackup reports to keep in the report directory.
The "Report Results for" drop down specifies the filter used to select the testresults that are reported. You can choose Last Test Run, Current Configuration,All Tests, Custom, or Certification. If the Custom filter was previously renamed,
Chapter 8 Creating and Displaying Reports 179
the dialog box displays the current name of the custom filter. You can create ormodify a custom filter for generating test reports for a specific set of testcriteria.
See Using View Filters for a description of the filters.
See Custom View Filter for a description of how to create a custom view filter.
Check "Backup Options settings" to enable the report backup option andspecify the number of backups preserved.
When "Backup old reports" is enabled, the harness saves the previous reportsby appending a tilde and a sequential number to the .html extension (such asfailed.html~1~). The harness maintains the specified number of copies bydeleting the oldest copy when the limit of backups is reached for a specificreport. Changing this or any other setting in the report dialog box does notalter any previously saved backup reports. Existing backups are not deleted ifbackups are turned off and file names are not changed as old backups aredeleted.
The harness backs up the entire set of reports. If the first set of reports includedHTML, Text, XML, and COF formats, and the next set of reports are generatedin XML format only, the harness creates backups of the previous reports(appending the appropriate tilde and sequence number to the backup filename). The harness generates the new top-level index.html file and updatesits hyperlinks to maintain a self-consistent backup report set.
In the left column, choose the report format(s) to be generated by the harness.The options set in this dialog are persistent. Once set, they are used each timea report is generated. These settings also apply to reports printed from thecommand-line interface.
HTML Report: An HTML report showing configuration information, a resultsummary, and environment values. See HTML Options and KFL Options.
Plain Text Report: A text report showing only the test names and their resultstatus.
XML Report: An XML report containing configuration information, a resultsummary, and all result data for each test. This report is versatile - it can beused as input to Merge Reports and can be converted to other report formats.However, the file can be larger and slower to generate than other formats.
COF Report: The report browser displays a cof.xml hyperlink to the COFreport page, which contains a report in the COF format. COF is an extensiveXML format containing environment, configuration and test result data.
3. Click the Create Report(s) button.
The harness writes the reports and displays a dialog box that gives you the optionof either viewing the new reports in the report browser or returning to the TestManager window.
180 Graphical User Interface User’s Guide • November 2011

HTML OptionsIf you selected HTML Report in the Report Formats list, use the HTML Optionstab to select the sections of the main HTML report file that are generated.
The following options are available for generating HTML reports:
■ Configuration - Selecting this option enables all of the following subordinateoptions:
■ Question Log - Generates a report that is the equivalent of the ConfigurationQuestion Log.
■ Test Environment - Generates a report that is the equivalent of the ShowEnvironment dialog box.
■ Standard Values - Generates a report that contains the values from the Quick SetMode.
■ Results Summary - Generates a report of the pass, Fail, Error, Not Run, andTotal values.
The HTML report provides hyperlinks to content in the other HTML files. If itis not selected, the hyperlinks are not generated.
■ Known Failures - Generate a report of known failures, based on one or moreKnown Failures List (KFL) files. When the value for "Specify a Known FailuresList?" is set to Yes in the configuration editor, and one or more KFL files havebeen specified, the settings are stored in your user preferences and used as thedefault when the KFL option is selected.
■ Keyword Summary - Generates a report that provides a count of the numberof occurrences of keywords that appeared in the selected tests.
Chapter 8 Creating and Displaying Reports 181

HTML FilesUse the options on this tab to specify the content and the location of HTMLreports. The main report is the home page for browsing HTML reports. It can benamed report.html or index.html. The main report contains hyperlinks tothe extra files you choose to generate. The extra files you can choose are asfollows:
■ Passed Tests (passed.html): Tests that were executed during the test run andpassed.
■ Failed Tests (failed.html): Tests that were executed during the test run butfailed.
■ Error Tests (error.html): Tests that had errors and could not be run.
■ Not Run Tests (notrun.html): Tests that were not excluded from the test runbut were not run.
The main report and any extra files are written to the location you specified in theReport Directory field.
KFL Options in HTML ReportsKnown failure list reports enrich the reporting output so you can monitor thestatus of certain tests across test runs. This section describes how to create anduse a known failures list and discusses KFL reports and the Known FailureAnalysis.
Using a Known Failures ListA known failures list (KFL) is list of tests or test cases that are known to fail. Itspurpose is to provide failure data for reporting, so that failure behavior can betracked over time. Using a known failures list is optional and the feature is off bydefault. To activate the feature, answer yes to the Specify a Known Failures List?question in the configuration editor.
Once KFL files have been specified, (see Creating a Known Failures List andSpecifying a Known Failures List) you can choose the Known Failures option inthe HTML Options tab. This enables Known Failure Analysis options on the KFLOptions tab. Options you check on this tab are preserved as preferences for futurereports. This is true if reports are launched from the user interface or thecommand line.
Reporting Options:
182 Graphical User Interface User’s Guide • November 2011
■ Check for test discrepancies. This feature is No by default. To activate thisoption, choose it in the user interface.
Optional files/sections to generate:
These options are set to Yes by default.
■ List tests which are expected to fail and are still failing. See Unexpected Error(kfl_fail2fail.html).
■ List tests which were expect to fail but resulted in error instead. See NewPassed (kfl_fail2error.html).
■ Report on tests in KFL which are now missing.
Any generated data is added to the Known Failure Analysis which is foundtowards the end of the HTML report (report.html and/or index.html). It isa summary of various comparisons between the selected result set (CurrentConfiguration, Last Test Run, etcetera) and the items listed in the KFLs providedin the configuration.
Creating a Known Failures ListThe KFL is a text file with the extension .kfl.
Note – The KFL file name or its path must not begin with a dash "-" or containspaces. As decribed in Specifying Known Failures Lists With kfl in the Command-Line Interface User’s Guide, a space is a separator on the command line, therefore filepath arguments such as C:\Program Files\myconfig\foobar do not work.
The .kfl file lists one test or test case per line. You have the option of specifyinga bug ID following the test name (a space separator is required). Use # forcomments. For example:
# Demo.kfllists/DoublyLinkedList/insertTest.html 0000123BigNum/subtractTest.html 0000456BigNum/compareTest.html 0000789
If you provide a bug prefix URL, that ID will be appended to that address,creating a convenient link in your report. To specify the bug prefix URL, selectFile > Preferences. Under Test Manager, select Reporting, and specify the URL.
Chapter 8 Creating and Displaying Reports 183
Note – This feature does not validate the URL or perform any processing.
Note –
Specifying a Known Failures ListFollow these steps to use one or more known failure lists to add failure analysisdata to HTML reports.
1. From the configuration editor, select Configure > Edit Configuration.
2. Under Parameters, select "Specify a Known Failures List?" and choose Yes. OnceYes is chosen the parameter "Specify Known Failures List Files" is active.
3. Choose one or more KFL files, as described in the configuration editor’sKnownFailuresListInterview.
4. The files you choose are stored in your user preferences and are considered thedefaults.
If you have specified KFL files in the configuration editor it’s preferable to modifythe list using the configuration editor. If you want to modify the list of KFL filesfrom the command line, See Specifying Known Failures Lists with kfl in theCommand Line Interface User’s Guide.
Known Failures List ReportsIf you specified a known failures list in the configuration editor, the HTML reportwill include a section titled Known Failure Analysis. When you create a reportyou can check the HTML Option "Known Failures" to create the New Passed,Missing (not run), and New Failures reports. The options on the KFL Options tabgenerate reports for New Passed, Missing (test not found) and Old Failure.
184 Graphical User Interface User’s Guide • November 2011
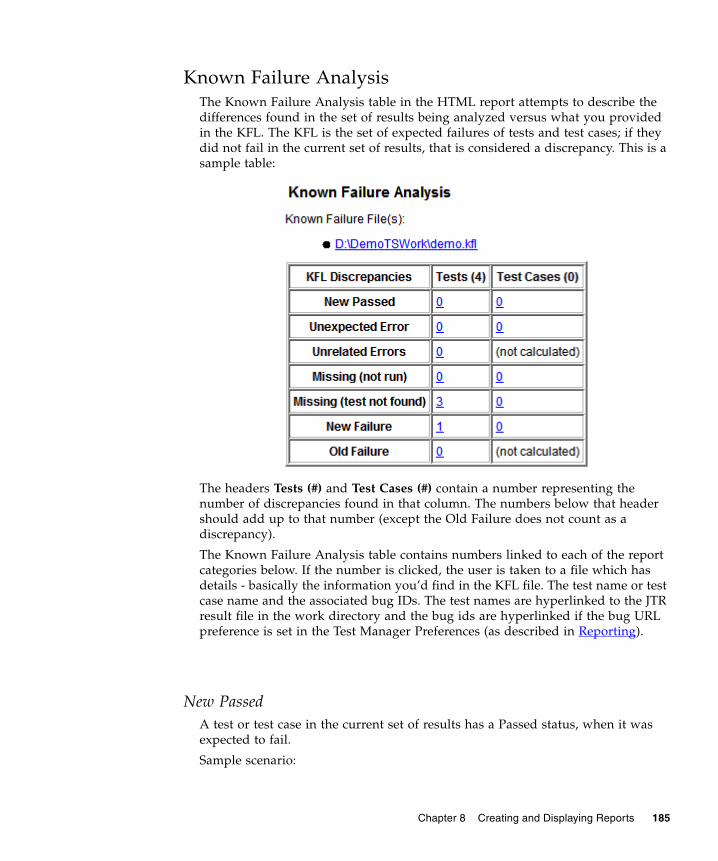
Known Failure AnalysisThe Known Failure Analysis table in the HTML report attempts to describe thedifferences found in the set of results being analyzed versus what you providedin the KFL. The KFL is the set of expected failures of tests and test cases; if theydid not fail in the current set of results, that is considered a discrepancy. This is asample table:
The headers Tests (#) and Test Cases (#) contain a number representing thenumber of discrepancies found in that column. The numbers below that headershould add up to that number (except the Old Failure does not count as adiscrepancy).
The Known Failure Analysis table contains numbers linked to each of the reportcategories below. If the number is clicked, the user is taken to a file which hasdetails - basically the information you’d find in the KFL file. The test name or testcase name and the associated bug IDs. The test names are hyperlinked to the JTRresult file in the work directory and the bug ids are hyperlinked if the bug URLpreference is set in the Test Manager Preferences (as described in Reporting).
New PassedA test or test case in the current set of results has a Passed status, when it wasexpected to fail.
Sample scenario:
Chapter 8 Creating and Displaying Reports 185
1. A product under development has a defect described in bug 1234, which exists inbuilds 1-5. The quality department now expects an error in test abc123 wheneverthe tests are run against the product, and has put test abc123 on the knownfailures list (KFL).
2. Build 6 arrives and test abc123 now passes because the defect has been fixed.
3. By looking at this Fail to Pass section of the report, the quality department willsee test abc123 listed and investigate the reason this test is suddenly passing.
4. After confirming the fix, a typical action would be to remove test abc123 fromthe KFL.
Unexpected ErrorA test or test case in the current set of results has an Error state, but it wasexpected to Fail. An Error usually indicates some sort of problem executing thetest. Investigate items in this category to see why they resulted in an Error ratherthan a simple Pass or Fail.
Missing (Not run)For some reason the test on the KFL was not run in the set of results beingreported. It may not indicate a problem if a partial set of results is being analyzed,or if the KFL contains a wide set of tests, all of which would never appear in asingle set of results.
Missing (test not found)The results for a test listed in the KFL are missing. Because the test was listed inthe KFL, it was expected to exist and Fail. A missing test may not indicate aproblem, but should be investigated. This section can be disabled by deselectingthe appropriate option in the HTML KFL report options in the Create Reportdialog.
New FailureAny test or test case which has a Failed status in the current results but does notappear in the KFL.
186 Graphical User Interface User’s Guide • November 2011
Old FailureThe lists of tests and test cases which failed and were expected to fail. This is nota discrepancy and is provided for informational purposes.
Report FilesThe possible contents of the report directory are as follows:
index.html /html config.html env.html error.html excluded.html failed.html kfl_fail2error.html kfl_fail2fail.html kfl_fail2missing.html kfl_fail2notrun.html kfl_fail2pass.html kfl_newfailures.html kfl_tc_fail2error.html kfl_tc_fail2missing.html kfl_tc_fail2notrun.html kfl_tc_fail2pass.html kfl_tc_newfailures.html notRun.html passed.html report.css report.html /text summary.txt
Chapter 8 Creating and Displaying Reports 187
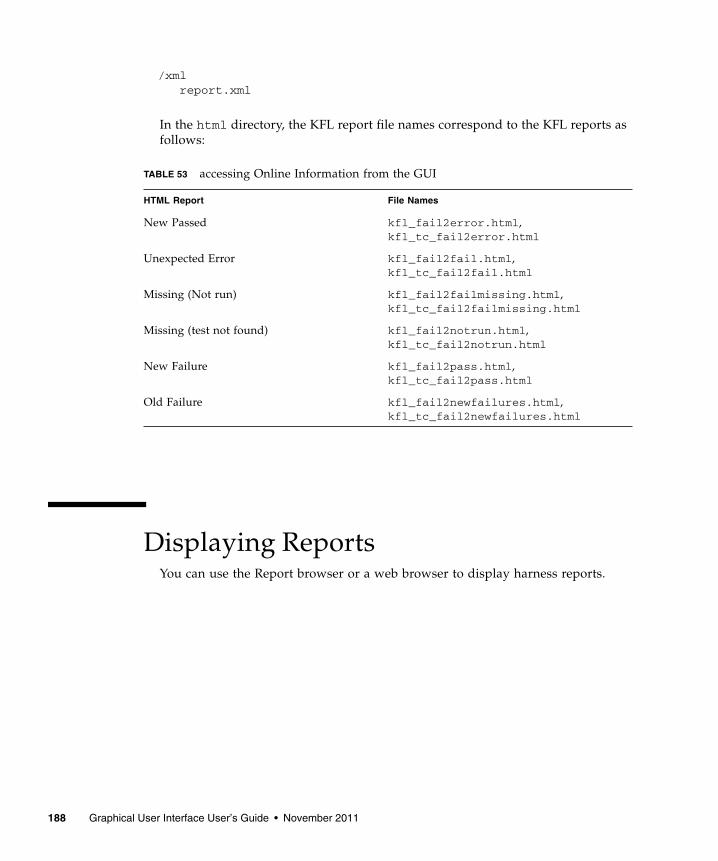
/xml report.xml
In the html directory, the KFL report file names correspond to the KFL reports asfollows:
Displaying ReportsYou can use the Report browser or a web browser to display harness reports.
TABLE 53 accessing Online Information from the GUI
HTML Report File Names
New Passed kfl_fail2error.html,kfl_tc_fail2error.html
Unexpected Error kfl_fail2fail.html,kfl_tc_fail2fail.html
Missing (Not run) kfl_fail2failmissing.html,kfl_tc_fail2failmissing.html
Missing (test not found) kfl_fail2notrun.html,kfl_tc_fail2notrun.html
New Failure kfl_fail2pass.html,kfl_tc_fail2pass.html
Old Failure kfl_fail2newfailures.html,kfl_tc_fail2newfailures.html
188 Graphical User Interface User’s Guide • November 2011
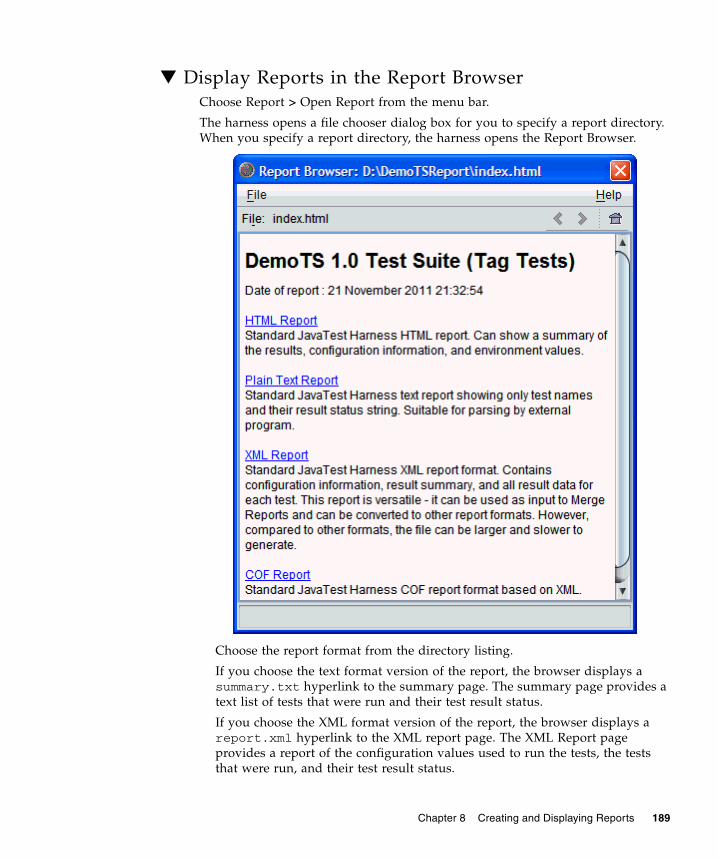
▼ Display Reports in the Report BrowserChoose Report > Open Report from the menu bar.
The harness opens a file chooser dialog box for you to specify a report directory.When you specify a report directory, the harness opens the Report Browser.
Choose the report format from the directory listing.
If you choose the text format version of the report, the browser displays asummary.txt hyperlink to the summary page. The summary page provides atext list of tests that were run and their test result status.
If you choose the XML format version of the report, the browser displays areport.xml hyperlink to the XML report page. The XML Report pageprovides a report of the configuration values used to run the tests, the teststhat were run, and their test result status.
Chapter 8 Creating and Displaying Reports 189
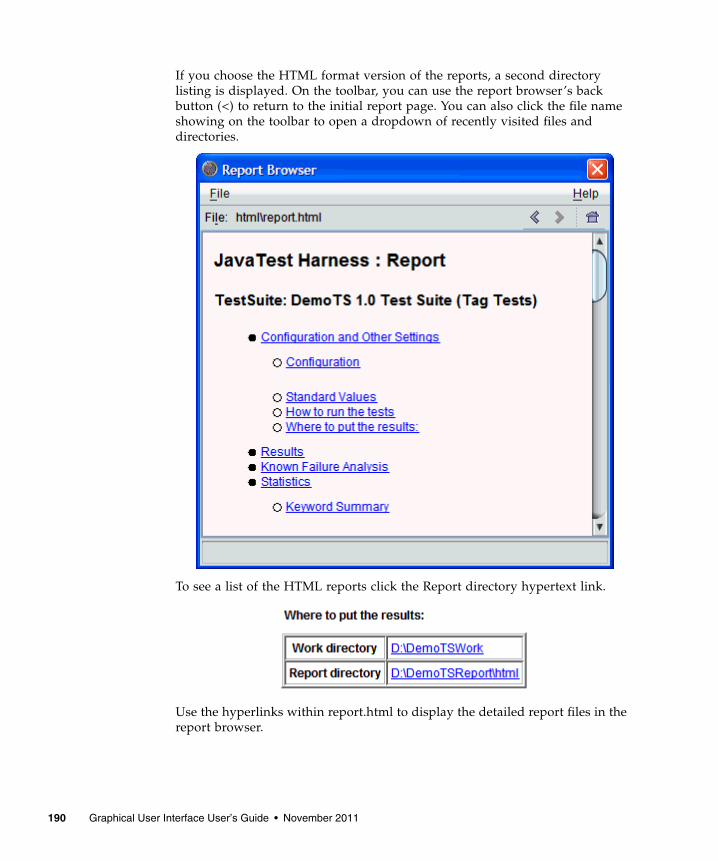
If you choose the HTML format version of the reports, a second directorylisting is displayed. On the toolbar, you can use the report browser’s backbutton (<) to return to the initial report page. You can also click the file nameshowing on the toolbar to open a dropdown of recently visited files anddirectories.
To see a list of the HTML reports click the Report directory hypertext link.
Use the hyperlinks within report.html to display the detailed report files in thereport browser.
190 Graphical User Interface User’s Guide • November 2011
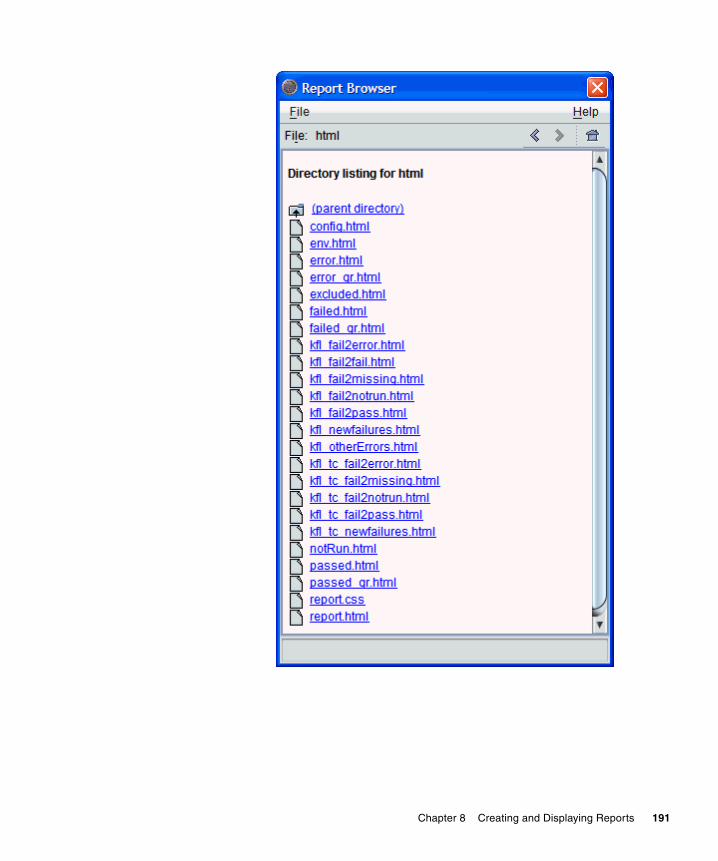
Chapter 8 Creating and Displaying Reports 191
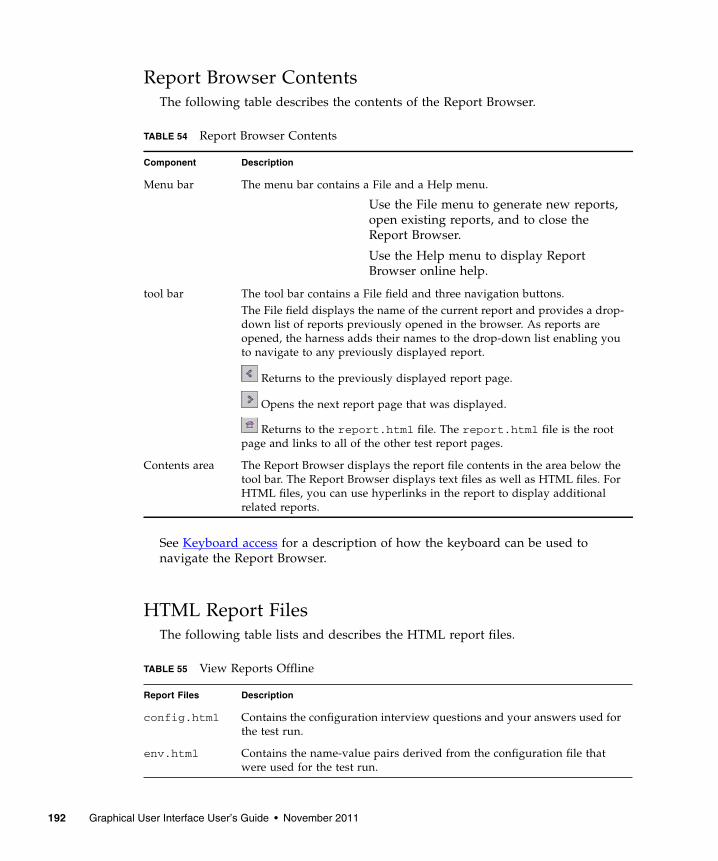
Report Browser ContentsThe following table describes the contents of the Report Browser.
See Keyboard access for a description of how the keyboard can be used tonavigate the Report Browser.
HTML Report FilesThe following table lists and describes the HTML report files.
TABLE 54 Report Browser Contents
Component Description
Menu bar The menu bar contains a File and a Help menu.
Use the File menu to generate new reports,open existing reports, and to close theReport Browser.
Use the Help menu to display ReportBrowser online help.
tool bar The tool bar contains a File field and three navigation buttons.The File field displays the name of the current report and provides a drop-down list of reports previously opened in the browser. As reports areopened, the harness adds their names to the drop-down list enabling youto navigate to any previously displayed report.
Returns to the previously displayed report page.
Opens the next report page that was displayed.
Returns to the report.html file. The report.html file is the rootpage and links to all of the other test report pages.
Contents area The Report Browser displays the report file contents in the area below thetool bar. The Report Browser displays text files as well as HTML files. ForHTML files, you can use hyperlinks in the report to display additionalrelated reports.
TABLE 55 View Reports Offline
Report Files Description
config.html Contains the configuration interview questions and your answers used forthe test run.
env.html Contains the name-value pairs derived from the configuration file thatwere used for the test run.
192 Graphical User Interface User’s Guide • November 2011
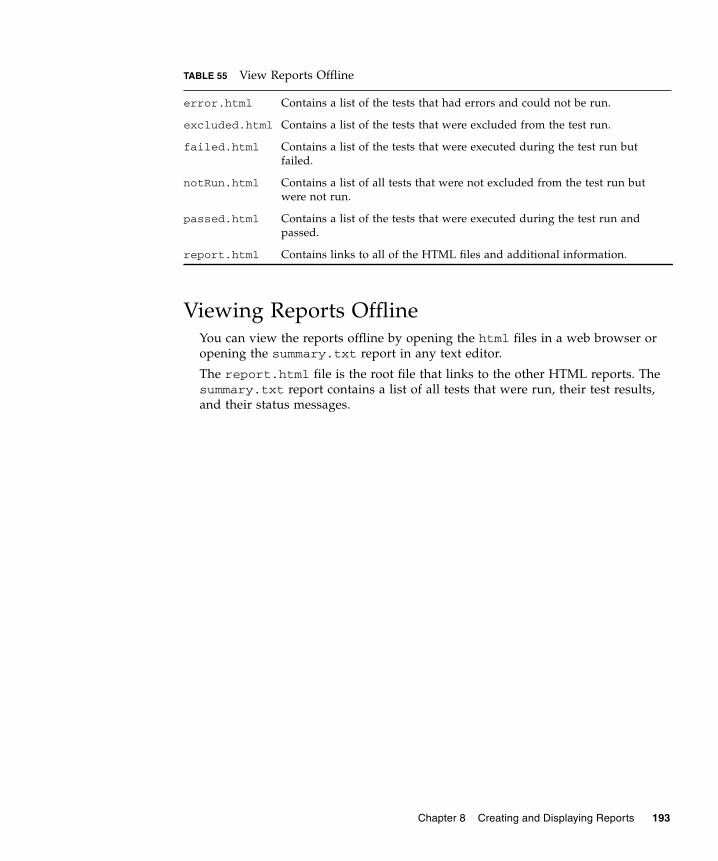
Viewing Reports OfflineYou can view the reports offline by opening the html files in a web browser oropening the summary.txt report in any text editor.
The report.html file is the root file that links to the other HTML reports. Thesummary.txt report contains a list of all tests that were run, their test results,and their status messages.
error.html Contains a list of the tests that had errors and could not be run.
excluded.html Contains a list of the tests that were excluded from the test run.
failed.html Contains a list of the tests that were executed during the test run butfailed.
notRun.html Contains a list of all tests that were not excluded from the test run butwere not run.
passed.html Contains a list of the tests that were executed during the test run andpassed.
report.html Contains links to all of the HTML files and additional information.
TABLE 55 View Reports Offline
Chapter 8 Creating and Displaying Reports 193

194 Graphical User Interface User’s Guide • November 2011
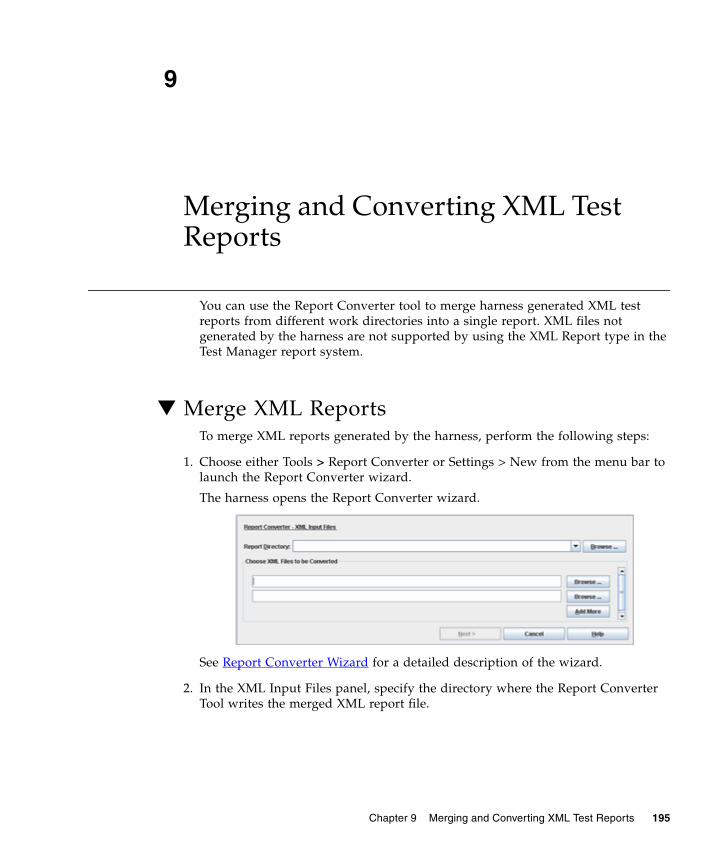
9
Merging and Converting XML TestReports
You can use the Report Converter tool to merge harness generated XML testreports from different work directories into a single report. XML files notgenerated by the harness are not supported by using the XML Report type in theTest Manager report system.
▼ Merge XML ReportsTo merge XML reports generated by the harness, perform the following steps:
1. Choose either Tools > Report Converter or Settings > New from the menu bar tolaunch the Report Converter wizard.
The harness opens the Report Converter wizard.
See Report Converter Wizard for a detailed description of the wizard.
2. In the XML Input Files panel, specify the directory where the Report ConverterTool writes the merged XML report file.
Chapter 9 Merging and Converting XML Test Reports 195
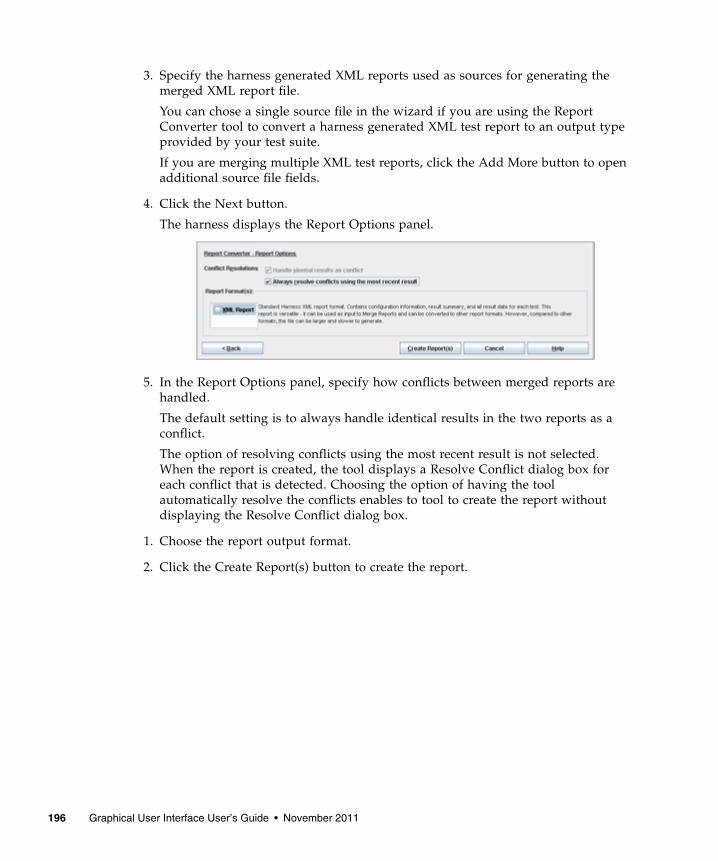
3. Specify the harness generated XML reports used as sources for generating themerged XML report file.
You can chose a single source file in the wizard if you are using the ReportConverter tool to convert a harness generated XML test report to an output typeprovided by your test suite.
If you are merging multiple XML test reports, click the Add More button to openadditional source file fields.
4. Click the Next button.
The harness displays the Report Options panel.
5. In the Report Options panel, specify how conflicts between merged reports arehandled.
The default setting is to always handle identical results in the two reports as aconflict.
The option of resolving conflicts using the most recent result is not selected.When the report is created, the tool displays a Resolve Conflict dialog box foreach conflict that is detected. Choosing the option of having the toolautomatically resolve the conflicts enables to tool to create the report withoutdisplaying the Resolve Conflict dialog box.
1. Choose the report output format.
2. Click the Create Report(s) button to create the report.
196 Graphical User Interface User’s Guide • November 2011
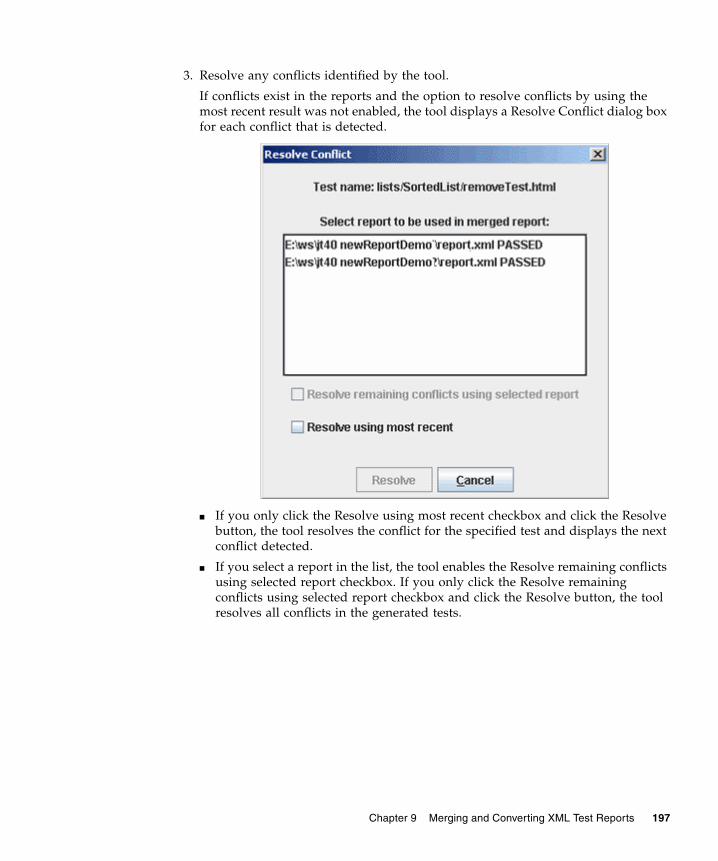
3. Resolve any conflicts identified by the tool.
If conflicts exist in the reports and the option to resolve conflicts by using themost recent result was not enabled, the tool displays a Resolve Conflict dialog boxfor each conflict that is detected.
■ If you only click the Resolve using most recent checkbox and click the Resolvebutton, the tool resolves the conflict for the specified test and displays the nextconflict detected.
■ If you select a report in the list, the tool enables the Resolve remaining conflictsusing selected report checkbox. If you only click the Resolve remainingconflicts using selected report checkbox and click the Resolve button, the toolresolves all conflicts in the generated tests.
Chapter 9 Merging and Converting XML Test Reports 197

■
198 Graphical User Interface User’s Guide • November 2011
10
Auditing Test Results
The harness includes an audit tool that you can use to analyze the test results in awork directory. The audit tool verifies that all tests in a test suite ran correctly andidentifies any audit categories in a test run with errors.
You can use the GUI or the command-line interface to audit a test run. See theCommand-Line Interface User’s Guide for a detailed description of auditing a testrun from the command line.
▼ Audit a Test RunTo audit a test run in the GUI, perform the following steps:
1. Choose Tool > Test Results Auditor from the menu bar.
The harness launches the Test Results Auditor and the Options dialog box. If youare repeating an audit, you might have to open the Options dialog box from themenu bar.
2. If the harness did not launch the Options dialog box, choose Audit > Optionsfrom the menu bar.
3. In the Options dialog box, specify the reference test suite.
Chapter 10 Auditing Test Results 199

4.
See Audit Test Results Options for a detailed description. You can use thedrop-down list or the chooser to specify a test suite. If you choose a referencetest suite, the harness sets the entries in the work directory drop-down list tothe work directories that are currently loaded and matches the specified testsuite. If you have multiple test suites and work directories, specifying a testsuite can simplify choosing the options.
The harness always uses the test suite associated with the work directory thatyou choose to audit. See Work Directory below for a description of how tochoose a work directory to audit.
5. In the Options dialog box, specify the work directory.
The harness audits the work directory named in the Work Directory field. Ablank field indicates the work directory is not set.
You can use the drop-down list or the chooser to specify the work directory toaudit. If you choose a reference test suite, the harness only lists the workdirectories associated with it in the drop-down list. You are not limited tousing these work directories. If you choose a work directory, the harness usesthe test suite associated with the work directory and sets the entries in theConfiguration File drop-down list to those most recently used with the workdirectory.
If you do not choose a work directory, the harness uses the work directoryassociated with the configuration file that you specify. See Configuration Filebelow for a description of how to choose a reference configuration file.
6. In the Options dialog box, specify the configuration file.
200 Graphical User Interface User’s Guide • November 2011
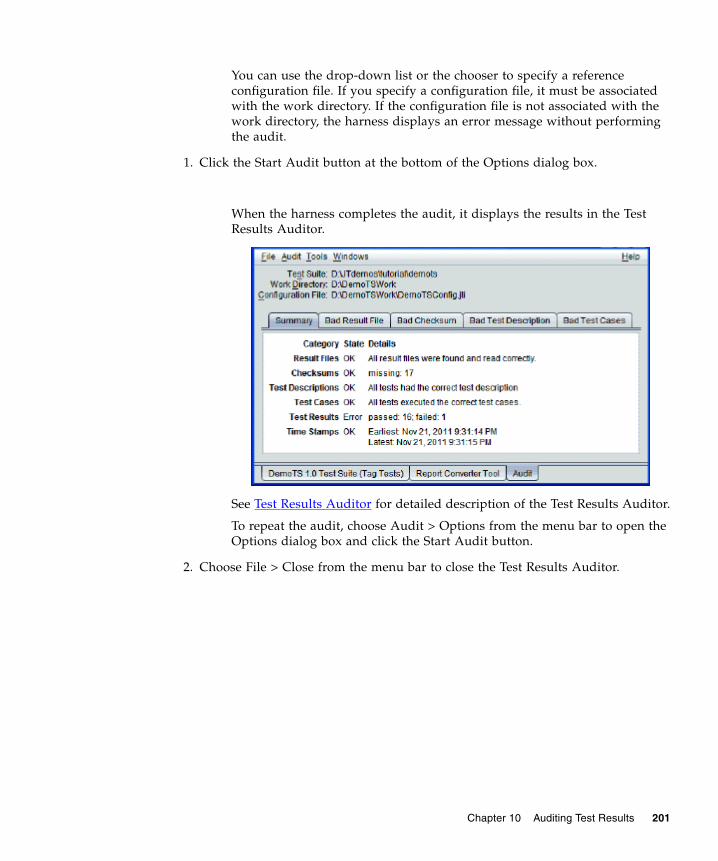
You can use the drop-down list or the chooser to specify a referenceconfiguration file. If you specify a configuration file, it must be associatedwith the work directory. If the configuration file is not associated with thework directory, the harness displays an error message without performingthe audit.
1. Click the Start Audit button at the bottom of the Options dialog box.
When the harness completes the audit, it displays the results in the TestResults Auditor.
See Test Results Auditor for detailed description of the Test Results Auditor.
To repeat the audit, choose Audit > Options from the menu bar to open theOptions dialog box and click the Start Audit button.
2. Choose File > Close from the menu bar to close the Test Results Auditor.
Chapter 10 Auditing Test Results 201

202 Graphical User Interface User’s Guide • November 2011

11
Troubleshooting With the GUI
The harness provides information you can use in troubleshooting problems. Totroubleshoot problems using the harness see the following topics:
■ Harness Fails During Use
■ Problems Running Tests
■ Problems Viewing Test Results
■ Output Overflow Message Displayed in Test Run Messages
■ Problems Viewing Reports
■ Problems Writing Reports
■ Problems Moving Reports
Harness Fails During UseIf the harness fails, you can use the harness.trace file in your work directoryto help troubleshoot the problem. The harness.trace file is a plain-text file thatcontains a log of harness activities during the test run. It is written in the workdirectory, is incrementally updated, and is intended primarily as a log of harnessactivity.
Chapter 11 Troubleshooting With the GUI 203
Problems Running TestsThe goal of a test run is for all tests in the test suite that are not filtered out tohave passing results.
If the root test suite folder contains tests with errors or failing results, you musttroubleshoot and correct the cause to satisfactorily complete the test run. SeeTroubleshooting a Test Run for information about the resources that the harnessprovides for troubleshooting.
Tests with ErrorsTests with errors are tests that could not be executed by the harness. These errorsusually occur because the test environment is not properly configured. Use theTest tabbed panes and the Configuration Editor to help determine the changerequired in the configuration.
The following is an example of how the Test Manager tabbed panes and theConfiguration Editor can be used to identify and correct a configuration error:
1. Use the test tree to identify the folder containing test that had errors.
2. Click the folder icon to open its Summary tab in the Test Manager window.
3. Click the Error tab to display the list of tests in the folder that had errors.
4. Double-click a test in the list to display it in the test tree and view its detailed testinformation.
5. Click the Test Run Messages tab to display detailed messages describing whathappened during the running of each section of the test.
The contents of each output section vary from test suite to test suite. Refer to yourtest suite documentation for detailed descriptions of the test section messageswhen troubleshooting a test run.
1. Click the Configuration tab to display a two-column table of the name-value pairsthat were derived from the configuration file and actually used to run the test.
The names in the table identify test environment properties used by the harnessto run the test. The values displayed were used to run the test. Refer to your testsuite documentation for detailed descriptions of the name-value pairs for yourtest.
204 Graphical User Interface User’s Guide • November 2011
2. Choose View > Configuration > Show Question Log to view the Question Log ofthe current, saved configuration.
Use the question log to identify the configuration value that is incorrect and itsconfiguration question.
1. Search the configuration file for the specific characters or character strings thatmust be changed.
See Searching a Configuration for a detailed description of how the currentconfiguration can be searched for a character or string of characters.
1. Click the Done button to save your changes to the configuration file
Rerun the tests.
Tests that FailTests that fail are tests that were executed but had failing results. The test or theimplementation might have errors.
The following is an example of how the Test Manager tabbed panes can be usedto identify and correct a test failure:
1. Use the test tree to identify the folder containing test that had errors.
2. Click the folder icon to open its Summary tab in the Test Manager window.
3. Click the Error tab to display the list of tests in the folder that had errors.
4. Double-click a test in the list to display it in the test tree and view its detailed testinformation.
5. Click the Test Run Messages tab to display detailed messages describing whathappened during the running of each section of the test.
The contents of each output section vary from test suite to test suite. Refer to yourtest suite documentation for detailed descriptions of the test section messageswhen troubleshooting a test run.
Problems Viewing Test ResultsMost problems in viewing test results in the Test Manager result from the use ofview filters (other than the All Tests view filter) with a current configuration set torun specific tests (such as, running tests based on their prior status). When a view
Chapter 11 Troubleshooting With the GUI 205

filter other than All Tests is used in the Test Manager, only the fields of the filteredcategory appear to be updated in the Test Manager Summary tab. This is normalbehavior of the GUI when view filters are used.
The harness only displays tests in the GUI that match the specified view filtercriteria. All other tests are displayed as Filtered Out.
As test results change, the harness moves the tests to the Filtered Out category(not to a test result category) in the Test Manager and turns the appropriate nodein the test tree gray. Consequently, the fields for the other categories in the TestManager Summary tab might not appear to be updated.
Example:If you change the current configuration to run only tests with a prior status ofFailed and use the Current Configuration view filter, the Test Manager displaysall tests that are not a Failed status as Filtered Out. This enables you to monitoronly those tests with a previous Failed status. When you begin the test run, anytests with Passed or Error results are displayed in the Filtered Out category of theTest Manager. To view the actual test results, change to a different view filter. SeeView Filters for additional information. of the view filters.
Output Overflow Message Displayed inTest Run Messages
An output stream in the Test Run Messages Pane might display the followingmessage:
Output overflow:the harness has limited the test output ofthe text to that at the beginning and the end, so that youcan see how the test began, and how it completed.
If you need to see more of the output from the test,set the system property javatest.maxOutputSize to a highervalue. The current value is 100000
Set the system property of javatest.maxOutputSizeby using the syntax in:
206 Graphical User Interface User’s Guide • November 2011

java -Djavatest.maxOutputSize=200000 -jar lib/javatest.jar....
If you see this message, restart the harness with the harness VM system propertyjavatest.maxOutputSize value set to a greater number and rerun the test toensure that all of the data is saved.
The value of javatest.maxOutputSize is an integer subject to the maximuminteger size of the VM. It sets the number of characters allowed in the output.
Problems Viewing ReportsThe harness does not automatically generate reports of test results after a test run.You must generate test reports either from the command line or from the harnessGUI. See Creating Reports for detailed information.
Problems Writing ReportsFilters are used to write test reports for a specific set of test criteria. Verify thatyou are using the appropriate filter to generate reports of test results. See CreatingReports for detailed information.
Problems Moving ReportsTest reports contain relative and fixed links to other files that might be brokenwhen you move reports to other directories.
You must update these links when moving reports to other directories. Theharness provides an EditLinks utility that updates the links in the reports foryou when moving reports. See the Command-Line Interface User’s Guide.
Chapter 11 Troubleshooting With the GUI 207

208 Graphical User Interface User’s Guide • November 2011
12
Glossary
.jte FilesSee environment files.
.jti FilesSee configuration file.
.jtp FilesSee parameter files.
.jtr FileSee test result files.
.jtx FilesSee exclude list.
.kfl FilesSee Known Failures List File.
AAll Tests View FilterA test tree view filter that displays all folders and tests in the test suite.
AuditThe JT harness includes an audit tool that you can use to analyze the testresults in a work directory. The audit tool verifies that all tests in a test suiteran correctly and identifies any audit categories of a test run that had errors.
You can use the GUI or the command-line interface to audit a test run.
B
CClassThe prototype for an object in an object-oriented language. A class might also
be considered a set of objects that share a common structure and behavior. Thestructure of a class is determined by the class variables that represent the stateof an object of that class and the behavior is given by a set of methodsassociated with the class.
Chapter 12 Glossary 209

ConfigurationInformation about the computing environment required to execute a testsuite.
In the GUI, you can use the Configuration Editor to collect or modifyconfiguration information or to load an existing configuration. SeeConfiguration Editor. The Configuration Editor collects the following twotypes of data in a configuration file:
• Test environment
• Standard Values
In the command-line interface, you can perform the following tasks:
Use the EditJTI utility to modify configuration information (see EditJTI).
Set specific configuration values in the command line when starting the harness.
Configuration EditorThe Configuration Editor provides two editing modes, the Question modeand the Quick Set mode. Use the Question mode to create a configuration filefor the test run and to search interview titles, questions, and answers forcharacter strings. Use the Quick Set mode to modify specific runtime values.
To open the Configuration Editor, choose Configure -> Edit Configuration fromthe Test Manager menu bar.
Configuration FileContains all of the information collected by the configuration editor about thetest platform.
The harness derives the configuration values required to execute the test suitefrom environment entries in a configuration file (.jti).
Use the Configuration Editor or EditJTI to change configuration values in a.jti file.
You can also set specific values in the command line.
Configuration ValueA value specified by the user for the purpose of configuring a test run.
Configuration values are derived from environment entries in a configurationfile (.jti) and used by test suite specific plugin code to execute and run tests.
Use the Configuration Editor or EditJTI to change the configuration valuesin the .jti file. You can also set specific configuration values in the commandline.
For legacy test suites the configuration value is read from an environment file(.jte). Current test suites do not use or support the environment file.
CurrentConfigurationThe configuration containing the test environment and standard values
currently loaded in the test manager or specified in the command line for usein running tests and displaying test status.
Current ConfigurationFilterA filter that only displays or generates reports for the folders and tests that
have not been filtered out in the configuration.
210 Graphical User Interface User’s Guide • November 2011
DDesktopThe configuration and layout of the windows used by the JT harness.
The desktop is saved when you exit from the harness and is automaticallyrestored in your next session.
The JT harness desktop is displayed using tabs.
EEnvironmentSee Test Environment.
Environment EntryA name-value pair derived from a configuration file and used by test suitespecific plugin code to execute and run tests. These name-value pairs provideinformation (configuration values) about how to run tests of a test suite on aparticular platform.
For legacy test suites, the name-value pairs are read from an environment file(.jte) and derived from the configuration file (.jti). Current test suites donot use or support the environment file.
Environment FilesContain one or more test environments used by legacy test suites.Environment files are identified by the .jte extension in the file name.Current test suites do not use or support the environment file.
ErrorThe test is not filtered out and the JT harness could not execute it. There areno test results for tests having errors. Errors usually occur because the testenvironment is not properly configured.
In the GUI, the JT harness displays error icons for tests with errors and forfolders containing any tests with errors. Folders marked with error icons canalso contain tests and folders that are Failed, Not Run, Passed, and Filteredout.
Exclude ListExclude list files (*.jtx), supply a list of invalid tests to be filtered out of atest run by the test harness. The exclude list provides a level playing field forall implementors by ensuring that when a test is determined to be invalid, thenno implementation is required to pass it. Exclude lists are maintained by thetechnology specification Maintenance Lead and are made available to alltechnology licensees.
In the GUI, use the configuration editor to add or remove exclude lists from atest run. In the command line, you can specify an exclude list in the command.
To view the contents of an exclude list, choose Configure -> Show Exclude Listfrom the Test Manager menu bar. Exclude lists can only be edited or modifiedby the test suite Maintenance Lead.
Chapter 12 Glossary 211
FFailTest results determined by the JT harness that do not meet passing criteria.
In the GUI, the JT harness displays Failed icons for tests that the test suite hasdetermined have failing results and for folders containing any tests with failresults. Folders marked with Failed icons can also contain tests and folders thatare Not Run, Passed, and Filtered out.
Filtered OutFolders and their tests that are excluded from the test run by one or more testrun filters.
In the GUI, Filtered Out folders and tests are identified in the test tree by grey
folder and test icons.
FiltersA facility in the JT harness that accepts or rejects tests based on a set ofcriteria. There are two types of filters in the JT harness, view filters and runfilters. View filters are set in the Test Manager to display the results for specificfolders and tests and to create test reports. Run filters are set in theConfiguration Editor or are specified as commands in the command-line tospecify which tests are run.
GGlossaryUse the Glossary tab in the left pane of the help viewer to open the glossary.
The glossary pane is divided into two areas. The top area displays the list ofterms and the bottom area displays their definition.
Glossary entries are listed in alphabetical order. You can scroll through the listor search for a specific term.
To search for a specific term, enter it in the Find field and press Return. If theterm is in the glossary, the harness highlights it in the list and displays itsdefinition. Press Return to repeat the search.
212 Graphical User Interface User’s Guide • November 2011

H
IInterviewFor the JT harness to execute a test suite, it requires information about how
your computing environment is configured. The Configuration Editor uses aninterview to simplify the process of collecting this information.
Because the quantity and scope of this information depends on the test suite, atest suite might include a specific interview for the Configuration Editor to use.
The information collected by the interview is written to a configuration file(.jti) and used by the JT harness to derive the environment variablesrequired execute the test suite.
Interview FileSee configuration file.
JJavaTest Harness
PreferencesA dialog box that you can use to set the window style and tool tip optionsused by the JT harness. To open the Preferences dialog box, choose File ->Preferences from the Test Manager menu bar.
JTIStandard file extension for a configuration file. See configuration file.
KKeywordsSpecial values in a test description that describe how the test is executed.
Keywords are provided by the test suite for use in the Configuration Editor orcommand line as a filter to exclude or include tests in a test run.
Known Failures ListFilesKnown Failures List (KFL) files (*.kfl), list tests that are known to fail.
The purpose of this option is to enrich the reporting output so you can monitorthe status of certain tests across test runs. If a KFL is specified, the HTMLreport includes a Known Failure Analysis section. This section provideshypertext links to the tests listed in the KFL. Also, if bug IDs are specified inthe KFL the IDs are hypertext linked to a bug tracking system (specified as aURL in File > Preferences > Test Manager > Reporting).
One or more KFLs can be specified as a parameter in the configuration editor.KFLs can also be specified from the command line.
Chapter 12 Glossary 213

LLast Test Run View
FilterA filter that displays the results of those tests and folders included in the lasttest run either in views of the test tree or in test reports.
Log LevelA descriptive criteria (Critical, Warning, Monitoring Info, and Debug Info)applied to each message within a log.
M
NNot RunThe test is not filtered out but the JT harness has not yet run it.
The JT harness displays Not Run icons for tests that have not yet been run.Folders containing tests that have not been run are displayed with the Not Runicon only when they do not also contain tests or folders with Error or Failedresults.
O
PParameter FilesLegacy files used to configure how the harness runs legacy test suites on your
system. Parameter files use the file name extension .jtp.
Although parameter files are deprecated, the harness provides support forthose test suites that use parameter files. Current test suites do not use orsupport the parameter files.
PassTest results determined by the JT harness to meet passing criteria.
The JT harness displays Passed icons for tests that the test suite has determinedhave passing results and for folders containing only tests with passing results.
Port NumberA number assigned to the JT harness that is used to link specific incomingdata to an appropriate service.
Prior StatusA filter used to restrict the set of tests in a test run based on the last test resultinformation stored in the test result files (.jtr) in the work directory.
Use the configuration editor or command line to enable the Prior Status filterfor a test run.
214 Graphical User Interface User’s Guide • November 2011
Progress MonitorA dialog box that displays detailed information about the currentconfiguration of a test run. Information displayed in the Progress Monitor isnot altered by view filter settings.
Q
RReport DirectoryThe directory in which the harness writes test reports.
The location of the report directory is set in the GUI or from the command lineby the user when generating test reports.
SStandard ValuesThe Quick Set mode of the Configuration Editor displays the standard values
of a configuration.
TTabbedA window style in which the JT harness desktop is a single top-level window
that displays all JT windows as tabbed panes.
Test CaseA subsection inside of a test. The terminology for a ’test case’ varies amongtest harnesses, but in this harness, a test is a larger entity than the test case. Atest contains zero or more test cases; a test with no test cases is simply a basictest entity in this harness. The ’test’ is the primary entity rendered in the maintree display, summaries, etc. ’Test cases’ are currently only recognized inlimited areas of the harness.
Test DescriptionMachine readable information that describes a test to the JT harness so that itcan correctly process and run the related test. The actual form and type of testdescription depends on the attributes of the test suite. When using the JTharness, the test description is a set of test-suite-specific name-values pairs.
Each test in a test suite has a corresponding test description that is typicallycontained in an HTML file.
Chapter 12 Glossary 215

Test EnvironmentA collection of configuration values derived from environment entries in theconfiguration file that provide information used by test suite specific plugincode about how to execute and run each test on a particular platform.
When a test in a legacy test suite is run, the harness gives the script a testenvironment containing environment entries from configuration data collectedby the configuration editor. See configuration.
For legacy test suites, the environment entries were read from an environmentfile. Use of environment files is deprecated, but the harness continues toprovide support for test suites that use environment files. See environment file.
Current test suites do not use or support environment files.
Test ManagerThe JT harness window used to configure, run, monitor, and manage testsfrom its panels, menus, and controls.
The Test Manager window is divided into two panes. It displays the foldersand tests of a test suite in the tree pane on the left and provides informationabout the selected test or folder in the information panes on the right.
A new Test Manager window is used for each test suite that is opened.
Test PathsThe locations of the test folders and tests in the test tree specified in theConfiguration Editor for running tests.
Test paths are used to specify the tests in a specific branch of the test tree or tospecify a specific test to run. The harness walks the test tree and runs allspecified tests (unless otherwise filtered out) that it finds.
Use the configuration editor to set the test paths listed in the test runconfiguration.
Test Result FilesContains all of the information gathered by the JT harness during a test run.
The test result files (.jtr) are stored in a cache in the work directoryassociated with the test suite.
You can view the test result files in a web browser configured to use the JTharness ResultBrowser servlet.
Test Run FiltersInclude or exclude tests in a test run. Tests are included or excluded from testruns by the following means:
• Exclude lists
• Keywords
• Prior status
Test run filters are set using the Configuration Editor or the command-lineinterface.
Test ScriptA script used by the JT harness, responsible for running the tests andreturning the status (pass, fail, error) to the harness. The test script mustinterpret the test description information returned to it by the test finder. Thetest script is a plug-in provided by the test suite. In the GUI, the Test ManagerProperties dialog box lists the plug-ins that are provided by the test suite.
216 Graphical User Interface User’s Guide • November 2011

Test SuiteA collection of tests, used in conjunction with the JT harness, to verifycompliance of the licensee’s implementation of the technology specifications.
A test suite must be associated with a work directory before the harness canrun its tests.
Test TreeThe hierarchical representation of the folders and tests in a test suite.
The test tree is displayed in the Test Manager window and uses colored statusicons to indicate the test status of the folders and tests. Use view filters tospecify the folders and tests whose test status are displayed in the test tree.
U
VView FiltersInclude or exclude the results of tests in views of the test tree.
View filter settings only change the Test Manager display and do not includeor exclude tests from a test run. Use the test run filter settings to include orexclude tests from a test run.
WWork DirectoryA directory associated with a specific test suite and used by the JT harness to
store files containing information about the test suite and its tests.
Until a test suite is associated with a work directory, the JT harness cannot runtests.
X
Y
Z
Chapter 12 Glossary 217

218 Graphical User Interface User’s Guide • November 2011

Index
Symbols.jtx files, 97
Aaccessing
UsersGuideonline, 5add Exclude List files, 122agent, 12Agent Monitor tool, 31, 147All Tests View Filter, 58appearance preferences
desktop, 21Audit Test Results window, 81auditing test results, 198
BBad Checksum panel
Test Results Auditor window, 84Bad Result File panel
Test Results Auditor window, 84Bad Test Cases panel
Test Results Auditor window, 85Bad Test Description panel
Test Results Auditor window, 85Bookmarks, 108browser
exclude list, 170contents, 171test details, 171
report, 188test environment, 168
defined in environment, 170defined in file, 170Entry Name, 170Value, 170
Test Manager Properties, 172browsing test information, 151bug prefix URL, 25, 183button bar (tool bar), 41
Cchanging configuration values, 92changing tests to run, 118Clear Results
test tree pop-up menu, 54configuration
creating a new, 90creating a template, 116test manager properties, 174
configuration checklist, 168Configuration Editor
Question Mode, 64File menu, 65Help menu, 68index pane, 69More Info pane, 70question pane, 69Recent Configuration, 66, 74Search menu, 67View menu, 68
Question Mode viewKeywords pane, 100setting test execution values, 105
1

Standard Value, 70Configuration Editor window
Question ModeBookmarks menu, 66
configuration filechanging values, 92editing values, 93
Configure menu, 37configuring a test run, 87Create Report tabbed panes, 34creating a configuration, 90creating a template, 116creating merged reports, 193creating test reports, 177Current Configuration view filter, 56Current Template view filter, 58Custom view filter, 59
edit, 59specify tests, 60use exclude lists, 62use keywords, 60use prior status, 61use test suite filter, 62using, 62
Ddesktop
appearance preferences, 21displaying
configuration checklist, 168online information, 25Question Log, 172test manager properties, 172test tree pop-up menu, 51
displaying reports, 188
Eediting Quick Set values, 93exclude list
latest, 98, 123other, 99, 124
Exclude List browser, 170Exclude List contents, 171Exclude List files, 97Exclude List test details, 171execution order, 24
FFile menu, 16Files tab
viewing, 161filters
view, 55folder icons, 49folder information
Test Manager, 154folder result status icon, 49folder run status icon, 49
Ggetting started
GUI, 13GUI, 13
tools, 30
HHelp
button, 26menu, 25
help F1 key, 26Help menu, 19HTML Files tab, 181HTML report options, 180
Iicons
folder, 49result status, 49run status, 49
test, 49result status, 50run status, 50
information areaTest Manager, 45
initial files, 94
KKeywords
run filter, 100, 125Keywords pane
Configuration EditorQuestion Mode view, 100
Template Editor, 125
2 JavaTest Harness Graphical User Interface User’s Guide • November 2011
KFL, 182, 183, 184KFL report bug prefix, 25, 183KFL reports, 184, 185, 186known failure analysis, 184
LLast Test Run View Filter, 56latest exclude list, 98log viewer, 79
Mmarkers, 108menu
Configure, 37desktop
File, 16Help, 19Tool, 18Windows, 19
test tree pop-up, 51clear previous test results, 54execute, 51override current configuration, 52refresh test suite contents, 52
menus, 16monitor, progress, 42monitoring a test run, 143monitoring output logs, 146multiple configurations, 112Multi-Selection Tab, 158
Nnumber of
failed tests, 155passed tests, 155tests filtered out, 155tests not run, 155tests selected to run, 155tests with errors, 155
number of teststotal, 155
Oonline UsersGuide
accessing', 5online UsersGuide', 4
options, tool tip, 22order, 24
Pplug-ins
test manager properties, 174Preferences dialog box, 20progress indicator, 45
elapsed time, 45Progress Monitor, 42
Memory, 44Progress area, 43Tests in Progress, 44Time, 44
QQuestion Log, 172Question Mode view
settingconcurrency, 106time factor, 107
Quick Pick test executiontest tree pop-up menu, 51
Quick Set Mode, 70Quick Start, 5
RRefresh Test Suite Contents
test tree pop-up menu, 52remote agent, 12remove Exclude List files, 122Report Browser, 188Report Converter Tool, 31Report Converter Tool window, 32report directory, 187report files, 187reports
KFLNew Passed, 185
test, 175resolving configuration-template conflicts, 132Restore Tools State on Start, 23run filter
Keywords, 100, 125run tests
Index 3
start, 142running tests
Test Manager window, 139
Ssecurity note, 11setting
concurrency, 106, 130test execution values, 105, 129time factor, 107, 131
setting preferences, 20shutdown options, 23site administration, 113, 116specify tests to run, 94standard values
Tests pane, 94starting a test run, 142stopping a test run, 148Summary information, 155
number of testfiltered out, 155not run, 155selected to run, 155total, 155
number of testserrors, 155failed, 155passed, 155
Summary panelTest Results Auditor window, 83
Ttemplate
Tests pane, 118Template Bookmarks, 134Template Editor
editing test execution values, 129Keywords pane, 125Question Mode, 72
File menu, 73Help menu, 76index pane, 76More Info pane, 77question pane, 77Recent Configuration, 66, 74Search menu, 75View menu, 75
Quick Set Mode, 78setting
concurrency, 130time factor, 131
Template Editor windowQuestion Mode
Bookmarks menu, 74templates, 113templates, editing, 116templates, loading, 138Test Description tab, 160Test Environment browser, 168
defined in environment, 170Defined in file, 170Entry Name, 170Value, 170
test icons, 49test information
Test view, 159Test Manager
Configuration tab, 162Error test results, 157Failed test results, 157Filtered Out tests, 158folder view, 154information area, 45Not Run tests, 157Passed test results, 157Summary information, 155, 156
number of failed tests, 155number of passed tests, 155number of tests not run, 155number of tests with errors, 155subtotal, 155test filtered out, 155total, 155
Test Run Messages, 164message list, 165Result message, 165
Test view, 159test manager
properties, 172configuration, 174plug-ins, 174test suite, 173work directory, 173
Test Manager status line, 63
4 JavaTest Harness Graphical User Interface User’s Guide • November 2011
Test Manager tool, 35Test Manager window
browsing test information, 151progress indicator, 45
elapsed time, 45progress bar, 45
running tests, 139Test Description tab, 160Test Run Details tab, 163
property names, 163values, 164
test tree, 47test reports, 175test result status icon, 50test results
auditing, 198Test Results Auditor window
Bad Checksum panel, 84Bad Result File panel, 84Bad Test Cases panel, 85Bad Test Description panel, 85Summary panel, 83
test runmonitoring, 143start, 142stopping, 148
Test Run Messages, 164message area, 167message list, 165Output Summary message, 165Result message, 165summary message, 165Test Result message, 166
test run status icon, 50test status
Error, 157Failed, 157Filtered Out, 158Not Run, 157Passed, 157Summary information, 156
test suitetest manager properties, 173
Test Suite Errorsviewing, 174
test tree, 47Test view, 159
testsrunning, 139
toolTest Manager, 35
tool bar, 41Tool menu, 18tool tip options, 22tool, Agent Monitor, 31, 147tools
GUI, 30troubleshooting, 201
output overflow, 206
reportsmoving, 207viewing, 207writing, 207
running tests, 203tests that fail, 205tests with errors, 204
running the harness, 203viewing test results, 205
troubleshooting a test run, 149
UUser'sGuide
accessingonline', 5
Vview filter, 55
All Tests, 58Current Configuration, 56Current Template, 58Custom, 59Last Run, 56
viewing source file list, 161viewing Test Suite Errors, 174
Wwindow
Audit Test Results, 81Windows menu, 19work directory
test manager properties, 173work directory status line, 63
Index 5

6 JavaTest Harness Graphical User Interface User’s Guide • November 2011