itq level 2 presentation software powerpoint...
TRANSCRIPT

ITQ Level 2 Presentation Software
PowerPoint 2013 7 © CiA Training Ltd 2013
Contents
SKILL SET 1 BASICS............................................................................................................................ 9 1 - PRESENTATIONS........................................................................................................................ 10 2 - CREATING A NEW PRESENTATION............................................................................................. 11 3 - SAVING A PRESENTATION.......................................................................................................... 13 4 - CLOSING A PRESENTATION........................................................................................................ 15 5 - OPENING A PRESENTATION....................................................................................................... 16 6 - DEVELOP YOUR SKILLS ............................................................................................................. 18
SUMMARY : BASICS.............................................................................................................................. 19
SKILL SET 2 PRESENTATION STYLES......................................................................................... 20 7 - THEMES.................................................................................................................................... 21 8 - COLOUR SCHEMES.................................................................................................................... 22 9 - THE SLIDE MASTER .................................................................................................................. 24 10 - FORMATTING THE SLIDE MASTER........................................................................................... 25 11 - BULLET LEVELS...................................................................................................................... 27 12 - ADDING AUTOMATIC FIELDS................................................................................................... 29 13 - APPLYING A BACKGROUND..................................................................................................... 31 14 - DEVELOP YOUR SKILLS ........................................................................................................... 33
SUMMARY : PRESENTATION STYLES..................................................................................................... 34
SKILL SET 3 TEMPLATES................................................................................................................ 35 15 - USING AN EXISTING TEMPLATE............................................................................................... 36 16 - CREATING A TEMPLATE .......................................................................................................... 38 17 - USING A CREATED TEMPLATE................................................................................................. 40 18 - APPLYING A SAVED THEME .................................................................................................... 42 19 - AMENDING A TEMPLATE......................................................................................................... 43 20 - DEVELOP YOUR SKILLS ........................................................................................................... 44
SUMMARY : TEMPLATES....................................................................................................................... 45
SKILL SET 4 EDITING CONTENT................................................................................................... 46 21 - USING UNDO AND REDO ......................................................................................................... 47 22 - USING COPY AND PASTE......................................................................................................... 48 23 - USING CUT AND PASTE ........................................................................................................... 50 24 - IMPORTING TEXT .................................................................................................................... 51 25 - INSERTING TEXT ..................................................................................................................... 53 26 - FIND AND REPLACE DATA ....................................................................................................... 55 27 - DEVELOP YOUR SKILLS ........................................................................................................... 56
SUMMARY : EDITING CONTENT............................................................................................................ 57
SKILL SET 5 POWERPOINT OBJECTS.......................................................................................... 58 28 - INSERTING A DIAGRAM ........................................................................................................... 59 29 - ORGANISATION CHARTS.......................................................................................................... 61 30 - FORMATTING ORGANISATION CHARTS.................................................................................... 63 31 - INSERTING ONLINE PICTURES................................................................................................. 64 32 - MOVING AND RESIZING OBJECTS............................................................................................ 66 33 - OBJECT ORIENTATION............................................................................................................. 67 34 - OBJECTS ON SLIDE MASTER.................................................................................................... 68

Presentation Software ITQ Level 2
© CiA Training Ltd 2013 8 PowerPoint 2013
35 - INSERTING A PICTURE FROM FILE............................................................................................ 69 36 - CROPPING A PICTURE.............................................................................................................. 70 37 - ALIGNING DATA WITH TABS.................................................................................................... 71 38 - TABLES ................................................................................................................................... 72 39 - INSERTING CHARTS................................................................................................................. 74 40 - FORMATTING CHARTS............................................................................................................. 76 41 - DEVELOP YOUR SKILLS ........................................................................................................... 78
SUMMARY : POWERPOINT OBJECTS..................................................................................................... 80
SKILL SET 6 CONTROLLING A PRESENTATION ...................................................................... 81 42 - CHANGING SLIDE ORDER........................................................................................................ 82 43 - DELETING SLIDES.................................................................................................................... 83 44 - HIDING SLIDES ........................................................................................................................ 84 45 - HYPERLINKS ........................................................................................................................... 85 46 - ACTION BUTTONS................................................................................................................... 87 47 - USING BUILT-IN ANIMATION ................................................................................................... 88 48 - USING CUSTOM ANIMATION .................................................................................................... 89 49 - ANIMATING CHARTS ............................................................................................................... 91 50 - SETTING UP A SLIDE SHOW..................................................................................................... 93 51 - ADDING SOUND....................................................................................................................... 94 52 - ADDING A MOVIE.................................................................................................................... 96 53 - APPLYING SLIDE TRANSITIONS................................................................................................ 97 54 - APPLYING TIMINGS ................................................................................................................. 98 55 - REHEARSE TIMINGS .............................................................................................................. 100 56 - DEVELOP YOUR SKILLS ......................................................................................................... 102
SUMMARY : CONTROLLING A PRESENTATION..................................................................................... 103
SKILL SET 7 FINISHING AND PRINTING................................................................................... 104 57 - ADDING SPEAKER’S NOTES................................................................................................... 105 58 - START AND END SLIDES........................................................................................................ 106 59 - SPELL CHECKING .................................................................................................................. 107 60 - PROOF READING ................................................................................................................... 108 61 - PAGE SETUP.......................................................................................................................... 109 62 - PRINTING SLIDES AND PRESENTATIONS................................................................................. 110 63 - OTHER PRINTS ...................................................................................................................... 111 64 - DEVELOP YOUR SKILLS ......................................................................................................... 112
SUMMARY : FINISHING AND PRINTING ................................................................................................ 113
ANSWERS ............................................................................................................................................ 114
GLOSSARY.......................................................................................................................................... 116
INDEX................................................................................................................................................... 119

Presentation Software ITQ Level 2
© CiA Training Ltd 2013 20 PowerPoint 2013
Skill Set 2
Presentation Styles
By the end of this Skill Set you should be able to:
Use Themes
Amend Colour Schemes
Set up a Slide Master
Format a Slide Master
Use Different Bullet Levels
Insert Automatic Fields
Apply a Background

ITQ Level 2 Presentation Software
PowerPoint 2013 21 © CiA Training Ltd 2013
Exercise 7 - Themes
Knowledge:
More often than not, it is important for any presentation to have a consistent style across all slides. Although the same formatting can be copied manually to every slide in a presentation, PowerPoint offers several more efficient methods of doing this automatically. The quickest way is to apply a Theme to the presentation.
A Theme is a coordinated set of background colours, graphics, and text formatting definitions which can be applied to all slides in one go. Once applied, the design template characteristics can be altered manually to suit.
Activity:
1. Start PowerPoint. From the starting screen, click Open Other Presentations to display the Open screen. Click Computer .
2. Next, locate and open the Far North2 presentation from the supplied data files. This is the first three slides of a recruitment presentation with no formatting applied.
3. Select the DESIGN tab. The Themes , Variants and Customize groups will be displayed.
4. Place your mouse pointer over some of the available theme thumbnails in the Themes group on the Ribbon (but do not click). A preview of how this theme will affect your presentation is shown. Notice how the background colours, graphics, bullet points and text formatting all change.
5. Click to select a theme of your choice. Notice that all slides in the presentation are changed (as shown in the Slides Pane on the left).
6. Click the More drop-down arrow, , to the right of the theme preview images, and select the theme called Facet (the names of the themes will appear in a ToolTip as the mouse pointer hovers over the preview images).
Note: If this theme is not available on your computer, use an alternative.
7. View each slide in the presentation, and then return to slide 1.

Presentation Software ITQ Level 2
© CiA Training Ltd 2013 22 PowerPoint 2013
Exercise 8 - Colour Schemes
Knowledge:
PowerPoint includes many colour schemes . These are sets of coordinated colours (Variants ) which change the appearance of a selected theme.
Activity:
1. The themed presentation should still be open with the DESIGN tab displayed. The theme’s default colour scheme is shown in the Variants group.
2. To select a different colour scheme, click the More drop-down arrow, , from
the Variants group and select Colors , .
3. Place your mouse pointer over some of the available schemes (but do not click). A preview of how this will affect your presentation’s theme is shown.
4. Select Blue and examine the effect on the slides in your presentation.
5. Click the More drop-down arrow from the Variants group and select Colors again. This time, select Customize Colors from the bottom of the list.

ITQ Level 2 Presentation Software
PowerPoint 2013 23 © CiA Training Ltd 2013
Exercise 8 - Continued
6. Examine the dialog box that appears. This can be used to select your own colours for different parts of the presentation.
7. Notice how the Theme colors match the colours used in the presentation.
8. Click the drop-down arrow to the right of Accent 1 and select a purple colour from Standard Colors . Notice how the Sample preview changes.
9. Change Text/Background – Dark 1 to red from Standard Colors .
10. To save the changes as a new theme, replace the text in the Name box with My Theme and click Save. The amended theme is applied to the presentation.
11. Examine each slide and notice the effect. Click Colors , , again. Your new colour scheme is shown towards the top of the list.
Note: You can edit your new colour scheme by right-clicking and selecting Edit.
12. Finally, apply the Blue Warm colour scheme. This produces a satisfactory and professional design for this presentation.
13. Save the presentation as themed and leave it open for the next exercise.

Presentation Software ITQ Level 2
© CiA Training Ltd 2013 24 PowerPoint 2013
Exercise 9 - The Slide Master
Knowledge:
The most efficient way to apply consistent design to a presentation is to use a feature called Slide Master . This allows background effects, text formatting and graphics to be added to every slide in a presentation at the same time. If a new slide is added, it will automatically use the Slide Master formatting.
The Slide Master is one of three different master pages that can be defined in PowerPoint, the others being Handout Master and Notes Master . Only Slide Master will be covered in this guide.
Activity:
1. The themed presentation should still be open. Select the VIEW tab and click Slide Master .
2. Scroll to the very top of the Slides Pane and select the first slide: the Slide Master . Leave this view open for the next exercise.
3. Examine the Slide Master screen and buttons on the SLIDE MASTER tab.
Note: Any changes made to the Slide Master will affect a whole presentation. For example, text or graphics added to this slide will appear on every slide in your current themed presentation.
Note: Layouts are used to define formatting and positioning of content for individual slide types only (e.g. Title Slide, Title and Content, etc).
Slide Master
Layouts

ITQ Level 2 Presentation Software
PowerPoint 2013 25 © CiA Training Ltd 2013
Exercise 10 - Formatting the Slide Master
Knowledge:
The Slide Master can be formatted in the same way as a normal slide. This includes changing fonts, colours and text alignment. The difference is that the formatting will be applied to all slides in the presentation (and all slides that are added later).
Many organisations will define a single set of formatting (called a house style) which is to be applied to all presentations (and even letters and documents, etc). This is intended to produce a consistent ‘look’ or corporate image to all the output from an organisation. For a presentation, house styles are ideally applied to the Slide Master .
Activity:
1. The themed presentation Slide Master should still be open. Make sure the Slide Master at the very top of the Slides Pane is selected (this is the main master slide).
2. Click once to place the cursor anywhere in the top text box, Click to edit Master title style .
Note: You do not have to select all of the text in a text box to adjust its formatting. You can simply place the cursor anywhere within a line of text. However, take care not to place the cursor in a space between words.
3. Display the HOME tab.
Note: Notice the font type, size and alignment selected. The existing font is Trebuchet MS, size 36 pt.

Presentation Software ITQ Level 2
© CiA Training Ltd 2013 26 PowerPoint 2013
Exercise 10 - Continued
Note: Your employer’s house style states that slide titles should be Calibri, 40 pt, Bold, Underlined, Center aligned and Purple. First level bullet points should be Arial, 20 pt and second level bullets should be Arial, 18 pt.
4. Using the buttons in the Font group, change the font to Calibri , the font style to Bold and Underlined , and the size to 40.
5. To change the font colour of this bullet, click the Font Color button drop-down and select a purple colour from within Standard Colors .
6. Centre the text by clicking the Center alignment button, , in the Paragraph group.
7. Click within the first bullet text in the second text box: Click to edit Master text styles .
8. Then, change the font to Arial and the size to 20. Leave the other settings.
9. Click within the next bullet text: Second Level . Set the font to Arial , the style to Italic and the size to 18.
10. Click in the text Click to edit Master title style again. To add a border to this text box, click the Quick Styles button in the Drawing group. Select any style of your choice.
11. To change the colour of the border, click the Shape Outline button in the Drawing group and select a purple colour (to match the text).
Note: Borders can be added to any text box using this method. The Shape Fill and Shape Outline styles can also be adjusted in the Drawing group.
12. On second thoughts, the title would look better without a border. Click the Shape Outline button in the Drawing group and select No Outline .
13. Display the SLIDE MASTER tab and click Close Master View to see how the presentation has been affected.

ITQ Level 2 Presentation Software
PowerPoint 2013 27 © CiA Training Ltd 2013
Exercise 11 - Bullet Levels
Knowledge:
Text that you enter on a slide often takes the form of bullet points . There are several levels of bulleted text available which allow minor details to be made about major points. The formatting of bullet points for the whole presentation can be set in Slide Master view (including the bullet symbols themselves).
When text is entered on a slide PowerPoint assumes it will be a first level bullet point. The process of changing that bullet to a lower level bullet is called Demotion .
Note: As you might guess, the process of changing a bullet to a higher level is called Promotion.
Activity:
1. The themed presentation should still be open. Change to Slide Master view and make sure the main slide master (the one at the top) is selected.
2. Click in the First level bullet text (Click to edit Master text styles ). The bullet level fonts were changed in the previous exercise but other formatting can be changed.
3. Display the HOME tab and click the Line Spacing button, .
4. Select 1.5 lines. The first level bullet points will now be spaced further apart on the slides.
5. Bullet symbols can also be changed. Click the drop-down arrow on the
Bullets button, , to display a list of options. Select Arrow Bullets .
Note: An alternative method for changing the bullet symbol is to right click in the required level bullet text and select Bullets.

Presentation Software ITQ Level 2
© CiA Training Ltd 2013 28 PowerPoint 2013
Exercise 11 - Continued
Note: To further customise bullet symbols (and even choose your own pictures to use), click the Bullets drop-down arrow and select Bullets and Numbering. The Picture and Customize buttons can be used to tailor bullet points to suit your presentation.
6. Place the cursor in the Second level text. Then choose a bullet style of Filled Square Bullets .
7. Display the SLIDE MASTER tab and select Close Master View .
Note: Notice that the text and bullets have changed to reflect the Slide Master.
8. Select slide 3 of the presentation.
9. Click in the second bullet point, First satellite launch in 1999 .
10. Click the Increase List Level button, , in the Paragraph group on the HOME tab. The text becomes second level and adopts the formatting defined for this level.
11. The bullets for this slide should all be first level. Click the Decrease List
Level button, , to promote bullet back to first level.
12. Save the presentation with the same file name and leave it open for the next exercise.

ITQ Level 2 Presentation Software
PowerPoint 2013 29 © CiA Training Ltd 2013
Exercise 12 - Adding Automatic Fields
Knowledge:
Items such as the date, the name of the designer, and the slide number can be added so that they appear on each slide in the presentation. The data can be added using Header and Footer view. By default the data is shown along the lower edge of each slide. If the date is inserted as an automatic field , it will update each time the presentation is opened, saved or printed.
Activity:
1. Select the INSERT tab and click Header & Footer in the Text group. The Header and Footer dialog box appears.
2. From the Slide tab, select the Date and time option.
3. Click the Update automatically option. This will update the field every time the presentation is opened or run.
4. Change the Language to English (UK) to allow you to select a local date format.
5. Click the arrow on the date drop-down box to display a list of date formats. Select the date in the form 6-Aug-13 .
6. Check the Slide number option to show slide numbers on all the slides.
7. Check the Footer option and then type Designed by in the Footer box and add your name afterwards.
Note: Notice the Preview image on the right which shows the options that are selected and where they will appear on the slides.

Presentation Software ITQ Level 2
© CiA Training Ltd 2013 30 PowerPoint 2013
Exercise 12 - Continued
8. Click Apply to All to insert the information on all slides in the presentation. Examine the effect on each slide.
9. View the Slide Master and look at the bottom of the slide. This shows the default position for the three footer text boxes in this theme.
Note: Notice that the Slide number appears as a field, <#>.
Note: It is possible to click in any box and change the format or alignment of the content, or even to move any box to a different location by clicking and dragging.
10. Click and drag to select all of text in the text box starting Designed by …
11. Display the HOME tab. Then, using the Font Color drop down, change the colour of the text to Black .
12. Close the Master View to see the effect.
13. Save the changes to the presentation.
14. Leave the presentation open for the next exercise.

ITQ Level 2 Presentation Software
PowerPoint 2013 31 © CiA Training Ltd 2013
Exercise 13 - Applying a Background
Knowledge:
Previous exercises have shown a slide background being added as part of a theme, but it is possible to add various background effects manually to slides. A background can be a plain solid colour, a colour gradient, a texture, a pattern or a picture.
Backgrounds can be applied to all slides (by being applied to the Slide Master ) or they can be applied individually to the current slide only.
Activity:
1. Display the DESIGN tab.
2. Then, from the Variants group, click the More drop-down arrow and select Background Styles .
3. Roll the cursor over the various preset backgrounds to see a preview on the slide.
4. Locate and select Style 5 to apply it. Notice the background is applied to all the slides in the presentation.
5. Click the Background Styles button again and select Format Background to display the Format Background pane.
6. Under FILL , select the Picture or texture fill option.
7. Then, click the Texture button, .
8. Place the cursor over each background texture to display its name in a ToolTip . Locate and select Newsprint .
9. Click the Apply to All button. Notice that the Newsprint background is applied to all the slides.
10. Next, select Gradient fill on the Format Background pane.
Presentation Software ITQ Level 2
© CiA Training Ltd 2013 32 PowerPoint 2013
Exercise 13 - Continued
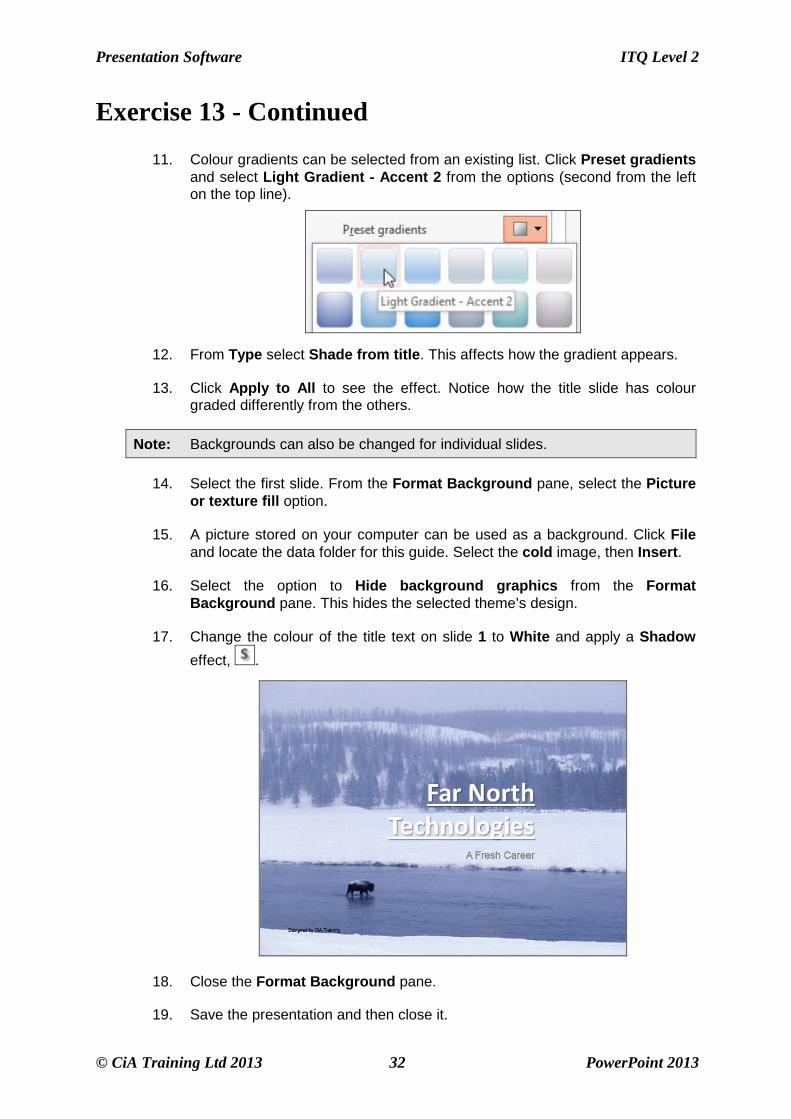
11. Colour gradients can be selected from an existing list. Click Preset gradients and select Light Gradient - Accent 2 from the options (second from the left on the top line).
12. From Type select Shade from title . This affects how the gradient appears.
13. Click Apply to All to see the effect. Notice how the title slide has colour graded differently from the others.
Note: Backgrounds can also be changed for individual slides.
14. Select the first slide. From the Format Background pane, select the Picture or texture fill option.
15. A picture stored on your computer can be used as a background. Click File and locate the data folder for this guide. Select the cold image, then Insert .
16. Select the option to Hide background graphics from the Format Background pane. This hides the selected theme’s design.
17. Change the colour of the title text on slide 1 to White and apply a Shadow
effect, .
18. Close the Format Background pane.
19. Save the presentation and then close it.

ITQ Level 2 Presentation Software
PowerPoint 2013 33 © CiA Training Ltd 2013
Exercise 14 - Develop Your Skills
You will find a Develop Your Skills exercise at the end of each Skill Set. Work through it to ensure you’ve understood the previous exercises.
1. Open the presentation Fashion .
2. Apply the Parallax theme, .
3. Select the Green colour scheme from Variants .
4. Customise the colours and select a dark green colour for Text/Background - Dark 1 .
5. Save the amended theme as exercise14 .
6. Set up the Slide Master using the following house style as a guide:
NAME FONT
POINT SIZE FEATURE ALIGNMENT
Title Forte
44 pt Standard (not bold)
Centre
First level bullet
Garamond
40 pt Italic with arrow bullet
Left
Second level bullet
Brush Script MT
32 pt Left
Note: If the exact fonts listed above are not available, choose alternatives.
FEATURE
POSITION
Slide Number Bottom right
Your Name Bottom left
Date (Automatic) Middle box
7. Close the Master Slide .
8. Add the image woods.jpg , which is supplied with the data for this unit, as a background to the title slide only.
9. Change the text colour for both text boxes on this slide to white.
10. Make sure the theme’s background graphic is hidden.
11. Save the presentation as fashion2 and close it.
Note: Example solutions are given in the Answers section at the end of the guide.

Presentation Software ITQ Level 2
© CiA Training Ltd 2013 34 PowerPoint 2013
Summary: Presentation Styles
In this Skill Set you have started the presentation software program PowerPoint. You have opened, saved and closed presentations.
You should now be able to demonstrate your ability to:
• Format complex presentations by:
� Using themes
� Applying backgrounds
� Changing colour schemes
• Use the Slide Master to:
� Define bullet levels
� Add automatic fields

ITQ Level 2 Presentation Software
PowerPoint 2013 81 © CiA Training Ltd 2013
Skill Set 6
Controlling a Presentation
By the end of this Skill Set you should be able to:
Change Slide Order
Delete and Hide Slides
Use Hyperlinks
Create Action Buttons
Use Preset and Custom Animation
Animate Charts
Set up a Slide Show
Apply Slide Transitions and Timings
Add Sound

Presentation Software ITQ Level 2
© CiA Training Ltd 2013 82 PowerPoint 2013
Exercise 42 - Changing Slide Order
Knowledge:
To make a presentation flow more smoothly you may want to change the order of some of the slides. Slide Sorter view provides an easy way to achieve this.
Activity:
1. Open the Far North5 presentation and switch to Slide Sorter view.
2. Use the Zoom slider, , at the bottom right of the Status Bar to select a zoom level that keeps the slide titles legible and shows at least five slides per row.
3. Slide 13, Department Staff would be better positioned after slide 4, Structure . Click on slide 13 and hold down the mouse button.
4. Drag the slide towards slide 5 and the other slides are rearranged around it.
5. When the slide appears after slide 4, release the mouse. The Department Staff slide is now slide 5.
Note: Slides can also be repositioned by using click and drag in the Slides Pane at the left of Normal view.
6. Save the presentation as actions and leave it open.

ITQ Level 2 Presentation Software
PowerPoint 2013 83 © CiA Training Ltd 2013
Exercise 43 - Deleting Slides
Knowledge:
Slides that are no longer required can be deleted. The easiest way to do this is in Slide Sorter view.
Activity:
1. In the actions presentation, in Slide Sorter view, click between slides 3 and 4 to place an insertion bar.
2. Using the New Slide button, insert a new Title and Content slide.
3. Switch to Normal view and enter the title Our Founder .
4. Add text to create the following slide:
5. The Far North Technology’s director has come in to see how the presentation is progressing. He is not happy about the new slide as he thinks his personal details are not relevant to the presentation. You must delete the slide. Switch back to Slide Sorter view.
6. Right click slide 4 to reveal a shortcut menu. Select Delete Slide from the menu.
7. He also thinks that slide 13 about the company mascot should not really be part of the presentation. Select that slide in Slide Sorter view and press <Delete>.
8. Save the presentation using the same file name and leave it open.
Presentation Software ITQ Level 2
© CiA Training Ltd 2013 84 PowerPoint 2013
Exercise 44 - Hiding Slides
Knowledge:
Occasionally a presentation may have slides that contain additional or sensitive information that does not need to be seen unless specifically requested. If necessary these slides can be hidden.
This feature is particularly useful when a single presentation is to be used for different purposes (i.e. a slide on sales figures can be hidden when giving a presentation to staff, but included when giving the same presentation to managers).
Activity:
1. The Far North Technology’s director is still not happy with the presentation. He thinks the slides about turnover should only be displayed when requested, rather than automatically.
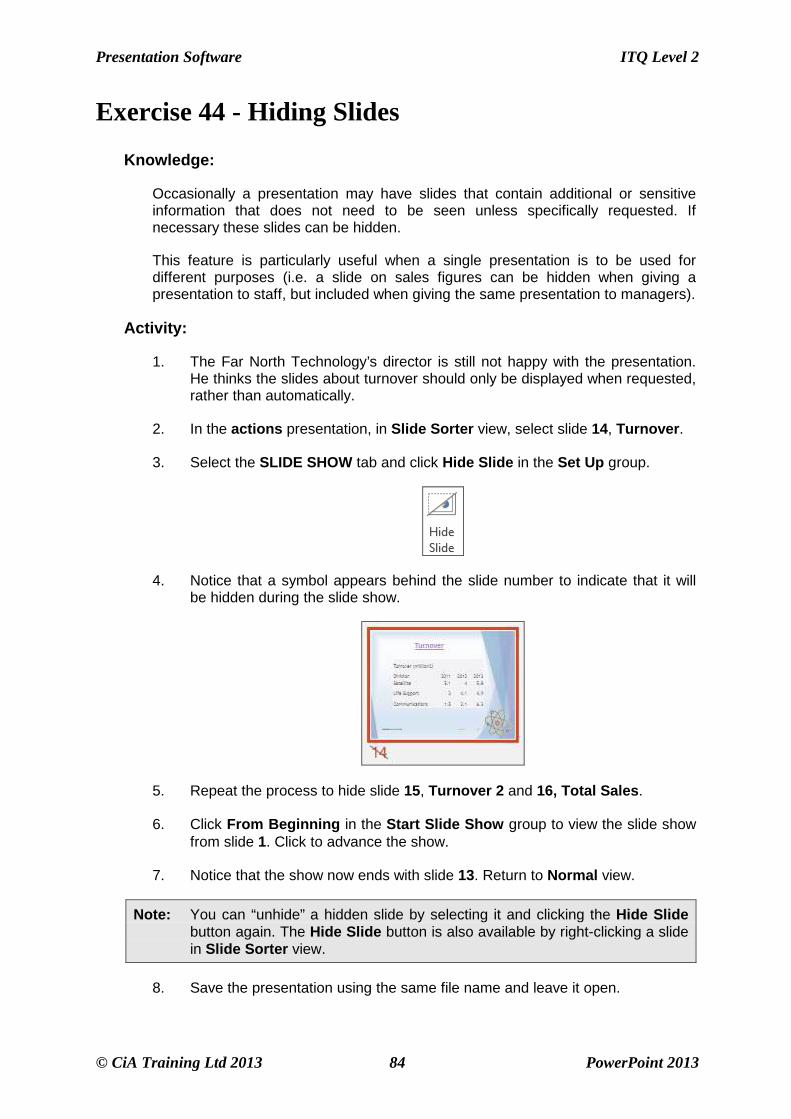
2. In the actions presentation, in Slide Sorter view, select slide 14, Turnover .
3. Select the SLIDE SHOW tab and click Hide Slide in the Set Up group.
4. Notice that a symbol appears behind the slide number to indicate that it will be hidden during the slide show.
5. Repeat the process to hide slide 15, Turnover 2 and 16, Total Sales .
6. Click From Beginning in the Start Slide Show group to view the slide show from slide 1. Click to advance the show.
7. Notice that the show now ends with slide 13. Return to Normal view.
Note: You can “unhide” a hidden slide by selecting it and clicking the Hide Slide button again. The Hide Slide button is also available by right-clicking a slide in Slide Sorter view.
8. Save the presentation using the same file name and leave it open.

ITQ Level 2 Presentation Software
PowerPoint 2013 85 © CiA Training Ltd 2013
Exercise 45 - Hyperlinks
Knowledge:
Regular users of the Internet will be familiar with hyperlinks – text or images that, when clicked, move the user directly to another location. Hyperlinks can be created on slides to navigate to other slides in a presentation, to other files on your computer, or to locations on an Intranet or the Internet.
Activity:
1. In the actions presentation, view slide 2, A Fresh Career in Normal view.
2. Click and drag to select the text The Challenge and display the INSERT tab. Click Hyperlink from the Links group.
3. From the Insert Hyperlink dialog box, click the Place in This Documen t button in the left panel then select 10. Attitude from the list of slide titles.
4. Click OK to create the hyperlink. Then click away from the text to deselect it.
5. Notice that the colour of the hyperlink text on the slide is different to other text. When the hyperlink has been visited, the text colour will change.
Note: Hyperlink colours are defined in the Color Scheme settings.
6. To test the hyperlink, click the Slide Show button, , at the lower right of the screen with slide 2 still selected.
7. Move your mouse to display the pointer. Then, click on the hyperlink text, The Challenge . Instead of moving to slide 3, the next slide to appear will be slide 10. Press <Esc> to end the slide show.
8. Display slide 2 again. Note that the hyperlinked text has changed colour after it has been used.
Presentation Software ITQ Level 2
© CiA Training Ltd 2013 86 PowerPoint 2013
Exercise 45 - Continued
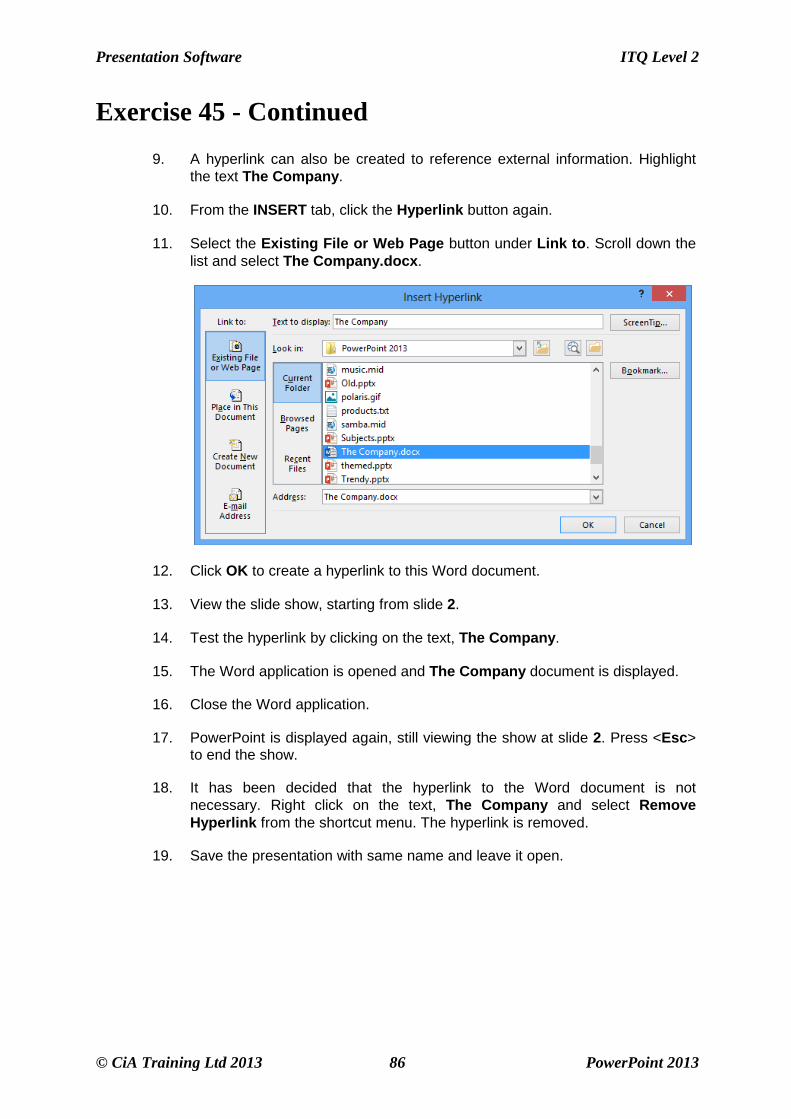
9. A hyperlink can also be created to reference external information. Highlight the text The Company .
10. From the INSERT tab, click the Hyperlink button again.
11. Select the Existing File or Web Page button under Link to . Scroll down the list and select The Company.docx .
12. Click OK to create a hyperlink to this Word document.
13. View the slide show, starting from slide 2.
14. Test the hyperlink by clicking on the text, The Company .
15. The Word application is opened and The Company document is displayed.
16. Close the Word application.
17. PowerPoint is displayed again, still viewing the show at slide 2. Press <Esc> to end the show.
18. It has been decided that the hyperlink to the Word document is not necessary. Right click on the text, The Company and select Remove Hyperlink from the shortcut menu. The hyperlink is removed.
19. Save the presentation with same name and leave it open.

ITQ Level 2 Presentation Software
PowerPoint 2013 87 © CiA Training Ltd 2013
Exercise 46 - Action Buttons
Knowledge:
Action buttons are often used to create hyperlinks within a presentation, as an alternative to a text hyperlink. They allow rapid, easy navigation between slides.
Activity:
1. In the actions presentation, select slide 13, Major Missions .
2. To add an Action Button , click the Shapes button on the INSERT tab.
3. From Action Buttons at the bottom of the list, select the Custom action
button, .
4. Click and drag a rectangular button shape below the table. The Action Settings dialog box appears on the screen.
5. Ensure that the Mouse Click tab is selected.
6. Click the Hyperlink to option and, from the drop-down list, select Slide .
7. From the list of slides displayed, select slide (14) Turnover (a hidden slide).
8. Click OK and OK again.
Note: You can draw any shape to use as an action button. Select it and click Action from the Links group (INSERT tab) to display the Action Settings dialog box, allowing you to select a hyperlink destination. Pictures can also be used as hyperlinks in this way.
9. With the button still selected, type Turnover . This will become the button text. Adjust the size of the button by dragging the corner handles, if required.
10. Click the Slide Show button to see the slide as it will appear in the final presentation.
11. Click the new Turnover action button.
12. The presentation moves to slide 14, the Turnover slide, even though it is hidden and would not be displayed as part of a normal slide show.
13. Exit the slide show but leave the presentation open.