iroad x10 user guide
TRANSCRIPT

IROAD X10
USER GUIDE
To ensure safety usage, please read this manual carefully before installation and follow the instructions herein.Store this manual in a secure place for future reference.
IROAD reserves the rights to change or modify the contents of this manual at any time without prior notice.
PRODUCT INFORMATIONPRODUCT OVERVIEWPACKAGE COMPONENT NAME OF EACH PARTSPECIFICATION
............................. 4......................... 5
............................. 6...................................... 7
SETUPINSTALLATIONUNINTERRUPTED FUSE CABLEOBD2 SCANNER
................................... 8~9............ 10
................................... 11
USING THE DEVICEPRODUCT OPERATIONBUTTON SCENARIORECORDING MODEVOICE GUIDANCEVIDEO FOLDERS IN SD MEMORY CARDFIRMWARE UPDATE
........................ 12....................... 13~14
.............................. 15........................... 16~17
.... 18....................... 19~21
BEFORE USINGUSER MANUALPRECAUTION
....................................... 1...................................... 2~3
DEDICATED PC VIEWERINSTALLATION & RUNNING THE VIEWEROVERVIEWWATCHING FRONT/REAR VIEWENLARGING THE SCREENOSD SETTINGS & OSDTHUMBNAIL/DRAWING A LANEBACKUPSYSTEM SETTINGSEVENT SETTINGSADAS SETTINGSUSER SETTINGSPORTABLE DISK VERSION INFO
.. 22............................................ 23
............. 24..................... 25
.......................... 26............ 27
............................................... 28............................... 29
................................. 30................................... 31................................... 32................................... 33
..................................... 34
TROUBLESHOOTING .............. 50
............................................................... 35
HOW TO CONNECT
SYNCING WITH SMARTPHONE
APPLICATION
iOSANDROID
MAIN SCREEN/LIVE VIEWLIST OF RECORDINGS & PLAYBACKSETTINGSOBDII SCANNER APPLICATION
....................................................... 36.............................................. 37
...................... 38...... 39
....................................... 40~44..... 45~49
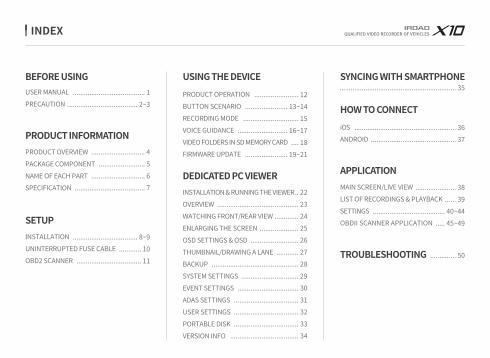
INDEX

1. USER MANUAL
THANK YOU FOR CHOOSING JAEWONCNC IROAD VEHICLE RECORDERThis manual contains how to operate product and guide you to use correctly, Please read carefully before using product.
Please read carefully and follow the instructions given. This manual will guide you through on the instructions for the device.
- Available for download from the website at http://www.iroadkr.com Global website( Global - www.iroadkr.com / Singapore - www.iroad.sg / HongKong - www.iroad.hk / Malaysia - www.iroad.my )
- Dedicated viewer, latest firmware and other product information are available for download from the website.
- JAEWONCNC is not responsible for any problem that occurs if the device is used or obtained illegally.
- Though this product records and saves footages in the event of accident, it does not guarantee that every single accident scene is fully recorded.
- If the impact on the vehicle is minor, the accident scene may not be recorded as the impact sensor is unable to detect minor ones.
- The recordings obtained from the product might be used as a proof of accident. However, JAEWONCNC will not be responsible for any gain or loss caused by the accident.
GUARANTEE AND SUPPORTING
- This manual is legally protected by copyrights, all copyrights reserved to JAEWONCNC.
- This manual is the property of JAEWONCNC, no one is allowed to attempt to make an unauthorized copy, edit and/or translate the manual
- IROAD is the trademark of JAEWONCNC. JAEWONCNC has rights to IROAD (Name, Design, Brand image) any unauthorized use of IROAD will result in prosecution.
COPYRIGHTS AND TRADEMARK
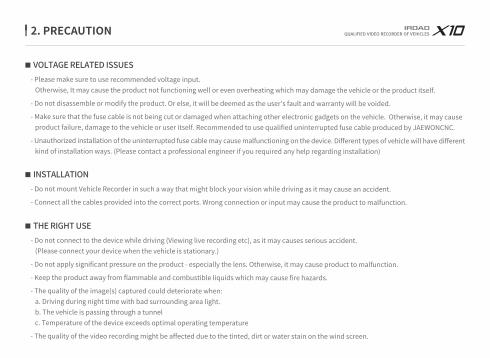
2. PRECAUTION
- Please make sure to use recommended voltage input. Otherwise, It may cause the product not functioning well or even overheating which may damage the vehicle or the product itself.
- Do not disassemble or modify the product. Or else, it will be deemed as the user’s fault and warranty will be voided.
- Make sure that the fuse cable is not being cut or damaged when attaching other electronic gadgets on the vehicle. Otherwise, it may cause product failure, damage to the vehicle or user itself. Recommended to use qualified uninterrupted fuse cable produced by JAEWONCNC.
- Unauthorized installation of the uninterrupted fuse cable may cause malfunctioning on the device. Different types of vehicle will have different kind of installation ways. (Please contact a professional engineer if you required any help regarding installation)
VOLTAGE RELATED ISSUES
- Do not mount Vehicle Recorder in such a way that might block your vision while driving as it may cause an accident.
- Connect all the cables provided into the correct ports. Wrong connection or input may cause the product to malfunction.
INSTALLATION
- Do not connect to the device while driving (Viewing live recording etc), as it may causes serious accident. (Please connect your device when the vehicle is stationary.)
- Do not apply significant pressure on the product - especially the lens. Otherwise, it may cause product to malfunction.
- Keep the product away from flammable and combustible liquids which may cause fire hazards.
- The quality of the image(s) captured could deteriorate when: a. Driving during night time with bad surrounding area light. b. The vehicle is passing through a tunnel c. Temperature of the device exceeds optimal operating temperature
- The quality of the video recording might be affected due to the tinted, dirt or water stain on the wind screen.
THE RIGHT USE
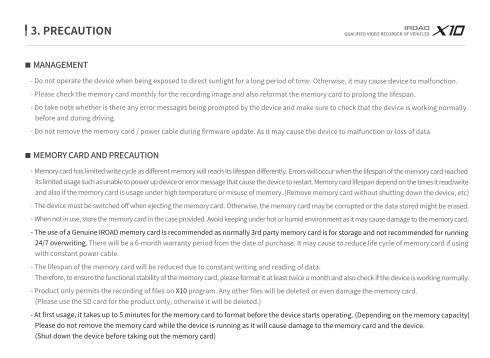
3. PRECAUTION
- Do not operate the device when being exposed to direct sunlight for a long period of time. Otherwise, it may cause device to malfunction.
- Please check the memory card monthly for the recording image and also reformat the memory card to prolong the lifespan.
- Do take note whether is there any error messages being prompted by the device and make sure to check that the device is working normally before and during driving.
- Do not remove the memory card / power cable during firmware update. As it may cause the device to malfunction or loss of data
MANAGEMENT
- Memory card has limited write cycle as different memory will reach its lifespan differently. Errors will occur when the lifespan of the memory card reached its limited usage such as unable to power up device or error message that cause the device to restart. Memory card lifespan depend on the times it read/write and also if the memory card is usage under high temperature or misuse of memory. (Remove memory card without shutting down the device, etc)
- The device must be switched off when ejecting the memory card. Otherwise, the memory card may be corrupted or the data stored might be erased.
- When not in use, store the memory card in the case provided. Avoid keeping under hot or humid environment as it may cause damage to the memory card.
- The use of a Genuine IROAD memory card is recommended as normally 3rd party memory card is for storage and not recommended for running 24/7 overwriting. There will be a 6-month warranty period from the date of purchase. It may cause to reduce life cycle of memory card if using with constant power cable.
- The lifespan of the memory card will be reduced due to constant writing and reading of data. Therefore, to ensure the functional stability of the memory card, please format it at least twice a month and also check if the device is working normally.
- Product only permits the recording of files on X10 program. Any other files will be deleted or even damage the memory card. (Please use the SD card for the product only, otherwise it will be deleted.)
- At first usage, it takes up to 5 minutes for the memory card to format before the device starts operating. (Depending on the memory capacity) Please do not remove the memory card while the device is running as it will cause damage to the memory card and the device. (Shut down the device before taking out the memory card)
MEMORY CARD AND PRECAUTION

4. PRODUCT OVERVIEW
Wi-Fi SupportReal Time Image (Live view recording) and playback is supported via Wi-Fi. Customize settings and automatic updates are supported.
OBD SCANNEROBD scanner provides real-time data and to diagnoseand fuel economy statistics in your vehicle via smartphone.
2CH High DefinitionFront : 4K/UHD 3840x2160p 30 frames per secondRear : Full HD 1920x1080p 30 frames per second
Remarkable hardware supporting high performance Front 8.3M pixels, Rear SONY Exmor Image Sensor
Memory Card Automatic Recovery FunctionIn case any error occurs, data is automatically recovered.
SAFEGUARD User’s Car BatteryAutomatic LBP cut off voltage function is embedded in the device to ensure the safety of the car battery.
HARDWARE
Dedicated PC Viewer & Smartphone PlaybackSetting & various functions on IROAD PC Viewer and Smartphone. Playback functions are available for both PC and Smartphone.
Firmware UpdateContinuously improving the software and maintaining stability of the products. Easy & simple when updating firmware through Smartphone directly or from our website www.iroadkr.com
High Intensity Security LEDHigh intensity LED makes it possible to check outside whether product is working.
Voice Recording & Voice GuidanceHigh Quality Sound RecordingBuilt-in Speaker with Clear Voice Guidance
External GPSDriving speed will be display on the recording playback.Location of the recording will be able to view via IROAD PC Viewer.
Variable Recording ModeAutomatic Parking Mode and Motion Detection functionImpact, 24 hours Recording Mode
X-VISIONBetter recording with brighter and clearer images even in low light environments.
ADASAdvanced Driver Assistance SystemLDWS, FCWS, FVDW

5. PACKAGE COMPONENT
Front Camera
All pictures shown are only for illustration purposes only.
The picture of this package may differ from the actual product.
All pictures shown are only for illustration purposes only.
The picture of this packagemay differ from the actual product.
Wi-Fi Dongle
Basic Components
Optional Items
Cigar Jack Power Cable External GPS Antenna SD Card Reader OBD Scanner
Rear Camera+Cradle
Rear Camera Cable
User ManualUninterrupted Fuse Cable
Cradle IROAD GenuineMicro SD
_ IROAD X9
USER GUIDE
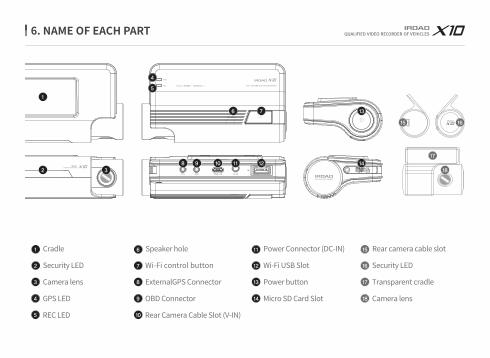
6. NAME OF EACH PART
1 Cradle
2 Security LED
3 Camera lens
4 GPS LED
5
7
8
9
16
17
18
10REC LED
15 Rear camera cable slot
Security LED
Transparent cradle
Camera lens
Power button
Micro SD Card Slot
Power Connector (DC-IN)
Wi-Fi USB SlotWi-Fi control button
ExternalGPS Connector
OBD Connector
Rear Camera Cable Slot (V-IN)
6
12
13
14
11Speaker hole
1810 11
5
12
13
9
6 7
8
4
16
17
15
2 3
1
14
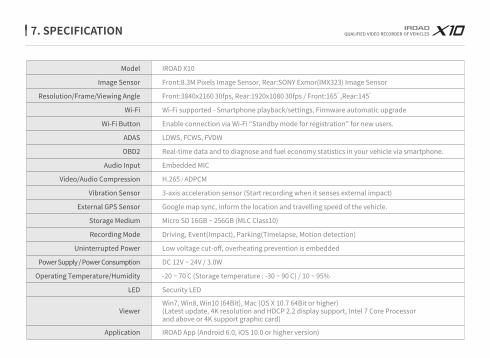
7. SPECIFICATION
Model
Image Sensor
Resolution/Frame/Viewing Angle
Wi-Fi
Wi-Fi Button
ADAS
OBD2
Audio Input
Video/Audio Compression
Vibration Sensor
External GPS Sensor
Storage Medium
Recording Mode
Uninterrupted Power
Power Supply / Power Consumption
Operating Temperature/Humidity
LED
Viewer
Application
IROAD X10
Front:8.3M Pixels Image Sensor, Rear:SONY Exmor(IMX323) Image Sensor
Front:3840x2160 30fps, Rear:1920x1080 30fps / Front:165 ,Rear:145
Wi-Fi supported - Smartphone playback/settings, Firmware automatic upgrade
Enable connection via Wi-Fi “Standby mode for registration” for new users.
LDWS, FCWS, FVDW
Real-time data and to diagnose and fuel economy statistics in your vehicle via smartphone.
Embedded MIC
H.265 / ADPCM
3-axis acceleration sensor (Start recording when it senses external impact)
Google map sync, inform the location and travelling speed of the vehicle.
Micro SD 16GB ~ 256GB (MLC Class10)
Driving, Event(Impact), Parking(Timelapse, Motion detection)
Low voltage cut-off, overheating prevention is embedded
DC 12V ~ 24V / 3.0W
-20 ~ 70 C (Storage temperature : -30 ~ 90 C) / 10 ~ 95%
Security LED
Win7, Win8, Win10 (64Bit), Mac (OS X 10.7 64Bit or higher)(Latest update, 4K resolution and HDCP 2.2 display support, Intel 7 Core Processor and above or 4K support graphic card)
IROAD App (Android 6.0, iOS 10.0 or higher version)
o o
oo
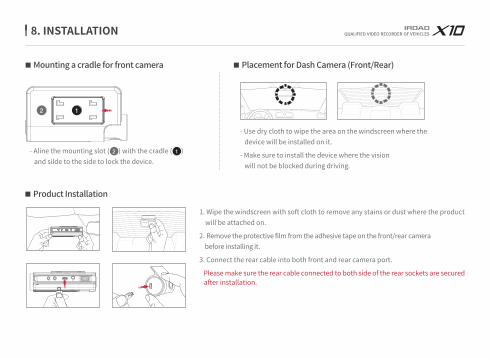
- Aline the mounting slot ( ) with the cradle ( ) and silde to the side to lock the device.
8. INSTALLATION
- Use dry cloth to wipe the area on the windscreen where the device will be installed on it.
- Make sure to install the device where the vision will not be blocked during driving.
1. Wipe the windscreen with soft cloth to remove any stains or dust where the product will be attached on.
2. Remove the protective film from the adhesive tape on the front/rear camera before installing it.
3. Connect the rear cable into both front and rear camera port.
Please make sure the rear cable connected to both side of the rear sockets are secured after installation.
Placement for Dash Camera (Front/Rear)Mounting a cradle for front camera
Product Installation
12
12

9. INSTALLATION
4. Connect power cable to DC-IN slot
5. At the other end of the cable, do connect it to the vehicle fuse box or cigar jack power. Procedure on installation for uninterrupted fuse cable, please refer to the website www.iroadkr.com or follow the instructions stated on page 10
6. Make sure that the product is operating normally
Once the memory card is being inserted into the memory card slot,user will be able to hear a “click” sound.
At first usage, it takes up to 5 minutes for the memory card to format before the device starts operating. (Depending on the memory capacity)
Recording starts with a voice guidance mentioning "Start recording"
Make sure to insert the memory card in the correct way.
GPS
When Connect External GPS into the GPS port which can be found on the top of the device,
user will be able to access the GPS function which provides the vehicle speed, location and other additional information.
Please make sure to have some distance between the device (Front Camera) and the GPS to prevent any interference issue.
Product Installation
Connect External GPS Inserting Memory Card into the device
10
15
10
10
20
20
15
15
10
10
10
15
10
15
10
10
20
VCC
KDJB-8872-POWH
KD
JB-
8872-
PO
WH

10. UNINTERRUPTED FUSE CABLE
The LBP function will prevent the car battery from continuously discharging during parking mode when the device detected the voltage
dropping below the preset voltage.
(If you park for a long time, battery discharge may occur depending on the vehicle condition.)
Uninterrupted fuse cable (LBP function)
How to Install Uninterrupted Fuse Cable
User is advised to check the wiring before doing any installation. There might be a switch of (VCC, ACC, GND) wire color. Please do contact professional technician if you required any help on installation.
1
2
3
4
1 2 310
15
10
10
20
20
15
15
10
10
10
15
10
15
10
10
20
Find the correct fuse terminal using electric tester to locate the fuse box of the vehicle.
[VCC]Line (Yellow Line): Make sure engine is off and connect to a current flowing fuse. [ACC]Line (Red Line): Connect to the fuse which the electric current is not present.
Connect the GND wire to the vehicle ground iron part.Do not connect the wire on fuse that is not working or having voltage leak.
Connect the power cable to test whether the product is operating. Once confirmed, organize the wiring cables neatly.
Please do switching test (Driving mode <-> Parking mode ) before wiring.
4

11. OBDII SCANNER
What is OBDII?OBDII (On-board diagnostics) is an automotive term referring to a vehicle's self-diagnostic and reporting capability.It provides real-time data in addition to diagnostic trouble codes(DTC) and allows to identify and diagnose malfunctions in your vehicle by connecting the device to the OBDII connector.
How to connect OBDII
3
Connect OBDII cable to devcie with vehicle engine off.
Connect power cable of OBDII to device.
Check the OBDII port. Typically, the OBDII port is located within 60cm of steering wheel such as dashboard or fuse box.The location of the OBDII port may vary depending on vehicle. Please follow up instruction manual or vehicle manufacturerfor exact location.
Connect the OBDII connector to the OBDII port. Before finishing installation, make sure normal operation.
1
2
3
4
Please connect the wiring in the correct order. Otherwise it may cause product or vehicle malfunction.Please use only IROAD genuin OBDII cable. It may cause defects when try to other products.
1 42
Before connecting to the vehicle OBDII port, make sure to connect OBDII and device first.

12. PRODUCT OPERATION
Power ON
Power OFF
External GPS
Wi-Fi User Registration
- All LED will be turned on when the engine is on.
- There will be a voice guidance to assist the user once the device starts recording.
- GPS LED light will be off when there’s no GPS connection.
- All LED will be off when the engine is off or the power cable is disconnected.
- While external GPS is being connected, the GPS LED light will flicker.
(GPS LED light will be constantly on when connected to the satellite.)
- Please check the connection again if the LED light is not on despite having installed with external GPS.
- Press the Wi-Fi registration button on the device, there will be voice guidance (Standby mode for registration).
User will need to select the product on the list that they wish to register.
- The “Standby mode registration” will be deactivated after 2minutes.
Product OperationMenu and function can be changed without prior notice by sudden firmware upgrade or product enhancement.

13. BUTTON SCENARIO
Button Scenario 1
Power OFF- Press and hold the button for 5 seconds long.- “Shut down the system.” will be signaled, and the device will be powered off.
※ When 'Wi-Fi OFF', the consumption power is reduced by 0.3w and the device operating time is increased by 10%. ※ 'Wi-Fi ON/OFF' function allowing Users to turn Wi-Fi power on/off. Do not confuse it with 'Wi-Fi registration button'. When connecting to a smartphone, you must press 'Wi-Fi Registration Button'.※ Smartphones that have already been registered previously, Users do not have to re-registered even if the Wi-Fi on/off function is used.※ Default settings - Wi-Fi function is ON.
Power ON- Press and hold the button for 5 seconds long.- “Start recording.” will be signaled, and the device will be powered on.
Wi-Fi OFF- Press the button for 1.5 seconds long. “Ding” sound will signal.- “Wi-Fi power is off.” will be signaled, and Wi-Fi connection will be unavailable.
Wi-Fi ON- Press the button for 1.5 seconds long. “Ding” sound will signal.- “Wi-Fi power is on.” will be signaled,and Wi-Fi connection will be available.
Menu and function can be changed without prior notice by sudden firmware upgrade or product enhancement.

14. BUTTON SCENARIO
Button Scenario 2
Wi-Fi Stand-by Mode ON- Press the button shortly. “Ding-dong” sound will signal.- “Stand-by mode for the registration.” will be signaled, and Wi-Fi connection can be initiated.
Wi-Fi Stand-by Mode OFF- Press the button shortly. “Ding-dong” sound will signal.- “Stand-by mode for the registration is released.” will be signaled, and Wi-Fi connection cannot be initiated.
Audio Recording OFF- Press the button for 3 seconds long. “Ding-dong” sound will signal.- “Stop recording the voice.” will be signaled, and will be recorded without audio.
Audio Recording ON- Press the button for 3 seconds long. “Ding-dong” sound will signal.- “Start recording the voice.” will be signaled, and will be recorded with audio.
Menu and function can be changed without prior notice by sudden firmware upgrade or product enhancement.
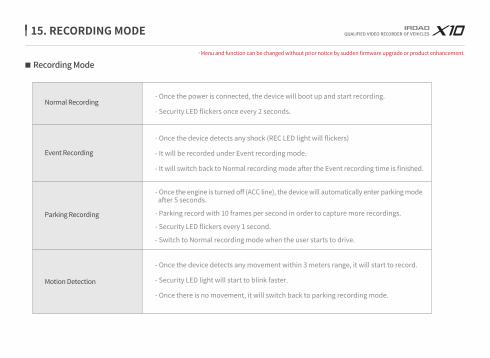
15. RECORDING MODE
Normal Recording
Event Recording
Parking Recording
Motion Detection
- Once the power is connected, the device will boot up and start recording.
- Security LED flickers once every 2 seconds.
- Once the device detects any shock (REC LED light will flickers)
- It will be recorded under Event recording mode.
- It will switch back to Normal recording mode after the Event recording time is finished.
- Once the device detects any movement within 3 meters range, it will start to record.
- Security LED light will start to blink faster.
- Once there is no movement, it will switch back to parking recording mode.
- Once the engine is turned off (ACC line), the device will automatically enter parking mode after 5 seconds.
- Parking record with 10 frames per second in order to capture more recordings.
- Security LED flickers every 1 second.
- Switch to Normal recording mode when the user starts to drive.
Recording ModeMenu and function can be changed without prior notice by sudden firmware upgrade or product enhancement.

16. VOICE GUIDANCE
Voice Guidance 1Menu and function can be changed without prior notice by sudden firmware upgrade or product enhancement.
Start recording.
Shut down the system.
Stand-by mode for the registration
Complete the registration.
Stand-by mode for the registration is released
No Wi-Fi dongle
Users connected.
User access disabled.
Wifi power is on.
Wifi power is off.
Already registered smart phone.
GPS connected.
Recording does not have enough available. Please check overwriting setting.
User's searcing starts so, recording is paused.
Start recording.
Driving mode to start recording. Safe driving.
Video is not being entered.
Records in parking mode.
Impact event has occurred during parking.
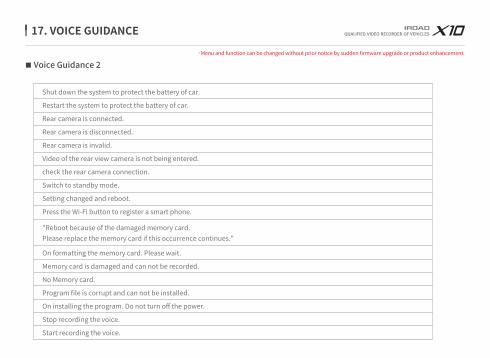
17. VOICE GUIDANCE
Voice Guidance 2Menu and function can be changed without prior notice by sudden firmware upgrade or product enhancement.
Shut down the system to protect the battery of car.
Restart the system to protect the battery of car.
Rear camera is connected.
Rear camera is disconnected.
Rear camera is invalid.
Video of the rear view camera is not being entered.
check the rear camera connection.
Switch to standby mode.
Setting changed and reboot.
Press the Wi-Fi button to register a smart phone.
"Reboot because of the damaged memory card. Please replace the memory card if this occurrence continues."
On formatting the memory card. Please wait.
Memory card is damaged and can not be recorded.
No Memory card.
Program file is corrupt and can not be installed.
On installing the program. Do not turn off the power.
Stop recording the voice.
Start recording the voice.

18. VIDEO FOLDERS IN SD MEMORY CARD
Config Data Event ViewerUpdate
System Folder - Log.txt : Saved device status- System.cfg : Saved device settings - Version.ini : Saved version information- obd.txt : Saved the vehicle information. (Option-OBD Scanner is installed)- obd_bin : Saved operation status (Option-OBD Scanner is installed)
Normal (Driving) Recording Folder- Normal recordings are being saved into this folder. The number of files being saved depends on the capacity of the memory card.
Event(Impact) Recording Folder- Recorded data of events (Impact, Parking, Motion) recording will be saved into this folder.
Firmware Folder- Allow user to manually update the device firmware using the update file downloaded from our website.
Viewer Setup Program
Memory Card Directory
Config
Data
Event
Update
Viewer
Menu and function can be changed without prior notice by sudden firmware upgrade or product enhancement.

19. FIRMWARE UPDATE
1 .
2 .
3 .
4 .
5 .
6 .
Automatic Update via PC Viewer Program
Application will prompt an update message when the PC viewer program is being installed for the first time as shown on the picture above.
If the user selects the upgrade button, it will automatically download the upgrade file into the memory card.
Make sure the power cable is disconnected from the device first before inserting the memory card.
Once the memory card is being inserted into the device, connect the power cable and start the engine.
The device will format by itself and will prompt a message “Re-installing the program, please do not turn off the power.”
Once the device is being rebooted, this means that the update is done.
Menu and function can be changed without prior notice by sudden firmware upgrade or product enhancement.

20. FIRMWARE UPDATE
Automatic Update [Wi-Fi]
[Message Pop-up]
Firmware
Do you want to update the latest firmware?
Cancel OK
Confirm the device is properly registeredMessage Pop-up will be appeared when press the "Firmware Update" button on IROAD ApplicationPress "OK", Update will begin automaticallyPlease do not turn off smartphone and product while updatingonce update completed, the device is rebooted and restart recording
1 .2 .3 .4 .5 .
Menu and function can be changed without prior notice by sudden firmware upgrade or product enhancement.

21. FIRMWARE UPDATE
Update
Disconnect the power cable.Remove the memory card from the device and insert it into the card reader. Afterwards, insert the card reader into the PC.Once it is done, copy the downloaded firmware file into the memory card under the folder named “Update”.Insert the memory card back into the device.Connect the power cable back into the device (DC-IN) port.Turn on the engine. Make sure the engine is on. The device will update and format by itself and the LED light will start to flicker.It will then prompt a message “Re-installing the program, please do not turn off the power.”Once the update is done, the device will reboot and starts recording.
1 . 2 .
3 .4 .5 .6 .
7 .
Manual UpdateMenu and function can be changed without prior notice by sudden firmware upgrade or product enhancement.
22. INSTALLATION & RUNNING THE VIEWER
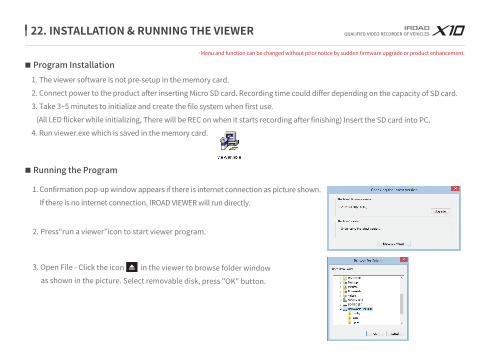
1. The viewer software is not pre-setup in the memory card.2. Connect power to the product after inserting Micro SD card. Recording time could differ depending on the capacity of SD card.3. Take 3~5 minutes to initialize and create the file system when first use. (All LED flicker while initializing, There will be REC on when it starts recording after finishing) Insert the SD card into PC.4. Run viewer.exe which is saved in the memory card.
1. Confirmation pop-up window appears if there is internet connection as picture shown. If there is no internet connection, IROAD VIEWER will run directly.
2. Press“run a viewer”icon to start viewer program.
3. Open File - Click the icon in the viewer to browse folder window as shown in the picture. Select removable disk, press "OK" button.
Program Installation
Running the Program
Menu and function can be changed without prior notice by sudden firmware upgrade or product enhancement.

23. DEDICATED PC VIEWER
Playback Recording.
Menu
Thumbnail
Drawing a lane
Backup
Setup
Open
Play/pause, Stop
Repeat event
Step Reverse, Step
Previous / Next event
Front / Rear images
Vehicle Status1
6 7
9
10
11
1 8
2 8
15
16
1516
17
9 10 11 12 13 14
34 5
4
2
3
7
5
6
14
12
13
Front / Rear image playback screen
Google Map(only when external GPS is connected)
Recording file list
Adjust playback speed
Volume control
G-sensor (Acceleration) Graph
Speed indicator(only when GPS/OBD2 is connected)
17
GPS signal receiving tab (only when external GPS is connected)
Transmission info (only when OBD2 is connected)
Brake / Acceleration (only when OBD2 is connected)
Turn signal (only when OBD2 is connected)
RPM (only when OBD2 is connected)
Engine Coolant Temp (only when OBD2 is connected)
Steering Angle (only when OBD2 is connected)
Overview
Front / Rear image switch
Front / Rear image PIP
Black & White mode switch
Split screen - Front & Rear
Menu and function can be changed without prior notice by sudden firmware upgrade or product enhancement.

24. DEDICATED PC VIEWER
Click the icon to watch front/rear image Click the icon to watch both front/rearin half
Click the icon to watch front/rear PIP
Watching Front/Rear ImageMenu and function can be changed without prior notice by sudden firmware upgrade or product enhancement.

25. DEDICATED PC VIEWER
Enlarging a Screen
Partial Enlargement of a Screen
Double left click (mouse) on the main menu screen to expand to full screen.
Click the left button (mouse) to return to previous screen again.
Magnifier will appear, when right click (mouse) in playback screen. You can move the enlarged screen by holding the left button (mouse) and drag the screen to view other area of the recording.
The Magnifier will disappear if click the right button (mouse).
Menu and function can be changed without prior notice by sudden firmware upgrade or product enhancement.
26. DEDICATED PC VIEWER
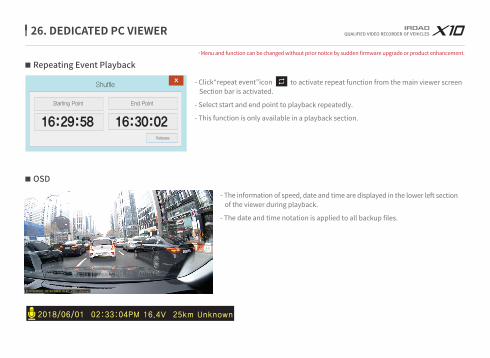
2018/06/01 02:33:04PM 16.4V 25km Unknown
Repeating Event Playback
OSD
- Click“repeat event”icon to activate repeat function from the main viewer screen Section bar is activated.
- Select start and end point to playback repeatedly.
- This function is only available in a playback section.
- The information of speed, date and time are displayed in the lower left section of the viewer during playback.
- The date and time notation is applied to all backup files.
Menu and function can be changed without prior notice by sudden firmware upgrade or product enhancement.
27. DEDICATED PC VIEWER
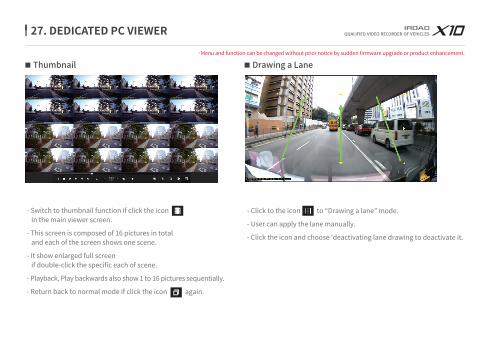
Drawing a LaneThumbnail
- Switch to thumbnail function if click the icon in the main viewer screen.
- This screen is composed of 16 pictures in total and each of the screen shows one scene.
- It show enlarged full screen if double-click the specific each of scene.
- Playback, Play backwards also show 1 to 16 pictures sequentially.
- Return back to normal mode if click the icon again.
- Click to the icon to “Drawing a lane” mode.
- User can apply the lane manually.
- Click the icon and choose 'deactivating lane drawing to deactivate it.
Menu and function can be changed without prior notice by sudden firmware upgrade or product enhancement.

Backup-Data Settings Backup-Data Settings
28. DEDICATED PC VIEWER
Backup-Data Settings
Cancel
Backup Information
Finish
The Backup is processing..
0 % 100 %
Backup-Data Settings
CancelNext
Front Camera Rear Camera
Select Channel Audio ON/OFFAudio
Backup-Data Path
Search...c:\user\gateam\document\20140924_090044.avi
Date/Time Event
2016/06/21 19:29:55 Impact
Normal
Impact
Normal
Normal
Normal
Parking
Cancel
AVI
MULTI AVI BACKUP
JDR
MULTI JDR BACKUP
JPEG
BMP(Watermark)
GSENSOR
Selection
OK
Backup-Data Settings
Backup
2018/12/27 19:29:55
2018/12/27 19:30:15
2018/12/27 19:30:45
2018/12/27 19:30:55
2018/12/27 19:31:27
2018/12/27 19:32:02
2018/12/27 19:32:22
- Click the “Backup” icon in main screen menu.
- Backup settings provides a various type of video recording downloads such as AVI, Multi AVI, JDR, Multi JDR, JPEG, BMP and G sensor formats.
- AVI format file can be played on Windows Media Player or other Third-party Player as long as the player able to support the file format.
- JDR format file can be played back with dedicated IROAD viewer only.
- Images file can be opened with Image viewer or other image application.
- To download multi recording for AVI, selected the recording user wish to download by the time and date.
- Download will begin after selecting a download folder/path follow with the next button.
- AVI backup is available to use tamper-resistant function.
- User will be able to select download with audio or without by checking or unchecking the Audio Save button.
Menu and function can be changed without prior notice by sudden firmware upgrade or product enhancement.

29. DEDICATED PC VIEWER SETTING
Setup(H:/config/system.cfg)
CancelOK
Camera Settings
Forward-camera
Normal(fps)
Event(fps)
Brightness
Rear-camera
30
30
Default
Normal(fps)
Event(fps)
Brightness
30
30
Default
Audio Recording
On Off
Use auto-off timer
On Off
Timer setup
Time : 48 Hour
Rear camera reverse recording
On Off
Night vision
On Off
Security Led
On Off
High temperature shutdown
On Off
Standard time zone
(GMT +09:00) Seoul,Osaka,Sapporo,Tokyo
Automatically adjust dock for daylight saving changes
Auto Reboot
AM 03:00
SYSTEM will be rebooted every day forstablity of operation.
Km/h / Mph
Km/h Mph
DefaultLoad Config
시스템 Event ADAS User Settings Removable Disk VersionSystem
1
2
3
6
4 5
9
14
8
Buzzer
On Off
7
11
12 13
10
System SettingsNormal(FPS) ‒ Setting for Frame Per Second for normal recording.
Event(FPS) - Setting for Frame Per Second during event recording.
Brightness - Adjust the brightness of recording There are 3 setting for brightness, Darkness / Default / Bright
Reverse (Rear) ‒ Save with reversed image
Night Vision ‒ ON / OFF is available
Audio Recording - Enable/Disable audio when recording
Buzzer - Alarm will sound when event have occur (Available to ON/OFF)
Auto Reboot - Auto Reboot - Reboot the device at the pre-set time so that the system will do a check on the memory card and also the device system.
Security LED - Select on/off (Only for front camera)
High Temperature Shutdown - When the temperature limit is reached(75 °C) in parking mode, the power is cut off to protect the product.
Speed Meter Display - Change distance notation, KM or Miles
Use Auto-Off Timer ‒ After entering the parking mode, the power is cut off by setting timer.
Timer Setup ‒ Auto-Off timer setting
Standard Time Zone - Select exact time zone
1
2
3
4
5
6
7
8
9
10
11
12
13
14
Menu and function can be changed without prior notice by sudden firmware upgrade or product enhancement.
30. DEDICATED PC VIEWER SETTING
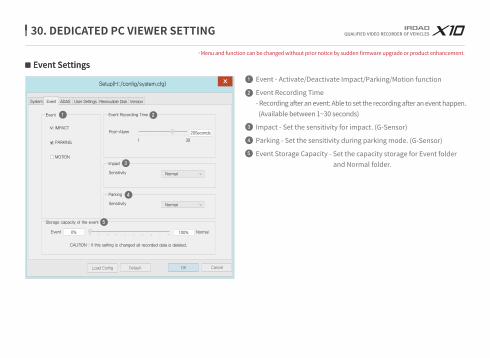
Event SettingsEvent Settings
Setup(H:/config/system.cfg)
CancelOK
Impact
Sensitivity Normal
Storage capacity of the event
0%
CAUTION : If this setting is changed all recorded data is deleted.
Event 100% Normal
DefaultLoad Config
Event
IMPACT
PARKING
MOTION
Parking
Sensitivity Normal
Event Recording Time
Post-Alarm 20Seconds
1 30
1 2
3
4
5
System Event ADAS User Settings Removable Disk Version
Event - Activate/Deactivate Impact/Parking/Motion function
Event Recording Time - Recording after an event: Able to set the recording after an event happen. (Available between 1~30 seconds)
Impact - Set the sensitivity for impact. (G-Sensor)
Parking - Set the sensitivity during parking mode. (G-Sensor)
Event Storage Capacity - Set the capacity storage for Event folder and Normal folder.
1
2
3
4
5
Menu and function can be changed without prior notice by sudden firmware upgrade or product enhancement.

31. DEDICATED PC VIEWER SETTING
ADAS Settings
ADAS : On / Off
LDWS : On / Off
FVDW : On / Off
FCWS : On / Off
Sensitivity of LDWS : Low / Normal / High
Sensitivity of FCWS : Low / Normal / High
Speed of Land Departure : 50, 60, 70km/h
1
2
3
4
5
6
7
CancelOK
ADAS(Advanced Driver Assistance Systems)
ADAS Lane Departure Warning System
On
Off
Lane Departure Sensitivity Detection
Sensitivity : Normal
Collision Sensitivity Detection
Sensitivity : Normal
Lane departure Speed Detection
Speed : 50km/h
DefaultLoad Config
System Event User Settings Removable Disk Version
On Off
Front Vehicle Start Alarm
On Off
Forward Collision Warning System
On Off
ADAS
1 2
3
4
5
6
7
Setup(H:/config/system.cfg)
Menu and function can be changed without prior notice by sudden firmware upgrade or product enhancement.

32. DEDICATED PC VIEWER SETTING
User Settings
※ This is a personal information tab. Please prevent the information from leaking. Be aware that user will not be able to view the recording if user fail to login when the password in forgotten. (SD card lock)
Vehicle Info - Save vehicle information
Driver Info - Save drivers information
Serial Info - Enter product serial number
User Info- No one can check the information if set password here.- User ID - Enter login ID (Default: admin)- Password - Set password for login (Default-None)
LBP (Low Voltage Cut-Off function)Prevent car battery from discharging. (Adjust the optimal voltage for the safety of your car)
Time settingSet the exact time if not connected to an external GPS. Set the time few minutes ahead considering travelling distance between PC and your car.Allow user to manually set the date and time for the device.
1
2
3
4
5
6
Setup(H:/config/system.cfg)
Vehicle Info
Vehicle info
Driver Info
License plate No
User Info
User ID
Password
admin
LBP
AutoPower Off
Winter LBP
23.3V 23.5V 23.8V 24.0V 24.3V 11.3V 11.5V 11.8V 12.0V 12.3V
On Off
Time set
2018-09-24 PM 03:18
1
2
3
4
5
6
System Event ADAS User Settings Removable Disk Version
CancelOKDefaultLoad Config
Menu and function can be changed without prior notice by sudden firmware upgrade or product enhancement.

33. DEDICATED PC VIEWER SETTING
Portable DiskThis function is for formatting or recovering data from the memory cardwhen there is an error or problem. Please do back up your data. Otherwise, the data will be lost once reformatted.
- Select the right drive for SD memory card
- Select the function
- All of data will be deleted if format the drive
The performance of the memory card could be affected when used for too long. Proper management of memory card is important.Please format or check the memory card once or twice every month in order to keep the stable recording condition and long usage of memory card.
Setup(H:/config/system.cfg)
CancelOK
Removable Disk
Select Drive
H:/ DISK :
TOTAL SIZE :
FREE SPACE :
Drive Information
H:/
14.91
488.94
GB
MB
DefaultLoad Config
DATA RECOVER FORMAT DRIVE
System Event ADAS User Settings Removable Disk Version
Menu and function can be changed without prior notice by sudden firmware upgrade or product enhancement.
34. DEDICATED PC VIEWER SETTING
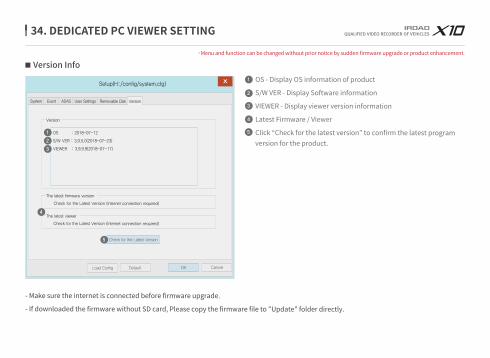
Version Info1
2
3
4
5
- Make sure the internet is connected before firmware upgrade.
- If downloaded the firmware without SD card, Please copy the firmware file to "Update" folder directly.
OS - Display OS information of product
S/W VER - Display Software information
VIEWER - Display viewer version information
Latest Firmware / Viewer
Click “Check for the latest version” to confirm the latest program version for the product.
Setup(H:/config/system.cfg)
CancelOK
Version
OS : 2018-07-12
S/W VER : 3.0.5.0(2018-07-23)
VIEWER : 3.9.9.9(2018-07-17)
DefaultLoad Config
The latest firmware version
Check for the Latest Version (Internet connection required)
The latest viewer
Check for the Latest Version (Internet connection required)
Check for the Latest Version
1
2
3
4
5
System Event ADAS User Settings Removable Disk Version
Menu and function can be changed without prior notice by sudden firmware upgrade or product enhancement.

35. SYNCING WITH SMARTPHONE
IROAD Smart Manager
Before use
- Available on Android and iOS device
- Please search "IROAD" on Google play store or Apple App store
- Live view and playback via Wi-Fi connection will be able to delay depending on smartphone condition or specification
- Do not handle the product while driving, it causes serious accident
- USB Wi-Fi Dongle is optional puchasing and expendable item
- Press Wi-Fi button or icon on the device if there is voice guidance ("Registration standby mode") Please confirm the Wi-Fi reception signal is strong enough or check Wi-Fi advanced option of smartphone which has to be being connected stably while update. (e.g "smart network switch" has to be off)
- There will be able to Wi-Fi drop out depending on surroundings
- Wi-Fi connect inside of vehicle is recommended for connection stablity
- Saving frames of each may differ while Wi-Fi connected, Automatically recover once disconnected
Menu and function can be changed without prior notice by sudden firmware upgrade or product enhancement.

36. HOW TO CONNECT
iOS1. Turn on Wi-Fi
2. Select IROAD_XXX_XXX in the list
3. Write the password [qwertyuiop] and Join (Password is all letters of second row of the keyboard)
4 . Press the Wi-Fi registration button of the product to activate "Registration standby mode"
Wi-Fi
Wi-Fi
CHOOSE A NETWORK...
IROAD
Other...
Settings
IROAD_XXX_XXXX
Enter Password
Password
Cancel Join
Password qwertyuiop
Menu and function can be changed without prior notice by sudden firmware upgrade or product enhancement.

37. HOW TO CONNECT
ANDROID
Register the product when first run the application
- Press the Wi-Fi registration button of the product to activate "Registration standby mode"
STEP 1Smartphone is searching close located product with priority
- The image, SSID and model are displayed
- Registration is completed when press the product image
STEP 2
ADD DEVICE
Please addIROAD DASH CAM
12:30
LIVE VIEW
12:30
MY DEVICE : IROAD XXXVer 2.0.0 18.08.24
1 / 1
Add device
Please addIROAD DASH CAM device.
12:30
Refresh
IROAD_XXX_XXXXXModel : XXX
Signal strength : Very good
1 / 8
Menu and function can be changed without prior notice by sudden firmware upgrade or product enhancement.
38. MAIN SCREEN / LIVE VIEW
LIVE VIEW
MY DEVICE : IROAD XXXVer 2.0.0 18.08.24
1
2
3
4
5
3
1 2
4 5
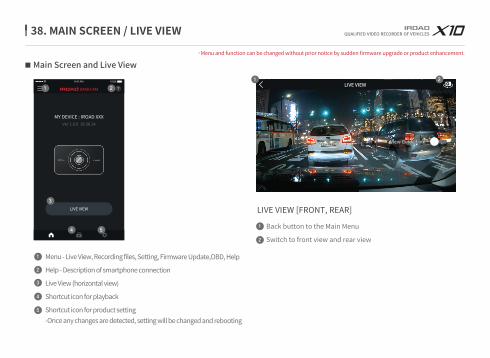
Menu - Live View, Recording files, Setting, Firmware Update,OBD, Help
Help - Description of smartphone connection
Live View (horizontal view)
Shortcut icon for playback
Shortcut icon for product setting-Once any changes are detected, setting will be changed and rebooting
Main Screen and Live View
LIVE VIEW
View Guide Line
LIVE VIEW [FRONT, REAR]
Back button to the Main Menu
Switch to front view and rear view
1
1
2
2
Menu and function can be changed without prior notice by sudden firmware upgrade or product enhancement.
39. LIST OF RECORDINGS & PLAYBACK
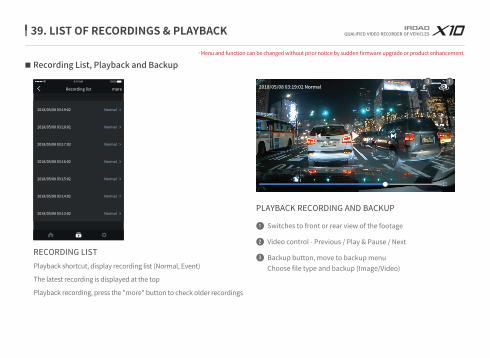
Playback shortcut, display recording list (Normal, Event)
The latest recording is displayed at the top
Playback recording, press the "more" button to check older recordings
RECORDING LIST
1
2
3
Switches to front or rear view of the footage
Video control - Previous / Play & Pause / Next
Backup button, move to backup menuChoose file type and backup (Image/Video)
PLAYBACK RECORDING AND BACKUP
Recording List, Playback and Backup
Recording list more
2018/05/08 03:19:02
2018/05/08 03:18:02
2018/05/08 03:17:02
2018/05/08 03:16:02
2018/05/08 03:15:02
2018/05/08 03:14:02
2018/05/08 03:13:02
Normal
Normal
Normal
Normal
Normal
Normal
Normal
2018/05/08 03:19:02 Normal13
2
Menu and function can be changed without prior notice by sudden firmware upgrade or product enhancement.

40. SETTINGS
1080p, FHD
CAMERA SETTINGS
Settings - Recording
Brightness
Driving mode frame
Event(Impact,Parking,Movement) recording frame
Night Vision ON/OFF
Rear Camera Reverse View ON/OFF
1
2
3
4
5
Menu and function can be changed without prior notice by sudden firmware upgrade or product enhancement.

41. SETTINGS
Settings - Time, Sound
Auto reboot ON/OFF
Auto reboot time
Daylight saving time ON/OFF
Timezone setting
1
2
3
4
Time
Auto Reboot
03:00 AM
REBOOT TIME
Daylight Saving Time
Timezone (GMT +09:00) Seoul...
1
2
3
4
TIME SETTINGSSpeaker volume [3 Steps]
Audio recording ON/OFF
Voice guidance ON/OFF
Event Buzzer ON/OFF
1
2
3
4
Sound
Audio Recording
RECORD
Voice Guidance
Event Buzzer
NOTIFICATION
2
3
4
SOUND SETTINGS
Volume Medium1
Menu and function can be changed without prior notice by sudden firmware upgrade or product enhancement.

42. SETTINGS
ADAS SETTINGS
Settings - ADAS
ADAS
ADAS ON/OFF
Lane departure warning ON/OFF
LDWS activation speed (50-70/km)
LDWS Sensitivity
Front vehicle departure warning ON/OFF
FCWS ON/OFF
FCWS Sensitivity
1
2
3
4
5
6
7
ADAS
FORWARD COLLISION WARNING SYSTEM
FCWS
FCWS Sensitivity High
FRONT VEHICLE DEPARTURE WARNING SYSTEM
FVDW
LANE DEPARTURE WARNING SYSTEM
LDWS
Activation Speed of LDWS
LDWS Sensitivity
50 Km
Medium
1
3
4
7
5
6
2
※ ADAS configuration change is available only when there is GPS connection, otherwise it won't be applied
Menu and function can be changed without prior notice by sudden firmware upgrade or product enhancement.

43. SETTINGS
Event
20 Seconds
POST-IMPACT RECORDING TIME
EVENT SETTINGS
Settings - Event
Impact detection ON/OFF
Impact sensitivity
Parking Mode ON/OFF
Parking Mode Sensitivity
Motion detection ON/OFF
Post-Impact recording time
Memory allocation setting - Allocate memory capacity between event and normal recording storage folder. Once the percentage changed, device is rebooted after format
1
2
3
4
5
6
7
Motion Detection
Impact
Impact Sensitivity Low
Parking Mode
Parking Mode Sensitivity Medium
1
3
4
5
2
Capacity
EVENT RECORDING CAPACITY
Warning: If this setting is changed, all recorded data will be removed.
40 %7
6
Menu and function can be changed without prior notice by sudden firmware upgrade or product enhancement.

44. SETTINGS
System
Info
LOW BATTERY PROTECTION
Battery Protection
Power Off 12 V / 24 V
Use the low voltage shutdown function to safely protect the car battery.
PARKING MODE TIMER
Auto Off
Automatically turn off after above set time goes to protect product on parking mode.
HIGH TEMPERATURE SHUTDOWN
High Temperature Shutdown
When the high temperature (75 °C) is reached after entering the parking mode, the power is cut off to protect the product.
SECURITY LED
Security LED
SYSTEM SETTINGS
Settings - System
Info - Product information (Driver, Car, Firmware version, Model etc..)
Low Battery Protection- Product will be shutdown once battery voltage reaches preset level- This function is important for using parking mode in order to prevent battery discharge
Security LED On / Off
Shutdown in high termperature ON/OFF- Cutoff the power automatically once temperaure is reached 75°C while parking mode to protect product and vehicle
Parking Mode Timer - Product will be shutdown automatically after preset parking time
1
2
3
4
5
1
3
4
5
2
Menu and function can be changed without prior notice by sudden firmware upgrade or product enhancement.

45. OBDII SCANNER APPLICATION
iOS / Andorid
12:30
Firmware Update
OBD
Set Device Name
Delete Device
LIVE VIEW
Recording List
Dash Cam Settings
Firmware Update
OBD
Help
For models with OBD support, connect to "IROAD" app and after completed synched,OBD Button is activated on iOS(Upper left menu button), Andorid( Upper right menu button)
※ Real-time vehicle information (OBD Scanner) is only supported in the latest application via smart app3 For more information, please visit to IROAD website (www.iroadkr.com)
Menu and function can be changed without prior notice by sudden firmware upgrade or product enhancement.

46. OBDII SCANNER APPLICATION
OBD Setting
LIVE VIEW
Recording List
Dash Cam Settings
Firmware Update
OBD
Help
Cancel
No registered OBD informationDo you want to proceed OBD setting?
NO INFO
OK
When running the OBD tap first, please input vehicle inforamtion settings
STEP 1Please enter Vehicle Manufacturer, Vehicle Models, Years, Fuel Type, Displacement, Official Fuel Efficiency, Maximum Capacity, Vehicle Lengths, Vehicle Class in order to save. (Please enter the information of actual vehicle correctly)
- After saved settings, please identify information to be saved.
STEP 2
SETTING
Set My Car(Left 7 times of resets.)
Please set your vehicle info to use OBD. Please make sure correct information inputted due to limitaion of resets. (Total 7 times, 7 times left)
※Please enter the same vehicle information as the information on your vehicle registration card. If you have entered wrong information, you will not be able to verify the exact vehicle status and information.
※The OBD does not work when it is set to different vehicles more than 7 times due to vehicle replacement or other reasons. There is no limit to the same vehicle.
Manufacturer
KIA
HYUNDAI
BMW
AUDI
BENZ
TOYOTA
NISSAN
Prev Next
Vehicle Class
1.7 Diesel(18”) A/T
Prev Save
1.Manufacturer : KIA2.Vehicle Model : K53.Model Year : 2016
4.Engine Type : Diesel5.Engine Displacement : 1685cc6.Fuel Consumption : 15.6km/l
7.Seating Capacity : 5seat8.Vehicle Length : 4855mm
9.Vehicle Class : 17” Diesel(18”)A/T
SETTING
Reset REGISTER
※ For more information, please refer to the supported vehicles and support items registered on the IROAD homepage.
Menu and function can be changed without prior notice by sudden firmware upgrade or product enhancement.
47. OBDII SCANNER APPLICATION
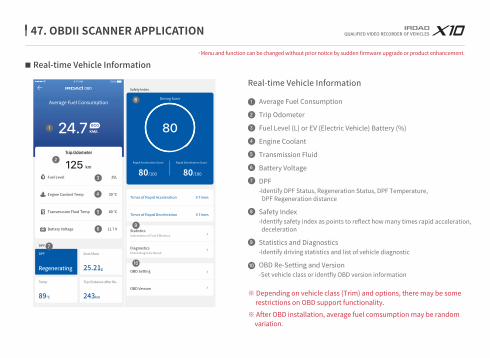
Real-time Vehicle Information
Average Fuel Consumption
Trip Odometer
Fuel Level
Engine Coolant Temp
Transmission Fluid Temp
Battery Voltage
35L
30 ℃
80 ℃
11.7 V
Times of Rapid Acceleration
Times of Rapid Deceleration
Statistics
Diagnostics
Information of Fuel Efficiency
Check Diagnosis Result
5 Times
5 Times
Safety Index
Driving Score
Rapid Acceleration Score Rapid Deceleration Score
DPF
DPF
Regenerating
Soot Mass
25.21g
Temp
89℃
Trip Distance after Re...
243km
Real-time Vehicle Information
1
2
3
4
5
6
7
8
9
OBD Setting
OBD Version
10
Average Fuel Consumption
Trip Odometer
Fuel Level (L) or EV (Electric Vehicle) Battery (%)
Engine Coolant
Transmission Fluid
Battery Voltage
DPF-Identify DPF Status, Regeneration Status, DPF Temperature, DPF Regeneration distance
Safety Index-Identify safety index as points to reflect how many times rapid acceleration, deceleration
Statistics and Diagnostics-Identify driving statistics and list of vehicle diagnostic
OBD Re-Setting and Version-Set vehicle class or identfiy OBD version information
1
2
3
4
5
6
7
8
9
10
※ Depending on vehicle class (Trim) and options, there may be some restrictions on OBD support functionality.※ After OBD installation, average fuel comsumption may be random variation.
Menu and function can be changed without prior notice by sudden firmware upgrade or product enhancement.

48. OBDII SCANNER APPLICATION
Menu and function can be changed without prior notice by sudden firmware upgrade or product enhancement.
Statistics
STATISTICS
09/10/2019
Average Fuel Efficiency
Daily Monthly
Total Driving Distance
STATISTICS
10/2019
Average Fuel Efficiency
Daily Monthly
Total Driving Distance Average Driving Distance
Identify daily / monthly driving statistics. (Total Trip Odometer, Average Driving Distance, Fuel Consumption)
- The fuel consumption of the actual vehicle may differ from the fuel consumption on the app screen when users drive a short distance.
Driving Statistics (Daily/Monthly)

49. OBDII SCANNER APPLICATION
Diagnostic
DIAGNOSTICS
[P0100]
[P0200]
[P0300]
Mass or Volume Air Flow “A” Circuit
Injector Circuit/Open
Random/Multiple Cylinder Misfire Detec...
RECHECK
LIST
Please press "Diagnostic" button to identify information of vehicle.Identify diagnostic information of vehicle.
※ Vehicle diagnostic function is procided for reference only. If the vehicle diagnostics result revealed error code, please get detailed checks from car repair shop.
Menu and function can be changed without prior notice by sudden firmware upgrade or product enhancement.

50. TROUBLESHOOTING
1. Check if the fuse cable is connected to the correct fuse.2. Only use authentic fuse cable for IROAD device.3. When using cigar jack to power up the device, the device will be turned off when the engine is off.4. Recommended by connecting fuse cable in order to access parking mode.
Device unable to power up due to cable issue1. Power will be cut-off to safe guard the car battery when the voltage reaches the pre-set voltage.2. Battery discharging period might get shorten due to the battery condition / the motion recordings recorded.
No power after parking. (LBP)
1. Recording can be playback using IROAD PC viewer and IROAD App on smart phone.2. 3rd party players may not fully support the recording video format.3. If error occurs during recording, contact IROAD After-sale Service for further enquiries.
Unable to view playback recording1. Make sure the device is power off before inserting the memory card into the device.2. If the device prompts any error message regarding the memory card, try reformatting the memory card and insert back to the device and test again.3. User is required to insert the memory card into the memory card reader before inserting into the PC.4. Make sure to check whether the memory card reader is faulty
Device keep restarting due to memory card issue
1. Check if there is any dust or dirt on front and rear camera lenses. 2. If windscreen is tinted, it may affect video quality. 3. Surrounding light may affect the video quality
The quality of recorded video is not clear

