introduction -...
TRANSCRIPT

Version: April 21, 2014Edited by Jerry Proc

Contents
INTRODUCTION.......................................................................................................................................3HISTORICAL BACKGROUND................................................................................................................3HMCS HAIDA BASIC SPECIFICATIONS...............................................................................................7A TOUR OF THE SHIP..............................................................................................................................8TORPEDO TUBES.....................................................................................................................................8MAIN GALLEY..........................................................................................................................................9BAKERY.....................................................................................................................................................9TRANSMITTING STATION...................................................................................................................10CANTEEN.................................................................................................................................................11MESS DECKS...........................................................................................................................................11RADIO ROOMS.......................................................................................................................................12ELECTRONICS MAINTENANCE ROOM.............................................................................................13CARLEY FLOATS...................................................................................................................................144 INCH GUNS...........................................................................................................................................14SHIPWRIGHT SHOP...............................................................................................................................15LAUNDRY ROOM...................................................................................................................................15PETTY OFFICERS MESS........................................................................................................................15OPERATIONS ROOM.............................................................................................................................16CHART HOUSE.......................................................................................................................................18SONAR CONTROL ROOM.....................................................................................................................18WHEEL HOUSE.......................................................................................................................................19CAPTAIN’S SEA CABIN........................................................................................................................21BRIDGE....................................................................................................................................................21COMMUNICATIONS..............................................................................................................................22CATWALKS.............................................................................................................................................2240 mm BOFORS........................................................................................................................................23EMERGENCY STEERING POSITION...................................................................................................23
2

3”50 READY USE MAGAZINE..............................................................................................................243" 50 CALIBRE GUNS.............................................................................................................................24SQUID ANTISUBMARINE MORTARS.................................................................................................26THE SQUID HANDLING ROOM...........................................................................................................27THE WARDROOM..................................................................................................................................27OFFICERS CABINS.................................................................................................................................28OFFICERS GALLEY................................................................................................................................29HAIDA BATTLE HONOURS..................................................................................................................30CAPTAIN’S DAY CABIN.......................................................................................................................30SICK BAY.................................................................................................................................................31REGULATING OFFICE FLATS..............................................................................................................31BOILERS and ENGINE............................................................................................................................32FREQUENTLY ASKED QUESTIONS....................................................................................................32BIBLIOGRAPHY......................................................................................................................................38
INTRODUCTION
The purpose of this manual is to enhance and standardize volunteer’s knowledge of HMCS HAIDA, her history and operation so that the visiting public may be better informed and better served. The manual can be seen as a supplement to the self-guiding HAIDA tour brochure. Some of you may have a particular interest in a certain area or apparatus in which you would like to learn more. This manual will provide you with the necessary information in order to help you answer and anticipate some questions the public may ask you. This guide is a heavily edited version of a 139 page Parks Canada document titled “Interpretation Manual” and dated 2004.
Contributors:
Jim Brewer, Marg Mathers, Carla Morse, Jerry Proc, Daniel VanBrugge, Marilyn Watson, Michael Whitby, Cdr. Robert Willson and Peter Dixon.
3
HISTORICAL BACKGROUND
While HMCS Sackville in Halifax serves as a memorial to Canada's naval contribution in World War II, and in particular to one battle, the Battle of the Atlantic, HMCS Haida exemplifies Canada's naval experience for much of this century - from the years preceding the war when the tiny Royal Canadian Navy struggled for existence, through the war years when Canada made a global contribution to the war at sea, to the Cold War, when Canada as a member of NATO deterred aggression on the seas. In terms of operational experience, national and naval policy, technological development, historic personalities, and the cultural experience of Canadians at sea, Haida reflects important elements of our maritime experience.
Since its founding in 1910, the Canadian Navy has been primarily a destroyer navy. This type of warship has been best suited to our naval requirements: flexible, sufficiently small to work inshore for coastal defense yet sturdy enough and with enough endurance to survive the harsh conditions of the North Atlantic and Pacific oceans, and strong enough in terms of armament to defend against the type of threat we were most likely to encounter. They were capable of being built in Canadian shipyards and they were relatively inexpensive - always an important consideration.
Until Canada began to design her own destroyers in the 1950's, Canada either acquired ships from the Royal Navy or built British designs in Canada, though with modifications to suit Canadian conditions. In 1938, when the RCN was looking to expand, the Tribal Class destroyers then under construction for the Royal Navy were state-of-the-art in terms of British destroyer design.
Larger and more heavily gunned than traditional designs, their purpose was to counter the powerful destroyers coming into service in the German, Japanese and Italian navies. At the beginning of WWII, the Royal Canadian Navy only had 13 ships on strength. Six of these were destroyers and the rest consisted of four minesweepers and three auxiliary vessels. Only two of the six destroyers were new and built in 1931. The other four, having been acquired in the late 1930’s, were used ships purchased from the Royal Navy.
The RCN saw the Tribals as their key to survival. After World War I, the Navy's fleet of obsolescent major warships and minor vessels was struck from strength in a cost-cutting move. Learning from that experience, the RCN wanted more substantial, modern vessels that would be too valuable to scrap. Moreover, the Tribals seemed ideally suited to Canada's requirements. When defense spending began to increase in the late 1930s, the Mackenzie King government placed a priority on home defense. With the power and flexibility needed for the Navy's coastal defense role, the Tribal Class destroyers had the gun
4

and torpedo strength to challenge surface raiders - which had posed the greatest threat in Canadian waters during the First World War - while also possessing significant anti-aircraft and anti-submarine capability.
Nonetheless it took plenty of persuasion and the onset of war - to obtain government approval. But in March 1940, after complex negotiations with the British, who were reluctant to devote scarce shipyard resources to building for other countries, it was agreed that Britain would build four Tribals for Canada in exchange for ten corvettes to be built in Canadian yards for the Royal Navy. Haida was the final of the four British-built ships and eventually another four Canadian Tribals were built in Halifax.
The Canadian Tribals were to be named after indigenous native tribes. They were: HMCS Iroquois, HMCS Athabaskan, HMCS Huron, and HMCS Haida (in order of construction). The four built in Halifax were completed after the war and were named HMCS Micmac, HMCS Nootka, HMCS Cayuga, and HMCS Athabaskan (second of name). Haida was named after the Haida Nation of the Queen Charlotte Islands in BC
The Haida people were skilful hunters, fishermen and fearsome warriors, marauding up and down the west coast as far south as the Columbia River near the Washington / Oregon border. They made up the most sophisticated hunter-gatherer society the world has ever known. Their folklore attests to a mythical "thunderbird", the flapping of whose wings brought thunder, and the flashing of its eyes, the lightning. Haida's badge is a two-headed thunderbird (symbolizing an all around view) with outstretched wings to symbolize Haida’s guns thundering across the seas. The ship's colours are blue and gold. The ship does not have a motto. The thunderbird symbol is prominent in two places: the ship's badge on the quarterdeck, and atop the mainmast. .
In all, 27 Tribals were built - 16 for the British, 3 for Australia and 8 for Canada. From the outset, the Canadian ships were known as Improved Tribal Class Destroyers. Those responsible for the design and construction of the Canadian Tribals took advantage of the early lessons of the war, which the Australians failed to do, and built them stronger to withstand Arctic conditions. Haida was built by Vickers-Armstrong Ltd. at Newcastle-on- Tyne, England. The keel was laid down on September 29, 1941. The ship was launched (sponsored by Lady Laurie, Mayoress of London) on August 25, 1942. The ship commissioned (or entered naval service) on August 30, 1943.
It is not by accident that Haida is known as "Canada's Fightingest Ship", as she has earned an impressive war record. Once commissioned, she took part in air operations off the Norwegian coast, and in escort duty on the famous Murmansk Run -convoys to deliver supplies to northern Russia. Her experiences here were far from unique, for several other Canadian ships and hundreds of Canadians serving in British ships plus Canadian naval airmen, participated in this campaign. This was a tough duty since convoys were run in the darkness of the harsh Arctic winter, base facilities were extremely poor, and the Germans put up tough resistance in the form of U-boats and major surface ships.
5

One such convoy should be mentioned. In December 1943, the Germans sent the battle cruiser Scharnhorst to attack convoy JW55B, whose escort included the Canadian Tribals Haida, Huron and Iroquois. Haida's captain, Harry DeWolf, was in command of the destroyers and the merchant ships at the rear of the convoy. He had the difficult task of making sure that the merchant ships kept station in the worst conditions, chasing down U-boat contacts and on the two occasions when Scharnhorst approached the convoy, marshalling the escorts to drive her off. The enemy never got that close to the convoy and the outcome was the sinking of Scharnhorst.
It was in the English Channel in 1944 that Haida and DeWolf achieved almost legendary status. Attempting to wear down German capabilities prior to the invasion of Europe, the 10th Destroyer Flotilla, (stationed at Plymouth, England and which at one time or another included all four Canadian Tribals then in commission), fought a series of battles against German destroyers. In these, Haida was the major player, participating in the destruction of three German destroyers as well as several coastal vessels. In the three battles culminating in the loss of German destroyers, and in the April 1944 battle which resulted in the loss of HMCS Athabaskan, Harry DeWolf in Haida was either in command of the entire force involved or had command thrust upon him during the battle. In each case, the combination of his leadership and tenacity, and the skill and determination of Haida's sailors, were the keys to victory. These successes won the admiration of fellow professionals and the Canadian people.
No other warship has made a greater contribution to Canada's naval traditions than did Haida.
The success of the Tribals during WWII has overshadowed their post-war record, but until they paid off in the mid1960s, the Tribals continued to make important contributions. Six of the Tribals saw duty in Korea, including two tours by Haida. Destroyers played an important role in this first United Nations peacemaking operation. They were involved in blockading the enemy coast, defending friendly islands against amphibious assault, protecting the coastal flanks of UN armies, bombarding enemy positions, preventing~ the movement of enemy supplies by rail, and screening UN aircraft carriers flying off missions inland. Usually the Canadian destroyers operated in joint task forces with ships of other UN navies, experience which paid great dividends in the later Cold War years when such became the normal practice.
During the Cold War, the Royal Canadian Navy's priority became anti-submarine warfare, and the Navy earned a reputation as one of the finest anti-submarine forces - if not the finest - in NATO countries. As part of the move to specialization, the Tribals were converted to destroyer-escorts. This involved a major transformation through the fitting of the Squid anti-submarine weapon, new gun armament, sophisticated surveillance systems and greatly improved living conditions.
During the conversion of Haida between 1949 and 1951, the forward 4.7" guns were replaced with twin 4" gun mountings, while the 4" mounting aft was replaced with the 3" 50-calibre gun. The after 4.7" mounting and the depth charge racks were removed and the squid anti-submarine mortars installed. Extensive changes also took place with the after superstructure. The 20 mm Oerlikons were replaced with the single 40 mm Bofors guns. The two-pounder pom pom was removed and replaced with the
6

Mark 29 gun sight used with the Mark 34 radar to control the 3" 50-calibre gun. Jointly these two pieces were known as the Mk 63 Fire Control System. The 4 inch guns had their own Mk 63 system. This is the armament the ship had when it went to Korea in 1952 and 1954. There have been additions and changes to the radar and sonar equipment since this major conversion to a DDE.
This is the version of Haida that today's visitor sees. In many ways she was the precursor to the sophisticated vessels that have followed her in the Navy, and as such she serves as a tribute to the technological prowess of the RCN during the Cold War.
Finally paid off in October 1963, Haida was acquired from the Department of National Defense by a group of Toronto businessmen and former naval officers supported by then- Premier John Robarts - himself a former naval officer. This group wished to see Canada's most famous warship preserved. She was brought to Toronto and opened as a museum ship in 1965, and was moved to Ontario Place in 1971. In 1984, on the recommendation of the Historic Sites and Monuments Board of Canada, HMCS Haida was declared to be of national historic and architectural significance. On 13 Nov 2002, the ship was formally transferred to the federal government under the care of Parks Canada and after an extensive refit at Port Weller Dry Dock over the winter of 2003 arrived in Hamilton, On August 30, 2003 - the 60th anniversary of her commissioning.
While Haida's outstanding war record is unique among Canadian ships, she is also symbolic of Canada's naval experience for much of this century. Designed in the mid 1930s, Haida's post-war modifications influenced ships that still serve in the Canadian Navy. So too, the people who served in her shared the same experiences of thousands of other Canadians who have served in the Navy. They may not have served in Tribals, but they fought in World War II and Korea, they stood watch in NATO exercises and on UN missions, and they represented Canada to the world. It is this combination of the unique and the typical that is Haida's historic legacy.
HMCS HAIDA BASIC SPECIFICATIONS
Length: 377 feet (11 5 m) (tip of bow to tip of stern)Beam (or width): 37.5 feet (11.5 m)
Displacement (or weight): 2,200 tons standard; 2,744 tons when fully loaded with fuel, ammunition, provisions and crew.
Fuel: 500 tons of Bunker C oil.Range: 5,700 nautical miles at a speed of 15 knots (17.3 mph or 28 km/h), or 3000 nautical miles at 20 knots (23 mph or 37 km/h), and considerably less range as speed increased.
Crew : Wartime - 245; Peacetime - 225. There were 14 working officers including the captain and up to four officer-cadets in training. These cadets bunked in Cabin #7 which in the late 1950's became #3 naval stores that housed all the electronic parts.
7

SUMMARY:
Every national historic site in Canada has been designated as such for important reasons and these reasons guide the way in which these sites are interpreted to the visiting public. HMCS Haida is of national historic and architectural significance because of:
a) her role in naval combat, and b) because she is the last of the Tribal Class Destroyers.
HMCS Haida is valued because:
• she symbolizes Canada's naval experience in World War II, Korea and the Cold War; • she is emblematic of Canada's role on the world stage; • of her participation with the Russian convoys, her support to the Normandy invasions, and operations in the English Channel and Bay of Biscay; and • for her role in the Korean conflict.
A TOUR OF THE SHIP
This section of the Guide is laid out in the same sequence as the walking tour.
TORPEDO TUBES
This quadruple mounting houses four "Mark Nine" , 21" diameter torpedoes. These were one of the ship's main offensive weapons against other vessels. The ship only carried four torpedoes in the tubes and could not reload at sea. This was done in harbour by crane due to the weight of the torpedo and the lack of a torpedo magazine. The torpedo had to be perfectly aligned inside the tube so that the various setting devices could be accessible. The davit held the torpedo while it was eased into the tube. There was an area called the Torpedo Pistol Shop, and Torpedo Stores where minor
maintenance to gyros and to warheads was done. The torpedo could not be "dry fired" in the tube because it had to be immersed in seawater to cool the engine.
8

The mounting operated electrically by means of the motor above the mounting, but could also be rotated manually if necessary. Normally, the torpedoes were aimed and fired from the Torpedo firing sights on the bridge, but could be fired "locally" from the mounting using its local firing sight. The entire mounting trained ninety degrees to wither port or starboard. The torpedoes were fired by means of an impulse charge, loaded into the breech of the firing pistol. The expansion chamber then compressed the gas which in turn pushed the torpedo out of the tube and some ten feet clear of the ship. . The trigger mechanism inside the torpedo then fired its engine as it left the tube. The torpedoes were fired from aft to forward to take into account the forward movement of the ship, and to prevent them from colliding with one another as they left the tube.
The tactics of the time dictated that the ship moved at right angles to the target and then turned to fire a "spread" of torpedoes on the apex of the turn. The torpedo could also be fired at a tangent to the target by means of setting the gyro from 0 to 30 degrees.
The Mk 9 torpedo itself weighs 5 000 pounds and had a range of 11 000 yards, or 5.5 nautical miles at a speed of 45 nautical miles per hour (52 mph or 84 km/hr). It had a warhead filled with 250 pounds of torpex which had the equivalent force of 800 pounds of TNT. Two different types of warhead exploders were used: magnetic - set to explode after a change in the magnetic field caused by the vessel's hull as the torpedo passed under it, or by a contact exploder - activated as the torpedo hits the target. Magnetic exploders were extremely unreliable and most Navies in WWII discontinued their use.
MAIN GALLEY
Within this space, three to four cooks prepared three meals a day for over 200 men. The equipment contained is not quite the same as it was when the ship was operational. The propane stove was installed for the Sea Cadet courses in 1975 and replaced the original oil-fired cast iron stove, and two large steam cauldrons. The forward section housing the counter and cupboards are original. The food was served to the various mess men through the doors on either side of the galley and through the sliding panel that was fitted in the mid-1950's. Just behind the galley both to port and to starboard are the two
bins known as the Potato Lockers. A large quantity was obviously required. Potatoes were accessed by means of the hinged door in the tray. The purpose of the hasp was to prevent pilferage by the crew. Stokers were notorious for stealing potatoes and taking them below for "instant baked potato".
Out on deck on the port side across from the sea boat is a cage known as the beef screen. Here sides of beef were stowed and then were butchered out on deck in the area forward of the sea boat. The galley is
9

an important interpretative tool for the visitors. Most people are stunned by the cramped space. It is also important, as it is a key link to the mess deck later in the tour.
BAKERY
Inside the passageway on the starboard side is the bakery. Originally, it had a large mix-master, and two ovens. Bread and a few goodies like cakes and pie's were made daily and usually baked at night, and then stowed in the Bread Locker out on deck under canvas for consumption that day.
TRANSMITTING STATION
The transmitting station has nothing to do with outside communications; rather, it is here that data necessary to aim and fire the main armament, the two twin 4" mountings, was processed. Naval Gunnery is a very complex problem. In a nutshell, a moving ship is trying to hit a moving target. It was not simply a matter of leading the target. The Admiralty Fire Control Clock, a primitive analogue mechanical computer developed in the 1930’s, did the calculations necessary for this simultaneous relative velocity solution for surface targets.
Information about the target, namely its estimated range, compass bearing, speed and course were "fed" to the transmitting station from a various sources. A crewmember set the appropriate dials by entering the information into the Fire Control Clock manually. Information about Haida such as speed and direction was also entered. This adversary vessel's course, and speed were also necessary to complete the calculation of the "fire control solution". The solution was a gun bearing and elevation which were then "transmitted" to the gunners. The gun's crews then trained and elevated the gun to the specified angle and bearing.
When the guns were loaded, and the breech closed, the "gun ready lamps" would light up in:
(a) the Control Officer's position in the Director (b) the transmitting station above the Clock (c) the "layers" position in the gun.
As the guns were loaded one would see "left gun A", "right gun A" "left gun B", "right gun B". When all four were lit, the Control Officer in the Director pushed a button (or directed the fire control party to do it from the Clock) and all four guns were fired electrically.
10

In order to hit the moving surface target, a technique known as "straddling" was used. The first salvo, or shot was aimed to be past, or "over" the target; the second was to be under, or "short". This was observed from the Director and they reported the splashes or "the fall of shot" to the Fire Control Party. Halving the difference between these two ranges resulted result in hits on the third and subsequent salvoes.
Another variable necessary in the calculation of the fire control solution was that of the wind direction and speed. The relative wind speed and direction were determined by the anemometer and wind vane located on the foremast yardarm, and was read from the indicators above the clock. The object forward of the sliding door in the T.S. is known as the Dumaresque. This calculated the wind triangle to give the true wind direction. The intensity of the wind has a significant effect on the round's trajectory. Other factors in the fire control solution are the ballistics, i.e. the type of propellant used, the number of rounds fired by the gun etc.
In surface action or in shore bombardment, the guns were controlled by the surface gun director. In anti-aircraft action, the Mk 29 gun sight and the MK 34 gunnery control radar controlled the guns.
CANTEEN
The ship's canteen was the place where men bought supplies such as razors, shampoo, toothpaste, cigarettes, snacks, souvenirs, etc. This space was restored and painted in 2003 while the ship was in dry dock.
MESS DECKS
The mess decks are one of the most difficult areas to interpret adequately. First and foremost, "mess deck" is the term given to the area where the sailors lived ate and slept. The crew inhabiting the forward end of the ship, or in the "foc'sle" was a method of accommodation used since the beginning of seafaring. It is only in the latter half of the twentieth century that the practice had ceased. One analogy that can be made is that the ship is really not that different from sailing ships in that the sailors lived over and around the guns they manned. Haida is similar in that they are around the gun support, and over the
ammunition hoist which services the guns.
The most important point of the Mess Deck is the number of crew that it could accommodate.. In the After Upper mess, 50 men slept, ate and dressed. Another 50 were below in the After Lower mess deck.
11

Going forward, in the Forward Upper mess there were another 40 men, while there were 20 in the Forward Lower mess deck. CPO’s had their own Mess.. The men slept in hammocks (each had his own), which were put up when they went to bed. Black bars attached to the deckhead were used to “sling one’s mic ( hammock). Everywhere you see a kink in the bar, represents the end of a hammock. The Admiralty allocation of "airspace" was 18 inches per man. Seamen got in or out of the hammock by pulling oneself up chin-up style from the bar, and then settling feet first.
Each morning at 0600 hours "Wakey Wakey, lash Up and Stow" was piped. The hammocks were then lashed like a sausage, and were put in the Hammock Racks located behind the gun support, and in the after corners of the space. This allowed for more manageable movement, both of crew and supplies (such as ammunition from the hoist). It also made it a little more comfortable for sitting at the tables.
Each of the tables represents a "Mess". That is, eight or nine men were grouped into that particular area. A leading Seaman, known as the Killick, was in charge of those men. Meals were prepared in the Main Galley, and at each meal, someone from each mess was designated as "the duty mess man" and it was their function to go to the galley with a large tray. There he reported which mess he was from and the cooks in the galley would "dish out" the entire meal to him. From there, he took it back to his mess and dished it out to the individual members. This system was known as "Broadside Messing", a stark contrast to the cafeteria messing on today’s ships. The large grey lockers on the bulkheads were known as the "Mess Deck Fannies" and they housed the crockery, and utensils used by the members of that mess. It was also the "the duty mess man's" job to wash the dishes after the meal. The duty mess man role rotated amongst the individual mess members on a daily basis.
The wooden lockers seen in the mess also double as mess seating (known as benches). These were the only space that a sailor had for his clothing or "Kit". The "kit bag" or duffel bag was placed in the bottom of the locker to serve as a liner. The individual items of clothing were folded, rolled and tied up in order to fit into the locker. By being rolled up they could then be layered in the locker. There was no such thing as "civilian clothes". The practice of sailors in the Canadian Navy wearing civilian clothes ashore did not begin until after Haida was paid off.
RADIO ROOMS
Radio One is the main radio office which is located in the port passageway across from the heads. It consists of three sections.
The Radio Room itself is the main area. The forward section is the Message Centre which houses the bulk of the ship’s radioteletype equipment . The small compartment at the after end is the Coding Office This is
12

the place where off-line traffic was encrypted or decrypted manually using the KL-7 encryptor/decryptor. Only a picture of the device remains.
Mounted above the four CSR 5 receivers atop the desks on the starboard side is the Aerial Exchange Board. This enabled an operator to connect his receiver (by patch cord) to any of four receiving antennas. Above the Aerial Exchange Board is a signal amplifier (Antenna Multicoupler) and filter which can drive up to six receivers.
Mounted on a shelf and to the right of the multicoupler is the Canadian Marconi FR-12 transmitter/ receiver . It was used on the Naval Administrative Radio Net to exchange messages with other ships in company. These messages would deal with logistics, personnel, conduct of exercises etc.
Most importantly in Radio 1 are the four consoles on the starboard side, They were normally manned by two operators possibly three, if one of the two were new to the job. One position was likely a spare. The operators copied the Morse fleet broadcast from Halifax at 25 words per minute and recorded the messages on Telegraphic typewriters/. As more automation found its way into the ship, the fleet broadcast became encrypted and was automatically decrypted by the KWR-37 on-line crypto receiver and printed on a teleprinter in the Message Centre.
On the port side of Radio 1, there is an assortment of equipment. First up are the three UHF voice channels. A UHF voice channel consists of a transmitter, receiver and a Channel Amplifier Unit. To participate in NATO exercises, a ship needed to have seven servicable voice channels. In HAIDA three of these channels were in Radio 1 while the other four were located in Radio 3 and remotely controlled by their users. The RCK receiver and TDQ transmitter gave the ship the capability to communicate with aircraft within the VHF aeronautical band. To the left of the TDQ transmitter is the Canadian Marconi CM11 transmitter/ receiver. In the RCN, it was the workhorse transmitter in the 1950-1960 period and mainly used for ship to shore or shore to ship communications. Just aft of the door in Radio 1 are six Channel Switching units. These allow various radios to be connected with specific Remote Control Units (RCU)
There are a total of four radio rooms aboard HAIDA . Radio 2 is located in the office flats below the pistol shop. It houses the Canadian Marconi PV500 radioteletype transmitter and two more CM11 transmitter/receivers. These could be flashed up if Radio 1 was put out of action or if the Morse circuit in Radio 1 was overloaded with traffic.
Radio 3, is on the port side signal deck, below the Bridge. As mentioned previously, it housed four UHF voice circuits which were operated remotely. Other that setting up transmit frequencies prior to departure, Radio 3 was unmanned.
13

Radio 4 is above the Main Galley on the starboard side, aft of the signal deck. This was the Electronic Warfare room but mostly referred to as "Radio 4". Here, the main function was the identification of adversary ships by their radar signatures. Radio 4 is not opened to the general public.
ELECTRONICS MAINTENANCE ROOM
It is located on the main deck, port side, just forward of the break in the foc'sle. This compartment previously housed the 293 radar electronics. Here, technicians performed simple repairs on some of the ship's electronic equipment. The only maintenance done in the EMR was on pieces of self -contained equipment that could be flashed up in this location that were light enough to carry there. The compartment also housed the ship's IFF (Identification Friend or Foe) equipment. The EMR is not open to the public.
CARLEY FLOATS
These life rafts, made out of tin and filled with cork, were the primary life saving apparatus if the ship were to go down. Many people refer to the ship's boats as lifeboats. They were used as such, but given the way destroyers were sunk, very few ships had time to turn out the davits and lower boats. After 1958, the Carley floats were replaced with twenty man inflatable life rafts.
Wounded or injured survivors were allocated to the inside netting, so they would be sitting or lying on the raft. The survivors in the water held onto the rafts by clinging to the rope hand holds on the side (25-30 at a time). If they weren't rescued quickly or at all, the occupants perished from hypothermia and dehydration. Most of the casualties in the Battle of the Atlantic occurred this way. The average "life expectancy" in the North Atlantic was twenty minutes; even less in the Arctic.
Each member of the crew was assigned a specific raft, known as his Raft Station. When the ship left port, "Raft Stations" was piped and everyone not on watch went to his raft. This was the method of accounting for everyone aboard. This was also done if someone went overboard, to determine who was missing.
4 INCH GUNS
TWIN 4" HA/ LA MK 16 GUN - Loosely translated, it means two 4" diameter guns, type 16, in a high angle (85 degrees), low angle (-10 degrees) mounting. There are two 4" mountings: "A" gun on the foc'sle, and "B" gun above . The 3" 50 would be referred to as "X" gun. The initials S.I.L. on the breech ring refer to the manufacturer - Sorel Industries Limited.
14

These guns constituted the ship's "main" armament as described in the section on the Transmitting Station. The gun is said to be in a mounting, as opposed to a turret. In a turret, such as on cruisers and battleships, the ammunition was supplied directly into the gun up through the centre. With a mounting, the ammunition arrives externally. If the gun mounting were to be removed the only evidence of it on deck would be a 12" hole in the deck for the wiring. When firing, the equivalent force of the recoil with the barrel 45 degrees elevation was 60 tons. These guns were trained, elevated and fired electrically, but loaded manually. There was also a manual back-up procedure if the power failed. In reality, one person could conceivably train, elevate, load, aim and fire the gun - but only in extremes. The number of men in the gun crew varied, depending upon what the ship was doing. However, for basic interpretative purposes, the gun's crew can be said to have been 15, with another 12 supplying ammunition along the route from the magazine. The fire control personnel and the director are not included in this number.
Besides anti aircraft shells with proximity fuses, other types of ammunition were used in the guns, namely, AP or Semi Armour Piercing and HE, or High Explosive. Semi Armour Piercing would penetrate and explode inside the target while High Explosive would explode upon contact. For Haida's actions, SAP was the type of ammunition used, except in shore bombardments.
BASIC DATA MRK 16 4-INCH H.A.\L.A. GUNS
Weight of shell: 351bs / 16 kg Weight of round: 661bs / 30 kg Muzzle Velocity: 2 619 fps Rate of Fire: 15 rounds per minute
SHIPWRIGHT SHOP
Located directly aft of ‘A’ gun, the shipwright shop was a workplace for sailors whose trade was a combination of plumber, carpenter and sheet metal worker. They were the forerunners of today's hull technicians.
15

LAUNDRY ROOM
This was the ship's laundry. It contained a large drum-type washer, extractor, electric ironing machine, and a steam heated dryer. The equipment is all missing. Normally, the Laundry Room was manned by a two-man crew working steady days. Each Mess would have a specific day in which they would have their clothes washed. A little bribery helped to obtain extra care of one’s laundry.
PETTY OFFICERS MESS
The Petty Officers' mess was the area where the various departmental or trades , mid level supervisors lived. A Petty Officer in the Navy is the equivalent of a Sergeant in the army. The Petty Officers were the main link with the crew and were the day-to-day, departmental supervisors. A coxswain was the senior non-commissioned member of the crew aboard. The coxswain was the only non-commissioned member of the crew who could go to speak directly to the Captain, everyone else had to go through the proper chain of command. The coxswain was the person in charge of scheduling watches, responsible for the operation of the canteen, and acted as a mediator and advisor for members of the crew in dealing with work or personal problems. There was also the chief boatswain mate (known as the "Buffer") who was the person in charge of the upper deck maintenance and supervised things like paint and cleaning crews, chief weapons technician, chief electrician, and chief store's man and a chief electronics tech.
The portside mess was for the engine room artificers (or ERA's). These were the senior members of the engineering department responsible for the operation and maintenance of the Engine Room, Boiler Rooms, Gearing Room, ete. The term "artificer" is from the British Navy which means tradesman, or highly skilled journeyman.
There is a small pantry in the laundry room flats for them to make small snack or even dinner. This area has a hot plate, sink and dishes. The fridge is in the mess.
OPERATIONS ROOM
There are actually four different spaces in this area, all of which serve a specific purpose. They are the Operations Room, the Charthouse, the Sonar Control Room, and the Wheelhouse.
The operations room is the area seen from the door. During World War II it was known as the "plot ". There was one plot table under the opening in the deck head (which is now closed). In addition, there was a magnifying lens fitted into the opening. At night, the
16

officers on the bridge could easily watch the plot from the Bridge above. With the 1949-1952/ refit came the introduction of radar with a slave display on the bridge. At that time, an additional plot table was installed. The two plotting tables currently on display are not the same type as those fitted in this space when the ship was paid off. One plot table was used to "plot" the movement of Haida and all other ships and subs, while the second table was used to track aircraft in the area. The way it works is that a projector at the bottom throws an image known as a graticule to the tabletop. Simply defined, a graticule is something similar to a spider web.
The radial lines represent degrees of a circle (the compass), while the concentric circles represent distance in yards. Tracing paper was put on the glass top of the table and the projected graticule moved across the bottom of the table, throwing the image to the tracing paper. The motor was connected electrically to the gyrocompass and a Chernikeeff log moved the graticule at a scaled-down speed and direction of the ship. A plotter can diagram the three dimensional phenomena (what you see visually) into a one dimension in order to discern the targets movements. Once that was established, the tactical information necessary to manoeuvre one’s own ship was available. This information was then relayed from the Plot to the Bridge.
The specialized equipment in this small space is as follows:
Sperry Marine Radar - Mk2
This is a 0 to 30-mile range; surface search radar designated as High Definition Warning Surface (HDWS). From the early 1950's, until well into the 1970's, almost every ship in the RCN was fitted with the Sperry Mk 2. Although its primary use was to locate other ships, helicopters, navigation aids and shorelines, it was very effective in detecting submarine periscopes. The Mk 2 set was first produced by Sperry Gyroscope of Great Neck, NY in 1953.
The Sperry radar operates in the 9375 MHz (former "X" band) at a power level of 30 kilowatts and has a maximum range of 30 miles. Today, Haida has a complete working system and the parabolic slice antenna is mounted on the foremast just below the large air search antenna.
VK5 Radar Repeater Unit
Forward of the plot table is VK5 radar PPI display that could be driven by either the AN/SPS-6C radar or the Sperry Mk2 radar signal. The VK5 can display bearing and range information in a standard configuration with range rings or electronic cursor. By enabling the “off centre” sweep function, it could display signals from another ship or aircraft and show you bearings and ranges from your own position The VK5 contains 101 electron tubes and has operated previously but now is in need of repair.
IFF (Identification Friend or Foe)
17

When Haida was first commissioned, she was fitted with the Mark III IFF system. By the time she was paid off, Haida had the Mark 10 IFF system that was comprised of the ANjUPA24, ANjUPX-1, and AN/UPX-5 devices. The control box for the UPX-24 video decoder can be seen on the forward bulkhead in the Ops Room near the VK5 display. One IFF antenna (white cylindrical object) can still be seen at the tip of the lower yardarm, foremast, on the port side. Haida's IFF equipment was fitted in the Electronics Maintenance Room (EMR) and unfortunately there are no examples of it aboard the ship.
Decca Navigator
The Decca system was a coastal electronic navigational system that was more accurate than the Loran ‘A’ system. It was fitted on Canadian ships in the early 1960's. It consisted of a receiver and display unit called a decometer. Decca was only rented to clients and never sold. . An example of a Decca decometer is mounted in the Ops Room. The Decca Company only rented the equipment.
CHART HOUSE
This is where the Navigating Officer did the majority of his work. In the 1960's this room contained a Loran-A receiver, gyro repeat and three chronometers. The drawers contain folios of charts of the regions of the world in which the ship was operating as well as other areas to which the ship might be diverted on short notice. The Navigator was responsible for the "passage plans" that is, determining the best course to get from point A to point B. In addition, the Navigator supervised the Navigator's Yeoman who was trained to "correct" or update the charts carried aboard.
SONAR CONTROL ROOM
This room contains the sonar displays and indicators for the various sonar sets carried in the ship. Sonar is an acronym for Sound Navigation and Ranging. Originally this was an American term which was adopted internationally with the formation of NATO, as the name for the devices which used sound waves transmitted underwater to locate submerged objects such as submarines, mines, torpedoes, or even wrecks.
Prior to the adoption of the term Sonar, the Canadian, British and other Commonwealth Navies used the term
ASDIC, in reference to the Anti-Submarine Detection Investigation Committee of 1917, which designed the equipment. Haida carried various submarine detection equipment over the years. At the end of her service life she was fitted with the following:
18

AN /SQS 10 - An American built search sonar first produced in 1950 with a search range of 6 000 yards under ideal conditions. This was vastly superior to the 2,000 yard range of WWII ASDIC sets.
AN/SQS-501 - This type was used to identify submarines lying on the ocean floor where the water was shallow. This was the only sonar type which did not have a transducer fitted in the sonar dome. Instead it used three transducers mounted in the forward end of the ship's hull.
147F - A British depth finding set that complemented the main ASDIC. It first entered service in 1943.
164B - An ASDIC used in conjunction with the Squid ahead-throwing weapons systems. It was a range and bearing finding device that was supplemented with data from the 147F set. None of aforementioned equipment is aboard today.
The following equipment is set up on the table on the outboard bulkhead, from forward to aft:
DEPTH FINDER CONTROLLER and Indicator.
Depth was determined by tilting the 147 Transducer located in the bottom of the ship. By measuring the angle (0), and the range (r) the depth (d) was automatically calculated.
RANGE RECORDER- When an echo was received, the metal stylus moving across iodine treated paper "burned" a mark on the paper. This was measured on a mechanical scale to show the range. The Range Recorder also controlled the firing of the Squid Mortars. When the metal bar, on the top part of the recorder contacted the firing pin, the firing sequence for the mortars was initiated. Various factors in the firing equation were entered mechanically: own ship speed, target depth (estimated or calculated), target bearing, target range, range rate (the rate of change in the bearing or the target's movements). To obtain the complete solution it was necessary to reduce the bearing rate to "zero" in order to close the submarine on a collision course. The Squids fired automatically when the range equalled three hundred yards.
FIRST OPERATOR or CONTROL
CONSOLE. This indicator was used to set up the sonar pattern that was transmitted. Each time the operator heard an "echo" he pushed the button in the centre of the indicator. This sent an electrical pulse to the Range Recorder, Bearing Recorder and Depth Recorder, making a "burn" mark on the paper on each of them.
BEARING RECORDER. The bearing of the submarine relative to the ship was recorded on the paper. The angle at which the line of these bearing marks developed, as successive echoes were recorded, indicated which way the target was moving- left or right relative to the ship, and how fast.
19

Various other equipment can be found in the Sonar Control Room, such as telephones, the Mark IV Fuse Setting Panel, and other devices for transmitting sonar information to the Bridge and Operations Room. The equipment for transmitting and receiving the sonar pulses was located in the Sonar Instrument Space in the Forward Lower Mess deck. The transducers for each sonar set were located in the Sonar Dome, directly below the Forward Lower Mess deck.
WHEEL HOUSE
Two important operational functions took place here: (a) the ship was steered by the helmsman; (b) engine orders were relayed from the Bridge, through the wheelhouse for execution and acknowledgement by the Engine Room. The ship was directed or conned by means of a gyrocompass repeat. The gyrocompass was located off the electrical workshop flats. It generated an artificial axis pointing to True North. The ship's course or heading was indicated by the number of degrees clockwise from North, being either 000 or 360, East 090, South 180 and West 270, etc. The helmsman was
told what course to steer by the Officer of the Watch (OOW), and he did this by turning the ship to port or to starboard until the correct numeric course was showing on the Starboard Gyro Repeater. The helmsman could not see where the ship was going. This is the concept the visitors find hard to imagine. The Helmsman was literally concerned with watching three numbers move either left or right on the gyro repeat. It was the OOW, who was controlling the direction and speed. There is also a magnetic compass in the Wheelhouse. It was used to steer the ship if the gyro compass failed due to power failure or damage.
The engine room telegraphs were used to tell the Engine Room what to do. Notice that there is the Port Telegraph, and the Starboard Telegraph, which relay the commands for port and starboard engine movements. The settings on the telegraph are in three major modes: Stop, Ahead, and Astern. Within the Ahead and Astern settings there are three speeds, slow, half and full. The order was given by the OOW via the voice pipe, and repeated by the Helmsman such as "Port engine slow ahead, Starboard engine slow astern". The men on the telegraphs then set the telegraphs to the ordered speed. When this was done, the Telegraph Repeater in the Engine Room moved to the same setting and a loud bell rang in the Engine Room. Someone from Engine Room replied by pushing a button on the Engine Telegraph reply gong. This then rang a bell in the Wheelhouse telegraphs that served as the acknowledgement. The Helmsman then replied, "Engine Orders passed and repeated Sir" which told the OOW that the engine room had complied.
Once the ship was underway, the telegraphs were normally set at half ahead, or cruising speed. The ship's speed would be adjusted up or down by means of increasing or decreasing the number of
20

Revolutions of the propeller shaft. This was ordered via the Starboard telegraph. You will notice that it has two handles, while the Port has one. This is the Revolutions telegraph and applies to BOTH engines. The OOW would order "Revolutions Two Zero Zero". The Helmsman repeated the order and would set the starboard telegraph to 200 revolutions. Again, the bell would ring signifying the engine room's compliance, and the Helmsman would report, "Two Zero Zero Revolutions passed and repeated, Sir."
There are a few more devices in the wheelhouse. 1) Four hydraulic pressure gages on the forward bulkhead to show whether the pumps in the wheel are working. 2) A rudder angle indicator to show whether the rudder was responding to the wheel. 3) An indicator to steer by sonar. This was used when the sonar system had a contact and allowed the helmsman to keep the ship heading towards the target. 4) Gyros Fail Alarm . This would come on if any problem developed with the gyrocompass. From this you can surmise that something like coming alongside a jetty could involve numerous and simultaneous engine and wheel orders, all of which were relayed by the helmsman. This is why senior Petty Officers took the helm while doing such manoeuvres as they had years of experience. When Haida was in operation, the coxswain took the wheel while the ship was at action stations, when entering and leaving harbour and at any other time during which intricate steering was required.
CAPTAIN’S SEA CABIN
Located directly underneath the bridge and aft of the Ops Room is where the Captain ate and slept while the ship was at sea. Optionally, he could take his meals in his Day Cabin while at sea. Because he was literally steps away from the Operations Room and the Bridge, that made him available immediately. There are also communication devices here so he could stay in contact with those on the Bridge.
BRIDGE
Command, Control, Communications are the three words which best describe the basic functions of the Bridge. Everything and everybody aboard came under the "command" of the Bridge. Anything the ship was doing when underway was controlled, authorized or ordered from the Bridge. It was the "Brain" of the ship.
COMMAND
The Captain exercised command, either personally, or through the officer of the watch, or in some cases, the
navigating officer known as the "Pilot". Command in this case included conning the ship, authorizing the use of weapons, or of anything else that needed doing.
CONTROL 21

'Control' referred to the movement of the ship, and the operation of all weapons systems. The ship was conned (steered) by order of the Officer of the Watch (OOW). The OOW was usually standing at the pelorus, or the gyrocompass repeater where he could be in the centre. There was a magnetic compass there as well in case the gyrocompass failed. He was the one who was watching where the ship was going. All departmental reports were made to him and then from him to the Captain through reports such as "Number One Boiler Room on Line", "A" Gun Closed up", "Damage Control Party Closed Up", ete. In addition to this, the Officer of the Watch was directly responsible for the duties of the watch on deck. The OOW was responsible to the Captain for the safety and navigation of the ship. Only the Captain could override the OOW.
All the ship's weapons systems were controlled from the Bridge. In surface action or in shore bombardment, the guns were controlled by the surface gun director. In anti-aircraft action, the Mk 29 gun sight and the MK 34 gunnery control radar controlled the guns. The torpedoes were aimed and fired from the Bridge at the Torpedo Firing Sights located on the port and starboard sides, aft of the gate to the Bridge.
COMMUNICATIONS
Communication was both external and internal. The 10" and 20" signalling lamps were used to communicate with other ships in Morse code. The flag signals hoisted on the Signal Deck were controlled by the chief signalman, or yeoman of signals, from the bridge. In addition to these, Morse code could also be flashed from the fighting lights on the foremast yardarms. There was also a pair of infrared lamps for nighttime communication. Messages and signals sent from the Radio Room also originated from the Bridge. Internal communication was done by the ship's broadcast system, sound powered telephones, voice pipe and by messenger. The sound powered telephones are a point-to-point communication system. The crank on the phone would be turned, a light and buzzer would activate on the called phone to draw attention. When going into action, each section of each department, Gunnery, Engineering, Communications, Damage Control, Operations, Torpedo and Anti Submarine reported to their department head, who in turn reported to the OOW. The same was true in normal peacetime cruising and at each change of Watch. Of course, this communication was not unidirectional. The OOW could contact any point in the ship if required. If he couldn't access the space directly, it would be done through the department. For example, if there were a problem with the steering gear, the OOW would communicate to the Steering Gear Compartment through Engine Room.
The Surface Gun Director behind and above the bridge is a Mk 3W range finder/director. It had a crew of four, namely, Control Officer, Rate Officer, Layer and Trainer.
The range finding portion was removed when the Mk 34 radar was installed since the radar now did the ranging. The Control Officer viewed the target through optical range sights. The Trainer then moved the Director onto the bearing of the target. The Layer could then elevate to the angle of sight, but only up to
22

a maximum of eighty degrees. As this was happening, the Range taker was recording the range as viewed from the range finder. This data was sent to the Transmitting Station for processing. The Rate Officer was responsible for detecting changes of course and speed of the target. He sent this information to the Transmitting Station by sound powered telephone.
When the Director moved, it drove the bearing and elevating indicators in "A" and "B" guns, and the Layer and Trainer in the mount moved to the same Relative Bearing and angle of elevation by following the "pointer". As stated previously, the Gun Ready Lamps are to the left of the Control Officer's seat. The Control Officer was also the one who observed the fall of the shot and this information (over, under, straddle) was sent to the Transmitting Station by means of a buzzer, and sound powered phone.
CATWALKS
These walkways were installed in the ship during the refit of October 1944. Due to the split deck configuration where the forecastle was higher than the Main Deck, these ships were "wet". In periods of rough seas or heavy weather, the Main Deck was awash with water. Therefore, movement around the weather decks was very dangerous in certain situations. A lifeline was rigged beginning at the break in the forecastle, was lashed to the funnel guy wires and secured to the After Canopy. Sailors would hold onto this as they moved fore and aft. If it were really treacherous, safety belts would be hooked onto it. The inclusion of the catwalks connecting the foc'sle with the After Canopy made fore and aft movement much easier and safer in heavy weather.
40 mm BOFORSThe ship’s four 40 mm Bofors anti-aircraft guns are mounted on the original twin 20 mm Oerlikon power mountings. When done this way, the navy designated them as “40 mm Boffins”.
The mounting operated hydraulically, with the fluid being supplied by the pumps forward of the after funnel on the Bofor deck, and aft of the helm on the Emergency Steering position. The mounting moved in response to the movement of the fire control "joystick". These guns used to have a Mark 11 Gyro Gunsight.
The design of the gun is such that it had a very high rate of fire due to the fact that the vertical block in the breech, opened upon recoil of the gun, so that the casing was ejected almost immediately after firing. This resulted in a rate of fire of 120 rounds per minute. The rounds were loaded into the breech in "clips" of four. There was a crew of two on the mount - the Aimer and loader. The ammunition used was high explosive, and was not fused. The gun could elevate to 70 degrees, and could depress to 0 degrees, which allowed it to be used against close surface contacts that were below the arc of fire of the
23

4 inch guns. The Bofors proved to be extremely useful o the RCN ships in Korea for blowing up floating mines. Captain Bob Welland, HAIDA’s second Captain, had the two aft Oerlikons replaced with two single barrel Bofors after the 1944 refit. Out of the remaining four Oerlikons, the two midship units were replaced with Bofors and the forward Oerlikons removed completely during the 1949-52 modernization.
EMERGENCY STEERING POSITION
The Emergency Steering Position consists of the "Binnacle" which housed a Magnetic Compass. A binnacle is not just a stand for the compass. it contains all the correction magnets to keep the compass facing north, the two big iron ball mounted on each side plus the two electromagnets that energize when the degaussing system is energized.
There was also a helm, a Gyro Repeater and two engine telegraphs. There is no Revolutions Telegraph as in the
Wheelhouse. Revolutions were passed to the Engine Room by sound powered phone.
The actual location of the Wheelhouse, while being practical and efficient in terms of operating the ship, is very vulnerable in combat. When so engaged, standard tactics called for the Bridge to be the primary target. If the Bridge was damaged or destroyed, so was the command and control of the vessel and thus, its ability to continue to fight was dramatically reduced. If the Bridge were hit, the Wheelhouse would also sustain damage.
The Emergency Steering Position is therefore the backup position if the Wheelhouse was knocked out, or if steering from there failed. It was strictly used for steering and engine controls, not command and control like the Bridge. If there was a massive steering failure, the ship could also be steered from Tiller flats or by differential speed of the main engines. This is the most elementary manoeuvring, technique but if that was all you had left, then it was still effective.
When the ship was in action, the Executive Officer, or the second-in-command was stationed at the Emergency Steering Position so that he could also direct the Damage Control Parties. For example, if the Bridge were hit, the XO was the person who sent people there to tend to the wounded and put out any fires. Once appraised and advised of the situation, the XO remained there, or assumed command of the ship if the Captain was killed or incapacitated.
24

3”50 READY USE MAGAZINE
This compartment , forward of the 3”50 gun stored ready-use ammunition for the 3"50 guns. There is another magazine below the Wardroom lobby. It contained both 3"50 rounds and 40 mm rounds. The Ready-Use Magazine was close to the gun mount due to the large numbers of rounds expended by the guns. This space was restored to its present appearance in 1991. Items of note within this display are the four ammunition trays for supply to the ammunition numbers for the gun. In addition, one can see the special canisters that the rounds were stored in. These actually interlock, to prevent their moving around at sea. This space was also used as the crew shelter for the 3" 50-calibre gun's crew.
3" 50 CALIBRE GUNS
These guns fired a round that was 3" in diameter. The length of the gun barrel is 50 times the diameter, thus 150 inches. Hence the name 3"50-calibre. This gun was designed by the U.S. Navy, primarily as an anti-aircraft gun. It could be used as a general-purpose weapon as well. This gun was installed during the conversion refit of 1949-1952 and occupies the space where the twin 4" mount, or "X" Gun, was mounted during the World War II period.
Unlike the twin 4", these guns could only be operated electrically. There is no manual back-up. This gun has two types of control; automatic control whereby the mount was operated from a remote director, and there was local Control in which the mount operated in response to signals originating on the mount, from the fire control data. When in local control, there were two types: local surface Control (the right hand position) and local Anti aircraft Control (the position on the left).
The gun crew consisted of the following:
1. Mount Captain 2. Local Surface Operator 3. Local Antiaircraft Operator 4. Sight Setter 5. Left Shell man, left Gun 6. Right Shell man, left Gun 7.Lleft Shell man, Right Gun 8. Right Shell man, Right Gun 9. First Magazine loader 10. Second Magazine loader 11. Third Magazine loader
25

12. Fourth Magazine loader
One difference between this gun and the 4" inch is that here, the loaders were loading ammunition into a hopper system wherein the rounds cycled around. They were actually "catapulted" into the breech by means of the chain drive, hence the swiftness and higher number of rounds fired per gun. The expended casings were flung out via the chute and were thrown clear of the mount. The "baskets" located below the gun mount were for these expended rounds. As they ejected they were sent down there so that they could not interfere with or cause a jam of the
mounting.
BASIC 3”50 DATA
Weight of Mounting: 31,700 lbs / 14 380 kg Limits of Gun Movement: Elevation 85 Depression .-15 Left/Right Train 360
Gun laying SpeedElevating rate: 24 /second Training rate: 30 /second
Rate of Fire: 40 rounds per barrel per minuteMaximum Range Surface Fire: 14, 200 yds / 1,2984 m Ceiling at 85 degrees elevation: 30,400 feet / 9,266 m Velocity: 2750 fps / 838 meters /sec.
SQUID ANTISUBMARINE MORTARS
The Squid Mortar represents a significant technological development during the Second World War, and was developed for antisubmarine warfare. In her original 1943 configuration, Haida carried depth charges in a rack on the stern as well as two depth charge throwers. The depth charge was the standard anti-submarine weapon (held over from World War I) and proved to be very ineffective for convoy "point defence" or in single ship attacks. The problem derived from the ASDIC
26

detection gear. In order to attack the submarine, the surface ship had to pass over it to drop depth charges off the stern. However, as the ship got close to the target, the echo from the submarine was returned almost simultaneously with the ASDIC pulse being transmitted. Therefore, it was impossible to determine the precise range of the submarine. As you attacked, you were "guesstimating" the submarine's position. Also, once you did attack, you had to start a new ASDIC search to re-locate the target. That was the submarine's best chance for evasion. With the development of the "creeping attack" where one ship maintained a constant contact and then directed a second ship to the attack, the results improved. The escort groups using three to four ships and taking turns attacking later perfected this. This technique was not developed until late 1943.
The Squid combines the features of an ahead throwing weapon, with the fusing and explosive power of the depth charge. The first submarine sunk by Squid was in August 1944. The firing range depended on the relative course and speed of the submarine. The range of the weapon is 300 yds (274 m). Just prior to firing, each bomb was given an electrical pulse that set the depth that it should explode at. When fired, the bombs flew over the ship's mast and landed 300 yards ahead. The six bombs were fired in a pre-set sequence so that they actually formed opposite triangular patterns. If one looks closely at the mount, it is evident that the three-barrels are not parallel with each other in either plane. At firing time, the first three Squids were set the deepest depth while the second three were fifty feet shallower. The two patterns encircled the target and the simultaneous explosions at the two depths crushed the pressure hull of the submarine. Both mounts are gyro stabilized to counter ships roll. The gyro unit is located in the electrical workshop.
THE SQUID HANDLING ROOM
The Squid bombs came up the Squid Hoist from the Squid Magazine two decks below using the electric winch on the port side. They were then stowed on the racks and shifted out to the trolleys by means of the hand cranks. The Local Control Fire Console is on the after bulkhead, on the starboard side just beside the door.
The Squid Handling Room occupies the space originally held by "Y" gun and the after 4.7" mounting. It was here on the morning of August 6, 1944 that Leading Seaman Roy Betts, and Able Seaman Gordon Rowe were killed,
and eight others wounded when a 4.7" casing exploded during loading. Although wounded, Able Seaman Michael Kerwin pulled two members of the gun's crew out of the fiery mount. He was awarded a Conspicuous Gallantry Medal (one of only two awarded to the RCN).
On the forward bulkhead is the CAT Gear or Counter Acoustic Torpedo device. The Germans developed an "escort killer" torpedo which homed in on the cavitation noise that the ship's propellers made in the water. "Cavitation" is the formation of "cavities" or bubbles in the water, around the propeller blades.
27

The explanation is complex, but basically, when the propeller blades turn at a certain speed, there is a pressure differential between the two sides of the blade which causes the water to vaporize, making a sort of bubble. The water rushing in to fill the cavity makes a loud noise. As the escort could not outrun the torpedo, this became a very effective weapon. It was developed so that the U-boats could cripple the escorts of the convoy, enabling them to sink the merchant ships without fear of counterattack. The CAT was towed astern or "streamed". The spindle allowed the towline to twist without flipping the CAT, while the two 45 degree angle arms drove the CAT underwater. The fin kept it on a flat course. The sound of the water running between the two bars was similar to that of the propellers, and louder, so the torpedo would be attracted to it, instead of the ship.
THE WARDROOM
The Wardroom is a very important interpretive area, since it underscores the difference in lifestyles between the ratings and the officers. The Wardroom was the "home" of the ship's officers. They took their meals here and also used the area for social and recreational purposes. The activities of the Wardroom Mess were supervised by the Executive Officer who was the President of the Mess. The Captain was not a member of the Mess, nor did he have access to the Wardroom. He was invited in for movies, socials and mess dinners, etc. This is a tradition dating back to the days
of sail when the Captain had his own food, steward and coxswain. The system was actually very effective, as the Captain remained detached from the officers so that they could relax without being under constant scrutiny. The command aspect was thus solidified, and reduced the likelihood of "personality clashes".
The Wardroom was also used as the area for treating injured and wounded when the ship was in action. The Medical Officer and the Sick Berth Attendant assessed and treated wounded crewmembers or survivors as they were brought down. In fact, this room was used for that very purpose the night HMCS Athabaskan was sunk. The combination of oil and water dripping from the survivors was such that it actually sloshed over the bottom sill of the Wardroom door. Seriously wounded or injured were placed in Sick Bay, or in the various Officers' Cabins. Hammocks could also be slung in the After Canopy to accommodate large numbers of wounded.
The Squid Hoist is the structure that dissects the room. The curved settee behind it is actually the remains of half of the original 4.7" gun support for the "Y" gun. Before 1950, the Squid Hoist would not have been there, and the other half of the gun support would have come to approximately where the after end of the hoist is now.
28

The buffet is original. When viewing it, the cupboard on the left is the ship's pistol lock up. The cupboard on the right contains beer steins that were formally owned by the Wardrooms of HMCS Nootka, and HMCS Cayuga, and have the names of some very famous Canadian Naval Officers on them. The space between them has the officers outgoing mailbox, and the chits in the slots are the individual officer's bar chits. The brass label on the mail box states "Presented by Marine Industries Ltd, to the Wardroom HMCS Haida on the occasion of her refit in Sorel P.Q. July 1961”.
All officers hold a Commission, which is a call by the Monarch for that person to serve in the military on his/her behalf. When the ship commissioned in 1943, King George VI was the monarch so the ship was His Majesty's Canadian Ship. When Haida recommissioned in 1952, she was the first Commonwealth warship to commission under Queen Elizabeth II.
OFFICERS CABINS
Within the Wardroom Lobby are five cabins for some of the ship's officers. The three on the Starboard side are (from forward to aft) Cabin One, Cabin Three and Cabin Five. The two on the Port side are the Executive Officer's Cabin, and Cabin Six. With the exception of the XO's cabin, the rest are double cabins, with two officers in each. There is another cabin across from the Cook's and Steward's Mess, aft of the Wardroom known as Cabin Seven. It housed four junior officers until the mid-1950's when it was converted to #3 naval stores room. It is now the artifact storage area.
The upper bunks in the double cabins fold down to make a settee. The desks, wardrobes, and sinks are all original.
There were four officers who had single cabins and in each case, the cabin doubled as their Department's office. They were: the Captain, the Executive Officer, the Supply Officer, and the Engineering Officer.
The Executive Officer was not a watch keeper; rather his position could best be described as the ship's General Manager. He coordinated the ship's routine with the Captain and the various Heads of Departments. He was responsible for the ship's Watch and Quarter Bill for each member of the crew. A crew members Quarter Bill shows (a) his mess (b) his action station (c) his station for entering and leaving harbour (d) his Special Sea Duty Station (e) his Raft Station and (f) whether he was G (able to draw grog) T (temperance i.e. no grog) or U.A. or Under Age and not entitled to draw grog. The XO also drafted a document known as daily orders that precisely detailed the ship's activities for the next day. These would be prepared in the coxswain's office and distributed throughout the ship during the early evening so that everyone was in the know. During the Last Dog Watch the XO conducted rounds. That was inspection of the living spaces for general cleanliness, and seaworthiness. The XO would also coordinate the defect lists and compile the requests for repair or servicing back in port. As stated previously, the XO was also the President of the Wardroom Mess and supervised the activities associated with this.
29

The Supply Officer's cabin is located in the Ship's Office Flat below the Captain's Day Cabin. It is the one aft of the Ship's office on the starboard side. The Supply Officer was responsible for the ships victualling (getting food), and he was the person responsible for the crew's pay or the "Paybob". He also controlled the stores accounts held by the various departments, and performed the duties of the Captain's Secretary.
The ship's office was used by the Pay writer for documentation of the crew's pay records, and by the Captain's Writer who was responsible for personnel (divisional records). He also typed the Monthly Reports of Proceedings, the written record of all the ship's activities and was responsible for typing the plethora of reports and letters associated with Service life.
Below the ships office flats are fuel oil tanks number 7 and 8.
OFFICERS GALLEY
As with the Main Galley, the counter and cupboards in this space are original. Originally, there was an oil fired stove here. Its chimney was located just forward of the 3"50 and was distinctive due to its "H" shape and known as the "Charley Noble". Meals for the officers would be prepared here and sent down to the Wardroom pantry for serving. The Captain's Steward also used this space to prepare meals for the Captain, which he then served via the Captain's Pantry.
HAIDA BATTLE HONOURS
Haida's Battle Honours board is located outside the Captain's Day Cabin. Haida has been awarded six battle honours depicting her service in WWII and Korea. Arctic 1943 and 1945 are for her service on the Russian convoys and in liberating Norway. The English Channel represents her service in the 10th Destroyer Flotilla as do the other honours of Normandy (Operation Overlord the invasion of Europe 6 June 1944) and Biscay. The award for Korea is actually one honour as those were the dates in which the ship served in her first tour. Haida served a second tour in 1954 as a peacekeeper after the cessation of hostilities. The other item of note is that Haida does not have a motto (such as Athabaskan's - ''We fight as one").
Haida Inc. Plaque
This plaque beside the door to the Captain's cabin honours the members of Haida Incorporated formed by Neil Bruce, David Kidd, Peter Ward, Alan Howard, and Norm Simpson who acquired and preserved the ship in 1964. The ship was operated by these people from 1964 until 1971 when the ship was turned over to the Government of Ontario. She owes her existence to these people.
30

CAPTAIN’S DAY CABIN
It was here that the Captain managed the affairs of the ship. The space consists of the office or Day Cabin, a bedroom or Sleeping Cabin and bathroom (or Head). The Captain used this cabin in harbour, and sometimes during the day at sea. When the ship was at sea he slept in the Captain's Sea Cabin in order to be close to the Bridge and the Operations Room. The built-in furniture, such as the settee, sideboard, fireplace bunk and cupboards are original. As fitted in 1943, the desk was actually against the starboard bulkhead. It was changed to its present place in the refit of 1961. The chairs and table are more recent additions.
As stated in the section on the Wardroom, the Captain lived independently of the ship's officers. He had his meals prepared by the Captain's Steward and these were served from the Captain's Pantry through the sliding hatch. The table in the centre serves as a dining table as the Captain would also entertain fellow squadron Captains or senior officers in this space. He would also invite some of his junior officers to dine with him.
The Captain's Day Cabin also served as an emergency operating room. The operating table was bolted to the deck in the centre of the suite. Above was circular bracket that held the surgical light. This space was ideal for this purpose as it is close to Sick Bay, and the space had no function when the ship was in action. There are two known cases where this cabin was used for surgery. The first was an appendectomy successfully performed on Andrew Gillespie on November 28, 1943, and a wounded sailor was operated on (successfully) to remove a 20 mm round fragment in February 1945. Surgery was seldom done at sea as it was better to transfer the patient to a larger ship such as a cruiser, or an aircraft carrier that had proper facilities.
The Captain's Day Cabin and the Sick Bay are the only areas where damage to the ship sustained in action can be seen. On the starboard bulkhead, just forward and below the present 3"50 casing cage there is a 2"x 2" metal patch. This covers a bullet hole from an Oerlikon round fired by the German destroyer T -29 on April 26, 1944. Two other rounds went into Sick Bay but there were no casualties. Rumour has it that the round that entered the Captain's Cabin took the heads off Cdr. DeWolf’s golf clubs but this has been neither confirmed nor denied.
SICK BAY
The Sick Bay is the ship's hospital or infirmary. The ship carried a Medical Officer in wartime who was assisted by a Sick Berth Attendant, the equivalent of a Registered Nurse. Seriously ill or wounded would be attended to here, or in the Wardroom. During peacetime, the ship just had the Sick Berth Attendant
31

who was called the "Tiffy" or "Doc". These people were very highly skilled. Members of the ship's company who were ill or required attention would muster for Sick Parade" usually each morning at 0800 hours. Depending on the severity of the problem, the "Tiffy" would see to it, or send the patient ashore for treatment.
REGULATING OFFICE FLATS
Located below sickbay are the Reg Office flats. Off his area, on the starboard side, is the Coxswain’s (regulating) Office where the seaman branch (watch keeping, etc) was controlled. It was also where mail was sorted, sent and received. Next to the Coxswain's Office is the Engineering Officer's cabin. There, he had all of the engineering and electrical drawings for the whole ship. On the port side is Radio Room #2.
The fourth room in this area is the After KVA compartment. The after 50 KVA motor alternator is located in this space. Below this area are the main fuel tanks number 5 and 6 plus number 2 diesel fuel tank.
BOILERS and ENGINE
Haida has three drum boilers - each in its own pressurized room. Bunker 'C' oil was burned to heat water in the boilers and produce both saturated (wet) and superheated (dry) steam. The saturated steam heated the ship and powered other devices such as pumps. The superheated steam, used in the turbines, flowed through pipes into the Engine Room through six emergency stop valves (three on each side), then into the manoeuvring valves (throttles).
The steam next passed through the main engines - first through the high-pressure turbines and then the
low pressure turbines thus causing the propellers to rotate. Waste steam entered the main condenser and passed a series of cold tubes. This turned the steam back into water. The water was drawn out by an extractor pump and stored in a tank. The feed pump drew water from the tank and passed it through a preheater before it went back into the boiler for reheating. This is known as a closed loop system.
32

The men who worked in the Engine Room were 'Stokers' or ERAs (Engine Room Artificers - senior people) and a Chief . They were responsible for maintaining the four turbine engines and regulating the speed of the ship. The men who worked in the Boiler Rooms were responsible for regulating the temperature and pressure of the steam. Operations and communications were controlled by telegraphs and sound-powered telephones.
The Engine and Boiler Rooms are located on the deck below the main deck. The Engine Room is directly beneath the torpedo tubes and the Boiler Rooms are ahead of the Engine Room. Their exhaust feeds the two funnels.
FREQUENTLY ASKED QUESTIONS
This FAQ section is intended for you to become aware of just a few of the many interesting anecdotes that you and the public may find interesting. Become familiar with them and if the opportunity arises, consider telling your visitors about them.
HMCS Haida's Pennant Number
One of the restoration decisions concerns the pennant number Haida has painted on her hull (one on each side) and stern. With direction from Parks Canada's Cultural Resource Management Policy and through discussions with a range of informed individuals, it was decided that Haida should display pennant number 215. This decision, however, has raised questions and even some criticism among some veterans groups and other naval organizations.
Through her 20 years of service Haida bore two pennant numbers. The first, G63, was based on the British (Royal Navy) identification system. Haida carried this number from her commissioning into the RCN in 1943 to 1949. That year, with Canada an active NATO ally, the RCN needed a new numbering system that would clearly distinguish Canadian naval vessels from their American and British allies. The new Canadian numbering system was intended to prevent confusion between the American hull numbering system and the British pennant numbering system. Under this system, G63 was converted to DDE215.
From December 1949 to March 1952, Haida was taken out of service for a major refit and conversion to a destroyer escort. All the Canadian Tribal Destroyers went through this conversion. In March 1952, Haida was recommissioned with the pennant number of DDE 215. It should be understood that the change from G63 to 215 did not occur as part of the major refit but earlier, on January 10, 1949 to be exact.
After the refit, the configuration of the ship had changed considerably. Most of her weapon systems were modernized and she sported a new radar system. The aft section of the superstructure was altered so extensively, that some said she was barely recognizable.
33

Haida's current appearance reflects this mid-life conversion. and she displayed 215 until paid off in 1963. From 1965 to 2002, when Haida was on display in Toronto, she sported pennant G63. This was at the RCN's request since they were still using the two hundred numbering series for their active ships and the use of G63 was to prevent confusion.
G63 represents HMCS Haida's most famous period of service, the Second World War, and there is a strong emotional attachment to it by some WWII veterans and their families. This number is also associated with Captain Harry DeWolf, the Murmansk Run convoys, the loss of HMCS Athabaskan and the D-Day Landings. Now that Parks Canada owns the ship, the preference is to have paint scheme and pennant number match her 1952 configuration. This is a more consistent arrangement and more historically accurate. Therefore, the RCN formally gave Parks Canada permission to use 215.
The Unlucky Lady, HMCS Athabaskan G07
The first two Canadian Tribals were laid down as Iroquois and Athabaskan. Due to bombing, the launch of Iroquois was delayed so Athabaskan was renamed Iroquois and launched first while the damaged Iroquois was renamed Athabaskan and would be repaired before being launched. Iroquois was launched in September 1941, and Athabaskan in November. Athabaskan's poor luck continued throughout her regrettably short life. About two months after her commissioning in February 1943, when she was on patrol in the Iceland-Faeroes Passage, Athabaskan sustained extensive hull damage that took 5 weeks to repair. In June 1943, she collided with another vessel in Scapa Flow - resulting in another month of repairs. Near the end of that August, she was hit by a glider bomb off the Spanish coast but managed to limp to safety. Not until November 10 was she able to venture back out to sea. On April 29, 1944, three days after assisting in the destruction of a German torpedo boat, a torpedo struck Athabaskan. At 4: 17 a.m., she signalled to Haida that she was hit, suffered an explosion and ten minutes later sank 240 feet to her watery grave with 128 of her men. Haida was 5 miles away but saw the explosion that dealt Athabaskan her death blow. Haida returned and managed to rescue 48 men before the coming dawn forced her to leave. The Germans arrived later and took 85 Athabaskans as POW's.
One of the worst omens in sailor folklore is changing a ship's name.
Harry DeWolf Rides a Torpedo
Before serving as Commander on HMCS Haida, Harry DeWolf was the commanding officer of HMCS St. Laurent and did convoy duty out of Halifax until 1940, At this point, DeWolf and St. Laurent were ordered to England to assist with the evacuation of British and French troops from France following the
34
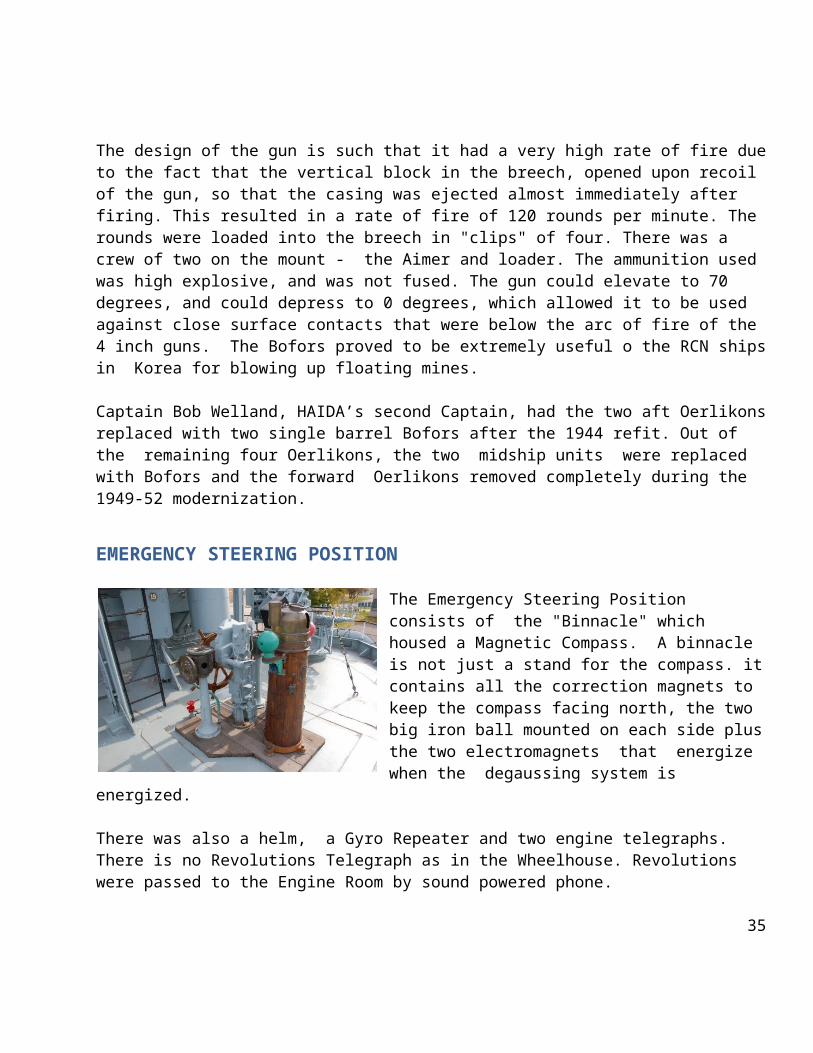
"Miracle of Dunkirk", Under DeWolf, St. Laurent became the first Canadian ship to exchange shots with the enemy when she engaged a field battery unit of General Rommel on the coast of France.
On one Sunday afternoon in July 1940, St. Laurent was sailing with HMCS Skeena in protected waters. The torpedomen on watch were cleaning, polishing and painting the torpedo tubes. To prevent accidental firings there were simple, hand-operated safety latches. Torpedoes on St. Laurent were 24 feet long (7.3 metres), weighed 1.5 tons, travelled at 45 knots (83 km/h) and had 600 pounds of TNT that could crush a ship's hull like a pop can. It was one of these deadly torpedoes that was accidentally fired by one of the torpedomen when he lifted the safety latch to paint underneath and accidentally pulled the firing lever.
The torpedo tubes were pointing toward the stern and so the torpedo was fired aft. On its path towards crashing into the aft superstructure it tore away some ammunition boxes and ripped off the starboard ladder. The torpedo had not yet become armed but could at any moment and this would spell the end of St. Laurent. DeWolf, arriving from the bridge, and the torpedo gunner's mate managed to brace the torpedo against the guardrails and keep it there while it was still scrabbling for grip to make its next charge. When the torpedo momentarily rolled away from the guardrail, DeWolf straddled the torpedo and grabbed hold of the guardrail. At this point, if the torpedo got away on DeWolf, the churning propeller would make mincemeat of him and free the torpedo to blow up the destroyer. The gunner's mate had since run off to find a key to turn off the compressed air that was driving the propellers.
This accomplished, the torpedo was lashed against the guardrails and another problem arose. The warhead had been damaged and was not safe to move around with a quarter ton of sensitive explosives on a hair trigger. So how was this situation handled later on? Once back in harbour, the torpedo was safely lifted off the ship and onto the jetty. Eventually, this warhead was secured to a land mine and blown up.
Haida Joins the Train Busters Club
In July 1952, sailors aboard USN Orleck were inspired to establish the Train Buster's Club (TBC) after demolishing two trains travelling along the east coast of Korea. The reason for the formation of the TBC was to boost morale and relieve the intense boredom between long watches. The TBC had few rules but they were strictly enforced. Membership was granted only upon a confirmed kill of a locomotive. Any additional kills were tallied, whether the locomotive was destroyed or not.
It was particularly difficult for Canadian ships to gain membership since they operated primarily on the west coast while the trains operated in the mountainous terrain of the east coast. Assignments for Canadian ships in this area were rare. Interestingly, HMCS Crusader- a Canadian ship - was the undisputed champion of the TBC with four confirmed trains - three of which came in a 24-hour period. As well, of the 28 kills officially tallied by the TBC, the RCN had eight (accomplished by Crusader, Haida, and Athabaskan). This gave the RCN the proportional record - a significant feat.
35

Just imagine the feelings of those serving aboard Haida as they arrived in Korea. They were well aware of her impressive history and knew it was nearly imperative for them to join the TBC to continue her legacy. Twice an opportunity arose but the first time the engine escaped and the second time the range was too great. Finally, five months after missing their first opportunity, Haida lay in wait once again. In the middle of the night, they spotted a speeding train. The guns were aligned and the shells exploded dead centre - causing the engine to topple and a massive wreck to pile up behind it. Haida had 'made' the TBC.
Three days later Haida was back at it. During the night a train was spotted and all guns opened fire, bringing the train to a standstill. Starshell* revealed that the engine was merely yards away from the safety of a tunnel. The trainmen were able to quickly unhook the engine and get it to safety but the rest of the train was destroyed. Officially, Haida was credited with 2.5 trains.
• Starshell - a shell fired from a ship's guns that released a flare and small parachute, illuminating the targeted area.
The Restoration of Haida at Port Weller Dry Dock
The "Commemorative Integrity Statement" for HMCS Haida states that in addition to being representative of Canada and Canadians at home and on the world stage, she also is of “ national historic and architectural significance because of her role in naval combat and because she is the last of the Tribal Class Destroyers". As heritage interpreters, we must also communicate to our guests the process involved in ensuring the historical and architectural significance of Haida is preserved.
Specifically, we will focus on the restoration work completed at Port Weller from December 2002 to August 2003. Those working with Haida had to keep in mind that Haida was a National Historic Site and therefore Parks Canada's Cultural Resource Management (CRM) Policy applied. This meant that special consideration had to be given when repairing and restoring things (not only logistical and operational consideration.
The highest priority was to repair and preserve the hull since the very life of the ship was being threatened by corrosion. Not only did this agree with CRM Policy but coincided well with the amount of money budgeted for the restoration. The money spent on this project could have easily doubled had CRM staff addressed preservation and restoration issues aside from the hull, like on the deck and superstructure. These could always be addressed at a later time when the ship was out of dry-dock. As some may know, dry-dock time is very expensive.
One proposal was to cover the entire hull with a second skin - right over the existing plates. This is known as 'cladding' and was the simplest, fastest and cheapest option. This would involve strapping the original hull and then welding the cladding overtop, leaving a small airspace in between the two hulls. However, this proposal was not followed for a number of reasons:
36

1. Cladding would cause the 'lines' and 'look' of the ship to be lost.
2. This procedure was experimental and Haida was too valuable to be conducting experiments on. For instance. the ship would float lower in the water due to the extra steel; and by hanging a second hull over the original, there was the possibility of causing additional and damaging stress to the frame. 3. Marine experts warned that the resulting space between the two hulls would provide an ideal environment for the corrosion to continue its assault unseen and untreated.
4. Cladding would make Haida look 'new' and cover up all the little bangs and dents on the hull that hold the stories and character of the ship. CRM staff decided a 'new' look was not desirable and did not want to fool the public into thinking it was a new hull. As much as possible, the original fabric of the ship was to be preserved.
For instance, if one were to look straight on at the bow of the ship, you will notice a 2-foot long 'bend' in the bow that is rumoured to be the result of an incident as the ship was preparing to dock in Halifax after returning home from WWII. As an interpreter, it may be nice to let our visitors know this, even though they will not be able to physically see this prang due to the chain link fencing.
It was decided that in order to maintain the historical and architectural integrity of the ship, repair of the original hull plates would be a priority over replacement. The retention of the original plates was the highest priority. If that was not possible, then replacement with a like material was considered the next best option.
Before any work was done, each of the 241 hull plates at or below the water line was individually examined and labelled. In some areas, the corrosion was so bad that you could puncture it with a light blow of a hammer. In areas where the plates had to be removed, new plates were welded from the inside and outside to ensure a proper bond was attained. Where this was not possible a "doubler" (or new plate) was put in place over the old one. On a point of interest, as the ship was preparing to leave Ontario Place, one salvage team member accidentally thrust his paint scraper directly through the hull. The scraper was left in and the hole patched with rags and pitch. When the ship was in dry dock, it was possible to see the scraper protruding from the bottom of the hull.
Putting the plates back on was another issue. Ships are no longer riveted or constructed on a 'backbone' with numerous 'ribs' attached but are welded and constructed along the length, not width, of the ship. Riveting was preferred since it was the original method of construction but welding was eventually settled on for a few reasons:
1. The whole riveting process is very time consuming and expensive - the cost would have nearly doubled.
37

2. Riveting is a dying craft and riveters are hard to come by. In fact, there is only one shipyard in the Great Lakes system that still has riveters.
3. Time constraints would severely inhibit the progress of the restoration.
As well, welded and riveted plates side by side tell an interesting story of the changing methods of shipbuilding. Welding also served the time and cost constraints since money could be saved for more restoration work elsewhere on the ship. As a point of interest for our guests, every one of the rivets on Haida was put in by hand with two workers - one operating the rivet gun while another held a retainer in place on the other side.
Most of this restoration work has been done below the waterline so unfortunately nobody will see much of the work done in Port Weller. However, it is possible to point out to the public the weld beads visible on the port side, as they are either boarding or debarking the ship. In all, about 50, 000 work-hours and $4.2 million were spent preserving and restoring the historical and architectural integrity of the ship.
BIBLIOGRAPHY
Admiralty Manual of Navigation, Volume One, 1954, Her Majesty's Stationery Office, London, 1954.
Gough, Barry. HMCS Haida: Battle Ensign Flying. Vanwell Publishing, St. Catharines, 2000.
Hodge, Peter, Tribal Class Destroyers of the Royal Navy and Commonwealth Navies, Martin Press Ltd., London, 1971
McBirnie, S.C. Marine Steam Engines and Turbines, Fourth Edition, Butterworths, London, 1 980.
Nesdale, Iris, Action Station: Tribal Destroyers of the Royal Australian Navy, Gillingham Printers Ltd., Adelaide, 1989
Noel, John editor, Knights Modern Seamanship 18th Edition, Von Nostran and Rheinhold, New York, 1989.
Saarlas, Maido Steam and Gas Turbines For Marine Propulsion, Second Edition, United States Naval Institute Press, Annapolis Maryland, 1987.
3-lnch Mounts Mark 27 Mod 3, and Mark 33 Mods, 0, 2, 4, 6, 7, and 8. Description, Operation and Maintenance. Published by Chief of Bureau of Weapons, 15 September 1960.
Macintyre, Donald, Bathe, Basil, Man of War A History of The Combat Vessel, McGraw Hill, Toronto 1971.
38

Tryckare, Tre The Lore of Ships, Crescent Books, New York, 1975.
Maloney, Elbert S. Chapman Piloting Seamanship and Small Boat Handling. 57 Edition, Hearst Marine Books, New York, 1985
Lynch, Thomas G. Canada's Flowers. History of the Corvettes of Canada 193991945,Nimbus Publishing Ltd. Halifax, 1985.
Admiralty Manual of Seamanship Volume Two, 1951, H.M.S.O. London 1952.
Fitzsimons, Bernard General Editor, The Illustrated Encyclopedia of 20th Century Weapons and Warfare, various volumes, Columbia House, New York, 1980.
B.R. 224/45 The Gunnery Pocketbook. 1945
Gunnery Manual Vol 2, Part 28 Gun Construction and Testing 1954, Naval Ordnance Department, Admiralty
39