introduction to plc programming
TRANSCRIPT
www.globalautomation.info
GLOBAL AUTOMATION

Here’s a valuable PLC reference that you can use right now. This particularreference is taken from our award-winning textbook—ProgrammableControllers: Theory and Implementation, 2nd Edition.
In it, you’ll get an overview of how relay logic can be converted intoPLC logic. There’s also lots of examples, tables, and ladder diagrams tohelp explain the topics.
Best yet, we’ve included the corresponding chapter from the companionworkbook. Here you can look over the key points as well as see howmuch you learned by answering the review questions. And, yes, theanswers are also included.
This PLC reference is just a sample of what the textbook and workbookhave to offer. If you like it, we’ve included the product literature pagewith the order number.
A Special Note ToOur Customers

Introduction to Programmable Controllers
Number Systems and Codes
Logic Concepts
Processors, the Power Supply, and Programming Devices
The Memory System and I/O Interaction
The Discrete Input/Output System
The Analog Input/Output System
Special Function I/O and Serial Communication Interfacing
Programming Languages
The IEC-1131 Standard and Programming Language
System Programming and Implementation
PLC System Documentation
Data Measurements and Transducers
Process Responses and Transfer Functions
Process Controllers and Loop Tuning
Artificial Intelligence and PLC Systems
Fuzzy Logic
Local Area Networks
I/O Bus Networks
PLC Start-Up and Maintenance
System Selection Guidelines
1:
2:
3:
4:
5:
6:
7:
8:
9:
10:
11:
12:
13:
14:
15:
16:
17:
18:
19:
20:
21:
21 Chapters of PLC Know-HowTABLE OF CONTENTS
✔ Follow our 11 major steps in selecting a PLC for an application and avoid using the wrong controller
✔ Install sinking and sourcing inputs and outputs properly—one wrong wire and it won’t work
✔ Implement safety circuits correctly in PLC applications to protect people and equipment
✔ Prevent noise, heat, and voltage variations from ruining your PLC system
✔ Implement a step-by-step static and dynamic start-up checkout to guarantee smooth PLC system operation
✔ Design preventive safety and maintenance into your total control system
SELECTION, INSTALLATION & SAFETY
TROUBLESHOOTING & MAINTENANCE✔ Learn no-nonsense troubleshooting procedures to reduce
downtime✔ Troubleshoot analog I/O and avoid undesirable count jumps✔ Learn 6 preventive maintenance procedures to keep your PLC
system running fault free✔ Learn a step-by-step procedure for finding hidden ground loops ✔ Learn how to deal with leaky inputs ✔ Identify vibration problems and use them for preventive
engineering control✔ Control excessive line voltage and avoid intermittent shutdowns
PROGRAMMING✔ Learn the number systems and codes used in PLC addressing✔ Eliminate the confusion of ladder logic programming✔ Master all types of timers and counters used in real-life
applications✔ Avoid ladder scan evaluation problems✔ Implement a safe circuit with hardware and software interlocking
Catalog# ABT-ITV206BOOK $88
The biggest book on PLCs. Written by industry experts, this book covers important, up-to-date, real-world programmable controller topics and applications. This new edition is completely revised and updated to give you the latest developments and insights from the field. At 5 pounds and 1,035 pages, it puts all the PLC information you need at your fingertips. And, since this is a generic PLC reference, it will help you with all of the different makes and models of PLCs in your facility.
But, this book is about more than just PLCs—it also thoroughly explains process control, instrumentation, and plant networks. Whether you’re already an expert on PLCs or just starting out, our problem-solving approach is guaranteed to help you succeed.
• Valuable Maintenance Tips •
PLC Reference Book
You covered a huge amount of detail very well. It was very easy to understand.
—Jeff Camp, United Control Corp.

Sample pages from the workbook
Imagine having the answers to over 800 PLC problems at your fingertips. That’s what you get with Programmable Controllers: Workbook and Study Guide. At 334 pages, it’s the perfect companion to Programmable Controllers: Theory and Implementation, 2nd Edition.
This workbook provides not only valuable summaries of each of the text-book’s twenty-one chapters, but also over 800 review questions. And each of the review questions includes a detailed answer and explanation. Use it on the job to brush up on the essentials and to solve any PLC problem.
Whether you’re an expert or just learning about PLCs, you’ll find plenty to put your skills to the test.
Catalog #ABT-ITV206WKBK $28
Programmable Controllers: Workbook/Study Guide
You Will Learn:
• Proper address assignment and interfacing
• Basic PLC ladder program implementation
• Data measurement
• Internal coil assignments
• Proper digital and analog interfacing procedures
• Advanced function block programming
• Network protocols
• Analog input and output data handling
• Correct PLC installation
A sample problem from Chapter 11 of the workbook:
System Programming and Implementation
Circle the locations where timer traps will be used in the PLCimplementation of this reduced-voltage start motor circuit.
StopStart
OLL1 L2
TR1
TR1
S1
S1
TR1
TR1
TR1
S2
S2
S1 M1
M1
1
2
3
4
5
6
StopStart
OLL1 L2
TR1
TR1
S1
S1
TR1
TR1
TR1
S2
S2
S1 M1
M1
1
2
3
4
5
6
Q.Q.Q.
A.A.A.
Sometimes you think you know it all, but after reading the questions, I often times had to refer back to the theory book.
—Ernest Presto, Electrical Engineer, Polyclad Laminates, Inc.
Perfect textbook companion:
• 800 answers to common PLC problems at your fingertips
• Makes a great review tool
• Practice PLC addressing and programming
• Great on-the-job quick-reference guide
• Separate answer section makes quizzing easy
• Valuable chapter summaries
Sample Problem

Introduction to PLCProgramming andImplementation—from relay logic toPLC logic
Key TermsControl strategy—thesequence of steps that mustoccur during a process orPLC program to produce thedesired output control.
Control task—the desiredresults of a control program.
Flowcharting—a method ofpictorially representing theoperation of a process in asequential manner.
Program coding—theprocess of translating a logicor relay diagram into PLCladder program form.
He that invents a machine augmentsthe power of man and the well-beingof mankind.
—Henry Ward Beecher
2
Introduction to PLC Programming and Implementation—from relay logic to PLC logic
Due to the nature of this publication and because of the different applications ofprogrammable controllers, the readers or users and those responsible for applying theinformation herein contained must satisfy themselves to the acceptability of eachapplication and the use of equipment therein mentioned. In no event shall the publisherand others involved in this publication be liable for direct, indirect, or consequentialdamages resulting from the use of any technique or equipment herein mentioned.
The illustrations, charts, and examples in this book are intended solely to illustrate themethods used in each application example. The publisher and others involved in thispublication cannot assume responsibility or liability for actual use based on theillustrative uses and applications.
No patent liability is assumed with respect to use of information, circuits, illustrations,equipment, or software described in this text.

3
Introduction to PLC Programming and Implementation—from relay logic to PLC logic
Contents1 CONTROL TASK DEFINITION ..............................................................42 CONTROL STRATEGY .......................................................................43 IMPLEMENTATION GUIDELINES ............................................................54 PROGRAM ORGANIZATION AND IMPLEMENTATION....................................6
CREATING FLOWCHARTS AND OUTPUT SEQUENCES ................................7CONFIGURING THE PLC SYSTEM .....................................................10REAL AND INTERNAL I/O ASSIGNMENT ..............................................10REGISTER ADDRESS ASSIGNMENT ....................................................15ELEMENTS TO LEAVE HARDWIRED ....................................................15SPECIAL INPUT DEVICE PROGRAMMING .............................................17PROGRAM CODING/TRANSLATION.....................................................24
5 DISCRETE I/O CONTROL PROGRAMMING ...........................................25CONTROL PROGRAMMING AND PLC DESCRIPTIONS.............................26SIMPLE RELAY REPLACEMENT..........................................................27SIMPLE START/STOP MOTOR CIRCUIT ...............................................29FORWARD/REVERSE MOTOR INTERLOCKING ........................................33REDUCED-VOLTAGE-START MOTOR CONTROL.....................................37AC MOTOR DRIVE INTERFACE ........................................................40CONTINUOUS BOTTLE-FILLING CONTROL ...........................................44LARGE RELAY SYSTEM MODERNIZATION ............................................47
STUDY GUIDE ..................................................................................54REVIEW QUESTIONS ..........................................................................55ANSWERS........................................................................................64
www.globalautomation.info

4
Introduction to PLC Programming and Implementation—from relay logic to PLC logic
The implementation of a control program requires complex organizationaland analytical skills, which change depending on the application. Becausethey are so varied, we cannot explain how to solve every specific control task.Nevertheless, we can provide you with techniques and guidelines for com-pleting this problem-solving process. In this handbook, we will introduce astrategy for implementing a control program, which includes program orga-nization, system configuration, and I/O programming. These strategies alsoapply to PLCs with the IEC 1131-3 programming standard. Additionally, wewill present both simple and complex PLC programming examples. After youfinish, you will be ready to learn how to document the PLC system—the laststep in implementing the control program.
2 CONTROL STRATEGY
After the control task has been defined, the planning of its solution can begin.This procedure commonly involves determining a control strategy, thesequence of steps that must occur within the program to produce the desiredoutput control. This part of the program development is known as thedevelopment of an algorithm. The term algorithm may be new or strange tosome readers, but it need not be. Each of us follows algorithms to accomplish
HIGHLIGHTS
1 CONTROL TASK DEFINITION
A user should begin the problem-solving process by defining the controltask, that is, determining what needs to be done. This information providesthe foundation for the control program. To help minimize errors, the controltask should be defined by those who are familiar with the operation of themachine or process. Proper definition of the task is directly related to thesuccess of the control program.
Control task definition occurs at many levels. All of the departmentsinvolved must work together to determine what inputs are required, so thateveryone understands the purpose and scope of the project. For example, ifa project involves the automation of a manufacturing plant in whichmaterials will be retrieved from the warehouse and sent to the automaticpackaging area, personnel from both the warehouse and packaging areasmust collaborate with the engineering group during the system definition.Management should also be involved if the project requires data reporting.
If the control task is currently done manually or through relay logic, theuser should review the steps of the manual procedure to determine whatimprovements, if any, can be made. Although relay logic can be directlyimplemented in a PLC, the procedure should be redesigned, when possible,to meet current project needs and to capitalize on the capabilities of program-mable controllers.

5
Introduction to PLC Programming and Implementation—from relay logic to PLC logic
certain tasks in our daily lives. The procedure that a person follows to gofrom home to either school or work is an algorithm—the person exits thehouse, gets into the car, starts the engine, and so on. In the last of a finitenumber of steps, he or she reaches the destination.
The PLC strategy implementation for a control task closely follows thedevelopment of an algorithm. The user must implement the control from agiven set of basic instructions and produce the solution in a finite number ofsteps. If developing an algorithm to solve the problem becomes difficult, heor she may need to return to the control task definition to redefine theproblem. For example, we cannot explain how to get from where we are toBullfrog County, Nevada unless we know both where we are and whereBullfrog County is. As part of the problem definition, we need to know if aparticular method of transportation is required. If there is a time constraint, weneed to know that too. We cannot develop a control strategy until we have allof this problem definition information.
The fundamental rule for defining the program strategy is think first,program later. Consider alternative approaches to solving the problem andallow time to polish the solution algorithm before trying to program thecontrol function. Adopting this philosophy will shorten programming time,reduce debugging time, accelerate start-up, and focus attention where it isneeded—on design when designing and on programming when programming.
Strategy formulation challenges the system designer, regardless of whetherit is a new application or the modernization of an existing process. In eithercase, the designer must review the sequence of events and optimize controlthrough the addition or deletion of steps. This requires a knowledge of thePLC-controlled field devices, as well as input and output considerations.
3 IMPLEMENTATION GUIDELINES
A programmable controller is a powerful machine, but it can only do what itis told to do. It receives all of its directions from the control program, the setof instructions or solution algorithms created by the programmer. Therefore,the success of a PLC control program depends on how organized the user is.There are many ways to approach a problem; but if the application isapproached in a systematic manner, the probability of mistakes is less.
The techniques used to implement the control program vary according to theprogrammer. Nevertheless, the programmer should follow certain guide-lines. Table1 lists programming guidelines for new applications and modern-izations. New applications are new systems, while modernizations are up-graded existing control systems that have functioned previously without aPLC (i.e., through electromechanical control or individual, analog, loopcontrollers).

6Industrial Text & Video Company www.industrialtext.com 1-800-752-8398
Introduction to PLC Programming and Implementation—from relay logic to PLC logic
As mentioned previously, understanding the process or machine operationis the first step in a systematic approach to solving the control problem. Fornew applications, the strategy should follow the problem definition. Review-ing strategies for new applications, as well as revising the actual method ofcontrol for a modernization project, will help detect errors that were intro-duced during the planning stages.
The programming stage reveals the difference between new and moderniza-tion projects. In a modernization project, the user already understands theoperation of the machine or process, along with the control task. An existingrelay ladder diagram, like the one shown in Figure1, usually defines thesequence of events in the control program. This ladder diagram can be almostdirectly translated into PLC ladder diagrams.
New applications usually begin with specifications given to the person whowill design and install the control system. The designer translates thesespecifications into a written description that explains the possible controlstrategies. The written explanation should be simple to avoid confusion. Thedesigner then uses this explanation to develop the control program.
Table 1. Programming guidelines.
4 PROGRAM ORGANIZATION AND IMPLEMENTATION
Organization is a key word when programming and implementing a controlsolution. The larger the project, the more organization is needed, especiallywhen a group of people is involved.
In addition to organization, a successful control solution also depends on theability to implement it. The programmer must understand the PLC controltask and controlled devices, choose the correct equipment for the job
snoitacilppAweN snoitazinredoM
•
•
•
•
•
•
fonoitcnufderisedehtdnatsrednU.metsyseht
sdohtemlortnocelbissopweiveR.noitarepossecorpehtezimitpodna
.noitarepossecorpehttrahcwolF
gnisuybtrahcwolfehttnemelpmIcigolyalerrosmargaidcigol
.ygolobmys
dnasesserddaO/IlaerngissAdnastupniotsesserddalanretni
.stuptuo
noitatnemelpmicigolehtetalsnarT.gnidocCLPotni
•
•
•
•
rossecorplautcaehtdnatsrednU.noitcnufenihcam
noitarepofocigolenihcamweiveR.elbissopnehwezimitpodna
sesserddalanretnidnaO/IlaerngissA.stuptuodnastupniot
otnimargaidreddalyaleretalsnarT.gnidocCLP

7
Introduction to PLC Programming and Implementation—from relay logic to PLC logic
(hardware and software), and understand the PLC system. Once thesepreliminary details are understood, the programmer can begin sketching thecontrol program solution. The work performed during this time forms animportant part of the system or project documentation. Documenting a systemonce it is installed and working is difficult, especially if you do notremember how you got it to work in the first place. Therefore, documentingthe system throughout its development will pay off in the end.
CREATING FLOWCHARTS AND OUTPUT SEQUENCES
Flowcharting is a technique often used when planning a program after awritten description has been developed. A flowchart is a pictorial represen-tation that records, analyzes, and communicates information, as well asdescribes the operational process in a sequential manner. Figure 2 illustratesa simple flowchart. Each step in the chart performs an operation, whether itis an input/output, decision, or data process.
In a flowchart, broad concepts and minor details, along with their relationshipto each other, are readily apparent. Sequences and relationships that are hardto extract from general descriptions also become obvious when expressed
Figure 1. Electromechanical relay circuit diagram.
L1 L2
CR1LS7PB14
CR1
CR2
CR3
PL3
PL4
SOL3 UPCR1SOL
PS7
CR3
SOL4 FWDLS9LS8
LS8
CR2PS7
SOL5 DWNReset CR2Start
8
Introduction to PLC Programming and Implementation—from relay logic to PLC logic
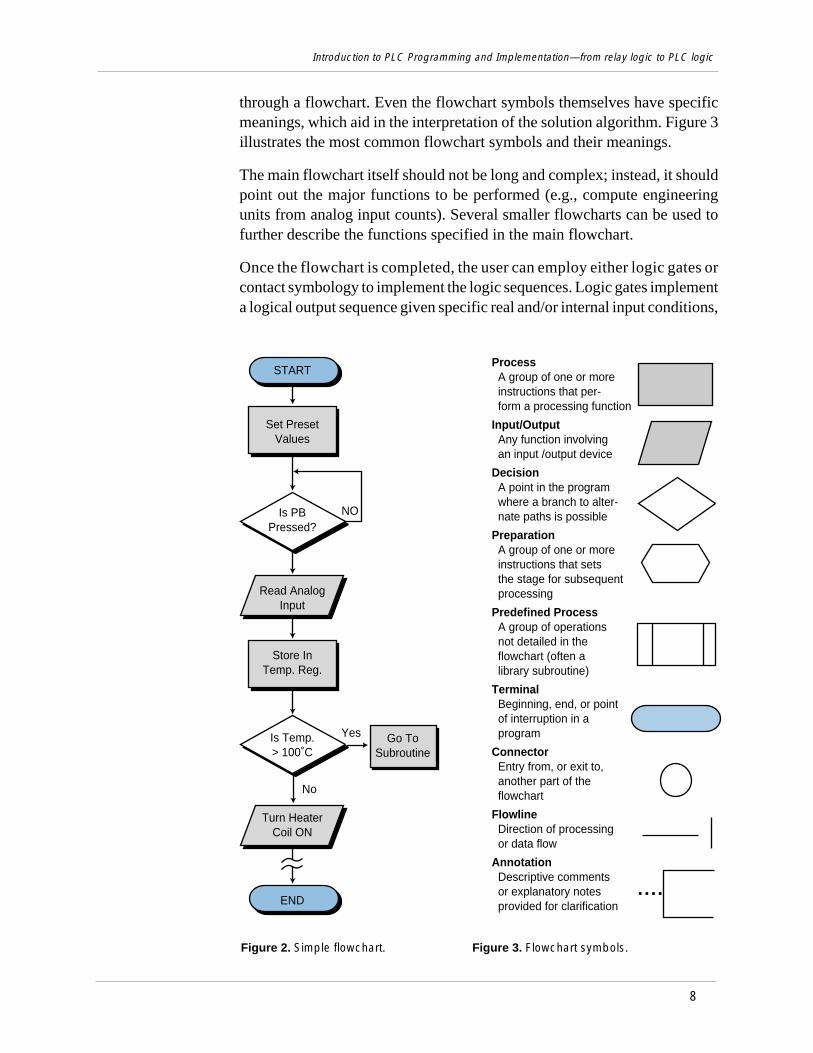
through a flowchart. Even the flowchart symbols themselves have specificmeanings, which aid in the interpretation of the solution algorithm. Figure 3illustrates the most common flowchart symbols and their meanings.
The main flowchart itself should not be long and complex; instead, it shouldpoint out the major functions to be performed (e.g., compute engineeringunits from analog input counts). Several smaller flowcharts can be used tofurther describe the functions specified in the main flowchart.
Once the flowchart is completed, the user can employ either logic gates orcontact symbology to implement the logic sequences. Logic gates implementa logical output sequence given specific real and/or internal input conditions,
Figure 2. Simple flowchart. Figure 3. Flowchart symbols.
Process A group of one or more instructions that per- form a processing function
Input/Output Any function involving an input /output device
Decision A point in the program where a branch to alter- nate paths is possible
Preparation A group of one or more instructions that sets the stage for subsequent processing
Predefined Process A group of operations not detailed in the flowchart (often a library subroutine)
Terminal Beginning, end, or point of interruption in a program
Connector Entry from, or exit to, another part of the flowchart
Flowline Direction of processing or data flow
Annotation Descriptive comments or explanatory notes provided for clarification
START
Set PresetValues
Is PBPressed?
Read AnalogInput
Store InTemp. Reg.
Is Temp.> 100˚C
Turn HeaterCoil ON
END
Go ToSubroutine
Yes
NO
No

9
Introduction to PLC Programming and Implementation—from relay logic to PLC logic
Figure 4. (a) PLC contact symbology and (b) logic gate representation of a logicsequence.
Figure 5. A combination of logic gates and contact symbology.
while PLC contact symbology directly implements the logic necessary toprogram an output rung. Figure 4 illustrates both of these programmingmethods. Users should employ whichever method they feel most comfortablewith or, perhaps, a combination of both (see Figure 5). Logic gate diagrams,however, may be more appropriate in controllers that use Boolean instructionsets.
Inputs and outputs marked with an X on a logic gate diagram, as in Figure 4b,represent real I/O in the system. If no mark is present, an I/O point is aninternal. The labels used for actual input signals can be either the actualdevice names (e.g., LS1, PB10, AUTO, etc.) or symbolic letters and numbersthat are associated with each of the field elements. During this stage, the usershould prepare a short description of the logic sequence.
(a)
(b)
Reset B(Reset SOL2)
Counter 2330 gallons of B
B Finished(Start of pump
back B)
M
Counter 2330 gallons of B
Reset B(Reset SOL2)
B Finished(Start of pump back B)
B Finished
Count A GallonMeter
SOL1
Clear C1
A Finished
Up
Reset
C1
PV = 500 Gal.
500 Gal. of A

10
Introduction to PLC Programming and Implementation—from relay logic to PLC logic
CONFIGURING THE PLC SYSTEM
Table 2. I/O address assignment table for real inputs and outputs.
sserddAO/IeludoM
epyT kcaR puorG lanimreT noitpircseD
tupnI 0 0 0 noitisoP—1SL0 0 1 tceteD—2SL0 0 2 1tceleS—hctiwSleS0 0 3 tratS—1BP
tuptuO 0 0 4 1LOS0 0 5 1LP0 0 6 2LP0 0 7 1MrotoM
tuptuO 0 1 0 2LOS0 1 1 3LP
PLC configuration should be considered during flowcharting and logicsequencing. The PLC’s configuration defines which I/O modules will beused with which types of I/O signals, as well as where the modules will belocated in the local or remote rack enclosures. The modules’ locationsdetermine the I/O addresses that will be used in the control program.
During system configuration, the user should consider the following:possible future expansions; special I/O modules, such as fast-response orwire fault inputs; and the placement of interfaces within a rack (all AC I/Otogether, all DC and low-level analog I/O together, etc.). Consideration ofthese details, along with system configuration documentation, will resultin a better system design.
REAL AND INTERNAL I/O ASSIGNMENT
The assignment of inputs and outputs is one of the most important proceduresthat occurs during the programming organization and implementationstages. The I/O assignment table documents and organizes what has beendone thus far. It indicates which PLC inputs are connected to which inputdevices and which PLC outputs drive which output devices. The assignmentof internals, including timers, counters, and MCRs, also takes place here.These assignments are the actual contact and coil representations that areused in the ladder diagram program. In applications where electromechanicalrelay diagrams are available (e.g., modernization of a machine or process),identification of real I/O can be done by circling the devices and thenassigning them I/O addresses (see Example 1).
Table 2 shows an I/O address assignment table for real inputs and outputs,while Table 3 shows an I/O address assignment table for internals. Theseassignments can be extracted from the logic gate diagrams or ladder symbols

11
Introduction to PLC Programming and Implementation—from relay logic to PLC logic
EXAMPLE 1
For the circuit shown in Figure 7, (a) identify the real inputs and outputsby circling each, (b) assign the I/O addresses, (c) assign the internaladdresses (if required), and (d) draw the I/O connection diagram.
Table 3. I/O address assignment table for internal outputs.
Figure 6. Partial connection diagram for the I/O address assignment in Table 2.
that were used to describe the logic sequences. They can also come from thecircled elements on an electromechanical diagram. The numbers used forthe I/O addresses depend on the PLC model used. These addresses can berepresented in octal, decimal, or hexadecimal. The description section of thetable specifies the field devices that correspond to each address.
The table of address assignments should closely follow the input/outputconnection diagram (see Figure 6). Although industry standards for I/Orepresentations vary among users, inputs and outputs are typically repre-sented by squares and diamonds, respectively. The I/O connection diagramforms part of the documentation package.
eciveD lanretnI noitpircseD
7RC 0101 tnemecalper7RC01RDT 002T ces21remityaled-NO
01RC 1101 tnemecalper01RC41RC 2101 tnemecalper41RC
— 3101 kcolretniputeS
L1 L1 L2L2
LS2
LS1000 004
001 005
Inputs Outputs
ProgramCoding
R
PL1
SOL1
During the I/O assignment, the user should group associated inputs andoutputs. This grouping will allow the monitoring and manipulation of agroup of I/O simultaneously. For instance, if 16 motors will be startedsequentially, they should be grouped together, so that monitoring the I/Oregisters associated with the 16 grouped I/O points will reveal the motors’starting sequence. Due to the modularity of an I/O system, all the inputs andall the outputs should be assigned at the same time. This practice will preventthe assignment of an input address to an output module and vice versa.

12
Introduction to PLC Programming and Implementation—from relay logic to PLC logic
Assume that the PLC used has a modularity of 8 points per module.Each rack has 8 module slots, and the master rack is number 0. Inputsand outputs can have any address as long as the correct module isused. The PLC determines whether an input or output module isconnected in a slot. The number system is octal, and internals start ataddress 10008.
Figure 7. Electromechanical relay circuit.
SOLUTION
(a) Figure 8 shows the circled real input and output connections. Notethat temperature switch TS3 is circled twice even though it is only onedevice. In the address assignment, only one of them is referenced, andonly one of them is wired to an input module.
(b) Table 4 illustrates the assignment of inputs and outputs. It assignsall inputs and all outputs, leaving spare I/O locations for future use.
L1 L2
CR1
StartPB1 Stop
PB2
CR1
PL1
CR1 CR2TempTS3
CR1TempTS3
PL2
CR3
PL3
CR2
CR3CR2
SOL2Open
SOL1Open
LevelFS4
LevelFS5
H3Heating
or
H
Ready
www.globalautomation.info

13
Introduction to PLC Programming and Implementation—from relay logic to PLC logic
Figure 8. Identification of real I/O (circled).
Table 4. I/O address assignment.
sserddAO/IeludoM
epyT kcaR puorG lanimreT noitpircseD
tupnI 0 0 0 1BPtratS0 0 1 2BPpotS0 0 2 3STpmeT0 0 3 4SFleveL0 0 4 5SFleveL0 0 5 —0 0 6 —0 0 7 —
erapS 0 1 0 desutoN• • •• • •• • •
0 1 7
tuptuO 0 2 0 ydaeR1LP0 2 1 nepO1LOS0 2 2 2LP0 2 3 nepO2LOS0 2 4 3LP0 2 5 gnitaeH3H0 2 6 —0 2 7 —
L1 L2
CR1
StartPB1 Stop
PB2
CR1
PL1
CR1 CR2TempTS3
CR1TempTS3
PL2
CR2
PL3
CR2
CR3CR2
SOL2Open
SOL1Open
LevelFS4
LevelFS5
H3Heating
or
H
Ready
www.globalautomation.info

14
Introduction to PLC Programming and Implementation—from relay logic to PLC logic
(c) Table 5 presents the output assignments, including a descriptionof each internal. Note that control relay CR2 is not assigned as aninternal since it is the same as the output rung corresponding to PL1.When the control program is implemented, every contact associatedwith CR2 will be replaced by contacts with address 020 (the addressof PL1).
Table 5. Internal output assignment.
Figure 9. I/O connection diagram.
(d) Figure 9 illustrates the I/O connection diagram for the circuit inFigure 7. This diagram is based on the I/O assignment from part (b).Note that only one of the temperature switches, the normally open TS3switch, is a connected input. The logic programming of each switchshould be based on a normally open condition.
eciveD lanretnI noitpircseD
1RC 0001 1RCyalerlortnoC2RC — ydaeR1LPsaemaS3RC — nepO2LOSsaemaS
L1 L1 L2L2
StartPB1
StopPB2
TempTS3
000
001 021
Inputs Outputs
ProgramCoding
002
003 023
004
005
006
007
Input Output
Level FS4
Level FS5
020
022
PL1 Ready
PL2
SOL1 Open
SOL2 Open
PL3
H3 Heating
024
026
027
025
www.globalautomation.info

15
Introduction to PLC Programming and Implementation—from relay logic to PLC logic
REGISTER ADDRESS ASSIGNMENT
The assignment of addresses to the registers used in the control program isanother important aspect of PLC organization. The easiest way to assignregisters is to list all of the available PLC registers. Then, as they are used,describe each register’s contents, description, and function in a registerassignment table. Table 6 shows a register assignment table for the first 15registers in a PLC system, ranging from address 20008 to address 20168.
Table 6. Register assignment table.
ELEMENTS TO LEAVE HARDWIRED
During the assignment of inputs and outputs, the user should decide whichdevices will not be wired to the controller. These elements will remain partof the electromechanical control logic. These elements usually includedevices that are not frequently switched off after start, such as compressorsand hydraulic pumps. Components like emergency stops and master startpush buttons should also remain hardwired, principally for safety purposes.This way, if the controller is faulty and an emergency occurs, the user can shutdown the system without PLC intervention.
Figure 10 provides an example of system components that are typically lefthardwired. Note that the normally open PLC Fault Contact 1 (orwatchdog timer contact) is wired in series with other emergency conditions.This contact stays closed when the controller is operating correctly, butopens when a fault occurs. The system designer can also use this contact if anemergency occurs to disable the PLC system’s operation.
PLC fault contacts are safety contacts that are available to the user whenimplementing or enhancing a safety circuit. When a PLC is operatingcorrectly, the normally open fault contact closes and the normally closed one
retsigeR stnetnoC noitpircseD
0002 tupnigolanA )edisni(3pmettupnierutarepmeT1002 tupnigolanA )edistuo(4pmettupnierutarepmeT2002 erapS –3002 erapS –4002 tupniSWT 1lenapSWTmorftupni)1PS(tniopteS5002 tupniSWT 2lenapSWTmorf)1V(emulovtniopteS6002 0532tnatsnoC )BTces10.0(ces5.32fotnatsnocremiT7002 detalumuccA 0102RretnuocrofeulavdetalumuccA0102 erapS –1102 erapS –2102 0001tnatsnoC )1#eulav(elbatpu-koolfogninnigeB3102 0101tnatsnoC 2#eulavpu-kooL4102 3201tnatsnoC 3#eulavpu-kooL5102 9801tnatsnoC 4#eulavpu-kooL6102 0011tnatsnoC 5#eulavpu-kooL
www.globalautomation.info

16Industrial Text & Video Company www.industrialtext.com 1-800-752-8398
Introduction to PLC Programming and Implementation—from relay logic to PLC logic
Figure 10. Hardwired components in a PLC system.
opens when the PLC is first turned on. As shown in Figure 10, these contactsare connected in series with the hardwired circuit, so that if the PLC failsduring standard operation, the normally open contacts will open. This willshut down the hardwired circuit at the point where the PLC becomes thecontrolling element. This circuit also uses a safety control relay (SCR) tocontrol power to the rest of the control components. The normally closed faultcontacts are used to indicate an alarm condition.
In the diagram shown in Figure 10, an emergency situation (including a PLCmalfunction) will remove power (L1) to the I/O modules. The turning OFF ofthe safety control relay (SCR) will open the SCR contact, stopping the flowof power to the system. Furthermore, the normally closed PLC fault contact(PLC Fault Contact 2) in the hardwired section will alert personnel of a systemfailure due to a PLC malfunction. The designer should implement this type ofalarm in the main PLC rack, as well as in each remote I/O rack location, since
M2Start
Stop
M2 M3
PLC FaultContact 1
PLC FaultContact 2
M3
SCR
PL1
PLC Fail Alarm
PLC
OLs
OLs
OLs
F1
DisconnectSwich
Fuses 1M
M3
OLs
2M
M2
OLs
3M
M1
CoolantPump Motor
HydraulicPump Motor
SpindleMotor
L1 L2
SCR
To I/O System

17
Introduction to PLC Programming and Implementation—from relay logic to PLC logic
remote systems also have fault contacts incorporated into the remote control-lers. This allows subsystem failures to be signaled promptly, so that theproblem can be fixed without endangering personnel.
Figure 11. Electromechanical relay circuit.
SPECIAL INPUT DEVICE PROGRAMMING
Some PLC circuits and input connections require special programming. Oneexample is the programming of normally closed input devices. Rememberthat the programming of a device is closely related to how that device shouldbehave in the control program.
Normally Closed Devices. An input device that is wired as a normallyopen input can be programmed to act as either a normally open or a normallyclosed device. The same rule applies for normally closed inputs. Generally,if a device is wired as a normally closed input and it must act as a normallyclosed input, its reference address is programmed as normally open. As thefollowing example illustrates, however, a normally closed device in ahardwired circuit is programmed as normally closed when it is replaced in thePLC control program. Since it is not referenced as an input, the program doesnot evaluate the device as a real input.
EXAMPLE 2
For the circuit in Figure 11, draw the PLC ladder program and createan I/O address assignment table. For inputs, use addresses 108
through 478. Start outputs at address 508 and internals at address 1008.
SOLUTION
Figure 12 shows the equivalent PLC ladder diagram for the circuit inFigure 11. Table 7 shows the I/O address assignment table for thisexample. The normally closed contact (CR10) is programmed asnormally closed because internal coil 100 references it and requiresit to operate as a normally closed contact.
L1 L2LS14
CR10
PS1 CR10
LS15
CR10SOL7
www.globalautomation.info

18
Introduction to PLC Programming and Implementation—from relay logic to PLC logic
Figure 12. PLC ladder diagram of the circuit in Figure 11.
Master Control Relays. Another circuit the programmer should be awareof is a master control relay (MCR). In electromechanical circuit diagrams,an MCR coil controls several rungs in a circuit by switching ON or OFFthe power to those rungs. In a hardwired circuit, there is no definite end to anMCR except when the circuit is followed all the way through. For example,in Figure13, the MCR output in line 1 controls the power to the hardwired
Table 7. I/O address assignment table.
Figure 13. Electromechanical relay circuit with a master control relay.
L1 L1 L2L2
LS14
50
PS1*
LS15
LS1410
CR10100
CR10100
LS1512
PS111
CR10100
SOL750 SOL7
*Wired NCProgrammed NO
10
11
12
L1 L2MCRLS1PS1
PL1CR1
1
CR100TS20LS10051
2
4
3
HardwiredCircuits
50 HardwiredCircuits
Last hardwiredcircuit
MCR controls power to circuits below until the end of the hardwired circuit
Power to other circuits not controlled by MCR
MCR
sserddAO/I eciveD epyT
01 41SL tupnI11 1SP tupnI21 51SL tupnI05 7LOS tuptuO001 01RC lanretnI
www.globalautomation.info

19
Introduction to PLC Programming and Implementation—from relay logic to PLC logic
elements from line 3, where the MCR contact is located, to the last elementin line 51. If the master control relay is ON, power will flow to these rungs(lines 4 through 51). If the master control relay is OFF, power will not flowand these devices will not implement the control action. This configurationis equivalent to a hardwired subprogram or subroutine—if the MCR is ON,the rungs are executed; if it is OFF, the rungs are not executed. At line 2in the circuit, power branches to other circuits that are not affected by the MCR’saction. These circuits are the regular hardwired program.
During the translation from a hardwired ladder circuit to PLC symbology,the programmer must place an END MCR instruction after the last rung theMCR should control. Figure14 illustrates the placement of the MCR instruc-tion for the circuit in Figure 13. To provide proper fencing for the program’sMCR control section, internal output coil 1000, labeled CR1 (line 1 of PLCprogram), was inserted so that PL1 would not be inside the fenced MCRarea. This is the way the hardwired circuit operates. The END1 instruction
Figure 14. PLC ladder diagram with MCR fence.
L1 L1 L2L2
PS1
LS1
010
011
PS110
LS111
CR1Int 1000
LS100102
TS20103
Int2000
END1
2000PL1040
CR11000 MCR1
040 PL1
TranslatedLogic
TranslatedLogic
LS100
TS20 103
102
Rest of program from line 2 in
hardwired circuit
Fenced byMCR1
www.globalautomation.info
www.globalautomation.info

20
Introduction to PLC Programming and Implementation—from relay logic to PLC logic
ends the MCR fence. The instructions corresponding to the hardwiredcircuits that branch from line 2 in the electromechanical diagram of Figure 13are located after the END1 instruction. Figure15 illustrates a partial ladderrung of a more elaborate circuit with this type of MCR condition. Thecorresponding PLC program should have an END MCR after the rungcontaining the PL3 output.
Figure 15. Electromechanical relay circuit with an MCR.
M1
CR1
CR2
CR1
CR1UpLS1
Run
CR2
CR1
CR3
CR3
TDR1SOL1
SOL3
SOL4
SOL2
CR4
PL2
PL3
OLs
Set Up/Run
MCR
CR3
Enable
Up
MCR
TDR1CR3
LS2
LS3
PL4
CR4
CR4
CR5
CR4
CR3
CR4FeedLS4
CR1 LS5 TDR1
CR25 seconds
MasterControlRelay
Master ON
Up
Sol Up
Sol Dn
Dn ON
Set Up
Set Up ON
Feed Sol
Fast Sol
7
8
9
10
11
12
13
14
15
16
17
18
19
1
2
3
4
5
6
www.globalautomation.info

21
Introduction to PLC Programming and Implementation—from relay logic to PLC logic
Figure 16. MCR-controlled program elements.
EXAMPLE 3
Highlight the sections of the circuit in Figure 15 that will be under thecontrol of a PLC MCR. What additional measures must be taken toinclude or bypass other hardwired circuits within the MCR fence?
SOLUTION
Figure 16 highlights the circuits that must be fenced under the MCRinstruction. Note that solenoid SOL1 and part of its driving logic are notincluded in the MCR fencing because SOL1, CR3, and TDR1 can alsobe turned ON by logic prior to the MCR fence (see Figure 17). For theMCR fence to be properly programmed, the PLC program must
M1
CR1
CR2
CR1
CR1UpLS1
Run
CR2
CR1
CR3
CR3
TDR1SOL1
SOL3
SOL4
SOL2
CR4
PL2
PL3
OLs
Set Up/Run
MCR
CR3
Enable
Up
MCR
TDR1CR3
LS2
LS3
PL4
CR4
CR4
CR5
CR4
CR3
CR4FeedLS4
CR1 LS5 TDR1
CR25 seconds
MasterControlRelay
Master ON
Up
Sol Up
Sol Dn
Dn ON
Set Up
Set Up ON
Feed Sol
Fast Sol
7
8
9
10
11
12
13
14
15
16
17
18
19
1
2
3
4
5
6
www.globalautomation.info

22
Introduction to PLC Programming and Implementation—from relay logic to PLC logic
include two internal control relays that take SOL1 out of the fence.Figure 18 illustrates the fenced circuit with the additional internals(CR1000 and CR1001). Note that the instructions in this diagram havethe same names as in the hardwired circuit. The solenoid SOL1 will beoutside of the MCR fence because it can be turned ON by either theoutside logic (highlighted section in Figure 17) or the logic inside theMCR fence (highlighted section in Figure 18).
Figure 17. SOL1 activated by logic outside of the MCR fence.
Figure 18. MCR fence.
Up CR3
LS3
TDR1 CR3 SOL2
SOL2 PL3
END1
Up LS2 LS1 CR1001
MCR1
Set Up/Run Up CR4 CR1000
LogicDriving MCR
CR1000
CR1001
CR3 TDR1 SOL1
Fenced byMCR
CR1
CR3
CR3
TDR1SOL1
SOL2
CR4
PL3
CR3
MCR
TDR1CR3
LS2
LS3
Up
Sol Up
Sol Dn
Dn ON
7
8
9
10
11
Set Up/Run Up
add CR1001
add CR1000
www.globalautomation.info

23
Introduction to PLC Programming and Implementation—from relay logic to PLC logic
Bidirectional Power Flow. The circuit in Figure 19 illustrates anothercondition that can cause programming problems: the possibility of bidirec-tional power flow through the normally closed CR4 contact in line 8. Tosolve the bidirectional flow problem, the programmer must know whether ornot CR4 influences the two output rungs to which it is connected. These rungsare the CR3 control relay output and the solenoid SOL1 output (rungs 7 and9, respectively). Figure 19 illustrates the two paths that can occur in thehardwired circuit. PLCs only allow forward paths; therefore, if a reverse pathis necessary for this circuit’s logic, the CR4 contact must be included in thelogic driving the CR3 output (see Figure 9b).
Figure 19. (a) Forward and (b) reverse power flow in a hardwired circuit.
Instantaneous Timer Contacts. The electromechanical circuit shown inFigure 15 specifies an instantaneous timer contact (the normally openTDR1 contact in line 10). This type of contact, however, is usually unavail-able in PLCs. To implement an instantaneous timer contact (i.e., a contact
CR1
CR3
CR3
TDR1
SOL2
PL3
CR3
MCR
TDR1CR3
LS2
LS3
Up
Sol Up
Sol Dn
Dn ON
7
8
9
10
11
(a) Forward path
CR1
CR3
CR3
TDR1SOL1
SOL2
CR4
PL3
CR3
MCR
TDR1CR3
LS2
LS3
Up
Sol Up
Sol Dn
Dn ON
7
8
9
10
11
(b) Reverse path
CR4
SOL1
www.globalautomation.info

24
Introduction to PLC Programming and Implementation—from relay logic to PLC logic
that closes or opens once the timer is enabled), the programmer must use aninternal output to trap the timer, then use the internal’s contact as aninstantaneous contact to drive the timer’s logic.
In the electromechanical circuit in Figure 20a, if PB1 and LS1 both close, thetimer will start timing and the instantaneous contact (TMR1-1) will close,thus sealing PB1. If PB1 is released (OFF), the timer will continue to timebecause the circuit is sealed. Figure 20b illustrates the technique for trappinga timer. In this PLC program, an internal output traps the instantaneouscontact from the circuit’s electromechanical timer. Thus, the contacts fromthis internal drive the timer. If a trap does not exist, the timer will start timingwhen PB1 and LS1 both close, but will stop timing as soon as PB1 isreleased.
Figure 20. (a) An instantaneous timer contact in a hardwired circuit and (b) a trappedtimer in a PLC circuit.
Complicated Logic Rungs. When a logic rung is very confusing, the bestprogramming procedure is to isolate it from the other rungs. Then, reconstructall of the possible logic paths from right to left, starting at the output andending at the beginning of the rung. If a section of a rung, like the onediscussed in Example 3, directly connects or interacts with another rung, itmay be easier to create an internal output at the point where the two rungscross. Then, use the internal output to drive the rest of the logic. For the circuitshown in Figure 15, this cross point is in line 9 at the normally closed contactCR4 between normally open LS1 and normally closed CR3.
PROGRAM CODING/TRANSLATION
Program coding is the process of translating a logic or relay diagram intoPLC ladder program form. This ladder program, which is stored in theapplication memory, is the actual logic that will implement the control of themachine or process. Ease of program coding is directly related to how orderly
L1 L2PB1
TMR1-1
LS1 TMR1
TMR1-2SOL7
PB1
Internal
Internal
LS1 Internal
TMR1
TMR1 SOL1
(a) (b)
TrapCircuitInstantaneous
Timer Contact
www.globalautomation.info

25
Introduction to PLC Programming and Implementation—from relay logic to PLC logic
the previous stages (control task definition, I/O assignment, etc.) have beendone. Figure 21 shows a sample program code generated from logic gates andelectromechanical relay diagrams (internal coil 1000 replaces the controlrelay). Note that the coding is a PLC representation of the logic, whether it isa new application or a modernization. The next sections examine this codingprocess closer and present several programming examples.
Figure 21. Translation from (a) logic gates and (b) an electromechanical relay diagraminto (c) PLC program coding.
Start PB
SELInternal
Internal
PSLS
Motor
Start PB
CR1
CR1
CR1
SEL
PS
MotorLS
M
(a)
(c)
(b)
L1 L1 L2L2Start PB
110
SEL
LS
PB100
CR11000
CR11000
LS102
PS103
SEL101
CR11000
M110
M
100
101
PS103
102
I/O Assignment Program Coding I/O Assignment
5 DISCRETE I/O CONTROL PROGRAMMING
In this section, we will present several programming examples that illustratethe modernization of relay systems. We will also present examples relatingto new PLC control implementations. These examples will deal primarilywith discrete controls. The next section will explain more about analog I/Ointeraction and programming.
www.globalautomation.info

26
Introduction to PLC Programming and Implementation—from relay logic to PLC logic
CONTROL PROGRAMMING AND PLC DESCRIPTIONS
Figure 22. Example PLC configuration.
The PLC can accept four-channel analog input modules, which can be placedin any slot location. When analog I/O modules are used, discrete I/O cannotbe used in the same slot. The PLC can also accept multiplexed register I/O.These multiplexed modules require two slot positions and provide the enable(select) lines for the I/O devices.
Addresses 000 through 777 octal represent input and output device connec-tions mapped to the I/O table. The first digit of the address represents the racknumber, the second digit represents the slot, and the third digit specifies theterminal connection in the slot. The PLC detects whether the slot holds aninput or an output.
Modernization applications involve the transfer of a machine or process’scontrol from conventional relay logic to a programmable controller. Con-ventional hardwired relay panels, which house the control logic, usuallypresent maintenance problems, such as contact chatter, contact welding, andother electromechanical problems. Switching to a PLC can improve theperformance of the machine, as well as optimize its control. The machine’s“new” programmable controller program is actually based on the instructionsand control requirements of the original hardwired system.
Throughout this section, we will use the example of a midsized PLC capableof handling up to 512 I/O points (000 to 777 octal) to explain how toimplement and configure a PLC program. The I/O structure of the controllerhas 4 I/O points per module. The PLC has eight racks (0 through 7), each onewith eight slots, or groups, where modules can be inserted. Figure 22illustrates this configuration.
CPU
0 1 2 3 4 5 6 7
I/O Module Group or Slot
I/O PointRack 0
www.globalautomation.info

27
Introduction to PLC Programming and Implementation—from relay logic to PLC logic
Point addresses 10008 to 27778 may be used for internal outputs, and registerstorage starts at register 30008 and ends at register 47778. Two types of timerand counter formats can be used—ladder format and block format—but alltimers require an internal output to specify the ON-delay output. Ladderformat timers place a “T” in front of the internal output address, while blockformat timers specify the internal output address in the block’s output coil.
Throughout the examples presented in this section and the next, we will useaddresses 0008 through 0278 for discrete inputs and addresses 0308 through0478 for discrete outputs. Analog I/O will be placed in the last slot of themaster rack (0) whenever possible. During the development of these ex-amples, you will discover that sometimes the assignment of internals andregisters is performed parallel to the programming stages.
SIMPLE RELAY REPLACEMENT
This relay replacement example involves the PLC implementation of theelectromechanical circuit shown in Figure 23. The hardware timer TMR1requires instantaneous contacts in the first rung, which are used to latch the
Figure 23. Electromechanical relay circuit.
L1 L2
TMR1PB1
PS1
CR1
TS1FS1
CR1 LS1 SOL2
SOL1
CR1
CR2
TMR2CR1
CR3
CR3 SOL3TMR2
TMR1
PS2
3 sec
2 sec
www.globalautomation.info

28
Introduction to PLC Programming and Implementation—from relay logic to PLC logic
rung. If the instantaneous TMR1 contacts are implemented using a PLC time-delay contact, then PB1 must be pushed for the timer’s required time presetto latch the rung. This instantaneous contact will be implemented by trappingthe timer with an internal output.
Tables 8 and 9 show the I/O address and internal output assignments for theelectromechanical circuit’s real I/O. Table 10 presents the register assign-ment table. Note that internals do not replace control relays CR1 and CR2since the output addresses 030 and 031 corresponding to solenoids SOL1 andSOL2 are available. Therefore, addresses 030 and 031 can replace the CR1and CR2 contacts, respectively, everywhere they occur in the program. Thenormally open contact LS1 connects limit switch LS1 to the PLC inputinterface; and the normally open LS1 reference, programmed with an exam-ine-OFF instruction, implements the normally closed LS1 in the program.Figure 24 illustrates the PLC program coding solution.
Table 8. I/O address assignment.
Table 9. Internal address assignment.
Table 10. Register assignment.
sserddAO/IeludoM
epyT kcaR puorG lanimreT noitpircseD
tupnI 0 0 0 1BP0 0 1 1SP0 0 2 1SF0 0 3 1ST
tupnI 0 0 4 1SL0 0 5 2SP0 0 6 —0 0 7 —
tuptuO 0 3 0 1LOS0 3 1 2LOS0 3 2 3LOS0 3 3 —
eciveD lanretnI noitpircseD
1RMT 0001 1RMTpartotdesU1RC — )030(1LOSsaemaS2RC — )130(2LOSsaemaS
1RMT 1001 1RMTremiT2RMT 2001 2RMTremiT
3RC 3001 3RCecalpeR
retsigeR noitpircseD
0004 ces3roftnuocremitteserP1004 1001remittnuocdetalumuccA2004 ces2roftnuocremitteserP3004 2001remittnuocdetalumuccA
www.globalautomation.info

29
Introduction to PLC Programming and Implementation—from relay logic to PLC logic
SIMPLE START/STOP MOTOR CIRCUIT
Figure 24. PLC implementation of the circuit in Figure 23.
Figure 25 shows the wiring diagram for a three-phase motor and its corre-sponding three-wire control circuit, where the auxiliary contacts of the starterseal the start push button. To convert this circuit into a PLC program, firstdetermine which control devices will be part of the PLC I/O system; these arethe circled items in Figure 26. In this circuit, the start and stop push buttons(inputs) and the starter coil (output) will be part of the PLC system. The startercoil’s auxiliary contacts will not be part of the system because an internal willbe used to seal the coil, resulting in less wiring and fewer connections.
L1 L1 L2L2
PB1
PS1
PB1000
TMR Trap 1000
PS1001
TMR Trap1000
030
000
001
PS2005
TS1
FS1002
TS1003
SOL1030
TMR11001
SOL1030
CR31003
003
FS1TMR Trap 1000
TMR11001
TMR21002
002
TMR21002
PS2005
CR31003
SOL3032
TMR11001
SOL1030
LS1004
LS1
TMR11001
SOL1030
LS1004
SOL2031
004
TMR
PR 400030
AR 4001TB = 0.1
TMR
PR 400220
AR 4003TB = 0.1
SOL1
031
SOL2
032
SOL3
www.globalautomation.info

30
Introduction to PLC Programming and Implementation—from relay logic to PLC logic
Table 11 shows the I/O address assignment, which uses the same addressingscheme as the circuit diagram (i.e., inputs: addresses 000 and 001, output:address 030).
To program the PLC, the devices must be programmed in the same logicsequence as they are in the hardwired circuit (see Figure 27). Therefore, thestop push button will be programmed as an examine-ON instruction
Figure 25. (a) Wiring diagram and (b) relay control circuit for a three-phase motor.
Figure 26. Real inputs and outputs to the PLC.
(a)
(b)
L1 L2
StartStop
M
OL
M
2 3
Motor
3
2
T1 T2 T3
L1 L2 L3
OL
M
Power
Start
StopM
(a)
Push ButtonStation
(three-wire control)
L1 L2
StartStop
M
OL
M
2 3
www.globalautomation.info

31
Introduction to PLC Programming and Implementation—from relay logic to PLC logic
Industrial Text & Video Company www.industrialtext.com 1-800-752-8398
Table 11. I/O address assignment.
Figure 27. PLC implementation of the circuit in Figure 25.
(a normally open PLC contact) in series with the start push button, which isalso programmed as an examine-ON instruction. This circuit will drive output030, which controls the starter. If the start push button is pressed, output 030will turn ON, sealing the start push button and turning the motor ON throughthe starter. If the stop push button is pressed, the motor will turn OFF. Notethat the stop push button is wired as normally closed to the input module. Also,the starter coil’s overloads are wired in series with the coil.
In a PLC wiring diagram, the PLC is connected to power lines L1 and L2(see Figure 28). The field inputs are connected to L1 on one side and to themodule on the other. The common, or return, connection from the inputmodule goes to L2. The output module receives its power for switching theload from L1. Output terminal 030 is connected in series with the starter coiland its overloads, which go to L2. The output module also directly connectsto L2 for proper operation. Note that, in the motor control circuit’s wiringdiagram (see Figure 29), the PLC output module is wired directly to thestarter coil.
Although the three-phase motor has a three-wire control circuit, its corre-sponding PLC control circuit has only two wires. This two-wire configurationis similar to a three-wire configuration because it provides low-voltagerelease; however, it does not provide low-voltage protection. Referring to
sserddAO/I
eludoMepyT kcaR puorG lanimreT noitpircseD
tupnI 0 0 0 )CN(BPpotS0 0 1 BPtratS0 0 2 —0 0 3 —
tuptuO 0 3 0 1MrotoM0 3 1 —0 3 2 —0 3 3 —
L2L1 L1L2
001
000
Start
Stop M OL
M030
Start001
Stop000
M030
030

32
Introduction to PLC Programming and Implementation—from relay logic to PLC logic
Figure 28. PLC wiring diagram of a three-phase motor.
Figure 29. Motor control circuit’s wiring diagram.
Motor
3
2
T1 T2 T3
L1 L2 L3
M
OL
PLCOutput
030
FromL1
To L2
PLC
M
L1
000
001
L2
Stop
Start
Inputs
L1
L2
L3
M
OL
F
Outputs 030
Common
Common
Power
www.globalautomation.info

33
Introduction to PLC Programming and Implementation—from relay logic to PLC logic
Figure 29, the starter’s seal-in contacts (labeled as 3—| |—2) are not used andare shown as unconnected. If the motor is running and the overloads open,the motor will stop, but the circuit will still be ON. Once the overloads cooloff and the overload contacts close, the motor will start again immediately.Depending on the application, this situation may not be desirable. Forexample, someone may be troubleshooting the motor stoppage and the motormay suddenly restart. Making the auxiliary contact an input and using itsaddress to seal the start push button can avoid this situation by making thetwo-wire circuit act as a three-wire circuit (see Figure 30). In this configura-tion, if the overloads open while the motor is running, the coil will turn offand their auxiliary contacts will break the circuit in the PLC.
Figure 30. Two-wire circuit configured as a three-wire circuit.
FORWARD/REVERSE MOTOR INTERLOCKING
Figure 31. Hardwired forward/reverse motor circuit.
L2L1 L1L2
001
000
Start
M
Stop M OL
002
M002
Start001
Stop000
M030
030
Figure 31 illustrates a hardwired forward/reverse motor circuit with electricaland push button interlockings. Figure 32 shows the simplified wiringdiagram for this motor. The PLC implementation of this circuit should
L1 L2
Stop Rev R M1
For PL1M1
All OLsFor
F
F M2
Rev PL2M2
R
www.globalautomation.info

34
Introduction to PLC Programming and Implementation—from relay logic to PLC logic
include the use of the overload contacts to monitor the occurrence of anoverload condition. The auxiliary starter contacts (M1 and M2) are notrequired in the PLC program because the sealing circuits can be programmedusing the internal contacts from the motor outputs. Low-voltage protectioncan be implemented using the overload contact input so that, if an overloadoccurs, the motor circuit will turn off. However, after the overload conditionpasses, the operator must push the forward or reverse push button again torestart the motor.
Figure 32. Forward/reverse motor wiring diagram.
For simplicity, the PLC implementation of the circuit in Figure 31 includesall of the elements in the hardwired diagram, even though the additionalstarter contacts (normally closed R and F in the hardwired circuit) are notrequired, since the push button interlocking accomplishes the same task. Inthe hardwired circuit, this redundant interlock is performed as a backupinterlocking procedure.
Figure 33 shows the field devices that will be connected to the PLC. The stoppush button has address 000, while the normally open sides of the forward andreverse push buttons have addresses 001 and 002, respectively. The overloadcontacts are connected to the input module at address 003. The output
L1 L2 L3
M
F R
1 2 3 1 2 3
T1 T3
T2
F
3
2R
3
2
OL
www.globalautomation.info

35
Introduction to PLC Programming and Implementation—from relay logic to PLC logic
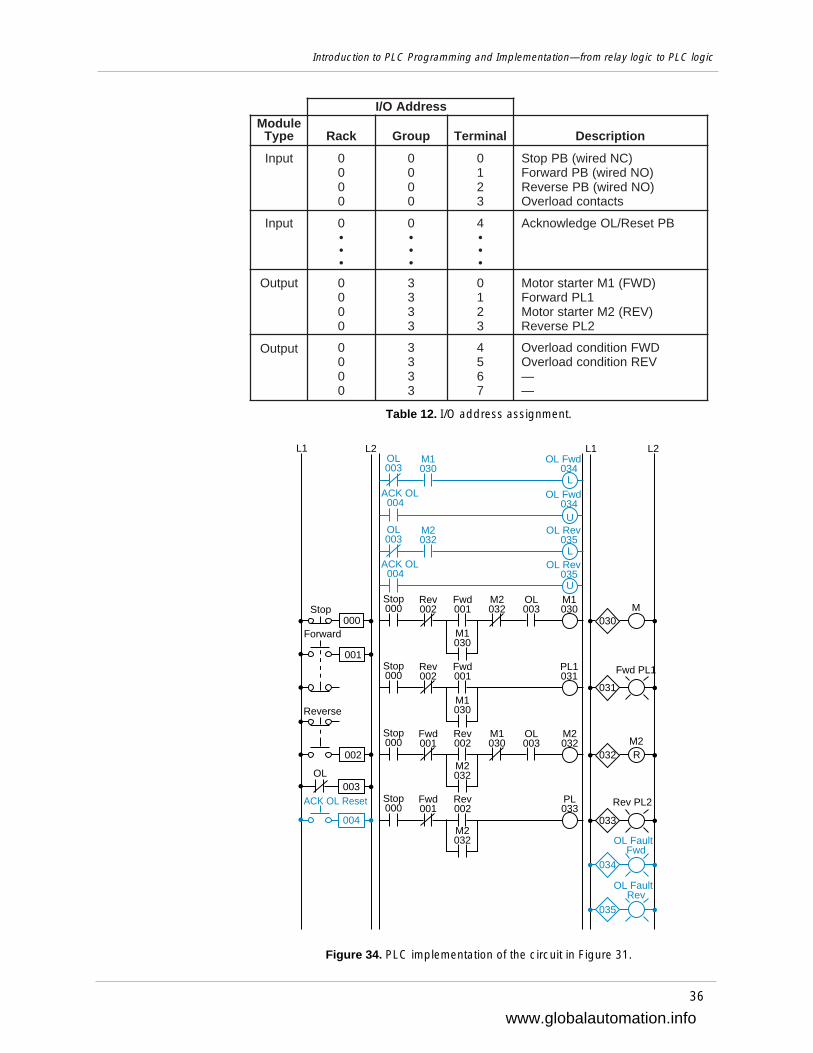
devices—the forward and reverse starters and their respective interlockingauxiliary contacts—have addresses 030 and 032. The forward and reversepilot light indicators have address 031 and 033, respectively. Additionally,the overload light indicators have addresses 034 and 035, indicating that theoverload condition occurred during either forward or reverse motor opera-tion. The addresses for the auxiliary contact interlocking using the R and Fcontacts are the output addresses of the forward and reverse starters (030 and032). The ladder circuit that latches the overload condition (forward orreverse) must be programmed before the circuits that drive the forward andreverse starters as we will explain shortly. Otherwise, the PLC program willnever recognize the overload signal because the starter will be turned off inthe circuit during the same scan when the overload occurs. If the latchingcircuit is after the motor starter circuit, the latch will never occur because thestarter contacts will be open and continuity will not exist.
Table 12 shows the real I/O address assignment for this circuit. Figure 34shows the PLC implementation, which follows the same logic as thehardwired circuit and adds additional overload contact interlockings. Notethat the motor circuit also uses the overload input, which will shut down themotor. The normally closed overload contacts are programmed as normallyopen in the logic driving the motor starter outputs. The forward and reversemotor commands will operate normally if no overload condition existsbecause the overload contacts will provide continuity. However, if anoverload occurs, the contacts in the PLC program will open and the motorcircuit will turn OFF. The overload indicator pilot lights (OL Fault Fwd andOL Fault Rev) use latch/unlatch instructions to latch whether the overloadoccurred in the forward or reverse operation. Again, the latching occursbefore the forward and reverse motor starter circuits, which will turn off due
Figure 33. Real inputs and outputs to the PLC.
L1 L2
Stop Rev R M1
For PL1M1
All OLsFor
F
F M2
Rev PL2M2
R
www.globalautomation.info
36
Introduction to PLC Programming and Implementation—from relay logic to PLC logic
Table 12. I/O address assignment.
Figure 34. PLC implementation of the circuit in Figure 31.
sserddAO/IeludoM
epyT kcaR puorG lanimreT noitpircseD
tupnI 0 0 0 )CNderiw(BPpotS0 0 1 )ONderiw(BPdrawroF0 0 2 )ONderiw(BPesreveR0 0 3 stcatnocdaolrevO
tupnI 0 0 4 BPteseR/LOegdelwonkcA• • •• • •• • •
tuptuO 0 3 0 )DWF(1MretratsrotoM0 3 1 1LPdrawroF0 3 2 )VER(2MretratsrotoM0 3 3 2LPesreveR
tuptuO 0 3 4 DWFnoitidnocdaolrevO0 3 5 VERnoitidnocdaolrevO0 3 6 —0 3 7 —
L2L1L2L1
030
002
000
Reverse
Stop M
031
Fwd PL1
003OL
M1030
Rev002
M1030
Stop000
Fwd001
M2032
OL003
032M2032
Rev002
M1030
Stop000
Fwd001
M2032
OL003
M1030
Rev002
PL1031
Stop000
Fwd001
M1030
OL Fwd 034
OL003
001
Forward
034
RM2
033M2032
Rev002
Stop000
Fwd001
PL033
004
ACK OL Reset Rev PL2
LOL Fwd 034
UM2032
OL Rev 035
OL003
035
LOL Rev 035
U
OL Fault Fwd
OL Fault Rev
ACK OL 004
ACK OL 004
www.globalautomation.info

37
Introduction to PLC Programming and Implementation—from relay logic to PLC logic
to the overload. An additional normally open acknowledge overload resetpush button, which is connected to the input module, allows the operator toreset the overload indicators. Thus, the overload indicators will remainlatched, even if the physical overloads cool off and return to their normallyclosed states, until the operator acknowledges the condition and resets it.
Figure 35 illustrates the motor wiring diagram of the forward/reverse motorcircuit and the output connections from the PLC. Note that the auxiliarycontacts M1 and M2 are not connected. In this wiring diagram, both theforward and reverse coils have their returns connected to L2 and not to theoverload contacts. The overload contacts are connected to L1 on one side andto the PLC’s input module on the other (input 003). In the event of an overload,both motor starter output coils will be dropped from the circuit because thePLC’s output to both starters will be OFF.
Figure 35. Forward/reverse motor wiring diagram.
REDUCED-VOLTAGE-START MOTOR CONTROL
Figure 36 illustrates the control circuit and wiring diagram of a 65% tapped,autotransformer, reduced-voltage-start motor control circuit. This reduced-voltage start minimizes the inrush current at the start of the motor (locked-rotor current) to 42% of that at full speed. In this example, the timer must beset to 5.3 seconds. Also, the instantaneous contacts from the timer in lines 2and 3 must be trapped.
L1 L2 L3
L1
To PLCInput 003
L1
L2
L1
F
M
FWD REV
R
OL
3
2M1
3
2M2
www.globalautomation.info

38
Introduction to PLC Programming and Implementation—from relay logic to PLC logic
Figure 36. (a) Hardwired relay circuit and (b) wiring diagram of a reduced-voltage-startmotor.
Figure 37 illustrates the hardwired circuit with the real inputs and outputscircled. The devices that are not circled are implemented inside the PLCthrough the programming of internal instructions. Tables 13, 14, and 15 showthe I/O assignment, internal assignment, and register assignment, respec-tively. Figure 38 illustrates the PLC implementation of the reduced-voltage-start circuit. The first line of the PLC program traps the timer with internaloutput 1000. Contacts from this internal replace the instantaneous timercontacts specified in the hardwired control circuit. This PLC circuit imple-mentation does not provide low-voltage protection, since the interlockingdoes not use the physical inputs of M1, S1, and S2. If low-voltage protectionis required, then the starter’s auxiliary contacts or the overload contacts canbe programmed as described in the previous examples. If the auxiliarycontacts or the overloads are used as inputs, they must be programmed as
StopStart
OLL1 L2
TR1
TR1
S1
S1
TR1
TR1
TR1
S2
S2
S1 M1
M1
T1
T2
T3
M
S1S2
M1
S1S2
M1
S1S2
M1
L1
L2
L3
65%
1
2
3
4
5
6
(a)
(b)
www.globalautomation.info

39
Introduction to PLC Programming and Implementation—from relay logic to PLC logic
Table 13. I/O address assignment.
Table 14. Internal address assignment.
Table 15. Register assignment.
Figure 37. Real inputs and outputs to the PLC.
sserddAO/I
eludoMepyT kcaR puorG lanimreT noitpircseD
tupnI 0 0 0 )CN(BPpotS0 0 1 )ON(BPtratS
tuptuO 0 3 0 1MretratSrotoM0 3 1 1S0 3 2 2S
StopStart
OLL1 L2
TR1
TR1
S1
S1
TR1
TR1
TR1
S2
S2
S1 M1
M1
1
2
3
4
5
6
retsigeR noitpircseD
0004 3.5rofces1.0esabemit,35eulavretsigerteserP)1001situptuoremit(ces
1004 1001tuptuoremitrofretsigerdetalumuccA
eciveD lanretnI noitpircseD
— 0001 tiucricremitparTremiT 1001 remiT
www.globalautomation.info

40Industrial Text & Video Company www.industrialtext.com 1-800-752-8398
Introduction to PLC Programming and Implementation—from relay logic to PLC logic
normally open (closed when the overloads are closed and the motor isrunning) and placed in series with contact 1000 in line 3 of the PLC program.If the overloads open, the circuit will lose continuity and M1 will turn OFF.
Figure 38. PLC implementation of the circuit in Figure 36.
AC MOTOR DRIVE INTERFACE
A common PLC application is the speed control of AC motors with variablespeed (VS) drives. The diagram in Figure 39 shows an operator station usedto manually control a VS drive. The programmable controller implementa-tion of this station will provide automatic motor speed control through ananalog interface by varying the analog output voltage (0 to 10 VDC) to thedrive.
The operator station consists of a speed potentiometer (speed regulator), aforward/reverse direction selector, a run/jog switch, and start and stop pushbuttons. The PLC program will contain all of these inputs except thepotentiometer, which will be replaced by an analog output. The required inputfield devices (i.e., start push button, stop push button, jog/run, and forward/reverse) will be added to the application and connected to input modules,rather than using the operator station’s components. The PLC program willcontain the logic to start, stop, and interlock the forward/reverse commands.
L2L1 L1L2
030
001
000
Start
Stop
M1 OL
031 S1
032 S2
Trap1000
Trap1000
Start001
Stop000
S2032
Trap1000
S1031
M1030
TMR1001
Trap1000
TMR1001
S1031
M1030
Trap1000
PR: 4000 = 53AR: 4001TB = 0.1
TMR
S1031
S2032
M1030
Trap1000
TMR1001

41
Introduction to PLC Programming and Implementation—from relay logic to PLC logic
Industrial Text & Video Company www.industrialtext.com 1-800-752-8398
Figure 39. Operator station for a variable speed drive.
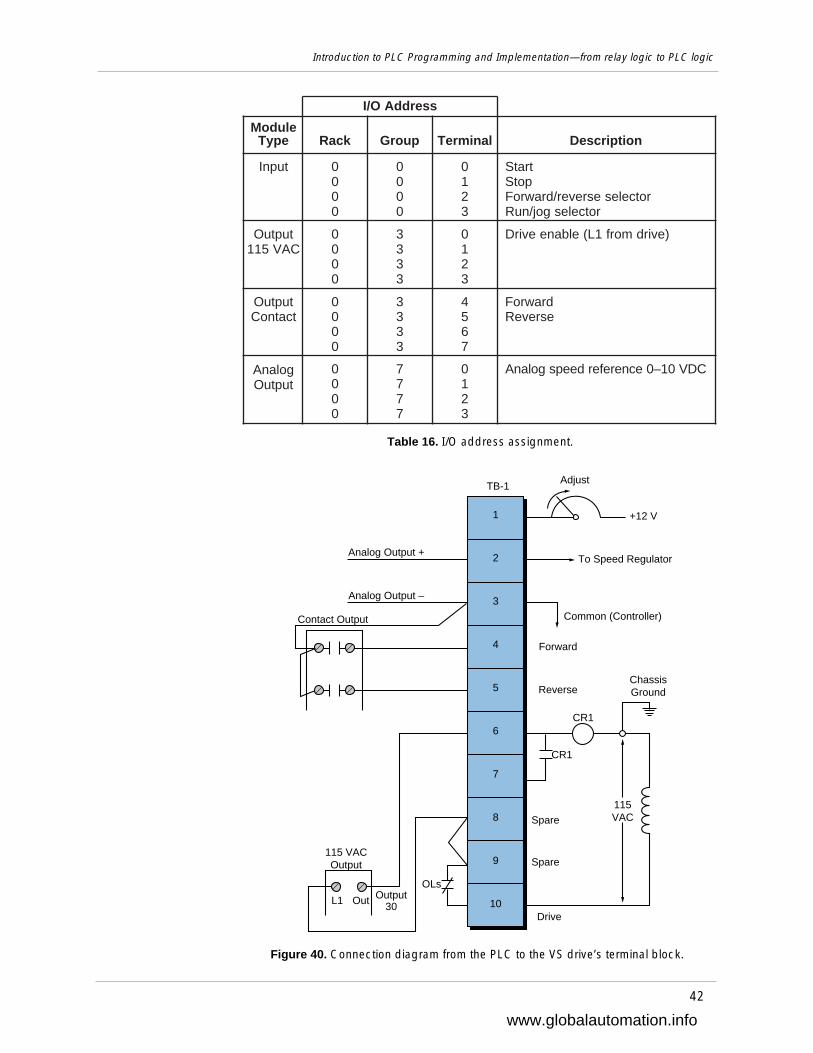
Table 16 shows the I/O address assignment table for this example, whileFigure 40 illustrates the connection diagram from the PLC to the VS drive’sterminal block (TB-1). The connection uses a contact output interface toswitch the forward/reverse signal, since the common must be switched. Toactivate the drive, terminal TB-1-6 must receive 115 VAC to turn ON theinternal relay CR1. The drive terminal block TB-1-8 supplies power to thePLC’s L1 connection to turn the drive ON. The output of the module (CR1)is connected to terminal TB-1-6. The drive’s 115 VAC signal is used tocontrol the motor speed so that the signal is in the same circuit as the drive,avoiding the possibility of having different commons (L2) in the drive (thestart/stop common is not the same as the controller’s common). In thisconfiguration, the motor’s overload contacts are wired to terminals TB-1-9and TB-1-10, which are the drive’s power (L1) connection and the outputinterface’s L1 connection. If an overload occurs, the drive will turn OFF
Sta
rtS
top
1
2
3
4
5
6
7
8
9
10
Run
Jog
Reverse
Forward
Reverse
Spare
Spare
Forward
Spe
edP
oten
tiom
eter
TB-1
To Speed Regulator
Common (Controller)
Field Drive
OL
OL
OL
CR1
CR1
115VAC
ChassisGround
Adjust
+12 V
42
Introduction to PLC Programming and Implementation—from relay logic to PLC logic
Figure 40. Connection diagram from the PLC to the VS drive’s terminal block.
Table 16. I/O address assignment.
sserddAO/I
eludoMepyT kcaR puorG lanimreT noitpircseD
tupnI 0 0 0 tratS0 0 1 potS0 0 2 rotcelesesrever/drawroF0 0 3 rotcelesgoj/nuR
tuptuO 0 3 0 )evirdmorf1L(elbaneevirDCAV511 0 3 1
0 3 20 3 3
tuptuO 0 3 4 drawroFtcatnoC 0 3 5 esreveR
0 3 60 3 7
golanA 0 7 0 CDV01–0ecnereferdeepsgolanAtuptuO 0 7 1
0 7 20 7 3
1
2
3
4
5
6
7
8
9
10
Reverse
Spare
Spare
Forward
TB-1
To Speed Regulator
Common (Controller)
Drive
CR1
CR1
115VAC
ChassisGround
Adjust
+12 V
Analog Output +
Analog Output –
Contact Output
L1 Out
115 VACOutput
OLsOutput
30
www.globalautomation.info

43
Introduction to PLC Programming and Implementation—from relay logic to PLC logic
because the drive’s CR1 contact will not receive power from the outputmodule. This configuration, however, does not provide low-voltage protec-tion, since the drive and motor will start immediately after the overloads cooloff and reclose. To have low-voltage protection, the auxiliary contact fromthe drive, CR1 in terminal TB-1-7, must be used as an input in the PLC, sothat it seals the start/stop circuit.
Figure 41 shows the PLC ladder program that will replace the manual operatorstation. The forward and reverse inputs are interlocked, so only one of themcan be ON at any given time (i.e., they are mutually exclusive). If the jogsetting is selected, the motor will run at the speed set by the analog outputwhen the start push button is depressed. The analog output connection simplyallows the output to be enabled when the drive starts. Register 4000 holds thevalue in counts for the analog output to the drive. Internal 1000, which is usedin the block transfer, indicates the completion of the instruction.
Sometimes, a VS drive requires the ability to run under automatic or manualcontrol (AUTO/MAN). Several additional hardwired connections must bemade to implement this dual control. The simplest and least expensive wayto do this is with a selector switch (e.g., a four-pole, single-throw, single-break selector switch). With this switch, the user can select either theautomatic or manual option. Figure 42 illustrates this connection. Note that
Figure 41. PLC implementation of the VS drive.
L1 L1 L2L2Start PB1 000
StartPB1000
StopPB2001
DriveEn030
XFER OUT
PR 4000Slot 7Rack 0Length 1
Fwd* Rev SEL1002
FwdSEL1002
Fwd034
Drive En030
Done1000
Run* Jog SEL2003
RevSEL1002
Rev035
Stop PB2 001Run/Jog
003Drive En
030
030 TB-1-6
TB-1-8
034
035
TB-1-4
TB-1-5
TB-1-3
TB1-2TB1-3
070
A+–
*Selector switch is logic 1 (closed) in Fwd/Run position and logic 0 (open) in Rev/Jog position
www.globalautomation.info

44
Introduction to PLC Programming and Implementation—from relay logic to PLC logic
the start, stop, run/jog, potentiometer, and forward/reverse field devicesshown are from the operator station. These devices are connected to the PLCinterface under the same names that are used in the control program (refer toFigure 41). If the AUTO/MAN switch is set to automatic, the PLC willcontrol the drive; if the switch is set to manual, the manual station willcontrol the drive.
CONTINUOUS BOTTLE-FILLING CONTROL
Figure 42. VS drive with AUTO/MAN capability.
In this example (see Figure 43), we will implement a control program thatdetects the position of a bottle via a limit switch, waits 0.5 seconds, and thenfills the bottle until a photosensor detects a filled condition. After the bottleis filled, the control program will wait 0.7 seconds before moving to the nextbottle. The program will include start and stop circuits for the outfeed motorand the start of the process. Table 17 shows the I/O address assignment, whileTables 18 and 19 present the internal and register assignments, respectively.These assignments include the start and stop process signals.
Start
Stop
1
2
3
4
5
6
7
8
9
10
Run
Jog
ForwardReverse
Reverse
Spare
Spare
Forward
TB-1
To Speed Regulator
Common (Controller)
Field Drive
OL
OL
OL
CR1
CR1
115VAC
ChassisGround
Adjust
+12 V
Auto
Auto
Manual
ManualSpeed
Manual
Manual
Manual
–Analog Output
+Analog Output
Auto
Auto
ContactOutput
L1 Out
115 VACOutput
www.globalautomation.info

45
Introduction to PLC Programming and Implementation—from relay logic to PLC logic
Table 18. Internal output assignment.
Table 19. Register assignment.
Figure 43. Bottle-filling system.
Table 17. I/O address assignment.
eciveD lanretnI noitpircseD
remiT 1001 tcetednoitisopretfayaledces5.0rofremiTremiT 2001 tcetedlevelretfayaledces7.0rofremiT
— 3001 1Mrotomdeef,tuodemit,dellifelttoB
Limit Switch
LS
FixedRollers
Outfeed Motor Drive(Always ON During Process)
M2
Feed MotorDriveM1
Photoeye DetectorPerpendicular To Bottle
Filled Bottles
Solenoid Operated ControlFluid
sserddAO/I
eludoMepyT kcaR puorG lanimreT noitpircseD
tupnI 0 0 0 1BPssecorptratS0 0 1 )CN(2BPssecorppotS0 0 2 )tcetednoitisop(hctiwstimiL0 0 3 )tcetedlevel(eyeotohP
tuptuO 0 3 0 1MrotomdeeF0 3 1 )NOmetsys(2MrotomdeeftuO0 3 2 lortnocdioneloS0 3 3 —
retsigeR noitpircseD
0004 )1001(ces1.0esabemit,5eulavteserP1004 1001rofeulavdetalumuccA2004 )2001(ces1.0esabemit,7eulavteserP3004 2001rofeulavdetalumuccA
www.globalautomation.info

46
Introduction to PLC Programming and Implementation—from relay logic to PLC logic
Figure 44 illustrates the PLC ladder implementation of the bottle-fillingapplication. Once the start push button is pushed, the outfeed motor (output031) will turn ON until the stop push button is pushed. The feed motor M1will be energized once the system starts (M2 ON); it will stop when the limitswitch detects a correct bottle position. When the bottle is in position and0.5 seconds have elapsed, the solenoid (032) will open the filling valve andremain ON until the photoeye (PE) detects a proper level. The bottle willremain in position for 0.7 seconds, then the energized internal 1003 will startthe feed motor. The feed motor will remain ON until the limit switch detectsanother bottle.
Figure 44. PLC implementation of the bottle-filling application.
L1 L1 L2L2
Start PB1
Stop PB2
PB1000
M2031
Int31003
BottleFilled1003
PB2001
032
000
001
PE
003
LS
LS002
M2031
M1030
M2031
002
SOL1
031
LS002
M2031
TMR1001
M2
030 M1
TMR
PR 400050
AR 4001TB = 0.1
TMR1001
PE003
M2031
SOL032
TMR1002
LS002
M2031
BottleFilled1003
PE003
M2031
BottleFilled1003
TMR1002
TMR
PR 400070
AR 4001TB = 0.1
www.globalautomation.info

47
Introduction to PLC Programming and Implementation—from relay logic to PLC logic
LARGE RELAY SYSTEM MODERNIZATION
This example presents the modernization of a machine control system thatwill be changed from hardwired relay logic to PLC programmed logic. Thefield devices to be used will remain the same, with the exception of those thatthe controller can implement (e.g., timers, control relays, interlocks, etc.).The benefits of modernizing the control of this machine are:
• a more reliable control system
• less energy consumption
• less space required for the control panel
• a flexible system that can accommodate future expansion
Figure 45 illustrates the relay ladder diagram that presently controls the logicsequence for this particular machine. For the sake of simplicity, the diagramshows only part of the total relay ladder logic.
An initial review of the relay ladder diagram indicates that certain portionsof the logic should be left hardwired—lines 1, 2, and 3. This will keep allemergency stop conditions independent of the controller. The hydraulicpump motor (M1), which is energized only when the master start push buttonis pushed (PB1), should also be left hardwired. Figure 46 illustrates thesehardwired elements. Note that the safety control relay (SCR) will providepower to the rest of the system if M1 is operating properly and no emergencypush button is depressed. Furthermore, the PLC fault contact can be placedin series with the emergency push buttons and also connected to a PLC failurealarm. During proper operation, the PLC will energize the fault coil, thusclosing PLC Fault Contact 1 and opening PLC Fault Contact 2.
Continuing the example, we can now start assigning the real inputs andoutputs to the I/O assignment document. We will assign internal outputaddresses to all control relays, as well as timers and interlocks from controlrelays. Tables 20 and 21 present the assignment and description of the inputsand outputs, as well as the internals. Note that inputs with multiple contacts,such as LS4 and SS3, have only one connection to the controller.
Figure 47 shows the PLC program coding (hardwired relay translation) forthis example. This ladder program illustrates several special coding tech-niques that must be used to implement the PLC logic. Among these tech-niques are the software MCR function, instantaneous contacts from timers,OFF-delay timers, and the separation of rungs with multiple outputs.
An MCR internal output, specified through the program software, performsa function similar to a hardwired MCR. Referring to the relay logic diagramin Figure 45, if the MCR is energized, its contacts will close, allowing powerto flow to the rest of the system. In the PLC software, the internal MCR
www.globalautomation.info

48
Introduction to PLC Programming and Implementation—from relay logic to PLC logic
PB1MasterStart
PB2MasterStop
PB5 SetupPB6 Reset
PB3Emergency
Stop 1
PB4Emergency
Stop 2
M1 SCR1-1
SCR1-2
MCR
OL1 OL1
4FU
OL1OL1
1M 1M 1M
M1
OL2OL2
2M 2M 2M
M2
1FU
2FU
3FU
L1
L2
L3
H1
X1 X2 X3
H2 H3 H4
L1 L2
M1
SCR1
CR1
TDR1
CR2
CR3
MCR
PL1
PL2
CR1-1
TDR2-1
CR1-2
CR2-1 LS1 LS2 LS3 SOL1
CR4
TDR1
PS1HydPres
R
PL4
R
PL3
R
G
SEL1
SEL2
SS2
SS1 EnableOff On
1
2
13
14
3
4
5
6
TDR2CR4-1
PB6StartCycle
15
7
8
9
10
11
23
25
26
24
12
TDR2-2 LS4 LS5 CR3-1SOL2
16
18
19
20
21
22
17
LS4
PB7Unload
PL5
G
SOL3
PL7G
PL6
G
M2
TDR3
TDR3-1Main Back-Up
SS3
LS6 TDR3-2
SOL4
PL8G
LS7 TDR3-3
Figure 45. Electromechanical relay diagram.
www.globalautomation.info

49
Introduction to PLC Programming and Implementation—from relay logic to PLC logic
PB1MasterStart
PB2MasterStop
PB3Emergency
Stop 1
PB4Emergency
Stop 2
M1 SCR1-2
SCR1-1
OL1 OL1
4FU
H1
X1 X2 X3
H2 H3 H4
L1 L2
M1
SCR1
PL1
G
PLC FaultContact 1
PLC FaultContact 2 PLC Fail Alarm
PLC
Figure 46. Elements of the moderization example system to be left hardwired.
sserddAO/I
eludoMepyT kcaR puorG lanimreT noitpircseD
tupnI 0 0 0 BPputeS—5BP0 0 1 )CNderiw(teseR—6BP0 0 2 hctiwserusserpciluardyH—1SP0 0 3 CN(hctiwsrotceleselbanE—1SS
)detcennocnutfeltcatnoc
tupnI 0 0 4 noitisop1tceleS—1LES0 0 5 noitisop2tceleS—2LES0 0 6 )1noitisop(puhctiwstimiL—1SL0 0 7 )2noitisop(puhctiwstimiL—2SL
tupnI 0 1 0 tesnoitacoL—3SL0 1 1 elcycdaoltratS—6BP0 1 2 )CNderiw(parT—4SL0 1 3 hctiwsnoitisoP—5SL
tupnI 0 1 4 BPdaolnU—7BP0 1 5 )ONderiw(pukcab/niaM—3SS0 1 6 tcetedhtgnelmumixaM—6SL0 1 7 pukcabhtgnelmuminiM—7SL
tuptuO 0 3 0 KOputeS—2LP0 3 1 1tceleS—3LP0 3 2 2tceleS—4LP0 3 3 drawrofecnavdA—1LOS
tuptuO 0 3 4 egagnE—2LOS0 3 5 NOegagnE—5LP0 3 6 rotomnuR—2M0 3 7 NOnurrotoM—6LP
tuptuO 0 4 0 potstsaF—3LOS0 4 1 NOpotstsaF—7LP0 4 2 pukcabhtiwdaolnU—4LOS0 4 3 NOpukcaB—8LP
Table 20. I/O address assignment.
www.globalautomation.info

50
Introduction to PLC Programming and Implementation—from relay logic to PLC logic
eciveD lanretnI noitpircseD
1RC 0001 )ydRputeS(1RC1RDT 0002 detalumucca(0003retsigerces01teserpremiT
)1003retsigerRCM 0071RCM sserddaRCMtsriF2RC — sserdda3LPsaemaS3RC — sserdda4LPsaemaS4RC — 1LOSsaemaS
— 1001 fotcatnocsuoenatnatsniroflanretniputesoT2RDT
2RDT 1002 detalumucca(2004retsigerces5teserpremiT)3004retsiger
— 2001 fotcatnocsuoenatnatsniroflanretniputesoT3RDT
3RDT 2002 detalumucca(4004retsigerces21teserpremiT)5004retsiger
Table 21. Internal address assignment.
1700 accomplishes this same function (for this example, MCR1700 is thefirst available address for MCRs). If the MCR coil is not energized, the PLCwill not execute the ladder logic that is fenced between the MCR coil and theEND MCR instruction.
An internal will not replace the control relay CR2 in line 9 since the PL3contacts in line 10 can be used instead. This technique can be used whenevera control relay is in parallel with a real output device. Moreover, we do notneed to separate the coils in lines 17 and 18 of the hardwired logic. This hasalready been done, since the PLC used here does not allow rungs withmultiple outputs. Using separate rungs for each output is always a goodpractice.
The normally closed inputs that are connected to the input modules areprogrammed as normally open, as explained in the previous sections. Thelimit switch LS4 has two contacts—a normally open one and a normallyclosed one in lines 17 and 19, respectively, of Figure 45. However, only oneset of contacts needs to be connected to the controller. In this example, wehave selected the normally closed contact LS4. Although the normally opencontact is not connected to the controller, its hardwired function can still beachieved by programming LS4 as a normally closed ladder contact.
Applications such as this one also require timers with instantaneouscontacts, which are not available in most PLCs. An instantaneous contact isone that opens or closes when the timer is enabled. In most PLCs, an internalcoil is used as a substitute for an instantaneous contact. Line 15 in thehardwired logic shows that, if PB6 is pressed and CR4 is closed, the timerTDR2 will start timing and contact TDR2-1 will seal PB6. This arrangementrequires special PLC implementation. If we use software timer contacts, the
www.globalautomation.info
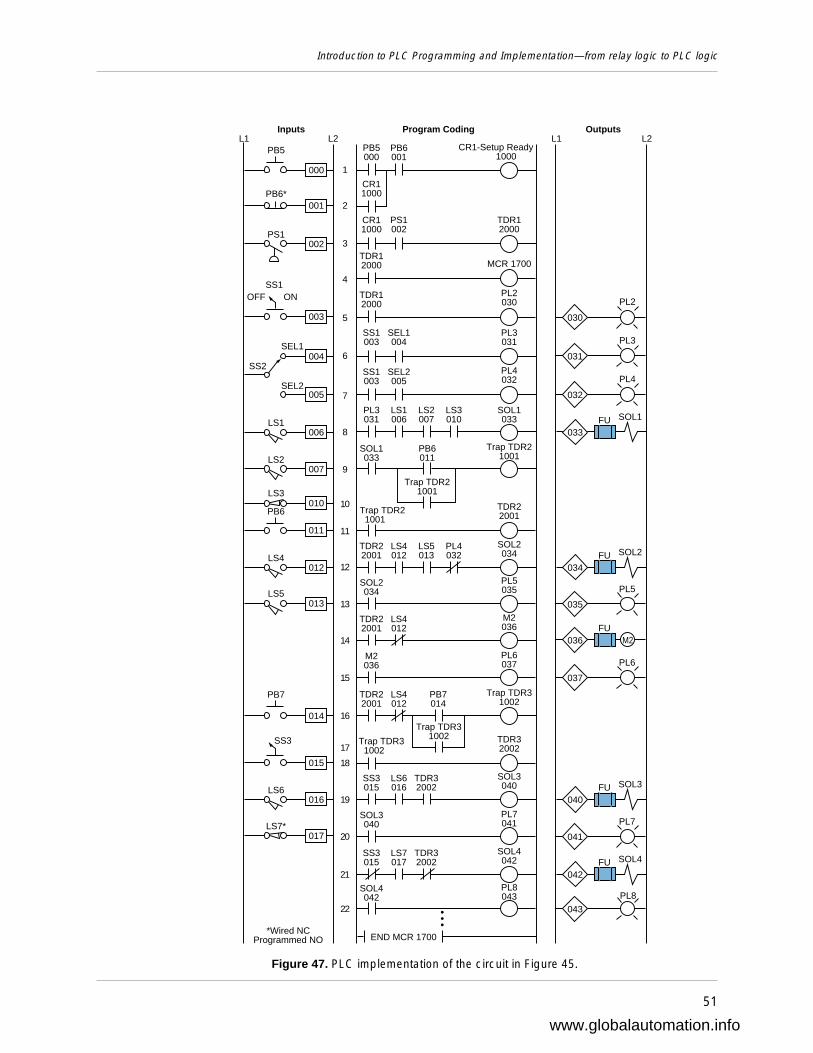
51
Introduction to PLC Programming and Implementation—from relay logic to PLC logic
L1 L1 L2L2PB5
PB6*
PS1
000
001
Inputs Program Coding Outputs
002
003
004
SS1
SS2
PL2
030
PL3
031
PL4
032
033
PB5000
CR11000
PB6001
CR1-Setup Ready 1000
CR11000
TDR12000
PS1002
TDR12000
SS1003
SEL1004
PL3031
005
SS1003
SEL2005
PL4032
M2036
TDR22001
LS4012
M2036
MCR 1700
TDR12000
PL2030
015
SS3 Trap TDR3 1002
TDR32002
013 035
SOL2034
PL5035
010
LS1006
PL3031
LS1006
LS2007
LS3010
SOL1033
SEL1
SEL2
END MCR 1700*Wired NC
Programmed NO
FU
034LS4
012
TDR22001
LS4012
LS5013
PL4032
SOL2034 FU
FU
LS2
LS3
011
Trap TDR2 1001
TDR22001PB6
LS5
PB7
007
SOL1033
PB6011
Trap TDR21001
Trap TDR21001
Trap TDR31002
014
TDR22001
LS4012
PB7014
Trap TDR31002
SOL1
SOL2
040LS6
016
SS3015
LS6016
TDR32002
SOL3040 FU SOL3
PL5
037
M2036
PL6037 PL6
1
2
3
4
5
6
7
8
9
10
11
12
13
017 041
SOL3040
PL7041LS7* PL7
PL8
20
043
SOL4042
PL8043
22
14
15
16
17
18
19
042
SS3015
LS7017
TDR32002
SOL4042 FU SOL4
21
ONOFF
Figure 47. PLC implementation of the circuit in Figure 45.
www.globalautomation.info

52
Introduction to PLC Programming and Implementation—from relay logic to PLC logic
timer will not seal until it has timed out. If PB6 is released, the timer will resetbecause PB6 is not sealed. To solve this problem, we can use internal coil1001 to seal PB6 and start timing timer 2001 (TDR2). Lines 9, 10, and 11of the PLC program coding show this technique. The time delay contacts(2001) are used for ON delays.
www.globalautomation.info

Introduction to PLCProgramming andImplementation—from relay logic toPLC logic
Study Guide and ReviewQuestions
PLC Skills• Review
• Reinforce
• Test
• Sharpen
www.globalautomation.info

54
Introduction to PLC Programming and Implementation—from relay logic to PLC logic
STUDY GUIDE
• The first step in developing a control program is the definition of the control task.The control task specifies what needs to be done and is defined by those who areinvolved in the operation of the machine or process.
• The second step in control program development is to determine a control strategy,the sequence of processing steps that must occur within a program to produce thedesired output control. This is also known as the development of an algorithm.
• A set of guidelines should be followed during program organization andimplementation in order to develop an organized system. Approach guidelinesapply to two major types of projects: new applications and modernizations ofexisting equipment.
• Flowcharting can be used to plan a program after a written description has beendeveloped. A flowchart is a pictorial representation of the process that records,analyzes, and communicates information, as well as defines the sequence of theprocess.
• Logic gates or contact symbology are used to implement the logic sequences in acontrol program. Inputs and outputs marked with an “X” on a logic gate diagramrepresent real I/O.
• Three important documents that provide information about the arrangement of thePLC system are the I/O assignment table, the internal address assignment table, andthe register address assignment table.
- The I/O assignment table documents the names, locations, and descriptions of thereal inputs and outputs.
- The internal address assignment table records the locations and descriptions ofinternal outputs, registers, timers, counters, and MCRs.
- The register address assignment table lists all of the available PLC registers.
• Certain parts of the system should be left hardwired for safety reasons. Elements suchas emergency stops and master start push buttons should be left hardwired so that thesystem can be disabled without PLC intervention.
• Special cases of input device programming include the program translation ofnormally closed input devices, fenced MCR circuits, circuits that allow bidirectionalpower flow, instantaneous timer contacts, and complicated logic rungs.
- The programming of contacts as normally open or normally closed depends onhow they are required to operate in the logic program. In most cases, if a normallyclosed input device is required to act as a normally closed input, its referenceaddress is programmed as normally open.
www.globalautomation.info
55
Introduction to PLC Programming and Implementation—from relay logic to PLC logic
- Master control relays turn ON and OFF power to certain logic rungs. In a PLCprogram, an END MCR instruction must be placed after the last rung an MCR willcontrol.
- PLCs do not allow bidirectional power flow, so all PLC rungs must be pro-grammed to operate only in a forward path.
- PLCs do not provide instantaneous contacts; therefore, an internal output must beused to trap a timer that requires these contacts.
- Complicated logic rungs should be isolated from the other rungs during program-ming.
• Program coding is the process of translating a logic or relay diagram into PLC ladderprogram form.
• The benefits of modernizing a relay control system include greater reliability, lessenergy consumption, less space utilization, and greater flexibility.
REVIEW QUESTIONS
1 What is the first step in designing an effective PLC control system?
a–approach the system in a systematic mannerb–flowchart the processc–define the control taskd–define the control strategy
2 A(n) __________________ is a procedure that uses a finite number of steps toachieve a desired outcome.
3 List four guidelines that are recommended as an approach to modernizing acontrol system.
4 In a modernization project, an existing __________________ often defines thesequence of events in the control program.
5 System operation for new applications usually begins with:
a–sample diagramsb–specificationsc–the control strategyd–logic diagrams
6 A(n) __________________ is a graphical representation of a solution’s algorithm.
7 Logic sequences for a control program can be created using:
a–logic gatesb–relay ladder symbologyc–PLC contact symbologyd–all of the above
www.globalautomation.info

56
Introduction to PLC Programming and Implementation—from relay logic to PLC logic
8 Draw the equivalent logic gate diagram for the circuit shown in Figure 1.
Figure 2. Logic gates for problem 9.
9 Draw the equivalent contact symbology diagram for the logic gates shown inFigure 2.
Figure 1. Circuit for problem 8.
10 True/False. Only real inputs and outputs are documented during address assign-ment.
11 I/O address assignments are typically represented in one of three numbersystems: __________________, __________________, or __________________.
12 The I/O address assignment table should closely follow the __________________.
13 Using the circuit shown in Figure 3 and assuming that the PLC has a modularity of8 points per module, there are eight modules per rack, the master rack is numbered0, and the number system is octal:
(a) circle all real inputs and outputs
(b) assign the I/O addresses
(c) draw the I/O connection diagram
LS1StartPB
Switch
SOL1
PL1
Start Stop
M1
LS2 PS1
LS1 M1
www.globalautomation.info

57
Introduction to PLC Programming and Implementation—from relay logic to PLC logic
14 The principle reason for leaving certain portions of the control circuit hardwired isto:a–minimize wiringb–avoid failure of main magnetic elementsc–ensure safetyd–keep some devices running at all times
15 The PLC fault contacts are wired to other hardwired emergency circuit elements:a–in parallelb–in seriesc–normally opend–normally closed
16 The main reason the PLC fault contacts are included in the hardwired circuit is:a–to prevent system shut downb–to detect I/O failuresc–to include the PLC as an emergency stop conditiond–to shut down the system if there is a PLC failure
17 Describe the purpose and operation of a safety control relay (SCR).
18 True/False. Normally closed input devices are always programmed normally open.
Figure 3. Circuit for problem 13.
L1 L2
CR1LS7PB14
CR1
CR2
CR3
PL3
PL4
SOL3 UPCR1SEL
PS7
CR3
SOL4 FWDLS9LS8
LS8
CR2
SOL5 DWNReset CR2Start
www.globalautomation.info

58
Introduction to PLC Programming and Implementation—from relay logic to PLC logic
19 What is the purpose of the normally closed PLC fault contacts in the circuit inFigure 4 and describe what will happen if the PLC fails?
M2Start
Stop
M2 M3
PLC FaultContact 1
PLC FaultContact 2
M3
SCR
PL1
PLC Fail Alarm
PLC
OLs
OLs
OLs
F1
DisconnectSwich
Fuses 1M
M3
OLs
2M
M2
OLs
3M
M1
CoolantPump Motor
HydraulicPump Motor
SpindleMotor
L1 L2
SCR
Figure 4. Circuit for problem 19.
20 Using the circuit shown in Figure 5 and starting inputs at address 108, outputs ataddress 508, and internals at address 1008:
(a) assign the I/O addresses
(b) draw the equivalent PLC ladder diagram
21 True/False. In a PLC ladder program, an END MCR instruction must be used tofence the area controlled by a master control relay.
22 What element can be used to trap timers in a PLC control program?a–a reset instructionb–a start push buttonc–a pilot lightd–an internal output
www.globalautomation.info

59
Introduction to PLC Programming and Implementation—from relay logic to PLC logic
23 Explain why the hardwired circuit in Figure 6 must be reconfigured when it istranslated into a PLC ladder diagram.
Figure 5. Circuit for problem 20.
L1 L2
CR1LS1
SOL1
SOL2SEL1
PB2 PB3
PB1CR1
1
2
3
4
M1
Figure 6. Circuit for problem 23.
24 Program _____________________ is the process of translating logic or relay contactdiagrams into PLC ladder form.
25 Assuming that inputs use addresses 000–027, outputs use addresses 030–047,internals start at address 1008, timers start at address 2008, and an internal outputis used to trap the instantaneous timer contacts, use the circuit shown in Figure 7to:
(a) assign the internal addresses
(b) assign the I/O addresses
(c) draw the I/O connection diagram
LS14
CR10
PS1 CR10
LS15S4
CR10SOL7
SS3
SS4
www.globalautomation.info

60
Introduction to PLC Programming and Implementation—from relay logic to PLC logic
26 Given that the stop push button will be wired as normally open, use the circuit inFigure 8 to:
(a) assign the I/O addresses
(b) draw the I/O connection diagram
L1 L2
Stop Rev R M1
For PL1M1
All OLsFor
F
F M2
Rev PL2M2
R
Figure 8. Circuit for problem 26.
Figure 7. Circuit for problem 25.
L1 L2
TMR1PB1
PS1
TMR1
TS1FS1
CR1 LS1 SOL2
SOL1
CR1
CR2
TMR2CR1
CR3
CR3 SOL3TMR2
TMR1
PS2
3 sec
2 sec
www.globalautomation.info

61
Introduction to PLC Programming and Implementation—from relay logic to PLC logic
StopStart
OLL1 L2
TR1
TR1
S1
S1
TR1
TR1
TR1
S2
S2
S1 M1
M1
1
2
3
4
5
6
Figure 9. Circuit for problem 27.
Figure 10. Variable speed drive.
27 Circle the locations where timer traps will be used in the PLC implementation of thecircuit in Figure 9.
28 Figure 10 shows a variable speed drive that is manually controlled by an operatorstation. What input field devices are required for the PLC implementation of thisstation?
Sta
rtS
top
1
2
3
4
5
6
7
8
9
10
Run
Jog
Reverse
Forward
Reverse
Spare
Spare
Forward
Spe
edP
oten
tiom
eter
TB-1
To Speed Regulator
Common (Controller)
Field Drive
OL
OL
OL
CR1
CR1
115VAC
ChassisGround
Adjust
+12 V
www.globalautomation.info

62
Introduction to PLC Programming and Implementation—from relay logic to PLC logic
29 The PLC implementation of the large relay circuit in Figure 11 should include anormally open PLC fault contact and use internals to trap the timers. The PLC systemhas capacity for 512 I/O (000 to 777 octal). Inputs should start at address 0008 andoutputs should start at address 0308. Internals should have addresses 1000–1777,MCRs should have addresses 2000–2037, and timers should have addresses2040–2137. Using this large relay circuit:
(a) indicate the portions to be left hardwired
(b) assign the I/O addresses
(c) assign the internal addresses
(d) draw the I/O connection diagram
Figure 11. Large relay circuit.
(continued on next page)
M1
CR1
CR2
CR1
CR1UpLS1
Run
CR2
PL2
OLs
Setup/Run
MCR
Enable
MasterControlRelay
Master ON
1
2
3
4
5
6
M2Start
Stop
M2 M3
PLC FaultContact 1
M3
SCR
PL1
OLs
OLs
OLs
F1
DisconnectSwich
Fuses M3
M3
OLs
M2
M2
OLs
M1
M1
CoolantPump Motor
HydraulicPump Motor
SpindleMotor
L1 L2
SCR
www.globalautomation.info

63
Introduction to PLC Programming and Implementation—from relay logic to PLC logic
Figure 11 continued.
CR1
CR3
CR3
TDR1SOL1
SOL3
SOL4
SOL2
CR4
PL3
CR3Up
MCR
TDR1CR3
LS2
LS3
PL4
CR4
CR4
CR5
CR4
CR3
CR5FeedLS4
CR1 LS5 TDR1
CR25 seconds
Up
SOL Up
SOL Dn
Dn ON
Setup
Setup ON
Feed SOL
Fast SOL
7
8
9
10
11
12
13
14
15
16
17
18
19
www.globalautomation.info

64
ntroduction to PLC Programming and Implementation—from relay logic to PLC logic
ANSWERS
1 c–define the control task
2 algorithm
3 Guidelines for modernizing a control system include:
- understanding the actual process or machine function- reviewing the machine logic and optimizing it when possible- assigning real I/O addresses and internal addresses to inputs and outputs- translating relay ladder diagrams into PLC coding
4 relay ladder diagram
5 b–specifications
6 flowchart
7 d–all of the above
8
9
LS1
StopStart
LS2
PS1
M1
10 false; internal outputs are also documented during address assignment
11 octal, decimal, hexadecimal
12 I/O connection diagram
Switch SOL1
Start
PL1
PL1 LS1
SOL1
www.globalautomation.info

65
Introduction to PLC Programming and Implementation—from relay logic to PLC logic
13 (a)
(b)sserddAO/I
eludoMepyT kcaR puorG lanimreT noitpircseD
tupnI 0 0 0 41BP0 0 1 7SL0 0 2 7SP0 0 3 LES0 0 4 8SL0 0 5 9SL0 0 6 BPtratS0 0 7 BPteseR
erapS 0 1 0 desutoN• • •• • •• • •
0 1 7
tuptuO 0 2 0 3LP0 2 1 pU3LOS0 2 2 drawroF4LOS0 2 3 nwoD5LOS0 2 4 4LP0 2 5 —0 2 6 —0 2 7 —
L1 L2
CR1LS7PB14
CR1
CR2
CR3
PL3
PL4
SOL3 UPCR1SEL
PS7
CR3
SOL4 FWDLS9LS8
LS8
CR2
SOL5 DWNReset CR2Start
*
*LS8–only N.O. is connected to PLC it is programmed as N.C.
;
www.globalautomation.info

66
ntroduction to PLC Programming and Implementation—from relay logic to PLC logic
(c)
14 c–ensure safety
15 b–in series
16 d–to shut down the system if there is a PLC failure
17 A safety control relay is used to remove power from the I/O modules during a system error.
When a malfunction occurs, the safety control relay will turn off, opening its SCR contact to
stop the flow of power to the connected devices.
18 false; most of the time a normally closed input device is programmed as normally open;
however, the programming of the input will depend on its function in the program
19 The normally closed PLC fault contacts are used to energize the PLC failure alarm. If the PLC
fails, the PLC fault coil will not energize. Therefore, the normally open PLC fault contacts will
not close to provide power to the connected devices. Instead, the normally closed PLC fault
contacts will remain closed, sounding the PLC failure alarm.
SOL4
SOL5
L1 L1 L2L2
PB14
LS7
LS8
LS9
PS7
Start
Reset
000
001 021
Inputs Outputs
ProgramCoding
002
003023
004
005
006
007
Input Output
020
022
PL3
PL4
SOL3
024
026
027
025
SEL
www.globalautomation.info

67
Introduction to PLC Programming and Implementation—from relay logic to PLC logic
20 (a)
(b)
21 true
22 d–an internal output
23 There is a possibility of bidirectional power flow through the normally closed contact CR1in line 3. A PLC will only allow power to flow in a forward path. Therefore, if the reverse pathfrom line 4 to line 2 is meant to be followed, the circuit would have to be reconfigured so thatthe CR1 contacts are included in both lines 2 and 4.
24 coding
25 (a)
sserddAO/IeludoM
epyT kcaR puorG lanimreT noitpircseD
tupnI 0 1 0 41SL0 1 1 3SS0 1 2 1SP0 1 3 4S0 1 4 51SL0 1 5 4SS0 1 6 —0 1 7 —
tuptuO 0 5 0 7LOS• • •• • •• • •
lanretnI 1 0 0 01RC
010 011
100
012100
100
013 014
015050
eciveD lanretnI noitpircseD
1RMT 001 1RMTpartotdesU1RC — 1LOSsaemaS2RC — 2LOSsaemaS3RC 101 3RCecalpeR
1RMT 002 1remiT2RMT 102 2remiT
www.globalautomation.info

68
ntroduction to PLC Programming and Implementation—from relay logic to PLC logic
(b)
(c)
sserddAO/IeludoM
epyT kcaR puorG lanimreT noitpircseD
tupnI 0 0 0 1BP0 0 1 1SP0 0 2 1SF0 0 3 1ST0 0 4 1SL0 0 5 2SP0 0 6 —0 0 7 —
tuptuO 0 3 0 1LOS0 3 1 2LOS0 3 2 3LOS• • •• • •• • •
L1 L1 L2L2
PB1
PS1
000
100
100
001 100
030
000
001
PS2005
TS1 002 003 030
200 030 101
003
FS1 T200
002
201 005 101 032
LS1 200 030 004 031
200 030 004 T201
004
SOL1
031
SOL2
032
SOL3
PV3 TB 1 sec
PV2 TB1
www.globalautomation.info
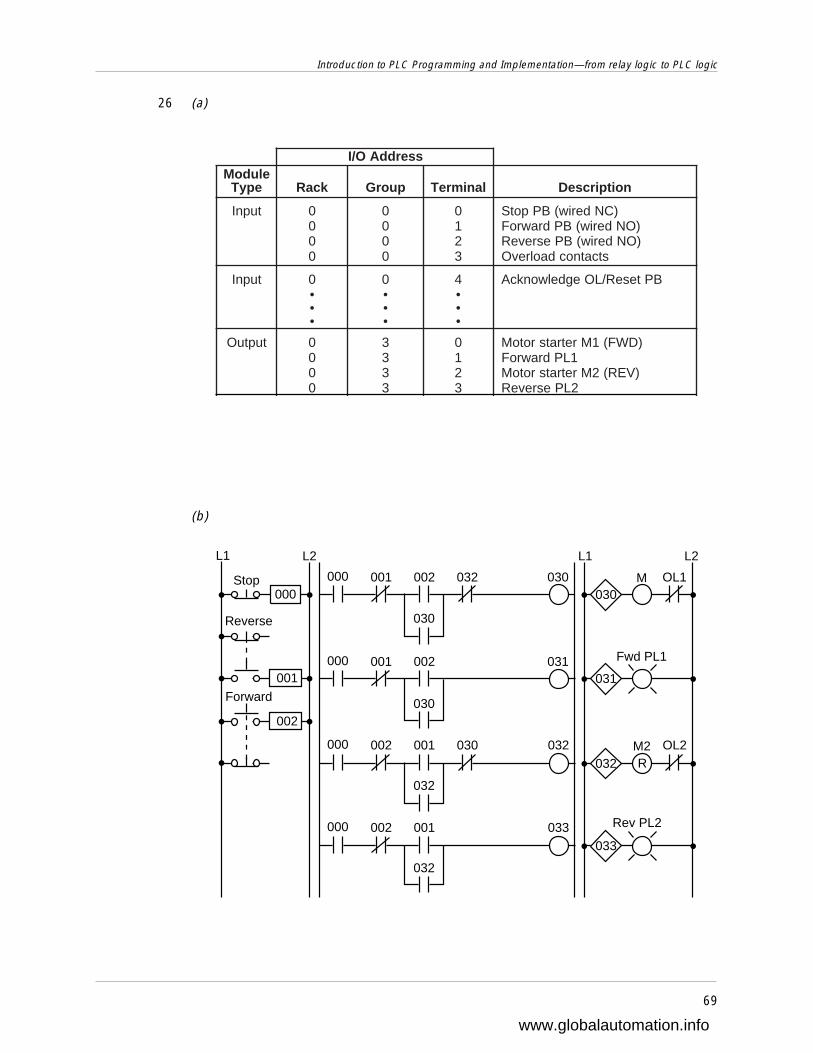
69
Introduction to PLC Programming and Implementation—from relay logic to PLC logic
26 (a)
(b)
sserddAO/IeludoM
epyT kcaR puorG lanimreT noitpircseD
tupnI 0 0 0 )CNderiw(BPpotS0 0 1 )ONderiw(BPdrawroF0 0 2 )ONderiw(BPesreveR0 0 3 stcatnocdaolrevO
tupnI 0 0 4 BPteseR/LOegdelwonkcA• • •• • •• • •
tuptuO 0 3 0 )DWF(1MretratsrotoM0 3 1 1LPdrawroF0 3 2 )VER(2MretratsrotoM0 3 3 2LPesreveR
L2L1L2L1
030000
Forward
Stop M
031
Fwd PL1
030
001 030000 002 032
032
032
001 030000 002 032
OL1
OL2
030
001 031000 002001
Reverse
RM2
033
032
001000 002 033 Rev PL2
002
www.globalautomation.info

70
ntroduction to PLC Programming and Implementation—from relay logic to PLC logic
27
M2Start
Stop
M2 M3
PLC FaultContact 1
PLC FaultContact 2
M3
SCR
PL1
PLC Fail Alarm
PLC
OLs
OLs
OLs
F1
DisconnectSwich
Fuses 1M
M3
OLs
2M
M2
OLs
3M
M1
CoolantPump Motor
HydraulicPump Motor
SpindleMotor
L1 L2
SCR
28 The field input devices are the start push button, stop push button, jog/run selector switch,and forward/reverse selector switch. The speed potentiometer will be replaced by an analogoutput in the PLC implementation.
29 (a)
StopStart
OLL1 L2
TR1
TR1
S1
S1
TR1
TR1
TR1
S2
S2
S1 M1
M1
1
2
3
4
5
6
www.globalautomation.info

71
Introduction to PLC Programming and Implementation—from relay logic to PLC logic
(b)
(c)
sserddAO/IeludoM
epyT kcaR puorG lanimreT noitpircseD
tupnI 0 0 0 nuR/puteS0 0 1 BPnuR0 0 2 1SLpU0 0 3 SSelbanE
tupnI 0 0 4 BPpU0 0 5 2SL0 0 6 3SL0 0 7 4SLdeeF
tupnI 0 1 0 5SL0 1 1 desutoN• • • •• • • •• • • •
0 1 7
tuptuO 0 3 0 retratS1M0 3 1 nOretsaM2LP0 3 2 pU1LOS0 3 3 nwoD2LOS
tuptuO 0 3 4 nOnwoD3LP0 3 5 nOputeS4LP0 3 6 deeF3LOS0 3 7 deeFtsaFLOS
eciveD lanretnI noitpircseD
1RC — 1MsaemaS2RC 0001 2RCecalpeRRCM 0002RCM RCMecalper—sserddaRCMtsriF3RC 1001 3RCecalpeR4RC — 4LPsaemaS5RC — 3LOSsaemaS
— 2001 remitparT1RDT 0402T 1RDTecalper—sserddaremittsriF
RCM 0002DNE noitcescigolRCMDNE— 3001 ecnefRCMni1LOSsaemaS
www.globalautomation.info

72
ntroduction to PLC Programming and Implementation—from relay logic to PLC logic
(d)
L2L1L2L1
030000
Setup/RunM1
031
PL2Master ON
001
Run
002LS1 Up*
003
004
Up
005LS5
LS6006
LS4007
LS5010
030
001 030000 OLs
006
1000
033
SOL2Down
032
SOL1Up
036
SOL3Feed
037
SOL4Fast Feed
034
PL3Down ON
035
PL4Setup ON
004 032000 035 1001 2040
035 036007
036 0371001
035
1001 033004 1002 1001
002 1000000 030
005 1003004 002
004 1001000 030
0351003
1003
MCR 2000003
031003
034033
035000
T20401002
End 2000
010 1002030
1000
Enable
*Wired NCProgrammed NO
www.globalautomation.info