introduction to microsoft office publisher 2010 · pdf filei will make your text italic, or...
TRANSCRIPT

7/14/2011 1 Version 1.0

Getting Started:
To Begin, click on the start menu icon on the bottom, left hand side of your screen
Next, click on All Programs
Scroll down until you see Microsoft Office,
Click on it, and find Microsoft Publisher 2010. Click to Open.
7/14/2011 2 Version 1.0

Publisher opens to a Page Design screen.
This page is where you can locate various
template designs for a multitude of business and personal needs.
We are going to begin with a simple flyer.
Please click on the Flyers icon.
7/14/2011 3 Version 1.0

Click on the All Marketing icon
Next, scroll down the list of templates until you find the template named, Book Sale,
under the Other header.
Once the template is selected, click the Create icon on the lower, right
hand side of the screen
7/14/2011 4 Version 1.0

When you open your template, the image below is what your workspace should look like
This flyer is being designed to advertise
a Book Sale at the Mid York Library System
7/14/2011 5 Version 1.0
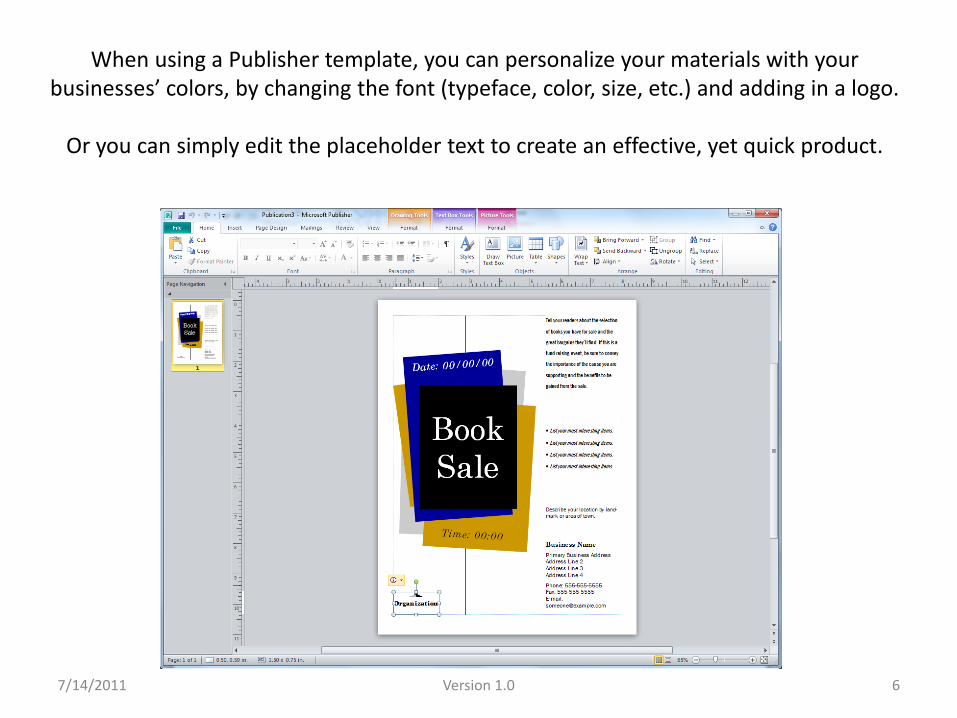
When using a Publisher template, you can personalize your materials with your businesses’ colors, by changing the font (typeface, color, size, etc.) and adding in a logo.
Or you can simply edit the placeholder text to create an effective, yet quick product.
7/14/2011 6 Version 1.0

To change the business information on the flyer, click on
File at the upper, left hand corner.
Next, under Info, click on
Edit Business Information
7/14/2011 7 Version 1.0

Begin typing in your organization’s information in the
Create New Business Information Set. For Individual name, type in the name of the contact person
for the event.
Under Job position or title,
type in the title of the contact person
listed above.
Under Organization, type in: Mid York Library System.
The Address line
should include the street address, city, state, and zip code
Under Phone, fax and e-mail, type in the phone number where the contact person can
be reached, as well as the company’s fax number and the email for the event, whether it be a personal email account, or in this case,
an event email.
Under Business
Information set name,
type in Book Sale
Then, click the Change button to
insert the organization’s logo
Under Tagline or motto,
type in The Information Experts
7/14/2011 8 Version 1.0

To find the logo to implement into your template design, click
on Documents.
In that folder will be a JPEG file, entitled
Mid York Logo. Double-click on that file.
Then, click on Publisher
Image Files.
7/14/2011 9 Version 1.0
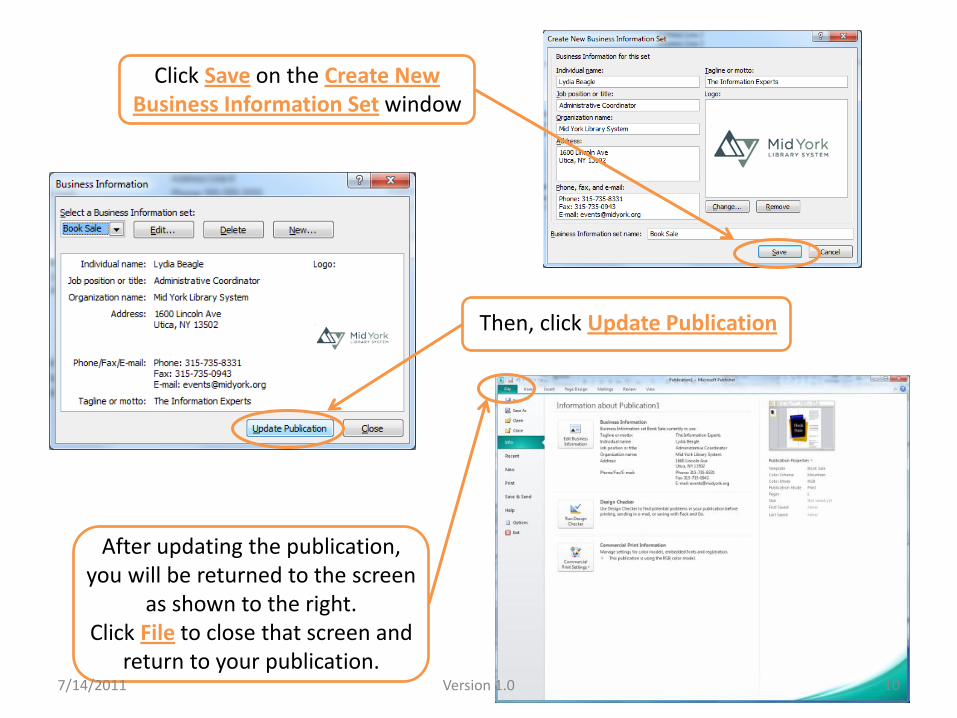
Click Save on the Create New Business Information Set window
Then, click Update Publication
After updating the publication, you will be returned to the screen
as shown to the right. Click File to close that screen and
return to your publication. 7/14/2011 10 Version 1.0

When you return to your publication, you
will see where the information you
typed into the Create New Business
Information Set window has been
added in.
Logo
Organization name and Address
Phone number, Fax Number and
Contact Email
7/14/2011 11 Version 1.0

Changing the Color Theme of Your Publication Using Preset Color Schemes
At the top of your Publication’s page, click on the Page Design tab.
You can scroll through the different color palettes to decide which one best suits the purpose, or theme, of your publication.
For the purposes of this lesson, we will use the Teal color scheme, as it has the same colors as the Mid York logo that we just inserted into our publication.
Click on the color scheme entitled Teal .
7/14/2011 12 Version 1.0

After applying the Teal color scheme, it is time to insert your event’s information into the appropriate placeholder text areas
Place your cursor over the text, 00/00/00, and click. This will highlight the area of the text that you need to change.
Once this is highlighted, you can begin typing in the correct Date information.
Type in 06/24/2011 where you highlighted.
7/14/2011 13 Version 1.0

Repeat the same steps to highlight and
change the time.
Once highlighted, type in 2:00pm
7/14/2011 14 Version 1.0
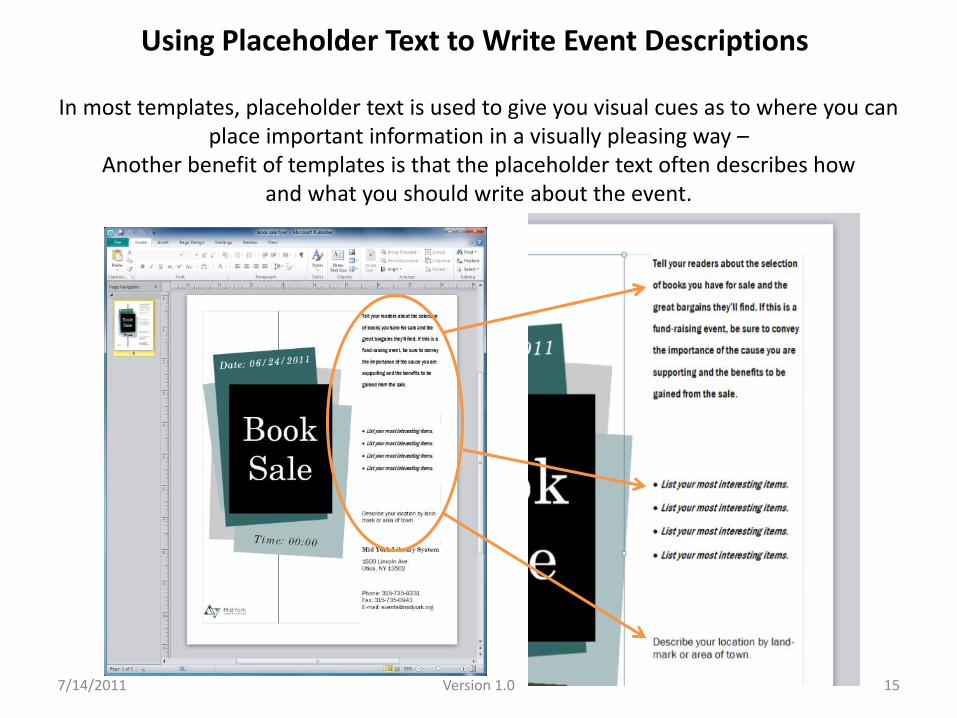
Using Placeholder Text to Write Event Descriptions
In most templates, placeholder text is used to give you visual cues as to where you can place important information in a visually pleasing way –
Another benefit of templates is that the placeholder text often describes how and what you should write about the event.
7/14/2011 15 Version 1.0

Click on the paragraph of text in the top, right hand corner of the publication.
Type the following in the highlighted area:
Come support your local library by shopping from
our huge selection of discarded books. Books range in price from 50
cents to $1.00 and all proceeds go towards
the purchase of new eBook titles for all 43 of our member libraries!
7/14/2011 16 Version 1.0
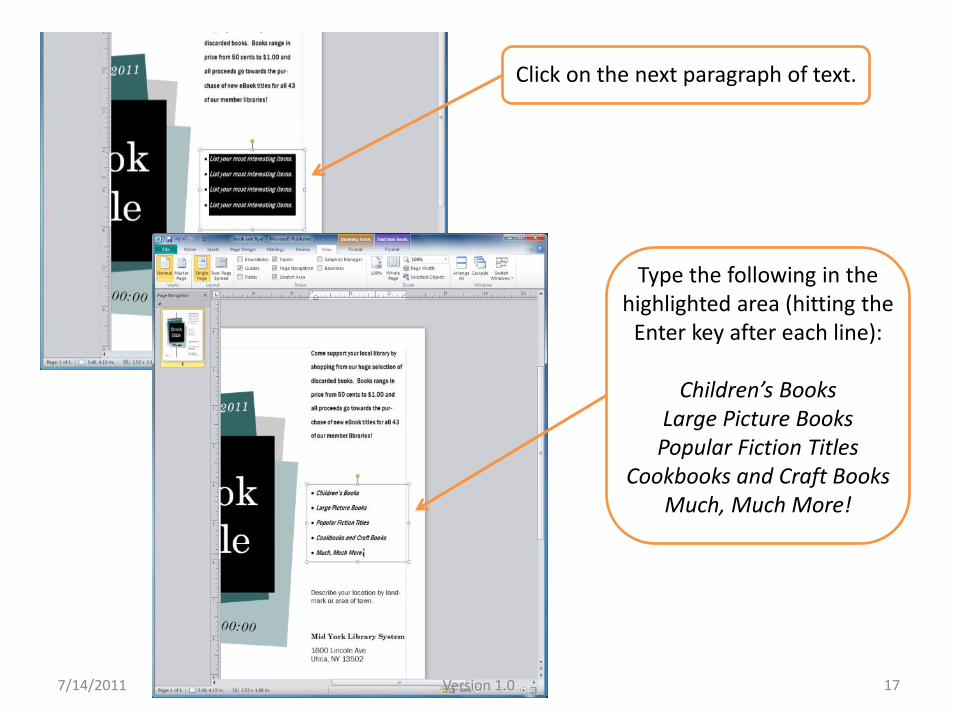
Click on the next paragraph of text.
Type the following in the highlighted area (hitting the
Enter key after each line):
Children’s Books Large Picture Books
Popular Fiction Titles Cookbooks and Craft Books
Much, Much More!
7/14/2011 17 Version 1.0

Click on the next paragraph of text.
Type the following in the highlighted area:
For more information about the Mid York Library System or the
Book Sale, check out our website at www.midyork.org
The Book Sale will be held at:
*Whenever creating a flyer for a business /organization, it is
always a good idea to provide a website where people who may
be unfamiliar with it can find out more information*
7/14/2011 18 Version 1.0

Spell-Checking Your Document It is always a good idea to do a Spell-check on any documents where you have edited or added in text.
Click on the Review Tab
at the top of your Publisher Window and then click
Spelling
If a word is spelled incorrectly, the Check Spelling window will pop up with suggested changes. In this case, Support is
the correct change: Click Support and Change
When all misspelled words have been corrected, or if there were no misspellings,
this window will pop up. Click OK
7/14/2011 19 Version 1.0
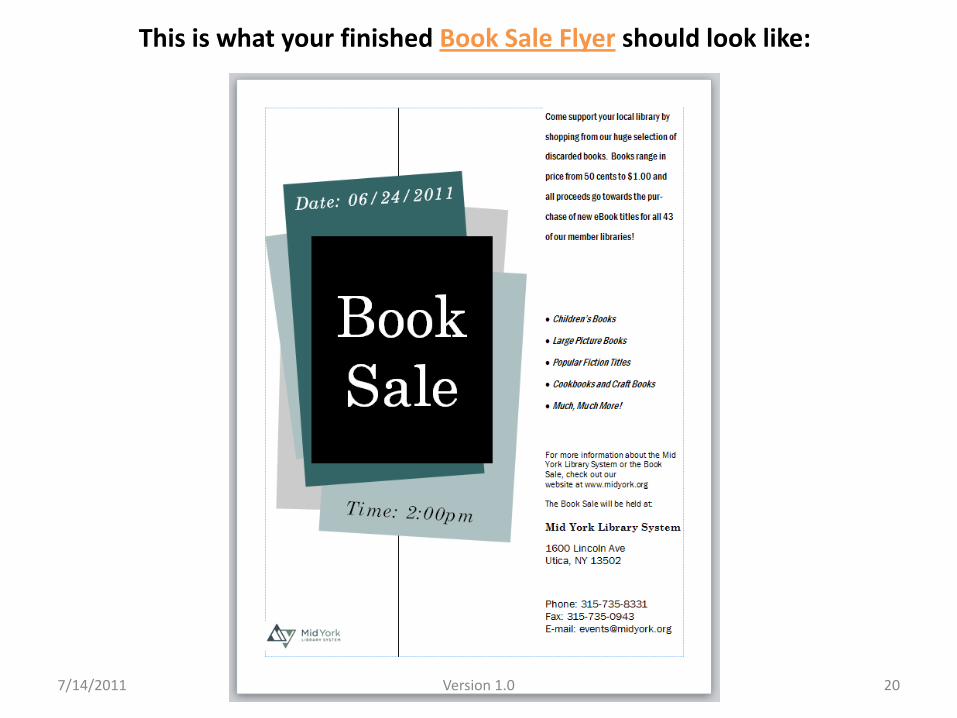
This is what your finished Book Sale Flyer should look like:
7/14/2011 20 Version 1.0

Text Editing Basics: Creating a Personalized Certificate
of Completion
7/14/2011 21 Version 1.0
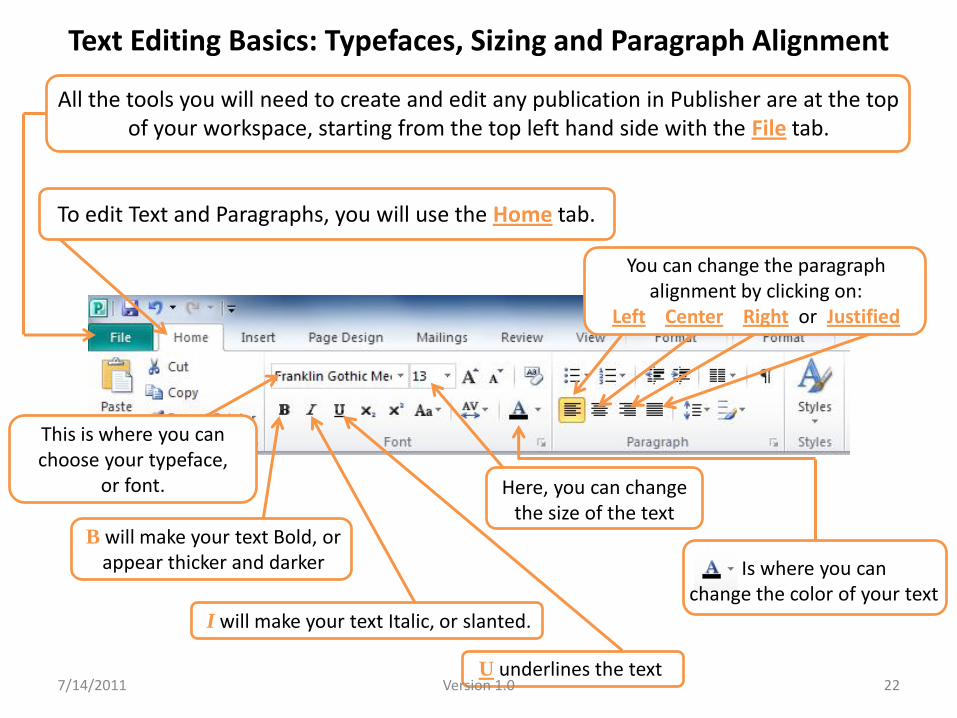
Text Editing Basics: Typefaces, Sizing and Paragraph Alignment
All the tools you will need to create and edit any publication in Publisher are at the top of your workspace, starting from the top left hand side with the File tab.
To edit Text and Paragraphs, you will use the Home tab.
I will make your text Italic, or slanted.
B will make your text Bold, or appear thicker and darker
U underlines the text
This is where you can choose your typeface,
or font. Here, you can change the size of the text
Is where you can change the color of your text
You can change the paragraph alignment by clicking on:
Left Center Right or Justified
7/14/2011 22 Version 1.0

Creating a New File
In the Publisher window, click on File in the top,
left hand corner.
Then, click New
7/14/2011 23 Version 1.0

Click on Award Certificates
Then, at the right hand side of the Templates window,
under where it says, Customize, click on the Color Schemes box
and scroll down until you find the Teal Color Scheme. Click on that.
7/14/2011 24 Version 1.0

Find the template named, Appreciation 7.
Click on it
Then, click Create
7/14/2011 25 Version 1.0
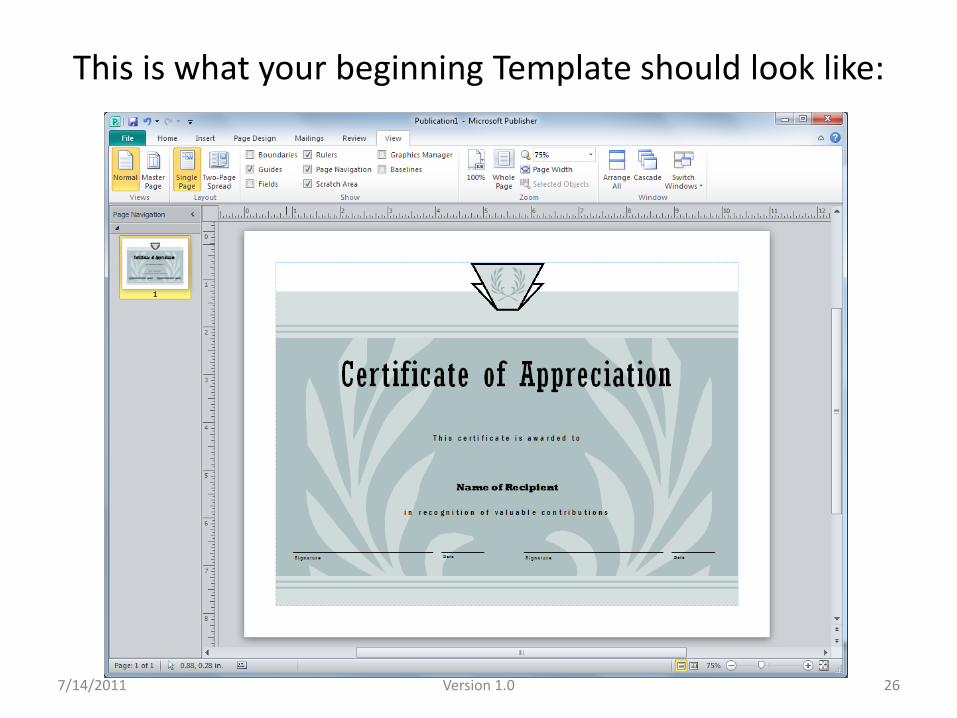
This is what your beginning Template should look like:
7/14/2011 26 Version 1.0

Click on the text, Certificate of Appreciation,
to highlight
Delete the current text and type: Certificate of Completion
7/14/2011 27 Version 1.0

Highlight the text, Certificate of Completion
Then, in the Upper, Left Hand Corner
of the window, click on the Home tab
7/14/2011 28 Version 1.0

Click on the Font Name in your Home toolbox – a drop-down
menu will appear with all of your computers loaded fonts.
Change the Font to Perpetua Titling MT and in
the Font Size box, type in 34.
Then, click on the Bold button to increase the Font’s thickness.
7/14/2011 29 Version 1.0

Click in the text box, This Certificate is Awarded to
Place your cursor over the highlighted text box until a vertical arrow appears ( ).
Then, click and pull the text box up to make the text box bigger
7/14/2011 30 Version 1.0

Click on the Font Menu and scroll down until you find Perpetua.
Click on that font.
Then, change the font size to 24 in the Font Size Menu
Next, click in the text box, Name of Recipient
7/14/2011 31 Version 1.0
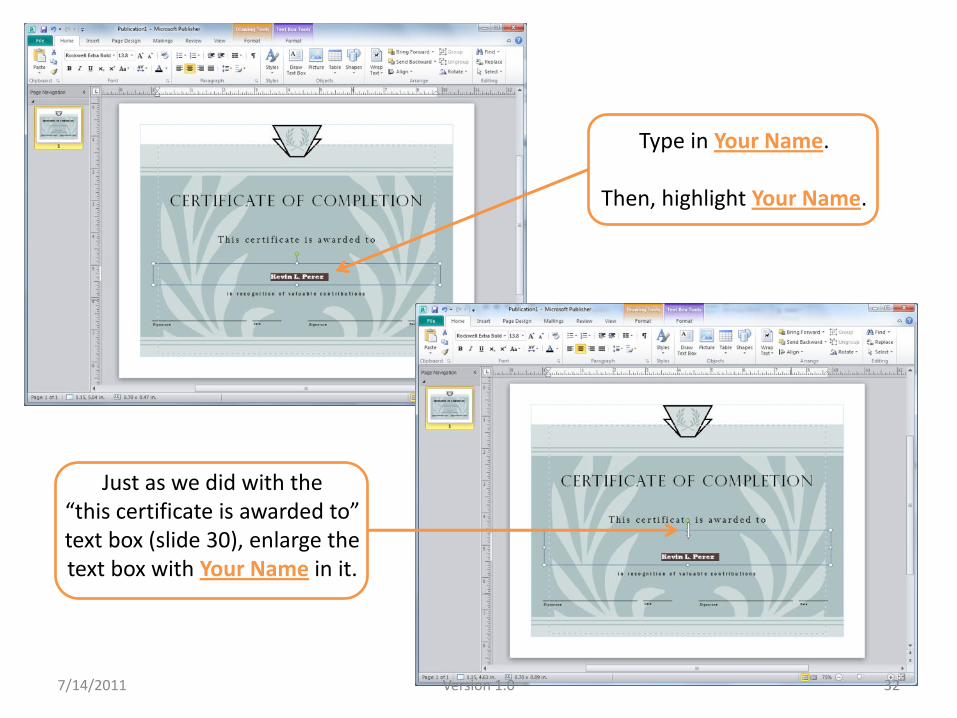
Type in Your Name.
Then, highlight Your Name.
Just as we did with the “this certificate is awarded to” text box (slide 30), enlarge the text box with Your Name in it.
7/14/2011 32 Version 1.0
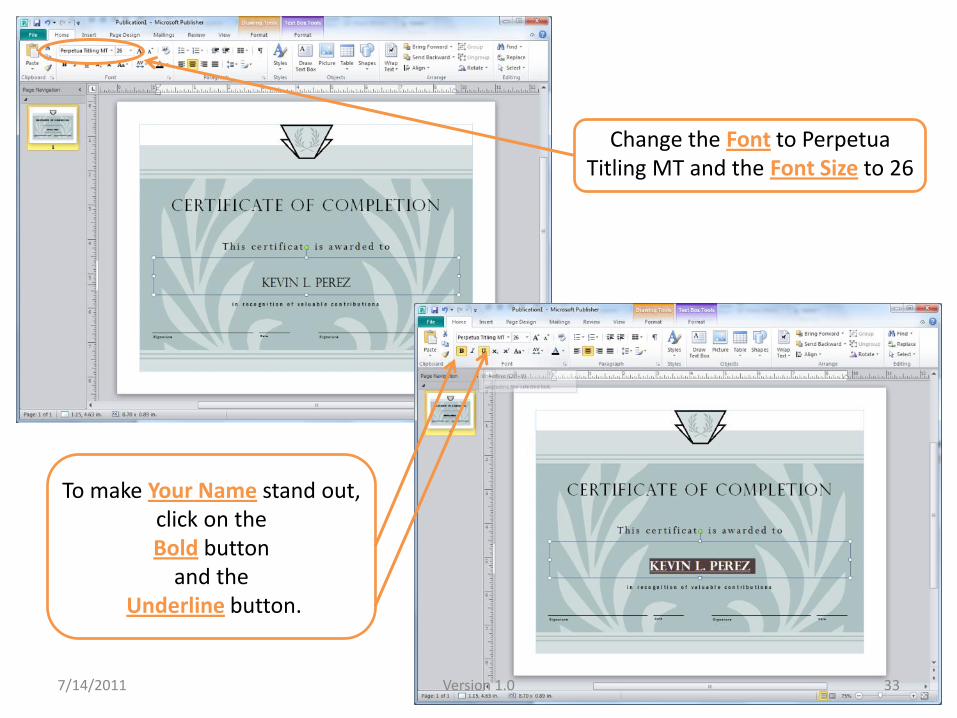
Change the Font to Perpetua Titling MT and the Font Size to 26
To make Your Name stand out, click on the Bold button
and the Underline button.
7/14/2011 33 Version 1.0
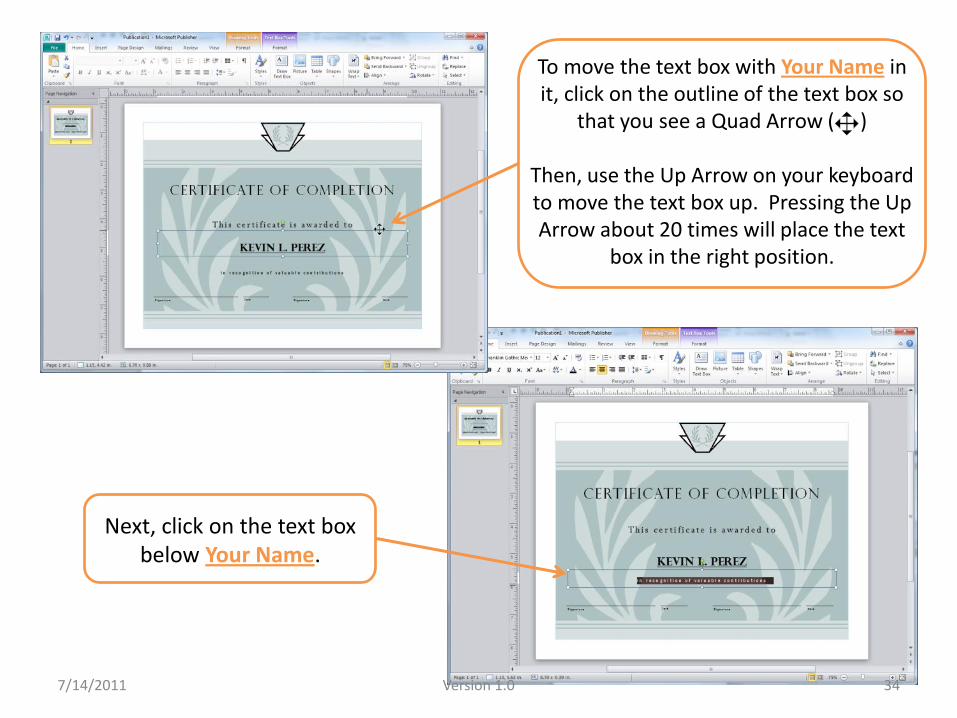
To move the text box with Your Name in it, click on the outline of the text box so
that you see a Quad Arrow ( )
Then, use the Up Arrow on your keyboard to move the text box up. Pressing the Up Arrow about 20 times will place the text
box in the right position.
Next, click on the text box below Your Name.
7/14/2011 34 Version 1.0

Once again, follow the instructions (used on
slide 30 and 32) to increase the size of
the text box.
Then, to insert new text, either Delete the
current text, or highlight it and begin
typing over it.
Change the current text to read:
For successfully completing two hours
of instruction in Microsoft Publisher
2010 on June 24, 2011
7/14/2011 35 Version 1.0
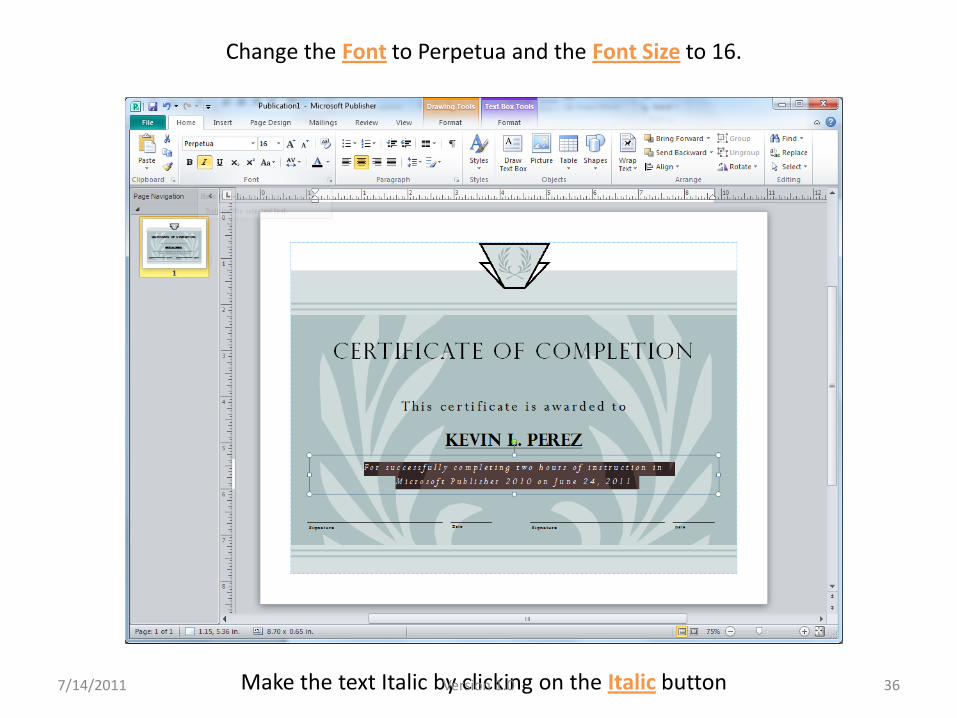
Make the text Italic by clicking on the Italic button
Change the Font to Perpetua and the Font Size to 16.
7/14/2011 36 Version 1.0
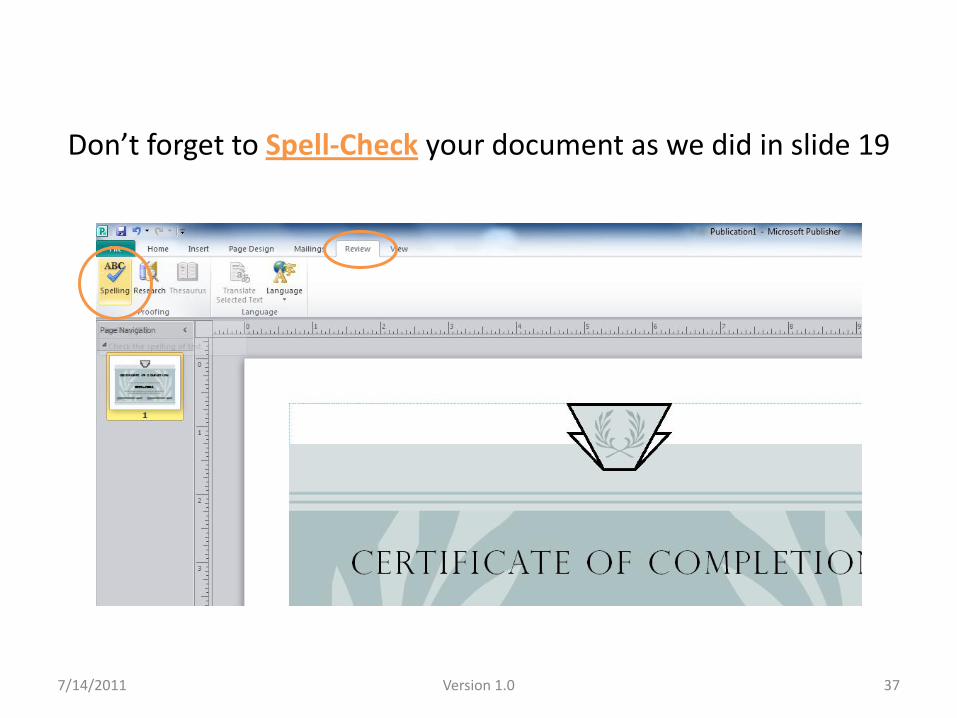
Don’t forget to Spell-Check your document as we did in slide 19
7/14/2011 37 Version 1.0

This is what your finished Certificate of Completion should look like:
Congratulations! 7/14/2011 38 Version 1.0

This training session was developed for the Public Computing Center (PCC) and Mobile Public Computing Center (mPCC) at Mid York Library System. The PCC and mPCC are funded by two Broadband Technology Opportunity Program (BTOP) grants. These grants are part of $9.5 million that was awarded to the New York State Library, a unit of the Office of Cultural Education within the New York State Education Department (NYSED) by the U.S. Department of Commerce National Telecommunications and Information Administration (NTIA) in order to increase access to computers in public libraries across New York State. Funding for this award is being provided by the American Reinvestment and Recovery Act (ARRA) Broadband Technology Opportunities Program.
7/14/2011 39 Version 1.0