instructions - qc supply
TRANSCRIPT

Ref. No. Part No. Description Qty.
1 THI80 Caplug, W5, 1/2” 4
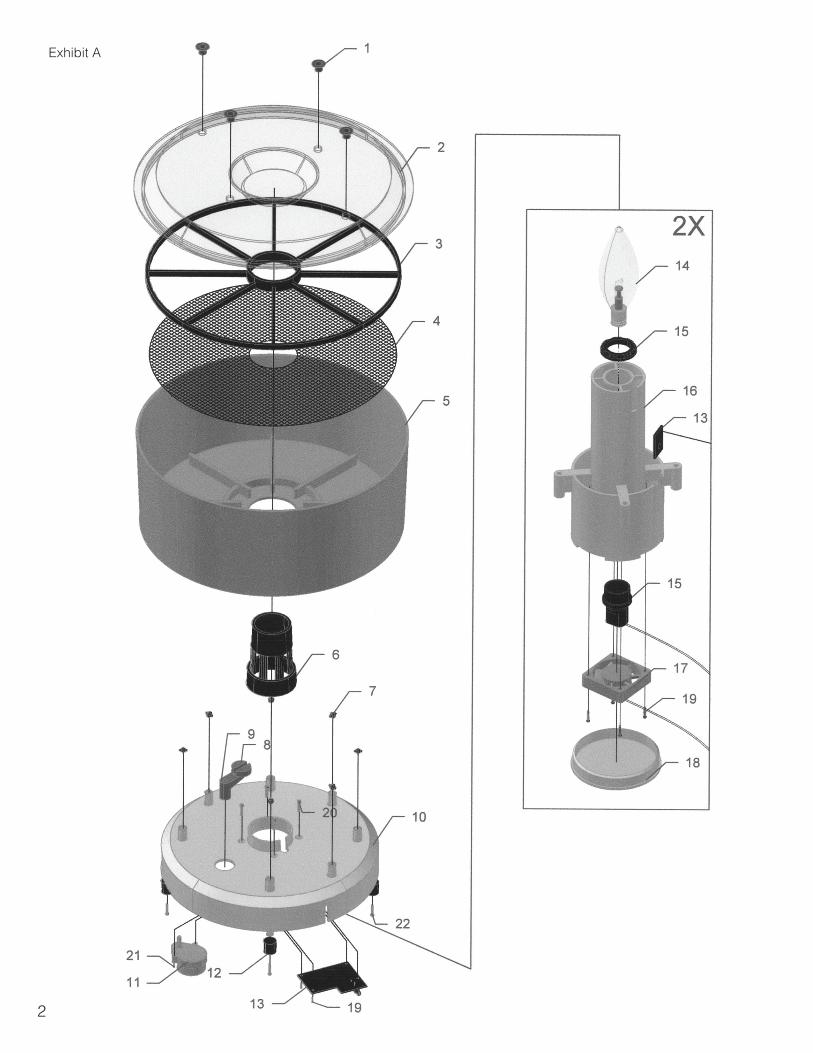
2 THI73 Cover, THI Incubator 13 THI74 Turn Rack, THI Incubator 14 THI75 PVC Coated Wire Floor, 16” 15 THI202 Tray, THI Incubator 16 THI203 Tower, THI Incubator 17 THI255 3/8” Wheel, Nylon 78 THI224 Crank Roller, THI Incubator 19 THI360 Crank, THI Incubator 110 THI301 Base, THI Incubator 111 THI236 Motor 150 120V/60Hz, 1/120 RPM 112 70253 516R Recessed Bumper 413 EC1000 Incubator Control, THI30 114 THI81 Bulb, 60W, Candelabra Base, 110/60 115 THI237 Candelabra Base with Nut 116 THI321 Fan and Bulb Housing 117 THI238 40 mm Cooling Fan, 12V DC, 6 CFM 118 THI266 Housing Cap 119 OF517 #4 x 5/8” PH Screw 820 OF516 #8 x 3/4” PH Screw 421 OF518 #8 x 3/8” PH Screw 622 OF524 #8 x 1” PH Screw 423 THI79 Thermometer 124 THI385 Base Cover Plate (Not Shown) 125 THI267 Strain Relief (Not Shown) 126 THI77 Cord Set, 5’ (Not Shown) 127 THI86 3 AMP Fuse (Not Shown) 228 ISBTHI30 Instruction Manual (Not Shown) 129 ISBIG Guide to Successful Incubation (Not Shown) 1
INSTRUCTIONSAND REPAIR PARTS LIST
CAUTION On all equipment used in incubation and brooding, be sure power cord assemblies are not connected when installing, cleaning or making repairs. Be sure any outlet used for power cord con-nection is actually grounded. Brower cord assemblies and heaters or heat sources should only be repaired by a qualified electrician. Frayed or worn power cords should be replaced immediately. • BROWER INCUBATORS must be plugged into a ground fault circuit interrupter (GFI) protected
outlet.• BROWER INCUBATORS must NOT be connected to an outlet with extension cords.• BROWER INCUBATORS controls or any electrical components must NOT be subjected to water.
Do NOT spray water into the tower of the incubator.• BROWER INCUBATORS must be repaired using only Brower supplied repair parts, except for Ref.
No. 14 and 27. Failure to follow these safety precautions could result in an electrical shock causing serious injury or death. Do NOT surround you incubator-underneath, on the sides, on the top-with materials such as blankets, towels, rags, newspaper or the like. Do NOT place any materials inside the incubator such as newspaper, paper towels and so forth (anywhere-above the floor or below the floor). Following hatching, your incubator should be cleaned and dried as soon as possible. Do not allow a high concentration of moisture to remain in the incubator. With Brower’s Top Hatch Incubator, Models THI30 or THI30220, the tray is separate from any electrical parts. The tray is dishwasher safe (on low heat) and can be cleaned using other techniques described herein. Allow all these parts to dry before you place the lid on the tray and store these parts until the next usage. Brower assumes no liability for failed hatches or problems which develop after hatching.When it comes to species other than birds--snakes, turtles and the like--please consult an expert in these areas. We do not represent that our equipment can be used with any species other than birds.
THI30 and THI30220EGG INCUBATOR
! !
Brower®
PO BOX 2000 • HOUGHTON, IOWA 52631 USAPHONE 319-469-4141 • FAX 319-469-4402E-mail: [email protected] • Web: www.browerequip.com
EQUIPMENT FOR POULTRY • LIVESTOCK • PETS
COPYRIGHT © 2012ALL RIGHTS RESERVED
ISBTHI30REV. 1.2
PRINTED IN U.S.A.
1
2
Exhibit A
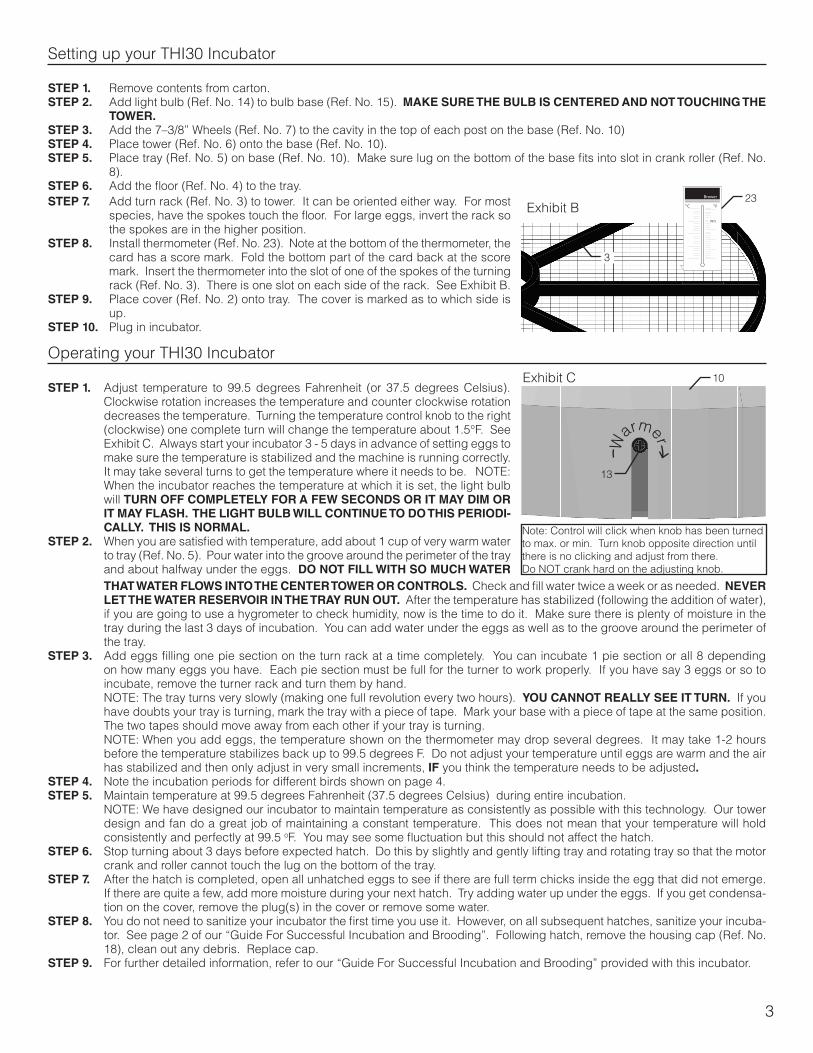
Note: Control will click when knob has been turned to max. or min. Turn knob opposite direction until there is no clicking and adjust from there.Do NOT crank hard on the adjusting knob.
Setting up your THI30 Incubator
STEP 1. Remove contents from carton. STEP 2. Add light bulb (Ref. No. 14) to bulb base (Ref. No. 15). MAKE SURE THE BULB IS CENTERED AND NOT TOUCHING THE
TOWER. STEP 3. Add the 7–3/8” Wheels (Ref. No. 7) to the cavity in the top of each post on the base (Ref. No. 10)STEP 4. Place tower (Ref. No. 6) onto the base (Ref. No. 10). STEP 5. Place tray (Ref. No. 5) on base (Ref. No. 10). Make sure lug on the bottom of the base fits into slot in crank roller (Ref. No.
8). STEP 6. Add the floor (Ref. No. 4) to the tray.
Operating your THI30 Incubator
STEP 1. Adjust temperature to 99.5 degrees Fahrenheit (or 37.5 degrees Celsius). Clockwise rotation increases the temperature and counter clockwise rotation decreases the temperature. Turning the temperature control knob to the right (clockwise) one complete turn will change the temperature about 1.5°F. See Exhibit C. Always start your incubator 3 - 5 days in advance of setting eggs to make sure the temperature is stabilized and the machine is running correctly. It may take several turns to get the temperature where it needs to be. NOTE: When the incubator reaches the temperature at which it is set, the light bulb will TURN OFF COMPLETELY FOR A FEW SECONDS OR IT MAY DIM OR IT MAY FLASH. THE LIGHT BULB WILL CONTINUE TO DO THIS PERIODI-CALLY. THIS IS NORMAL.
STEP 2. When you are satisfied with temperature, add about 1 cup of very warm water to tray (Ref. No. 5). Pour water into the groove around the perimeter of the tray and about halfway under the eggs. DO NOT FILL WITH SO MUCH WATER
STEP 7. Add turn rack (Ref. No. 3) to tower. It can be oriented either way. For most species, have the spokes touch the floor. For large eggs, invert the rack so the spokes are in the higher position.
STEP 8. Install thermometer (Ref. No. 23). Note at the bottom of the thermometer, the card has a score mark. Fold the bottom part of the card back at the score mark. Insert the thermometer into the slot of one of the spokes of the turning rack (Ref. No. 3). There is one slot on each side of the rack. See Exhibit B.
STEP 9. Place cover (Ref. No. 2) onto tray. The cover is marked as to which side is up.
STEP 10. Plug in incubator.
99.5
FC oo
Brower
Exhibit B
3
23
THAT WATER FLOWS INTO THE CENTER TOWER OR CONTROLS. Check and fill water twice a week or as needed. NEVER LET THE WATER RESERVOIR IN THE TRAY RUN OUT. After the temperature has stabilized (following the addition of water), if you are going to use a hygrometer to check humidity, now is the time to do it. Make sure there is plenty of moisture in the tray during the last 3 days of incubation. You can add water under the eggs as well as to the groove around the perimeter of the tray.
STEP 3. Add eggs filling one pie section on the turn rack at a time completely. You can incubate 1 pie section or all 8 depending on how many eggs you have. Each pie section must be full for the turner to work properly. If you have say 3 eggs or so to incubate, remove the turner rack and turn them by hand.
NOTE: The tray turns very slowly (making one full revolution every two hours). YOU CANNOT REALLY SEE IT TURN. If you have doubts your tray is turning, mark the tray with a piece of tape. Mark your base with a piece of tape at the same position. The two tapes should move away from each other if your tray is turning.
NOTE: When you add eggs, the temperature shown on the thermometer may drop several degrees. It may take 1-2 hours before the temperature stabilizes back up to 99.5 degrees F. Do not adjust your temperature until eggs are warm and the air has stabilized and then only adjust in very small increments, IF you think the temperature needs to be adjusted.
STEP 4. Note the incubation periods for different birds shown on page 4.STEP 5. Maintain temperature at 99.5 degrees Fahrenheit (37.5 degrees Celsius) during entire incubation. NOTE: We have designed our incubator to maintain temperature as consistently as possible with this technology. Our tower
design and fan do a great job of maintaining a constant temperature. This does not mean that your temperature will hold consistently and perfectly at 99.5 oF. You may see some fluctuation but this should not affect the hatch.
STEP 6. Stop turning about 3 days before expected hatch. Do this by slightly and gently lifting tray and rotating tray so that the motor crank and roller cannot touch the lug on the bottom of the tray.
STEP 7. After the hatch is completed, open all unhatched eggs to see if there are full term chicks inside the egg that did not emerge. If there are quite a few, add more moisture during your next hatch. Try adding water up under the eggs. If you get condensa-tion on the cover, remove the plug(s) in the cover or remove some water.
STEP 8. You do not need to sanitize your incubator the first time you use it. However, on all subsequent hatches, sanitize your incuba-tor. See page 2 of our “Guide For Successful Incubation and Brooding”. Following hatch, remove the housing cap (Ref. No. 18), clean out any debris. Replace cap.
STEP 9. For further detailed information, refer to our “Guide For Successful Incubation and Brooding” provided with this incubator.
W
armer
Exhibit C 10
13
3

WHEN ORDERING PARTS(1) Show NAME and MODEL NUMBER: Example - THI30 Incubator
(2) Show PART NUMBER and FULL DESCRIPTION of part: Example THI260 Crank
HOW TO ORDER PARTSRepair parts may be ordered from your dealer.
LIMITED WARRANTY
From the date of purchase, all components of our Models THI30 and THI30220 incubators are covered by a one year limited warranty for defects in material and workmanship under normal use and service. War-ranty is limited to the replacement of components. This limited warranty is void if the product is sold to the end user more than 2 years after Brower sold the product to the first owner, distributor and/or retailer. This warranty is expressly in lieu of all other warranties express or implied including the warranties of merchant-ability and fitness and all other obligations or liabilities on the part of Brower. Brower does not assume nor authorize any other person or entity to assume for Brower any other liability in connection with the sale of our products. Brower does not assume any liability for any component which has been subject to ac-cident, negligence, alteration, abuse or misuse. The CAUTION statements on page 1 of this instruction manual, concerning electrical repairs and the like, are an integral part of this limited warranty statement. Due to the numerous factors affecting the hatching of eggs, Brower makes no representations about the number of eggs that will be hatched using our incubators. Brower assumes no liability for the failure of eggs to hatch. Brower incubators are recommended for general poultry hobbyists. Brower incubators are not intended for professional or commercial use or for the incubation of exotic and/or expensive eggs. Brower is not responsible if our products do not comply with local product codes or codes outside of the USA.
4
EXPECTED INCUBATION AND HATCHING TIME - DAYSChicken and Bantam 21 Pigeon 17Bobwhite Quail 23-24 Goose 28-34Button Quail 16 Duck 28Cortunix Quail 17-18 Muscovy Duck 35-37Valley Quail 21-22 Guinea 28Ring Neck Pheasant 23-24 Parakeet 18Mongolian Pheasant 24-25 Parrots 28Chukar Partridge 23-24 Dove 14Turkey 28 Mynah 14Peafowl 28-30 Finch 14Grouse 25