instructions for the creation of computational...
TRANSCRIPT
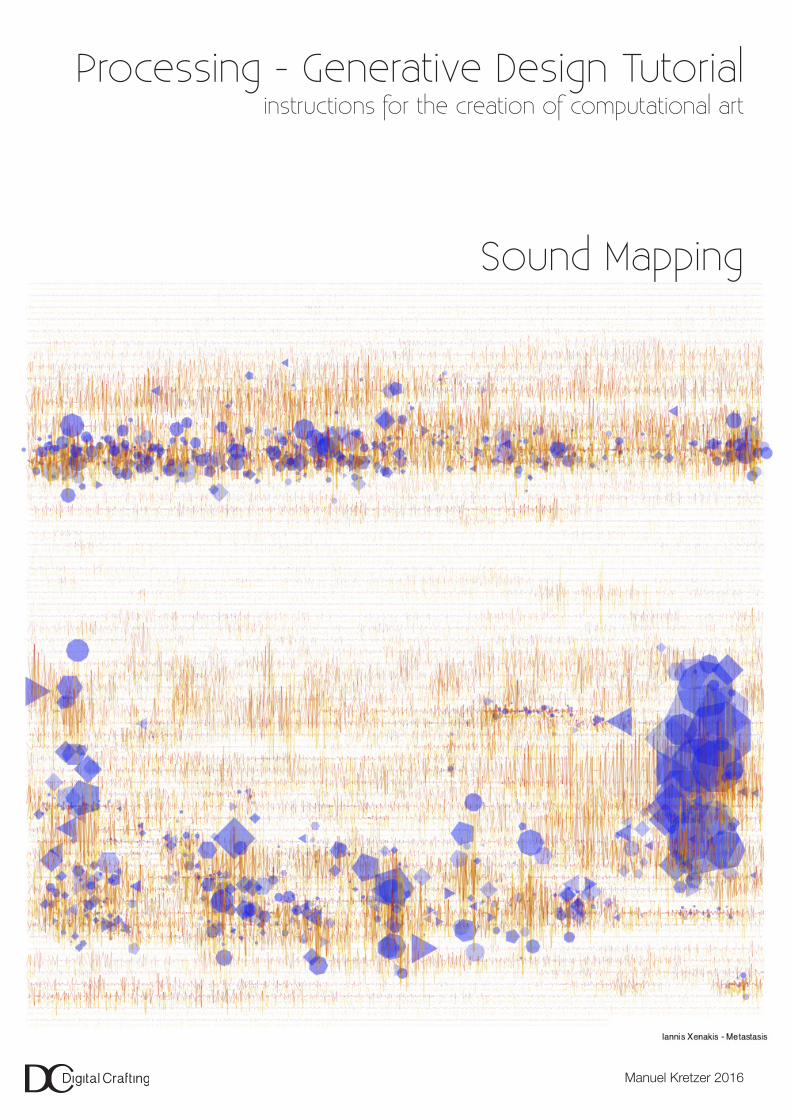
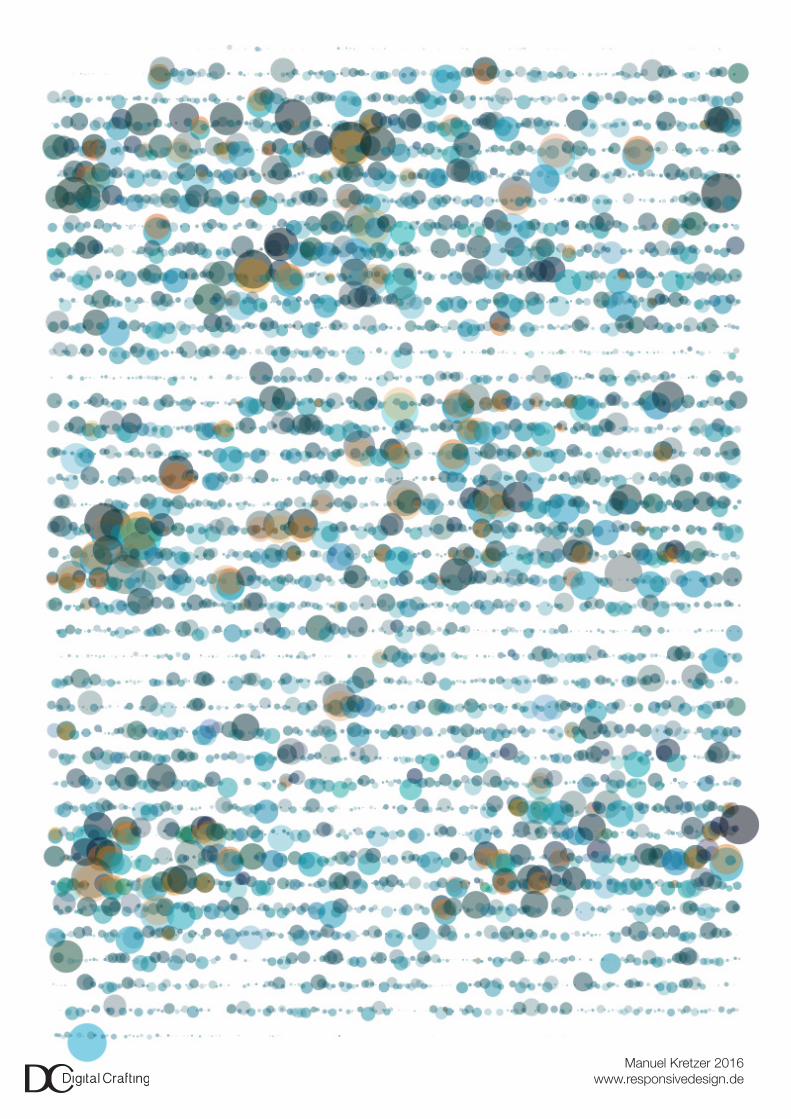
Processing - Generative Design Tutorialinstructions for the creation of computational art
Sound Mapping
Manuel Kretzer 2016
Processing - Generative Design Tutorial: Sound Mapping
Contents
1. Introduction 3 2. Minim 4
3. Basic Code 4
4. Adding Substance 7 5. More Complex Shapes 8
6. Combining Shapes 8
7. Stereo 9
8. Song Meta Information 10
9. Position 10
10. Export 10
11. Addition: Audio Lines 12
2

Processing - Generative Design Tutorial: Sound Mapping
1. Introduction
In the following we will use digital information from audio files, such as songs or music clips, and translate it into graphical shapes and patterns. Music visualization is a common feature found in electronic music visualizers and media player software, which generate animated imagery in real time and synchronized with the music as it is played. Visualization techniques often use changes in the music’s loudness and frequency spectrum as their input.
The very first electronic music visualizer was the Atari Video Music introduced by Atari Inc. in 1976, which aimed at creating a visual exploration that could be implemented into a Hi-Fi stereo system.
Atari Video Music The Shape of Song
Much less exhausted than real time music visualization is however the creation of static images, revealing a song’s structure within a single frame. Martin Wattenberg’s ‘The Shape of Song’ (2001) is an attempt to display the complexity of musical patterns in the form of translucent arches. While his software identifies repetitions and identical passages of a song, our attempt is much simpler, relating only to the frequency level and loudness of the chosen clip.
All codes in this tutorial are also saved in ‘tutorial-06_processing - codes’.
3
Processing - Generative Design Tutorial: Sound Mapping
4
2. Minim
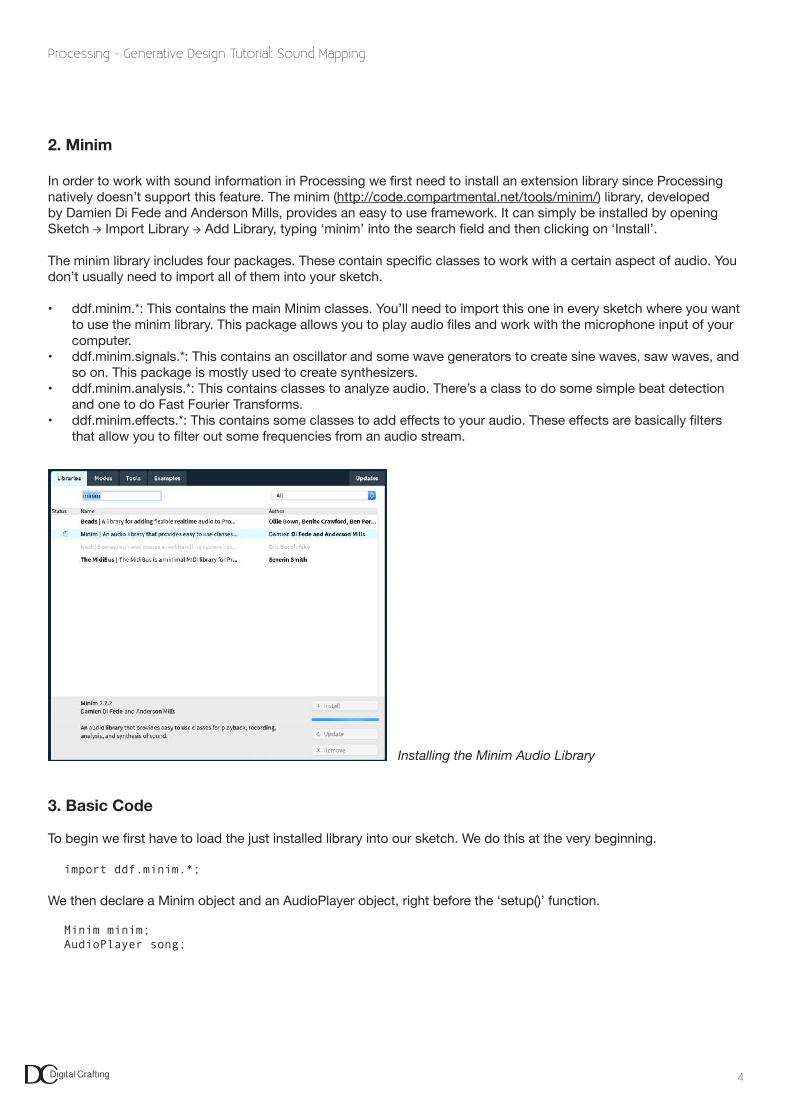
In order to work with sound information in Processing we first need to install an extension library since Processing natively doesn’t support this feature. The minim (http://code.compartmental.net/tools/minim/) library, developed by Damien Di Fede and Anderson Mills, provides an easy to use framework. It can simply be installed by opening Sketch → Import Library → Add Library, typing ‘minim’ into the search field and then clicking on ‘Install’.
The minim library includes four packages. These contain specific classes to work with a certain aspect of audio. You don’t usually need to import all of them into your sketch.
• ddf.minim.*: This contains the main Minim classes. You’ll need to import this one in every sketch where you want to use the minim library. This package allows you to play audio files and work with the microphone input of your computer.
• ddf.minim.signals.*: This contains an oscillator and some wave generators to create sine waves, saw waves, and so on. This package is mostly used to create synthesizers.
• ddf.minim.analysis.*: This contains classes to analyze audio. There’s a class to do some simple beat detection and one to do Fast Fourier Transforms.
• ddf.minim.effects.*: This contains some classes to add effects to your audio. These effects are basically filters that allow you to filter out some frequencies from an audio stream.
Installing the Minim Audio Library
3. Basic Code
To begin we first have to load the just installed library into our sketch. We do this at the very beginning.
import ddf.minim.*;
We then declare a Minim object and an AudioPlayer object, right before the ‘setup()’ function.
Minim minim; AudioPlayer song;
Processing - Generative Design Tutorial: Sound Mapping
5
and add some global variables
int spacing = 10; // space between lines in pixelsint border = spacing*2; // top, left, right, bottom borderint amplification = 3; // frequency amplification factor
int y = spacing;float ySteps; // number of lines in y direction
Inside the ‘setup()’ function, we set some general parameters, initialize the minim object, load the MP3 file from the data folder, and play it.
void setup() { size(800, 800); background(255); strokeWeight(1); stroke(0); noFill();
minim = new Minim(this); song = minim.loadFile(“song.mp3”); song.play(); }
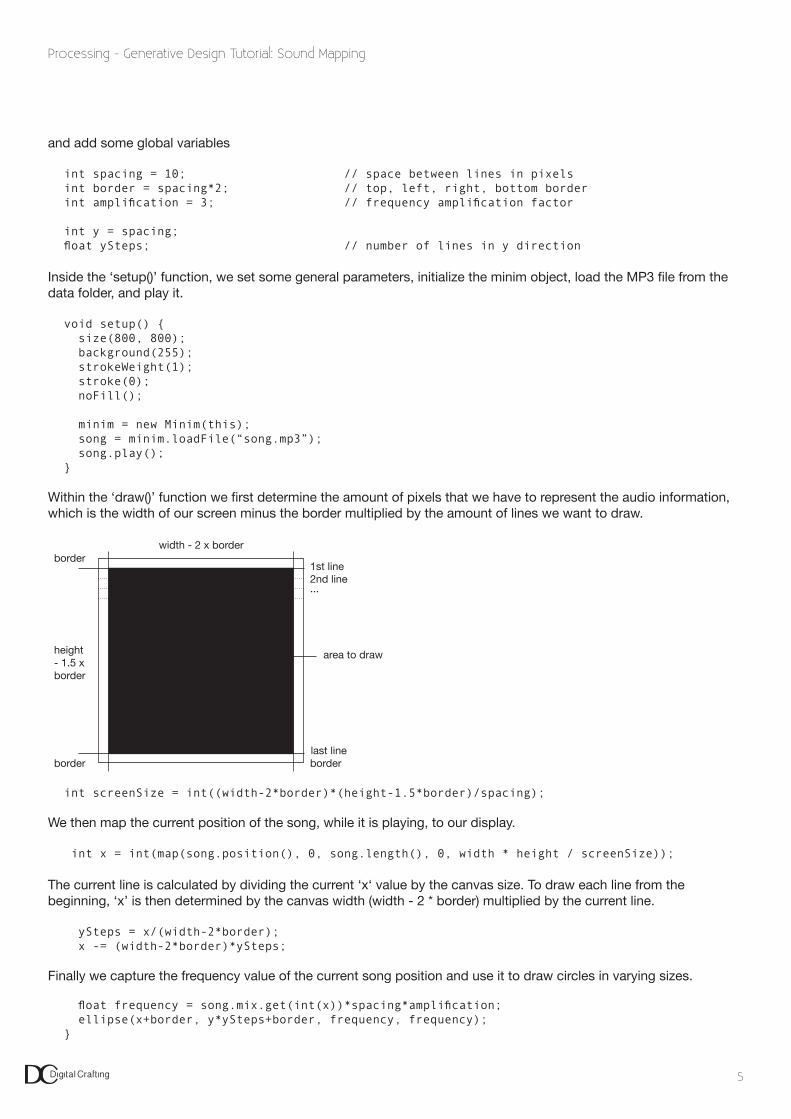
Within the ‘draw()’ function we first determine the amount of pixels that we have to represent the audio information, which is the width of our screen minus the border multiplied by the amount of lines we want to draw.
border
2nd line
area to draw
...
last line
1st line
width - 2 x border
height - 1.5 x border
borderborder
int screenSize = int((width-2*border)*(height-1.5*border)/spacing);
We then map the current position of the song, while it is playing, to our display.
int x = int(map(song.position(), 0, song.length(), 0, width * height / screenSize));
The current line is calculated by dividing the current ‘x‘ value by the canvas size. To draw each line from the beginning, ‘x’ is then determined by the canvas width (width - 2 * border) multiplied by the current line.
ySteps = x/(width-2*border); x -= (width-2*border)*ySteps;
Finally we capture the frequency value of the current song position and use it to draw circles in varying sizes.
float frequency = song.mix.get(int(x))*spacing*amplification; ellipse(x+border, y*ySteps+border, frequency, frequency);}

Processing - Generative Design Tutorial: Sound Mapping
6
To conclude we also need to add the stop() function to our sketch, so the AudioPlayer object can be closed, and the Minim object can be stopped when we quit the sketch.
The full code now looks like this (sketch_06_01):
import ddf.minim.*;
Minim minim; AudioPlayer song;
int spacing = 16; // space between lines in pixels int border = spacing*2; // top, left, right, bottom borderint amplification = 3; // frequency amplification factor
int y = spacing;float ySteps; // number of lines in y direction
void setup() { size(800, 800); background(255); strokeWeight(1); stroke(0); noFill();
minim = new Minim(this); song = minim.loadFile(“song.mp3”); song.play(); }
void draw() { int screenSize = int((width-2*border)*(height-1.5*border)/spacing); int x = int(map(song.position(), 0, song.length(), 0, screenSize));
ySteps = x/(width-2*border); // calculate amount of lines x -= (width-2*border)*ySteps; // set new x position for each line
float frequency = song.mix.get(int(x))*spacing*amplification; ellipse(x+border, y*ySteps+border, frequency, frequency);}
void stop() { song.close(); minim.stop(); super.stop();}
Processing - Generative Design Tutorial: Sound Mapping
7
4. Adding Substance
Now that the basic code is set we can start adding some variations.
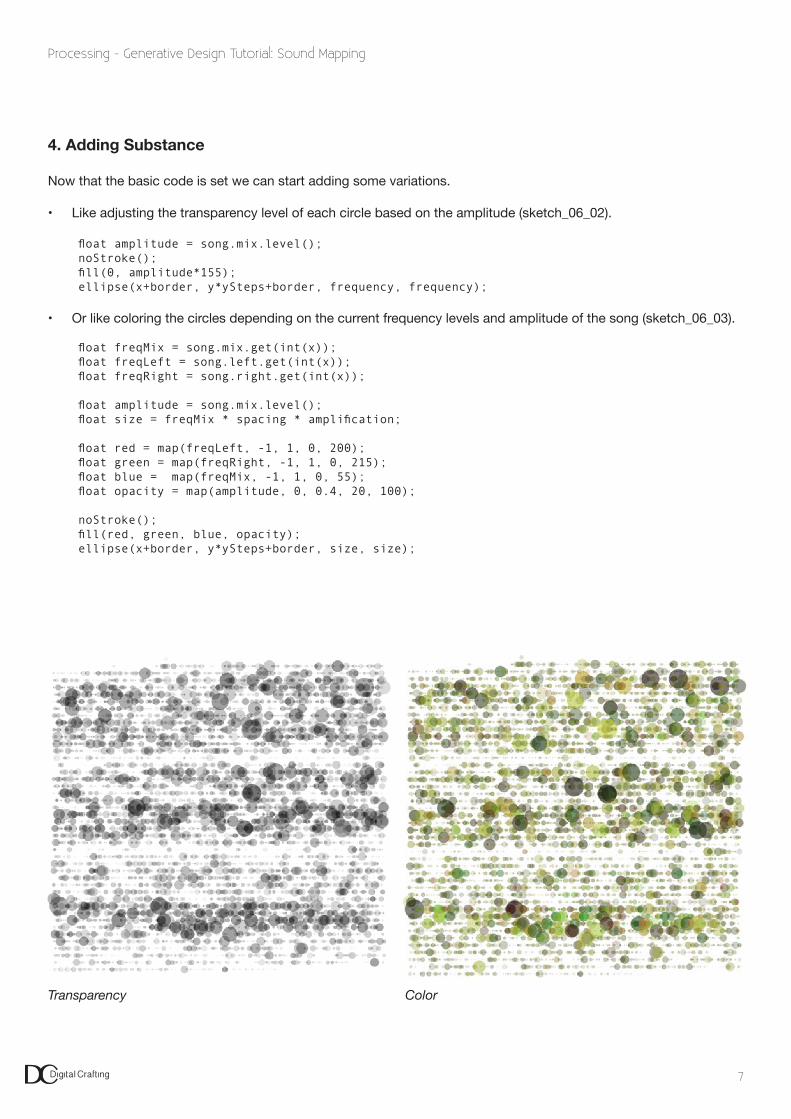
• Like adjusting the transparency level of each circle based on the amplitude (sketch_06_02).
float amplitude = song.mix.level(); noStroke(); fill(0, amplitude*155); ellipse(x+border, y*ySteps+border, frequency, frequency);
• Or like coloring the circles depending on the current frequency levels and amplitude of the song (sketch_06_03).
float freqMix = song.mix.get(int(x)); float freqLeft = song.left.get(int(x)); float freqRight = song.right.get(int(x));
float amplitude = song.mix.level(); float size = freqMix * spacing * amplification;
float red = map(freqLeft, -1, 1, 0, 200); float green = map(freqRight, -1, 1, 0, 215); float blue = map(freqMix, -1, 1, 0, 55); float opacity = map(amplitude, 0, 0.4, 20, 100);
noStroke(); fill(red, green, blue, opacity); ellipse(x+border, y*ySteps+border, size, size);
Transparency Color
Processing - Generative Design Tutorial: Sound Mapping
8
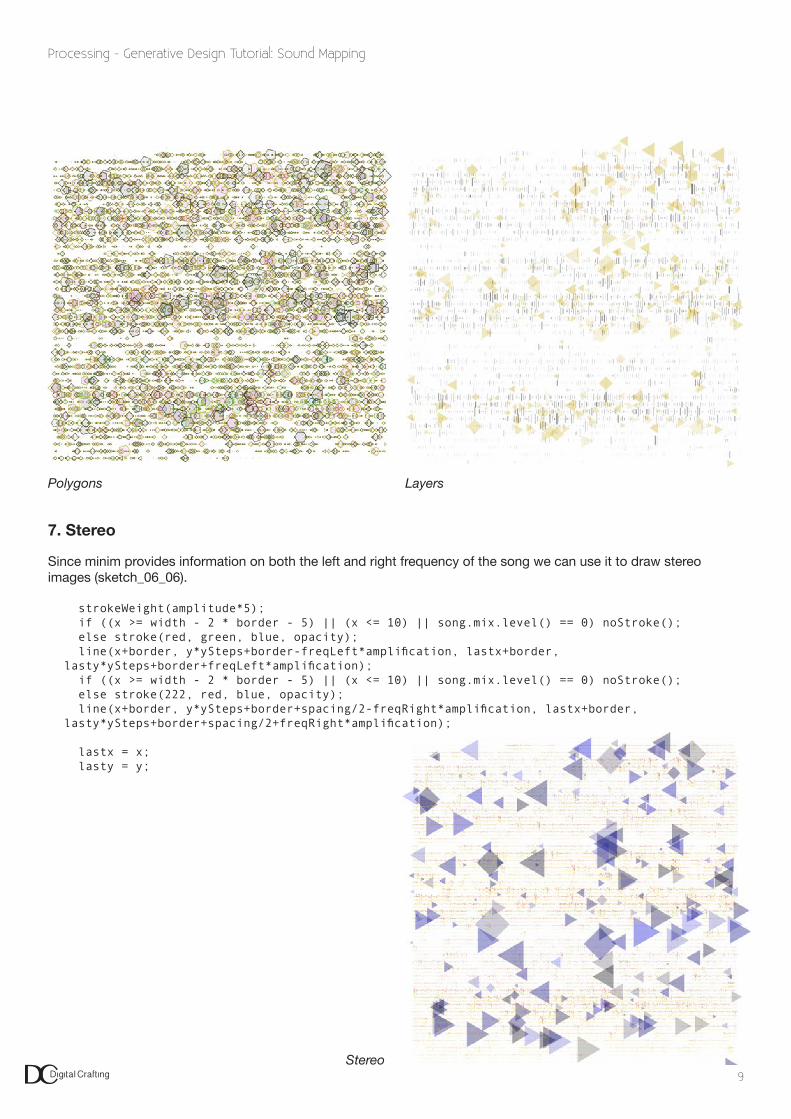
5. More Complex Shapes
The amplitude can also be used to draw polygons, whose amount of vertexes and size vary accordingly. A conditional clause makes sure strokes are only drawn when a minimum level is reached (sketch_06_04).
if (amplitude < 0.1) { noStroke(); } else { stroke(red, green, blue); }
fill(red, blue, green, 15);
pushMatrix(); translate(x+border, y*ySteps+border); int circleResolution = (int)map(amplitude, 0, 0.6, 3, 8); // number of vertexes float radius = size/2; float angle = TWO_PI/circleResolution; beginShape(); for (int i=0; i<=circleResolution; i++) { float xShape = 0 + cos(angle*i) * radius; float yShape = 0 + sin(angle*i) * radius; vertex(xShape, yShape); } endShape(); popMatrix();}
6. Combining Shapes
We can also have different types of shapes drawn based on varying conditions, such as a set of lines in the background and polygons when the amplitude reaches a certain threshold (sketch_06_05).
strokeWeight(amplitude*5); stroke(0,opacity); line(x+border, y*ySteps+border-freqMix*spacing, x+border, y*ySteps+border+freqMix*spacing);
if (amplitude > 0.3) { noStroke(); fill(red, green, blue, 50);
pushMatrix(); translate(x+border, y*ySteps+border+size); int circleResolution = (int)map(amplitude, 0.3, 0.45, 3, 5); float radius = size/2; float angle = TWO_PI/circleResolution; beginShape(); for (int i=0; i<=circleResolution; i++) { float xShape = 0 + cos(angle*i) * radius; float yShape = 0 + sin(angle*i) * radius; vertex(xShape, yShape); } endShape(); popMatrix(); }
Processing - Generative Design Tutorial: Sound Mapping
9
7. Stereo
Since minim provides information on both the left and right frequency of the song we can use it to draw stereo images (sketch_06_06).
strokeWeight(amplitude*5); if ((x >= width - 2 * border - 5) || (x <= 10) || song.mix.level() == 0) noStroke(); else stroke(red, green, blue, opacity); line(x+border, y*ySteps+border-freqLeft*amplification, lastx+border, lasty*ySteps+border+freqLeft*amplification); if ((x >= width - 2 * border - 5) || (x <= 10) || song.mix.level() == 0) noStroke(); else stroke(222, red, blue, opacity); line(x+border, y*ySteps+border+spacing/2-freqRight*amplification, lastx+border, lasty*ySteps+border+spacing/2+freqRight*amplification);
lastx = x; lasty = y;
Polygons Layers
Stereo

Processing - Generative Design Tutorial: Sound Mapping
10
8. Song Meta Information
Minim includes the possibility to display audio meta data, such as file name, track length, track title, author, album title, date, comments, lyrics, track, genre, copyright, composer, publisher and many more. It can however only display meta data if it is saved with the audio track. To check if your track contains meta data or to add information you can for example use iTunes, right click on your song and choose ‘get info’.
Song info as revealed in iTunes
To display this information along with our image we first need to initialize the meta data at the very top of our script.
AudioMetaData meta;
In ‘setup()’ we then create a font and load the song’s meta information. textFont(createFont(“Helvetica”, 11)); // set up font textAlign(RIGHT); // align text to the right meta = song.getMetaData(); // load music meta data
At the beginning of ‘draw()’ we then create a string containing the desired information, draw a rectangle the size of our text and print the track’s artist and title.
String info = meta.author() + “ - “ + meta.title(); // song artist and titlefloat textsize = textWidth(info); // get size of text lengthnoStroke();fill(255); // draw rectangle the size of the textrectMode(CORNER);rect(width-border-textsize-spacing, height-border, textsize+border+spacing, border);fill(0);text(info, width-border, height-border/2); // print song info
Song info as displayed in Processing
9. Position
To display the current song position in the comments bar we can use the following code.
void position() { int totalSeconds = (int)(song.length()/1000) % 60; int totalMinutes = (int)(song.length()/(1000*60)) % 60; int playheadSeconds = (int)(song.position()/1000) % 60; int playheadMinutes = (int)(song.position()/(1000*60)) % 60; String info = playheadMinutes + “:” + nf(playheadSeconds, 2 ) + “/” + totalMinutes + “:” + nf(totalSeconds, 2 ); println(info); }
10. Export
As described in the previous tutorials Processing provides various methods for saving the created content in different formats, such as pdf, svg or jpg. The final program looks like this (sketch_06_07):

Processing - Generative Design Tutorial: Sound Mapping
11
import ddf.minim.*; import processing.pdf.*; // pdf exportimport java.util.Calendar; // java calendar timestamp
Minim minim; AudioPlayer song; AudioMetaData meta;
int spacing = 16; // space between lines in pixels int border = spacing*2; // top, left, right, bottom borderint amplification = 6; // frequency amplification factor
int y = spacing;float ySteps; // number of lines in y directionfloat lastx, lasty;
void setup() { size(800, 800); //beginRecord(PDF, meta.author() + “ - “ + meta.title()+ “ - “ + timestamp() + “.pdf”);// save pdf with song artist, title and time background(255); textFont(createFont(“Helvetica”, 11)); // set up font textAlign(RIGHT); // align text to the right
minim = new Minim(this); song = minim.loadFile(“song.mp3”); meta = song.getMetaData(); // load music meta data song.play();}
void draw() {
String info = meta.author() + “ - “ + meta.title(); // song artist and title float textsize = textWidth(info); // get size of text length noStroke(); fill(255); // draw rectangle the size of the text rectMode(CORNER); rect(width-border-textsize-spacing, height-border, textsize+border+spacing, border); fill(0); text(info, width-border, height-border/2); // print song info
int screenSize = int((width-2*border)*(height-1.5*border)/spacing); int x = int(map(song.position(), 0, song.length(), 0, screenSize)); // current song pos ySteps = x/(width-2*border); // number of lines x -= (width-2*border)*ySteps; // new x pos in each line
float freqMix = song.mix.get(int(x)); float freqLeft = song.left.get(int(x)); float freqRight = song.right.get(int(x)); float amplitude = song.mix.level(); float size = freqMix * spacing * amplification; float red = map(freqLeft, -1, 1, 200, 222); float green = map(freqRight, -1, 1, 10, 199); float blue = map(freqMix, -1, 1, 10, 88); float opacity = map(amplitude, 0.3, 0.5, 80, 100);
strokeWeight(amplitude*5); if ((x >= width - 2 * border - 5) || (x <= 10) || song.mix.level() == 0) noStroke(); else stroke(red, green, blue, opacity); line(x+border, y*ySteps+border-freqLeft*amplification, lastx+border, lasty*ySteps+border+freqLeft*amplification); if ((x >= width - 2 * border - 5) || (x <= 10) || song.mix.level() == 0) noStroke(); else stroke(222, red, blue, opacity); line(x+border, y*ySteps+border+spacing/2-freqRight*amplification, lastx+border, lasty*ySteps+border+spacing/2+freqRight*amplification);
Processing - Generative Design Tutorial: Sound Mapping
12
lastx = x; lasty = y;
if (amplitude > 0.33) { noStroke(); fill(0, 0, random(255), 50);
pushMatrix(); translate(x+border, y*ySteps+border+size); int circleResolution = (int)map(amplitude, 0.33, 0.5, 3, 5); float radius = size/2; float angle = TWO_PI/circleResolution; beginShape(); for (int i=0; i<=circleResolution; i++) { float xShape = 0 + cos(angle*i) * radius; float yShape = 0 + sin(angle*i) * radius; vertex(xShape, yShape); } endShape(); popMatrix(); } position(); // display song position in console if (song.isPlaying() == false) endRecord(); // stop pdf recording}
void position() { // current song position in minutes and seconds int totalSeconds = (int)(song.length()/1000) % 60; int totalMinutes = (int)(song.length()/(1000*60)) % 60; int playheadSeconds = (int)(song.position()/1000) % 60; int playheadMinutes = (int)(song.position()/(1000*60)) % 60; String info = playheadMinutes + “:” + nf(playheadSeconds, 2 ) + “/” + totalMinutes + “:” + nf(totalSeconds, 2 ); println(info); }
void stop() { song.close(); minim.stop(); super.stop();}
void keyReleased() { if (key == ‘s’ || key == ‘S’) saveFrame(timestamp()+”_##.png”); // save png of current frame if ((song.isMuted() == false && key == ‘ ‘)) song.mute(); // mute song else if ((song.isMuted() == true && key == ‘ ‘)) song.unmute(); // unmute song}
String timestamp() { Calendar now = Calendar.getInstance(); return String.format(“%1$tH%1$tM%1$tS”, now);}

Processing - Generative Design Tutorial: Sound Mapping
11. Addition: Audio Waves
The following is a quick addition, which emerged during making this tutorial. The code draws vertical lines, representing the frequency spectrum of the song at certain positions.
First we import our libraries
import ddf.minim.*; // minim libraryimport processing.pdf.*; // pdf export libraryimport java.util.Calendar; // java timestamp
Minim minim; // initialize minimAudioPlayer song; // setup up playerAudioMetaData meta; // get song meta info
We then set a number of global variables
int spacing = 5; // distance between linesint border = 20; // top, left, right, bottom borderint amplification = 40; // frequency amplificationint num = 100; // resolution in y directionint cutBack = 20000; // remove parts from the song endint cutFront = 10000; // remove parts from the song startint pos, counter;
float[] x = new float[num]; // array of values in x directionfloat[] y = new float[num]; // array of values in y direction
In ‘setup()’ we define the canvas size, display variables, load the song, play it, and - if desired - remove parts from the beginning which may be too silent and only result in straight lines
void setup() { size(2000, 2000); minim = new Minim(this); song = minim.loadFile(“song40.mp3”); // load song meta = song.getMetaData(); // load song meta information
song.play(); // play song song.cue(cutFront); // cut parts from song beginning
//beginRecord(PDF, meta.author() + “ - “ + meta.title()+ “ - “ + timestamp() + “.pdf”); // save pdf background(255); noFill(); strokeWeight(1); stroke(0);}
During ‘draw()’ we use ‘curveVertex()’ to draw smoothly curved lines between our coordinates in y-direction. The amount of coordinates (resolution) is defined by the ‘num’ variable. Using a ‘for loop’ we then iterate through each number (‘i‘) and assign x and y accordingly. The first (x[0], y[0]) and last (x[num-1], y[num-1]) items in the array are set to their fixed position in the grid.
13

Processing - Generative Design Tutorial: Sound Mapping
void draw() {
beginShape(); // start custom shape x[0] = pos + border; // set x and y value of first array item to ‘zero’ y[0] = border; curveVertex(x[0], y[0]); for (int i = 0; i < num; i++) { // loop through each element in array x[i] = pos + border + song.mix.get(i)*amplification; // assign frequency value at position y[i] = map( i, 0, num, border, height-border ); // map ‘i’ to canvas height curveVertex(x[i], y[i]); // draw curves } x[num-1] = x[0]; // set x and y value of last array item to ‘zero’ y[num-1] = height-border; curveVertex(x[num-1], y[num-1]); endShape(); // close custom shape
int skip = (song.length() - cutFront - cutBack) / ((width-2*border) / spacing); // amount to skip song forward, based on spacing if (pos + border < width-border) { // skip song, set new x position song.skip(skip); pos += spacing; } else { minim.stop(); // stop song if canvas is full } position(); // display song position in console if (song.isPlaying() == false) endRecord(); // stop pdf recording}
Additionally we add a function which displays the current position of the song in the console, and some key actions, such as saving a png image when pressing ‘s’ or muting/ unmuting the song when pressing the space bar.
void position() { // current song position in minutes and seconds int totalSeconds = (int)(song.length()/1000) % 60; int totalMinutes = (int)(song.length()/(1000*60)) % 60; int playheadSeconds = (int)(song.position()/1000) % 60; int playheadMinutes = (int)(song.position()/(1000*60)) % 60; String info = playheadMinutes + “:” + nf(playheadSeconds, 2 ) + “/” + totalMinutes + “:” + nf(totalSeconds, 2 ); println(info);}
void keyReleased() { if (key == ‘s’ || key == ‘S’) saveFrame(timestamp()+”_##.png”); // save png of current frame if ((song.isMuted() == false && key == ‘ ‘)) song.mute(); // mute song else if ((song.isMuted() == true && key == ‘ ‘)) song.unmute(); // unmute song}
String timestamp() { Calendar now = Calendar.getInstance(); return String.format(“%1$tH%1$tM%1$tS”, now);}
14

Processing - Generative Design Tutorial: Sound Mapping
Sources:
- “Processing 2: Creative Programming Cookbook” by Jan Vantomme (2012)
- Processing documentation (https://processing.org/tutorials/)
- Minim documentation (http://code.compartmental.net/minim/index.html)
13
The Prodigy - The Day is My Enemy Beethoven - 5th Symphony
Manuel Kretzer 2016www.responsivedesign.de