instruction manual - gaumard...
TRANSCRIPT

S500.100 OBSTETRIC SUSIE® Maternal and Fetal
Birthing Torso
INSTRUCTION MANUAL
Gaumard® Scientific Company, Inc. 14700 SW 136th Street Miami, FL 33196 e-mail: [email protected] ©2004-5 Gaumard® Scientific Company, Inc. All Rights Reserved

2
PLEASE READ THE FOLLOWING INSTRUCTIONS CAREFULLY PRIOR TO STARTING TRAINING EXERCISES ON YOUR NEW
SIMULATOR.
HANDLE YOUR SIMULATOR IN THE SAME MANNER AS YOU WOULD HANDLE YOUR PATIENT – WITH CARE AND
CONSIDERATION.
SHOULD YOU HAVE ANY QUESTIONS AFTER READING THIS INSTRUCTION MANUAL, CALL OR E-MAIL OUR CUSTOMER
SERVICE DEPARTMENT.
800-882-6655 USA Toll Free 305-971-3790 Worldwide
305-667-6085 Fax e-mail: [email protected]

3
TABLE OF CONTENTS Section 1 – Please Read This First Assembly Birthing Controller Leopold Maneuvers Birthing Practice Section 2 – Simulation Using the OB SUSIE Birthing Torso Overview Automatic Birthing System Dilating Cervix Fetal Palpation using the Articulating Fetus Normal Labor and Delivery Stage One Stage Two Stage Three Cesarean Delivery Prolapse of the Umbilical Cord Placenta Previa Breech Birth Postpartum Activity Fundal Massage Episotomy Repair Section 3 – Care of the Simulator Section 4 – References Section 5 – Limited Warranty Section 6 – Technical Support Section 7 – Common Spare Parts List

4
Section 1 – Please Read This First This section contains instructions for rapid assembly and checkout of the product. Your S500.100 OB Susie Maternal and Fetal Birthing Torso includes the following: Quantity Item One Torso One Abdomen cover One Birthing system with mounting flange One Articulating birthing baby with patent nose and mouth One Elevating “cushion” for Leopold Maneuvers Three Dilating cervices Two Placentas Three Vulvas – fully dilated Three Vulva for postpartum suturing Three Umbilical cords Two Umbilical clamps One Postpartum perineal insert One 48 hour postpartum uterine assembly One Silicone lubricant One Instructions for use One Carrying bag

5
Assembly The OB SUSIE® is shipped partially assembled. Place the simulator on a flat surface. Remove the abdominal cover and install the manually operated birthing mechanism. Attach the articulating fetus to the mechanism. Lubricate the fetal head and shoulders plus the inside of the dilating cervix as well as the inside of the vulval insert. Manually crank the birthing mechanism counterclockwise to advance the fetus. Rotate the white handle in either direction to demonstrate internal and external rotation.
Secure birthing mechanism with plastic clamp. The white transverse bar provides internal and external fetal rotation. The crank provides fetal movement down the birth canal.

6
Lubricate the fetal head and shoulders as well as the inside of the dilating cervix and vulva.
Fold the fetal arms then the fetal legs as shown.
7
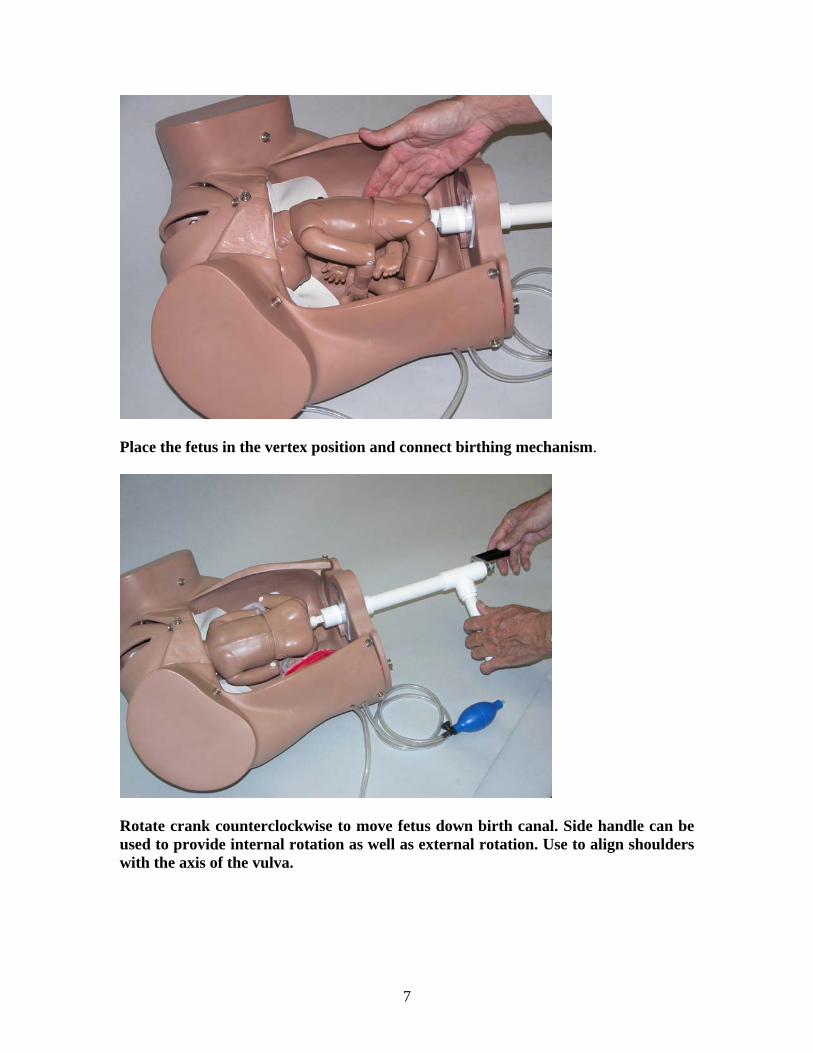
Place the fetus in the vertex position and connect birthing mechanism.
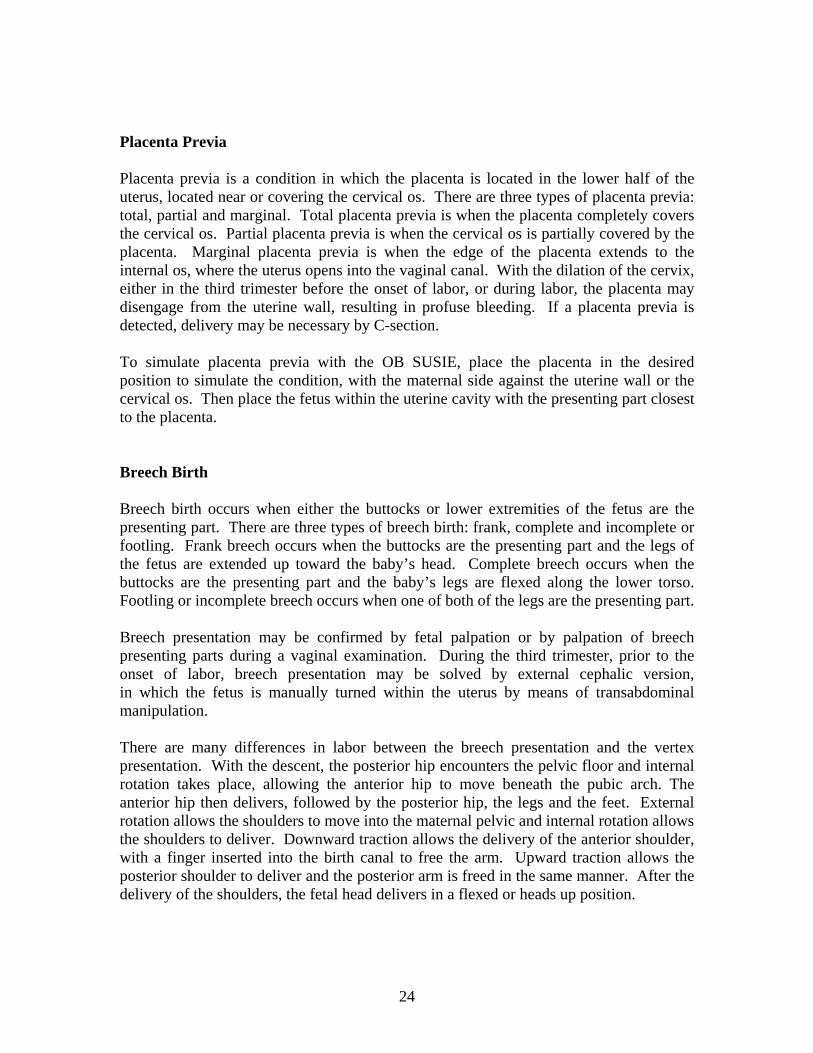
Rotate crank counterclockwise to move fetus down birth canal. Side handle can be used to provide internal rotation as well as external rotation. Use to align shoulders with the axis of the vulva.

8
Leopold Maneuvers To perform Leopold Maneuvers, retract the birthing mechanism fully and remove the articulating birthing baby from the birthing mechanism. Place the elevating cushion within the birthing torso. Route the inflation bulb outside OB SUSIE through any space provided on the left side. Place the birthing baby in the elevating cushion in the vertex, breech, or transverse positions. Install the “tummy cover”. Inflate the elevating cushion until the fetus is felt within the abdomen. Conduct the Leopold Maneuver exercises.
Place elevating pillow within simulator and make red connection.

9
Place fetus onto elevating pillow and lift fetus anteriorly using squeeze bulb.
Snap abdominal cover into place.

10
Lift fetus anteriorly using squeeze bulb.
Conduct the four Leopold Maneuvers.

11
Birthing Practice To perform birthing practice, remove the “tummy cover” and place the articulating birthing baby on the birthing mechanism. Lubricate the fetal head and shoulders, plus the inside of the vulva using water based silicone. Attach the umbilical cord to the baby, route the cord so it does not bind in the mechanism and attach the placenta to the pelvic cavity using the Velcro® fastener. Note that the fetus has a receptacle at the rectum into which the matching pin located on the birthing mechanism is inserted. Position the baby so that its head faces toward the left side of the simulator. This is the ROA or right occipital anterior position. Note: any other position may be chosen; however, take care that the fetal shoulders are aligned with the long axis of the vulval insert. Caution: if the fetal shoulders are NOT aligned with the vulva, binding may occur.
Remember to lubricate the inside of the vulva.

12
Also lubricate the inside of the dilating cervix.
Also lubricate the fetal head and shoulders.

13
Attach the umbilicus to the placenta.
Attach placenta to abdominal wall.

14
Attach umbilicus to fetus.
Fold arms toward fetal body then fold the legs

15
Umbical cord can be wrapped once around the fetal neck
Attach fetus to birthing mechanism

16
Select a vulval insert and dilating cervix and snap them into place. Note that the initial diameter of the cervical os is about 2 centimeters. As the baby moves down the birth canal, the cervix will dilate to 10 or 11 centimeters in diameter in order for the head and shoulders to pass through the cervix and vulval insert. The first few centimeters of movement normally take about half the total delivery time. Note that the baby rotates internally as it moves forward and that the baby turns after the head is delivered and before the shoulders are delivered. The student or instructor may help the fetal head and shoulders through the vulva as in real life. Once the shoulders are delivered, the student can remove the baby from the mother in the normal manner. The birthing cycle can be paused at any point and then resumed. In the event that the birthing baby binds in the birth canal, back up a little bit and then try again. Section 2 – Simulation Using the OB SUSIE® Birthing Torso Overview The OB SUSIE birthing torso offers the ability to demonstrate a variety of obstetric techniques including the following: Fetal palpation of the head, shoulders, backbone, knees and elbows Vaginal delivery using the automatic birthing system Shoulder dystocia Cesarean section delivery Complete, frank and footling breech positions Episiotomy Prolapse of umbilical cord Placenta previa- total, partial, and marginal Vacuum extraction This versatile simulator also includes specialized modules for Leopold Maneuvers, cervical effacement and a 19 piece articulating neonate for demonstration of many unusual birth presentations. The birthing baby is placed in any convenient position to simulate a realistic delivery situation. The life-size pelvic cavity has all major anatomic landmarks. It is designed with an open abdomen, which has a soft, detachable, replaceable “tummy cover” that attaches with snaps to the outside of the abdominal wall. The birth canal is of average/normal dimensions. The vulval/perineal insert is manufactured in soft plastic and is replaceable.

17
The OB SUSIE birthing torso also has a unique birthing mechanism and dilating cervix system, making it ideal for partograph recordings. There is also a three part episiotomy repair trainer that may be inserted and reused. Birthing Mechanism The OB SUSIE provides for delivery of the birthing baby. It uses a mechanical system which provides for internal rotation and 10 cm linear motion which moves the head from the onset of labor at Station -5 to the “crowning” position at Station +5. This is followed by another 10 cm linear motion to birth the head and a 90° rotation of the body to present the shoulders across the long axis of the vulva. As the fetus descends, the student may observe the fetal nose rotating from the 3 o’clock position at the start of labor to the 6 o’clock position during head delivery. Dilating Cervix As the fetus proceeds down the birth canal, it pushes against a fabricated uterus/cervix. This device looks like a disk with a small hole in the center and is attached to the entrance of the birth canal using three (3) metal snaps. The device is fabricated in such a way that permits considerable distension. The initial diameter of the cervix is about 2 centimeters. As the fetal presenting part presses against the simulated uterus/cervix, the cervix dilates and swells as the fetus moves down the birth canal. At crowning, the cervix has stretched to about 10 centimeters. We have measured the cervical dilation and fetal descent and have found it approximates physiological delivery. At crowning, the dilated cervix allows the head to pass through the cervix and through the vulval insert which simulates the labia. The advantage of the dilating cervix is that it allows the students to measure both fetal head descent and cervical dilation which are used to plot labor progress on a Partogram/Partograph. The simulator is provided with an articulating fetus for practicing palpation and is used with the automatic birthing system. The fetus measures approximately 17 inches. Relevant landmarks, such as the fontanelles (“soft spots” on the skull where unfused cranial bones meet), orbit, nose, mouth, ears and vertebral column are palpable. A detachable umbilical cord is attached to the birthing fetus, which allows for either cutting of the cord for realism, or detachment of the cord without cutting. The umbilical cord has a simulated umbilical vein in blue and two arteries in red. The hand-painted placenta is detachable from the umbilical cord and may be attached to the interior abdominal wall with Velcro. The placenta can be placed in several positions to simulate placenta previa. Remember to always apply water based silicone spray to the head and shoulders of the birthing fetus, as well as the inside of the vulval insert. This facilitates the birthing process and is easily cleaned after demonstration.

18
Cervix dilates as fetal head moves down birth canal.
Fetal head at crowning.

19
The “turtle sign” associated with shoulder dystocia can be simulated.
External fetal rotation provides anterior shoulder presentation.

20
Fetal Palpation Using the Articulating Fetus The articulating fetus may be palpated while in the abdominal cavity. Place the inflatable cushion within the abdominal cavity. To palpate the backbone, place the fetus face down on the cushion, snap the abdominal cover into place and gently inflate the cushion using the squeeze bulb provided, until the length of the backbone can be felt. To palpate the head and facial features, place the fetus face up on the abdominal cushion so that the presenting part (the portion of the fetus that descends first through the birth canal) is either the head (cephalic presentation), or in the breech position, or in the transverse position. Normal Labor and Delivery Labor is divided into three stages. The first stage begins with the onset of labor and ends when the cervix is completely dilated (expanded). The second stage begins with complete dilation and ends with the birth of the baby. The third stage begins with the expulsion of the baby and ends with the delivery of the placenta. Stage One The first stage is divided into latent, active and transitional phases. The latent phase begins with the onset of regular contractions. This cervix dilates to 3-4 cm and also effaces, thus thinning. The length of the latent phase varies greatly but is generally between 1.3-11.5 hours for a primipara (first time pregnant), and should generally not exceed twenty hours. For a multipara (pregnant more than once), the latent phase generally lasts from 1.0-9.7 hours and should not exceed 14 hours. In the latent phase, uterine contractions increase in frequency, duration, and intensity. They may begin mildly, lasting 15-30 seconds at intervals of 15-30 minutes and progress to moderate contractions, lasting 30-40 seconds at intervals of 5-7 minutes. During the active phase, the cervix dilates completely to 10 cm. (approximately 4 inches). Descent of the fetus into the birth canal accelerates and the cervix becomes completely effaced. Contractions become more frequent, usually every 2-3 minutes, are longer in duration, lasting about 60 seconds and increase in intensity. The length of the active phase of the first stage generally lasts between 1.0-8.2 hours for the primipara and 2.0-4.6 for the multipara. The rate of cervical dilation in the active phase is approximately 1.2 cm per hour in the primipara and 1.5 cm per hour in the multipara. However, when cervical dilation reaches 8-10 cm, the rate of dilation decreases and the rate of fetal descent increases.

21
Stage Two The second stage of labor begins with the complete dilation of the cervix and ends with the delivery of the baby. This stage of labor usually takes no longer than an hour for the primipara, however it can last as long as three hours. In the multipara the second stage takes approximately 15 minutes, but can last up to a half hour. Generally, contractions are 60-90 seconds in duration at intervals of 2-3 minutes. The mother is encouraged to bear down with the beginning of each contraction so as to aid in the expulsion of the fetus. Six movements of the fetus permit its birth: 1. descent, 2. flexion, 3. internal rotation, 4. extension, 5. external rotation, 6. expulsion. Descent of the fetus is achieved by the force of the uterine contractions, maternal pushing or “bearing down” and gravity (if the patient is upright). In the OB SUSIE, lightly lubricating the fetal head and the inside of the vulval insert with silicone lubricant will ease the movement of the fetus through the cervix and vulva. Flexion, the bending or flexing of the fetal head toward its chest, resulting in the smaller diameter of the presenting part (the part of the body that first appears in the cervix), occurs due to the resistance of the cervix, the pelvic walls and floor upon the presenting part of the fetus. Internal rotation takes place as the fetal head meets the muscles of the pelvic floor. Generally, the head which enters the pelvis in the transverse (crosswise) position, turns so that the occiput (back of the head) is anterior to the symphysis pubis. Thus, the fetus rotates so that it is face down in the pelvis. Internal rotation may also take place so that the fetus is face up in the pelvis. Extension occurs as the fetus nears the vaginal opening. As the head continues its descent, the caregiver’s right hand exerts upward pressure on the perineum and thus on the chin of the fetus, encouraging extension. This also prevents the fetal head from slipping backward between contractions. The left hand is applied to the occiput, providing the gentle pressure that discourages a too rapid extension of the head. The perineum begins to bulge and the head crowns. Crowning is the appearance of the largest diameter of the head in the opening of the vagina. An episiotomy may be performed at this time to prevent tearing of the perineum and to avoid massive stretching of the perineal tissues. As soon as the head has presented, the airway is cleared using a suction bulb. Insert an index finger to determine if the umbilical cord is around the neck of the baby. If so, the cord can usually be slipped over the head or if the cord is too tight, it may be clamped and cut.

22
Ritgen’s Maneuver may be performed by inserting hands into the vaginal opening of the simulator and assisting the movement of the fetus. The caregiver may assist as in an actual delivery and may perform an episiotomy on the replaceable vulval/perineal insert. Use of water soluble silicone lubricant will greatly facilitate this portion of the labor demonstration. External rotation takes place when the head realigns with the fetal back and shoulders and is approximately perpendicular to the mother’s body. At this time, internal rotation of the shoulders may occur to ease movement of the body through the pelvis. Expulsion occurs with the anterior shoulder first passing under the symphysis pubis and delivering, followed by the posterior shoulder delivering over the perineum. This may be aided by pulling the head downward gently thereby facilitating the delivery of the anterior shoulder. The posterior shoulder may be delivered with gentle upward traction. The body of the baby then delivers. Following expulsion, the umbilical cord is clamped in two places: one on the placental side and one approximately two centimeters from the newborn. The cord is then cut. The cut end of the umbilical cord is inspected to assure the presence of one umbilical vein and two arteries. Expulsion can be demonstrated on the simulator by allowing the delivery caregiver to gently pull down and then up on the fetus to deliver both shoulders. Once the shoulders have been delivered, the motor stops and the rest of the baby is gently removed from the simulator’s pelvic cavity. After expulsion, the cord can be cut or detached. The presence of the umbilical vein (blue) and the arteries (red) may be seen through the clear tubing covering the umbilical cord. Stage Three The third stage of delivery begins after the expulsion of the fetus. The uterus begins to contract and with this decrease in size, the placenta will begin to separate from the uterine wall. This separation occurs approximately 5-10 minutes after delivery and can be identified by four different indicators:
1. A fresh flow of blood from the vagina as a result of the placental separation 2. The fundus of the uterus rises in the abdomen 3. The uterus becomes spherical in shape 4. A longer length of umbilical cord is apparent outside of the vagina as the
placenta moves toward the vagina Once these signs have been observed, the mother may bear down to deliver the placenta. The caregiver may also aid in the delivery by applying gentle pressure to the fundus.

23
The placenta may deliver in different ways. The delivery of the placenta fetal side up is most common although delivery with the maternal side up is also not unusual. Delivery with the maternal side up may indicate incomplete delivery of all placental material. Regardless of delivery position, the placenta should be inspected to ascertain whether it is intact. If the placenta appears to be fragmented, it may be necessary to manually explore the uterus, remove placental fragments and inspect for serious internal bleeding. The third stage may be simulated with the OB SUSIE by gently disengaging the placenta from the interior abdominal wall through the vulval opening. The placenta may then be pushed through the open vulva, or gently removed through the opening by means of the umbilical cord. Manual exploration of the uterus may also be demonstrated by inserting a hand up through the vaginal opening and into the pelvic cavity. Cesarean Delivery Cesarean birth is the delivery of the fetus through an abdominal and uterine incision A Cesarean delivery, also called a C-section may be performed as a result of breech presentation, pre-term or dysfunctional labor, fetal distress, prolapsed umbilical cord, placenta previa, abruption placenta, or a variety of other abnormalities. When performing a Cesarean section, an incision is made into the abdomen. A transverse incision is made across the lowest and narrowest portion of the abdomen, just below the pubic hair line. A vertical incision may also be used between the umbilicus and the symphisis pubis. A vertical incision called a paramedian, just off center, may also be used. The instructor can demonstrate a C-section by removing the metal snaps just above the pubic bone and birthing the baby between the stomach cover and the pubic bone. Prolapse of the Umbilical Cord Prolapse of the umbilical cord is a dangerous complication which involves the presence of the umbilical cord in the birth canal in front of the presenting part. This condition may occur as a result of breech presentation, transverse lies, a small fetus, an overly long cord, a placenta placed low in the uterus, or other abnormalities. Fetal distress is common with prolapse. With every contraction, the umbilical cord is compressed between the mother’s pelvis and the presenting part. If the blood flow through the cord is interrupted, the baby may die. If a cord is observed in the birth canal ahead of the presenting part, gloved fingers should be inserted and the presenting part lifted off the cord to relieve pressure on the cord. This procedure must be maintained until the prolapse has been solved, either by a termination to the compression of the cord, or until delivery of the fetus by C-section.
24
Placenta Previa Placenta previa is a condition in which the placenta is located in the lower half of the uterus, located near or covering the cervical os. There are three types of placenta previa: total, partial and marginal. Total placenta previa is when the placenta completely covers the cervical os. Partial placenta previa is when the cervical os is partially covered by the placenta. Marginal placenta previa is when the edge of the placenta extends to the internal os, where the uterus opens into the vaginal canal. With the dilation of the cervix, either in the third trimester before the onset of labor, or during labor, the placenta may disengage from the uterine wall, resulting in profuse bleeding. If a placenta previa is detected, delivery may be necessary by C-section. To simulate placenta previa with the OB SUSIE, place the placenta in the desired position to simulate the condition, with the maternal side against the uterine wall or the cervical os. Then place the fetus within the uterine cavity with the presenting part closest to the placenta. Breech Birth Breech birth occurs when either the buttocks or lower extremities of the fetus are the presenting part. There are three types of breech birth: frank, complete and incomplete or footling. Frank breech occurs when the buttocks are the presenting part and the legs of the fetus are extended up toward the baby’s head. Complete breech occurs when the buttocks are the presenting part and the baby’s legs are flexed along the lower torso. Footling or incomplete breech occurs when one of both of the legs are the presenting part. Breech presentation may be confirmed by fetal palpation or by palpation of breech presenting parts during a vaginal examination. During the third trimester, prior to the onset of labor, breech presentation may be solved by external cephalic version, in which the fetus is manually turned within the uterus by means of transabdominal manipulation. There are many differences in labor between the breech presentation and the vertex presentation. With the descent, the posterior hip encounters the pelvic floor and internal rotation takes place, allowing the anterior hip to move beneath the pubic arch. The anterior hip then delivers, followed by the posterior hip, the legs and the feet. External rotation allows the shoulders to move into the maternal pelvic and internal rotation allows the shoulders to deliver. Downward traction allows the delivery of the anterior shoulder, with a finger inserted into the birth canal to free the arm. Upward traction allows the posterior shoulder to deliver and the posterior arm is freed in the same manner. After the delivery of the shoulders, the fetal head delivers in a flexed or heads up position.

25
Although it is possible for a vaginal delivery of breech presentations, once a breech presentation has been confirmed, a Cesarean is often performed to lower the risk of infant mortality due to cord prolapse or birth asphyxia. To simulate breech presentations with the OB SUSIE, retract the birthing mechanism fully, remove the cover in the fetal head, insert the birthing mechanism into the fetal head using either one or two adapters and place the fetal legs in either an extended position to simulate “footling” delivery or retract the legs for a “frank” delivery.
Remove plug in fetal head for breech delivery

26
Removing plug reveals aperture for birthing mechanism
One way of not losing the plug is to insert it into the rectum

27
Attach the fetal head to the birthing mechanism
Frank delivery in process

28
The Pinard or leg-flip maneuver frees one leg
The fetal arms are delivered and the fetus rotated anteriorly to birth the head.

29
Postpartum Activity Fundal Massage Remove the fully dilated vulval insert and snap the postpartum perineal insert into place. Attach the 48 hour postpartum uterine assembly to the distal end of the vagina using the locking ring assembly. Note that the postpartum uterine assembly consists of a thin outer uterine skin and a smaller, harder inner uterus. Use the squeeze bulb to inflate the space between the two uteri to expand the soft external skin and simulate the “boggy” uterine condition. As the student performs bimanual massage, air will leak out of the thumb screw in the squeeze bulb. As air is released, one may palpate the abdominal cover and note the uterus is contracting to a point where the firm, contracted inner uterus will be palpated. Massage may be conducted using the transdermal approach.
Remove the vulva and cervix, and insert the uterine assembly

30
Insert the elevating cushion and snap the uterine assembly into place.
Elevate the uterine assembly using the squeeze bulb.

31
Massage the boggy uterus which shrinks it into a small and firm condition. Episotomy Repair Remove the fully dilated vulva used during delivery and select on of the three episotomy repair modules. Snap the module into place. Use a “000” size suture and small curved needle to repair the surgical incision or repair.

32
Section 3 – Care of the Simulator Treat the OB SUSIE with care, as you would your expectant mother! After use, clean the simulator with a mild detergent or with soap and water. Remove all traces of any lubricant. Do not clean with harsh abrasives. Dry thoroughly. * Store the simulator in a cool area in the packing carton provided. * Do not stack or store heavy materials on top of the carton. * Indelible marks made with ballpoint pens, ink or marker cannot be removed. * Do not wrap the simulator in newsprint. * Do not use povidone iodine on the simulator. * Replacement parts are available from the manufacturer or from your Distributor.

33
Section 4 – References
1. Myles Textbook for Midwives. Edited by Bennett and Brown. 2. Life Saving Skill Manual for Midwives, 3rd Edition. John Snow, Inc. 3. Managing Complications in Pregnancy and Childbirth. WHO/RHR/00.7.
Published in 2000. 4. NOELLE™ Training Guide with basic and advanced interactive scenarios.
Gaumard Scientific Company, Inc. Published 2003. (Instructor and Student Guides available.)
5. NOELLE™ Perinatal Monitor. Gaumard Scientific Company, Inc. 2003.

34
Section 5 – Limited Warranty Gaumard® Scientific Company (Gaumard) warrants that if the accompanying product proves to be defective in material or workmanship within one (1) year from the date of the original purchase, Gaumard will, at Gaumard’s option, either repair or replace same without charge. This limited warranty may be enforced only by the first consumer user. All subsequent purchasers acquire the product “as is” without this limited warranty. This warranty covers all defects in material or workmanship, except:
1. Damage resulting from accident, misuse, neglect, or from other than normal and ordinary use of the product.
2. Damage resulting from failure to clean or use the product in accordance with the instructions.
3. Damage resulting from repair or attempted repair by anyone other than Gaumard.
When repair is indicated, the user must:
1. Contact Gaumard and request service authorization. 2. At the customer’s expense, ship the product with a copy of the bill of sale to
Gaumard. Gaumard disclaims liability for incidental and consequential damages for breach of any express or implied warranty, including any implied warranty of merchantability with respect to this product. This writing constitutes the entire agreement of the parties with respect to the subject matter hereof, no waiver or amendment shall be valid unless in writing signed by Gaumard.

35
Section 6 – Technical Support Contact us if you have any questions or if you system requires repair. Toll Free USA 800-882-6655 Worldwide 305-971-3790 Fax 305-667-6085 e-mail [email protected] Office hours 8:30 a.m. – 4:30 p.m. EST, Monday-Friday Internet catalog www.gaumard.com Gaumard® Scientific Company, Inc. 14700 SW 136 Street Miami, FL 33196-5691

36
Section 7 – Common Spare Parts List for the S500.100 OB SUSIE® Part # Description Price ($US) 500.100.001 Stomach cover 50.00 500.100.002 Birthing mechanism with mounting flange 100.00 500.100.003 Dilating cervices (set of 2) 40.00 500.100.004 Replaceable vulval inserts (set of 2) 40.00 500.100.005 Articulating Birthing Baby 225.00 500.100.006 Elevating cushion for Leopold Maneuvers 75.00 500.100.007 Placenta 25.00 500.100.008 Postpartum perineal insert 50.00 500.100.009 48 hour postpartum uterine activity 75.00 500.100.010 Set of 4 umbilical cords and clamps 50.00 500.100.011 Episiotomy trainer (set of 3) 115.00 500.100.012 Water based silicone lubricant 5.00