instruction manual cz 200cz-usa.com/.../uploads/2014/04/instruction-manual-cz-200.pdf · adjustment...
TRANSCRIPT
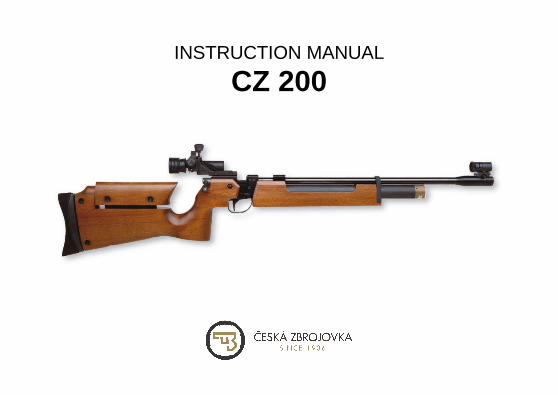
INSTRUCTION MANUAL
CZ 200

15
Before handling the firearm read this manual carefully and observe the following safety instructions.
Improper and careless handling of the firearm could result in unintentional discharge and could cause injury, death or damage to property. The same consequences can be caused by unauthorized modifications or adjustments, corrosion, or use of non-standard or damaged ammunition. In these cases the manufacturer shall not be responsible in any manner whatsoever for the resultant consequences.
Before leaving the factory this firearm was tested, carefully inspected, and packed. CZ cannot accept responsibility for product handling while in transit, or upon leaving the factory. Therefore, please examine this rifle carefully at the time of purchase to ensure that it is unloaded and undamaged.
This instruction manual should always accompany the firearm and that even in the case of its loan or sale.
CONTENTS
SAFETY INSTRUCTIONS 16 AIR RIFLE DESCRIPTION AND TERMINOLOGY 17 OPERATING INSTRUCTIONS 19
Ammunition 19 Reservoir filling 19 Sights adjustments 21 Pellet velocity (energy) 21 Adjustment of the trigger mechanism 21 Cocking and loading the rifle 22
MAINTENANCE INSTRUCTIONS 22 Disassembly for cleaning 22 Assembling the rifle 23
Cleaning the rifle 23 Cleaning the bore and pellet chamber 23 Cleaning other parts of the rifle 24 Lubrication 24 Waste Management 24
LIST OF PARTS CZ 200T 25 TROUBLESHOOTING, CAUSES AND
REMEDIES 26 TECHNICAL SPECIFICATIONS 27 LIST OF FIGURES 28

16
SAFETY INSTRUCTIONS
Always follow the safety instructions for your safety and the safety of others.
1. Always handle your firearm as if it were loaded.
2. Never point your firearm at anything you do not intend to shoot.
3. Never take anyone's word that a gun is unloaded.
4. Always make sure that your firearm is not loaded before laying it down, or handing it to another person.
5. Always store your rifle unloaded with the striking mechanism released.
6. Never abuse your firearm by using it for any purpose other than shooting.
7. Never leave a loaded firearm unattended.
8. Prior to loading the firearm make sure that barrel bore, chamber, and action are clean and clear of obstructions. Clean a dirtied firearm immediately so that it will function properly and safely.
9. Always use only clean, dry, original high quality commercially manufactured ammunition, which is appropriate to the caliber of your rifle.
10. Never drink alcoholic beverages or take drugs before or during shooting.
11. Never squeeze the trigger or put your finger in the trigger guard until you are aiming at a target and ready to shoot.
12. Always be absolutely sure of your target, and the area behind it, before you squeeze the trigger. A bullet could travel through or past your target up to several hundred meters.
13. Never shoot at a hard surface such as rock, or a liquid surface such as water.
14. Never indulge in "horseplay" while holding your firearm.
15. Always make sure your firearm is not loaded before cleaning, storing or travelling.
16. Always keep and store your firearm and ammunition in separate locked receptacles out of reach and sight of children and untrained people.
17. Never alter any parts of your rifle as the safety and proper function of your rifle could be seriously compromised.

17
18. Always be aware that corrosion, use of damaged ammunition, dropping the rifle on hard surfaces or other "coarse treatment" could cause a damage you may not see. If something like this happens, allow let the firearm to be examined and tested by a competent gunsmith.
AIR RIFLE DESCRIPTION AND TERMINOLOGY
The names of all air rifle parts are given in the chapter List of Parts.
Series CZ 200 PCP (pre-charged pneumatic) air rifles is a result of the close co-operation between Czech arms factory Ceska
Zbrojovka and renown English air guns manufacturer Air Arms.
These guns, involving a compact receiver with a fixed or removable compressed air reservoir, feature accurate, consistent and
recoilless behavior that will be appreciated mainly by the wide spectrum of young and beginning shooters.
The basic CZ 200 S versions are made in caliber .177”/4,5 mm or .22”/5,5 mm and can be used beside sporting also for pest control
purposes (if allowed) as their muzzle energy can be set up to 16 Joule.
The target style model CZ 200 T, made in caliber .177”/4,5 mm, is designed mainly for the training and basic competition shooting.
Design of the air rifle complies with ISSF rules.
18
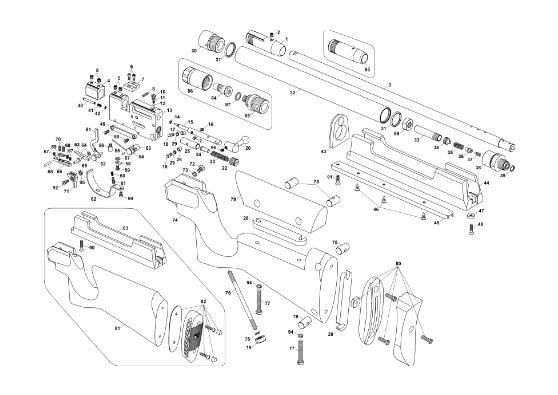
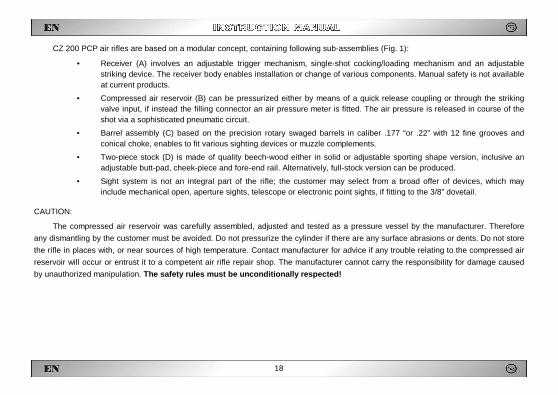
CZ 200 PCP air rifles are based on a modular concept, containing following sub-assemblies (Fig. 1):
• Receiver (A) involves an adjustable trigger mechanism, single-shot cocking/loading mechanism and an adjustable striking device. The receiver body enables installation or change of various components. Manual safety is not available at current products.
• Compressed air reservoir (B) can be pressurized either by means of a quick release coupling or through the striking valve input, if instead the filling connector an air pressure meter is fitted. The air pressure is released in course of the shot via a sophisticated pneumatic circuit.
• Barrel assembly (C) based on the precision rotary swaged barrels in caliber .177 “or .22” with 12 fine grooves and conical choke, enables to fit various sighting devices or muzzle complements.
• Two-piece stock (D) is made of quality beech-wood either in solid or adjustable sporting shape version, inclusive an adjustable butt-pad, cheek-piece and fore-end rail. Alternatively, full-stock version can be produced.
• Sight system is not an integral part of the rifle; the customer may select from a broad offer of devices, which may include mechanical open, aperture sights, telescope or electronic point sights, if fitting to the 3/8” dovetail.
CAUTION:
The compressed air reservoir was carefully assembled, adjusted and tested as a pressure vessel by the manufacturer. Therefore
any dismantling by the customer must be avoided. Do not pressurize the cylinder if there are any surface abrasions or dents. Do not store
the rifle in places with, or near sources of high temperature. Contact manufacturer for advice if any trouble relating to the compressed air
reservoir will occur or entrust it to a competent air rifle repair shop. The manufacturer cannot carry the responsibility for damage caused
by unauthorized manipulation. The safety rules must be unconditionally respected!

19
OPERATING INSTRUCTIONS
Ammunition
For shooting use only quality pellets in caliber .177” or .22”, as per. par. 9 of Safety Instructions.
Reservoir filling
USE ONLY CLEAN, FILTERED AND DRY COMPRESSED AIR.
For filling the compressed air reservoir use only compressed-air bottle, compressor or mechanical pump complying with your
country’s requirements on manipulation with such devices and limited to 230 bar operation. The reservoir is hydraulic tested by the
manufacturer at 300 bar, but do not attempt to exceed the 200 bar air pressure. The reservoir can be damaged irreversibly and
thus the gun in whole. In the interest of safety the compressed-air reservoir has a safety device that operates at approximately 250 bar.
Once operated (indicated by deformation of the cylinder end) the reservoir is beyond further use and the cylinder must be replaced.
Note: Filling to a higher pressure will not increase power and may actually trouble operation, filling to lower pressures will not reduce
power, only the number of shots. If the rifle is continually fired when the pressure in the compressed-air reservoir is below refill pressure
(less than 60 bar), the remaining air will eventually escape through the barrel spontaneously. This is not harmful to the rifle but can cause
surprise to yourself or bystanders.
Note: The rifle must be unloaded when refilling or replacing the reservoir.

20
Filling the reservoir by the quick release coupling (Fig. 2)
This type of reservoir (only at Models AA S 200) can be filled with the gun after removing the cover.
- Connect the coupling at the hose (A) from the compressed-air bottle (or other pressurizing device) with the coupling
connector located at the reservoir.
- Check that the release screw (C) at the adapter (B) is closed.
- Slowly open the main bottle valve (D) and feed the air in the reservoir until the pointer of adapter manometer (E) will
approach the 190 bar value.
- Close the bottle valve immediately.
- Turn the air release screw to release the excessive air from the interconnecting hose.
- Disengage the quick release coupling.
The compressed air reservoir and the gun are ready to further manipulation and use.
Filling the reservoir with the air pressure gauge (Fig. 3)
This type of reservoir must be first removed (unscrewed) from the gun.
- Screw the reservoir (A) on the adapter (B) attached to the valve of the compressed-air bottle.
- Check that the release screw at the adapter is closed.
- Slowly open the main bottle valve and simultaneously check the value shown by pointer of the pressure gauge. As soon as it
approaches 170 bar (Model CZ 200 T) event. 190 bar (Model CZ 200 S) value, close the valve.
- Check again the value indicated by the pressure gauge.
- Turn the release screw to release the excessive air from the adapter.
- Unscrew cautiously the reservoir from the adapter.
The reservoir is ready to be screwed in the receiver. The PCP rifle is prepared for further use.

21
Sights adjustments
The sights to be fitted on the 3/8” dovetail and adjusted according to the instruction of their manufacturer. Pellet velocity (energy)
Models CZ 200 S can be set for the pellet muzzle energy up to 16 Joule. According to the purpose of use the rifle performance can be optimized for specific pellets controlling the muzzle velocity of the pellet by a chronograph. Models CZ 200 T are set for the pellet muzzle energy of 7.5 Joule maximum.
Because of seriousness of the pellet muzzle energy readjustment contact please in this matter for advice the trading company’s representative.
WARNING! It is a very serious offence to be in possession of a gun that you are not authorized for. Adjustment of the trigger mechanism
Striking point adjustment
The trigger mechanism is set by the manufacturer for the two-stage weight, the 1st stage up to 3 N and the 2nd stage over 5 N. The engagement of the trigger lever and the 1st stage trigger weight are not recommended to change from original. The rifle for these adjustments is recommended to commit to a competent workshop. Trigger play, pull and position adjustment
The trigger play can be controlled by M3x6 screw, which is located in the front side of the trigger base (Fig. 4). After longer time of use it may come to its release (having no influence on the rifle performance). The screw is resting on the pawl washer in the receiver. When screwing it in the play will be reduced.
2nd stage trigger weight can be regulated by the adjustment screw located behind the trigger guard.
Position of the trigger can be changed by shifting it on the trigger base after releasing the clamping screw.
CAUTION: Be careful during the adjustment procedure, it may come to an unwanted rifle discharge.

22
Cocking and loading the rifle
WHEN LOADING KEEP ALWAYS THE RIFLE MUZZLE POINTED IN A SAFE DIRECTION!
Before shooting check if the reservoir, with air pressure meter, is filled.
Holding the gun securely with your left hand grasp the bolt handle firmly and rotate counterclockwise and pull toward the rear of the
gun. The bolt will remain open when it reaches the full rear position, the trigger mechanism will be engaged (Fig. 5). If the bolt is gripped
with the thumb on the other side, the cocking action will be smoother.
The proper caliber pellet can be inserted into the pellet channel (Fig. 6). Beware of its proper orientation.
Push the loading bolt right the way forward and at the end of the stroke turn clockwise until locked. The pellet is loaded in the barrel
and striking mechanism is cocked. Check if the cocking arm is returned under action of the cocking arm spring to the initial position. If be
there, the gun is ready to shoot.
CAUTION: The gun has no trigger safety. Therefore do not insert your finger in the trigger guard in course of cocking and loading.
MAINTENANCE INSTRUCTIONS
Disassembly for cleaning
KEEP ALWAYS THE RIFLE MUZZLE POINTED IN A SAFE DIRECTION!
The CZ 200 Series PCP air rifles are based on a modular concept, consisting from sub-assemblies shown at Fig. 1. To dismantle the rifle in the mentioned subassemblies follow this procedure:
- Using Allen key loosen the fore-end screw (Fig. 7). After its unscrewing you can strip the fore-end stock forward.
- The compressed-air reservoir can be unscrewed by hand.
- Barrel assembly can be removed after loosening the two M5x6 socket head screws situated in the front part of the receiver (Fig. 8).
- The butt-stock (resp. full-stock) can be taken apart when the right side stock screw is loosened (using screwdriver) and (by means of special wrench supplied with the accessories) unscrewing the nut sited in the pistol grip (Fig. 9).

23
The gun is ready for cleaning. CAUTION:
Do not continue dismantling of a.m. subassemblies, as they were preset by the manufacturer and an unauthorized action can cause change of the adjustment eventually also their damage.
Assembling the rifle
- Insert the barrel assembly in the receiver and fix by means of two screws.
- The compressed-air reservoir screw on by hand.
- Apply the fore-end stock and secure it by the screw.
- Put the butt-stock (resp. full-stock) on the receiver and fasten-down by screw and nut.
Cleaning the rifle
The rifle to be cleaned
- after getting wet
- in the mild weather conditions at least once a year
- in the severe weather conditions at least once per month, depending on frequency of use
Cleaning the bore and pellet chamber
For ultimate accuracy clean and re-lube the barrel frequently.
Correct materials for this purpose are very important, therefore use only products recommended by air rifle specialists in relevant countries. Cleaners and oils intended for firearms needn’t be suitable for air guns. For cleaning we recommend the following procedure:
- Cut a piece of the nylon (or nylon coated) fishing line (10 kg) 3-times the length of your barrel, fold in half and tie ends together.

24
- Open loading bolt.
- Feed un-knotted end down barrel from the muzzle end until short piece of folded end protrudes.
- Pass a piece of the soft cotton cloth between the protruding loop, spray it with "Gun Cleaner" or white spirit, turn the rifle upside down and pull the line through the barrel slowly.
- Repeat the previous two steps until the cloth is clean.
- Repeat the previous two steps once more without any cleaner to dry the barrel.
- Repeat the previous two steps once more with the cloth sprayed with "Gun Oil". Cleaning other parts of the rifle
Maintenance of other parts of the rifle can be carried out with a dry soft cloth, on the stock may be applied a suitable polishing product. Lubrication
Lubrication of the internal mechanism should not be required until the annual service (Fig. 10).
A small dab of "Gun Grease" (A) may be applied to the loading bolt and cocking arm. Work them by moving them forward and backwards. A small drop of the "Gun Oil" (B) may be applied to the striker.
Keep your gun in a dry and dust-free environment. Regular care and proper handling will keep your gun as new and its functioning
will not be compromised. Before shooting wipe the barrel bore and chamber dry.
Waste Management
When used properly, the materials used in the product and packaging have no adverse effects on human health or the environment. When disposing of the product or its packaging, metal parts (steel and non-ferrous metals), plastics, wood, paper and cardboard should be stored separately in collecting containers intended specifically for that purpose.
25
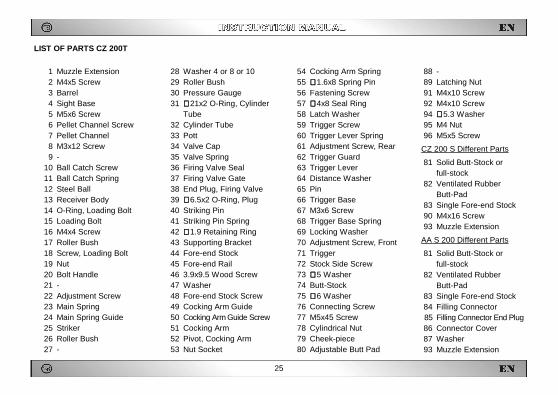
LIST OF PARTS CZ 200T
1 Muzzle Extension 2 M4x5 Screw 3 Barrel 4 Sight Base 5 M5x6 Screw 6 Pellet Channel Screw 7 Pellet Channel 8 M3x12 Screw 9 -
10 Ball Catch Screw 11 Ball Catch Spring 12 Steel Ball 13 Receiver Body 14 O-Ring, Loading Bolt 15 Loading Bolt 16 M4x4 Screw 17 Roller Bush 18 Screw, Loading Bolt 19 Nut 20 Bolt Handle 21 - 22 Adjustment Screw 23 Main Spring 24 Main Spring Guide 25 Striker 26 Roller Bush 27 -
28 Washer 4 or 8 or 10 29 Roller Bush 30 Pressure Gauge 31 ∅∅∅∅21x2 O-Ring, Cylinder
Tube 32 Cylinder Tube 33 Pott 34 Valve Cap 35 Valve Spring 36 Firing Valve Seal 37 Firing Valve Gate 38 End Plug, Firing Valve 39 ∅∅∅∅6.5x2 O-Ring, Plug 40 Striking Pin 41 Striking Pin Spring 42 ∅∅∅∅1.9 Retaining Ring 43 Supporting Bracket 44 Fore-end Stock 45 Fore-end Rail 46 3.9x9.5 Wood Screw 47 Washer 48 Fore-end Stock Screw 49 Cocking Arm Guide 50 Cocking Arm Guide Screw 51 Cocking Arm 52 Pivot, Cocking Arm 53 Nut Socket
54 Cocking Arm Spring 55 ∅∅∅∅1.6x8 Spring Pin 56 Fastening Screw 57 ∅∅∅∅4x8 Seal Ring 58 Latch Washer 59 Trigger Screw 60 Trigger Lever Spring 61 Adjustment Screw, Rear 62 Trigger Guard 63 Trigger Lever 64 Distance Washer 65 Pin 66 Trigger Base 67 M3x6 Screw 68 Trigger Base Spring 69 Locking Washer 70 Adjustment Screw, Front 71 Trigger 72 Stock Side Screw 73 ∅∅∅∅5 Washer 74 Butt-Stock 75 ∅∅∅∅6 Washer 76 Connecting Screw 77 M5x45 Screw 78 Cylindrical Nut 79 Cheek-piece 80 Adjustable Butt Pad
88 - 89 Latching Nut 91 M4x10 Screw 92 M4x10 Screw 94 ∅∅∅∅5.3 Washer 95 M4 Nut 96 M5x5 Screw
CZ 200 S Different Parts
81 Solid Butt-Stock or full-stock
82 Ventilated Rubber Butt-Pad
83 Single Fore-end Stock 90 M4x16 Screw 93 Muzzle Extension
AA S 200 Different Parts
81 Solid Butt-Stock or full-stock
82 Ventilated Rubber Butt-Pad
83 Single Fore-end Stock 84 Filling Connector 85 Filling Connector End Plug 86 Connector Cover 87 Washer 93 Muzzle Extension

26
TROUBLESHOOTING, CAUSES AND REMEDIES
If your firearm is properly used and maintained, malfunctions will rarely occur. However, if such a situation does occur please observe the following instructions.
CAUTION - if a malfunction occurs, the possibility of an unintentional discharge is substantially increased. For this reason, when clearing malfunctions, observe the Safety Instructions already mentioned above. Keep the rifle pointed in a safe direction, do not turn the rifle against your body or anyone else’s. Do not place your hands in front of the barrel!
Malfunction Possible Cause Remedy
The gun didn’t
discharge after
pulling the trigger.
The bolt insufficiently cocked.
The pellet is inserted incorrectly.
Insufficient air pressure in the compressed-air
reservoir.
Repeat bolt cocking procedure.
Disassemble the barrel and carefully remove the jammed
pellet.
Refill the compressed-air reservoir.
After cocking the
bolt to the rear
position the striking
mechanism is not
retained.
Damage or change of adjustment to the trigger
mechanism.
Gun to be committed for repair to the competent
gunsmith.
If you cannot clear away any malfunction in the manner described above, entrust the rifle to a competent gunsmith for inspection and repair.

27
TECHNICAL SPECIFICATIONS
Model CZ 200 S CZ 200 T
Caliber [mm] 4,5 (.177”) or 5,5 (.22”) 4,5 (.177”)
Overall length [mm] 907 872 - 928
Distance between trigger (in rear position) and stock end [mm]
360 320 - 336 ... short stock
340 - 356 ... medium stock 360 - 376 ... long stock
Rifle height w/o sights [mm] 165 180
Overall width [mm] 53 53
Barrel length [mm] 485 485
Rifling 12 R/H grooves 12 R/H grooves
Rifling pitch [mm/turn] 450 450
Total weight [kg] 2.80 approx. 3.0 max. approx.
Reservoir volume [ml] 122 122
Filling pressure [bar] 190 170
Muzzle energy [Joule] 16 max. 7.5 max.
Trigger pull 2-stage adjustable 2-stage adjustable

28
LIST OF FIGURES
1. Basic sub-assemblies of the gun
2. Filling the reservoir with quick release coupling
3. Filling the reservoir with air pressure gauge
4. Trigger play and pull adjustment
5. Cocking the striking mechanism
6. Loading the pellet
7. Fore-end stock releasing screw
8. Barrel fixing screws
9. Butt-stock disassembly screw and nut
10. Lubrication points
The Manufacturer, reserves the right to make any changes it thinks necessary to improve its models or to meet any requirements of manufacturing or
commercial nature.