instruction book for pivoting da-lift 26p and 33p
TRANSCRIPT

INSTRUCTION BOOK FOR
Pivoting Da-Lift 26P and 33P
2
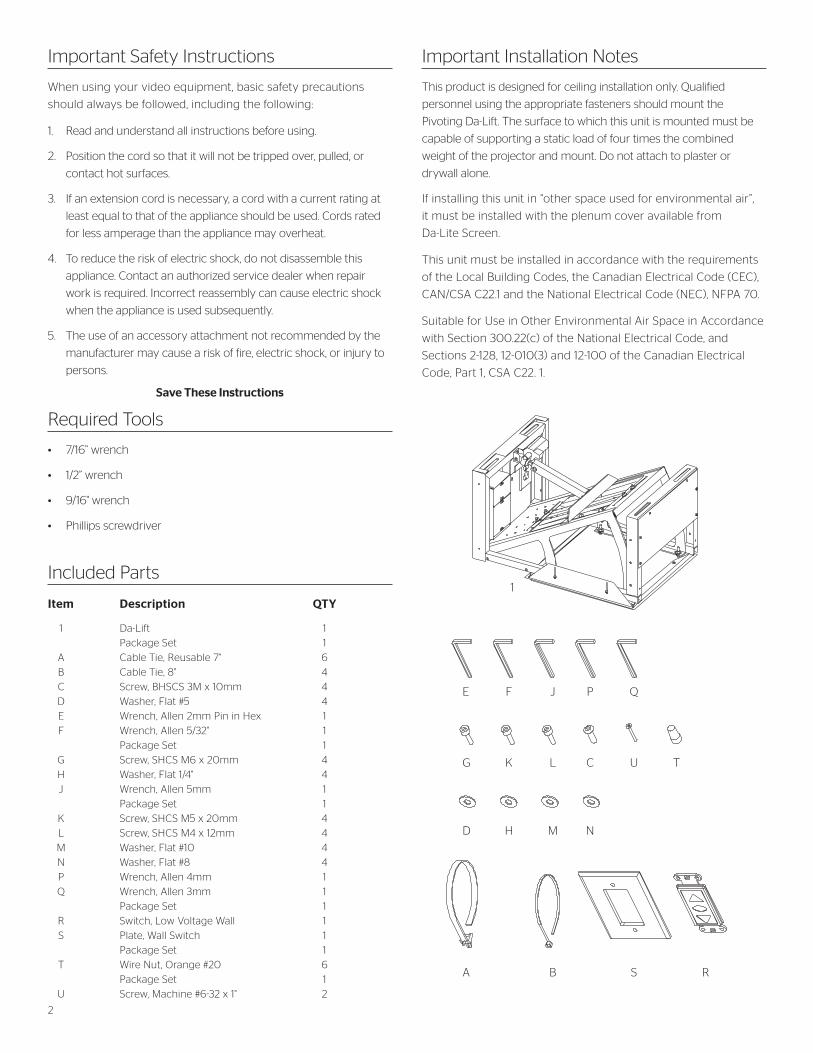
Important Installation Notes
Required Tools
Important Safety Instructions
This product is designed for ceiling installation only. Qualified
personnel using the appropriate fasteners should mount the
Pivoting Da-Lift. The surface to which this unit is mounted must be
capable of supporting a static load of four times the combined
weight of the projector and mount. Do not attach to plaster or
drywall alone.
If installing this unit in “other space used for environmental air”,
it must be installed with the plenum cover available from
Da-Lite Screen.
This unit must be installed in accordance with the requirements
of the Local Building Codes, the Canadian Electrical Code (CEC),
CAN/CSA C22.1 and the National Electrical Code (NEC), NFPA 70.
Suitable for Use in Other Environmental Air Space in Accordance
with Section 300.22(c) of the National Electrical Code, and
Sections 2-128, 12-010(3) and 12-100 of the Canadian Electrical
Code, Part 1, CSA C22. 1.
• 7/16” wrench
• 1/2” wrench
• 9/16" wrench
• Phillips screwdriver
When using your video equipment, basic safety precautions
should always be followed, including the following:
1. Read and understand all instructions before using.
2. Position the cord so that it will not be tripped over, pulled, or
contact hot surfaces.
3. If an extension cord is necessary, a cord with a current rating at
least equal to that of the appliance should be used. Cords rated
for less amperage than the appliance may overheat.
4. To reduce the risk of electric shock, do not disassemble this
appliance. Contact an authorized service dealer when repair
work is required. Incorrect reassembly can cause electric shock
when the appliance is used subsequently.
5. The use of an accessory attachment not recommended by the
manufacturer may cause a risk of fire, electric shock, or injury to
persons.
Save These Instructions
Item Description QTY
1 Da-Lift 1
Package Set 1
A Cable Tie, Reusable 7" 6
B Cable Tie, 8" 4
C Screw, BHSCS 3M x 10mm 4
D Washer, Flat #5 4
E Wrench, Allen 2mm Pin in Hex 1
F Wrench, Allen 5/32" 1
Package Set 1
G Screw, SHCS M6 x 20mm 4
H Washer, Flat 1/4" 4
J Wrench, Allen 5mm 1
Package Set 1
K Screw, SHCS M5 x 20mm 4
L Screw, SHCS M4 x 12mm 4
M Washer, Flat #10 4
N Washer, Flat #8 4
P Wrench, Allen 4mm 1
Q Wrench, Allen 3mm 1
Package Set 1
R Switch, Low Voltage Wall 1
S Plate, Wall Switch 1
Package Set 1
T Wire Nut, Orange #20 6
Package Set 1
U Screw, Machine #6-32 x 1" 2
E F J P Q
G K L C U T
D H M N
A B S R
1Included Parts

3
Figure 3
Centerline of All-Thread
5/16" Centerline of All-Thread to Cutout
"L""W"
Da-Lift Model "L" "W"26P 23-1/2" 7" TO 14-1/4"
33P 30-1/2" 11-1/2" TO 18-3/4"
Figure 1Figure 2
Channel (Not Supplied)
TrimProjectorCeiling Tile
Ceiling Tile Holder Cap
Ceiling Tile Holder
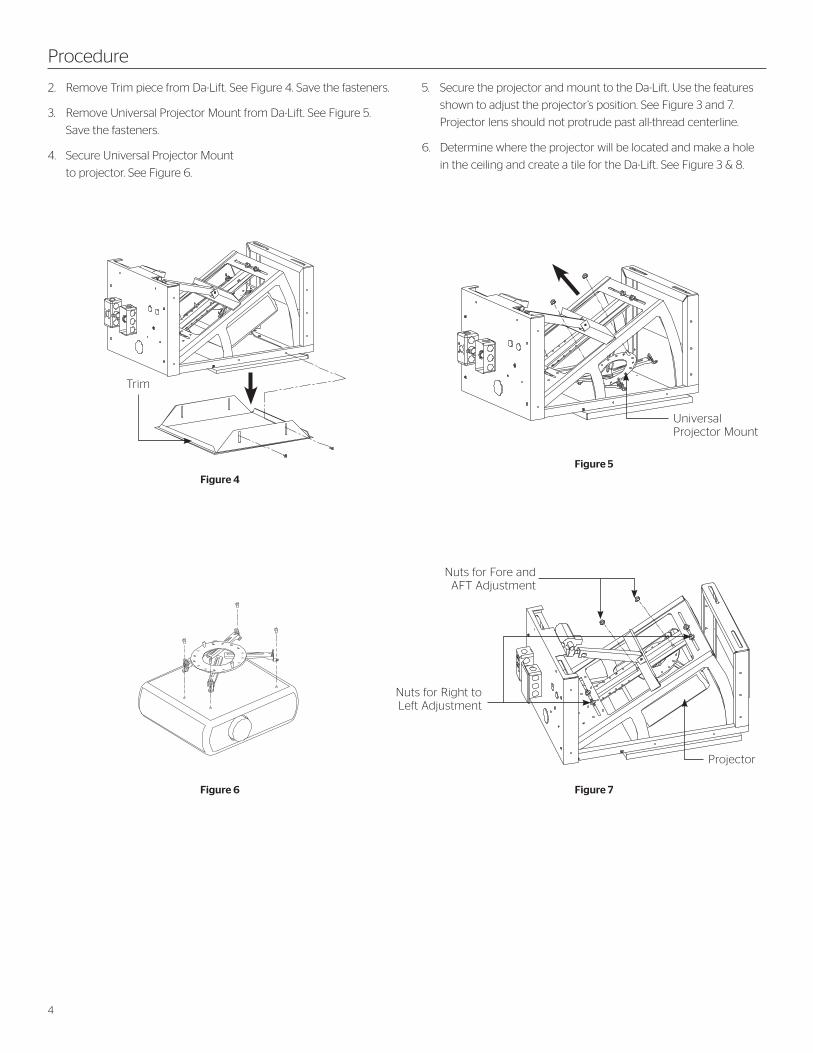
Procedure
1. The following procedure is shown with suspended ceiling
construction but the Pivoting Da-Lift will work with drywall
ceiling. Remove contents from carton and examine for
damaged or missing parts.
If installing the Pivoting Da-Lift with a plenum cover, fasten
Plenum Cover Bottom to Da-Lift first. See Plenum Cover
instruction sheet Steps #1 and #2.
3/8" All-Thread, Nuts, and Washers (Not Supplied)
1/2" Conduit Knockout (For Wall Switch or Optional Remote Receiver)
1-1/2" Conduit Knockout (For Projector Signal Cable)
120V AC ConnectionSuspended Ceiling
Grid and Tile
Channel Mounted To Structural Ceiling (Not Supplied)
4
2. Remove Trim piece from Da-Lift. See Figure 4. Save the fasteners.
3. Remove Universal Projector Mount from Da-Lift. See Figure 5.
Save the fasteners.
4. Secure Universal Projector Mount
to projector. See Figure 6.
Figure 4
Figure 5
Figure 6 Figure 7
Trim
Universal Projector Mount
Projector
Nuts for Right to Left Adjustment
Nuts for Fore and AFT Adjustment
Procedure
5. Secure the projector and mount to the Da-Lift. Use the features
shown to adjust the projector’s position. See Figure 3 and 7.
Projector lens should not protrude past all-thread centerline.
6. Determine where the projector will be located and make a hole
in the ceiling and create a tile for the Da-Lift. See Figure 3 & 8.

5
Procedure (Continued)
NOTE: Cut-Outs are square. Tollerances are ±1/8".
Da-Lift Model "A" "B"26P 16-1/2" 15-3/8"
33P 21" 19-7/8"
Figure 8
Figure 10 Figure 11
Figure 9
Scrap
"Up" Relay
Cut-Out
"Down" Relay
"Down" Limit Switch Stop Brackets
"Up" Limit Switch
"Down" Limit Switch
Tile Has to Fit Inside Ceiling Tile Holder
Trim Piece Has to Fit Inside Cut-Out
"A"
"B"
7. The Da-Lift comes with factory installed preset limit switches.
See Figure 9. If obstructions above the ceiling will prohibit easy
access to the switches, the switches may be moved to the
opposite side of the Da-Lift.
The “up” and “down” positions of the projector may be changed.
To allow the projector to go higher, raise the “Up” Limit Switch
Bracket. To allow the projector to go lower, increase the height of
the “Down” Limit Switch Stop Brackets. There are safety stops to
keep the projector from going too far. Do not allow the Da-Lift to
hit the safety stops.
8. Attach Da-Lift to the structural ceiling. See Figure 10.
9. Lower Da-Lift by connecting the power supply to 120 volt or
220 volt AC power. Use the switch shown to operate the Da-Lift.
See Figure 11. The “Stop” button is needed only for intermediate
stopping.
WARNING! Avoid pinch points when operating
Da-Lift with built-in switch.
AVERTISSEMENT! Évitez les points de pincement lorsque le
Da-Lift avec interrupteur intégré est mis en marche.
3/8" All-Thread
3/8" Hex Nut
3/8" Flat Washer
3/8" Flat Washer
3/8" Lock Hex Nut
NOTE: Items Called Out Are Not Supplied
Channel
Connect To 120V AC Or220V AC.
"Stop""Down"
"Up"
Ceiling Tile Holder Cap

6
Procedure (Continued)
10. Power the projector and adjust projector location.
11. Remove Ceiling Tile Holder Cap from Da-Lift. Install Ceiling Tile
cutout from step 6 into Ceiling Tile Holder and assemble Ceiling
Tile Holder Cap. See Figure 12.
12. Install Trim Piece onto Da-Lift. See Figure 13. You may need to
adjust the position of the Ceiling Tile Holder to clear the Trim.
13. Use provided Cable Ties for cable management. See Figure 14.
Allow enough slack in the cords for projector movement.
If Da-Lift is a 220V version, use the supplied electrical adapter.
14. Use a licensed electrician to wire the Da-Lift. See Figure 15 (120
volt) or Figure 16 (220 volt). Plug the power supply into the
receptacle of the Da-Lift.
Figure 13
Figure 12
Ceiling Tile Holder Cap
Ceiling Tile
Trim
Figure 14
Cable Tie Holes
A
Cable Storage
Figure 15 Figure 16
220V AC 50Hz Supply
HotCommon
Ground
Recommended Wire Size: 12AWG
Brown (Hot)Blue (Common)Green (Ground)
120V AC 60Hz
Supply
HotCommon
Ground
Recommended Wire Size: 12AWG
Black (Hot)White (Common)Green (Ground)
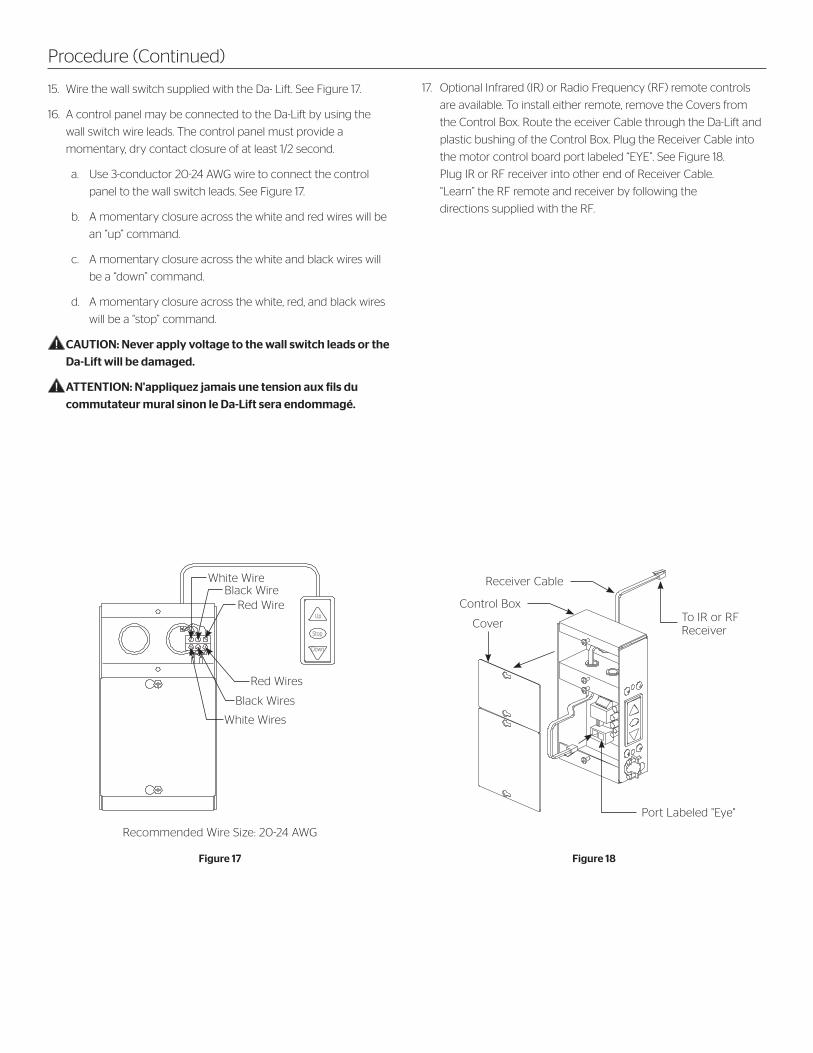
15. Wire the wall switch supplied with the Da- Lift. See Figure 17.
16. A control panel may be connected to the Da-Lift by using the
wall switch wire leads. The control panel must provide a
momentary, dry contact closure of at least 1/2 second.
a. Use 3-conductor 20-24 AWG wire to connect the control
panel to the wall switch leads. See Figure 17.
b. A momentary closure across the white and red wires will be
an “up” command.
c. A momentary closure across the white and black wires will
be a “down” command.
d. A momentary closure across the white, red, and black wires
will be a “stop” command.
CAUTION: Never apply voltage to the wall switch leads or the
Da-Lift will be damaged.
ATTENTION: N'appliquez jamais une tension aux fils du
commutateur mural sinon le Da-Lift sera endommagé.
Procedure (Continued)
Figure 17 Figure 18
Recommended Wire Size: 20-24 AWG
White WireBlack Wire
Red WireUp
Stop
Down
White Wires
Receiver Cable
Control BoxTo IR or RF Receiver
Port Labeled "Eye"
Cover
Black Wires
Red Wires
17. Optional Infrared (IR) or Radio Frequency (RF) remote controls
are available. To install either remote, remove the Covers from
the Control Box. Route the eceiver Cable through the Da-Lift and
plastic bushing of the Control Box. Plug the Receiver Cable into
the motor control board port labeled “EYE”. See Figure 18.
Plug IR or RF receiver into other end of Receiver Cable.
“Learn” the RF remote and receiver by following the
directions supplied with the RF.

E-453
A Milestone AV Technologies Brand
3100 North Detroit Street
Warsaw, Indiana 46582
P: 574.267.8101 or 800.622.3737
F: 574.267.7804 or 877.325.4832
www.da-lite.com
DL–0383 (Rev. 1) 9.14
© 2014 Milestone AV Technologies LLC. Printed in U.S.A.