installing puppy linux to usb tutorial
DESCRIPTION
How to install Puppy Linux to a USB flash drive and to make it bootable. A mirror of the original presentation by Alex Gotev. All work is originally done by him.TRANSCRIPT
1Alex Gotev – Introduction to Puppy Linux: installation on a USB Flash DiskNovara, 2009-10-24
Introduction to Puppy Linux:Installation on a USB Flash Disk
Alex Gotev
2Alex Gotev – Introduction to Puppy Linux: installation on a USB Flash DiskNovara, 2009-10-24
ContentsWhat is Puppy Linux?How can I have it?How do I boot it?What programs does it include?Installation on a USB Flash Disk
3Alex Gotev – Introduction to Puppy Linux: installation on a USB Flash DiskNovara, 2009-10-24
What is Puppy Linux?Puppy Linux is a GNU/Linux LiveCD distribution developed by Barry Kauler. It's designed to be fast and small. It can be run and installed even on very old hardware (Pentium I) and it's light and portable.The entire operating system and all the applications are runned from the RAM (if there's enough on the PC) and this grants great performaces to Puppy Linux.Even if it's possibile to install it on the Hard Drive like the other Linux distributions, this is not necessary, because the OS can be used from CD or USB without changing any setting on the host PC's OS.
4Alex Gotev – Introduction to Puppy Linux: installation on a USB Flash DiskNovara, 2009-10-24
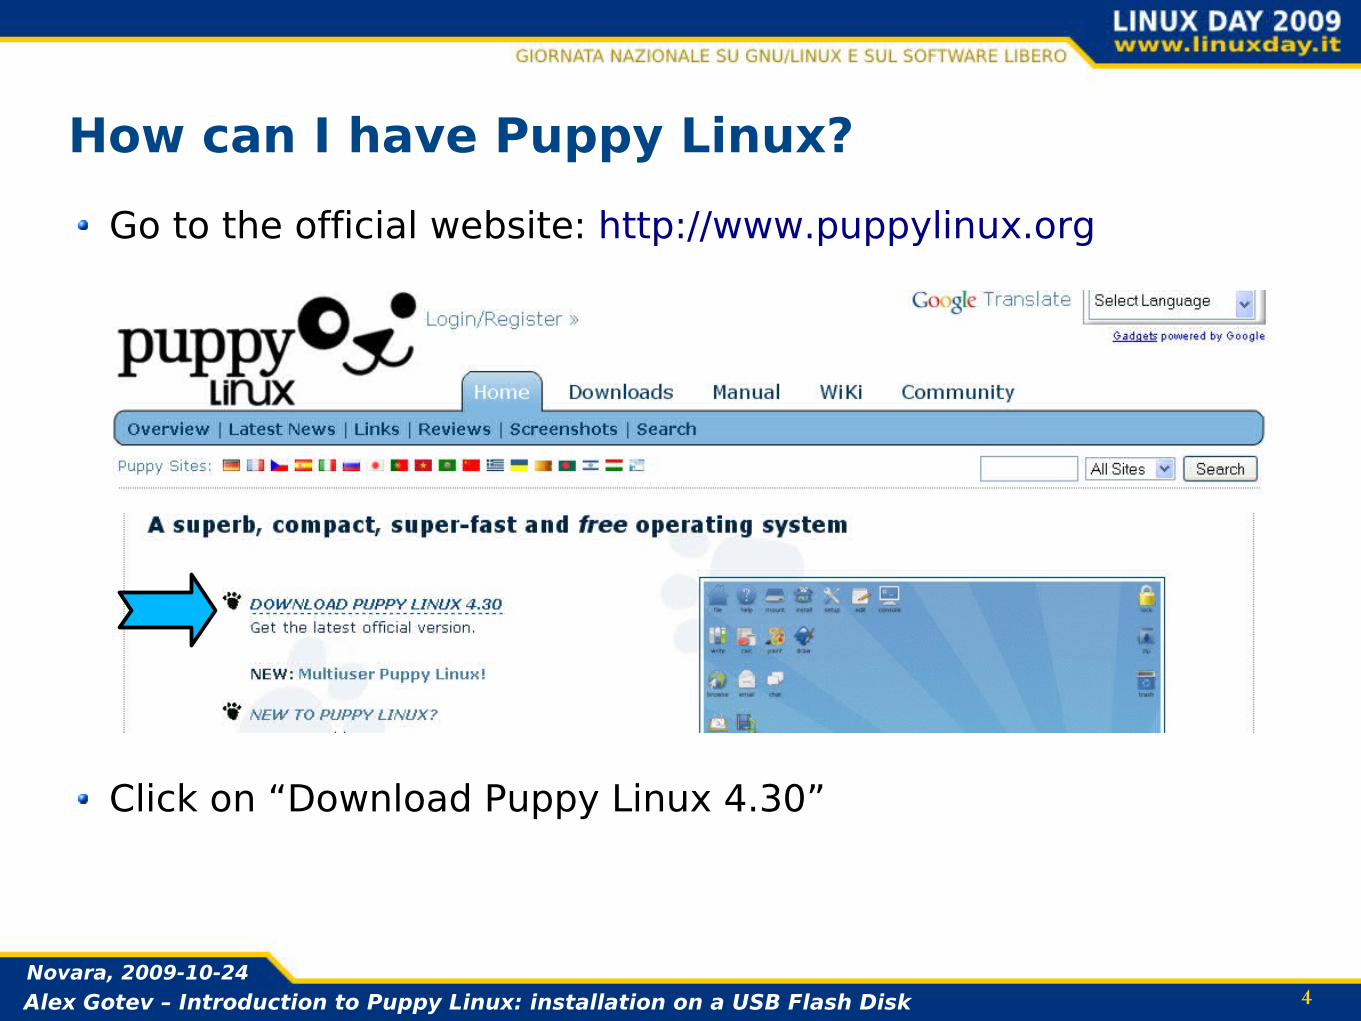
How can I have Puppy Linux?Go to the official website: http://www.puppylinux.org
Click on “Download Puppy Linux 4.30”
5Alex Gotev – Introduction to Puppy Linux: installation on a USB Flash DiskNovara, 2009-10-24
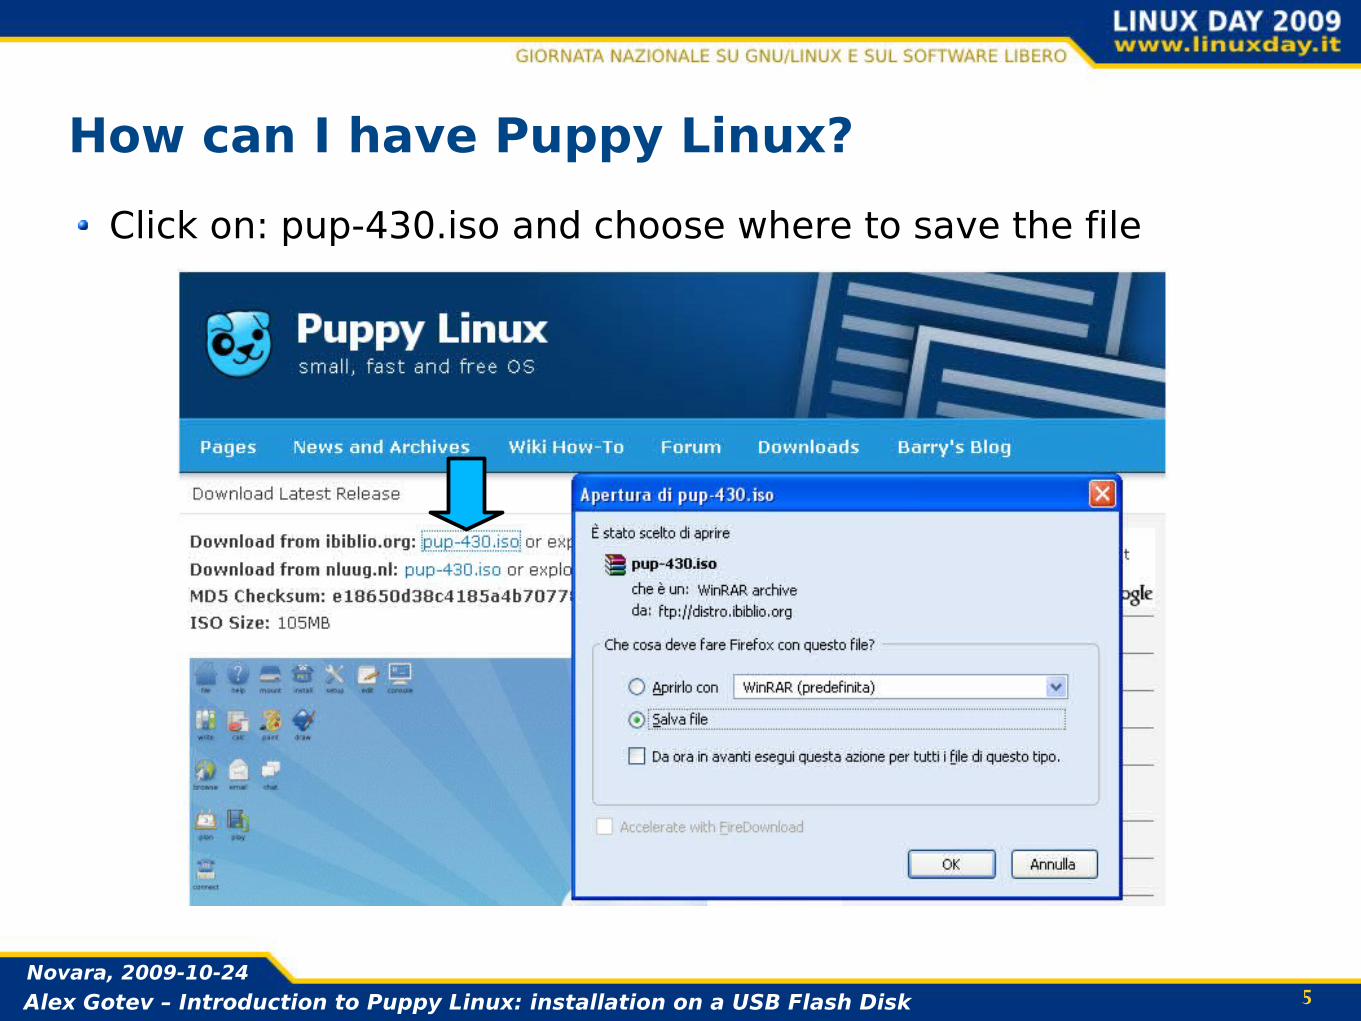
How can I have Puppy Linux?Click on: pup-430.iso and choose where to save the file
6Alex Gotev – Introduction to Puppy Linux: installation on a USB Flash DiskNovara, 2009-10-24
How can I have Puppy Linux?After you have downloaded the file, open it with your favourite CD burning program:– CDBurnerXP, freeware, website: http://cdburnerxp.se
– ImgBurn, freeware, website: http://www.imgburn.com
– Nero, shareware, website: http://www.nero.com
Burning CD Examples with CDBurnerXP and Nero
7Alex Gotev – Introduction to Puppy Linux: installation on a USB Flash DiskNovara, 2009-10-24
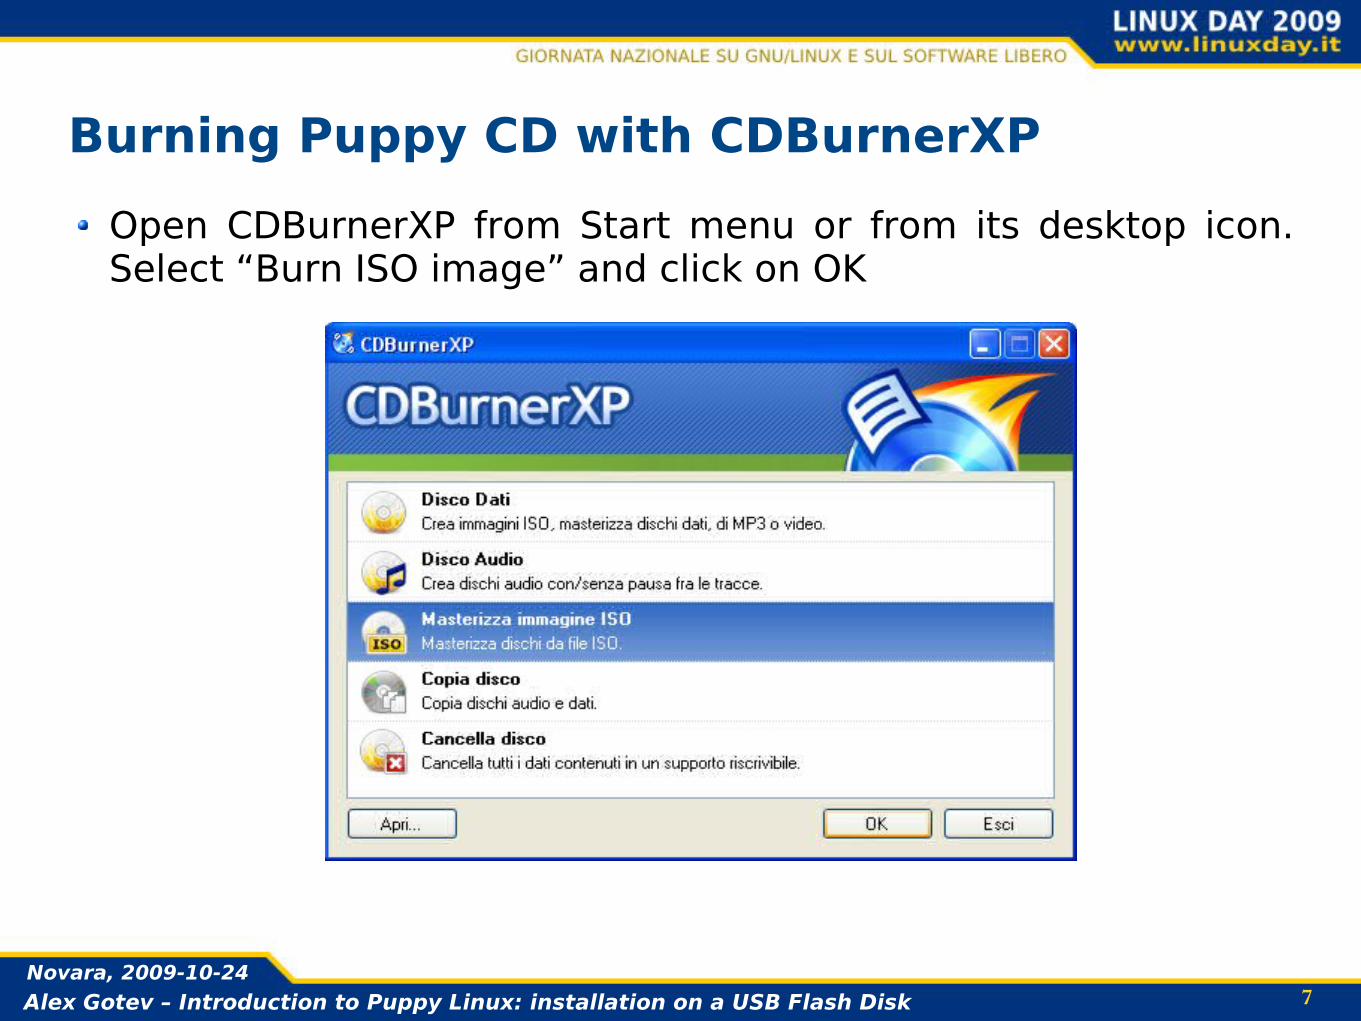
Burning Puppy CD with CDBurnerXPOpen CDBurnerXP from Start menu or from its desktop icon. Select “Burn ISO image” and click on OK
8Alex Gotev – Introduction to Puppy Linux: installation on a USB Flash DiskNovara, 2009-10-24
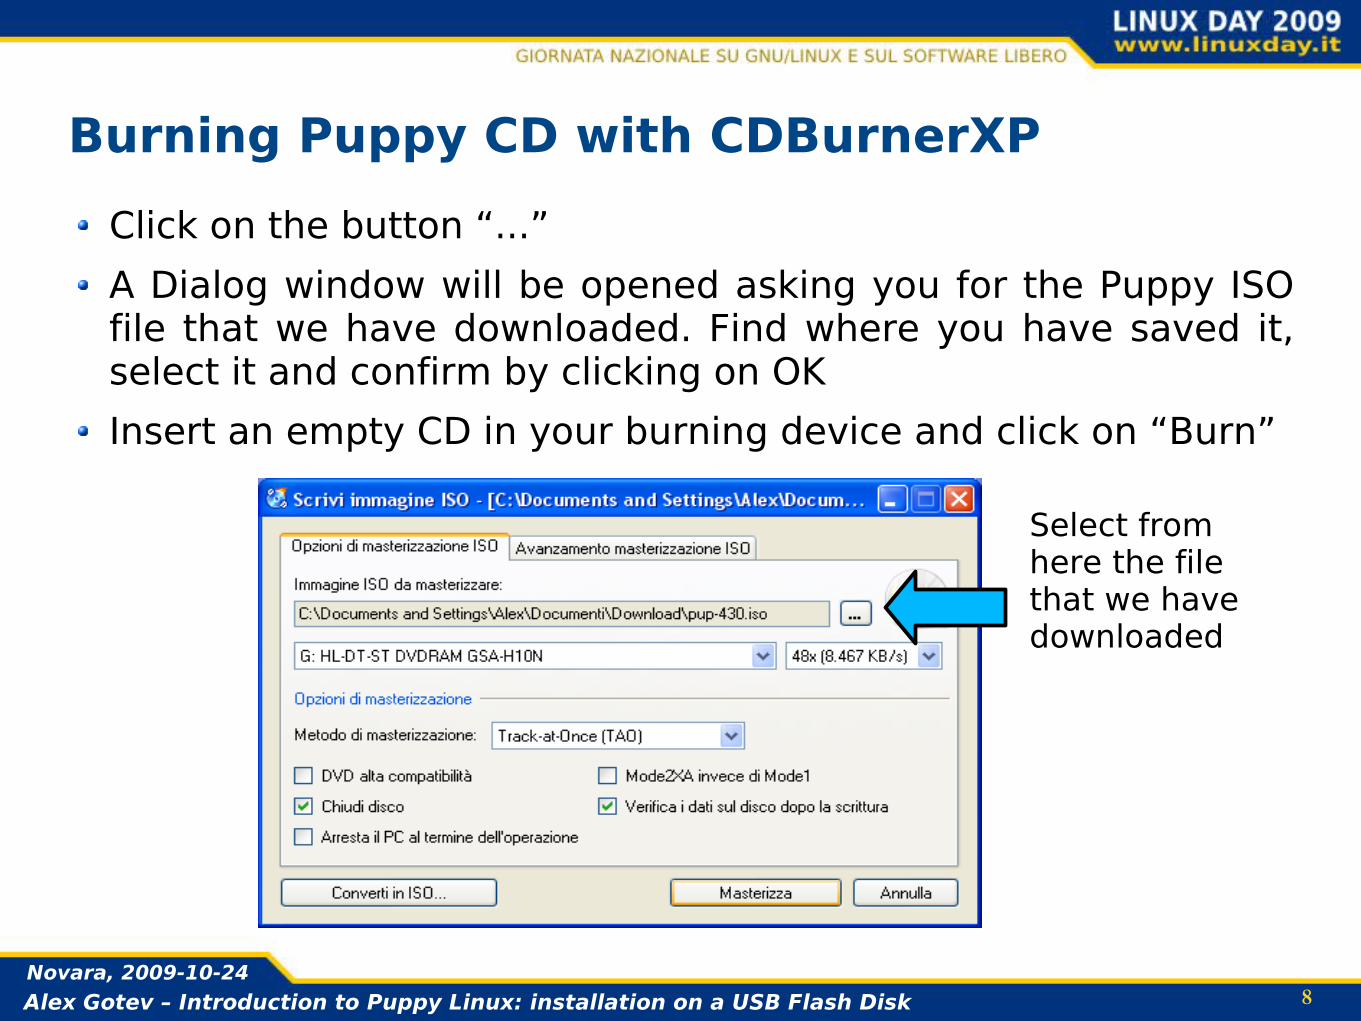
Burning Puppy CD with CDBurnerXPClick on the button “...”A Dialog window will be opened asking you for the Puppy ISO file that we have downloaded. Find where you have saved it, select it and confirm by clicking on OKInsert an empty CD in your burning device and click on “Burn”
Select from here the file that we have downloaded
9Alex Gotev – Introduction to Puppy Linux: installation on a USB Flash DiskNovara, 2009-10-24
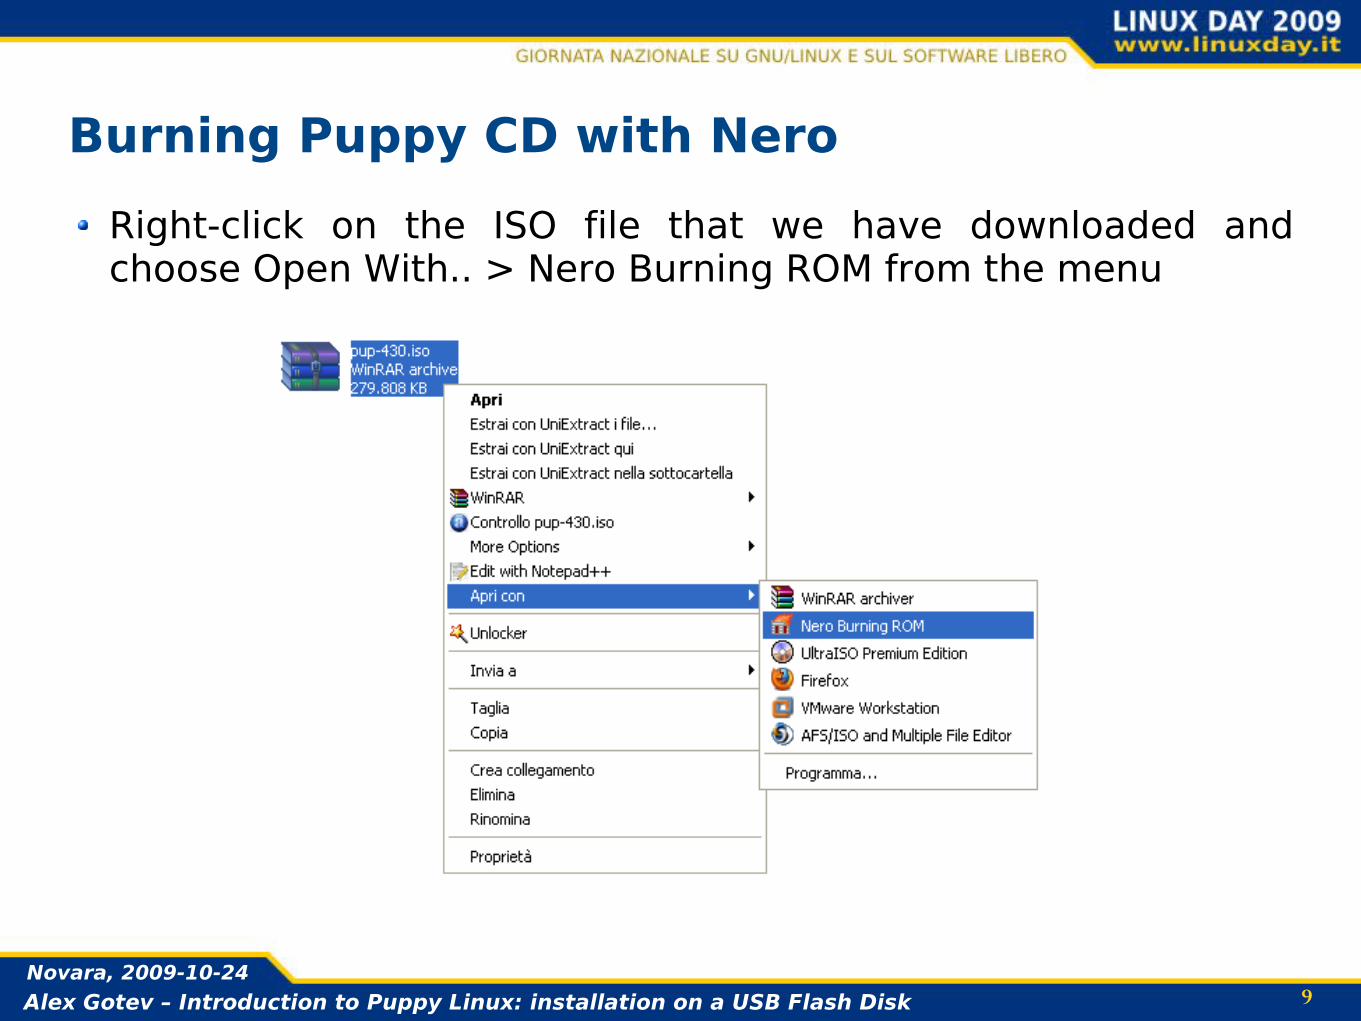
Burning Puppy CD with NeroRight-click on the ISO file that we have downloaded and choose Open With.. > Nero Burning ROM from the menu
1 0Alex Gotev – Introduction to Puppy Linux: installation on a USB Flash DiskNovara, 2009-10-24
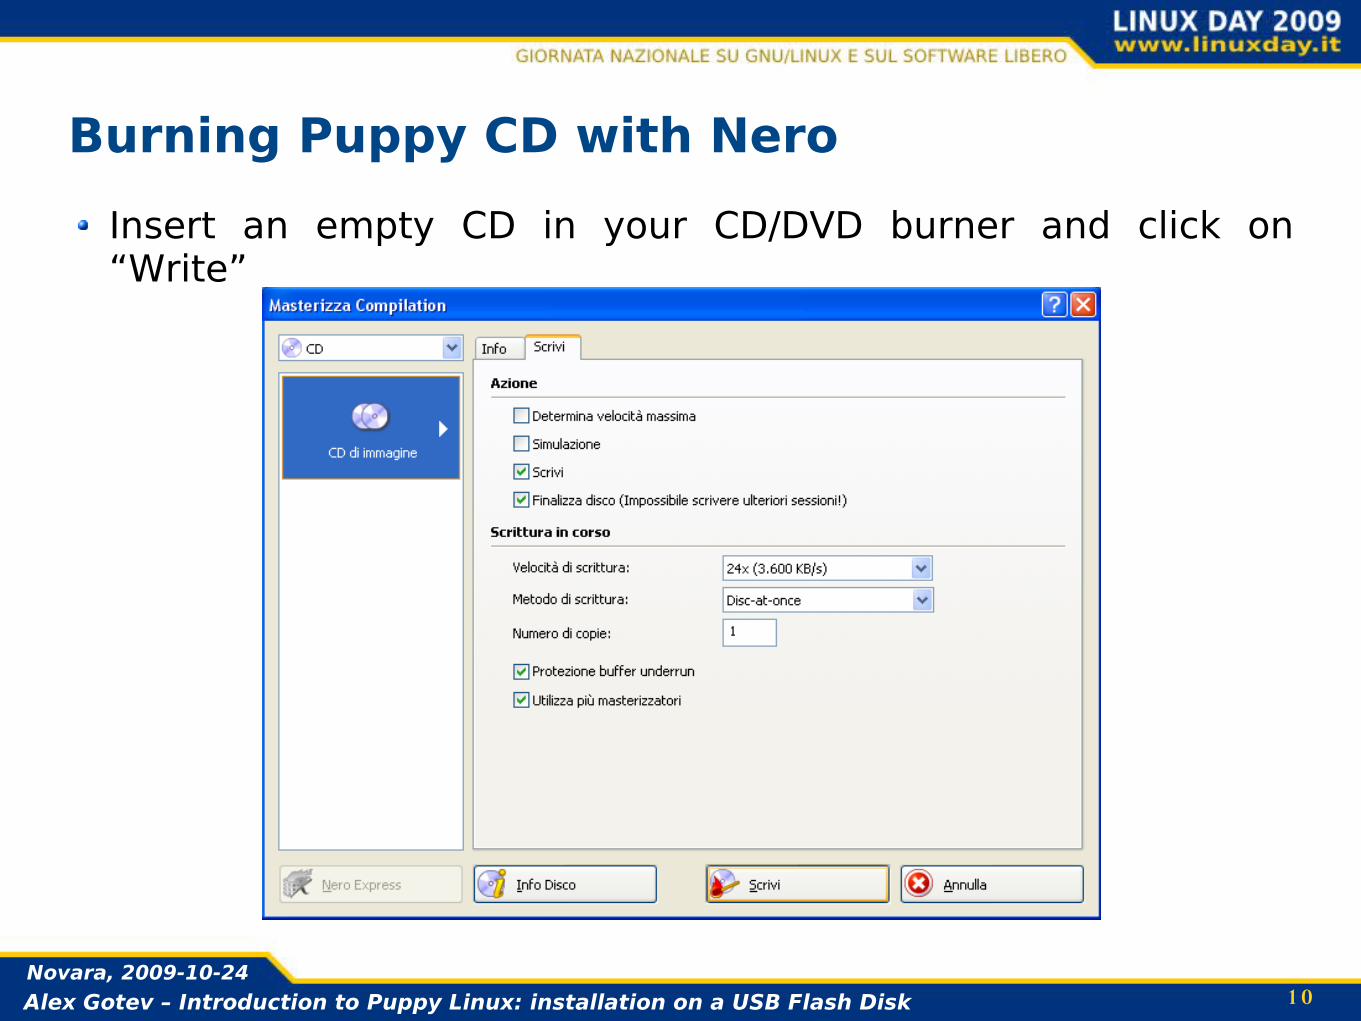
Burning Puppy CD with NeroInsert an empty CD in your CD/DVD burner and click on “Write”
1 1Alex Gotev – Introduction to Puppy Linux: installation on a USB Flash DiskNovara, 2009-10-24
Boot Puppy Linux from CDInsert the previosly burned Puppy Linux CD to your CD/DVD Rom reader and reboot your PCAfter the “beep” of the PC if a message similar to this is shown: “Press any key to boot from CD...”, press a keyIf nothing is shown or if the OS installed on the PC boots automatically, you have to setup the boot-up device priority in your BIOS. For more information on how to do this, visit: http://www.hiren.info/pages/bios-boot-cdrom
1 2Alex Gotev – Introduction to Puppy Linux: installation on a USB Flash DiskNovara, 2009-10-24
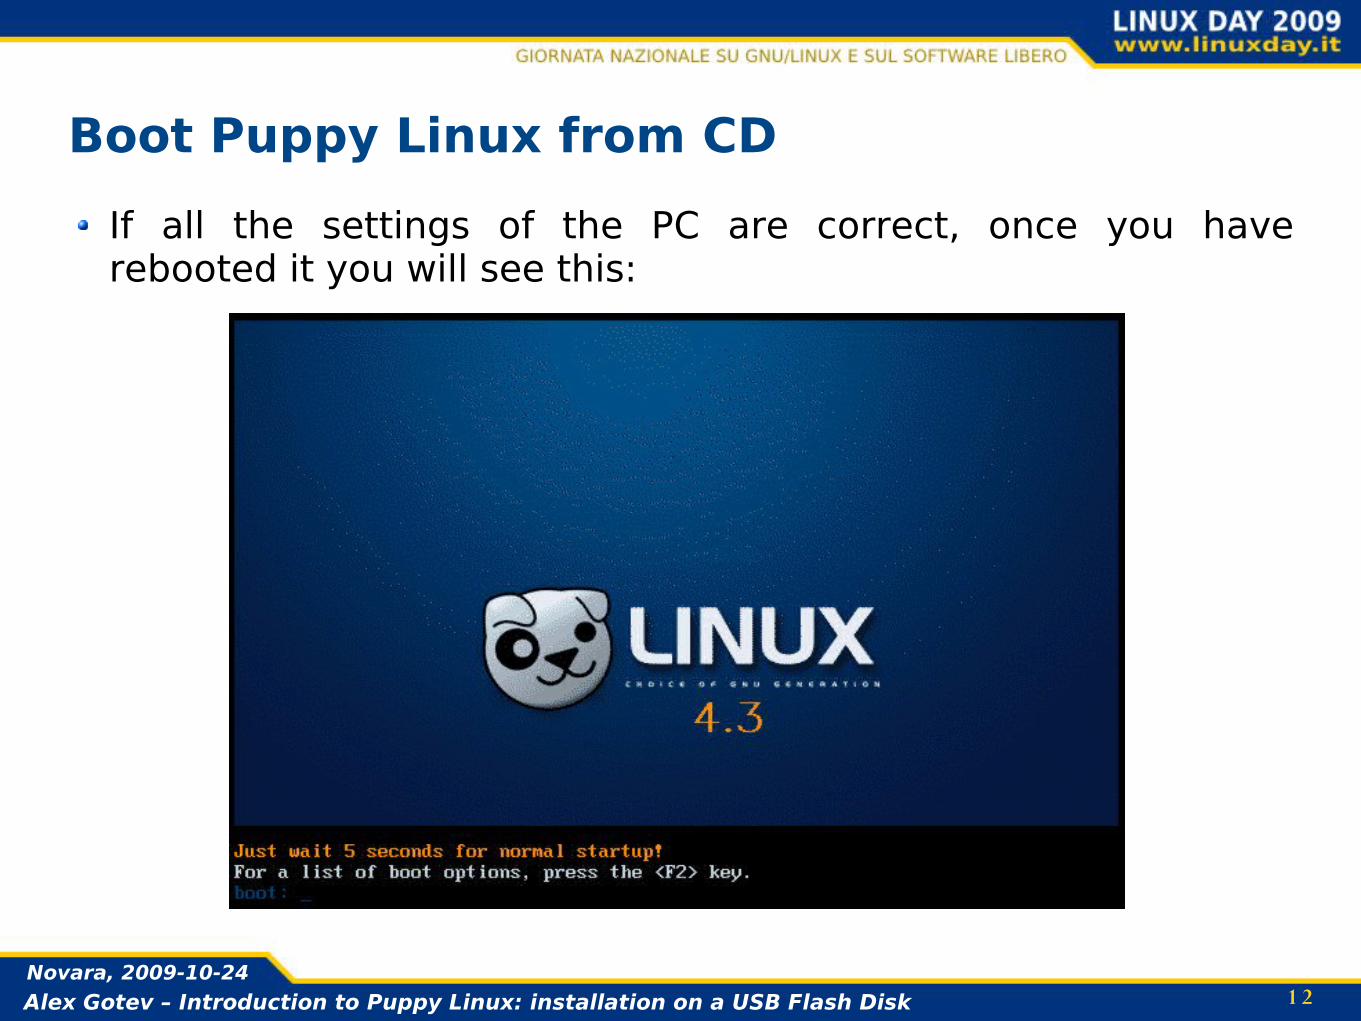
Boot Puppy Linux from CDIf all the settings of the PC are correct, once you have rebooted it you will see this:
1 3Alex Gotev – Introduction to Puppy Linux: installation on a USB Flash DiskNovara, 2009-10-24
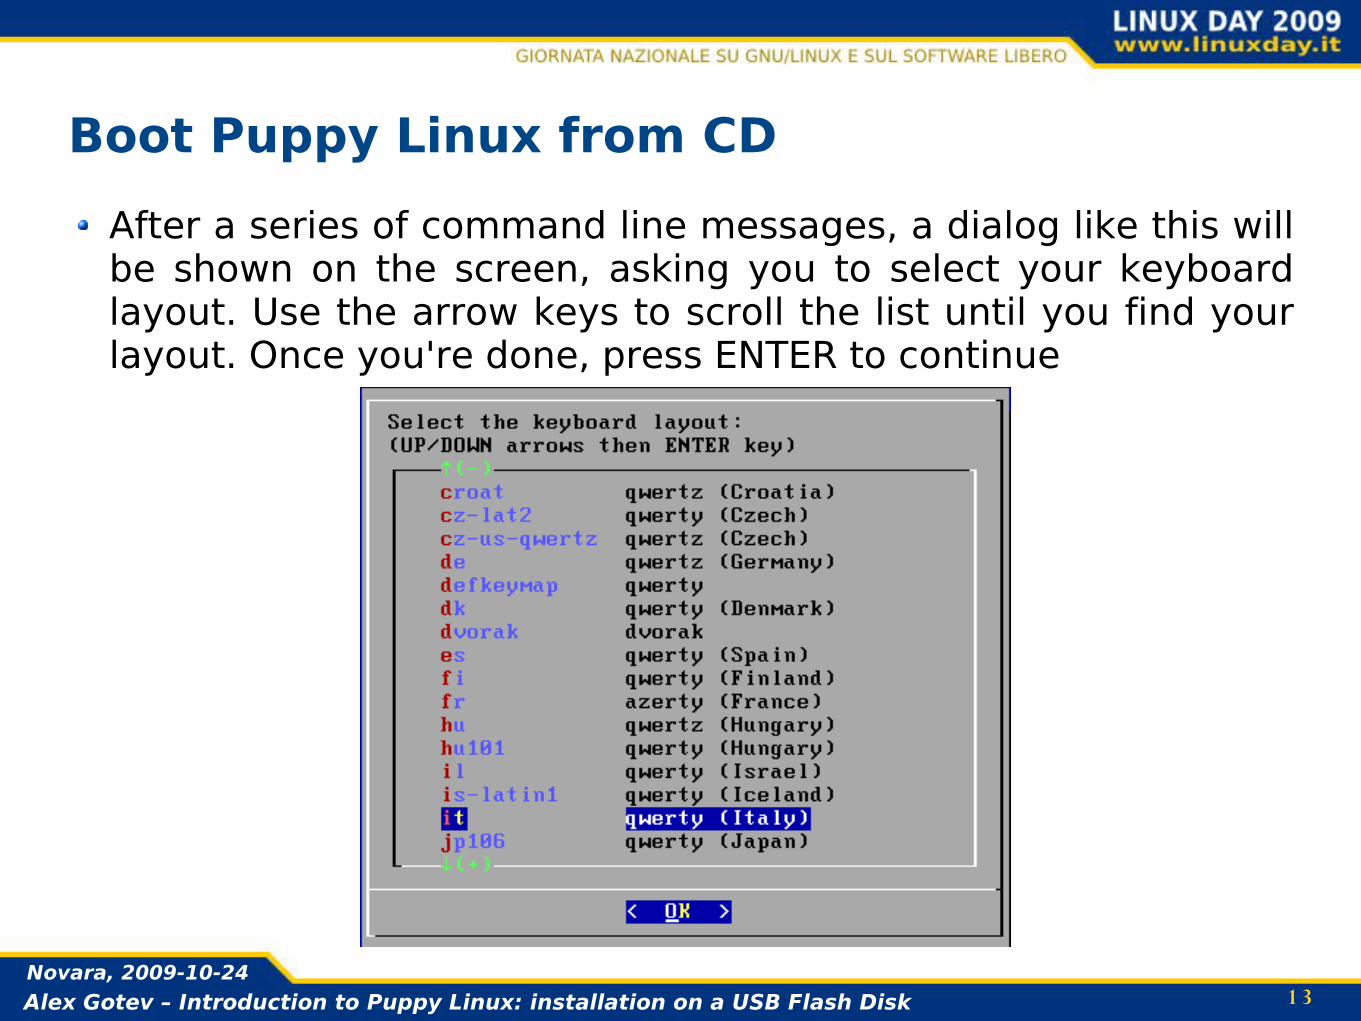
Boot Puppy Linux from CDAfter a series of command line messages, a dialog like this will be shown on the screen, asking you to select your keyboard layout. Use the arrow keys to scroll the list until you find your layout. Once you're done, press ENTER to continue
1 4Alex Gotev – Introduction to Puppy Linux: installation on a USB Flash DiskNovara, 2009-10-24
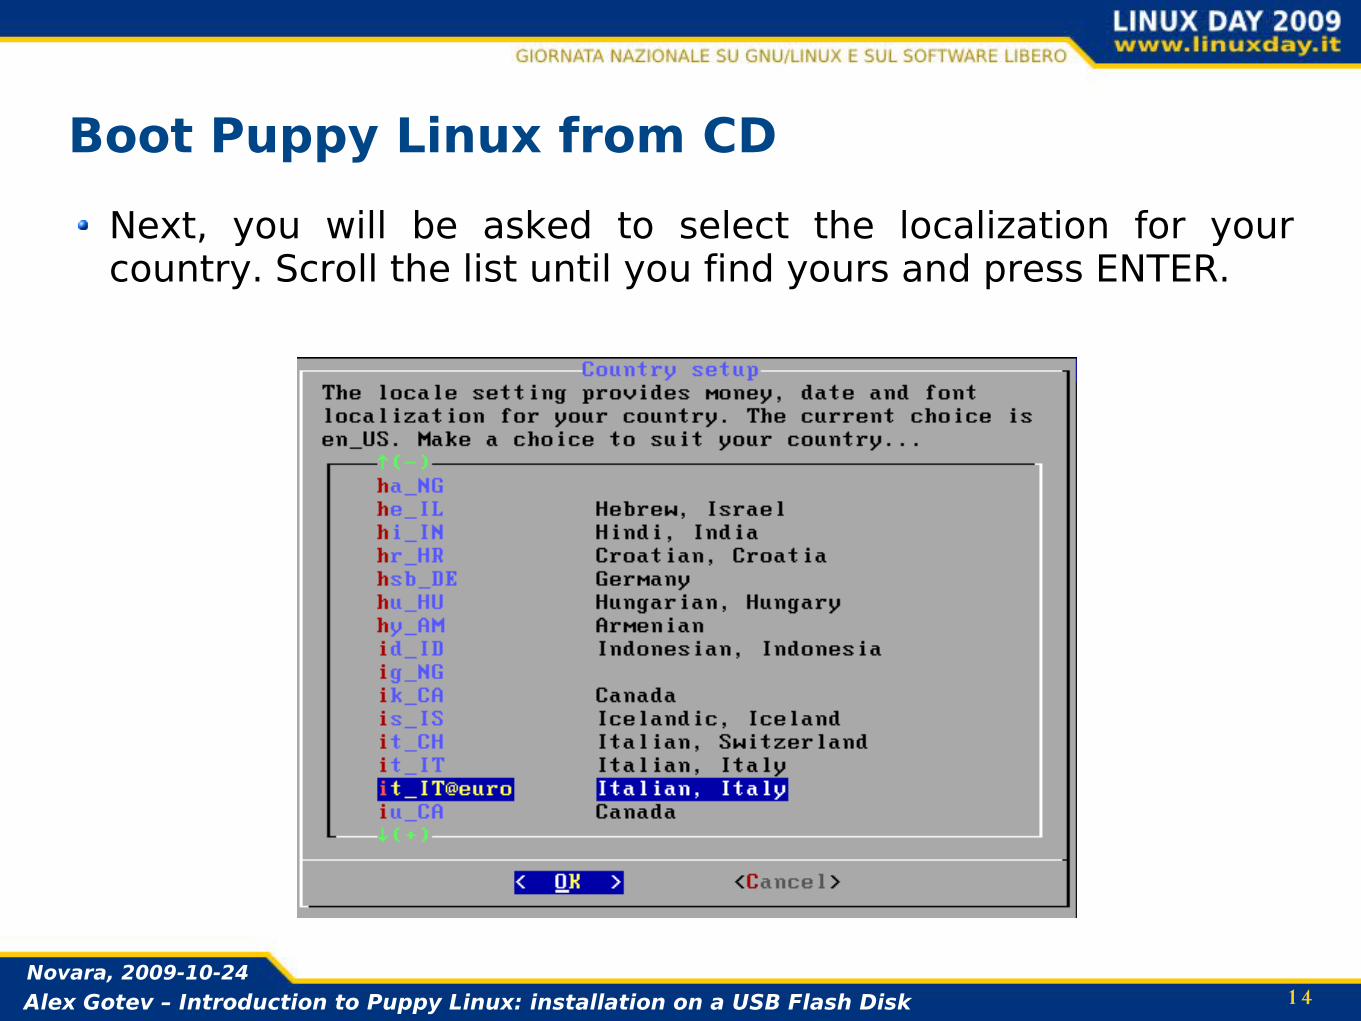
Boot Puppy Linux from CDNext, you will be asked to select the localization for your country. Scroll the list until you find yours and press ENTER.
1 5Alex Gotev – Introduction to Puppy Linux: installation on a USB Flash DiskNovara, 2009-10-24
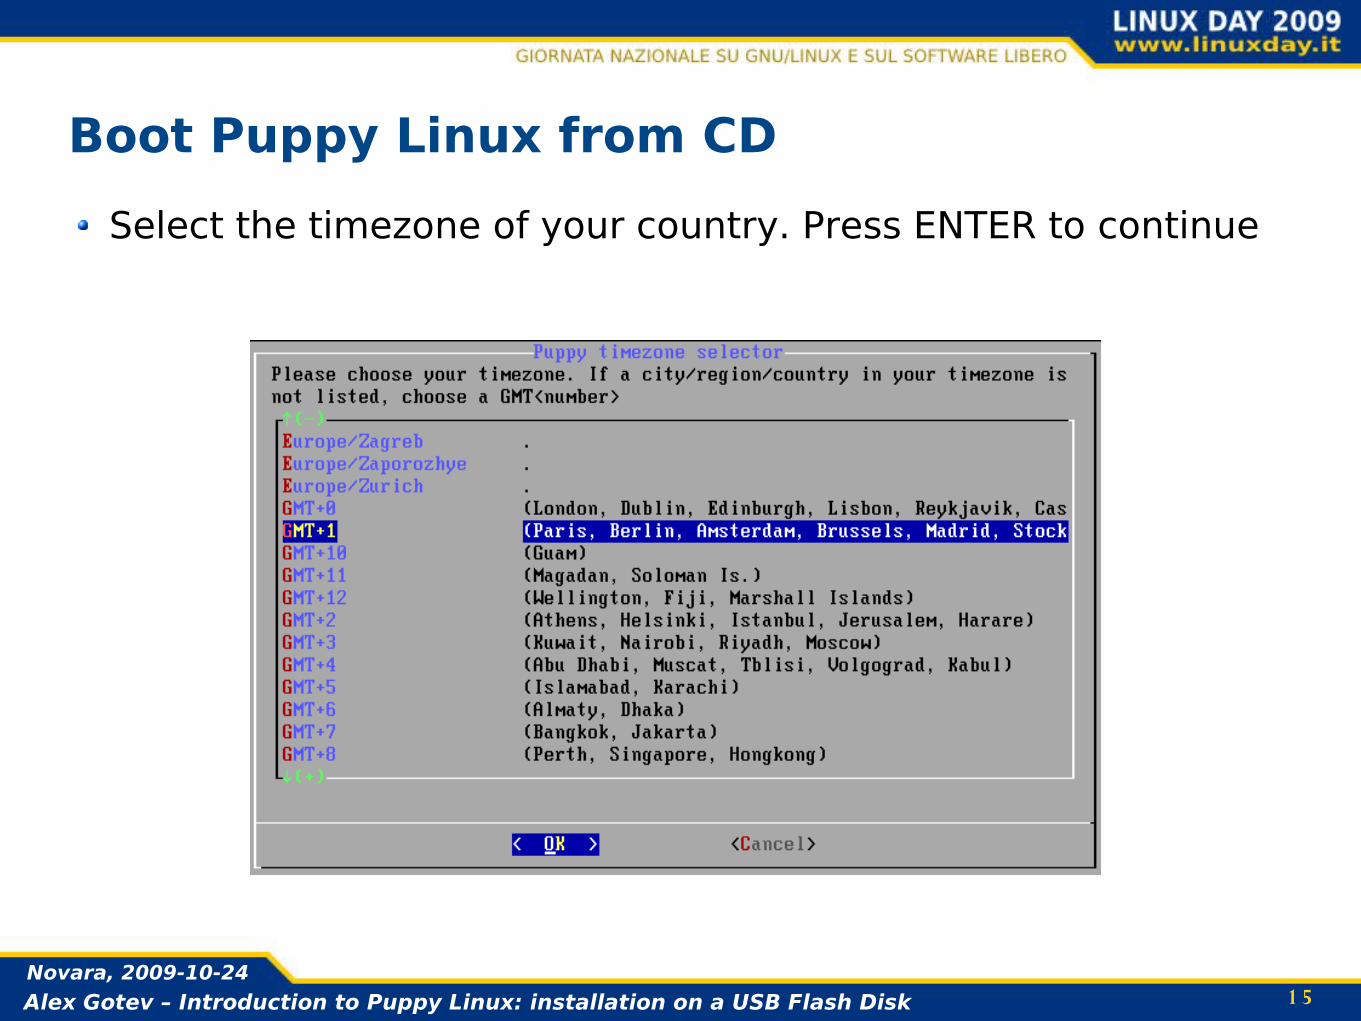
Boot Puppy Linux from CDSelect the timezone of your country. Press ENTER to continue
1 6Alex Gotev – Introduction to Puppy Linux: installation on a USB Flash DiskNovara, 2009-10-24
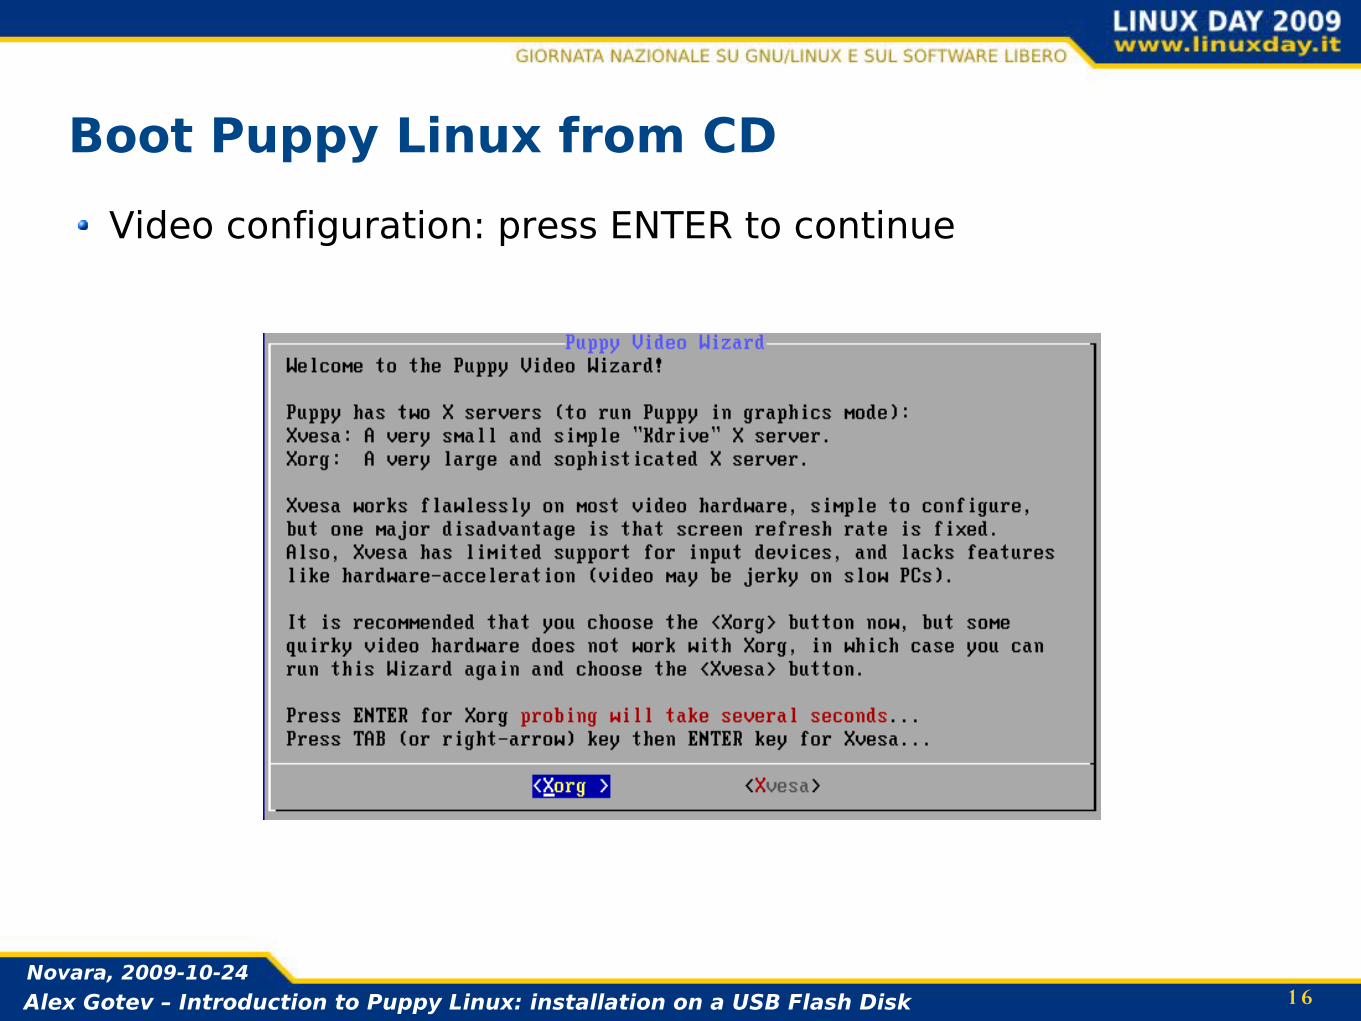
Boot Puppy Linux from CDVideo configuration: press ENTER to continue
1 7Alex Gotev – Introduction to Puppy Linux: installation on a USB Flash DiskNovara, 2009-10-24
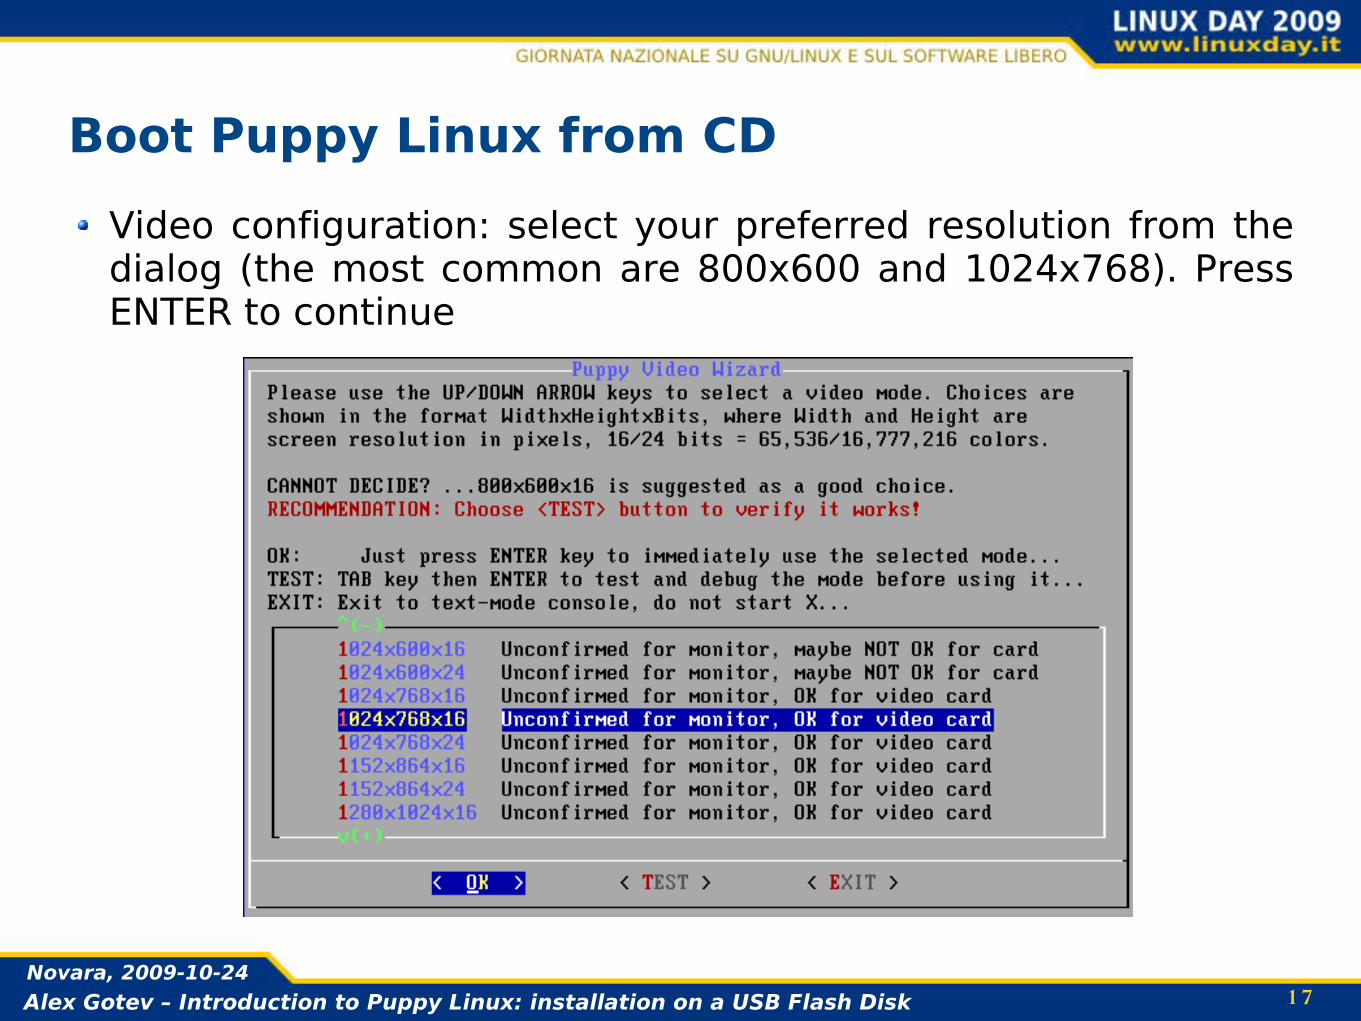
Boot Puppy Linux from CDVideo configuration: select your preferred resolution from the dialog (the most common are 800x600 and 1024x768). Press ENTER to continue
1 8Alex Gotev – Introduction to Puppy Linux: installation on a USB Flash DiskNovara, 2009-10-24
All the configurations are done!!
Are you ready to see Puppy Linux?
1 9Alex Gotev – Introduction to Puppy Linux: installation on a USB Flash DiskNovara, 2009-10-24
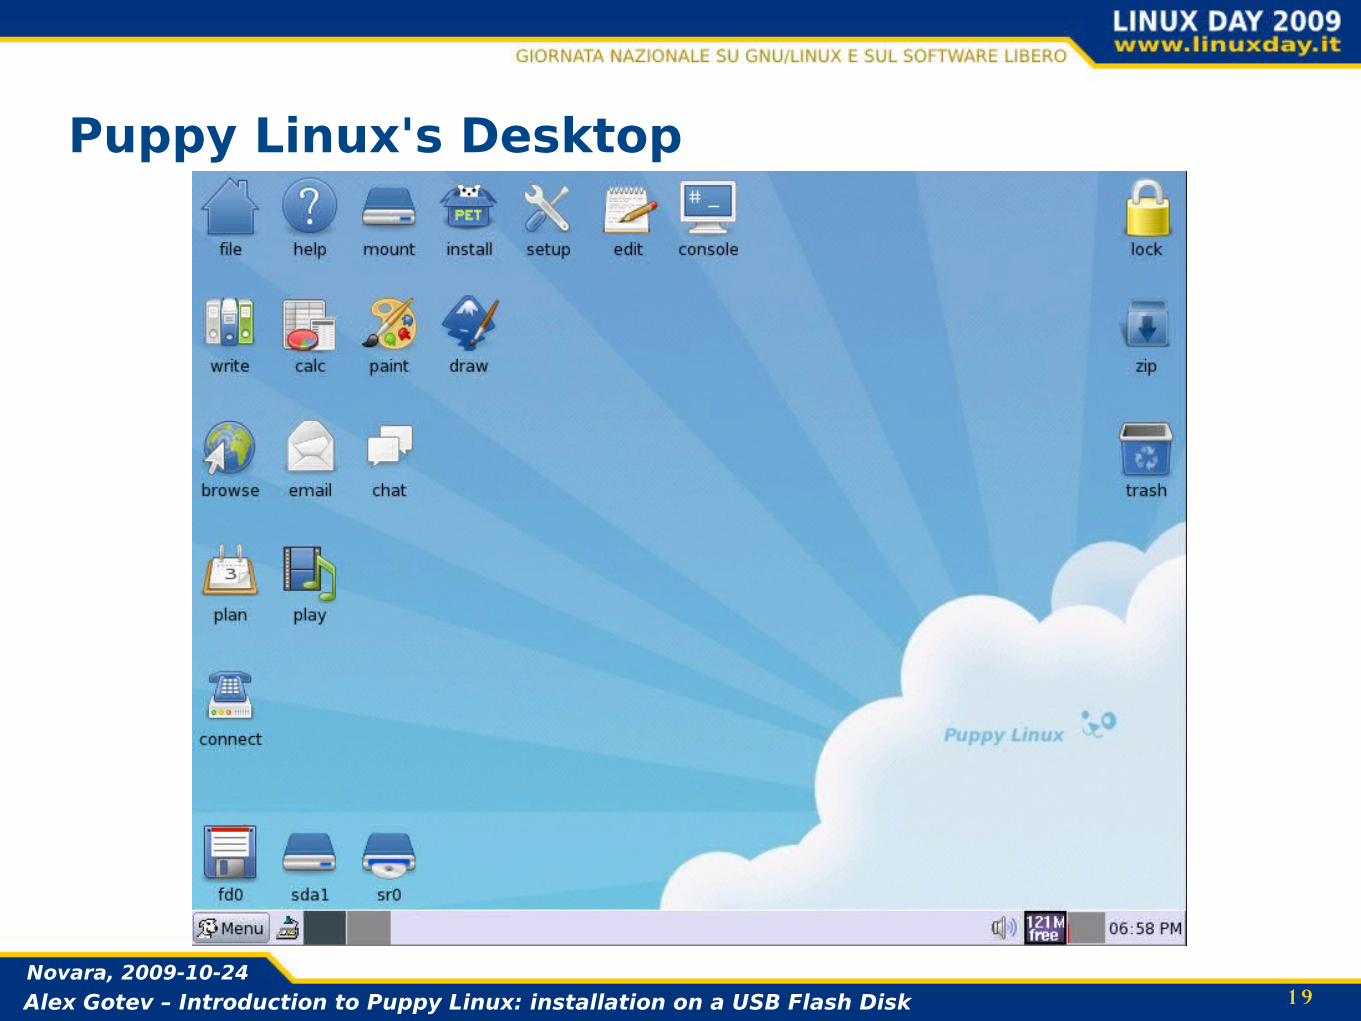
Puppy Linux's Desktop
2 0Alex Gotev – Introduction to Puppy Linux: installation on a USB Flash DiskNovara, 2009-10-24
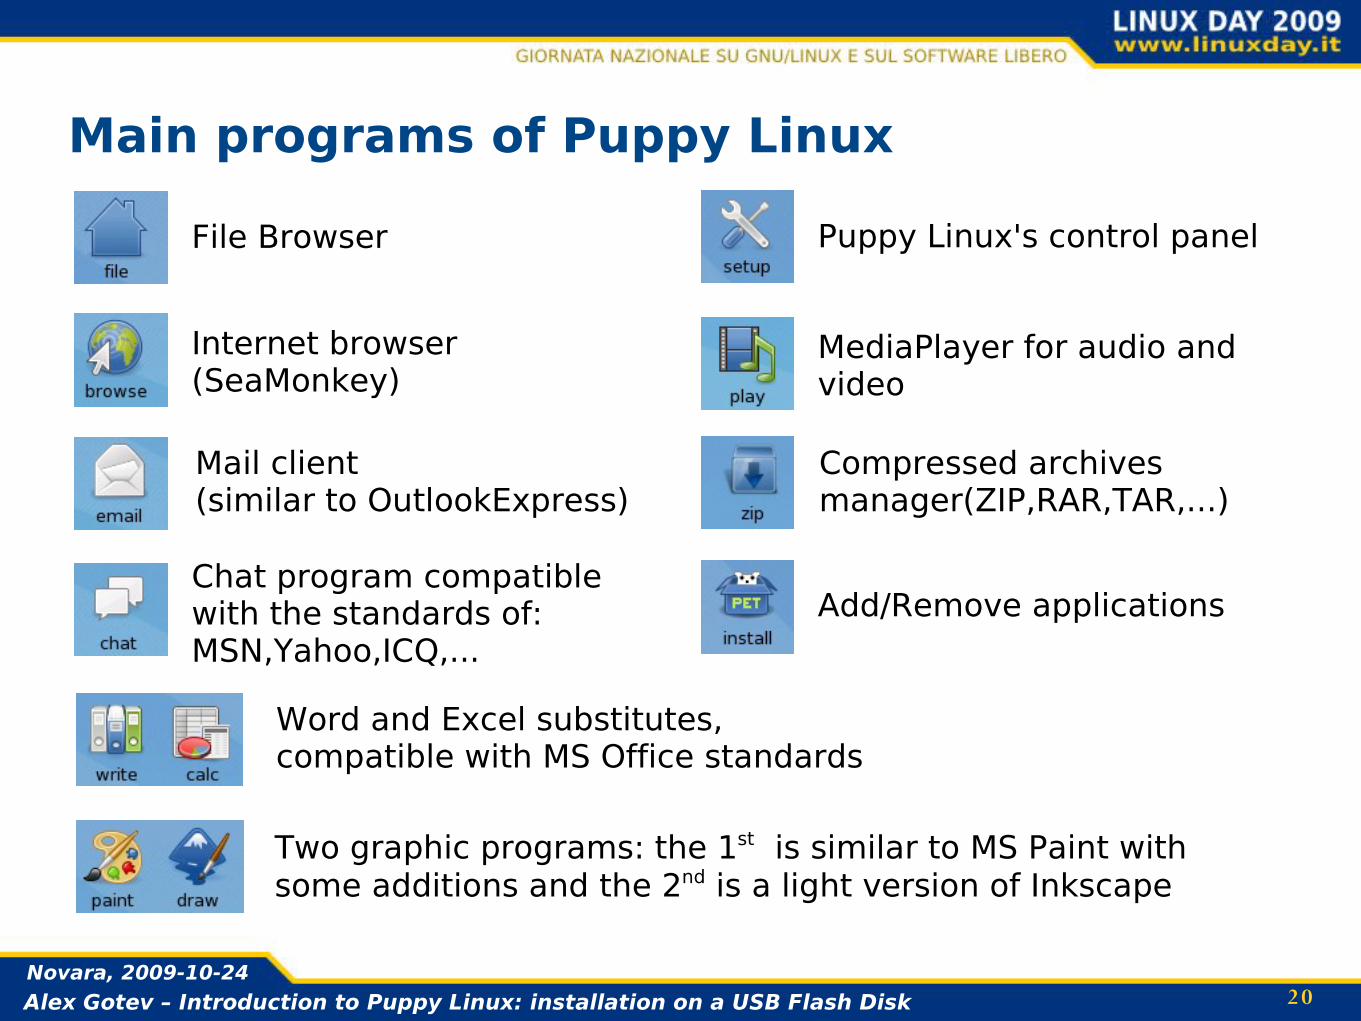
Main programs of Puppy Linux
File Browser Puppy Linux's control panel
MediaPlayer for audio and video
Compressed archives manager(ZIP,RAR,TAR,...)
Internet browser (SeaMonkey)
Mail client(similar to OutlookExpress)
Chat program compatible with the standards of: MSN,Yahoo,ICQ,...
Word and Excel substitutes, compatible with MS Office standards
Add/Remove applications
Two graphic programs: the 1st is similar to MS Paint with some additions and the 2nd is a light version of Inkscape
2 1Alex Gotev – Introduction to Puppy Linux: installation on a USB Flash DiskNovara, 2009-10-24
Install Puppy Linux on a USB Flash Disk(in about 5 minutes!)
2 2Alex Gotev – Introduction to Puppy Linux: installation on a USB Flash DiskNovara, 2009-10-24
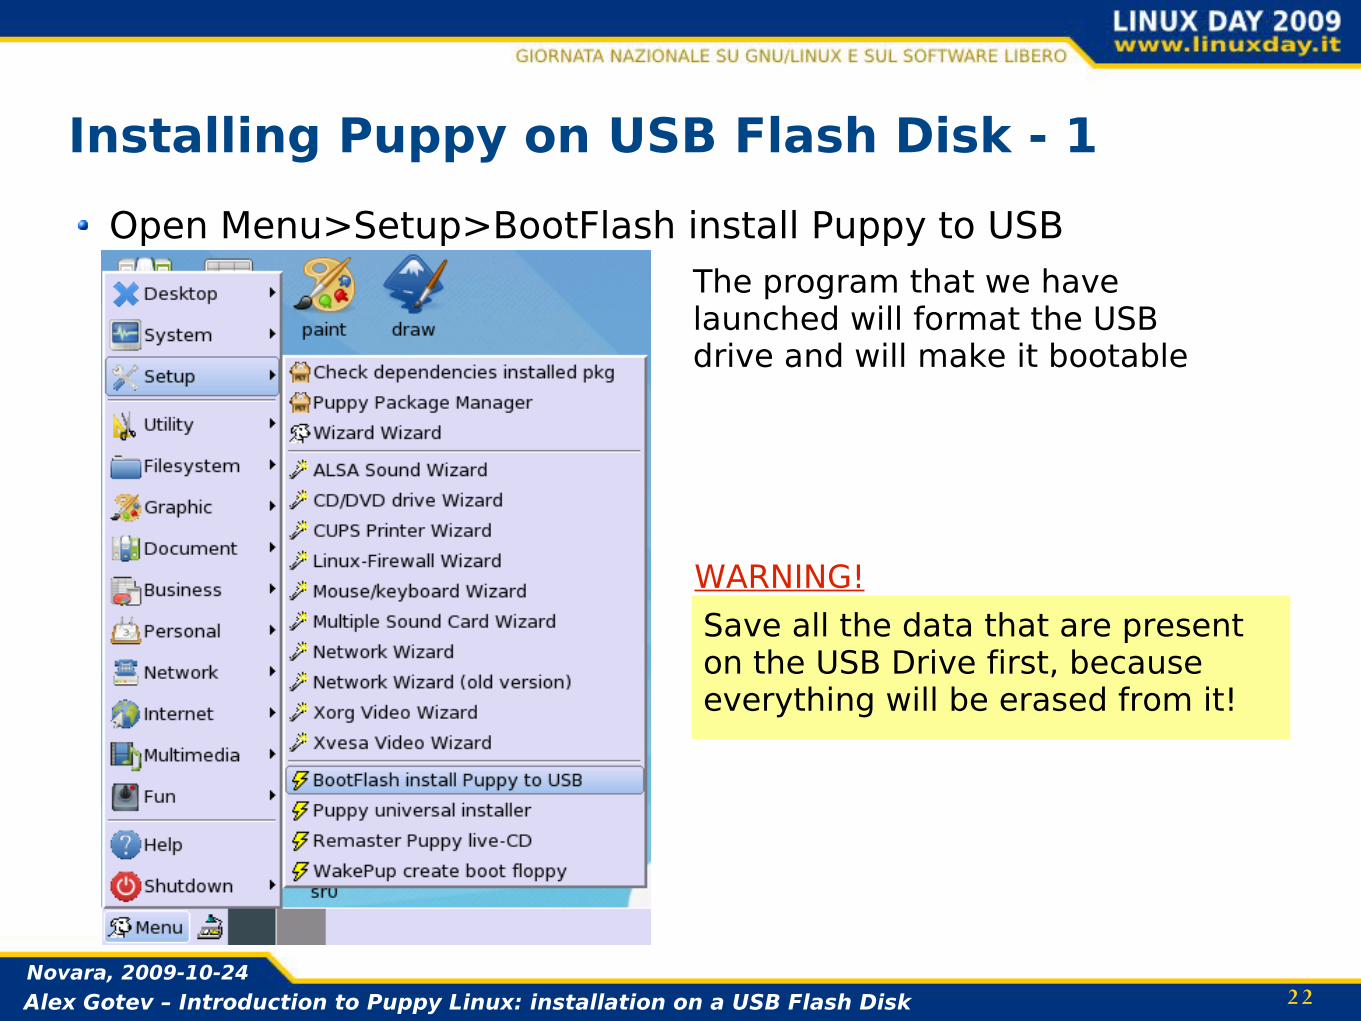
Installing Puppy on USB Flash Disk - 1Open Menu>Setup>BootFlash install Puppy to USB
The program that we have launched will format the USB drive and will make it bootable
Save all the data that are present on the USB Drive first, because everything will be erased from it!
WARNING!
2 3Alex Gotev – Introduction to Puppy Linux: installation on a USB Flash DiskNovara, 2009-10-24
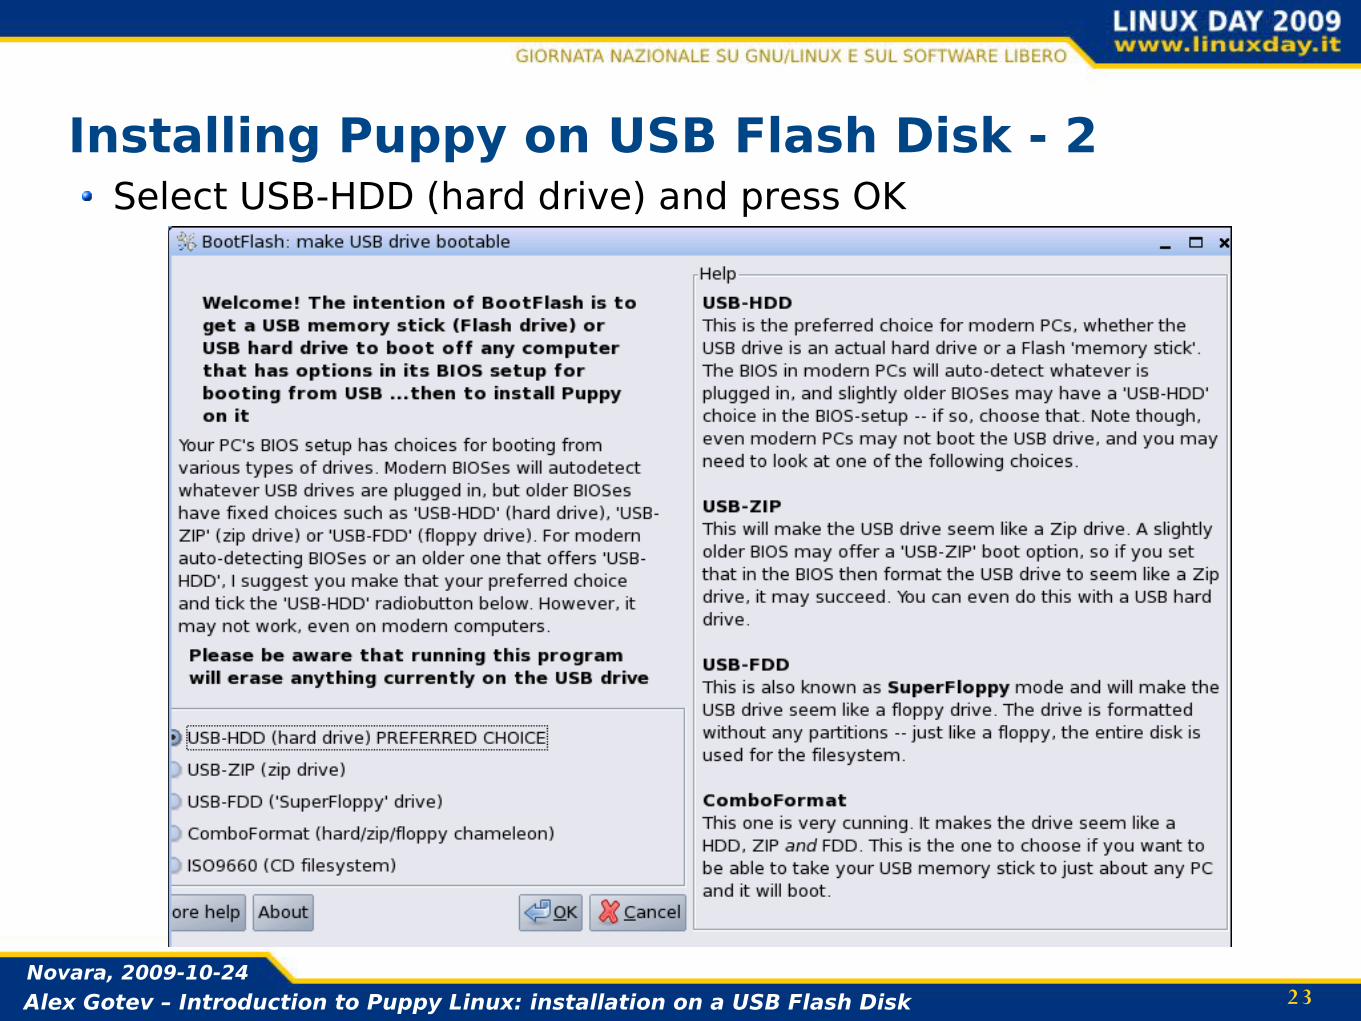
Installing Puppy on USB Flash Disk - 2Select USB-HDD (hard drive) and press OK
2 4Alex Gotev – Introduction to Puppy Linux: installation on a USB Flash DiskNovara, 2009-10-24
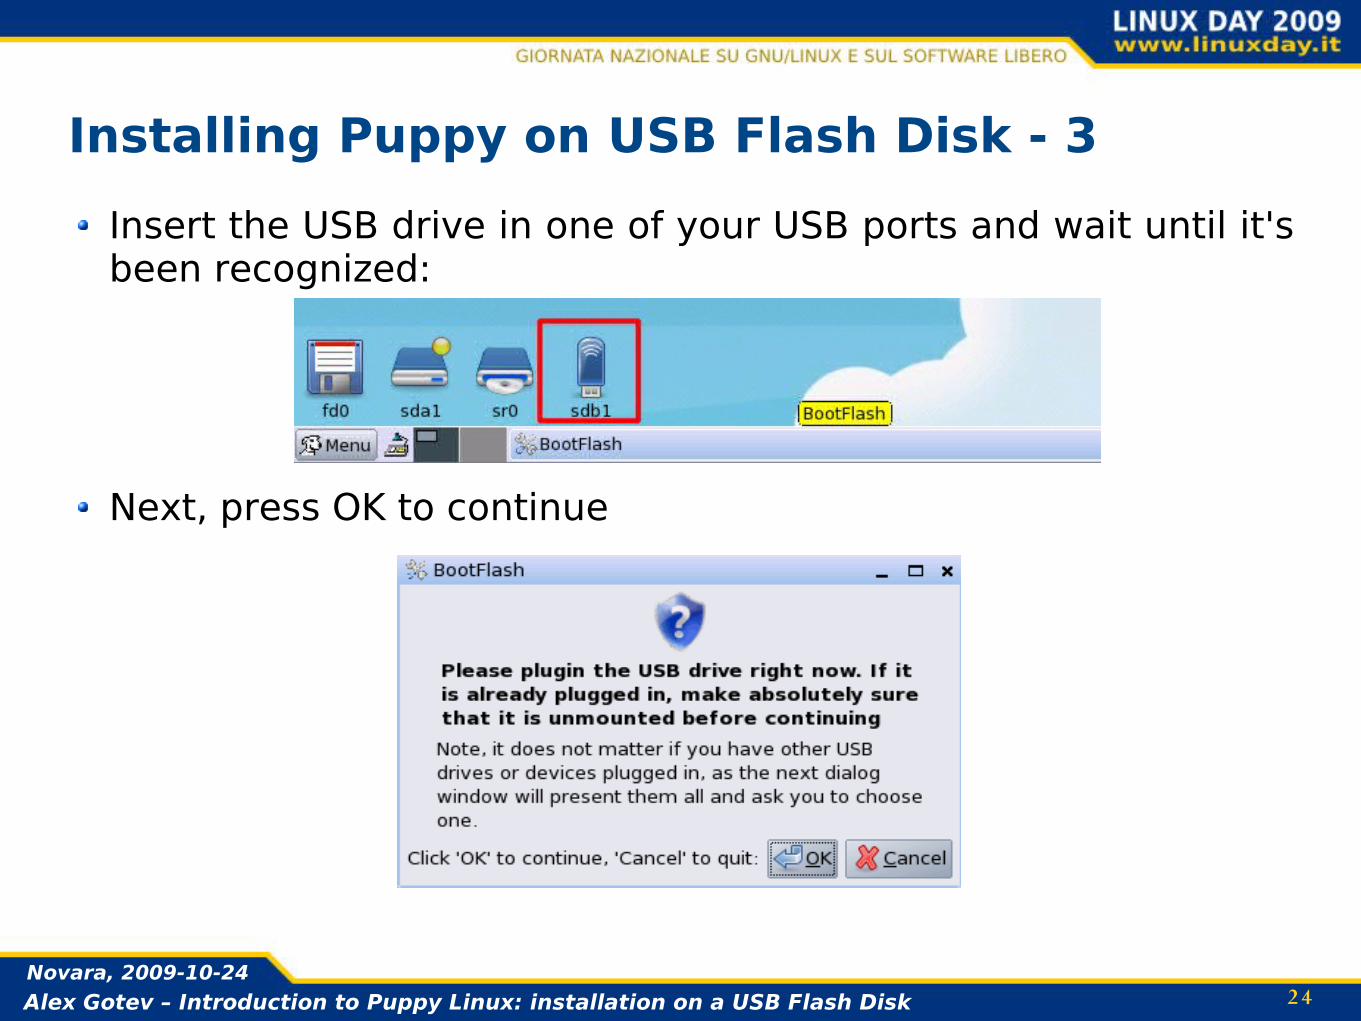
Installing Puppy on USB Flash Disk - 3Insert the USB drive in one of your USB ports and wait until it's been recognized:
Next, press OK to continue
2 5Alex Gotev – Introduction to Puppy Linux: installation on a USB Flash DiskNovara, 2009-10-24
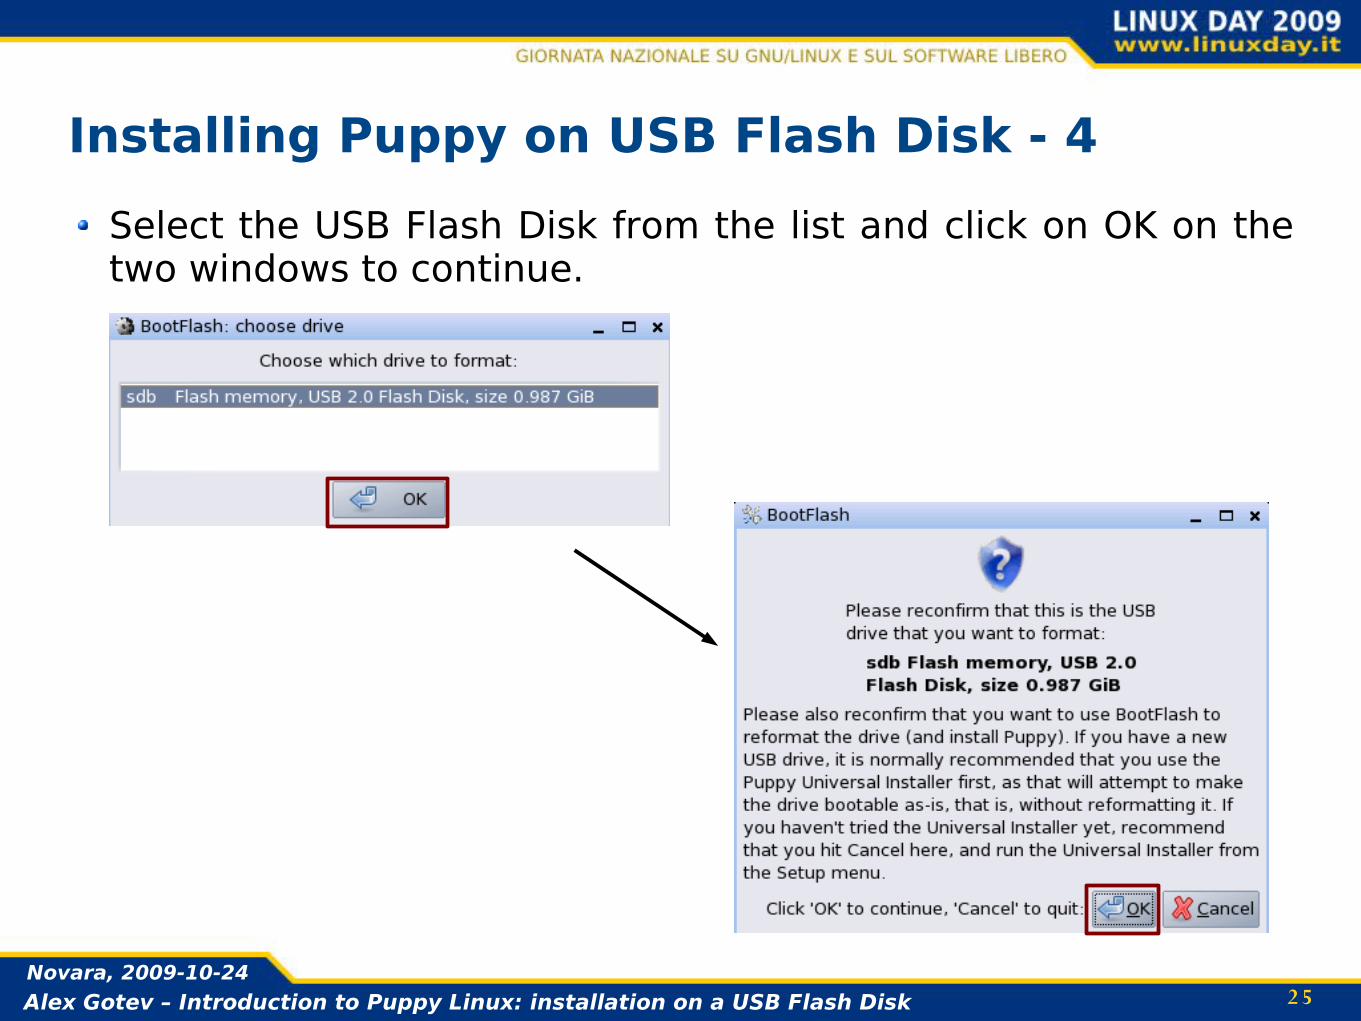
Installing Puppy on USB Flash Disk - 4Select the USB Flash Disk from the list and click on OK on the two windows to continue.
2 6Alex Gotev – Introduction to Puppy Linux: installation on a USB Flash DiskNovara, 2009-10-24
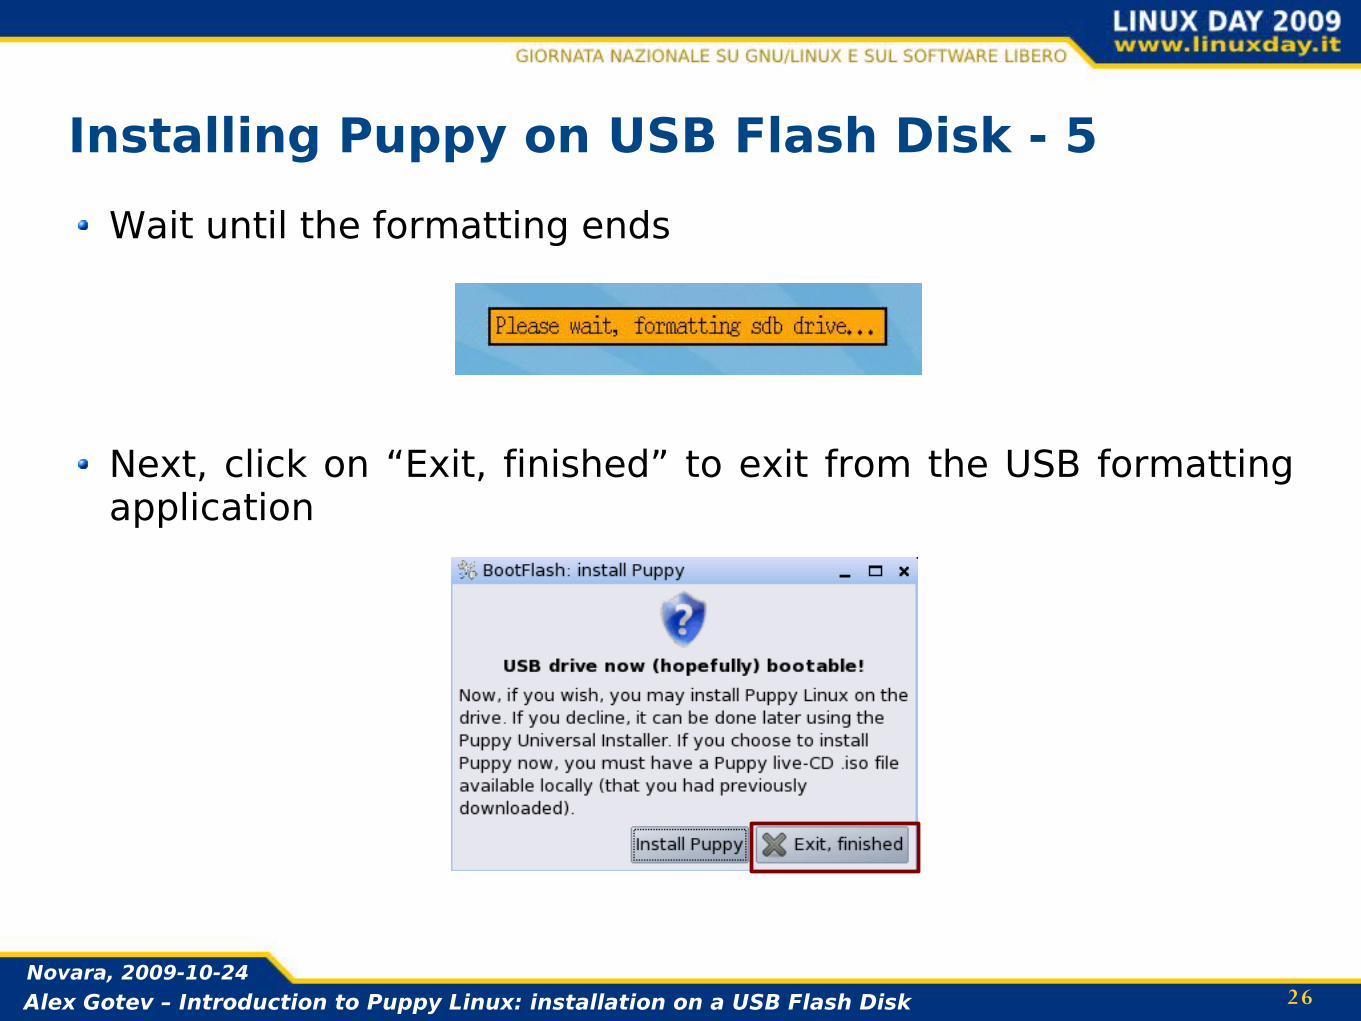
Installing Puppy on USB Flash Disk - 5Wait until the formatting ends
Next, click on “Exit, finished” to exit from the USB formatting application
2 7Alex Gotev – Introduction to Puppy Linux: installation on a USB Flash DiskNovara, 2009-10-24
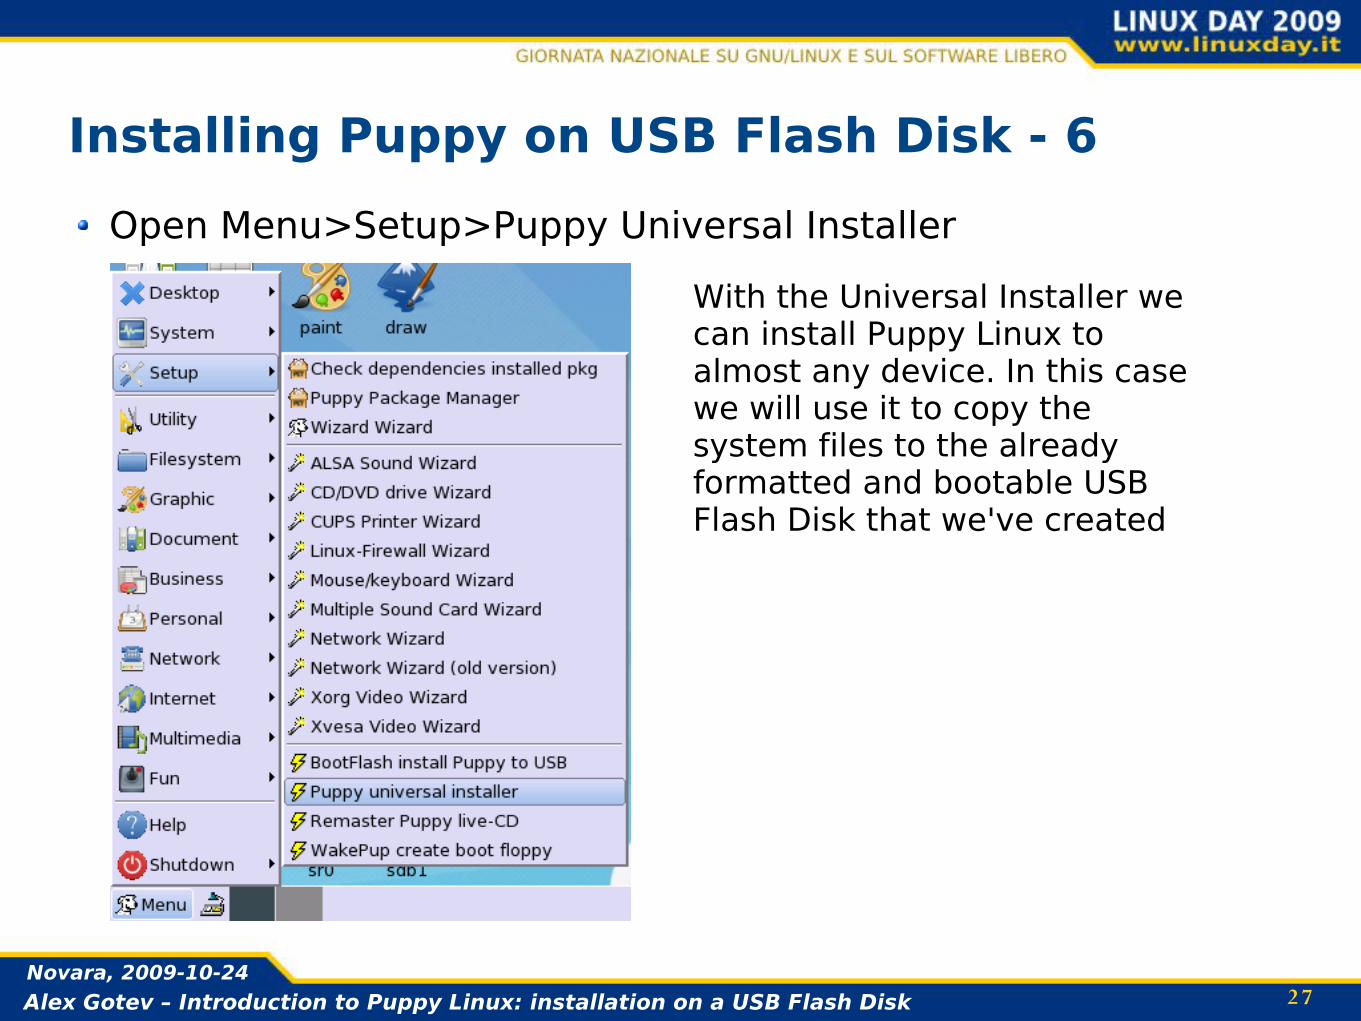
Installing Puppy on USB Flash Disk - 6Open Menu>Setup>Puppy Universal Installer
With the Universal Installer we can install Puppy Linux to almost any device. In this case we will use it to copy the system files to the already formatted and bootable USB Flash Disk that we've created
2 8Alex Gotev – Introduction to Puppy Linux: installation on a USB Flash DiskNovara, 2009-10-24
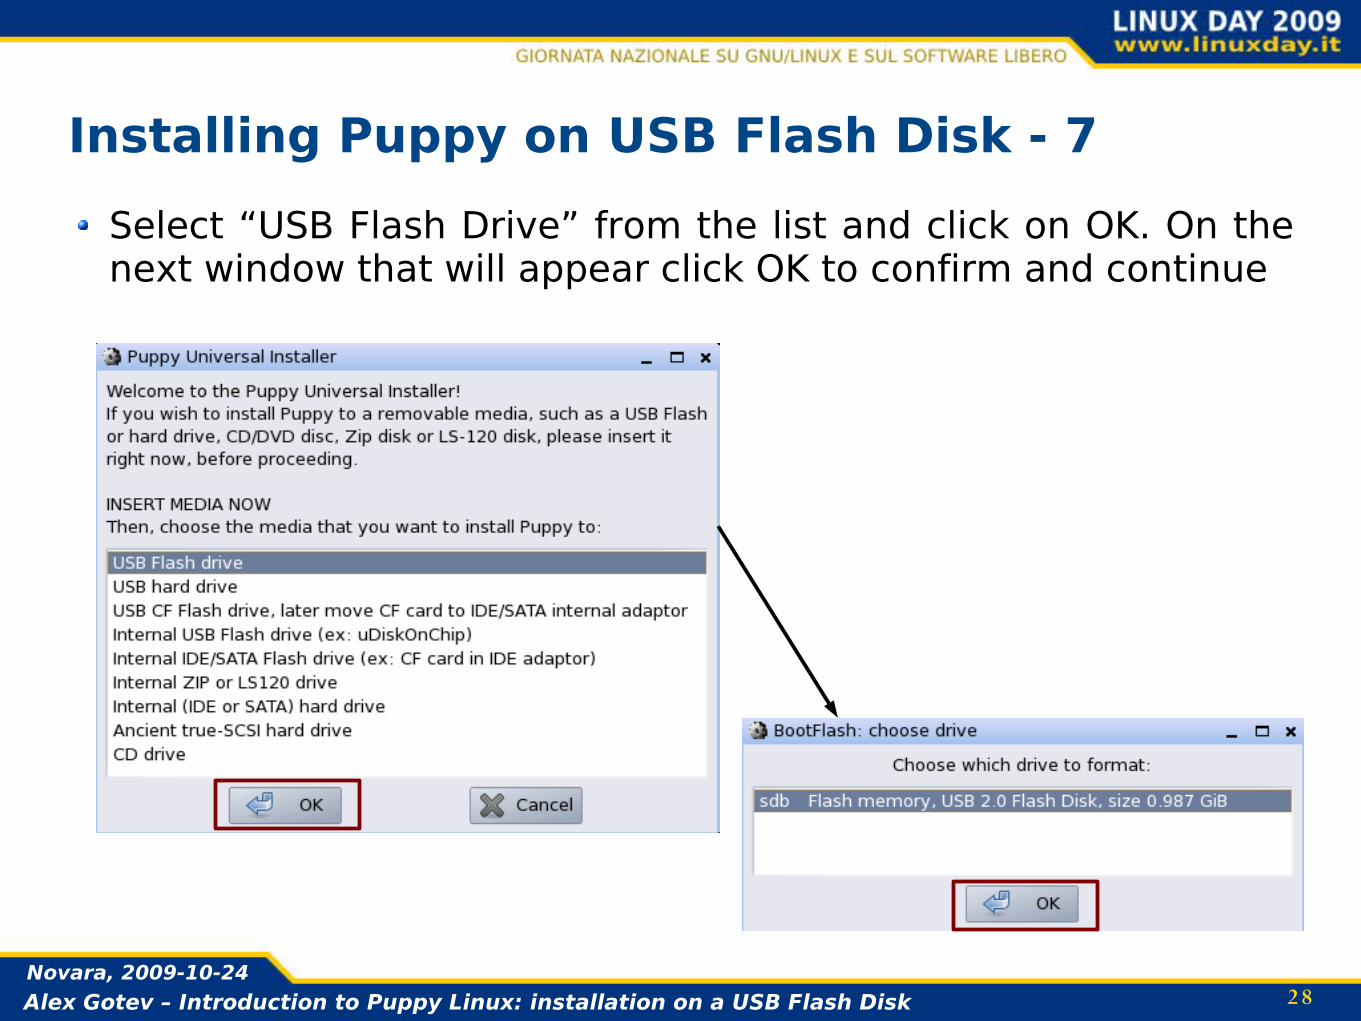
Installing Puppy on USB Flash Disk - 7Select “USB Flash Drive” from the list and click on OK. On the next window that will appear click OK to confirm and continue
2 9Alex Gotev – Introduction to Puppy Linux: installation on a USB Flash DiskNovara, 2009-10-24
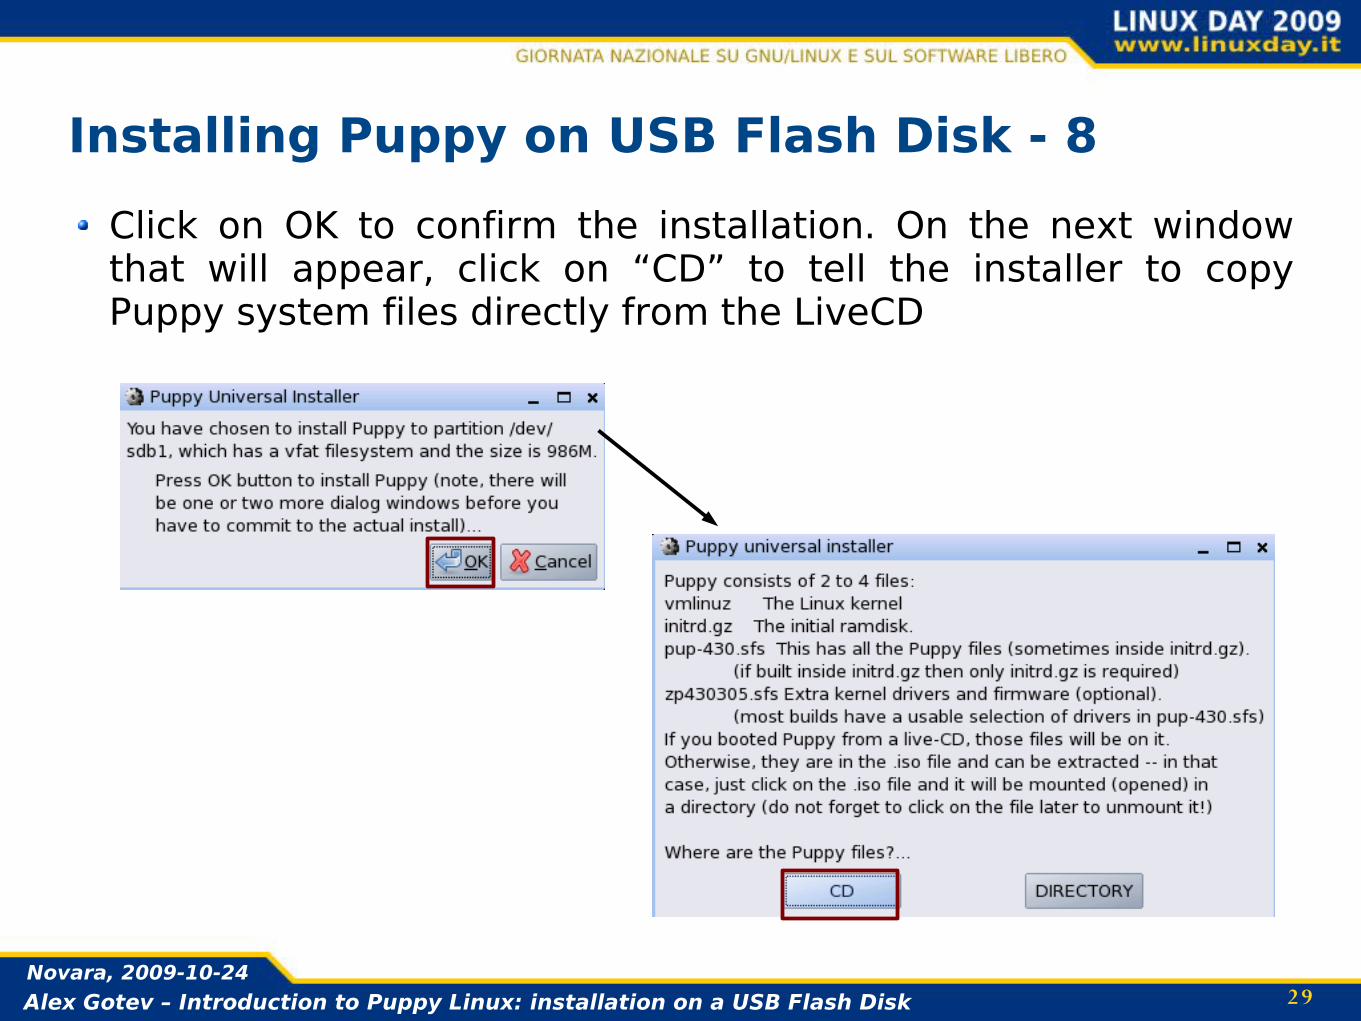
Installing Puppy on USB Flash Disk - 8Click on OK to confirm the installation. On the next window that will appear, click on “CD” to tell the installer to copy Puppy system files directly from the LiveCD
3 0Alex Gotev – Introduction to Puppy Linux: installation on a USB Flash DiskNovara, 2009-10-24
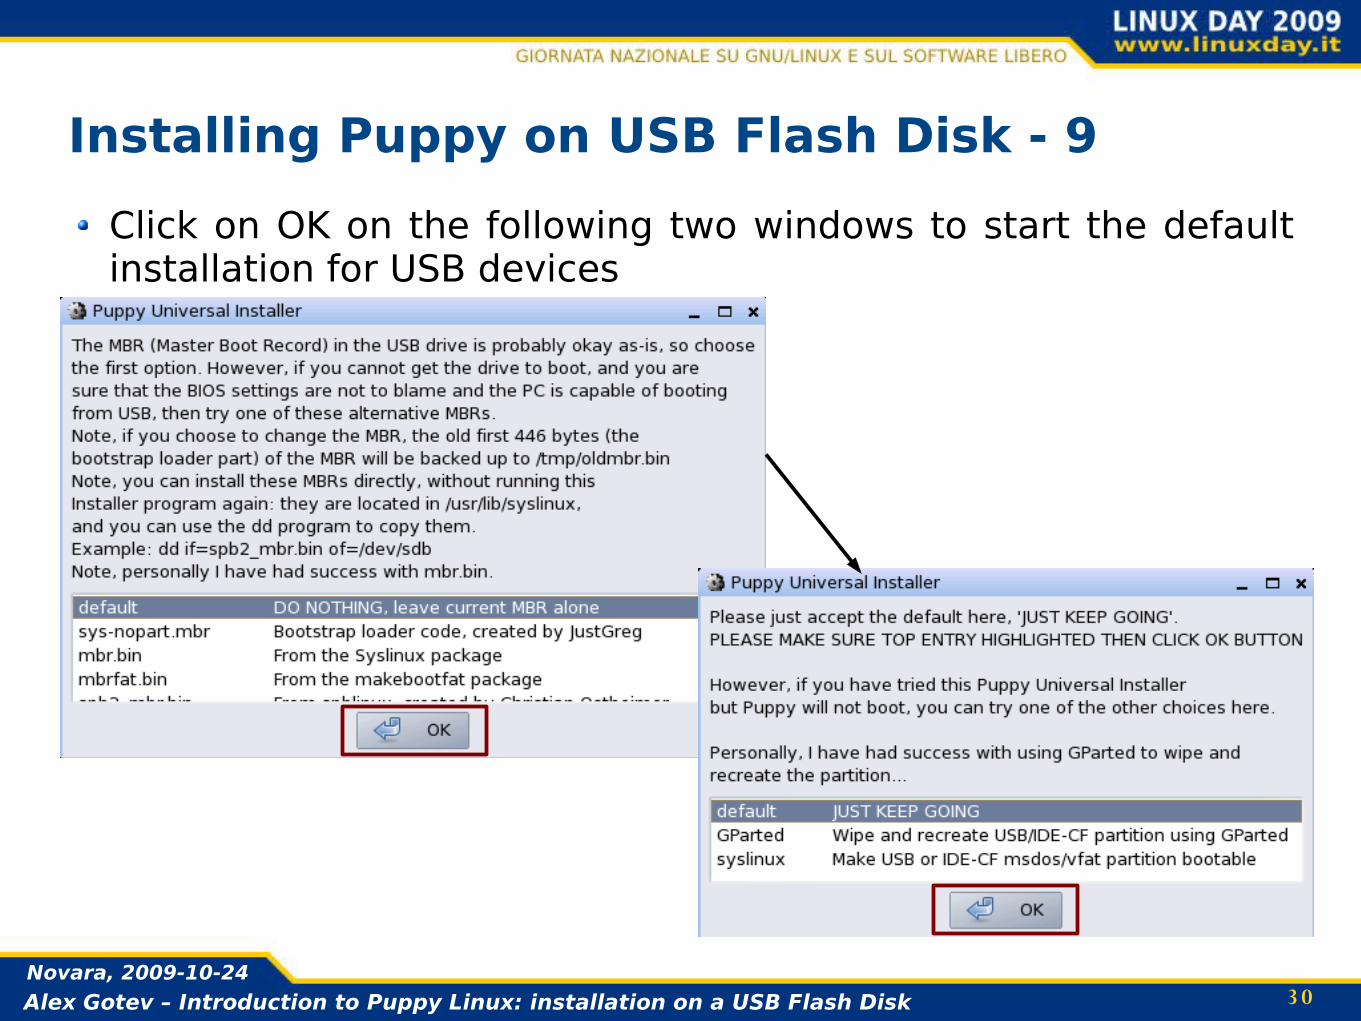
Installing Puppy on USB Flash Disk - 9Click on OK on the following two windows to start the default installation for USB devices
3 1Alex Gotev – Introduction to Puppy Linux: installation on a USB Flash DiskNovara, 2009-10-24
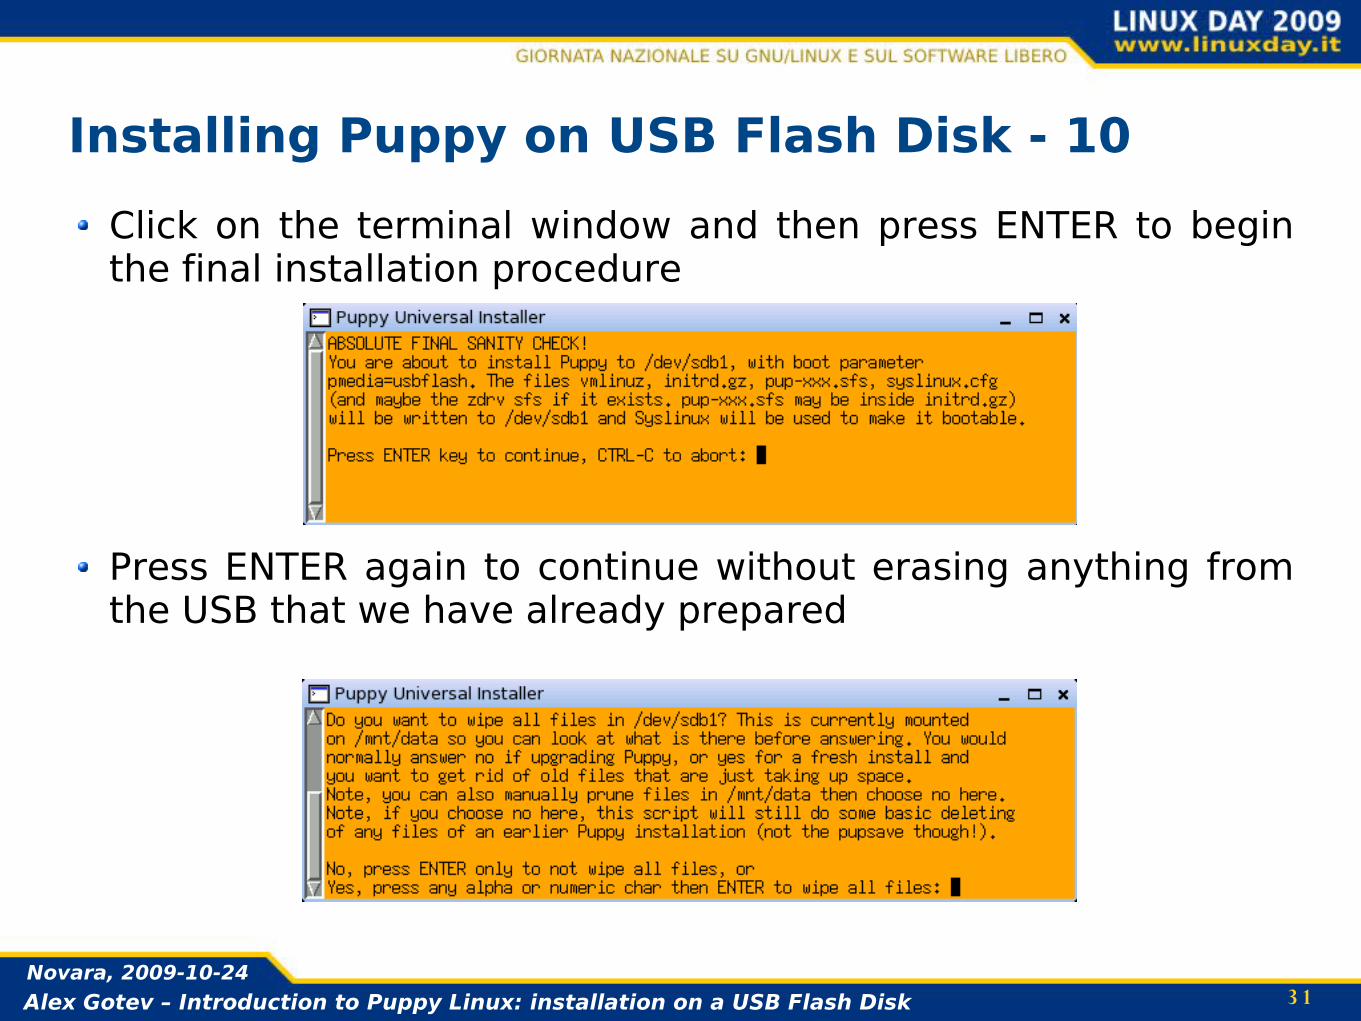
Installing Puppy on USB Flash Disk - 10Click on the terminal window and then press ENTER to begin the final installation procedure
Press ENTER again to continue without erasing anything from the USB that we have already prepared

3 2Alex Gotev – Introduction to Puppy Linux: installation on a USB Flash DiskNovara, 2009-10-24
Installing Puppy on USB Flash Disk - 11If we want to set Puppy to work by default with less than 256MB of RAM, press ENTER. Otherwise, type in a random letter from the keyboard and press ENTER(recommended).Typing in a letter and pressing ENTER will set Puppy to automatically choose the best RAM option according to the amount of RAM of the host PC
3 3Alex Gotev – Introduction to Puppy Linux: installation on a USB Flash DiskNovara, 2009-10-24
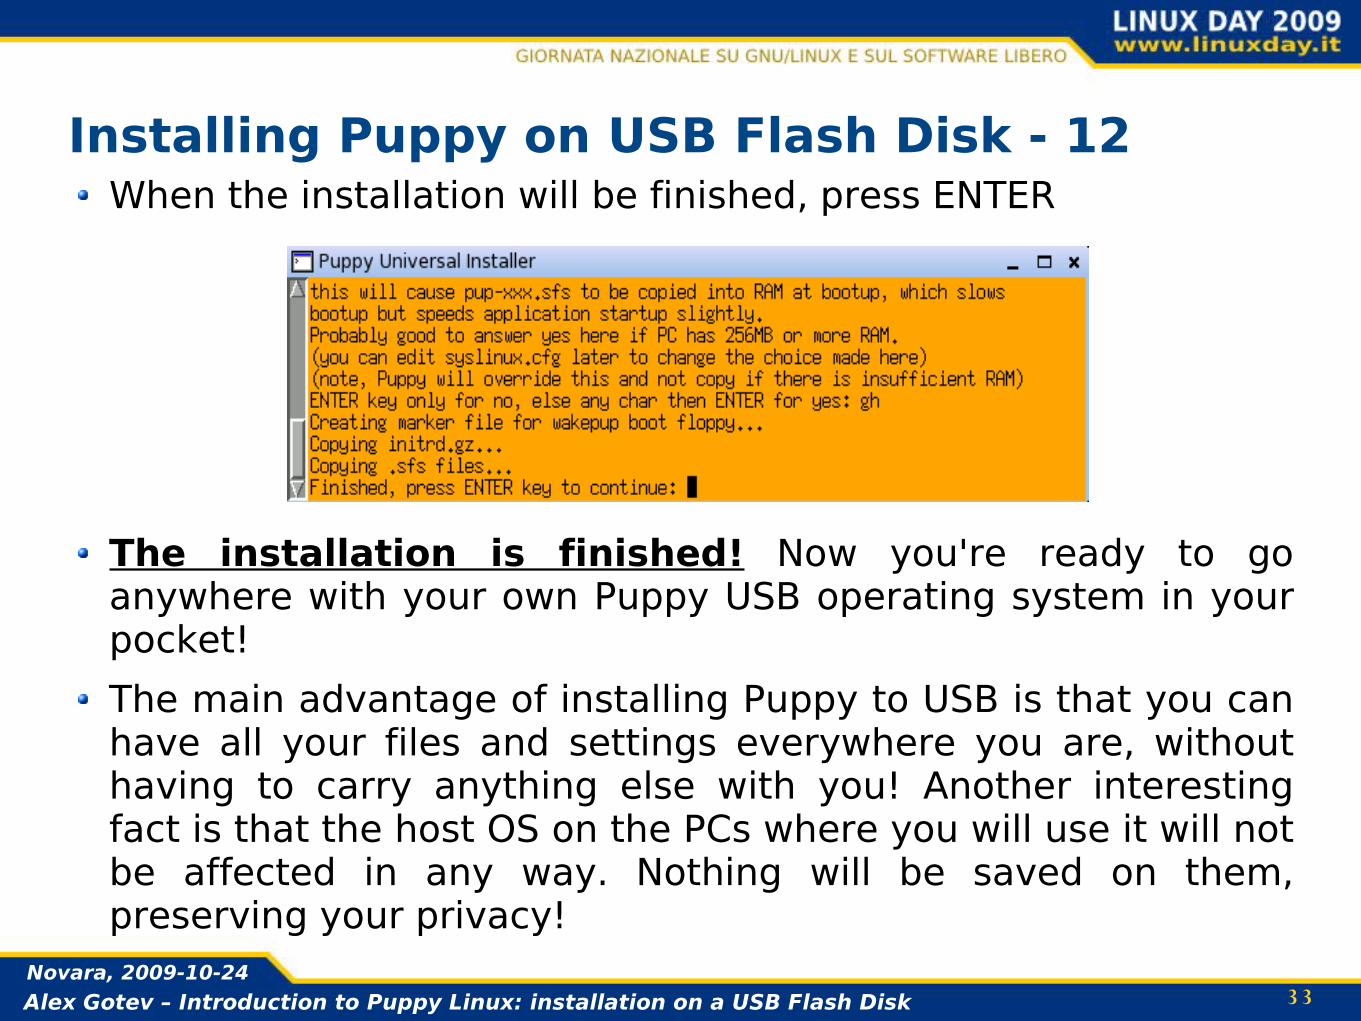
Installing Puppy on USB Flash Disk - 12When the installation will be finished, press ENTER
The installation is finished! Now you're ready to go anywhere with your own Puppy USB operating system in your pocket!The main advantage of installing Puppy to USB is that you can have all your files and settings everywhere you are, without having to carry anything else with you! Another interesting fact is that the host OS on the PCs where you will use it will not be affected in any way. Nothing will be saved on them, preserving your privacy!
3 4Alex Gotev – Introduction to Puppy Linux: installation on a USB Flash DiskNovara, 2009-10-24
THANK YOU FOR YOUR ATTENTION!
Alex GotevHigh school diplomated in Computer Technology and
student of Computer Engineeringat Politecnico di Milano
e-mail: [email protected]