installing and configuring microsoft exchange 2013 cu1 · pdf file2 create the certificate...
TRANSCRIPT

Installing and configuring
Microsoft Exchange 2013 CU1
Peter Dorner
Advisory Architect
IBM
May, 2013

1
Contents Initial network configuration: ....................................................................................................................... 3
Prerequsites .................................................................................................................................................. 4
For Hyper-V based virtual machines ......................................................................................................... 4
Exchange Server Prerequisites .................................................................................................................. 4
Preparing the schema and domain ............................................................................................................... 5
Verifying the new schema version ............................................................................................................ 6
Installing CAS server ...................................................................................................................................... 8
Command line instalation ......................................................................................................................... 8
Graphical installation ................................................................................................................................ 9
Accessing to the new ECP ....................................................................................................................... 12
Mailbox Role Installation ............................................................................................................................ 14
Command line installation ...................................................................................................................... 14
Graphical Installation .............................................................................................................................. 15
Exchange ECP .............................................................................................................................................. 16
Configuring CAS server ................................................................................................................................ 17
Creating the CAS Array ............................................................................................................................ 17
Configuring OWA, OA and mobile connections ...................................................................................... 17
Using PowerShell to configure Virtual Directories URL and permissions ........................................... 17
Configuring Virtual Directories via GUI ............................................................................................... 19
Configuring Outlook Anywhere .......................................................................................................... 21
Configure internal Autodiscover ............................................................................................................. 22
Site resilience .......................................................................................................................................... 24
Installing Certificate ................................................................................................................................ 25

2
Create the certificate request ............................................................................................................. 25
Compete the certificate request and assign it to Exchange services ................................................. 31
Assing the certificates to other CAS servers ....................................................................................... 33
Configuring the Mailbox server .................................................................................................................. 36
Create DAG.............................................................................................................................................. 36
Configuring the file share witness ...................................................................................................... 36
Create the Database Availability Group .............................................................................................. 38
Add DAG members.............................................................................................................................. 40
Adding Database copies to the DAG ....................................................................................................... 41
Basic administrative work with DAG ....................................................................................................... 42
Configuring Mail flow .............................................................................................................................. 43
Using Powershell ................................................................................................................................. 43
Using ECP ............................................................................................................................................ 43
Using IPSec for Outlook Anywhere ............................................................................................................. 46
Create IPSec rule on the CAS server ................................................................................................... 46
Create IPSec rule on the client ............................................................................................................ 55

3
Initial network configuration:
Server name Role IP Windows Version
Miami site
MiaDC01 DC, GC, DNS, Operations Master
10.10.10.11/24 Windows Server 2008 R2 Enterprise
MiaDC02 DC, GC, DNS 10.10.10.12/24 Windows Server 2008 R2 Enterprise
MiaCAS01 Exchange 2013 CAS 10.10.10.21/24 and Windows Server 2008 R2 Enterprise with SP1
MiaCAS02 Exchange 2013 CAS 10.10.10.23/24 and Windows Server 2008 R2 Enterprise with SP1
Miami.ps-united.com
Load balancer 10.10.10.25/24 and
MiaMBX01 Exchange 2013 Mailbox Server
10.10.10.31/24 and 172.16.0.11/8 (replication)
Windows Server 2008 R2 Enterprise with SP1
MiaMBX02 Exchange 2013 Mailbox Server
10.10.10.33/24 and 172.16.0.12/8 (replication)
Windows Server 2008 R2 Enterprise with SP1
PSUnitedDAG 10.10.10.35/24
MiaClient01 Test client 10.10.10.41/24 Windows 7 Professional with SP1 and Office 2010
Sydney site
SydDC01 DC, GC, DNS 10.10.20.11/24 Windows Server 2008 R2 Enterprise
SydDC01 DC, GC, DNS 10.10.20.12/24 Windows Server 2008 R2 Enterprise
SydCAS01 Exchange 2013 CAS 10.10.20.13/24 Windows Server 2008 R2 Enterprise with SP1
SydMBX01 Exchange 2013 Mailbox Server
10.10.20.15/24 and Windows Server 2008 R2 Enterprise with SP1
MiaClient02 Test client 10.10.20.21/24 Windows 7 Professional with SP1 and Office 2010
Windows Server 2008 forest and domain functional level
Internal domain name: ps-united.com
External domain name: ps-united.com
External and Internal Exchange FQDNs:
OWA for Miami Miami.ps-united.com
OWA for Sydney sydney.ps-united.com
Autodiscover URL autodiscover.ps-united.com

4
Prerequsites
For Hyper-V based virtual machines
On the Domain Controllers (DNS servers) for proper DNS resolution you need to run the
following commands otherwise the replication will failing between the sites using Hyper-V virtual
switches
dnscmd /Config /EnableEDnsProbes 0
On all servers change the Network Card settings under Computer Management and disable the
following:
IPv4 Large Send Offload
Checksum Offload
Exchange Server Prerequisites
.NET 4.5 Framework
Windows Management Framework 3.0
Desktop Experience Windows Server feature
KB 2619324 – for Outlook Anywhere feature
Microsoft Security Advisory update for secure assembly loading
Microsoft Unified Communications Manager API 4.0, Core runtime 64-bit
KB 974405
Ms Office Filter Packs 2010 version 2
Ms Office Filter Packs 2010 version 2 – SP1

5
Preparing the schema and domain On the first server add the RSAT windows feature using Add-WindowsFeature RSAT-ADDS command in PowerShell (on Windows Server 2012 use Install-WindowsFeature). Outcome
PS C:\Users\administrator.PS-UNITED> Add-WindowsFeature RSAT-ADDS WARNING: [Installation] Succeeded: [.NET Framework 3.5.1 Features] .NET Framework 3.5.1. You must restart this server to finish the installation process. WARNING: [Installation] Succeeded: [Remote Server Administration Tools] AD DS Snap-Ins and Command-Line Tools. You must restart this server to finish the installation process. WARNING: [Installation] Succeeded: [Remote Server Administration Tools] Server for NIS Tools. You must restart this server to finish the installation process. WARNING: [Installation] Succeeded: [Remote Server Administration Tools] Active Directory module for Windows PowerShell. You must restart this server to finish the installation process. WARNING: [Installation] Succeeded: [Remote Server Administration Tools] Active Directory Administrative Center. You must restart this server to finish the installation process. Success Restart Needed Exit Code Feature Result ------- -------------- --------- -------------- True Yes Succes... {.NET Framework 3.5.1, AD DS Snap-Ins and ... PS C:\Users\administrator.PS-UNITED>
After the server restarted prepare the Schema and Domain for Exchange 2013. To do run the
setup /PrepareSchema /IAcceptExchangeServerLicenseTerms then
setup /PrepareAD /OrganizationName: "Your Organization name"
/IAcceptExchangeServerLicenseTerms command.

6
Verifying the new schema version
To verify the Schema update, check the ms-Exch-Schema-Verision-Pt in ADSIEdit. The rangeUpper
values should be 15254
To verify that the Domain schema has been updated, check the objectVersion property in Active
Directory using ADSIEdit. The objectVersion is in the CN=<your organization>,CN=Microsoft
Exchange,CN=Services,CN=Configuration,DC=<domain> container. In Exchange 2013 CU1 it has to be
15614,

7
If you have more than one domain now you need to run the setup /PrepareDomain in the domains
other than where you ran the setup \PrepareAD (PreapreAD prepares the local domain)

8
Installing CAS server
Command line instalation
Run the Import-Module ServerManager in PowerShell then install the following server roles and
features. You can install the required Windows Server roles and features with the following command or
select Automatic installation when you install the CAS server role.
Add-WindowsFeature Desktop-Experience, NET-Framework, NET-HTTP-Activation, RPC-over-HTTP-
proxy, RSAT-Clustering, RSAT-Web-Server, WAS-Process-Model, Web-Asp-Net, Web-Basic-Auth, Web-
Client-Auth, Web-Digest-Auth, Web-Dir-Browsing, Web-Dyn-Compression, Web-Http-Errors, Web-Http-
Logging, Web-Http-Redirect, Web-Http-Tracing, Web-ISAPI-Ext, Web-ISAPI-Filter, Web-Lgcy-Mgmt-
Console, Web-Metabase, Web-Mgmt-Console, Web-Mgmt-Service, Web-Net-Ext, Web-Request-Monitor,
Web-Server, Web-Stat-Compression, Web-Static-Content, Web-Windows-Auth, Web-WMI
On Server 2012 use the following
Install-WindowsFeature AS-HTTP-Activation, Desktop-Experience, NET-Framework-45-Features, RPC-
over-HTTP-proxy, RSAT-Clustering, RSAT-Clustering-CmdInterface, RSAT-Clustering-Mgmt, RSAT-
Clustering-PowerShell, Web-Mgmt-Console, WAS-Process-Model, Web-Asp-Net45, Web-Basic-Auth,
Web-Client-Auth, Web-Digest-Auth, Web-Dir-Browsing, Web-Dyn-Compression, Web-Http-Errors, Web-
Http-Logging, Web-Http-Redirect, Web-Http-Tracing, Web-ISAPI-Ext, Web-ISAPI-Filter, Web-Lgcy-
Mgmt-Console, Web-Metabase, Web-Mgmt-Console, Web-Mgmt-Service, Web-Net-Ext45, Web-Request-
Monitor, Web-Server, Web-Stat-Compression, Web-Static-Content, Web-Windows-Auth, Web-WMI,
Windows-Identity-Foundation
The following will install the Client Access role along with the Management Tools with the necessary
Windows Features (if you missed to run above)
Setup.exe /m:Install /Roles:ca,mt /IAcceptExchangeServerLicenseTerms /InstallWindowsComponents

9
Graphical installation
For the GUI installation start setup.exe and follow the wizard
Select the Client access role
Confirm the target installation directory
If this server is the first Exchange server in the organization set the organization name

10
Understanding the split permission security model
Shared permissions This model allows administrators using the Exchange management tools to
create security principals in Active Directory. It doesn't separate the management of Exchange
and Active Directory objects from within the Exchange management tools.
Split permissions Split permissions enable organization to assign specific permissions and
related tasks to specific groups within the organization. Exchange 2013 gives you the option of
implementing split permissions in two different ways:
o RBAC split permissions Permissions are controlled by Role Based Access Control (RBAC). Only Exchange servers, services, and those who are members of the appropriate role groups can create security principals.
o Active Directory split permissions Permissions to create security principals in the Active Directory domain partition are completely removed from any Exchange user, service, or server. No option is provided in RBAC to create security principals.
More information: http://technet.microsoft.com/en-US/library/dd638106(v=exchg.150).aspx

11
Exchange Client access role is installing

12
Accessing to the new ECP
If you try to open the ECP or Exchange Powershell you will receive error because at least one server with
Mailbox role have to be in the Exchange organization.
The reason for this is the CAS server in Exchange 2013 is no longer perform any data rendering
and provides only authentication and proxy functions. As a result of this the CAS server is now stateless
and does not need session affinity from load balancer. The session regardless of the originating point
goes to the same place to the Mailbox server which hosting the active database copy.

13
HTTP, POP, IMAP request is passed as part of the HTTP package so any of the CAS server can
authenticate at any time. For OWA (Form Based Authentication) a cookie used for authnetication and
the cookie was encrypted with a per server session key so if another CAS received a request it could not
decrypt the session. This has been changed and now Exchange 2013 using the certificate installed on the
CAS server which means as long as all the CAS servers share the same certificate any member of the CAS
array can decrypt the cookie.

14
Mailbox Role Installation
Command line installation
Run the Import-Module ServerManager in PowerShell then install the following server roles and
features. You can install the required Windows Server roles and features with the following command or
select Automatic installation when you install the CAS server role.
Add-WindowsFeature Desktop-Experience, NET-Framework, NET-HTTP-Activation, RPC-over-HTTP-
proxy, RSAT-Clustering, RSAT-Web-Server, WAS-Process-Model, Web-Asp-Net, Web-Basic-Auth, Web-
Client-Auth, Web-Digest-Auth, Web-Dir-Browsing, Web-Dyn-Compression, Web-Http-Errors, Web-Http-
Logging, Web-Http-Redirect, Web-Http-Tracing, Web-ISAPI-Ext, Web-ISAPI-Filter, Web-Lgcy-Mgmt-
Console, Web-Metabase, Web-Mgmt-Console, Web-Mgmt-Service, Web-Net-Ext, Web-Request-Monitor,
Web-Server, Web-Stat-Compression, Web-Static-Content, Web-Windows-Auth, Web-WMI
On Server 2012 use the following
Install-WindowsFeature AS-HTTP-Activation, Desktop-Experience, NET-Framework-45-Features, RPC-
over-HTTP-proxy, RSAT-Clustering, RSAT-Clustering-CmdInterface, RSAT-Clustering-Mgmt, RSAT-
Clustering-PowerShell, Web-Mgmt-Console, WAS-Process-Model, Web-Asp-Net45, Web-Basic-Auth,
Web-Client-Auth, Web-Digest-Auth, Web-Dir-Browsing, Web-Dyn-Compression, Web-Http-Errors, Web-
Http-Logging, Web-Http-Redirect, Web-Http-Tracing, Web-ISAPI-Ext, Web-ISAPI-Filter, Web-Lgcy-
Mgmt-Console, Web-Metabase, Web-Mgmt-Console, Web-Mgmt-Service, Web-Net-Ext45, Web-Request-
Monitor, Web-Server, Web-Stat-Compression, Web-Static-Content, Web-Windows-Auth, Web-WMI,
Windows-Identity-Foundation
The following will install the Client Access role along with the Management Tools with the necessary
Windows Features (if you missed to run above)
Setup.exe /m:Install /Roles:mb,mt /IAcceptExchangeServerLicenseTerms /InstallWindowsComponents

15
Graphical Installation
For the GUI installation start setup.exe and follow the wizard, the setup is similar like the Client Access
role installation the only difference is the Malware Protection setting.

16
Exchange ECP After you installed at least one server with Client Access and Mailbox role you can access to the new ECP
using Internet Explorer from the CAS server using https://localhost.ecp link. Ignore the certificate
warning.
Logon as Administrator, set the time zone and ou can start configuring the new Exchange 2013
organization.

17
Configuring CAS server
Creating the CAS Array
CAS Array is gone in Exchange 2013 thanks for the new CAS stateless feature we don’t need to configure
it anymore. MAPI connection is gone, all traffic use RPC over HTTPS, however we can still use load
balancer to handle the traffic between the CAS servers, but the load balancer does not have to use
persitent connection.
Configuring OWA, OA and mobile connections
Using PowerShell to configure Virtual Directories URL and permissions
Set-OABVirtualDirectory -Identity "MiaCAS01\OAB (Default Web Site)" -ExternalUrl https://miami.ps-
united.com/OAB -RequireSSL:$true
Set-OABVirtualDirectory -Identity "MiaCAS01\OAB (Default Web Site)" -InternalUrl https://miami.ps-
united.com/OAB -RequireSSL:$true
Set-WebServicesVirtualDirectory -Identity "MiaCAS01\EWS (Default Web Site)" -ExternalUrl
https://miami.ps-united.com/EWS/Exchange.asmx -BasicAuthentication:$True -
WindowsAuthentication:$True
Set-WebServicesVirtualDirectory -Identity "MiaCAS01\EWS (Default Web Site)" -InternalUrl
https://miami.ps-united.com/EWS/Exchange.asmx -BasicAuthentication:$True
Set-OWAVirtualDirectory -Identity "MiaCAS01\OWA (Default Web Site)" -InternalUrl https://miami.ps-
united.com/OWA -LogonFormat ‘UserName’ -FormsAuthentication $True –DefaultDomain ‘ps-
united.com’
Set-OWAVirtualDirectory -Identity "MiaCAS01\OWA (Default Web Site)" -ExternalUrl https://miami.ps-
united.com/OWA -FormsAuthentication $True –DefaultDomain ‘ps-united.com’
Set-AutodiscoverVirtualDirectory -Identity 'MiaCAS01\AutoDiscover (Default Web Site)' -
WindowsAuthentication $true –BasicAuthentication $True
Set-ActiveSyncVirtualDirectory -Identity 'MiaCAS01\Microsoft-Server-ActiveSync (Default Web Site)' -
InternalUrl https://miami.ps-united.com/Microsoft-Server-ActiveSync

18
Set-ActiveSyncVirtualDirectory -Identity 'MiaCAS01\Microsoft-Server-ActiveSync (Default Web Site)' -
ExternalUrl https://miami.ps-united.com/Microsoft-Server-ActiveSync
Set-EcpVirtualDirectory -Identity "MiaCAS01\ECP (Default Web Site)" -InternalUrl https://miami.ps-
united.com/ECP -FormsAuthentication $True
Set-EcpVirtualDirectory -Identity "MiaCAS01\ECP (Default Web Site)" -ExternalUrl https://miami.ps-
united.com/ECP
Set-OutlookAnywhere –Identity 'MIACAS01\Rpc (Default Web Site)' -ExternalHostname miami.ps-
united.com –InternalHostname miami.ps-united.com -ExternalClientAuthenticationMethod Ntlm -
ExternalClientsRequireSsl:$true –InternalClientAuthenticationMethod Ntlm -
InternalClientsRequireSsl:$true –IISAuthentication Ntlm –SSLOffloading:$false
Set-ClientAccessServer –identity MiaCAS01 –AutodiscoverServiceInternalUri “httsp://autodiscover.ps-
united.com/autodiscover/autodiscover.xml”
After you configured all the Virtual Directories run iisreset /noforce on the CAS server.
19
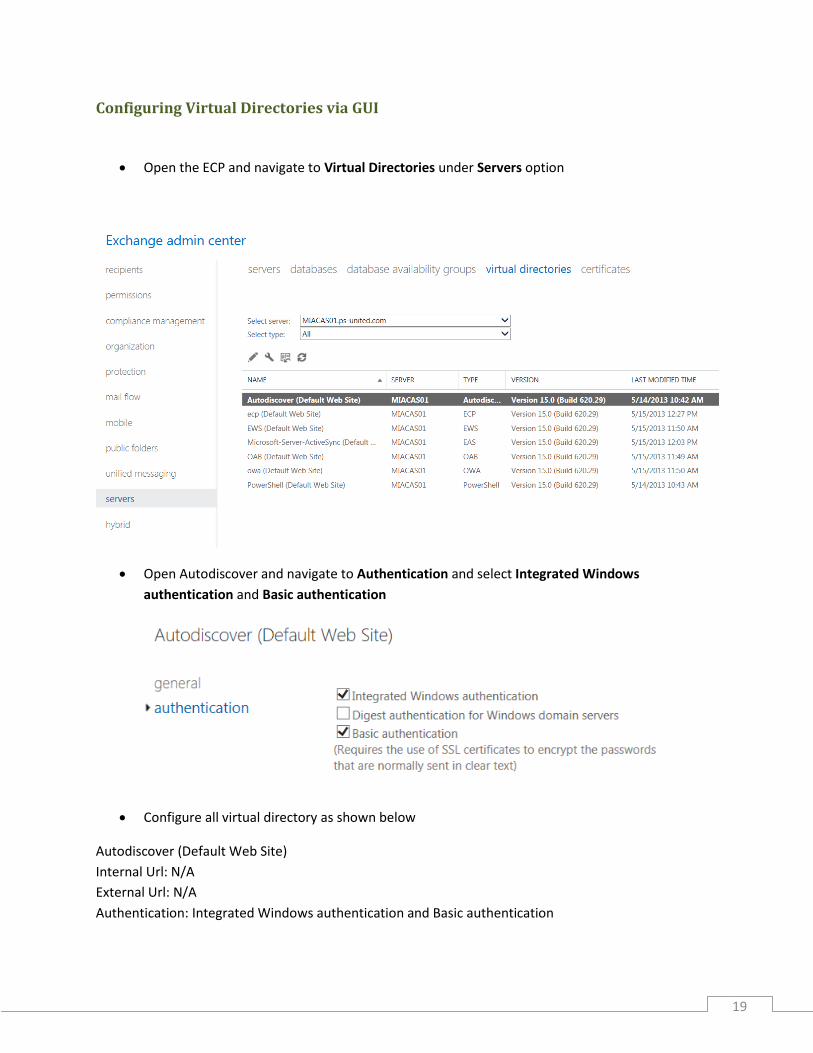
Configuring Virtual Directories via GUI
Open the ECP and navigate to Virtual Directories under Servers option
Open Autodiscover and navigate to Authentication and select Integrated Windows
authentication and Basic authentication
Configure all virtual directory as shown below
Autodiscover (Default Web Site)
Internal Url: N/A
External Url: N/A
Authentication: Integrated Windows authentication and Basic authentication

20
ecp (Default Web Site)
Internal Url: https://miami.ps-united.com/ECP
External Url: https://miami.ps-united.com/ECP
Authentication: Use forms-based authnetication
EWS (Default Web Site)
Internal Url: https://miami.ps-united.com/EWS/Exchange.asmx
External Url: https://miami.ps-united.com/EWS/Exchange.asmx
Authentication: Integrated Windows authentication and Basic authentication
Microsoft-Server-ActiveSync (Default Web Site)
Internal Url: https://miami.ps-united.com/Microsoft-Server-ActiveSync
External Url: https://miami.ps-united.com/Microsoft-Server-ActiveSync
Authentication: Basic Authentication (Ignore client certificates)
OAB (Default Web Site)
Internal Url: https://miami.ps-united.com/OAB
External Url: https://miami.ps-united.com/OAB
Authentication: N/A
owa (Default Web Site)
Internal Url: https://miami.ps-united.com/OWA
External Url: https://miami.ps-united.com/OWA
Authentication: Use forms-based authnetication (user name only) & select the logon domain
PowerShell (Default Web Site)
Internal Url: http://miacas01.ps-united.com/powershell
External Url: $NULL
Authentication: $NULL

21
Configuring Outlook Anywhere
Open ECP and navigate to Servers and select MiaCAS01. In the new windows select Outlook
Anywhere and set the Internal/External Url to miami.ps-united.com

22
Configure internal Autodiscover
This step applies only if your local domain has a different FQDN the external one for example
contoso.local vs contoso.com or you don’t want the clients to look up external DNS servers to locate the
Autodiscover service.
Go to you DNS server and create a new SRV record as shown below
Services: _autodiscover
Protocol: _tcp
Poer number: 443
Host offering this service: Autodiscover.ps-united.com
Create a new A record for Autodiscover.ps-united.com pointing to 10.10.10.25 (Load Balancer)

23

24
Site resilience
In Exchange 2013 you can have multiple virtual IP assigned to one single namespace. In the event of a
CAS server failure the clients will automatically fail over to the next working site (IP) address.

25
Installing Certificate
Create the certificate request
Create a wildcard certificate
Open ECP and select Certificates under Server menu and start the new certificate wizard.
Select Create a request for a certificate from a certification authority

26
Give a friendly name of your certificate, you will see this name on the main certifications page
Request a wildcard certificate, the root domain should be ps-united.com

27
Select the server where you want to store your certificate request
Fill out the required fileds accordingly

28
Select a destination for the request file

29
Create a SAN certificate
If you choose not to use a wildcard certificate you will see the following screen after you have
selected the server where you want to store the request. Here you can select which services you
want to use with this certificate, this screen helps you to select the correct FQDNs for your SAN
certificate
On the next screen you can add or remove additional FQDN if you need it.

30
All other steps are the same as the wildcard request
After you finished open the certificate request file and send to your certificate provider to issue the
actual certificate.

31
Compete the certificate request and assign it to Exchange services
After you have received your certificate from the Certificate Issuer select Complete from the
right hand side menu.
Type the UNC path for the .cer file
Select the servers where you want to import (CAS servers) the certificate
32
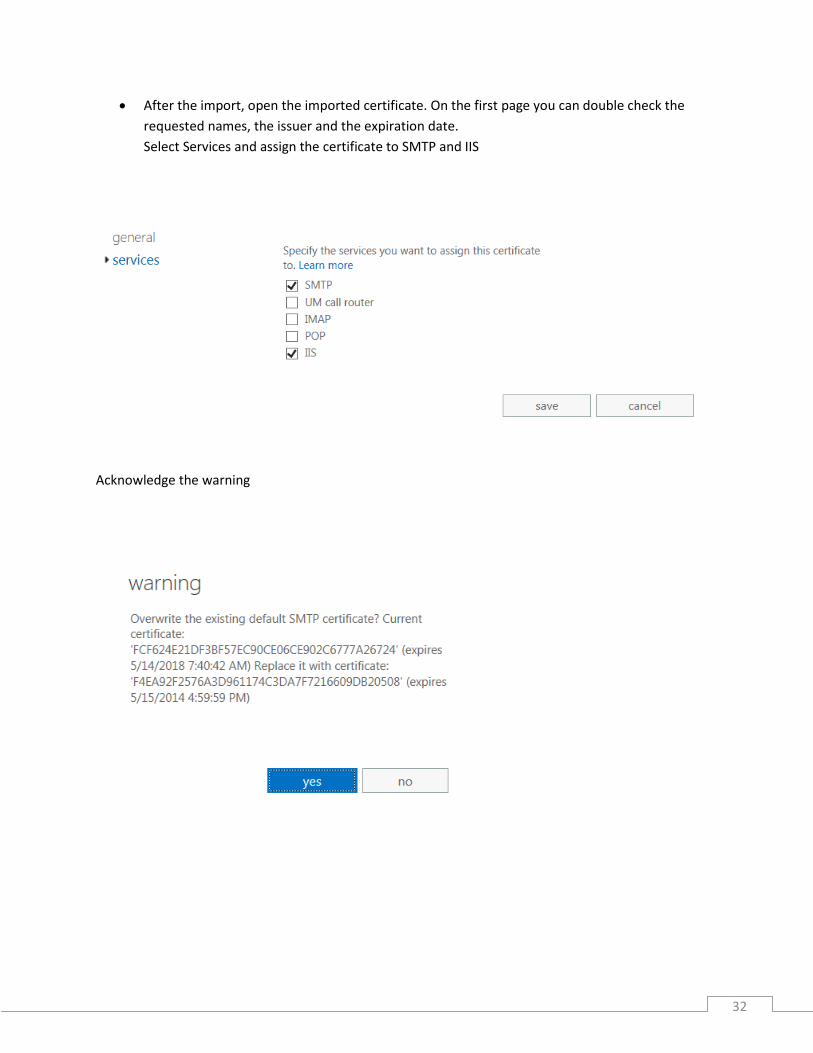
After the import, open the imported certificate. On the first page you can double check the
requested names, the issuer and the expiration date.
Select Services and assign the certificate to SMTP and IIS
Acknowledge the warning

33
To check that the inport was successful open Internet Explorer and go to the website https://miami.ps-
united.com/OWA and you should not get any certificate warning if you used a trusted 3rd party provider.
Assing the certificates to other CAS servers
Start the Export Exchange Certificate wizard and specify an UNC where you want to export the
certificate

34
Start the Import Exchange Certificate wizard
Specify the UNC path for the .pfx file

35
Select the servers where you want to import the certificate
After the import select the server where you have imported the certificate
Open the imported certificate and assign it to the appropiate services under the Services menu

36
Configuring the Mailbox server
Create DAG
Configuring the file share witness
On the selected File Share Witness computer the Exchange Trusted Subsystem group in Active
Directory must be added to the local Administrators group
Add Fileserver Feature using PowerShell
Add-WindowsFeature FS-FileServer

37
Check Windows firewall and make sure the File and Printer Sharing is added and allowed
through the firewall.
If the File Share Wittnes is another Exchange server it already has the corect permissions.

38
Create the Database Availability Group
Create a new computer object in Active Directory and add your first DAG member with Full
control under Security in the Properties of the computer Account.
Create DAG Using Powershell
New-DatabaseAvailabilityGroup -Name PSUnitedDAG -WitnessServer MiaCAS01 -WitnessDirectory
C:\DAG -DatabaseAvailabilityGroupIPAddresses 10.10.10.35
To doublecheck run the Get-DatabaseAvailabilityGroup

39
Create DAG using ECP
Select Database Availability Groups under Servers and start the new DAG Wizard
DAG name must be the computer name you have created (PSUnitedDAG)
Type the File Share Witness computer name
Type the Witness directory on MiaCAS01
Specify the DAG IP, if you don’t enter any IP it will use DHCP to acquire one

40
Add DAG members
Add DAG memebers using PowerShell
Add-DatabaseAvailabilityGroupServer -Identity PSUnitedDAG -MailboxServer MiaMBX01
Add DAG members using ECP
Select Manage DAG membership option on the DAG you have created
Select the server you want to add to the DAG and finish the wizard

41
Adding Database copies to the DAG
Using PowerShell
Add-MailboxDatabaseCopy -Identity MiaDB01 -MailboxServer MiaMBX02
Using ECP
Open Databases under Server in ECP
Select the database you want to add to a server as a copy and select Add database copy
Specify the server where you want to store the copy and save it

42
Basic administrative work with DAG
To check the status of the DAG run the following in PowerShell
Get-DatabaseAvailabilityGroup PSUnitedDAG -Status
The following script will create an Exchange Health Report including the DAG. The script is from
http://exchangeserverpro.com/test-exchangeserverhealth-ps1-v1-2-released
Test-ExchangeServerHealth.ps1
To rebalance the DAG based on activation preference, run the RedistributeActiveDatabases.ps1
–DagName PSUnitedDAG –BalanceDbsBy script. The file is under C:\Program
Files\Microsoft\Exchange Server\V15\Scripts

43
Configuring Mail flow
Using Powershell
New-SendConnector -Internet -Name Miami -AddressSpaces * -SourceTransportServers
MiaMBX01,MiaMBX02
Using ECP
Open Send Connector under Mail flow and start the New send connector wizard
Give a meaning name of the send connector and select Internet under type

44
You can use MX record lookup for mailsending or use a smarthost. In this case select Route mail
through smart hosts and add smtp.live.com as a smart host address
On the next page, select Basic Authnetication andtype in the credentials

45
Add the * address space to this send connector
Select the which server can use this connector (MiaMBX01 and MiaMBX02) and finish the
wizard

46
Using IPSec for Outlook Anywhere
Create IPSec rule on the CAS server
Start a new empty MMC console and add the IP Security Policies on Local Computer snap-in
and start a new IP Security Policy
Give the Outlook Anywhere as the name of the policy
Do NOT select the Activate the default response rule, click Next anf Finish

47
On the new rule select Add and select Next
The default selection (This rule does not specify a tunnel) is fine

48
Select All network connections
Select Add

49
Here we will filter the incoming conections for TCP 443, give the Port 443 as the name of the
new IP filter list and select Add
Selecy Next in the IP Filter Wizard
Give a Description of the filter list if you want then select Next
Any IP Address as the default is fine for the incoming traffic, select Next
50
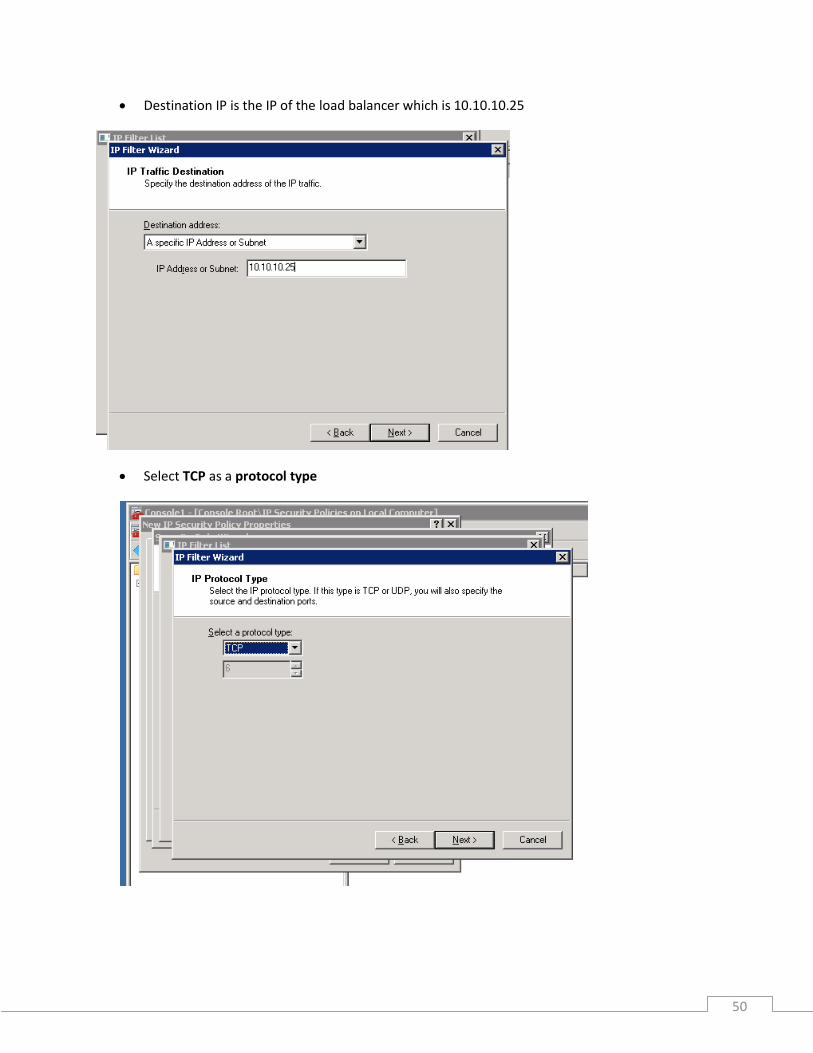
Destination IP is the IP of the load balancer which is 10.10.10.25
Select TCP as a protocol type

51
On the next page select the To this port option and enter 443 and finish the wizard
Select OK

52
Next
Create a new filter action and give the Integrity name, select Next

53
Select the Negotiate security option
Select Do not allow unsecured communication and hit Next

54
Select the Integrity only option and hit Next
Select the Use this string to protect the key exchange option and tpe the preshared key
thenselect Next and finish the wizard

55
Assign the policy on the CAS server
Create the same rule on MiaCAS02
Create IPSec rule on the client
The settings are the same however you need to specify the load balancer IP 10.10.10.25 as the
destination IP when you create the rule.
If you want to use IPsec outside of your network you need a separate IP for Outlook Anywhere and set
the external IP as a destination IP in the client IPSec settings. For example if the external Outlook
Anywhere FQDN is ipsec.ps-united.com then you need to put the IP associated with ipsec.ps-
united.com.
You can confirm that IPsec is working if you run Outlook and it’s connected to Microsoft Exchange or
using the IP Security Monitor MMC snap-in you can see the established Security Association.